How do you build a WooCommerce uniform shop with logos and bulk ordering?
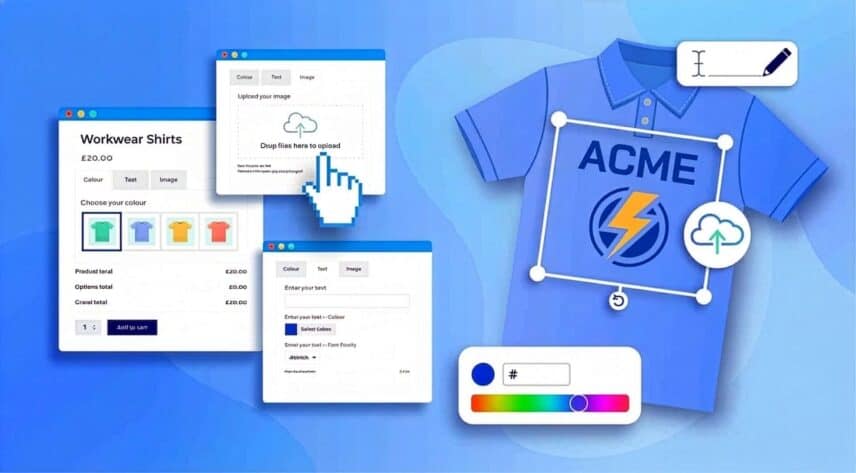
This guide shows you how to build a WooCommerce uniform shop where businesses can order logoed and personalized workwear in bulk. You’ll optionally add name and logo fields, live previews and a bulk order grid, then add quote requests, access restrictions or discounts.
It also covers a WooCommerce workwear B2B setup, where staff order from an approved range and managers can be required to approve orders above a spending limit. Each tutorial is self-contained – so you can pick the features your store needs.
After completing this guide:
- Customers will be able to:
- Add a name or logo to a garment and choose embroidery or print
- See a live preview of their logo or text on the product image
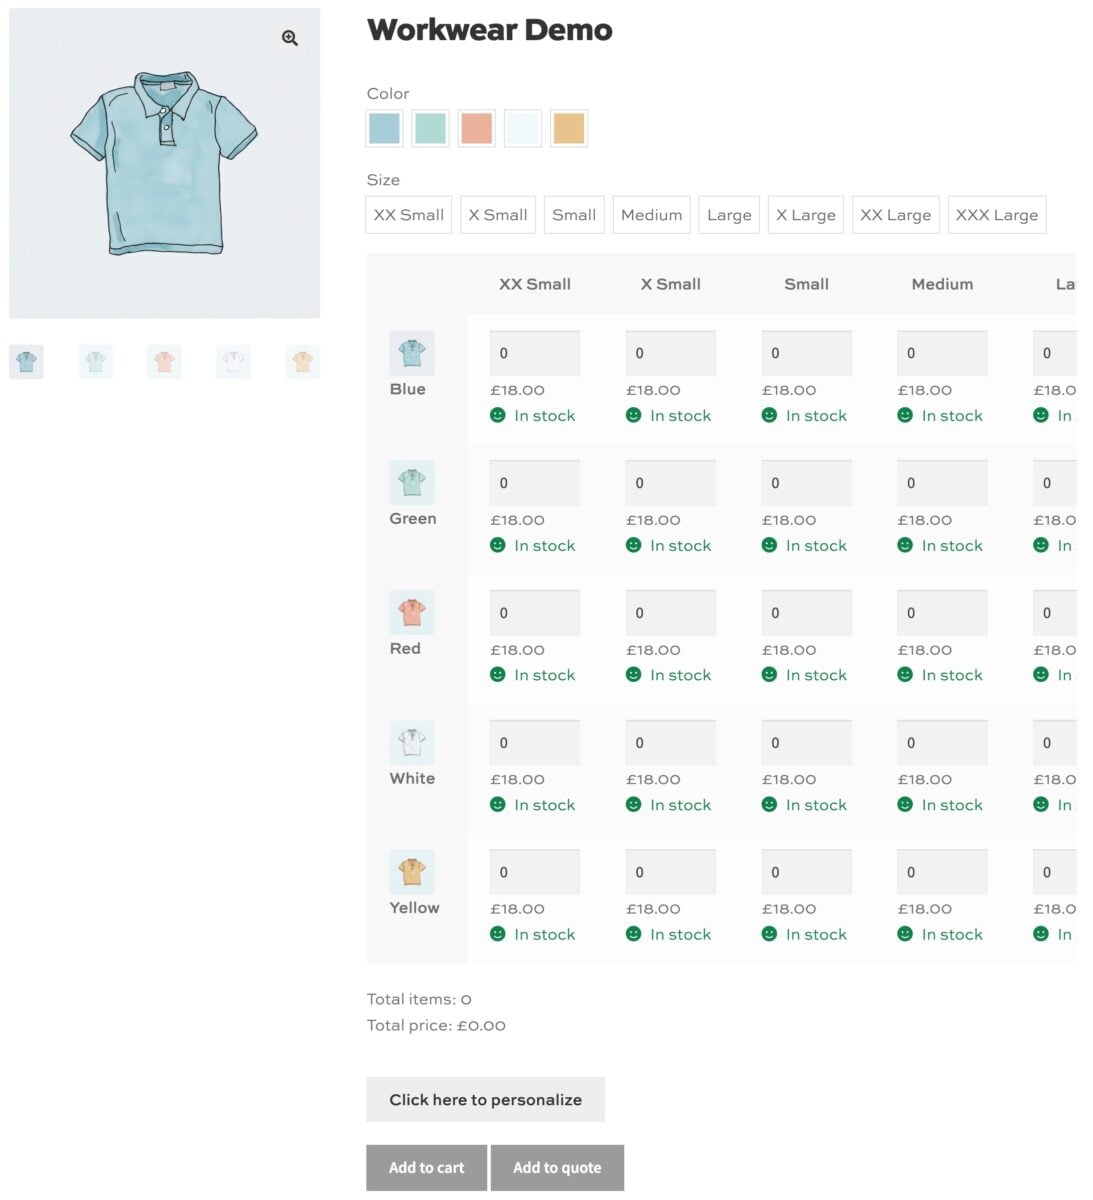
- Enter quantities for every color and size in one grid
- Request a quote for large or custom orders
- Staff at a business will be able to:
- Order from an approved range, up to a spending limit set by their manager
- As the store owner, you’ll be able to:
- Charge one-off setup fees and per-item decoration costs
- Restrict products to specific users or user roles
- Offer bulk discounts
- Remove clutter from the page by adding filters to the variations form and displaying add-on fields in a lightbox
There’s a demo product here so you can see an example product page with most of the features from this tutorial. We use a polo shirt as the example throughout, but every step works for other types of workwear.
The global workwear market was worth $19.20 billion in 2025 and is forecast to reach $28.08 billion by 2033, according to Grand View Research. Having an easy-to-use product page that helps your customers order their products is essential.
In this tutorial, we’ll assume that you already have WordPress and WooCommerce installed and ready to go.
What do workwear sites typically offer?
There are a number of features that buyers might expect from workwear products. The table below summarizes workwear features and which tutorial is most likely to be relevant.
| Feature | What buyers expect | Tutorial |
|---|---|---|
| Logo or text personalization with a setup fee | A one-off setup fee for each new logo, and a per-item decoration cost that decreases as quantity increases | 1, 6 |
| Preview and proof | A preview of the logo or text on the garment, and a proof or design review before production | 2 |
| Embroidery and print with different costs | Embroidery might have different costs from print | 1 |
| Quantity per size in one order | A grid where buyers enter a quantity for each size and color from a single bulk order form | 3 |
| Volume price breaks | Per-item pricing that improves automatically as quantity increases | 6 |
| Quotes for complex orders | A route to request a price for large orders or orders that mix many styles | 4 |
| Staff ordering portals | An approved range, and spending limits for staff | 5 |
What types of corporate clothing can you sell in WooCommerce?
Workwear stores sell far more than polo shirts. Typical ranges include scrubs, tunics, aprons, fleeces, jackets, trousers, footwear, hi-vis and PPE and event merchandise.
| Type | What changes on the product page | Tutorials that might be required |
|---|---|---|
| Polos, T-shirts, hoodies | Color and size grid, with logo and name personalization | 1, 2, 3, 6 |
| Fleeces, jackets, softshells | Same setup, with more placement options such as chest, sleeve and back | 1, 2, 3 |
| Hi-vis and PPE | Often ordered by a company for its staff, so access control and quotes matter | 4, 5 |
| Aprons, chef jackets, tunics, scrubs | Names and job titles per person. Aprons often need only one attribute, so no grid | 1, 5 |
| Trousers and footwear | Waist and leg length, or size only, and usually no decoration | 3 |
| Branded merchandise (caps, bags, event wear) | Same logo fields, previews and bulk pricing | 1, 2, 6 |
| Sizing variants | Tall, women’s and kids’ fits as separate variations or products | 3 |
Whichever type you sell, you can use the basic setup in this guide:
- A variable product
- Add-on fields for personalization
- Pricing and access rules on top
You can apply this to your entire WooCommerce branded merchandise store as well as just a uniform shop.
What plugins do I need for a WooCommerce uniform shop?
In this tutorial we use different plugins to accomplish different goals. The plugins we use are:
- Bulk Variations for the bulk order grid (tutorial 1)
- Product Add-Ons Ultimate for name, logo and decoration fields, and add-on pricing (tutorial 2)
- Text Preview and Image Preview for live previews (tutorial 3)
- Request a Quote for accepting quote requests for orders (tutorial 4)
- Members Only for the staff portal, restricted products and Teams (tutorial 5)
- Dynamic Pricing and Discount Rules for bulk discounts (tutorial 6)
Each plugin is purchasable if you only want certain functionality – or together at a significant discount as part of our All Access Pass.

Your support is outstanding, simply the best I have encountered. I upgraded to the Lifetime Bundle due to the support and quality of the plugins.
The All Access Pass gives you every Plugin Republic plugin for a single price, and every new plugin we release is added automatically. It’s the easiest way to build a WooCommerce uniform shop, because every plugin in this guide is included.
The pass also includes Variation Swatches for color swatches, Review and Approve for design sign-off, Advanced Uploads for cropping and sizing uploaded logos, Advanced Calculations for lookup tables and Product Table Ultimate for displaying products in tables.

How do you install the plugins?
Once you’ve purchased the plugins you need, just:
- Download each plugin’s zip file by clicking on the link on your order confirmation screen or in your welcome email. You’ll receive the email automatically a few seconds after you’ve completed the purchase
- Go to Plugins > Add New in your WordPress dashboard
- Click on the ‘Upload Plugin’ button
- Drag and drop the plugin’s downloaded zip file into the ‘Choose File’ area and click ‘Install Now’
- When the plugin has uploaded, click the ‘Activate Now’ button
How do you create your first workwear product?
Every tutorial is based on a standard variable product, and we’ll use a polo shirt with color and size variations. You can skip this section if you already have your product set up.
Step #1: Go to Products > Add New and enter a name, such as ‘Polo shirt’.
Step #2: Select ‘Variable product’ from the ‘Product data’ dropdown.
Step #3: Click the ‘Attributes’ tab and add a ‘Color’ attribute with the colors you stock, and a ‘Size’ attribute with your sizes. Check ‘Used for variations’ for both.
Step #4: Click the ‘Variations’ tab, choose ‘Generate variations’ and click ‘Go’. Then enter a price for each variation and upload an image for each color.
Publish your product. You now have a standard WooCommerce variable product – a polo shirt with color and size options.
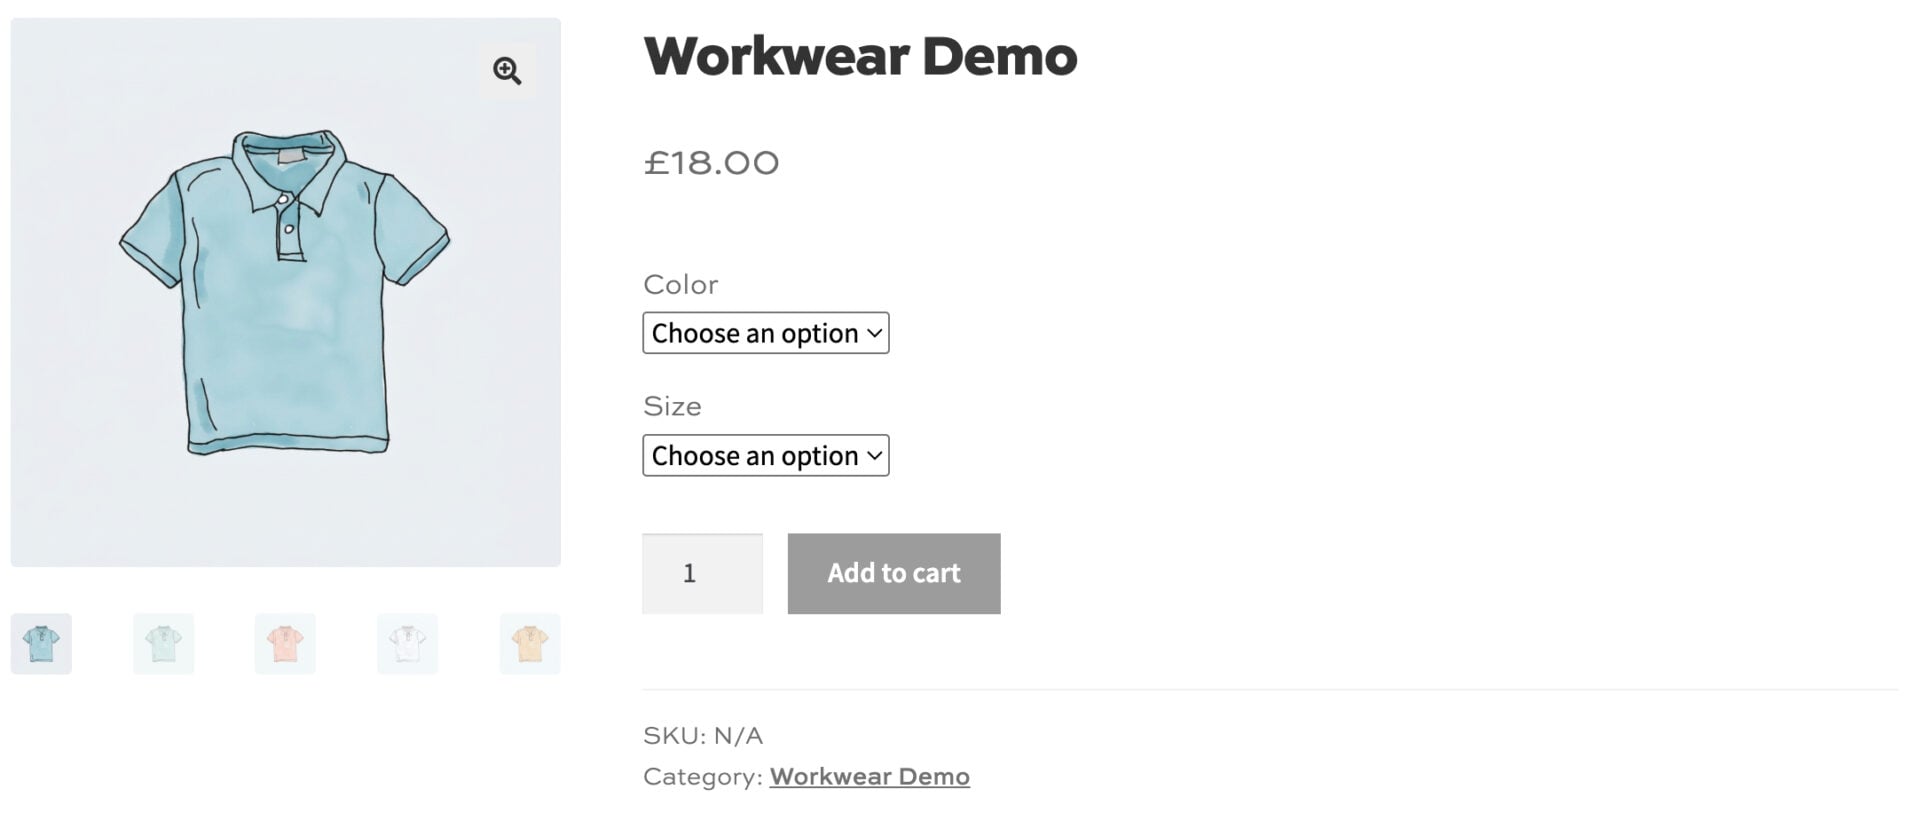
Now you can pick and choose from the tutorials below based on the features you need for your store. Each tutorial is self-contained and doesn’t require any elements from other tutorials.
Tutorial 1: How do you create a bulk order form for sizes and colors?
A bulk order form lets buyers enter a quantity for every color and size variation on one screen, instead of adding each variation to the cart separately. This is a huge timesaver for customers, meaning they can add dozens or even hundreds of variations to the cart at the same time.
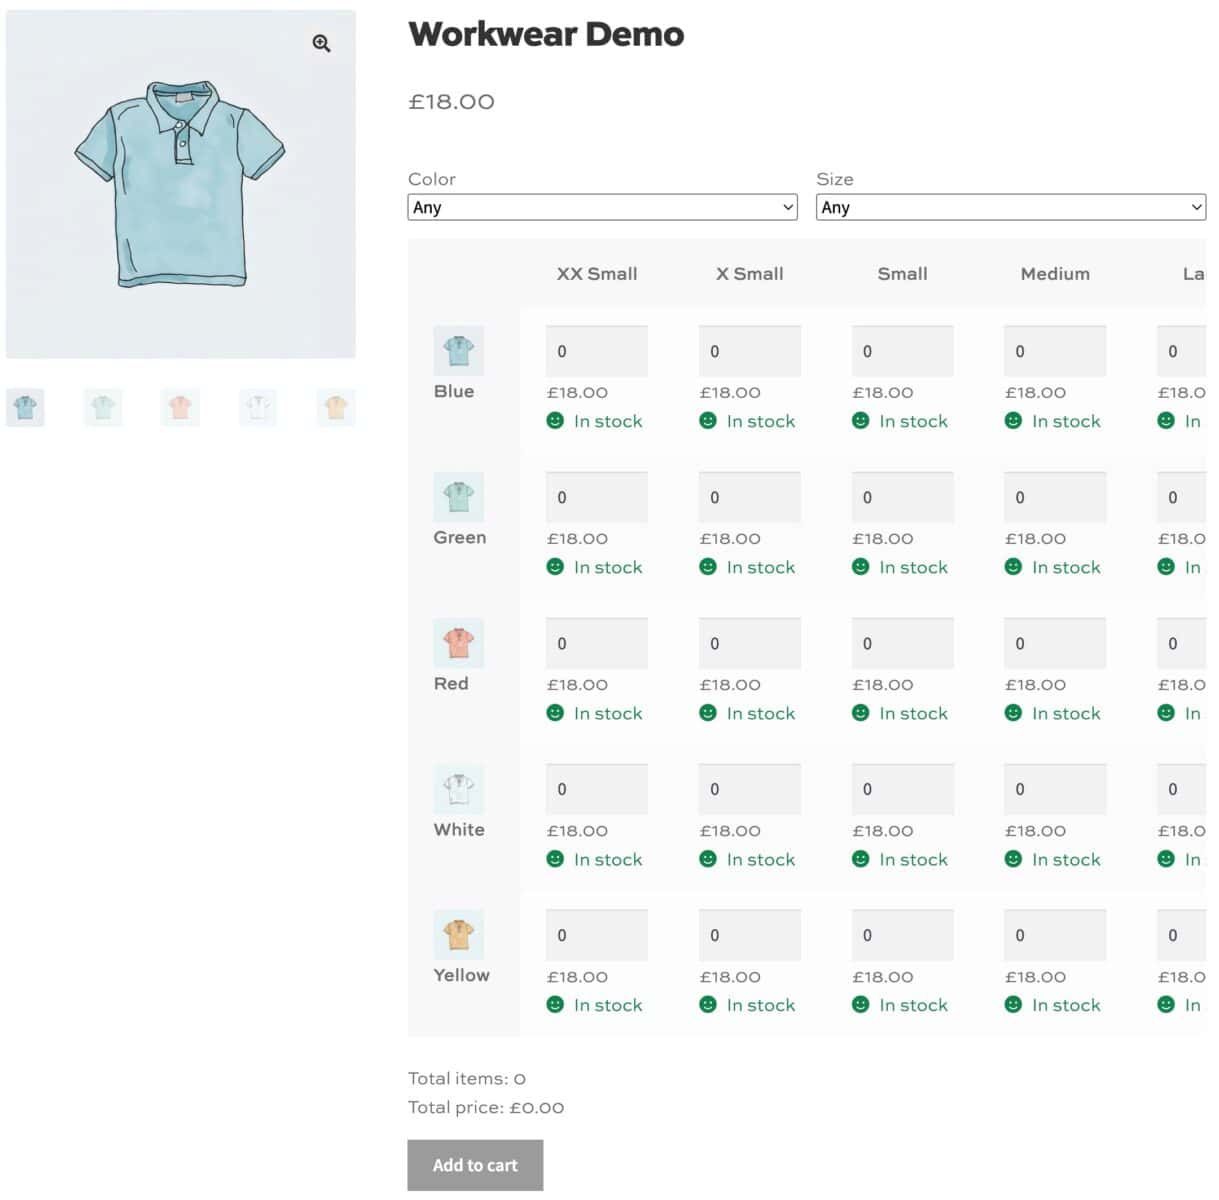
The WooCommerce Bulk Variations plugin replaces the standard variation dropdowns with a grid, making it perfect for clothing, workwear and B2B stores where customers needs to order multiple variations at the same time.
You’ll need: Bulk Variations.
Step #1: Go to WooCommerce > Settings > Bulk Variations and select ‘Grid’ as the ‘Display mode’.
Your variable products will display a grid instead of dropdowns (you can set this by individual product instead if you prefer). Let’s look at the grid settings.
Step #2: Adjust the grid settings to suit your store:
- Enable ‘Show price’ and ‘Show stock’ to show each variation’s price and stock status under its quantity field
- Check ‘Enable filtering’ so shoppers can filter the grid by attribute, e.g. to focus on the sizes for one color
- Enable ‘Display total number’ and ‘Display total price’ to show running totals as customers enter quantities
- Choose ‘Scrollable’ or ‘Responsive’ in ‘Mobile layout’ to control how the grid displays on phones
- Enable ‘Display grid full width’ to move the grid below the main product image, which helps if you have lots of sizes
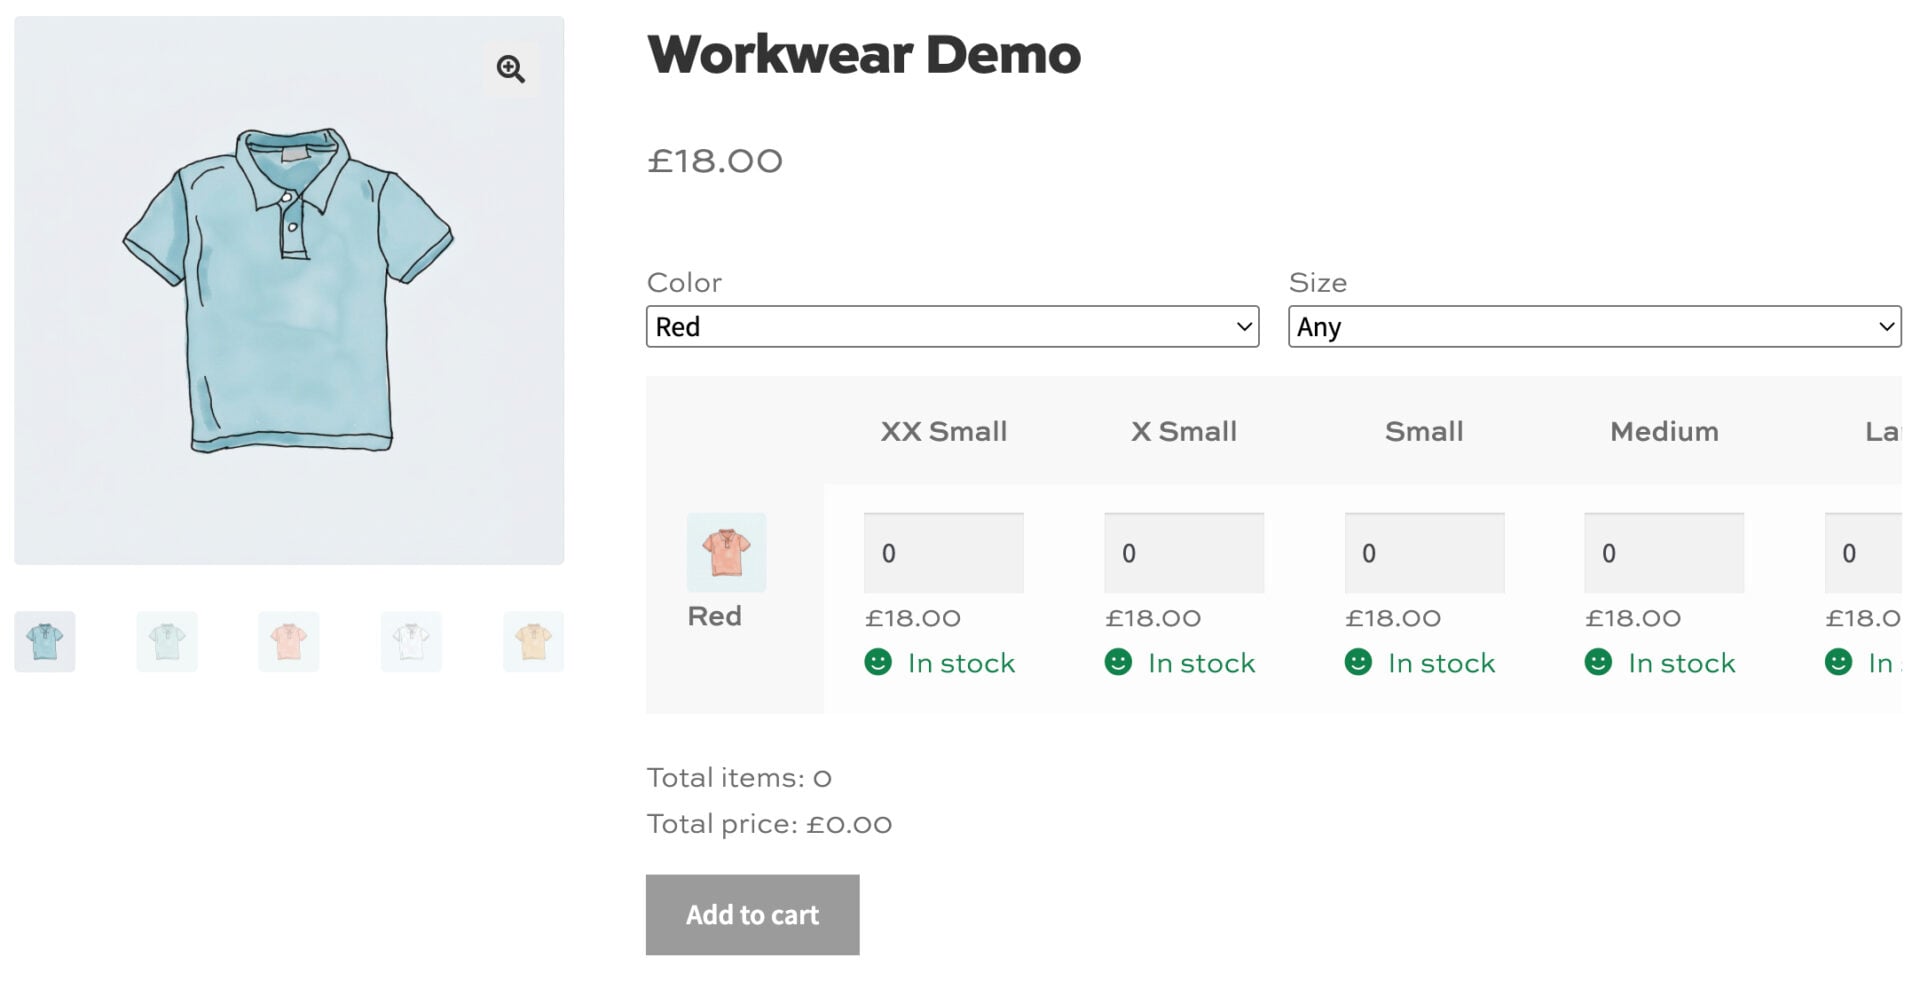
Step #3: Optionally enable the grid for some products only. Use the ‘Display Mode’ setting in the ‘General’ tab of the ‘Product data’ section to override the global setting for a single product.
Save and publish your product. Customers can now enter a quantity for each color and size and add everything to the cart with one click.
The grid works with the other plugins in this guide. Add-on fields from tutorial 2 appear after the grid, quantity discounts from tutorial 6 apply to the items customers select and customers can add their selections to a quote as we’ll see in tutorial 4. Read our guide to bulk variations forms for more details.
Our customers were finding it tough to see what was in stock when multiple attribute variations were in use. This plugin makes it way easier for customers to order the right size and colour variations.
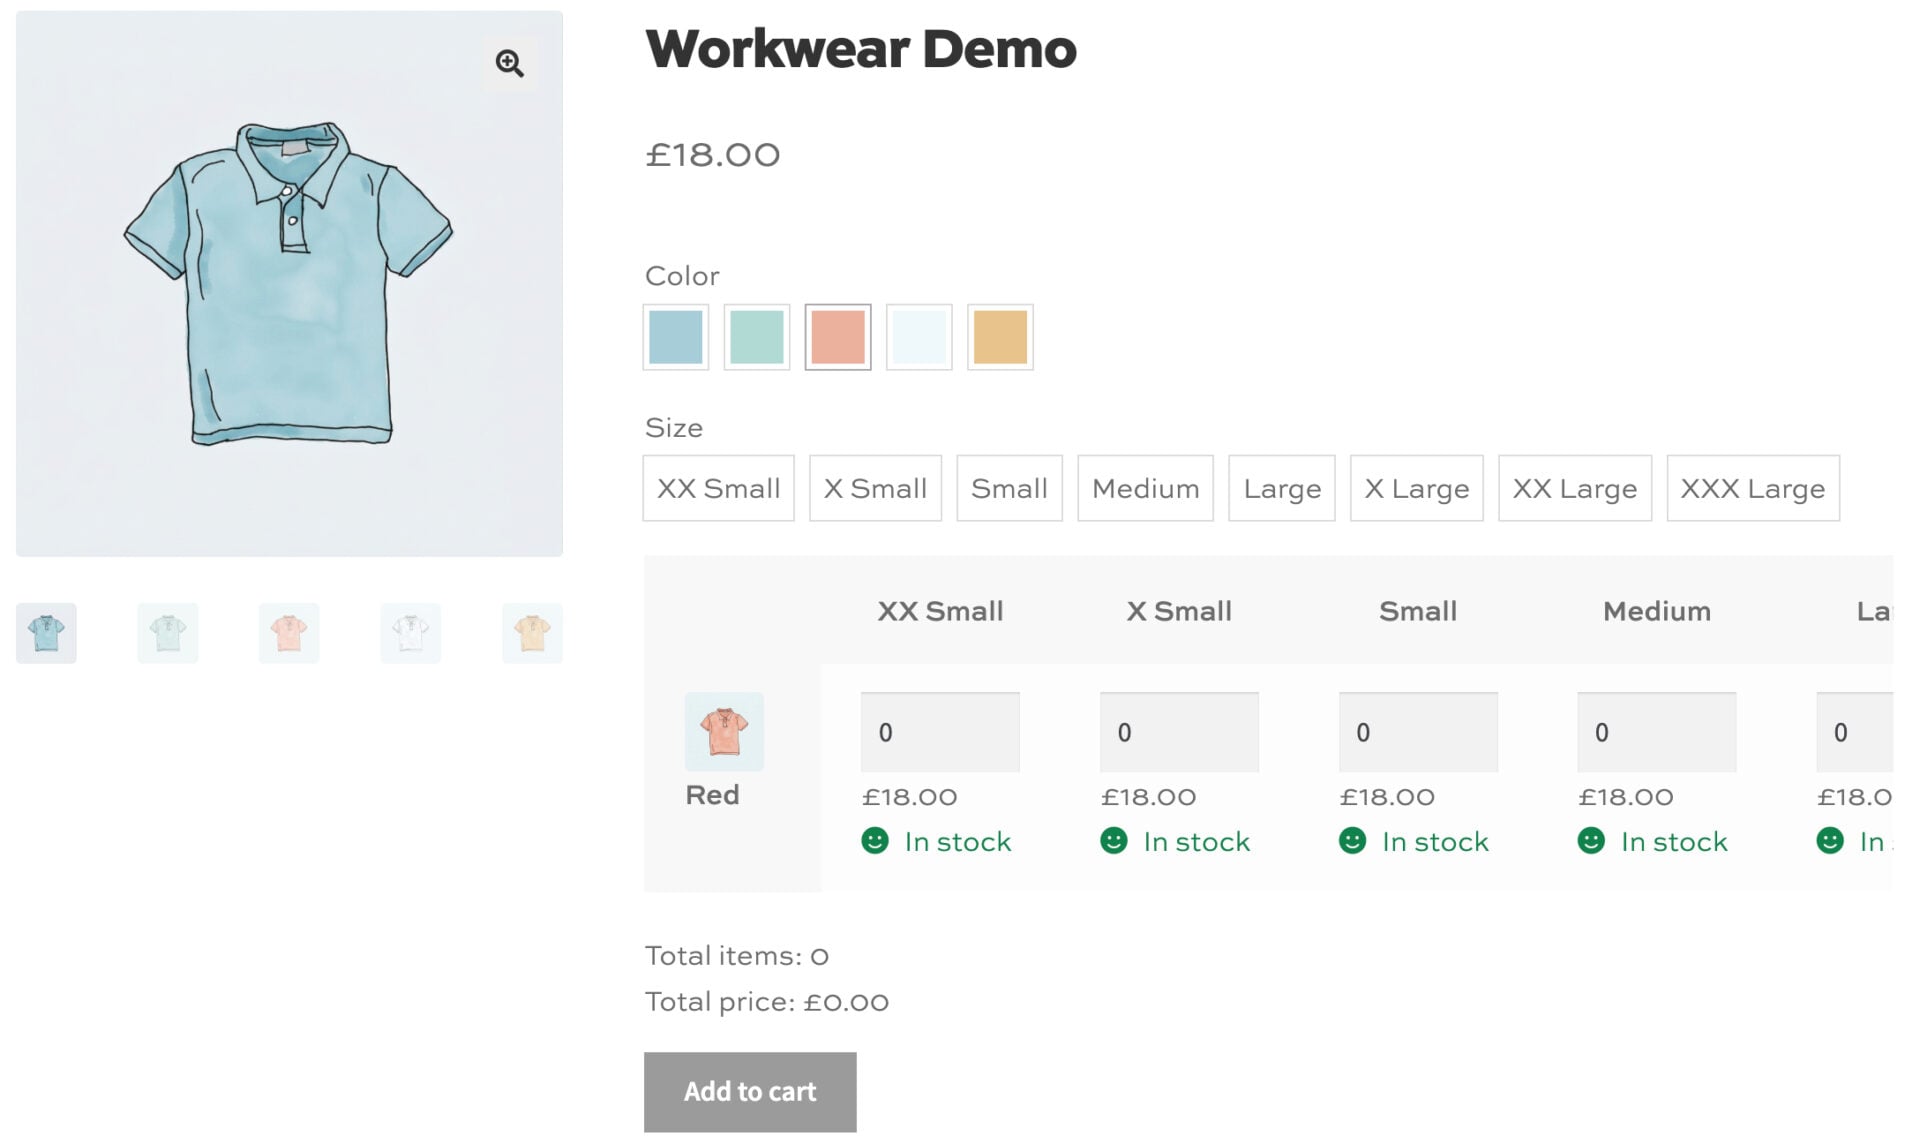
Replace filters with swatches
The Bulk Variations plugin is compatible with WooCommerce Variation Swatches – so you can replace the filter dropdowns with color, image or text swatches.
Tutorial 2: How do you set up a WooCommerce embroidery shop with name and logo fields?
The WooCommerce Product Add-Ons Ultimate plugin lets customers personalize a garment on the product page – so they can enter a company name, logo, even employees’ individual names. In this tutorial, we’ll add a decoration choice, a logo upload, a name field and a one-off setup fee to the polo shirt product page.
Product Add-Ons Ultimate has over 20 different field types so you can create any type of product personalization that you need. Adapt the fields in our example to suit your exact requirements. You can also create add-on fields globally then apply them to multiple products – saving you time in managing and editing fields.
You’ll need: Product Add-Ons Ultimate.
Step #1: Click the ‘Product Add-Ons’ tab in the ‘Product data’ section of your polo shirt, then click ‘Add Group’. Name the group ‘Personalization’.
You now have a group to hold your fields. Now let’s add the decoration options.
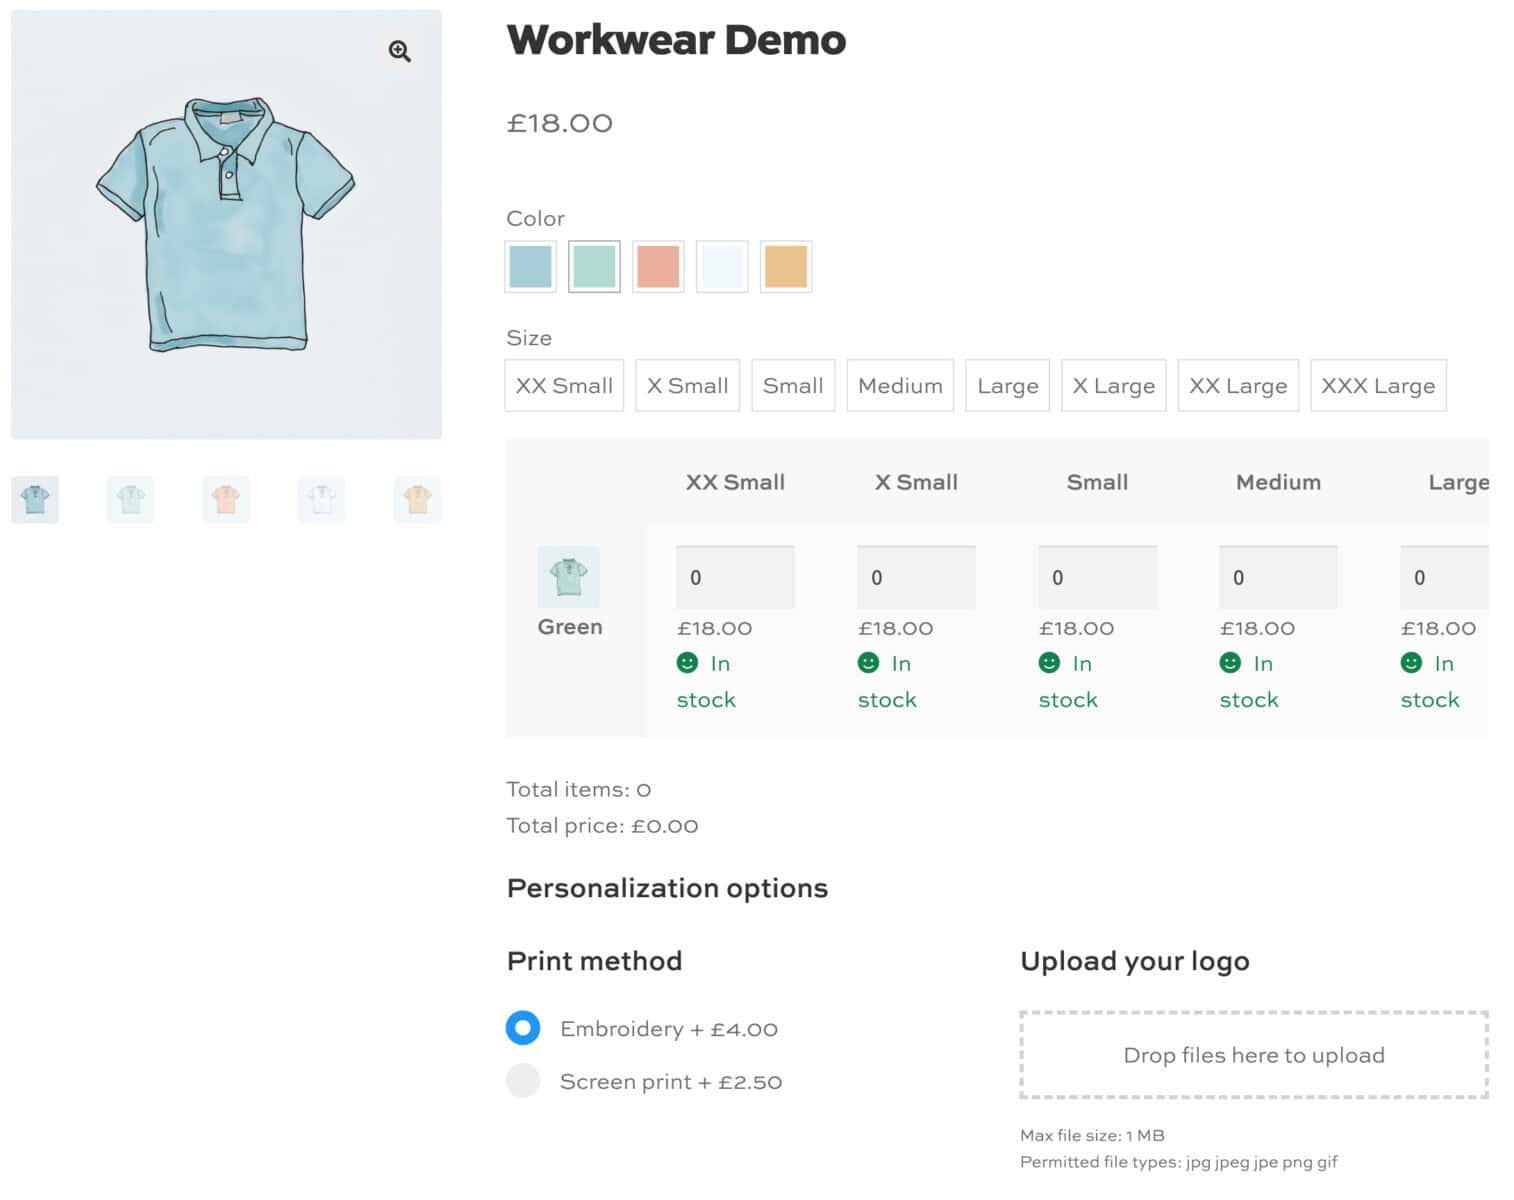
Step #2: Click ‘Add Field’ and choose ‘Radio Group’ as the field type. Label it ‘Print method’, click the ‘Options’ tab and add ‘Embroidery’ and ‘Screen print’ as options. Enter a price for each option in the ‘Price’ column, e.g. $4.00 for embroidery and $2.50 for screen print.
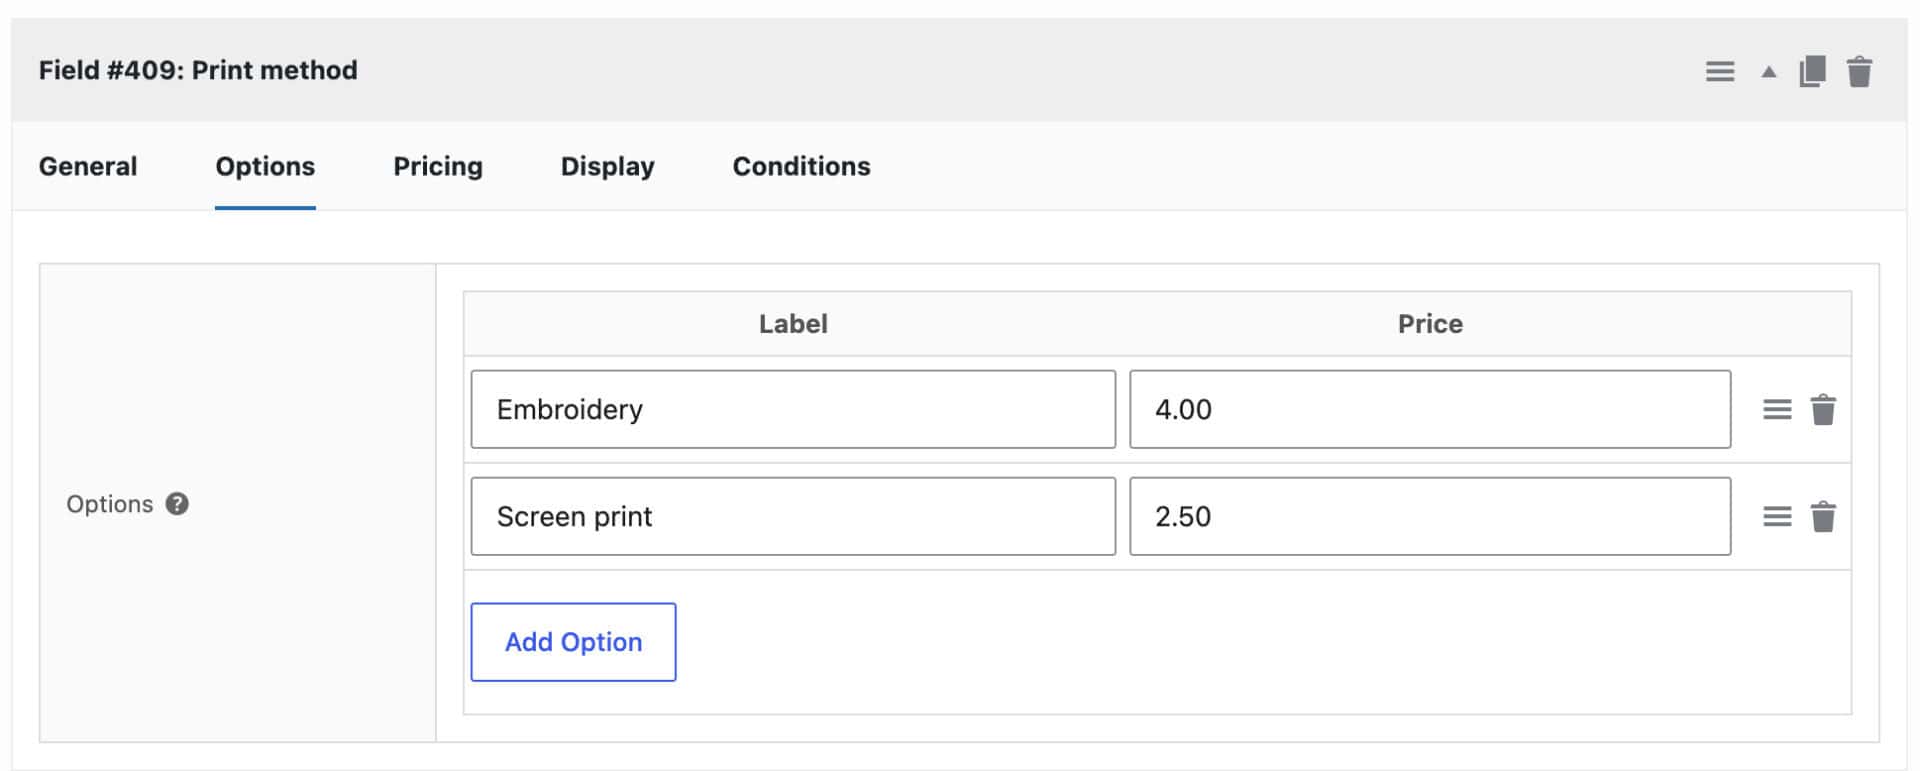
Customers can now choose how their garment is decorated, and the price updates when they select an option. These prices are charged per item by default, so they’re multiplied by the quantity ordered.
Step #3: Click ‘Add Field’ and choose ‘Upload’ as the field type. Label it ‘Upload your logo’ and mark it as required. Set the permitted file types to the formats your embroiderer or printer can use, in WooCommerce > Settings > Product Add-Ons.
Customers can now upload their logo on the product page. The uploaded file is attached to the order, so you have everything you need to produce the garment.
Step #4: Optionally add placement options. Add a ‘Select’ or ‘Swatch’ field labeled ‘Logo placement’ with options like ‘Left chest’, ‘Right chest’, ‘Back’ and ‘Sleeve’. Enter a price against any placement that costs extra.
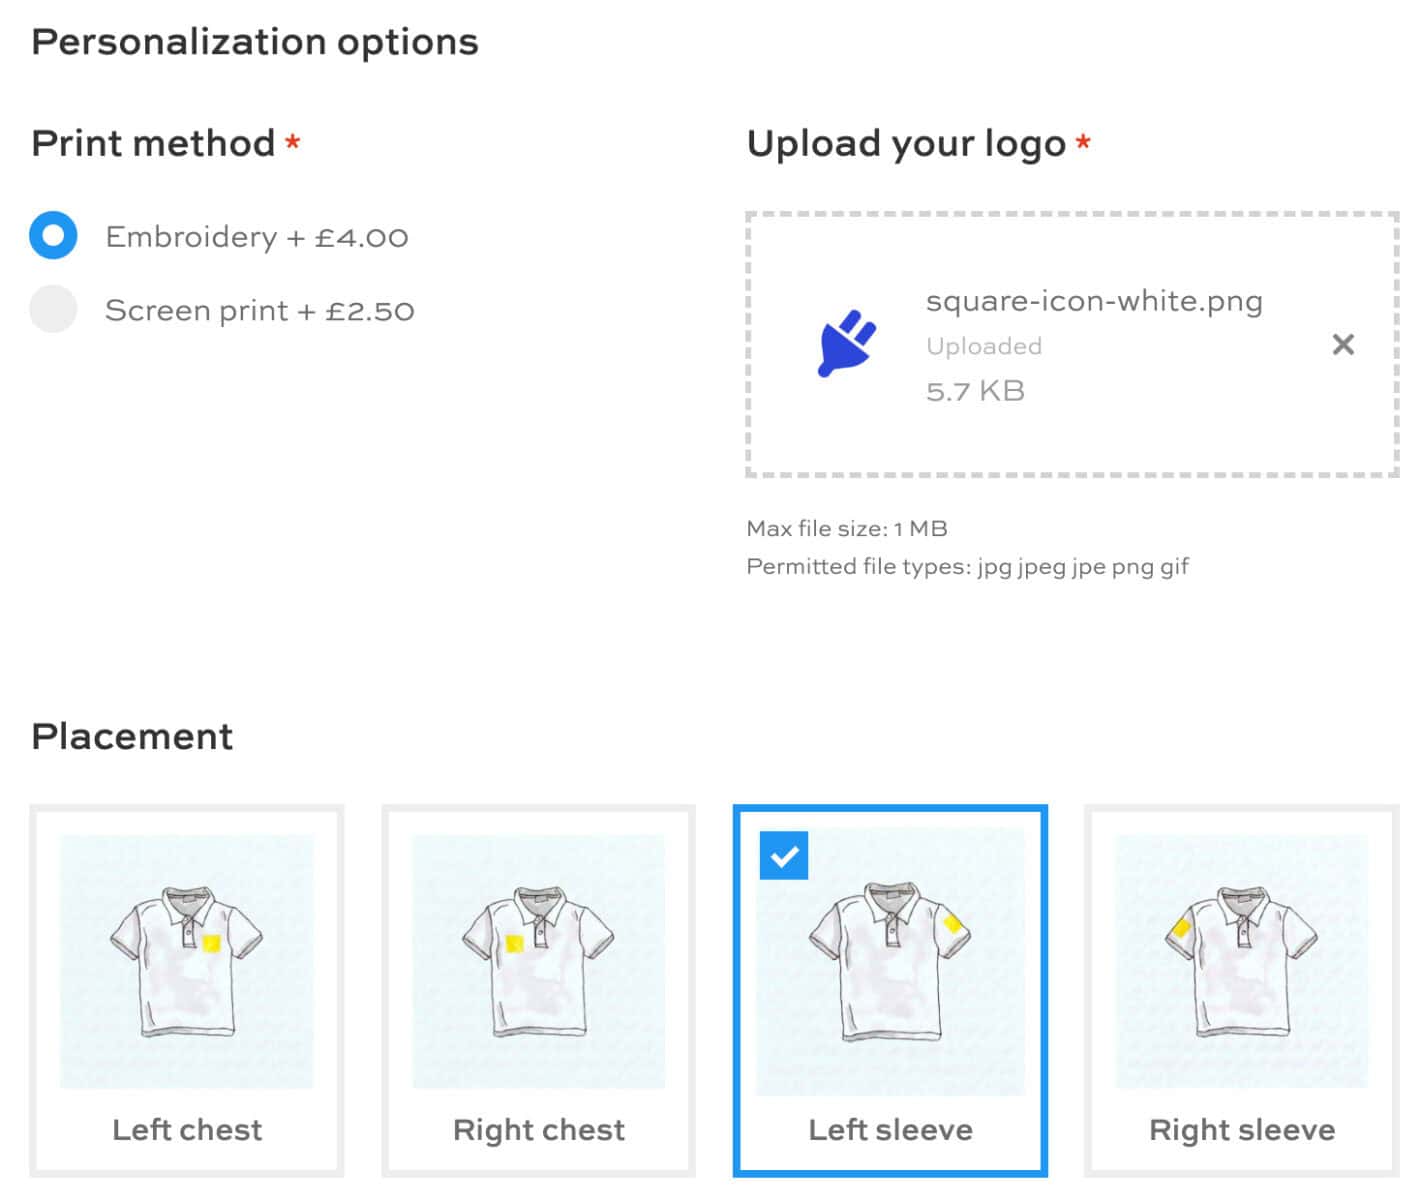
Customers can now tell you where the logo goes.
Step #5: Optionally add a ‘Personalize now’ button
If you prefer to keep the main product page as decluttered as possible, you can choose to display the add-on fields in a modal window. The user just needs to click a ‘Personalize this’ button.
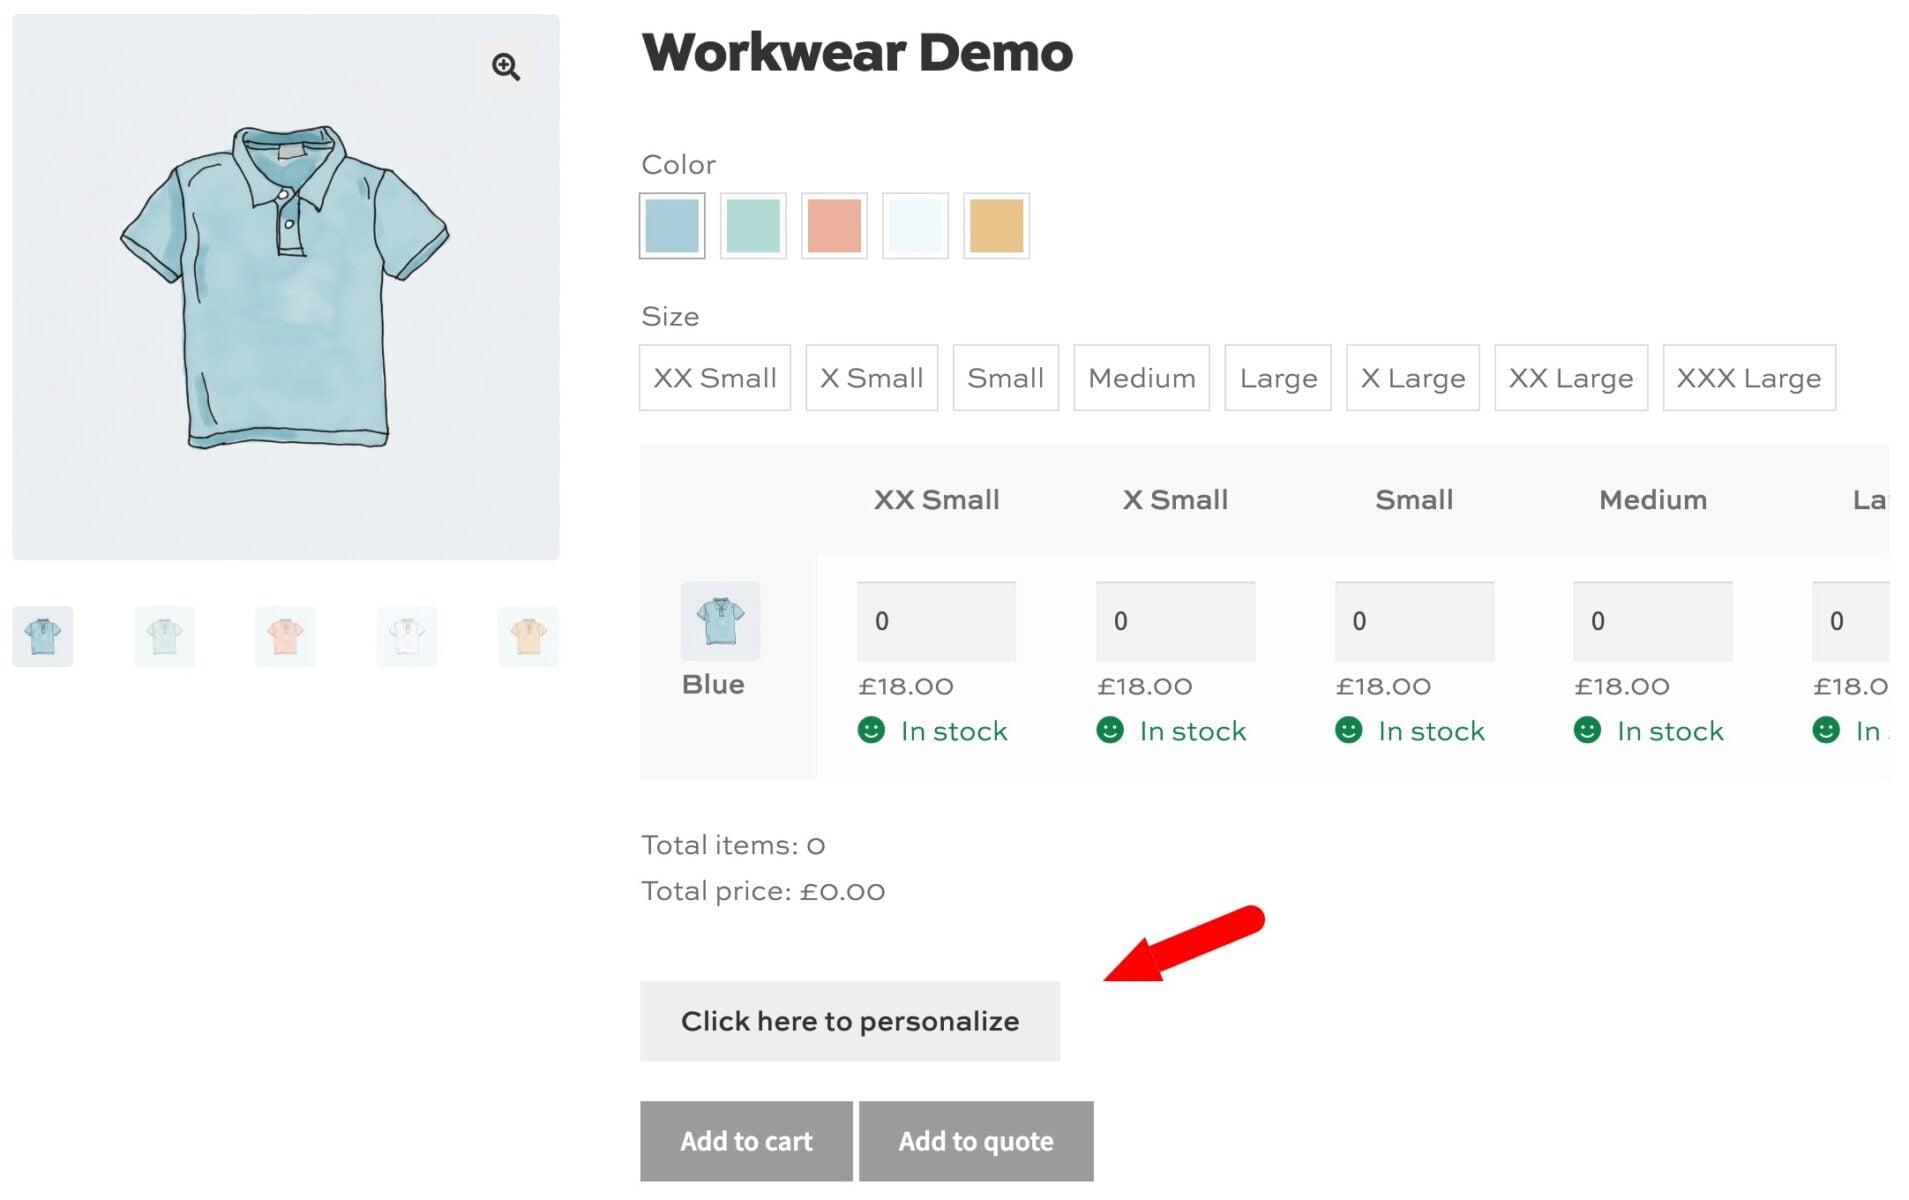
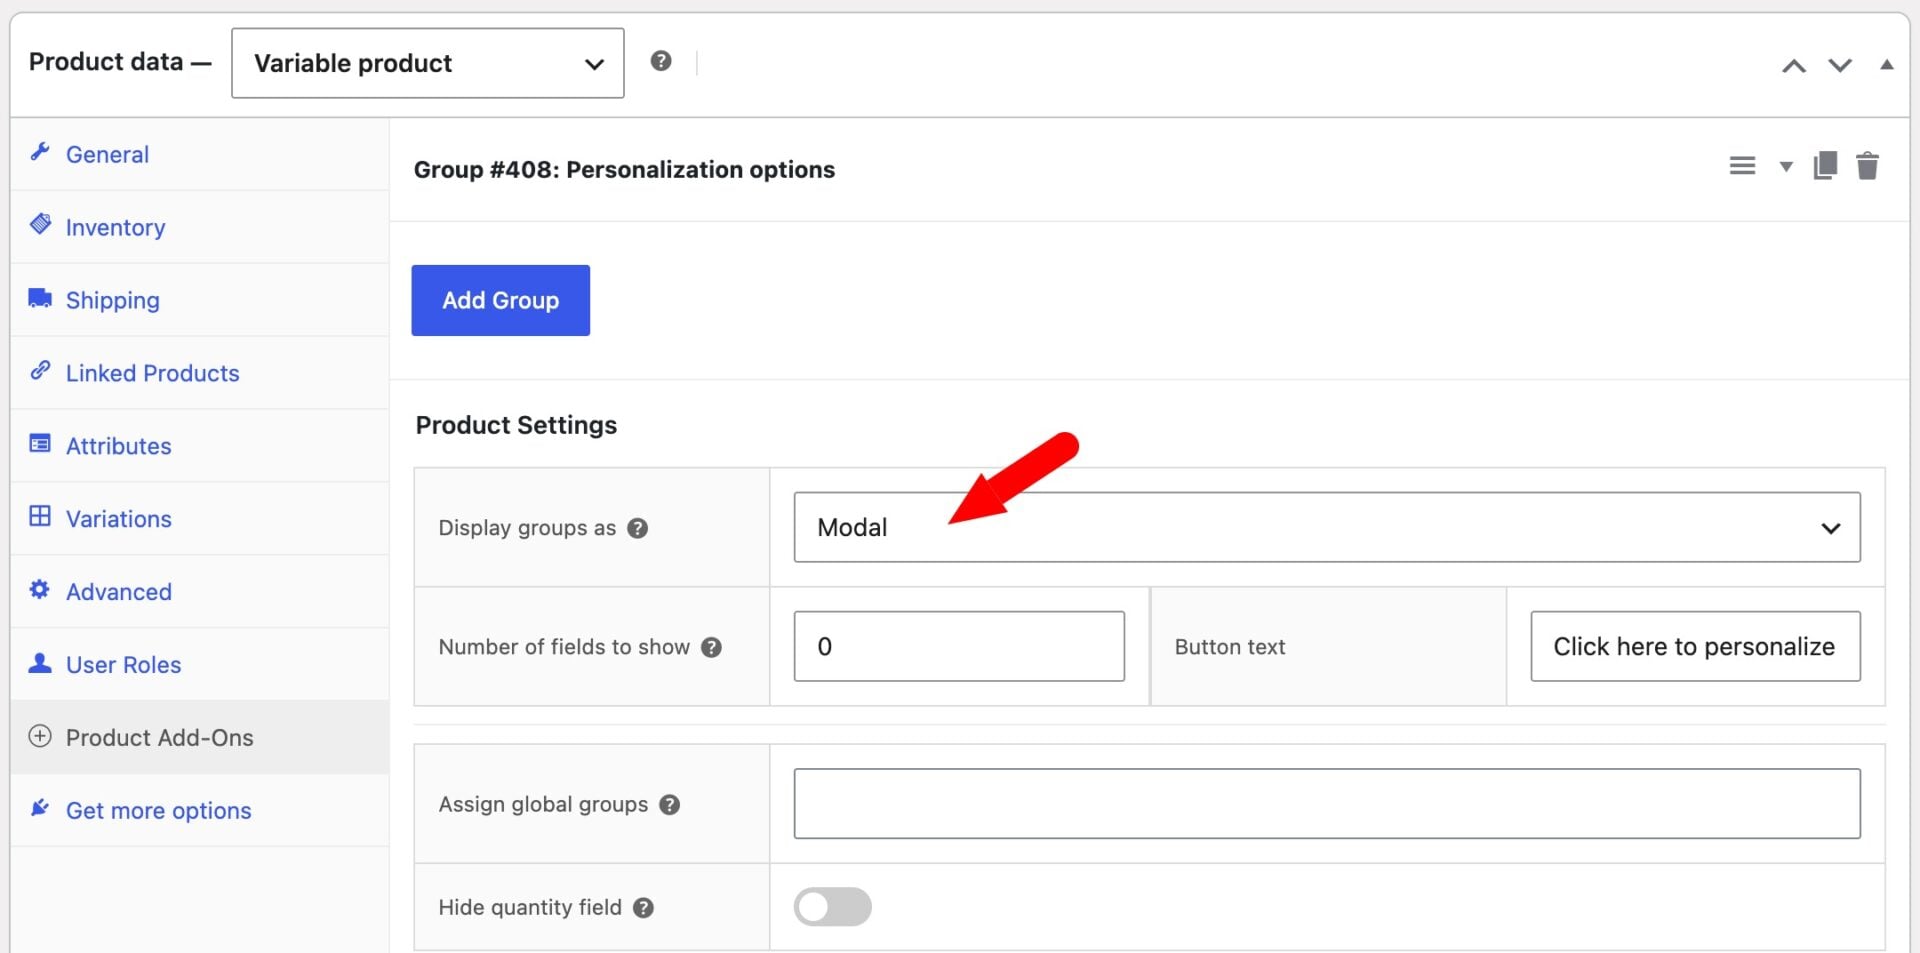
To enable a ‘Personalize this’ button:
- Choose ‘Modal’ in ‘Display groups as’
- Enter 0 in ‘Number of fields to show’ – this ensures that no fields appear on the product page; they all appear in the modal
- Enter text in the ‘Button text’ field to appear on the ‘Personalize’ button
Let’s look at how to add a one-off setup fee.
Step #6: Optionally add a setup fee. Add a ‘Checkbox’ field labeled ‘One-off logo setup fee’. Enter 20 in the ‘Field Price’ setting in the ‘Pricing’ section and enable the ‘Flat Rate’ option. Enable ‘Required’ if every logo order should include the fee.
Save and publish your product. Customers now pay the setup fee once, however many garments they order.
If you sell more than one garment, you can create your personalization group once as a global group instead of adding it to each product. Use the Global Add-Ons page to apply the group to all products or to selected categories.
How do you price add-ons for embroidery and print?
Add-Ons Ultimate gives you several ways to price each field, and you can mix them on the same product. Here are the options that a WooCommerce embroidery shop is most likely to need.
| Option | Use it for | How |
|---|---|---|
| Per item (default) | Embroidery charged on every polo | Field and option prices are quantity-based by default, so the price is multiplied by the quantity |
| One-off setup charge | Digitizing a logo once per order | Enable ‘Flat Rate’ and the price applies once, even if the customer adds more items |
| Different cost by decoration type | Embroidery vs screen print | Radio and select fields let you enter a different price for each option |
| Some fields per item, some one-off | Per-item embroidery plus a one-off setup fee on the same product | Set ‘Flat Rate’ on each field separately |
| Per character | Names | Enable ‘Price per character’ to multiply the ‘Field Price’ by the number of characters entered |
| Percentage or negative price | Premium fabrics, or discounts | Select ‘Percentage’ to price as a percentage of the base product price, or enter a negative value to reduce the price |
| Price by logo size | Small, medium and large logos | Use formulas, or lookup tables with the Advanced Calculations extension, to set prices based on other fields |
| Different prices for different roles | Waiving the setup fee for a client’s staff | Use role-based add-on prices to charge a different amount to each user role |
Let’s work through an example. A polo costs $18, embroidery costs $4 per item and the setup fee is $20.
For an order of 10 embroidered polos, the customer pays $180 for the garments, $40 for embroidery and $20 once for the setup fee. That’s $240 in total.
Text fields can also have extra pricing options. If you charge for names by character, you can also set a number of free characters, and choose to charge only for letters and numbers.
It’s also possible to charge a flat rate item once per product or once per order. So if you have a setup fee that will only apply once, even if the user is ordering multiple items like polo shirts, aprons, etc, you can just create the field as a global group and apply it to all your products.
If you want to know more about pricing options, read our guide to setting prices in Add-Ons Ultimate. Or take a look at our guide to formula-based pricing to learn how to use formulas and calculations in your pricing model.
Bonus #1: Show fields only when they’re needed
You can use conditional logic to keep the product page simple by showing a field only when it’s relevant. Click the ‘Conditions’ tab of a field and click ‘Add Condition’, then enter the parameters. For example, you could show ‘Logo placement’ only once a customer has chosen a decoration type.
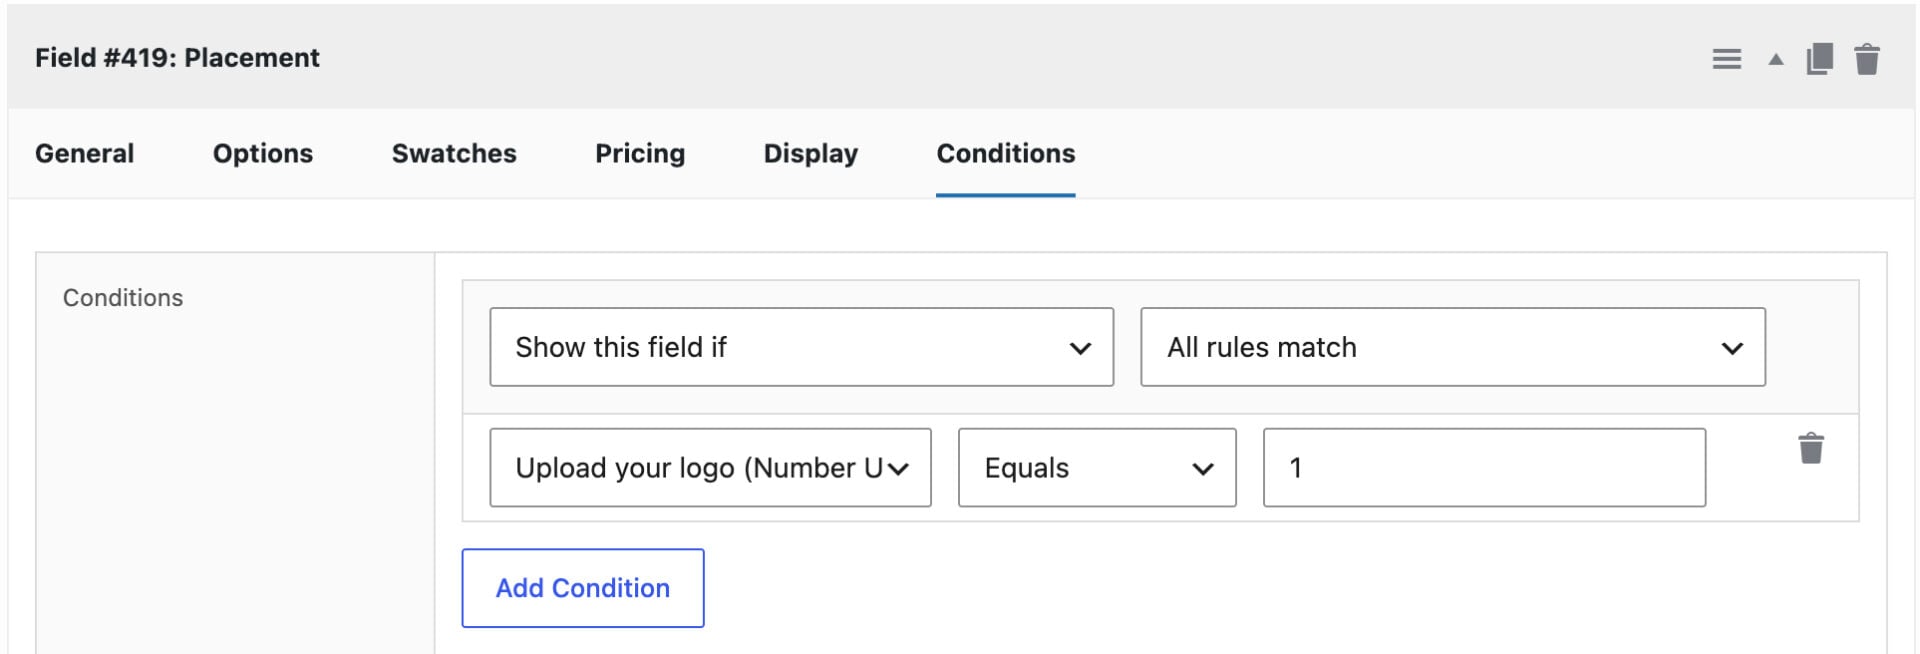
You can also charge a different setup fee for each decoration type. Create a separate flat-rate checkbox for each type, and add a condition so that each one only shows when its decoration type is selected.
Bonus #2: Ask for a different name on every garment
There are several options if you want to accept different names on each garment:
- Add a basic textarea field for your customer to paste in the names of each member of staff
- Add an upload field where the customer can upload a CSV file or spreadsheet – this could contain a list of each staff member’s name against their shirt size
- Create a group with a text field for the name and the staff member’s size. Enable the ‘Repeatable’ option and the group will duplicate to match the quantity of items being ordered. So a customer ordering four polos sees four name fields. Read our guide to repeatable fields and groups for more information.
Bonus #3: Charge different prices for add-on fields for different roles
Add-Ons Ultimate can show different add-on groups to different user roles, and set different add-on prices for each role. So you could waive the logo setup fee for existing customers by setting a role-based price on the setup fee field. Read our guide to role-based add-on prices for the steps.
Tutorial 3: How do you add live previews of logos and text?
Live previews let customers see their logo or text on the garment before they buy. This tutorial uses the Text Preview and Image Preview extensions for Add-Ons Ultimate.
You’ll need: Product Add-Ons Ultimate, Text Preview and/or Image Preview.
Add a live text preview
Click ‘Add Field’ in your ‘Personalization’ group and choose ‘Text Preview’ as the field type. Label it ‘Name on garment’ (or you can just use the text field from tutorial 2 instead). As customers type, their text appears live over the main product image.
You can also configure a number of other options for the text preview, including:
- Position: adjust the X and Y axis settings so the text sits where the name will be embroidered
- Font family: enable ‘Change the font family?’ so customers can choose a font
- Color: enable ‘Enable color picker’ to let customers choose any color, or link the text color to a swatch field if you want to limit the colors to the thread colors you offer
- User positioning: enable ‘Allow positioning’, ‘Allow rotation’ and ‘Allow resizing’ to let customers drag, rotate and resize the text themselves
Our guide to setting text preview to specific colors shows how to use swatches. Read our guide to adding live preview to WooCommerce products for more details on every text preview setting.

I'm using the plugin to give our customers the possibility to personalize our products with custom embroidery and to preview said embroidery on the product. The plugin is easy to use and configure and I especially enjoyed the quick and friendly support of the team.
Live image preview
Add an ‘Upload’ field labeled ‘Upload your logo’ and mark it as required. Click the ‘Uploads’ tab and enable ‘Preview image’.
You can also configure a number of other options for the image preview, including:
- Preview position: choose ‘Interactive – Over image’ so customers can resize, reposition and rotate the uploaded logo themselves
- Preview area: control where the logo can appear by clicking ‘Set image area’, choosing a rectangle or circle, dragging it over the chest area on the image, and clicking ‘Save area’.
Save your product, then publish it. Customers can now see their name and logo on the polo before they add it to the cart, and you can add as many preview fields as you like for the front, back and sleeves.

Your Image Preview plugin is amazing. There are so many possibilities and it really stands out. There is no WooCommerce plugin that does image previews as well as this one.
Review and approve
There are some further options as well. If you need to work on the customer’s proof before producing it, the Review and Approve extension adds a workflow that lets customers sign off on designs before production.
And if you need further control over uploaded logos, the Advanced Uploads extension allows users to crop, resize and rotate their uploads.
Both are included in the All Access Pass.
Tutorial 4: How do you let customers request a quote?
Some orders are too large or too specific for a fixed price. The WooCommerce Request a Quote plugin allows you to an ‘Add to Quote’ button to product and archive pages so that customers can ask for a price instead of buying outright. You can choose whether or not to display prices and whether or not to display the ‘add to cart’ button as well.
You’ll need: Request a Quote.
Step #1: Go to WooCommerce > Settings > Request a Quote. Choose which products get an ‘Add to Quote’ button: ‘All Products’, ‘Specific Products’, ‘Specific Categories’ or ‘Specific Tags’.
Step #2: Choose who can request a quote. You can allow all users, only logged-in users, only logged-out users or specific user roles. So, for example, if you only want to allow your B2B customers to request quotes, select the ‘B2B’ role here.
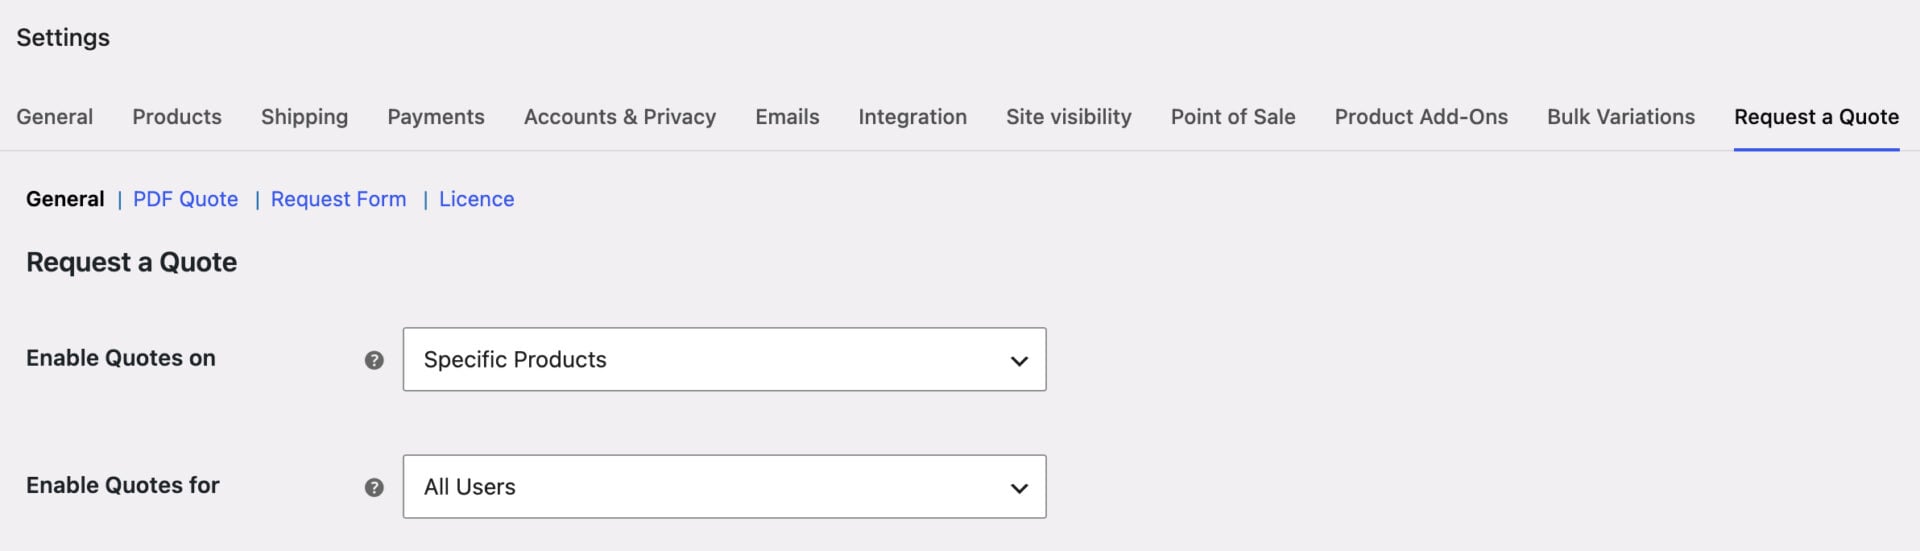
Only the customers you choose now see the ‘Add to Quote’ button. Now let’s look at some optional settings.
Step #3: Optionally hide prices, or show both buttons. You can remove prices from products that customers can only get by requesting a quote. Or you can display the ‘Add to Cart’ and ‘Add to Quote’ buttons together, so customers can choose to buy now or ask for a price first.
Step #4: Optionally send PDF quotes. Some customers like to receive their quotes as PDFs. You can enable this and automatically attach a branded PDF to every quote email.
You can also set quotes to expire after a chosen number of days, weeks or months, and include a ‘Checkout now’ link in the quote email so customers can pay in one click.
Save your settings. Customers can now add products to a quote and submit a request. Now let’s look at how to manage the quotes you receive.
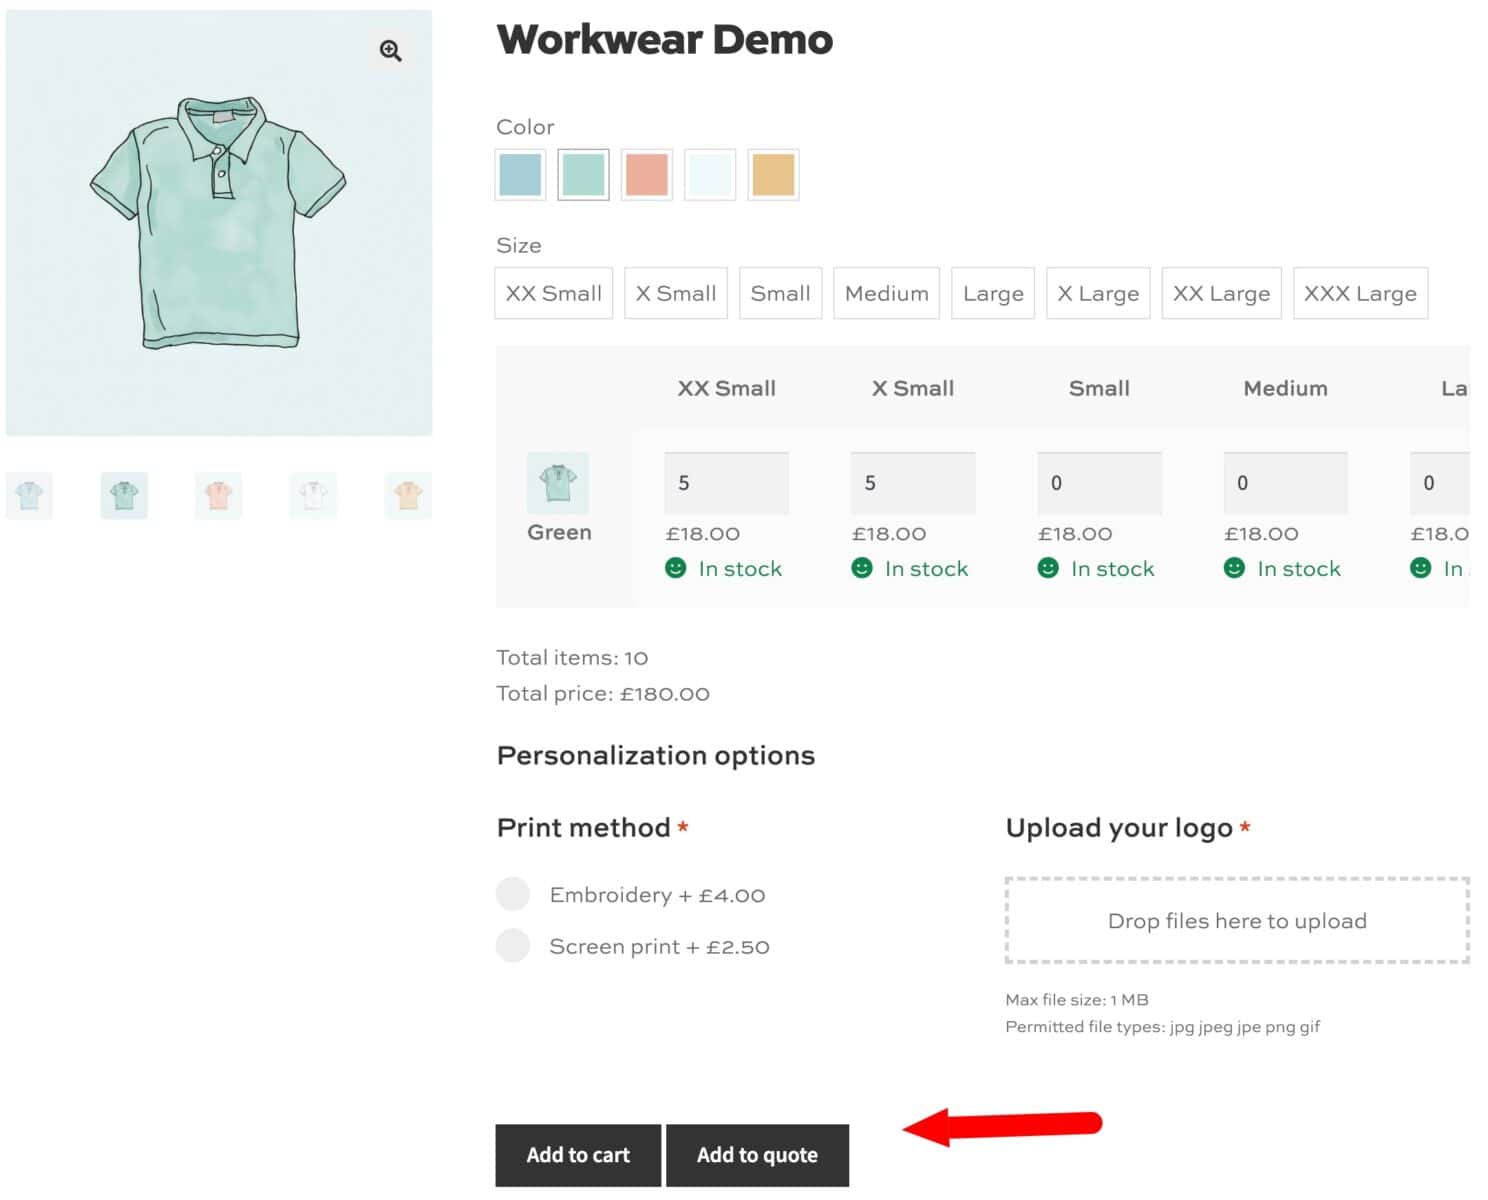
How do you manage quotes?
You can either set the plugin to automatically send the quote using the prices on the site, or you can manually edit the quote and set prices before sending the email.
Quote requests appear in WooCommerce > Orders alongside your regular orders. Hover over a line item and click the pencil icon to adjust the price, then choose ‘Send updated quote to customer’ from the order actions dropdown.
The customer will receive an email with a ‘Checkout now’ link that takes them straight to a dedicated payment page for their quoted order. If you’re using add-on fields, these will also be included as part of the quote, and any bulk or role-based pricing rules are applied automatically.
If you’re using the bulk order grid from tutorial 1, customers can specify quantities for multiple variations direct from the bulk order form and add these to their quote. Read our complete guide to WooCommerce Request a Quote for every setting.
Tutorial 5: How do you build a WooCommerce workwear B2B portal for staff ordering?
The WooCommerce Members Only plugin lets you build a private ordering portal where access is restricted to specific users and staff can only see the products and prices intended for them. Plus, its ‘Teams’ feature allows you to set spending limits per team member, anything exceeding the limit will need to be approved by a manager.
You’ll need: Members Only.
Step #1: Go to Members Only > User Roles and scroll down to the ‘Roles’ field. Enter a name such as ‘B2B’ for all your wholesale customers or even create roles for individual companies, and click ‘Add role’.
You now have roles to attach products and teams to. Now let’s choose how restrictions work.
Step #2: Go to Members Only > Settings and set ‘Restriction method’ to ‘User role’. Then choose how restricted products behave for everyone else:
- Enable ‘Hide in archives’ to remove restricted products from the shop and category pages
- Enable ‘Access product pages’ if you’d like other visitors to view a product without being able to buy it, or leave it disabled to redirect them
- Enable ‘Hide price’ and enter text such as ‘Log in to order’ in ‘Add to cart text’ if you want to keep pricing private
Step #3: Restrict a whole range of products by role. Go to Members Only > Plans and click ‘Add New Plan’, then configure:
- Plan name: name it after the range or the group of users that can access it, e.g. ‘Acme uniform’ or ‘B2B’
- Activate plan: enable this to switch the plan on
- Restricted content: choose ‘Specific content’ and decide what content is going to be restricted in ‘Content type’ – so you could specify certain product categories or all products, for example
- Permitted user roles: select the roles for the users who can access this restricted content – e.g. ‘Acme staff’ or ‘B2B’
- Landing page (optional): send other visitors somewhere useful, like a log-in page, if they try to access restricted content without being logged in
Save the plan.
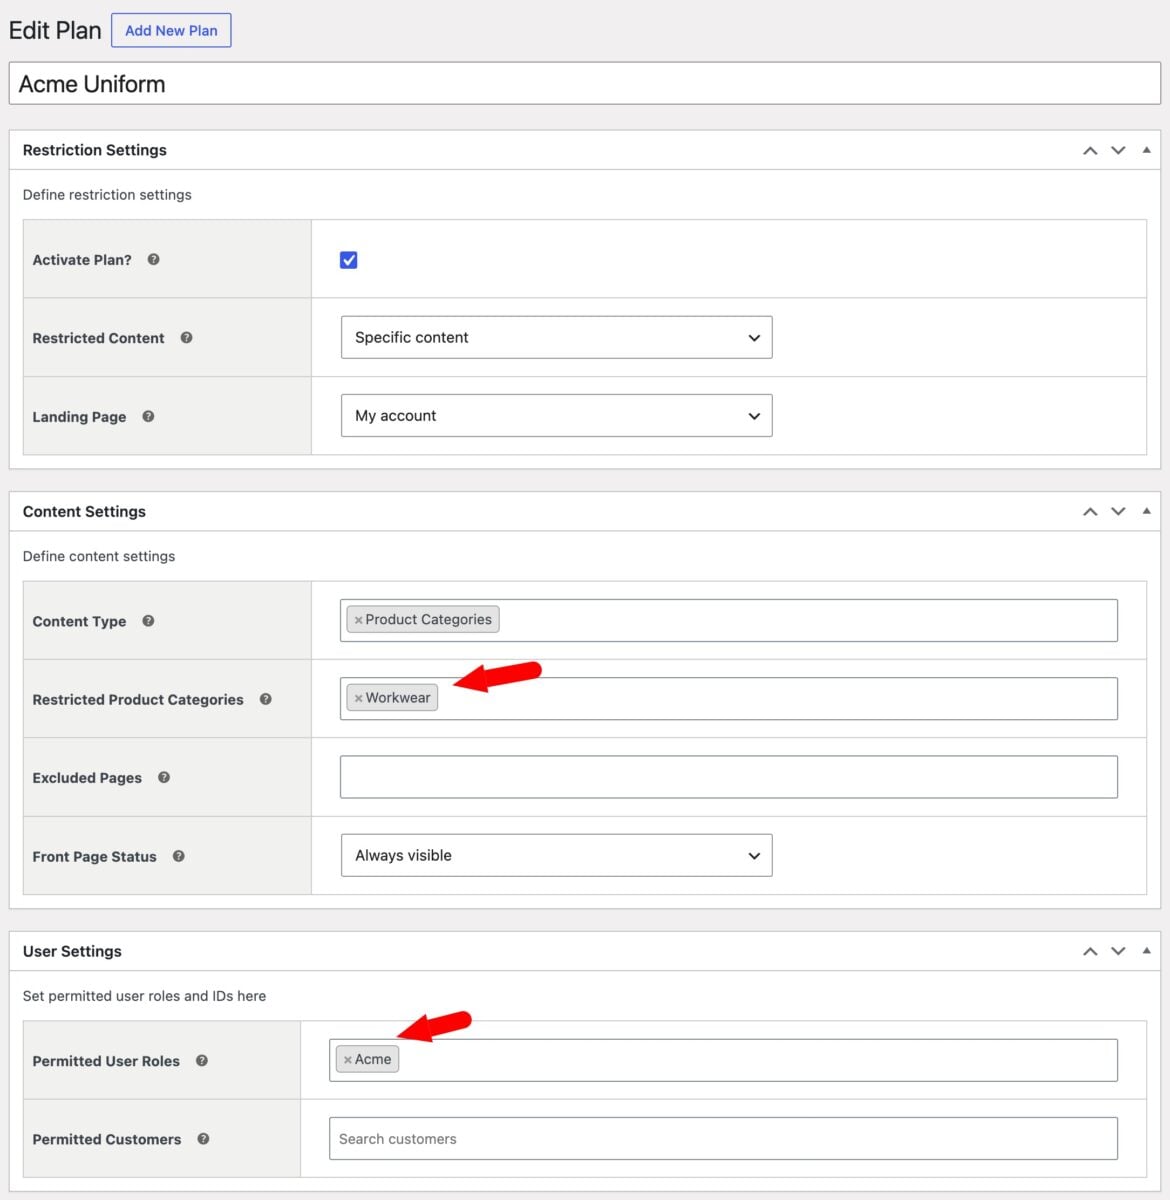
Only users with the required role can now access products in that category. You can create as many product categories and membership plans as you like, so you could create a product line per company, or just restrict non-B2B customers from accessing certain products.
Step #4: Optionally restrict individual products. Open a product and scroll to the ‘Members Only’ panel. Choose one of three methods:
- ‘By user role’ restricts the product to one or more roles
- ‘By user’ restricts the product to specific users. Enter a comma-separated list of user IDs, which is ideal for client-specific or bespoke products
- ‘By password’ lets anyone who enters a valid password access the product, without needing an account or a role
This is ideal if most of your store is public, but certain garments should only be available to specific users.
How to set spending caps for buyers
Some companies are happy to let their staff order items up to a certain value. The ‘Teams’ feature in Members Only allows you to create different teams, set spending limits for team members and specify a team manager to approve larger orders. To set this up:
- Go to Members Only > Settings and check the ‘Enable Teams’ option
- Go to Teams > Add New and create a team: select the user role the team applies to, choose an existing user as the manager and enter a ‘Max Order Value’
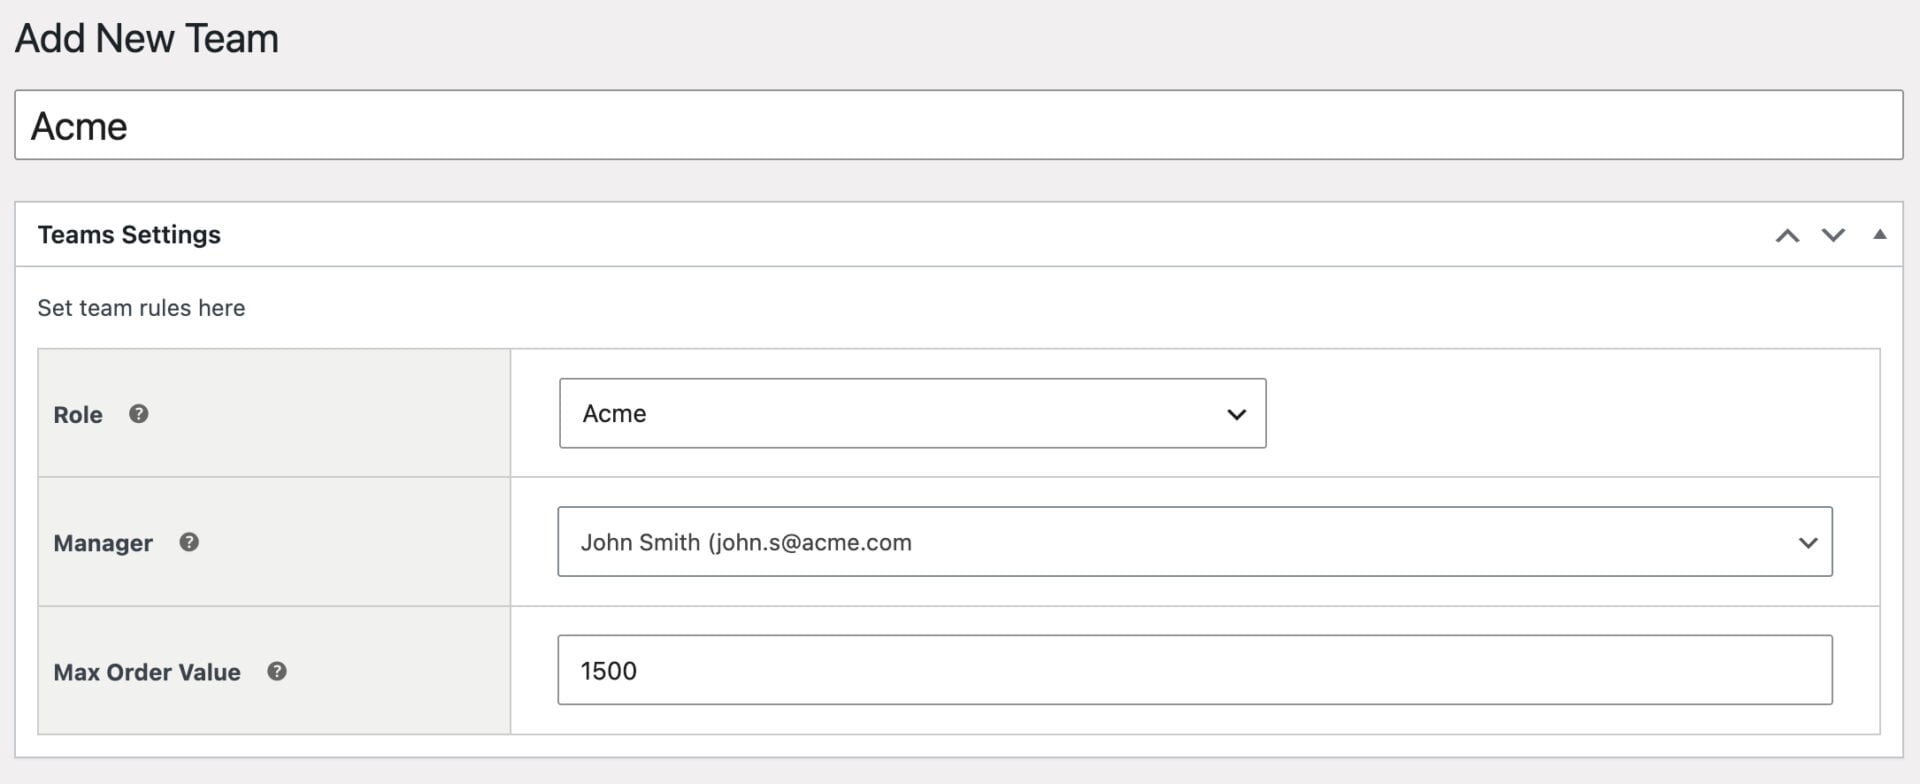
You can also override the limit for individual users if some staff need a higher or lower limit than the rest of their team.
Staff can now order up to the limit. If an order exceeds the limit, the member of staff will see a ‘Request Authorization’ button in the checkout instead of ‘Complete Order’. Clicking it creates an order with the status ‘Awaiting Authorization’ and emails the manager.
The manager approves or rejects the order from the ‘Awaiting Authorizations’ tab on their My Account page. Approving moves the order to ‘Processing’ as normal, and rejecting notifies the staff member who placed it.
Read our guide to Teams for more information.
How to approve new staff registrations
Many stores require the option to approve new B2B or wholesale customers. To enable new user registrations:
- Go to WooCommerce > Settings > Accounts & Privacy and enable the ‘On “My Account” page’ option under ‘Account Creation’
- Go to Members Only > User Roles and check ‘Enable user approval’
- Optionally define which roles require approval, so you can let new retail customers register immediately but require store manager approval for new wholesale customers
New registrations will wait as ‘Pending’. You’ll get an email with their details and the option to approve or reject them, so you can check that each new account belongs to a genuine member of staff. Read our guide to WooCommerce user approval for more.
For more on restricting content, read our complete guide to WooCommerce memberships.
Tutorial 6: How do you offer bulk discounts?
Many workwear and uniform stores will offer bulk or quantity-based discounts.
The WooCommerce Dynamic Pricing and Discount Rules plugin applies discounts automatically based on who the customer is and how much they order. The bigger the order, the lower the price per garment.
You’ll need: Dynamic Pricing and Discount Rules.
Step #1: Create a bulk pricing rule:
- Go to WooCommerce > Fees and Discounts and click ‘Add New’
- Choose ‘Bulk Pricing’ as the ‘Rule’ and select what products or categories the discount will apply to in the ‘Applies to’ field
- Create your quantity bands in the ‘Tiers’ section, e.g. set 1–9 items at the standard price, 10–19 at a 5% discount, 20–99 at a 10% discount and 100 or more at a 15% discount
- Set ‘Adjustment’ to ‘Percentage Discount’
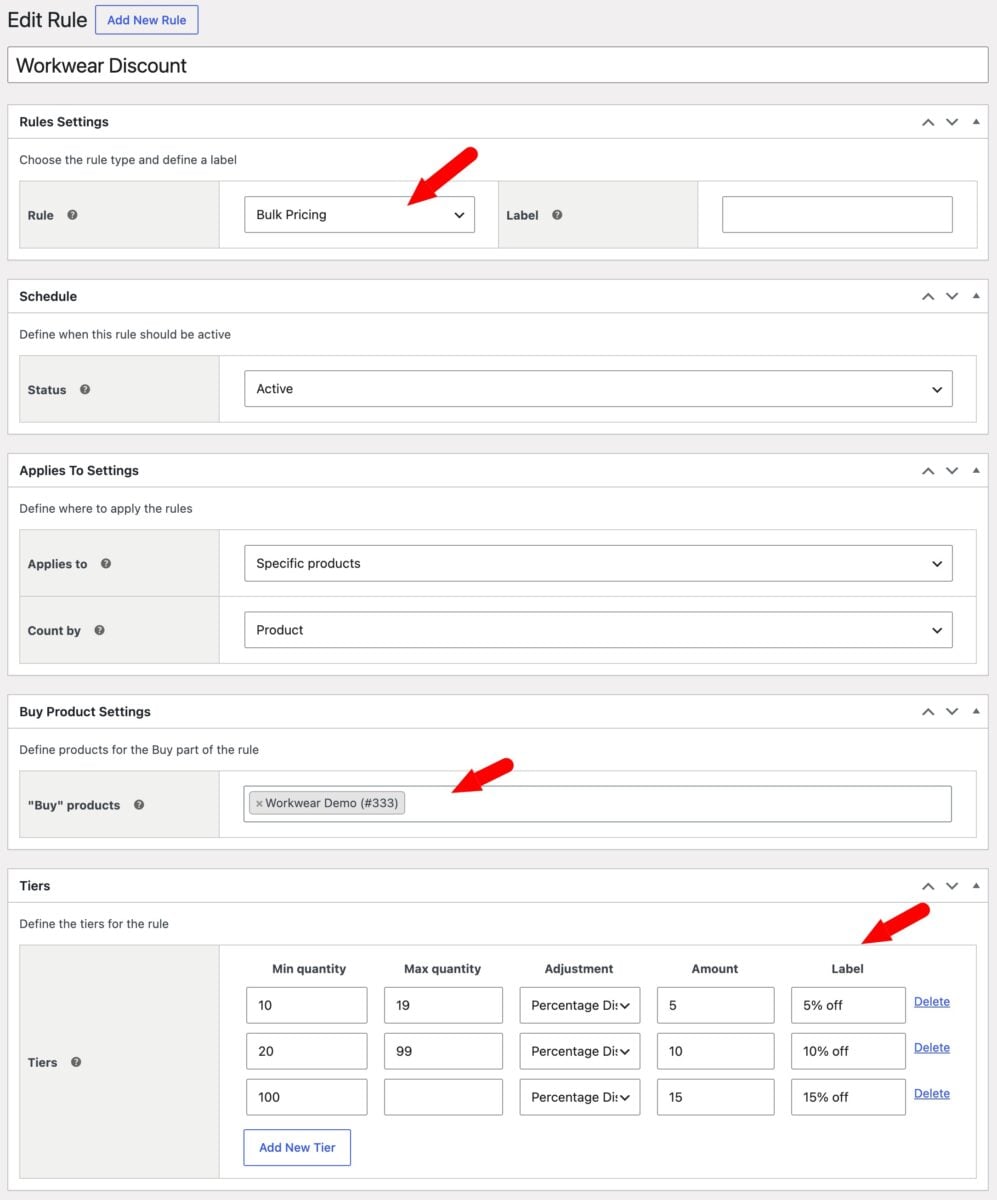
Customers now see the unit price drop automatically as they order more. If you’d rather enter an exact unit price for each band, set ‘Adjustment’ to ‘Tiered’ and enter the price per item in the ‘Amount’ field.
Step #2: Optionally add a discount for a user role. As an alternative method, you could apply a simple percentage or fixed reduction:
- Add another rule and choose ‘Simple’ as the ‘Rule’ type
- Set an adjustment such as a 10% percentage discount
- Enter the role, such as ‘Acme staff’, in the ‘Roles’ field
Anyone logged in with that role now sees the discounted price automatically, while other customers pay the regular price.
Step #3: Optionally show a pricing table. Dynamic Pricing and Discount Rules can display your quantity bands as a pricing table on the product page, so buyers see every price break before they order. The table works with the bulk order grid from tutorial 1.
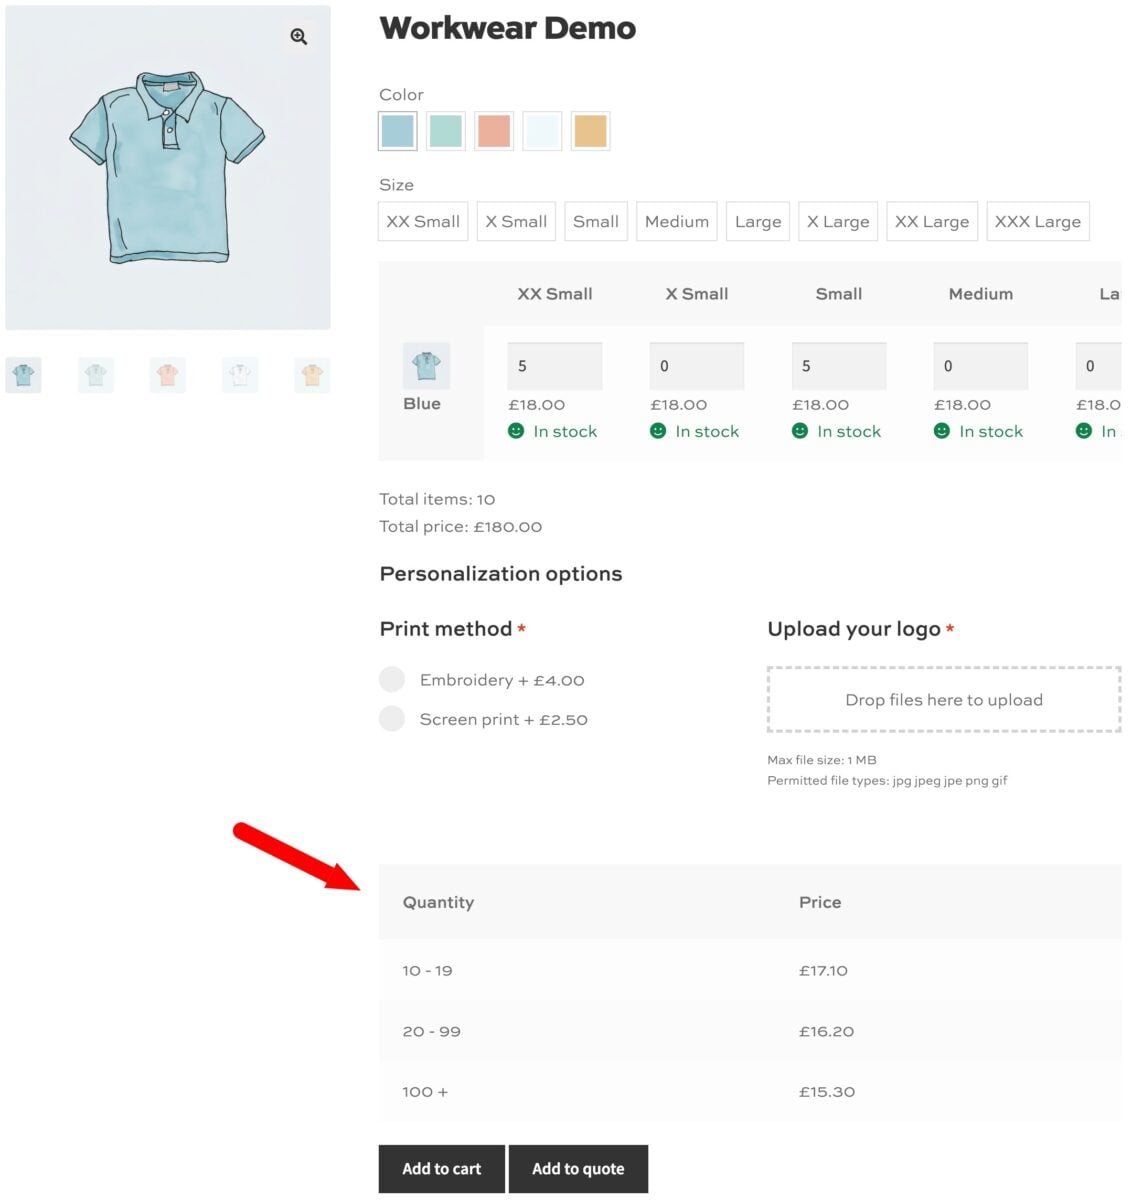
Save your rules. Customers now see the discounts applied as they add garments to the cart. Read our guide to building a B2B store for more on role-based prices and tax exemption.
For a longer look at trade registration, hidden prices and reordering, read our guide to building a B2B store.
Real world example of workwear store with bulk order form
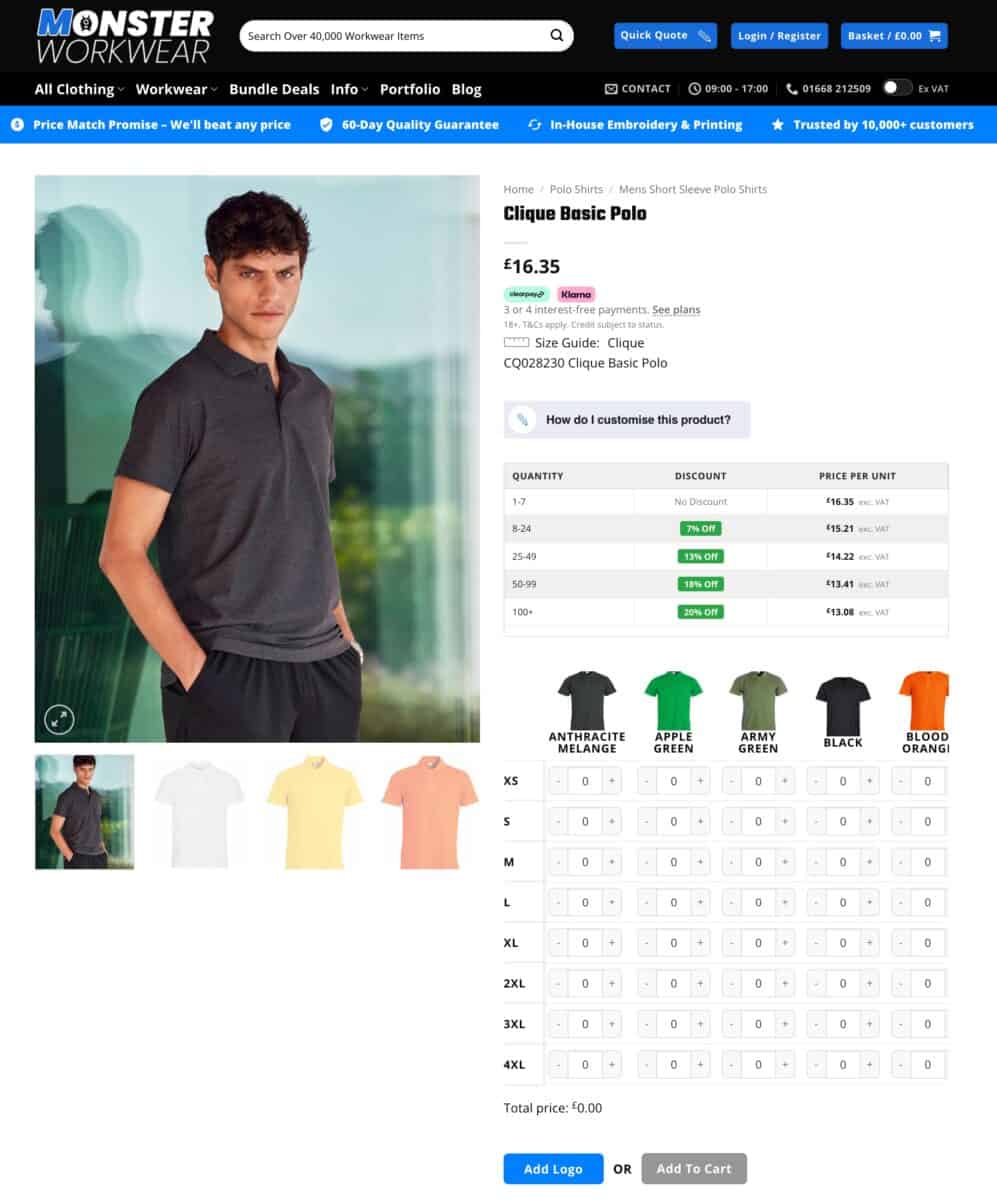
For a real world example of a workwear and uniform store that uses some of the plugins featured in this article, take a look at Monster Workwear which offers custom embroidered industry workwear and uniforms.
Here’s a typical product page where users can order multiple variations in bulk, customize the item with a logo, and receive bulk discounts.
Which features does your store need?
Each tutorial is optional, so use the combination that suits your customers:
- A small business accepting orders for a few dozen polos: tutorials 1, 2 and 3
- A store selling in volume: add tutorials 6
- Companies with staff accounts: add tutorials 4 and 5
How do you manage your uniform shop from the back end?
Most day-to-day management happens in WooCommerce > Orders. Uploaded logos and add-on selections appear on each order, and you can download all the files uploaded for an order.
Quote requests appear in the same list, and converted quotes are ordinary orders. Team orders that need sign-off have the status ‘Awaiting Authorization’, and their managers approve them from their My Account page. To review new staff registrations, go to Users.
WooCommerce uniform shop – recap
So that’s how to build a WooCommerce uniform shop with logos and bulk ordering. We looked at how to add name, logo and decoration fields, price embroidery and print and preview logos on the garment. We also looked at a bulk order grid, quotes, a staff portal with spending limits, and bulk discounts.
Together, these give you a complete corporate clothing setup in WooCommerce that works for all types of uniforms, workwear and branded merchandise. Every plugin is included in the All Access Pass, and each can also be bought separately.
All our plugins are compatible with all themes and page builders, including Astra, Flatsome and Woodmart, and page builders like Elementor and Divi. If you have any questions, our world-class support team is on hand to help. And every plugin is backed by a 14-day money-back guarantee, so you can try them risk-free.