How to create bulk variations forms in WooCommerce

In this tutorial we’ll look at two different ways to create WooCommerce bulk variations forms. A bulk variation form allows the user to add multiple variations of a product to their cart in one go. As an extra feature, your users will also be able to include add-on fields with their variations (if required).
Creating a WooCommerce bulk variations form
Let’s quickly look at what we mean by a bulk variations form in WooCommerce. Essentially, it’s a quick way of allowing your users to order different variations of a product in different quantities.
A simple example would be tee-shirts. Let’s say you’re selling tee-shirts (possibly through a wholesale store) and your customers will want to bulk order different sizes and colours of the same basic tee-shirt.
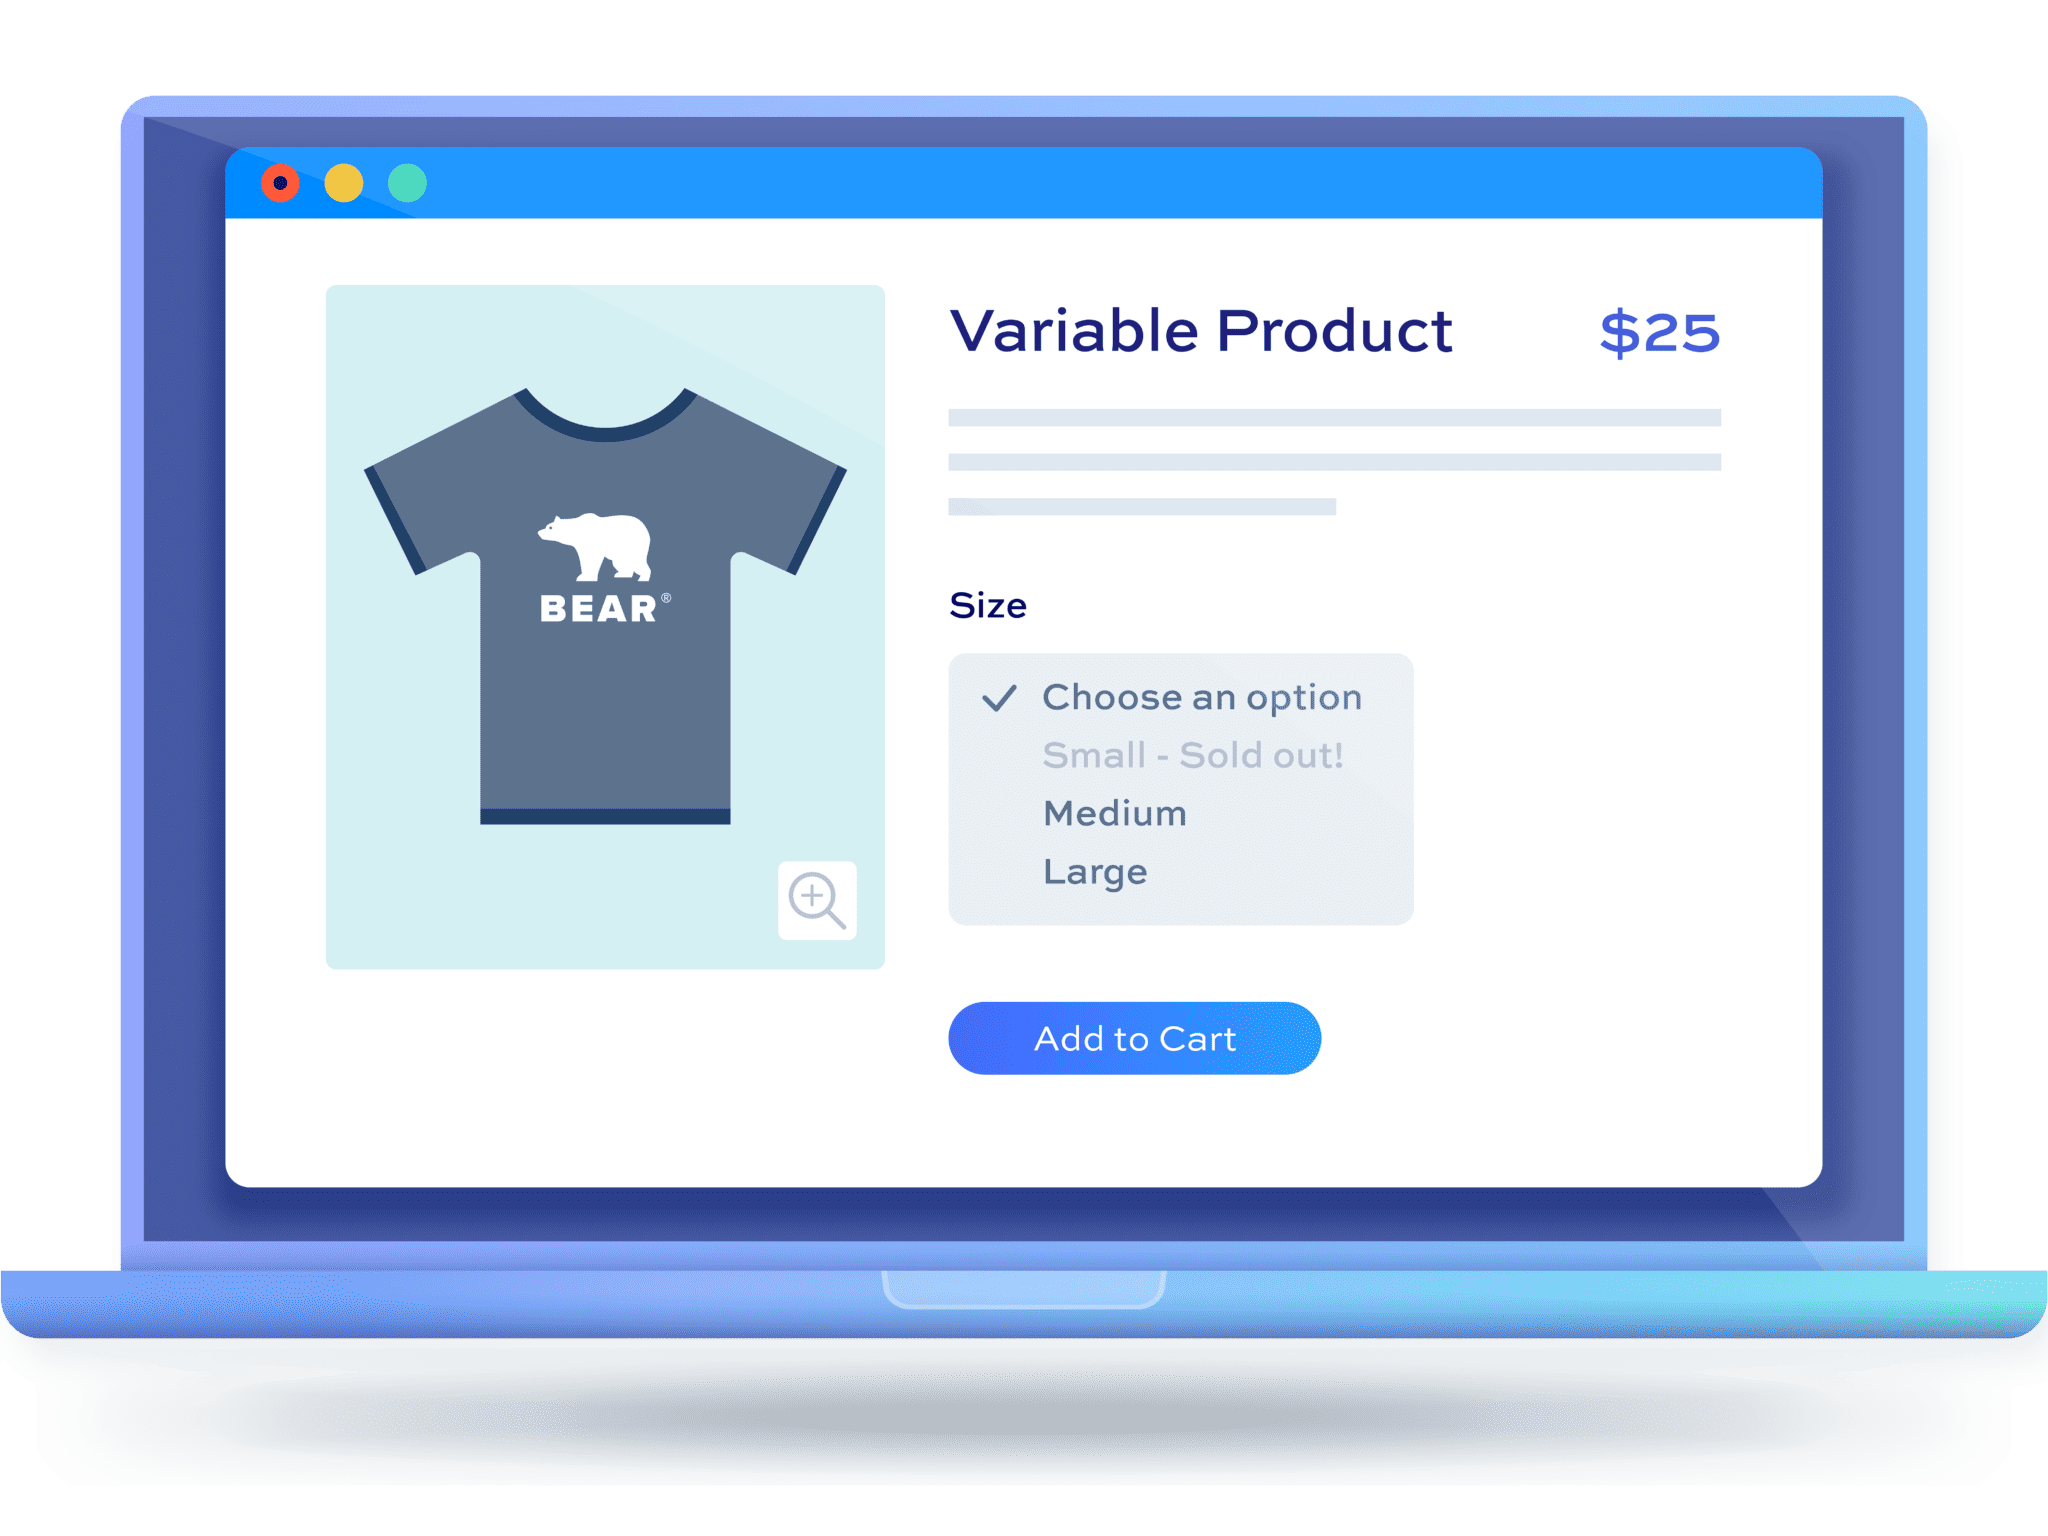
With the standard way that WooCommerce works, the customer would need to go to the product page, select their variation, choose the quantity, then add it to their cart. They’d then need to repeat this process for every variation required. It’s highly laborious.
With the methods in this article, customers can add multiple variations of the product to the cart with one click from a single form. It’s a simpler process for the customer which should result in better sales for you. It’s ideal for any store that uses bulk ordering, like wholesale and B2B stores.
You can also check out this article for how to create a bulk order form in WooCommerce.
Method #1: Create a bulk variations form using WooCommerce Better Variations
This is the best method for creating a WooCommerce bulk variations form. It uses Better Variations – a bulk variations plugin for WooCommerce. It allows you to display quantity fields for every variation in a product that uses one or two attributes. If your variable product has more than two attributes, then take a look at Method 3 below.
Bulk variations form examples
In the screenshot below, you can see a variable product with one attribute. Each variation has its own quantity field with price and stock levels displayed. The user can pick as many of each variation as they like, they add them all to the cart in one click.

There’s a link to a working demo product here.
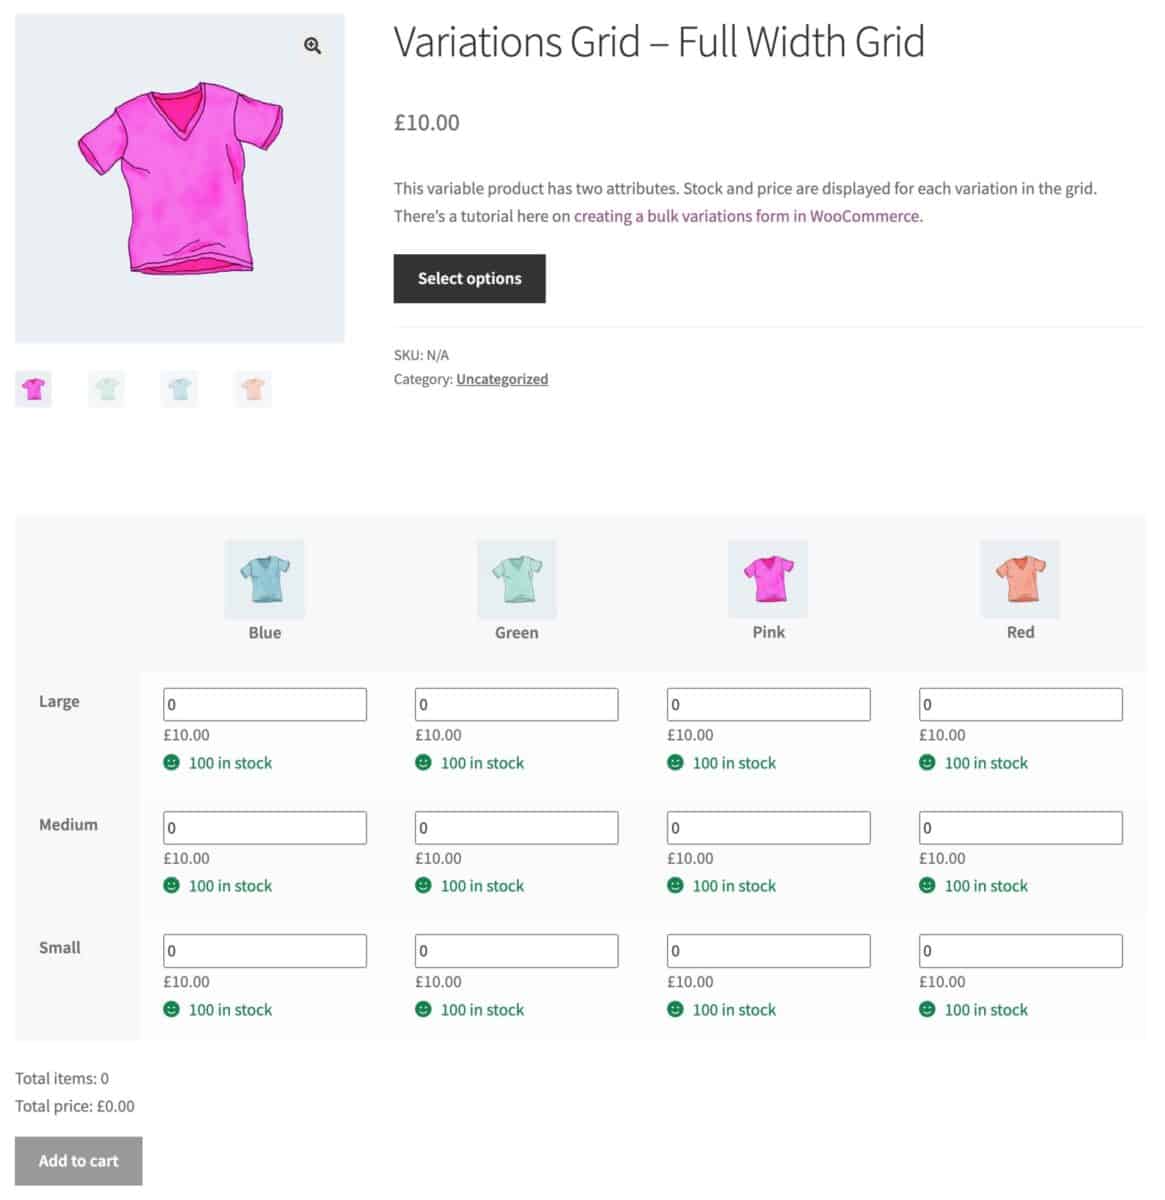
In this example, the variable product has two attributes.
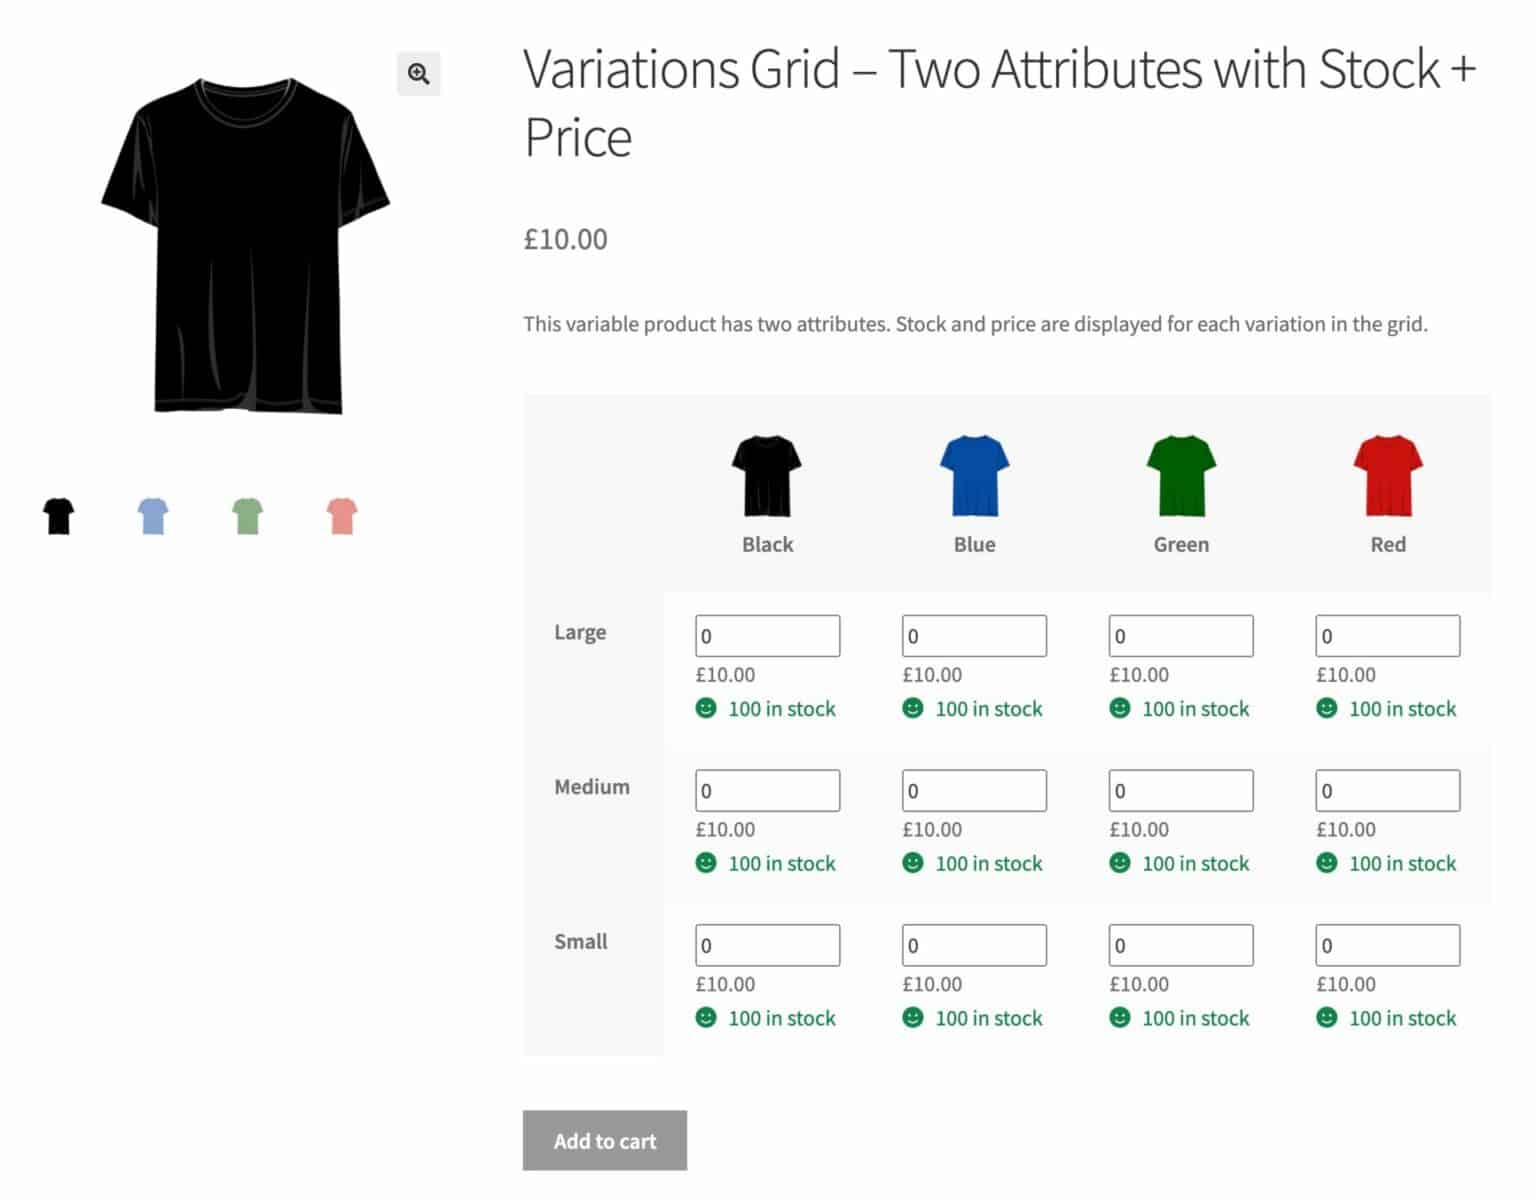
You can view this demo product here.
How to create a bulk variation form using WooCommerce Better Variations
In this method, we’re using the Better Variations plugin:
WooCommerce Better Variations is a simple plugin that gives you extra scope in how you display variations on the product page.
Step 1: Create your variable product
The first step is to create your variable product. Note that to create a grid, the product will need to use two attributes for its variations. In our example, that’s going to be Size and Colour – but it can be any two attributes.
Note that you should create your attributes in Products > Attributes rather than creating custom attributes per product. There is more information on creating product attributes here.
Add all your variations, give them a price, assign stock, etc.

Step 2: Set your display mode
Now you need to set the display mode in WooCommerce Better Variations. Go to WooCommerce > Settings > Better Variations and set the ‘Display mode’ setting to ‘Grid’.
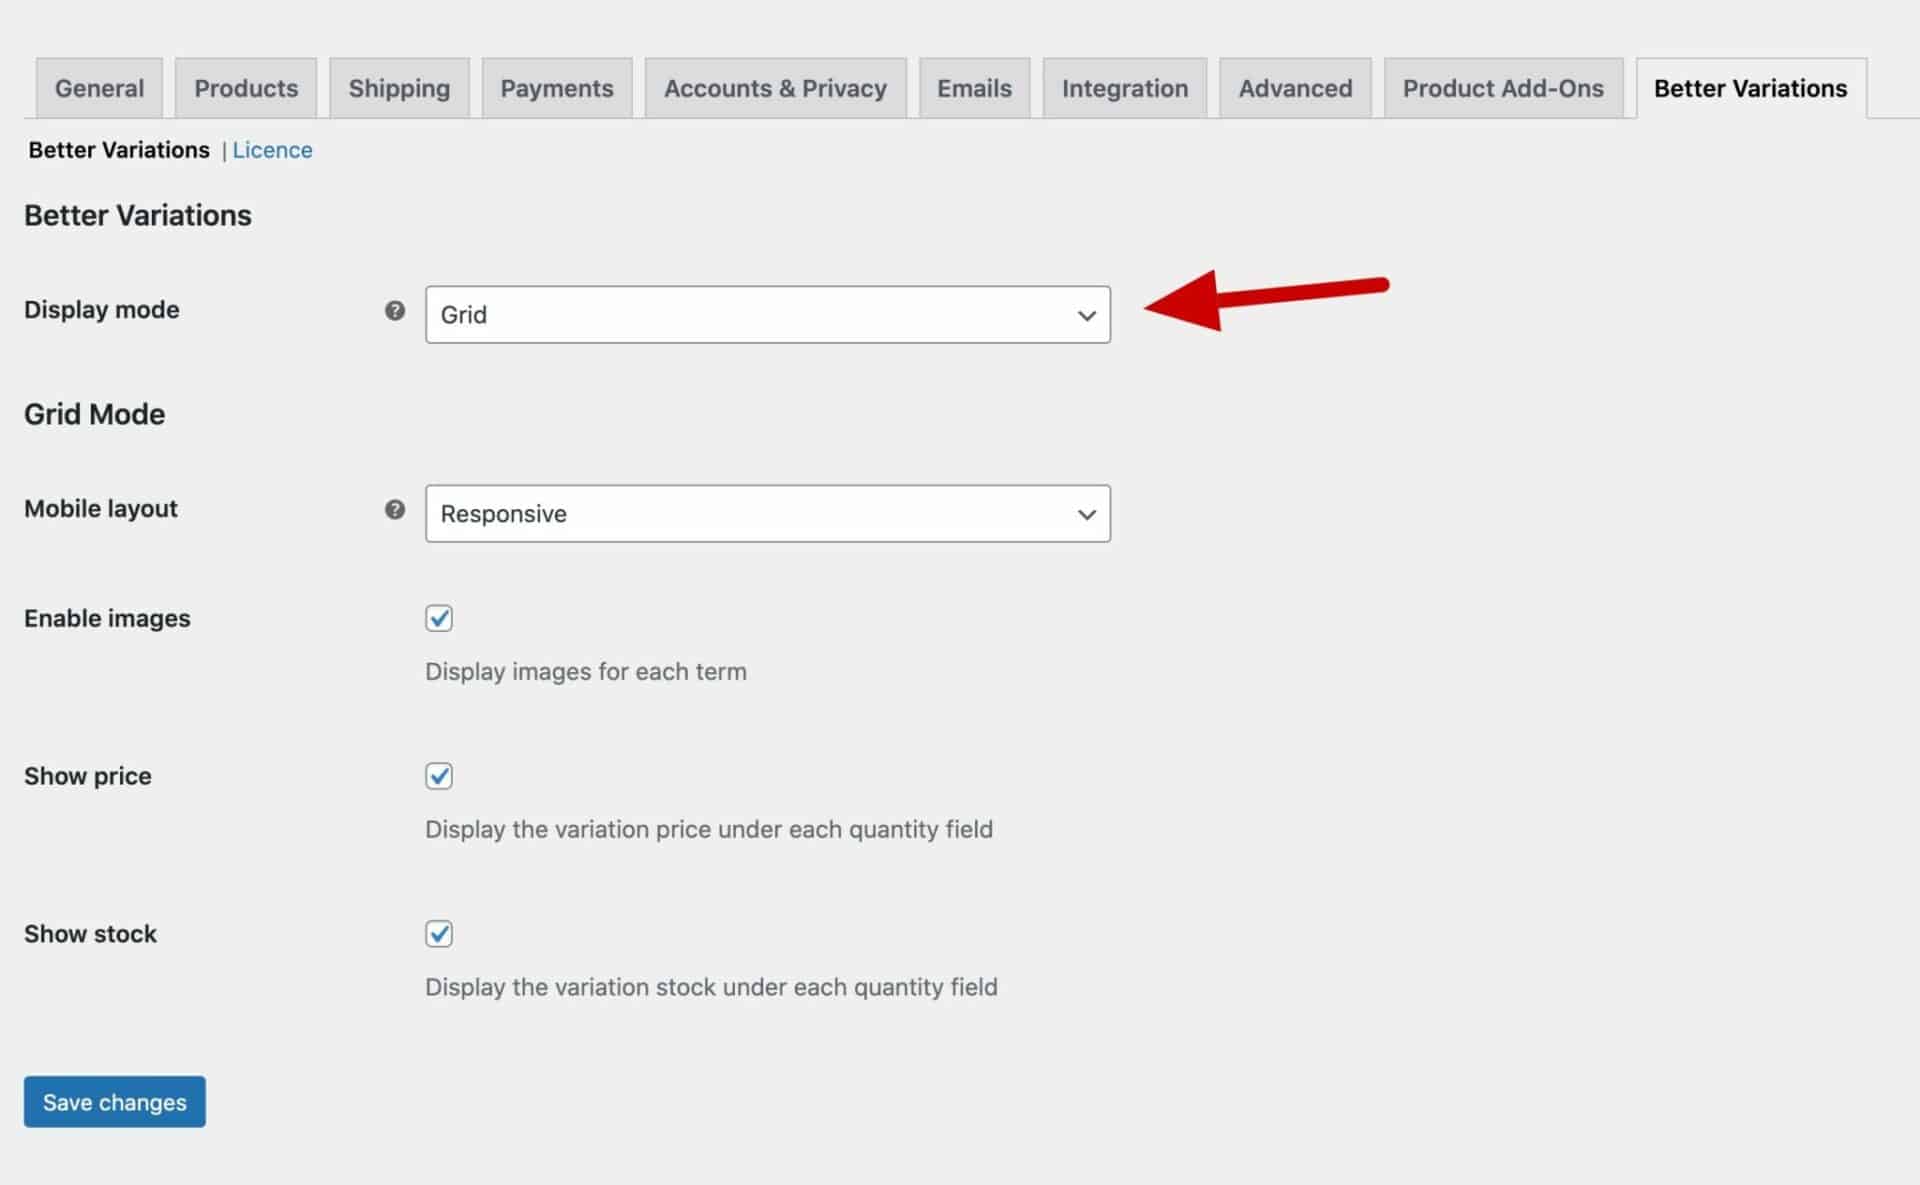
That’s it! Now, all your variable products with one or two attributes will be displayed in a grid.
Step 3: Additional settings
There are some further options that you can use to determine how the bulk variations are displayed.
Mobile layout
Set this to ‘Responsive’ to ensure that your bulk variations table is responsive so that on mobile devices the variations are stacked in a single column.
Set this to ‘Scrollable’ to retain the table layout on smaller screens but allow the user to scroll horizontally and vertically.
Enable images
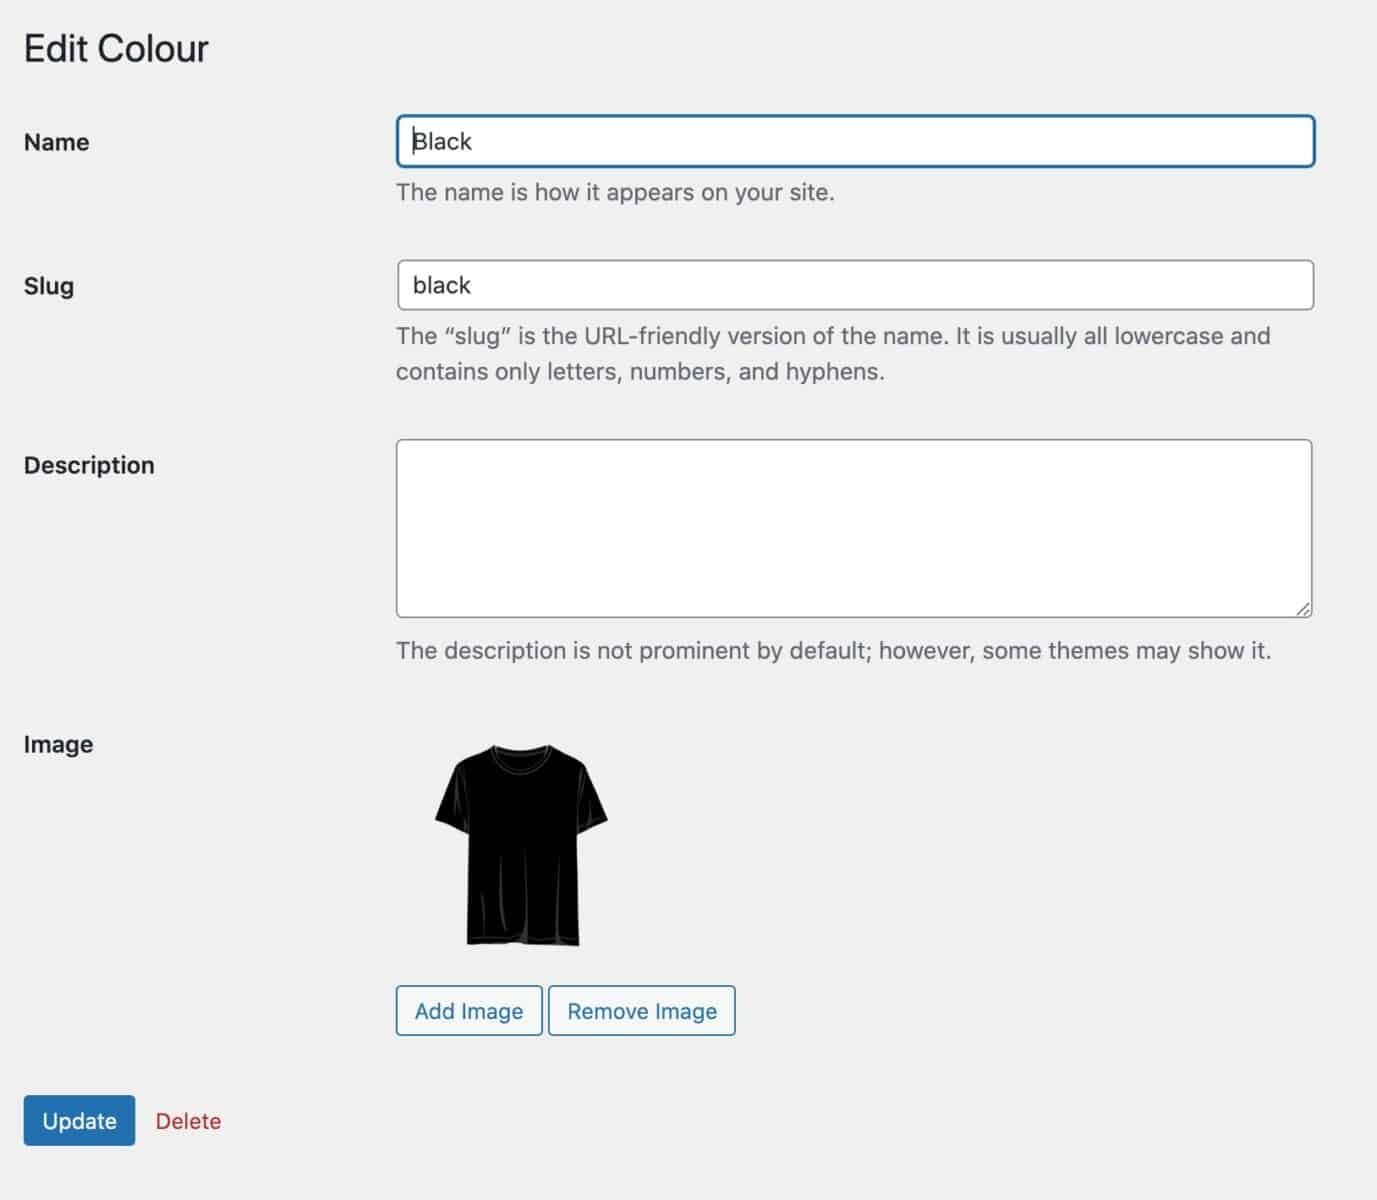
You can display image swatches next to each attribute term. Enable this option then go to Products > Attributes and select the attribute you’d like to add images to. Edit each attribute term and upload an image.
Show price
Enable this option if you want to display the variation price in the grid.
Show stock
Enable this option to display the stock status for each variation.
Display the grid at full page width
If you’d like to display the variations grid at the full width of your product page, select the ‘Display grid full width’ option. The grid will be moved down the product page below the main product image.
Step 4: Bulk variations with product add-ons
Better Variations is compatible with WooCommerce Product Add-Ons Ultimate, meaning that you can add extra fields to your products.
In the screenshot below, you can see a variable product with variations grid, plus extra fields like the option to upload an image and select its placement.

You can see a working demo product here.
Bulk variations with product add-ons
To add extra fields to your variations grid, you’ll need the WooCommerce Product Add-Ons Ultimate plugin.

Adding a file upload field
Let’s look at how to add a file upload field as an example.
- Click on the ‘Product Add-Ons’ tab in the ‘Product Data’ section
- Click ‘Add Group’ then ‘Add Field’
- Select ‘Upload’ as the Field Type
- Give your field a name
- You can add a price if you wish

Pricing your add-on fields
Add-Ons Ultimate allows you to assign a price to each add-on field. You can choose whether this price should be multiplied by the number of items in the cart or just applied once.
For instance, you might want to charge the user extra to add a logo to their product. And you might want to charge this for every item they order. To do this, just add a value in the ‘Field Price’ setting. This price will then be multiplied by every item – so if the user chooses 5 of one variation and 6 of another variation, the add-on field will be charged 11 times.
But if you just want to charge a fee as a one-off, you can select the ‘Flat Rate’ option. Perhaps you want to charge a set-up fee once per order – you can do this by enabling the flat rate setting. The charge will be applied as a single fee in the cart irrespective of how many items are in the order.
Method #2: Create a bulk variations form in a grid using Add-Ons Ultimate
In this method, we’ll create a grid of our variations on a product page just using the Product Add-Ons Ultimate plugin. This method has been superseded by Method 1, above, using Better Variations. Method 1 is much simpler but I’ve left this method in the article for completeness.
The grid will look like this:

See how the product’s size and colour variations are now displayed in an easy to read grid? The customer can just enter how many they need of each variation and click add to cart.
As an optional extra, we’ll also look at how to include additional fields on the product page so that your customers can personalise the product. For instance, they can specify some text or image to be printed on the tee shirts.
Let’s take a look at how to create this.
Creating a bulk variations grid
To create a variations grid like this, you’ll need the WooCommerce Product Add-Ons Ultimate plugin.
The Add-Ons Ultimate plugin allows you to add extra fields to your products so that your customers can personalise the products. To create our variations grid, we’re going to use a specific feature called ‘Child Products’. This allows you to use other products as extra options within a main product.
Step 1: Create your variable product
The first step is to create your variable product. Note that to create a grid, the product will need to use two attributes for its variations. In our example, that’s going to be Size and Colour – but it can be any two attributes.
Add all your variations, give them a price, assign stock, etc.
For more detailed information about creating variable products, take a look at this article.
Step 2: Create your bulk variable product
This method uses two products: the first is your variable product, the second is the main product where you’ll embed the bulk variations order form.
To create your bulk order product:
- Create a new, simple product
- In the ‘Product Data’ section, click on to the ‘Product Add-Ons’ tab
- Click ‘Add Group’ then ‘Add Field’
- Give your field a name, e.g. ‘Order Form’
- Choose ‘Products’ as the ‘Field Type’
- Enter the variable product that you just created in the ‘Child Products’ field
- Select ‘Variations Grid’ in the ‘Products Layout’ field

You’ve now created your WooCommerce bulk variations form. It will look something like this on the front end.

Bonus step: Including product add-ons with your variations form
Many stores want the ability to allow their users to customise products. This can be something like adding a message or gift wrapping through to more complex customisations like uploading files.
Because we’ve used the WooCommerce Product Add-Ons Ultimate plugin to create the bulk variations form above, we can easily add some extra options.
In our tee-shirts example, we’re going to allow our users to specify some text and upload an image which we’ll then print on the tee-shirts.
Adding a text field
To add a text field to the variations form:
- Click on the ‘Product Add-Ons’ tab in the ‘Product Data’ section
- Click ‘Add Group’ then ‘Add Field’
- Select ‘Text’ as the Field Type
- Give your field a name, e.g. ‘Text’
- Optionally, you can add extra parameters like a price for the text field or even a price per character
- If you only want to charge once for the text field, regardless of the quantity of items ordered by the customer, check the ‘Flat Rate’ field. Otherwise the field price will be multiplied by the quantity ordered.

And you can view a working demo here.
WooCommerce bulk variations form – recap
We’ve looked at two methods to create a bulk variations form in WooCommerce. Both methods listed each variation individually, allowing your customers to choose multiple variations and quantities at once.
The first method is recommended. It uses the WooCommerce Better Variations plugin to replace the standard WooCommerce attribute dropdowns with a grid.
The second method used the WooCommerce Product Add-Ons Ultimate plugin.
Whichever option you choose is backed by our 14-day money-back guarantee – so you can purchase risk free. The plugins are compatible with all themes and page builders. And we have a world-class support team ready to assist you with any questions.