How to set price by formula calculator in WooCommerce: Three quick tutorials

Are you looking for an easy way to set prices by using a formula calculator in WooCommerce? This detailed guide is all you’ll need. In this article, we will discuss some examples and will share quick tutorials to help you set up custom calculators for various products.
WooCommerce is loaded with features to help you seamlessly sell products from your eCommerce store. While it has all the basic features to help store owners sell products online, it does not have features to take care of all use cases. Specifically the advanced use cases.
One of those cases is using custom formulas to set the final price for a product.
Let’s take a look at a few examples where a custom formula calculator can simplify the checkout process.
Real-world custom product calculator examples
Adding custom calculators can be a great addition to many product use cases. These calculators can make your users’ purchase journey a lot easier. Let’s take a look at some of the real-world examples where adding price calculators can improve the purchase process.
- Wallpapers and paint jobs: Prices of wallpapers and custom wall design work can vary depending on the wall size. Storeowners often tackle this by just mentioning the per square feet price on the website, but then you won’t be able to give your customers the option to place an order. Also, you won’t be able to give your customers an estimate before they can place an order. By giving the option to calculate the effective price, you can immensely simplify the process.

- Banners and print materials: Banners and decals can have various sizes and qualities. For sizes, you can give users an option to enter the banner size and also add a custom radio button option to let customers select a print quality.
- 3D Printing Services: Here, customers can order prints based on the volume of material used, the complexity of the print, and the type of print material.
- Flooring Calculator: Although it can be any flooring service, you can add a custom calculator for materials like tile, hardwood, or carpet. Here, the costs are calculated based on area measurements and the type of material selected.
- Window Treatments: For products like blinds and curtains, where the price is determined by the measurements, material, and additional features like motorization.
These are just some of the use cases where adding a custom calculator can help your customers ascertain the prices more accurately. Let’s take a look at some of the features that a custom calculator plugin must have.
Features of price by formula calculator plugins
There are quite a few plugins out there in the market to help you set prices on your website by formula calculator. But before you pick a product, let’s look at what you should look for in the first place.
- Custom product variable input: You might want to sell products depending on their size, area, weight, volume, or even time.
- Lookup tables support: In more advanced cases, you might want to round off the product’s price to a whole number or offer successive discounts. Adding a lookup table can immensely simplify this challenge. You should also be able to upload CSVs to feed data to your price calculator plugin.
- Value for money: With so many different pricing, the only way to make sure you are getting the most out of your buck is by getting a more feature-rich plugin that is also priced reasonably.
- Reliable support: Even if you are building moderately complex store products, it is always good to know that a reliable support team capable of answering all the queries you might find along the way is readily available.
- Flexibility and compatibility: A plugin that is compatible with the most popular themes and WooCommerce plugins will help you scale operations without worrying about breaking anything. This peace of mind can massively help you focus on making more important business decisions.
While considering all these factors, there is a reliable plugin that can take care of everything.
Product Add-Ons Ultimate: Best WooCommerce price by formula calculator
With so many options and advanced logic to help you build custom calculators, WooCommerce Product Add-Ons Ultimate is the best solution on the market.

Here’s why WooCommerce Product Add-Ons Ultimate is better than most alternatives out there:
- Different value inputs: You can easily use different value inputs from users to calculate custom prices, such as:
- Values from other fields with field tags.
- Inputs from pre-defined global variables.
- Fetch prices from previously selected options such as radio buttons.
- Number of file uploads
- Pages in an uploaded PDF
- Fetch the number from the product quantity field.
- Numeric inputs and a lot more!
- Multi-unit support: You can use any unit of measurement for calculating the price, such as millimeters, centimeters, inches, kilograms, miles, etc.
- Operators: For determining a price, you get all four operators:
- (+) – for addition
- (-) – for subtraction
- (*) – for multiplication
- (/) – for division
- You can also determine how the calculation is performed. For example, you can hide the calculations and just show the final effective price to the customers. If you want to make the price more appealing, you can round up or round down the prices with a single click.
- Action: The action decides what happens after the calculation is performed.
- Display as cost: If you are creating a more complex product with further requirements for calculation, you can display the calculation result as cost.
- Set product price: If you don’t want to perform any further calculations, you can set the overall price of the product with the final calculated value.
- Update quantity: This will automatically update the quantity depending on the calculations.
- Update child product quantity: This will update the child product quantity if they are part of another product.
- Add to product weight: This will simply update the product weight. This can be used for further calculations.
Performing advanced calculations with lookup tables
If you want to extend the calculations on your website, you can use the Advanced Calculations for Add-Ons Ultimate plugin. This plugin works as an add-on for the WooCommerce Add-Ons Ultimate plugin and gives users an option to use lookup tables via CSV and define input fields and table IDs from the field settings.
In addition to that, Advanced Calculations will let you use Advanced Custom Fields (ACF) values in your calculations.
While not everyone will require the Advanced Calculations extension, it can give you next-level options to create custom calculators easily.
Let’s check some of the store examples where you can create advanced calculators on your website.
Tutorial 1: How to set a price by formula calculator for a WooCommerce carpet store
Goal: In this tutorial, we will create a carpet product. We will add a custom calculator where the customer can select the type of carpet using swatches and enter the carpet area in length and width to know the final price of the product based on the selection.
Let’s see how this can be done with the Product Add-Ons Ultimate plugin.
Firstly, make sure you have the plugin installed and activated on your website. Since this is a simple measurement calculator, you won’t require the Advanced Calculations extension.
Step 1: Create a carpet product
First of all, create a new product by going to WordPress Admin > Products > Add New. Give it a proper name and description.
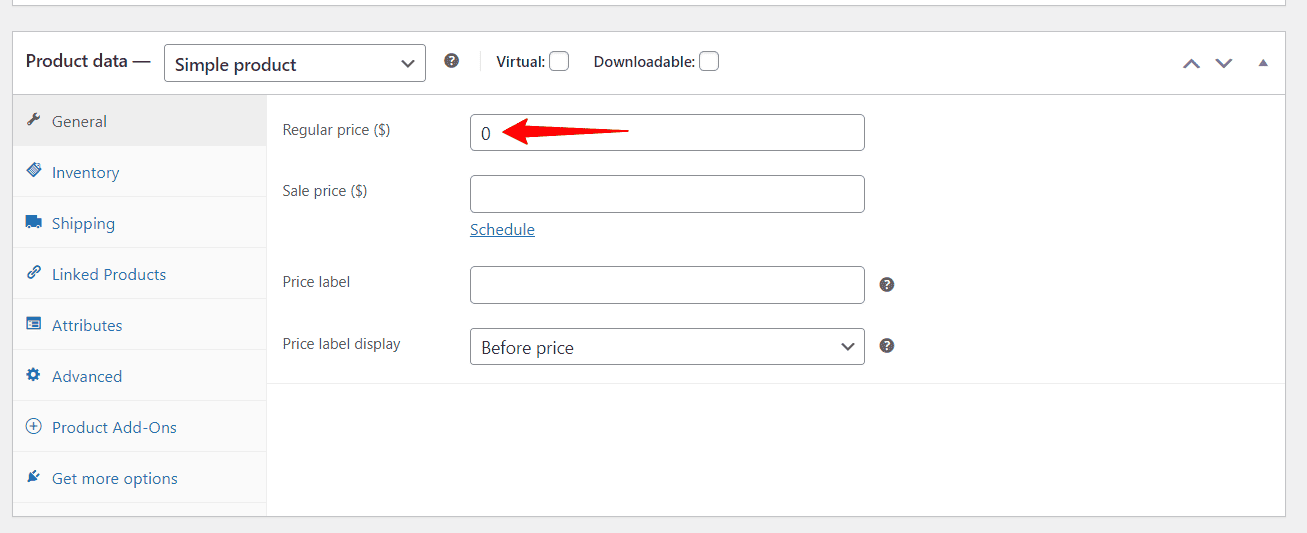
Set the Price to 0 (Zero). This value will be set by custom calculation.
Now let’s start adding add-ons. Click on the Product Add-Ons tab. Click on the Add Group button.
Step 2: Add option fields
Click on the Add Field button to add a new field.
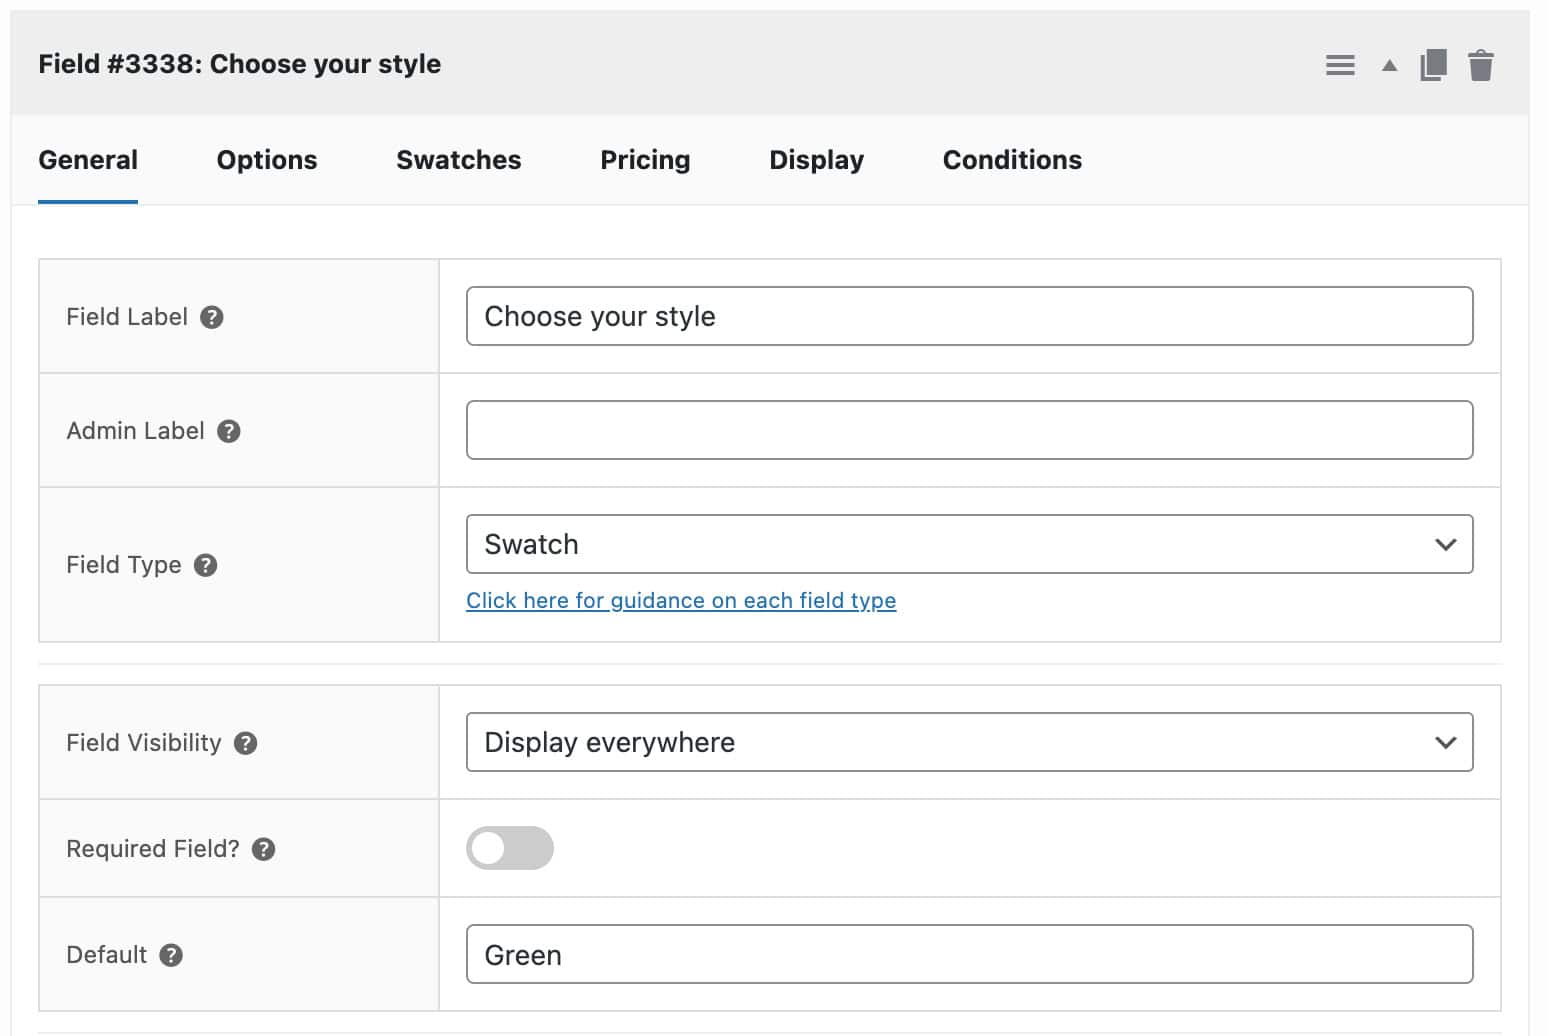
The first field type we’ll add is a Swatch to allow the user to choose which carpet type they want. Select the field type from the list and give it a label. Leave the field price empty.
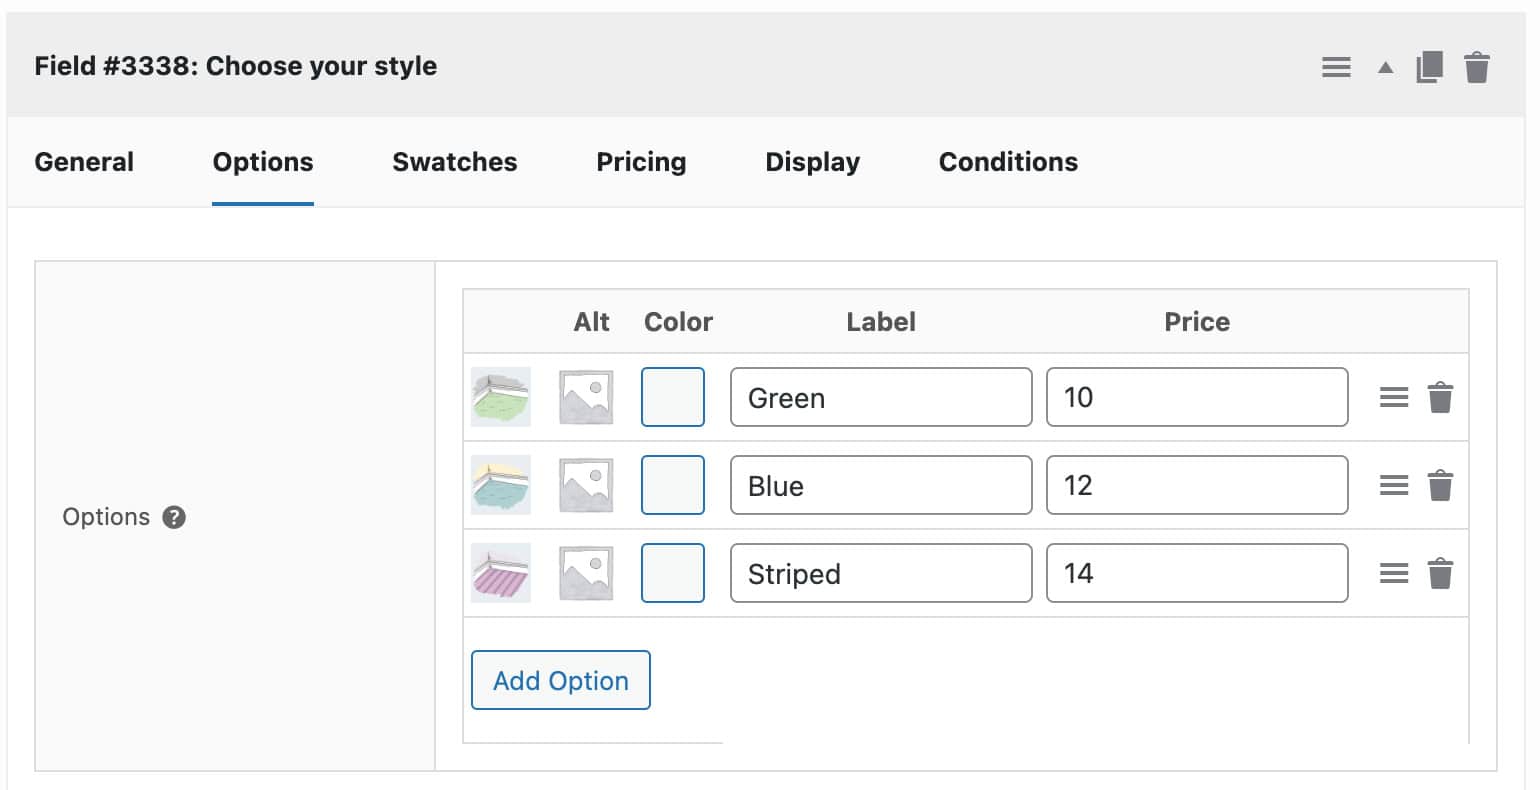
Add individual swatches and add images, labels, and, most importantly, price. These prices will be factored in to calculate the final price.
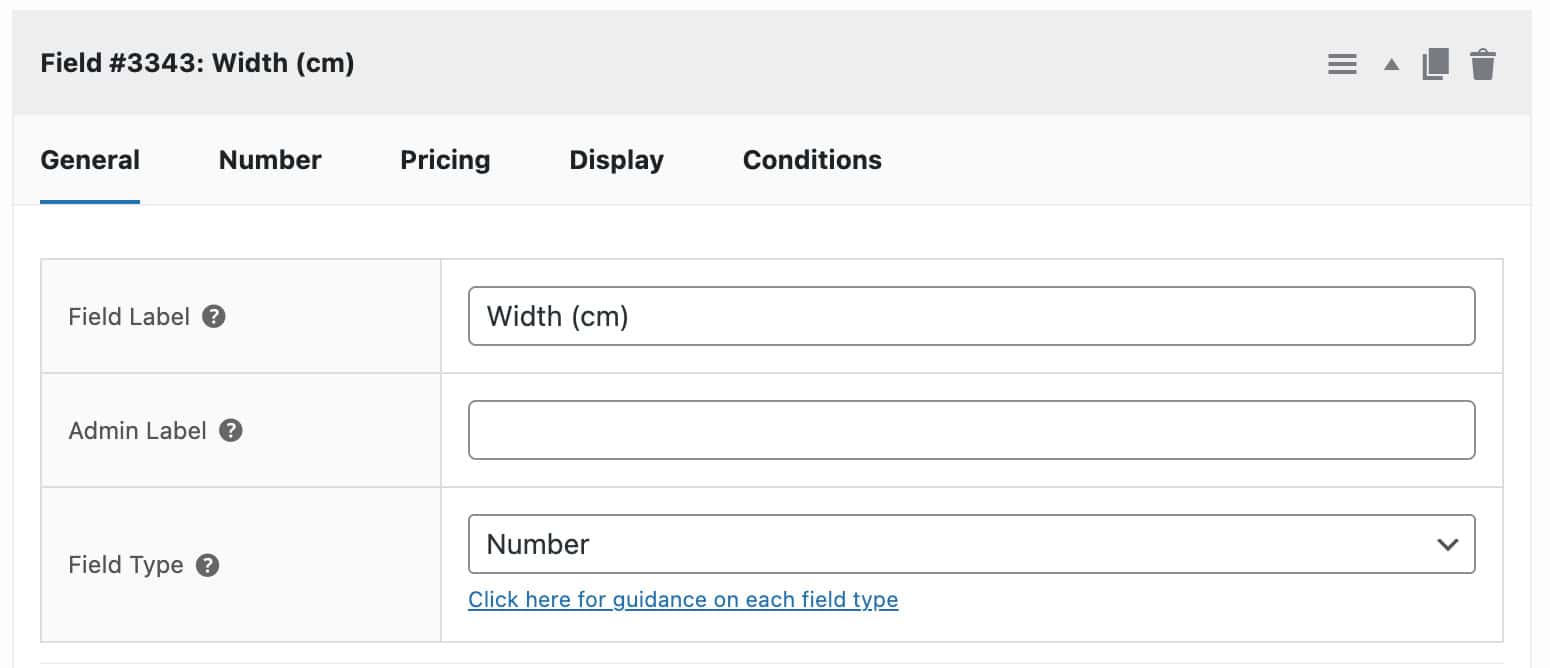
Now that we have added the swatch, let’s add the width and length fields.
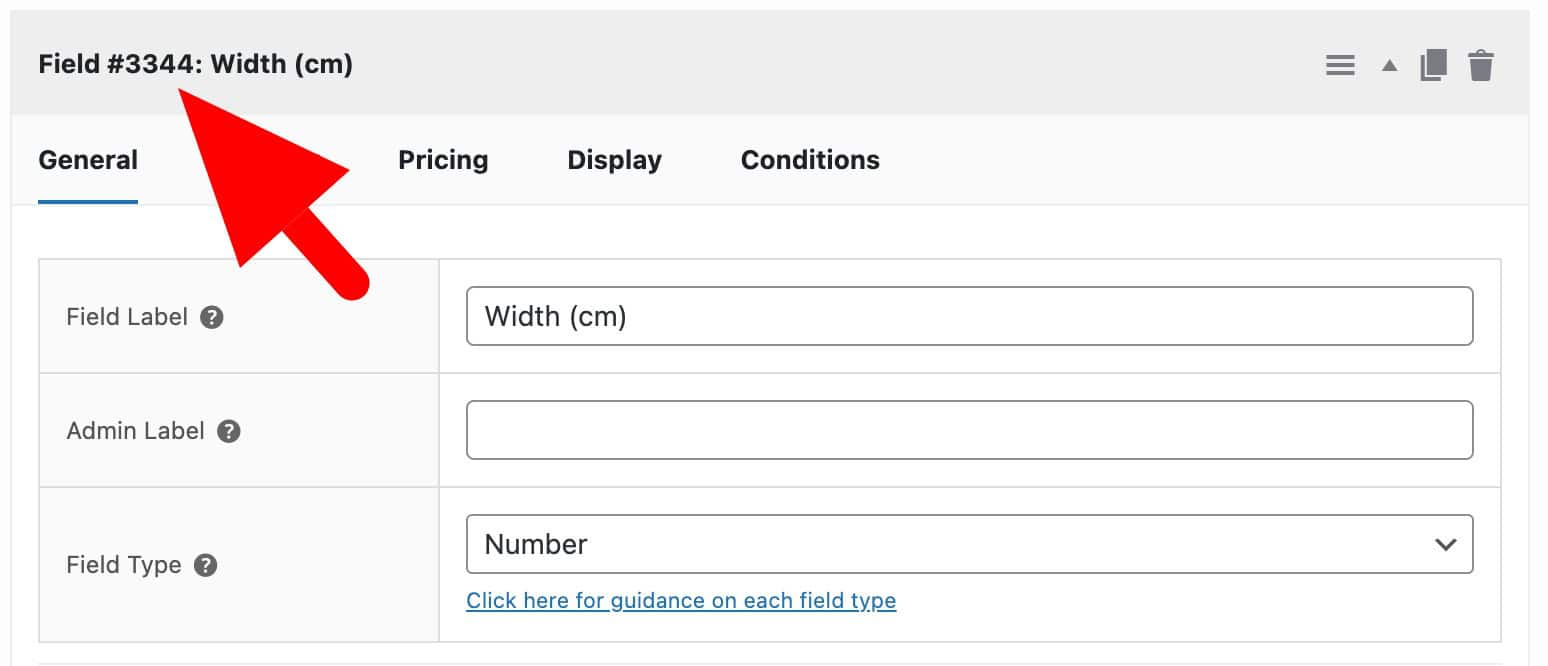
Create a new group and add two Number field types. Give them a label and note down the field number. In this example, we have #3343 and #3347 fields as width (cm) and length (cm).
Step 3: Adding calculations
Add another field and select the field type as Calculation. We’ll use this field to calculate the area based on the values entered by the user in the width and length fields above.
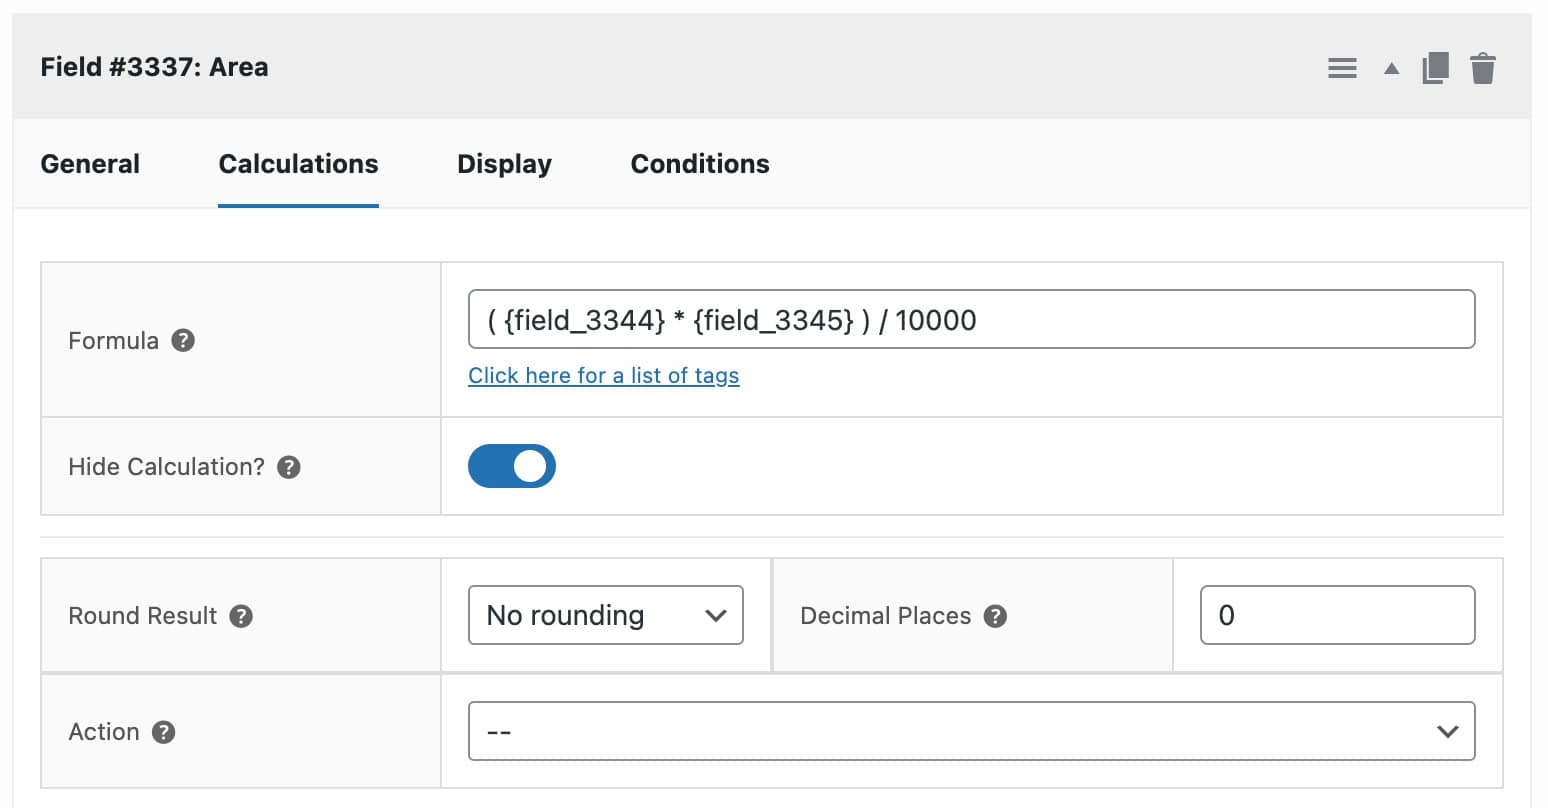
Enter this formula in the formula field: ( {field_3343} * {field_3347} ) / 10000
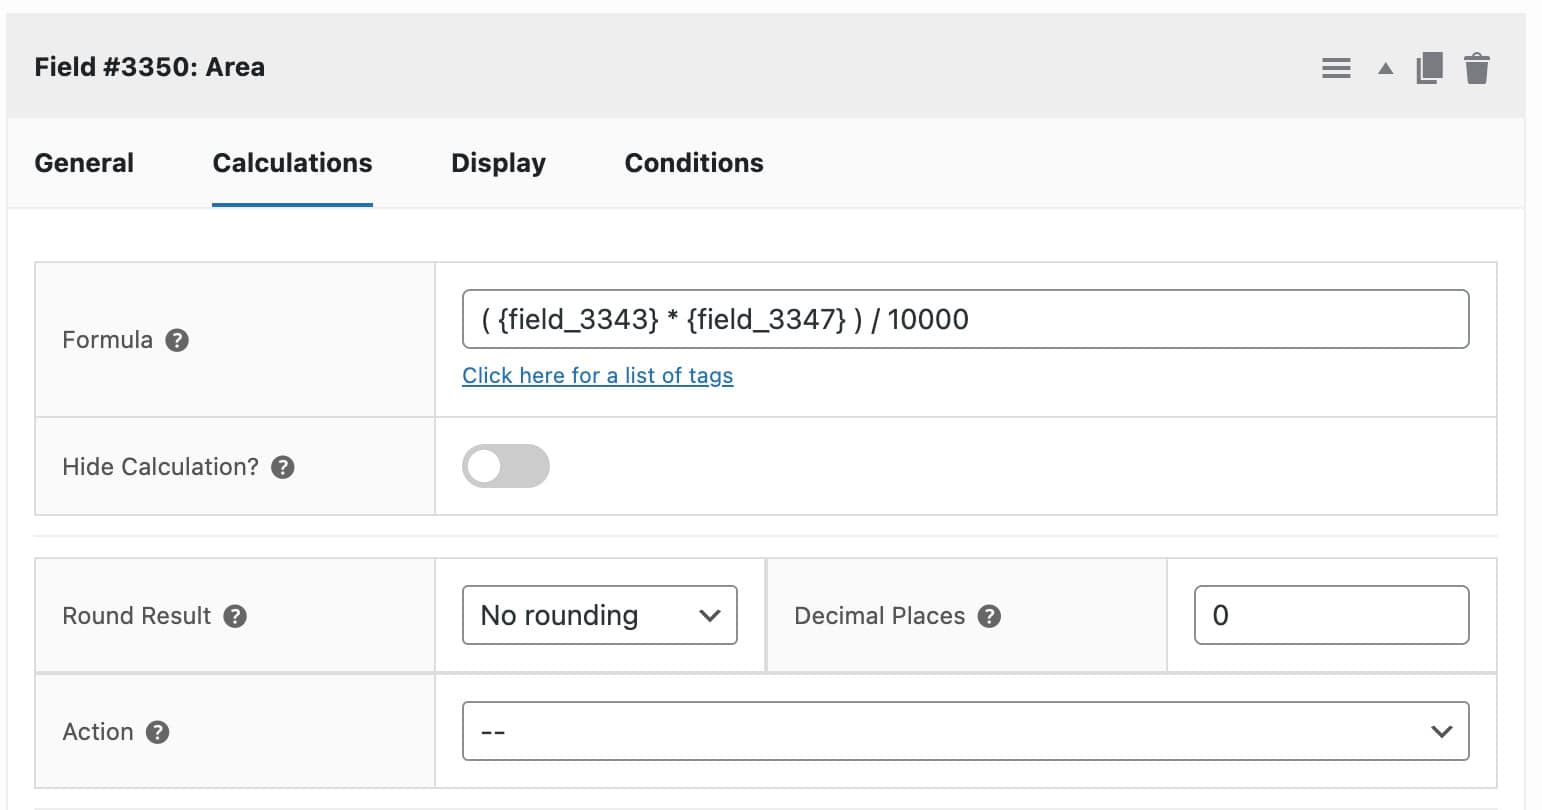
Since the user inputs are in centimeters and we want to give the result in square meters, we need to divide the area by 10000.
This will give us the total carpet area.
Now, for the final price, we need to multiply the total area by the carpet type price we set earlier.
For this, add a new calculation field and give it a name.
For the final calculation, we need to multiply the calculated area by the price of the selected carpet type so you need to use this formula: {field_3350} * {field_3338_option_price}. Remember to update the field IDs to your field IDs.
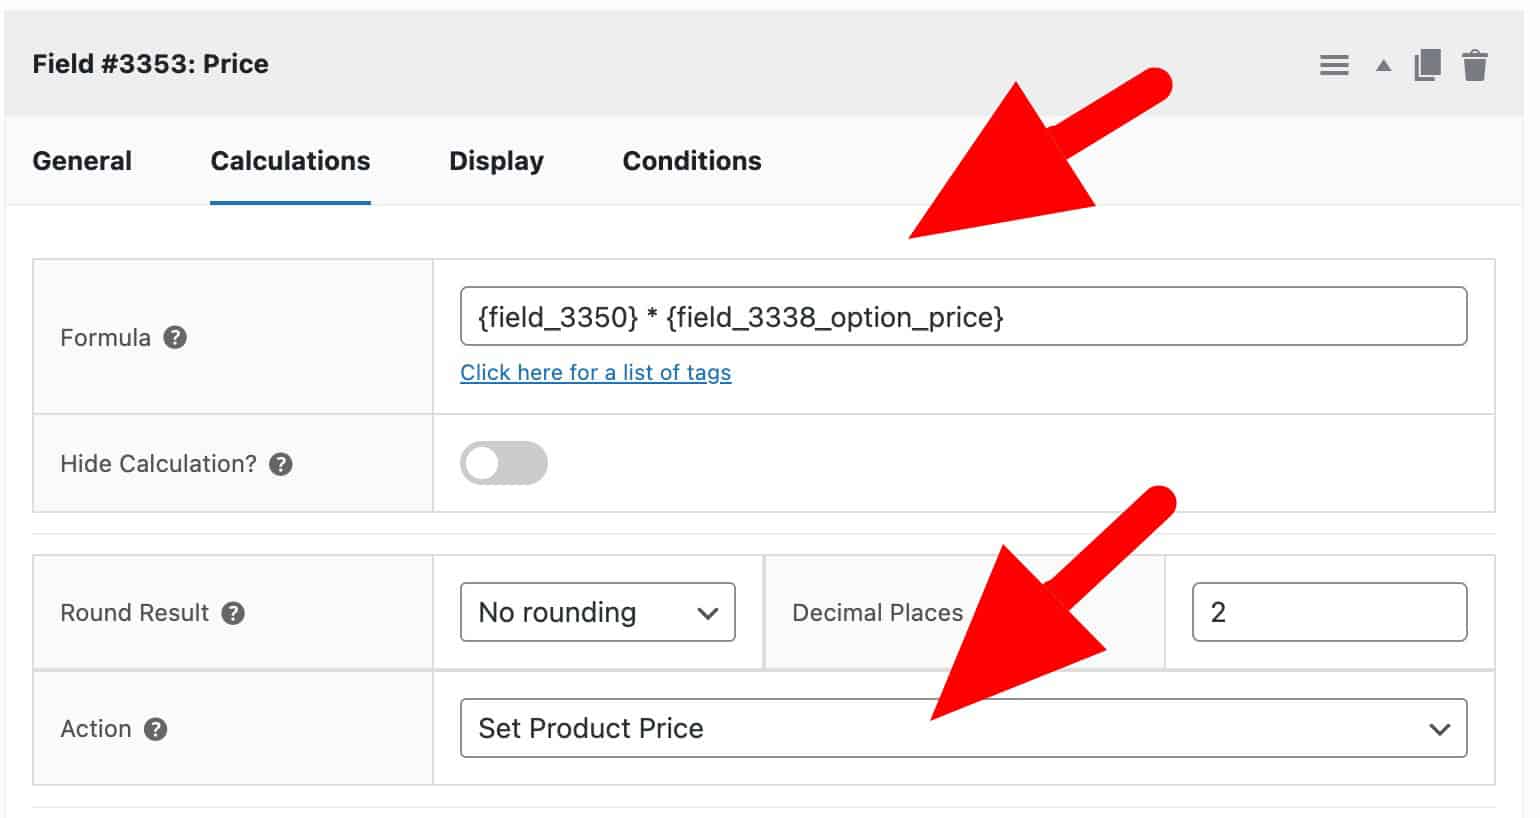
{field_3350} is the calculation field we used in the previous step. For the swatches, we want to fetch the price for the selection. You can do this by adding “_option_price” to the tag to fetch the price of the selected carpet type. Note that {field_3338} is the Swatch field we added first.
Lastly, select the action as Set Product Price.
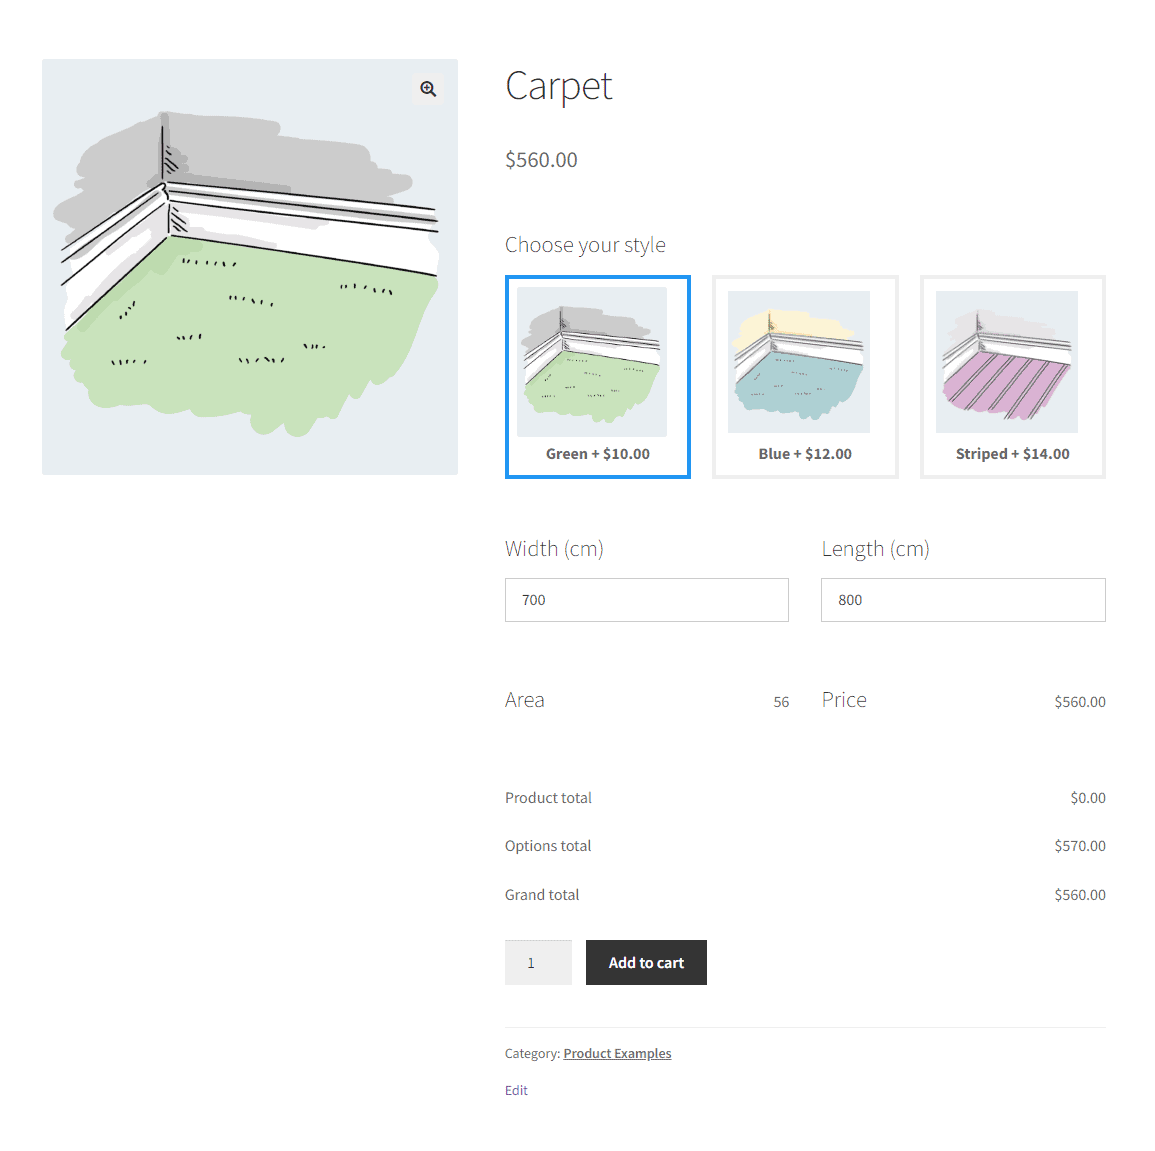
You can publish the product, and the calculator will work as designed. Here is a live demo of the product: Carpet price calculator
Tutorial 2: How to create a price by formula calculator for boxes of tiles
Goal: In this tutorial, we will calculate the total area of the floor. We will then use it to calculate how many boxes of tiles the customer will need. Then, add the required items to the cart.
Step 1: Create a floor tiles product
First of all, create a new product and give it a proper name and description.
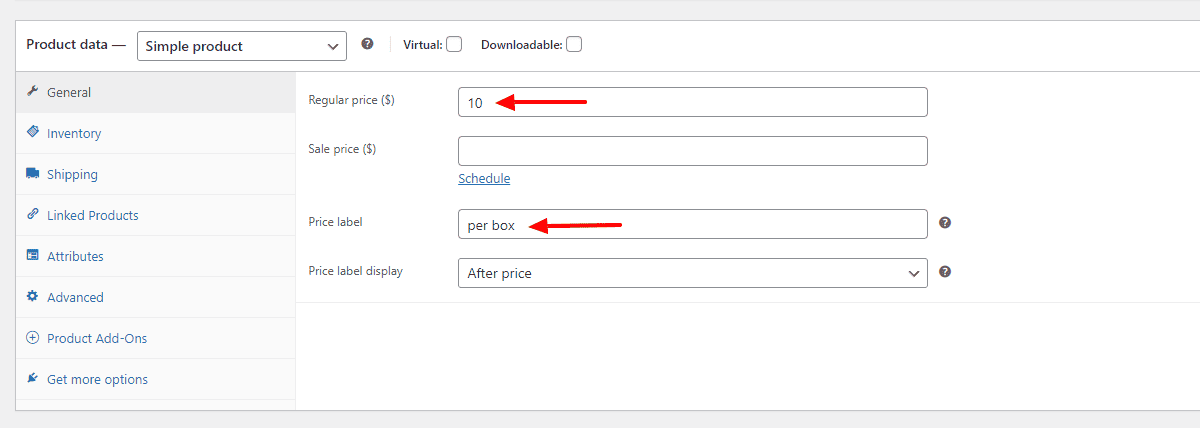
Set the Price as normal. This value will be your price of 1 box of tiles. You can also set a ‘Price label’, e.g., ‘per box’.
Now let’s start adding add-ons. Click on the Product Add-Ons tab. Click on the Add Group button.
Step 2: Add option fields and calculations
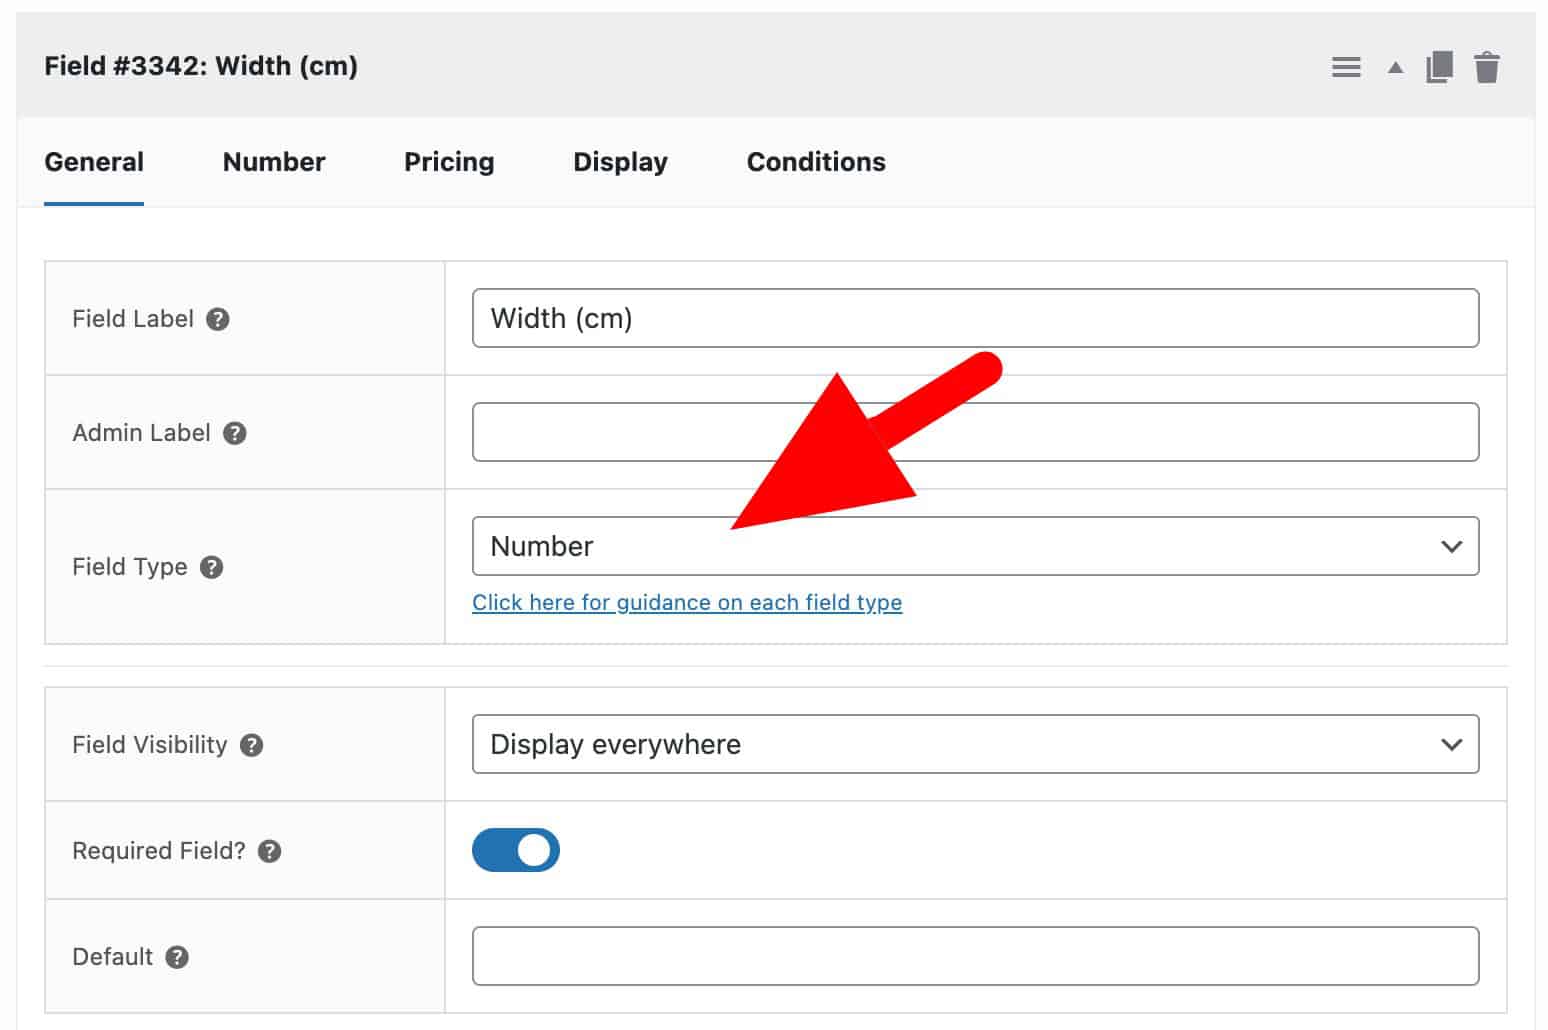
Just like in the previous example, we will add two ‘Number’ fields for length and width.
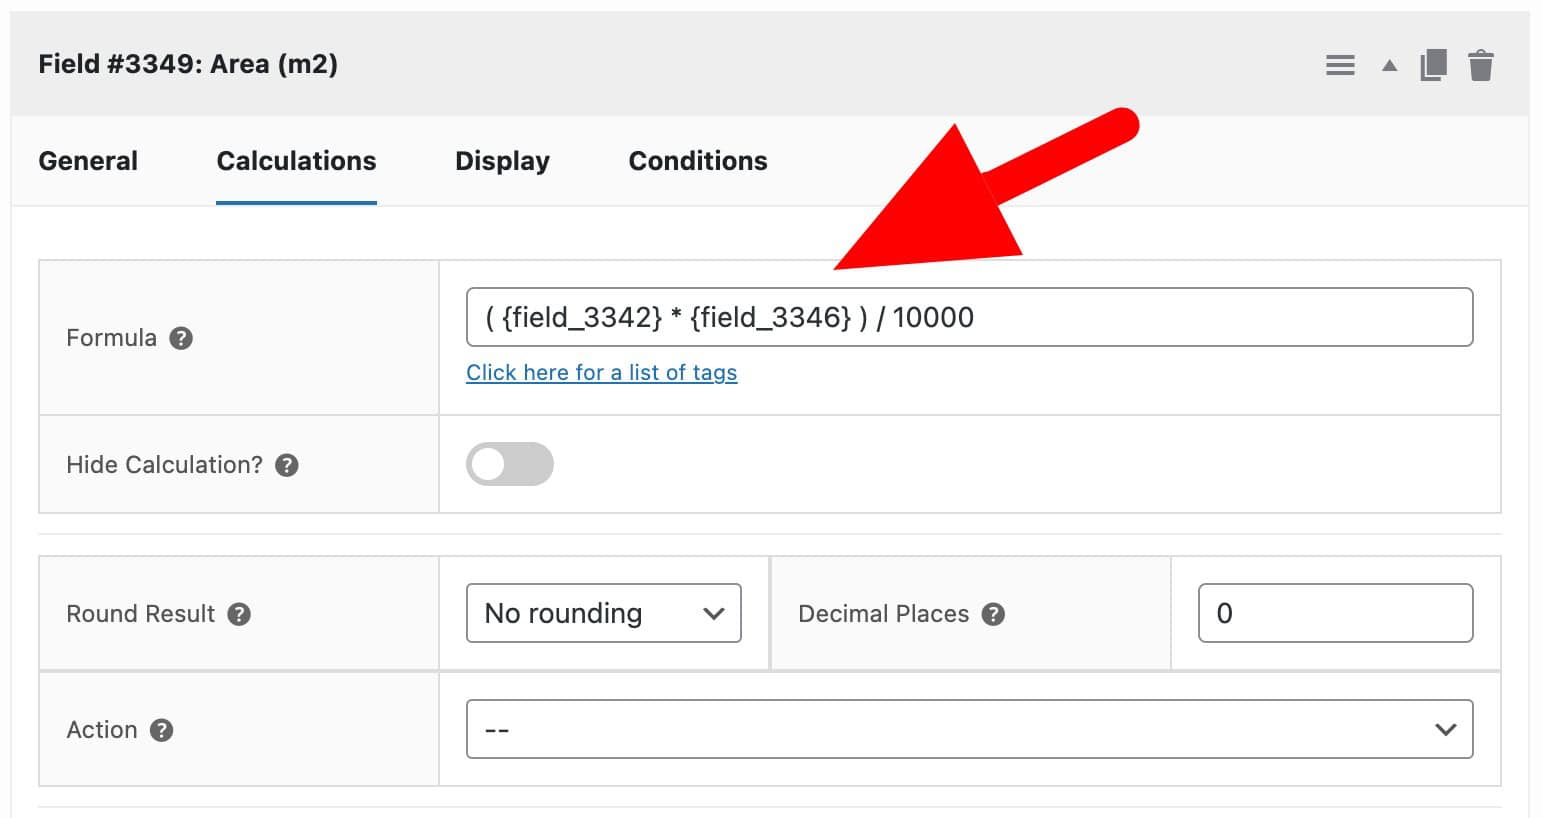
Now, we will add the calculation field to calculate the total area.
Use this formula to calculate the total area of the floor in square meters: ( {field_3342} * {field_3346} ) / 10000
Now, to finally calculate the number of tile boxes, we need to divide the area by the square meters per box. So, in our example, every box has 5 square meters of tiles, so we will divide the area by 5.
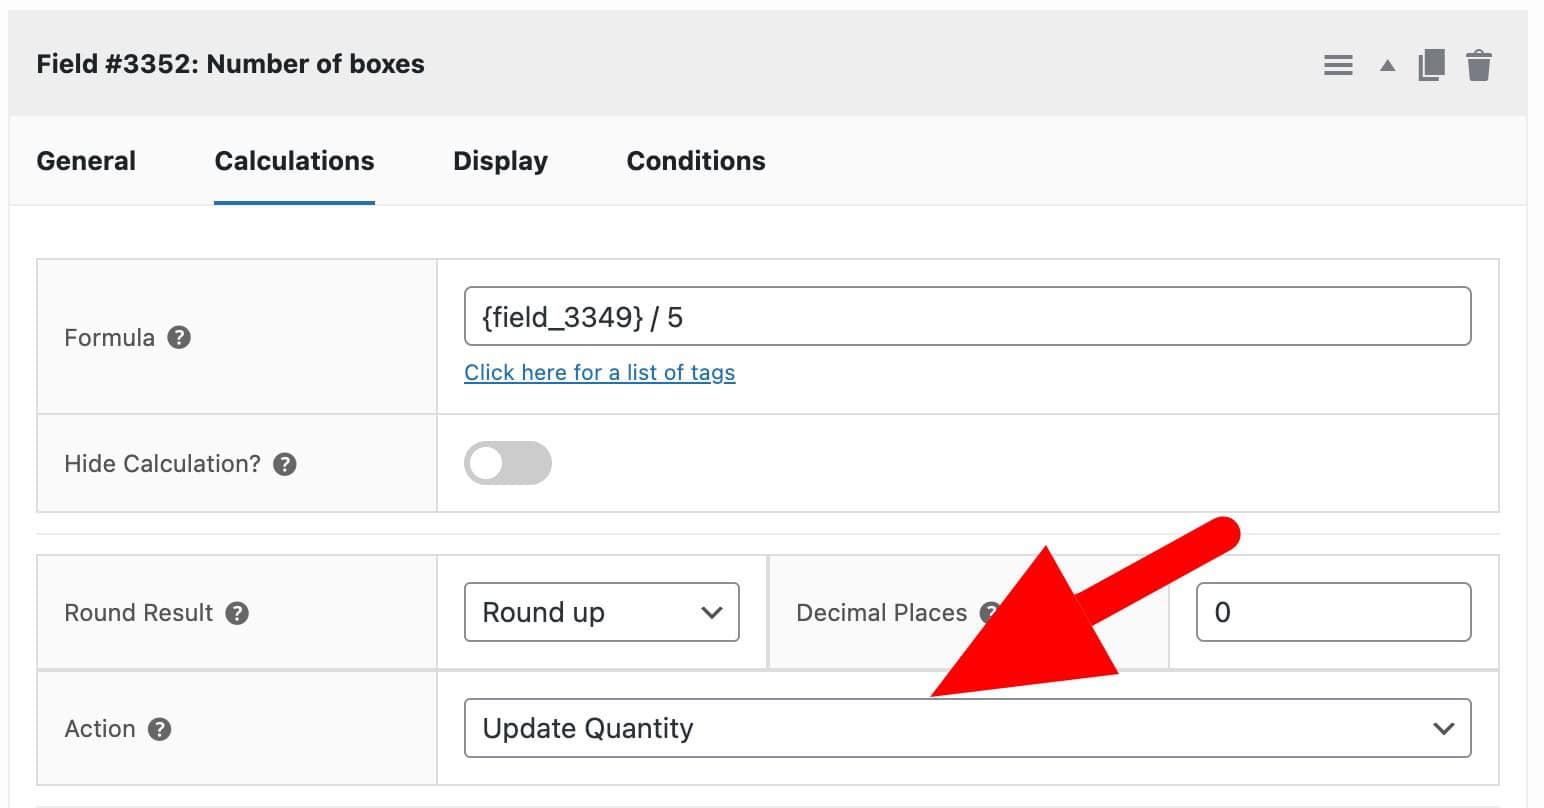
Lastly, set the ‘Action’ to ‘Update Quantity’, and the number of boxes that the user needs is automatically set.
Now, simply publish the product.
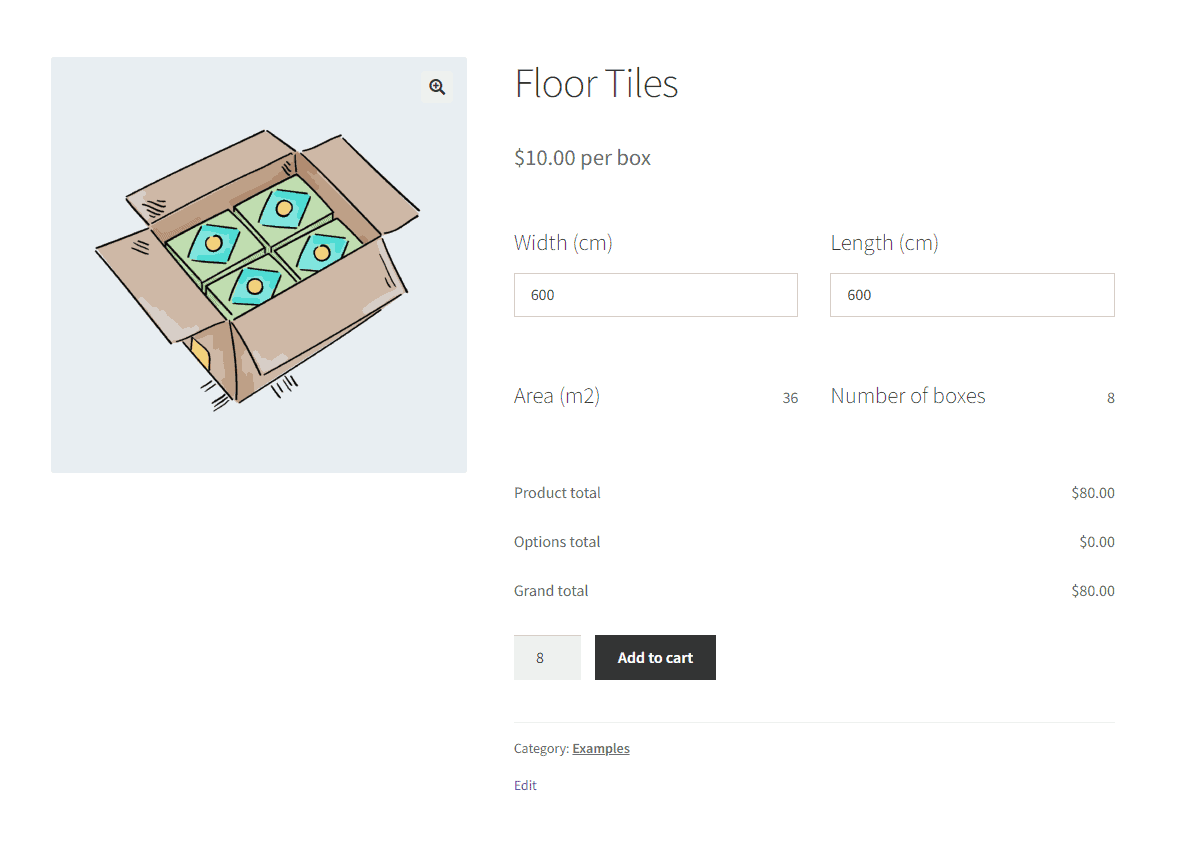
Here is a live example of the boxes of floor tiles calculator form.
Tutorial 3: Reading prices from a lookup table in WooCommerce
Goal: In this tutorial, we will create a wooden flooring calculator (like the first tutorial), but instead of using a formula to ascertain the price, we will use Advanced Calculations to upload a table of prices.
This is a more advanced setup where we will use a lookup table. This is perfect for displaying complex pricing, discounts for volume, and non-linear pricing.
Firstly, make sure you have the Product Add-Ons Ultimate plugin installed and activated on your website, along with the Advanced Calculations extension. This extension needs to be installed separately.
Once you have the plugins installed, let’s see how you can set pricing with the lookup table.
Step 1: Create a CSV with prices
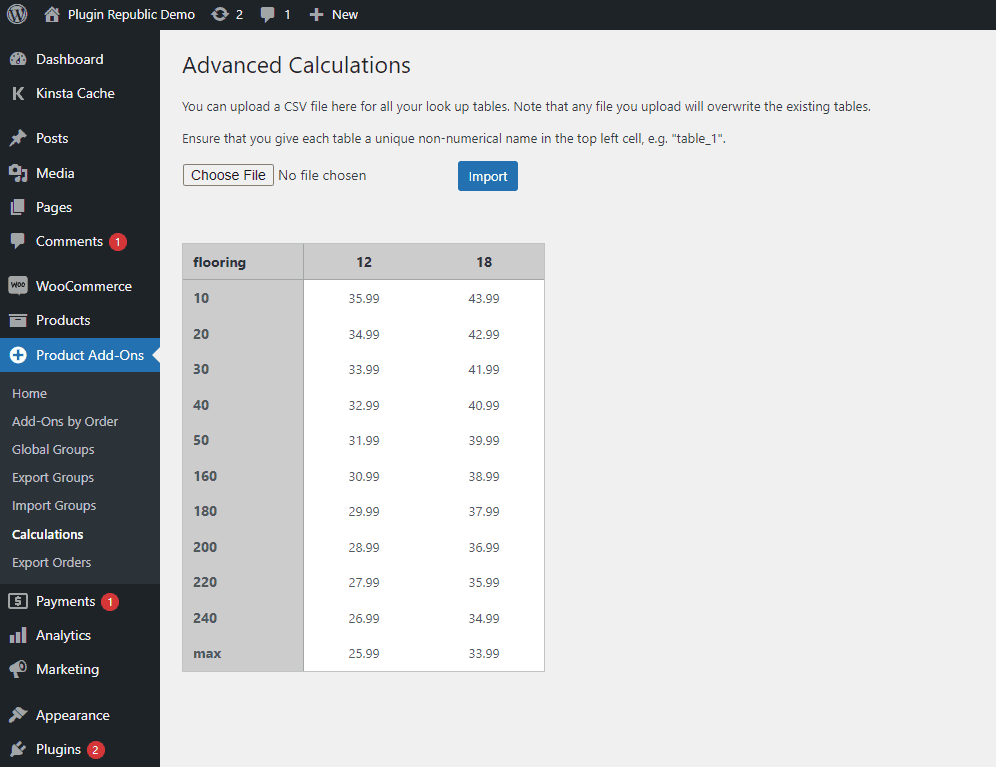
Firstly, create a price table that has two axes – the area required and the thickness of the flooring. This table will be used to apply bulk discounts. This way, the more flooring the user buys, the cheaper the cost per square meter becomes.
Once you have the table ready, upload the CSV file with prices to Product Add-Ons > Calculations and import the table.
Step 2: Create a new product
Create a new product by going to Products > Add New. Give it a proper name, description, etc.
Set the price to 0 (Zero). We will use the price calculator to set this.
Step 3: Add fields and calculators
Create a new option group and add the length and width number fields as we did in the previous tutorial. Give the field a proper name, etc.
Now, let’s create a new option group.
Here, we will add four fields: Area, Thickness, Price per meter square, and the final price.
For the Area field, we will use the same formula we used earlier to calculate the area in square meters.
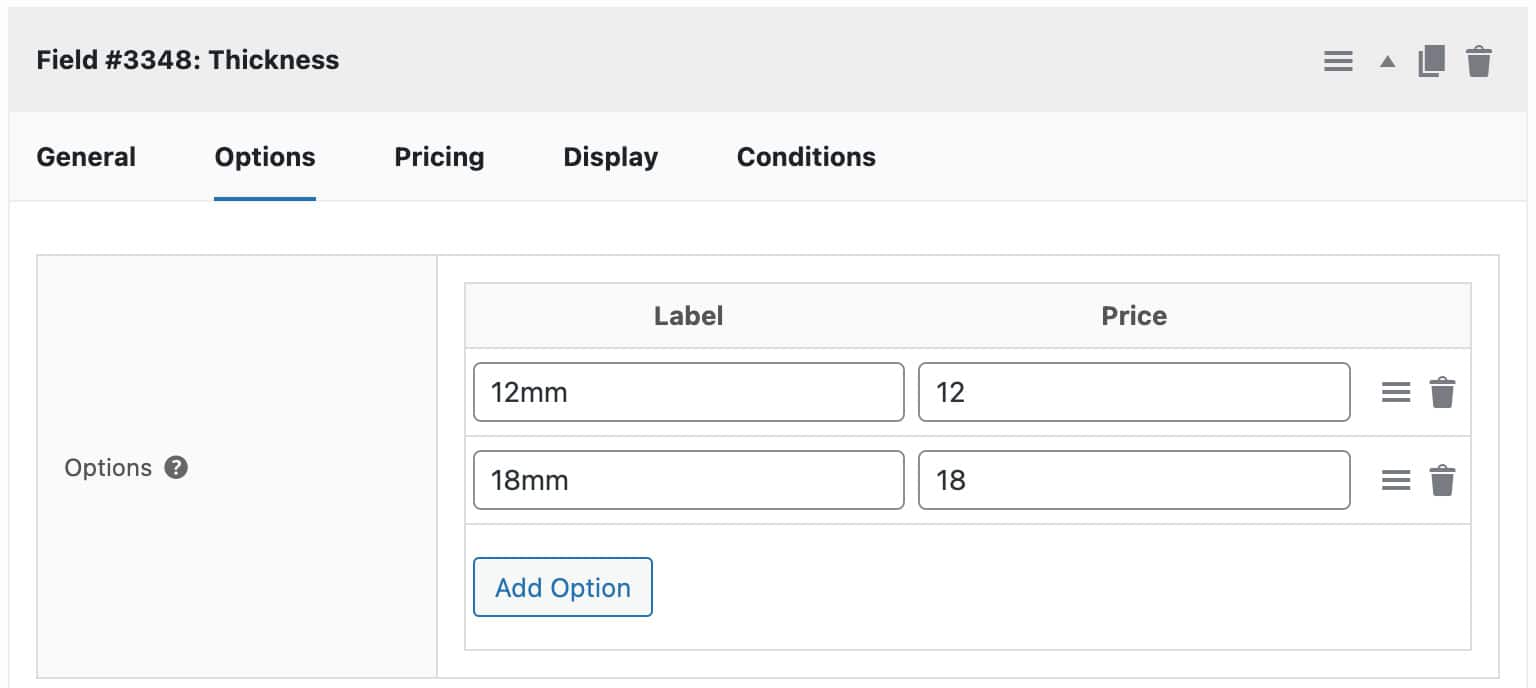
For the thickness, we will add two radio buttons to let customers select the thickness of the flooring. Add a radio group field then click the ‘Options’ tab to sett two options with two different prices.
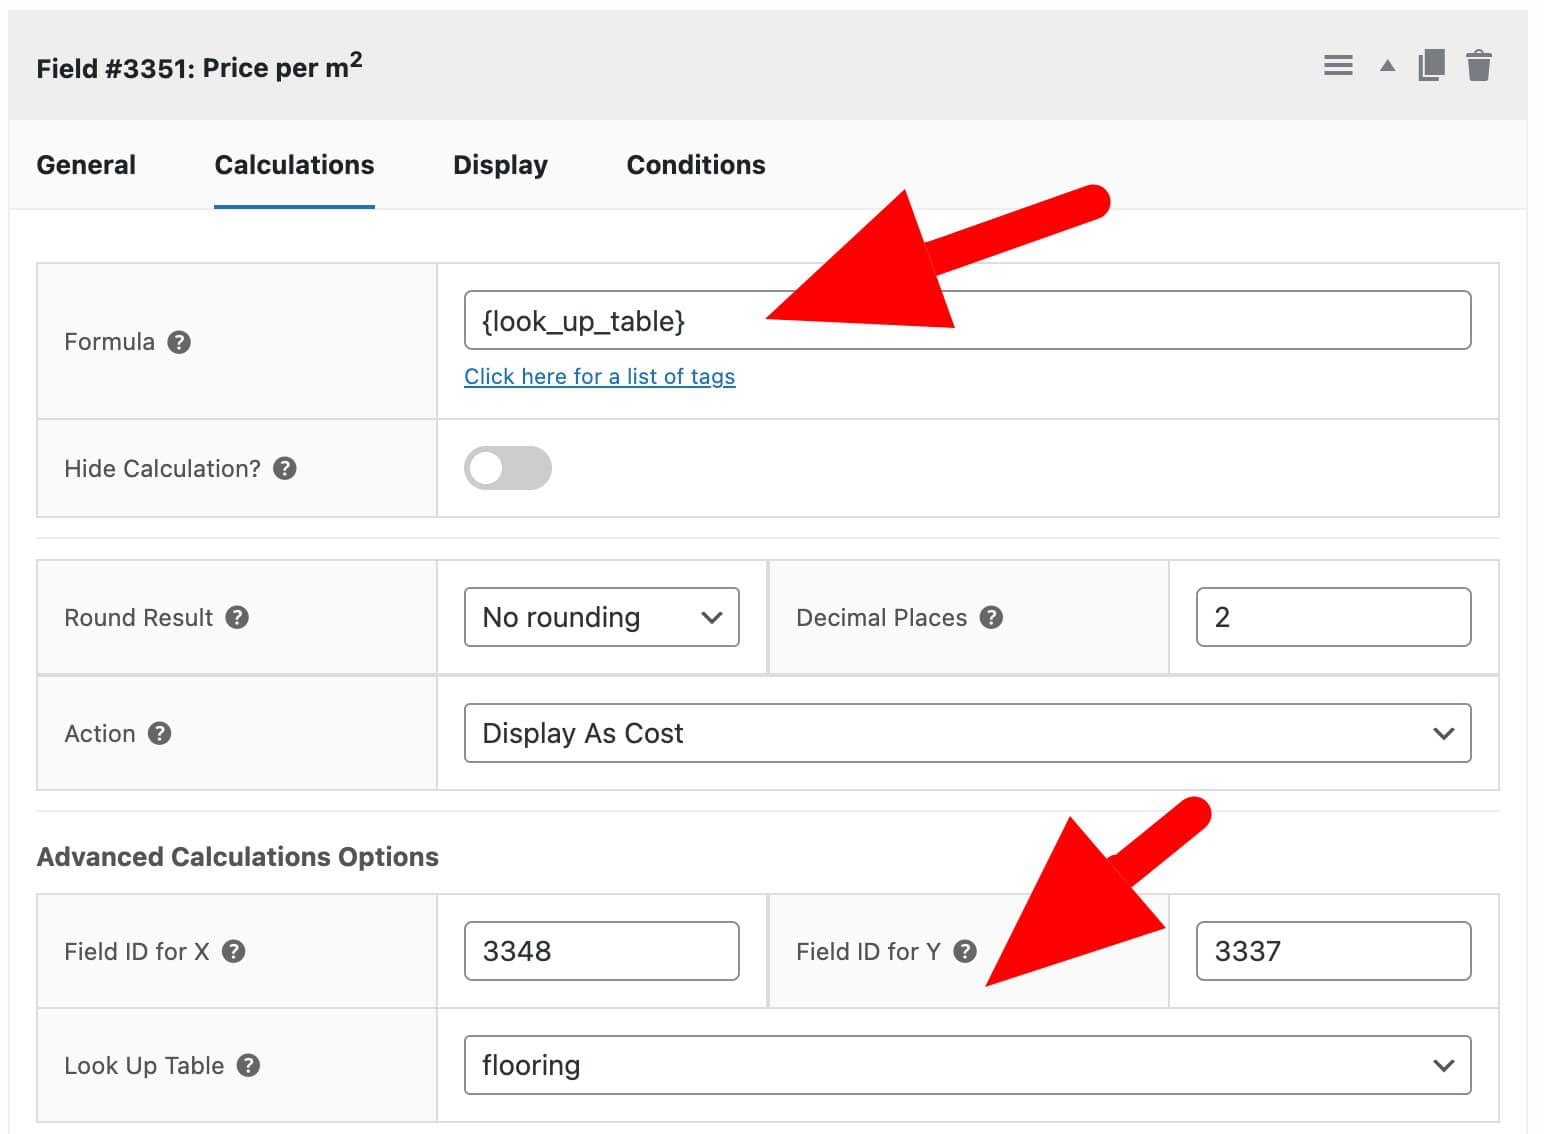
Now, to calculate the price per square meter, add a new calculation field and set the formula as {look_up_table} select the field ID of X and Field ID of Y, and select the Action as ‘Display As Cost’.
Our X-axis will be the thickness of the flooring – so we’ll enter the field ID for the ‘Thickness’ field in ‘Field ID for X’ and then the field ID for the area calculation in ‘Field ID for Y’. Choose the look up table in ‘Look Up Table’. Use ‘Display as Cost’ to show this value as a price but without setting the final product price.
Lastly, for the final price, we need to multiply the cost per square meter by the area. For this, add another Calculation field and add the formula {field_3337} * {field_3351}.
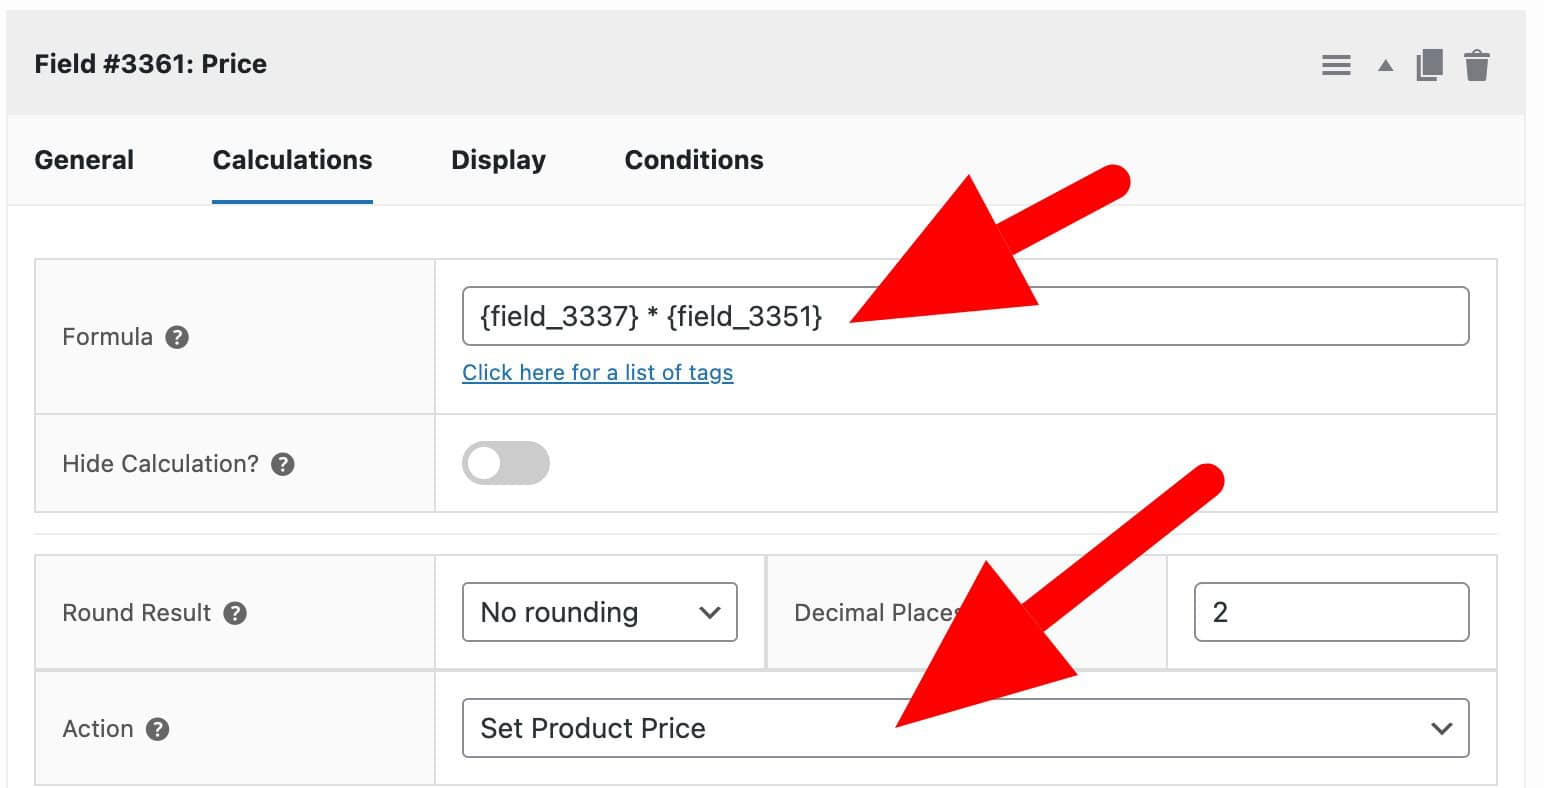
Set the Action to ‘Set Product Price’ and publish the product.
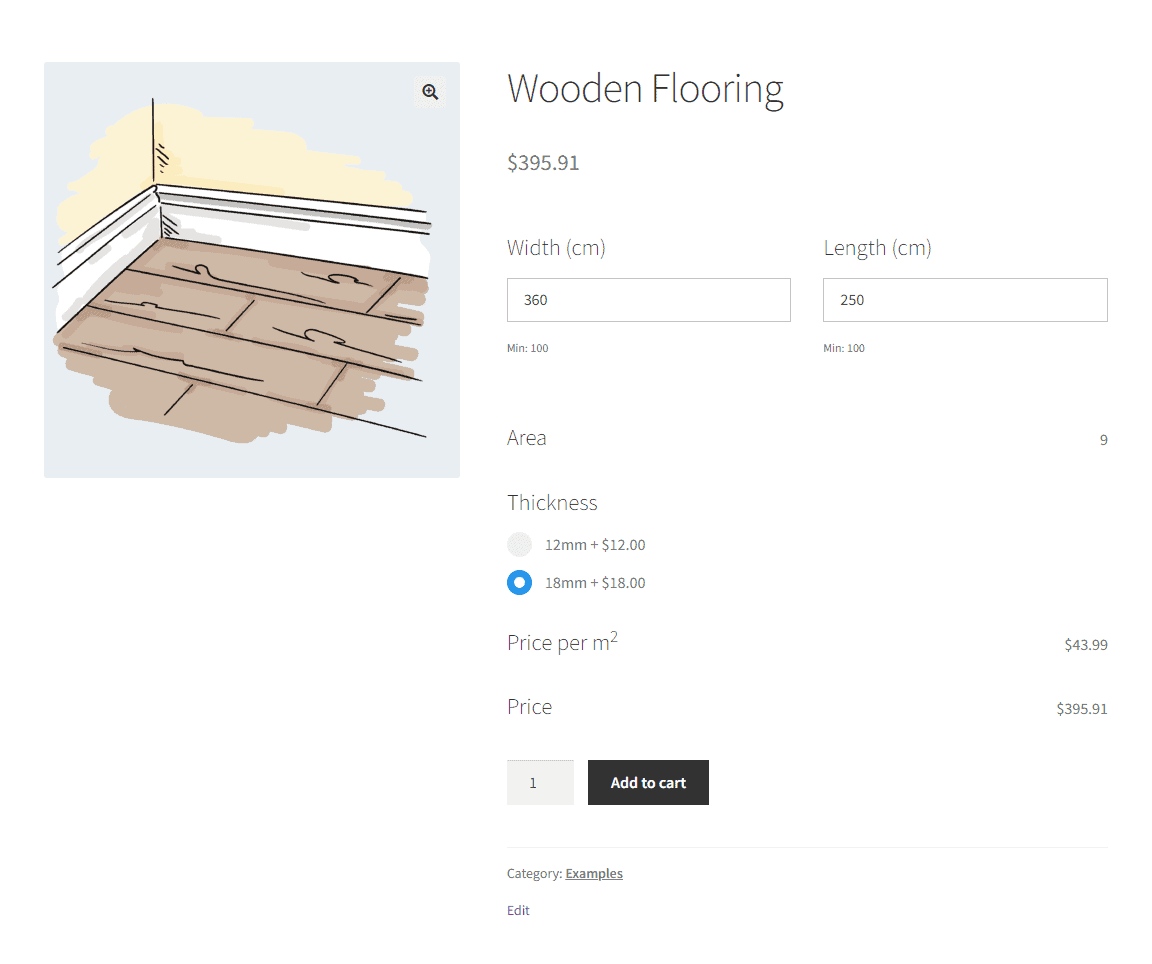
Here is a live example of the product using lookup table for price calculation: Wooden Flooring calculator.
Set price by formula calculators with WooCommerce Product Add-Ons Ultimate
If you are selling complex products that require automated calculators, you can use Product Add-Ons Ultimate to simplify calculations on your website.
You can create accurate and flexible calculators for your products and give your customers a user-friendly way to calculate the final product price before placing an order.
Also, if you want to maximize custom pricing, you can use Advanced Calculations for Add-Ons Ultimate to add lookup tables and work with custom ACF values.
Read Next: How to create a fencing calculator in WordPress
Start building powerful calculators on your website today with the WooCommerce Product Add-Ons Ultimate today and build more functional stores!