How do you add live preview to WooCommerce products?

This guide shows you how to create personalized WooCommerce products with live previews – like phone cases, custom apparel, or engraved gifts where customers see their own uploaded image, custom text or both applied to the product before they buy. This makes a huge difference to users when deciding whether to buy from you or not.
After completing this tutorial:
- Users will be able to:
- Select different product options for their personalized product – e.g. different phone models
- Upload an image, drag, resize, and rotate it while keeping the original aspect ratio, and see it applied directly to the product image
- Add their own text, choose its font, size, and color, and drag, resize or rotate it
- As the store owner, you’ll be able to:
- Control which options are offered and which base image each one uses
- Set the starting position, size, and rotation for the uploaded image or text
- Use transparent or non-transparent base images
- Restrict where on the product the image or text can be placed
Shopify reports that merchants offering an interactive preview of their products see an average 94% increase in conversions. A live preview gives customers that same confidence with a personalized product, letting them see exactly what they’re ordering before they add it to cart.
In this tutorial, we’ll assume that you already have WordPress and WooCommerce installed and ready to go.
What you’ll need
- WooCommerce Product Add-Ons Ultimate installed and activated. Both the Image Preview and the Text Preview plugins require Add-Ons Ultimate to be installed and activated.
- The Image Preview extension for the live image preview tutorial
- The Text Preview extension for the live text preview tutorial
You can purchase all these products together at a significant discount as part of the Product Add-Ons Ultimate Bundle:

Product Add-Ons Ultimate Bundle
Advanced features, superior control and excellent savings
If you already own one of the plugins, you can upgrade and just pay the difference.
Once you’ve purchased the plugins you need to:
- Download each plugin’s zip file by clicking on the link on your order confirmation screen or in your welcome email. You’ll receive the email automatically a few seconds after you’ve completed the purchase
- Go to Plugins > Add New in your WordPress dashboard
- Click on the ‘Upload Plugin’ button
- Drag and drop the plugin’s downloaded zip file into the ‘Choose File’ area and click ‘Install Now’
- When the plugin has uploaded, click the ‘Activate Now’ button
Install the Image Preview and Text Preview extensions the same way. Both require Add-Ons Ultimate to be active first.
How to add live preview to WooCommerce products
Here’s how to add a live preview feature to your WooCommerce product page so that users can view uploaded images and custom text live on the main product image.
- Install Product Add-Ons Ultimate and the Image Preview and/or Text Preview extensions
Add-Ons Ultimate will allow you to add custom upload and text fields to your WooCommerce products. The Image Preview and Text Preview extensions will allow you to add custom previews.
- Create a product for your previews and add custom fields
Create a standard WooCommerce product then add custom fields as required – an ‘Upload’ field for image previews and a ‘Text Preview’ field for text previews
- Configure the field settings
Define the parameters for your preview fields – e.g. their position on the image, whether to allow the user to drag or resize the previews, what font(s) to allow, etc
- Publish your product
Add as many preview fields as you like. When you’re ready, hit ‘Publish’ and test the product on the front end
Here’s a more detailed step-by-step guide to each type of live preview, starting with image previews.
Tutorial 1: Add live image preview to WooCommerce
This tutorial uses the WooCommerce Live Image Preview extension to let customers upload their own image and see it applied to the main product image in real time. We’ll build a personalized phone case product where customers first pick their phone model, then upload an image to see how it looks live on the case.
Note that Image Preview requires Product Add-Ons Ultimate.
The first step is to prepare some base images for the preview. In our example, we’ll use base images with transparent areas. If you prefer not to use transparent PNGs, take a look at the options in Step #3.
Step #1: Prepare a base image for each phone model
The WooCommerce Live Image Preview plugin allows you to position uploaded images above or below the main product image. For a product like a phone case, where the image preview should fit right to the edge of the case, it’s best to create images with transparent areas for where the upload should appear.
You can do this easily with online image editors and/or online services that will allow you to replace specific colors with transparent areas. Try Online PNG Tools – or get in touch with us if you want more help. It took about five minutes to make the images for our demo product.
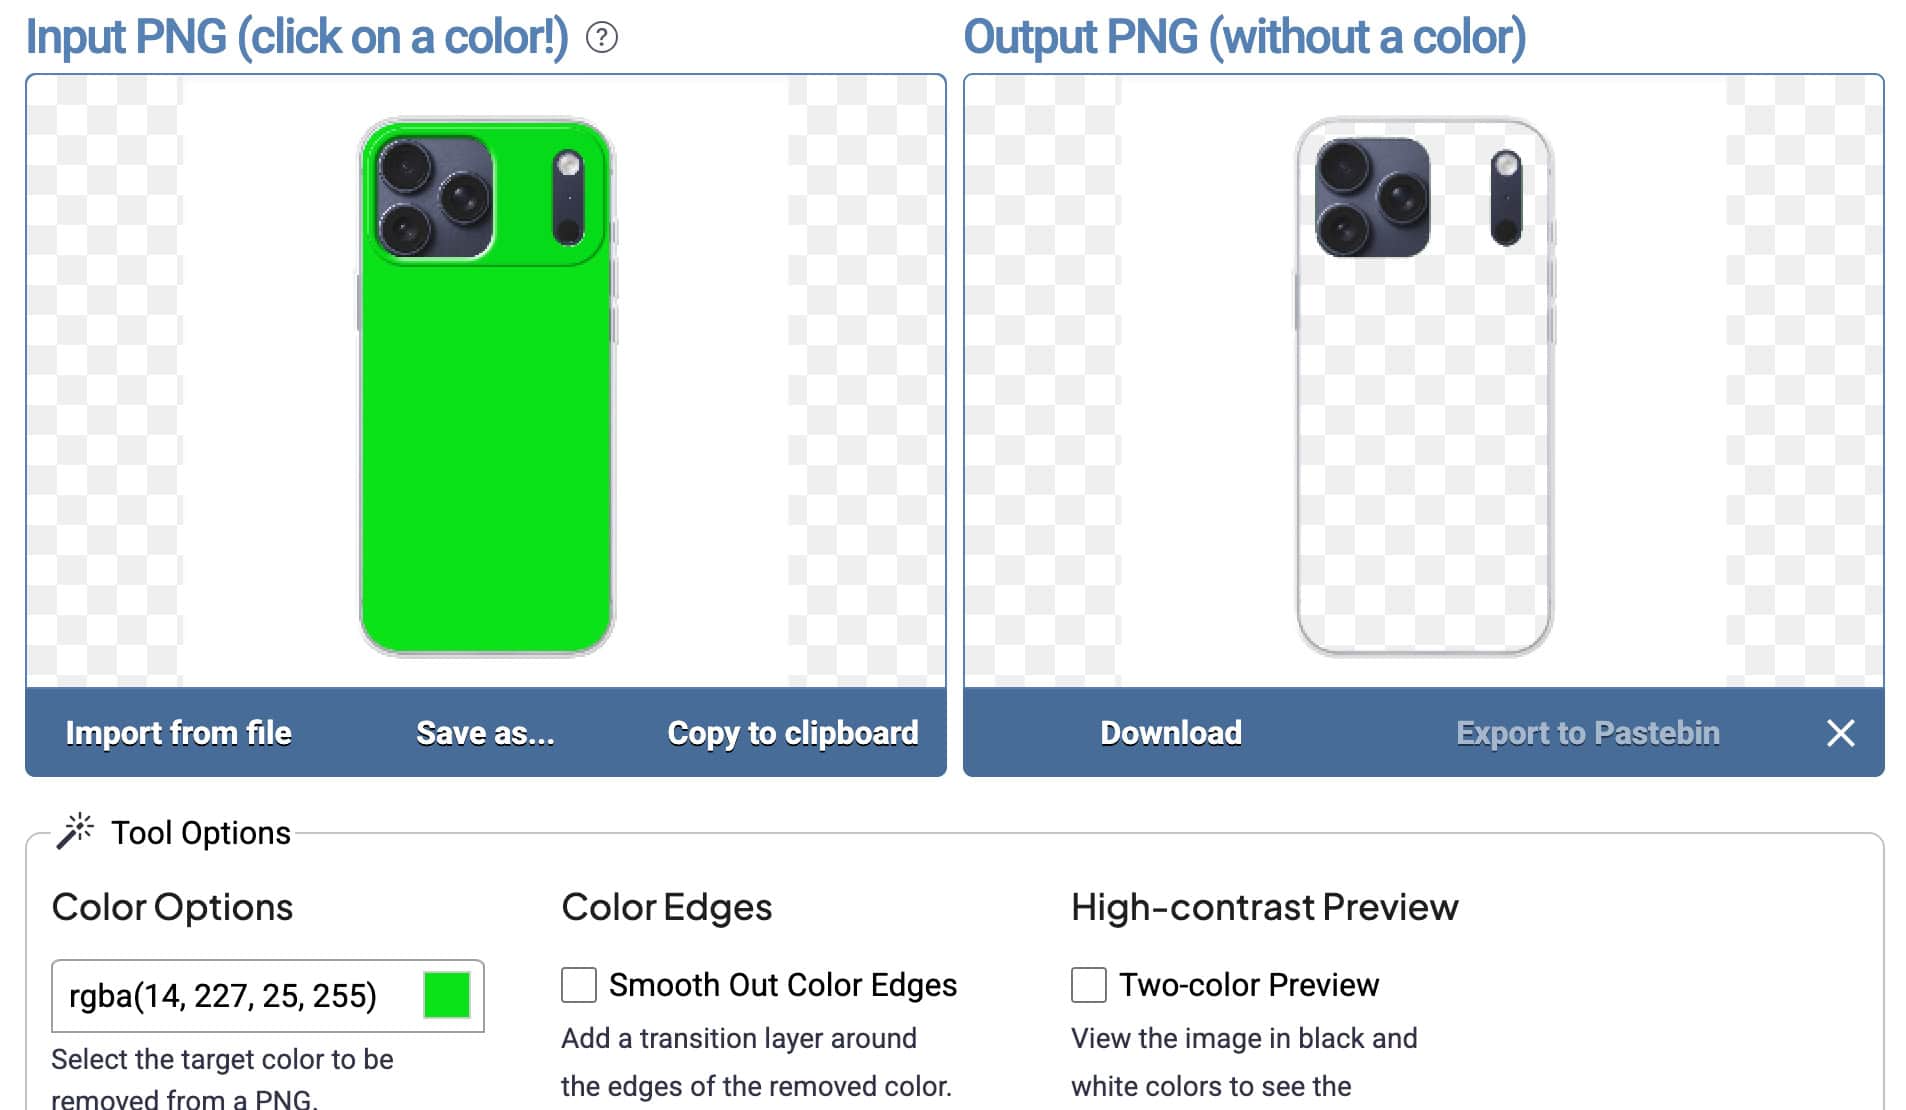
Create a base image for each phone model and save each one as a transparent PNG at the same dimensions, with the phone centered in the frame. The transparent area is where the customer’s uploaded photo will appear.
Once all your base images are ready, you can link each one to its corresponding option.
Step #2: Add a phone model selector field
In our example, we’ll build a single product for the personalized phone case then allow the user to select which model of phone they want. So we’ll add a field for them to make that selection. (If you don’t have multiple models for users to preview, you can skip this step).
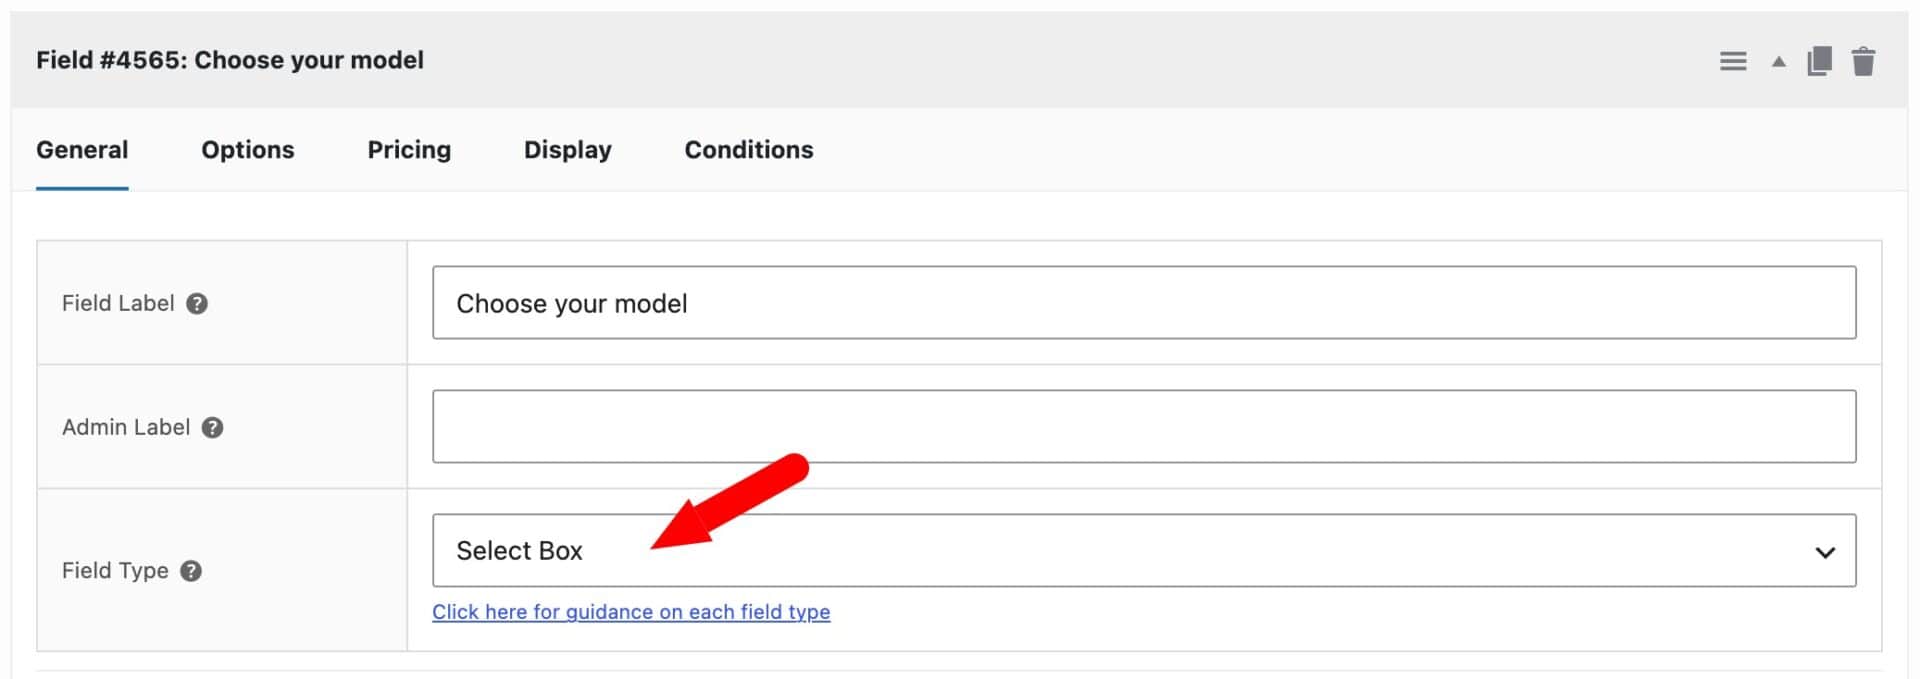
Go to your product’s ‘Product Add-Ons’ tab, click ‘Add Group’, then ‘Add Field’. Choose ‘Select Box’ as the field type.
Now click on to the ‘Options’ tab and add each phone model as an option – for example, iPhone 17 Pro Max, iPhone 18 Pro, and Samsung Note 20 Ultra. Upload a transparent PNG to each option and set a price per model if required.
You can also add some placeholder text as the first image if you want.
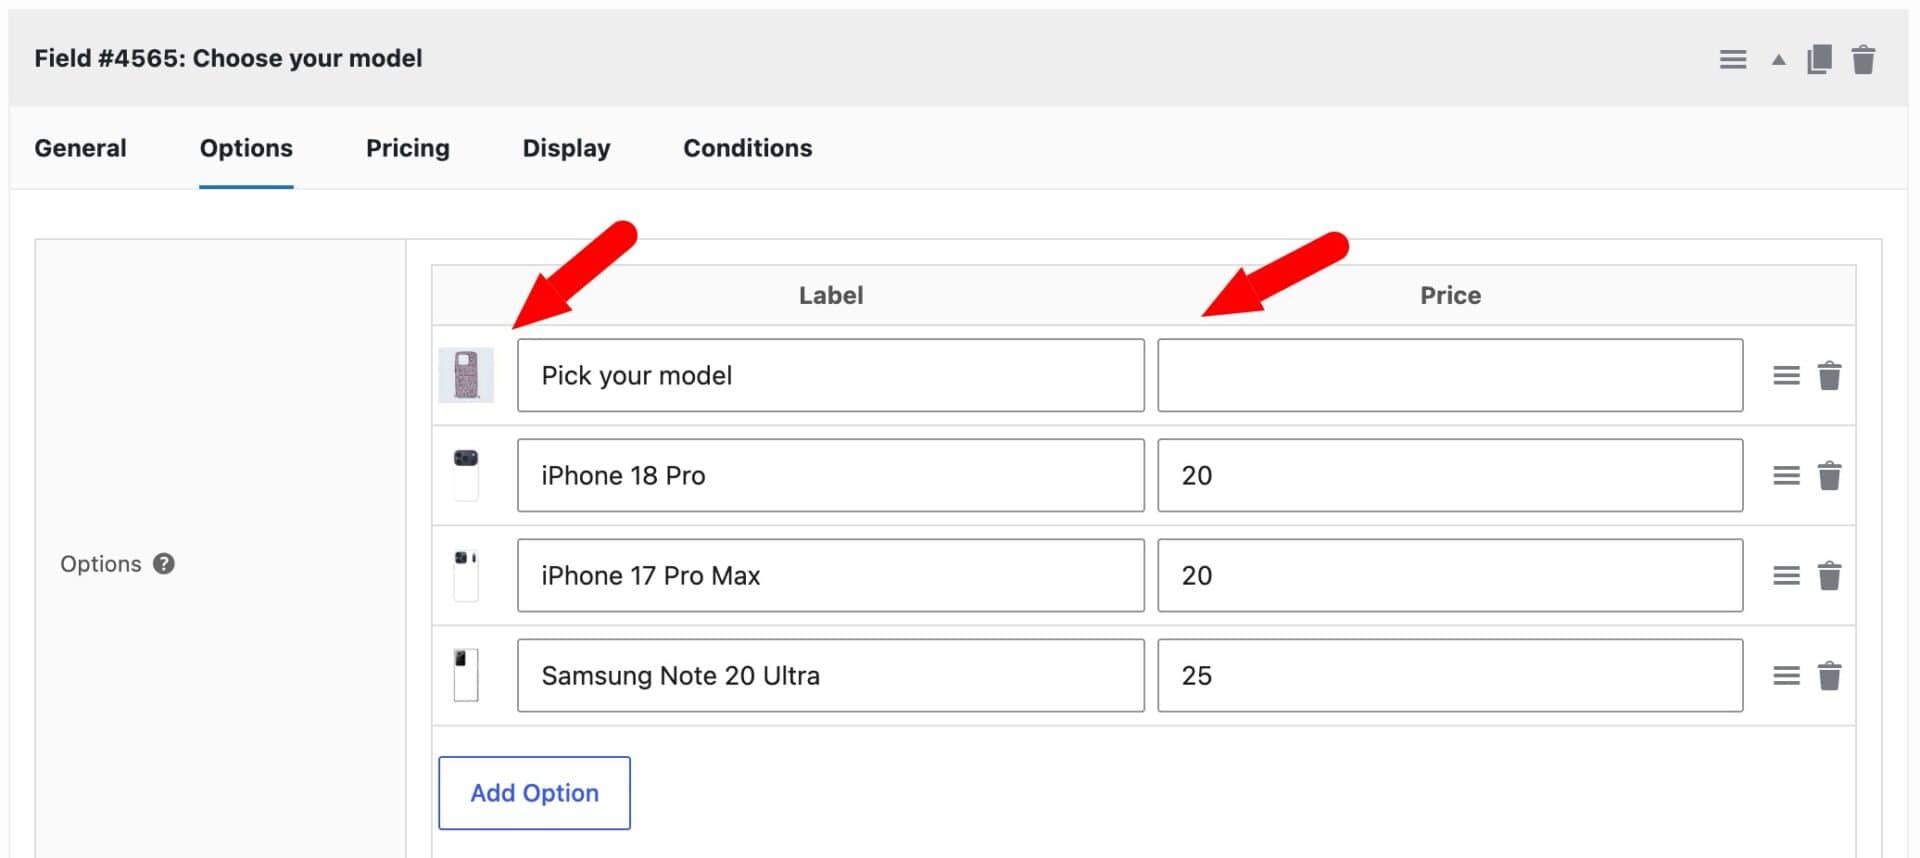
Note that we’re using ‘select box’ because it will display all the options in a dropdown list with small thumbnails per option. The user can then pick the option they want. You could also use a ‘Swatch’ field here if you wanted – this would display each model as a swatch with thumbnail.
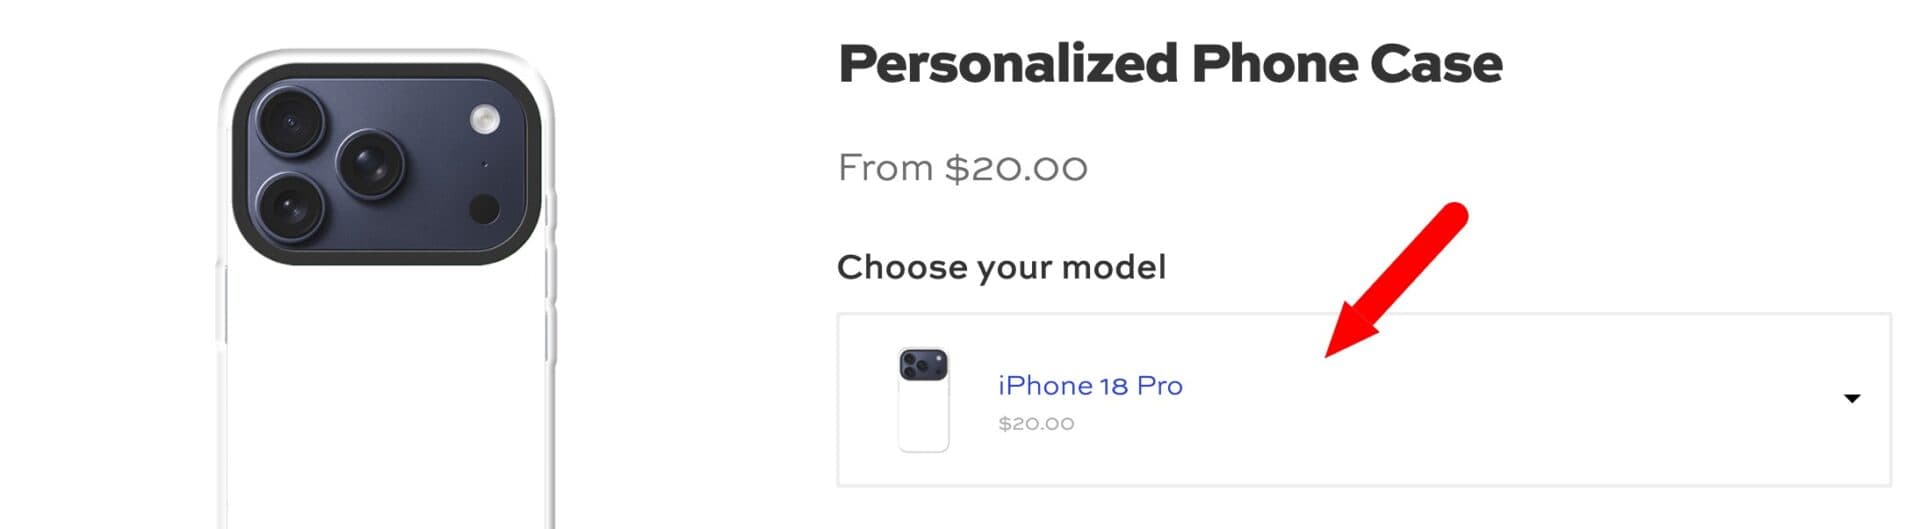
Your customers can now pick their phone model from a dropdown.
Now let’s make the product image update to match their selection. Click on the ‘Display’ tab, then enable the ‘Replace main image’ setting.
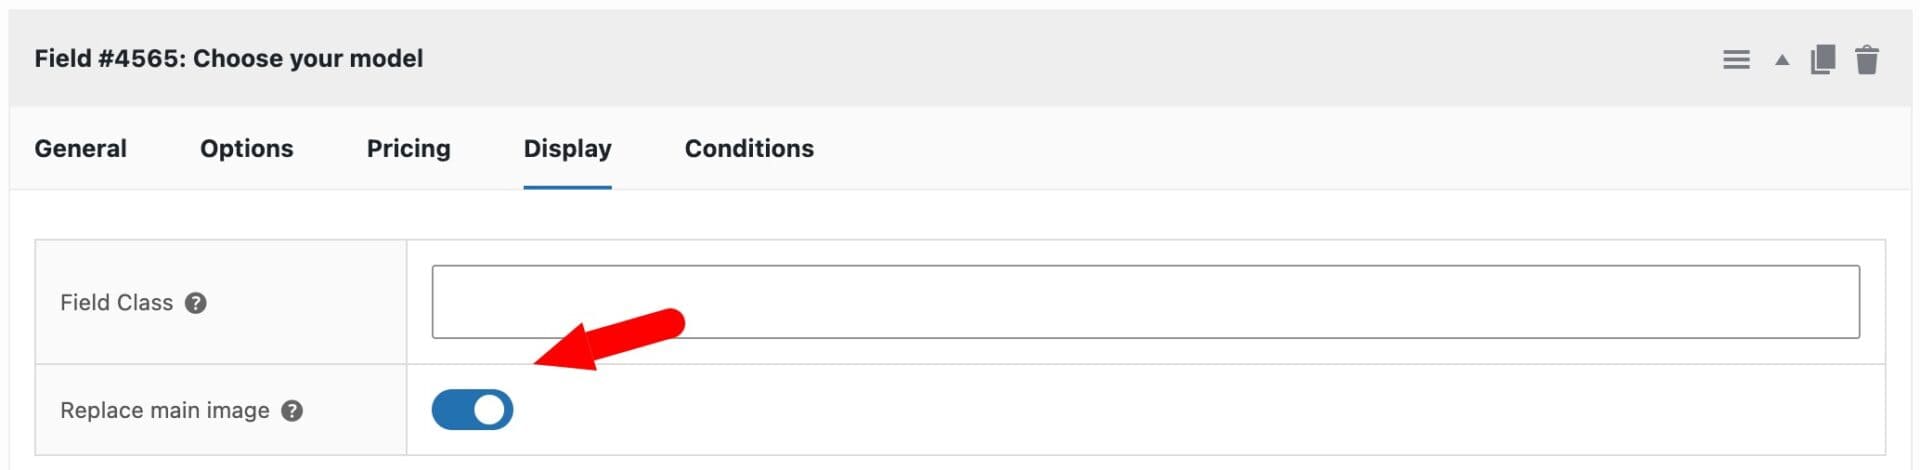
This means that when a customer selects a phone model from the select box field, the main product image updates to show the selected option’s image.
Now let’s add an upload field for the live preview.
Step #3: Add the live preview upload field
Add a new ‘Upload’ field and mark it as required.
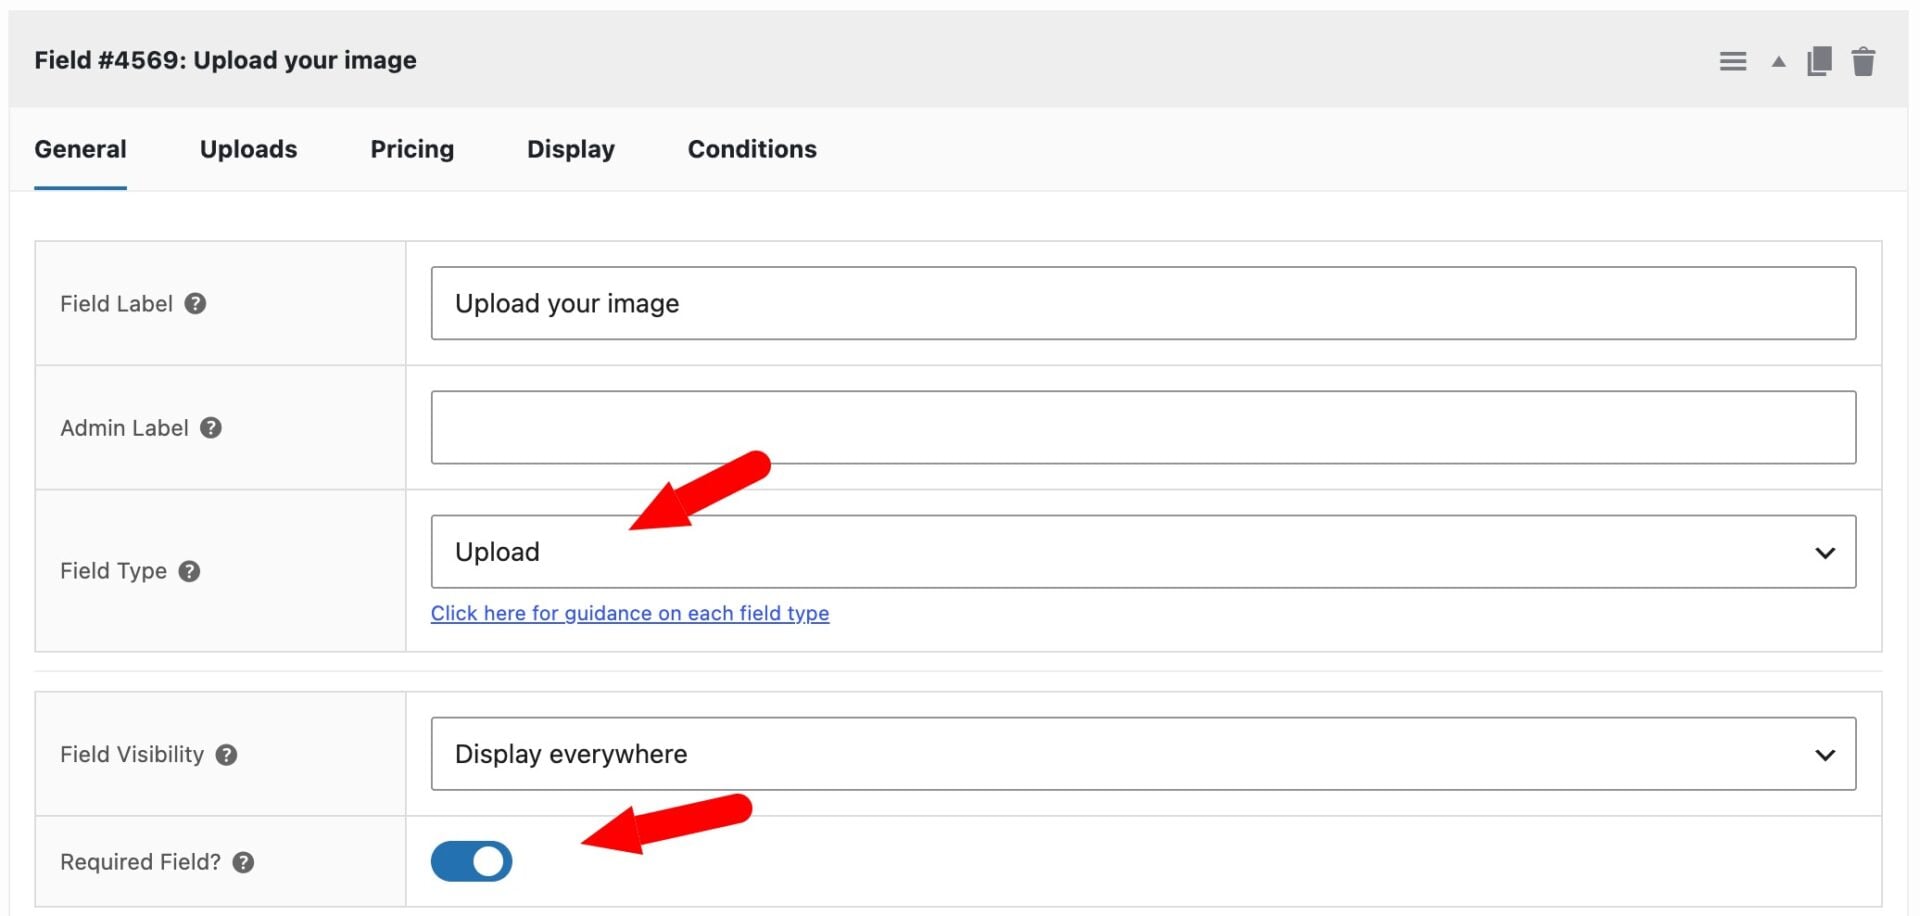
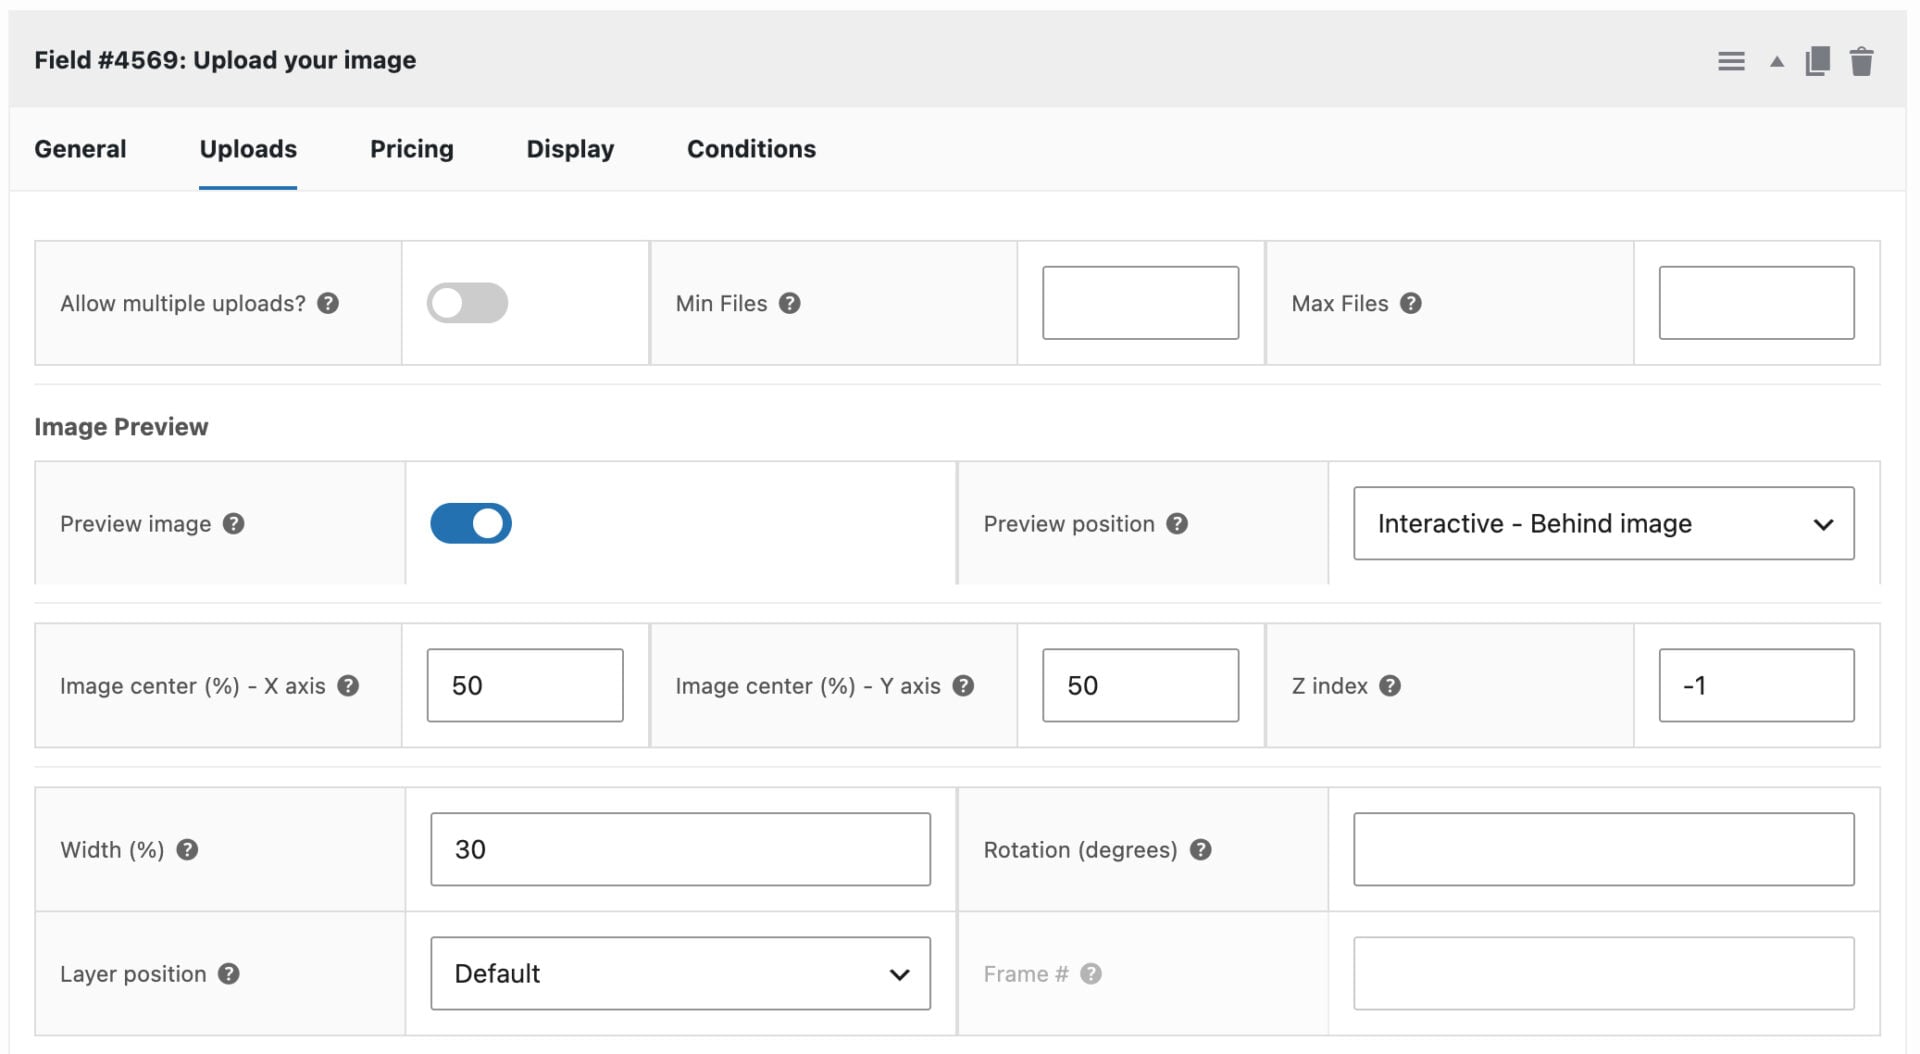
Click on the ‘Uploads’ tab and set the following options:
- Enable ‘Preview image’
- Choose ‘Interactive – Behind image’ in ‘Preview position’. This means that the uploaded image will set behind the main image so that it’s only visible through the transparent area. ‘Interactive’ means that the user will be able to drag, resize and rotate the uploaded image if they wish
- ‘Image center – X axis’ – choose a percentage value here to position the upload horizontally relative to the main product image. So, for example, if the transparent area is in the center of your main product image, enter 50 in this field to position the uploaded image in the center. The user will also be able to reposition the image if they want.
- ‘Image center – Y axis’ – choose a percentage value here to position the upload vertically relative to the main product image. As above, enter 50 to center the upload vertically.
- ‘Z index’ – if you’ve selected ‘Interactive – Behind image’ then this field will be automatically set to a negative value to ensure it sits behind the main image.
Conditional logic
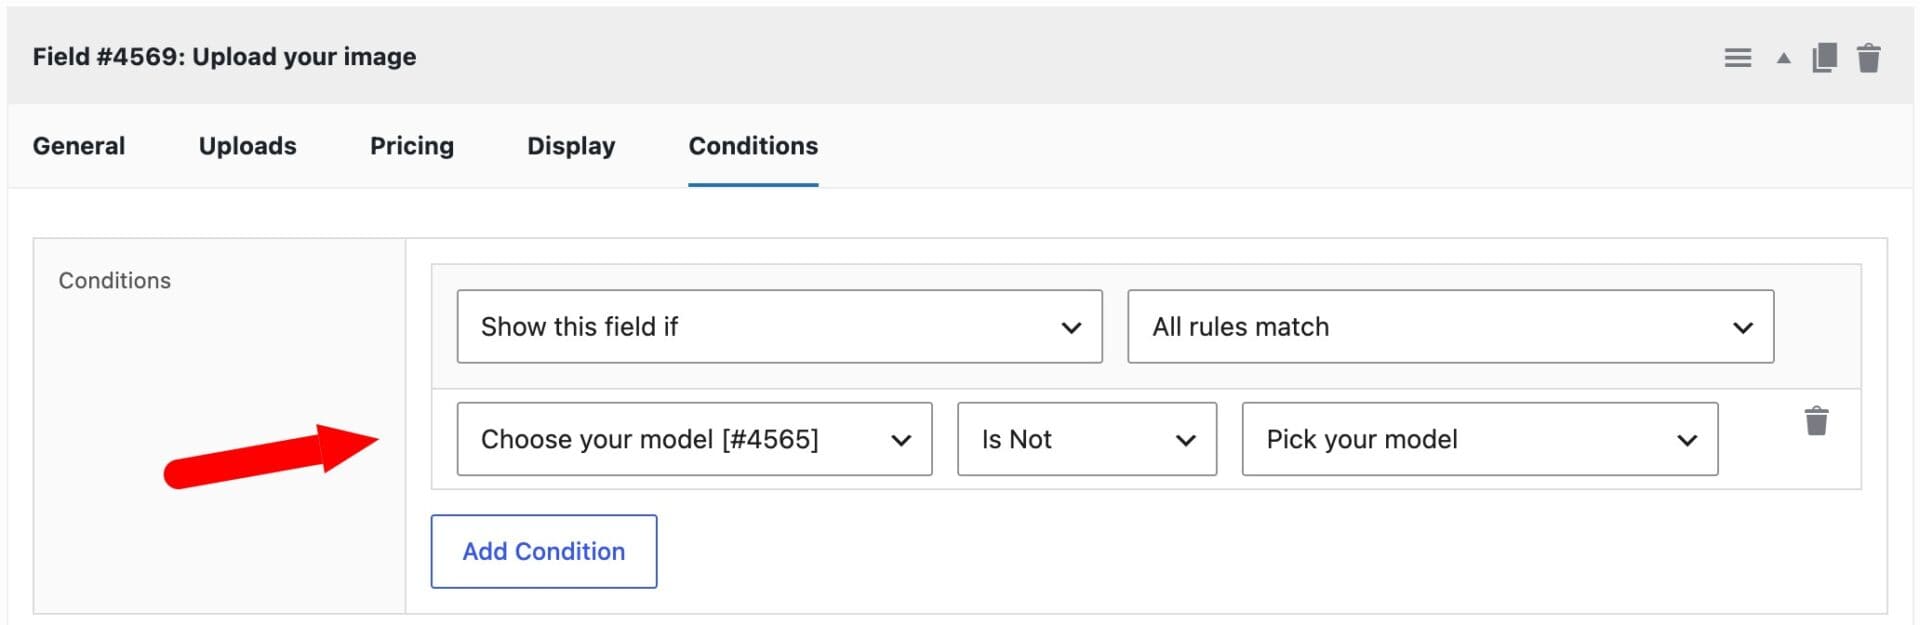
If you like, you can use some conditional logic to only display the upload field once the user has made their selection of phone model.
Just click on the ‘Conditions’ tab of your upload field and click ‘Add Condition’. Enter the parameters for your condition so that the field will only display if the placeholder text is not selected in the select box field.
Set specific live preview area (e.g. for non-transparent PNG files)
If you don’t want to use transparent PNG files, you can specify a preview area that will clip the uploaded image to a precise area. The user can still resize, reposition and rotate their upload – but only the part that falls within the preview area will be visible.
To do this, set ‘Preview position’ to ‘Interactive – Over image’. A new field – ‘Preview area’ – will appear.
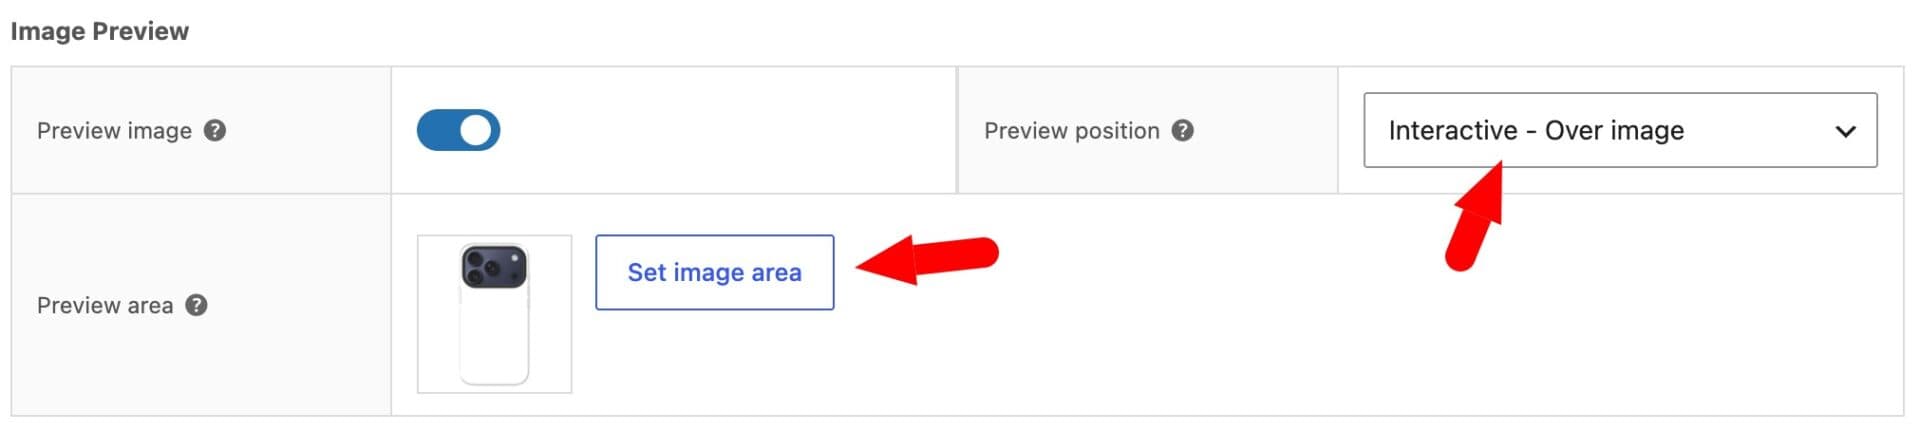
Click on ‘Set image area’ to draw your preview area. A modal window will appear. Choose the preview area shape – either rectangle or circle – then click and drag on the image to specify the area.
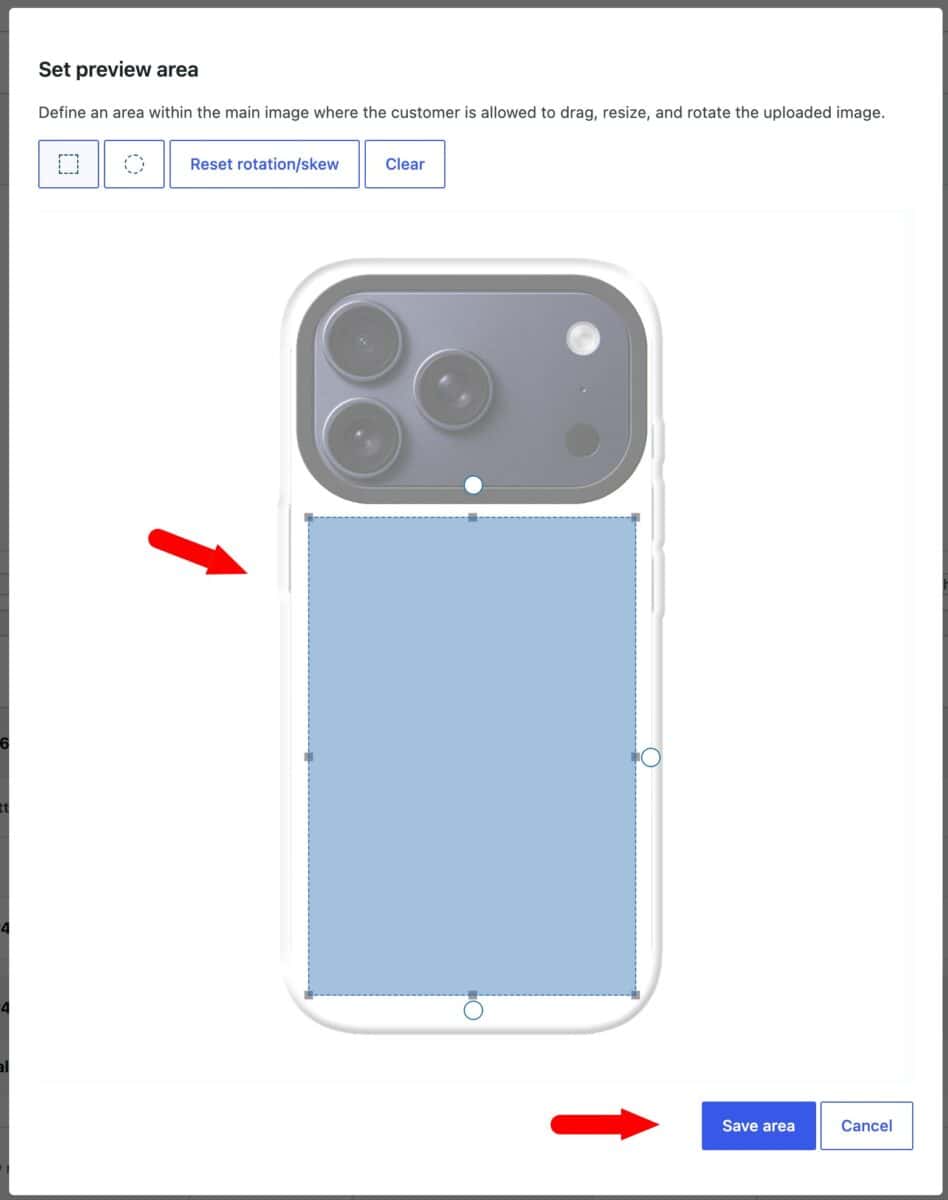
Click ‘Save area’ to set the preview area.
Save and publish
If you need to add more than one live image preview to your product, just repeat the steps above. You can add as many as you like and position each one differently.
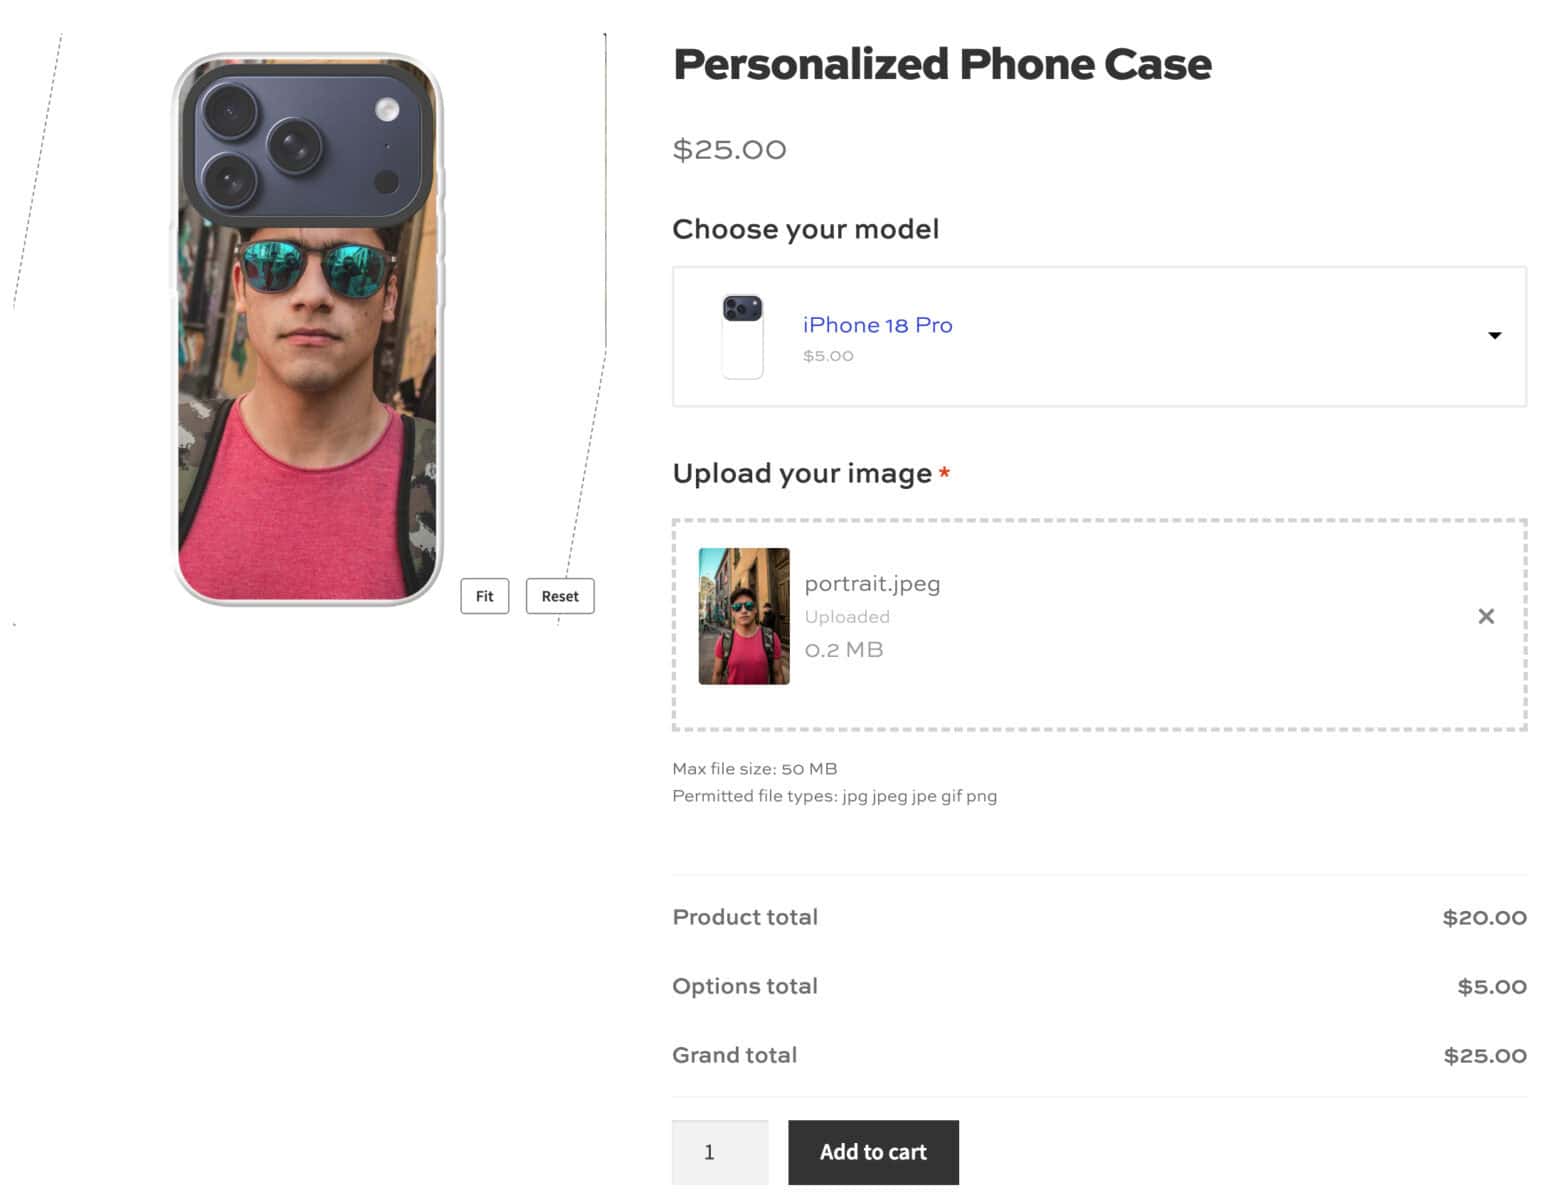
Once you’ve finished, you can publish your product. Customers will be able to select their phone model, upload a photo, and drag, resize, and rotate it live on the product image, all while keeping its original aspect ratio. There’s a demo product here if you’d like to see it working.

Your Image Preview plugin is amazing. There are so many possibilities and it really stands out. There is no WooCommerce plugin that does image previews as well as this one.
Tutorial 2: Add live text preview to WooCommerce
Now let’s look at how to let customers add their own text to a product instead of – or alongside – an uploaded image. This uses the WooCommerce Live Text Preview plugin, and works well for engraved gifts, name-printed apparel, or any product where customers add a short message.
Note that Text Preview requires Product Add-Ons Ultimate.
Step #1: Add a text preview field
Add a new field to your product and choose ‘Text Preview’ as the field type.
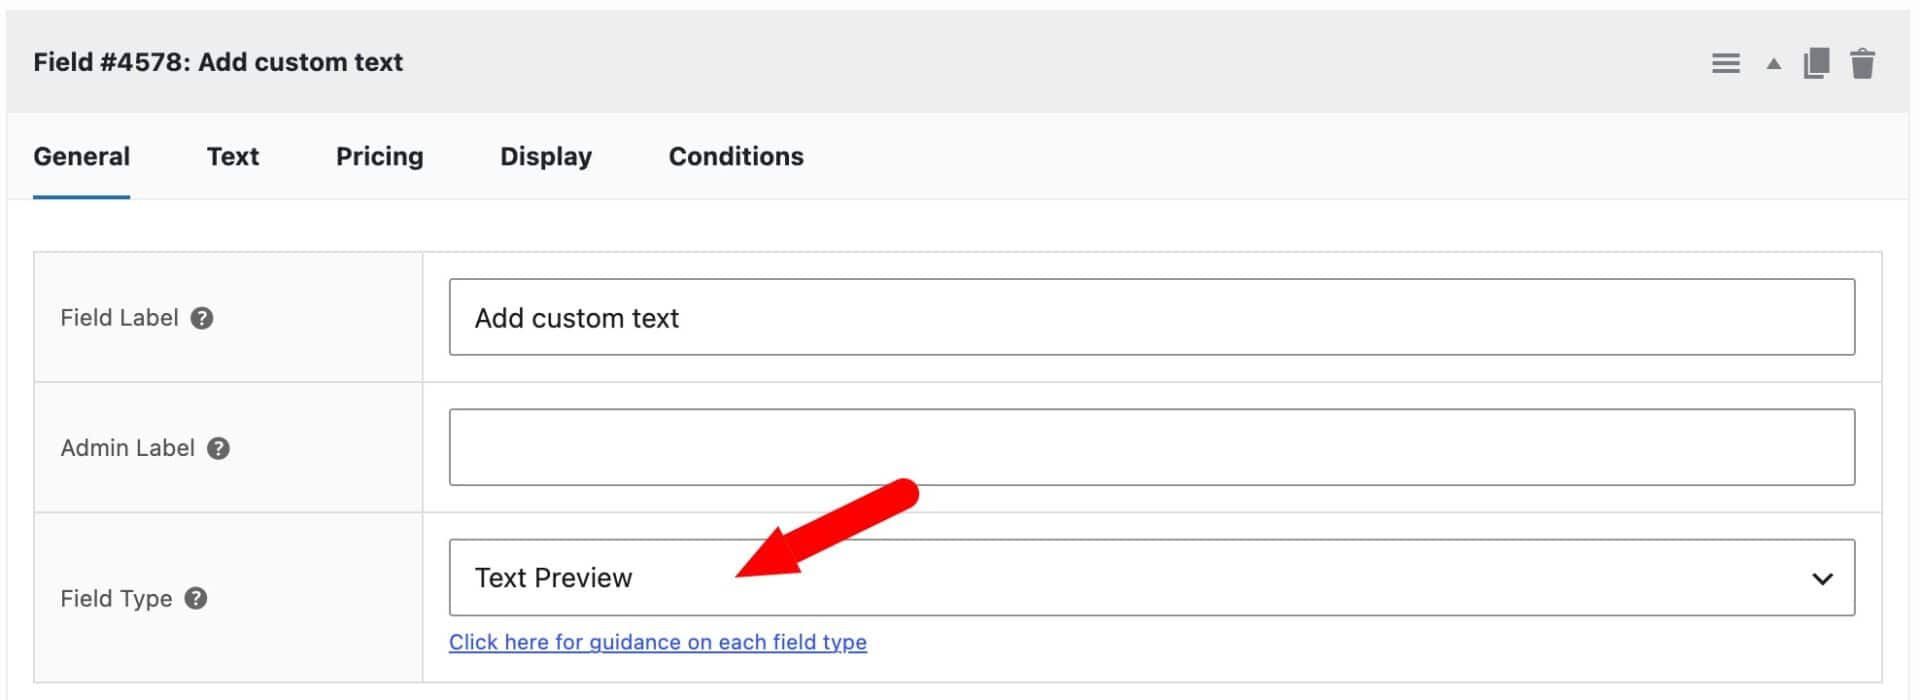
Click the ‘Text’ tab to set the standard text parameters, like the minimum and maximum number of characters allowed.
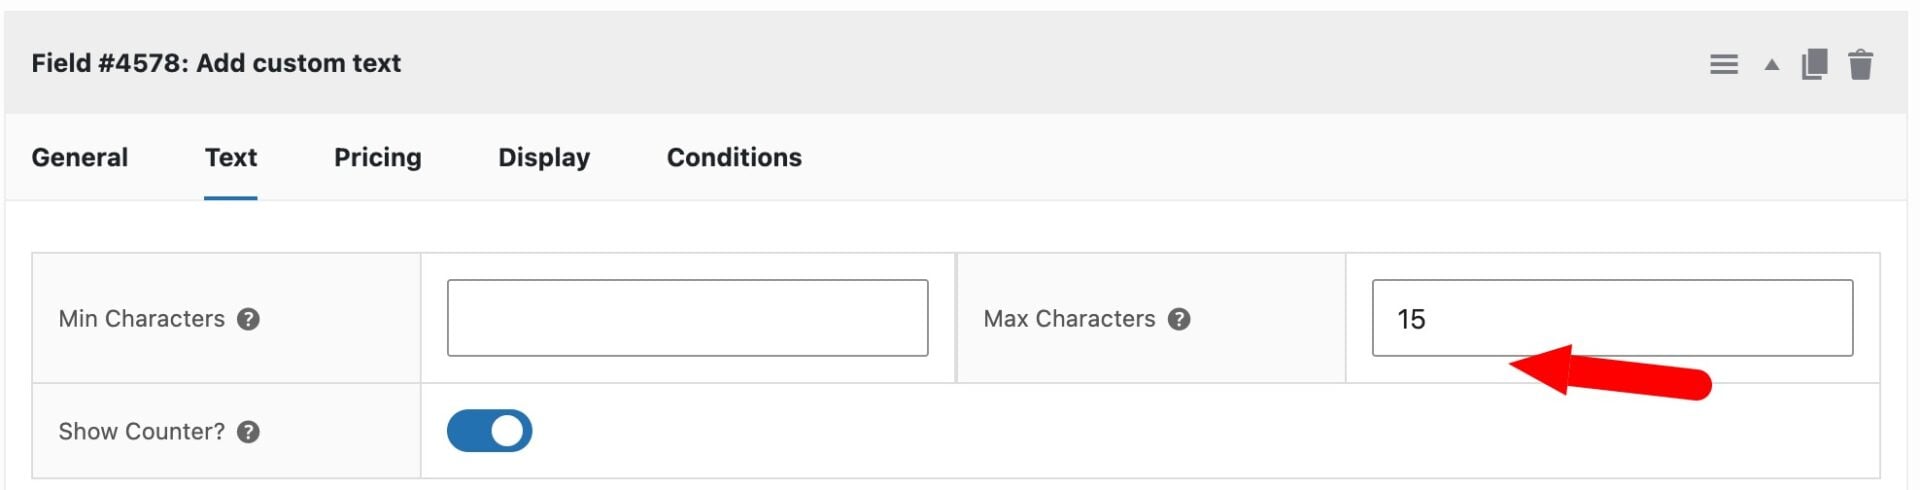
The ‘Text’ tab also has an extensive set of options specifically for text preview. For details on each setting individually, check out the Getting Started guide, but in summary:
- Positioning – set the text’s horizontal and vertical center position, its width relative to the image, which product image it appears on (Layer position and Frame #), and its z-index
- Text options – let customers change the font family, font size, and alignment; auto-size text to fit its container, force it onto a single line, or set a default line height
- Color options – enable a color picker, set a default text color, or link the text color to a swatch field elsewhere on the product
- Interactive options – let customers drag, rotate, and resize the text directly on the image, optionally confined to a preview area you draw yourself
Let’s look at how to use some of these settings for our live text preview.
Step #2: Define the position of the preview layer on the product image
The ‘Text Preview’ field will create a new element on the main product image. When the user starts typing into the custom field, their text will automatically appear in the new layer on the product image.
You can position this layer using the settings in the ‘Positioning Options’ section. However, note the ability to draw the preview layer described in Step 4 below.
Set the horizontal center position as a percentage – 0 places the center of the text on the left edge of the image, and 50 places it in the exact horizontal center. Choose a ‘Layer position’ of ‘Default’ for the text layer to appear on all products images. Or choose one of ‘First Frame’, ‘Last Frame’, or ‘Specific Frame #’ to display the preview on a specific product image.
Set a z-index value of 1 or greater if you’re layering the text preview over other elements, like an uploaded image – a higher z-index displays in front of layers with a lower one.
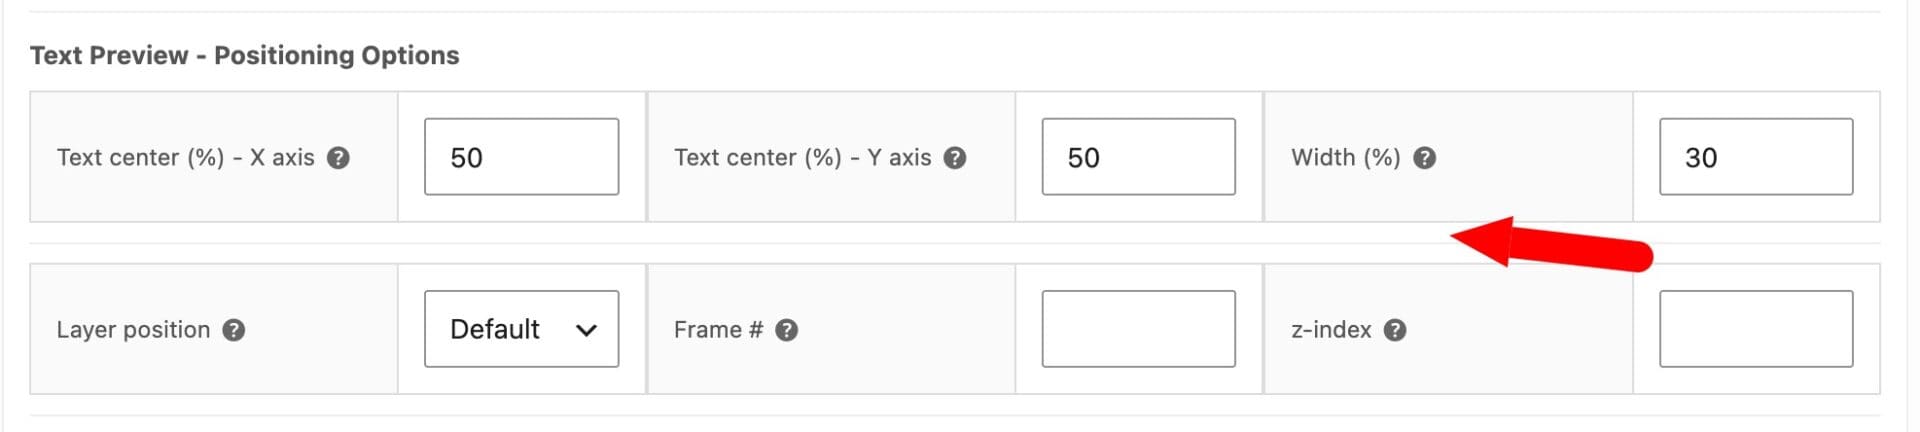
Your text now will now appear in the right place on the product image.
Let’s look at how to give customers some control over the style and appearance of the text preview.
Step #3: Let users customize font and text styles
The ‘Text Options’ section has a wide range of settings for controlling how the text looks and how much control you give to the customer.
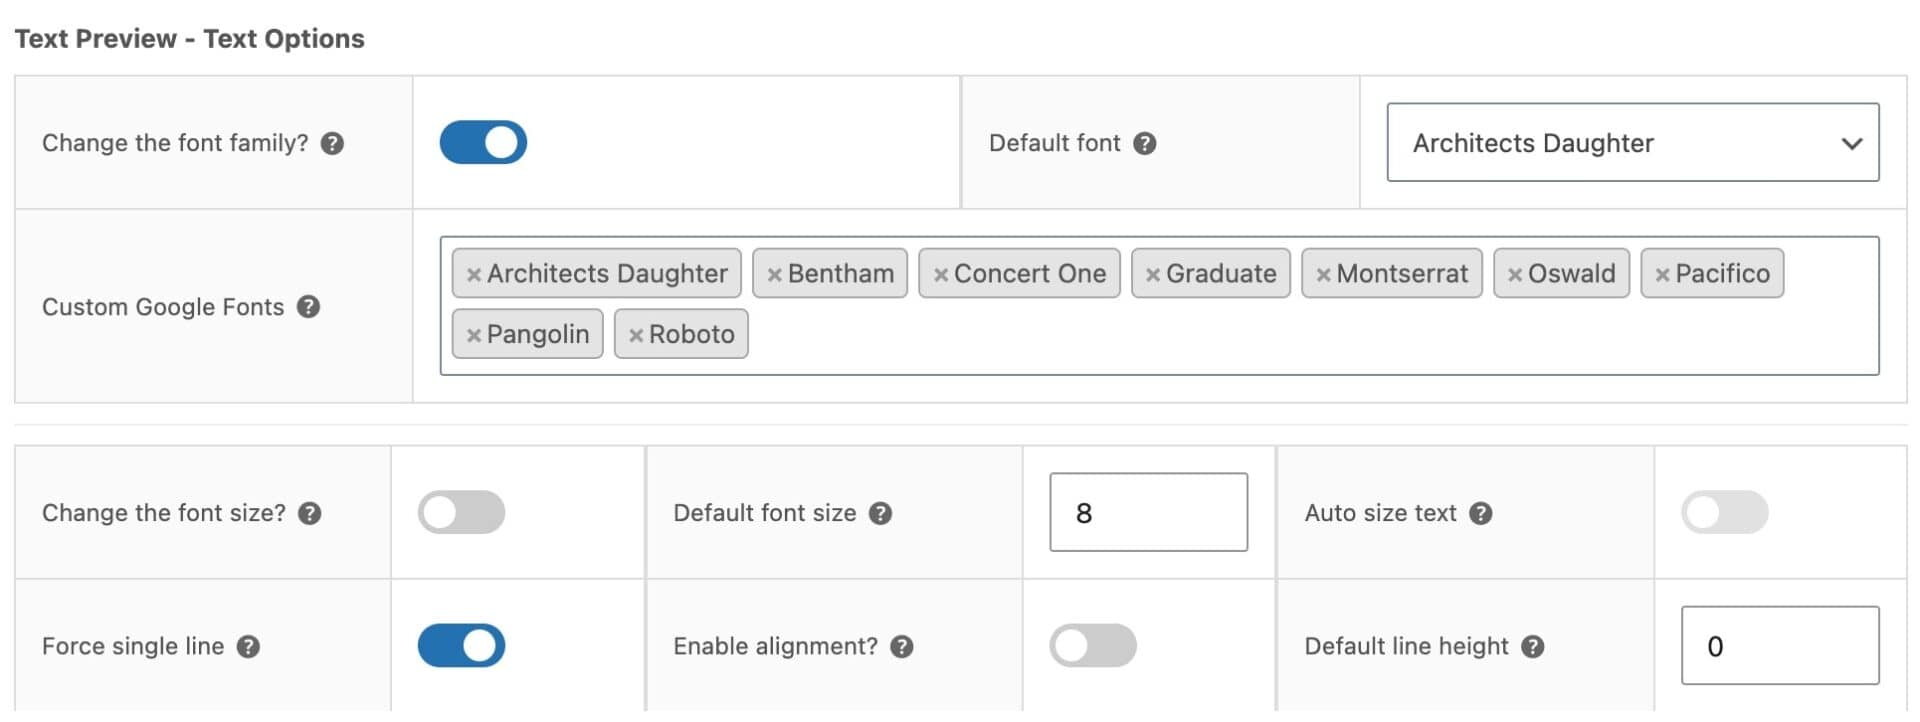
If you want to allow the customer to be able to select their own font, then enable ‘Change the font family?’. This will display a dropdown list on the product page with your chosen fonts.
You can define a list of fonts for the specific field in’Custom Google Fonts’ – or leave this field empty to use the list of fonts defined globally in WooCommerce > Settings > Product Add-Ons > Text Preview.
If you want to allow the user to enter a font size, enable ‘Change the font size?’. However, note that you can also allow users to resize the text preview field in Step 4.
‘Auto size text’ scales the text down automatically to fit its container while the customer types.
‘Force single line’ hides any text that doesn’t fit rather than wrapping it – this is essential for products where the text needs to stay on one line.
Enable ‘Enable alignment?’ to give customers left, center, and right alignment controls.
Allow the user to select text color
You can let the user define the color of the text preview themselves. There are a couple of different ways you can do this:
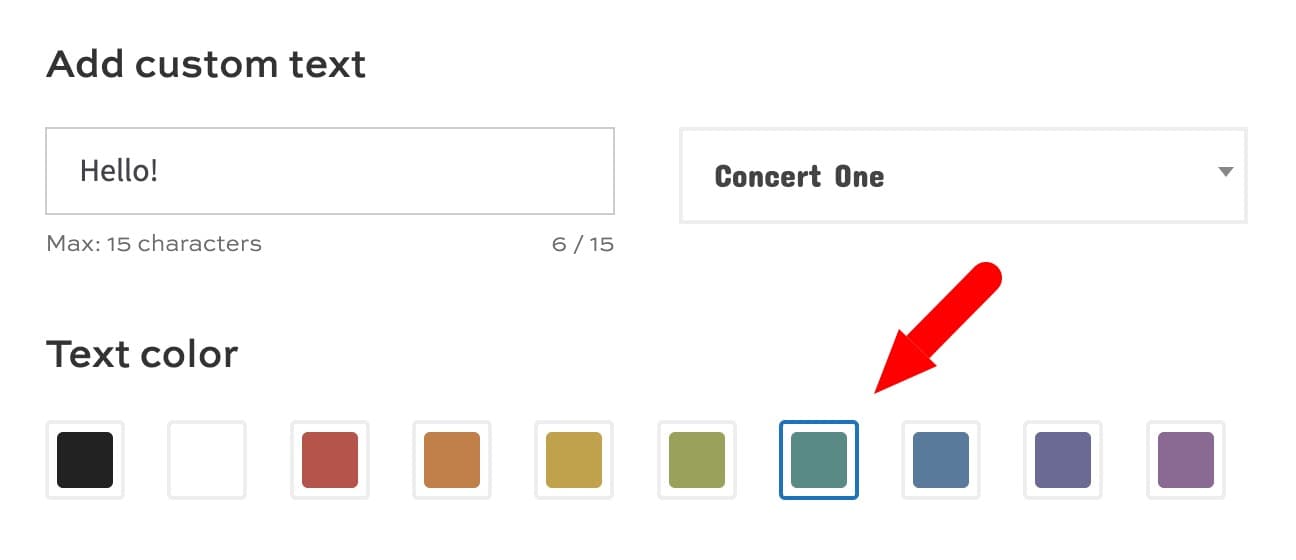
- First, you could ‘Enable color picker’. This will enable a colorpicker on the product page so customers can choose any color they like for their text
- Alternatively, if you want to limit the number of colors the user can choose from, you can display a set of color swatches. There’s a full guide on using color swatches in text previews here.
Step #4: Let customers drag, rotate, and resize the text
By default, the text field is fixed in place. Its position is determined solely by the settings you defined in Step 2. However, you can allow customers to move and adjust the text themselves directly on the product image – and define a specific area within which the customer can position the preview field.
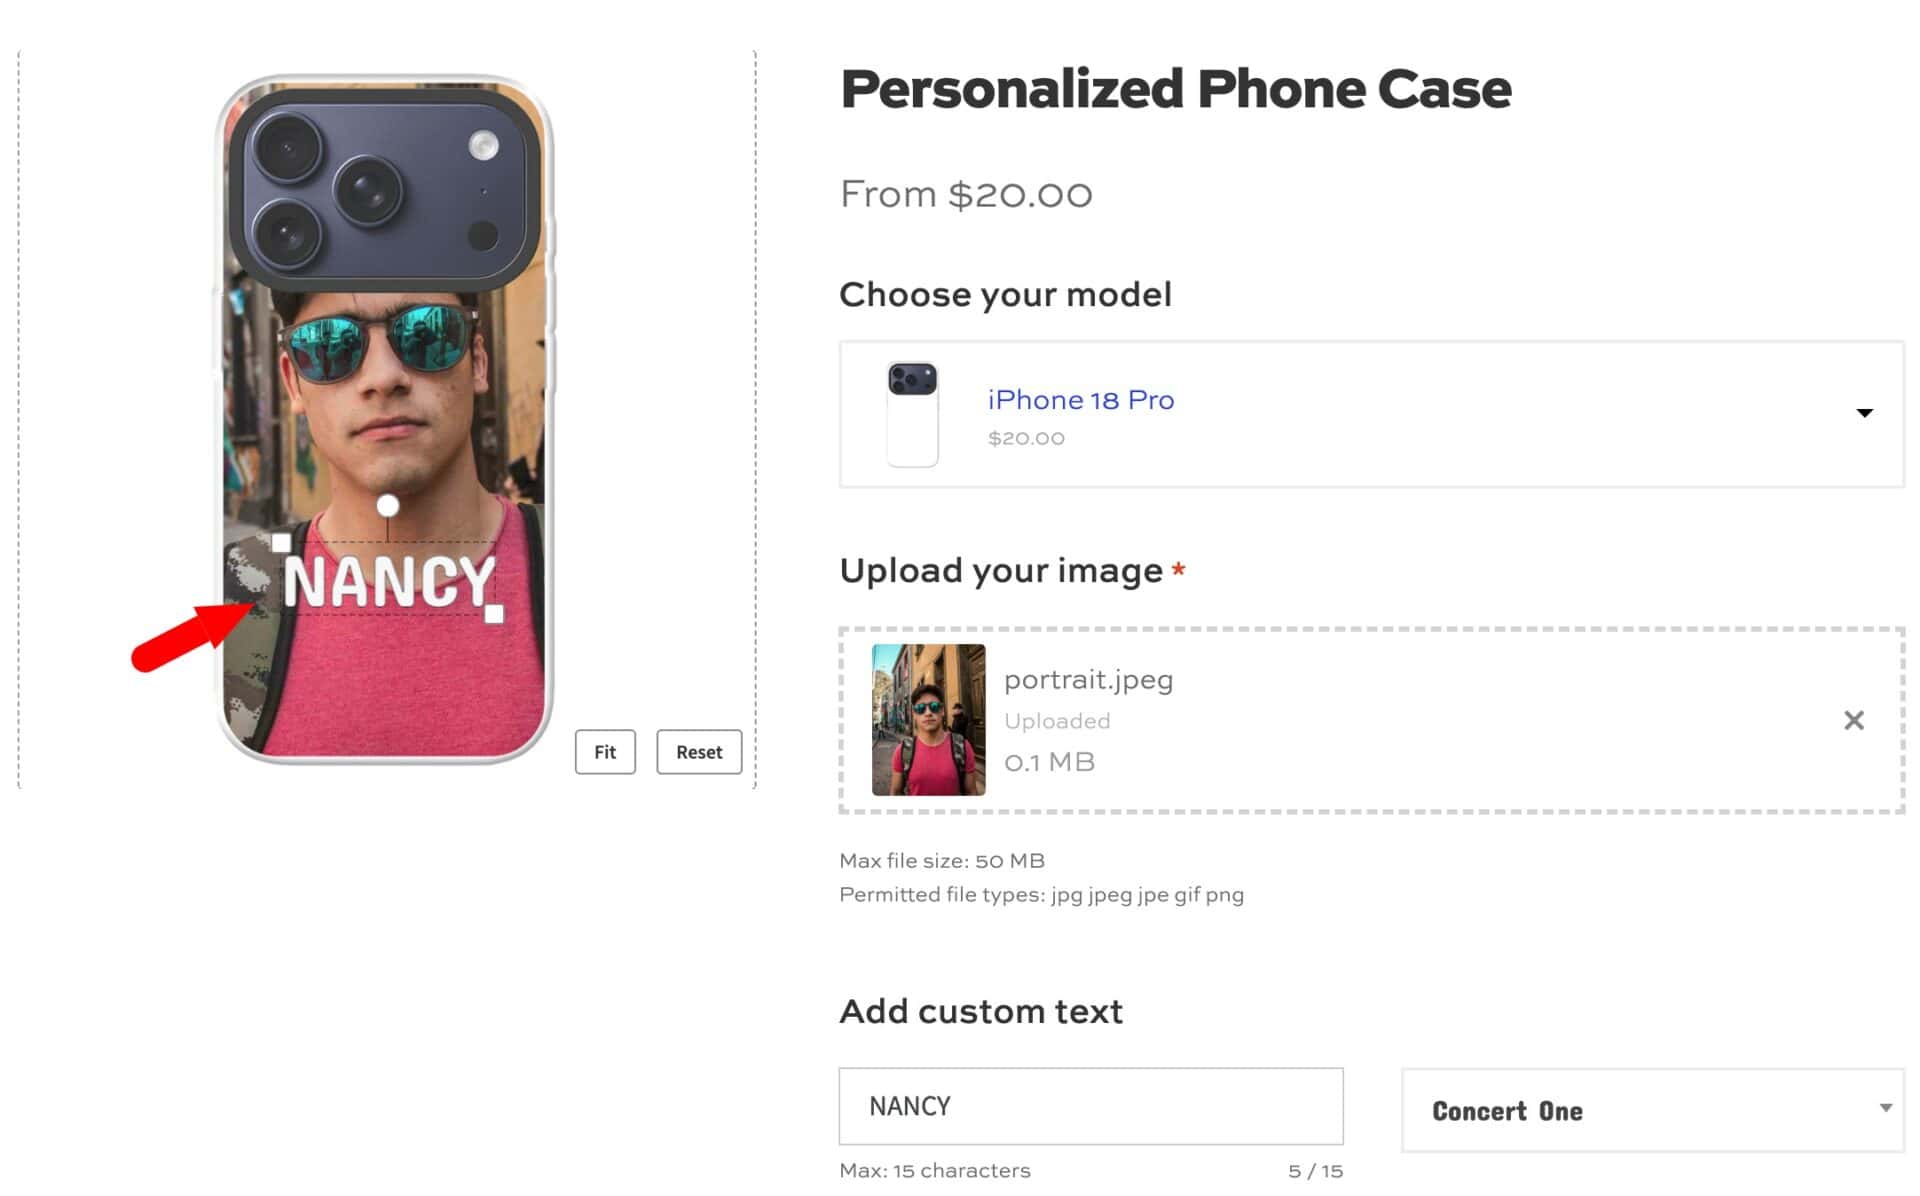
You can enable three different interactive possibilities for the user:
- Enable ‘Allow positioning’ for customers to drag the text anywhere on the product image
- Enable ‘Allow rotation’ to add a rotate handle which will allow users to rotate the text preview field
- Enable ‘Allow resizing’ to add corner handles so that the customers can resize the text preview, increasing or decreasing the font size automatically
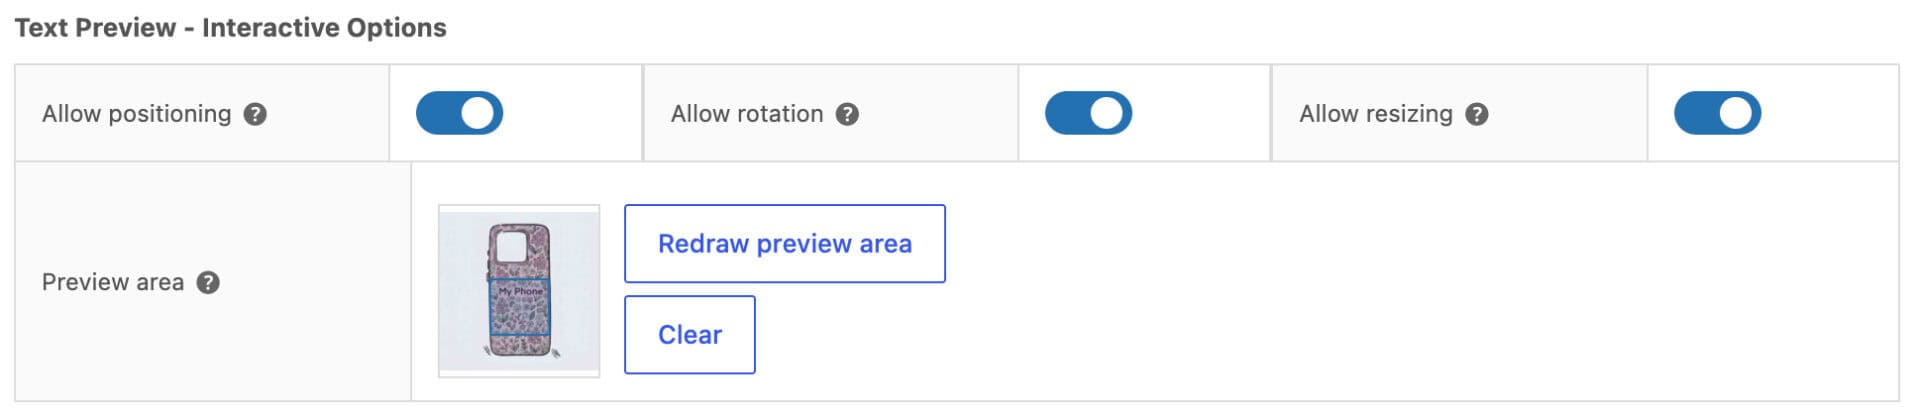
If you enable any of these options, you’ll be able to set a ‘Preview area’. Just click the ‘Set preview area’ button, choose a square or circle shape, then click and drag on the product image to draw the region – you can also rotate or skew a square area using its handles.
Customers can now drag, rotate, and resize their text, confined to the area you’ve defined.
Step #5: Optionally combine with image preview
If you’ve also completed Tutorial 1, you can use the Text Preview and Image Preview extensions on the same product. This lets customers preview their own uploaded image and their own text together, at the same time.
Save and publish your product. Customers can now type their own message and see it previewed live on the product image, styled with the font, size, and color they choose.
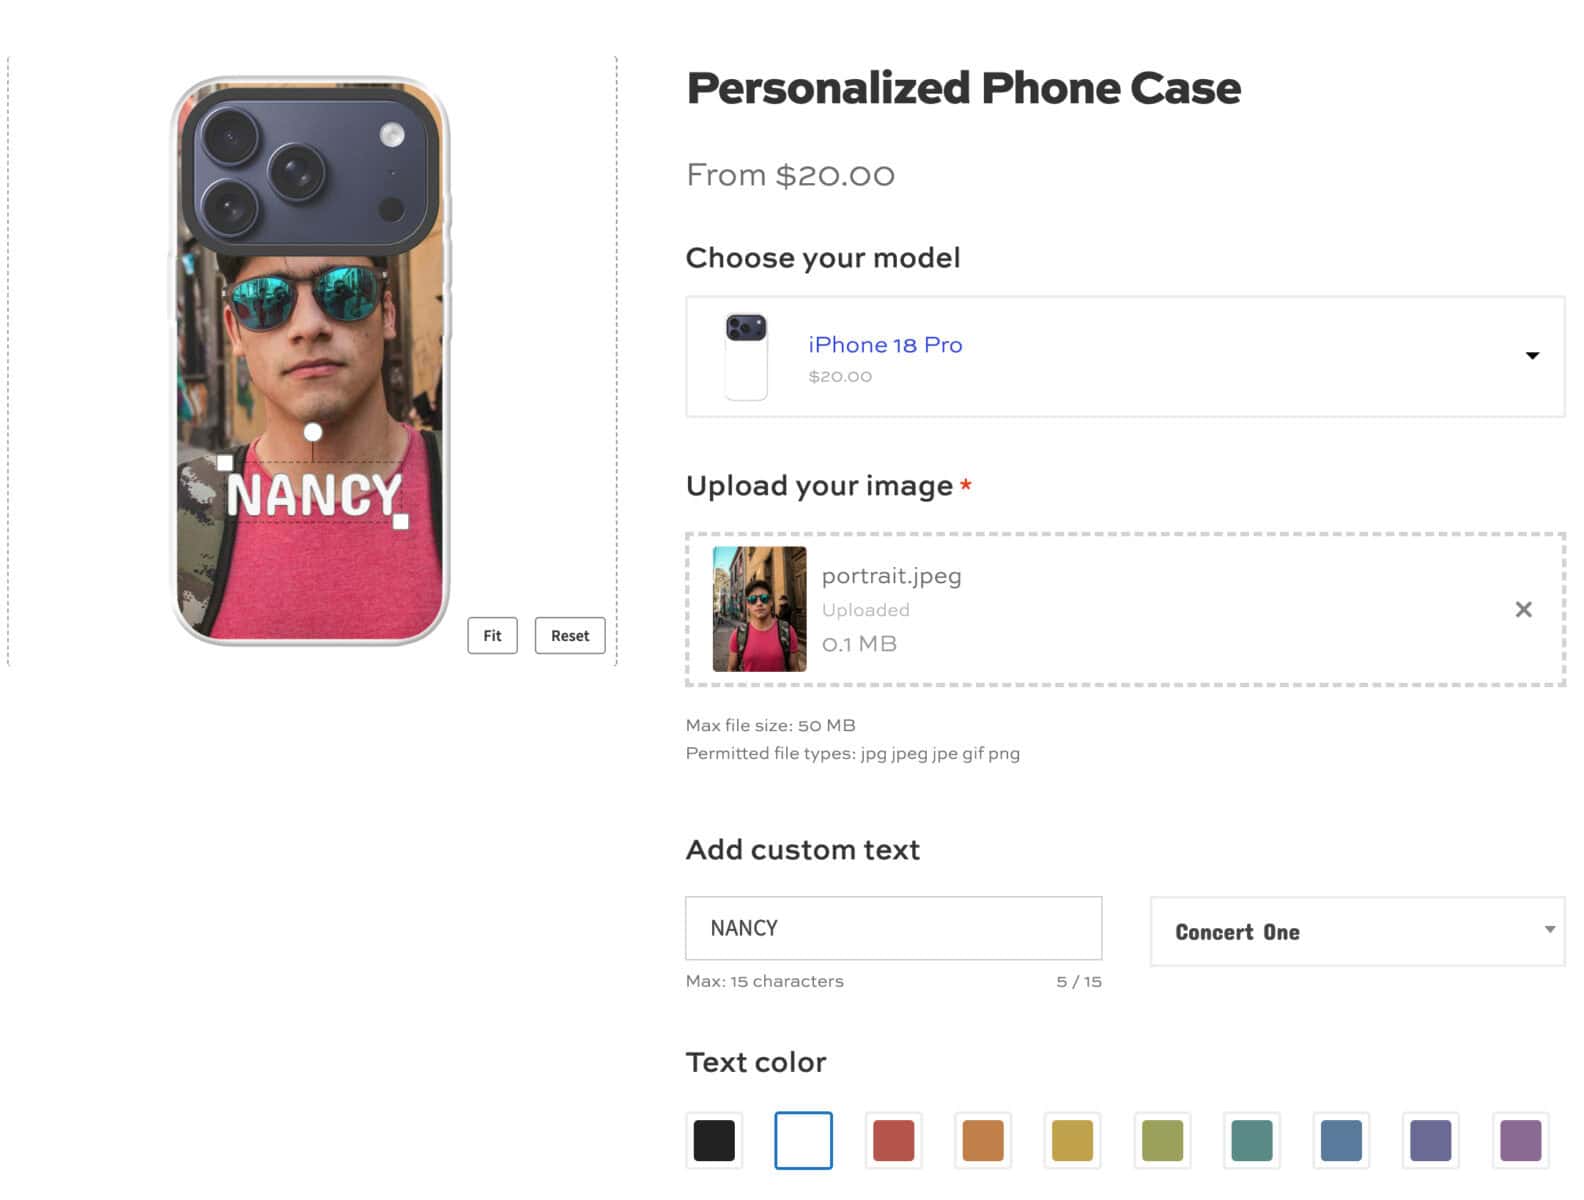
There’s a demo product here showing text and image preview combined on a single product.

I'm using the plugin to give our customers the possibility to personalize our products with custom embroidery and to preview said embroidery on the product. The plugin is easy to use and configure and I especially enjoyed the quick and friendly support of the team.
WooCommerce Live Preview – real-life examples
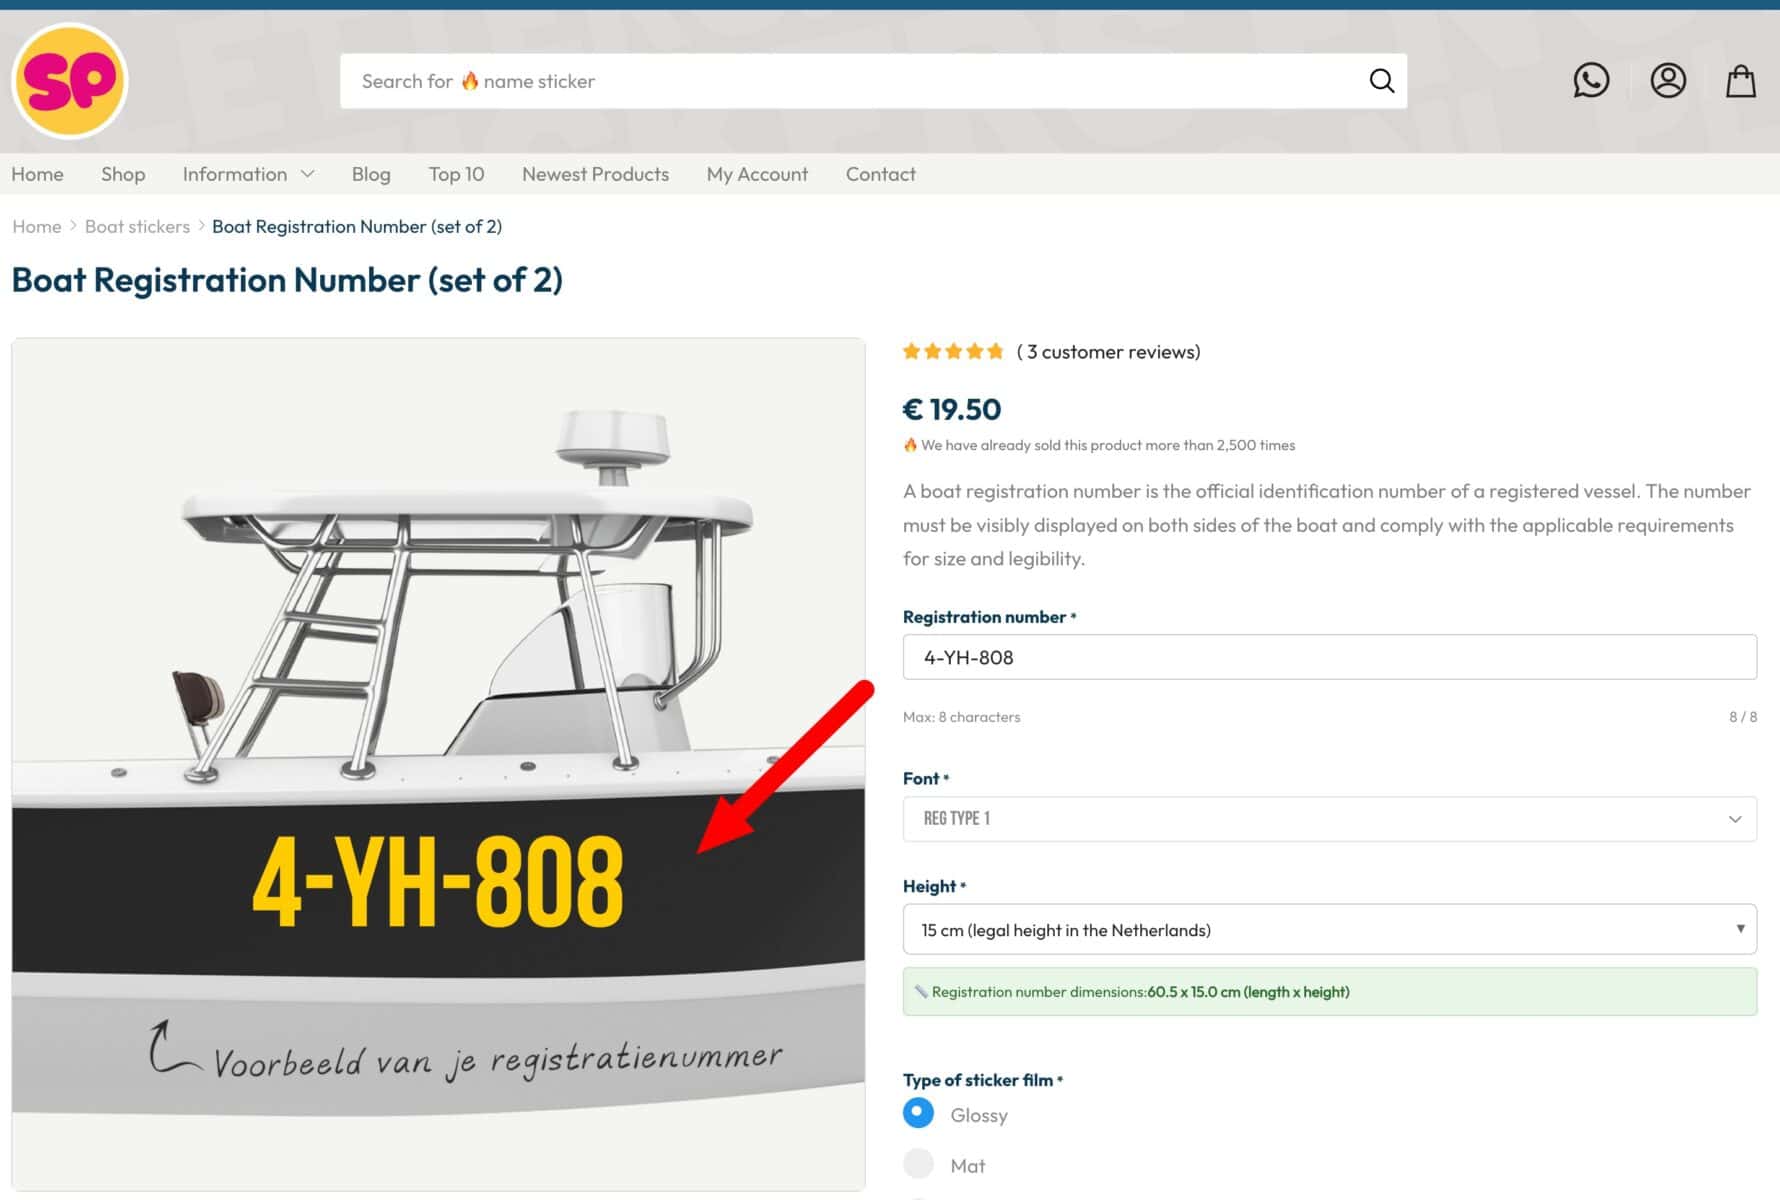
Stickers en Plakletters is a stickers supplier based in the Netherlands. They use Text Preview for their range of customizable stickers and decals. Customers can enter their custom text, pick a custom font, and see it previewed live on the main product image.
FAQs
Yes. Image Preview and Text Preview allow you to add as many preview fields to a product as you like. So customers can preview several personalized areas – like a front and back image, or a name plus a message – on the same product.
Yes. Image Preview and Text Preview are fully compatible and can both be active on the same product, letting customers upload a photo and add their own text, with both previewed live on the product image at the same time.
Yes. Image Preview and Text Preview are fully responsive, so customers get the same live preview experience on desktop and mobile.
Yes. Image Preview and Text Preview allow customers to resize, rotate and reposition the image and text preview layers.
Yes. Image Preview and Text Preview both allow you to define a preview area within which the user can drag the preview layer.
WooCommerce live preview – recap
So that’s how to add a live preview to your WooCommerce products, using WooCommerce Product Add-Ons Ultimate together with the Image Preview and Text Preview extensions. We looked at how to let customers select a product variant and see its base image update automatically, then how to let them upload a photo or add their own text and preview it live on the product before they buy.
You can purchase all the necessary plugins together at a significant discount as part of the Product Add-Ons Ultimate Bundle:
Product Add-Ons Ultimate Bundle
Advanced features, superior control and excellent savings
And if you already own one of the plugins, you can upgrade and just pay the difference.
Our plugins are compatible with all themes and page builders, including Astra, Flatsome, and Woodmart, and page builders like Elementor and Divi. If you have any questions, our world-class support team is on hand to help. And the plugins are all backed by a 14-day money-back guarantee, so you can try risk-free.