How to upload images to WooCommerce product pages

Many stores need to allow their users to upload images to the product page – online print shops, personalized gift stores or stationery stores are prime examples. WooCommerce doesn’t have this feature by default so you’ll need an extra plugin.
WooCommerce image upload plugin
The WooCommerce Product Add-Ons Ultimate plugin is the simplest, fastest, and most powerful way for you to add WooCommerce image uploads to your product pages.

Check this article if you’d like to find out more about uploading PDF files to product pages.
How to add an image upload button to WooCommerce product pages
Once you install and activate the WooCommerce Product Add-Ons Ultimate plugin, you can add custom fields to your products. The plugin offers over 20 different field types, like checkboxes, text fields, etc – plus it allows you to add a file uploader to your product page.
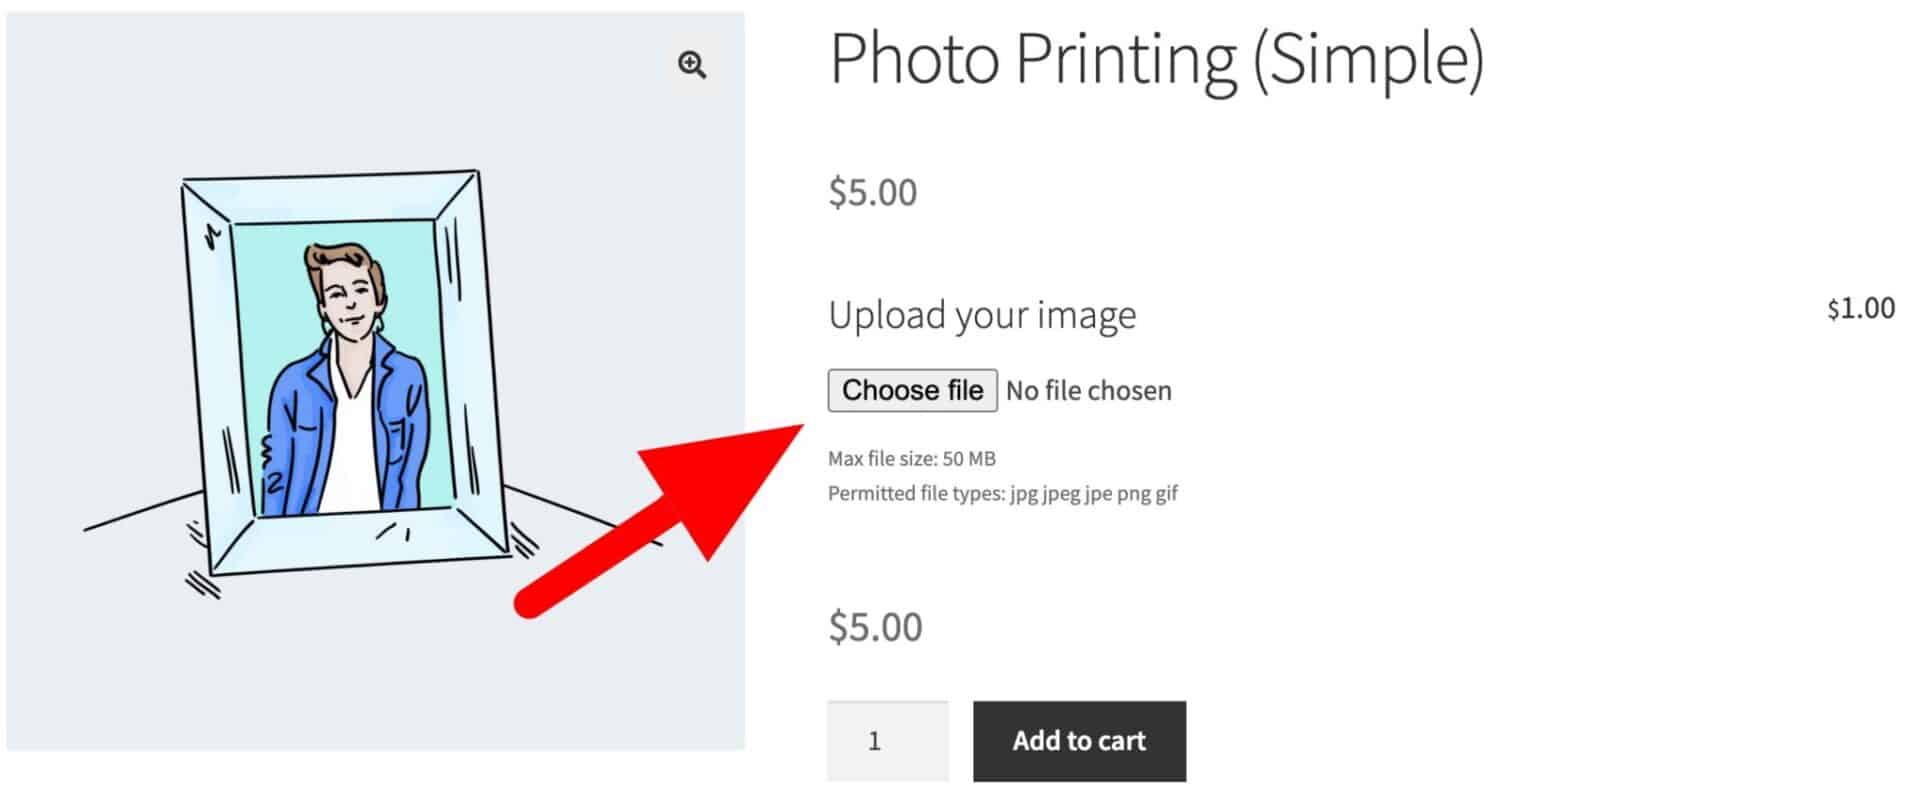
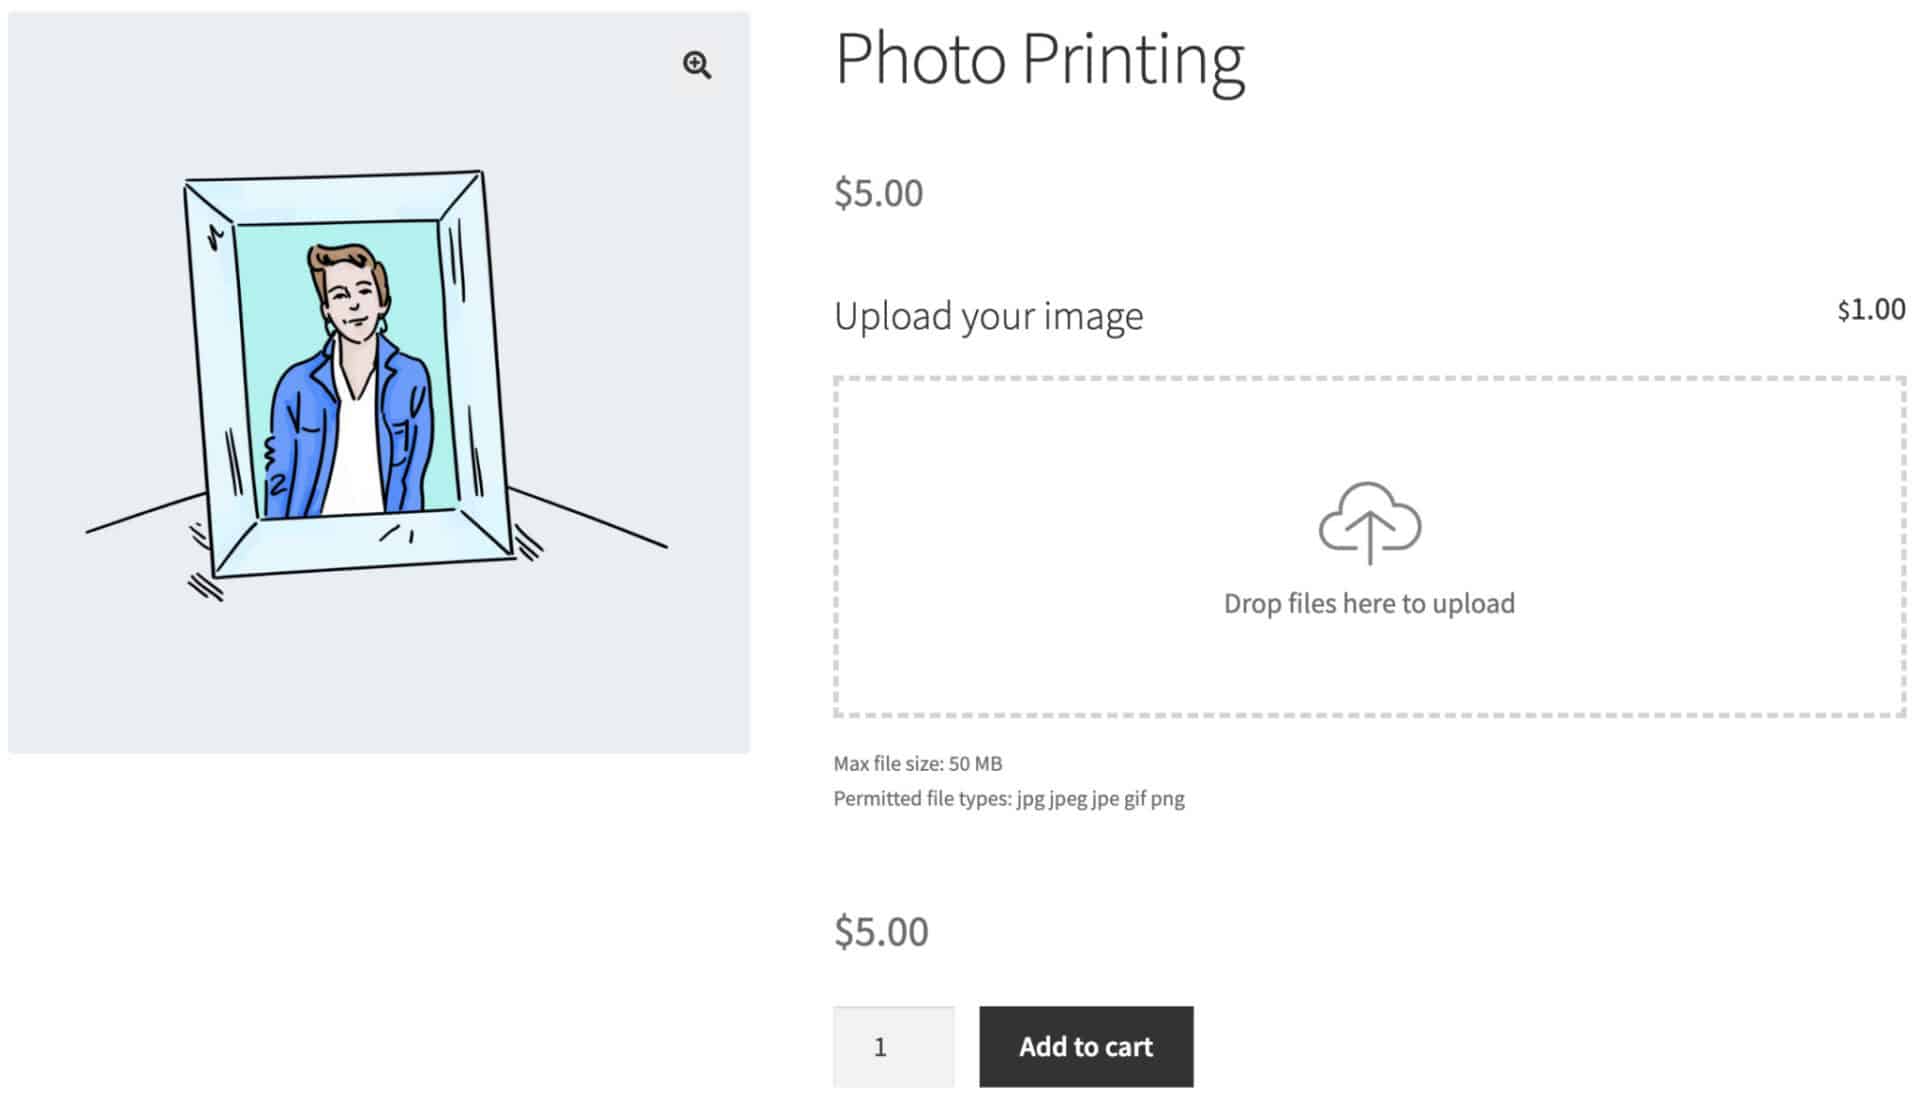
In this article, we’ll look at two different types of image upload field – a simple file input field and a modern drag and drop uploader for multiple files. You can see examples of each below.
Decide which image upload to use
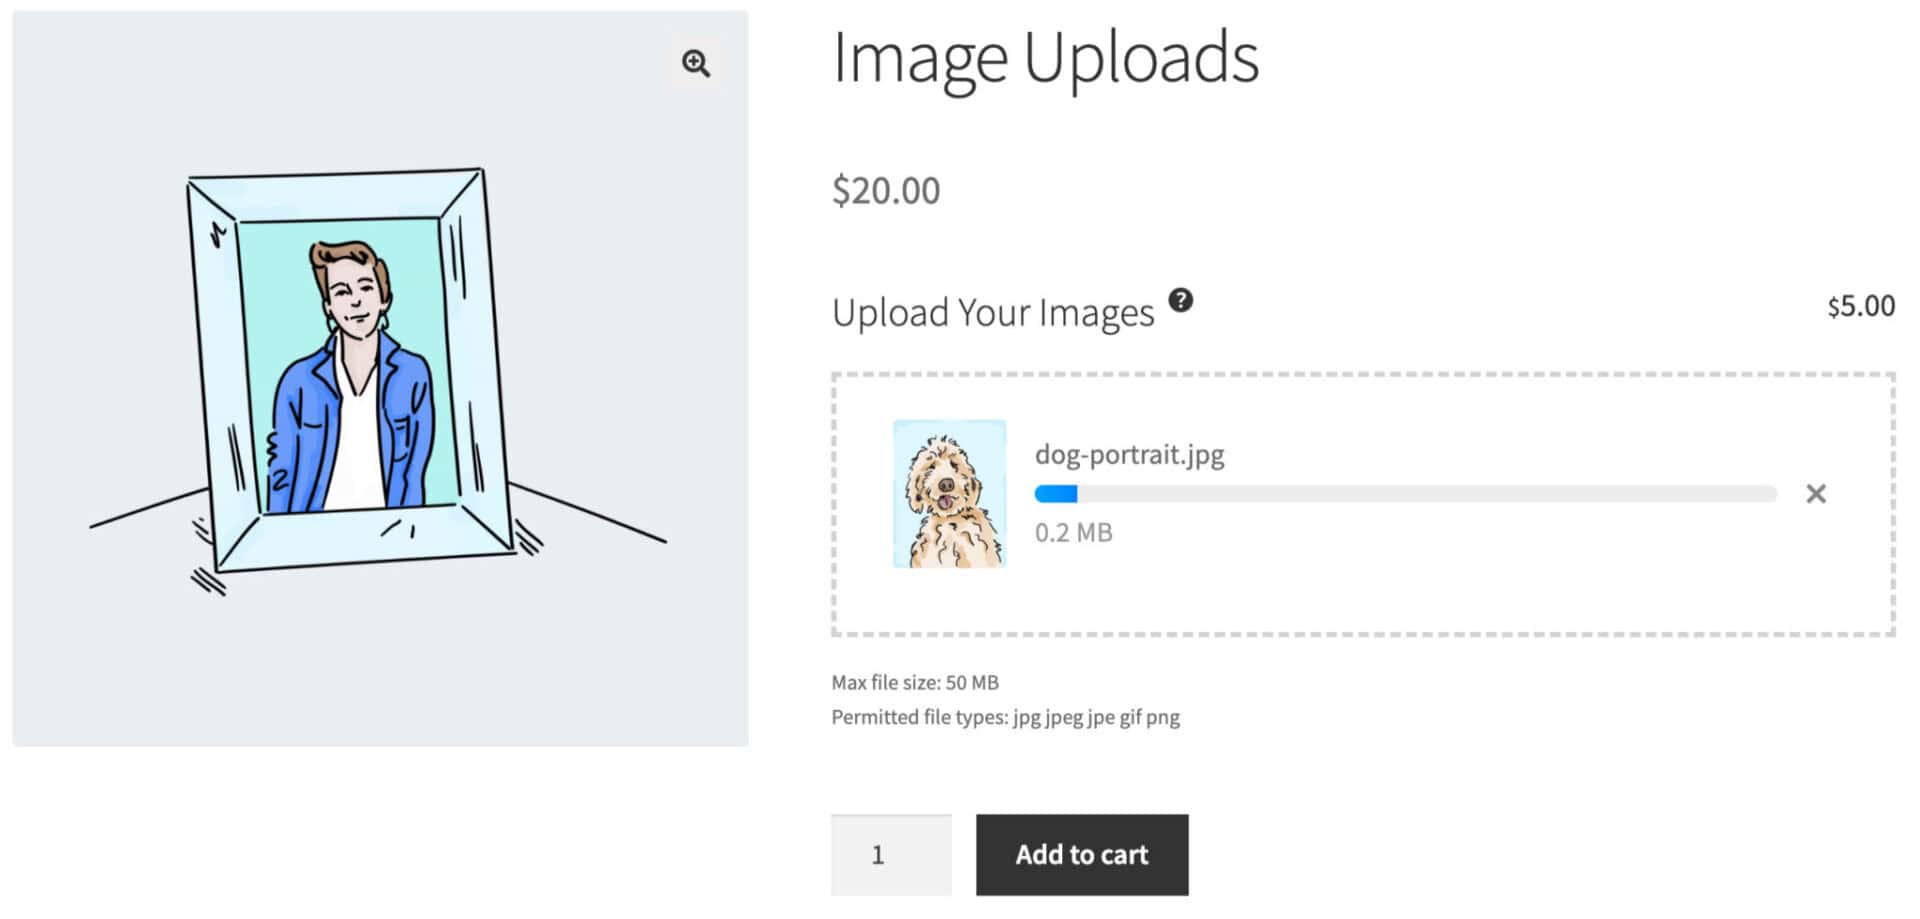
By default, Product Add-Ons Ultimate will use the modern image uploader with progress bar. This provides a better user experience on the front end and offers you more options:
- Progress bar to display the upload status for each file. This helps the user to see that the upload is taking place and how long it’s likely to take
- Thumbnails for uploaded images
- Ability to add or remove uploaded images
- Drag-and-drop functionality allowing the user to drag images into the field directly from their desktop or file explorer
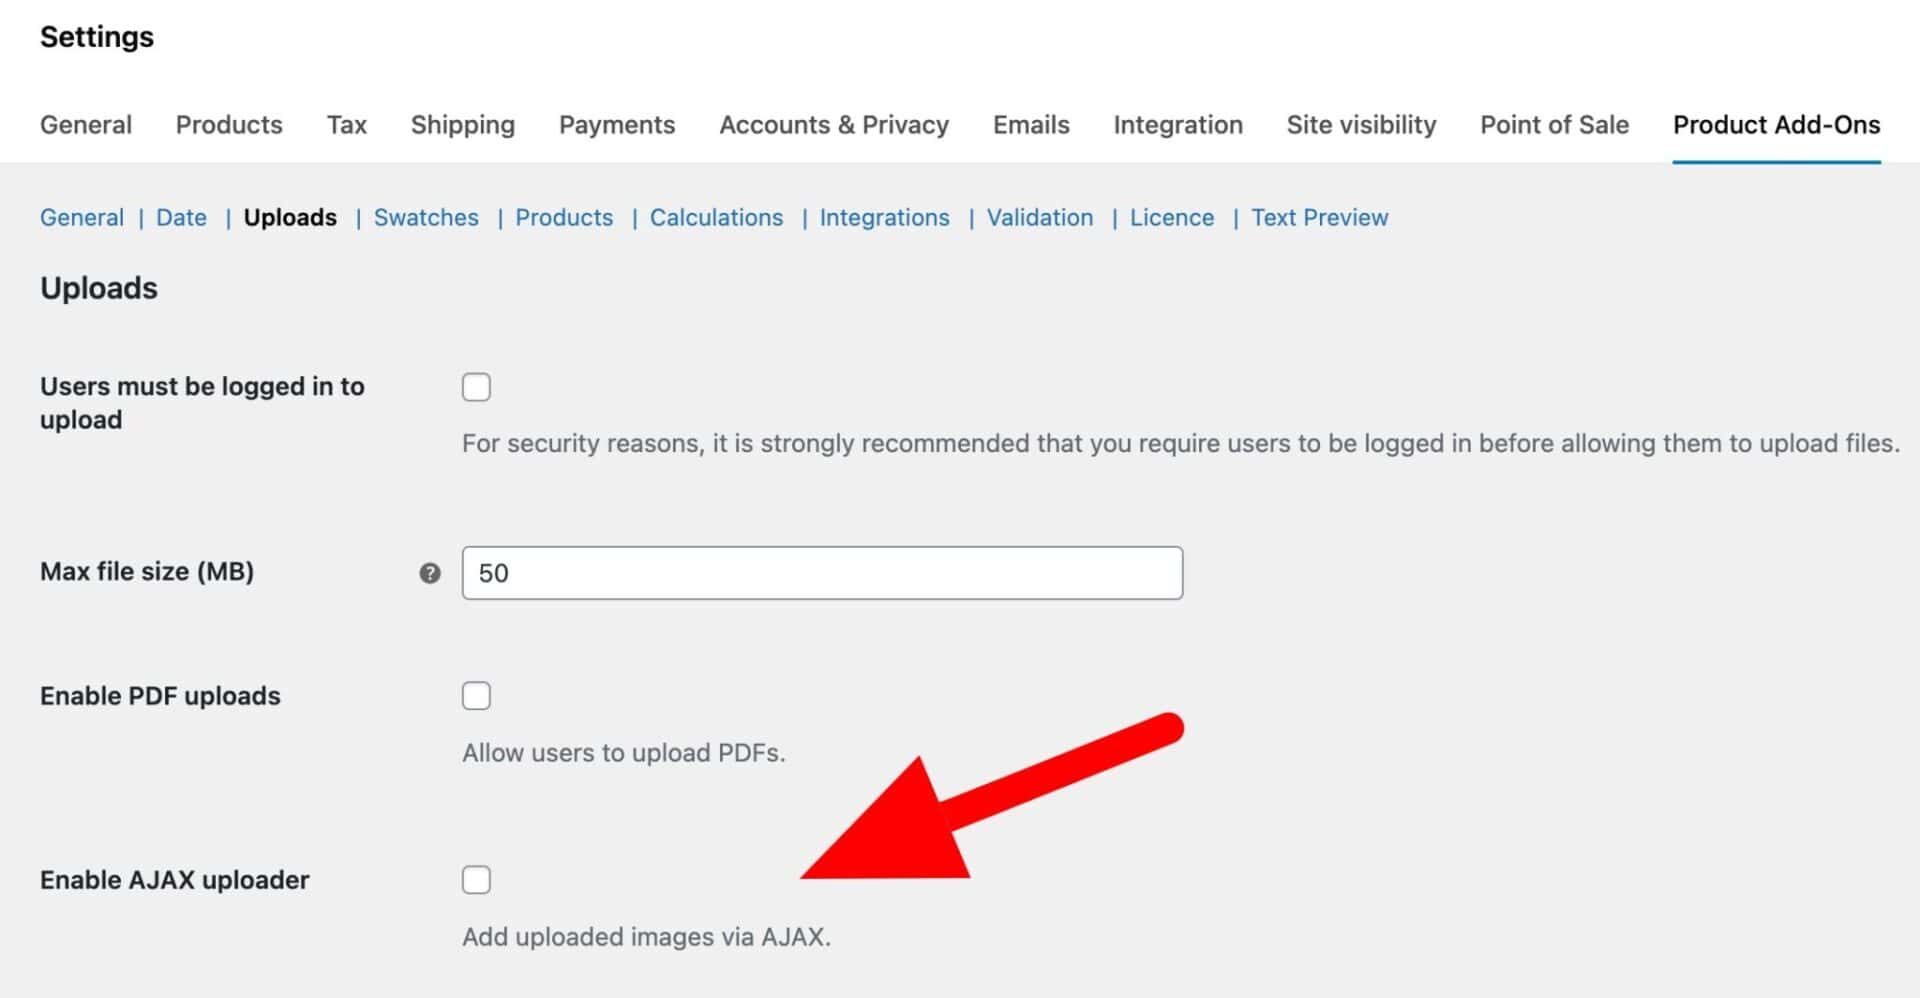
However, if you prefer to use the standard file input field:
- Go to WooCommerce > Settings > Product Add-Ons > Uploads
- Deselect the ‘Enable AJAX uploader’
Add an image upload field to your product page
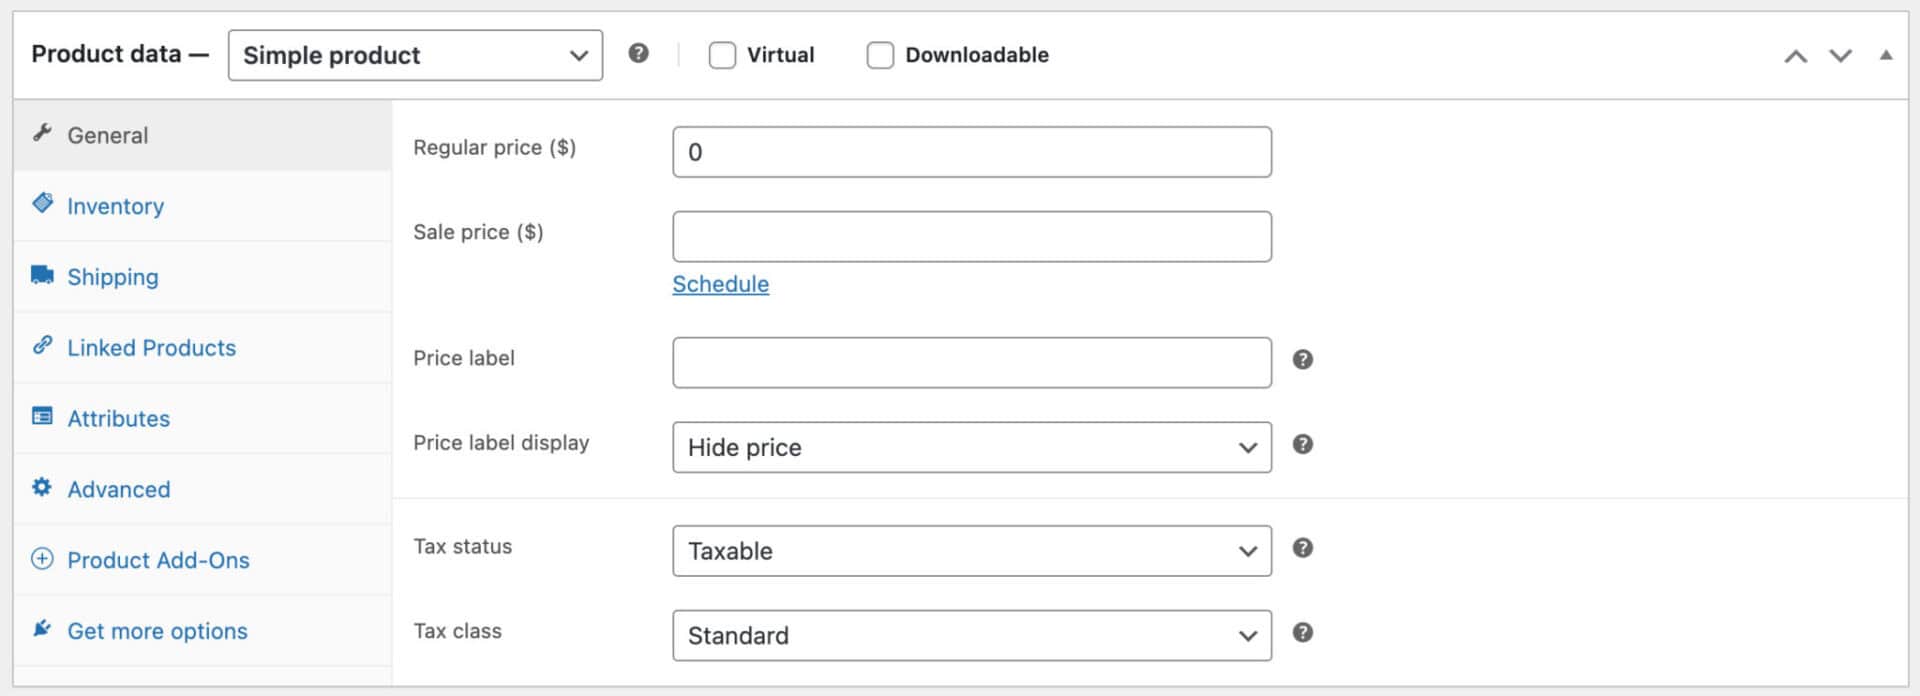
To add an image uploader to your product page, click the ‘Product Add-Ons’ tab in the ‘Product data’ meta box on any product within your store:
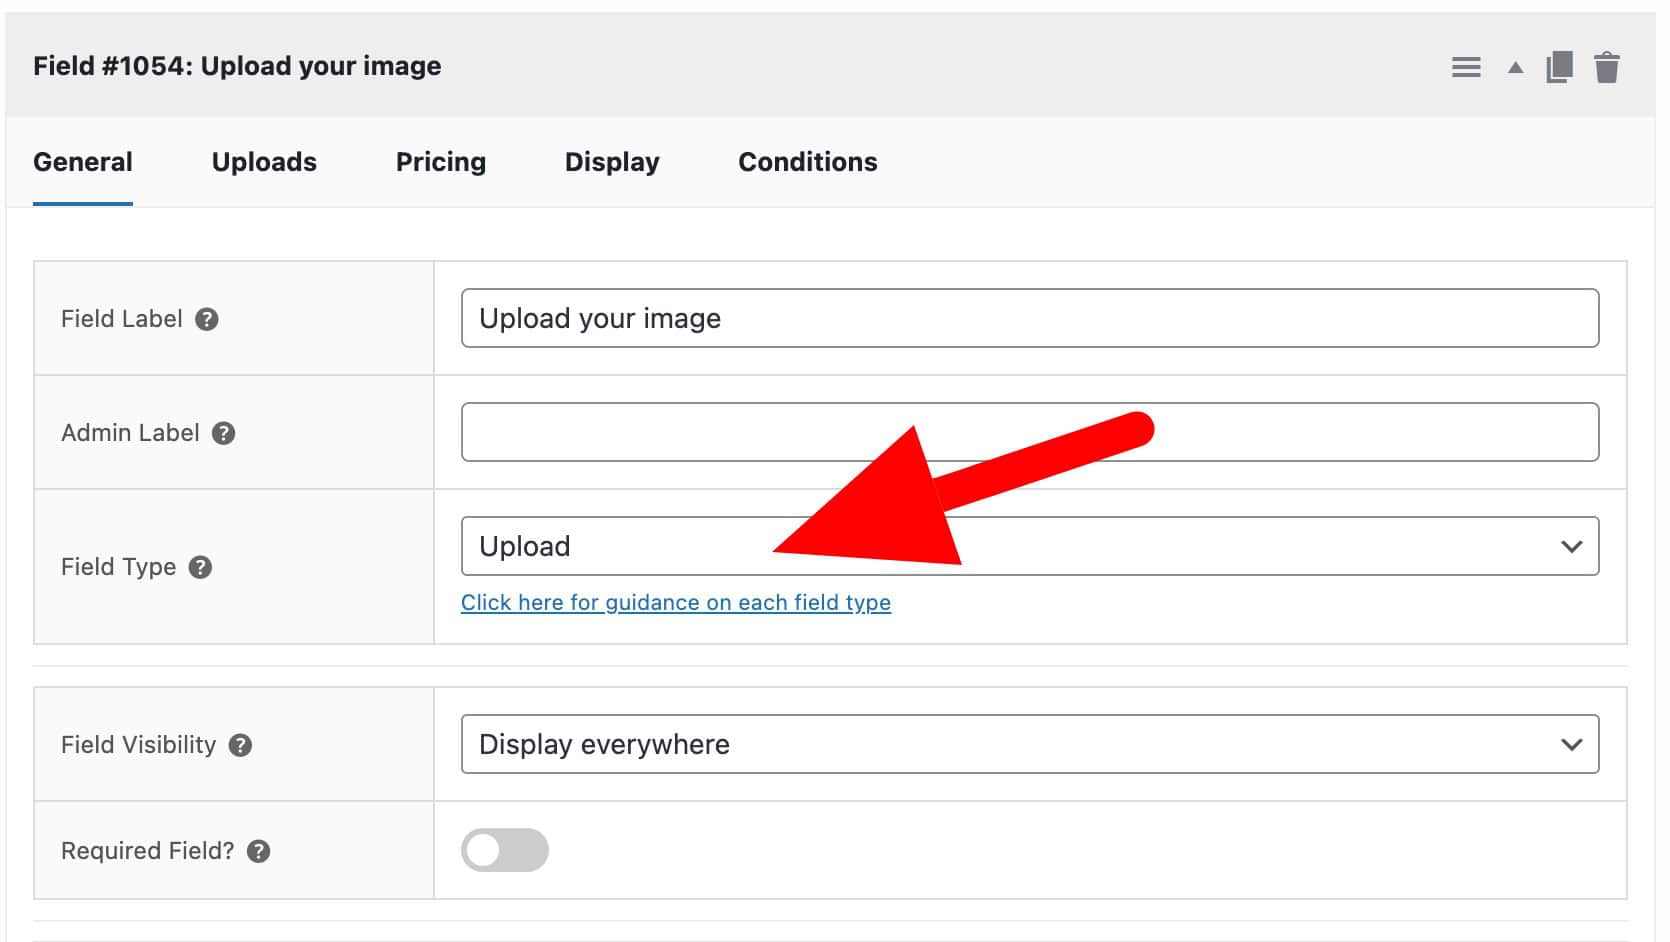
Next, click the ‘Add Group’ and ‘Add Field’ options, then choose ‘Upload’ as the ‘Field Type’. From here, enter a value in ‘Field Label’:
If you save your product and take a look on the front end, you’ll see that the product page contains an image upload field:
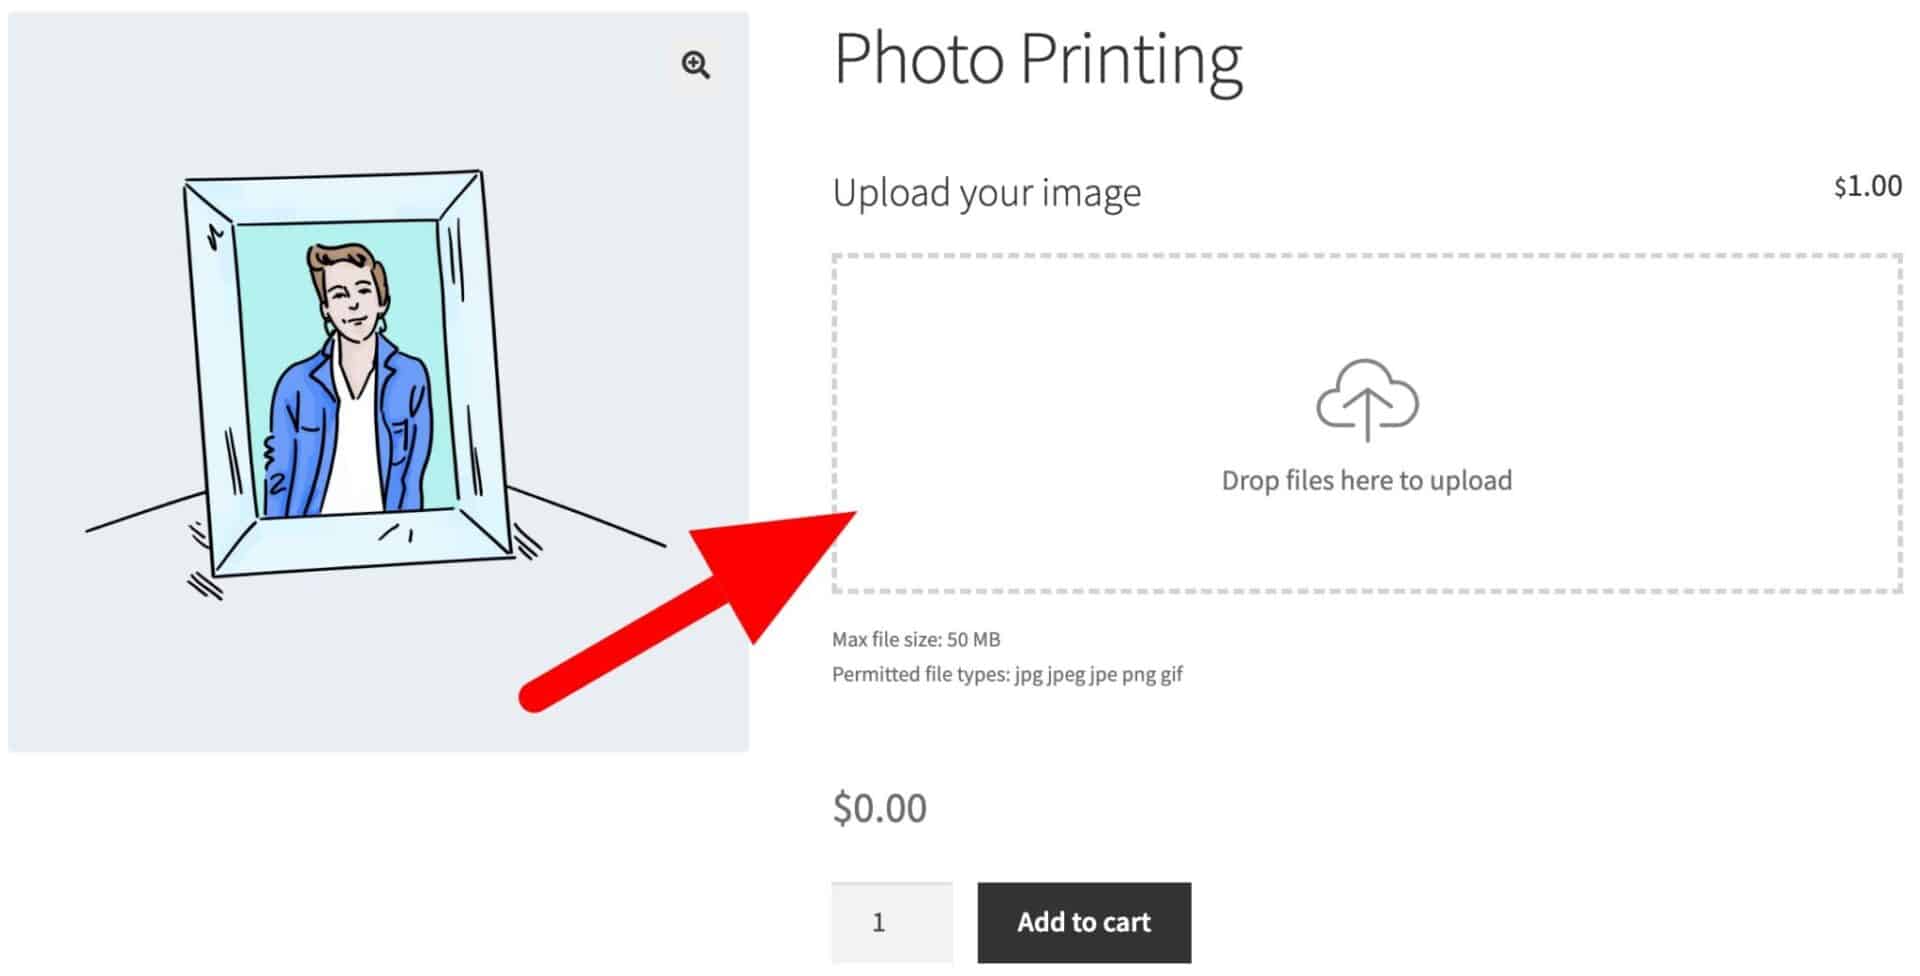
This is all you need to do to add WooCommerce image uploads to product pages.
There’s working demo of the product here.
Add an image upload field to multiple product pages
If you need to add an image upload field to multiple product pages, you can set up a ‘global’ field:
- Go to Product Add-Ons > Global Groups and click ‘Add New Group’ then ‘Add Field’
- Follow the steps above to create your upload field
- Decide which products to display the field on. Choose from ‘All Products’, ‘Specific Categories’ or ‘Specific Products’

This means you can add an image upload field from a single place and apply it to as many product pages as you like.
Now let’s look at some further options for our image upload field.
How to charge a price for WooCommerce image uploads
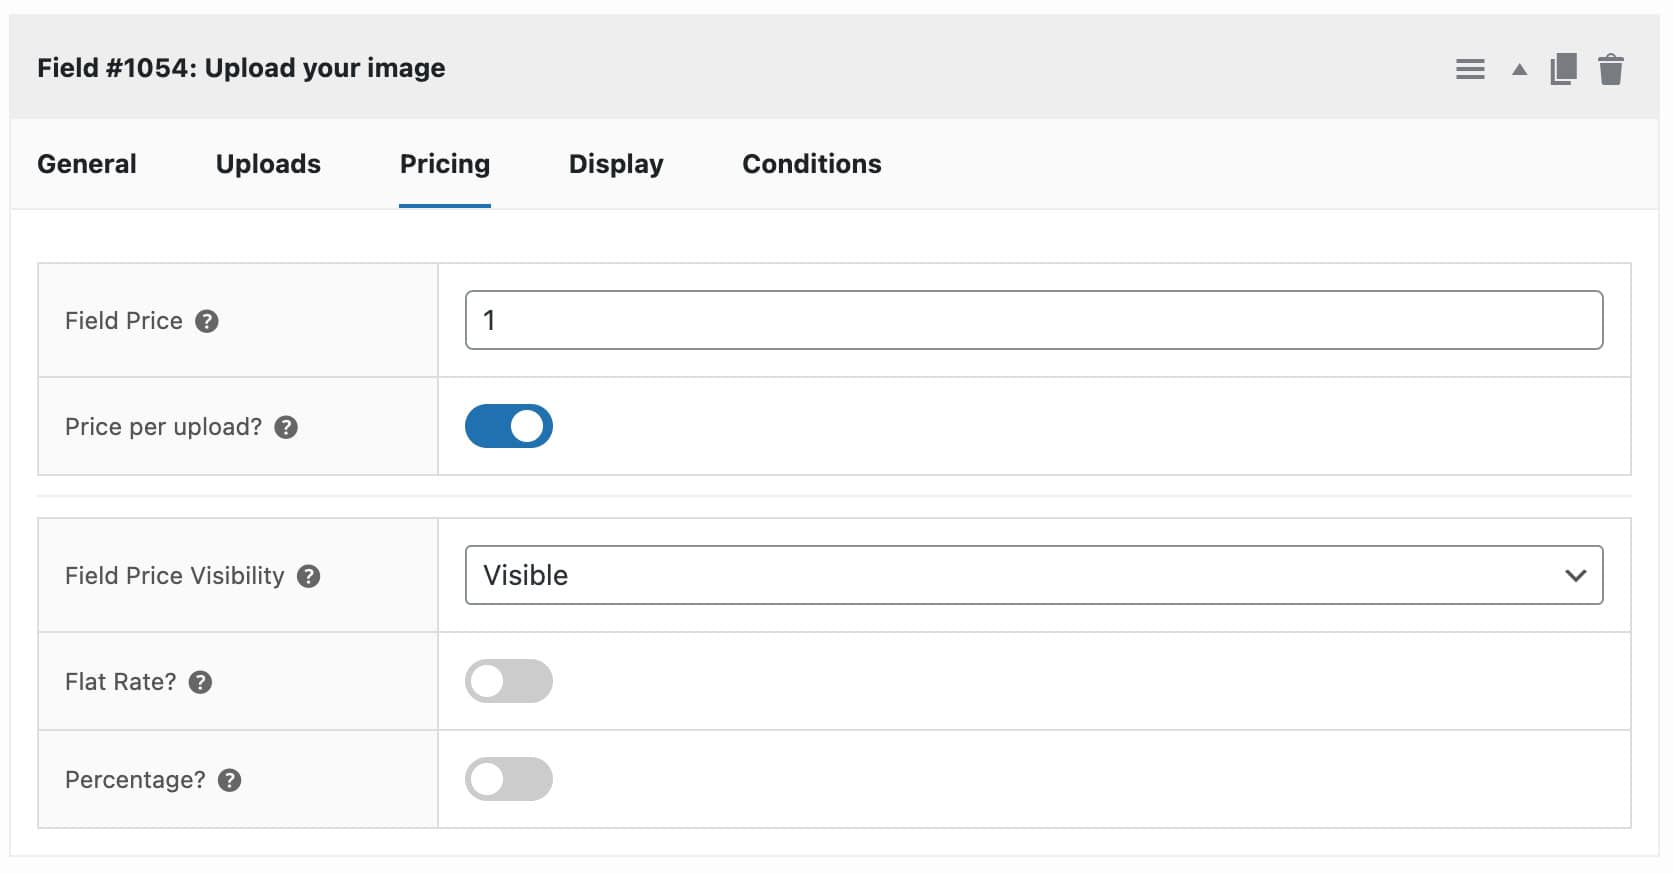
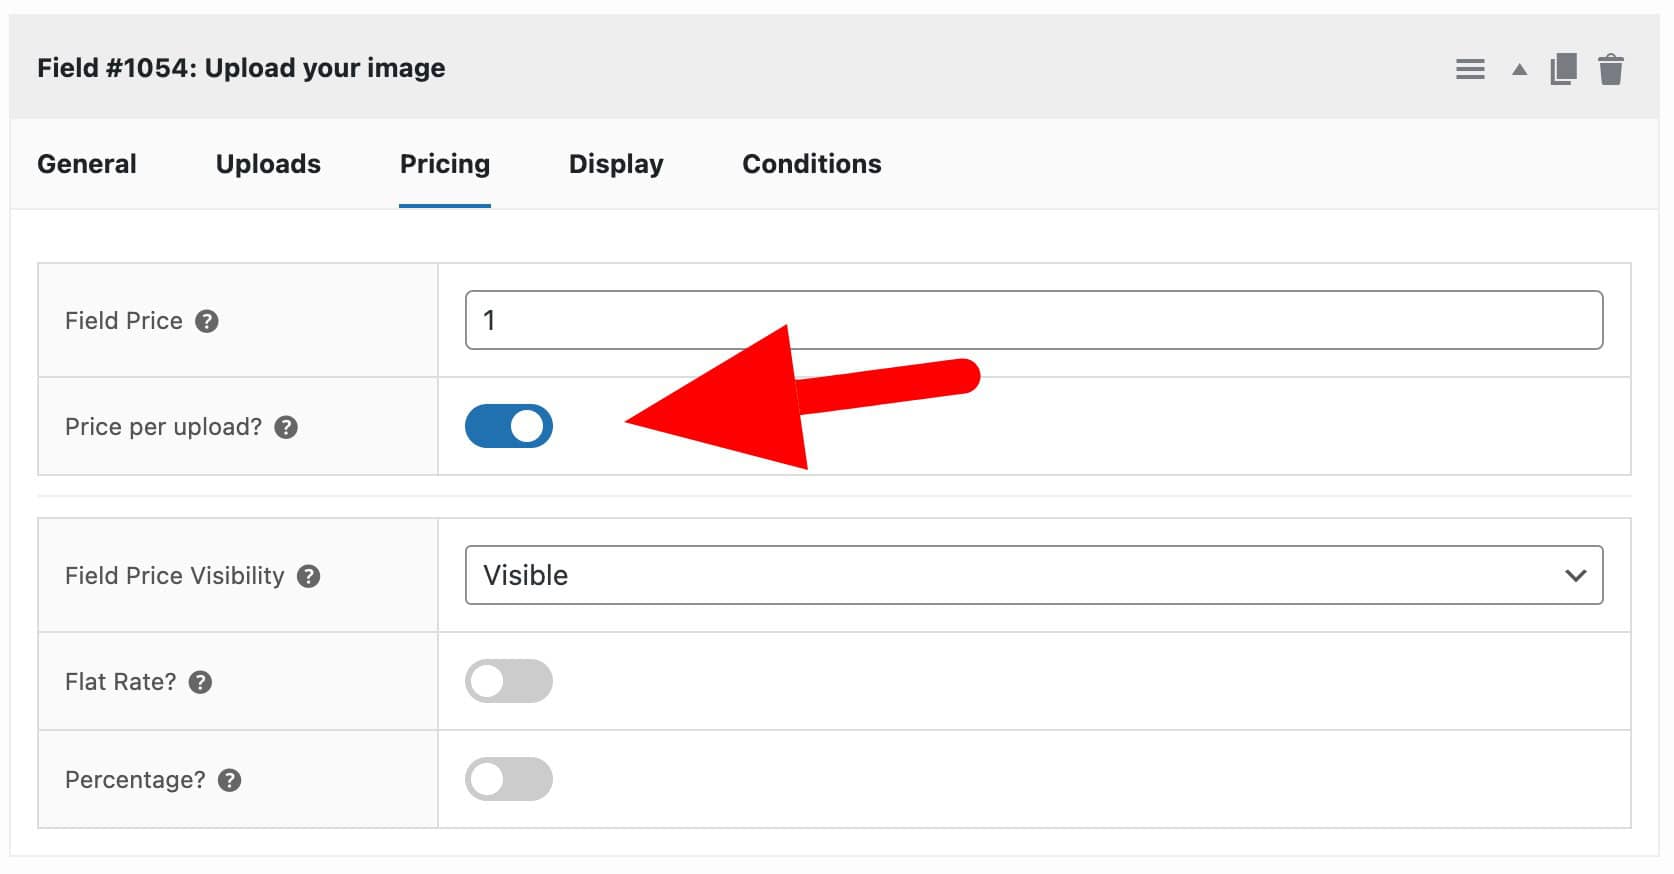
If you want to charge the customer an additional fee on top of the basic product price, enter the price for using the ‘Field Price’ setting on the ‘Pricing’ tab:
When the user uploads an image to this field, the overall product price will be increased by the value of the field price.
How to charge per image upload
Even better, you can charge the user for each upload that they make. Here, enable the ‘Price per upload’ option.
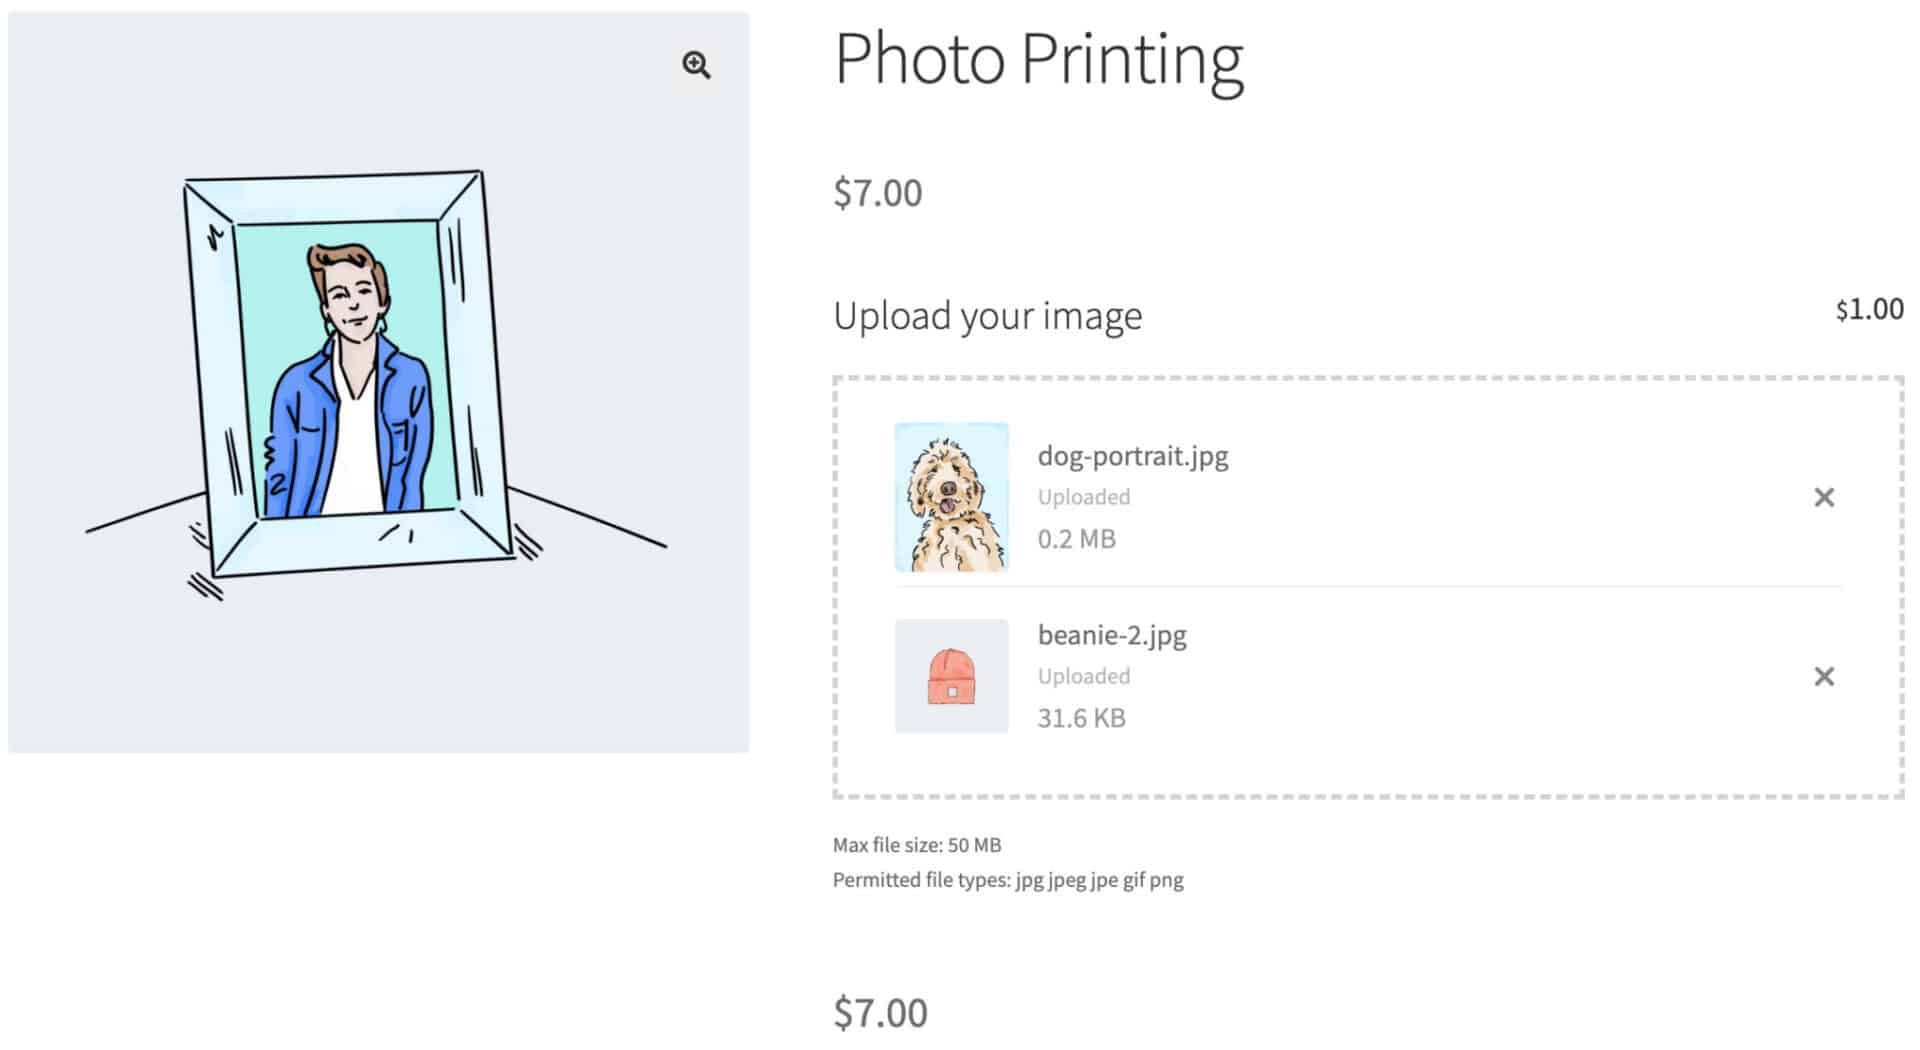
With this setting enabled, if the user uploads multiple images to the field the overall price will be increased by the field price multiplied by the number of uploaded images. The image below shows the total price of $7 – that’s $5 base price for the product plus two uploads at $1 each.
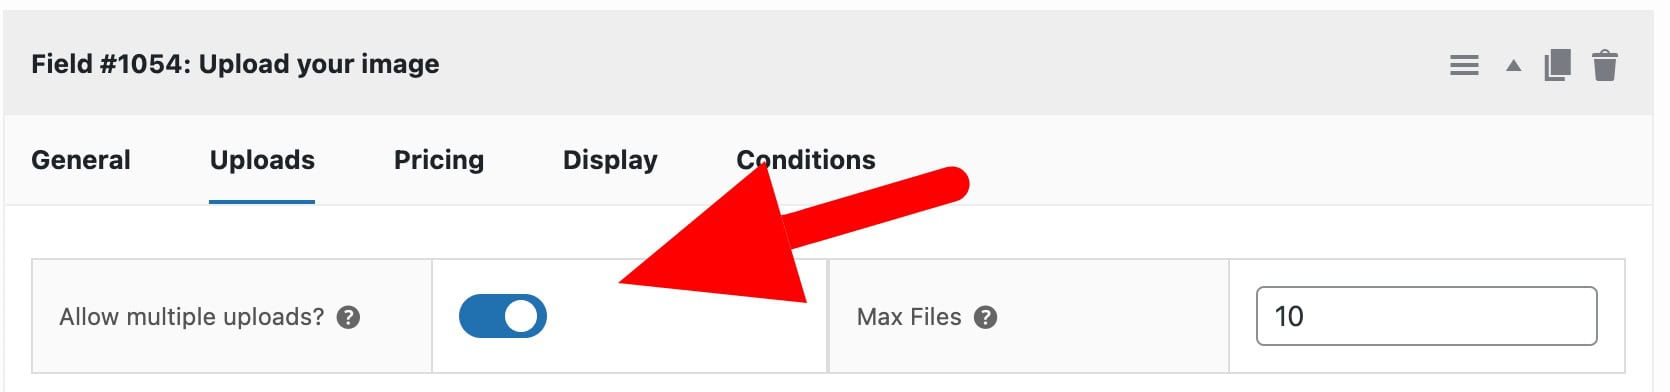
How to enable bulk WooCommerce image uploads
To allow the user to upload images in bulkd to the same field, you can enable the ‘Allow multiple uploads’ option in the ‘Uploads’ field settings:
How to set a maximum number of image uploads
If you have enabled ‘Allow multiple uploads’, you can also define the maximum number of images that can be uploaded to a field.
To do this, enter a value in the ‘Max Files’ field in your field settings:
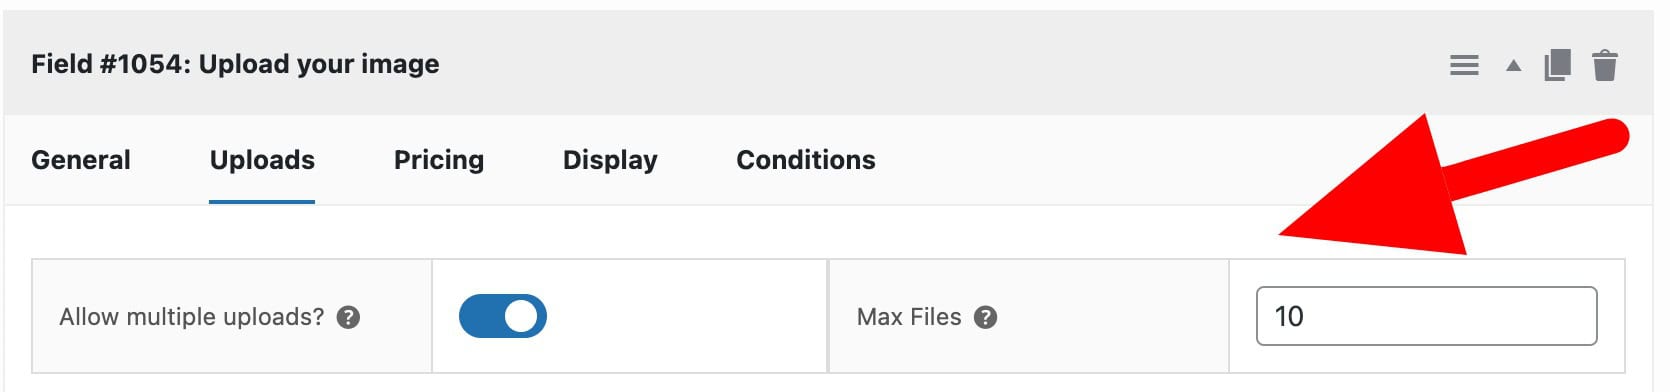
Once you save your changes, the AJAX uploader won’t accept more images than you’ve specified.
Additional settings for image uploads
Let’s have a look at some further options.
Require users to log-in to upload
If you want, you can require your users to log in to your site before they can upload any images to the product pages. To require users to log in”
- Go to WooCommerce > Settings > Product Add-Ons > Uploads
- Enable the ‘Users must be logged in to upload’ option
With this enabled, guest users will not be able to upload images.
How to set the maximum image file size
You can set a maximum file size for your image uploads to prevent your customers from uploading files that are too big:
- Go to WooCommerce > Settings > Product Add-Ons > Uploads
- Set the maximum file size in Megabytes (MB)
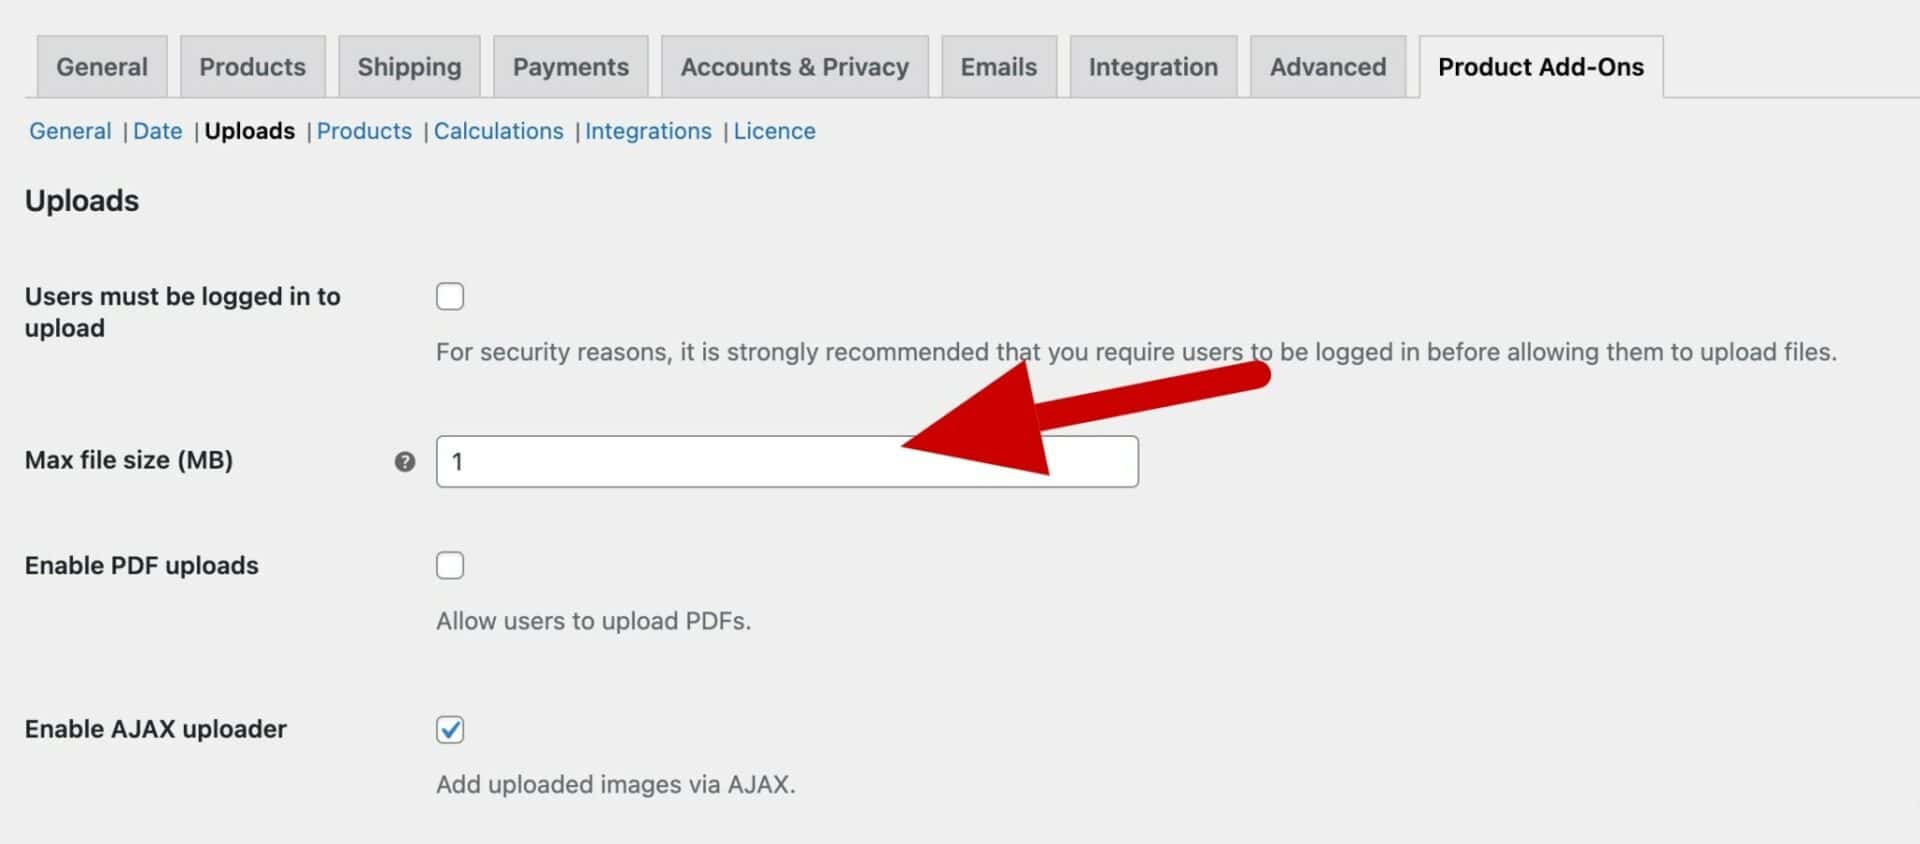
This will help to prevent your server space from getting filled up from user uploads. See below for how to clean and manage uploads.
How to define which file types can be uploaded
By default, the WooCommerce Product Add-Ons Ultimate plugin lets your customers upload image files only. The default file types you can upload are JPEGs, PNGs, and GIFs. To define file types:
- Go to WooCommerce > Settings > Product Add-Ons > Uploads
- Enter the permitted file types in the ‘File types’ field

Image uploads in the order process
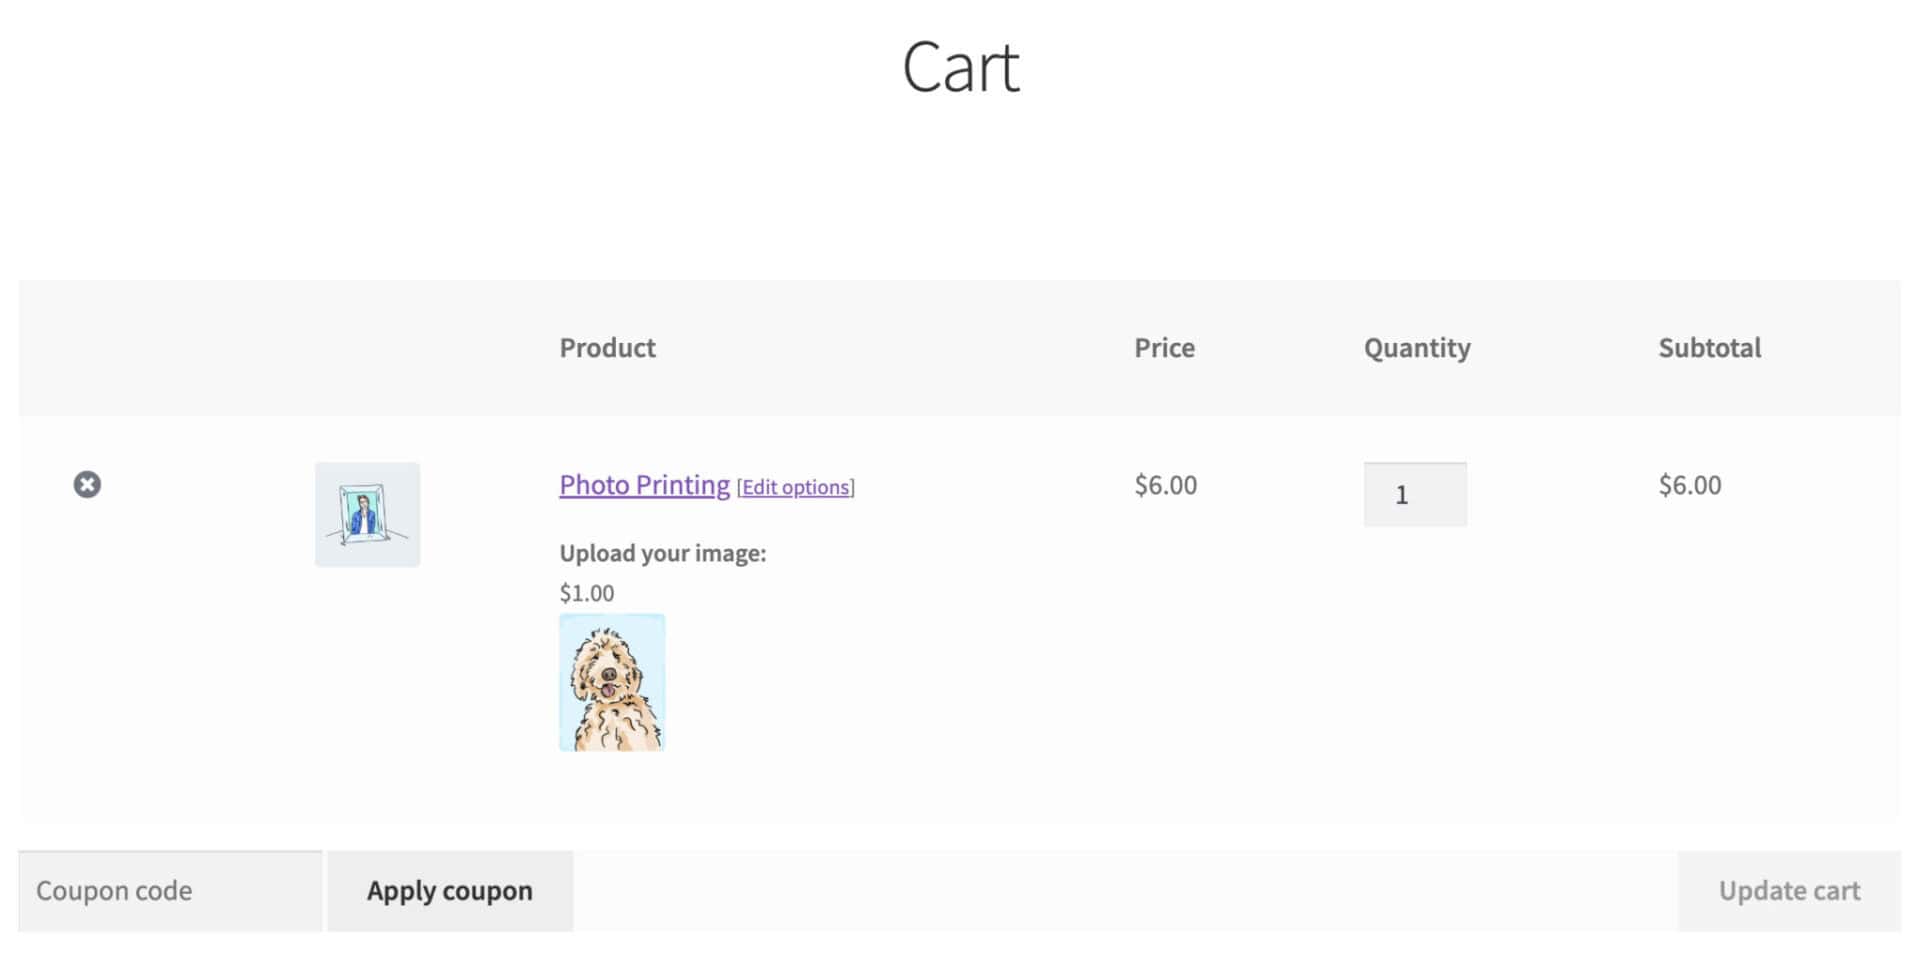
Once the user has uploaded one or more images to the product and clicked the ‘Add to cart’ button, the images will become part of the order. It will be displayed in the cart, checkout and order pages for the user.
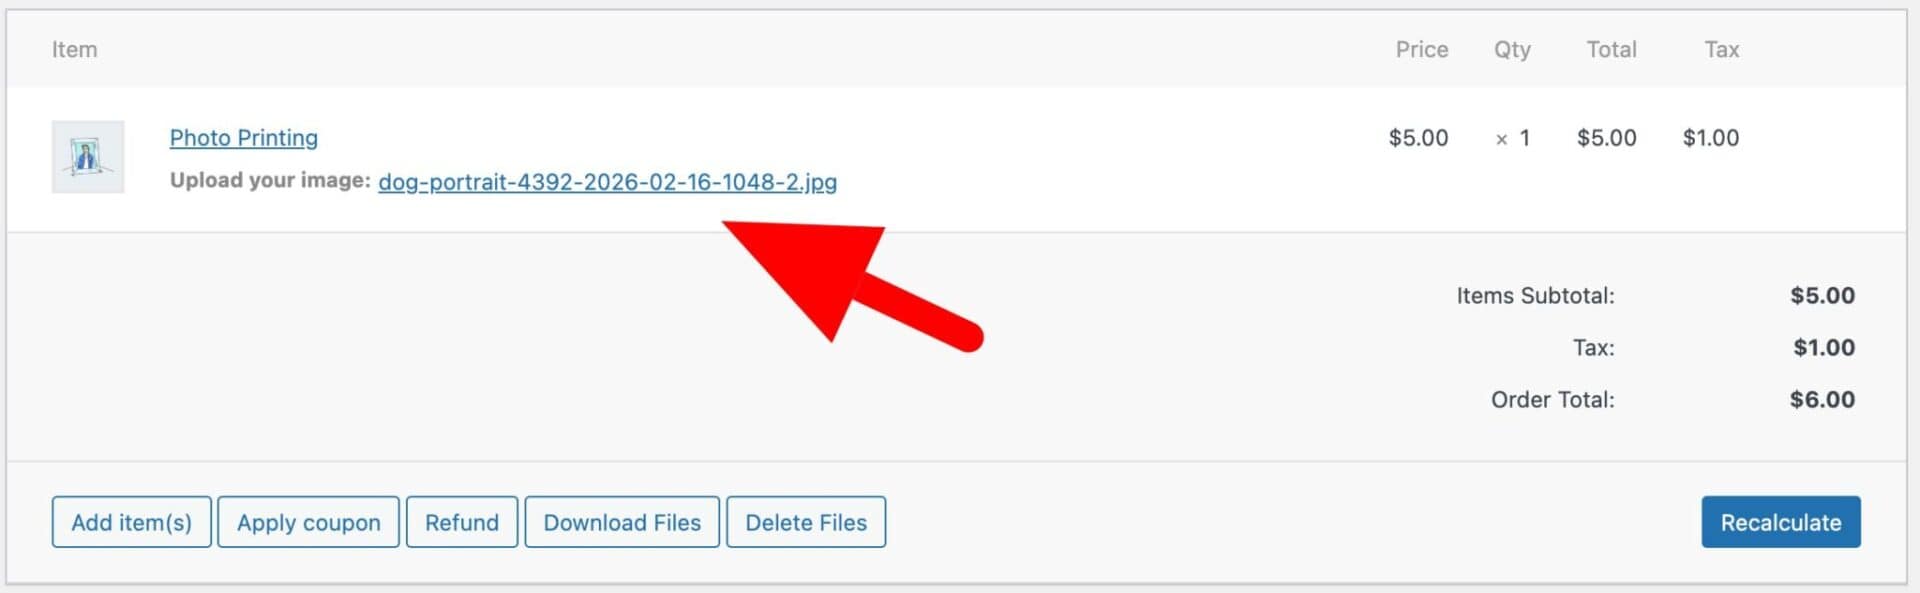
Images will also be included on admin order pages as URLs. Just click to view the image.
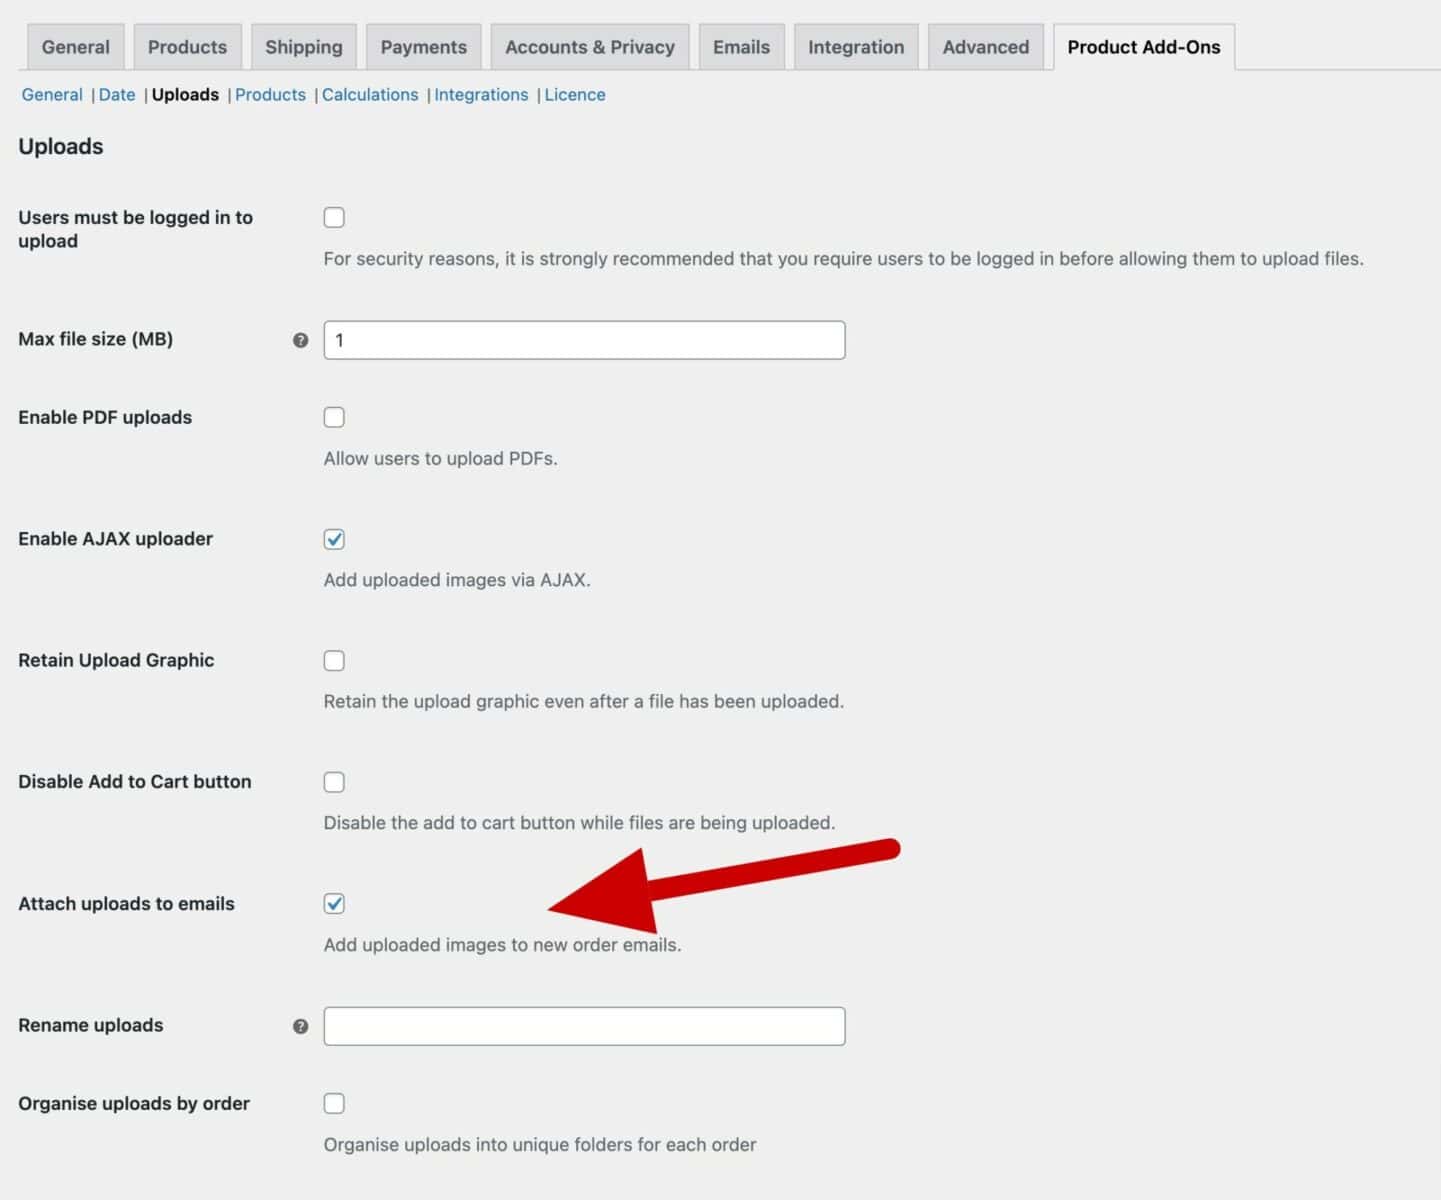
You can also choose to attach image uploads to the emails you receive when a customer places a new order:
- Go to WooCommerce > Settings > Product Add-Ons > Uploads screen
- Enable the ‘Attach uploads to emails’ option:
How to upload images to product pages – video
At this point, you have all of the basics you need. In fact, we have a video to help sum up and explain everything we cover up to this point:
How to use WooCommerce image uploads with other custom fields
Because Add-Ons Ultimate offers over 20 different field types, you can use your image upload field along with other custom fields.
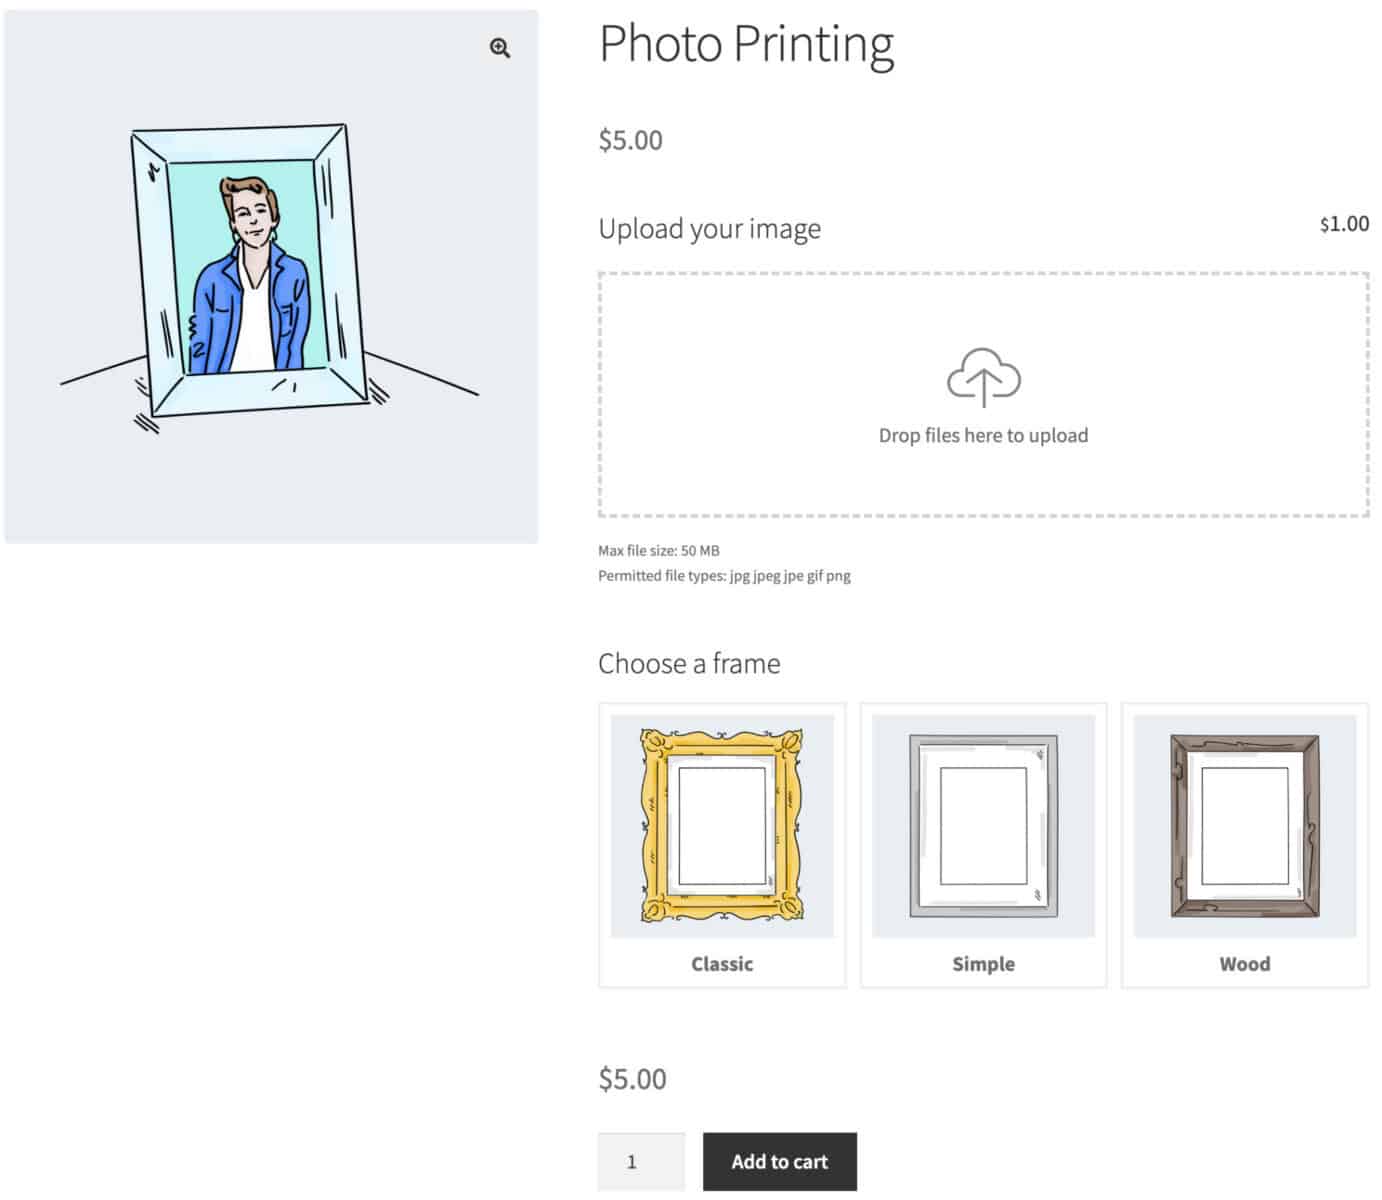
In the example, customers can upload their images and have them printed. They can also pick a frame type.
To achieve this, we’re going to add a swatch field to show the users which frames they can pick.
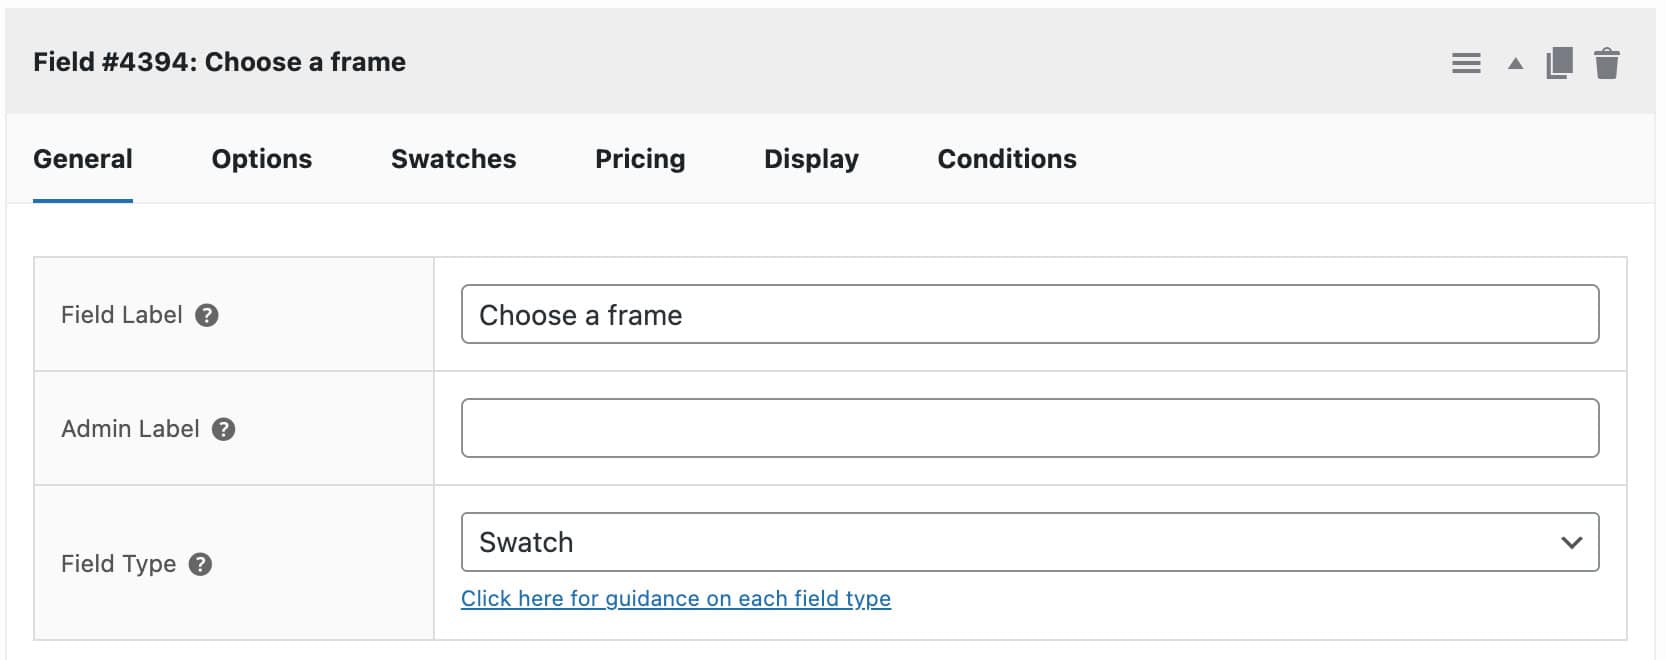
To add a new field, click ‘Add Field’ and select ‘Swatch’ as the field type: Give it a ‘Field label’ as well.
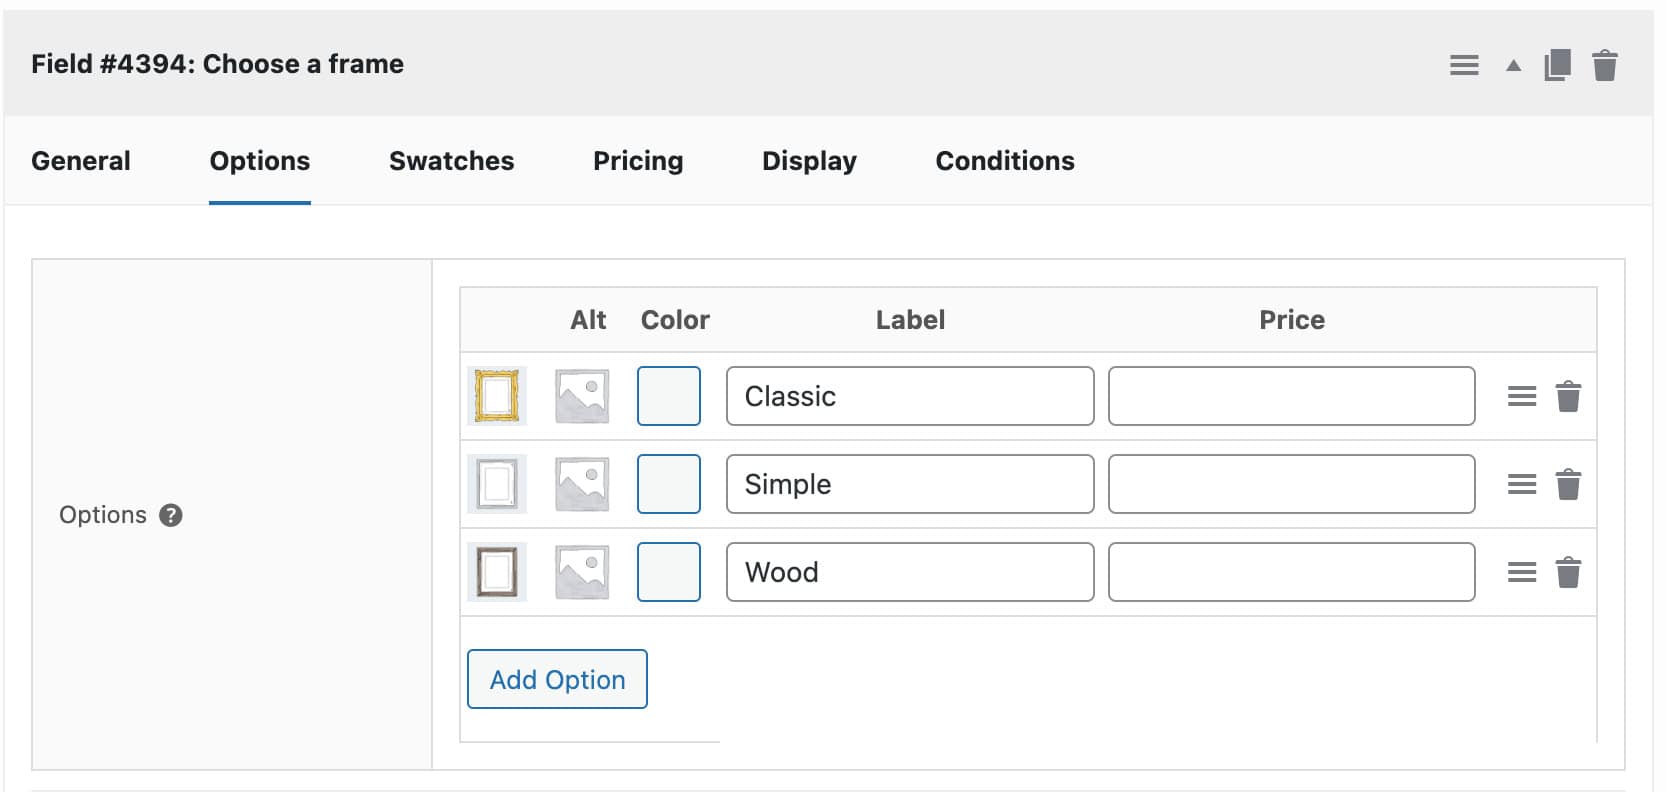
On the ‘Options’ tab, upload an image for each option and enter a label. If you want to charge extra for certain options, enter a price in the ‘Price’ column.
On the front end, you can see the additional options. You can add as many fields as you like.
How to manage image uploads
Let’s take a look at some settings and options for managing images uploaded by users on the product page.
How to organize WooCommerce image uploads by order number
By default, the plugin places uploaded images in a unique directory for each user. If you prefer, you can organize uploads by order number.
To ensure all image uploads within an order all live in the same directory:
- Go to WooCommerce > Settings > Product Add-Ons
- Enable ‘Organize uploads by order’

How to download all image uploads by order in a single ZIP file
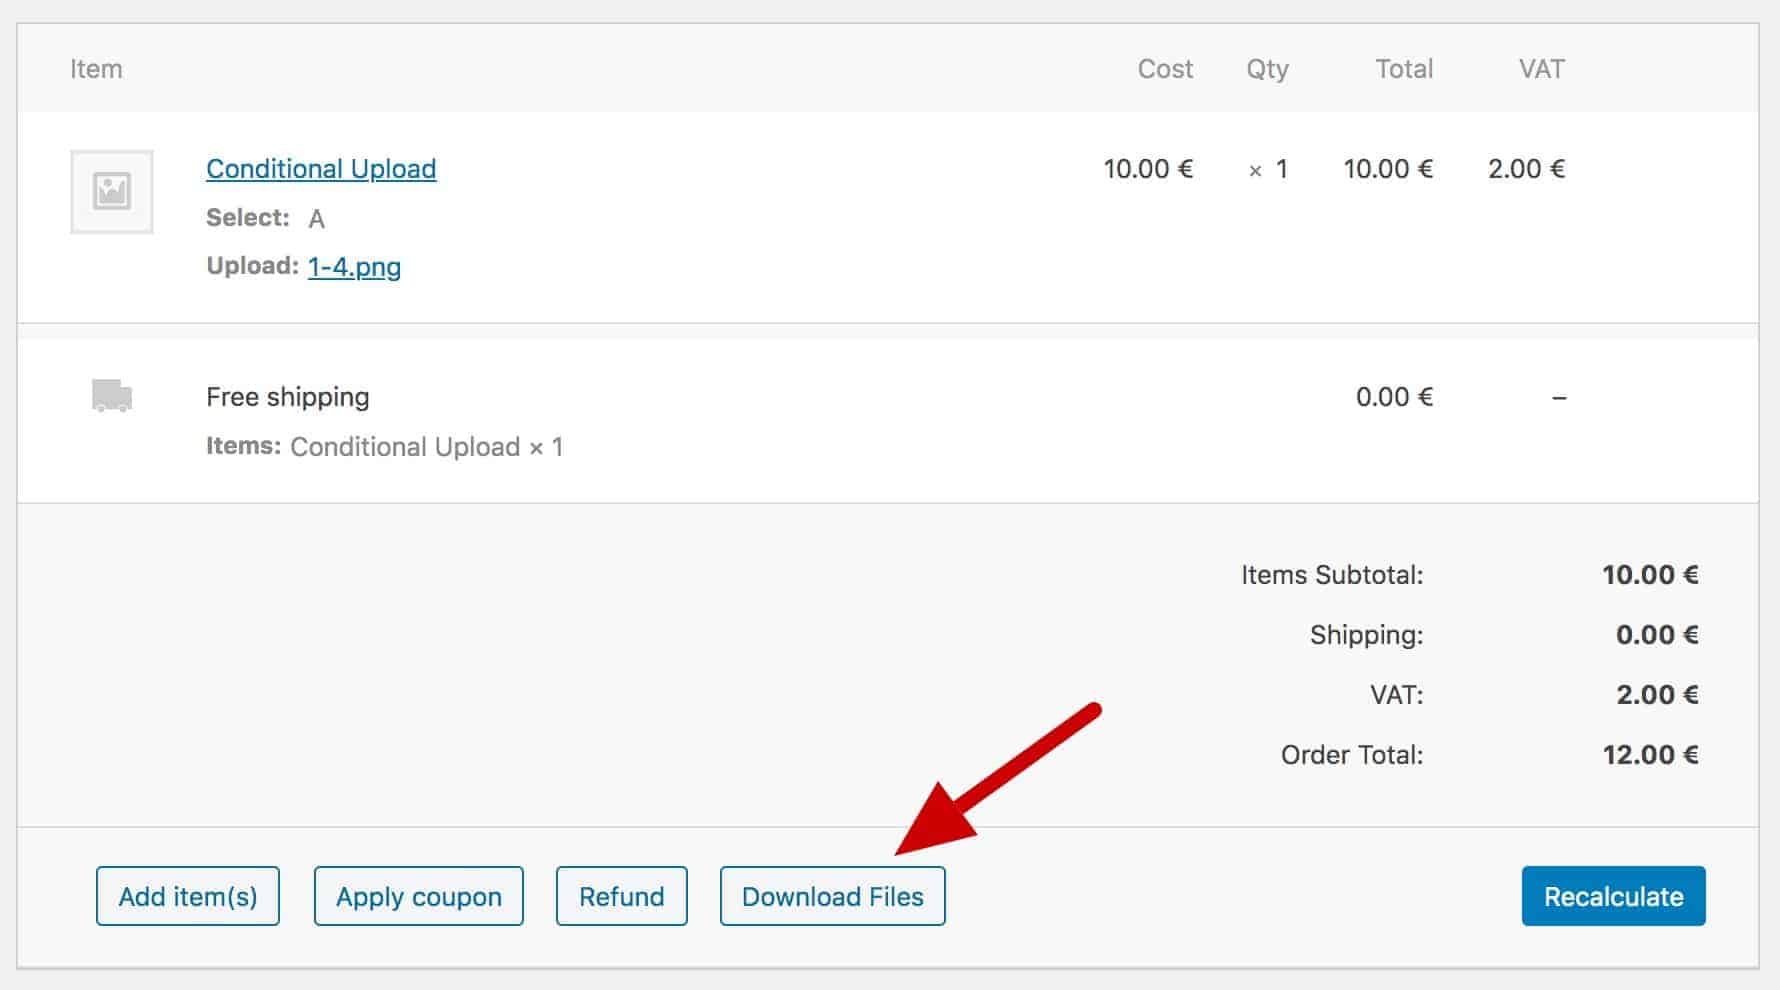
If you’ve enabled ‘Organize uploads by order’ above, you’ll be able to download all the file uploads from an order in a single ZIP file.
You’ll see a new button in the order screen to ‘Download files’:
At this point, WordPress takes over and serves the files to the user.
How to rename image uploads
If you wish, you can rename uploaded files. To do this:
- Go to WooCommerce > Settings > Product Add-Ons
- Enter the format for your file names in the ‘Rename uploads’ field:

You can use the following tags, and WooCommerce replace these when a user places an order:
{original_file_name}{order_number}{group_id}{field_id}{date}{product_id}{product_sku}
Think of them like mail merge tags, where they refer to database elements that turn into readable text on the front end.
How to delete unwanted uploads
You can manage and delete images that have been uploaded to your server in a number of ways:
- Delete all uploaded images associated with a specific order
- Delete uploaded images associated with all completed orders
- Delete all images uploaded before a certain date
This ensures that your server is not full of unwanted image uploads. To bulk delete uploads:
- Go to Product Add-Ons > Clean Up Files
- Choose ‘Delete uploaded files from Completed orders’ to delete all images uploaded to orders that have been marked ‘Complete’
- Alternatively, select a date and delete all images uploaded before that date
Extend Add-Ons Ultimate with additional plugins
You can extend the image upload features in WooCommerce Product Add-Ons Ultimate using one or more of the following plugins. All these plugins, plus Add-Ons Ultimate itself, are included in the Product Add-Ons Ultimate Bundle. Pricing for a single-site license for the bundle starts at $129.

Product Add-Ons Ultimate Bundle
Advanced features, superior control and excellent savings
How to edit image uploads
You might want to let users edit the images they upload. You can do this with WooCommerce Product Add-Ons Ultimate and with the Advanced Uploads extension.
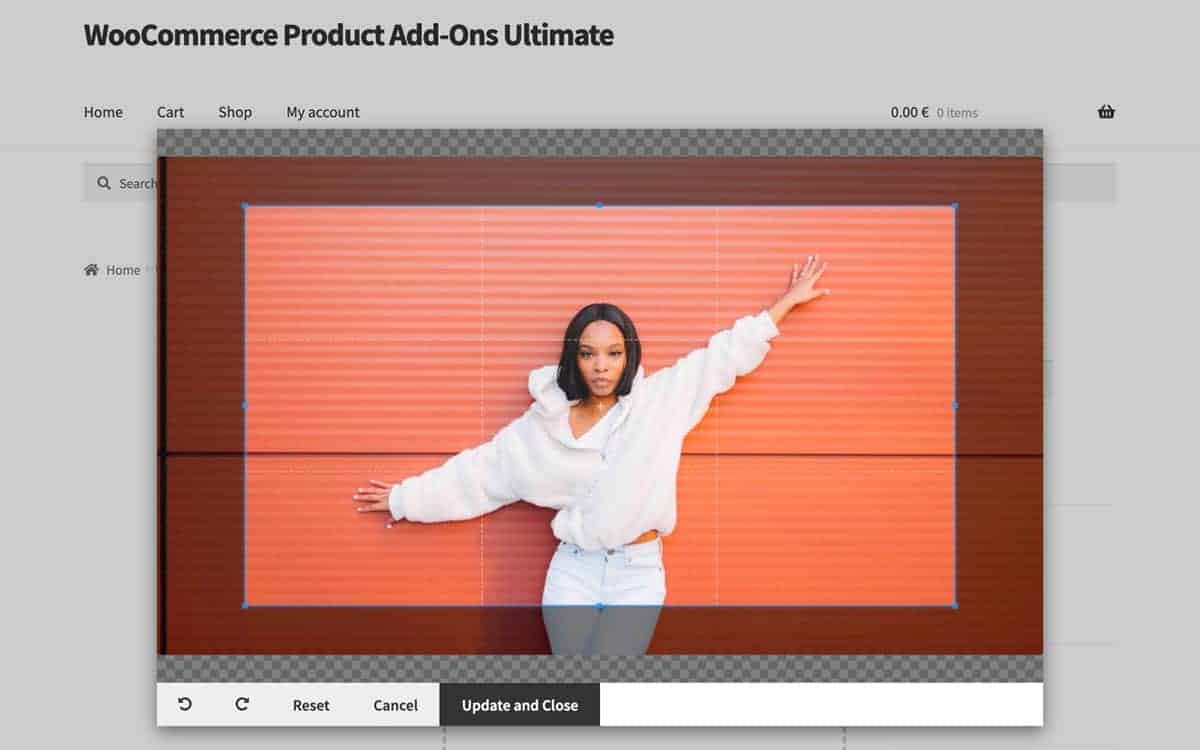
With the Advanced Uploads extension, users can crop, rotate and resize their uploaded images. You can also specify a minimum and maximum width and height, plus define the aspect ratio for cropping images.
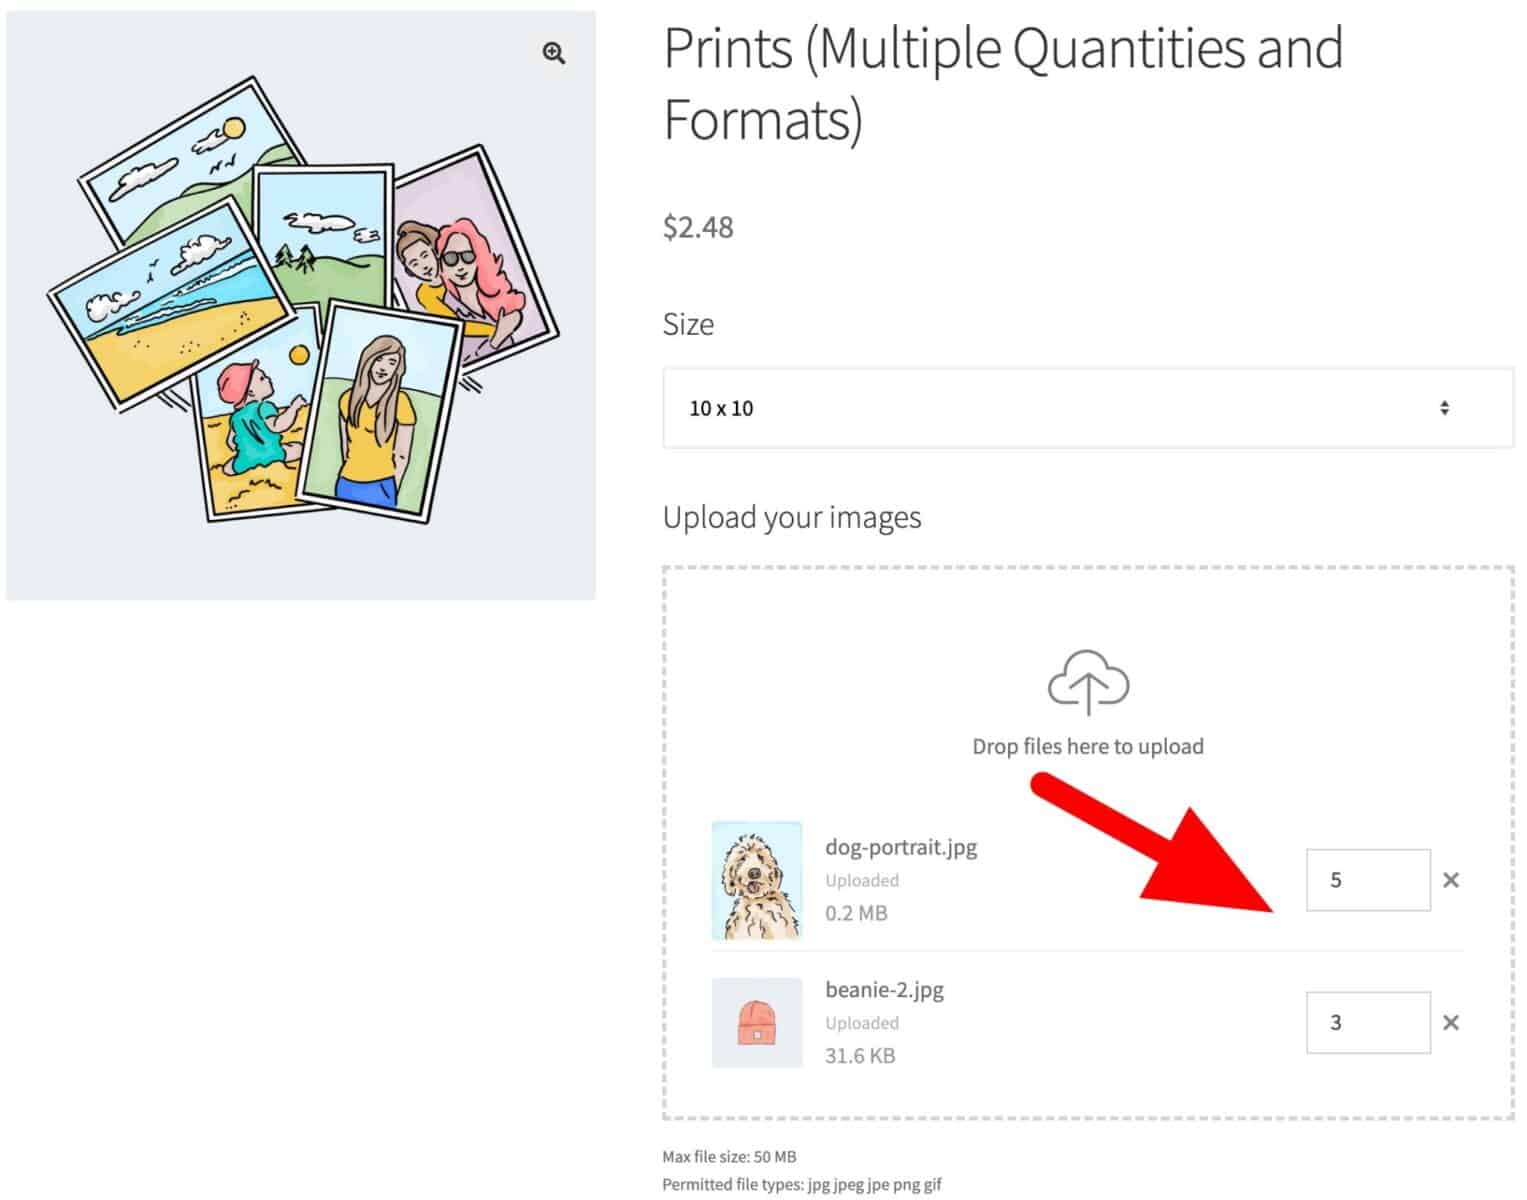
With Advanced Uploads, you can also allow the user to upload multiple images per field and specify a quantity for each file.
How to preview uploaded images on the main product image
With the Image Preview extension, you can allow users to upload images and see them previewed as part of the main product image.
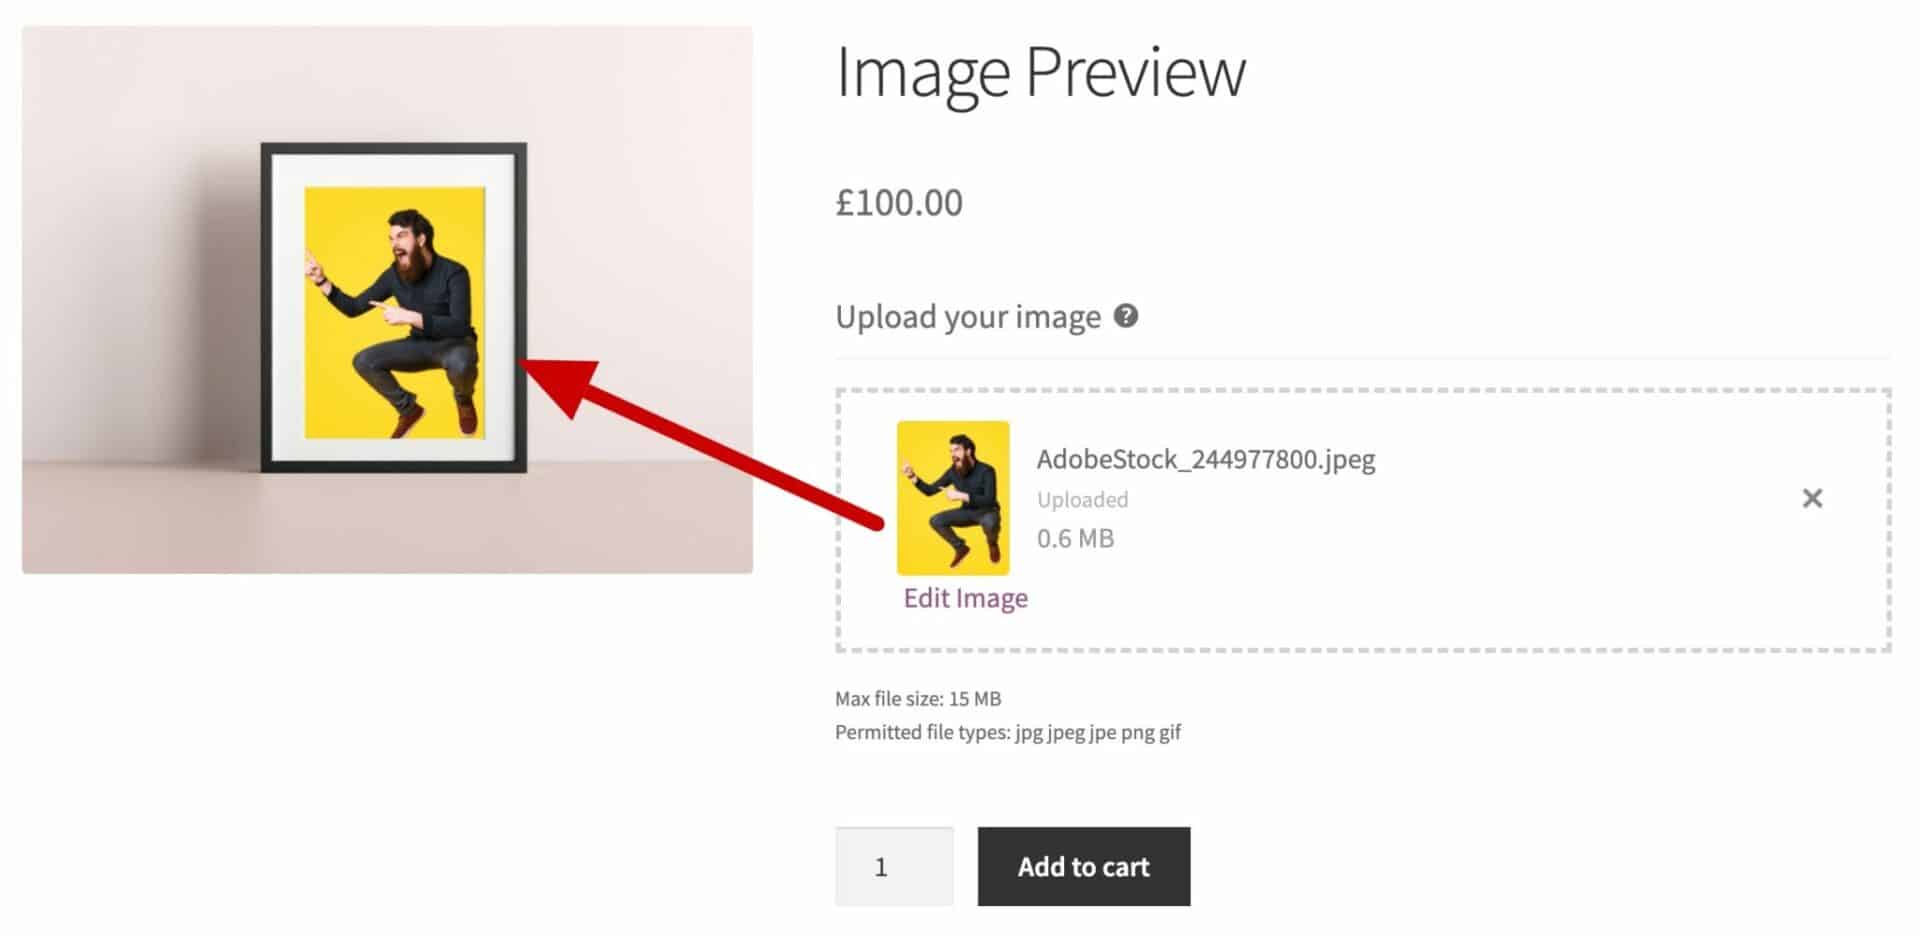
You can also have multiple image previews on the same product page if you wish.
How to review and approve WooCommerce image uploads
You might want to enable your customers to upload files that you then rework or revise. This way, you can present the order details page to the customer for their review and approval.
You can do this using the WooCommerce Review and Approve plugin. There’s a full tutorial on creating a WooCommerce file approval process elsewhere on the blog. It’s essential reading if you want to implement this functionality.
Adding WooCommerce image uploads to product pages – final thoughts
Using the WooCommerce Product Add-Ons Ultimate plugin, it’s simple to implement image uploads on a product page. You will set parameters such as file size and file types, and display thumbnails. For more advanced functionality, you can enable an AJAX drag-and-drop file uploader. This lets users upload their images in bulk.
For some of the more advanced features, you can use the extensions contained in the Product Add-Ons Ultimate Bundle
Product Add-Ons Ultimate Bundle
Advanced features, superior control and excellent savings
All our plugins come with a 14 day money back guarantee – so you can try risk-free. They’re compatible with all themes and page builders – and backed by our world-class support team.
Hey, is it possible to programmatically upload the image to the order for the user? Say I have an app that generates an image for them based on inputs, then want to add the image to the order without the user having to upload?
I have this same issue. I’m generating the data as an image uri and just want to attach it to the order when the item is added to the cart.
Do it works well on Mobiile. I already have one plugin but it does not work well on mobile phone.
Hi Tarun
Yes the plugin works well on mobile devices.
Thanks
Gareth
please tell me the plugin name and its cost
Hi – the plugin is Add-Ons Ultimate. You can find more here: https://pluginrepublic.com/wordpress-plugins/woocommerce-product-add-ons-ultimate/.
Thanks.
Suppose I have a photo frame which has 4 shapes : Circle, Heart, Square, Rectangle. And I want users to upload images with respect to the shapes, for example in front of label “Circle”, user will choose an image and so on for other shapes. Can I achieve using this plugin ?
Hi Akki
Yes, you can do this. Just create four upload fields, named for each of the shapes.
Thanks
Gareth
Hi
I want to know if your plugin supports RTL?
And is it possible to translate the plugin into other languages?
Thanks
Hi
Thanks – yes, the plugin supports RTL and is fully translatable. Let me know if you need any more information.
Thanks
Gareth
As a print lab, is there a way to upload the images and then apply print sizes individually which then creates the multi-print order?
Hi Paul – are you looking to apply different print sizes for each image?
Gareth
Hi Gareth, Yes, ideally there would be a gallery of uploaded mages and each selected image or a selected set can then be given print sizes, similar to Sunshine cart.
At the moment, no. It’s something I’m looking into but I don’t have a date for when.
OK, good to know it’s a potential.
I may use your plug and have a limit to what can be ordered
Is it possible to have the Price of consecutive Uploads to differ?
First Photo $3
Additional Photos $1
Hi Nikita
Yes, you can do this using the calculation field – https://pluginrepublic.com/documentation/calculation-fields/. This allows you to use the number of uploaded files in a formula.
Please let me know if you need any more information.
Thanks
Gareth
Hi, is it possible for my client upload their photo and crop them? For exemple he sets a Print 5×7 but the digital pic are in 16:9 ratio. Can he crop?
Thank you.
Yes, you can use the Advanced Uploads extension: https://pluginrepublic.com/wordpress-plugins/add-ons-ultimate-advanced-uploads/
Thanks
Gareth
Hello,
great plugin… Is there any options to choose quantity for every single uploaded photo?
Hello,
can I choose quantyq for every uploadte file ?
Hi Tadej – at the moment, no – but if there’s enough demand for it, I’ll look at adding the feature.
Thanks
Gareth
Hi Gareth, i really love the plugin, but i stopped myself from buying, because you do not have an option where i can upload a gallery of pictures(in my case emblems for trophies) and allow my customers to select from.
I would love to know if you are going to be able to make it possible or if not possible-can you give me further suggestion how i can achieve this. I really need this for my shop.
Hi Borissa – if you would like to display a gallery of images that the user can select, you could use the ‘Image Swatch’ field.
Thanks
Gareth
Hello,
Just bought the plugin, so far great!
Couple of questions:
1. Is it possible to have “IF” statement in calculations?
2. Would be great to be able to copy / paste global groups, maybe export all setting and then upload all settings on other website. Because Im building a web on local server to test and want to upload all the settings to live web afterwards, that would save tons of time doing everything manually!
Hi Irakli
In answer to your questions:
1. There’s no ‘IF’ statement in the calculation itself, but you can create multiple calculation fields and use conditions: https://pluginrepublic.com/documentation/conditions/
2. At the moment, no – but it’s something I’m working on.
Thanks
Gareth
Hello,
Is the possible to crop the uploaded image? We have square, landscape and cicrle shape of frames, so wen the customer upload the image, its need to crop to this shapes. Is it possible?
thanks, Gabor
Hi Gabor
I plan to add image cropping in a future version.
Thanks
Gareth
Hello Gareth,
what is your date of your plan, what do you think?
Gabor
Thanks Gabor – I can’t give you a realistic time frame for this. It’s something I’d like to get to but I don’t have capacity at the moment.
Gareth
Hi Gareth, the “Add Ons Ultimate” is the probably closest perfect plugin for uploads. Literally, I have not found anything closest to this. Do you have an update on the crop feature? I need to allow my customers to crop their pictures based on our required sizes/ratios for our products. This is the only thing keeping me from purchasing it. Can you please advise?
Hi Jay
Yes, you can use the Advanced Uploads extension for Add-Ons Ultimate: https://pluginrepublic.com/wordpress-plugins/add-ons-ultimate-advanced-uploads/. This will allow users to crop images based on specified aspect ratio.
Thanks
Gareth
Hello, I have purchased the plugin and the uploaded files do not appear in the orders when created.
What should i do?
Thanks
Please raise a support ticket from https://pluginrepublic.com/support/.
Thanks.
Hello Developers,
can you me about this point
“Image should not be cropped on the product page, add a perfect image size option in the backend so that user can’t change the image according to them.”
Please check it.
Thanks
Pankaj
Hi Pankaj
Do you mean that you want to ensure that all images get uploaded to a certain size? You can do that with Add-Ons Ultimate and the Advanced Uploads extension.
Thanks
Gareth
Hi Gareth – I want to buy Basic version and before I make the purchase I have couple of question to be sure that I don’t need to ask for refund after purchase;
can we add text field for instruction as optional below upload field on product page?
can the customer edit/delete/replace uploaded image on cart/checkout page or after the order is placed on order detail page?
Hi
Thanks for the questions:
1. Yes, you can add a description to the upload field to provide instructions
2. The customer can edit the image on the product page using this extension which works with Add-Ons Ultimate: https://pluginrepublic.com/wordpress-plugins/add-ons-ultimate-advanced-uploads/. The customer can also delete or replace the image: https://pluginrepublic.com/documentation/how-to-edit-add-ons-in-existing-orders/
Hope this helps.
Gareth
Hello! How Can I put it on an elementor product page?
Hi Joel
Please see this article: https://pluginrepublic.com/documentation/is-the-plugin-compatible-with-my-page-builder/
Thanks
Gareth
Hello, im wanting to upload an image, but I need to be able to retrieve the url image path to send in a HTTP POST request. Can I do this?
Hi Nick
Do you mean that you want to get the URL on the front end, when you upload the image? If so, that’s not possible with the plugin.
Thanks.
Hi Mr. Gareth,
we have issue with image preview and text preview. it is not shown in main product
Do uploader support also pdf for prints?
Hi Osman
Yes, you can upload PDF files using the upload field.
Thanks.
I see you recently added the ability to let users crop their images. I only see rectangle crop in the screenshots and documentation. Is Circle/Ellipse crop available in this plugin?
Hi Dave
Circle or ellipse cropping would only be possible with some custom CSS. I’m happy to take a look at it with you if you liked.
Thanks.
Yes. If it is possible to let, or better yet, force customers to crop their images into a circle and on the backend made a PNG with transparency, I would purchase the plugin in a heartbeat.
Would the custom CSS be on my end to implement or yours on the plugin side?
Thank you.
Hi
Yes, it’s possible to use some custom CSS to force the crop area into a circle: https://github.com/fengyuanchen/cropper/issues/545#issuecomment-628037727.
Thanks.
Do you offer a facility – so we can check the image first – and then take payment?
Hi – not at the moment but it’s a feature I plan to add.
Thanks.
Can I connect this to my cloud storage so all uploaded images and orders are saved in my cloud storage account?
Hi Christian
That’s something I’m looking into at the moment.
Thanks.
Do you know roughly when this will be added? Is it something you 100% plan on adding?
Thanks
Hi Christian
I don’t have a date for this at the moment.
Thanks.
I second this! Being able to connect to Facebook, Insta, etc would be excellent!!!
Hello,
Is it possible to upload an image and have that image displayed on the product so that customer can see how that particular image will look on the final product?
Thanks
That’s a feature that I’m working on.
Thanks.
Do you have any specific timeline for when this feature will be added?
Thanks
Unfortunately I don’t have a specific date that I can give you.
Ok. Thank you for letting me know.
Thanks
This would be awesome!
Hi can i use this plugin for clipping path services. how ?
Hi
You can use the Add-Ons Ultimate plugin to upload files on WooCommerce product pages. You can also use the Advanced Uploads extension to allow your users to crop their uploaded images.
Thanks.
Thank you for your answer
In clipping path service, the client sends images to the freelance, they retouch them and sends them back to the client. It is not the client who retouches the images
Okay, understood.
Yes, you can do this with the Review and Approve extension: https://pluginrepublic.com/wordpress-plugins/woocommerce-review-and-approve/. (Note that it requires the Add-Ons Ultimate plugin as well).
Thanks.
Hi- Can you confirm where the files are uploaded to? Sounds like you may be working on cloud storage like Google Drive. If we have products with multiple image uploads, we want to make sure they aren’t sent through email (due to email file size constraints), but a link is provided for the admin users to retrieve. Also, are these images kept permanently? Just wanted to see if we would run into server storage issues down the road.Thank you.
Hi
The files are uploaded to a directory in wp-content/uploads. We’re currently working on a solution for managing these files in order to ensure there are no storage issues.
Thanks.
Hi Gareth, I’d like to buy your All Bundle Pack. Just one question:
I want to use a combination of this extensions:
– Advanced Uploads
– Image Preview
My product has different sizes (for example 60×40 cm and 50×50 cm). Is it possible to change the preview image when the user change the size with a different upload mask based on the selected size?
Is it also possible to have a fixed image with a dynamic mask is the user select custom sizes? I’d like to use also the Advanced Calculation Plugin
Hi Fabio
Yes, you can do this by using a variable product with variations for each size, e.g. 60×40, 50×50, etc. You can assign a different image to each image.
Thanks.
Hello,
Does the download image option support exporting the product image with the upload image? For example, I want the user to be able to download how the product looks with the uploaded image. Is this possible?
Hi Jenn
It isn’t currently possible to export a “combined” image.
Thanks.
Hi Gareth,
I noticed above you had said that the Upload field works on mobile, however when I view my site on mobile it says that “I need to be logged in to upload files”. Is this something that can be fixed easily? My site doesn’t have an account based system on it so I’m not sure how that came up?
Kind Regards,
Andy.
Hi Andy
Please see this article: https://pluginrepublic.com/documentation/upload-fields/.
Thanks
is there a way to increase the image preview size in the cart?
Hi
Yes, you could do this using some CSS.
Thanks.
Where would we find this CSS?
Hi Carrie
Please raise a support ticket and we’ll be happy to help: https://pluginrepublic.com/support/.
Thanks.
Hi Gareth,
this plugin seems to be exactly what I’ve been looking for. I have a small printshop (prints on wood).
However, one question: Can I change the language (frontend) to German?
Hi Sabine
Yes, the plugin has been translated into German so it should automatically display in German on the frontend.
Thanks.
Hey
Is it not possible to uppload a .zip file or .svg or .eps?
Hi Jens
Yes, it’s possible to upload any file type.
Thanks.
Hello,
Is there an update on file upload to cloud storage? (AWS S3 specifically.)
Hi
This is not available as an option at the moment.
Is it possible to have the users select from a ton of photos already uploaded to the WordPress media gallery instead of them uploading their own images?
Thanks in advanced
Hi Claire
It’s not currently possible to select from photos in the media gallery. That would require a customisation.
Thanks.
Is it possible to count the PDF pages and define a price based on the number of pages?
Hi
Yes, with the latest version of Add-Ons Ultimate (Pro version) and Advanced Uploads, it’s possible to count the pages in an uploaded PDF then use that value to set the price.
https://pluginrepublic.com/wordpress-plugins/woocommerce-product-add-ons-ultimate/
https://pluginrepublic.com/wordpress-plugins/add-ons-ultimate-advanced-uploads/
Thanks.
Hi! Is it possible to crop an uploaded image with the base plug-in or do I still need to buy a second one?
Thank you
Hi
You need Product Add-Ons Ultimate, https://pluginrepublic.com/wordpress-plugins/woocommerce-product-add-ons-ultimate/, and Advanced Uploads, https://pluginrepublic.com/wordpress-plugins/add-ons-ultimate-advanced-uploads/.
Thanks.
Hi, this demo is well for us https://pluginrepublic.dev/product-extras/product/prints-multiple-quantities-and-formats
What plugins do I need for this example ?
Hi
You need the following:
Product Add-Ons Ultimate to add the extra fields: https://pluginrepublic.com/wordpress-plugins/woocommerce-product-add-ons-ultimate/
Advanced Calculations for the price lookup tables: https://pluginrepublic.com/wordpress-plugins/advanced-calculations/
Advanced Uploads to enable separate quantity fields for each uploaded file: https://pluginrepublic.com/wordpress-plugins/add-ons-ultimate-advanced-uploads/
These are all available at a discount as part of the Product Add-Ons Ultimate Bundle: https://pluginrepublic.com/wordpress-plugins/product-add-ons-ultimate-bundle/
Thanks.
In the Basic Plan, is there an option to upload logo from customer side and preview that product simultaneously?
If there is any guide available how to do it please share so I can check and buy the plugin.
Hi Raj
You can use the Basic licence of Add-Ons Ultimate plus the Image Preview plugin to preview uploaded images on the main product image: https://pluginrepublic.com/wordpress-plugins/image-preview-for-add-ons-ultimate/
Thanks.
Only 1 Plugin is required which are Image Preview plugin
You need two plugins: Add-Ons Ultimate and Image Preview.