How to use lookup table pricing in WooCommerce
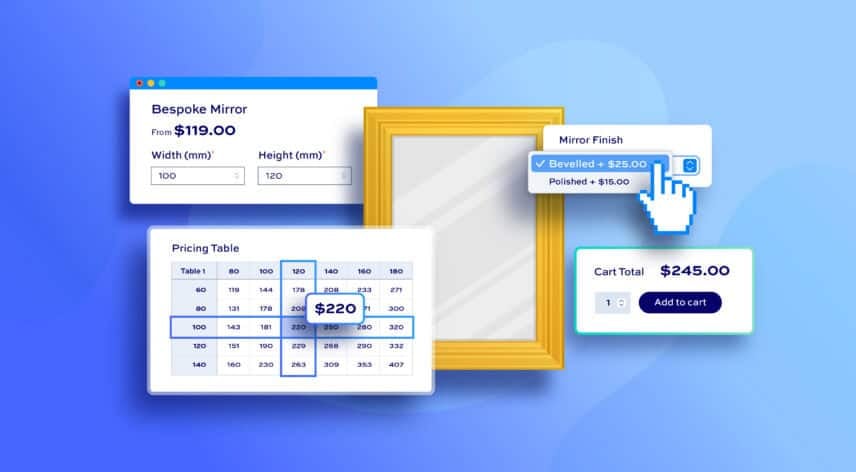
Lookup table pricing lets you charge the right price for made-to-measure products, straight from your own price table. Customers enter measurements or choose options with preset values and WooCommerce finds the matching price instantly.
In this tutorial, we’ll use made-to-measure mirrors as our example. After completing it:
- Users will be able to:
- One-axis table: enter the diameter of a round mirror in a single number field and see the price straight away
- Two-axis table (2D pricing table): enter the width and height of a rectangular mirror in two number fields and see the price straight away
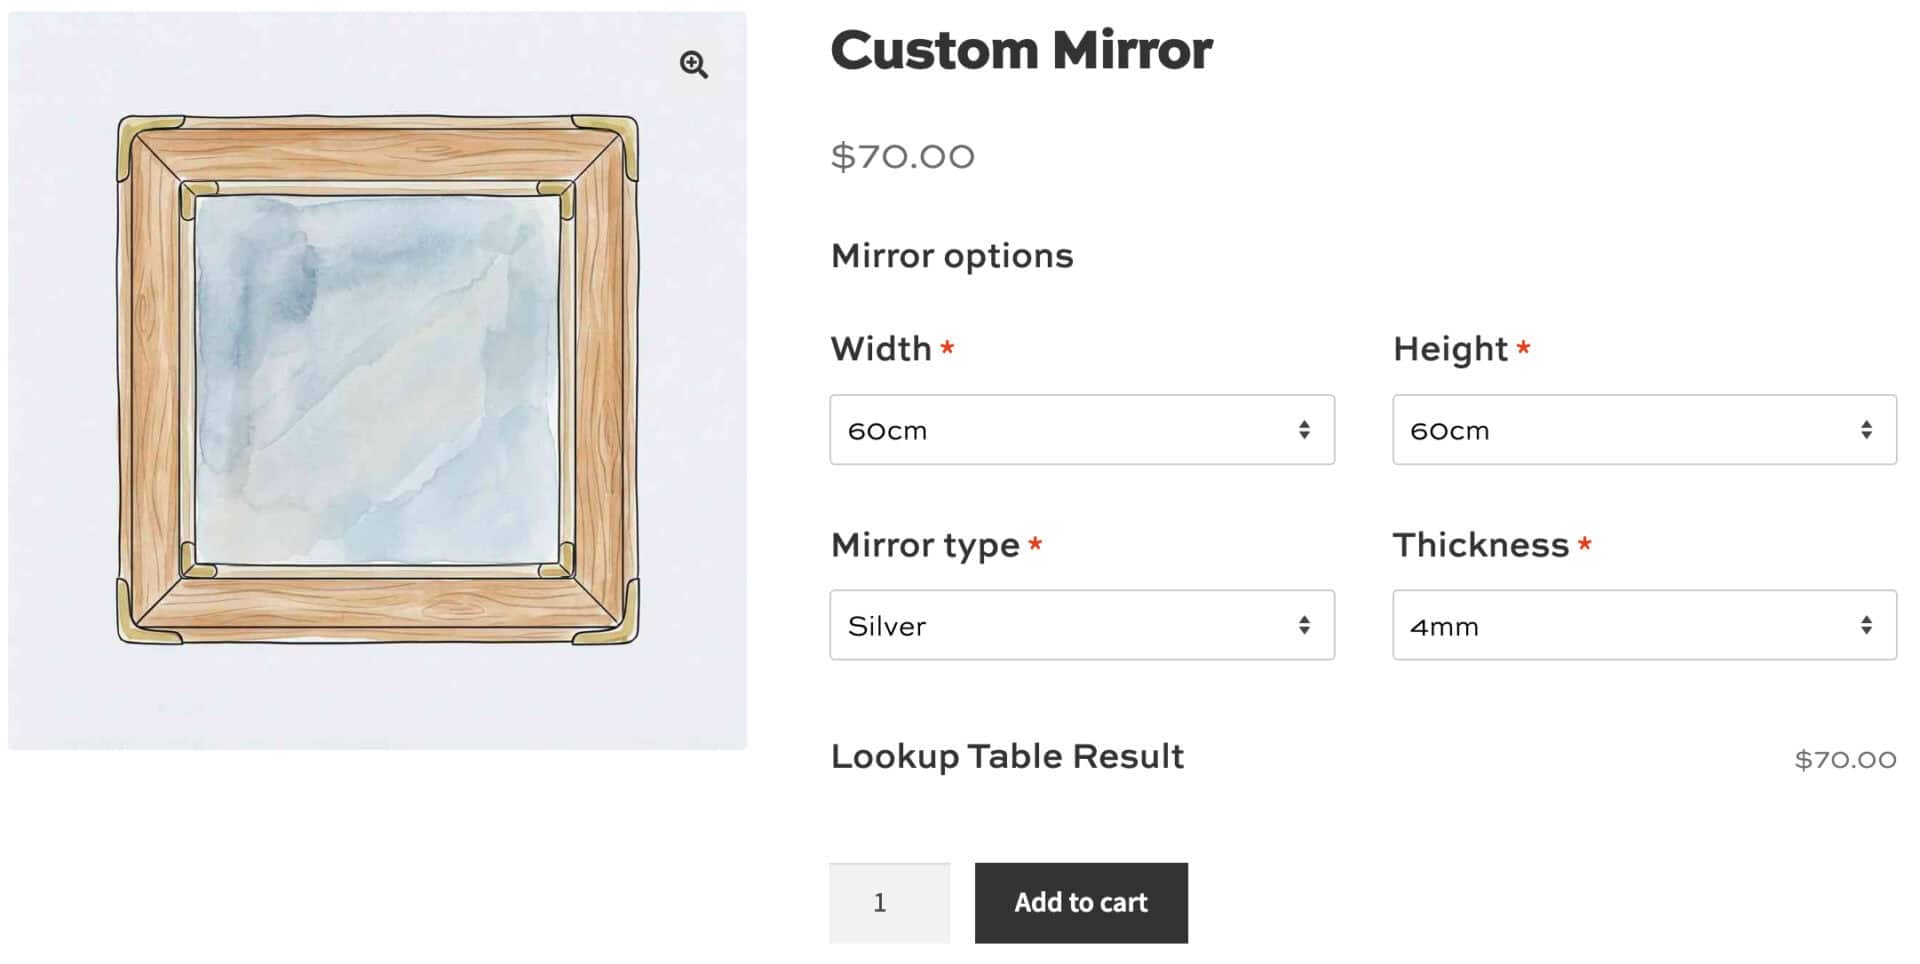
- Multi-axis table: choose a width, height, mirror type and thickness from four select fields and see the price update, as in the demo product
- As the store owner or admin, you’ll be able to:
- Import your price list from a CSV file or build it in your WordPress dashboard
- Set up tables to return prices based on one, two or multiple input fields
- Update a single price without uploading the whole table again
- As a bonus, we’ll also look at how to:
- Add a markup to your lookup prices
- Use different tables for different variations
There’s a demo product here for the multi-axis table so you can see it in action.
Customers value products made to their own requirements. Deloitte’s consumer research found that 36% of consumers are interested in buying personalized products, and one in five of them would pay a 20% premium.
What is a lookup table and when should you use one?
A lookup table is a table of prices for each size or option you sell. When a customer enters their measurements or makes a choice, WooCommerce finds the matching price in the table.
A lookup table works better than a formula when your prices don’t scale evenly. For example:
- You price in size bands, so every mirror up to 90 cm wide costs the same
- Your costs jump at certain sizes, for example when a panel needs thicker glass
- Your prices come from a price list you’ve already built in a spreadsheet
The shape of your table depends on how many inputs set the price. In this article, we’ll look at three examples:
- One input: a round mirror priced just by its diameter, using a table with a single column of prices
- Two inputs: a rectangular mirror priced by width and height, using a grid table – also called a 2D pricing table or price matrix – with widths along the top and heights down the side
- More than two inputs: a mirror priced by width, height, mirror type and thickness, using a flat table, also called a list-style table
Let’s start with the most common setup, the rectangular mirror.

Advanced Calculations allowed me to create input fields for the dimensions of the curtains that my client offers on his web shop. When you drop in the dimensions, the plugin grabs the data from the uploaded table. So elegant! The whole setup was very easy and saved me a lot of time.
What is a 2D pricing table?
A 2D pricing table is a grid of prices with two inputs: one along the top and one down the side. Each cell holds the price for that pair of values, such as a mirror’s width and height.
| 30 | 60 | 90 | |
|---|---|---|---|
| 30 | $45 | $60 | $75 |
| 60 | $60 | $85 | $110 |
| 90 | $75 | $110 | $145 |
To find a price, read across to the width and down to the height. In this table, a mirror 60 cm wide and 90 cm high costs $110.
Customers don’t need to enter a size that’s in your table. With ‘Exact match?’ unchecked, Advanced Calculations rounds each measurement up to the next size, so a mirror 55 cm wide and 80 cm high is priced as 60 × 90.
2D pricing tables are ideal for made-to-measure products where two measurements set the price, such as:
- Mirrors, glass and picture frames
- Blinds, curtains and shutters
- Banners, signs and printed panels
- Carpets, rugs and flooring cut to size
A 2D pricing table is one type of WooCommerce price matrix. If you want to show variation prices in a grid or list your products in a price table instead, take a look at our guide to creating a WooCommerce price matrix.
The rectangular mirror tutorial below shows you how to build a 2D pricing table step by step.
How do you set up lookup table pricing in WooCommerce?
WooCommerce doesn’t natively have a feature for lookup table pricing so you’ll need two extra plugins:
- WooCommerce Product Add-Ons Ultimate – allows you to add extra fields to product page so that users can enter measurements and select options
- Advanced Calculations – extends Add-Ons Ultimate and allows you to set pricing using lookup tables
You can buy these plugins separately or together at a discount as part of the Product Add-Ons Ultimate Bundle.

Product Add-Ons Ultimate Bundle
Advanced features, superior control and excellent savings
Here’s a quick overview of how to price a rectangular mirror by width and height using a grid table.
- Install the plugins
Install and activate Product Add-Ons Ultimate and Advanced Calculations
- Create your price table
Import your prices from a CSV file or enter them directly into your dashboard
- Create your mirror product
Add a simple product for your mirror
- Add width and height fields
Add number fields so that customers can enter their measurements in numeric format. Or use select fields if you want to limit the users to a pre-set list of options
- Add a calculation field
Connect the fields to your lookup table so the price updates automatically
Lookup tables video
Here’s a short video to accompany this tutorial.
Or you can follow our step-by-step guide below.
Step #1: Install Product Add-Ons Ultimate and Advanced Calculations
In this tutorial, we’ll assume that you already have WordPress and WooCommerce installed and ready to go.
Advanced Calculations adds lookup tables to the calculation fields in Product Add-Ons Ultimate. It’s compatible with all themes and page builders, so it will work with your existing store.
Once you’ve purchased both plugins, repeat these steps for each one:
- Download the plugin’s zip file by clicking on the link on your order confirmation screen or in your welcome email. You’ll receive the email automatically a few seconds after you’ve completed the purchase
- Go to Plugins > Add New in your WordPress dashboard
- Click on the ‘Upload Plugin’ button
- Drag and drop the plugin’s downloaded zip file into the ‘Choose File’ area and click ‘Install Now’
- When the plugin has uploaded, click the ‘Activate Now’ button
You now have both plugins installed and activated. Next, let’s create the price table.
Step #2: Create your mirror price table
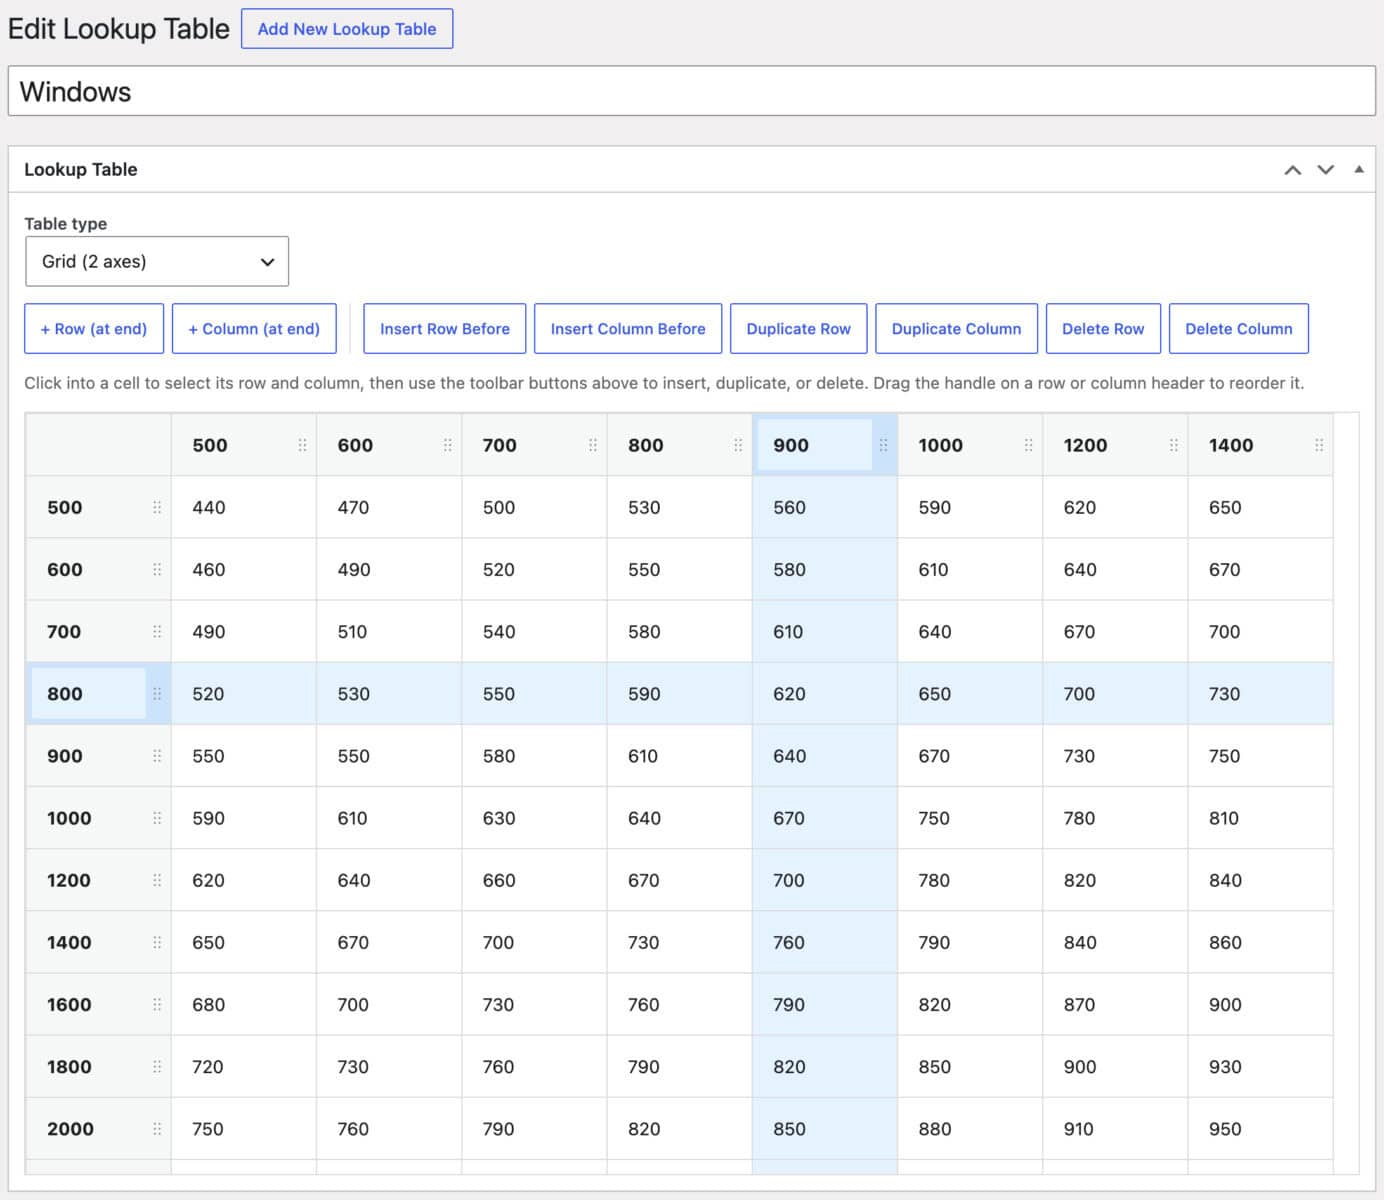
Go to Product Add-Ons > Lookup Tables in your WordPress dashboard and click ‘Add New Lookup Table’. Enter a name for the table, such as ‘Mirror prices’, and choose ‘Grid (2 axes)’ from the ‘Table type’ field. This creates a 2D pricing table with widths along the top and heights down the side.
You can then add your prices in one of two ways. Here’s our support doc on working with lookup tables for more details.
Option #1: Import a CSV file
Import a CSV file if your prices are already in a spreadsheet. Set out your spreadsheet like this, then save it as a CSV file:
| 30 | 60 | 90 | 120 | 150 | |
|---|---|---|---|---|---|
| 30 | 45 | 60 | 75 | 90 | 105 |
| 60 | 60 | 85 | 110 | 135 | 160 |
| 90 | 75 | 110 | 145 | 180 | 215 |
| 120 | 90 | 135 | 185 | 230 | 275 |
| 150 | 105 | 160 | 220 | 275 | 330 |
The first row holds the widths, starting from the second column. The first cell of each row below holds a height, and the top-left cell is left blank.
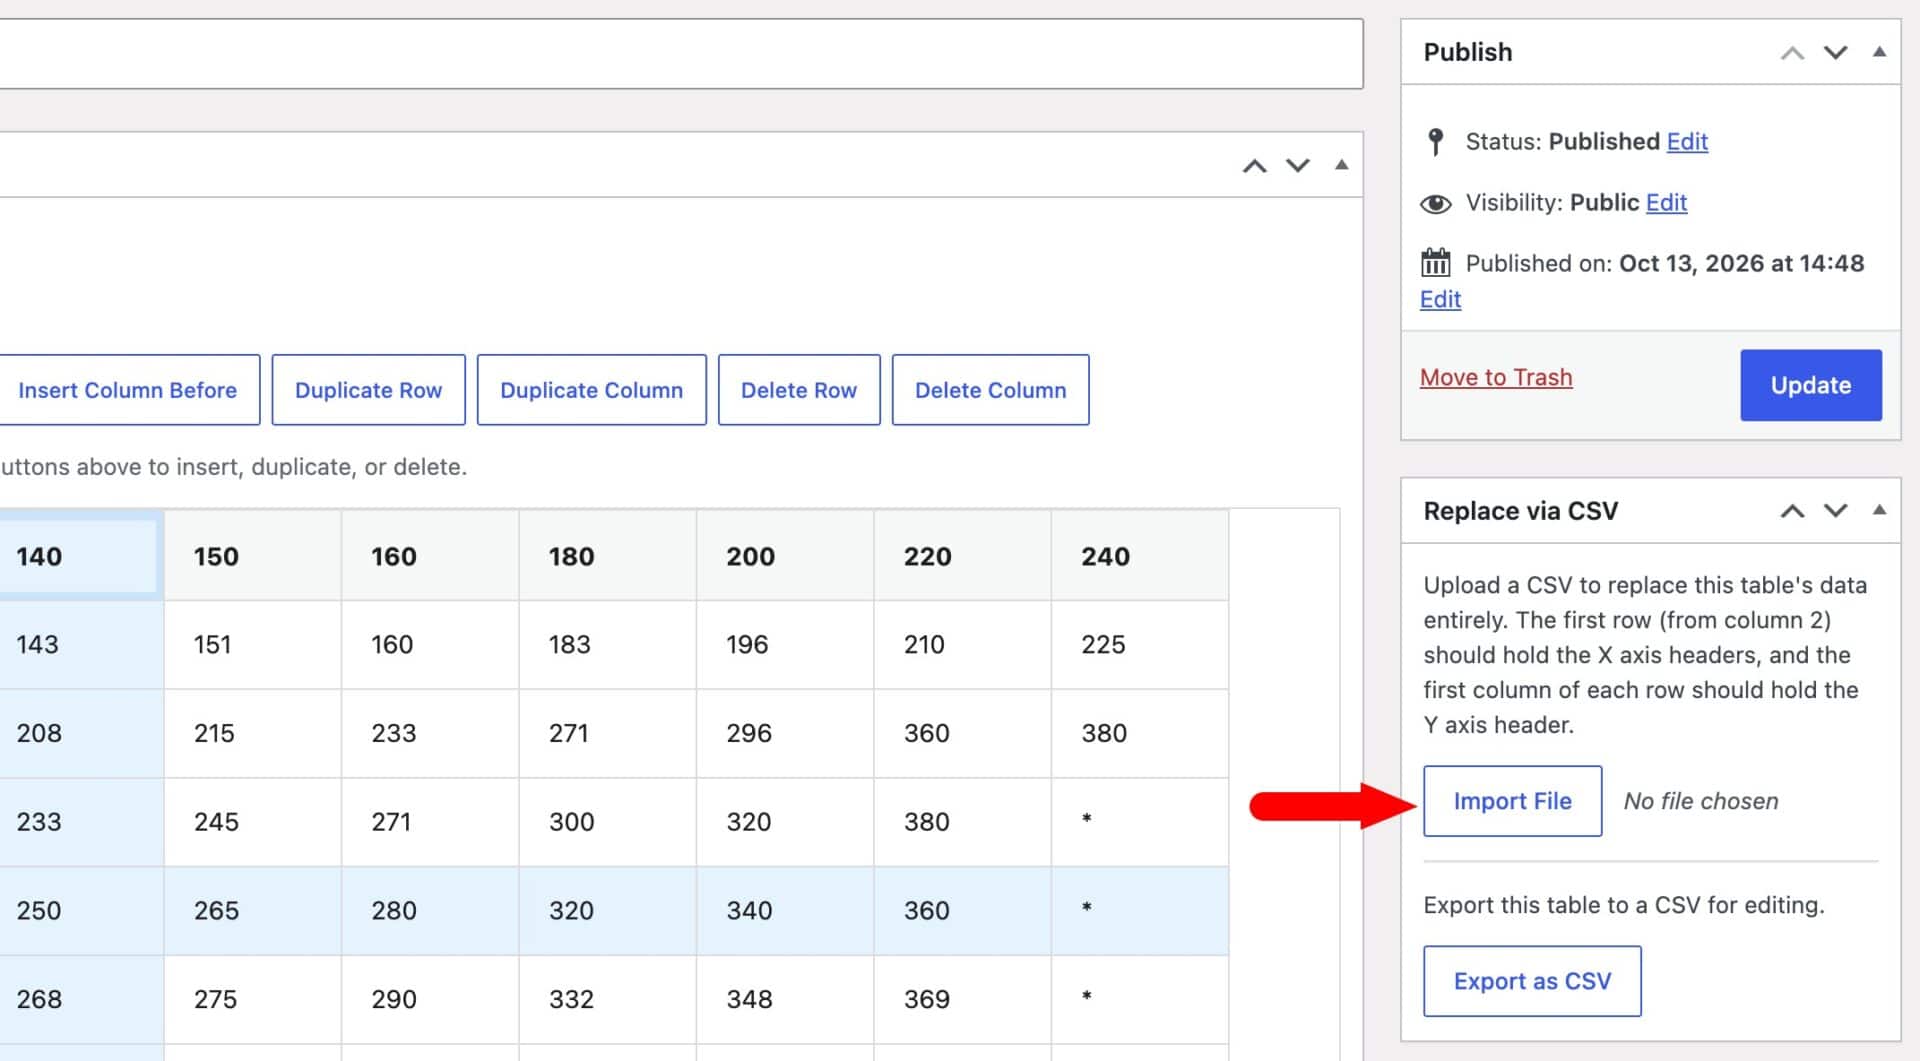
Click ‘Import File’ in the ‘Replace via CSV’ box in the sidebar and choose your file. The table imports immediately and its prices appear in the editor.
Option #2: Build the table in your dashboard
Click into any cell and type to enter a width, height or price. Use ‘+ Row (at end)’ and ‘+ Column (at end)’ to add more sizes.
Click into a cell to use the toolbar above the table. You can insert, duplicate and delete rows and columns, which makes it quick to add a size that’s similar to an existing one.
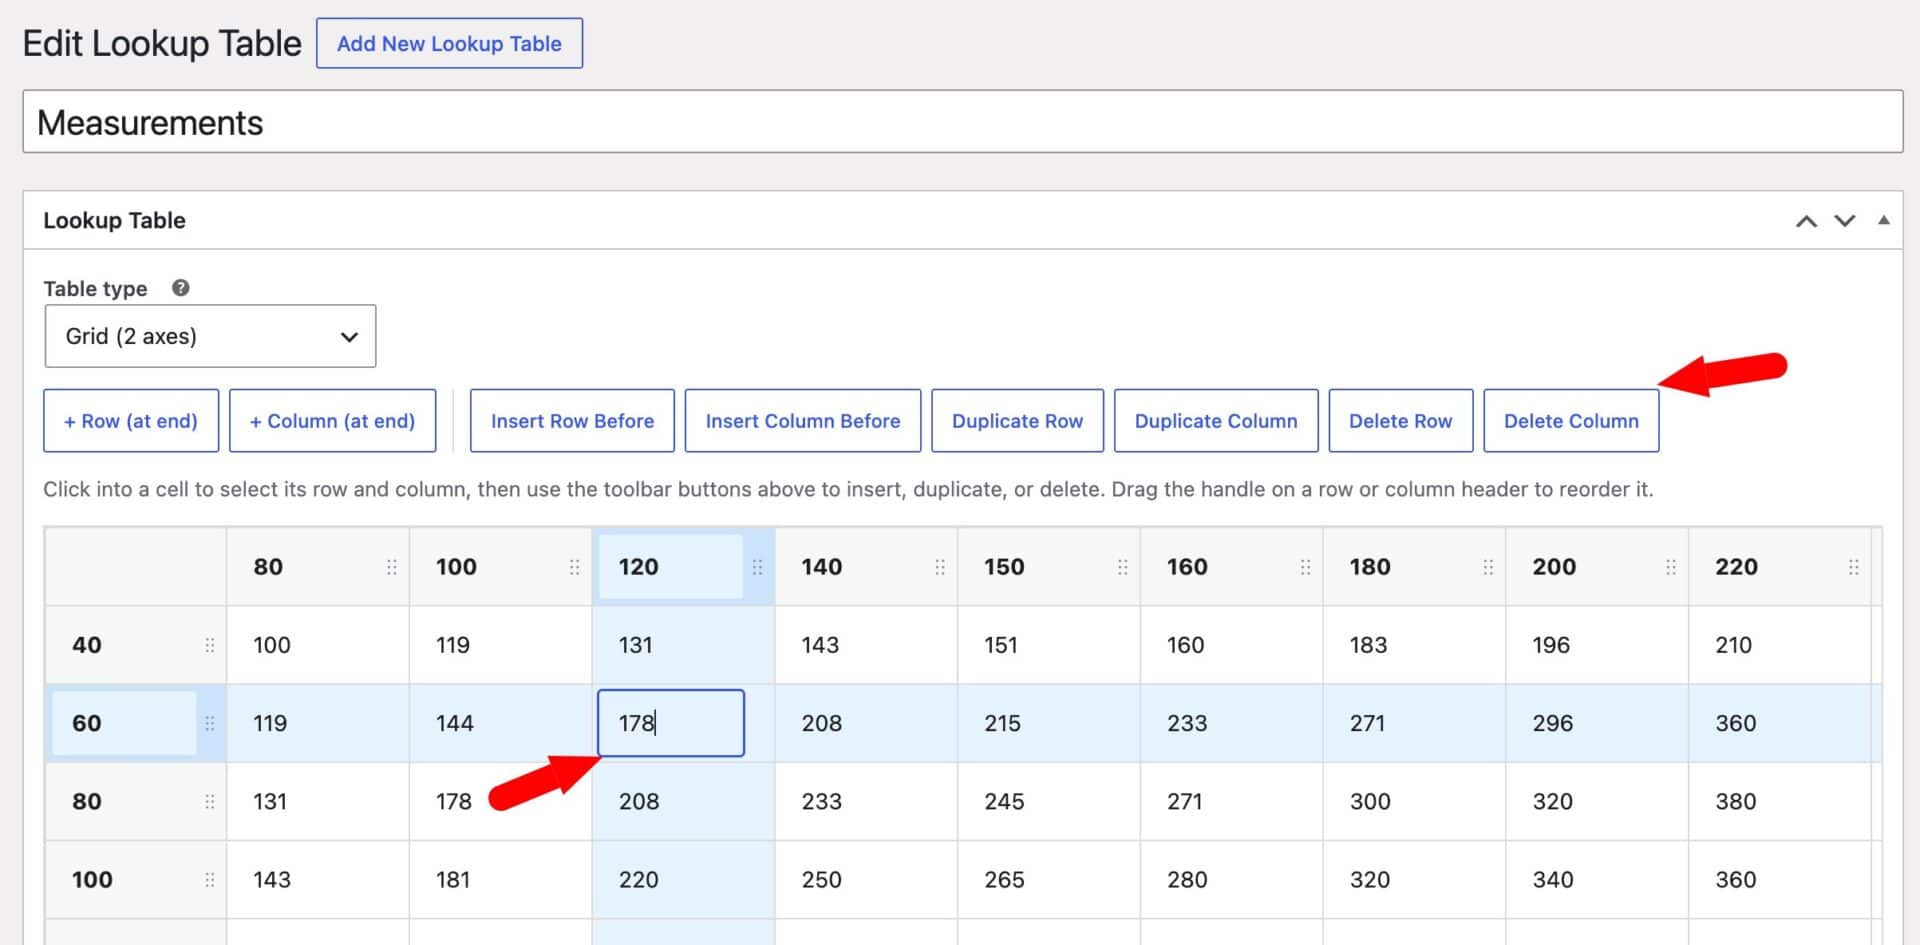
Click ‘Publish’ to save your table. You now have a price table for your mirrors. Next, let’s create the product.
Step #3: Create your mirror product
Go to Products > Add New and create a simple product for your mirror. Add a title, description and images in the same way you would for any other product.
You can set the regular price to 0, since the lookup table will set the price. Or you can enter another value – e.g. the lowest price for the product. Now let’s add the fields where customers enter their measurements.
Step #4: Add width and height fields
Click on the ‘Product Add-Ons’ tab on the ‘Product data’ panel. Add a field, set its ‘Field Type’ to ‘Number’ and label it ‘Width (cm)’.
Set a minimum and maximum value so customers can only enter sizes you can make. For our table, that’s 30 cm to 150 cm. You can also enter a custom ‘Step’ value – for example, if measurements should only be in multiples of 5cm, then enter 5 as the Step value.
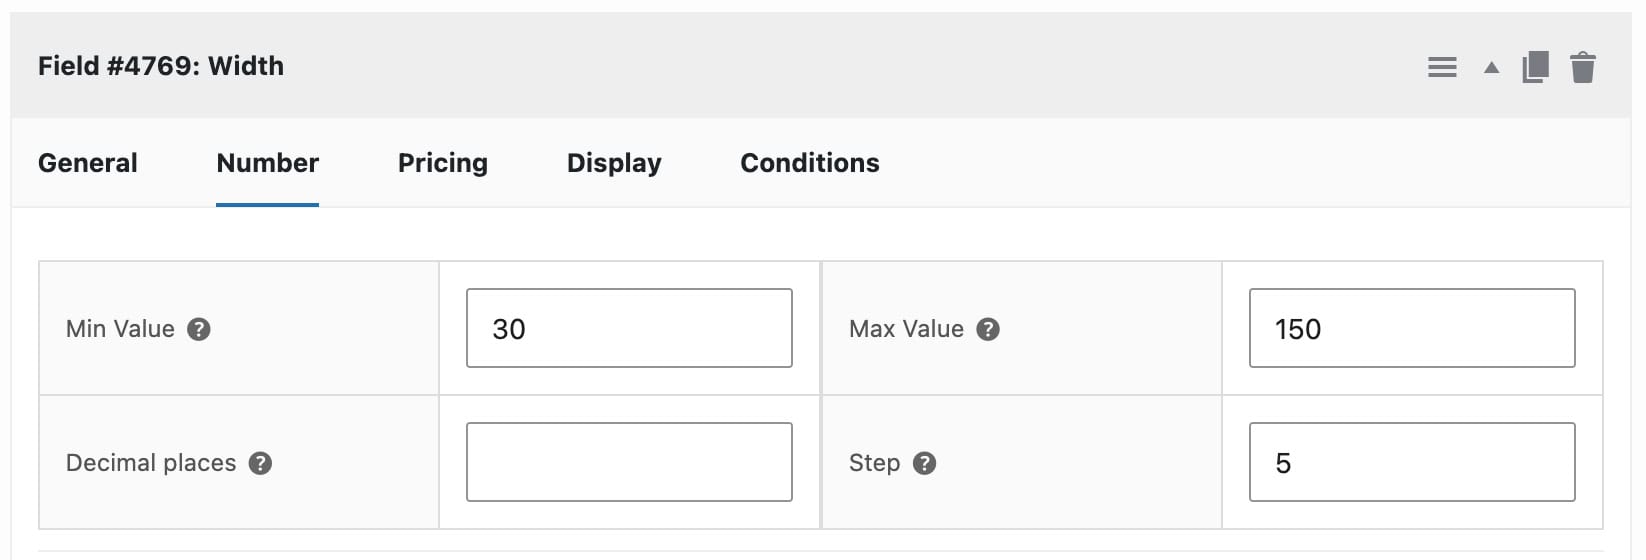
Repeat these steps to add a ‘Height (cm)’ field. Your product now has two fields where customers can enter their measurements.
Step #5: Add a calculation field
Add a third field and set its ‘Field Type’ to ‘Calculation’. Then:
- Enter
{look_up_table}in the ‘Formula’ box. This shows the ‘Advanced Calculations Options’ section - Select ‘Mirror prices’ in the ‘Look Up Table’ field
- Choose your width field in the ‘Field for X’ field and your height field in the ‘Field for Y’ field
- Set the ‘Action’ field to ‘Display As Cost’ so the result is added to the product price
Leave ‘Exact match?’ unchecked for both fields. This rounds each measurement up to the next size in your table, so a mirror 85 cm wide is priced as a 90 cm mirror.
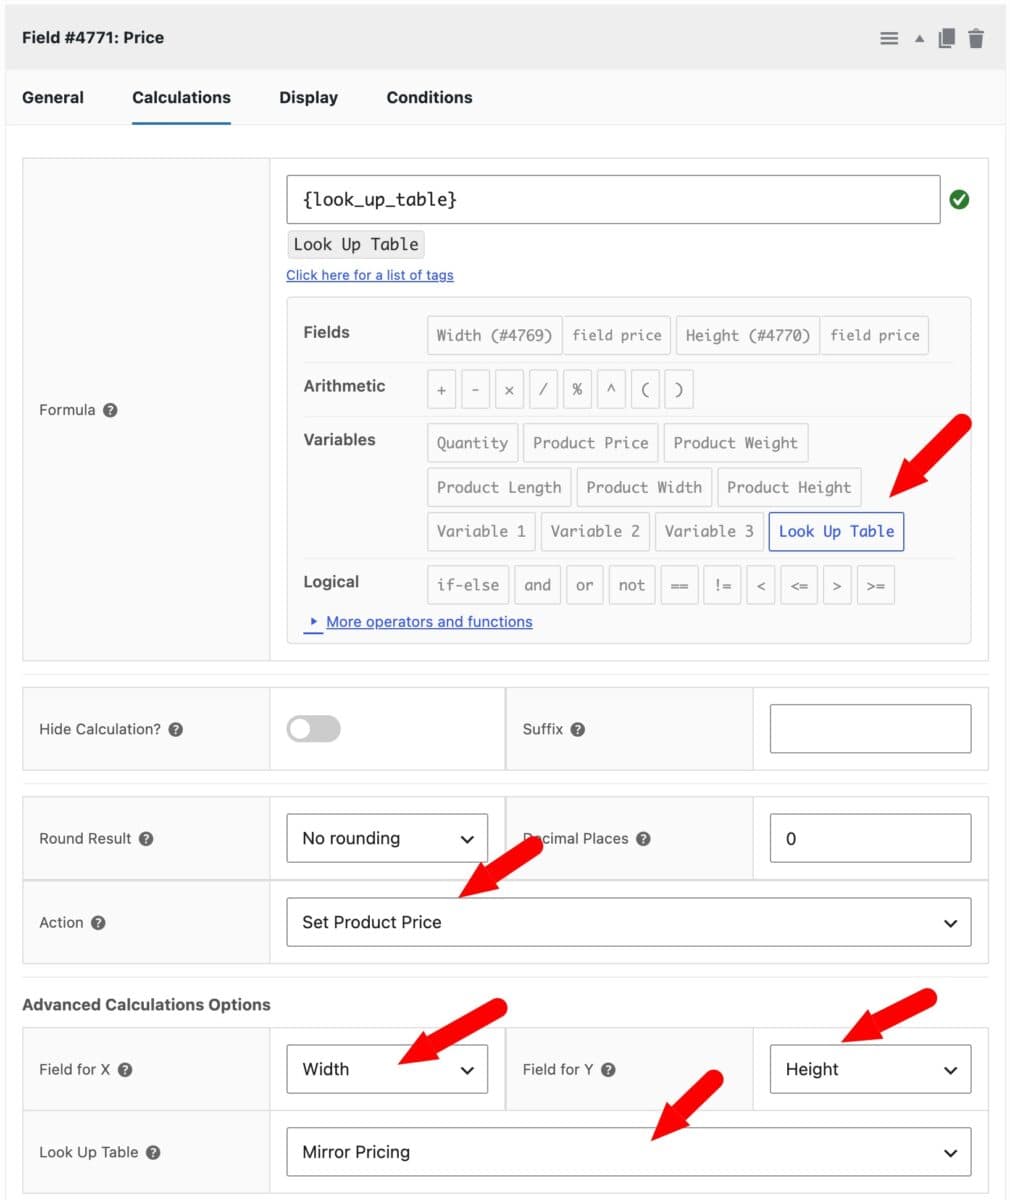
You now have a calculation field that reads the price from your table.
If you publish the product and view it on the front end, you can now enter values in the ‘Width’ and ‘Height’ fields. The plugin will read the customer measurements and use them to look up the correct price from the table.
That’s how to set up lookup table pricing in WooCommerce using a table with two axes. If you only have only input field (e.g. a ‘Diameter’ field for circular mirrors) you can use a single-axis table.
Now let’s look at how to price products using more than two inputs.
How to create a lookup table that requires more than two input fields
A mirror’s price often depends on more than its size. In this example, it also depends on the mirror type and the glass thickness.
That’s four inputs – width, height, type and thickness – so you’ll need a ‘flat’ table. Flat tables have three or more axes, listed as rows. Every column must match the customer’s input exactly for that row’s value to be returned
Step #1: Create a flat table
Create a CSV file with a column for each input and a final column headed ‘Return’ for the price:
| Width | Height | Mirror type | Thickness | Return |
|---|---|---|---|---|
| 60cm | 60cm | Silver | 4mm | 70 |
| 60cm | 60cm | Silver | 6mm | 85 |
| 60cm | 60cm | Bronze | 4mm | 90 |
| 60cm | 60cm | Bronze | 6mm | 105 |
| 60cm | 90cm | Silver | 4mm | 95 |
| 60cm | 90cm | Silver | 6mm | 115 |
| 60cm | 90cm | Bronze | 4mm | 120 |
| 60cm | 90cm | Bronze | 6mm | 140 |
| 90cm | 60cm | Silver | 4mm | 95 |
| 90cm | 60cm | Silver | 6mm | 115 |
| 90cm | 60cm | Bronze | 4mm | 120 |
| 90cm | 60cm | Bronze | 6mm | 140 |
| 90cm | 90cm | Silver | 4mm | 130 |
| 90cm | 90cm | Silver | 6mm | 160 |
| 90cm | 90cm | Bronze | 4mm | 165 |
| 90cm | 90cm | Bronze | 6mm | 190 |
Each row holds one combination of options and its price. Add a row for every combination you sell, then import the file in the same way as before. You can also choose ‘Flat table (3 or more axes)’ and enter the rows in your dashboard.
Step #2: Add input fields for each input
Flat tables only return a price when every input matches a row exactly. That means customers need to choose their sizes from a list rather than typing them in.
Create a mirror product and add four select fields on the ‘Product Add-Ons’ tab:
- Width: 60cm, 90cm
- Height: 60cm, 90cm
- Mirror type: Silver, Bronze
- Thickness: 4mm, 6mm
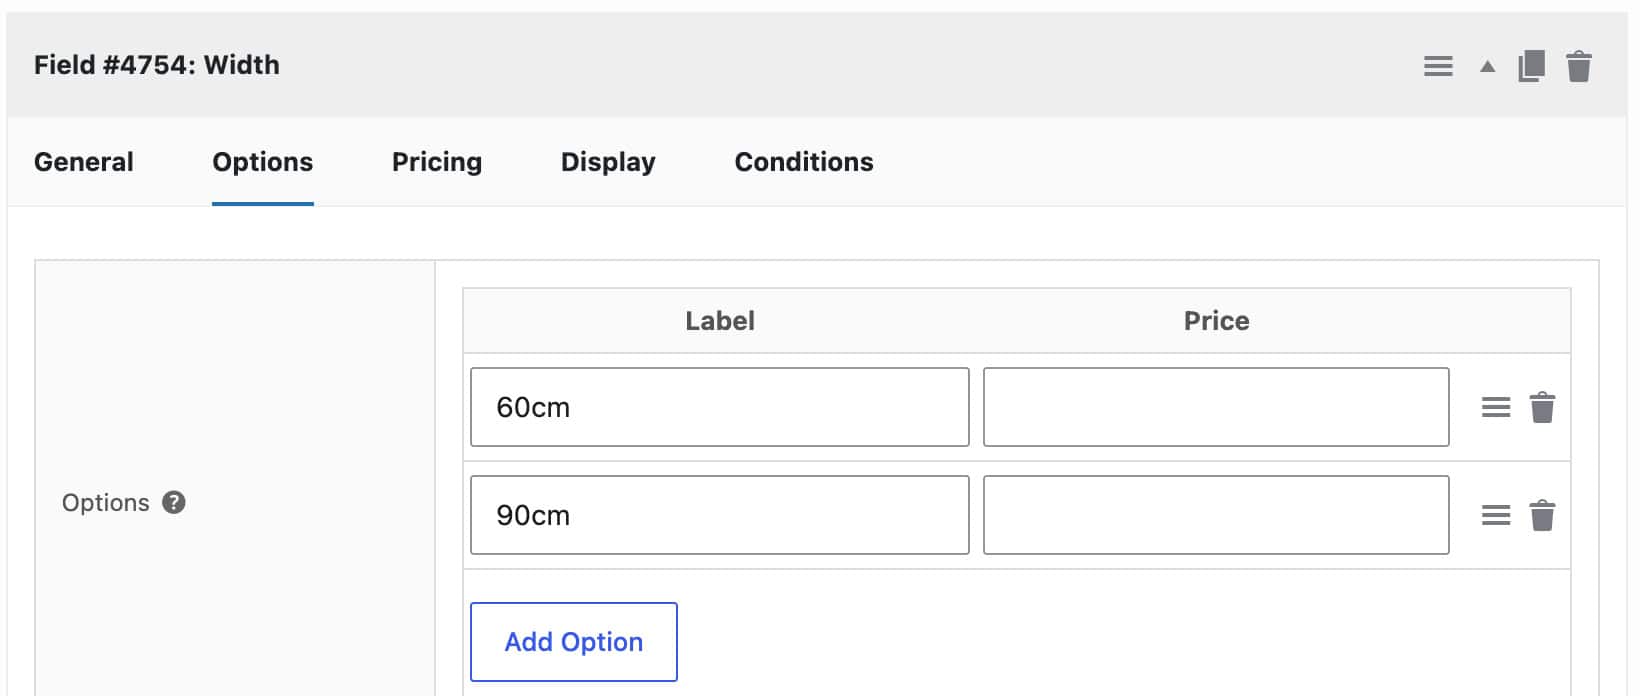
Make sure each option’s text matches your table exactly, including capital letters. For example, ‘Bronze’ in your field won’t match ‘bronze’ in your table.
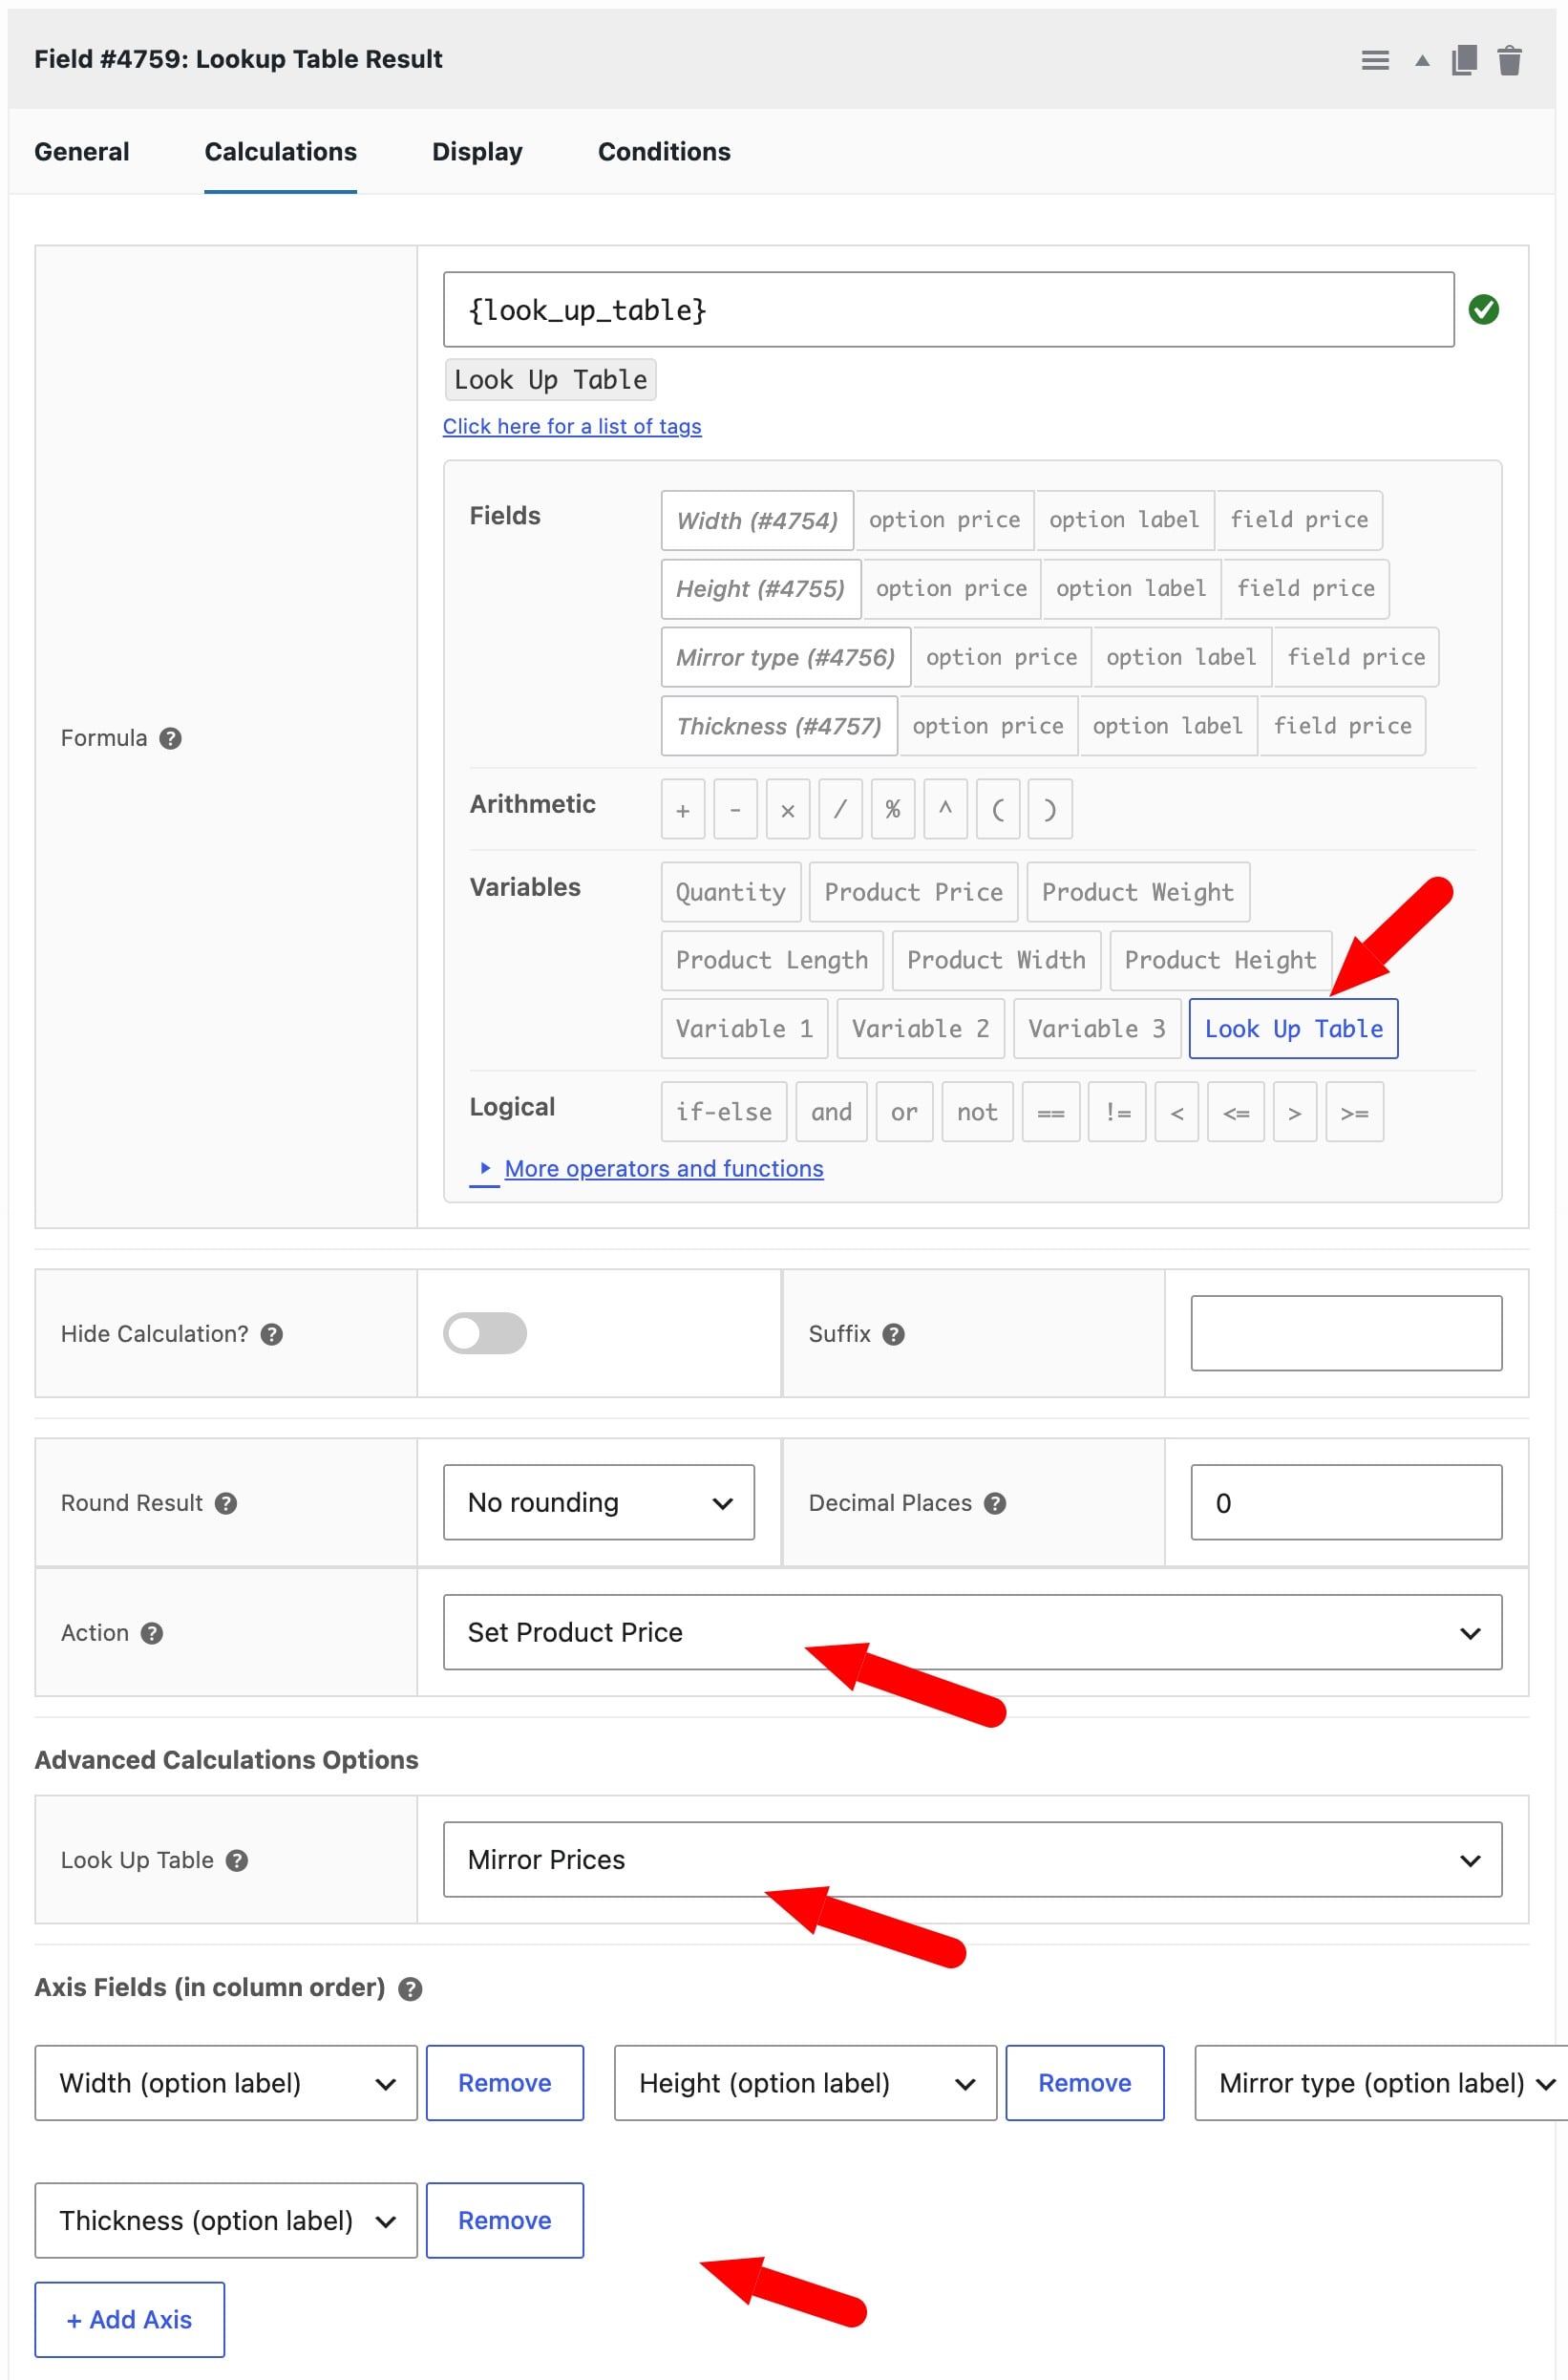
Step #3: Add a calculation field
Add a calculation field and enter {look_up_table} in the ‘Formula’ box. Select your flat table in the ‘Look Up Table’ field.
The ‘Field for X’ and ‘Field for Y’ settings are replaced by an ‘Axis Fields (in column order)’ section. Choose your fields in the same order as your table’s columns: width, height, mirror type, then thickness.
Each select field appears twice in the list. Choose the version ending ‘(option label)’ so the plugin matches the text of the option the customer selects (not the value entered in the ‘Price’ column).
Set the ‘Action’ field to ‘Display As Cost’ and publish your product. Customers can now choose their size, mirror type and thickness and see the price update as they go.
There’s a demo product here so you can try it yourself.
What kind of fields can you use as inputs for lookup tables?
Advanced Calculations allows you to use any field that gives a single value, whether that’s a number the customer types or an option they choose. Options can be numeric or text – both work.
Pick the field type that suits how your customers think about the product.
Number fields
Use number fields when customers enter their own measurements, such as width, height or diameter. They work best with grid tables, where ‘Exact match?’ can round each measurement up to the next size in your table.
Set minimum and maximum values on each number field so customers can only enter sizes you can make.
Select, radio and image swatch fields
Use these fields when customers choose from a set list, such as a mirror type, thickness or fixed size. Image swatches work well for options customers want to see, like the color of a bronze or silver mirror.
Each of these fields appears twice in the input dropdowns:
- (option label): matches the text of the option the customer selects, such as ‘Bronze’. This is the one you’ll usually want
- (option price): matches the price you’ve set for the option instead
Make sure each option’s text matches your table exactly. Choice fields work best with flat tables, since every value must match a row exactly.
Calculation fields
Use a calculation field when the value you need to look up has to be worked out first. For example, a calculation field could convert a customer’s measurements from inches to centimeters, then pass the result to your lookup table.
You can also use the result of one lookup table as the input for another.
Which fields should you avoid?
Avoid checkbox groups and image swatch fields that allow more than one choice. Customers can select several options at once, so the field doesn’t give a single value to match.
Bonus #1: How do you add a markup or discount to lookup prices?
Add a second calculation field to adjust the price from your table. This is useful for adding a markup or running a sale without editing every cell.
Click into the ‘Fields’ row above the new field’s ‘Formula’ box. Click the button for your lookup field to insert its placeholder, such as {field_123}.
Then build on it with normal math. For example, this adds a 20% markup:
{field_123} * 1.2Set this field’s ‘Action’ to ‘Display As Cost’. Make sure it’s the only one of the two fields set to ‘Display As Cost’, so the price isn’t added twice.
Bonus #2: How do you use different tables for different variations?
Use a variable product if you want a separate price table for each version of a product. For example, you could have one table for standard mirrors and another for safety-backed mirrors.
Product Add-Ons Ultimate lets you create variation-specific fields. Add a calculation field for each variation and select a different lookup table in each one.
How do you show the price table on the product page?
If you’d like to display the price table on the product page so that users can clearly see how the pricing works:
- Edit the calculation field for your lookup table
- Enable ‘Display table?’

How do you update your prices?
Open the table from Product Add-Ons > Lookup Tables, click into a cell and type the new price. Click ‘Update’ to save your changes.
For larger changes, click ‘Export as CSV’ in the ‘Replace via CSV’ box. Edit the file in your spreadsheet app, then import it again. Importing replaces the table’s existing data rather than adding to it.
FAQs
Yes. With Advanced Calculations, each lookup table can be used on as many products as you like. If you add your fields to a global group, make sure the width and height fields are in the same group as the calculation field. A calculation field can only find input fields that exist on the same product.
With ‘Exact match?’ unchecked, a size below your smallest value uses the first row or column, and a size above your largest uses the last. Set minimum and maximum values on your number fields to prevent sizes you don’t make. You can also enter ‘max’ as the last header in your table. This catches any size larger than your highest value.
Use Advanced Calculations to add two number fields for the width and height, then add a calculation field that reads the price from a grid table. Put the widths along the top of the table and the heights down the side, with a price in each cell.
Let customers enter their own measurements in number fields, then use an Advanced Calculations lookup table to find the price for their size. Leave ‘Exact match?’ unchecked so any size between your table’s values rounds up to the next one. This lets you sell custom sizes without creating a separate product or variation for every possible size.
Use a lookup table in Advanced Calculations when your prices don’t follow a simple rule, such as when you price in size bands or your costs jump at certain sizes. Use a formula when the price scales evenly, such as a fixed rate per square meter. For a formula, a calculation field in Product Add-Ons Ultimate can multiply the width by the height and a rate, with no lookup table needed.
Save your spreadsheet as a CSV file, then open your table from Product Add-Ons > Lookup Tables and click ‘Import File’ in the ‘Replace via CSV’ box. Advanced Calculations detects whether it’s a grid or flat table from the file’s header row. Importing replaces the table’s existing data. You can also export any table to CSV, edit it and import it again.
Yes. Advanced Calculations lets you use a flat table with a column for each input, such as width, height, material and finish, and a final ‘Return’ column for the price. Add a select field for each choice and make sure the option text matches your table exactly. The mirror type and thickness example above shows how this works.
Go to Product Add-Ons > Lookup Tables in Advanced Calculations, create a new table and choose ‘Grid (2 axes)’. Import your grid from a CSV file or enter the prices in your dashboard. Then add two number fields and a calculation field with {look_up_table} in the formula to your product.
Lookup table pricing in WooCommerce – recap
In this article, we looked at how to use lookup table pricing in WooCommerce. We priced a rectangular mirror by width and height using a grid table, a round mirror by diameter using a single-column table and a mirror by size, type and thickness using a flat table.
Advanced Calculations lets you import tables from CSV, edit prices in your dashboard and look up prices using as many inputs as you need. It works with the calculation fields in Product Add-Ons Ultimate.
All our plugins are compatible with all themes and page builders, including Astra, Flatsome and Woodmart, and page builders like Elementor and Divi. If you have any questions, our world-class support team is on hand to help. And the plugins are backed by a 14-day money-back guarantee, so you can try risk-free.
You can buy these plugins separately or together at a discount as part of the Product Add-Ons Ultimate Bundle.
Product Add-Ons Ultimate Bundle
Advanced features, superior control and excellent savings
Hi,
Regarding look up tables, is it possible to add or subtract a percentage from them should you want to adjust the price in the front end?
Yes, you could have a calculation field that used the result of the look up table field. There’s an article here that includes details of how to chain multiple calculation fields.
Thanks.
Gareth
Should I be building this as a variable product or a simple product if I’m including attributes such as color.
Thanks,
If you need to use attributes, then it’s probably best to use a variable product.
Hi,
In one product i have couple look up tables with different price, depends of chosen material (three price groups of materials) and dimensions.
How can i define which table it will use by clicking material?
Example
Client chose material group 1, insert dimensions and price should be importet form look up table 1
Client chose material group 2, insert dimensions and price should be importet form look up table 2
Etc
Hi Dawid
If you look at the second snippet referred to in the article above, you can see that you can define different look up tables for different fields. So you can just used conditional fields, https://pluginrepublic.com/documentation/conditions/, to display different fields depending on which group the client chooses.
Gareth
Hi Gareth,
Would it be possible to modify the plugin to use CSV files to upload the prices to save creating Arrays?
I know Magento use this option.
Nigel.
Hi Nigel
Yes, this is possible with the Advanced Calculations extension: https://pluginrepublic.com/wordpress-plugins/advanced-calculations/
Thanks
Gareth
That’s good news. If I committed to this plugin now, would the new feature be available as an upgrade?
Yes, this is possible with the Advanced Calculations extension: https://pluginrepublic.com/wordpress-plugins/advanced-calculations/
Thanks
Gareth
i have used select field with option but i doesn’t work
Hi – could you submit any support requests through the form here: https://pluginrepublic.com/support/
Thanks.
Hi,
I have determined min and max value for height and width, but after puting number over the range this is just took it.
How can i make comunicate as in your demo here? to Show information ” value can’t be less than … ”
Thanks
Hi Dawid
Could you raise a support ticket here: https://pluginrepublic.com/support/. Then we can take a look for you.
Thanks.
Can this plugin support converting a .csv to a website table? We have a very large csv file with different rows and columns and we might find that doing it manually will within the function like you have shown above would take too long. If you can advise that would be most appreciated 🙂
Hi Nigel
Yes, this is possible with the Advanced Calculations extension: https://pluginrepublic.com/wordpress-plugins/advanced-calculations/
Thanks
Gareth
is there a video training that shows us how to use this plugin?
Hi – I don’t have a video for this unfortunately.
Please let me know if you have any questions.
Thanks.
Hi Gareth,
I have installed the pro version. I had to convert from cm to mm to get an accurate measurement from the customer size input, so all good. Can you give me an heads up for installing tooltiped dashicons as in your demo site. I can insert one next to width/drop but at the front end it has added text: “data-field-value=””> before the dashicon. I appreciate this is off topic, but would appreciate your thoughts and also the plugin for the tooltip you used, or even if it is at all possible without going into the php files. Great work!
Hi
You can enable tooltips like this: https://pluginrepublic.com/documentation/enable-tooltips/
Thanks.
Hi, My company sells gifts online, and we have about 10.000 products without the color variations. What I would like to do is:
Create a product with color variations, then add print costs that are gathered from tables with let´s say “2 dimensions”. Meaning. I got the t-shirt, the the user selects the number of color he wishes to print that looks up a table of colors vs quantities (or instance silkscreen). Your Product sounds perfect.
The only question I have is: After I create all my tables manually (ex: pad printing, silkscreen…) can I use the all import plugin (https://www.wpallimport.com/documentation/woocommerce/variable-products/) to assign each table to a product, or, each product must have it’s own table, created manually?
Since wp all import imports custom fields, this would be a game changer for everyone with a large store 🙂
Great tutorial and work, anyway!
Hi Maria
The best way to do this is to create your calculation fields globally (https://pluginrepublic.com/documentation/global-add-ons/) and apply them to as many products as you like.
Then, we have an extension coming out very shortly that will allow you to import your pricing tables via CSV. You’ll be able to assign your tables to your global fields quickly and easily. The new extension is called Advanced Calculations for Add-Ons Ultimate and it will be available from early next week.
Let me know if you need any more information.
Thanks
Gareth
I’m eager to see that 🙂 My countdown is ticking 🙂
Do you have some sort of demo trial? Time based, of course?
Hi Maria
Could you contact me directly via the Support page: https://pluginrepublic.com/support/
Thanks.
Hi!
how did You set up on this “Window Blinds demo page” Price form 118 if you have to set price 0 because this blinds calculation is set as a cost ? Did YOu Put some Extra Field Or What ?
You could make better tutorial how to do that or make a YouTube movie.
regards
Hi Radoslaw
If you’d like some help setting up the plugin, please raise a s support ticket here: https://pluginrepublic.com/support/. We’ll be happy to help you with this.
Thanks.
Is it possible to set a ratio, and the change 1 field, height or width, for certain things that require to maintain an aspect ratio?
Thanks.
Hi
I’m not 100% clear on the question. The look up table allows you to return a value based on one or two user inputs. What is it you are looking to do?
Thanks.
Hi Gareth! There is a way to reuse lookup table value? I want to add extra 30% to lookup table price in one option, and another option I want to add extra XX price (no percentages). How to do that?
Hi
Yes, you can use a calculation field to get a value from the look up table; then you can use the value of that calculation field in another calculation field. There’s an article here that includes details of how to chain multiple calculation fields.
Thanks.
how to do this one?
i have one calculation from lookup table.
And i have conditional radio. if yes need to put 1 calculation again.
Thanks.
Hi Yoki
You can do that with conditional logic. Do you already have a licence for the plugin? If so, you can raise a support ticket here: https://pluginrepublic.com/support/. One of our team will be able to help you with this further.
Thanks.
Hi there, I have a few questions including questions specific to an Excel document, please can I send this over to you.
Kind regards
Jamie
Hi Jamie
Yes, of course. Please raise a ticket here: https://pluginrepublic.com/support/.
Thanks.
Hi Gareth
Can I use this plugin to do a size calculation without using a look-up table?
So customer inputs width* height, plug-in calculates area and provides a price based on the area formula such as £100 per square metre?
Thanks
Kim
Hi Kim
You can create an area calculation using the customer inputs for width and length. Then you can also calculate the product price based on the area and your own formula.
Thanks.
Hi there, I have 200+ products could I make this v lookup table as globally, so I don’t have to recreate table for each product and when price changes then I have to change only in table that all.
Kind regards
Dex
Hi Dex
Yes, you’d upload the table to one place and you can create a global field that uses the table on multiple products.
Thanks.
Thanks for the very fast reply,
I want this feature for a single website, can I get this feature in a basic plan?
To use look up tables on just one website, you’ll need the Pro version of Add-Ons Ultimate and the Basic version of Advanced Calculations.
https://pluginrepublic.com/wordpress-plugins/woocommerce-product-add-ons-ultimate/
https://pluginrepublic.com/wordpress-plugins/advanced-calculations/
Thanks.
When I enter the length into the table and then add it to the shopping cart. It adds an additional amount to the basket ?
Hi
Yes, you can use it in this way if you wish.
Thanks.
Hey dear Developer,
is the plugin still up to date and compatible with all actual versions (wordpress 6, woocommerce, etc)?
Thx, regards,
Hey, just saw the changelog, seems this plugin is what i need. nice.
Hi Moritz
Yes – the plugins are all compatible with the latest versions of WordPress and WooCommerce.
Thanks.
Is it possible to use additional calculations right in the formula field where you’d initiate the {look_up_table} price search?
For example do: ({look_up_table} * 0.9) directly in the formula field to get a 10% discount, instead of having to create an extra calculation field with: ({field_xxx_field_price} * 0.9)
Hi Robert
You can use {look_up_table} in one field to get a value from your look up table. Then use the value returned in another calculation – so then you can do more complex stuff. There’s an article here that includes details of how to chain multiple calculation fields.
If you need further help, please raise a ticket at https://pluginrepublic.com/support/ and the support team will get back to you.
Thanks.
Hei,
Is it possible to look up a value on the X-axis based on a field input, but, for the Y-axis, instead of looking up a field, specify a fixed value?
Hi Sara
Yes, you can do this.
Thanks.
How?
🙂
Hi
Please raise a support ticket here, https://pluginrepublic.com/support/, and our team will be happy to help you.
Thanks.
Hi
Could you raise a support ticket here – https://pluginrepublic.com/support/ – and our team will get on to it for you?
Please provide a link to the page in question, the exact steps to replicate the issue, and a description of the expected behaviour.
Thanks.
Can we have more than 3 fixed variables for Calculations?
Hi
Yes, it’s possible to have more than 3 fixed variables. Please raise a support ticket, https://pluginrepublic.com/support/, and our team will be happy to help you with this.
Thanks.