This guide covers how to add resources to bookable products using the Bookings for WooCommerce plugin.
To use resources, you need Bookings for WooCommerce plus the WooCommerce Product Add-Ons Ultimate plugin. If you don’t already have Add-Ons Ultimate, you can upgrade to the Bookings and Product Add-Ons Bundle at a discount. Here’s how to upgrade and just pay the difference between your existing license and the bundle.
This guide will walk you through using resources in bookable products. After reading the guide, you’ll be able to:
- Attach a resource – i.e. a shared item or service – to any number of bookable products
- Track each resource’s availability centrally, so a booking through one product blocks that resource for the same time and date for every other product it’s attached to
- Choose correctly between a resource and a Rental Bundle for a given use case
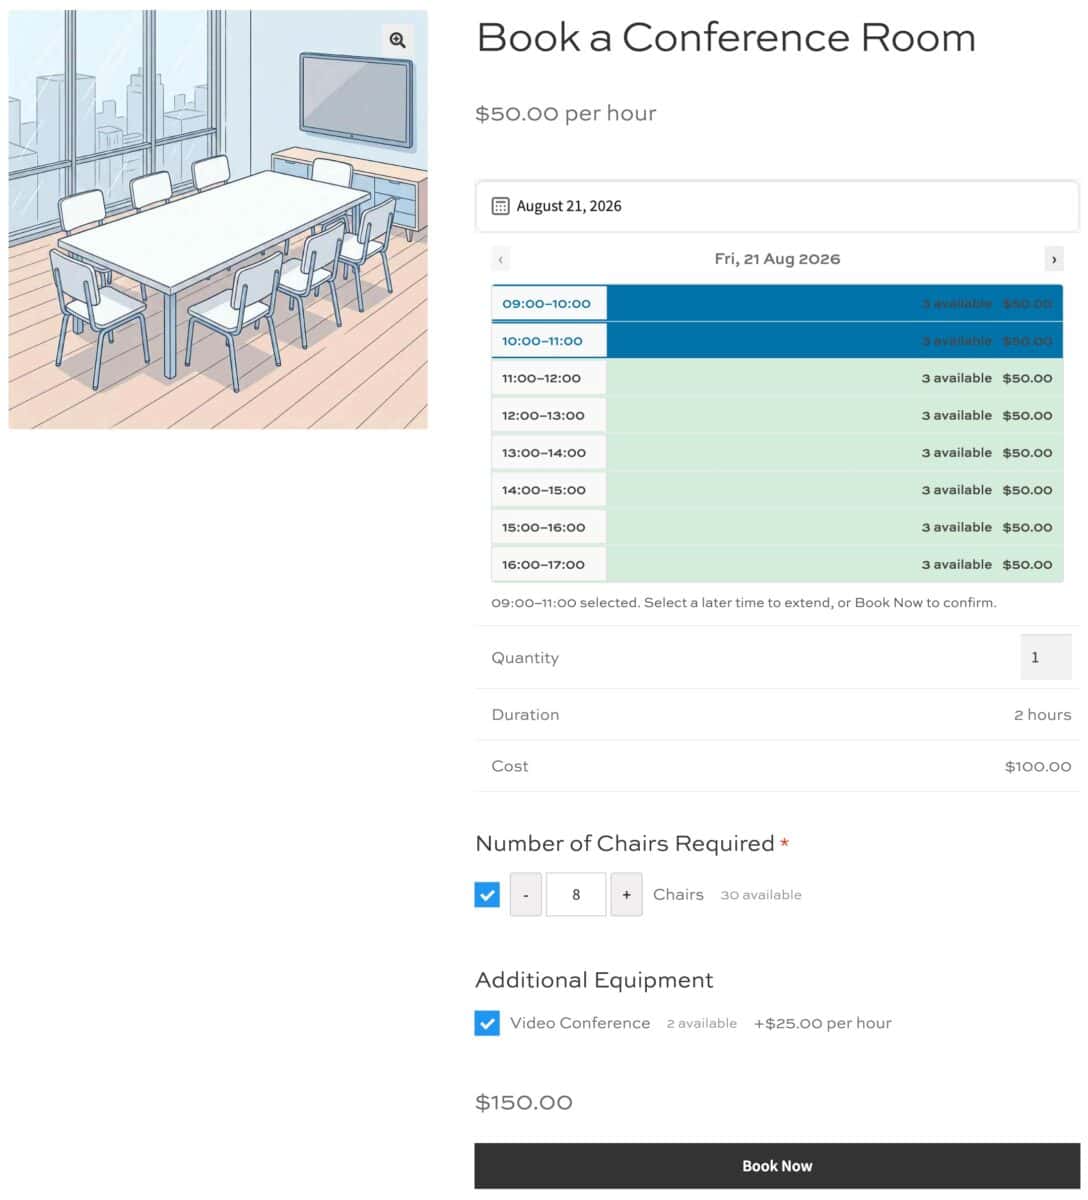
We’ll walk through an example of how to use resources for bookings by setting up bookable conference rooms with chairs and video conferencing kit.
What is a resource?
A resource is a bookable product that only exists to be attached to other bookable products. It can’t be booked on its own.
Typical examples might include: a conference room’s projector, extra chairs for room hire, a sound system for a wedding venue, even staff members. The same resource can be attached to multiple parent products at once, and Bookings for WooCommerce tracks its availability centrally, across all of them.
This means that if a customer books a projector for Conference Room A at 10am, the number of projectors available for Conference Room B at the same time is reduced.
You create a resource like any other bookable product, with one setting switched on: ‘Resource’. Once enabled, most other booking settings (Availability, Pricing, External calendar sync) are disabled, since a resource has no bookings or calendar of its own. Only its price, quantity, and (optionally) time slots need to be configured.

Example use case: Book a conference room with additional resources
We’ll set up a Conference Room product that’s booked by the hour, with two optional extras: chairs (free, with limited stock) and video conferencing kit (paid, also limited stock). We’ll look at how to:
- Ensure resources are never overbooked
- Price resources according to booking length and other factors
Let’s quickly set up the relevant products.
Step #1: Create the Conference Room product
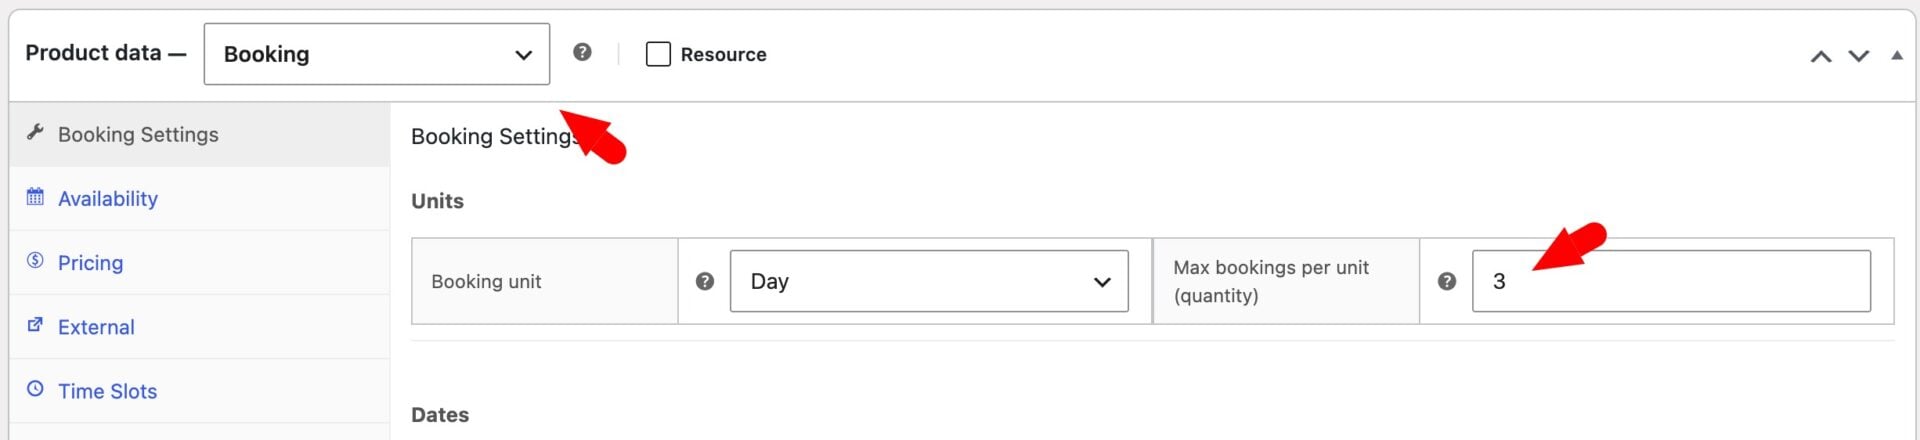
First, add a new product and set the product type to ‘Booking’. On the ‘Booking Settings’ tab, set ‘Max bookings per unit’ to 3, since there are 3 conference rooms available in our example at any one time. Leave ‘Booking unit’ at the default, since it doesn’t apply once time slots are enabled.
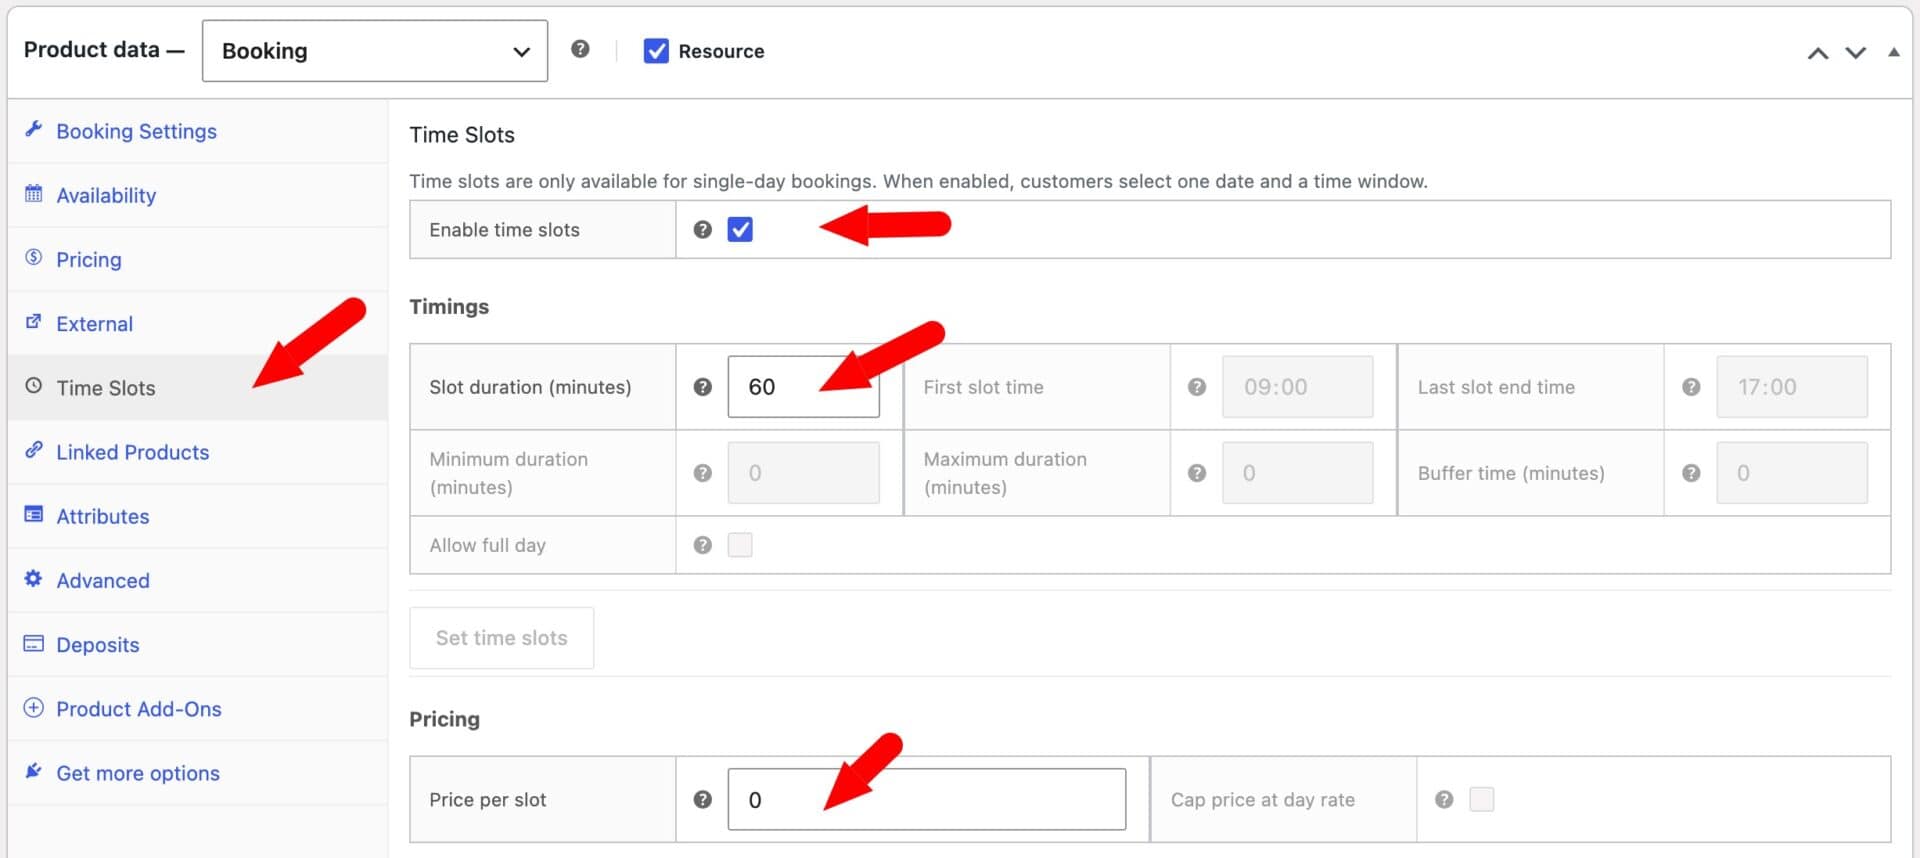
On the ‘Time Slots’ tab, enable time slots and set ‘Slot duration’ to 60 minutes, with ‘First time’ at 09:00 and ‘Last time’ at 17:00. Set ‘Price per slot’ to your hourly room rate, for example 50. Obviously, you can adjust these settings to suit your needs.
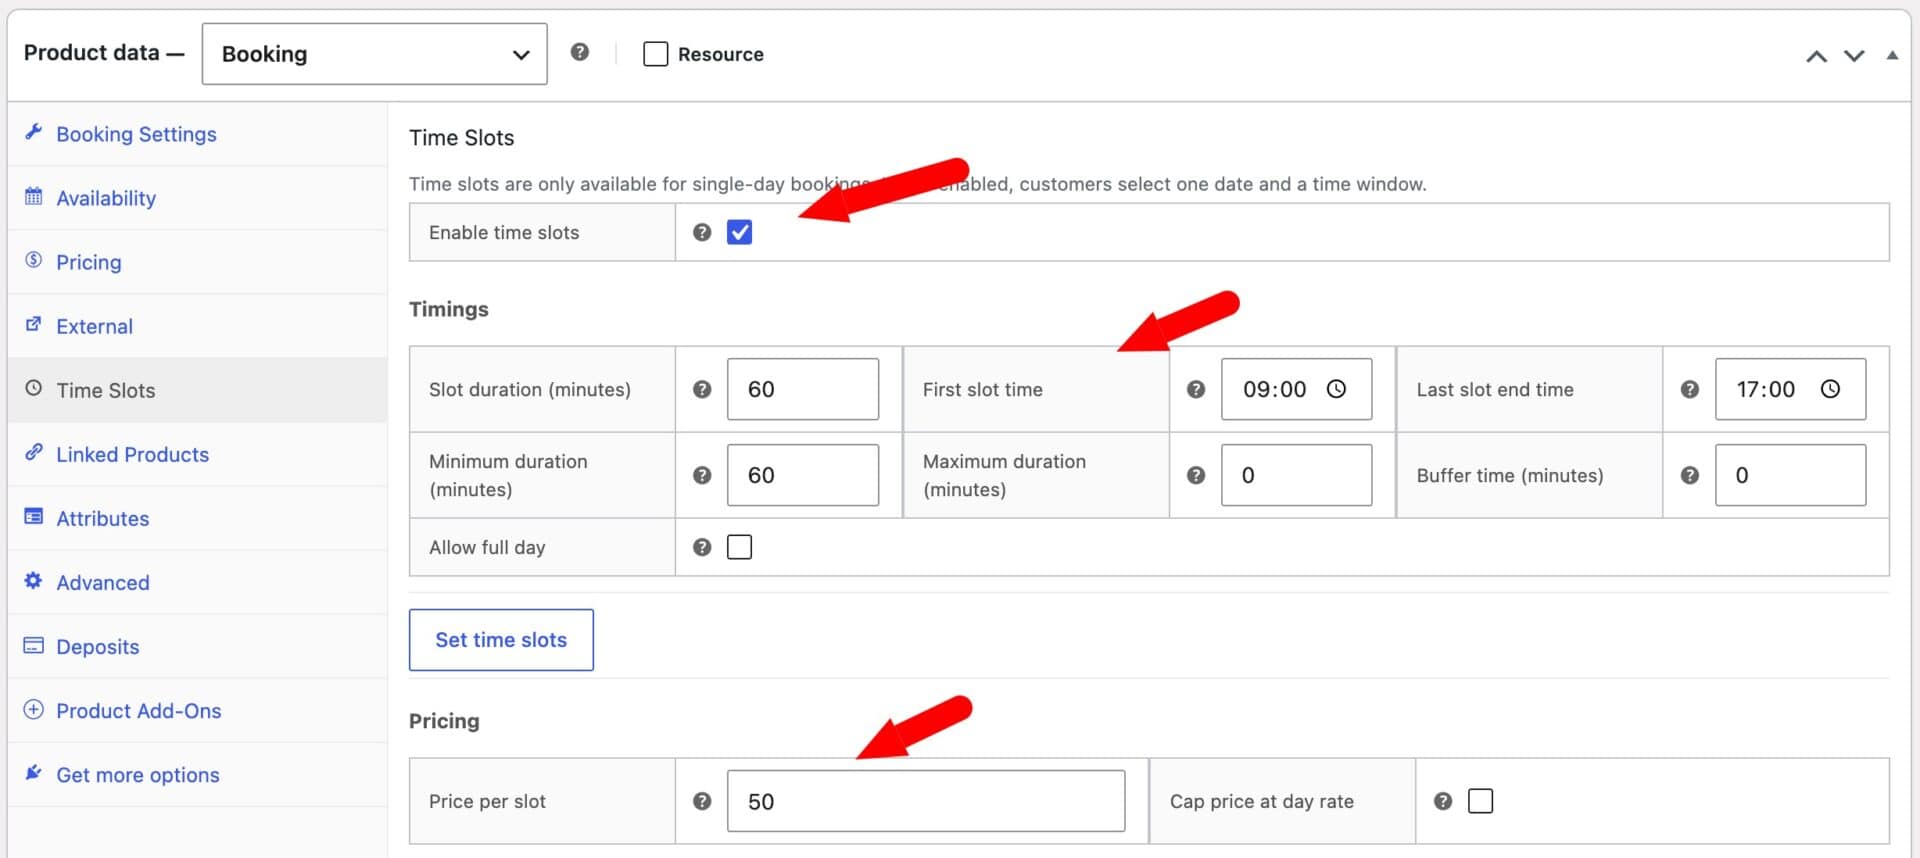
Customers can now pick an hour, or several consecutive hours, between 9am and 5pm, with up to 3 simultaneous bookings per slot. Now let’s set up the resources that will attach to it.
Step #2: Create the two resource products
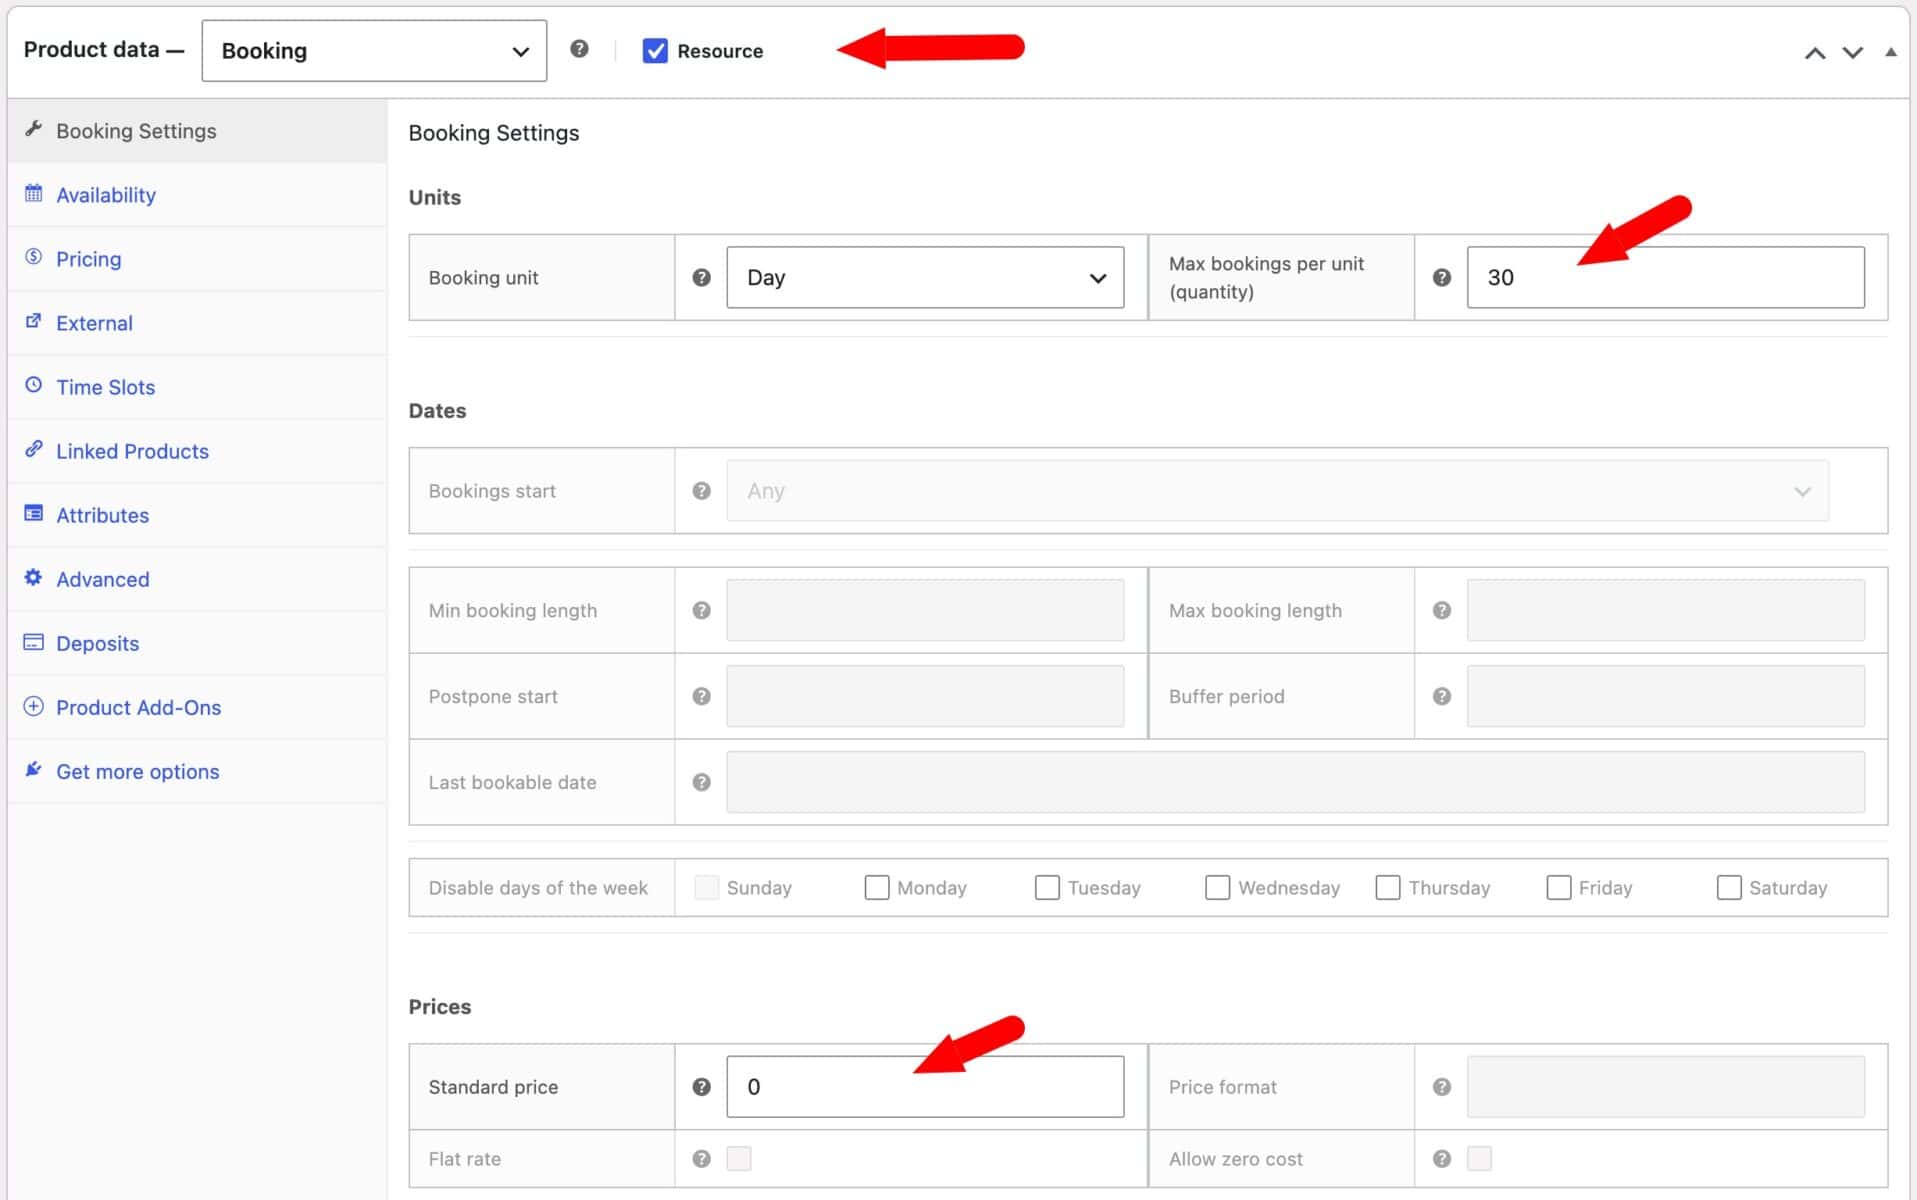
Each resource is a normal Booking product with ‘Resource’ enabled on the General tab. Once checked, most booking settings are greyed out, leaving only the fields relevant to pricing active.
Chairs
For your chairs resource, create a product with the following settings:
- Product type: Booking, with ‘Resource’ enabled
- ‘Max bookings per unit’:
30 - ‘Standard price’:
0(free) - Enable time slots, with ‘Slot duration’ at
60minutes and ‘Price per slot’ at0
Video conferencing kit
For the video conferencing resource, use the following settings:
- Product type: Booking, with ‘Resource’ enabled
- ‘Max bookings per unit’:
2(assuming you only have 2 available) - Enable time slots, with ‘Slot duration’ at
60minutes and ‘Price per slot’ at25
If a resource will ever be attached to a parent that books by time slot, the resource needs its own time slots enabled too, with a matching duration. Without this, booking it for a single hour blocks it for the entire day, for every other parent that might also want it.
You now have two resource products, each priced and configured to match how it’s actually used. Next, attach them to the Conference Room.
Step #3: Attach the resources to the Conference Room
To attach your resources to your main Conference Room product, add a Products field for each resource, or one field listing both, whichever suits your layout:
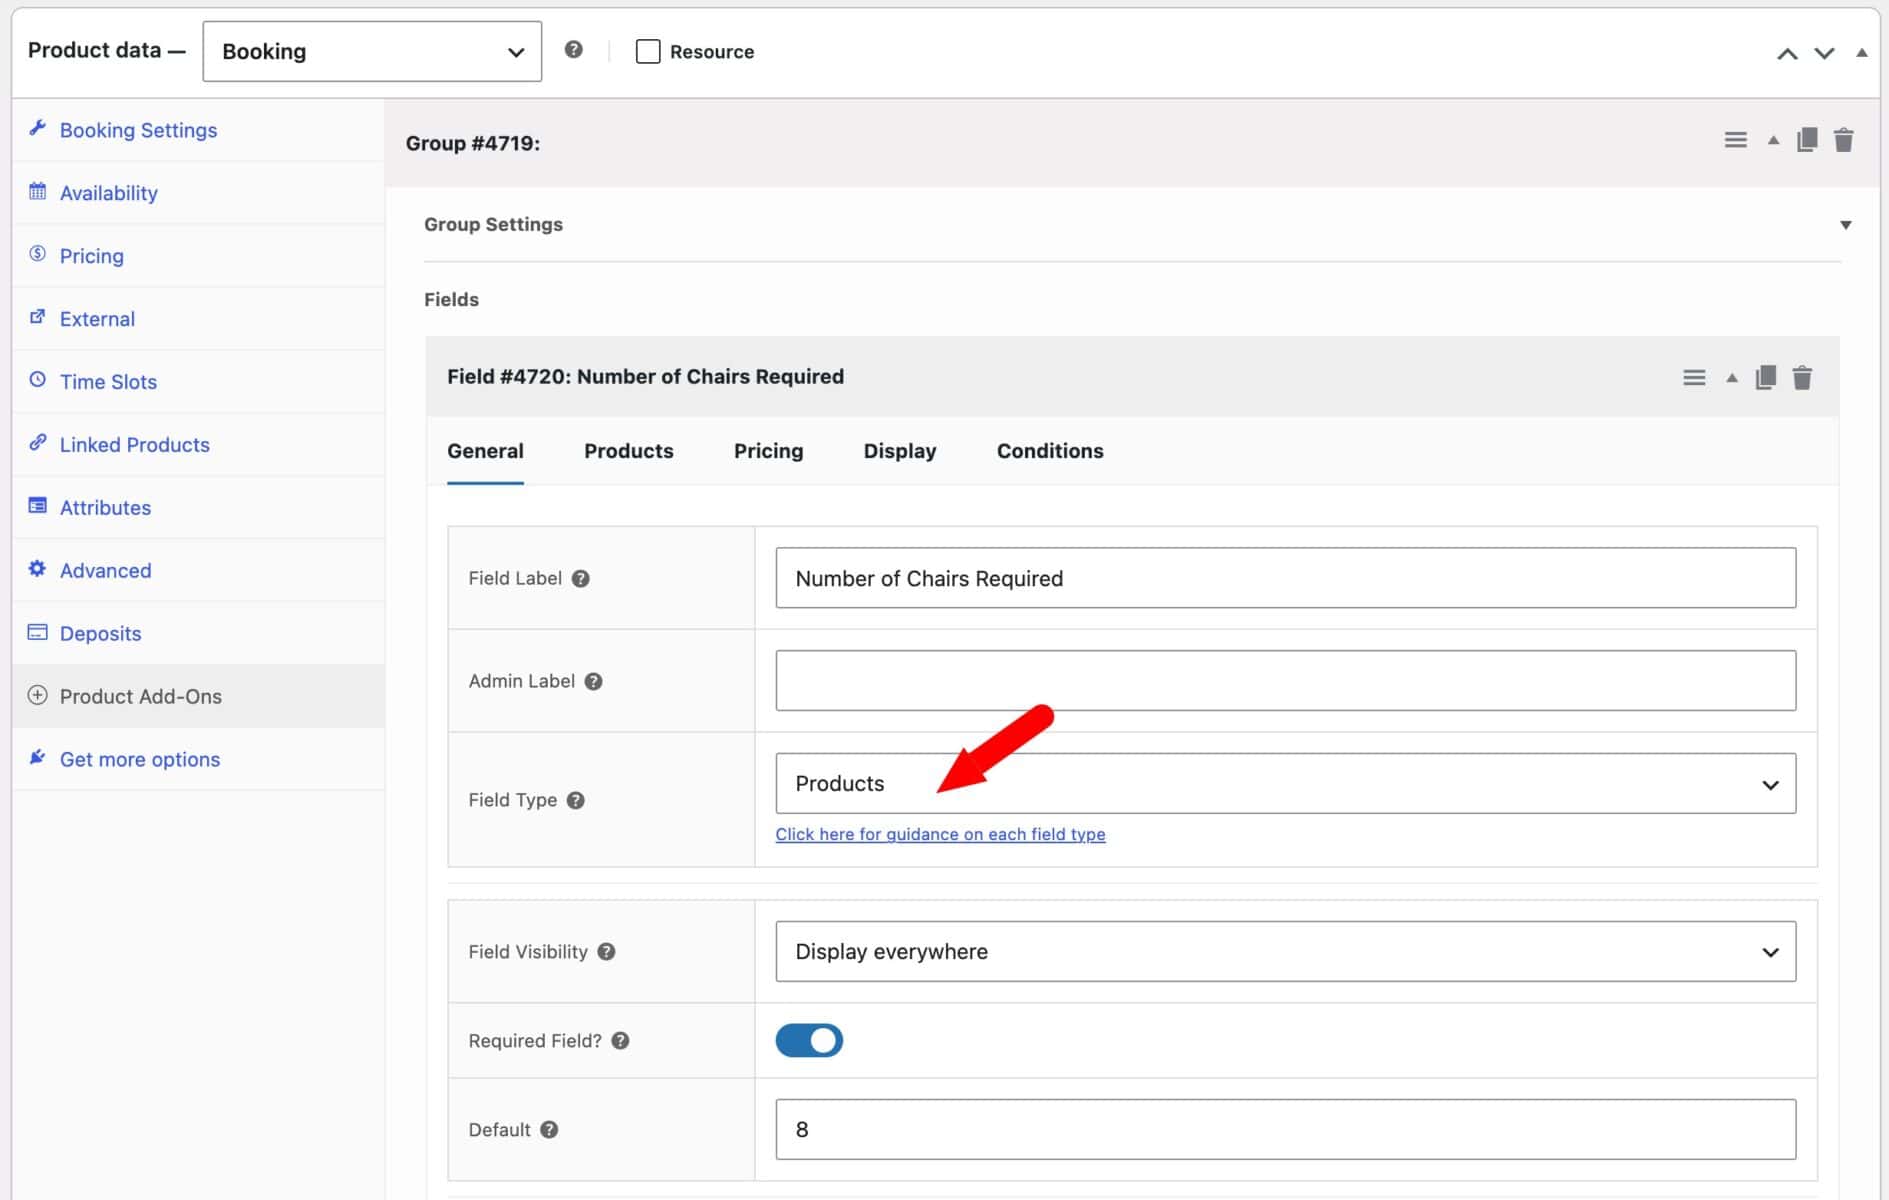
- On the ‘Product data’ section click the ‘Product Add-Ons’ tab
- Click ‘Add Group’ then ‘Add Field’
- Add a label to ‘Field Label’ and choose ‘Products’ in the ‘Field Type’ setting
- Switch to the ‘Products’ tab
- Enter the products for each of the resources that you are adding using this field
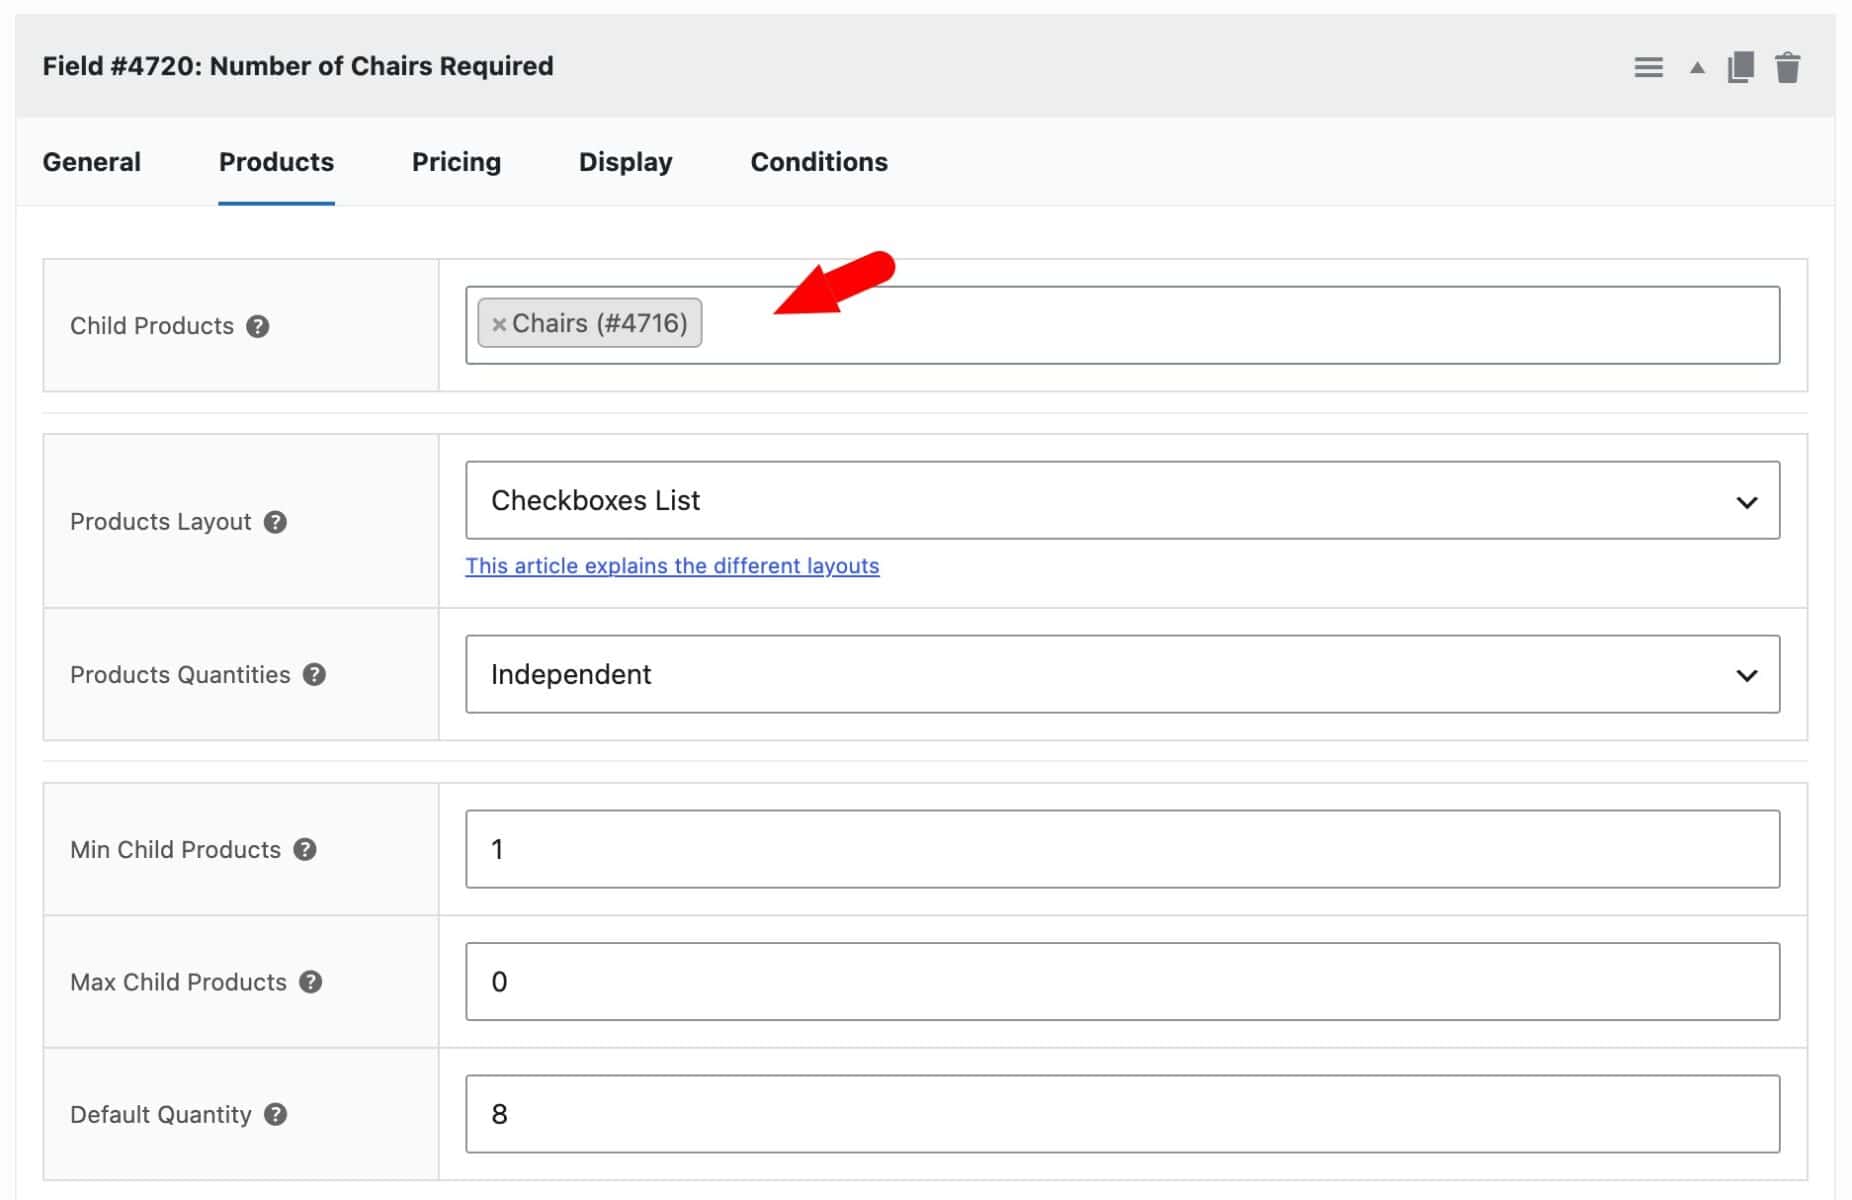
In this case, we are only going to add the ‘Chairs’ resource to this field. It’s possible to add as many resources as you like to a single ‘Products’ field – but in our example, the ‘Chairs’ resource has slightly different requirements to the ‘Video Conference’ resource.
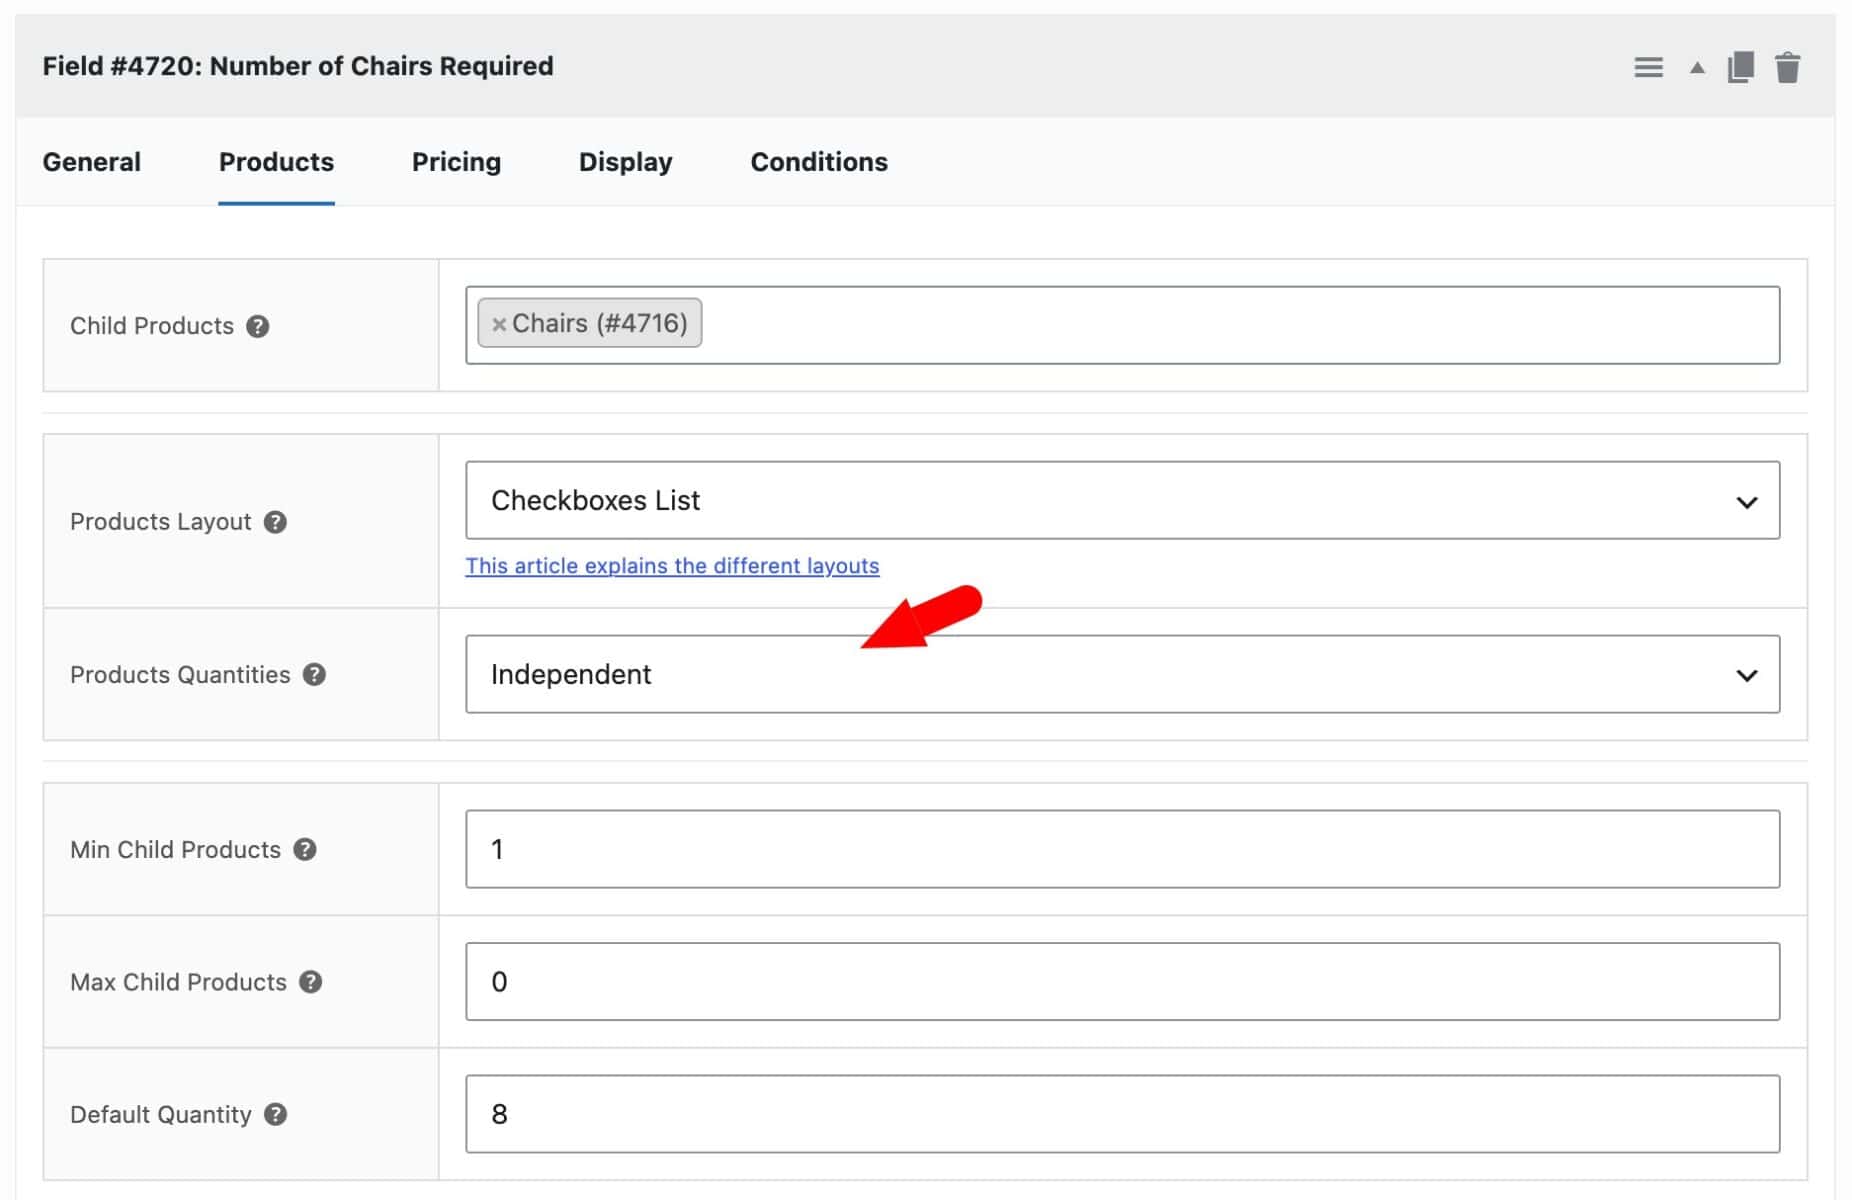
Products Layout
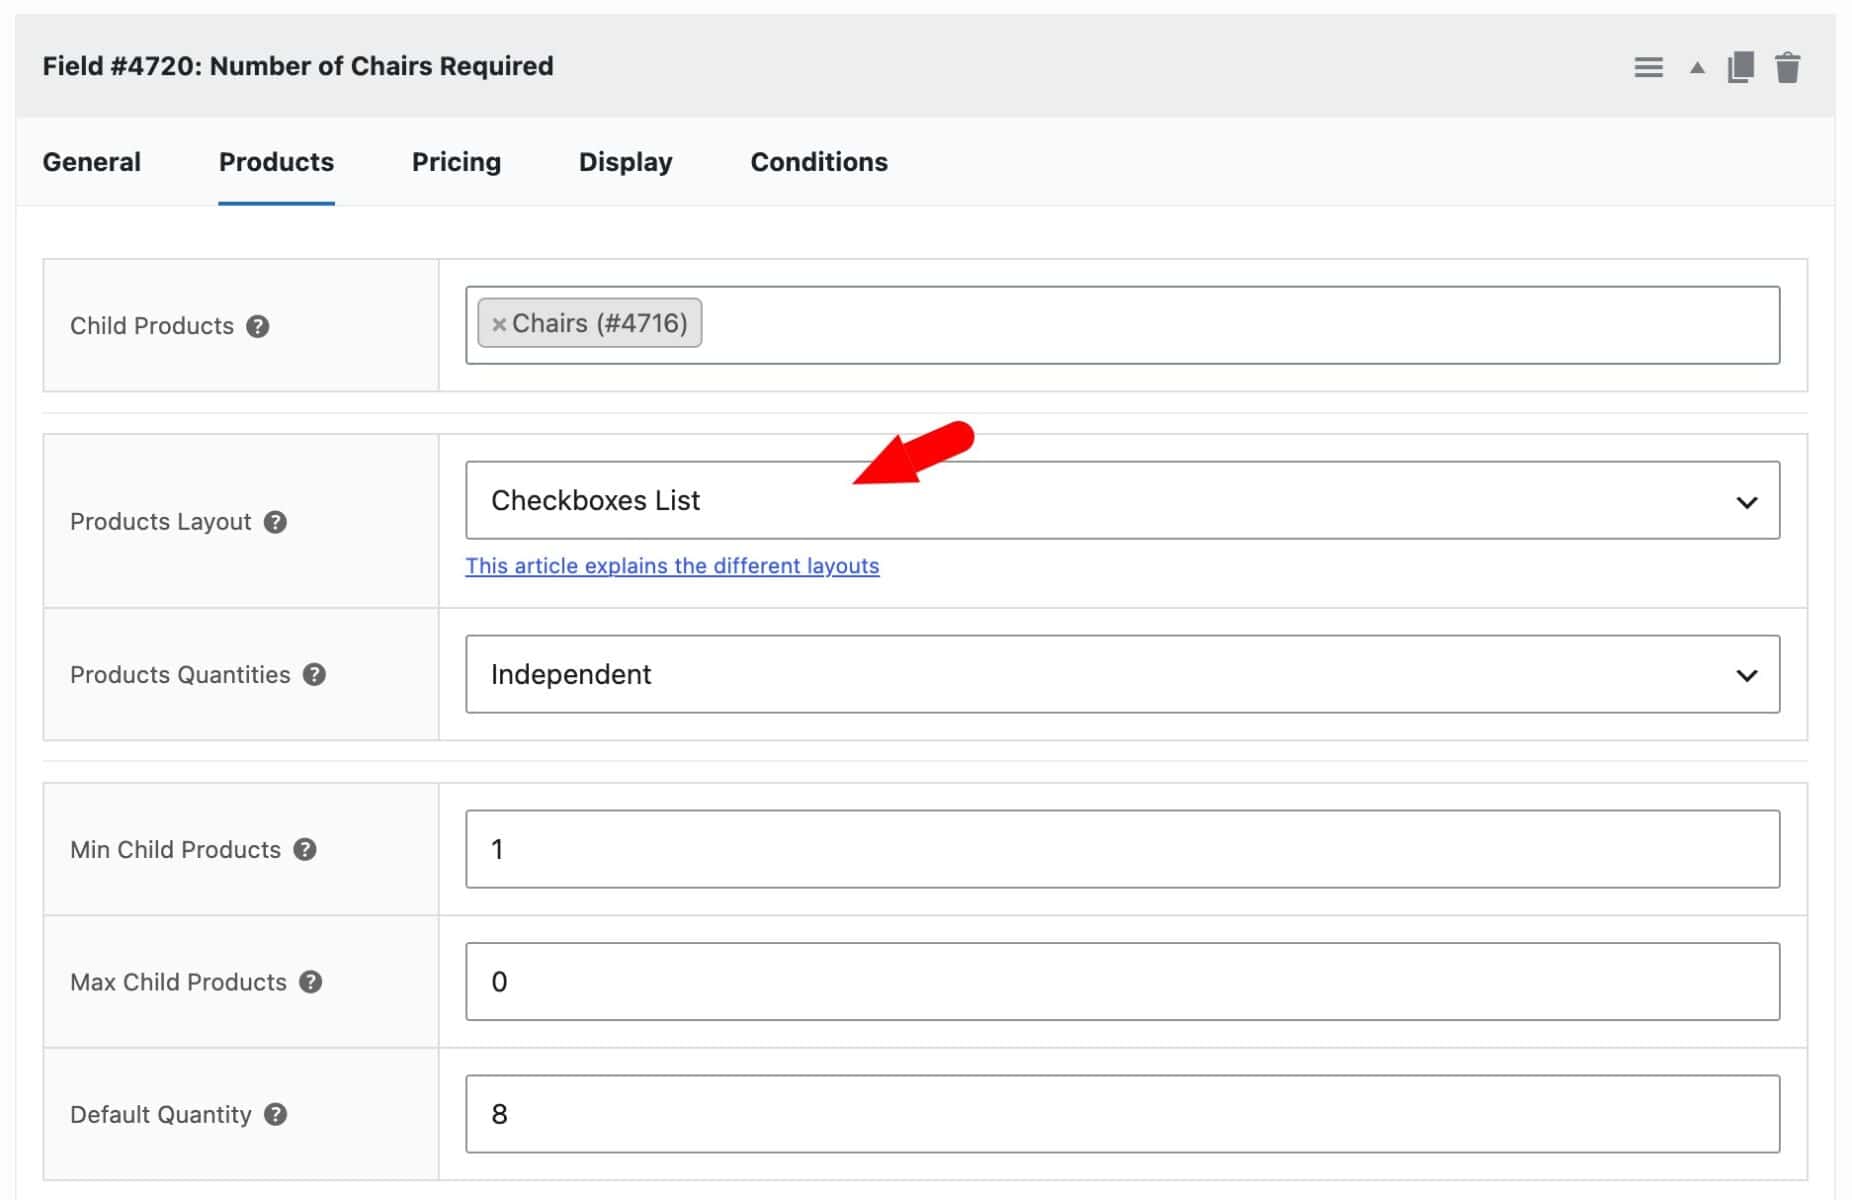
The ‘Products Layout’ setting determines how the resource options are displayed to the customer on the front end:
- Checkboxes Images: lets the customer select one or more resources, shown with a thumbnail image
- Checkboxes List: the same as Checkboxes Images, but without the image
- Components: presents each child product with thumbnail, product title and price, and quantity field (if enabled)
There’s a full guide to the different layouts available in this article. Note that only certain layouts are available for resources.
In our example, the Checkboxes List layout works well for Chairs and Video conferencing kit. Customers can just use a simple checkbox to indicate if they need the resource or not.
Products Quantities
The ‘Products Quantities’ setting manages how the customer chooses a quantity for each resource. The options are:
- Linked: the child’s quantity always equals the parent’s own booking quantity. The customer doesn’t choose a separate quantity for the child; it scales automatically. This is useful for a resource like the conferencing unit where you would need one per booking.
- Independent: the customer sets the child’s quantity separately from the parent’s. This is useful for the chairs resource – it allows the user to select how many of the resource they require independent of the booking duration
- One only: the customer can select the product but not a quantity; it’s included as a single unit.
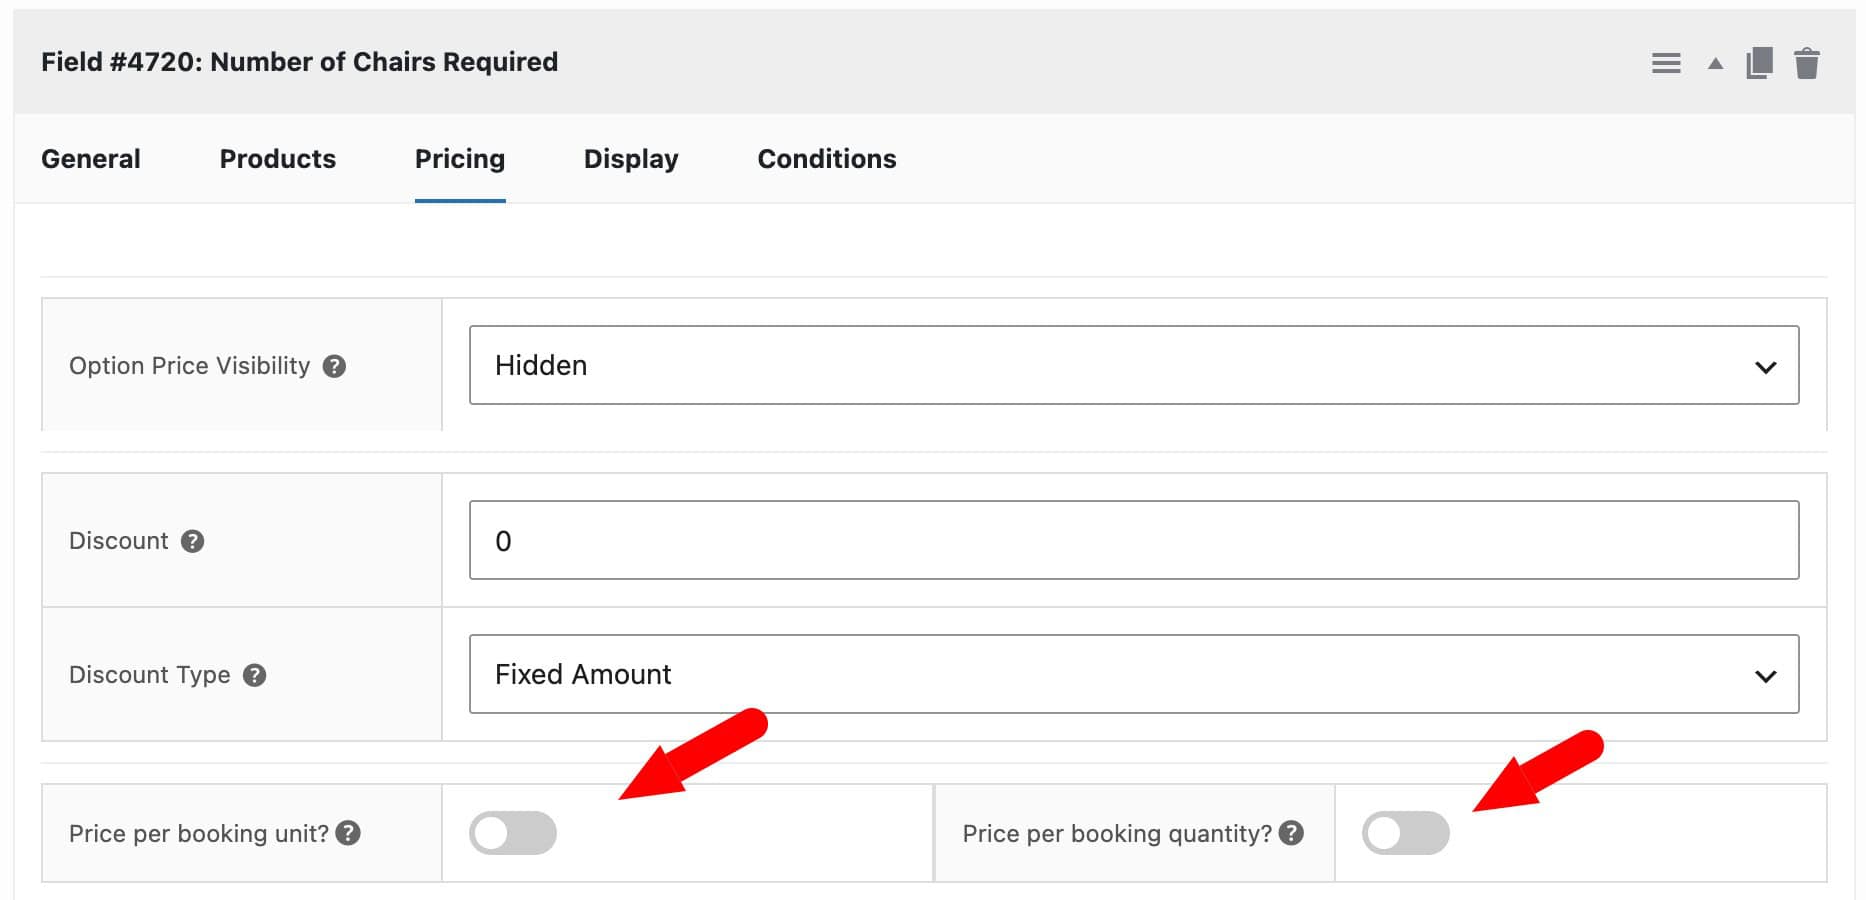
Price per booking unit and Price per booking quantity settings
On the ‘Pricing’ tab, there are two further settings that relate to pricing your booking resources.
- Price per booking unit: enable this option to multiply the price of the resource by the length of the booking – so if the booking is 3 days long and the resource has a base price of $5, the total price of the resource for the booking will be $15
- Price per booking quantity: enable this to multiply the resource’s price by the parent’s own booking quantity (in our example, the booking quantity is the number of conference rooms being booked)
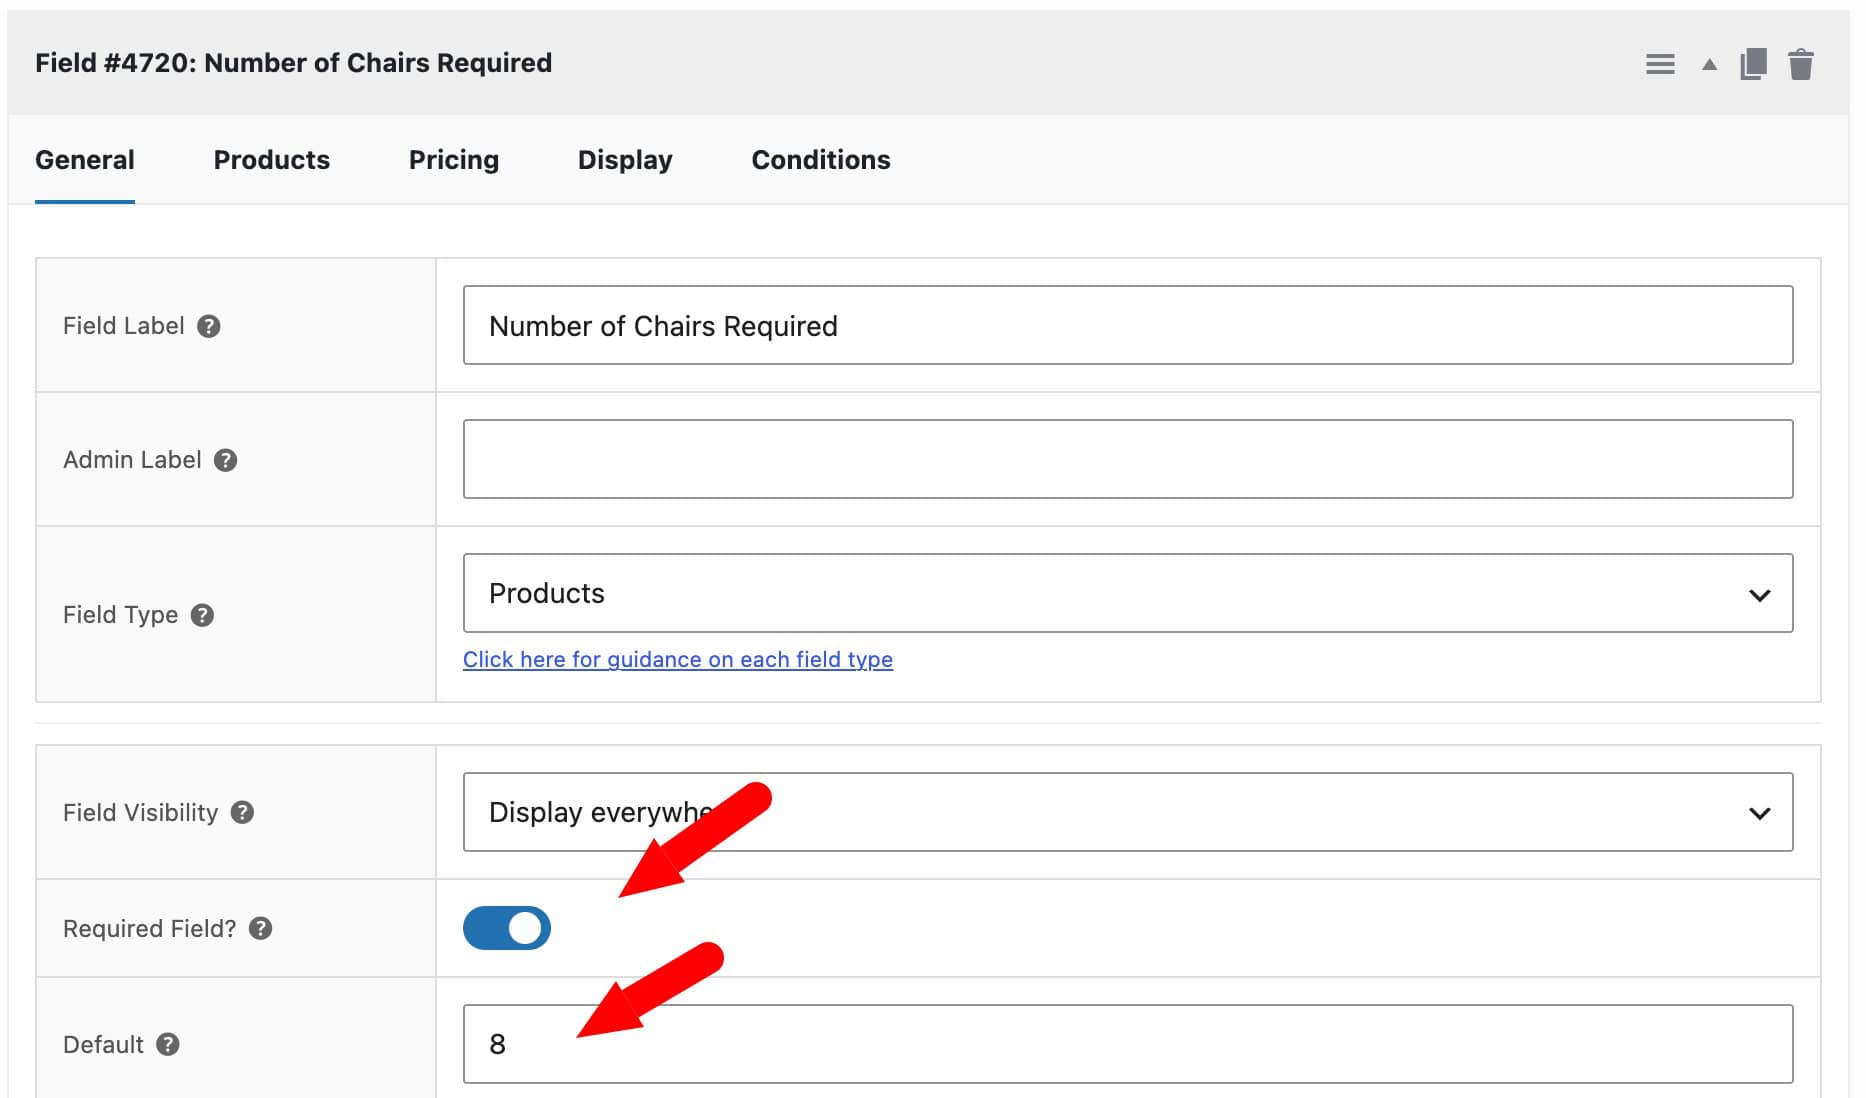
How to automatically add a resource to a booking
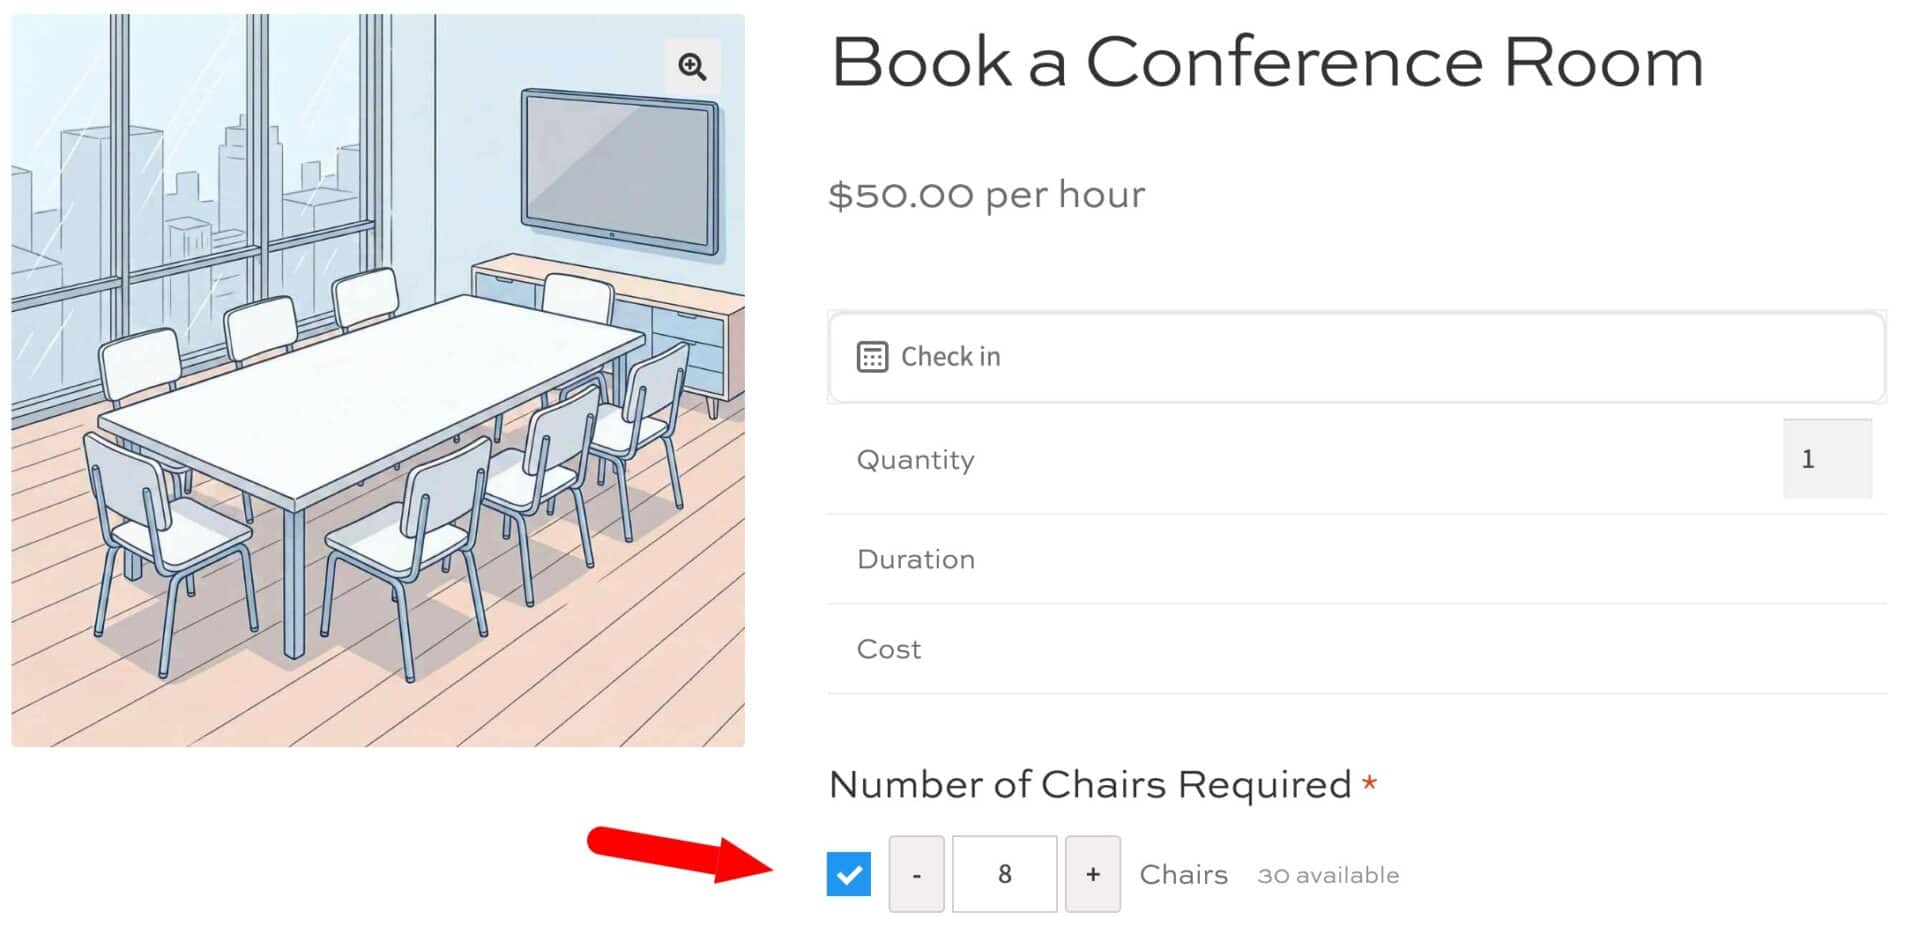
In our Conference Room example, the customer doesn’t need to select the option for the video conference resource – but they do need to specify how many chairs they want.
To ensure that a resource is automatically added to a booking:
- Create your resource product, e.g. ‘Chairs’
- Add it to your main bookable product as a child product
- Enable the ‘Required Field?’ setting on the ‘General’ tab
- If you are using ‘Independent’ product quantities, enter a default value in ‘Default’
Now, the resource will be automatically selected on the front end with a default value.
If your resource does not allow the user to select their own quantities – i.e. the ‘Products Quantities’ field is set to either ‘Linked’ or ‘One only’ – you can automatically add the resource by:
- Enabling the ‘Required Field?’ setting
- Entering the ID of the child product in the ‘Default’ field
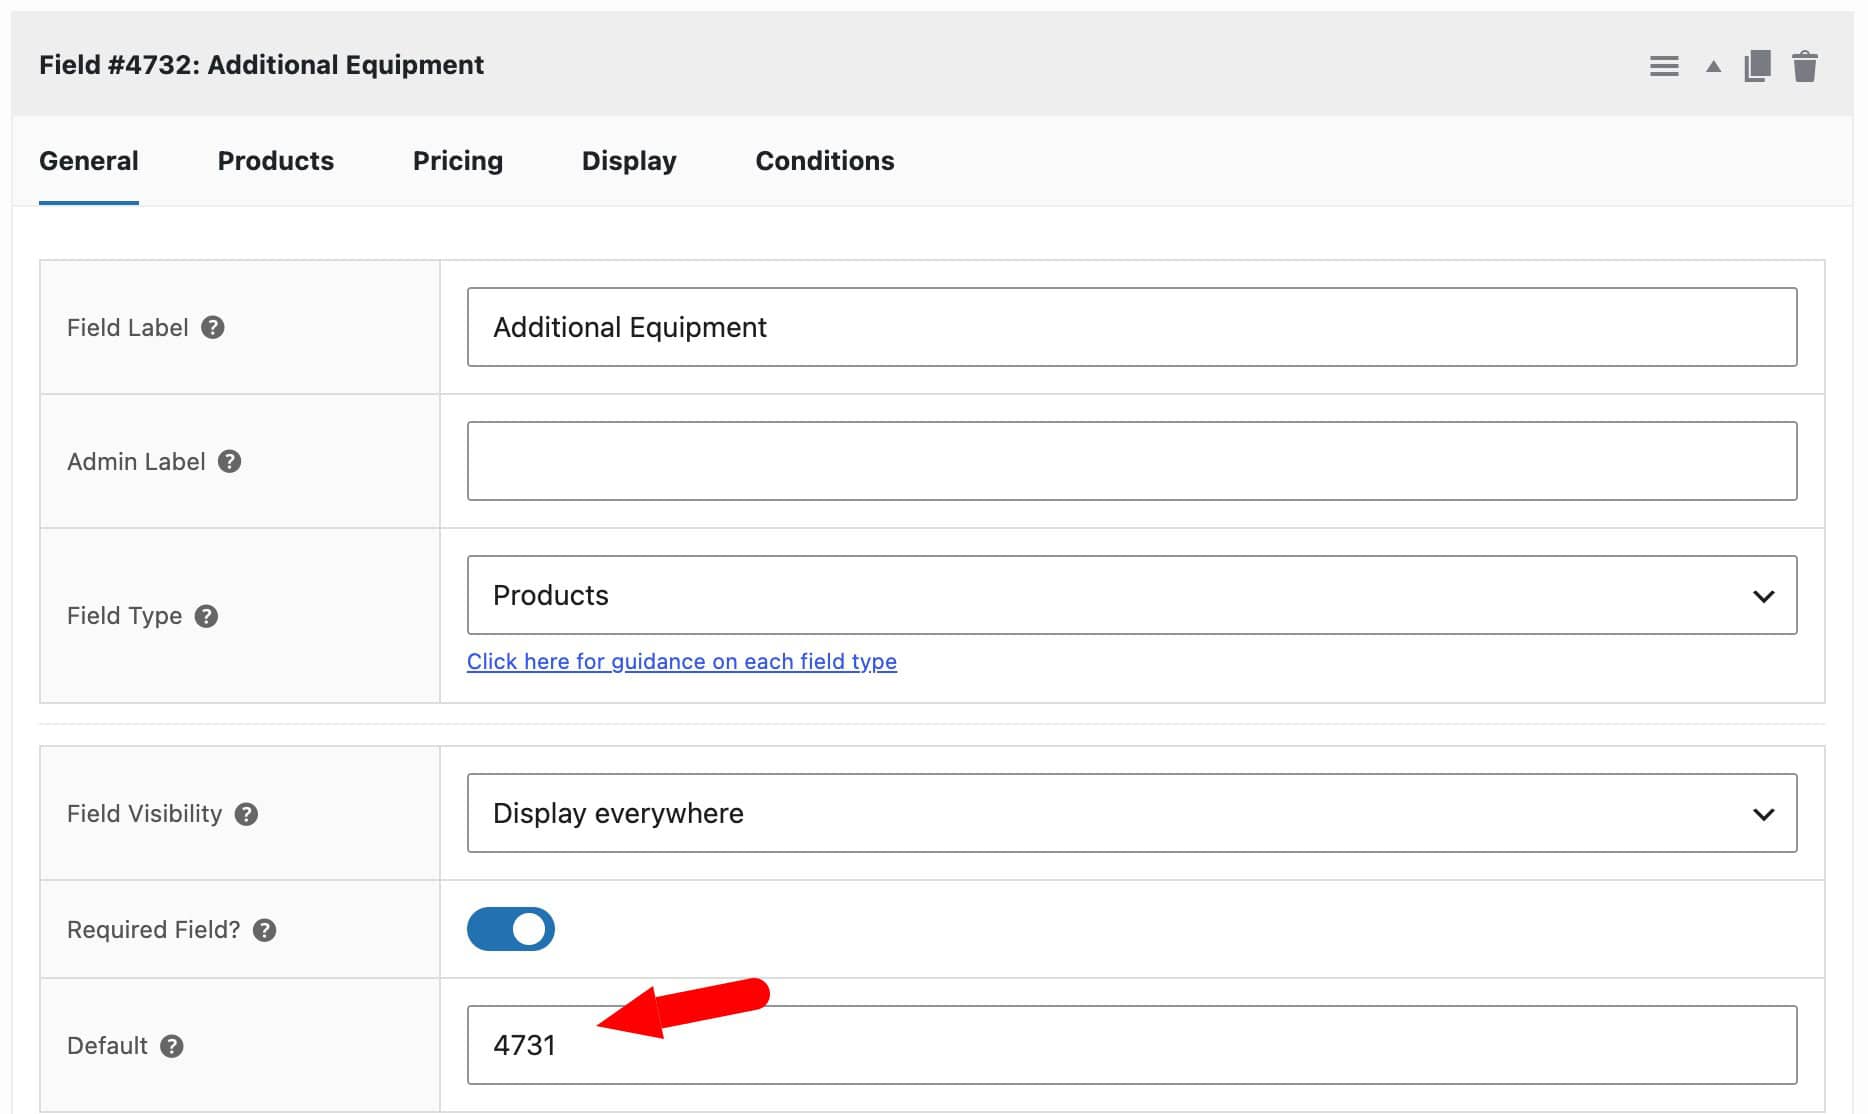
How to add resources “invisibly” to a booking
If you want to automatically add certain resources to a booking and you don’t want the customer to even see the resources being added, you can follow the steps above to automatically add a resource then apply the following setting:
- Field Visibility: select ‘Hide from customer’
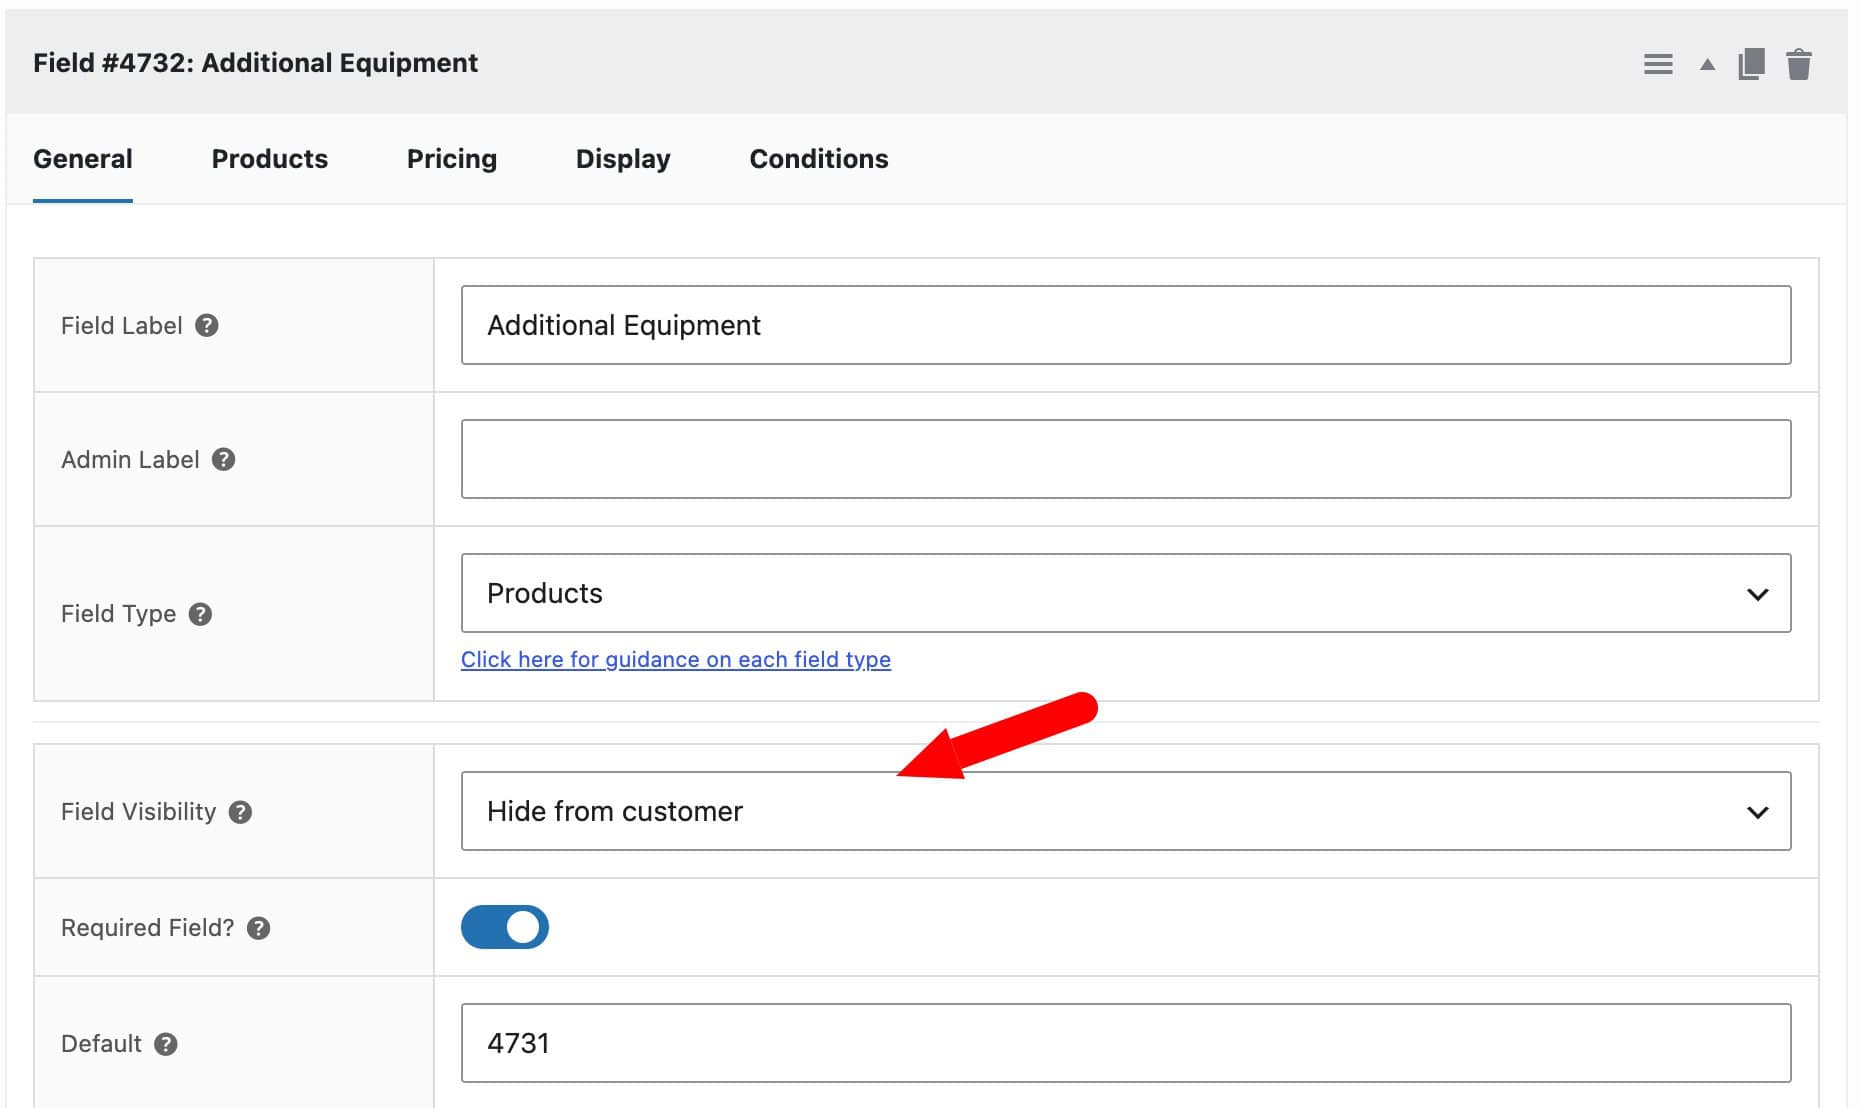
In this way, the resource will be automatically added to the booking according to the quantities you’ve specified – but the customer won’t even see it.
Setting custom availability and prices for resources
Just like with standard bookable products, you can set custom availability and pricing for resources. So, for example, certain resources might not be available on weekends or you might want to charge more for them at peak times.
There are three ways to block a resource. All three apply to the resource itself, independently of whichever parent product is booking it.
Disable days of the week
On the resource’s ‘Booking Settings’ tab, ‘Disable days of the week’ lets you rule out entire days. Check ‘Saturday’ and ‘Sunday’, for example, if the video conferencing kit is serviced every week.

Checked days are blocked outright. The resource won’t be offered for those dates through any parent product it’s attached to, regardless of remaining capacity.
Custom pricing or availability for specific date ranges
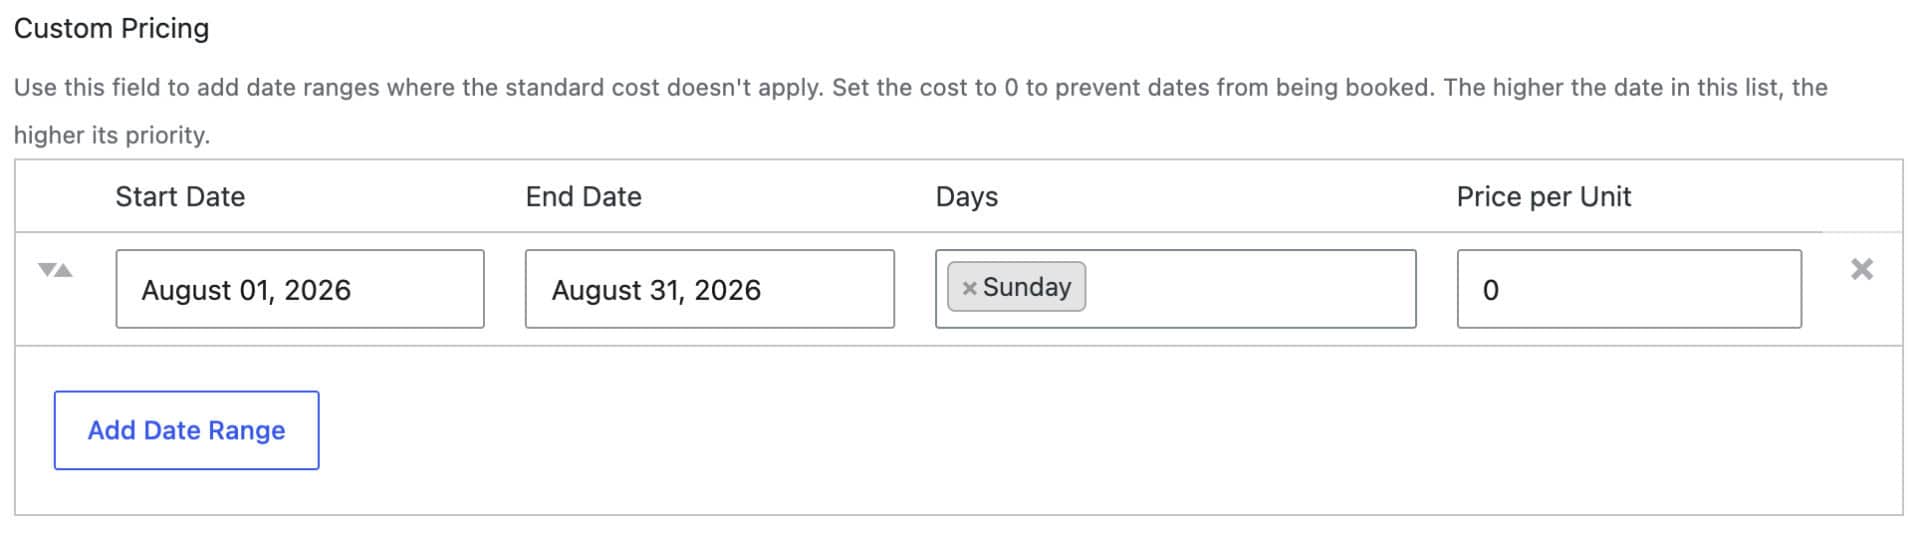
On the resource’s ‘Pricing’ tab, use ‘Add Date Range’ the same way you would for an ordinary bookable product. Two things you can do here:
- Block a range entirely: enter a Start Date and End Date and leave the price at
0. The resource becomes fully unavailable for every date in that range. This works well for taking the video conferencing kit out of service for a week of repairs. - Override the price for a range: enter a Start Date, End Date, and a price greater than
0. The resource stays bookable for that range, but at this price instead of its usual ‘Standard price’ or ‘Price per slot’.
Rows can also be restricted to specific days of the week using the ‘Days’ column. In the example below, the resource is unavailable on any Sunday in August.
Per-slot overrides: blocking or re-pricing a specific window
If the resource has its own time slots enabled, its ‘Time Slots’ tab also has an ‘Add override’ table. You can block date ranges and/or specific time slots.
Each override row has:
- Start time / End time: the window the override applies to, e.g. 12:00–13:00 to block the video conferencing kit over lunch.
- Start date / End date: optional. Leave blank to apply on every date, or set a range to limit it to a particular week.
- Availability: set to
0to fully block that window. Set it to a lower or higher number to reduce or increase how many units of the resource can be booked in that window, compared with its normal ‘Max bookings per unit’. - Price per slot: optionally charge a different price for that window, independently of blocking it. This is useful for a peak-time surcharge.
Continuing the conference room example: say the video conferencing kit needs to come out of service every day between 12:00 and 13:00 for a firmware check. Add one override row with Start time 12:00, End time 13:00, Availability 0, and no dates set.
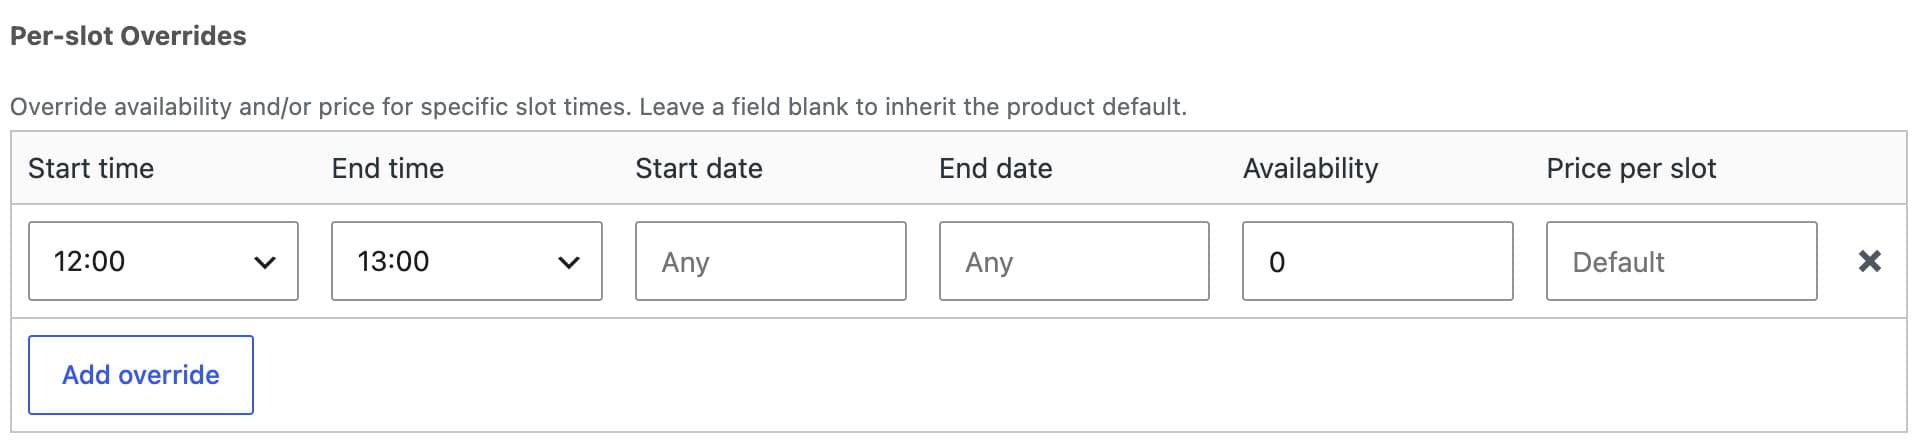
The kit will then show as unavailable for that hour on every date, through every parent product it’s attached to. It remains bookable at every other hour.
Managing bookings with resources
On the Edit Booking screen, you will see a “Related bookings” panel linking a parent booking to any resource or child bookings created alongside it in the same order, and vice versa. The main bookings list also has ‘Resource’ and ‘Related bookings’ columns.
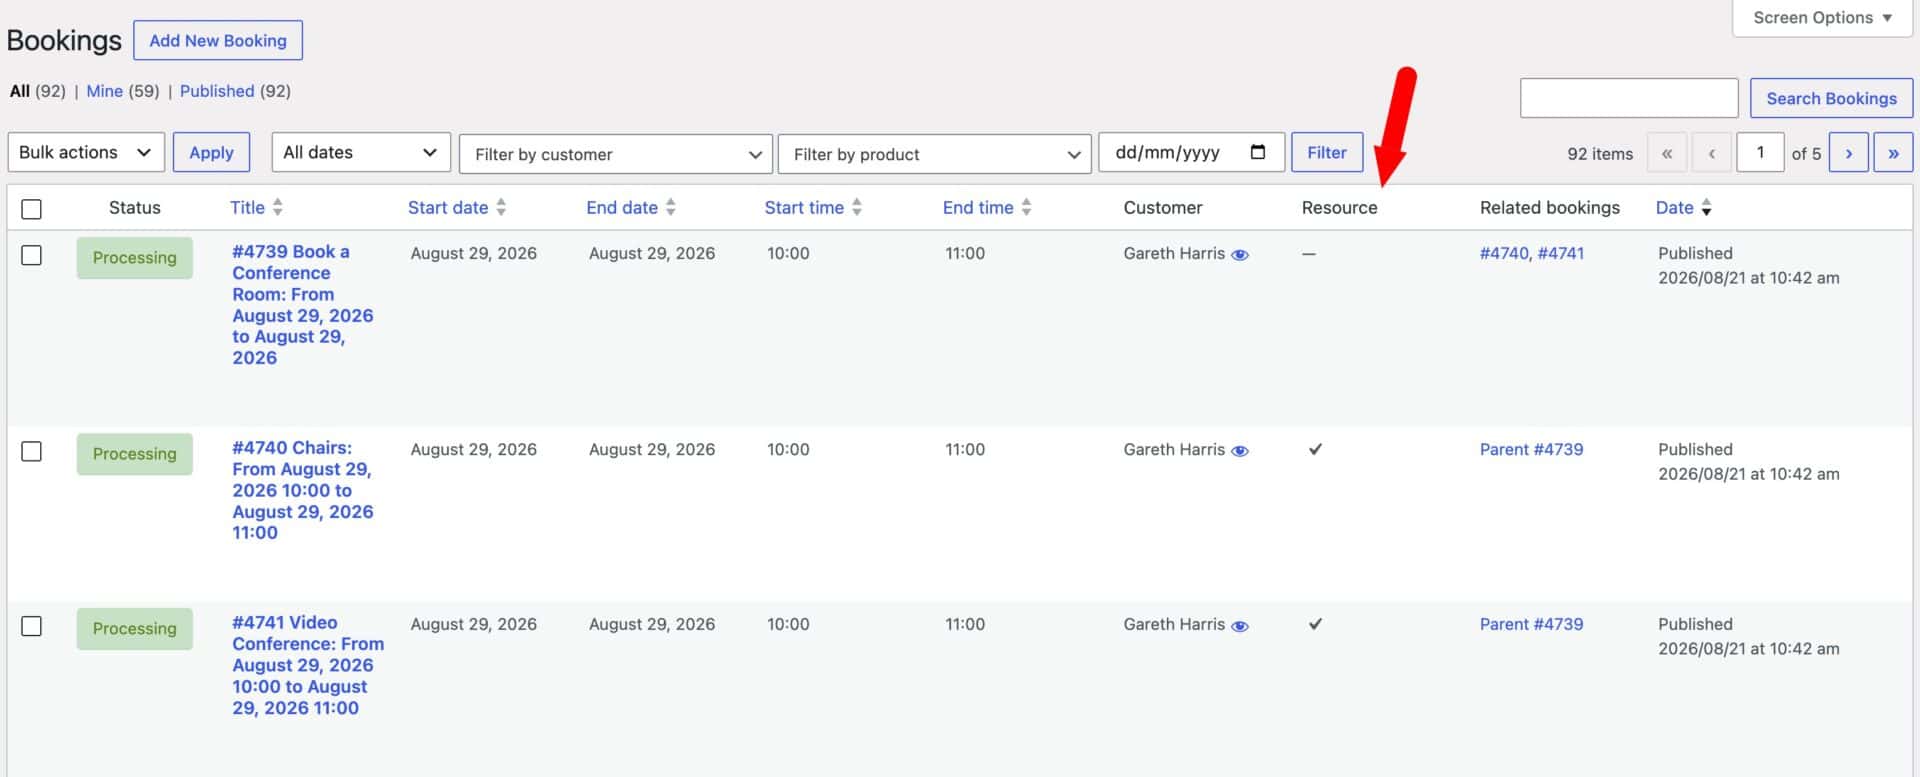
If you edit a parent booking’s dates from the admin, any attached resource bookings are automatically re-booked to match the new dates. If a resource isn’t available for the new dates, the whole save is blocked with an on-screen notice.
The difference between resources and rental bundles
Note that bookable resources are built entirely on top of Product Add-Ons Ultimate’s Products field type – just like rental bundles. This field type can actually be used in three slightly different ways with Bookings for WooCommerce:
- As a resource
- As part of a Rental Bundle
- For upsells or extra options that aren’t bookable
Check out the table below for clarity on each usage.
| Resource | Rental Bundle | Ordinary product | |
|---|---|---|---|
| What it’s for | A shared item or service attached to any number of different parent products | A set of bookable items that can be booked separately, or bundled together | A non-bookable option or add-on, for anything that isn’t time or date dependent |
| Availability | Tracked centrally – one pool of stock, shared across every parent it’s attached to | Tracked per parent product – no sharing between different parents | Not tracked – it’s a regular product, not a booking |
| Typical use | Equipment, staff, or add-ons used across your whole catalogue (a projector, a photographer, a doorman) | A “package” that’s always booked together with one specific product (a villa’s included linens, a car’s included spare tyre) | A gift wrap option, an upsell, or any other extra that doesn’t need its own dates or time slots |
| Setup | Enable ‘Resource’ on the child product itself | Enable ‘Rental Bundle’ on the Products field on the parent | Add a Products field on the parent and choose ordinary products as the Child Products – no extra checkbox needed |
| Can it be reused elsewhere? | Yes, the same resource can be a child of many different parents | No, a Rental Bundle field’s children are scoped to that one parent | Yes, the same product can be a child of many different parents |
Use a resource if the same item needs to be booked by more than one product and those bookings need to conflict with each other. Use a Rental Bundle if it’s a fixed set of extras that might be available individually or grouped together.
Resources for WooCommerce bookings – recap
That’s how to use the resource feature in Bookings for WooCommerce to share a single item or service across multiple bookable products. We looked at the difference between a resource and a Rental Bundle, then built a Conference Room product with two attached resources: free chairs and paid, time-limited video conferencing kit.
You need both Bookings for WooCommerce and WooCommerce Product Add-Ons Ultimate. These are available together at a discount as the Bookings and Product Add-Ons Bundle. If you already own one of the plugins, you can upgrade to the bundle and just pay the difference.
All our plugins are compatible with all themes and page builders, including Astra, Flatsome, and Woodmart, and page builders like Elementor and Divi. If you have any questions, our world-class support team is on hand to help. And they’re backed by a 14-day money-back guarantee, so you can try them risk-free.