You can let customers choose a specific staff member when they book, using the Resources feature in Bookings for WooCommerce. Staff are just a specific type of resource, so the same setup applies.
This is useful anywhere a customer needs to pick a person rather than just a time slot – booking a tutor, a hairdresser, or a consultant, for example. We’ll use booking an online tutor as the example.
Note that to work with staff members, you need Bookings for WooCommerce plus the WooCommerce Product Add-Ons Ultimate plugin. If you don’t already have Add-Ons Ultimate, you can upgrade to the Bookings and Product Add-Ons Bundle at a discount. Here’s how to upgrade and just pay the difference between your existing license and the bundle.
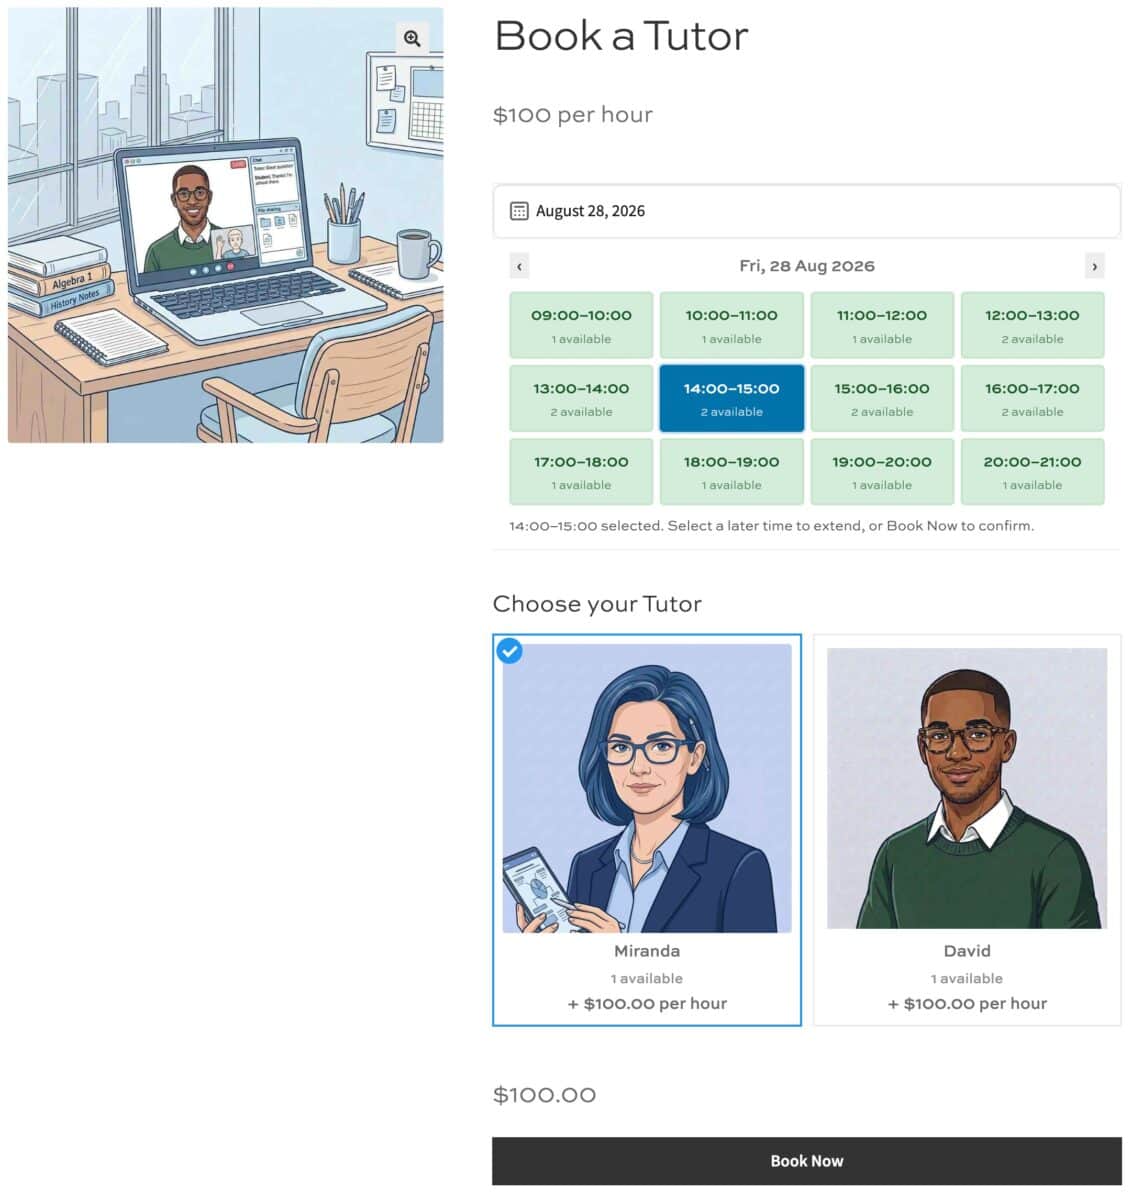
Example use case: Allocate staff members for an online tutor booking system
In this example, we’ll set up a product page where customers can book an online tutor. They’ll be able to choose a date and time then pick their preferred tutor. Tutors will be staff members – i.e. bookable resources that we can attach to the main booking page. You can add as many of these as you like.
Step #1: Create a bookable product for each staff member
First we need to create a separate bookable product for each tutor. In this example, each tutor is a member of staff. This means they can be booked on multiple products but their availability is tracked centrally so they can never be double-booked.
To add member of staff as a bookable resource in WooCommerce:
- Select ‘Booking’ as the product type and enable the ‘Resource’ option
- On the ‘Time slots’ tab, set each staff member’s availability – i.e. their start and end times – and the length of a lesson, e.g. 1 hour
- Add their hourly rate
- Publish the product
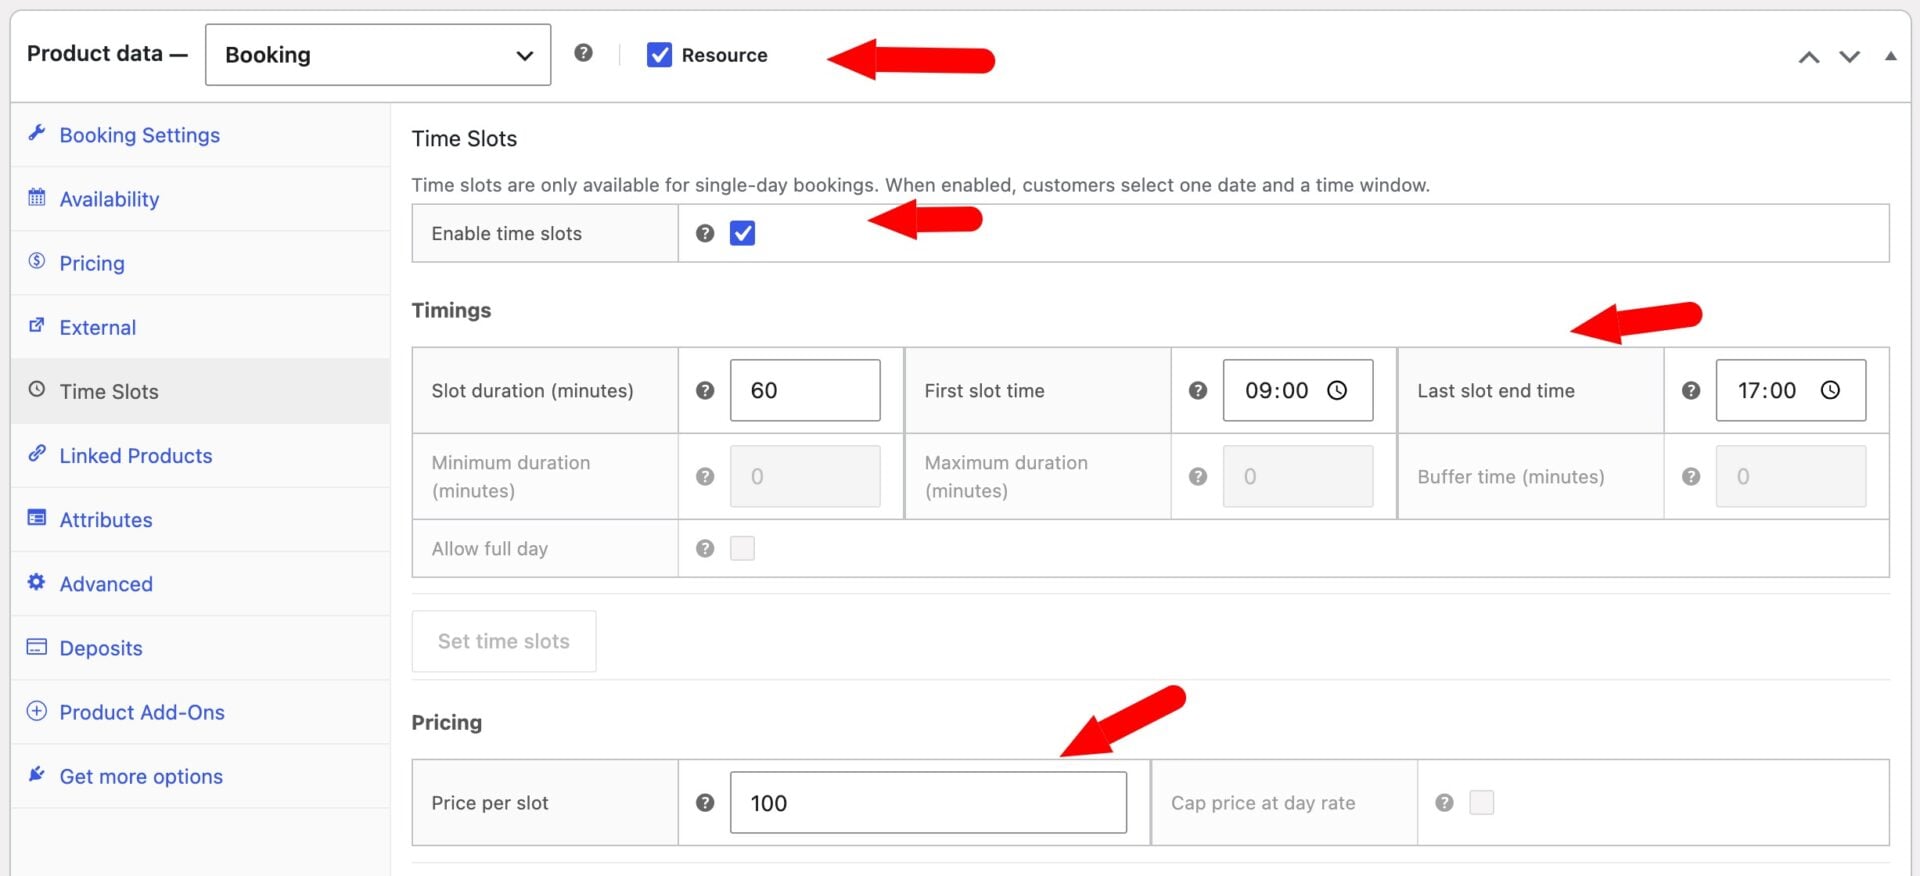
Repeat this for each tutor you want customers to be able to book. Each one now exists as a resource that can be assigned to bookings.
Step #2: Create the main booking page
Now we can create another bookable product – this is the one where customers will actually book their sessions. Call it something like ‘Book a Tutor’.
- Set the ‘Max bookings per unit’ field to the maximum number of tutors that you’ll have available at any one time. In our example, we just have two tutors.
- Pricing and availability are determined by the tutor resources, so hide the Quantity, Duration, and Cost fields from the front end.
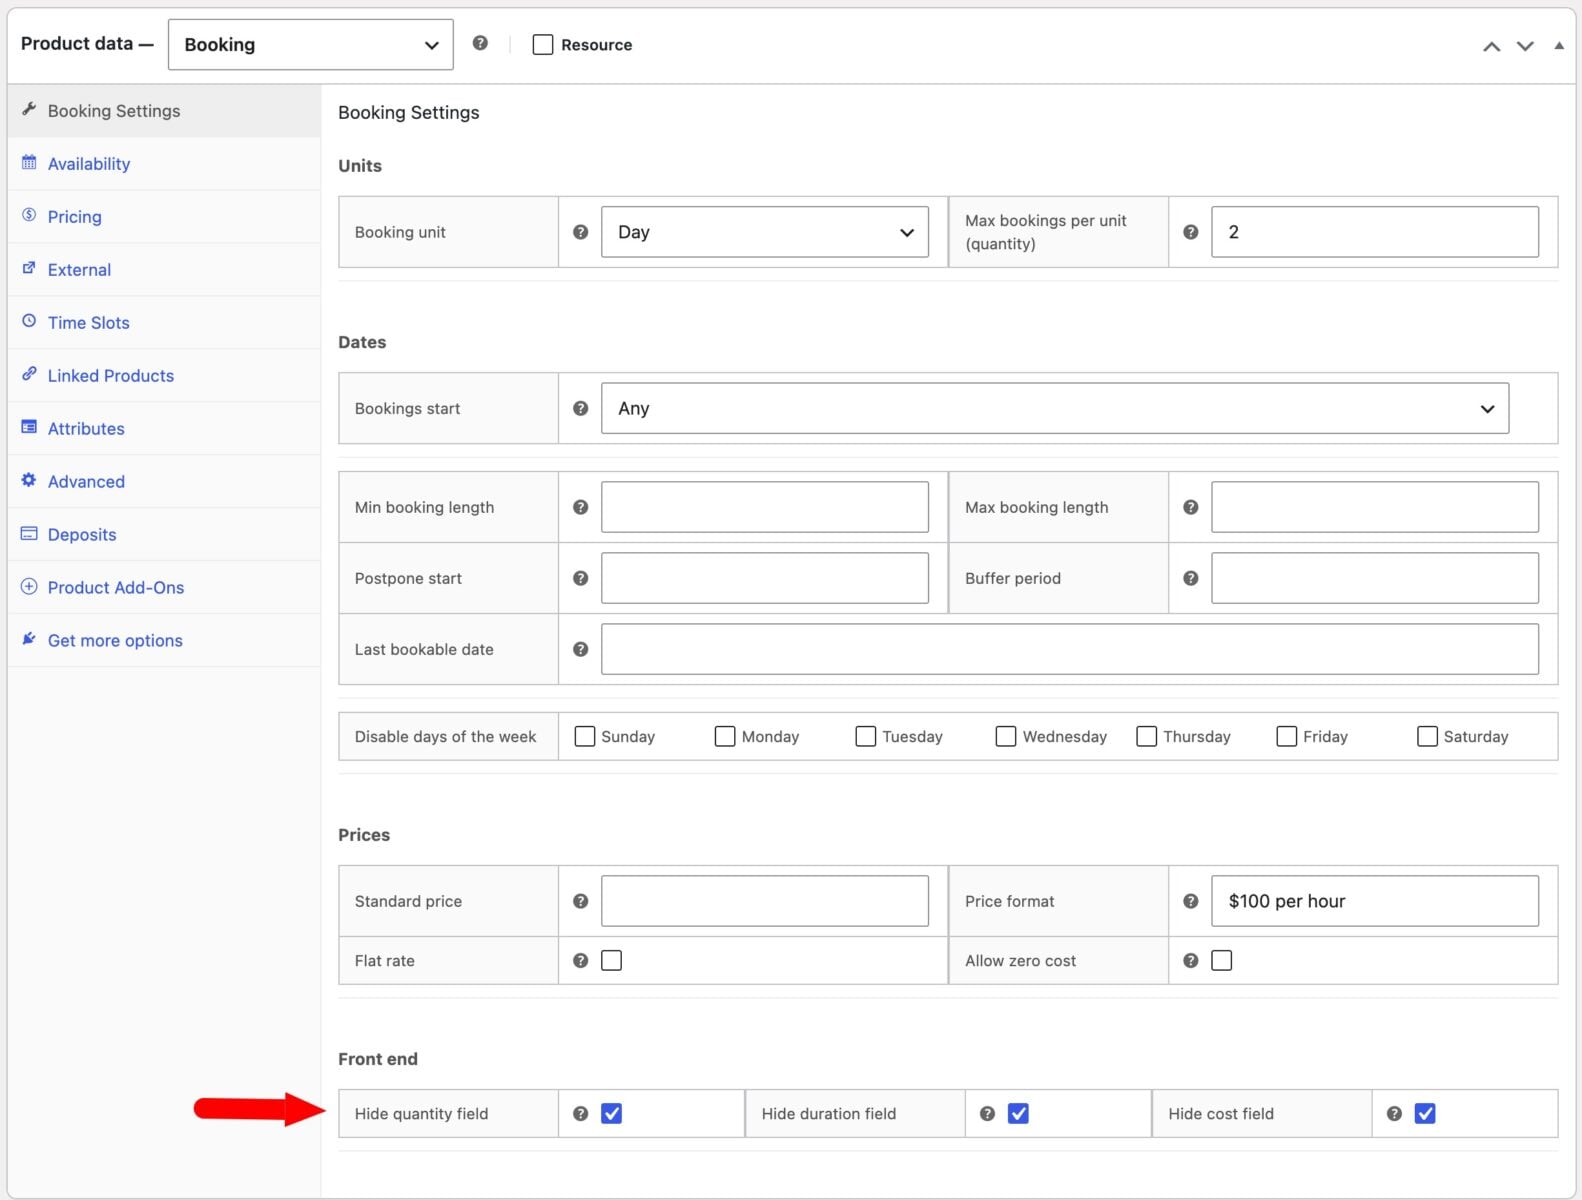
Now switch to the ‘Time slots’ tab.
- Enable time slots and set the same slot duration you used for your tutors
- Set the start and end times to cover the earliest and latest times any tutor is available. So if one tutor is starting at 9am and finishing at 5pm, and your other tutor starts at 12pm and finishes at 9pm, enter 09:00 for the ‘First slot time’ and 21:00 for the ‘Last slot end time’
- Pick a time slot view, such as Time Picker
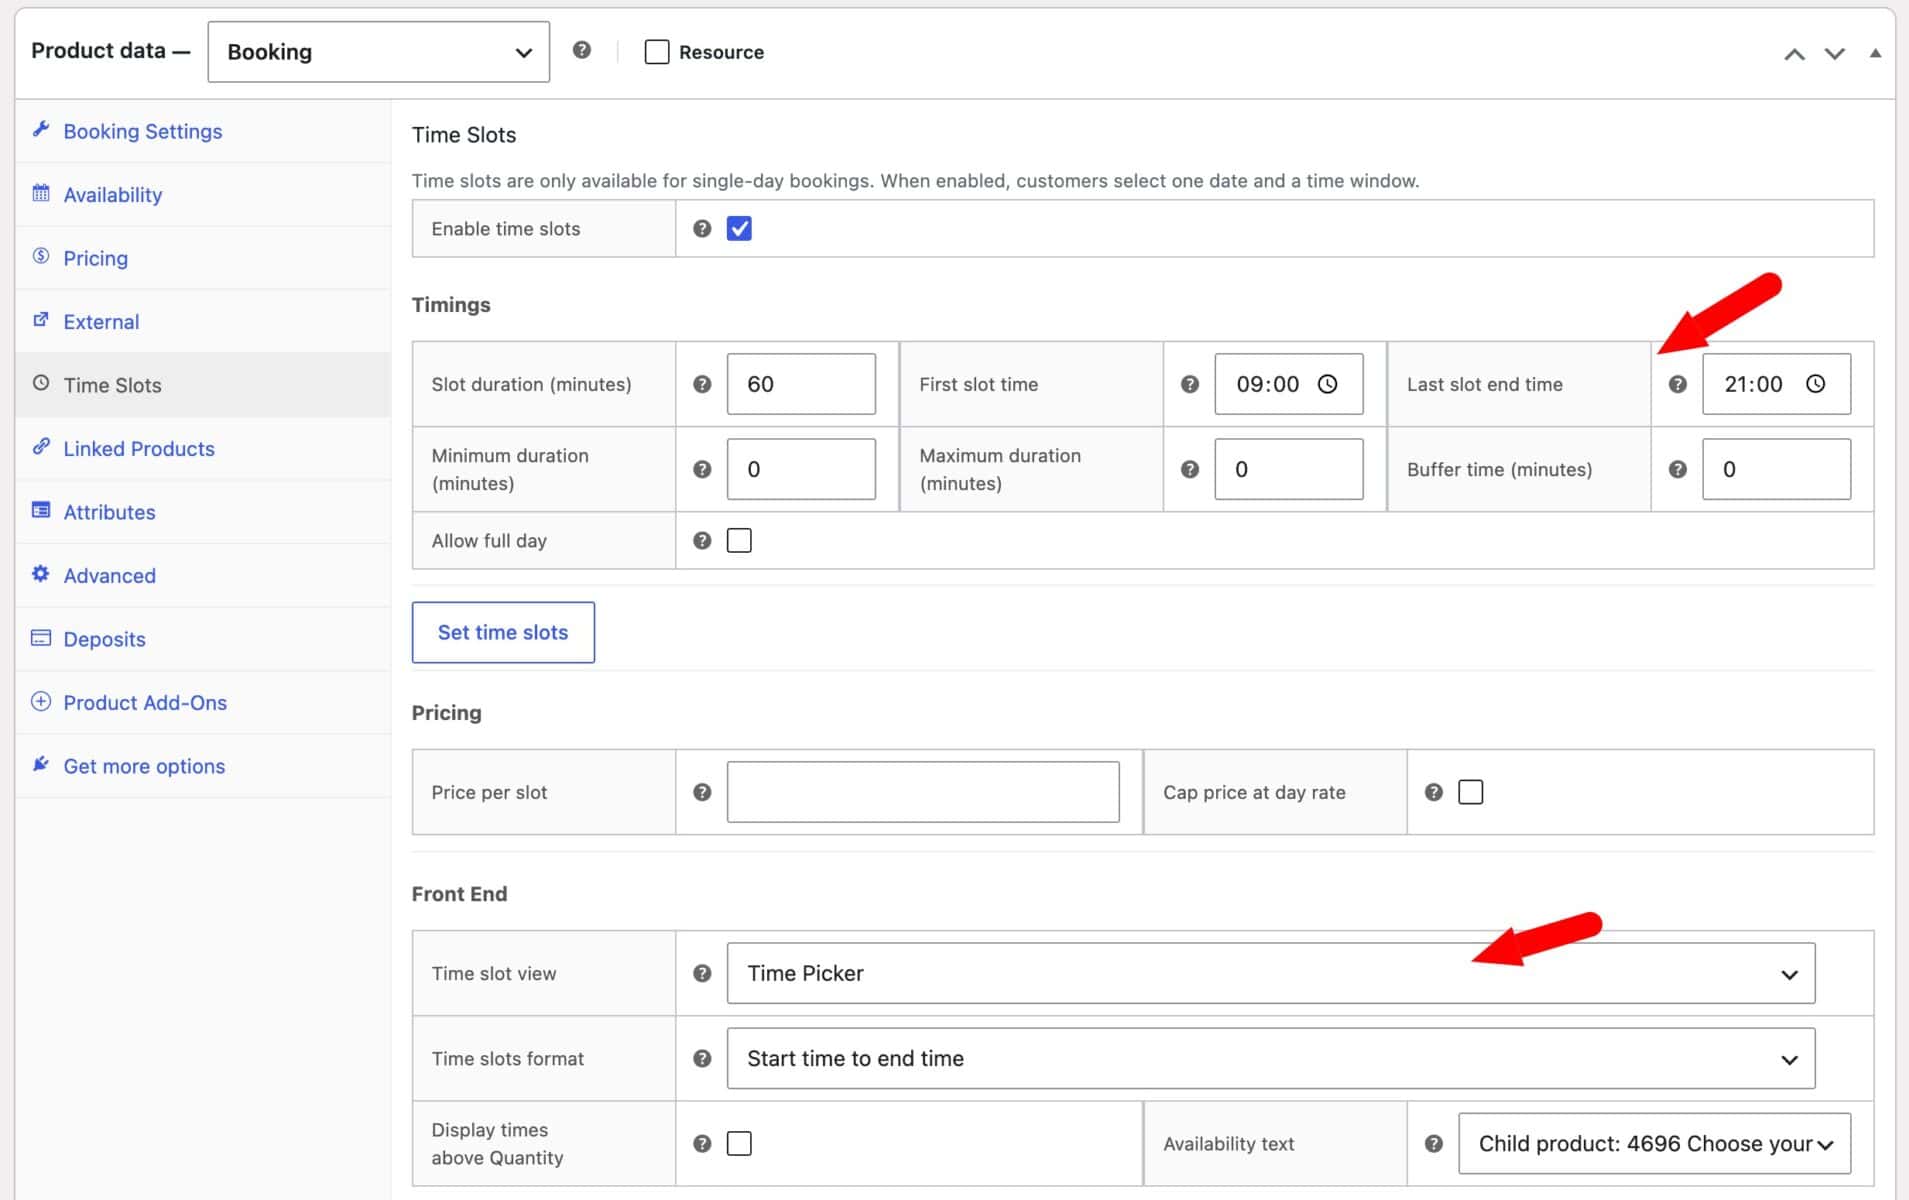
Step #3: Add your staff members
Finally, we just need to allocate our staff members to the main product. We do this using WooCommerce Product Add-Ons Ultimate ‘child product’ feature.
Still on the ‘Book a Tutor’ product:
- In the ‘Product data’ section, click the ‘Product Add-Ons’ tab
- Click ‘Add Group’ then ‘Add Field’
- Add a ‘Products’ field for your tutors and add a label
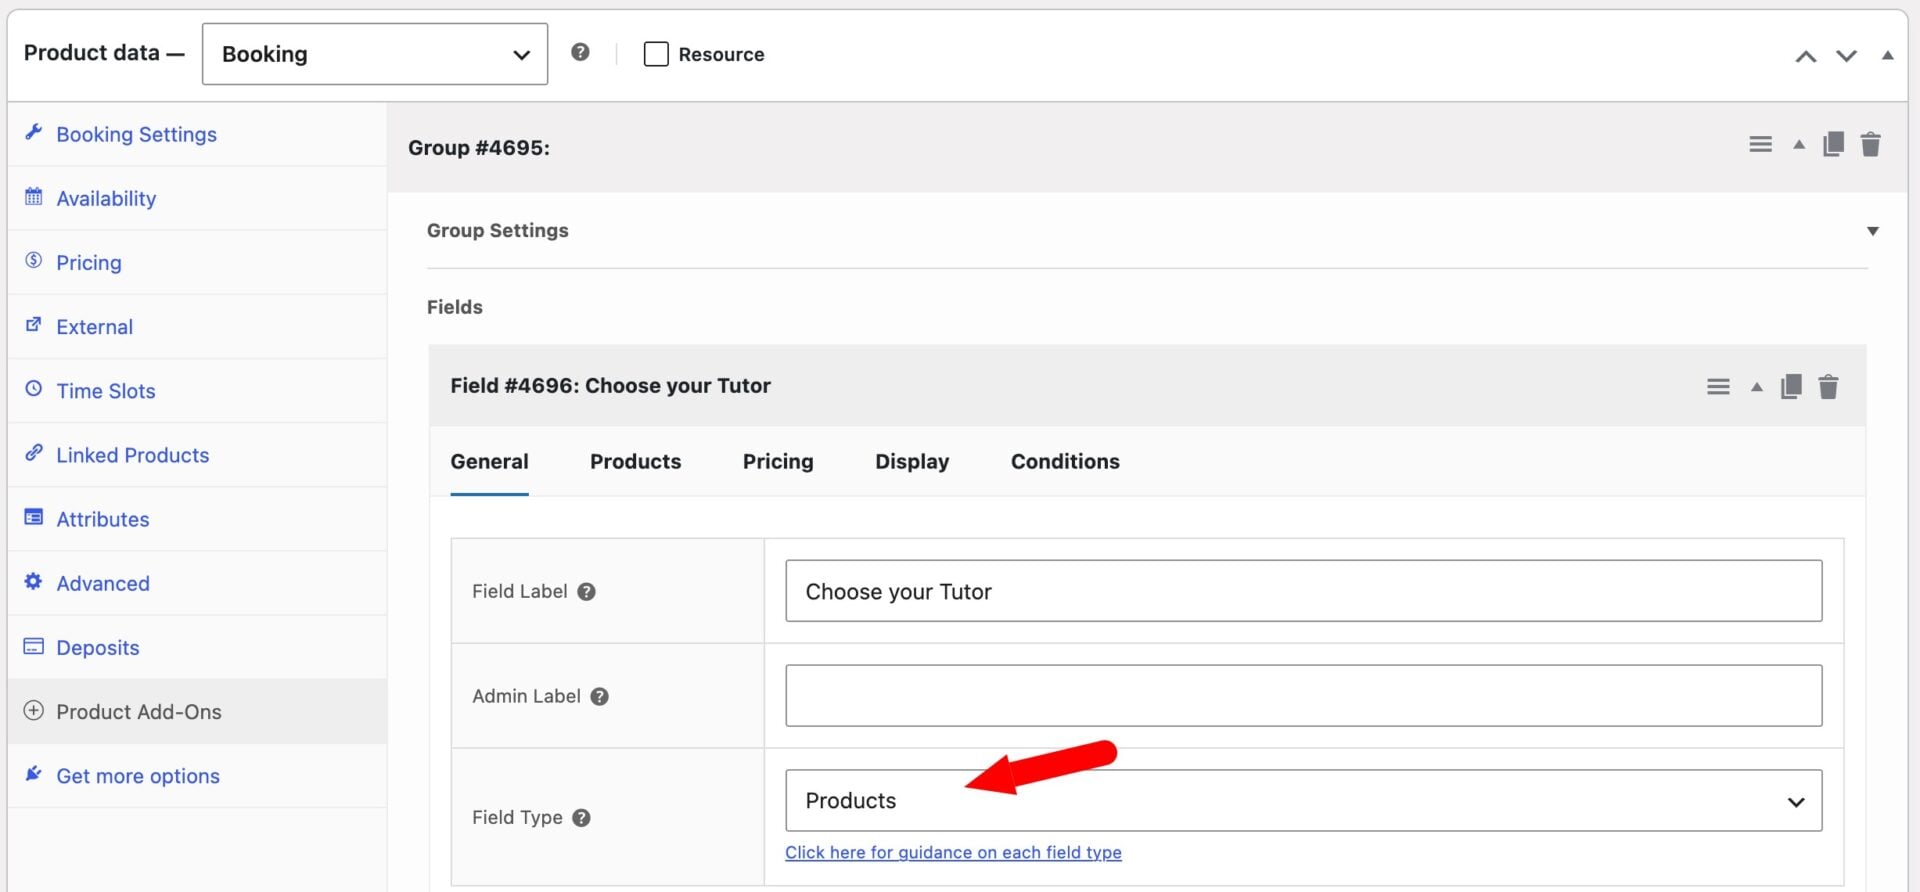
Click on the ‘Products’ tab and update the following:
- Set ‘Products Layout’ to ‘Radio Images’. This means customers can only pick one tutor per session. If you don’t have thumbnails of your tutors, select ‘Radio List’ instead.
- Set ‘Products Quantities’ to ‘One only’. This means that a tutor can only be booked for one session at a time
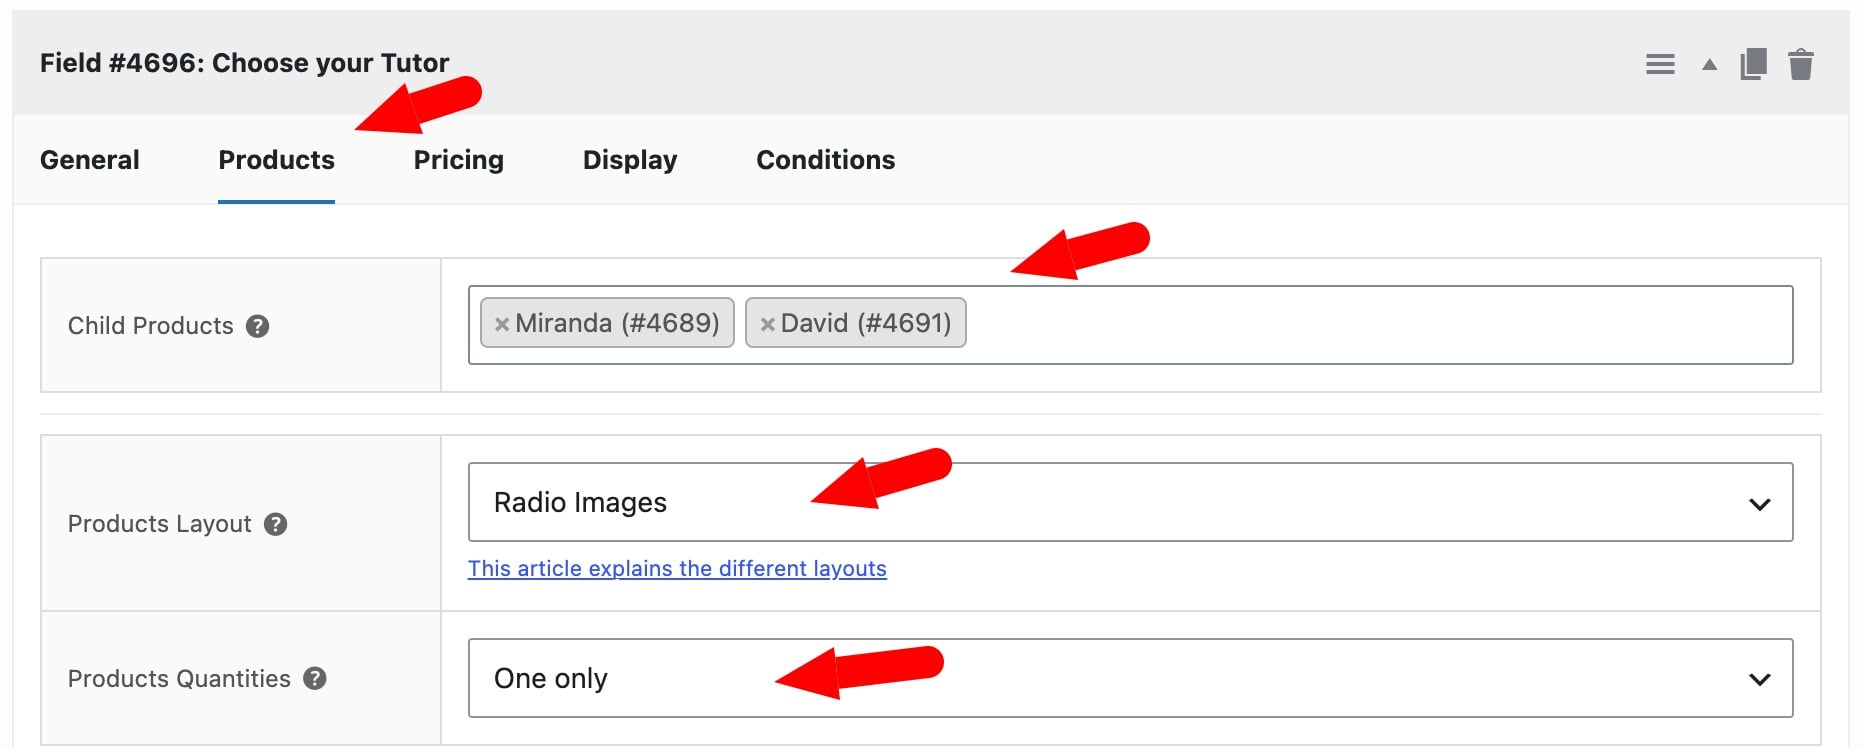
Now you can publish the product. Customers can pick a time slot and choose which tutor they want for that session, with pricing and availability handled automatically by the tutor’s own resource settings.
You can see a working example of the product here.
How do you set days off and holidays for staff members?
Each tutor is its own resource product, so days off and holidays are set on that tutor’s product – not on the main booking product. There are three ways to block time, and you can combine them.
Set regular days off every week
In our example, one of the tutors doesn’t like to work weekends. To disable specific days of the week on a regular basis:
- Edit the product page for the staff member
- On the ‘Booking Settings’ tab, use ‘Disable days of the week’ to rule out entire days they never work, e.g. Saturday and Sunday. Checked days are blocked outright, for every date, with no exceptions

Block out specific dates – e.g. for holidays
If you need to block out specific dates for holidays or other time off:
- On the tutor’s ‘Pricing’ tab, click ‘Add Date Range’ and enter a Start Date and End Date for the holiday, leaving the price at
0. The tutor becomes fully unavailable for every date in that range. - You can also restrict a row to specific days of the week using the ‘Days’ column – useful for something like a tutor who’s off every Friday in December.
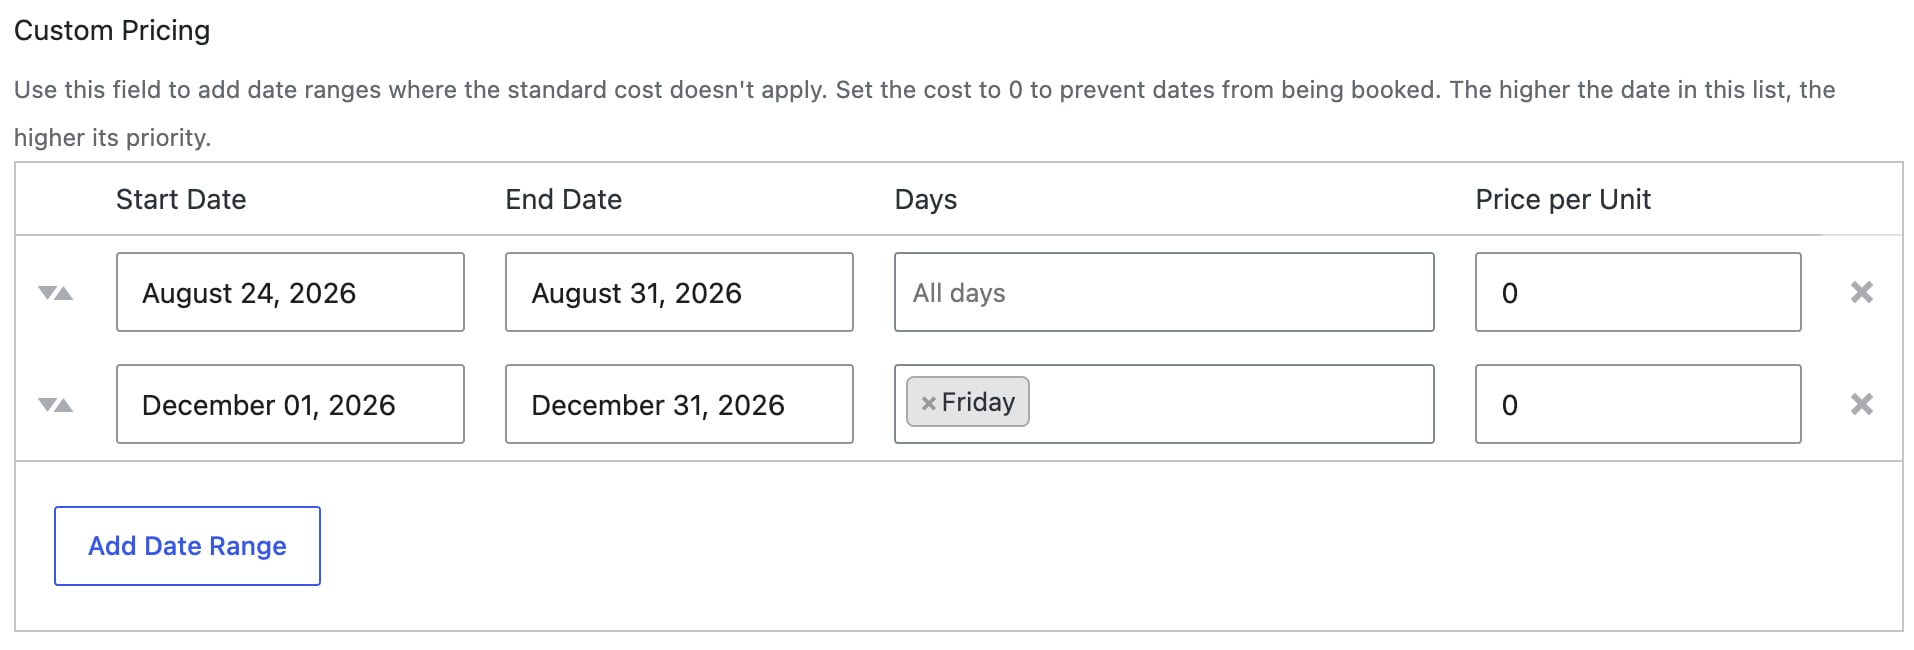
In the example above, the staff member has a week off in August as well as every Friday in December.
Block a specific time window – e.g. for breaks
If you need to block part of a day rather than the whole thing – a regular lunch break, or a one-off dentist’s appointment:
- On the staff member’s ‘Time Slots’ tab, click the ‘Add override’ button
- Set a Start and End times and dates for the window that you want to block out then set ‘Availability’ to
0 - Leave the Start date and End date blank to apply the block on every date, or set a range to limit it to a specific week.
In the example below, the staff member is not available on any day between 13:00 and 14:00.
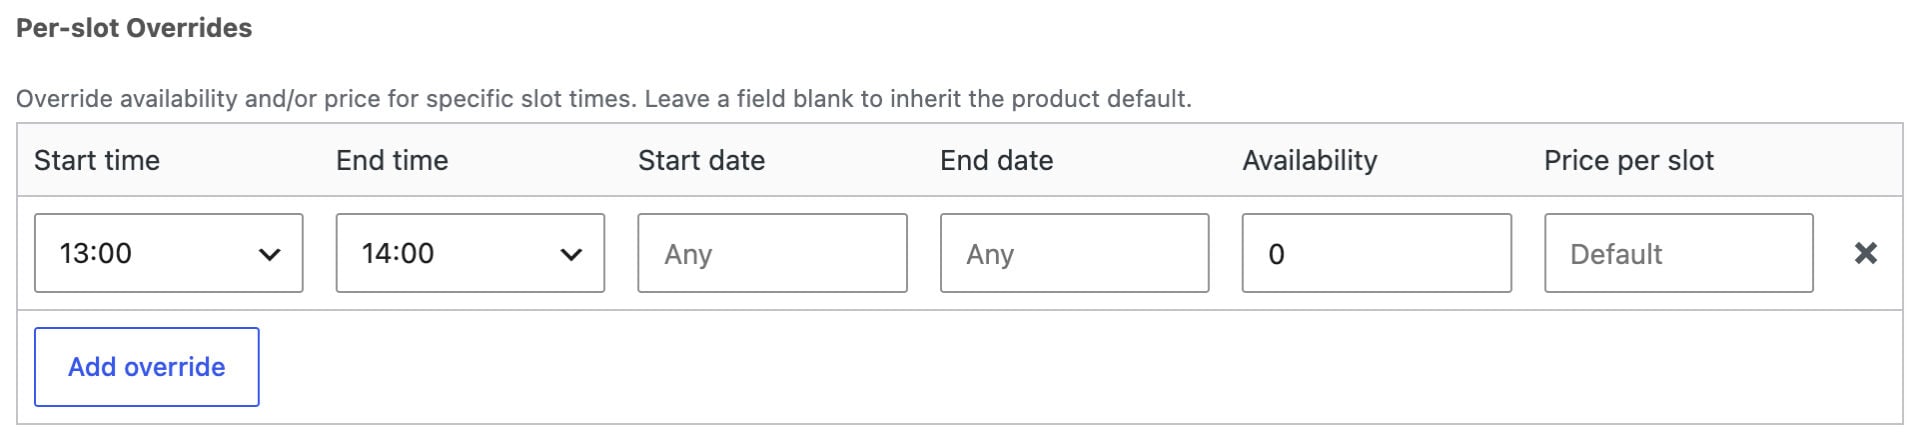
However you block time, it applies to that tutor everywhere they’re offered, and customers simply won’t see those dates or slots as available when booking.
How to automatically add staff members to bookings
It might be that you need to automatically allocate staff members to certain bookings – for instance, you have a certain member of staff who needs to be present. If so, take a look at how to automatically add resources to bookings.
How to invisibly add staff members to bookings
Likewise, it might be the case that you don’t need your customers to see what staff members are being allocated to their bookings. In that case, see how to add resources to bookings invisibly.