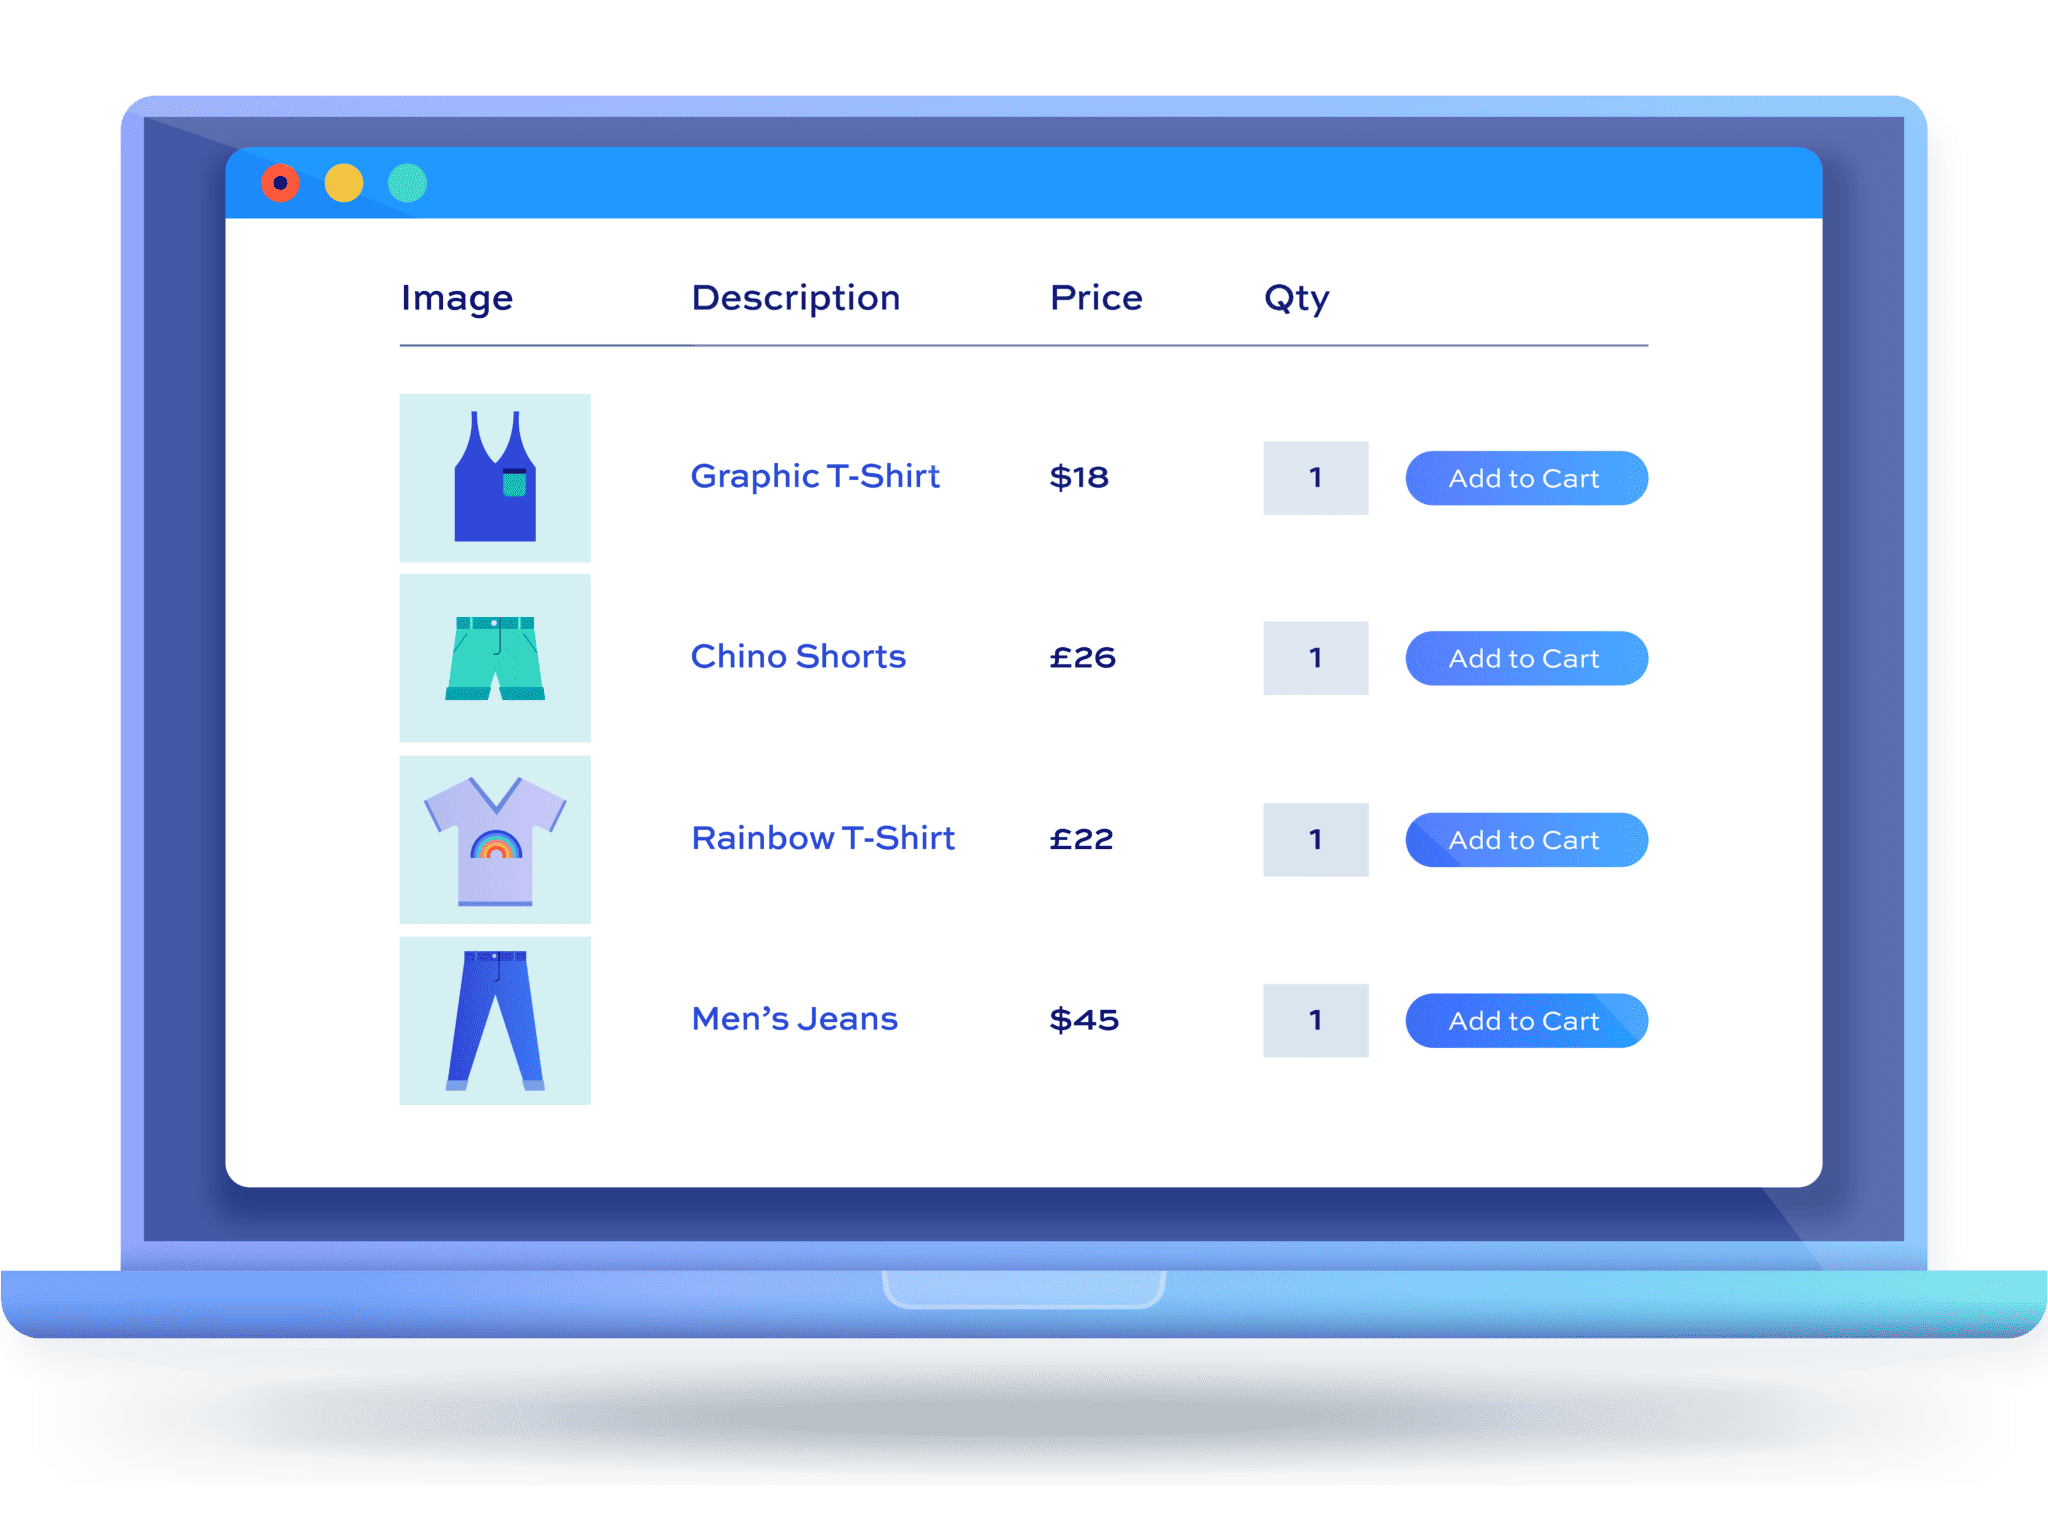
WooCommerce product table: when to use a table layout and how to set it up

The WooCommerce Product Table Ultimate plugin replaces your standard product grid with a list, or table, of products that customers can browse and order from a single page. This guide covers when a table layout works better than the default shop page, and how to set one up.
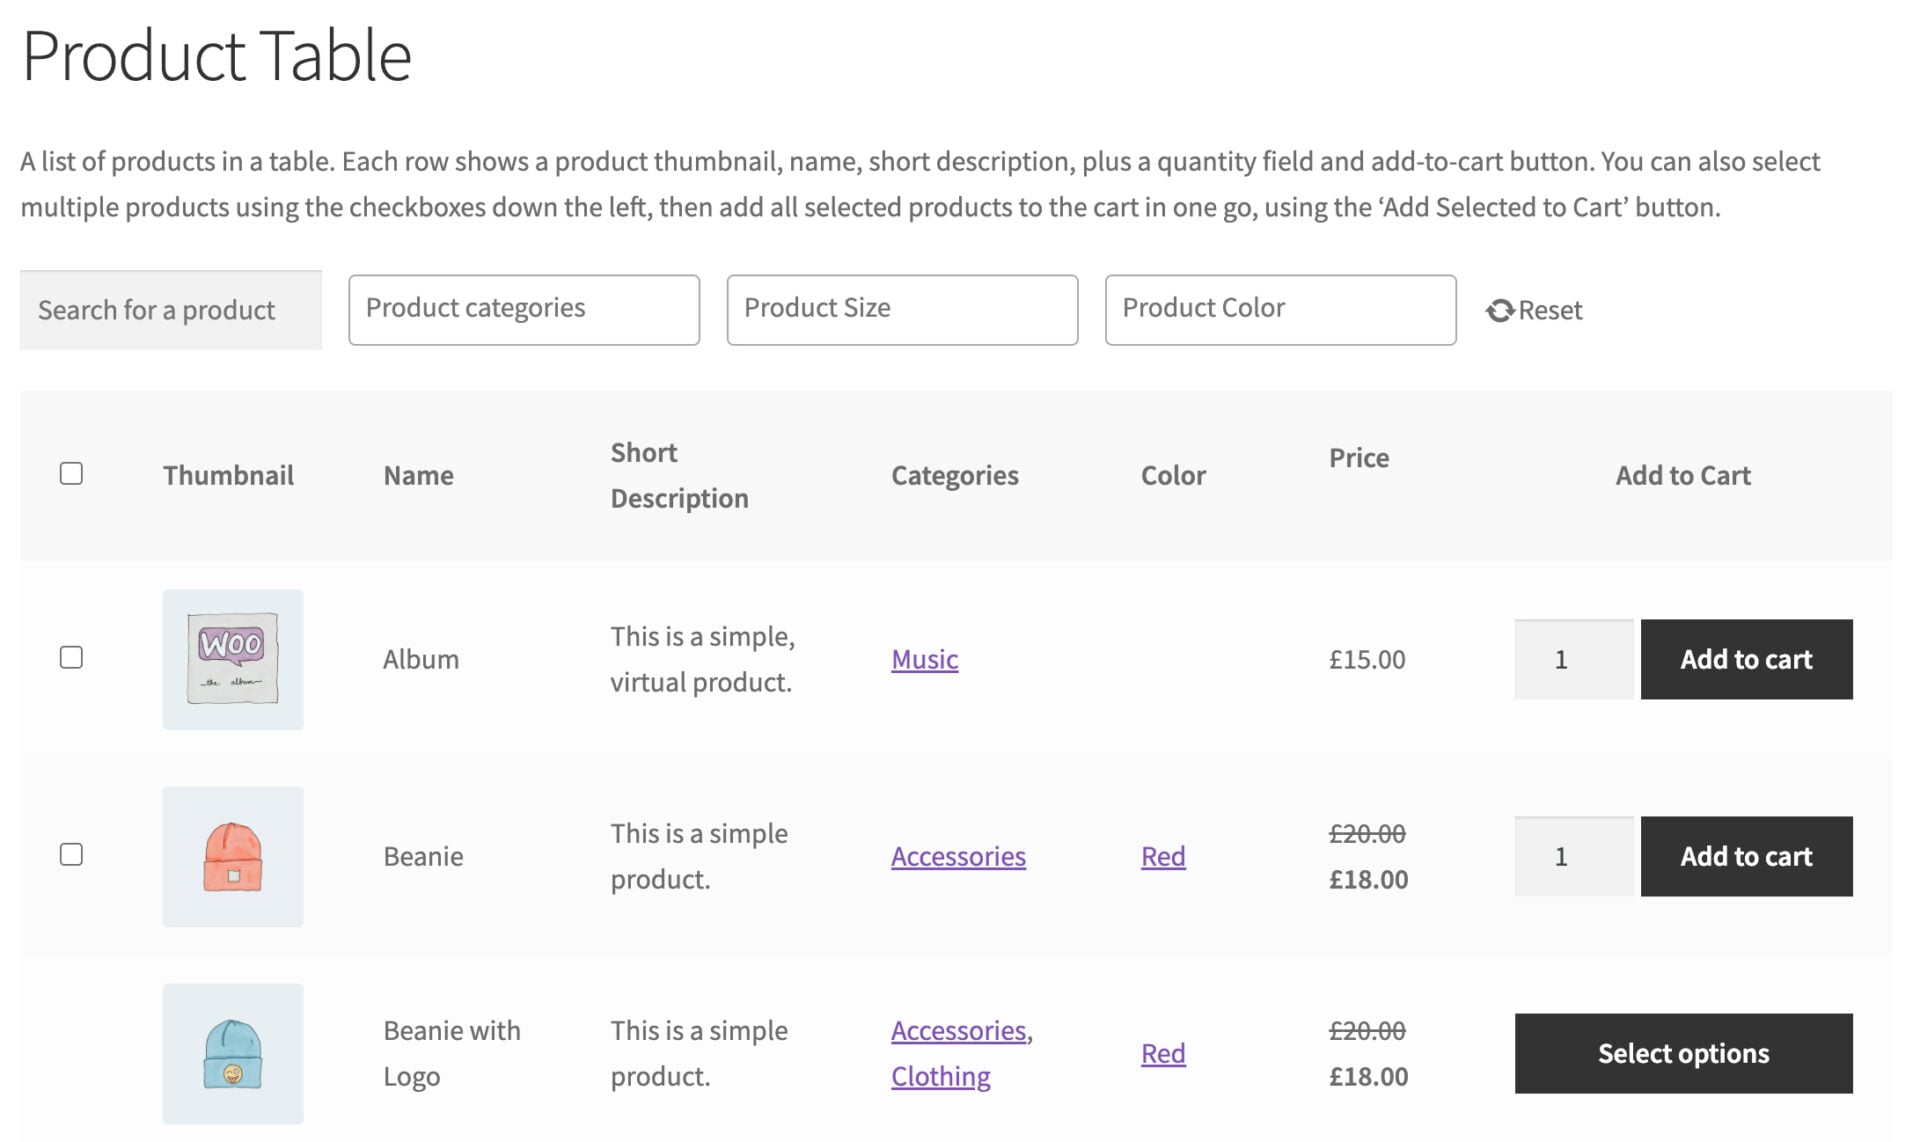
There’s a demo here so you can see how a product table works from a customer’s point of view.
In this guide, we’ll look at how:
- Customers can:
- Browse and order multiple products from one page, without clicking into each product individually
- Search, filter, and sort the table to find what they need quickly
- Add several items to their cart at once, using quantity fields or checkboxes
- Store owners can:
- Choose exactly which products, categories, or tags appear in the table
- Decide which columns to display – thumbnails, SKUs, stock, price, and more
- Add multiple tables with different settings, and paginate long product lists
- Replace your shop and archive pages with a table layout, if you want it store-wide
- As a bonus, we’ll also look at how to:
- Let customers filter and sort the table on the front end
- Customize the table’s colors and styling to match your site
- Combine the table with other Plugin Republic plugins, like Product Add-Ons Ultimate and Request a Quote
What does a WooCommerce product table do?
A product table replaces your grid of product images with a tabular product display – rows and columns, like a spreadsheet – with a checkbox, quantity field, or ‘Add to cart’ button on every row. Customers can scan a full product list view, pick several items, and check out in one go, instead of visiting each product page in turn.
Product Table Ultimate supports every WooCommerce product type, including simple products, variations, grouped products, and external or affiliate products. You can display it on its own page, drop it into an existing page or post, or use it to replace your shop and category archives entirely.
Allowing users to order in this way is useful for stores selling in bulk or to trade customers. McKinsey research found that 60% of B2B customers want to buy online and 62% prefer to reorder online, yet only a small fraction of sellers offer any kind of self-service ordering tool (McKinsey). A product table is an easy way to fix that.
What are the benefits of a product table for store owners?
Let’s look in more detail at how a product table can directly benefit store owners:
- Higher average order value
When customers can add several items to their cart from one screen, they’re more likely to order more than they came for. A trade customer working through a table of parts is far more likely to add three or four extra items than one who has to click into each product page separately. - Fewer support requests and phone orders
Customers who already know what they want – like restaurant regulars or trade customers reordering supplies – can self-serve instead of calling or emailing to place an order. That’s less time your team spends on manual order-taking. - Less development and design overhead
Columns, styling, and filters are all controlled through easy to manage settings, so you’re not paying a developer to build a custom listing page or maintain custom CSS every time your catalog changes.
With those in mind, let’s take a look at the main Product Table Ultimate features.
WooCommerce Product Table Ultimate features
Here’s a closer look at the main features of our Product Table Ultimate plugin.
Choose exactly which products appear
You can list your entire catalog in one table, or limit a table to specific categories or tags. A garden center could use one table for “Spring bulbs” and a separate one for “Garden tools”, each on its own page, rather than mixing everything into a single list. Or a restaurant could list starters, mains, and desserts on one page but in separate tables, each populated by dishes from specific categories.
Add multiple tables, each with its own settings
Every table you create can have its own products, columns, variation display, and styling, independent of every other table on your site. A store selling to both retail and trade could use one table with full pricing and images on its main shop page, and a separate, stripped-down table with just SKU and price on a trade-only ordering page.
Add tables anywhere – even replace your shop and archive pages
You can add a table to any page or post using a shortcode or block, or use the ‘Override pages’ setting to replace your default shop and category pages with a table layout across the whole site.
So a wholesale-only store might replace its entire shop page with a table, while a general retailer might keep the standard WooCommerce grid for shop and archive pages but add a table to a dedicated bulk-order page.
Display multiple tables on one page
You’re not limited to one table per page. You can add as many as you need, each pulling from different products or categories. A distributor could put a “New arrivals” table above a “Clearance” table on the same landing page, letting customers browse both without having to navigate to a different page.
Paginate long tables
Long product lists automatically break into pages, so customers aren’t faced with an overwhelming scroll. A stationery wholesaler with several hundred SKUs in one category can show a manageable number of products per page, with simple controls for browsing further.
Only show the columns that matter
Pick which product details will appear in columns per table – thumbnail, SKU, stock, price, and more. A restaurant menu might just need a dish name, description, and price, while a hardware store’s table needs SKU and stock columns so that trade customers can check availability at a glance.
Handle variations without extra clicks
Decide whether variations show on separate rows, as dropdowns within the row, or allow customers to launch the product page in a new tab. A paint supplier selling dozens of colors per product could list each shade as its own row, so customers see every option without opening a dropdown first. This works well when there isn’t much detail to communicate about each option.
Let customers order in bulk from one page
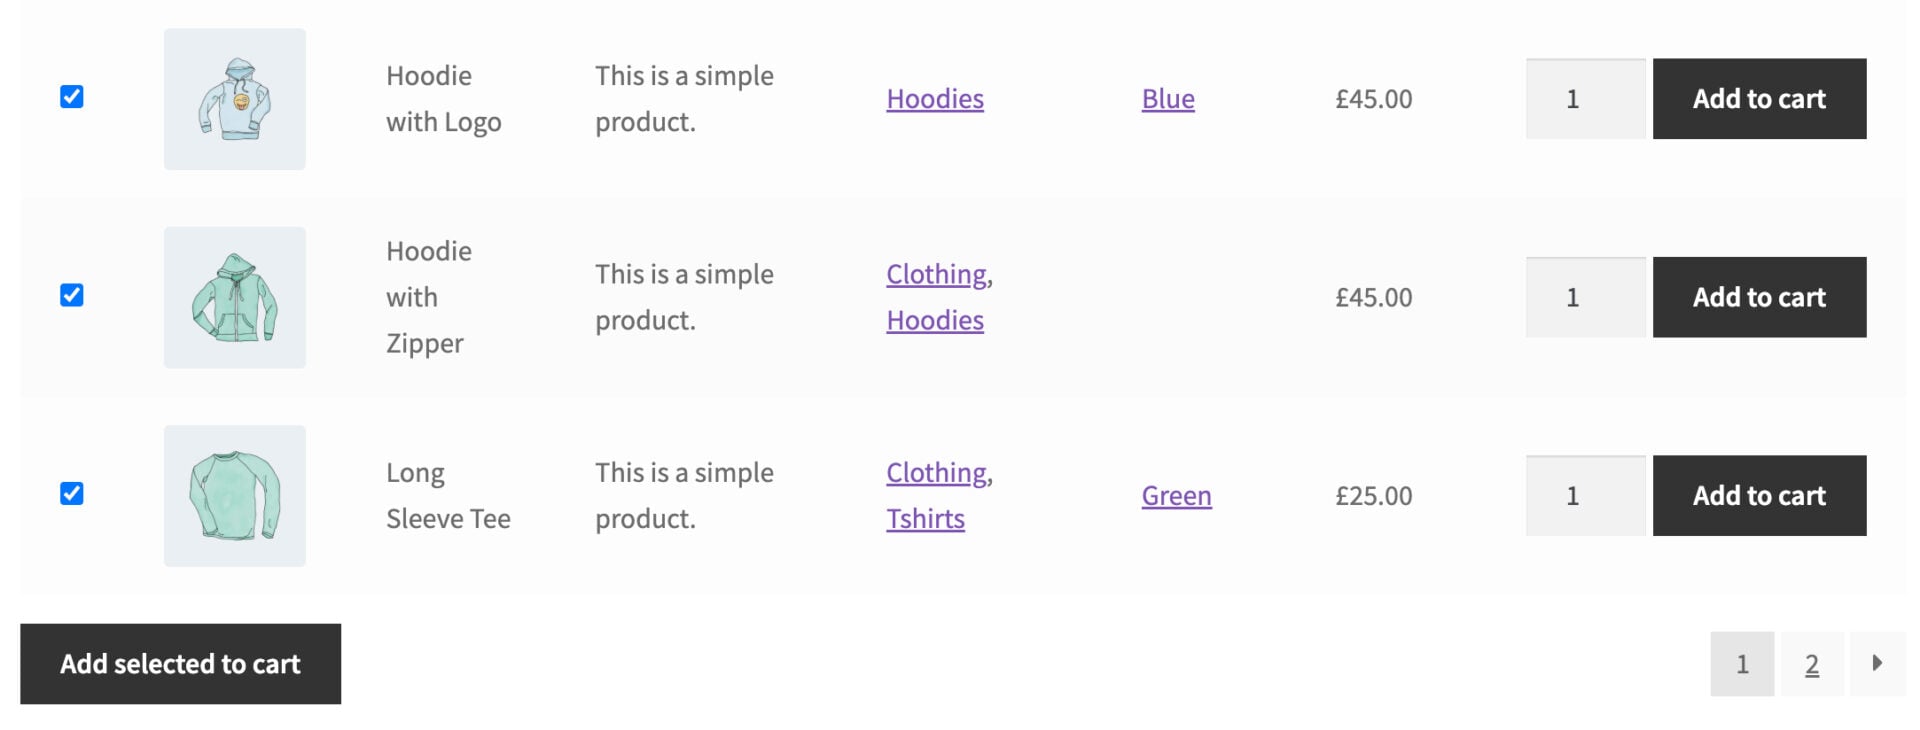
Add quantity fields and/or checkboxes so customers can select several products and add them to the cart together. A catering supplier’s customers can work through a table of ingredients once a week, ticking off everything they need for that order in a couple of minutes.
Help customers find what they need in a large catalog
Built-in search, filtering, and sorting mean customers aren’t stuck scrolling through hundreds of rows. Customers can type into a live search box to narrow the table as they type, click column headings to sort by price, name, or SKU, and use category, tag, or attribute filters – shown either as clickable links or dropdown menus above the table – to jump straight to the products they want.
A hardware store with an extensive fixings catalog can let customers filter by category or attribute, and sort by price or name, to narrow things down quickly.
Match the table to your site’s design
By default, the tables inherit their styles from your theme. But you can also adjust colors, fonts, and borders through the settings page or the WordPress Customizer, without writing any CSS. This keeps a table looking like a natural part of your site.
Extend the table with your other plugins
Product Table Ultimate works alongside the rest of the Plugin Republic lineup, so a table can display Add-Ons Ultimate fields, respect Members Only restrictions, apply Dynamic Pricing and Discount Rules, and allow users to add products to a quote request form. We’ll cover each of these integrations in more detail later in this guide.
When to use a table layout instead of the standard shop page
A table layout is useful whenever customers are ordering more than one or two items at a time. Wholesale and B2B buyers, for example, usually know exactly what they want and just need to move through a list quickly, rather than having to click through products page by page. For example, an office supplies buyer who is restocking printer paper and toner, or a builders’ merchant customer working through a list of fixings and fittings.
Restaurants and takeaways also benefit from a WooCommerce product list table for their menus, since their dishes need to be organized into easily scannable lists with an add-to-cart button and quantity field on each row. Quick order forms work the same way for any store where regular customers reorder the same items again and again.
A table layout also helps once your catalog gets large enough that a grid becomes hard to scan. That’s exactly the kind of case one of our customers, Richard Ortiz of RO Communications, used it for:

How do you set up a WooCommerce product table?
Here’s how to add a product table to your WooCommerce site.
- Install and activate the plugin
Upload and activate Product Table Ultimate like any other WooCommerce plugin.
- Configure your table’s global settings
Choose your products, columns, variation display, and bulk ordering options.
- Optionally replace your shop and archive pages
Show a table layout on your shop or category pages instead of the default grid.
- Add your table to a page
Insert the table using a shortcode or block, wherever you want it to appear.
Now here’s each step in more detail.
Once you’ve purchased Product Table Ultimate:
- Download the plugin’s zip file by clicking on the link on your order confirmation screen or in your welcome email. You’ll receive the email automatically a few seconds after you’ve completed the purchase
- Go to Plugins > Add New in your WordPress dashboard
- Click on the ‘Upload Plugin’ button
- Drag and drop the plugin’s downloaded zip file into the ‘Choose File’ area and click ‘Install Now’
- When the plugin has uploaded, click the ‘Activate Now’ button
Step #1: Configure your table’s global settings
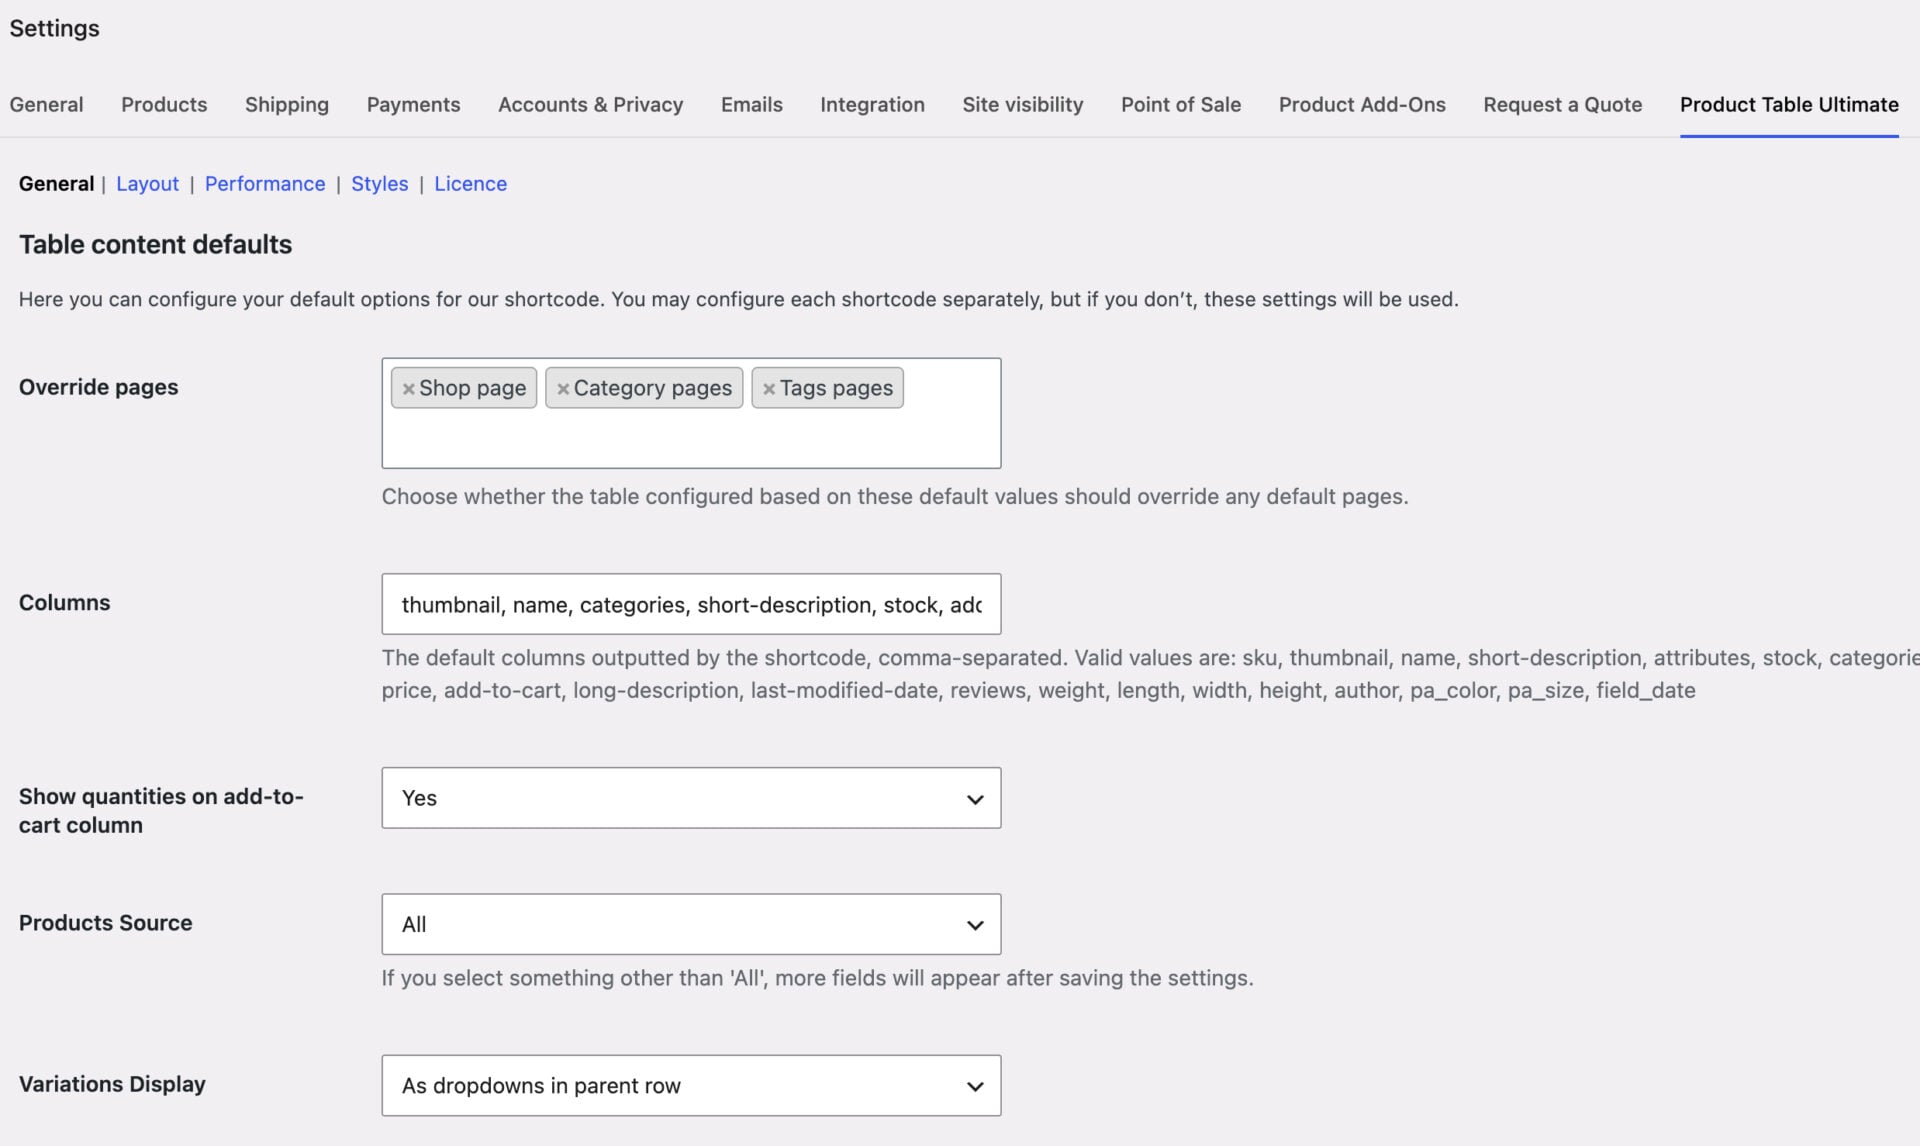
For the settings, go to WooCommerce > Settings > Product Table.
These settings apply to every table on your site by default, but you can override any of them for an individual table – see Step #3.
Choose which products to list
Use the ‘Products Source’ setting to decide what appears in your table. Choose ‘All’ to list your entire catalog, ‘Categories’ or ‘Tags’ to limit it to part of your store, or ‘Callback’ if you need a custom query.
If you choose ‘Categories’ or ‘Tags’, a second field appears where you select the specific terms to include. This gives you full control over whether a table covers your whole shop or just one product line.
Choose which columns to display
Use the ‘Columns’ field to define what shows in each row – thumbnail, name, SKU, price, stock, attributes, and ‘add-to-cart’ are the most common choices. List the columns you want separated by commas, in the order you’d like them to appear.
You now have a table showing exactly the product information your customers need to make a decision, with nothing extra cluttering the row.
Decide how to display variations
If you sell variable products, set ‘Variations Display’ to control how customers pick a size, color, or other option. Choose ‘As separate rows’ to list every variation on its own line, ‘As dropdowns in parent row’ for an expandable section under each product, or ‘As dropdowns in separate column’ to show the dropdown next to the ‘Add to cart’ button.
You can also choose ‘Redirect to product page’, which sends customers to the full product page to make their selection instead. This might be useful for stores where variations need more explanation than a table row allows.
Optionally allow bulk ordering
Turn on ‘Show quantities on add-to-cart column’ to let customers set a quantity before adding a product to their cart. If you want customers to pick several products at once, set ‘Enable Add Selected Button’ to ‘Yes’, which adds a checkbox to every row and a single button to add all selected items to the cart together.
Enable ‘Enable Select All Button’ as well if you’d like a checkbox in the table header that selects every product in one click. Using these settings will turn the table into a full-on bulk-ordering tool.
Step #2 (optional): Replace your shop and archive pages
Use the ‘Override pages’ setting to show a table layout on your shop page, category pages, tag pages, or other taxonomy archives, instead of the default WooCommerce grid. This is worth doing if most of your customers order in bulk, since it puts the table in front of them without any extra setup.
If you’d rather keep your existing shop layout and only use tables in specific places, leave this setting empty and follow the next step instead.
Step #3: Add your table to a page
Add the [product_table_ultimate] shortcode to any page or post, or search for the ‘Product Table Ultimate’ block in the block editor. Either method displays a table using the settings you’ve just configured, and you can add as many tables to as many pages as you like.
If you want a particular table to differ from your global settings – a different products source or column set, for example – you can override them for that table alone. Use shortcode parameters when adding the shortcode, or the block’s own settings panel when using the block editor.
You can take a look at the plugin’s documentation for more detailed guidance on setting it up.
How do you let customers filter, search, and sort the table?
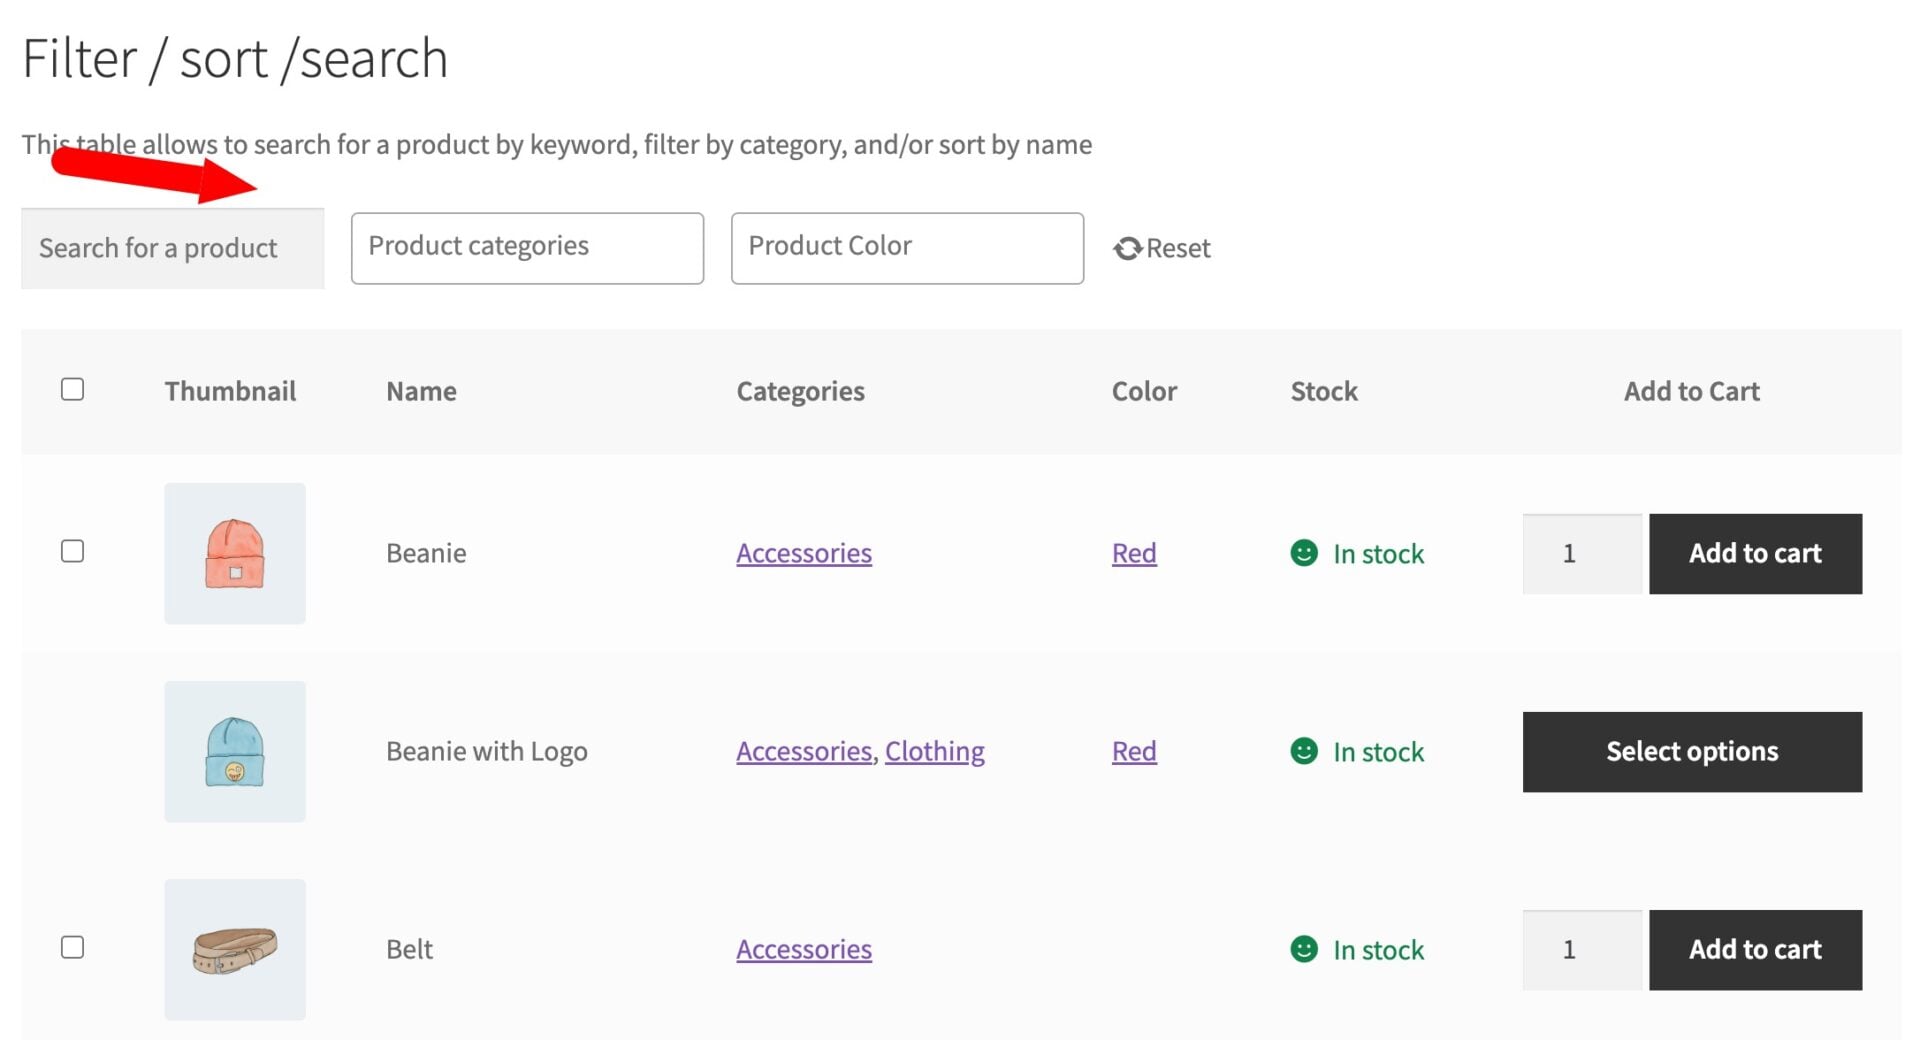
Giving your users the ability to filter and search tables is essential. It means they can find what they’re looking for quickly.
Product Table Ultimate gives you options for searching, filtering and sorting products.
Go to WooCommerce > Settings > Product Table > Layout to add search and filtering. Use ‘Sortable columns’ to let customers click a column heading – price or name, for example – to reorder the table.
Use ‘Filterable columns’ to let customers narrow the table down by category, tag, or attribute. Choose ‘Clickable terms’ under ‘Filter methods’ to turn those terms into simple links that customers click to apply a filter, or ‘Dropdown fields’ to display them as select boxes instead.
If you choose dropdown fields, use ‘Select filters locations’ to decide where they appear – above the table, below it, or both. This is worth testing on your own site, since a long list of dropdowns can look better above a short table, but below a longer one.
How do you customize the table’s appearance?
Go to WooCommerce > Settings > Product Table > Style to adjust colors, fonts, and borders without writing any CSS. You can set separate background and font colors for the table head and body, choose a border style and width, and adjust cell padding.
The same options also appear under Appearance > Customize > Product Table Ultimate, so you can preview changes live before saving them. A change in either location updates the other automatically.
How does Product Table Ultimate integrate with other Plugin Republic plugins?
Product Table Ultimate is built to work alongside the rest of the Plugin Republic lineup, so you can combine it with other plugins as your store’s needs grow.
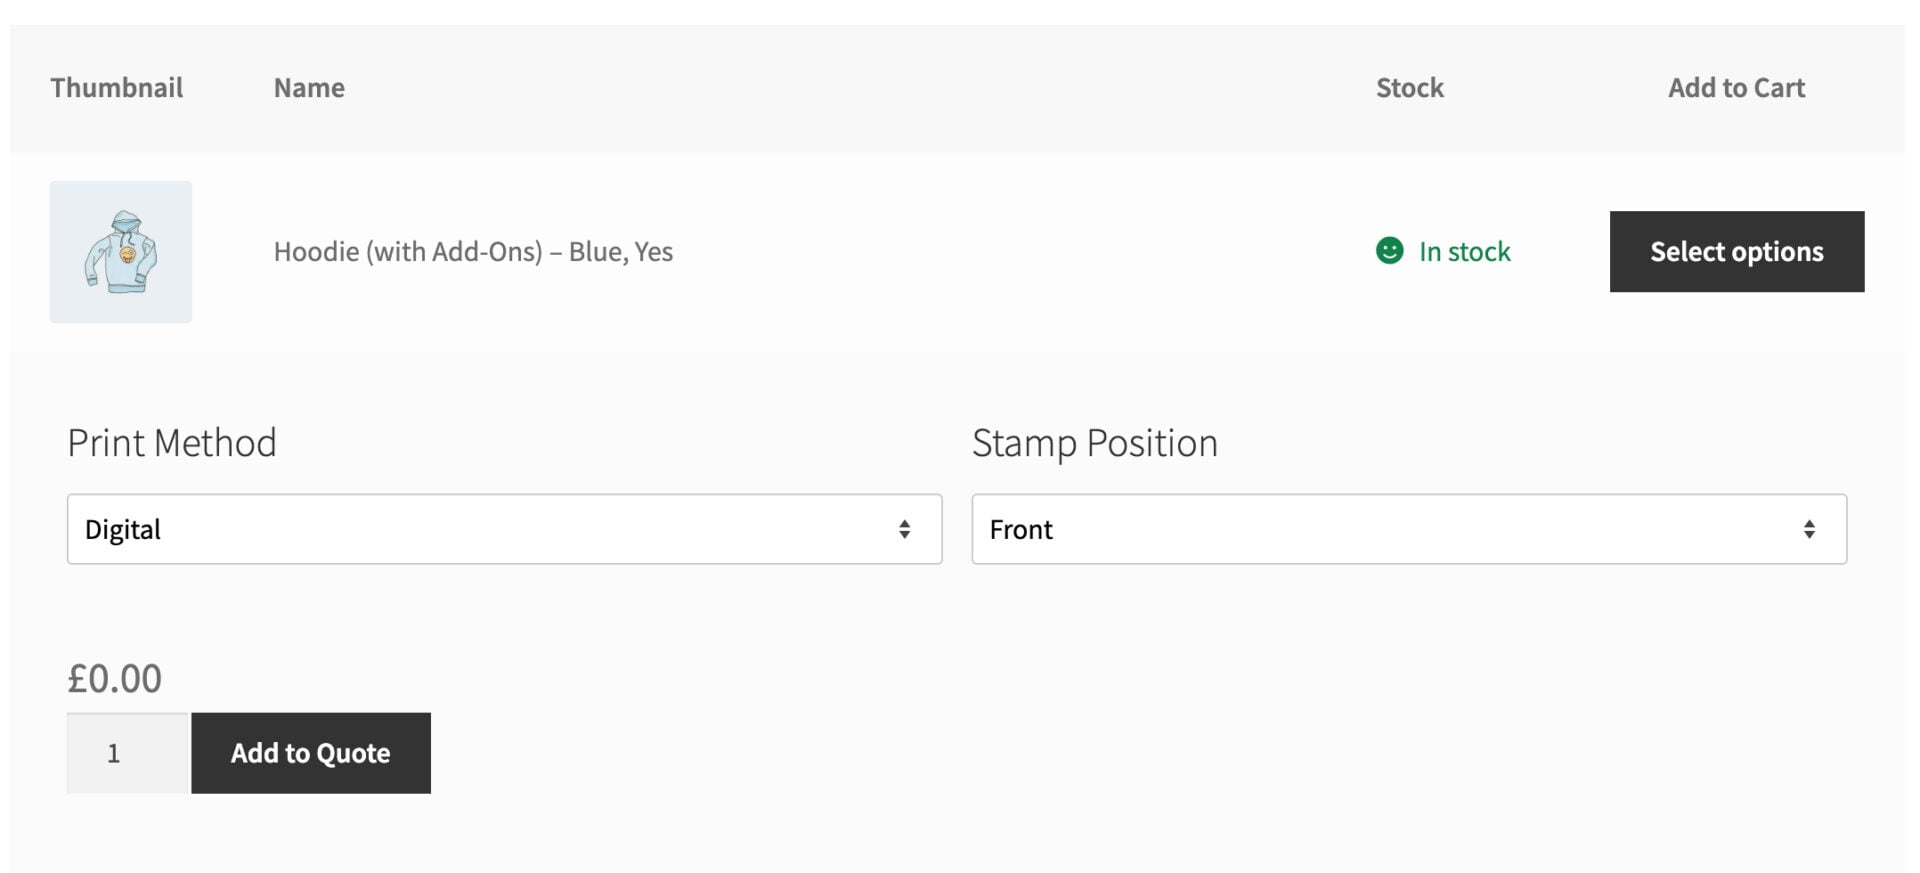
WooCommerce Product Add-Ons Ultimate. If Add-Ons Ultimate is active, you can display add-on fields directly in the table – or in a lightbox via the quickview option – so customers can personalize a product without leaving the list. This is useful for stores selling made-to-order or configurable products alongside standard ones.
WooCommerce Request a Quote. If Request a Quote is active, products can be added to a quote request form and submitted to the store owner.
WooCommerce Members Only. If Members Only is active, products restricted for the currently logged-in user – or for logged-out visitors – are automatically excluded from the table. No extra configuration is needed on your part.
WooCommerce Dynamic Pricing and Discount Rules. If DPDR is active, your existing bulk and role-based pricing rules apply to products in the table and display within it. This means wholesale or quantity discounts show up automatically, without you needing to set separate pricing for the table.
Real world examples of product tables
Here are a couple of real world examples of Product Table Ultimate in action.
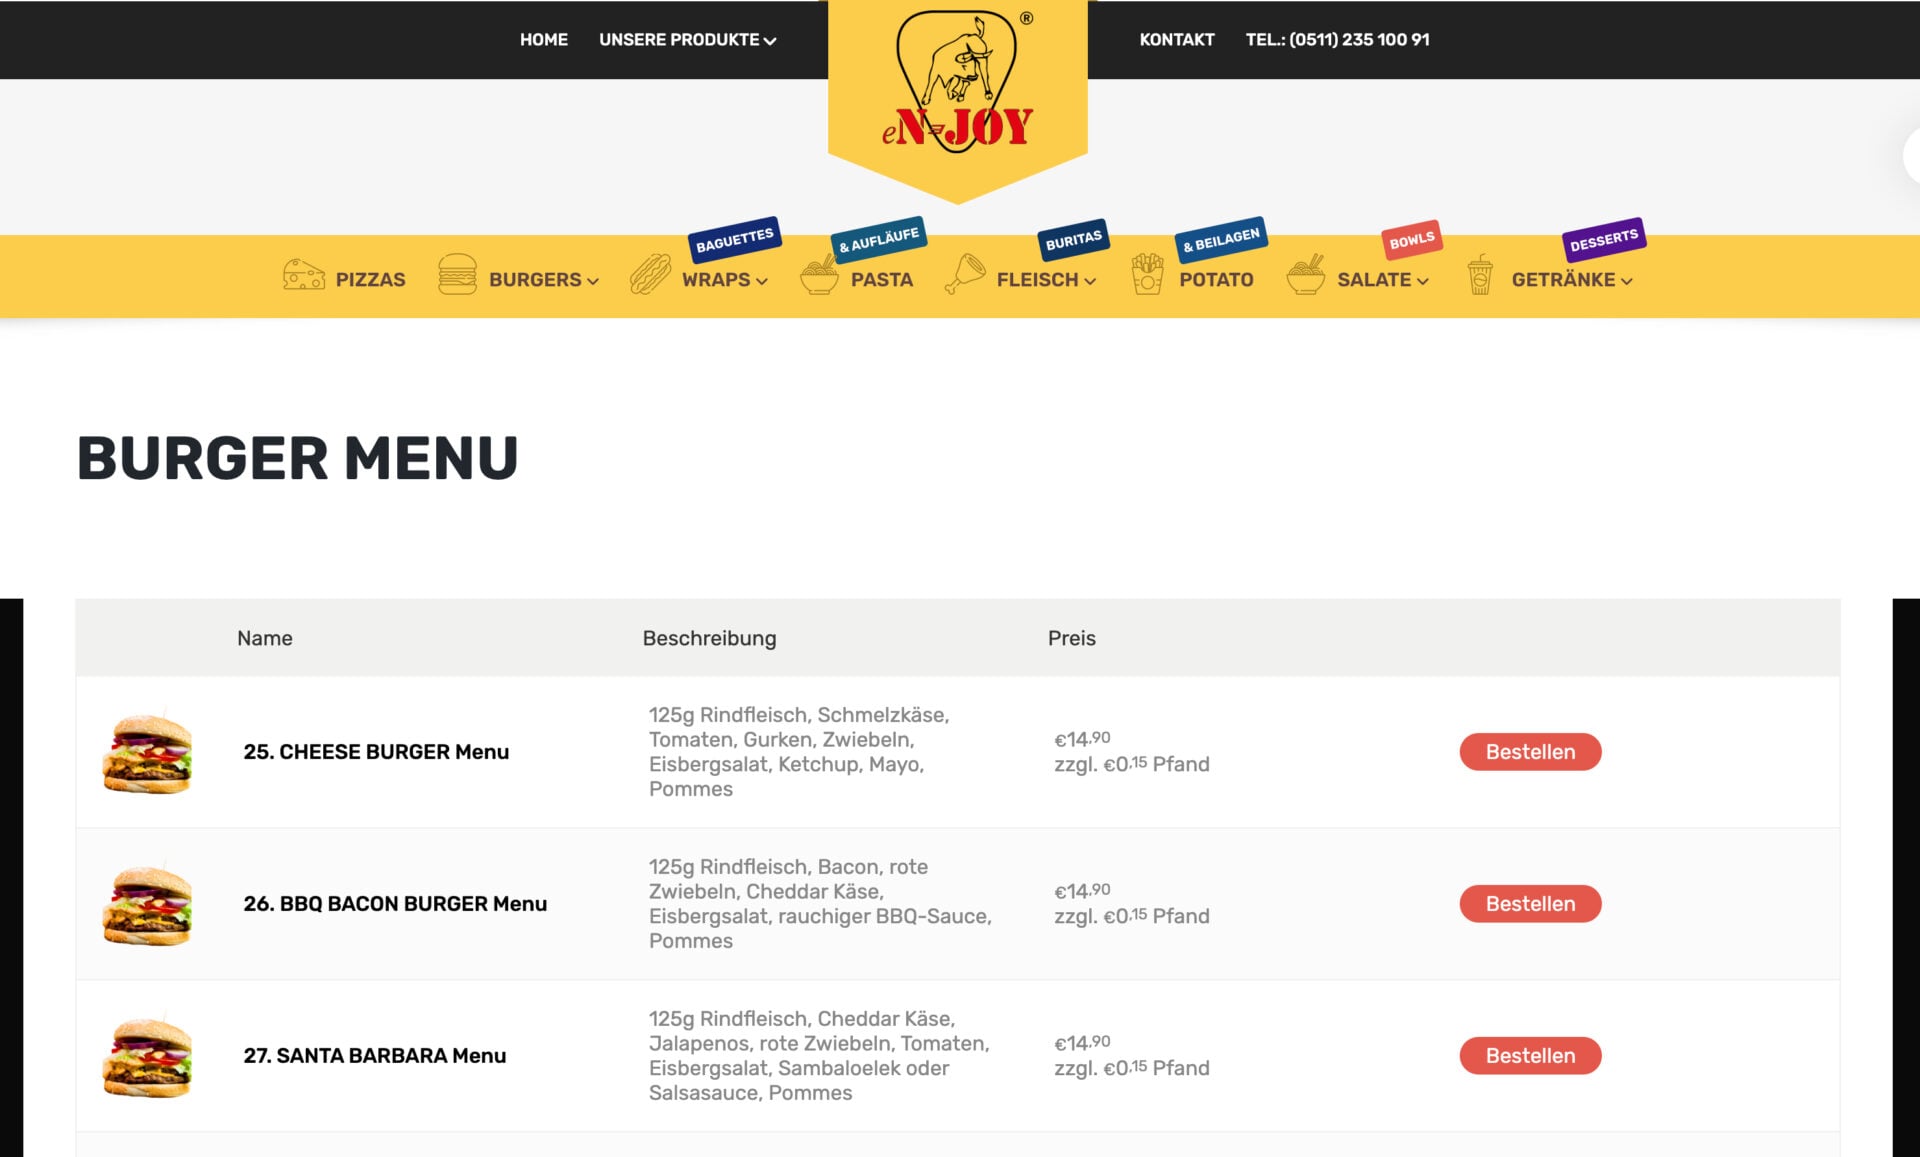
En-joy is a food delivery website that lists every item with a thumbnail, description, and price, and an ‘Add to cart’ button on each row. It’s a straightforward, scannable menu format that suits how customers order food online.
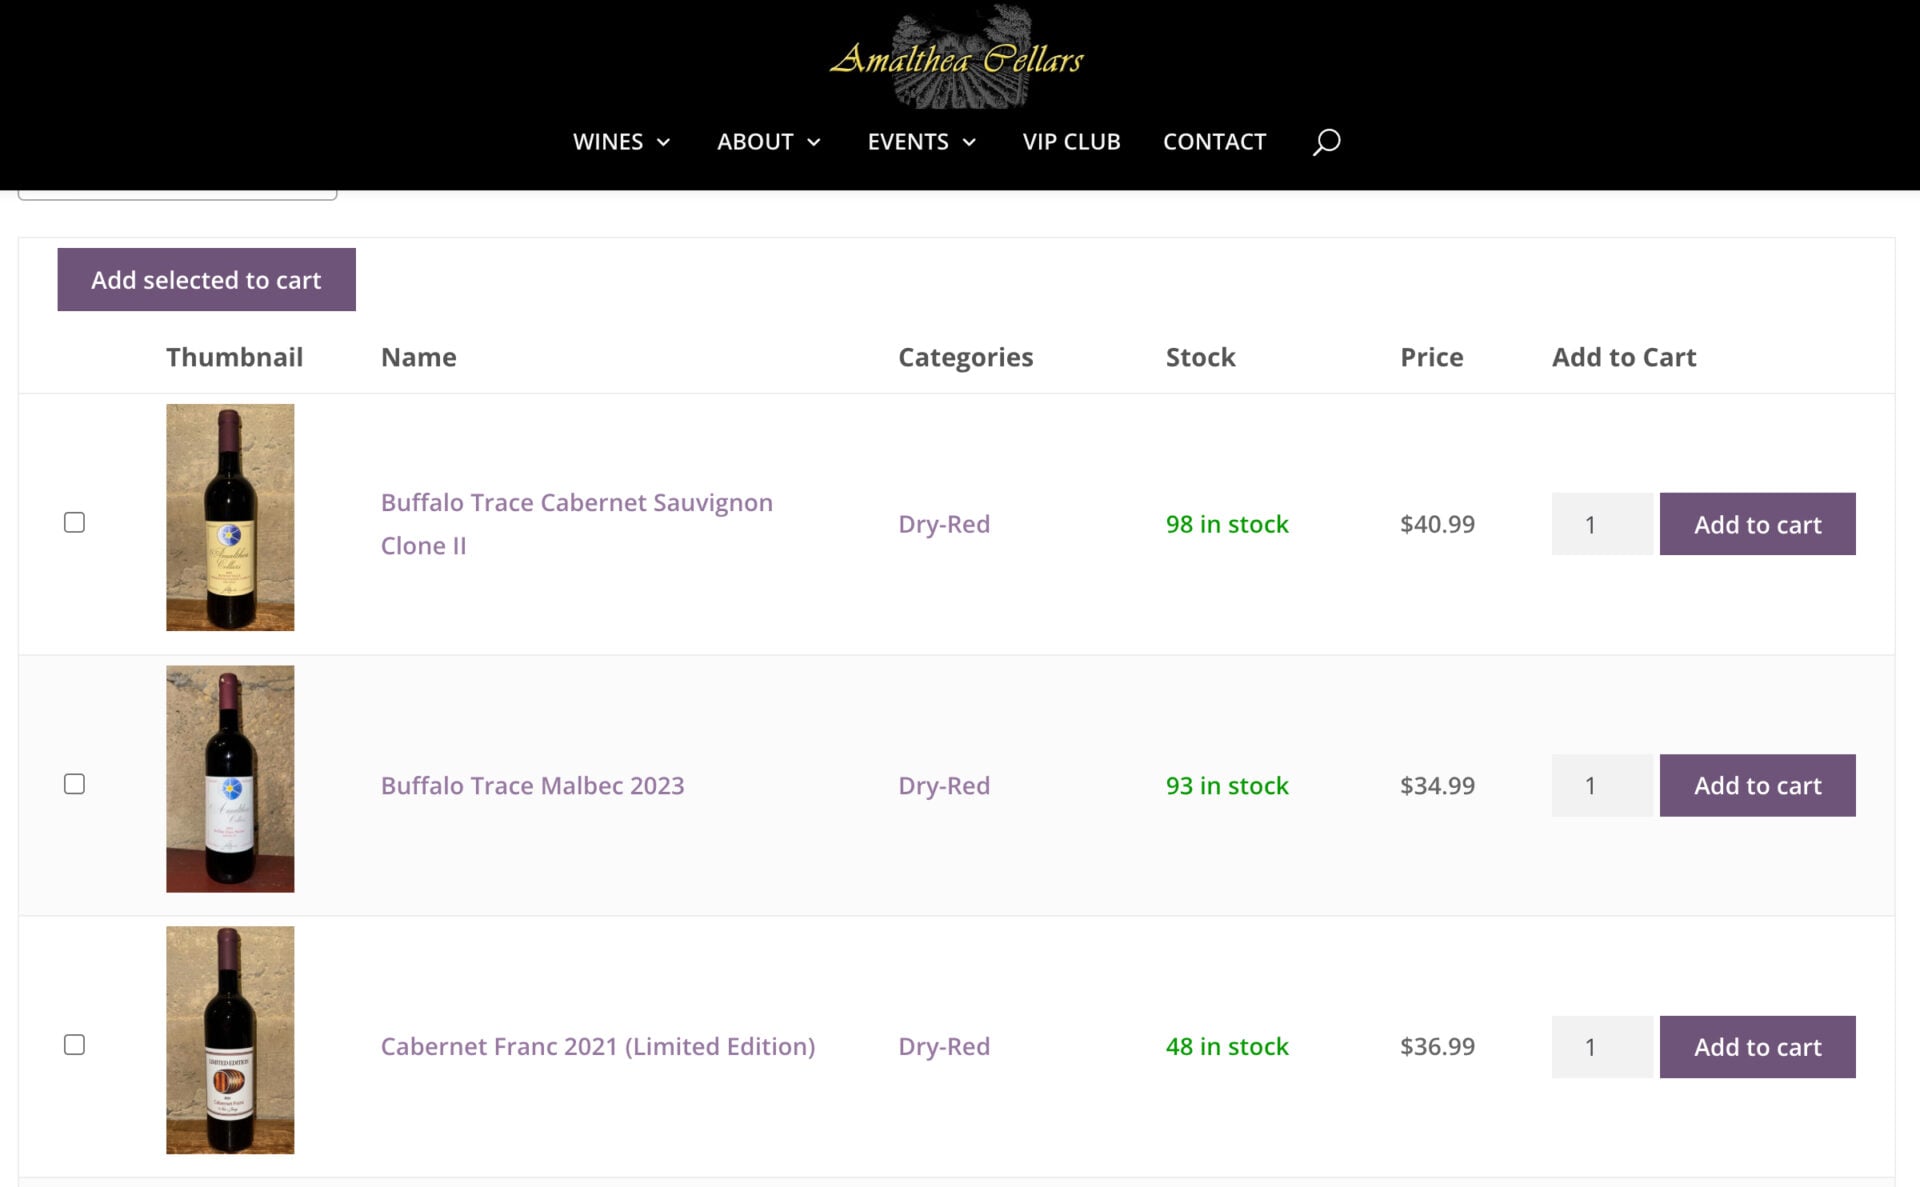
Amalthea Cellars use a standard grid layout for each wine – but also have a wine list page with product table for bulk ordering. It’s a full catalog of wines with stock and price columns, a category filter, and a checkbox on every row so customers can select several bottles and add them all to the cart with the ‘Add selected to cart’ button.
WooCommerce product table – recap
So that’s a look at what a WooCommerce product table can do, and how to set one up using the Product Table Ultimate plugin. We covered the plugin’s main features – product selection, multiple and paginated tables, columns, variations, bulk ordering, filtering, and styling – with examples of where each one fits, then when a table layout beats the standard shop page and how to configure one step by step. We also looked at how the plugin integrates with Product Add-Ons Ultimate, Request a Quote, Members Only, and Dynamic Pricing and Discount Rules.
WooCommerce Product Table Ultimate is compatible with all themes and page builders, including Astra, Flatsome, and Storefront, and page builders like Elementor and Divi. If you have any questions, our world-class support team is on hand to help. And it’s backed by a 14-day money-back guarantee, so you can try it risk-free.