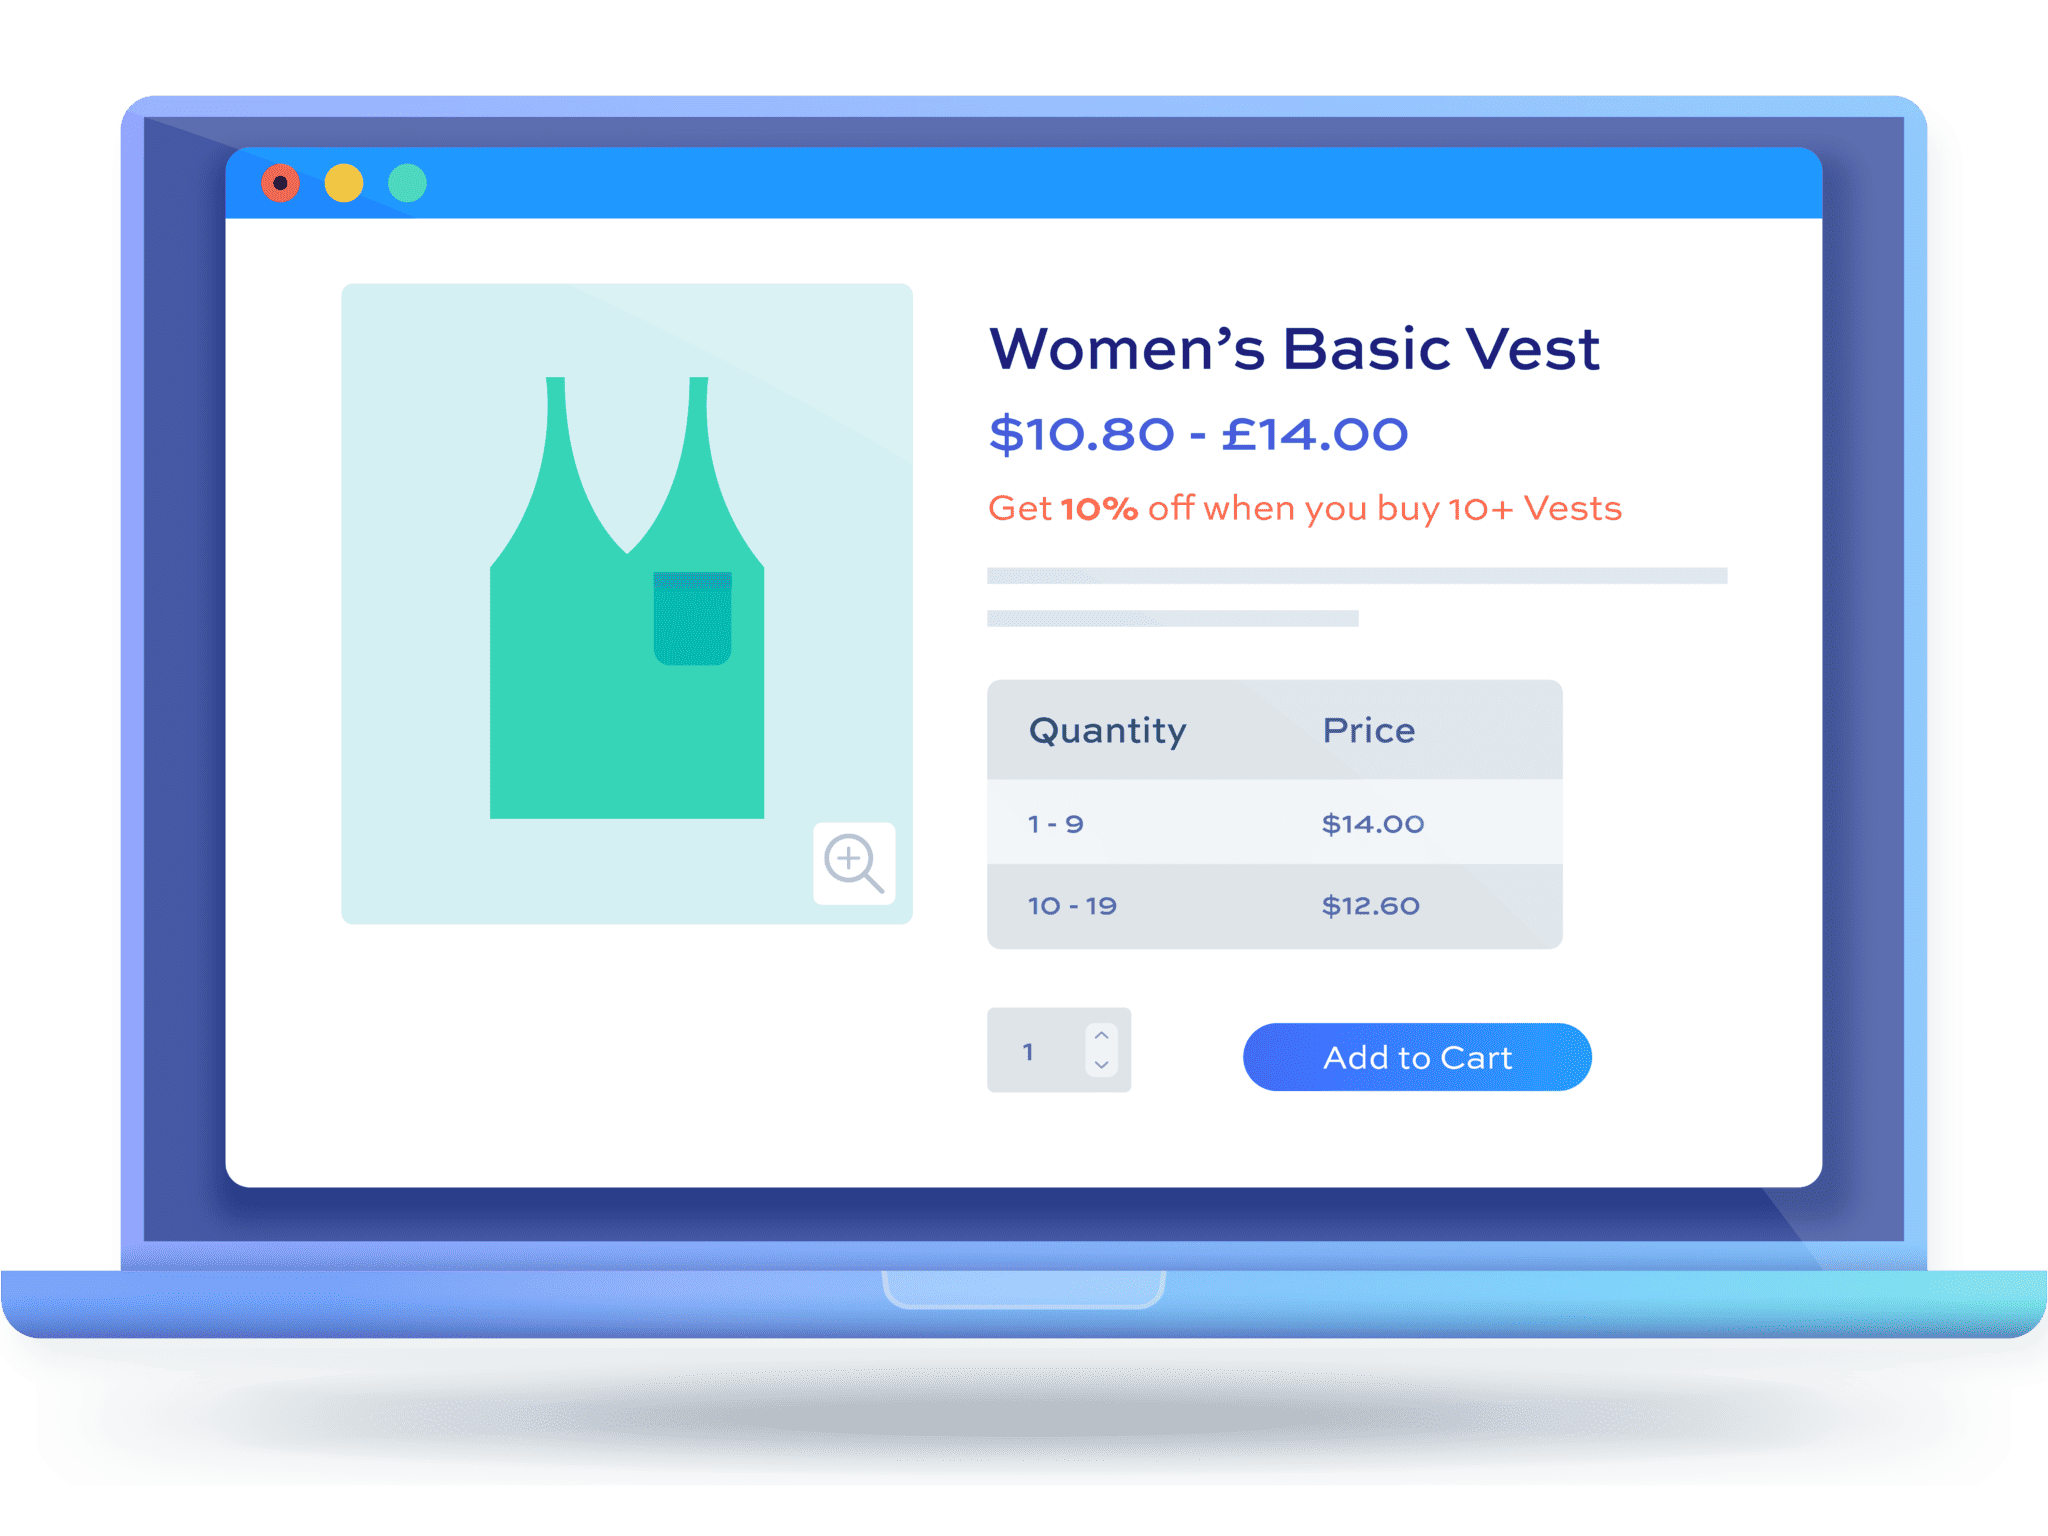
How to set up custom prices in WooCommerce: 10 methods

Setting custom prices in WooCommerce can mean different things depending on your store. It includes the ability to create discounts, allow the user to define their own price, even calculate pricing dynamically. In this tutorial we’ll look at several different methods for WooCommerce custom pricing.
What is custom pricing in WooCommerce?
Custom pricing is a way of offering different pricing to different customers on your WordPress site. You can charge different prices to different users, dynamically changing the amount based on a number of factors.
Scenarios where you might use custom pricing include:
- Pricing based on user roles
- Customer-specific pricing
- Bulk buys and other custom prices based on quantity
- Adding fees to an order
- Seasonal pricing where prices are set based on the time of year or other seasonal demand
- User-defined pricing where users set their own prices for products
- Custom prices based on user inputs
- Prices set by calculations or formulas
- Prices read from lookup tables
- User-defined prices through deposits and part payments
We’ll walk through each method individually with clear steps on how to accomplish them. These are simple pricing strategies – quick and easy to implement.
For the first few scenarios, we’ll use the WooCommerce Dynamic Pricing and Discount Rules plugin which allows you to create a number of pricing rules. You can:
- Increase or decrease product prices based on user role – so you can either apply a global discount or fee across your store for certain user roles, e.g. all ‘Gold’ members get 20% off
- Set different prices for each product based on user role. So you can set a regular price for products then specify different prices for ‘Gold’ members, ‘Silver’ members, etc
- Set pricing rules by product, category or taxonomy
- Adjust prices by percentages or fixed amounts
- Create pricing tiers
- Create seasonal pricing rules
WooCommerce Dynamic Pricing and Discount Rules
Create custom pricing rules in WooCommerce
Using rules to set custom prices
Let’s look at some specific examples of WooCommerce custom price rules and how to use the Dynamic Pricing and Discount Rules plugin to achieve them.
Pricing based on user role
A very common way of customizing your pricing is to provide discounts to some users based on their user role. If you’re operating a wholesale store or you’re offering exclusive deals to certain members, then you will almost certainly use role-based pricing.
To create a simple discount for a certain role:
- Install and activate Dynamic Pricing and Discount Rules
- Add a new rule and select the rule type, e.g. ‘Buy One Get One Free’, ‘Bulk Pricing’, etc
- Choose the roles that the rule should apply to in the ‘Roles’ field
- Enter the other parameters specific to the rule
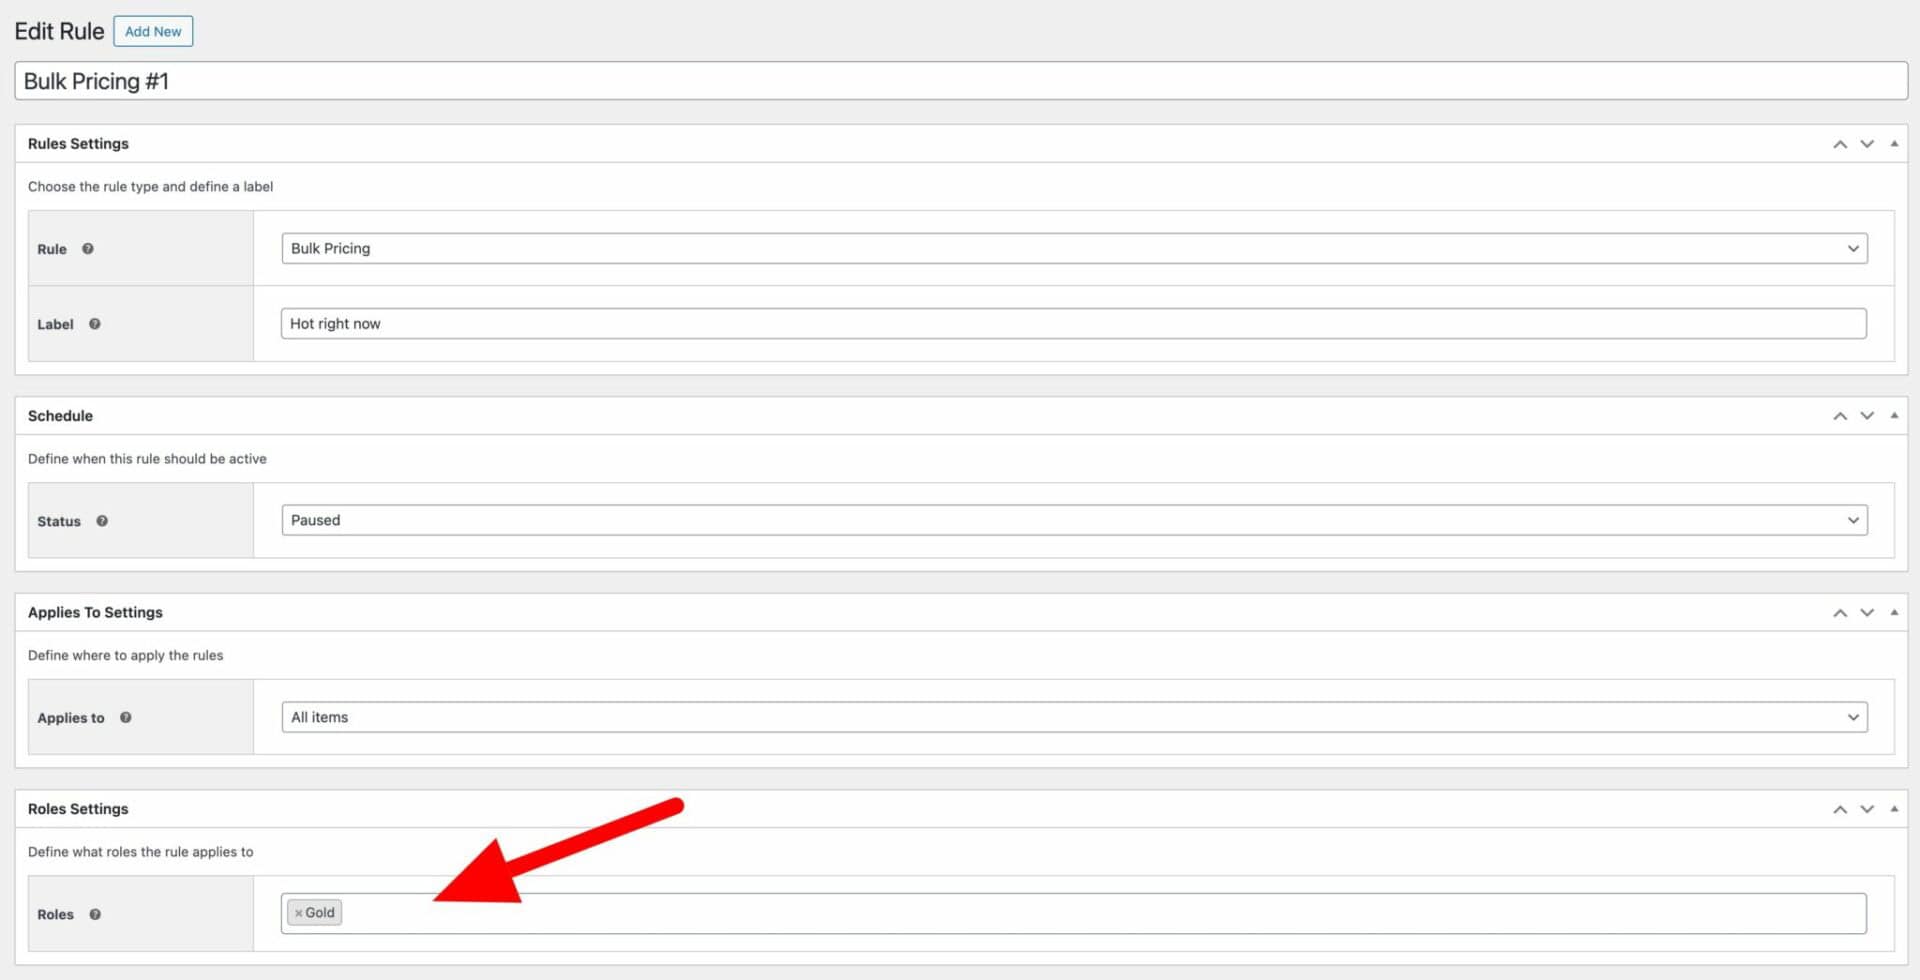
You can create as many of these role-based discounts as you like.
Note that you can create all kinds of role-based custom pricing in WooCommerce, e.g.:
- Set a store-wide discount for one or more roles – e.g. 20% off all products for ‘Gold’ members
- Set a fixed price discount for certain roles
- Apply discounts to all products within specific categories
- Set specific role-based prices for individual products
And you can create multiple rules – so you can apply different pricing for each user role.
Displaying custom pricing on the front end
If you like, you can opt to display all role-based prices – in order to show customers what the original price is against what the discounted price is. This can be a strong incentive for users to upgrade their membership in order to access reduced pricing.
For example, in the product below, the regular price is shown as well as the discounted price for users with the ‘Gold’ role.

There’s a detailed tutorial on setting prices by user role in WooCommerce here.
Restricting access to products by user role
If you want to set restrictions on which users can purchase which products, you can use the WooCommerce Members Only plugin. This is fully compatible with Dynamic Pricing and Discount Rules and the two plugins are available together at a discount in the WooCommerce Wholesale Plugin Bundle.
Customer-specific pricing
If you want to target individuals rather than groups with custom pricing, you can set customer-specific pricing rules.
To set customer-specific pricing, follow the steps above for creating role-based pricing but just choose specific user IDs in the ‘Roles and Users Settings’.
This works perfectly when you have multiple pricing rules for different users.
Here’s a guide on creating customer-specific products.
Simple discounts
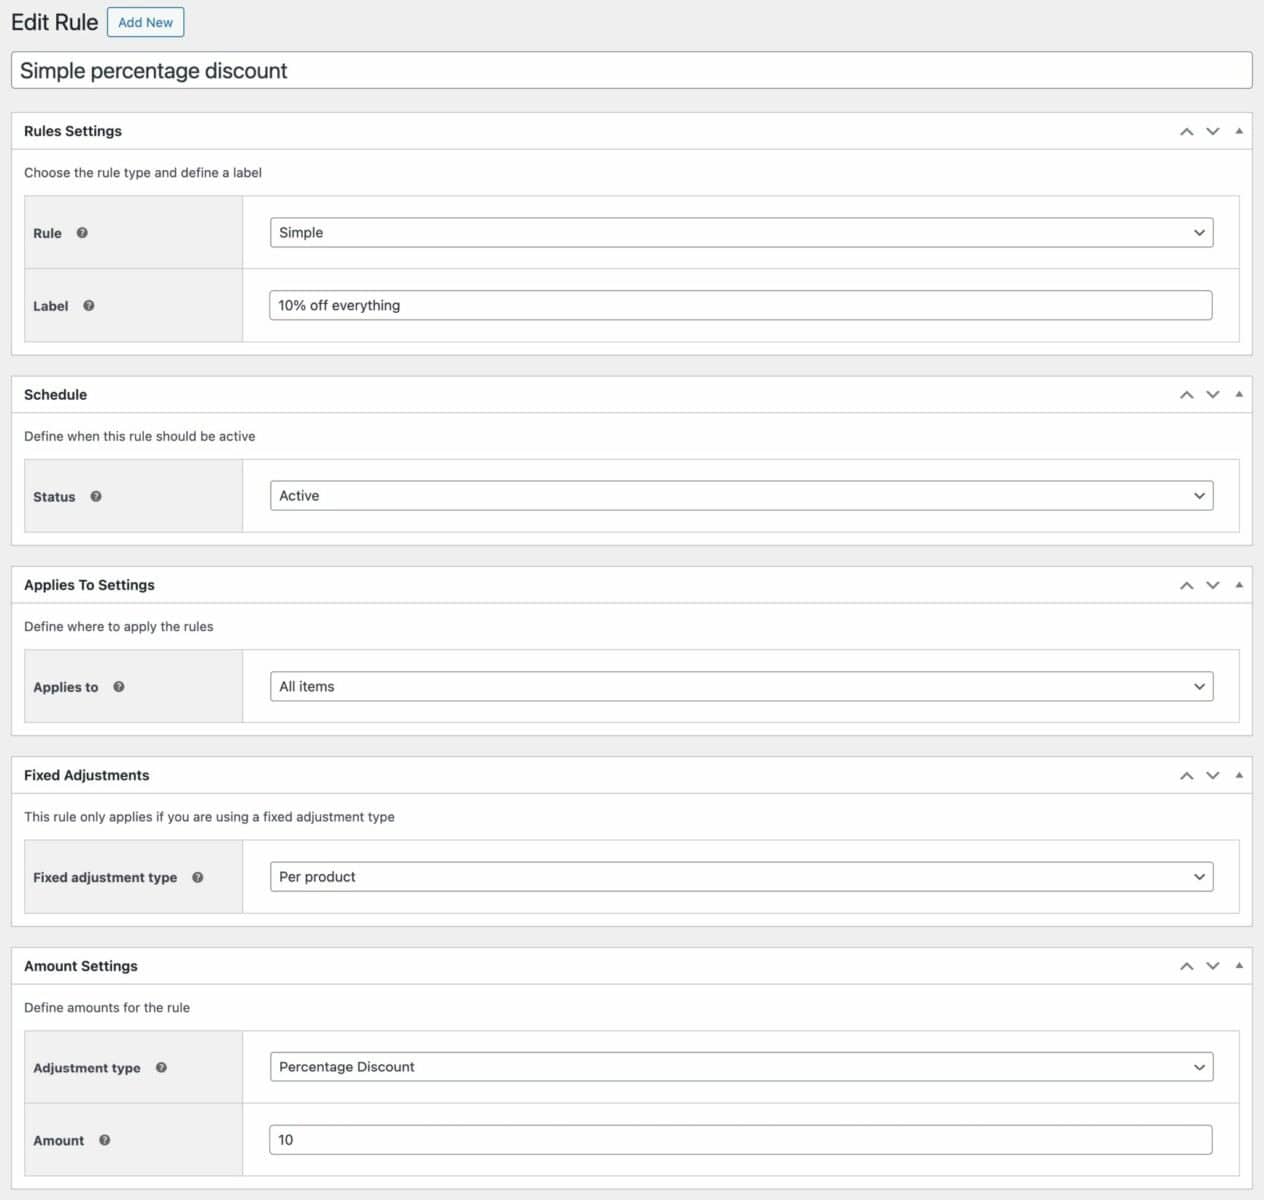
Sometimes you just want to apply a simple percentage or fixed discount to one or more products. Dynamic Pricing and Discount Rules makes this easy.
Follow the steps above to create a new pricing rule. In the ‘Rule’ field, choose ‘Simple’.
In the ‘Adjustment type’ field, choose how the price adjustment will work – either a discount or an additional fee, either a percentage of the product price or a fixed amount.
In the ‘Amount’ field, set the value of the adjustment.
Bulk buy or quantity discounts
Again with the Dynamic Pricing and Discount Rules plugin, you can create rules to discount prices depending on how many items the user adds to their cart.
Follow the steps above to create a new pricing rule. In the ‘Rule’ field, choose ‘Bulk Pricing’.
You can now set different pricing tiers so that different discounts will be triggered depending on how many items the user has in their cart.
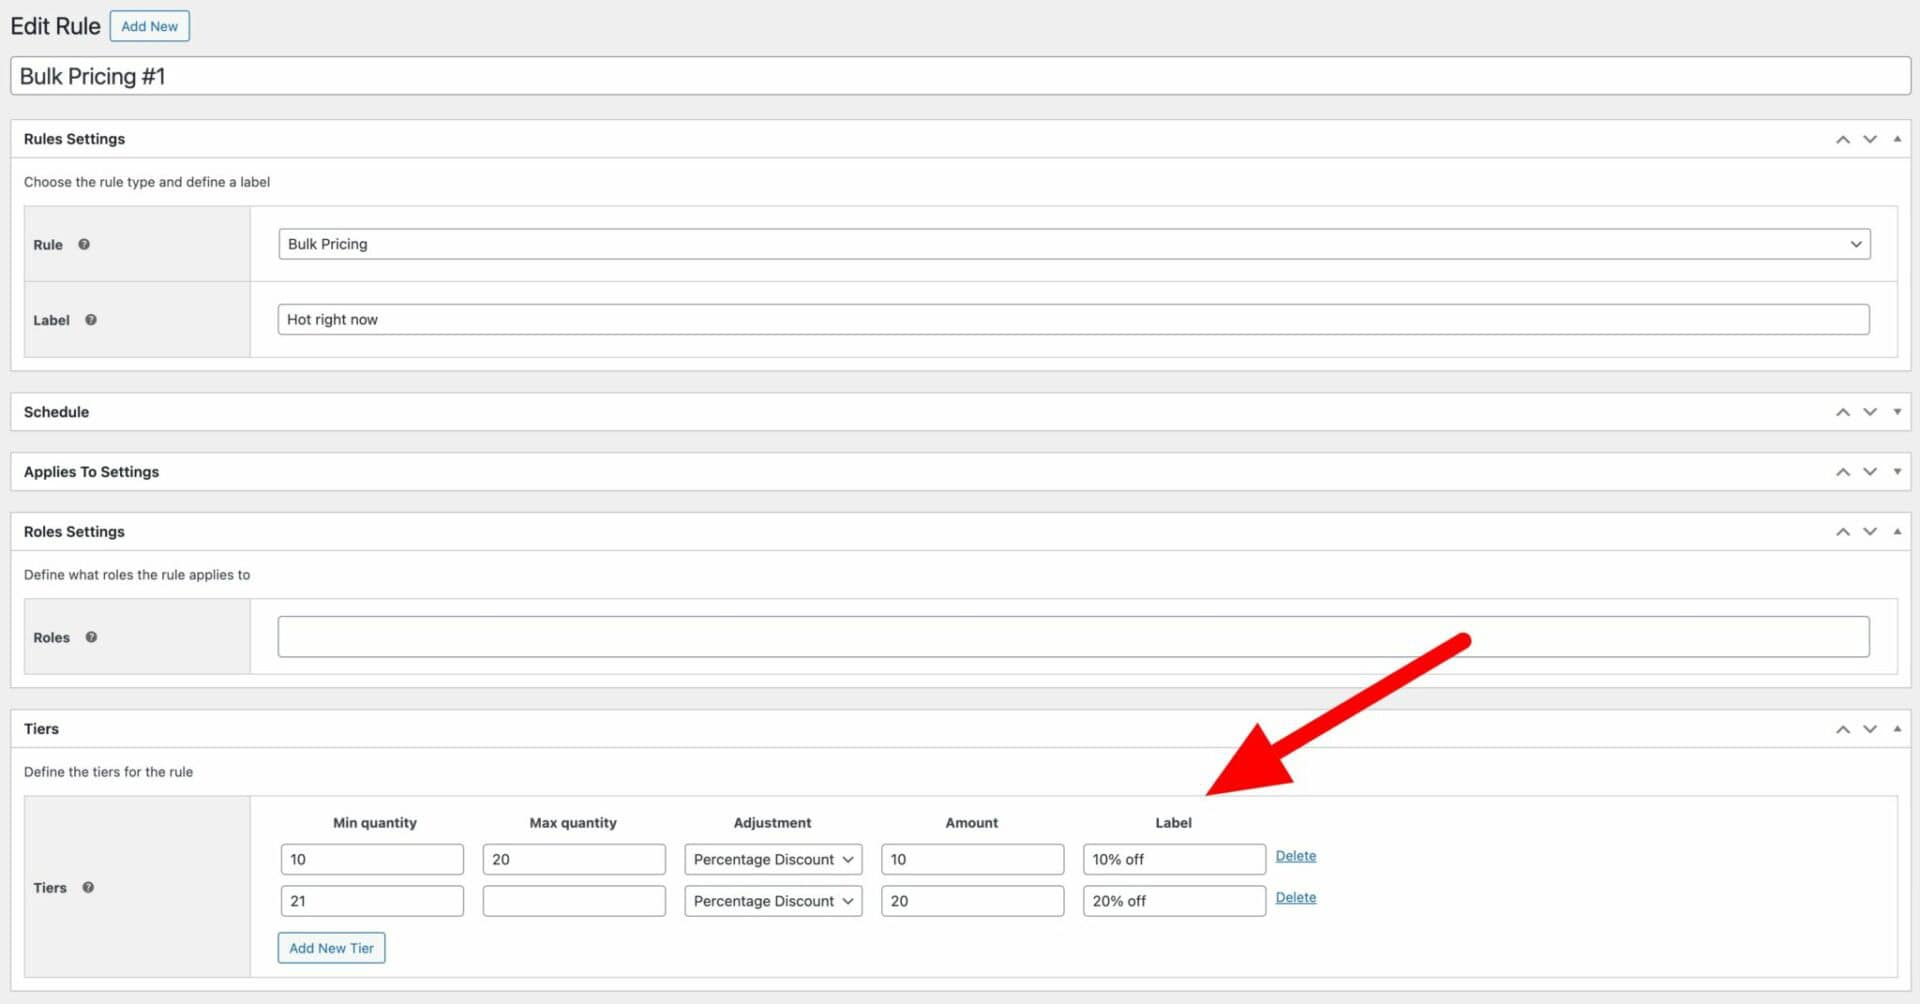
In the example setting above, the user will receive a 10% discount if they purchase 10 or more items. They’ll receive a 20% discount if they purchase more than 20 items.
You can set bulk pricing rules in conjunction with role-based pricing – so you can offer different bulk discounts to users depending on their role.
Furthermore, ou can choose to display pricing tiers on the front end so that users can see what quantities to purchase in order to reach the next discount tier. This is a great incentive to encourage users to increase the quantity of product that they’re purchasing.
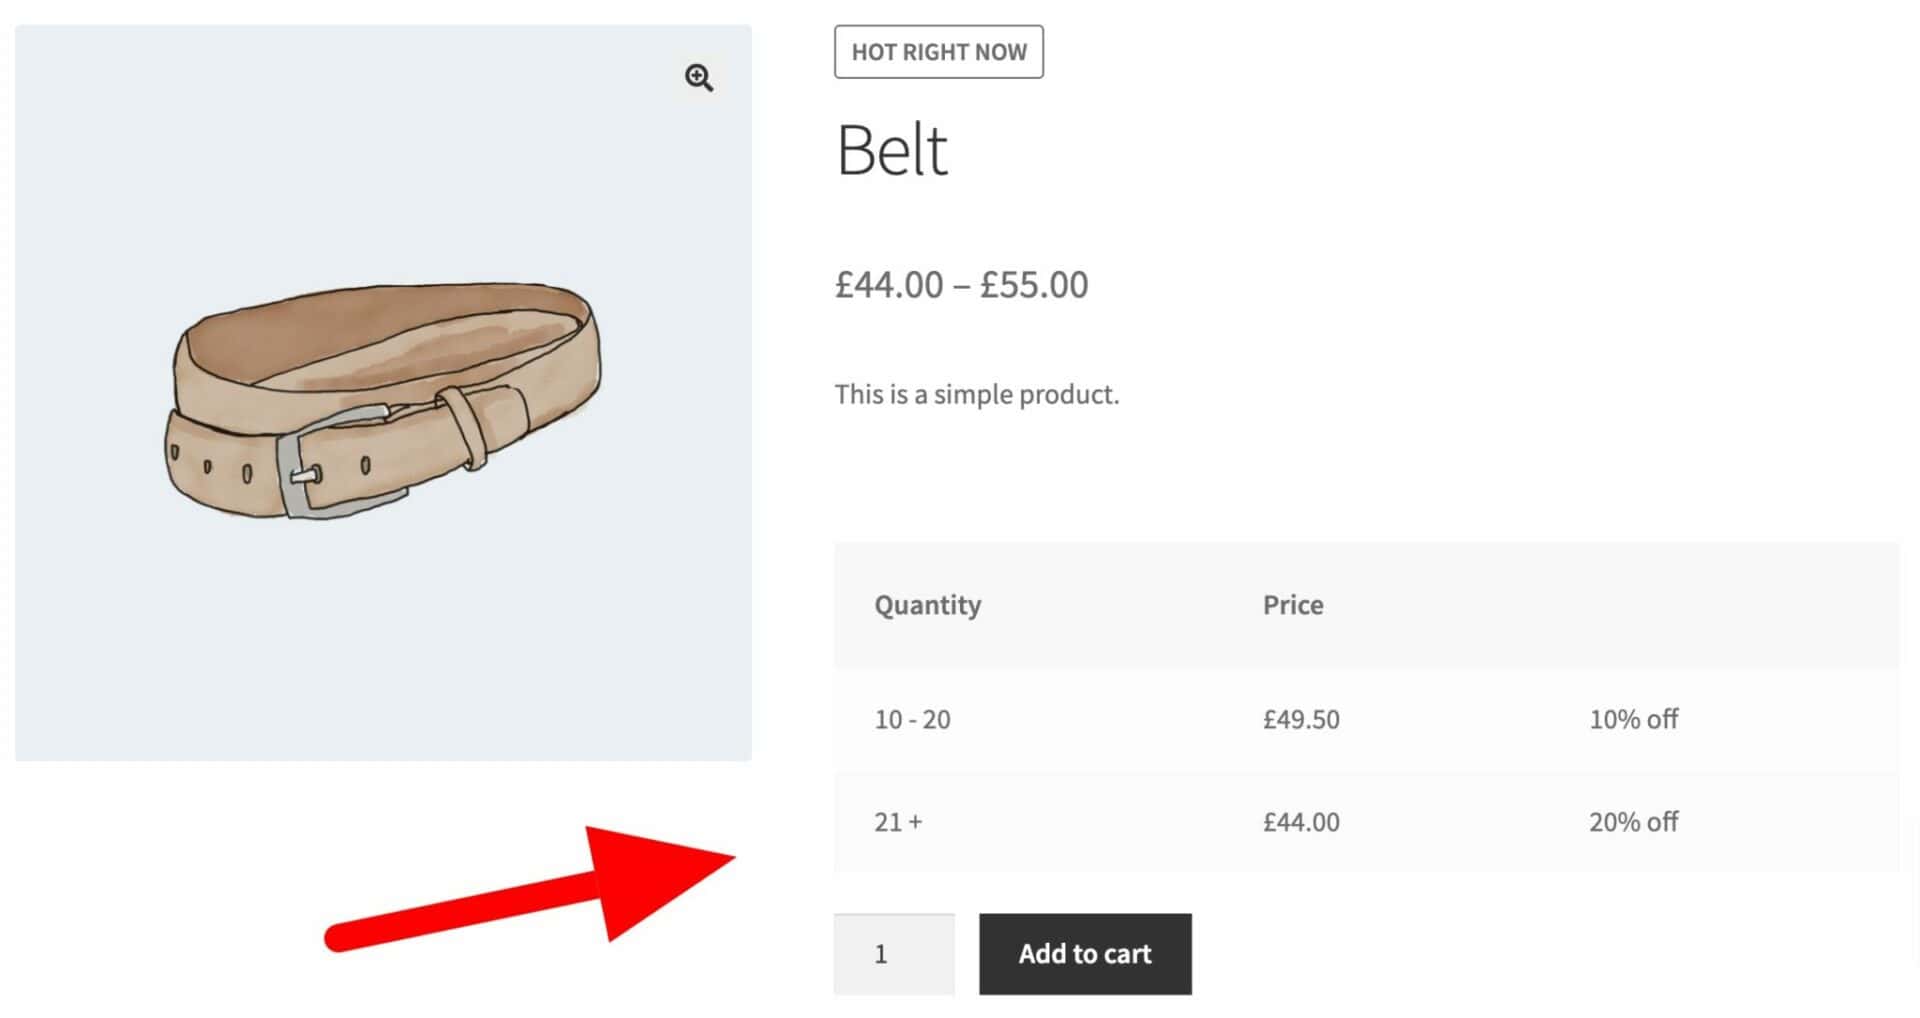
There is more information on creating bulk discounts in WooCommerce here.
Apply discounts or fees to orders based on the cart total
Similar to the bulk buy model above, you can also offer custom pricing to users based on the total value of the items in their cart.
Instead of ‘Bulk Pricing’, choose ‘Order Total’ as the type of rule.
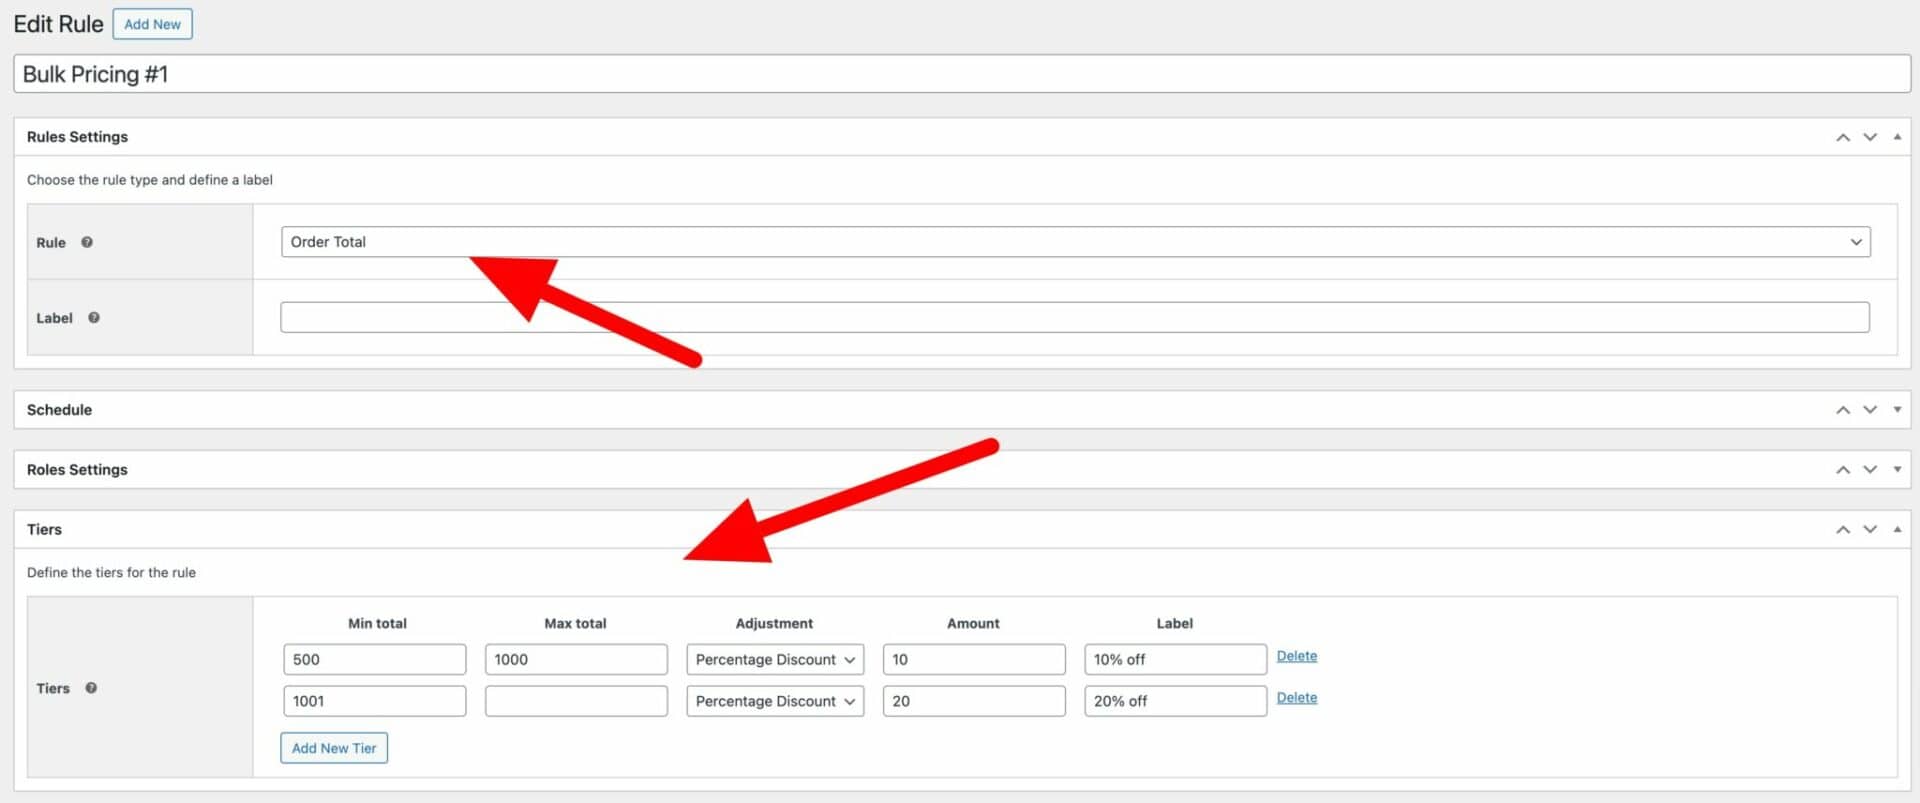
You can then specify different tiers for discounts based on the total value of the user’s cart. So if they spend more than $500, they’ll receive a 10% discount.
Just like bulk pricing, discounts on total order spends are a useful custom pricing method to encourage users to increase their average order value.
Adding extra fees
Discounts are not the only custom pricing strategy that you might want to follow in your store. You can just as easily apply additional fees instead.
So, for example, you can add a surcharge to a user’s order if they don’t purchase a certain number of items, or if their total order doesn’t hit a certain amount. Dynamic Pricing and Discount Rules allows you to make adjustments as follows:
- Percentage based discount – reduce the product or order price by a percentage value
- Fixed amount discount – reduce the product or order price by a fixed amount
- Percentage based fee – increase the product or order price by a percentage value
- Fixed amount fee – increase the product or order price by a fixed amount
With the Dynamic Pricing and Discount Rules plugin, you can also apply fees or discounts based on the payment gateway selected. So if certain of your payment gateways charge a processing fee to you, you can pass that on to your customer.
Here’s a tutorial on payment gateway fees in WooCommerce.
Seasonal pricing
Seasonal pricing includes any kind of price adjustment according to seasonal demand. This means that you can look to improve sales during slow periods by making your pricing more competitive; or you can increase your prices during times of high demand.
Typical examples of seasonal pricing include Black Friday discounts, holiday sales, clearance discounts. This could also include flash sales and other types of special offer.
You can create seasonal pricing discounts using the Dynamic Pricing and Discount Rules plugin. Just set up a rule as in the examples above, then set the ‘Status’ to ‘Scheduled’. You’ll see some further options for setting start and end times and dates.
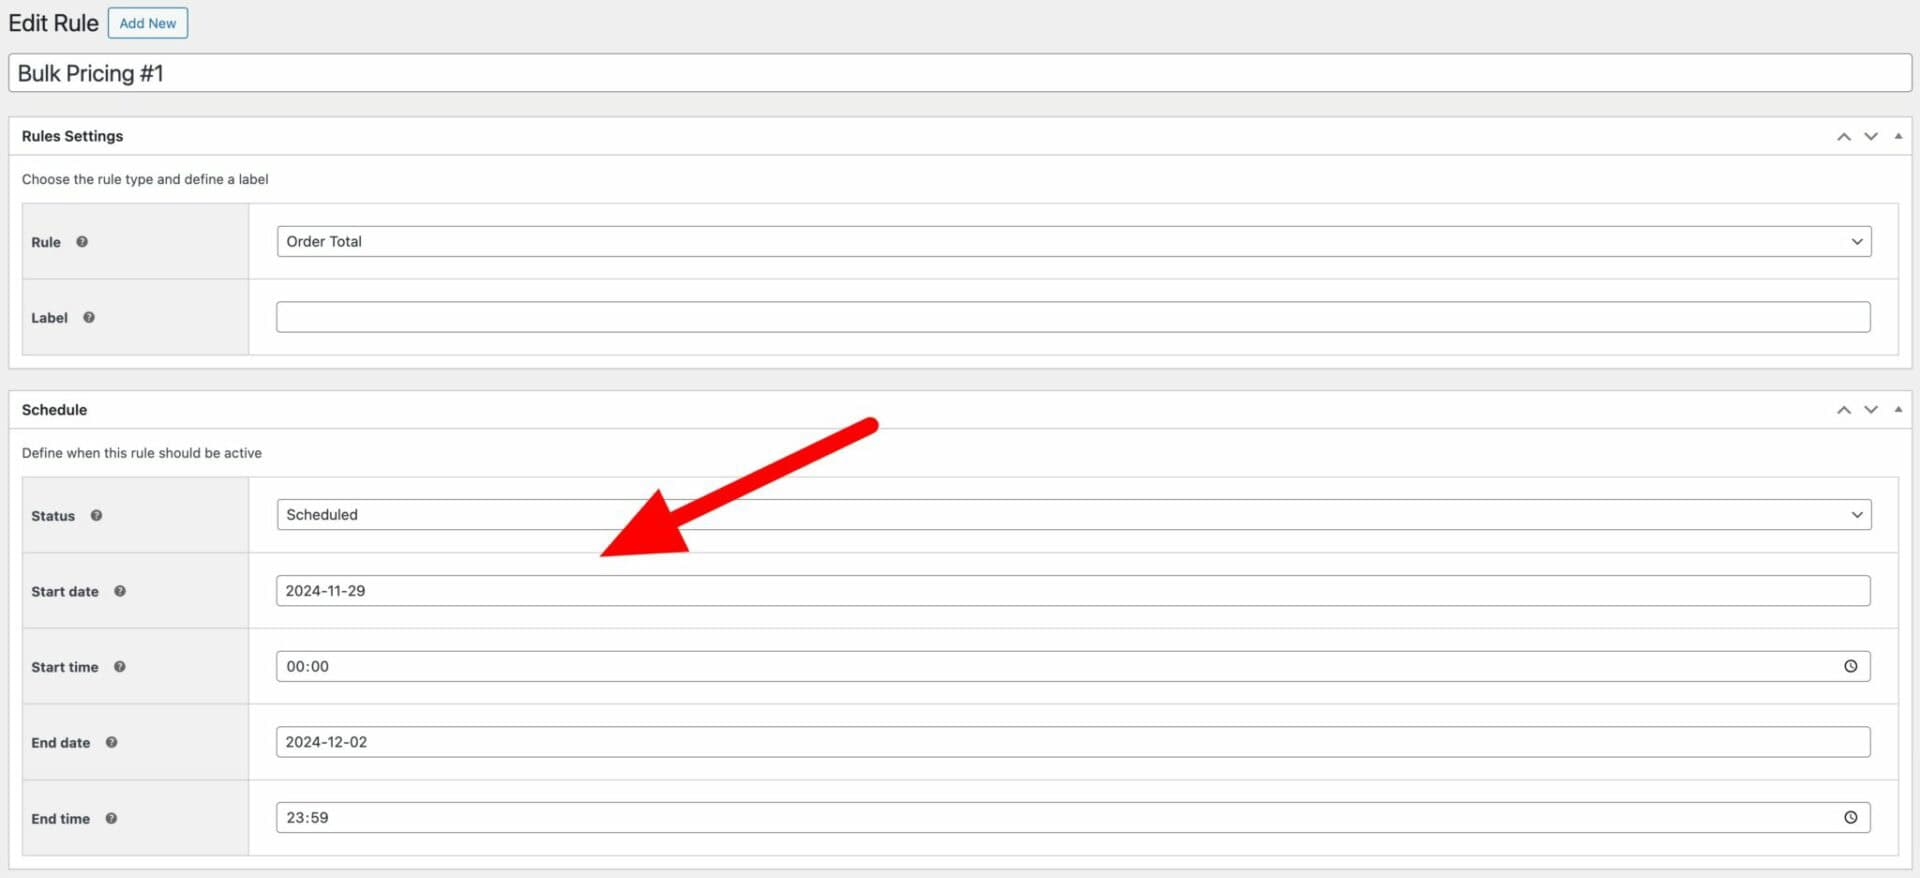
With these options set, your pricing rule will kick in the start of the period and end automatically when you specify. So you can set your seasonal custom pricing rules in advance.
Dynamic Pricing and Discount Rules recap
So far we’ve looked at a number of different ways to create custom pricing rules in your WooCommerce store. This includes:
- Changing product prices based on the user’s role. You can increase or decrease the price – either as a percentage or a fixed amount. And you can apply discounts across the whole store, for certain categories, or for certain products
- Creating different prices for specific customers
- Setting bulk buying discounts – so the more items a user purchases, the greater the discount
- Creating discounts based on order total
- Creating seasonal pricing rules
Now let’s look at alternative custom pricing methods using a different plugin.
Setting custom prices through product options
The Dynamic Pricing and Discount Rules plugin allows us to set simple and complex rules based on factors like user role, cart quantity and total, date and time, and so on. However, you might want to create custom pricing by building up a product price according to options selected by the customer.
In this section, we’ll look at:
- User-defined pricing where users set their own prices for products
- Custom products prices based on user selections
- Pricing set by calculations and formulas
- Prices read from lookup tables
Each of these methods requires the WooCommerce Product Add-Ons Ultimate plugin.
Let’s start with user-defined custom prices for WooCommerce.
User-defined custom pricing for WooCommerce products
In products with user-defined pricing, users can set their own prices. They can either set the entire price or a proportion of the overall price.
An example of a product with user-defined pricing is a charity donation. You can ask the user to make a donation via a WooCommerce product, they enter a value in the field, and this amount sets the product price. You could also use this for a product where users can pay invoices or make a payment for services.
As an example of where a proportion of the overall price is defined by the user, consider a tip or gratuity added to a product. For instance, you can allow the user to add an extra amount to the product as a tip for delivery or service. This could be a fixed amount or a percentage.
We can achieve both these scenarios using the WooCommerce Product Add-Ons Ultimate plugin.
Let’s look first at how to allow the user to set the whole product price.
How to enable a user-defined price in WooCommerce
In our first example, we’ll look at a product where the user can make a charity donation. They’ll be able to ‘name their price’ by entering a value in a field. This will set the overall product price.
You can enable a user defined price on a WooCommerce product by following these steps:
- Download and install the Product Add-Ons Ultimate plugin
- Create a new product and set the price to 0
- In the ‘Product Add-Ons’ tab of the ‘Product data’ section, click ‘Add Group’ then ‘Add Field’
- Set the ‘Field Type’ to ‘Name Your Price’
- Give the field a suitable label, e.g. ‘Donation value’
- Publish
Now, the user can enter a value in this field to set the overall product price.
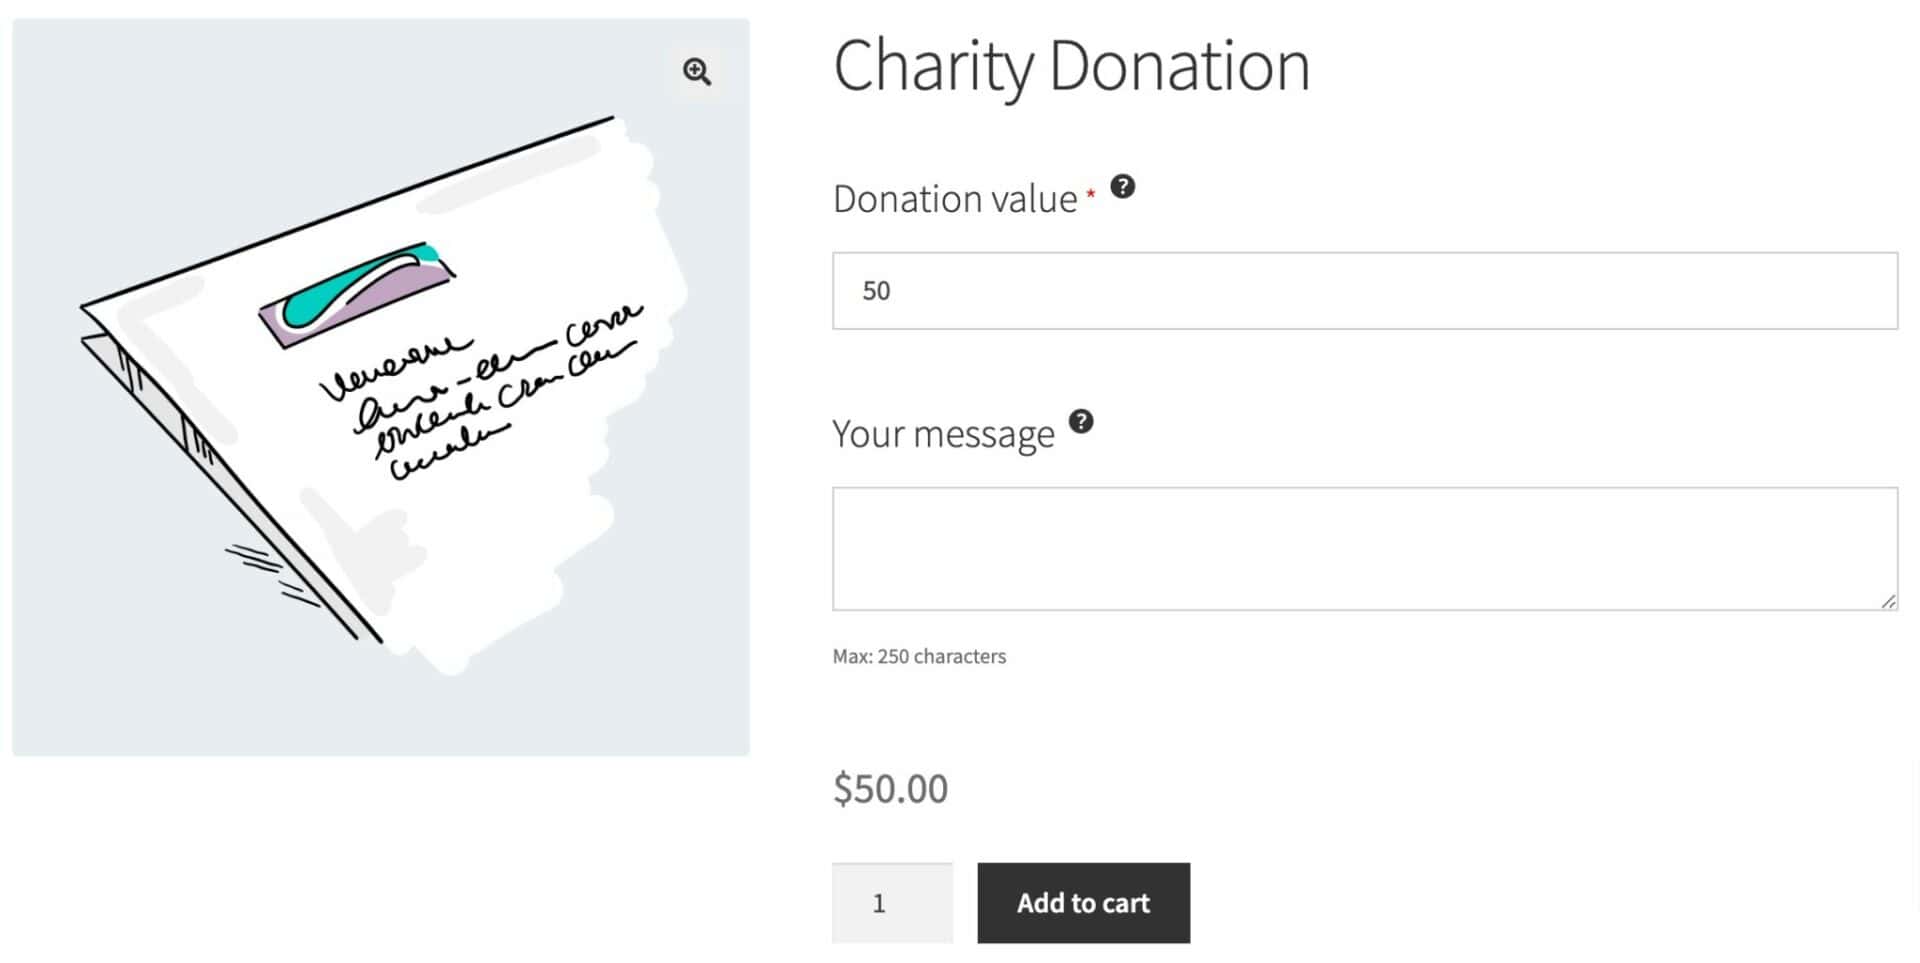
If you’d like to set minimum or maximum amounts, just enter those values in the ‘Min Value’ and ‘Max Value’ fields. This will ensure that the user can only enter their custom price within certain upper and lower limits.

You might also want to set the ‘Required Field’ option to ensure that the user enters a value in the field.
There’s a more detailed article on name your price products in WooCommerce here.
How to allow the user to add a custom amount to the product price
If you prefer that the user can’t set the entire price, you can make a proportion of the price user-defined. For example, you might want to let the user add a tip to the product price.
To allow the customer to add a user-defined price to the base product price:
- Download and install the Product Add-Ons Ultimate plugin
- Edit the product where the user can add a custom amount
- In the ‘Product Add-Ons’ tab of the ‘Product data’ section, click ‘Add Group’ then ‘Add Field’
- Set the ‘Field Type’ to ‘Name Your Price’
- Give the field a suitable label, e.g. ‘Add a tip’
- Publish
Again, if you’d like to set minimum or maximum amounts, just enter those values in the ‘Min Value’ and ‘Max Value’ fields.
If you’d like the user to enter a percentage of the product price, just enable the ‘Percentage’ field. The user can enter a percentage value and the plugin will calculate the actual value based on the product price.
How to add tips with preset values to a WooCommerce product
Instead of allowing the user to enter a value, you might prefer to offer them specific values to choose from – e.g. $1, $5, $10. This can make the decision-making process a bit easier for some users – and potentially increase the likelihood of them adding a tip.
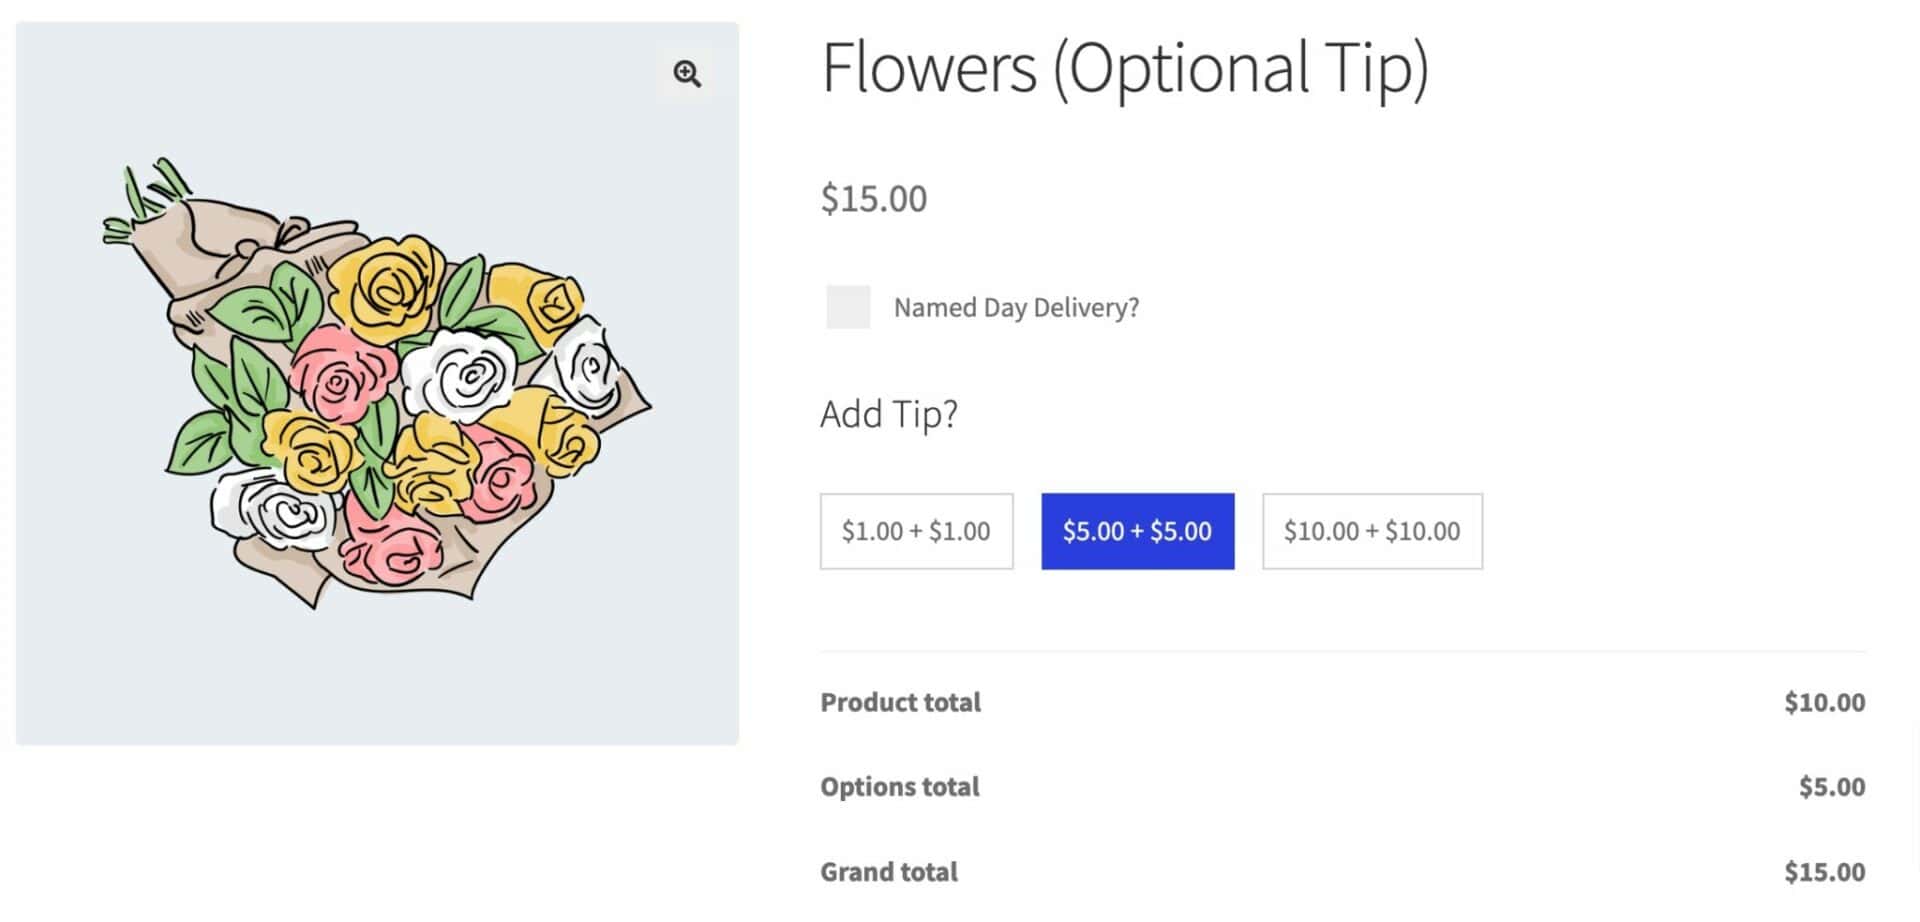
To offer fixed priced tips using the Add-Ons Ultimate plugin:
- Edit the product where the user can add a custom amount
- In the ‘Product Add-Ons’ tab of the ‘Product data’ section, click ‘Add Group’ then ‘Add Field’
- Set the ‘Field Type’ to ‘Radio’ and click ‘Add Option’ for each tip value
- Enter a label, e.g. $2.00, and the price itself, 2.00
- Give the field a suitable label, e.g. ‘Add a tip’
- Choose the ‘Display as Swatch’ option
- Publish

The user will be presented with a selection of clickable text buttons that will add a tip to the product. When they select one, the price will be updated.
Allow the user to enter a custom message
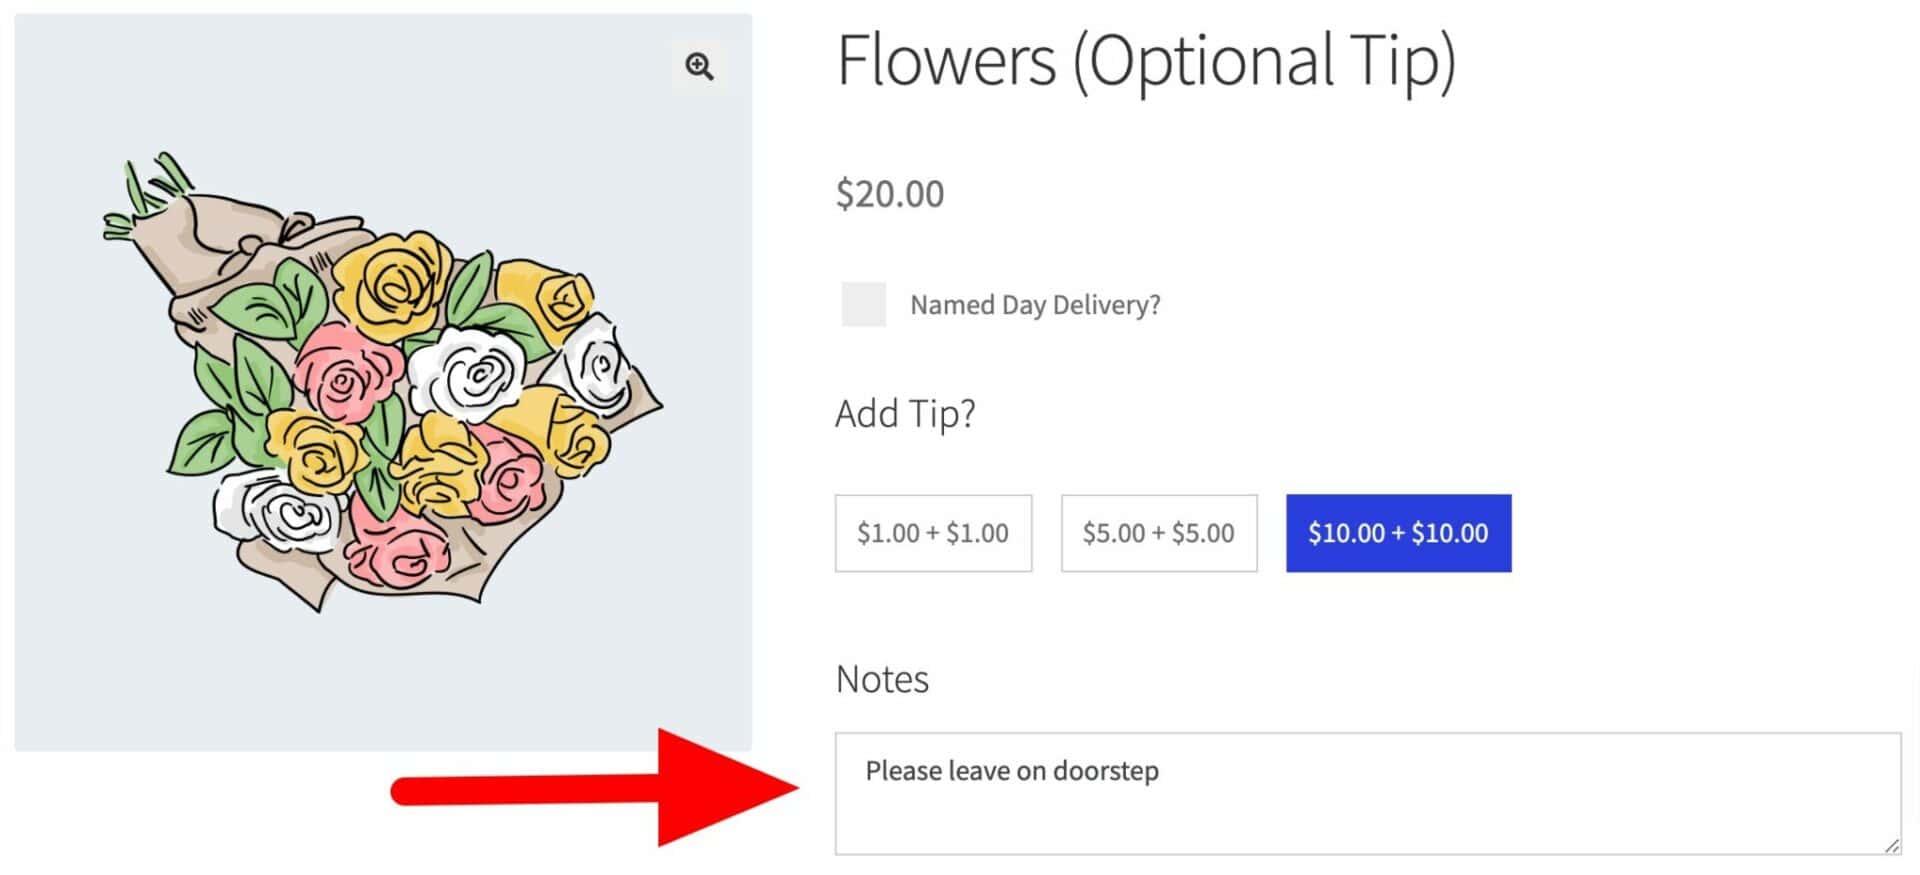
Finally, if we’re offering users the opportunity to define their own price or leave a tip, we could also give them a field to leave a message.
So, as well as adding fields for users to define their own pricing, you can add a textarea field for the user’s message.
Just follow the steps above to add a new field. This time, choose ‘Textarea’ as the field type.
Setting custom pricing through product options and user inputs
Staying with the Product Add-Ons Ultimate plugin, let’s look at another way to set custom prices.
The Add-Ons Ultimate plugin is designed specifically to add custom options to WooCommerce products. It has around 20 field types to choose from, most of which can be assigned a price – so the overall product price will increase depending on which options the user selects.
Field types include checkboxes, dropdown lists (select fields), color pickers, date picker, number fields, product fields, swatches, text fields, upload fields, and more.
Pizza is a typical example of a product where the price is built up according to the options selected. The user chooses crust, sauce, cheese, and toppings. Each one has a cost that contributes to the overall product price.
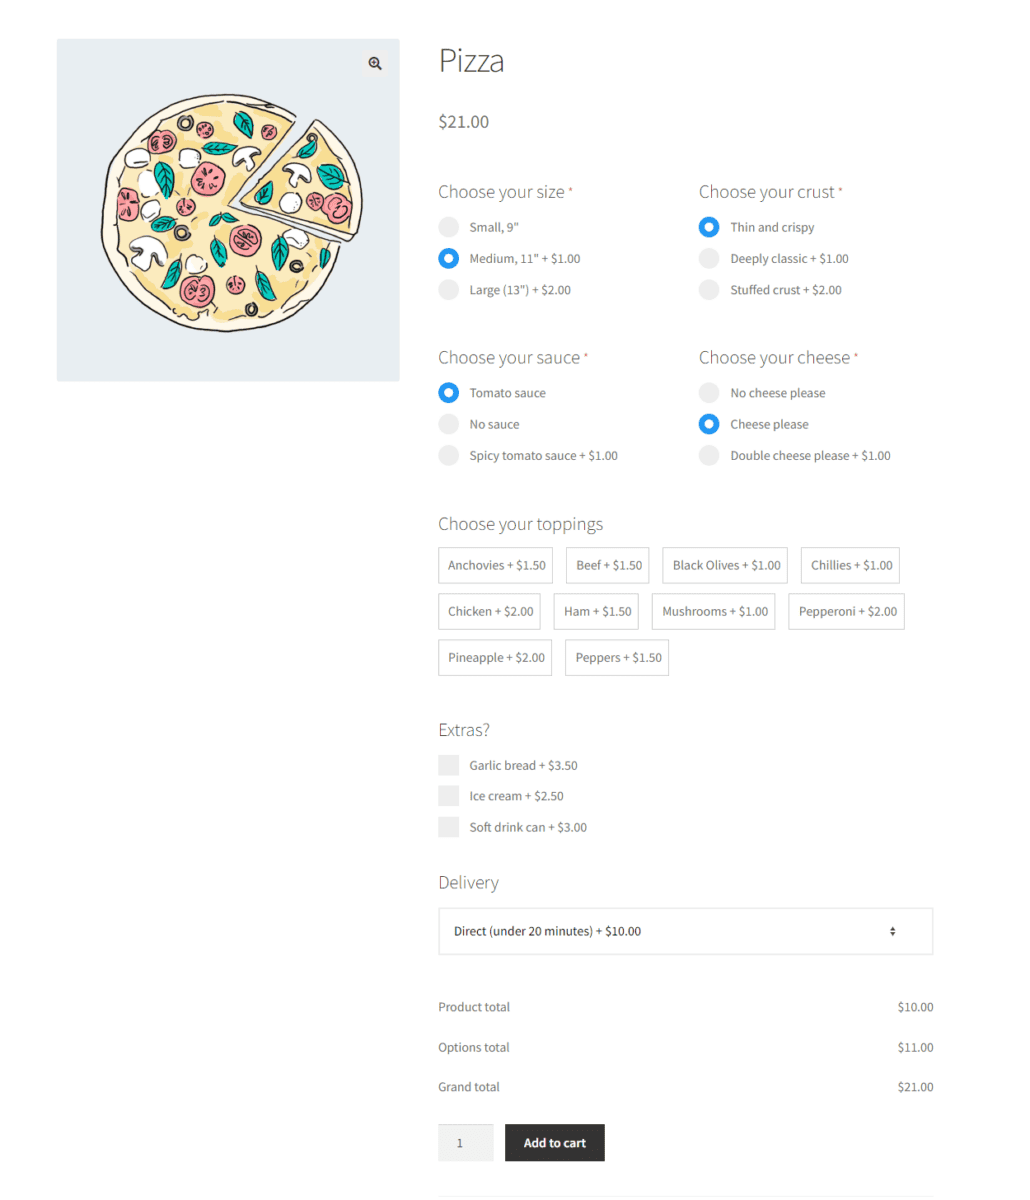
In the Product Add-Ons Ultimate plugin, there are different pricing methods available. For some options, the price will multiply based on the number of items that the customer orders; for other options, you can choose a fixed fee, or flat rate – a single charge regardless of the quantity ordered. You can also choose to change the price by a percentage of the base product price. And you can even set negative prices for options – decreasing the overall product price.
To set custom prices through product options:
- Install and activate Product Add-Ons Ultimate
- Edit the product where you’d like to add custom options (or you can set these globally if you prefer)
- In the ‘Product Add-Ons’ tab of the ‘Product data’ section, click ‘Add Group’ then ‘Add Field’
- Choose the type of field in the ‘Field Type’ setting
- Enter a label and a price
- Repeat for as many options as you want to add
- Publish the product
All your options will be added to the product page. When users make their selections, the price of the product will update.
Set custom prices based on calculations
As well as (or instead of) building up a product price through different options, you might want to set the price through a formula.
This is a more advanced way of offering WooCommerce custom pricing. You can use the values of customer inputs – like height and width – as well as other parameters to calculate an overall price.
For example, we might be selling customizable products like windows or doors. The user can enter the required height and width of the windows, then the plugin calculates the product price based on those measurements. The price can also factor in the cost of other options like type of glass, frame design and color, and so on.
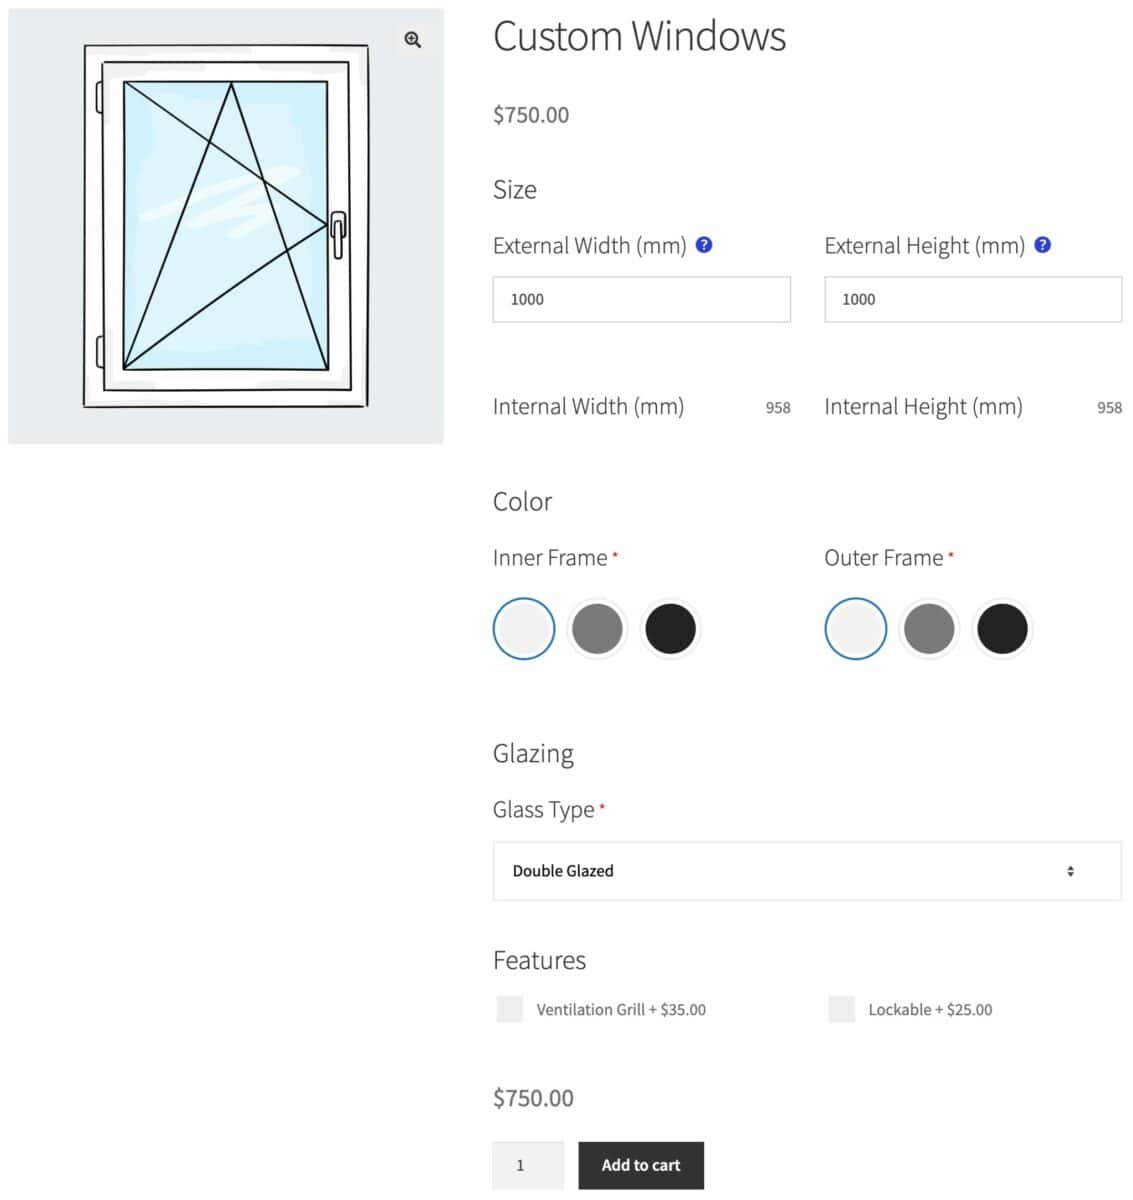
Calculation fields like this require the Pro version of Add-Ons Ultimate. There’s a full tutorial on setting product prices by formula in WooCommerce here.
Reading custom prices from lookup tables
If we want to get really advanced with custom pricing, we can also use lookup tables. With lookup tables you can create a grid of custom prices – look up a value along the x-axis and a value along the y-axis to return your product price.
For this, you’d also need the Advanced Calculations plugin.
This is perfect for products where users need to enter their own measurements but the pricing isn’t based on a formula. For example, if you’re selling made-to-measure curtains or blinds, the user will need to enter the width and height of their curtains and the price will be set based on those measurements.
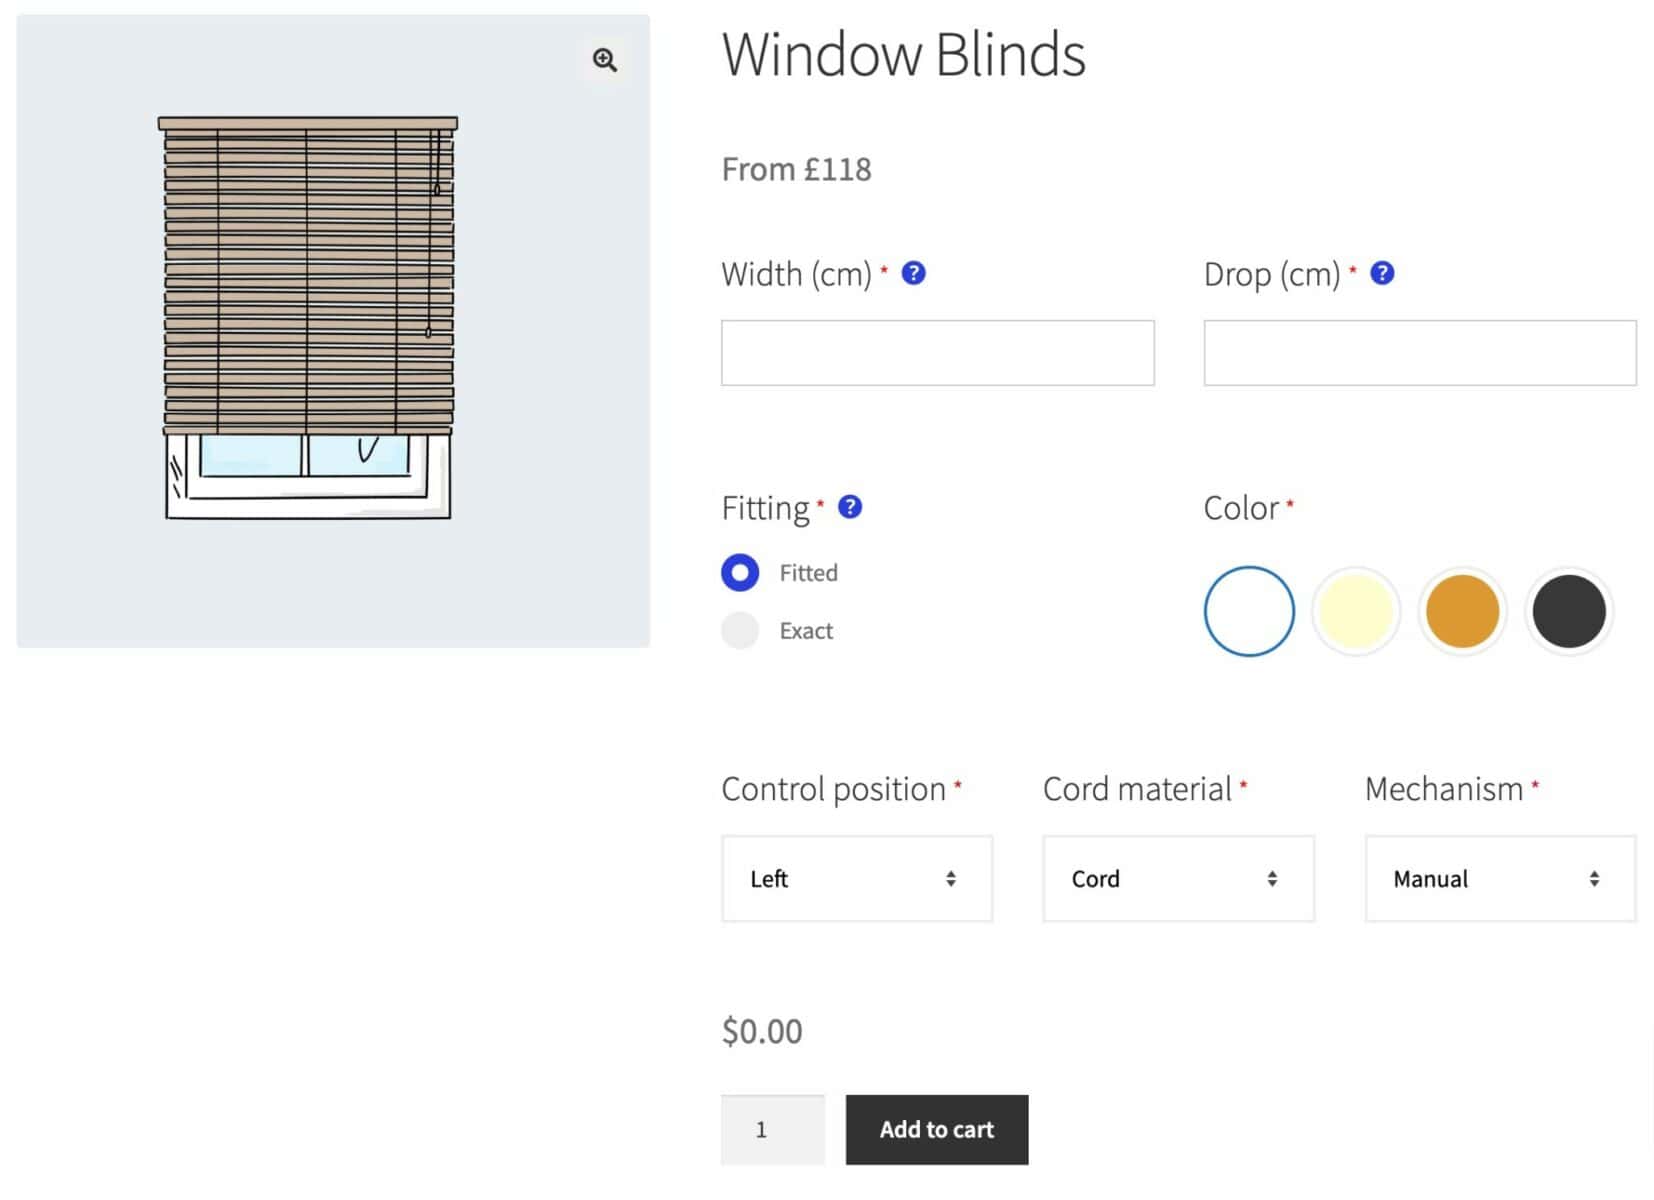
There’s a complete tutorial on how to set custom prices using lookup tables in WooCommerce here.
Recap
In this section we looked at several methods to create custom prices in WooCommerce including:
- User-defined prices
- Prices set according to which options the user selects
- Prices set by formulas and calculations
- Custom prices using lookup tables
All the pricing strategies above use the Product Add-Ons Ultimate plugin.
User-defined order totals
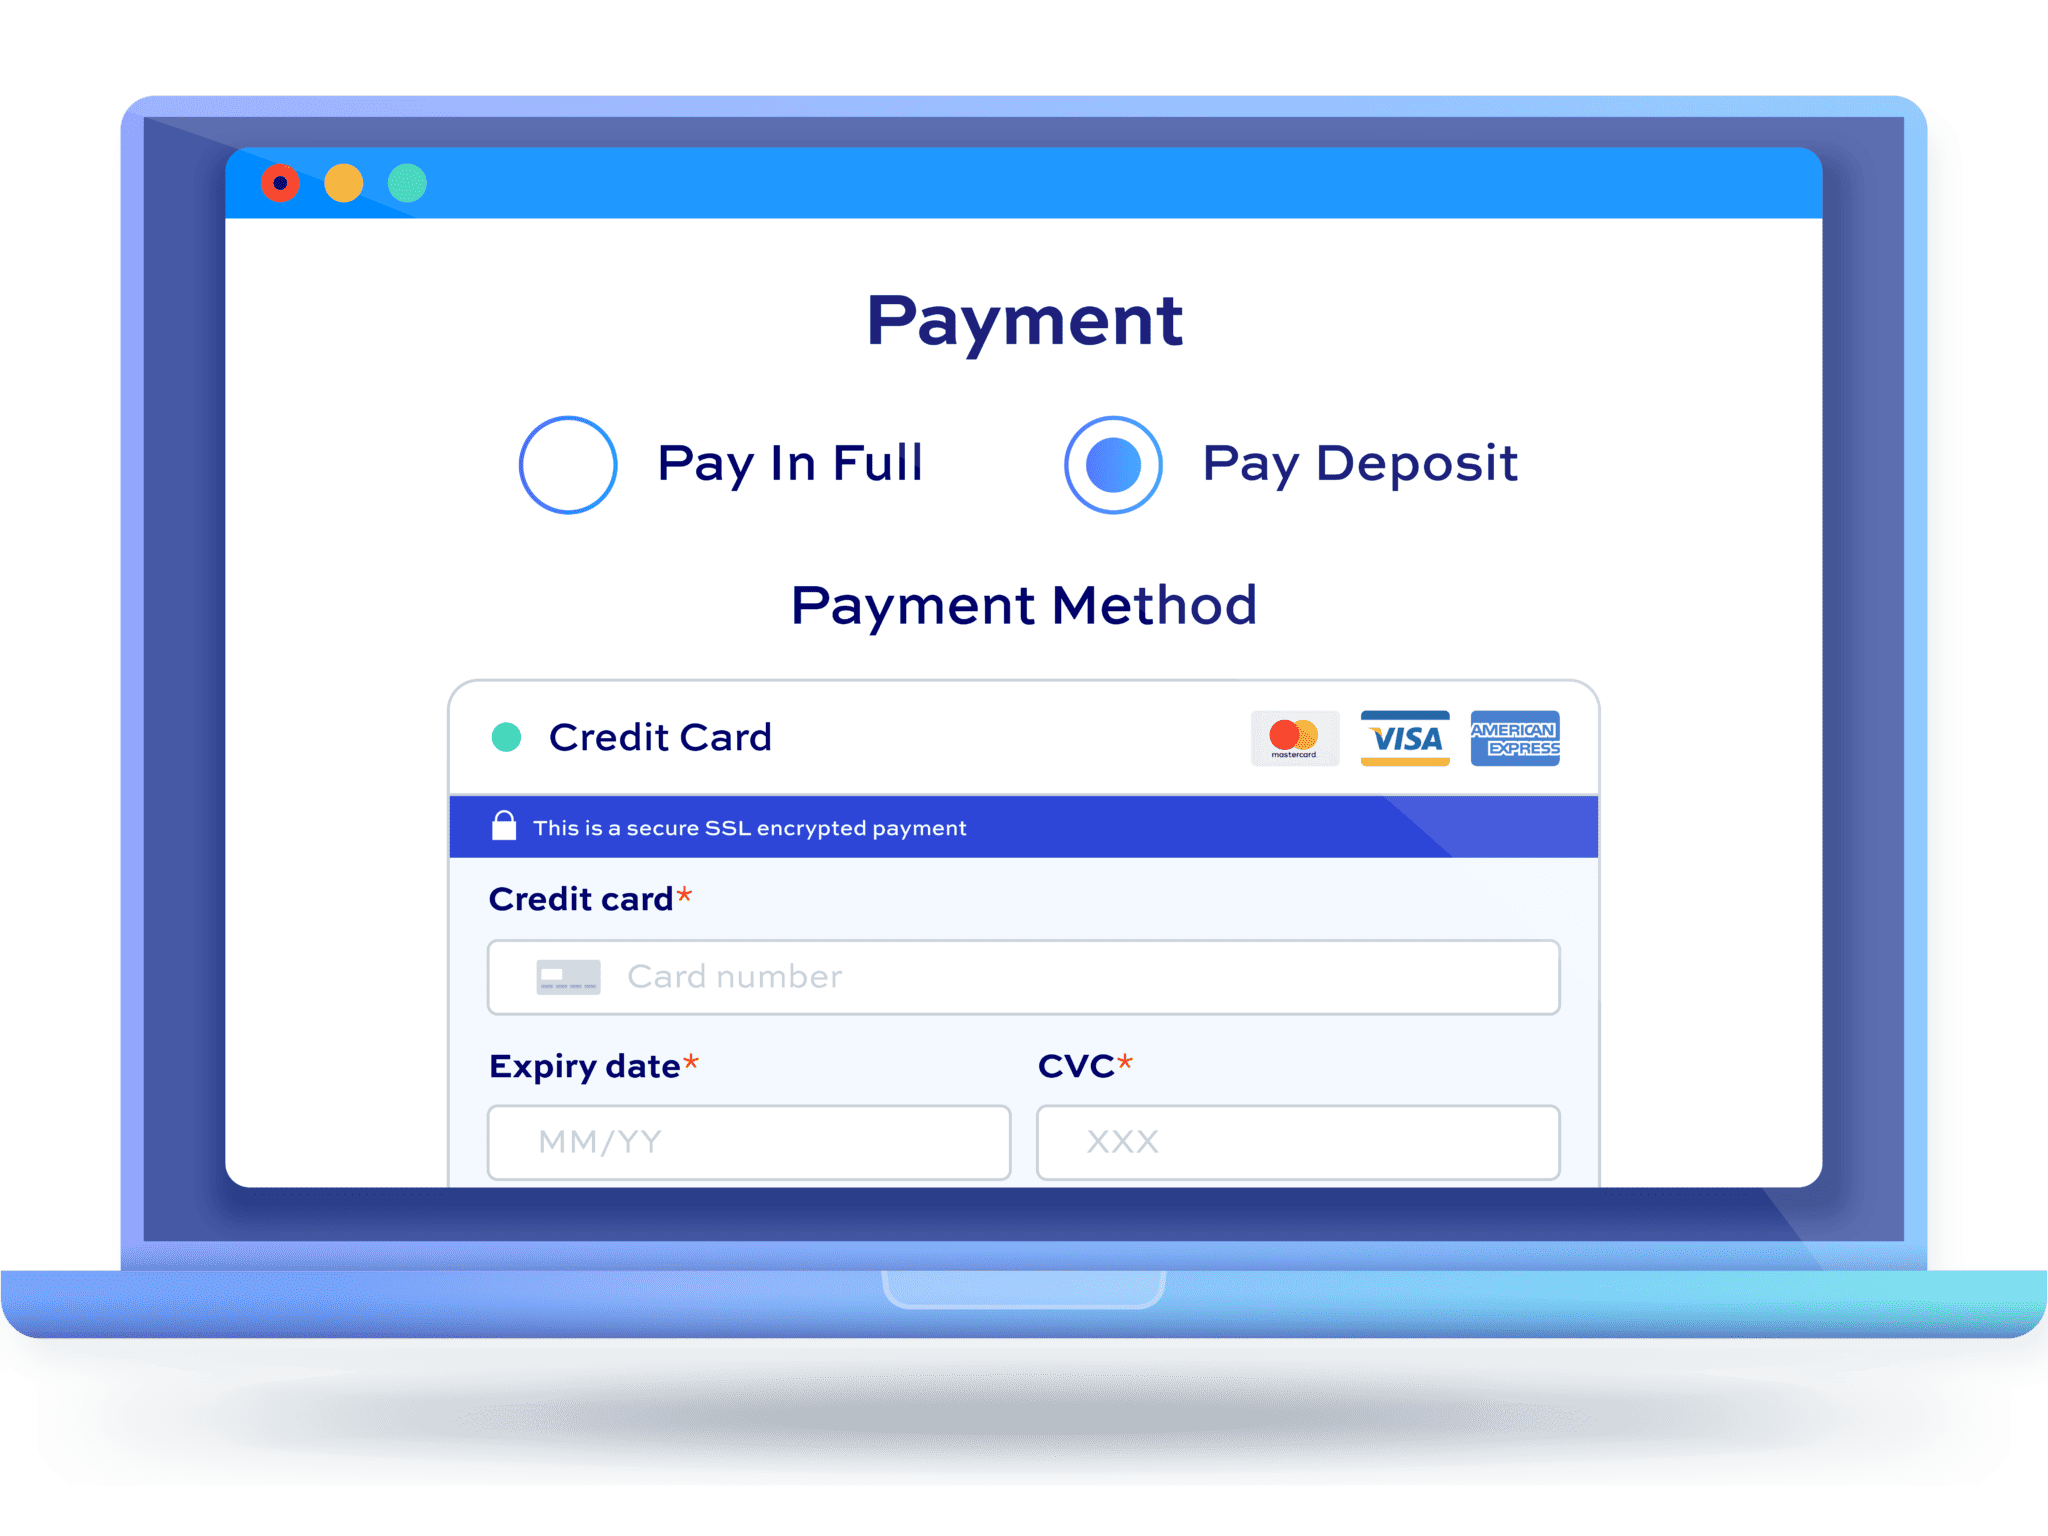
Somewhat similar to the user-defined product price above, you can also allow the user to define how much they pay for their entire order. This is achieved by enabling a deposit payment initially – which the user can set – then requiring the balance of the payment at a later date.
With the WooCommerce Deposits and Part Payments plugin, you can split payments for users. They pay an initial deposit then a second payment after a set time.
This is a slightly different way of accepting custom prices in WooCommerce. The overall price is fixed – but you can, if you wish, allow the user to define how much they pay for the deposit.
WooCommerce Deposits and Part Payments
Provide flexible payment options on products and orders
To enable user-defined deposits:
- Install and activate Deposits and Part Payments
- Go to WooCommerce > Settings > Deposits
- Enable the ‘User Defined Deposit’ setting
- You can set a minimum required amount for the deposit by entering a value in ‘User Defined Minimum Amount’
- You can also allow the user to pay off the remaining balance in parts by enabling ‘Optional Part Payments’
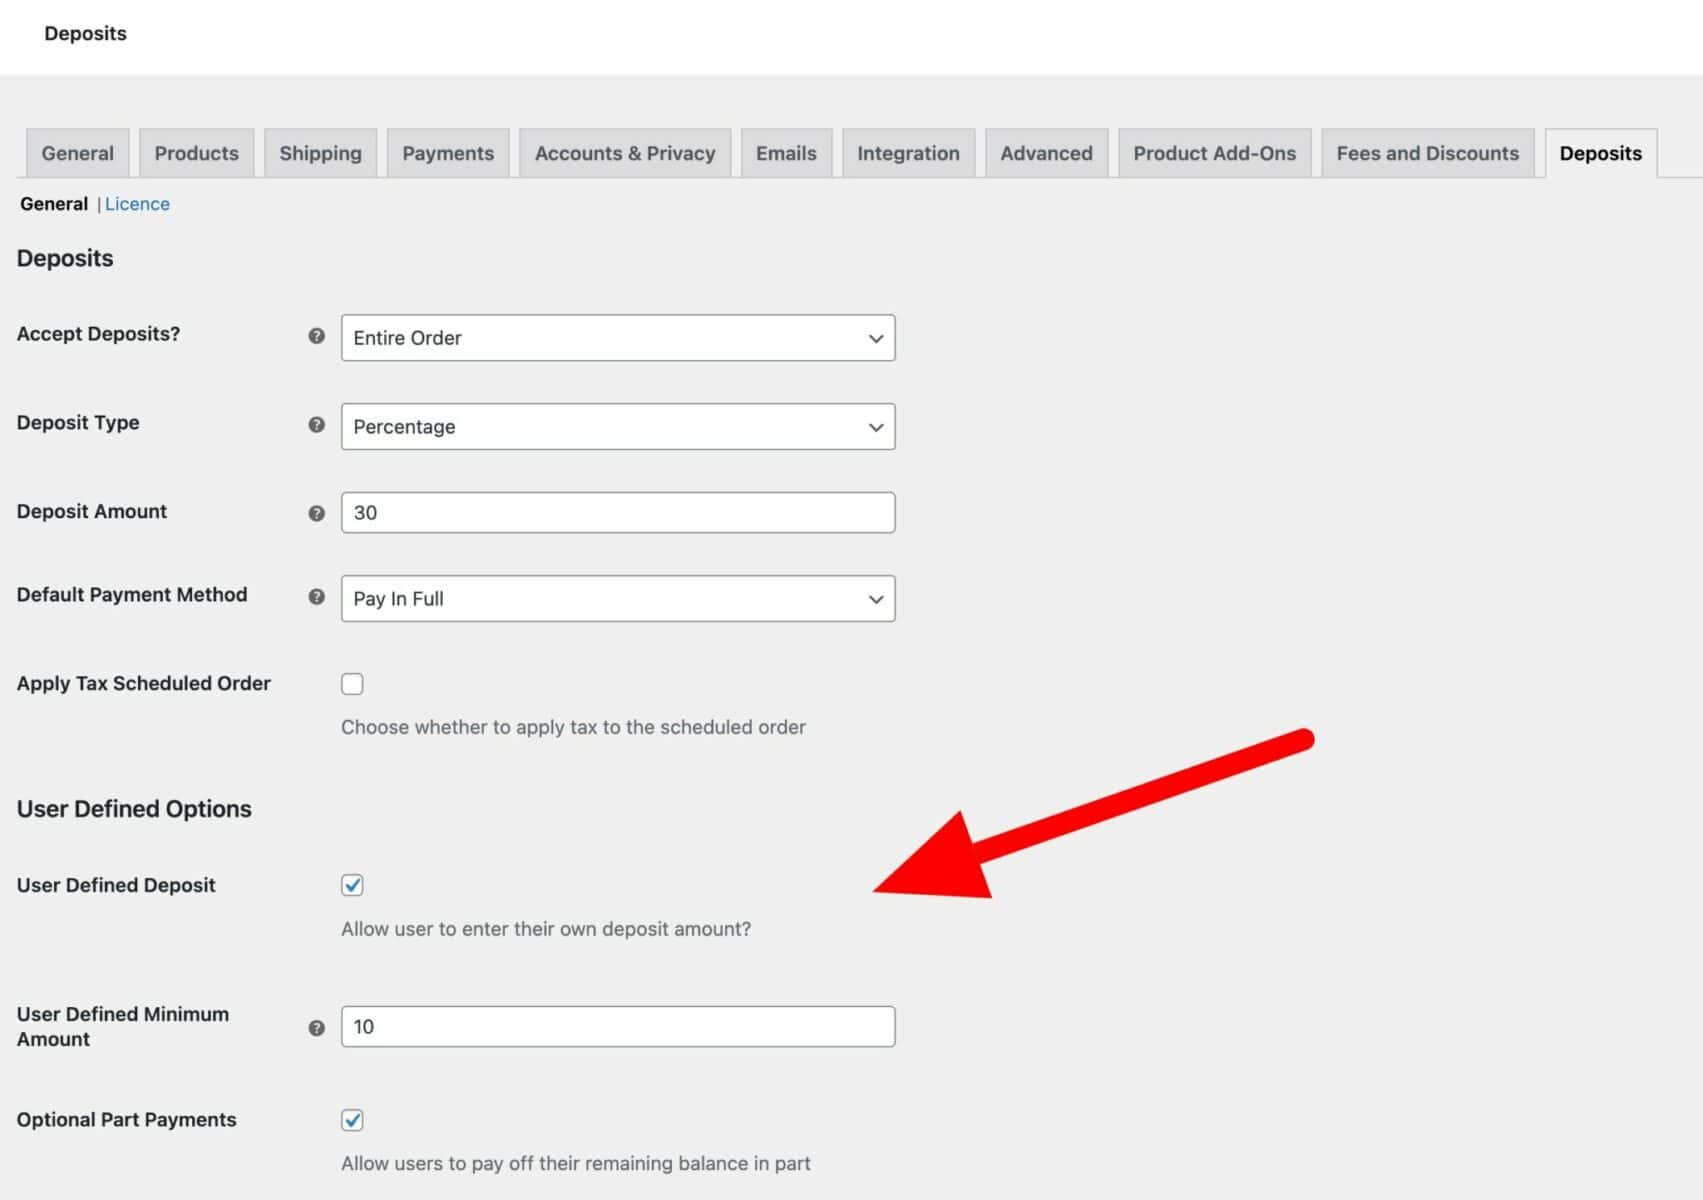
So now your user can pay for their order with an initial deposit. They can decide for themselves how much to pay as the deposit (within the limits you set). And they can choose how much to pay off of the remaining balance (again, within the parameters you’ve allowed).
There’s a longer tutorial on deposits and part payments in WooCommerce here.
Implement custom prices in your WooCommerce store
Using WooCommerce Dynamic Pricing and Discount Rules, WooCommerce Product Add-Ons Ultimate, or WooCommerce Deposits and Part Payments, you have all the functionality you need to create custom pricing options. The best part is that you don’t need any coding skills to create professional and effective pricing offers for your WooCommerce products.
