How to set up a ‘name your price’ product in WooCommerce – everything you need to know

A WooCommerce “Name Your Price” plugin enables you to be flexible in how much you charge for your products. This extension allows customers to set their own price for products or services. Store owners can offer flexible pricing by enabling customers to either pay what they want or set a minimum/maximum price range. This feature is useful for donations, pay-what-you-can models, or special promotions, encouraging customer engagement and boosting sales by offering pricing flexibility.
In this article, we’re going to look at multiple ways you can use a ‘name your price’ approach in a WooCommerce single product, including:
- Implementing a straightforward price for WooCommerce products using a name your price method (also called product open pricing)
- Adding WooCommerce donation options to a product
- Creating WooCommerce pay your bill notifications – pseudo-invoicing
- Integrating a WooCommerce pay what you want strategy into your site
We’ll accompany each example with a working demo product so you can see it in action.
At the end of the article, we’ll look at some of the reasoning behind using pay what you want pricing models. There will also be some creative ideas for using them in your own site.
WooCommerce ‘name your price’ – video
There’s a short video on creating name your price products here.
The key elements of a WooCommerce ‘name your price’ strategy
Our examples will all share some common features:
- Customers will have the option to define their own custom price for a product
- You’ll set minimum and maximum price ranges if you wish, or leave the price completely open-ended
- The total price field for the product will update as the customer enters the price
Additionally, some of the examples will have extra features:
- Users will be able to define part of the price, not the whole price
- You can use conditional logic to display personalized ‘name your own’ fields under certain circumstances. For example, if the user has selected a specific option
- If you let users define part of the price, you can opt to make this a required field or not
- You can set the amount as a percentage of the product price
- You can choose whether to set the amount as a fixed fee or per-item cost
A WooCommerce ‘Name Your Price’ plugin tutorial
All our examples use the WooCommerce Product Add Ons Ultimate plugin. This plugin lets your customers define their own preferred price for your products (plus a lot of other WooCommerce product options too).

WooCommerce Product Add-Ons Ultimate
Easily create Name Your Price products in WooCommerce
Step 1: Install and activate Add-Ons Ultimate
For all the examples in this article, your first step in creating your Name Your Price product is to install the Add-Ons Ultimate plugin in WordPress. Once you do that, you can create your product.
Step 2: Create your products or services
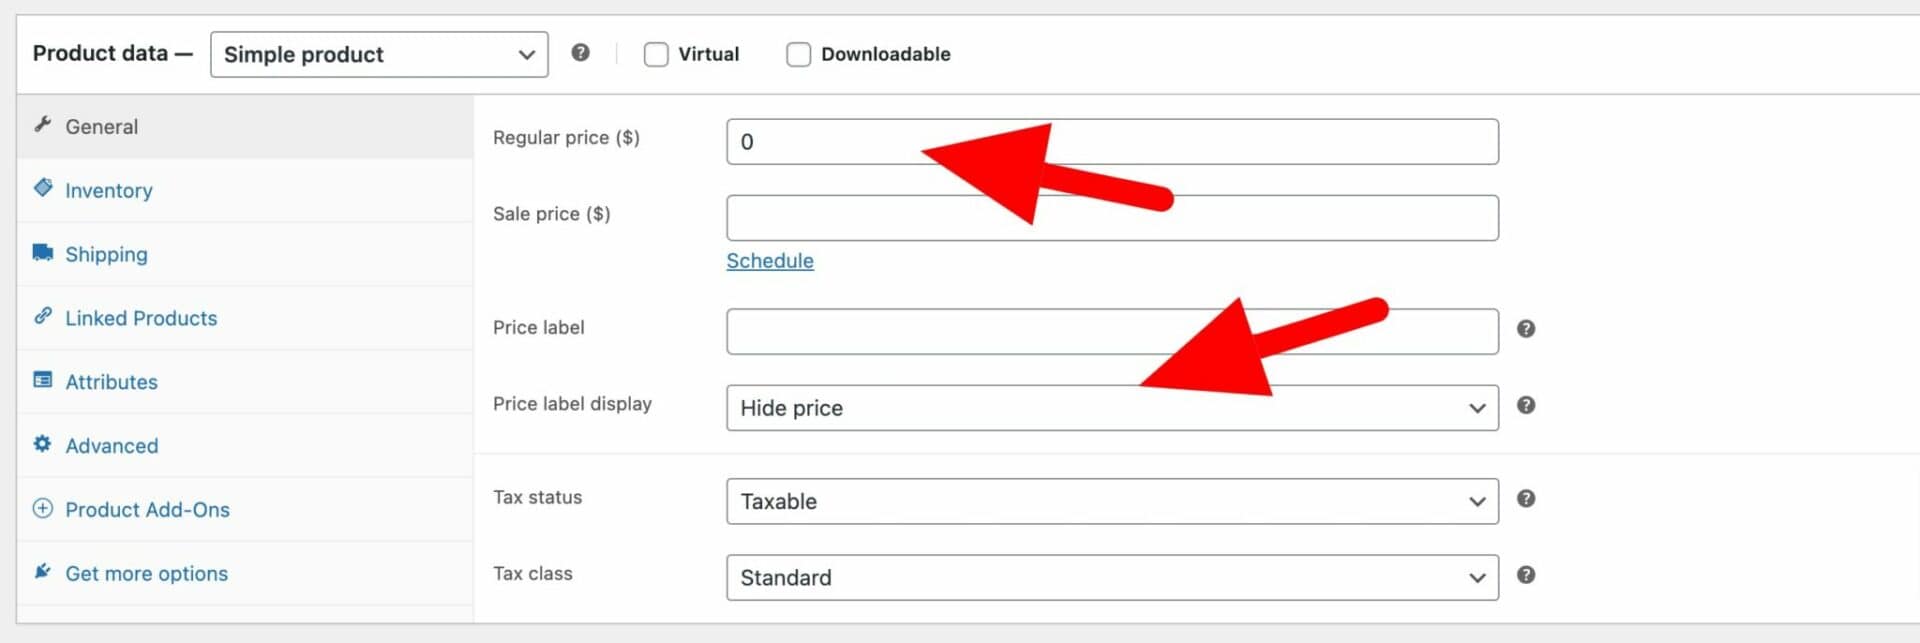
If you haven’t already done so, add a new WooCommerce product. Because the user will be able to set the price themselves, we’ll enter “0” in the ‘Regular price’ field. If we don’t want to display zero as the price, we can select ‘Hide price’ in the ‘Price label display’ field. This will hide the price label that usually appears under the title on the product page.
When you’re ready, you can move onto how to create the name your price field itself.
Example #1: How to create a WooCommerce ‘Name Your Price’ product
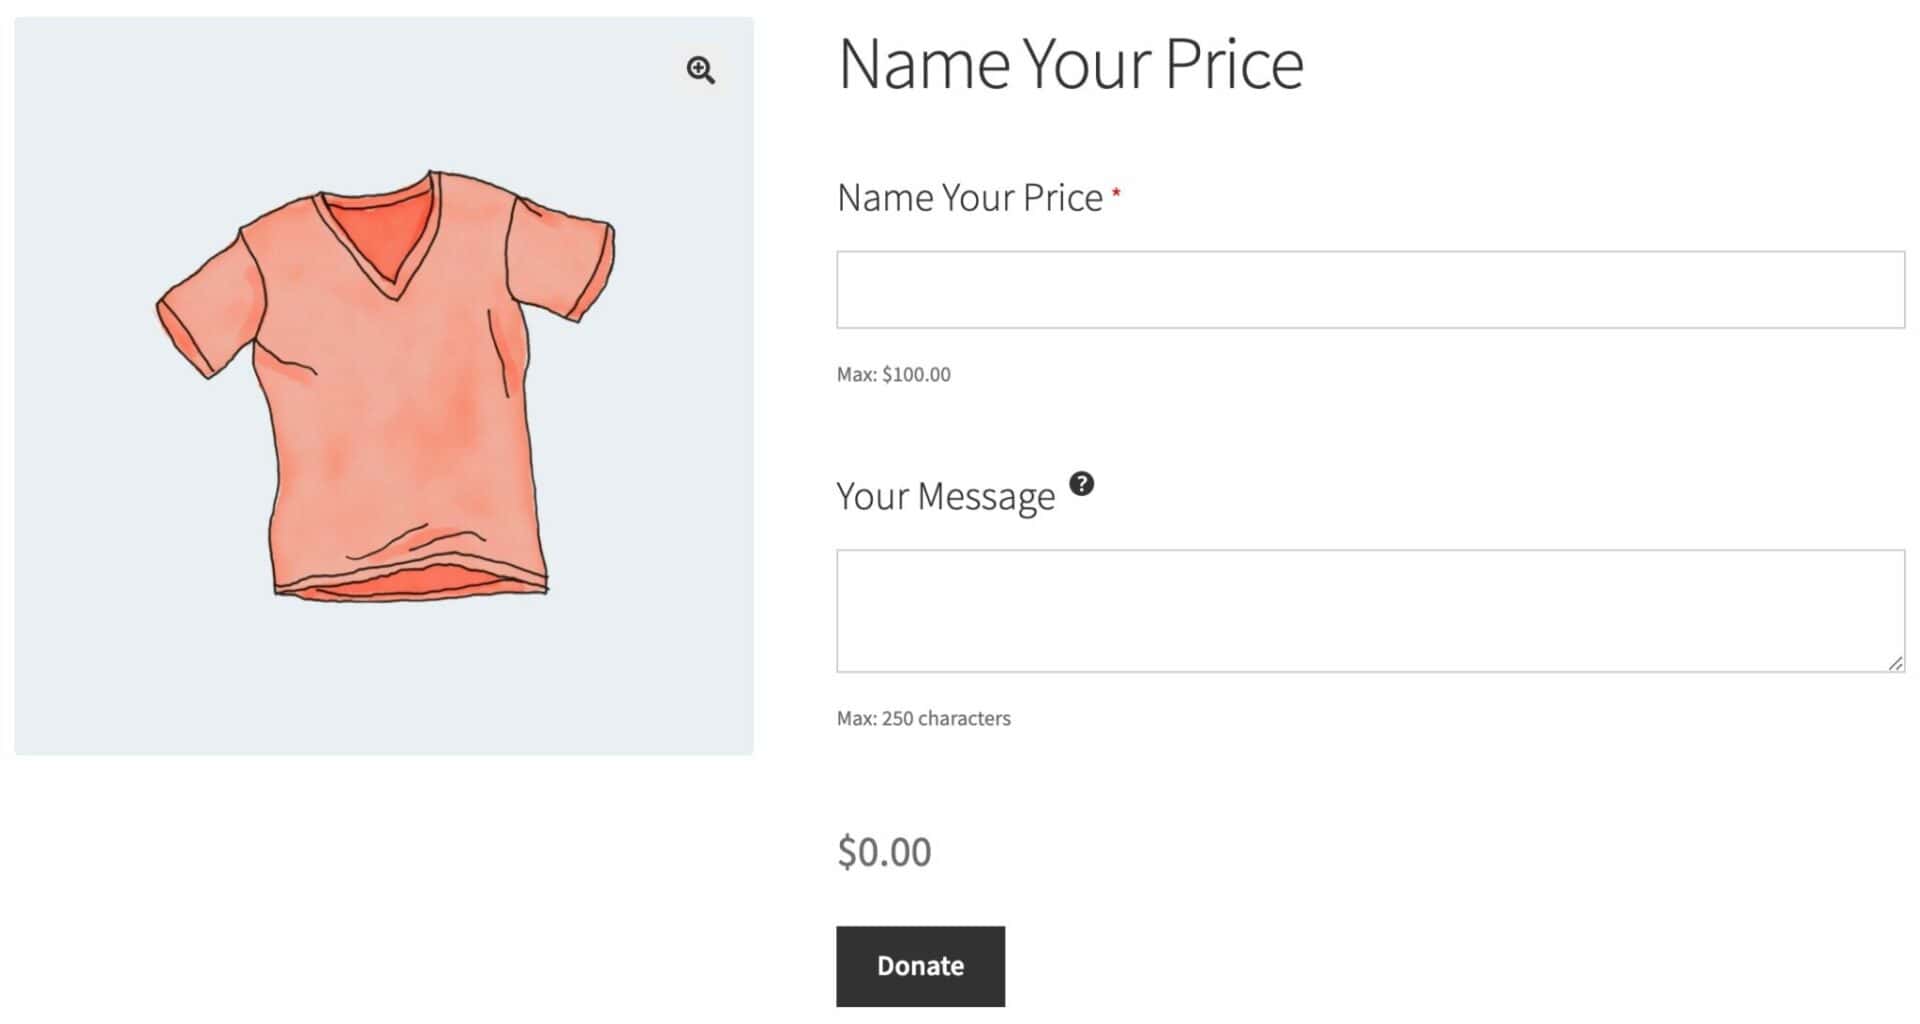
Let’s create a simple name your price product in WooCommerce. The customer will be able to name their own price for the product: the price will equal whatever value they enter in the name your price field.
This is an ideal method for creating a donation product in your WooCommerce store. Many charities and non-profit organizations accept donations through their websites and this allows your users to specify the amount they want to donate.
In our example, we’ll create a product where the user can specify the amount of their donation on the front end and add an optional message.
How to add a WooCommerce ‘Name Your Price’ field
To add a name your price field to your WooCommerce product:
- Click the ‘Product Add-Ons’ tab in the ‘Product data’ section
- Click ‘Add Group’ and ‘Add Field’
- Select ‘Name Your Price’ as the ‘Field Type’
- Enter some text in the ‘Field Label’
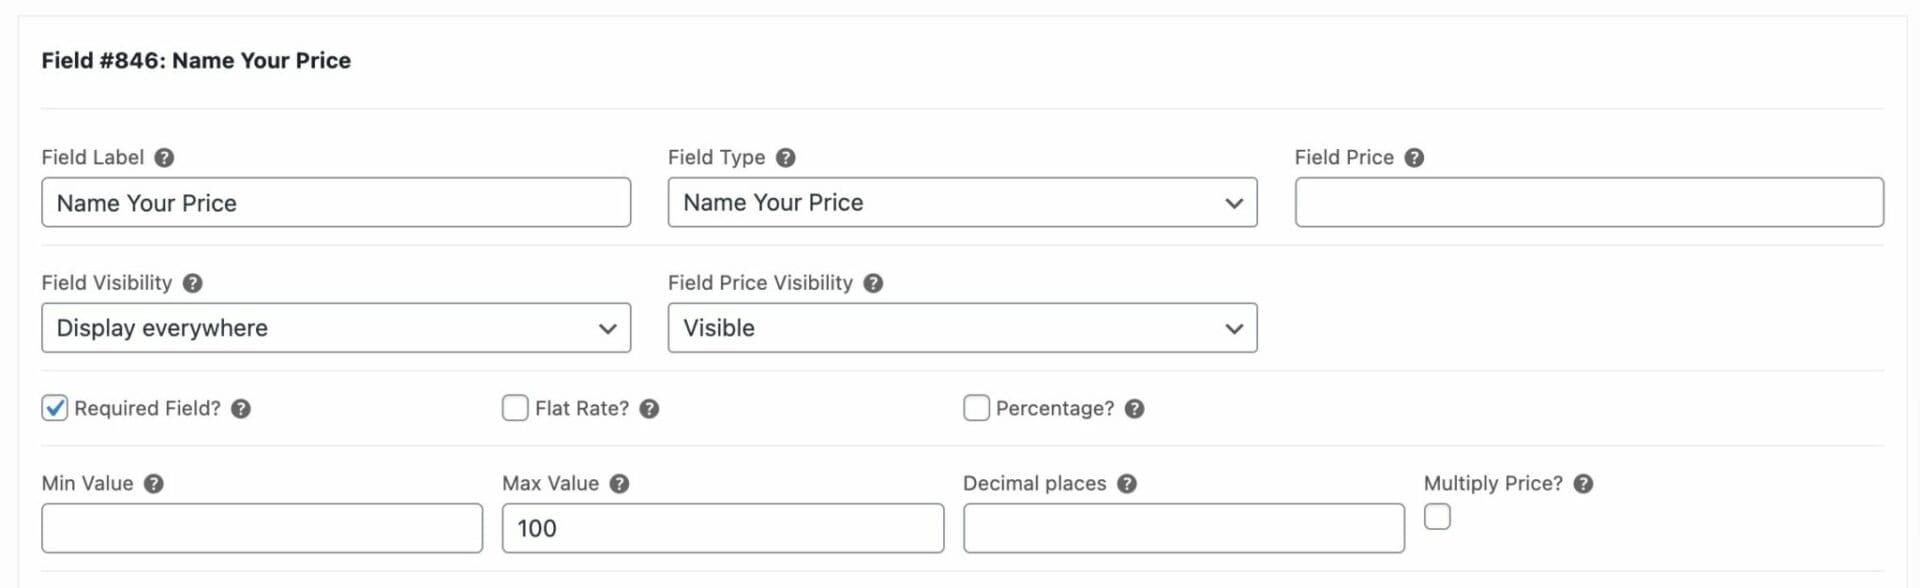
Make sure you enable the ‘Required Field’ setting. This will ensure that the user must enter a value in the field in order to add the product to the cart.
If you want to specify a minimum price or maximum price, you can enter a value in the ‘Min Value’ or ‘Max Value’ fields.
Add a message to accompany the donation
If you like, you can add a field for the user to type a message.
To add a field where users can enter their own message to accompany the donation:
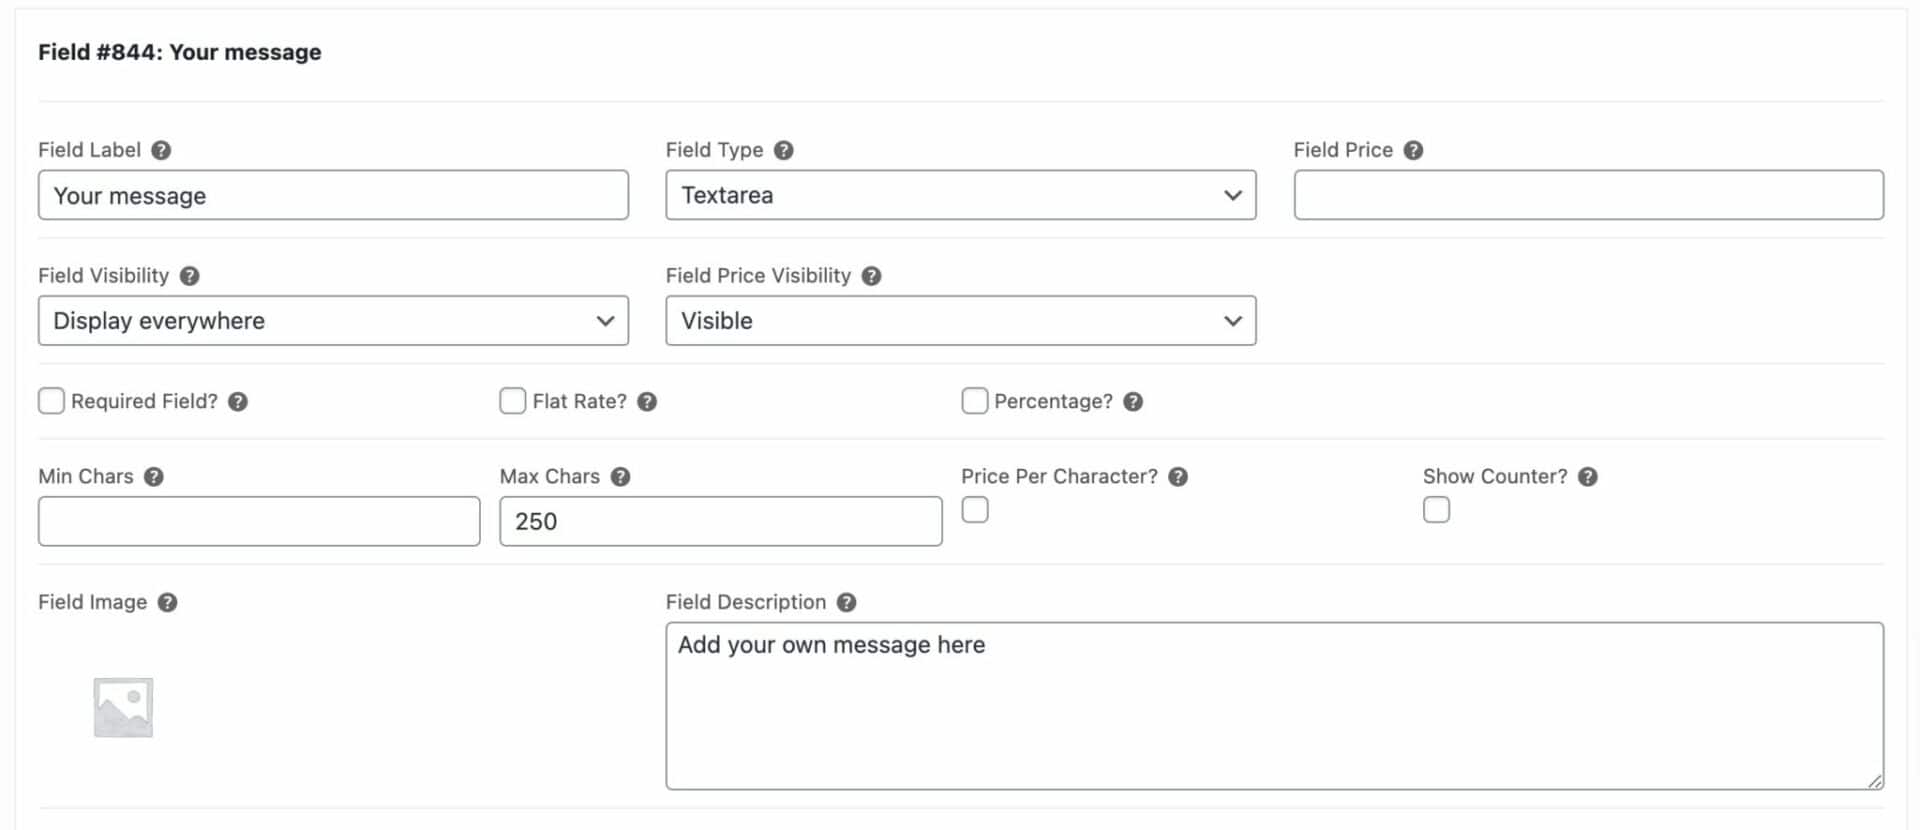
- Click ‘Add Field’
- Choose ‘Textarea’ as the ‘Field Type’
- Enter a ‘Field Label’
- You can specify a minimum or maximum number of characters for the message if you wish
Now the user can add an optional message to accompany their donation. The message will appear in the order and order emails.
Limit purchases to one only (remove quantity field)
Depending on the type of product, you might only want to allow the user to purchase a single quantity. If so, click on the ‘Inventory’ tab and select the ‘Sold individually’ option.
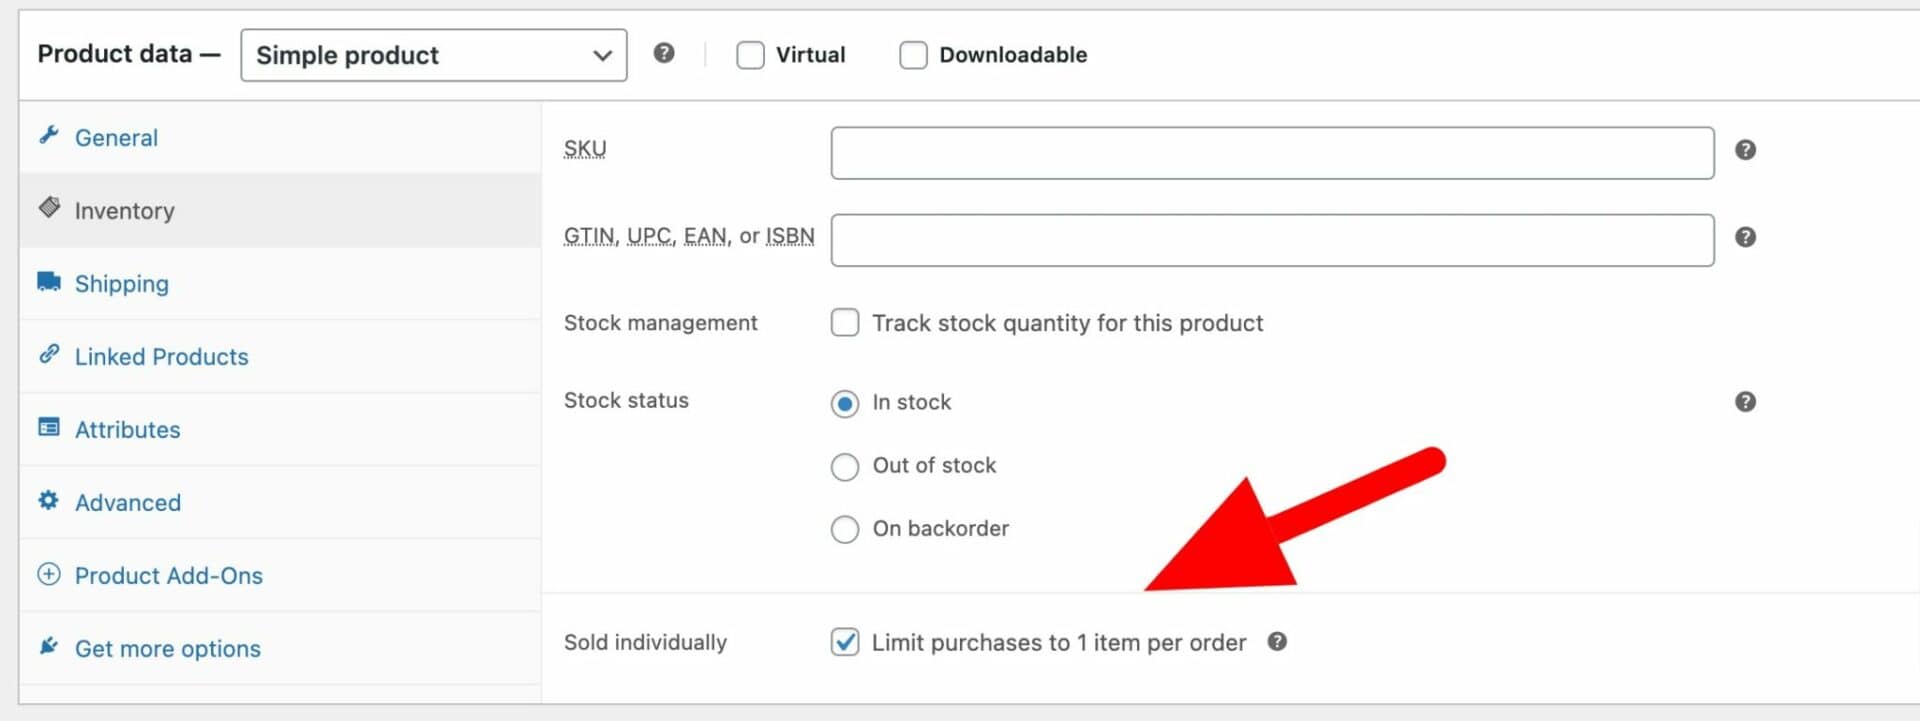
Now the quantity field next to the ‘Add to cart’ button will be removed.
Change the ‘Add to cart’ text
As another option, you might like to change the ‘Add to cart’ button text to something more suitable like ‘Donate’ or ‘Give now’. You can do this easily with the Add to Cart Button Custom Text plugin.
That’s how to add a Name Your Price field to a WooCommerce product. There’s a demo product for you to take a look at if you’d like to see the finished article.
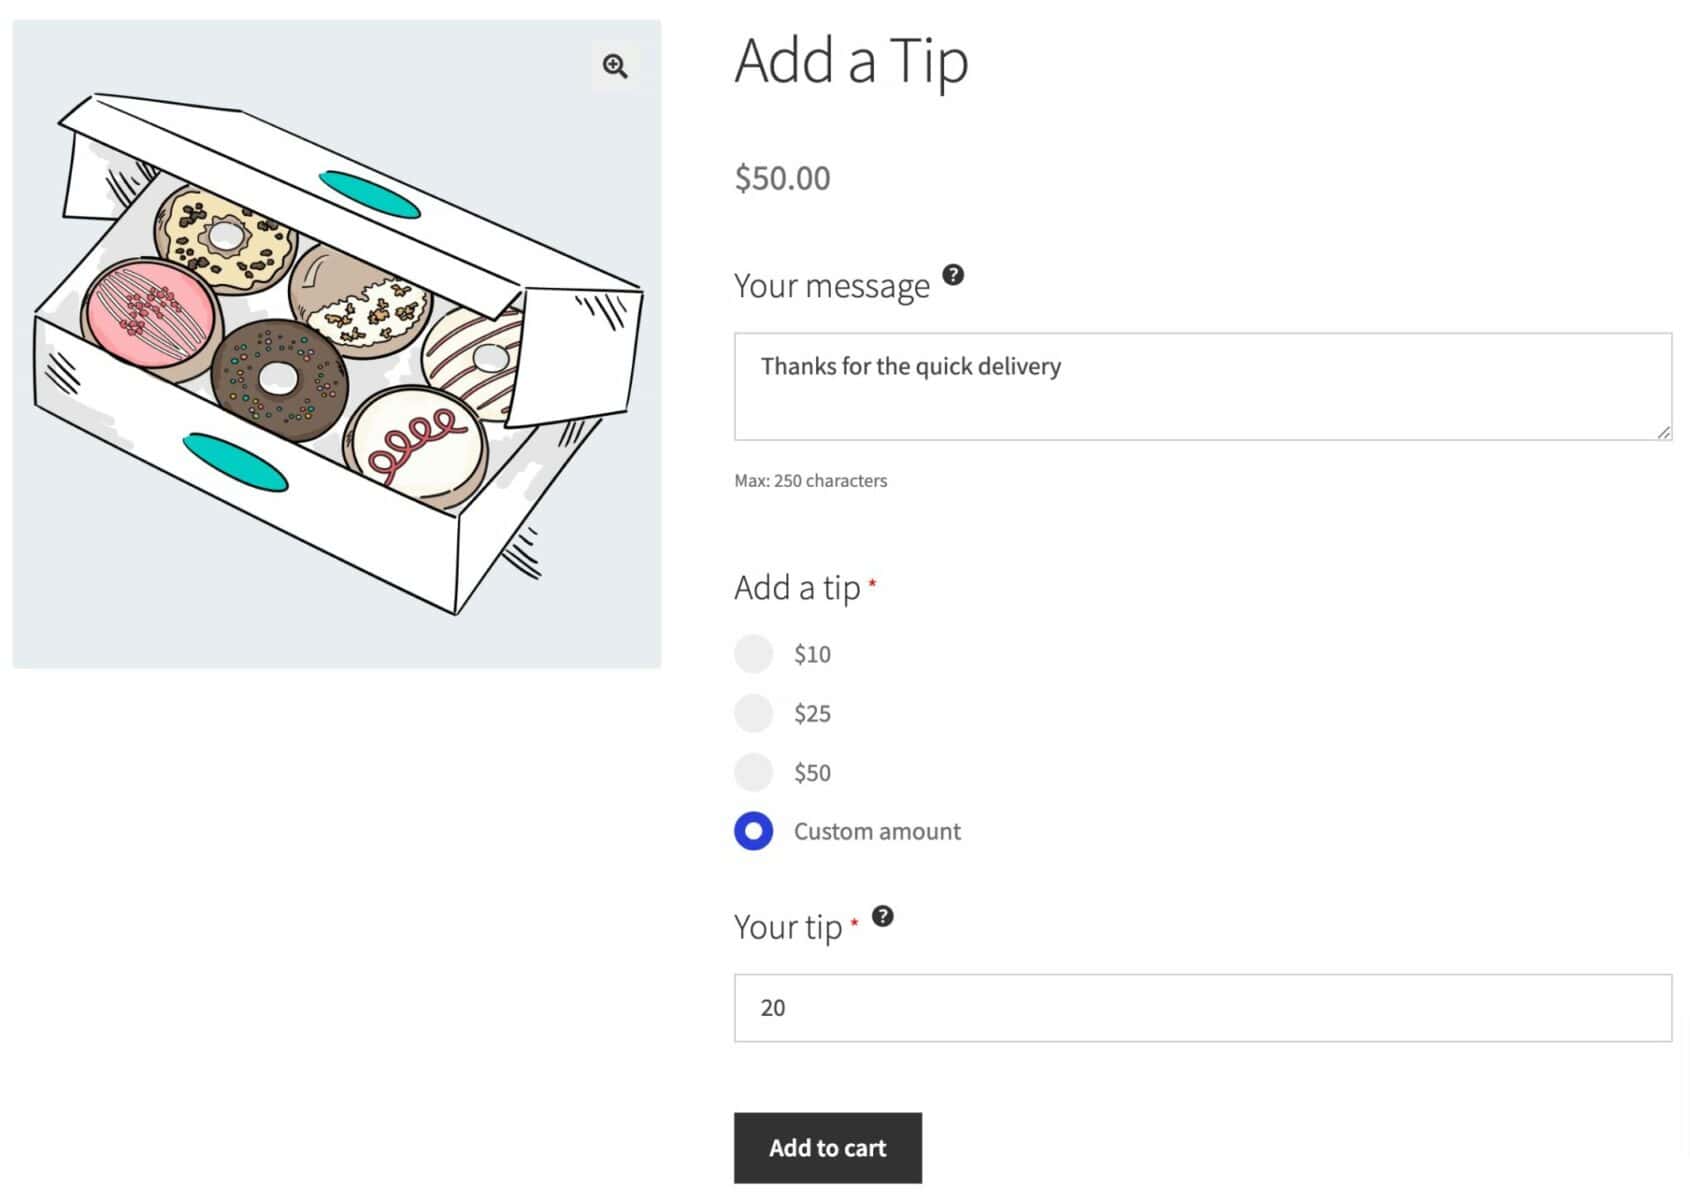
Example #2: How to add a tip in WooCommerce
Let’s have a look at some further options. In this product, the user can add a tip or gratuity to the overall product price. They can choose from preset pricing options or select a custom amount.
Create your product
Unlike with the donation product in Example #1, you’ll need to assign a base price to your product.
Creating your preset options
First, let’s create a field for users to set a predefined amount:
- In the ‘Product Add-Ons’ panel, click ‘Add Group’ then ‘Add Field’
- Select ‘Radio Group’ as the ‘Field Type’
- Enter text for each option and a corresponding price
- If you also want to allow the user to enter their own amount, add a final option for ‘Custom amount’ and enter 0 as the price
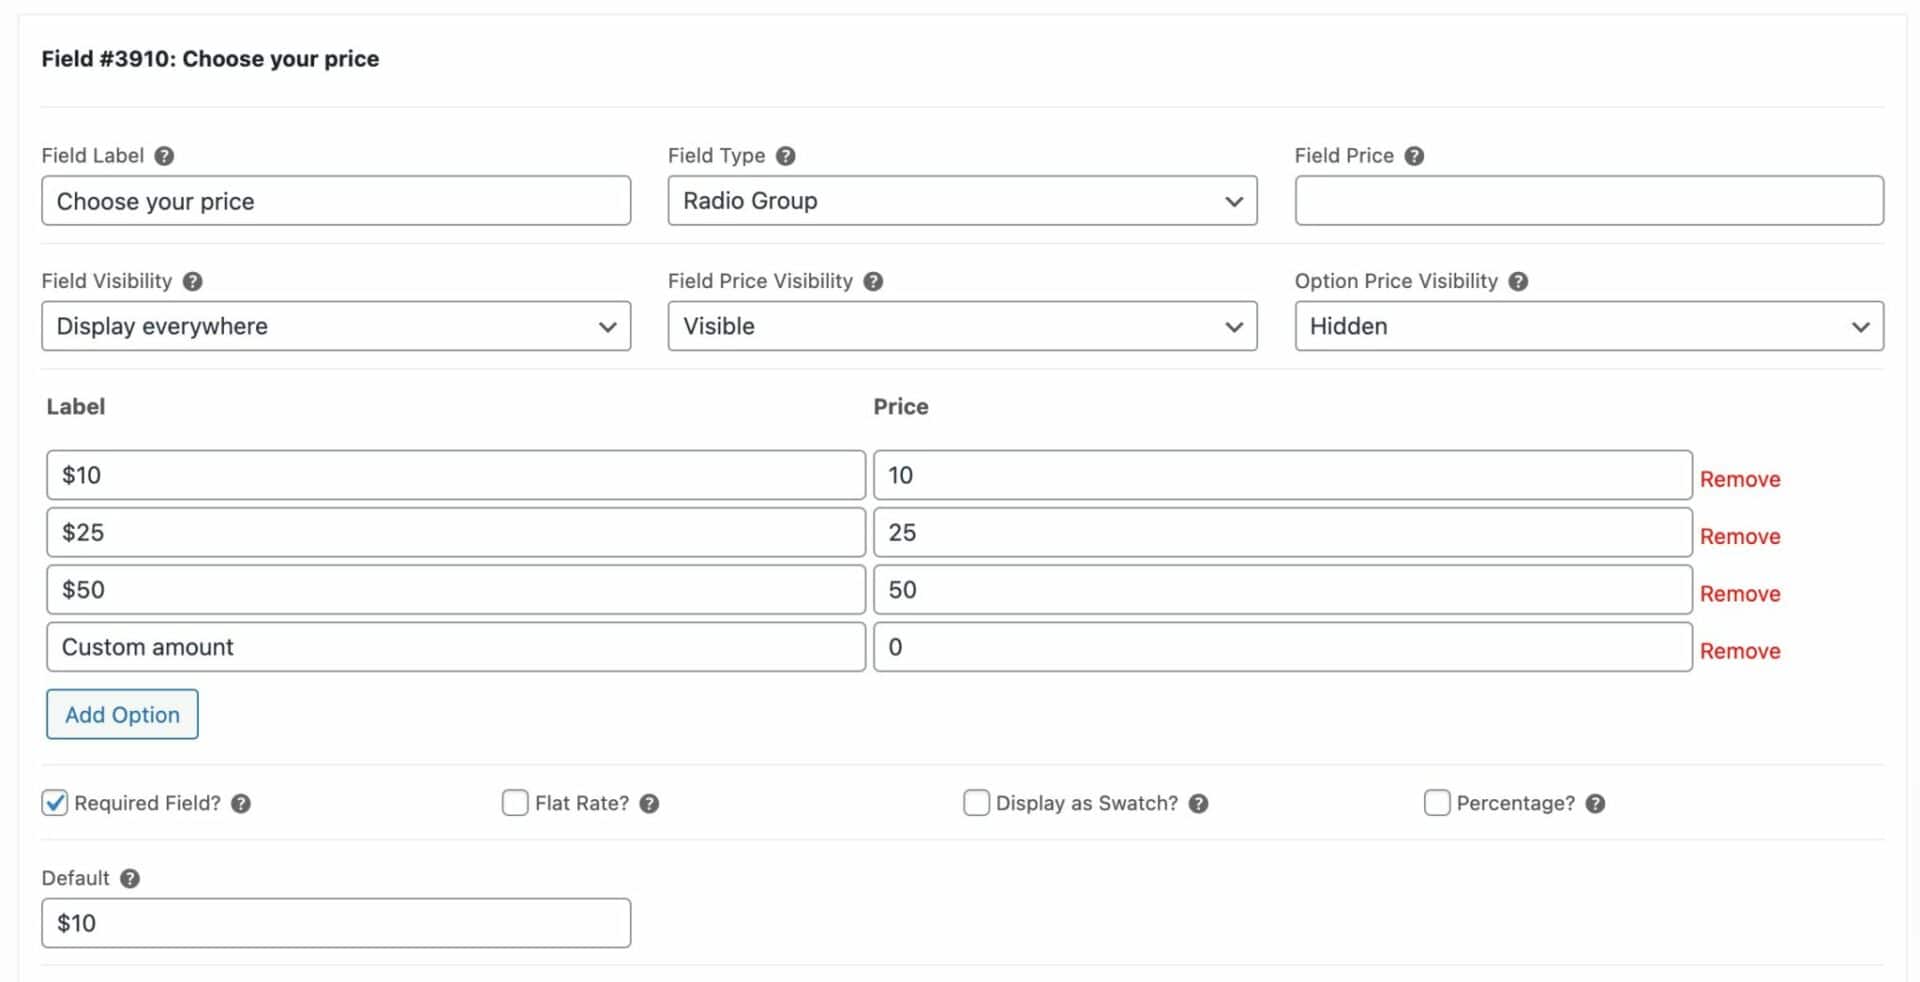
You can also enter a default value to ensure that one of the options is automatically selected when the user first arrives at the page. And select ‘Required Field’ to ensure the user selects a value.
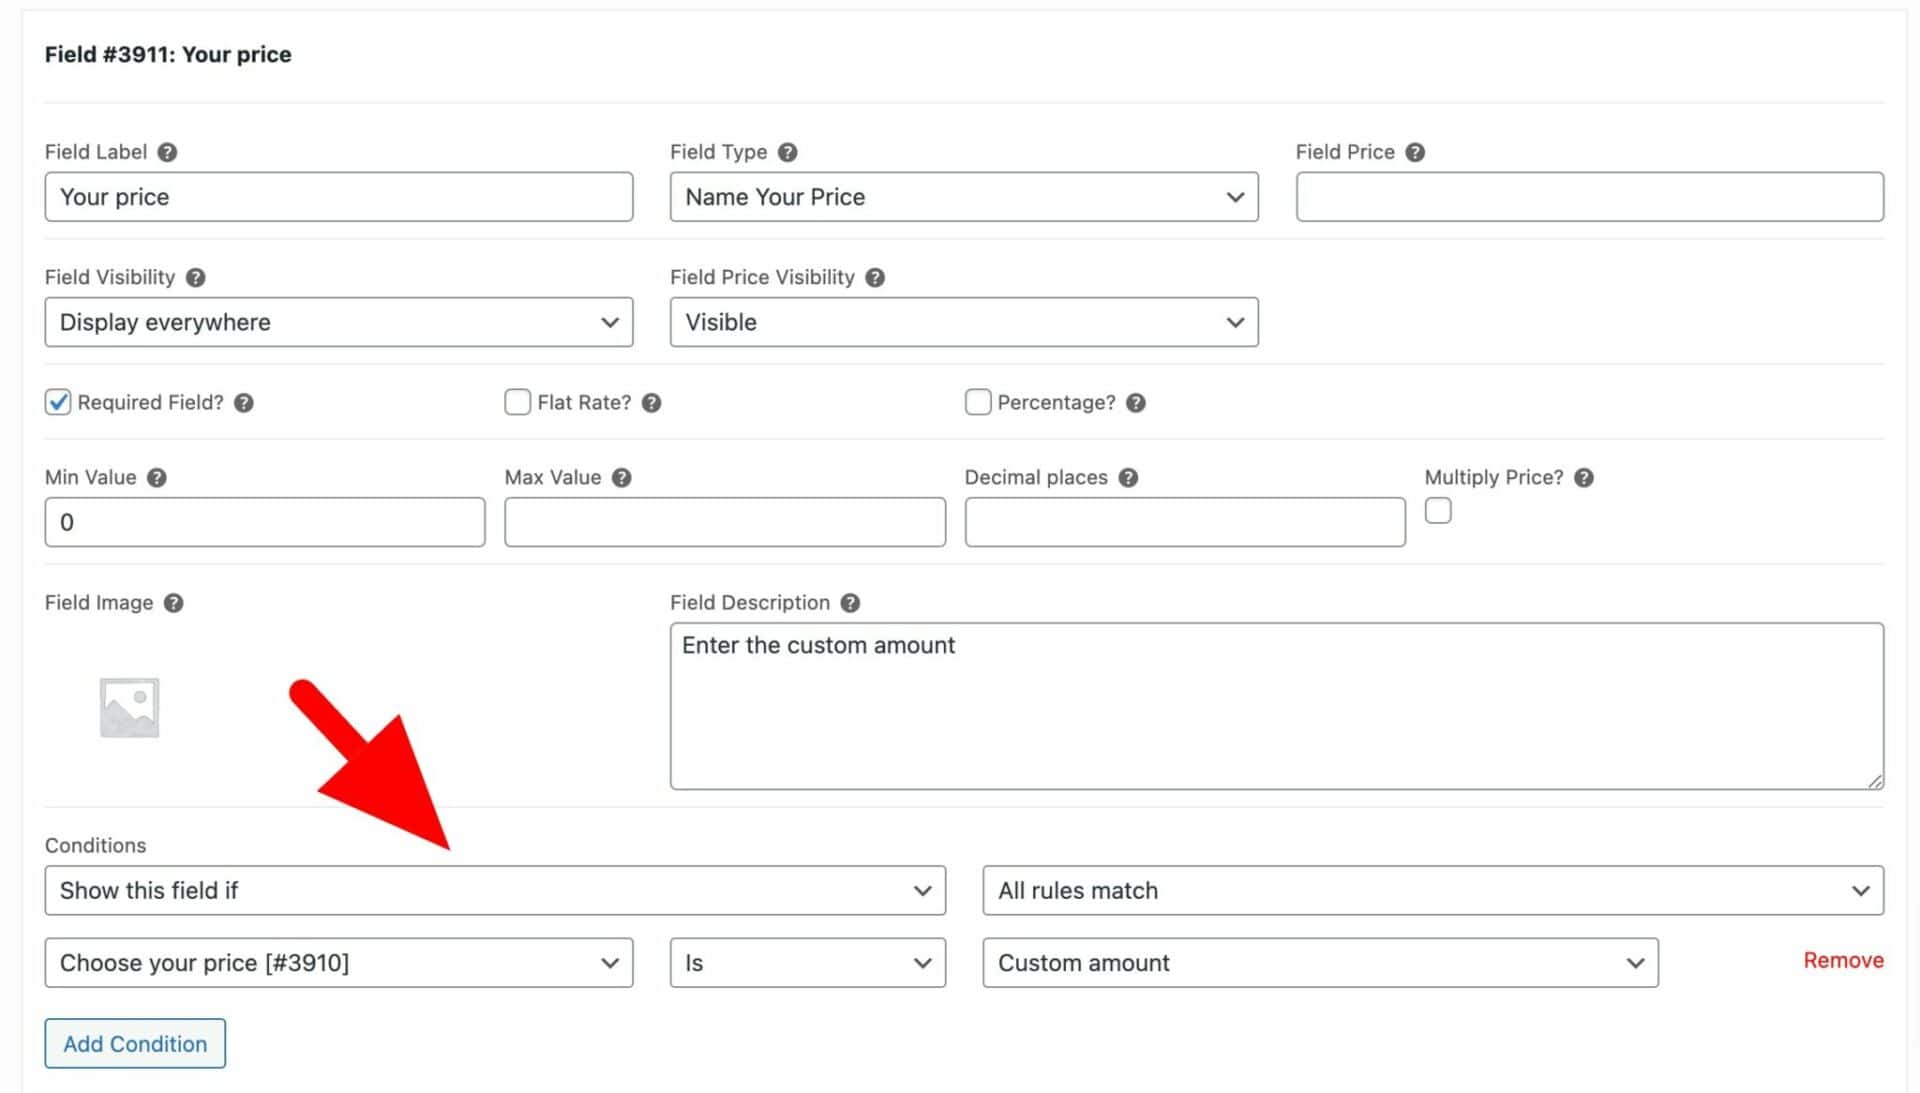
Adding the optional custom amount field
So far, this will work fine if the user chooses one of the preset values. Now we just need to add one more field for when the user selects ‘Custom amount’ from the radio group:
- Add a new field
- Select ‘Name Your Price’ as the ‘Field Type’
- Enter a ‘Field Label’, for example, ‘Your Price’
- Set ‘Required Field’ to ensure that an amount is entered before the user can add the product to the cart
- Define a minimum and/or maximum value
- Add conditional logic to the field so that it only displays if the user selects ‘Custom amount’ in the radio group
Now, the user can select a predefined amount or enter a custom value to add the tip.
There’s a demo product to see this in action.
Setting the tip value as a percentage
Often users might want to add a tip as a percentage of the product price rather than a fixed amount. You can do this easily by just selecting the ‘Percentage?’ option in your field:
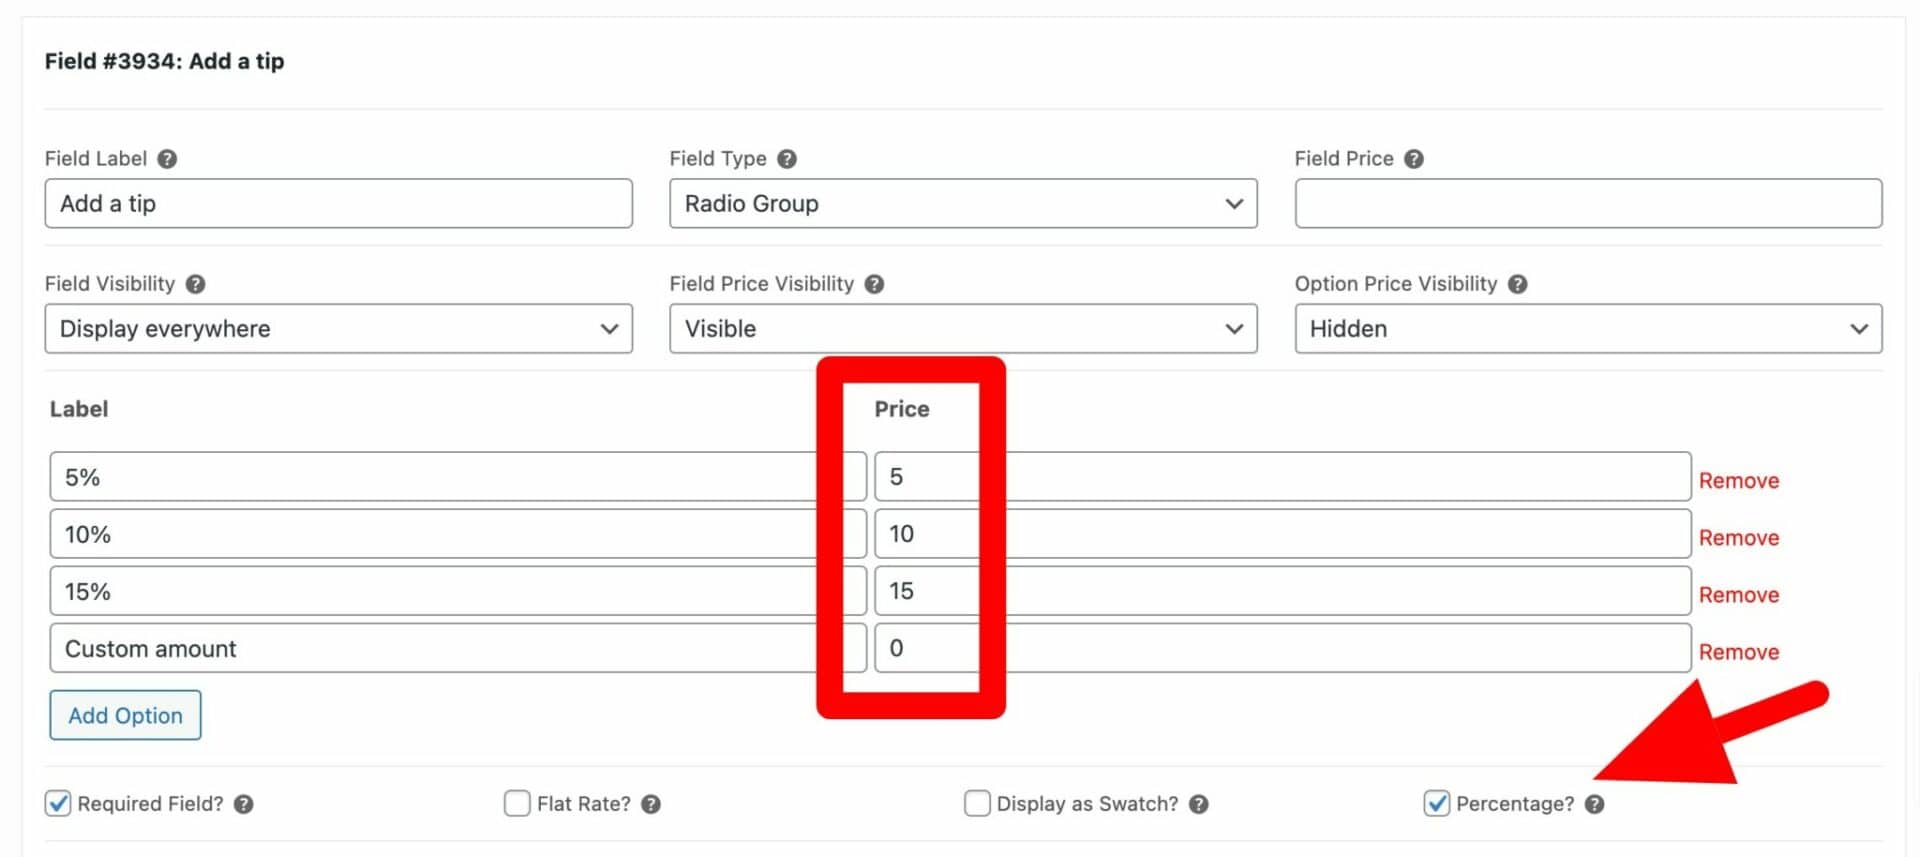
Now, the user can select an option and apply a percentage of the product price as a tip. The value in the ‘Price’ field will be the percentage value.
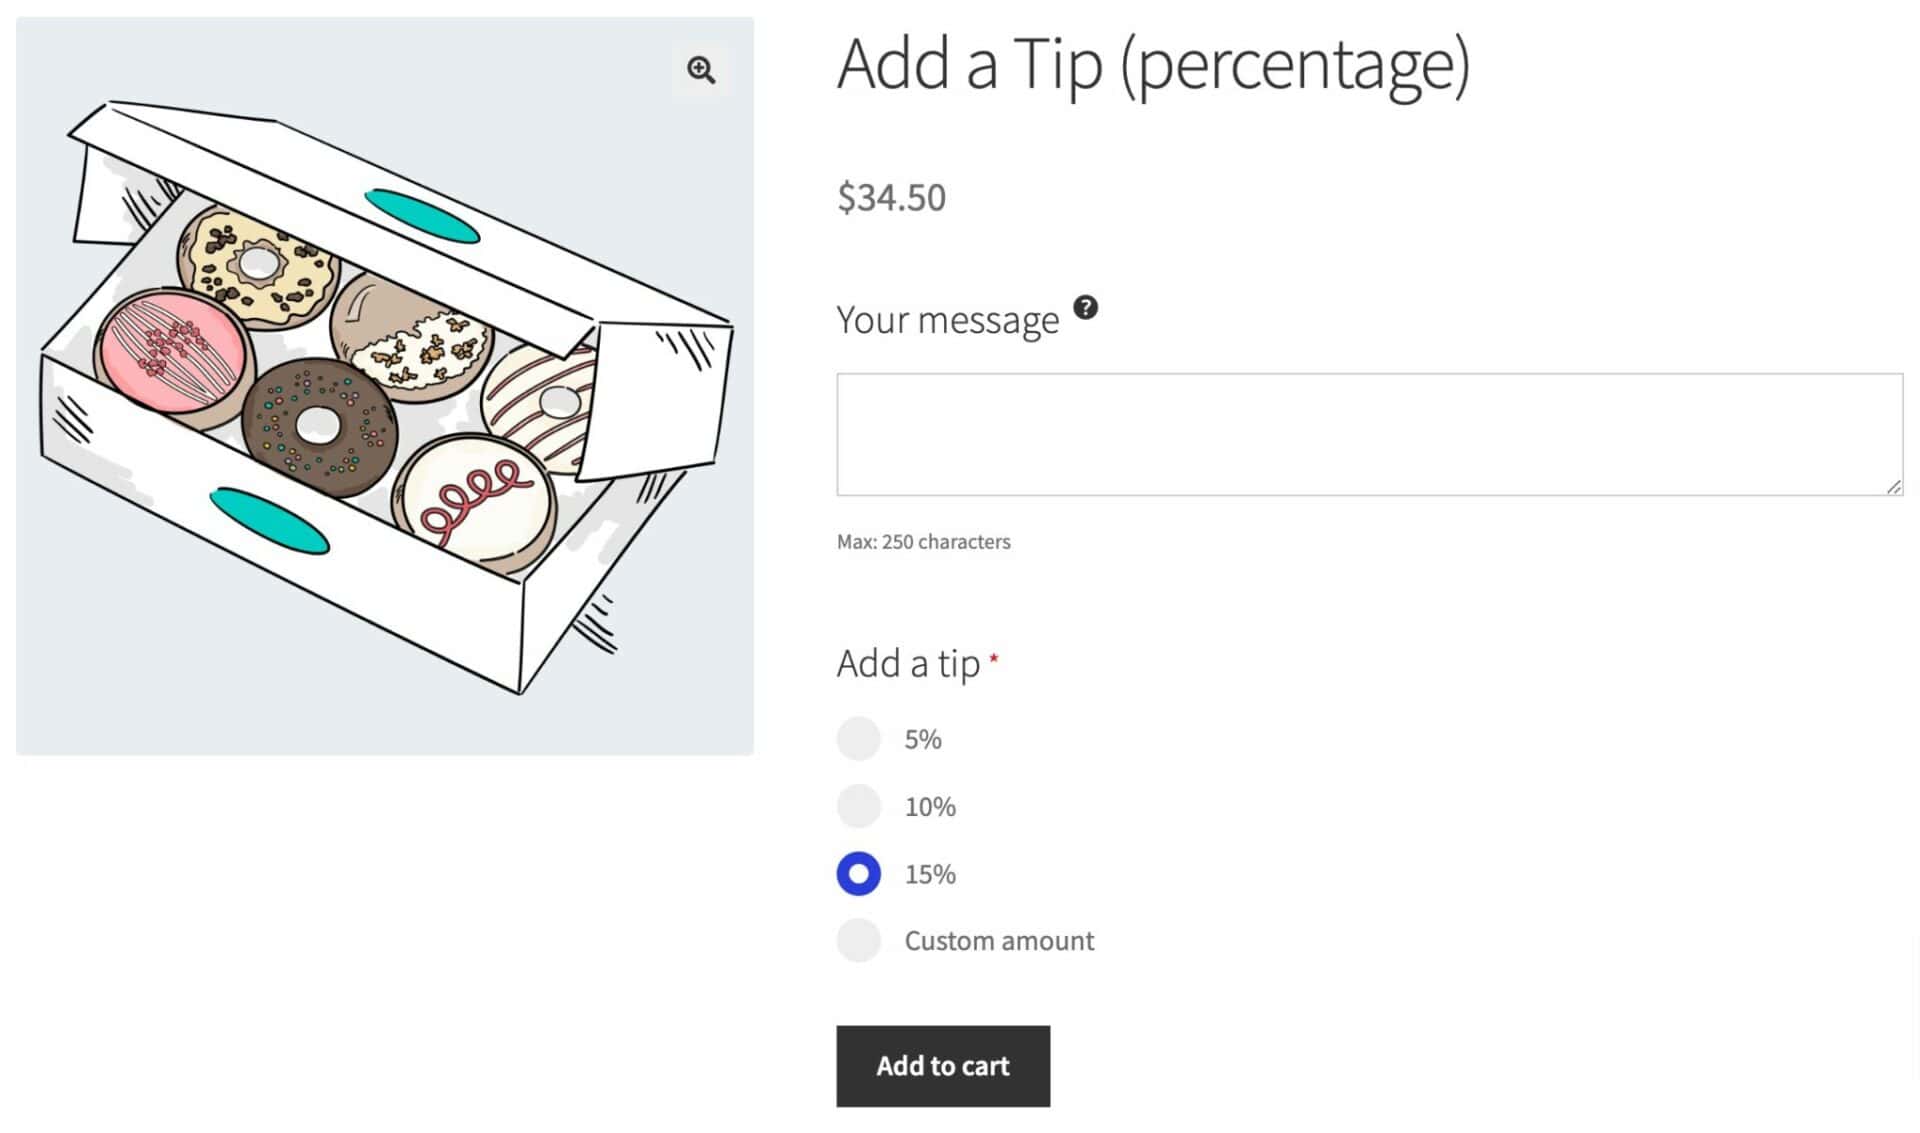
You can see a working example of this here.
Example #3: How to create a ‘pay your bill’ product in WooCommerce
A freelancer (or any other type of business that regularly invoices clients) will often receive payments through bank transfers or online payments. You can do use WooCommerce for invoice payments easily.
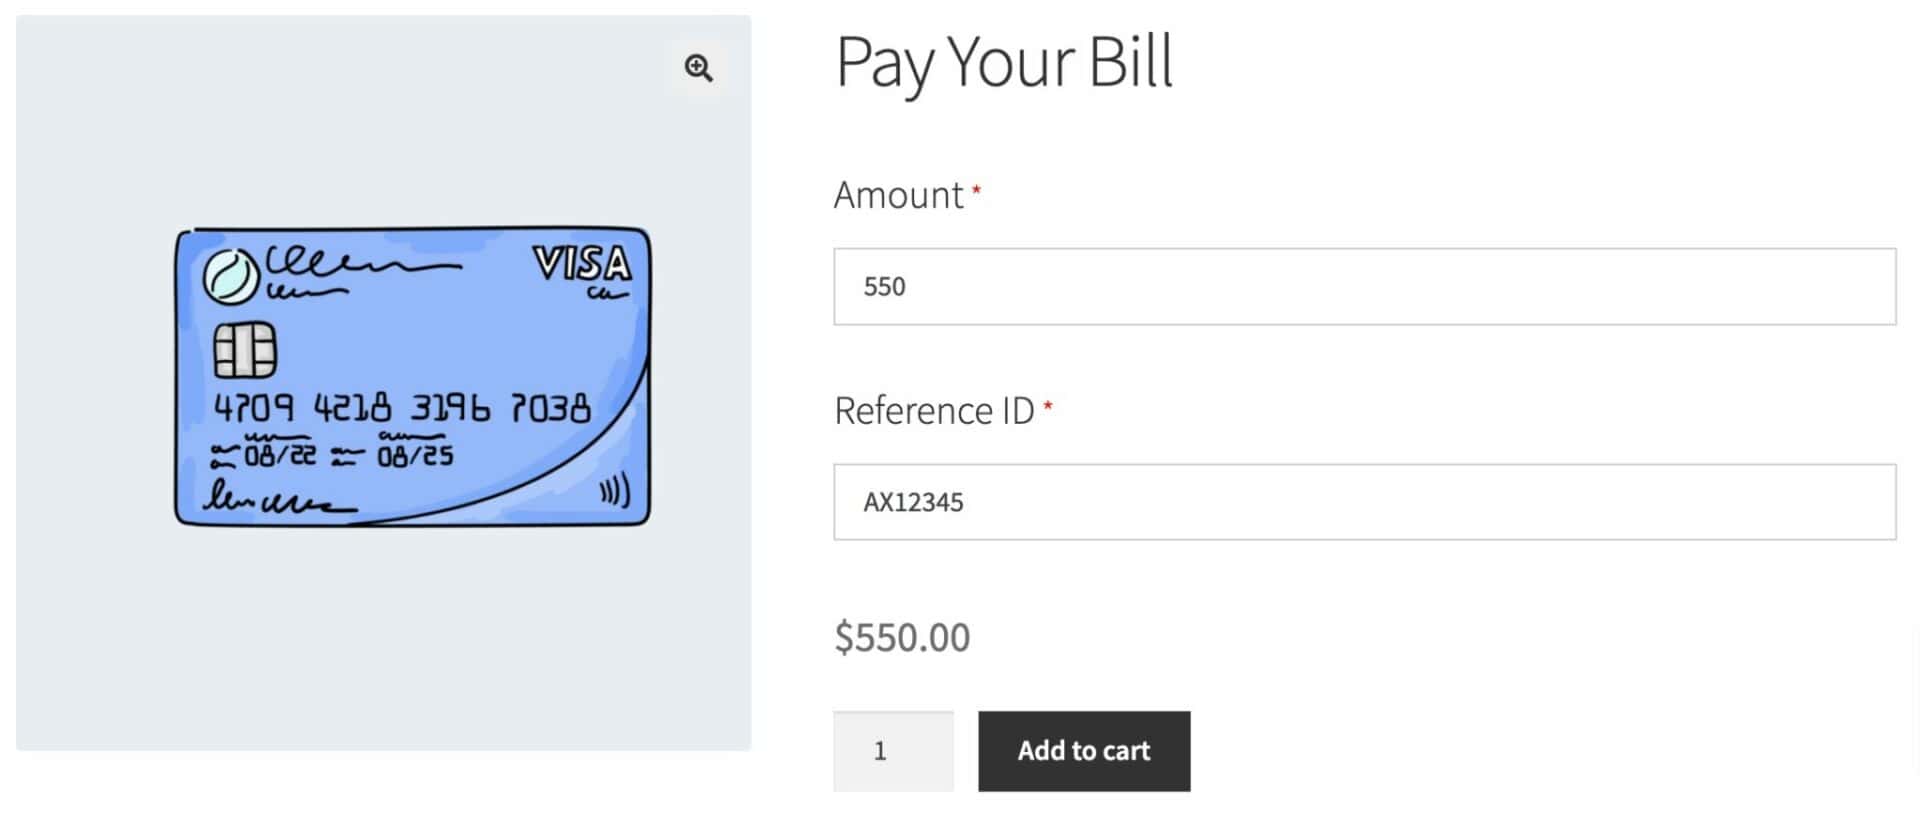
To create a WooCommerce pay your bill product:
- Create a new product called “Pay your bill”
- Set the price to “0” and choose ‘Hide price’ in ‘Price label display’ as with the first example product
- Click ‘Add Group’ and ‘Add Field’
- Add your ‘Name the Price’ field and label it ‘Amount’ (or similar)
- Click ‘Add Field’ again
- Create a ‘Text’ field and label it ‘Reference ID’ (or whatever makes sense for you)
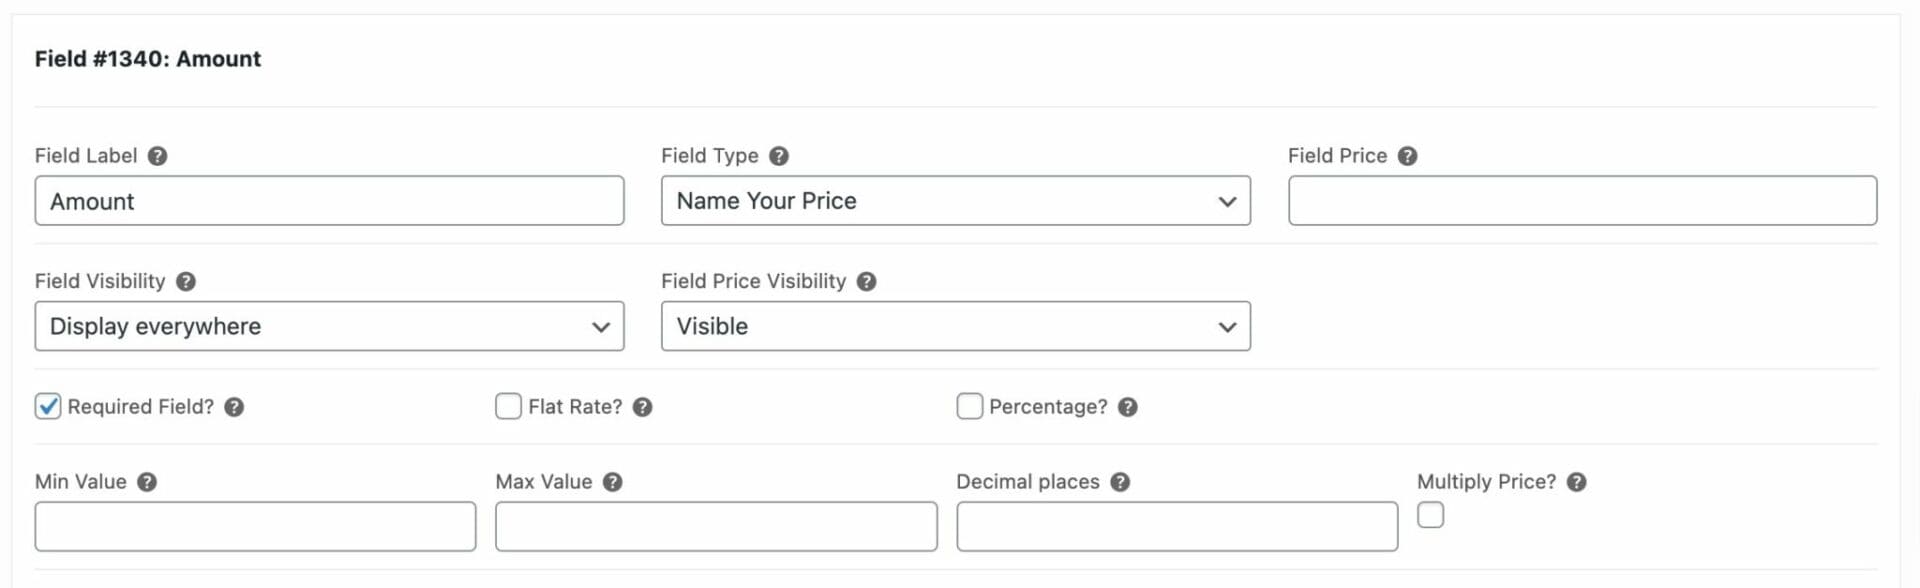

You’ll want to check the ‘Required Field’ option for both fields. This will ensure that your clients enter the amount and the reference ID before adding the product to the cart.
As the example product shows, you can use this invoicing tool to direct your clients to a page on your website where they can pay your invoices online. They just check out through WooCommerce as they would any other product.
Example #4: How to set a ‘Name Your Price’ field as a single fixed fee in the cart
If you want to let the customer buy multiple products, but only charge them a single donation value you need to first set up your product and name your price field as per the previous examples. Once changed, select the ‘Flat Rate’ checkbox. This will ensure that any entered amount is only chargeable once, no matter the quantity value.
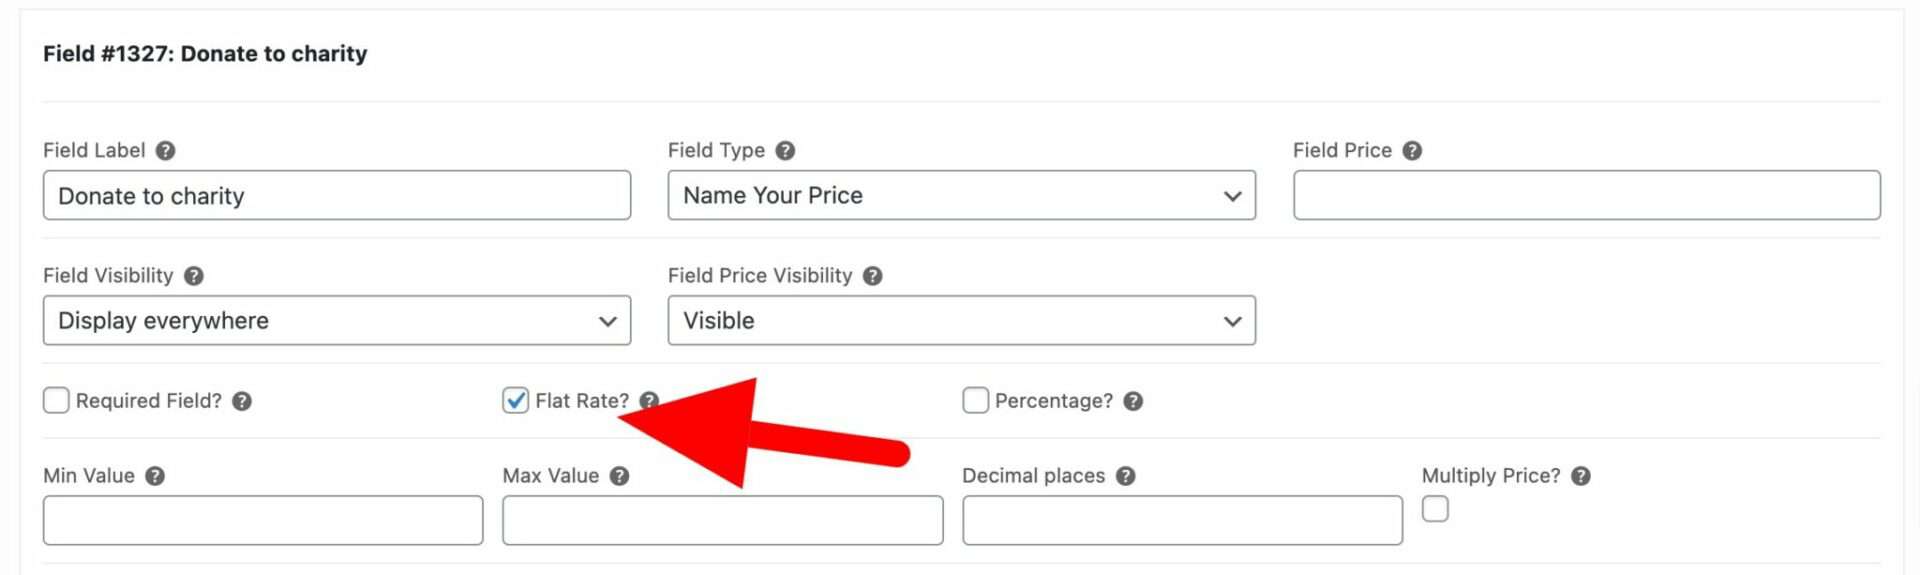
You can see the example product here – it’s the same as the additional donation product. The user is able to buy as many copies of the book as possible – the additional donation will process once only.
Why use ‘Pay What You Want’ payments?
Pay What You Want or ‘Pay What You Wish’ (PWYW) is a pricing model where customers are able to set their own prices for products. This can mean that customers could pay nothing for your product; it could even mean that they pay more than the expected value.
At first, a PWYW strategy can seem counter-intuitive. After all, who would pay full price for your product when they have the option to pay much less, or even nothing at all?
However, although it doesn’t seem like enabling customers to choose what they want to pay you is common sense, there is some sound theory behind the model. A Forbes article from 2015 highlights the success of Pay What You Want (PWYW) pricing, where customers set their own prices, often paying more than suggested.
Radiohead’s album In Rainbows famously used this model, generating more digital income than their previous albums combined. Research by Shelle M Santana from Harvard Business School found that emphasizing community and the people behind products, rather than promotions, increased customer payments.

Real-world examples, such as WordPress plugin donations and non-profit cafes, show that PWYW can work when guidelines are set, and it’s especially effective for low-cost products or special promotions. To make PWYW work, businesses should promote a sense of community, focus on people, set sensible price parameters, and consider it for specific products or limited-time offers.
The advantages of using PWYW on your own site
Let’s look at some scenarios for how you could use PWYW and make it work for you. We’re going to present these as approaches, but also advantages of using the strategy:
- You have a simple way to promote your products. Implementing a PWYW sale at an optimal time of the year (such as Black Friday and Cyber Monday) would be one way to stand out from your competitors. This is because a PWYW model is a great way of promoting your product and is likely to generate more interest than simply offering it for free.
- If you let your customers set the price, you send a clear message of trust. In return, you can expect a greater level of trust from your customers. PWYW is a simple way of strengthening your relationship with your clients.
- You can sell more products. Consider a situation where you only sell ten products per week at $50 each. With PWYW, you might sell (or give away) 500 products over the same period at an average of $5 each. Provided your running costs are low enough, you could potentially increase your profitability significantly.
Essentially, the PWYW model here helps you find the right price point for your product. Of course, you’ll need to remember other factors such as post-sales support when assessing this.
Ideas for using dynamic pricing options like WooCommerce Name Your Price products
You can implement name your own pricing in several ways. The following are just ideas, although you can mix and match to implement them, or even expand on them:
- Add a tip jar. Use a Name Your Price field to allow your customers to add an optional tip to the product when they purchase it.
- Use PWYW on one or more products as a special offer. This could be helpful in generating traffic to your site, obtaining some new external links, and hopefully gaining some longer term clients.
- Nominate a charity and let users donate an amount upon purchase. This won’t affect the cost of your product, but it may attract some publicity to your site and you’ll be doing a good turn.
Niche-based companies can also use PWYW in an effective way. For example, if you’re a charity or not for profit organization, you can take donations online using a Name Your Price strategy. You could also create an entire crowdfunding website using Name Your Price, where users can choose how much to contribute to projects.
You might even want to consider a Pay What You Can (PWYC) method of payment. This is a slight variation on PWYW, and asks customers to contribute what they feel they can afford.
Sponsorships represent a great way to offer a PWYW approach. Regardless of whether you’re running a marathon for charity or you’re organizing a school event, you can take payments such as donations and sponsorship money online. Each sponsor can choose what to pay you.
With WooCommerce Product Add Ons Ultimate, you could also let the sponsor include their name and add a unique message. This is similar to sites such as JustGiving, and lets you implement the same technology and features in a breeze. Using WooCommerce subscriptions can also work in this situation.
Finally, you might come across the concept of Mark Off Your Own Price (MOYOP). This is a method where you set a full price for your product, and let users choose their own discount. The psychology of this is going to be subtly different than for PWYW.
Here, you give the user your valuation of the product and invite them to agree or disagree. It can be a good alternative to offering a set price for a product, while also maximizing income.
Conclusion
A name your price strategy can be risky for WooCommerce store owners. However, studies show that there can be commercial value in doing so, provided you assess the risk. Consider the type of products you sell, and how you will implement a strategy or techniques to ensure you don’t make a loss. Done well, and using the. WooCommerce Product Add Ons Ultimate plugin to help users define a price, the rewards of implementing a name your price plugin can boost your income and sales.
Do you think a WooCommerce name your price strategy is viable and worth implementing? Let us know in the comments section below!
WooCommerce Product Add-Ons Ultimate
Easily create Name Your Price products in WooCommerce