How to upload PDFs to your WooCommerce product pages

If you run a WooCommerce store that involves any kind of custom work – print-on-demand, design services, document processing, legal forms – you’ve probably wished customers could upload a PDF file directly on the product page. WooCommerce doesn’t offer this out of the box, but it’s straightforward to add with the right plugin.
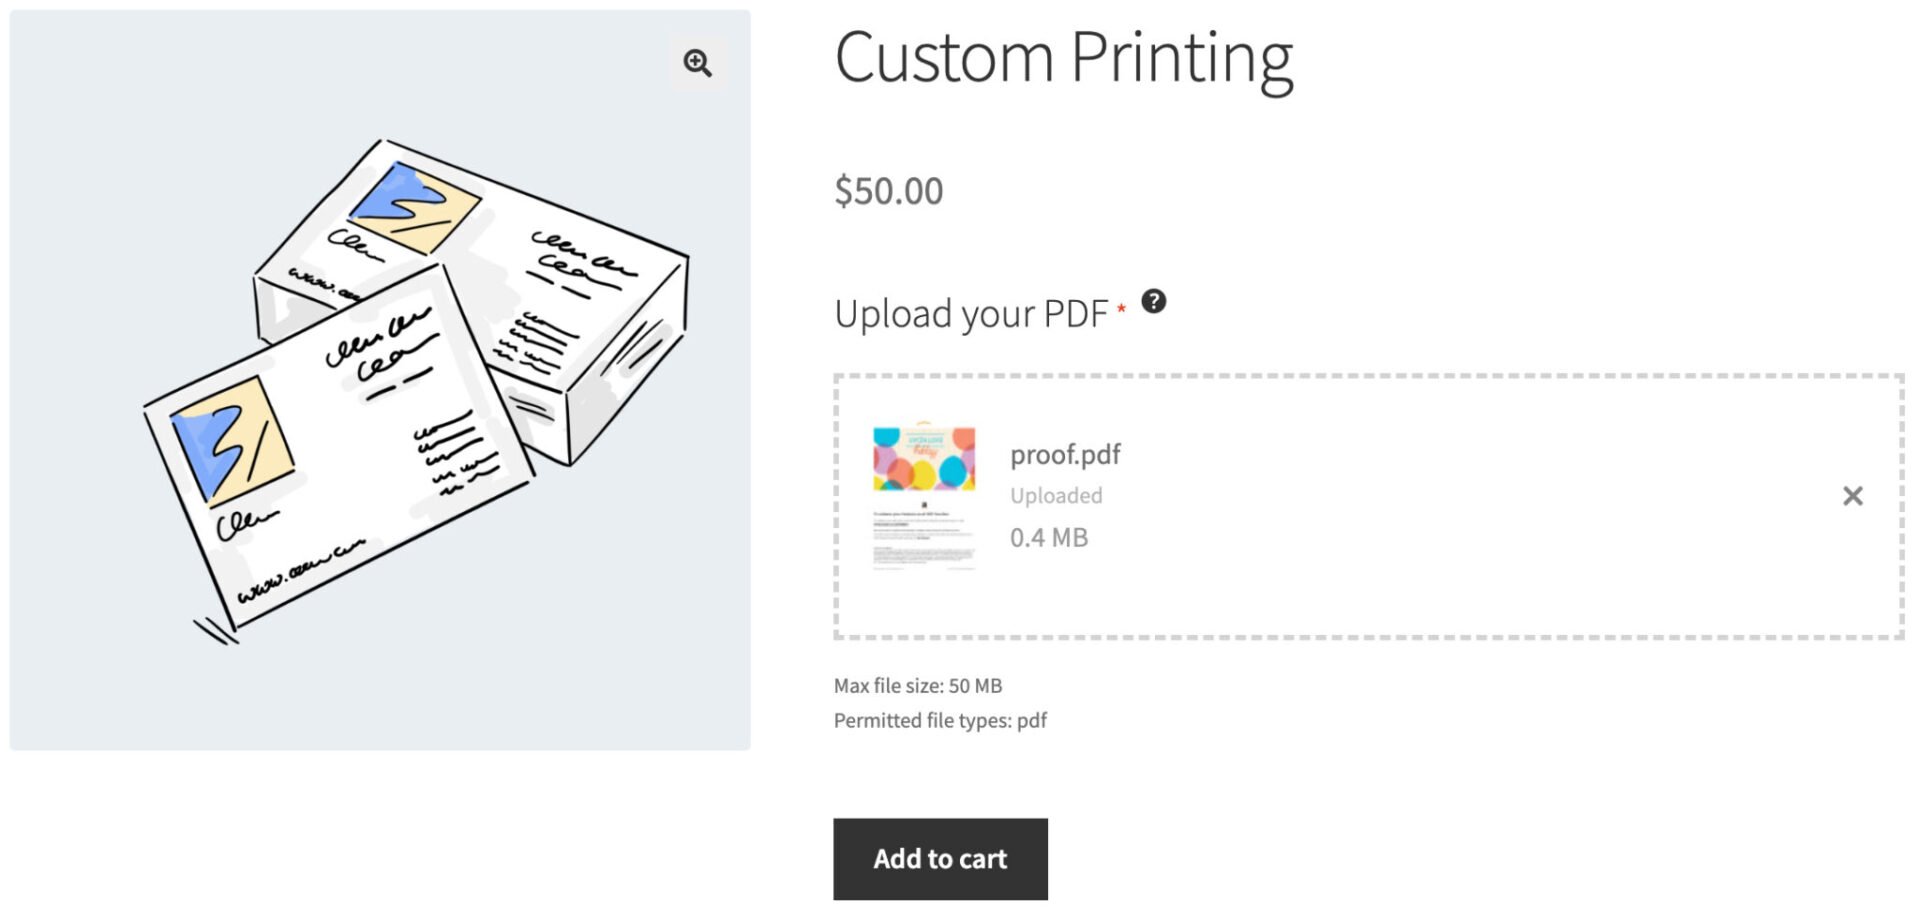
In this guide, we’ll show you how to add a PDF upload field to any WooCommerce product page using WooCommerce Product Add-Ons Ultimate. We’ll cover how to restrict uploads to PDF files only, allow customers to upload multiple files, and charge a fee per file uploaded. We’ll also look at an advanced option: automatically reading the page count of an uploaded PDF and using that figure to calculate the price.

WooCommerce Product Add-Ons Ultimate
Customize products with extra fields and options
Why use Product Add-Ons Ultimate for file uploads?
WooCommerce Product Add-Ons Ultimate is a plugin that lets you add extra fields to your product pages – things like text inputs, dropdowns, checkboxes, color swatches, and, crucially, file upload fields.
For PDF uploads specifically, the plugin lets you:
- Add a file upload button directly to the product page
- Restrict uploads to specific file types (such as PDF only)
- Set a maximum file size
- Allow customers to upload one file or multiple files
- Generate thumbnail image for the PDF
- Charge a flat fee or a per-file fee for uploads
- Use conditional logic to show or hide the upload field based on other selections
It works with simple and variable products, and uploaded files are attached directly to the WooCommerce order – so you and your team can access them as soon as the order comes in.
Step-by-step guide: create a WooCommerce PDF upload field
To follow this guide you’ll need:
- WooCommerce installed and active on your WordPress site
- WooCommerce Product Add-Ons Ultimate installed and licensed
- At least one product set up in WooCommerce
Once the plugin is installed, you’ll find its settings under WooCommerce > Settings > Product Add-Ons. The upload field itself can configured on a per-product basis, directly in the product editor, or globally if you want to add a PDF uploader to multiple products from one place.
Step #1: Enable PDF uploads
The first step is to go to WooCommerce > Settings > Product Add-Ons > Uploads and allow PDFs to be uploaded.
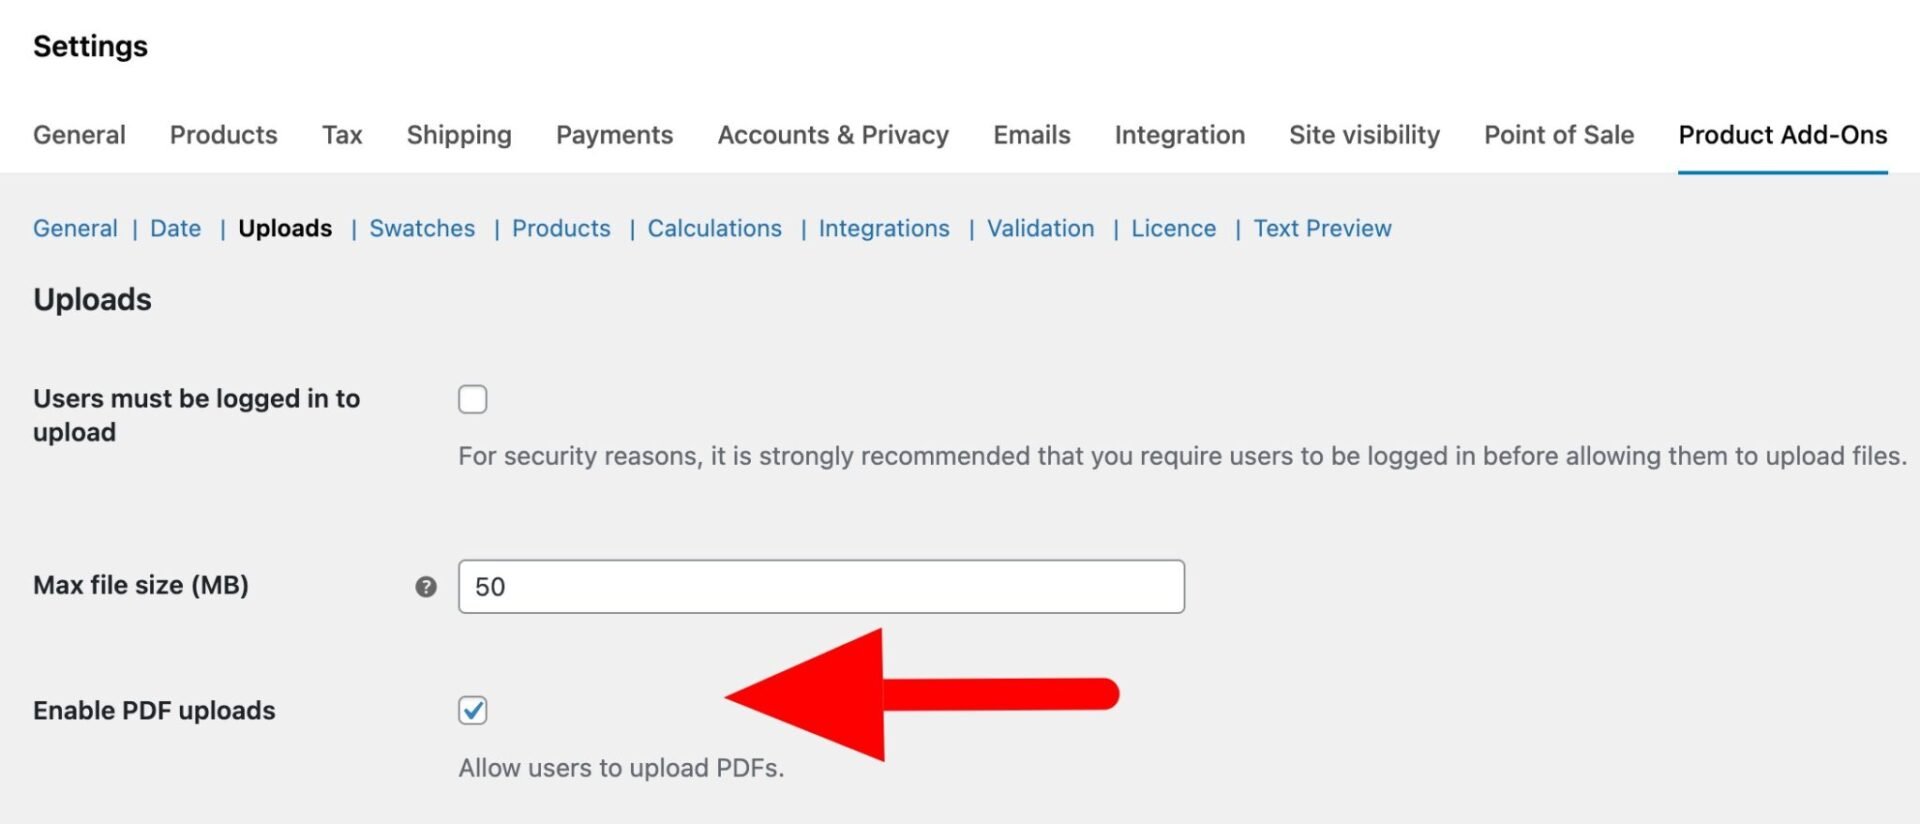
If you don’t want to allow any other file types to be uploaded, you can delete any other file types from the ‘File types’ setting. If you are happy to allow image uploads, you can leave this setting as it is.

You can also set a maximum file size on this page. A limit of 10–20 MB is reasonable for most PDF use cases, though you may want to increase this for high-resolution print files.
Step #2: Add an upload field to a product
To add a PDF upload field to a WooCommerce product:
- Go to Products > All Products in your WordPress dashboard and click to edit the product you want to add the upload field to. Scroll down past the standard product data tabs and you’ll find the Product Add-Ons panel.
- Click Add Group. Groups are containers for your add-on fields – you can have multiple groups on a single product, each with their own fields. Give this group a clear name, such as “Upload your files”. You can choose whether the group name is displayed to customers or kept hidden.
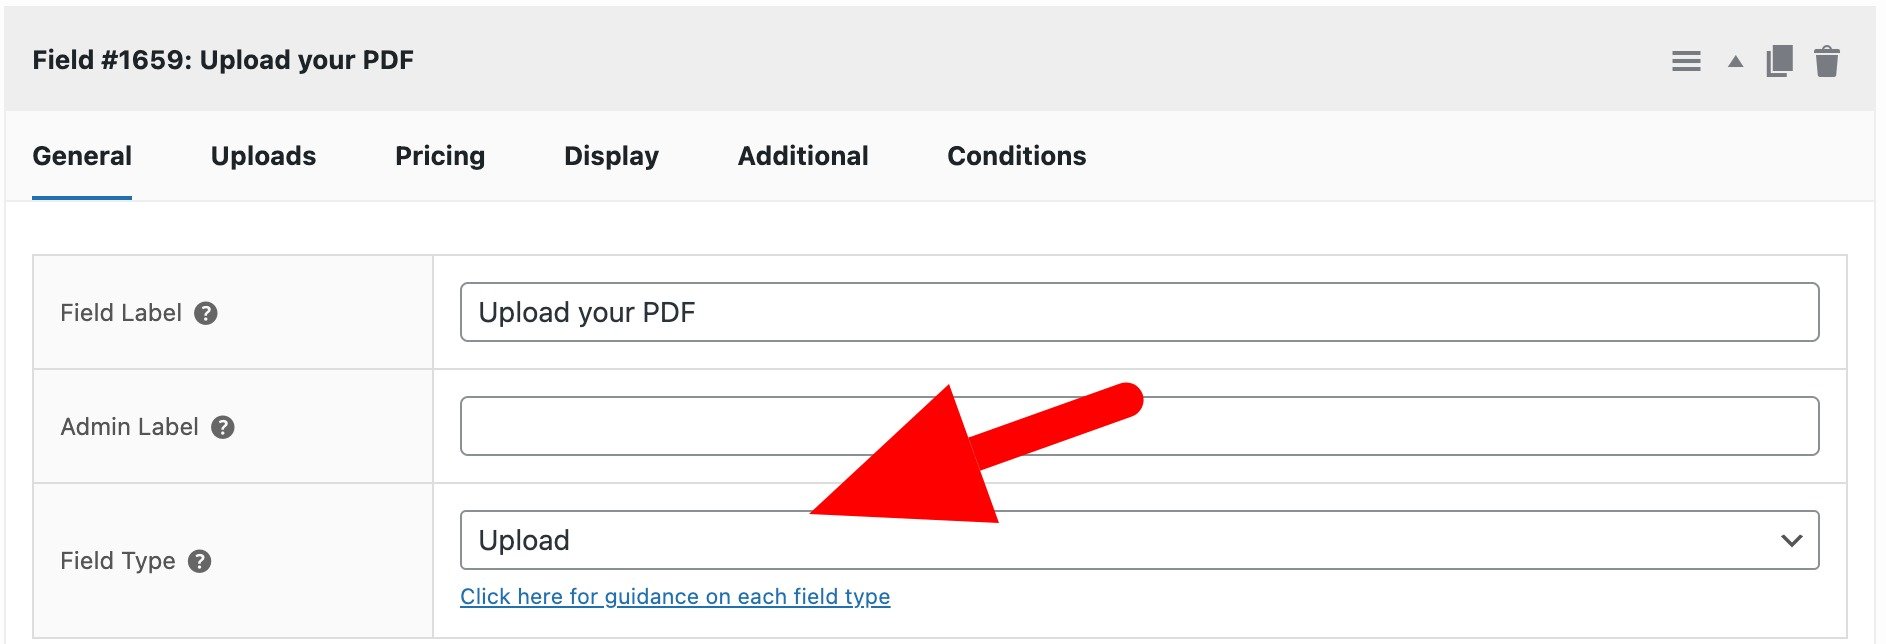
- Inside the group, click Add Field and select Upload as the field type. Give the field a label – something like “Upload your PDF” – that makes it clear to customers what they need to do. You can also add a description beneath the field for any additional instructions, such as file naming conventions or size limits.
Step #3: Allow multiple file uploads
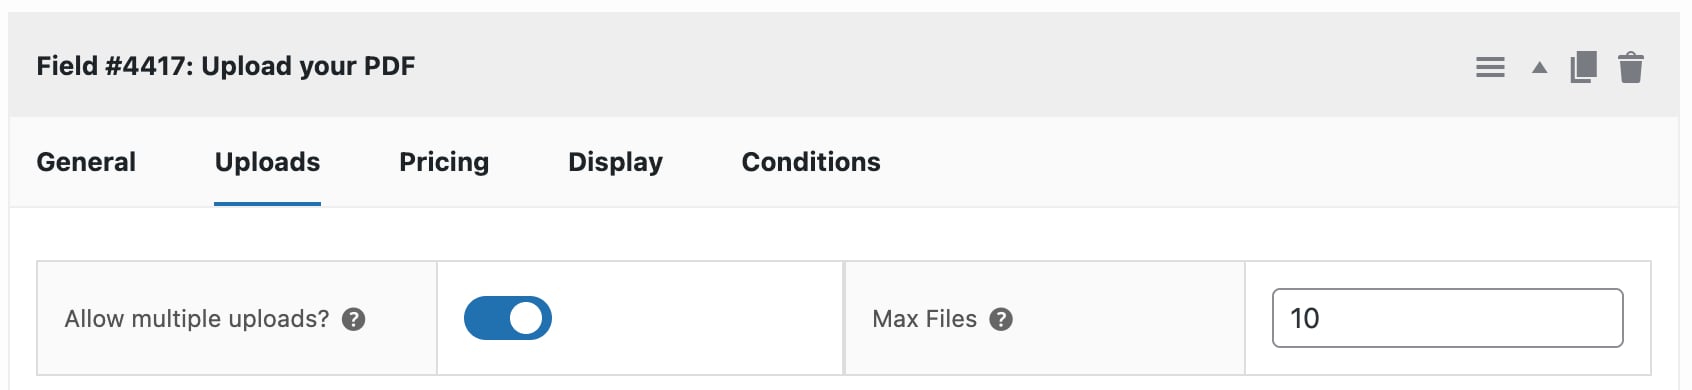
If you want customers to be able to submit more than one PDF at a time, enable the Allow multiple uploads option in the field settings. You can optionally cap the number of files – for example, allowing a maximum of five PDFs per order. Once enabled, customers will be able to select multiple files at once from their file browser, or drag and drop them into the upload area.
Step #4: Charge per uploaded file
Under the field’s pricing options, enter the fee you want to charge for each uploaded file in the Field Price setting and enable the Price pre upload option. For example, setting a per-file fee of $5 means a customer uploading three PDFs will see $15 added to their order total. The price updates dynamically on the product page as files are added, and the breakdown is shown clearly in the cart and at checkout.
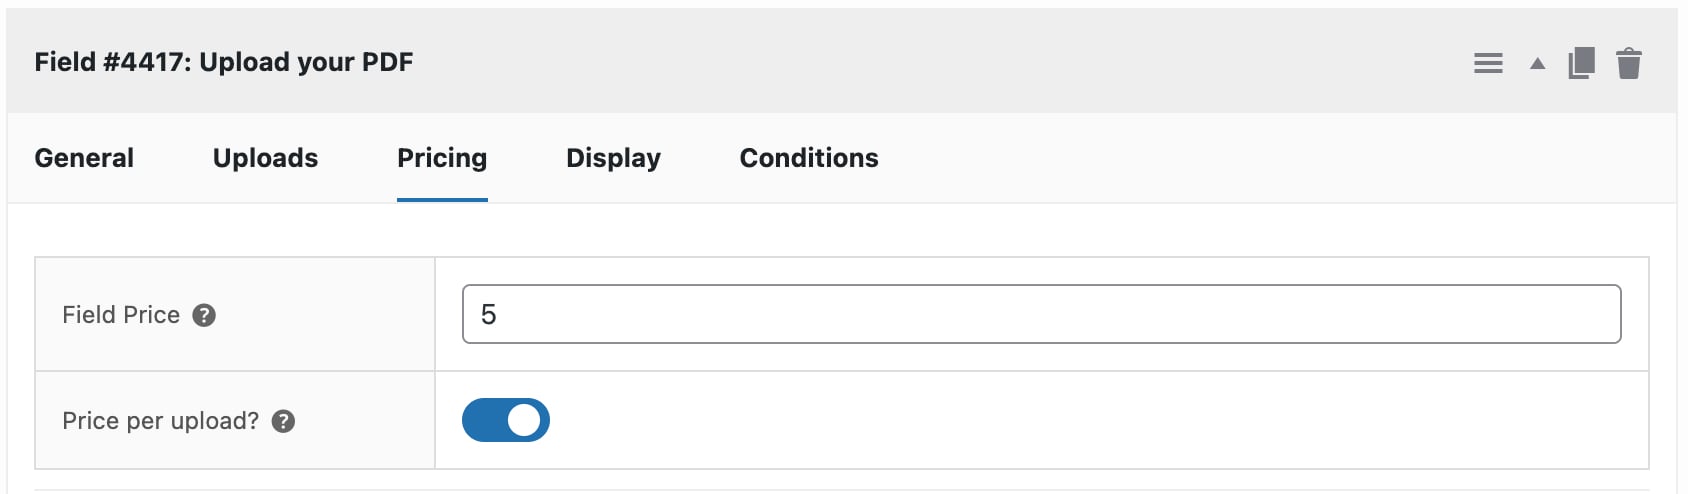
The upload pricing will just be added to the product’s base price.
How to manage uploaded PDFs
Once an order is placed, uploaded files are attached to it in the WooCommerce order details. Go to WooCommerce > Orders, open the relevant order, and you’ll find the uploaded files listed alongside the other order item meta. From there you can download them directly.
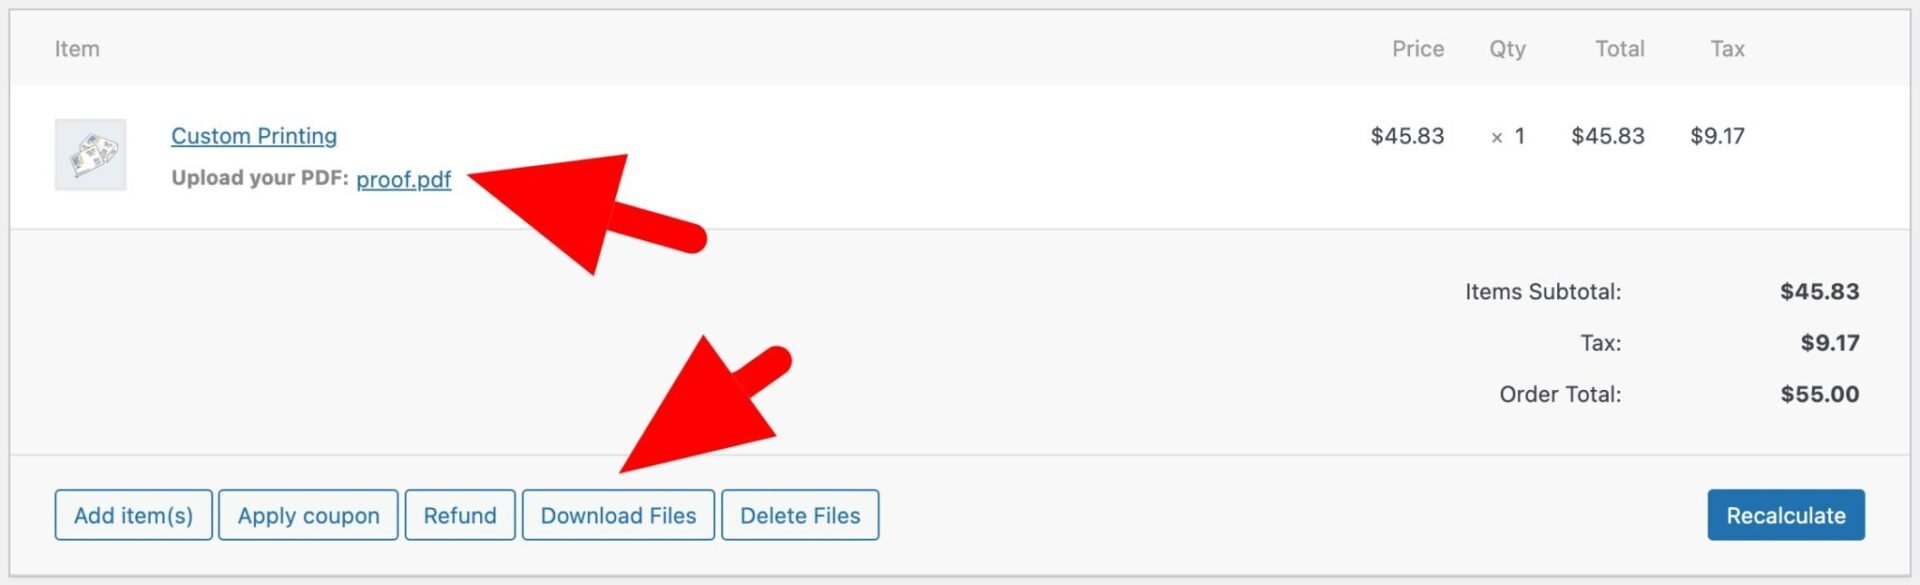
Files are stored in your WordPress uploads directory on the server, organized by order. You can clean old and unwanted uploaded PDFs in order to prevent your server from filling up. For high-volume stores, it’s also worth considering a cloud storage integration to keep your server tidy and ensure files are reliably backed up.
How to charge by PDF page size (no code required)
Some businesses – print shops, bookbinding services, copy bureaus, legal document services – it makes more sense to charge based on how many pages a customer’s PDF contains and/or the size of the pages rather than simply how many files they’ve uploaded.
This lets you price large-format printing, plans and posters by area or by length, using the same Upload field you set up for page counts. You’ll need the Advanced Uploads extension, with ‘Enable PDF page count’ switched on as in the previous section.

Advanced Uploads for Add-Ons Ultimate
Let users crop, size and rotate their uploaded files
Which PDF tags can you use?
Use these tags in a Calculation field, replacing xxx with your Upload field’s ID:
| Tag | Value |
|---|---|
{field_xxx_pdf_count} | Total number of pages in all the uploaded PDFs |
{field_xxx_pdf_width} | Width of the widest page, in mm |
{field_xxx_pdf_height} | Height of the tallest page, in mm |
{field_xxx_pdf_length} | Longest side of the largest page, in mm, whichever way round the page is |
{field_xxx_pdf_short_side} | Largest short side of any page, in mm. This is the narrowest roll width that every page will fit on |
{field_xxx_pdf_total_length} | Longest sides of all pages added together, in mm |
{field_xxx_pdf_area} | Area of all pages added together, in square meters |
If a customer uploads more than one PDF, the tags combine every page from every file. The page count, total length and area add all the pages up, and the other tags use the largest page.
Step #1: Optionally choose which page box to measure
Go to WooCommerce > Settings > Product Add-Ons > Uploads and choose an option from the ‘PDF page size box’ setting. ‘Crop Box’ measures the visible page area, as you’d see it in a PDF viewer, and it’s the default. If you print from print-ready files with bleed, choose ‘Trim Box’ to measure the finished size instead.
Click ‘Save changes’. Your store will now measure each page of every PDF that customers upload.
Step #2: Add the page size tags to your Calculation field
Open the formula builder in your Calculation field and find your Upload field. Click the ‘PDF width’, ‘PDF height’, ‘PDF length’, ‘PDF short side’, ‘PDF total length’ or ‘PDF area’ button to add that tag to your formula. Hover over a button to see exactly what it measures.
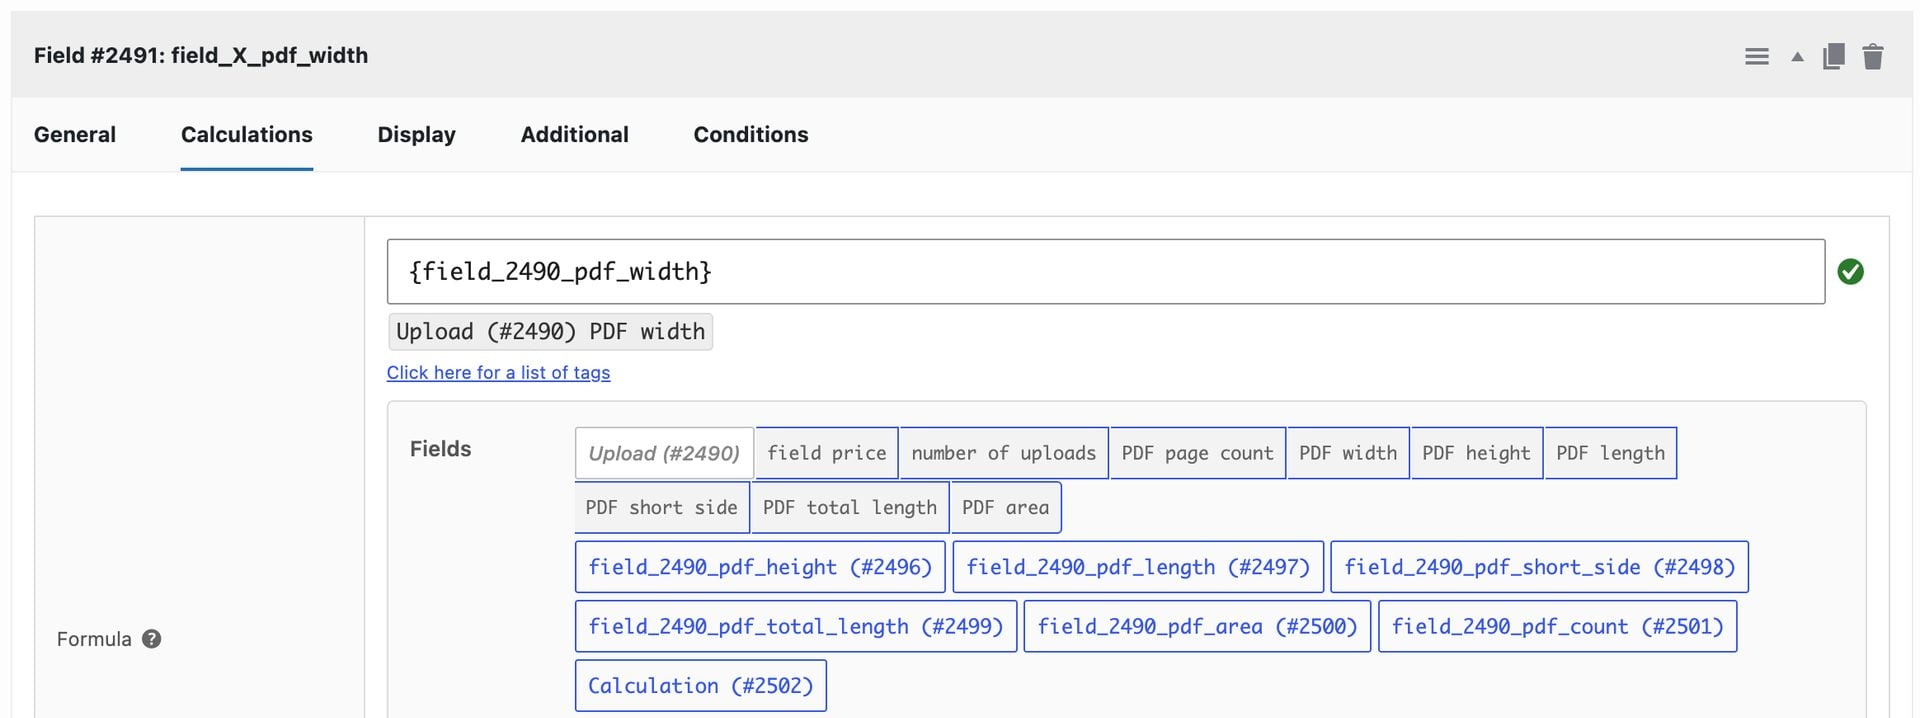
The PDF buttons only show for Upload fields that accept PDFs. If you can’t see them, check that PDF is one of the field’s file types.
Step #3: Write your pricing formula
Here are some example formulas you can adapt:
- Charge per square meter:
{field_xxx_pdf_area} * 12charges $12 per square meter, so a single A0 page costs $12 - Charge per meter of roll length:
({field_xxx_pdf_total_length} / 1000) * 8charges $8 per meter of roll. Dividing by 1000 converts millimeters to meters - Add a surcharge for wide formats:
{field_xxx_pdf_count} * 0.10 + ({field_xxx_pdf_short_side} > 420 ? 5 : 0)charges $0.10 per page, plus $5 if any page is wider than A3
You can also switch between pricing methods based on the page size:
{field_xxx_pdf_length} <= 1200 ? {field_xxx_pdf_count} * 2.50 : ({field_xxx_pdf_total_length} / 1000) * 8This charges $2.50 per page if the longest page is 1200mm or less. Anything longer is charged at $8 per meter of total length. A 3-page pattern on A0 sheets would cost $7.50, while a single 1500mm-long sheet would cost $12.
Save and publish your product. Now the price will update as soon as a customer uploads a PDF, based on both the number and the size of its pages. Find out more in our guide to pricing by PDF page count and page size.
How to charge by PDF page count (no code required)
For some businesses – print shops, bookbinding services, copy bureaus, legal document services – it makes more sense to charge based on how many pages a customer’s PDF contains rather than simply how many files they’ve uploaded. With the Advanced Uploads extension for Product Add-Ons Ultimate, you can do this without writing a single line of code.
Advanced Uploads for Add-Ons Ultimate
Let users crop, size and rotate their uploaded files
Here’s how to set it up.
Step #1: Enable PDF page count in plugin settings
Go to WooCommerce > Settings > Product Add-Ons > Uploads and enable both of the following settings:
- Enable PDF uploads
- Enable PDF page count
Click Save changes.

Step #2: Add an upload field (single file)
Add an Upload field to your product as described above. For page count pricing to work, you’ll need to disable “Allow multiple uploads” on this field – the page count feature reads a single file at a time. Set the allowed file type to pdf and make a note of the field’s ID, as you’ll need it in the next step.
Step #3: Add a calculation field
Add a Calculation field to the same add-on group. In the formula, use the tag {field_xxx_pdf_count} – replacing xxx with your upload field’s actual ID – to pull in the page count of the uploaded PDF.
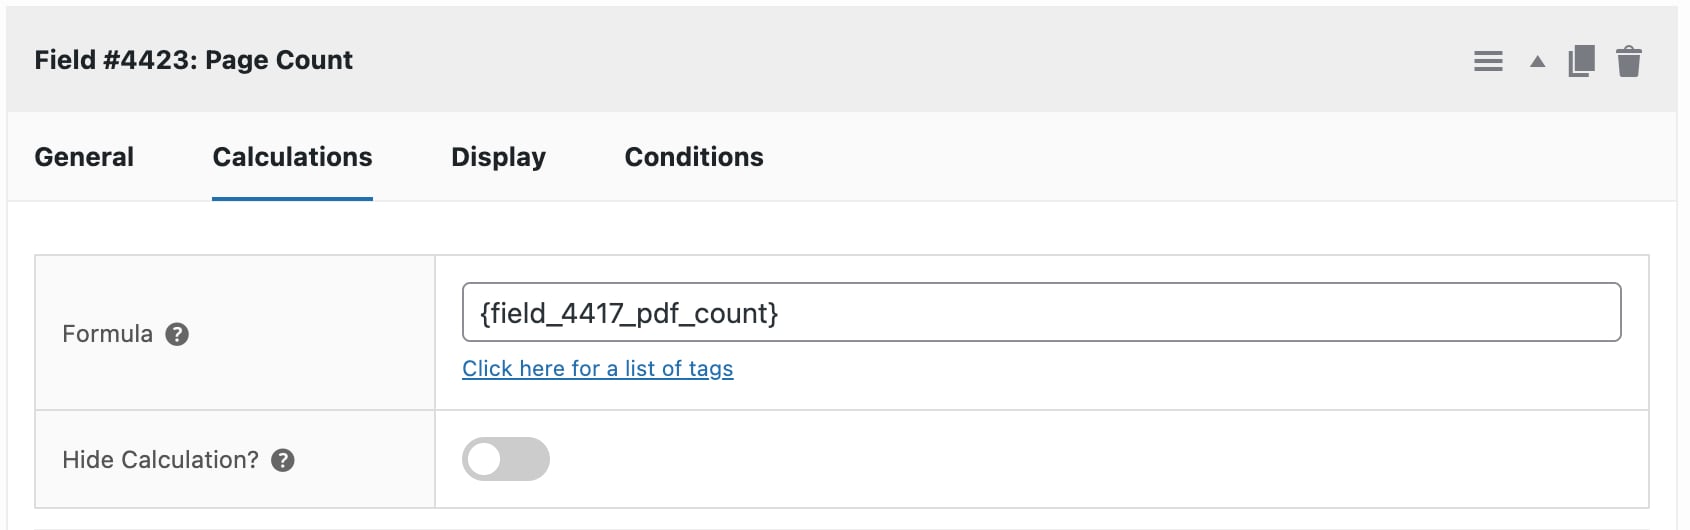
From there, you can build any pricing formula you like. For example:
{field_xxx_pdf_count} * 0.10charges $0.10 per page{field_xxx_pdf_count} * 0.10 + 1.00adds a $1.00 handling fee on top of the per-page rate
As soon as a customer uploads a PDF, the page count is read and the calculated price updates instantly on the product page.
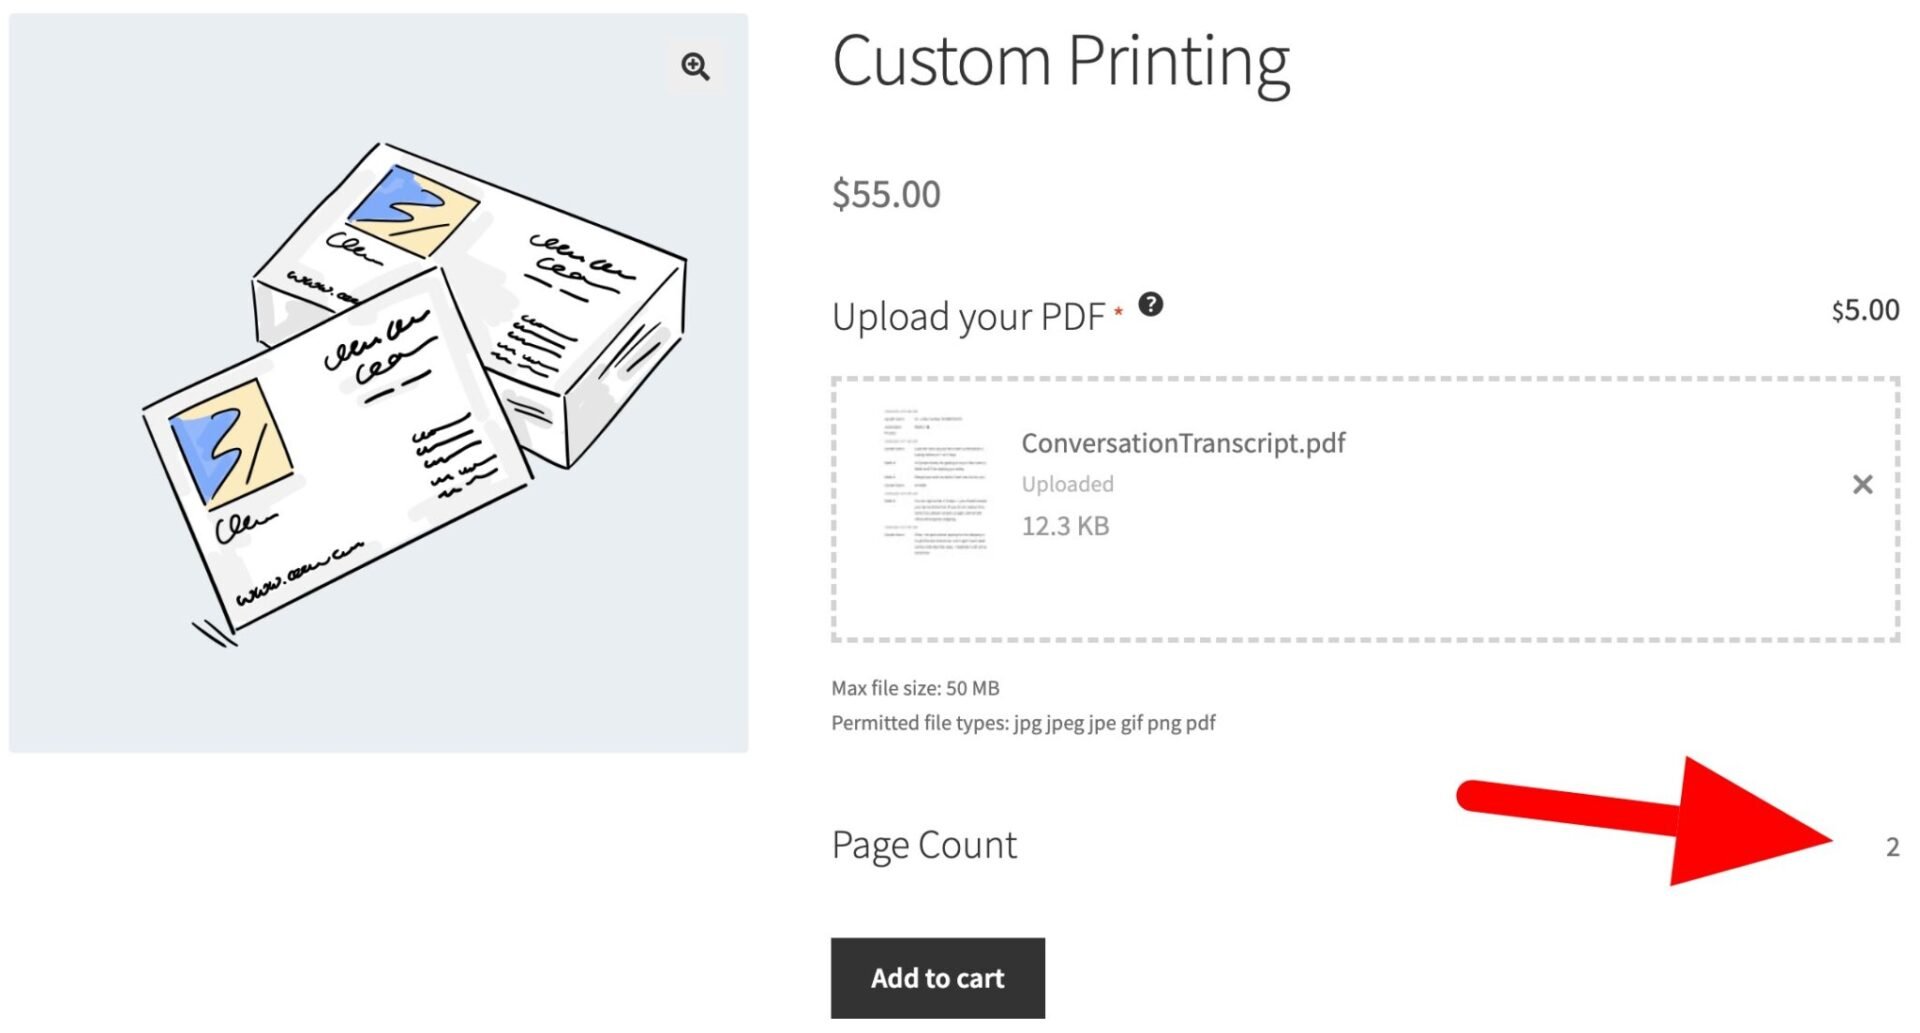
If you want to go further with calculation-based pricing – for example, reading values from lookup tables or combining multiple field inputs – take a look at Advanced Calculations for Add-Ons Ultimate.
Frequently asked questions
Yes – you can enter any file extension in the Allowed File Types field. Common options include jpg, png, docx, and zip. You can also allow multiple types at once.
Files are saved to your WordPress uploads directory, linked to their respective orders. For stores handling a large volume of uploads, a dedicated file management solution or cloud storage integration is worth considering.
Yes – there’s a required field option in the field settings. If it’s enabled, WooCommerce will prevent customers from adding the product to their cart until a file has been uploaded.
Yes – Product Add-Ons Ultimate is fully compatible with WooCommerce variable products. You can apply add-on groups to all variations or configure them per variation.
Yes. The Advanced Uploads extension measures every page of an uploaded PDF, so you can charge by width, height, length or area in a Calculation field. For example, {field_xxx_pdf_area} * 12 charges $12 per square meter of printed area. You can even switch between per-page and per-meter pricing based on the page size, as shown in how to charge by PDF page size.
Upload PDFs to WooCommerce products – recap
Adding a PDF upload field to your WooCommerce product pages doesn’t require any custom development. With Product Add-Ons Ultimate, you can set up a file upload field, restrict it to PDFs, allow multiple uploads, and charge per file in just a few minutes – and the Advanced Uploads extension takes it further by letting you calculate prices based on actual page count, automatically.
Product Add-Ons Ultimate works with all WordPress themes and page builders, is backed by our world-class support team, and comes with a 14-day money back guarantee – so you can try it completely risk-free.
WooCommerce Product Add-Ons Ultimate
Customize products with extra fields and options