How to sell cakes online

Are you dreaming of turning your passion for baking into a profitable online business but unsure how to sell cakes online? You’re in the right place. This comprehensive guide will walk you through the essential steps to establish a thriving online cake shop and how to leverage WooCommerce plugins to help ensure you offer the best customer experience and see those cakes fly off the (virtual) shelves.
Step-by-step guide on how to sell cakes online and grow your business
Defining your brand and niche
Before you begin any of the technical steps, it’s important to ensure you have a strong brand and USPs that will help your online cake business stand out amongst the competition. Custom creations, unique flavours and quality ingredients can help ensure you have lots that will differentiate you from competitors and attract a loyal customer base.
You can also try to identify your target audience before you launch. Doing so can help you uncover where and how those customer types like receiving their content, ensure you are posting on those platforms and create the kind of content that will appeal to them most.
Are you trying to appeal to rushed mums looking for a custom birthday cake? Hen or stag parties looking for fun, silly treats where they can upload photos of the bride or groom-to-be? Or perhaps you’re gunning for wealthy customers who are more than happy to fork out for a truly splendid cake for that special occasion? Zoning in on your target audience, looking at what competitors are doing and making note of what works and what doesn’t can also help you create a strong brand and strategy that will command attention and see you rise (pun intended) above the competition.
Building your product catalog
When it comes to selling cakes online, your visual presentation is going to be imperative to your business success. When people walk into a bakery, they can rely on their senses to help make an informed choice; seeing cakes piled high and smelling freshly baked treats will tempt them to make a purchase.
However, when shopping for cakes online, descriptions and images of the products are all your customers have to go on. Therefore, making these as appealing as possible is crucial. Use professional-quality photos to showcase your cakes so that potential buyers can get a real sense of what to expect when they order and be detailed and descriptive when creating your product descriptions. Selling cakes online, means you have to focus on making them look as good as possible before being able to sell them.
Providing standard information for each product, including ingredients, allergens, and customisation options, is important. However, taking the time to get creative with your descriptions will inspire a visceral reaction. You want them with rumbling stomachs and salivating mouths, so don’t hold back from making your creations sound truly irresistible.
Packaging, presentation and price setting
Choose attractive and functional packaging that not only protects your cakes during shipping but also enhances their overall presentation. To create a cohesive brand experience, incorporate your brand elements into the packaging design as well. You want your cakes to taste as good as they look, and since studies show that visual presentation plays a part in how much people enjoy their food, this is even more important to get right.
It’s important to sell your cake brand and not just your cakes, having an appealing enough presentation will definitely help in bringing customers back to you, and not to competitors. Especially if they can put it on their social media.
When it comes to setting your prices, there are also lots of factors to take into consideration. The cost of ingredients, your labour, and overhead expenses, as well as market demand and your desired ROS, will all have to be carefully calculated in order to set your pricing correctly to ensure you remain profitable.
Legal and financial considerations
Before you launch, you need to ensure that you have the necessary business license and permits to operate your business. Obtain food safety certifications to ensure that you comply with food safety regulations, protect your business with appropriate insurance coverage, and make sure you keep accurate financial records and consult with a tax professional.
How to set up your WooCommerce store to sell cakes online
Here we’ll take you through the various practical steps you’ll need to start selling cakes online using WooCommerce, a popular ecommerce plugin for WordPress that allows you to create and manage an online cake store.
WordPress and WooCommerce are a powerful combination for building a flexible, customizable, and scalable online store. Before we go through the setup process, let’s explore these platforms and the advantages they offer for creating an ecommerce site.
What is WordPress?
WordPress is a widely used, open-source content management system (CMS) that lets users create websites without needing extensive coding knowledge. Originally developed for blogging, WordPress now powers over 40% of the web and supports all kinds of sites, from portfolios to news sites to ecommerce platforms. Its flexibility comes from a vast library of plugins and themes, allowing for customization, design, and functionality adjustments.
What is WooCommerce?
WooCommerce is a free, open-source WordPress plugin that transforms a WordPress site into a fully functional ecommerce store. It’s designed to be user-friendly while offering extensive options for customization. With WooCommerce, you can manage products, accept payments, handle inventory, and track orders directly on your WordPress site.
Why choose WordPress + WooCommerce over competitors?
1. Cost-effectiveness and scalability
- Open source: Both WordPress and WooCommerce are free to use. Unlike hosted ecommerce platforms like Shopify or Wix, there are no mandatory monthly fees, although some plugins or themes may be paid options.
- No lock-in: Being open-source, WordPress allows you to export your data or move your store to a different hosting provider, offering greater flexibility compared to many proprietary platforms.
- Scalability: WooCommerce works well for small to large businesses. You can start small and scale as your store grows, making it ideal for a long-term solution.
2. Highly customizable with themes and plugins
- Themes: With thousands of WordPress themes, you have extensive options for design to ensure your store matches your brand.
- Plugins: WooCommerce has a robust ecosystem of plugins that add almost any feature you need, from shipping options to advanced SEO tools, without needing custom coding.
- Control over site functionality: Competitors like Shopify have limitations in terms of design and backend functionality, while WordPress and WooCommerce allow you full control to build the exact experience you want for your customers.
3. SEO and content capabilities
- WordPress is known for its SEO capabilities. You can take advantage of powerful SEO plugins (like Yoast) to improve your store’s ranking in search engines.
- It’s a great choice for content-heavy websites, letting you integrate a blog, create landing pages, and manage a range of content types that boost your site’s visibility and customer engagement.
4. Wide community and resource availability
- Because WordPress and WooCommerce are so widely used, you’ll find a large community of developers, tutorials, and forums to help troubleshoot or enhance your store.
- A huge number of developers specialize in WordPress and WooCommerce, making it easy to find expertise if you need custom development.
5. Payment gateway flexibility
- WooCommerce integrates with a large number of payment gateways (PayPal, Stripe, Square, and others), giving you options to serve customers globally.
- Unlike some competitors, WooCommerce doesn’t charge extra transaction fees beyond those of the payment gateway, which can save you money.
6. Strong security options
- WordPress offers excellent security features, and WooCommerce can be enhanced with various security plugins, allowing you to protect your store effectively.
- Since you can choose your hosting provider, you can select one with strong security standards, which can sometimes be more customizable than on hosted platforms like Shopify.
Now let’s get you set up.
Step 1: Choose a hosting provider and install WordPress
1. Select a hosting provider:
WooCommerce is a WordPress plugin, so you’ll need to create a WordPress website. Choose a hosting provider that supports WordPress and WooCommerce. Some popular options include:
2. Register a domain name:
Choose a unique domain name for your store (e.g. sarahbakescakes.com). Many hosting providers include free domain registration for the first year.
Suggested registrars could be:
To find out whether your domain name is available you can type it into the search bar on your registrar’s website. The registrar will then show whether it’s available, or if not, various similar options, including different extensions (like .com, .org, or .net). Select the one that best suits your needs, and proceed to checkout.
3. Install WordPress:
To install WordPress, start by logging into your hosting account; most hosting providers offer a quick one-click WordPress installation feature. Once you’re logged in, find the “Install WordPress” or “One-Click Install” option in your control panel. Select the domain where you want to install WordPress, and follow the provider’s instructions.
You’ll typically be prompted to set up basic details, like your site name, admin username, and password. After completing these steps, the hosting provider will install WordPress on your domain automatically. Once it’s done, you can log into your WordPress site by going to “yourdomain.com/wp-admin” and entering the admin credentials you just created. From there, you’re ready to start customizing your site!
It’s also worth noting that some hosts, such as Kinsta will automatically install WordPress and WooCommerce for you.
Step 2: Install the WooCommerce plugin
1. Log into your WordPress dashboard:
Once WordPress is installed, access your WordPress dashboard by going to yourdomain.com/wp-admin.
2. Install WooCommerce:
- Go to Plugins → Add New.
- Search for “WooCommerce.”
- Click Install Now and then Activate.
3. WooCommerce setup wizard:
After activation, WooCommerce will guide you through the initial setup with the WooCommerce setup wizard. Follow the steps to configure the basics like:
- Store Details (location, currency, etc.)
- Payment Methods (PayPal, Stripe, etc.)
- Shipping Options (flat rate, free shipping, etc.)
- Tax Settings
Step 3: Add products to your store
1. Create products:
In your WordPress dashboard, go to Products → Add New. You’ll need to add:
- Product Name
- Description (details about the product)
- Product Categories and Tags (to organise your store)
- Product Data (pricing, inventory, shipping, etc.)
- Product Images (use high-quality images)
2. Choose product types:
WooCommerce supports various product types, including:
- Simple Product: A single item (e.g. a cupcake).
- Variable Product: Products with variations (e.g., different sizes or flavours).
- Grouped Product: A collection of related products sold together. (e.g.Birthday celebration)
3. Publish products:
After filling out all the necessary details, click Publish to make the product live on your site. Woo! One step closer to being an online cake store!
There’s a step-by-step tutorial on creating your first online cake product below.
Step 4: Customize your store’s appearance
1. Choose a WooCommerce-compatible theme:
Your store’s design depends on the theme you use. Choose a WooCommerce-compatible theme that fits your brand. Popular themes include:
- Storefront (official WooCommerce theme)
- Astra
- OceanWP
To install a theme:
- Go to Appearance → Themes → Add New.
- Search for a theme, then click Install and Activate.
2. Customize your theme:
Once your theme is installed, go to Appearance → Customize to change settings like:
- Header and footer design
- Color schemes and fonts
- Menu structure
- Store layout (homepage, product pages, etc.)
*Please note that this is true for most themes, though could vary depending on which theme you have chosen for your store.
3. Add pages to your store:
Common pages include:
- Shop: Displays all your products.
- Cart: Where customers review their selected items.
- Checkout: The final step where customers enter payment and shipping information.
- My Account: For users to manage their orders and account details.
WooCommerce automatically creates these pages during the setup process, but you can edit them under Pages in your dashboard.
Step 5: Set up payment gateways
1. Configure payment methods:
Go to WooCommerce → Settings → Payments to choose and configure payment gateways such as:
- PayPal: Popular and easy to set up.
- Stripe: Allows for credit card payments directly on your site.
- Bank Transfer or COD: For offline payments.
2. Configure additional payment options:
If you want to offer discounts on your products or accept part payments, install plugins such as dynamic pricing and discount rules, and deposits and part payments.
Step 6: Configure shipping settings
1. Go to WooCommerce shipping settings:
Navigate to WooCommerce → Settings → Shipping to set up your shipping zones, methods, and rates.
2. Create shipping zones:
Divide your shipping into regions (e.g. local, national, international) to assign different shipping methods to different areas.
3. Set shipping methods:
Add shipping methods like:
- Flat rate: Fixed shipping cost.
- Free shipping: Encourage higher sales by offering free shipping for specific conditions (e.g., cart totals above $50).
- Local pickup: For customers who prefer to collect their orders in person.
4. Add shipping plugins (if necessary):
For advanced shipping features, you can use plugins such as role-based shipping methods and click and collect.
Step 7: Install essential plugins
Plugins extend the functionality of your WooCommerce store making it easier for your customers to view all of your product offerings, as well as to better manage more practical aspects, such as stock levels and payment information.
- Add-Ons Ultimate
- The WooCommerce Product Add-Ons Ultimate plugin elevates the shopping experience by enabling customers to personalize their products with options such as text, images, and extra features. This added flexibility allows customers to customize items according to their preferences, creating a more personal and unique shopping experience. For cake store owners, these customizable add-ons provide an opportunity to boost revenue by upselling tailored options that enhance the value of each product.
- Dynamic Pricing and Discount Rules
- Create advanced pricing rules for your cakes with a comprehensive solution that supports dynamic pricing and role-based discounts.
- Order Bump
- Boost cake sales and maximize your store’s revenue with the WooCommerce Order Bump plugin. Use modal pop-ups and exclusive discounts on bulk buying to increase average order value (AOV) and encourage customers to make larger purchases and spend more in your store.
- Request a Quote
- This handy plugin will allow customers to add products to their order and request a quote from you. This is ideal for bulk-buying customers and can help ensure you have complete control over your pricing and can manage quote requests with ease.
- Image Preview
- If you offer customisable cakes, this plugin lets customers see what their designs will look like before they buy
- Booking and Appointment Plugin
- Offer custom cake orders and consultations to enhance your offering.
- Shipping and Delivery Calculator
- Provide accurate shipping rates based on customer location and order weight using plugins like WooCommerce Shipping Table Rates or Shipping Zones.
- Social Media Integration
- Connect with your audience on popular platforms using plugins like Social Media Share Buttons
- Minimum and Maximum Quantity Order
- Set rules around minimum and maximum quantities to help control your profits and inventory.
- WooCommerce Thank You Pages
- Create bespoke WooCommerce Thank You Pages to incentivise customers, offer discounts and, promote cross-sells, and provide custom content.
Step 8: Test your store
Before launching, make sure everything works properly by:
- Placing test orders to check the customer experience.
- Testing payment gateways to ensure smooth transactions.
- Verifying that all pages (Shop, Cart, Checkout) function correctly.
Step 9: Launch your WooCommerce store
Once everything is set up and tested:
- Go live: Share your store’s URL with customers via social media, email, or other marketing channels.
- Monitor sales and traffic: Use built-in WooCommerce analytics or tools like Google Analytics to track performance.
Step 10: Ongoing management and optimization
Once live, you’ll need to continuously manage and improve your store by:
- Adding new products and updating existing ones.
- Managing orders and customer inquiries.
- Running promotions: Use WooCommerce’s discount features or install plugins like WooCommerce Dynamic Pricing for advanced discounts.
- Tracking inventory to ensure you never run out of stock.
Creating your first cake product: tutorial
Let’s take a look at how to create your first cake product in WooCommerce then add some extra options to allow the customer to personalize it.
With WooCommerce installed, go to Products → Add New. This is where you can enter all the details for your cake product.
- In the ‘Product name’ field, enter the name of your cake, e.g. ‘Happy Birthday Cake’
- Set the price in the Regular price field
- Use the Short description field to provide a brief overview of the cake. The text in this section will appear at the top of the page near the price and product image
- Enter more detail, if needed, in the Product description field
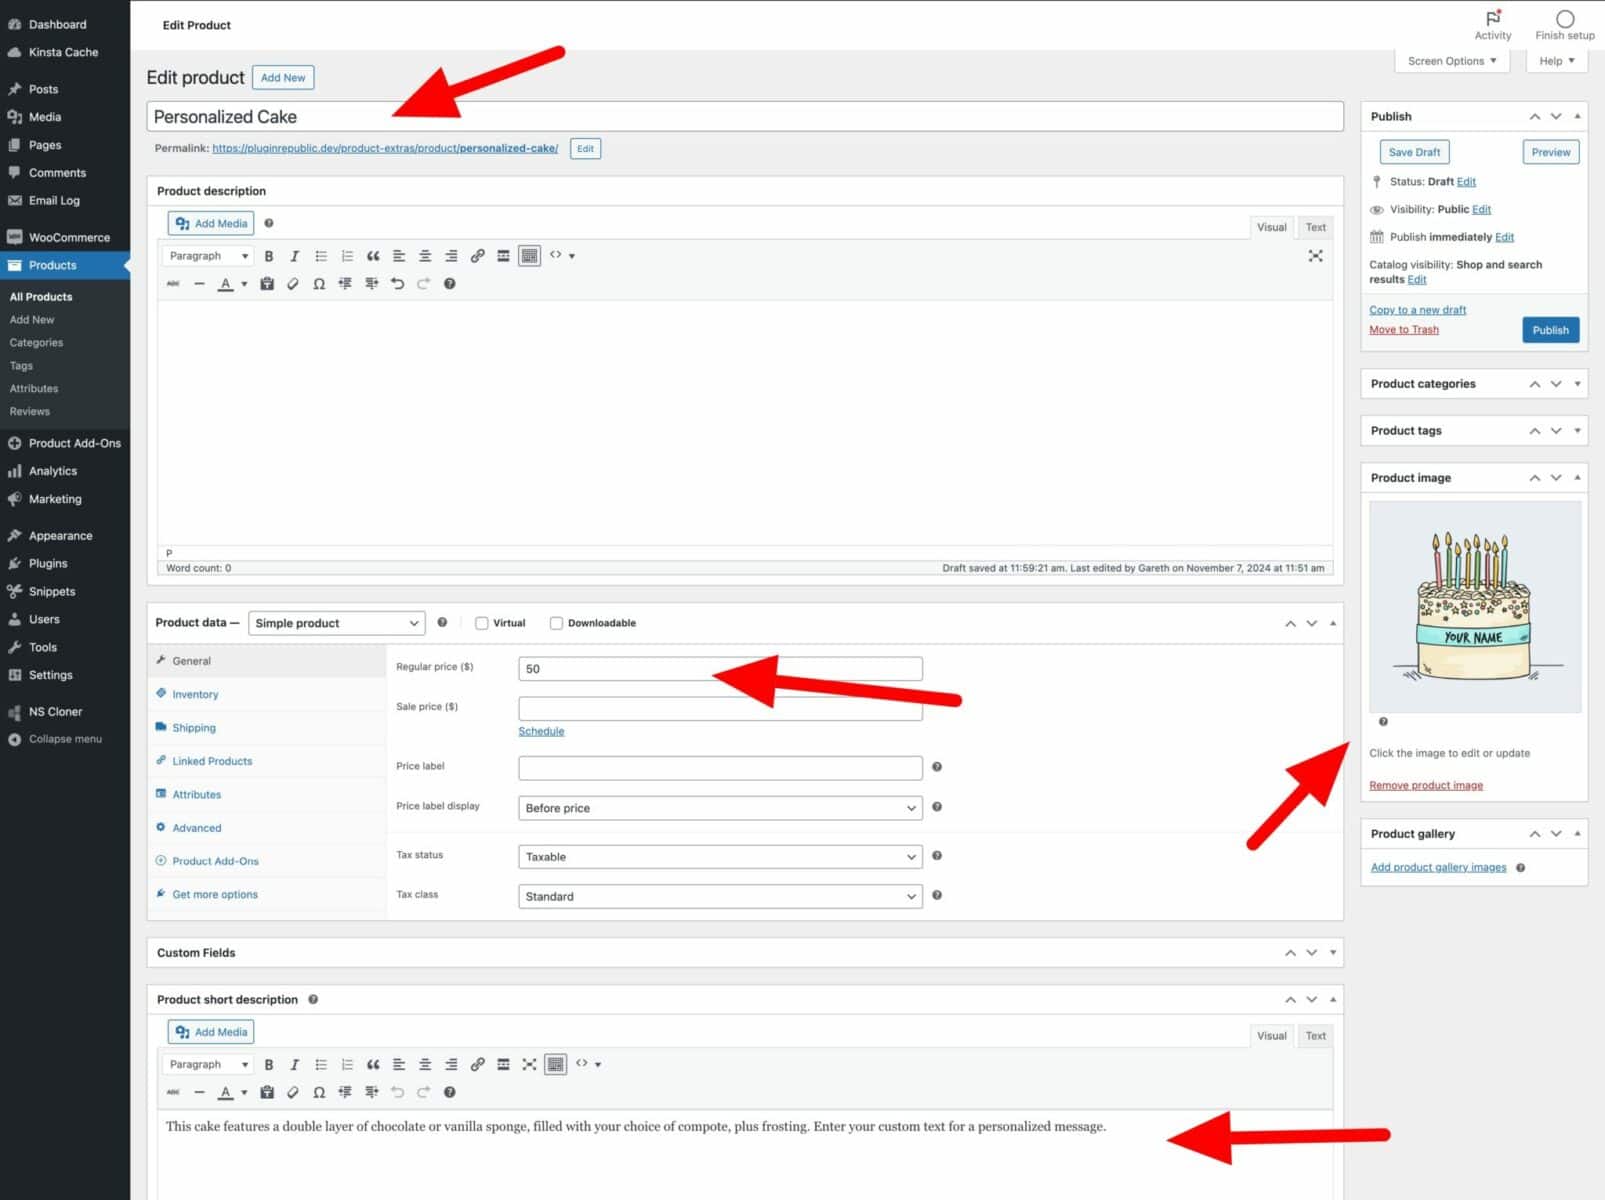
When you’ve added these details, you can publish the product. Click the Publish button to make the product visible to the rest of the world.
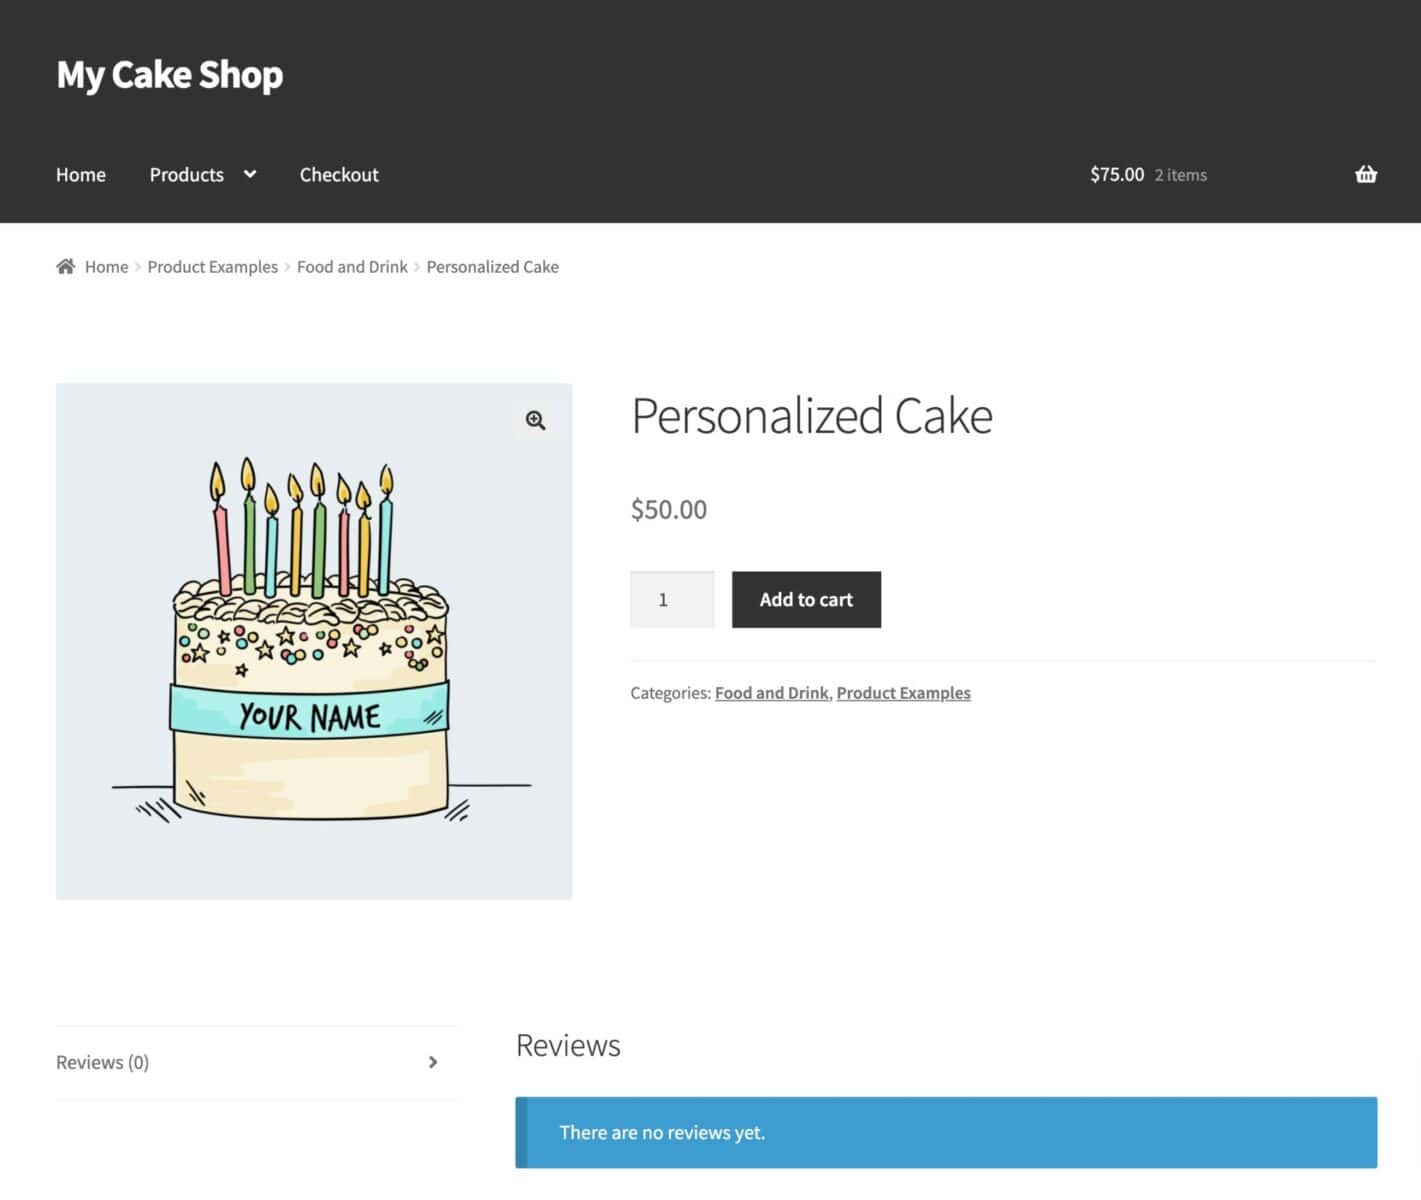
Click on the View product link in the top menu to see your product. It will look something like this on the front end. Remember, the appearance of your site will be mainly determined by the theme you choose.
Adding personalization options to your cake product
Now let’s look at how to let the customer personalize the cake. In our example, they’ll be able to choose different flavors and colors, enter a customized message or name, and upload an image to be displayed on the cake.
To personalize your cake product in this way, you’ll need the WooCommerce Product Add-Ons Ultimate plugin.
WooCommerce Product Add-Ons Ultimate
Personalize products with extra custom fields and options
Product Add-Ons Ultimate allows you to add extra options to your products. You can add around 20 different field types, including text fields, dropdown lists, checkboxes, and so on. These can add to the overall product price as well, if required.
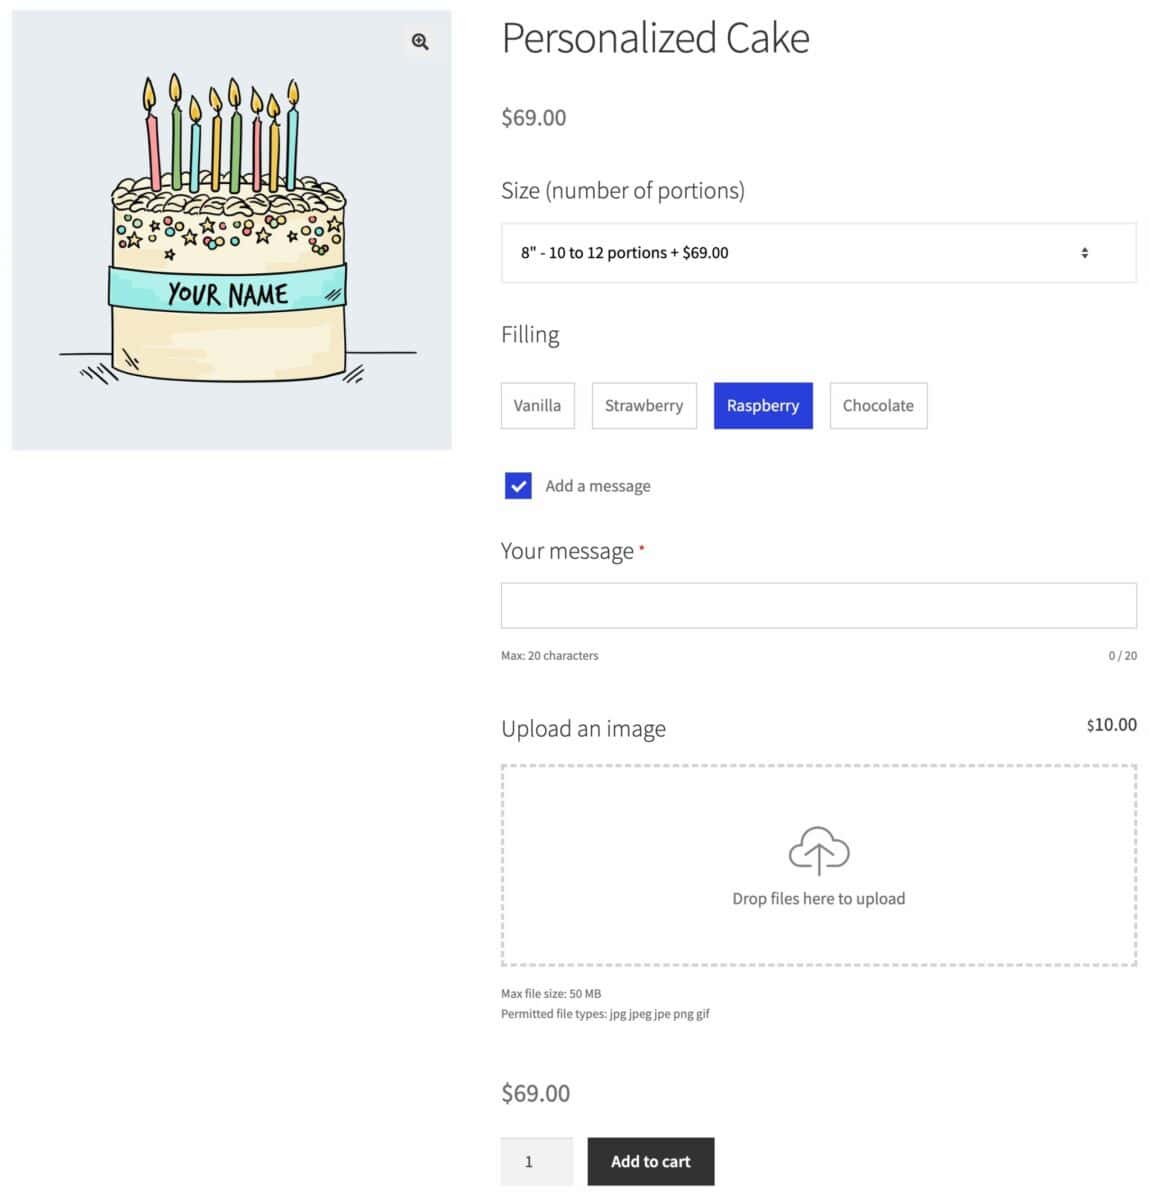
In our example product, we’ll add the following fields:
- A dropdown list (select field) for the size of the cake
- A swatches field to choose the flavor
- A checkbox field to add optional text
- A text field – e.g. for the recipient’s name
- An upload field for a photo of the recipient, if required
Our finished product will look something like this (again, this will partly depend on the theme you choose):
Let’s look at how to add these extra fields.
Step 1: Install and active the Add-Ons Ultimate plugin
Once you’ve purchased the Product Add-Ons Ultimate plugin, you can install it on your site:
- Download the zip file using the link in your welcome email,
- Go to Plugins → Add New in your WordPress dashboard
- Click on the Upload Plugin button
- Drag and drop the zip file into the Choose File area and click Install Now

When the file has uploaded, click on the Activate button.
Step 2: Create your first field
To create your first field:
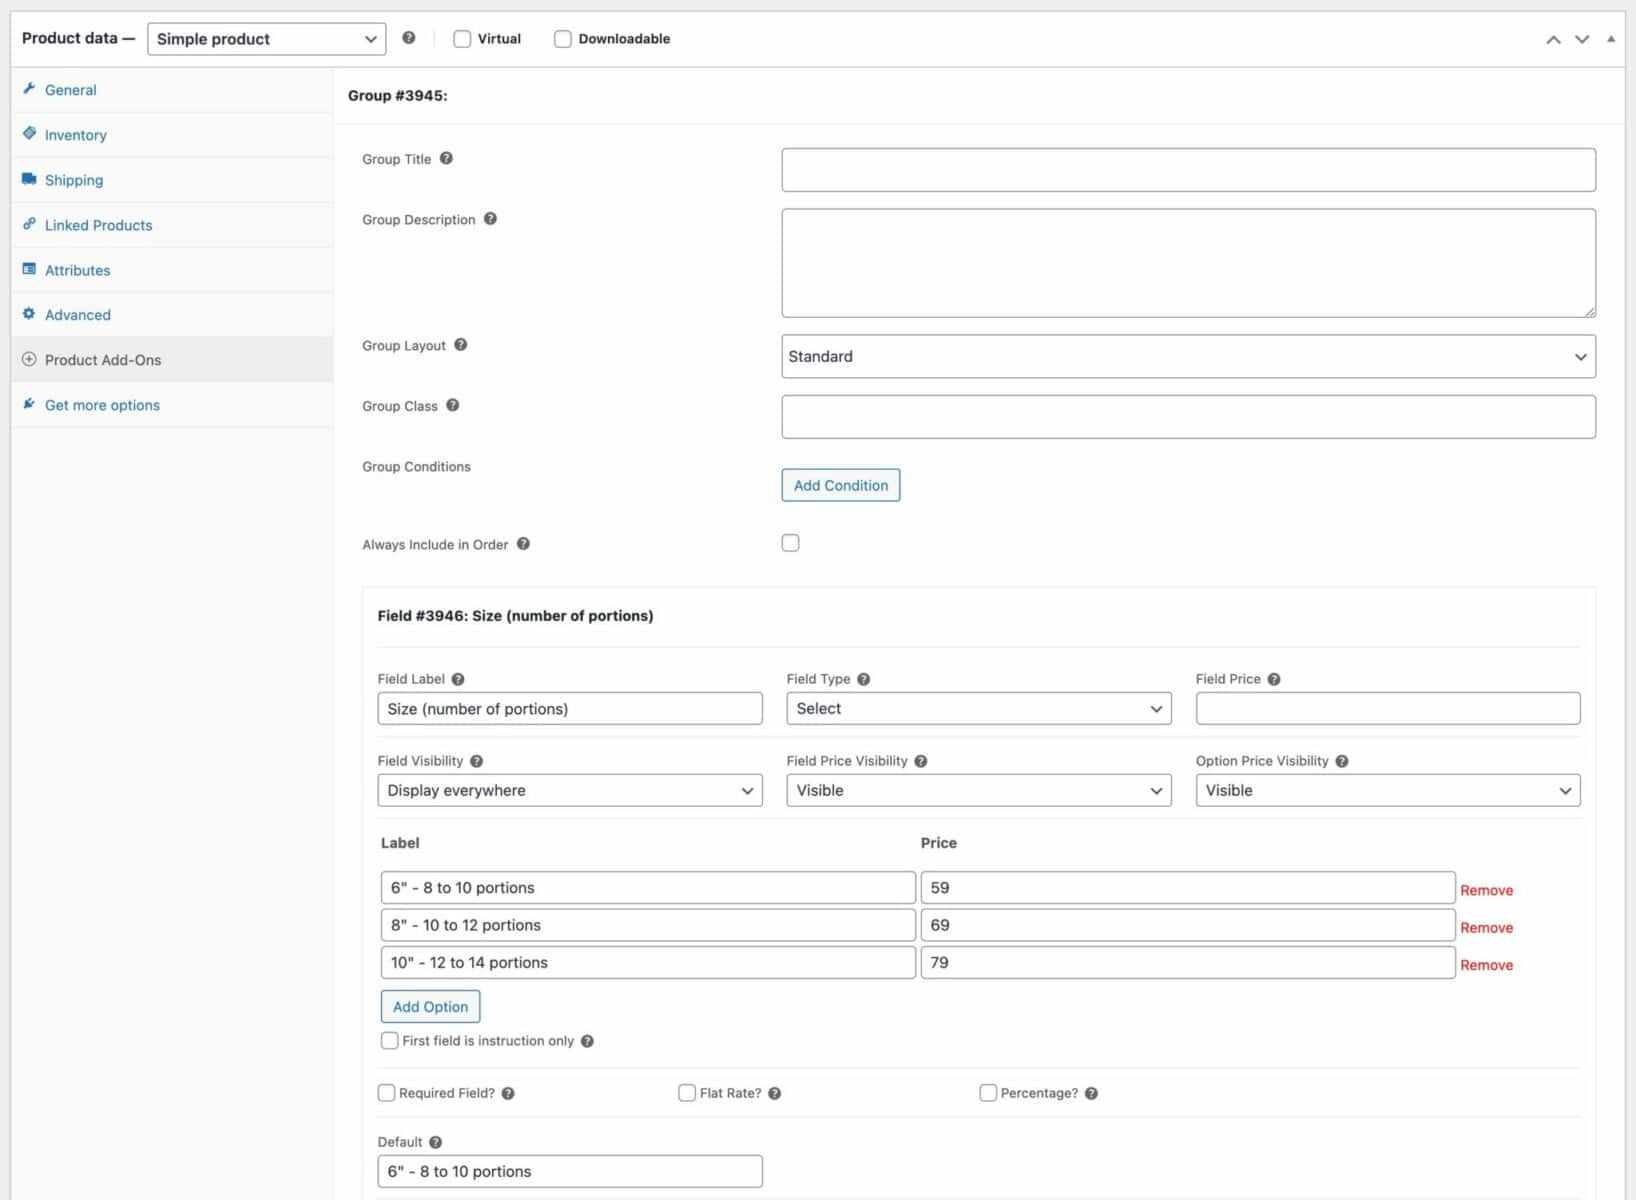
- Click the Product Add-Ons tab in the Product data section of your cake product
- Click Add Group then Add Field
- Choose the field type – in this case, we’ll choose Select
- Enter a label – e.g. Size
- Click Add Option for each option in the select field
- Enter some text for the option and a price if the user selects that option
- Enter a default value if you like by copying the text from the default option label and pasting it in the Default field
The settings will look something like this:
Step 3: Create the other fields
Now you can repeat the step above for all your other fields. Just choose which field type you’d like and add any prices if necessary.
If you are allowing the user to add their own text message, you can limit the number of characters by setting a value in Max chars. You can also choose to charge per character if you like.

Step 4: Preview and publish
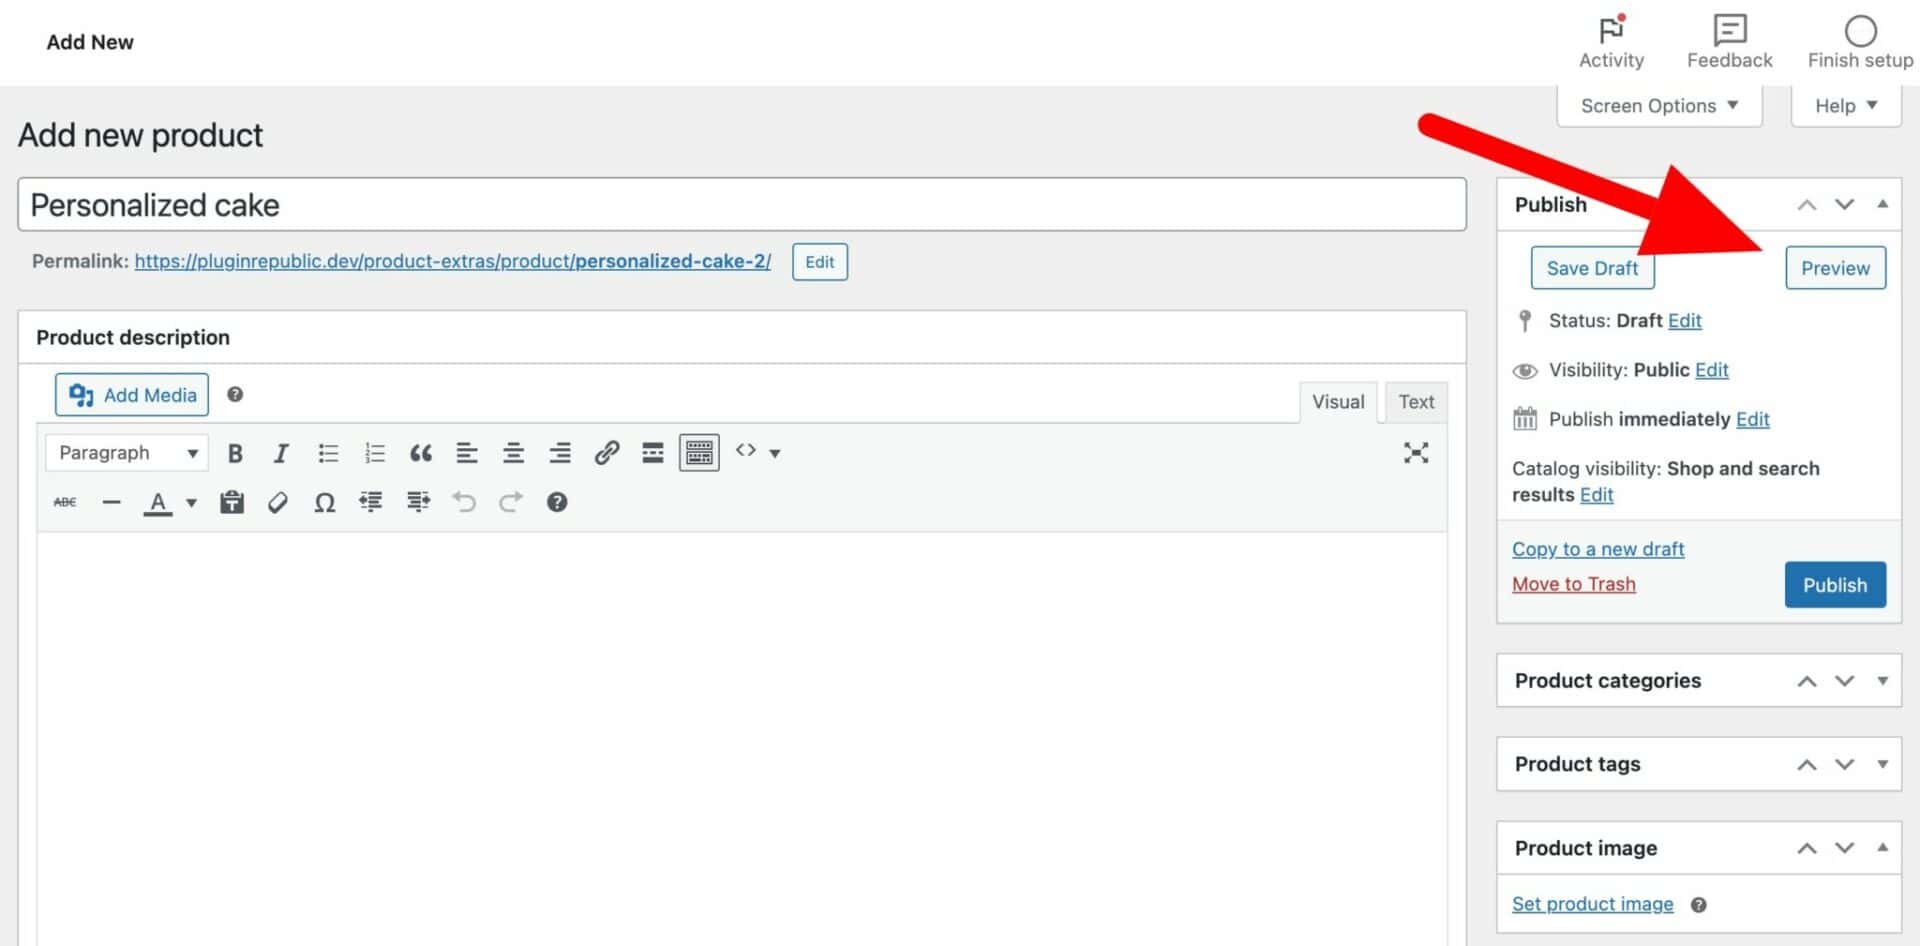
At any time, you can preview your product before making it live. So you can check what it looks like before any customers can see it.
To preview your product, just click the Preview button on the right of the screen:
When you want to save the product without publishing it, click the Save Draft button next to Preview.
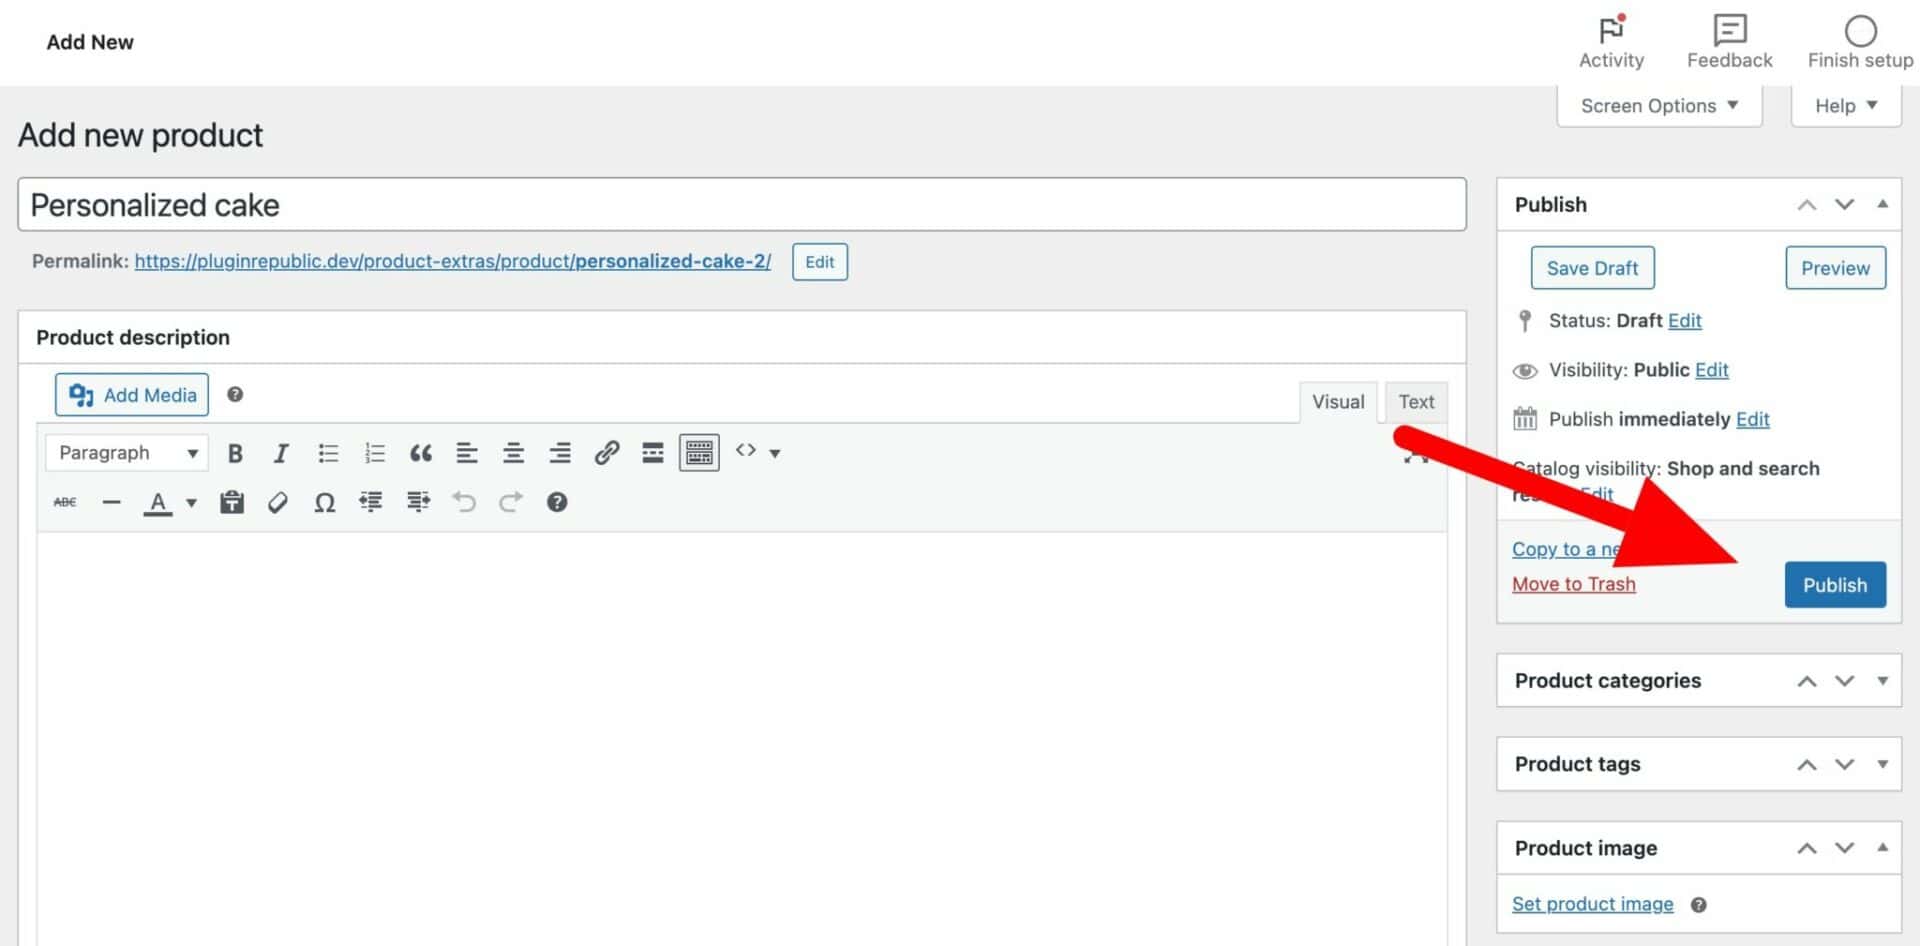
Finally, when you’re ready for the product to go live, click Publish.
Here’s what our example product looks like. You can view the fully working demo here.

Other aspects to consider when setting up an online cake store
Marketing and promotion
- Social media: Create engaging content and build a community on platforms like Instagram, Facebook, and Pinterest. Use relevant hashtags to increase your reach.
- Content marketing: Start a blog to share baking tips, recipes, and behind-the-scenes content. This can help attract organic traffic to your website.
- Email marketing: Build an email list and send regular newsletters to keep customers updated about new products, promotions, and exclusive offers. Use a plugin like Mailchimp or Constant Contact.
- Search Engine Optimization (SEO): Continue to optimise your website’s content and structure for search engines. Use relevant keywords in your product descriptions, blog posts, and meta tags.
- Influencer marketing: Partner with food bloggers or influencers in your niche to promote your products.
- Paid advertising: Consider using paid advertising platforms like Google Ads or social media advertising to reach a wider audience.
Customer service
- Responsive communication: Respond promptly to customer inquiries and provide excellent support. Use a live chat plugin or email support system.
- Easy returns and exchanges: Have a clear return policy and make the process hassle-free. Consider using a return management plugin.
- Customer feedback: Encourage customers to leave reviews and feedback. This can help you improve your products and services.
Expanding your business
- Wholesale: Explore opportunities to sell your cakes to local cafes, restaurants, or grocery stores.
- Corporate orders: Offer custom cakes for corporate events or employee appreciation.
- Gift baskets: Create gift baskets featuring your cakes and other complementary items.
- Seasonal offerings: Introduce seasonal or holiday-themed cakes to attract new customers.
By following these steps on how to sell cakes online and leveraging the power of WooCommerce plugins, you can create a successful online cake business that brings joy to your customers and fulfils your entrepreneurial dreams. Remember, dedication, creativity, and a passion for baking are key to building a thriving online cake store.
Not ready to start selling cakes online? Bookmark this page to help you when you do, and we’ll check in to see how we can help make your WooCommerce business a success when you’re ready to go!
