How to create a WooCommerce product customizer – 3 easy examples

A WooCommerce product customizer gives your customers the chance to design their own products. This is an essential feature for many WordPress store owners. In this article, I’m going to give you a step by step guide to building products that your users can customize on the front end, including three easy to follow specific use cases.
- What is a product customizer?
- What are the benefits of using a product customizer?
- How to create a product customizer in WooCommerce
- Product customizer use cases
To create your WooCommerce product customizer, you’ll need the WooCommerce Product Add-Ons Ultimate plugin.

Product Add-Ons Ultimate is the perfect custom product designer for your WooCommerce store. One of its main advantages over similar configurator plugins is that it will fit with your theme, giving the user a familiar interface.
Let’s take a look at some of its features.
What is a WooCommerce product customizer?
We can start by defining what we mean by a product customizer. A WooCommerce custom product designer customizer or product designer should allow the user to configure aspects of the product from the front end – that is from the product page itself.
Tee-shirt product designer
Let’s take a look at a common example – a tee-shirt designer.
You can see the demo product here.
Product workflow
The customer can use different fields, like checkboxes, text fields, file uploads, etc, to define their personalized version of the product.
Each extra field can have an additional price (or even discount) associated with it, so that as the customer makes their selections, the price of the product changes.
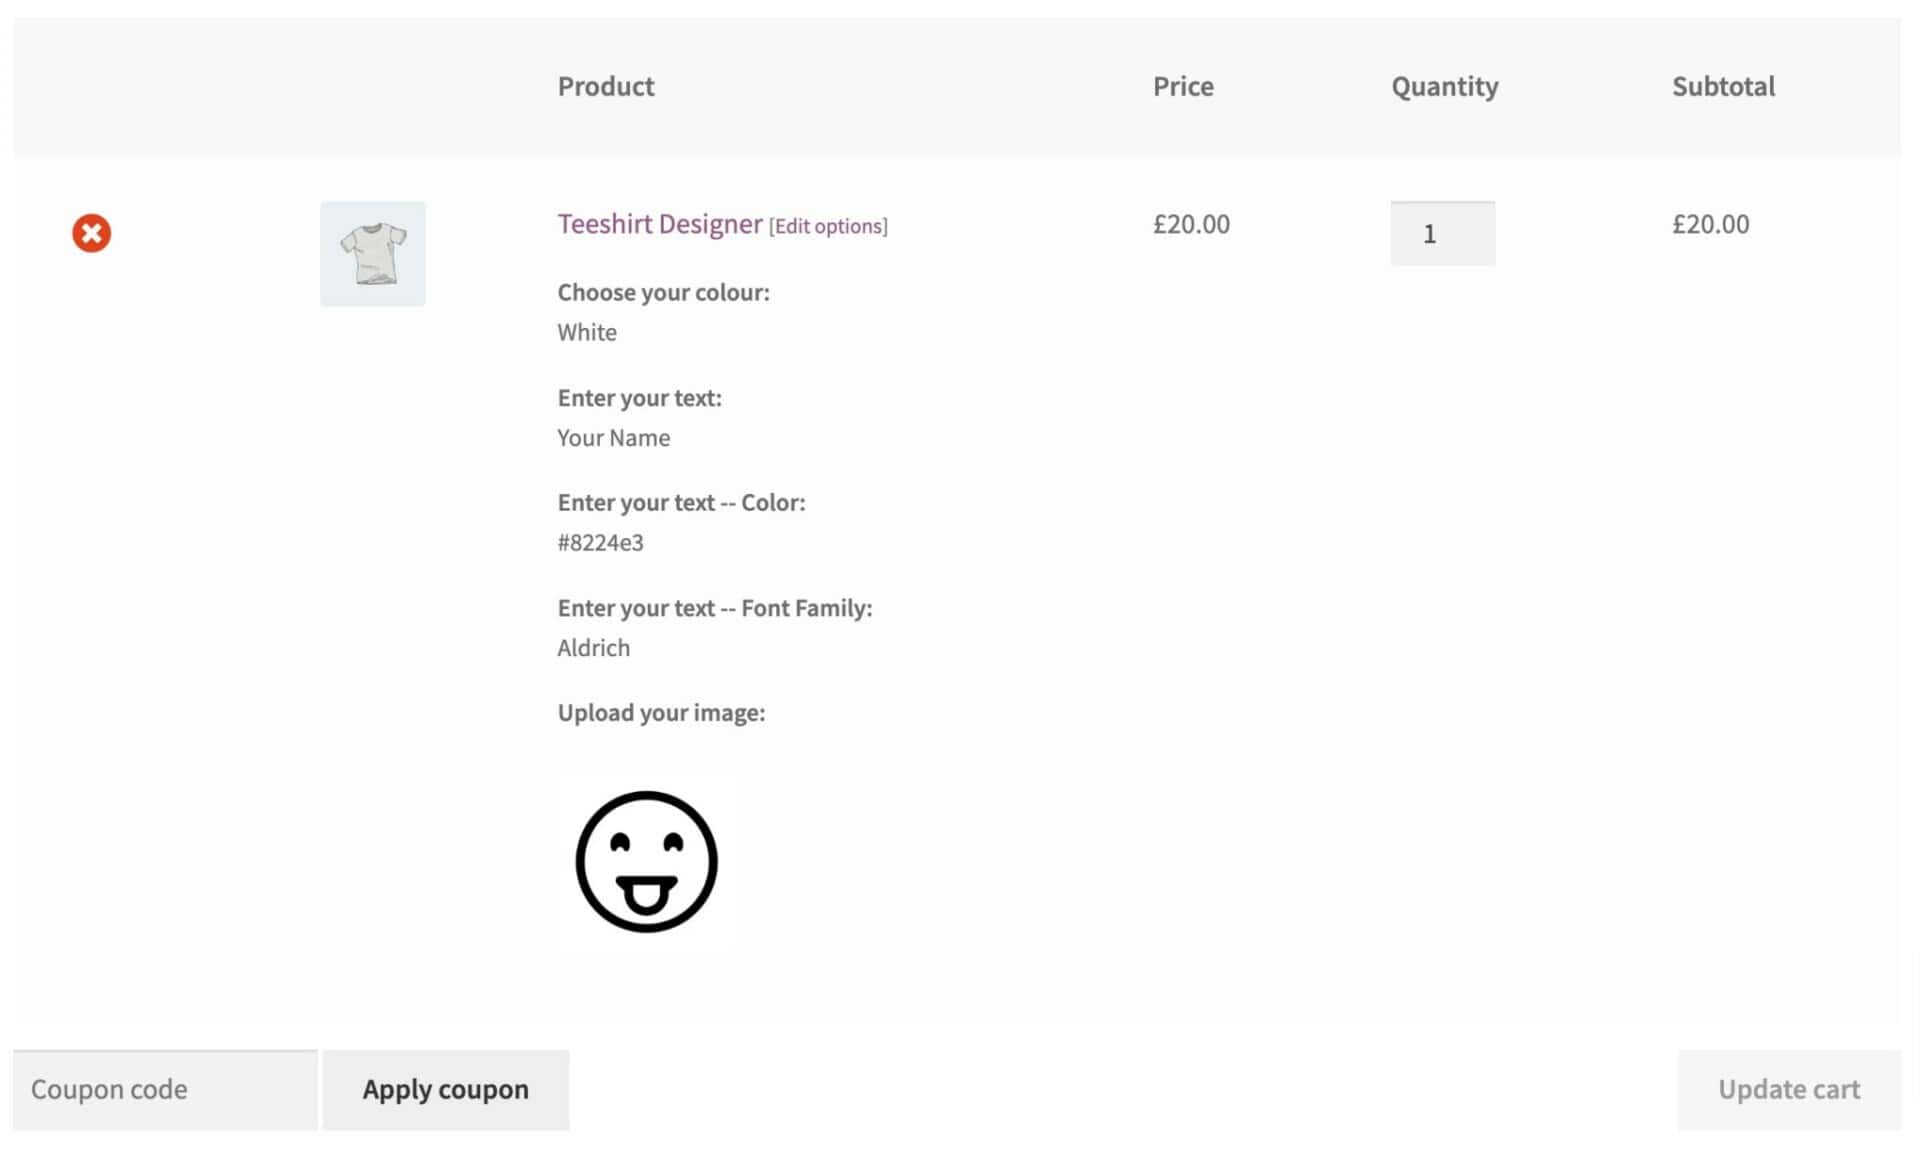
After the customer enters their options and adds the product to the cart, the extra fields are displayed as additional meta data in the cart.
When the customer purchases the product you, the store owner, will receive an email listing the product customizations. You’ll also be able to see the customizations in the order summary in the back end.
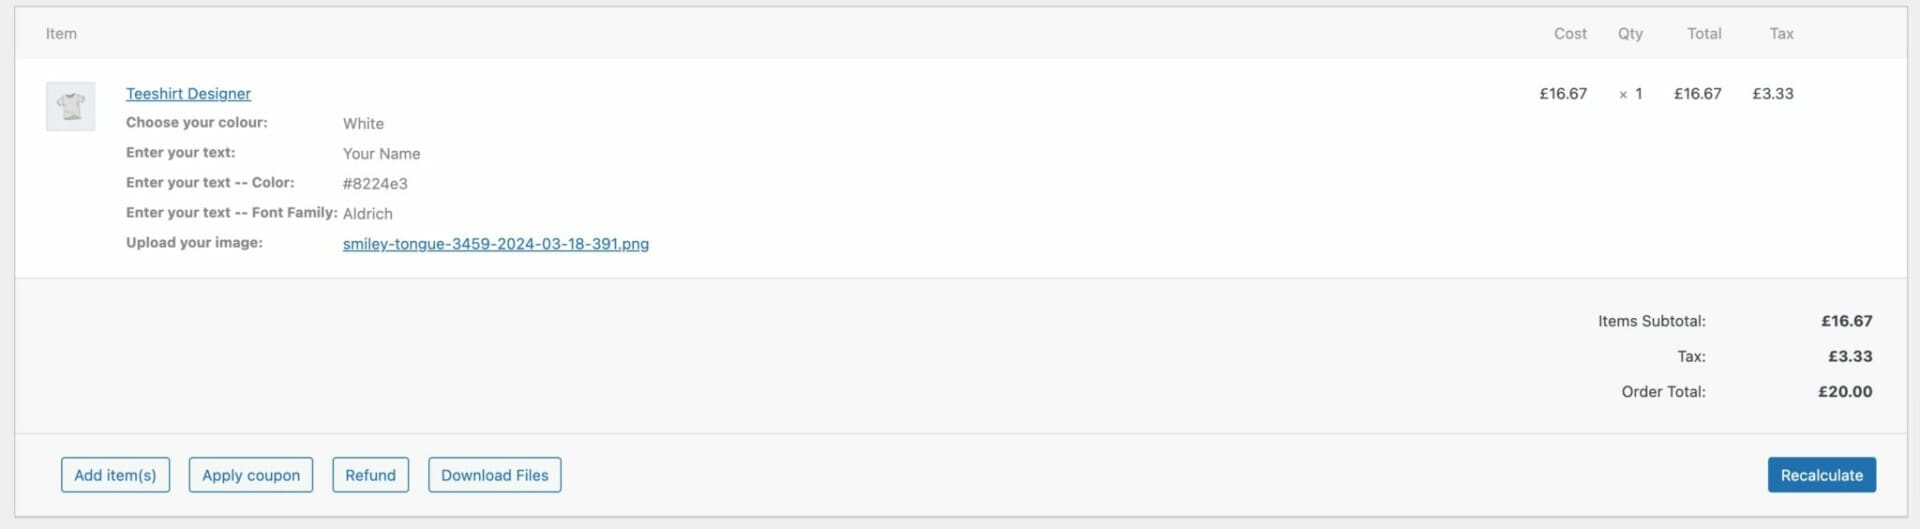
With all the customizations listed, you can prepare the customer’s order to their exact specification.
What are the benefits of using a product customizer?
Clearly, allowing your customers to configure products to their exact specification is a benefit to your business. Here are some examples of how adding customizable options to your products can benefit you:
- Upsells: encourage the customer to choose options to include upgrades within their purchase
- Complete the look: offer the customer the chance to buy multiple products from the product page with a single click
- Personalization: allow the customer to personalize their products
- Warranties: encourage the user to purchase a warranty direct from the product page
- Gift wrapping: add a checkbox so that the customer can choose to have the product gift wrapped
All these possibilities have one thing in common: they add value to your product.
How to create a product customizer in WooCommerce
In all the examples on this page, we’re using the WooCommerce Product Add-Ons Ultimate plugin. First we’ll look at setting it up and adding some simple fields; then we’ll look at specific examples of products where you would need to use it.
Download, install and activate
- When you purchase the Product Add-Ons Ultimate plugin, you’ll get an email with a download link and licence key.
- Download the zip file to your computer then go to the ‘Plugins’ page in your WordPress admin. Click ‘Add New’ then click ‘Upload Plugin’.
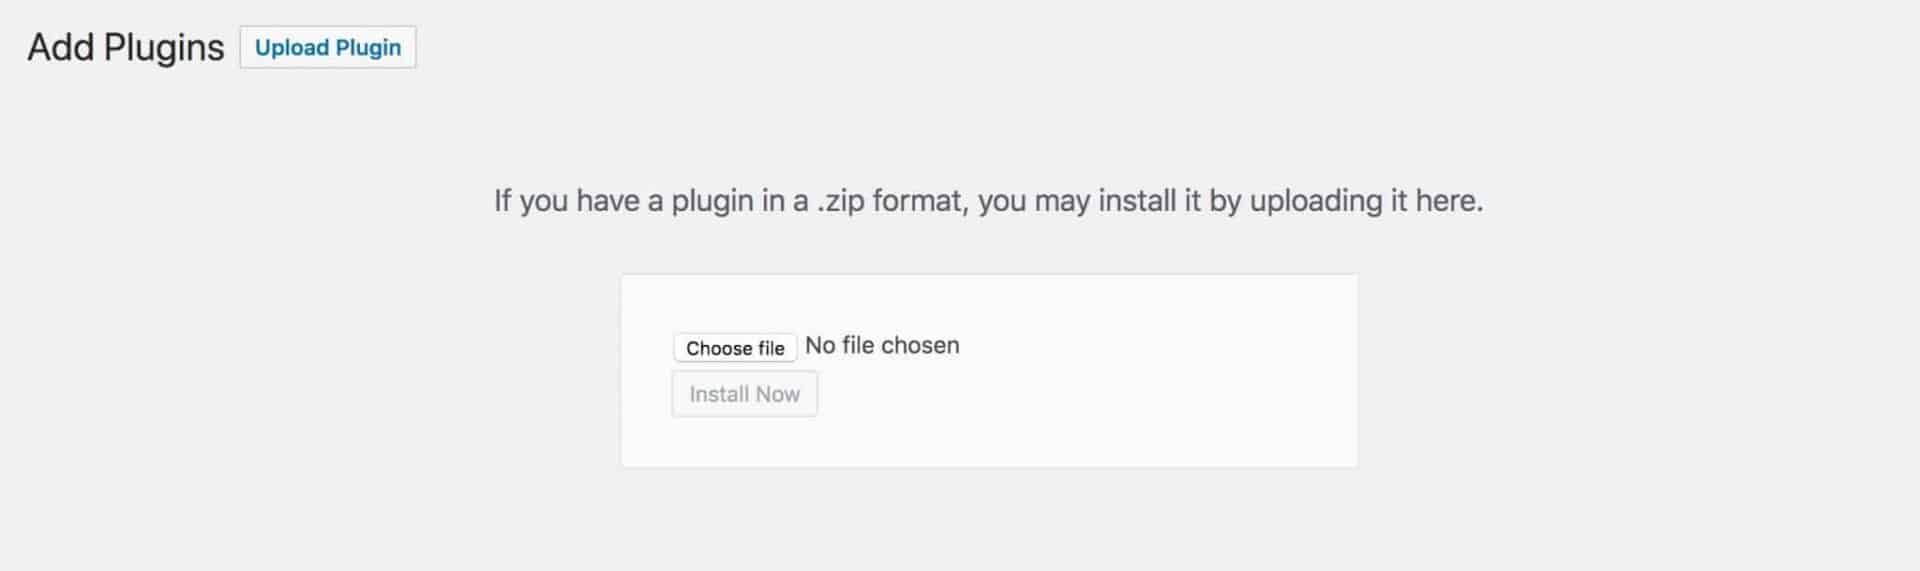
- Upload the WooCommerce Product Add-Ons Ultimate zip file and click ‘Install Now’.
- Once the plugin has uploaded, you’ll have the option to activate it. Click ‘Activate Plugin’.

WooCommerce Product Add-Ons Ultimate should now be installed and active.
Enter your licence key
Before you get started, go to WooCommerce > Settings > WooCommerce Product Add-Ons Ultimate and enter your licence key into the field.
Add a custom field to a product
WooCommerce Product Add-Ons Ultimate allows you to add extra fields direct to individual products or to multiple products through the Global Add-Ons page. In these examples, we’ll just look at adding fields to individual products – though the process is very similar for adding global fields as well.
- Create a new product and ensure you assign a price to it (even if the basic price is 0).
- Click the Product Add-Ons tab in the Product Data section
- Click ‘Add Group’ then ‘Add Field’

- Choose your field type in the ‘Field Type’ setting
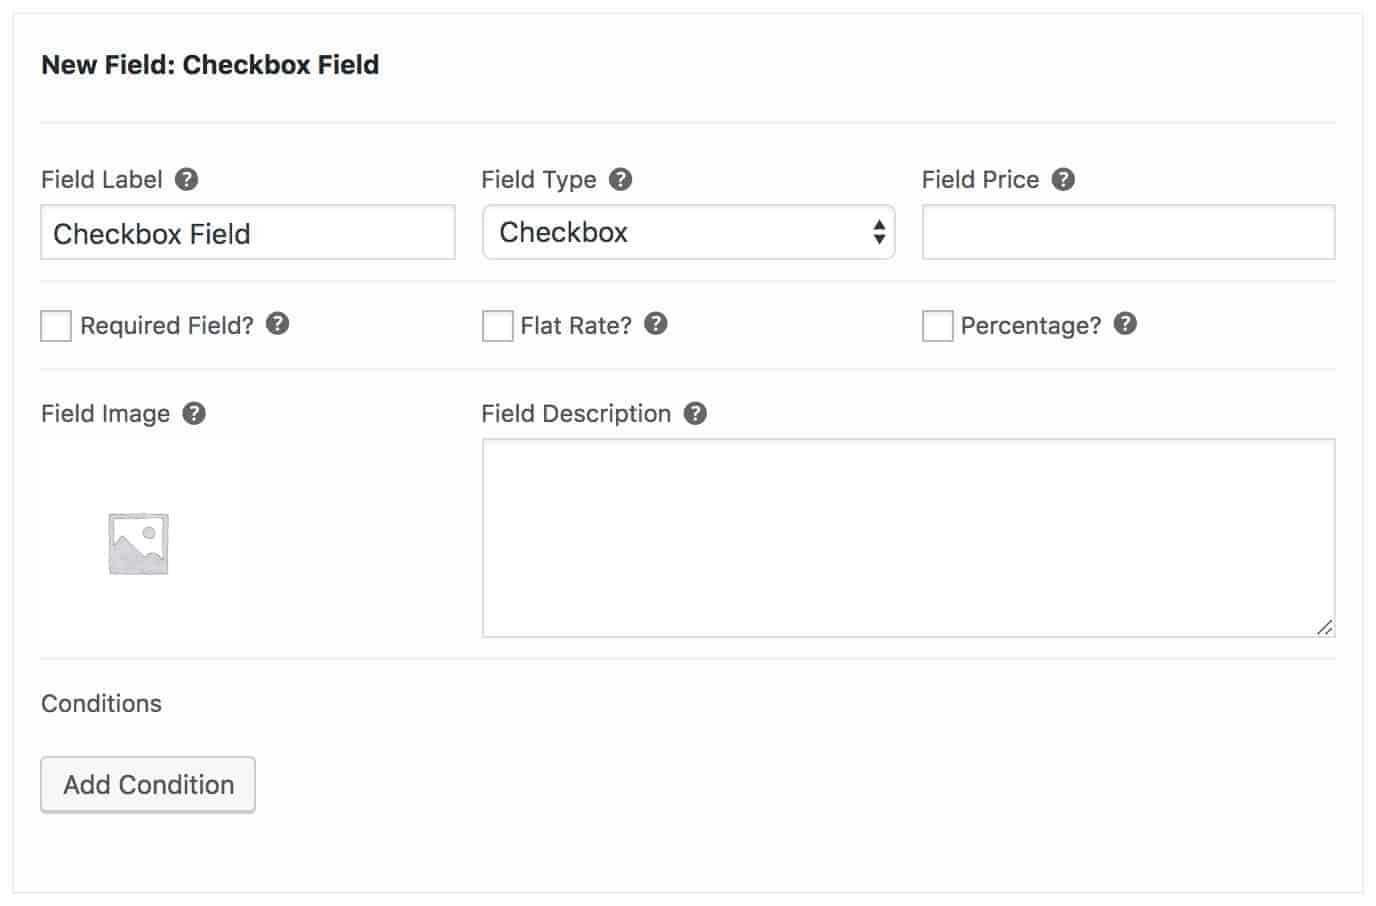
In the example above, we’ve added a ‘Checkbox’ field to the product. Publish the product and it’ll something like this on the front end (Storefront theme in this example but will work with any theme).
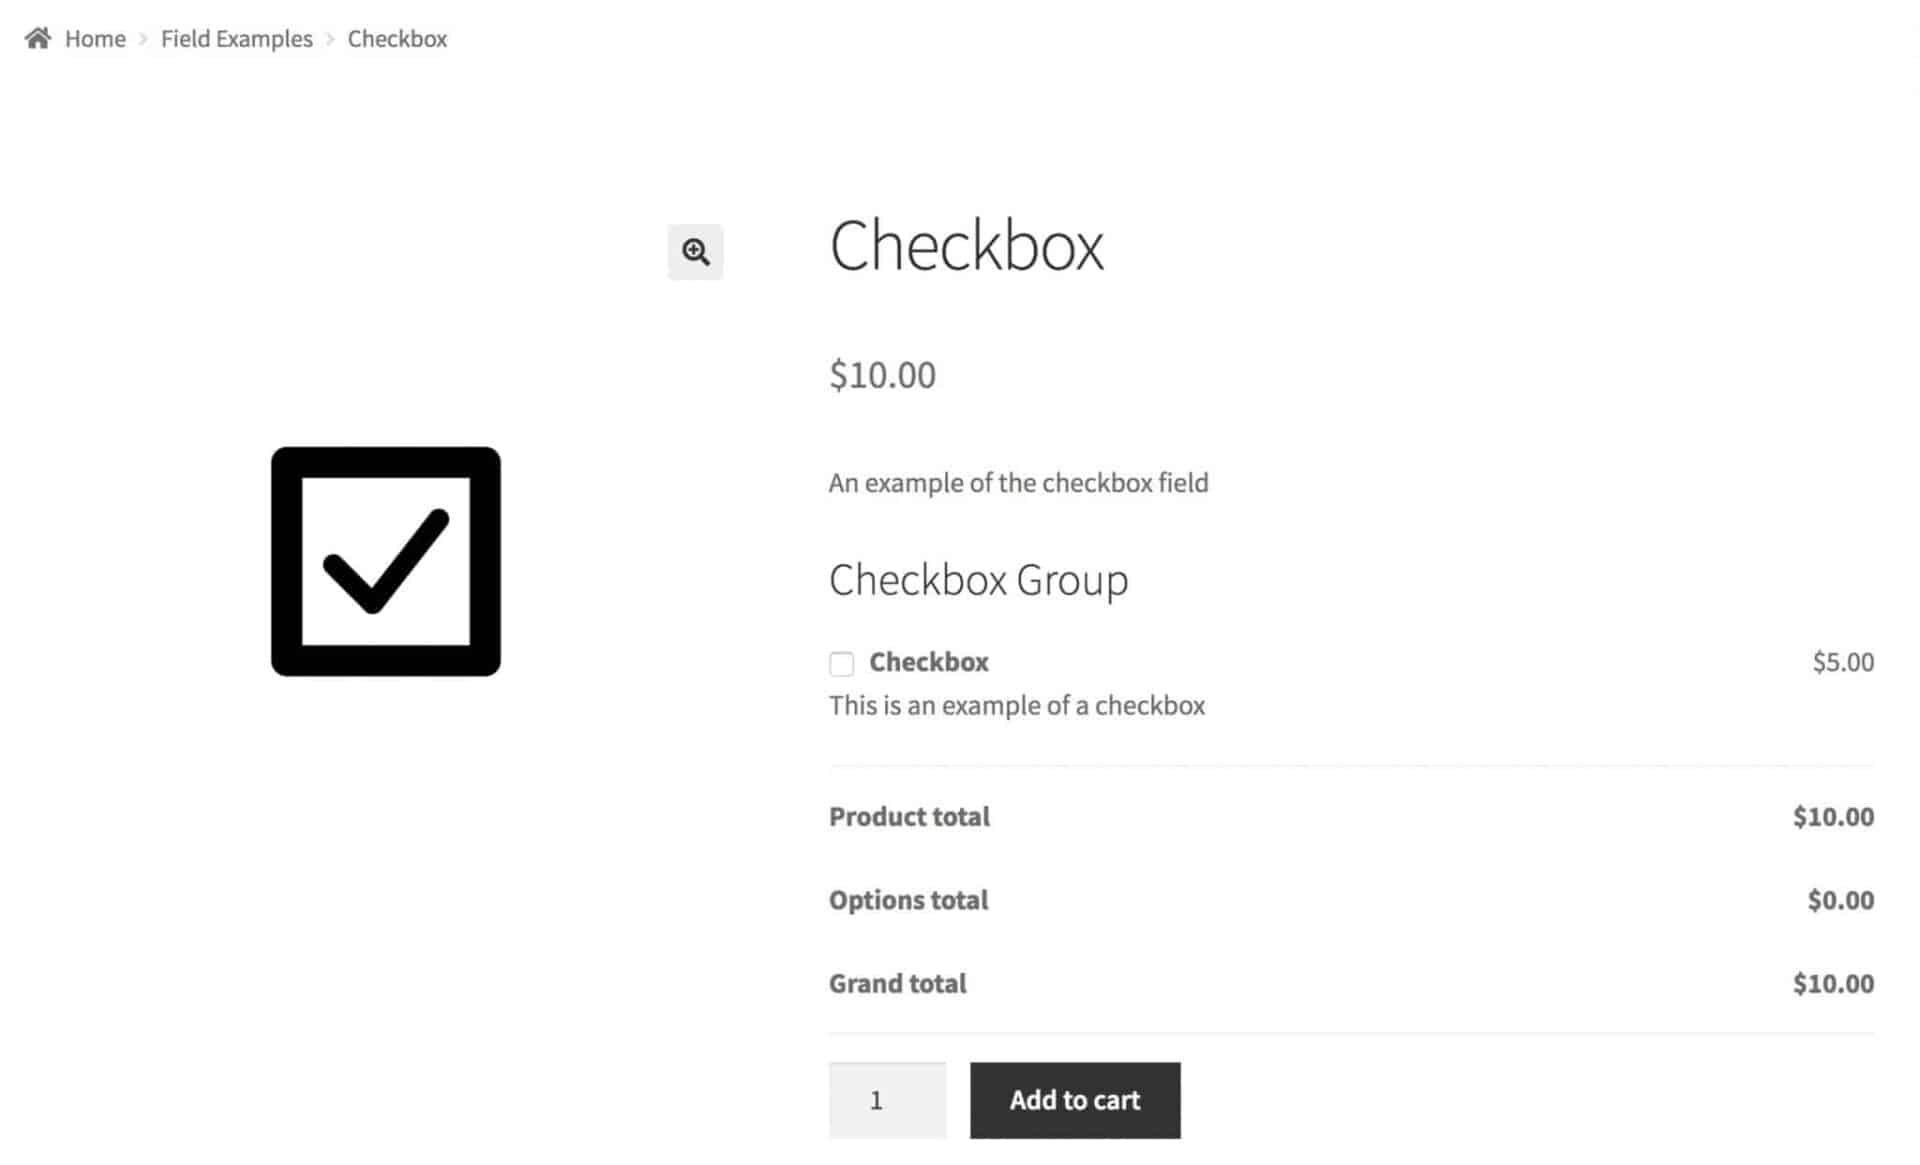
In the screenshot above, you can see that a checkbox field has been added with a label, description and price. If the user selects that checkbox, it’ll add $5 to the price of the product.
There’s also a table showing the base product price, the cost of additional options, and the grand total. This table is configurable so that you can change the labels, just show the total price, or hide it altogether.
That, in a nutshell, is how to add an extra field using WooCommerce Product Add-Ons Ultimate.
Related Tutorial
Find out more about WooCommerce custom fields here

Three product customizer use cases
Now let’s look at how to create some specific WooCommerce custom product designers where users can build up personalized their products from a set of options.
Related Tutorial
For further product builder ideas, take a look at this article on building your own product

1. How to create a simple teeshirt designer in WooCommerce
- How to create a simple teeshirt designer in WooCommerce
You can allow users to create their own teeshirts very simply in WooCommerce using the Product Add-Ons Ultimate plugin. Let’s create a product that allows users to:
- Add a colour swatch so that users can choose the colour of their shirt
- Then add an upload field for users to upload a graphic that will be printed on the teeshirt
- Add a text field to allow users to enter their own text to be printed on the shirt
Note that in order to preview text and uploaded images on the main product image, you’ll also need the following plugins:
However, you can still make a version of this product without these extra plugins – the user just won’t be able to preview their options live on the product image.
Follow the steps above to create a product and then add the following extra fields:
Create an image swatch field
- In the Product Add-Ons panel in the Product Data section, click ‘Add Field’.
- In the ‘Field Type’ option, choose ‘Image Swatch’.
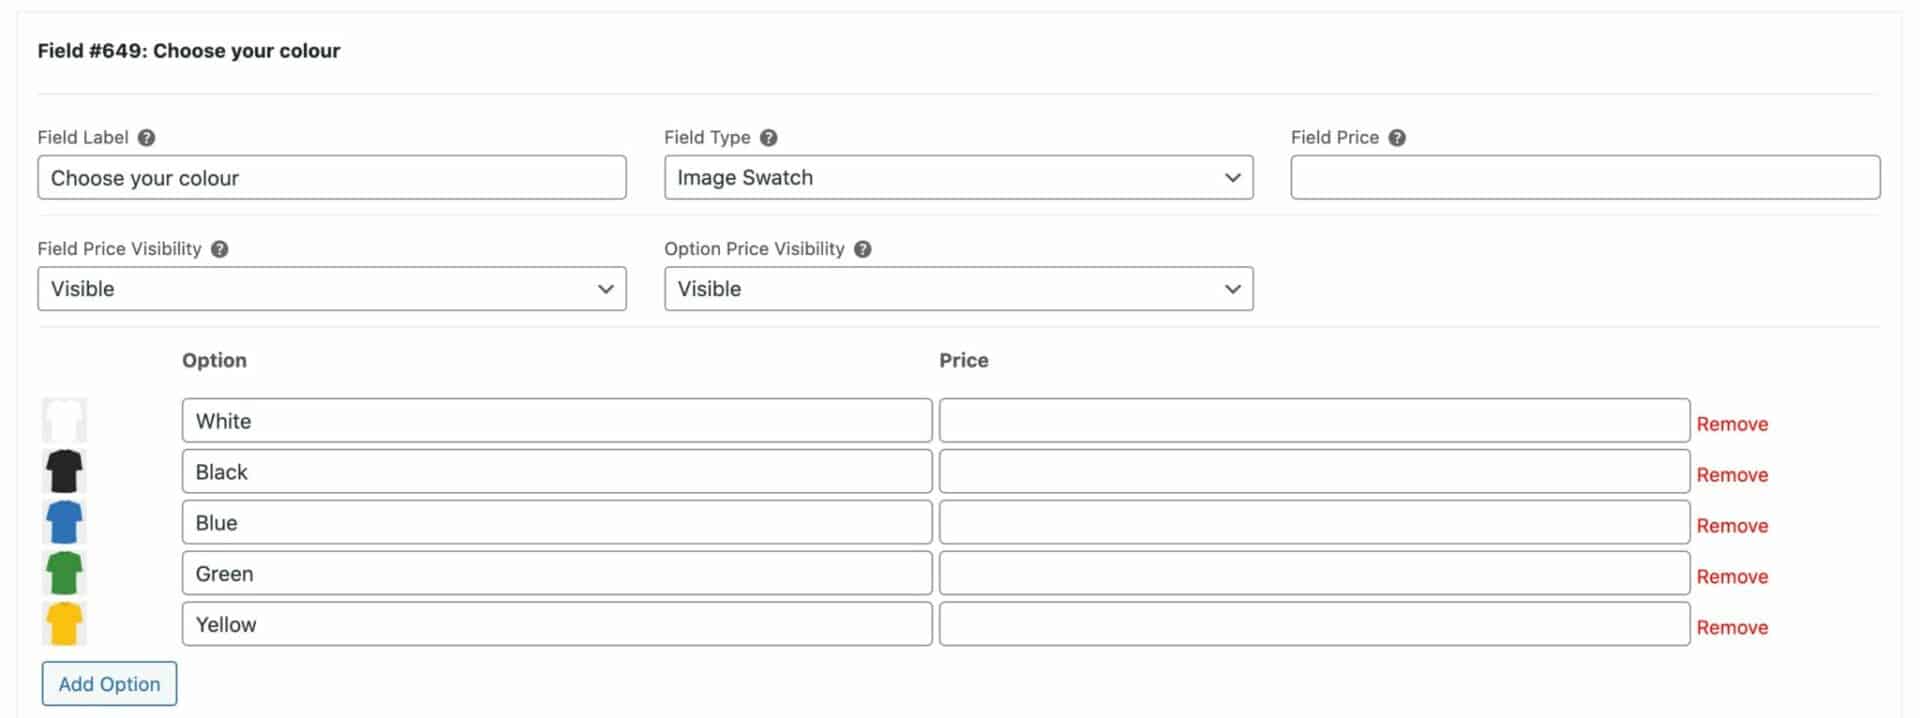
- You can add a title in the ‘Field Label’ field.
- Then click the ‘Add Option’ button for each image swatch that you wish to add. You can create simple images with solid background colours for your swatches.
- Note that because the colour swatch is descriptive enough, you can check the option to ‘Hide Labels’.
- You can also make it compulsory for the user to select a value in this field by choosing ‘Required Field’.
Create a text input field
Let’s allow our customers to add a short slogan.
- Click ‘Add Field’
- Choose ‘Text’ as the field type
- Enter a title in ‘Field Label’
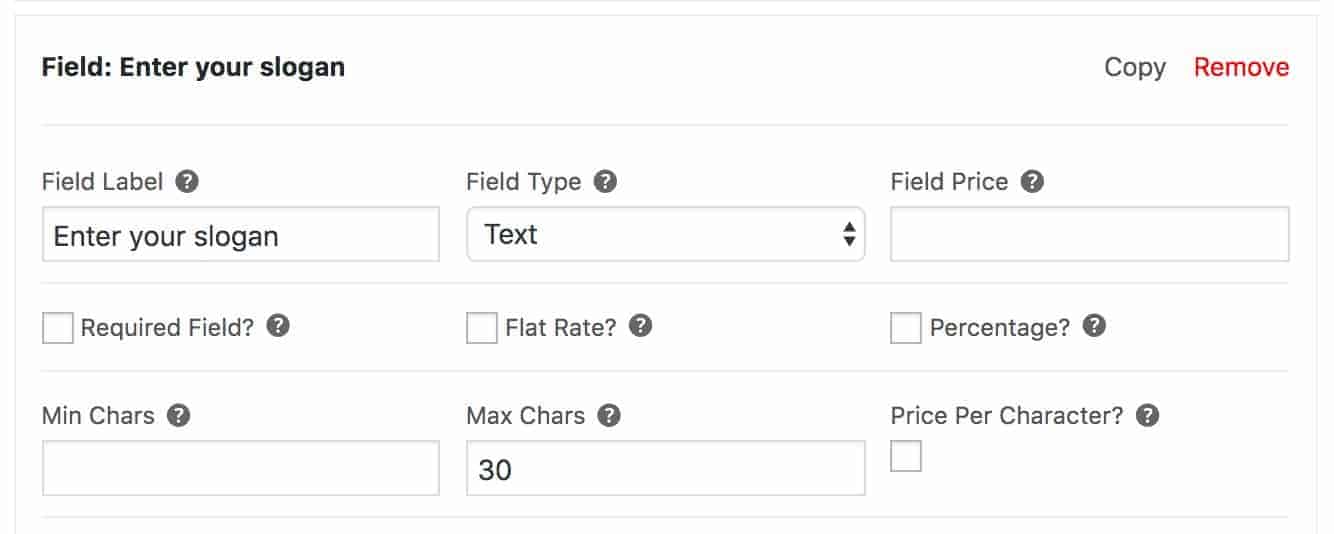
- Note that text fields have some extra options. In this case, we’ve set the max number of characters to be 30.
Create a file upload field
Finally, we can add a field where the customer can upload a graphic to print on their teeshirt.
- Click ‘Add Field’
- In the ‘Field Type’ option, choose ‘Upload’.
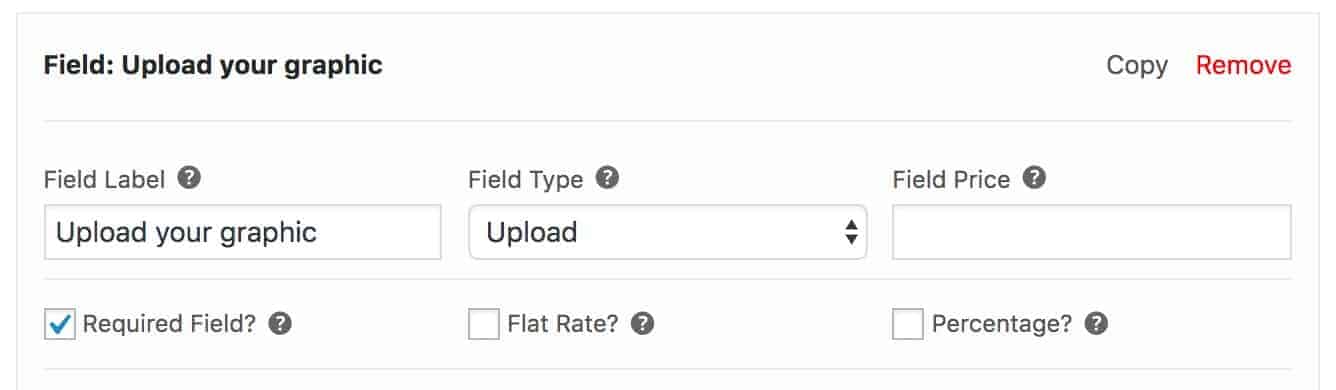
- Enter a title for the field in ‘Field Label’
- Check ‘Required Field’ to force the user to upload an image
Teeshirt designer product
Here we’ve created a really simple teeshirt designer product. You can take a look at a working example here.
Note that in the demo product, you can actually preview your text and uploaded image. We’ll take a look at how to do that now.
Bonus: preview your text and image uploads
In the example above, we can also use the Text Preview and Image Preview plugins to allow the user to preview their customisations.
These plugins require the Add-Ons Ultimate plugin and are available as part of the Add-Ons Ultimate Bundle:

Product Add-Ons Ultimate Bundle
Advanced features, superior control and excellent savings
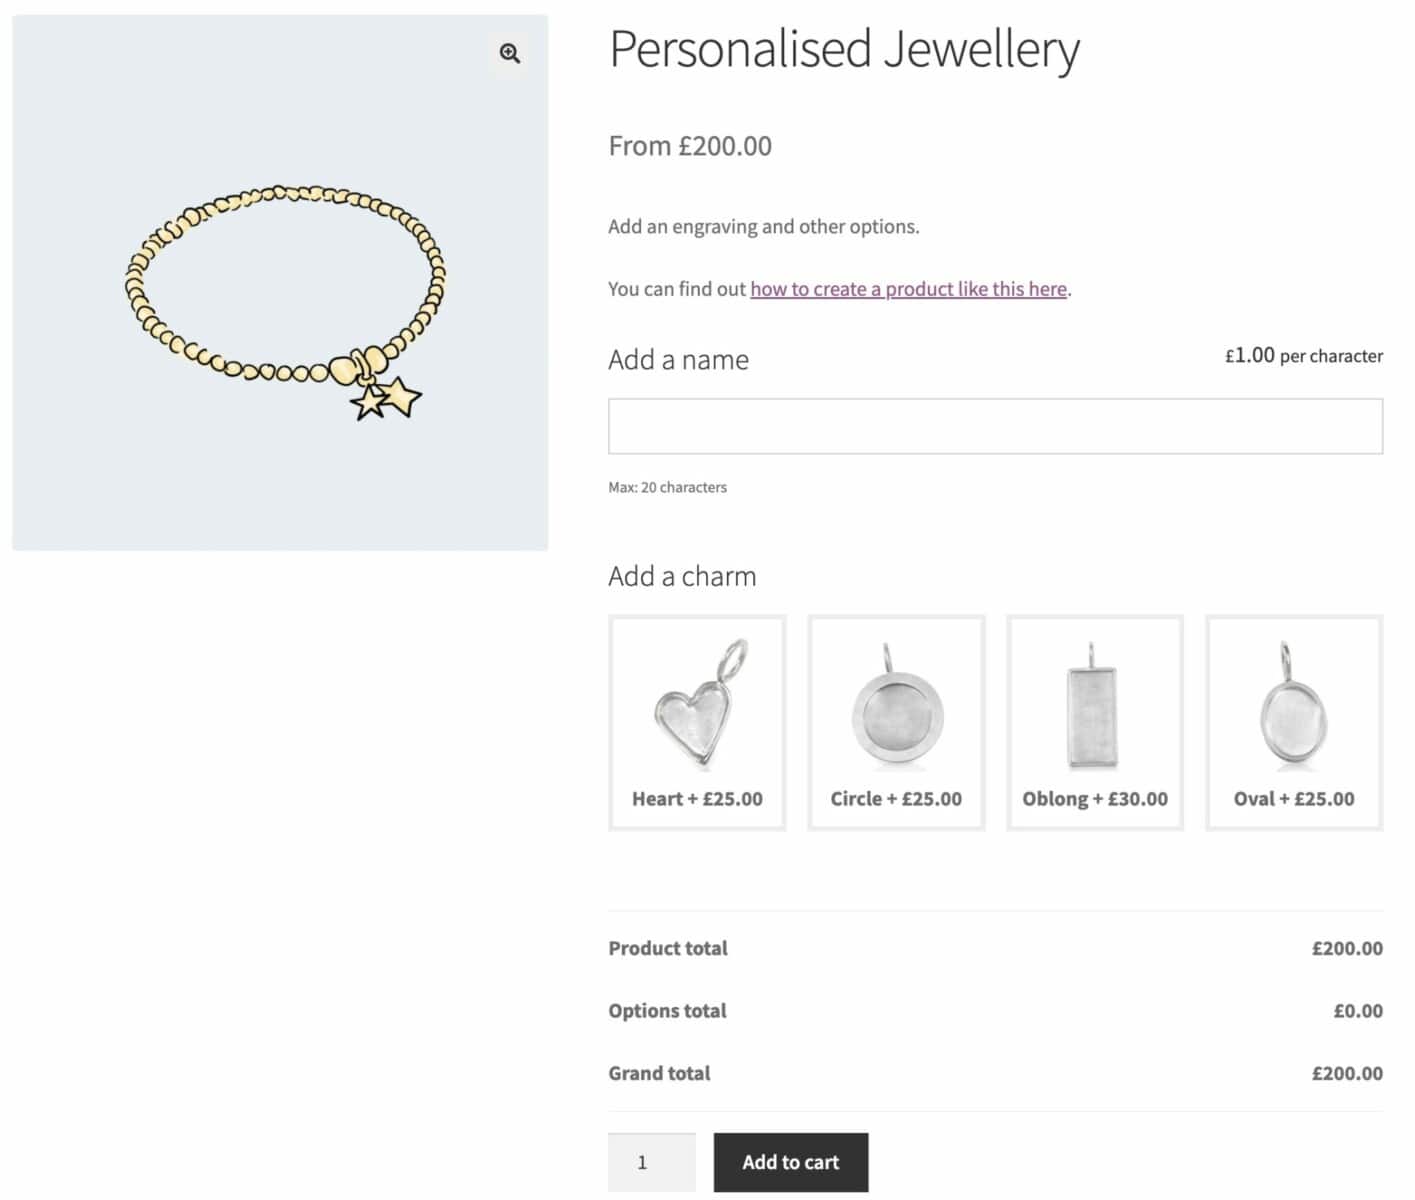
2. Designing and personalizing jewellery
Let’s create a WordPress product customizer so that customers can specify their own engraving for jewellery. In this example, we’ll create a product that will allow your customers to personalize a bracelet by:
- Adding a text field to allow the user to enter a name or other text to be engraved
- Adding an image swatch field for the customer to choose one or more charms to add to the bracelet
Follow the steps above to create a product and then add the following extra fields:
Create a text input field
- In the Product Add-Ons panel in the Product Data section, click ‘Add Field’.
- In the ‘Field Type’ option, choose ‘Text’.
- Enter a title in ‘Field Label’
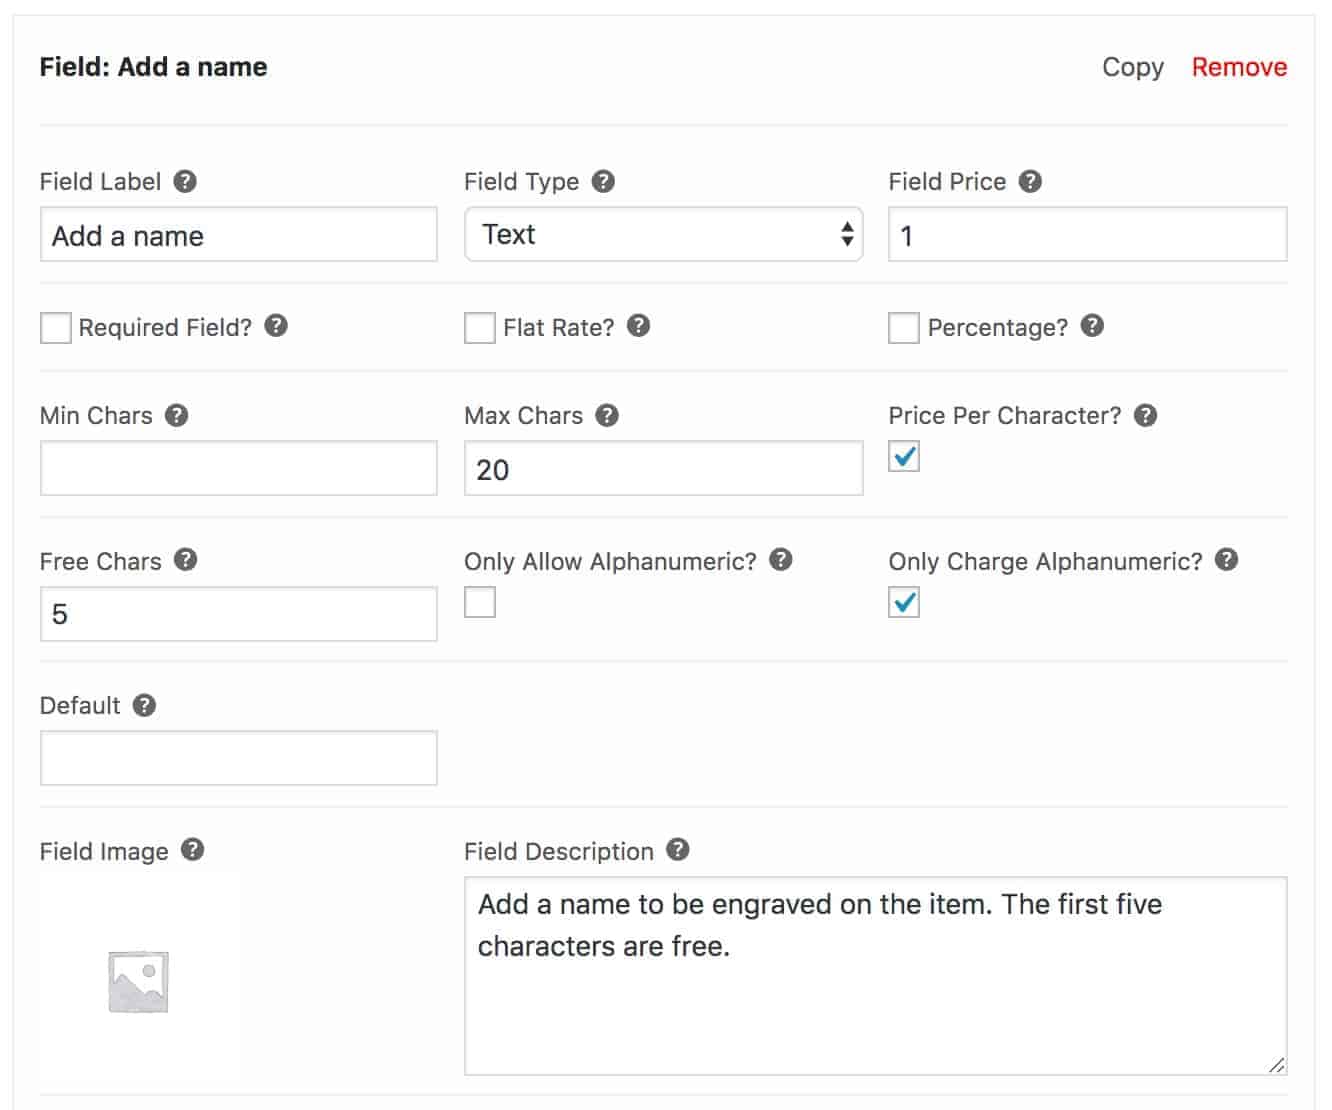
Note that we’ve set a few extra parameters here:
- In ‘Field Price’ we’ve entered a value for the field. Normally, this would just be added once to the cost of the product but, as this field is a text input, we also selected the ‘Price Per Character’ option. This means that the field price will be multiplied by the number of characters entered
- However, for our product we can allow up to 5 characters to be entered free of charge. So in ‘Free Chars’ we’ve entered ‘5’
- Also, we only want to charge for alphanumeric characters – we don’t want to charge for spaces for example. So we’ve also checked the ‘Only Charge Alphanumeric’ option
- We’ve also entered some additional information in the ‘Field Description’ field to explain things to the customer
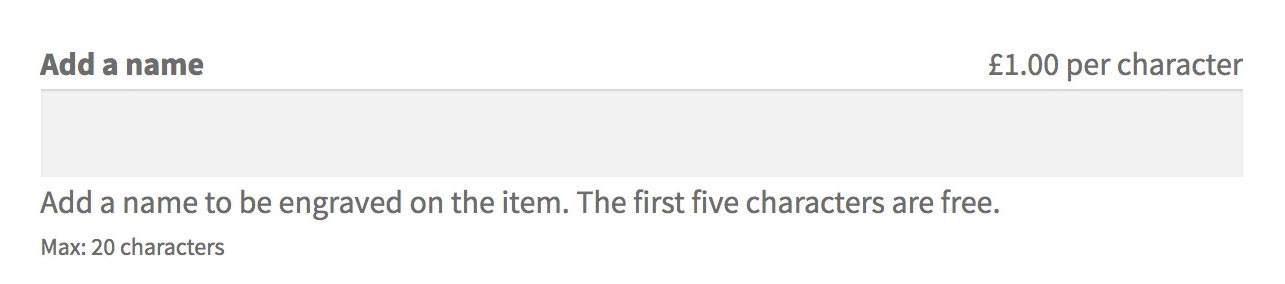
On the front end, the field looks like this:
Create an image swatch field
Now we can create a field that will allow users to choose different charms to add to their bracelet.
- In the Product Add -Ons panel in the Product Data section, click ‘Add Field’.
- In the ‘Field Type’ option, choose ‘Image Swatch’.
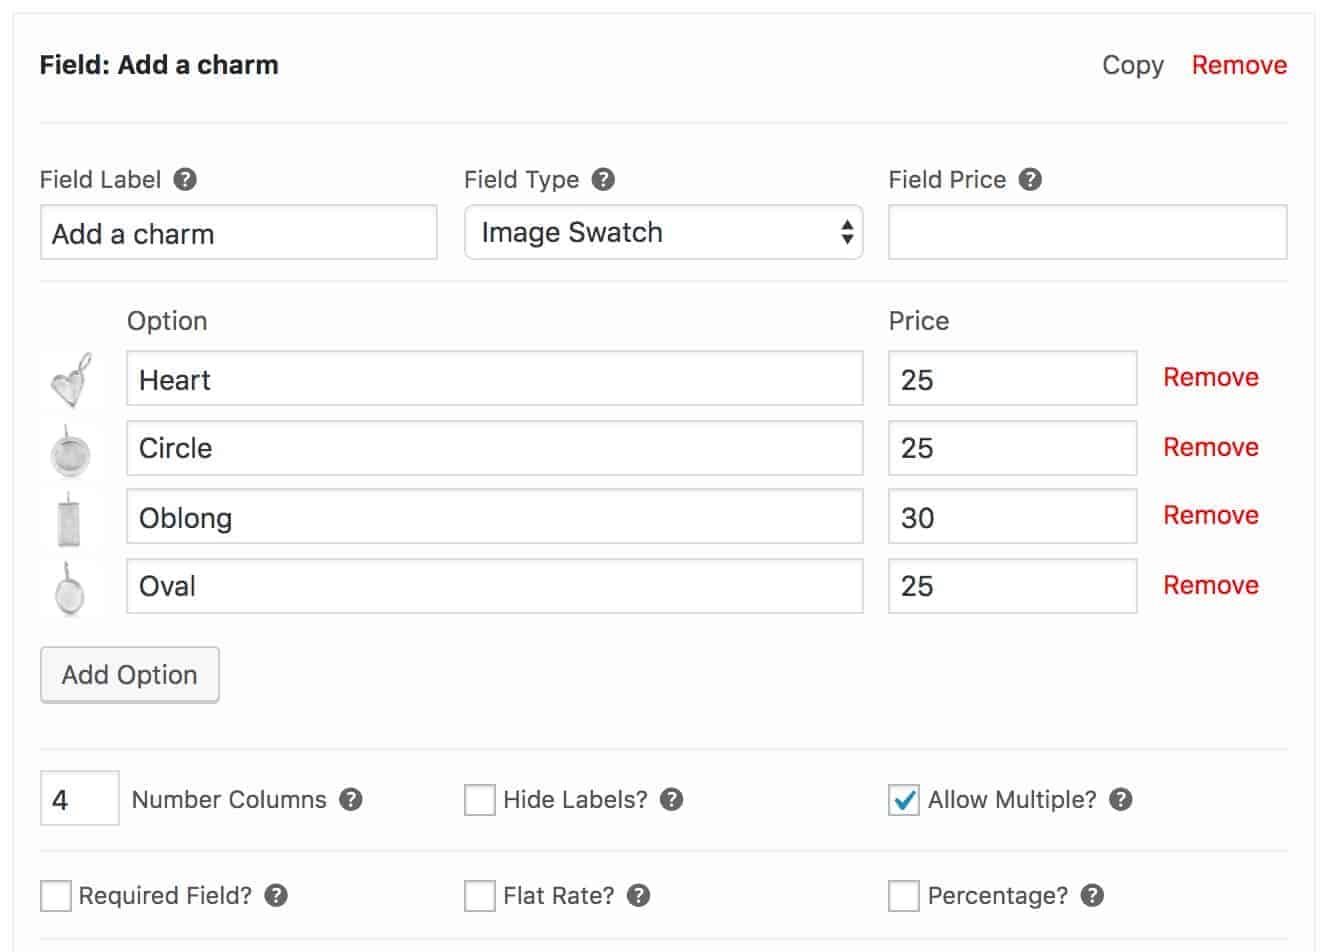
- Add your title to the ‘Field Label’ field.
- Then click the ‘Add Option’ button for each image swatch that you wish to add. For each charm, you can upload a different image.
- Set the layout by setting a value in the ‘Number Columns’ field
- You can allow the customer to choose more than one option from this field by checking the ‘Allow Multiple’ option
This is how it looks on the front end:
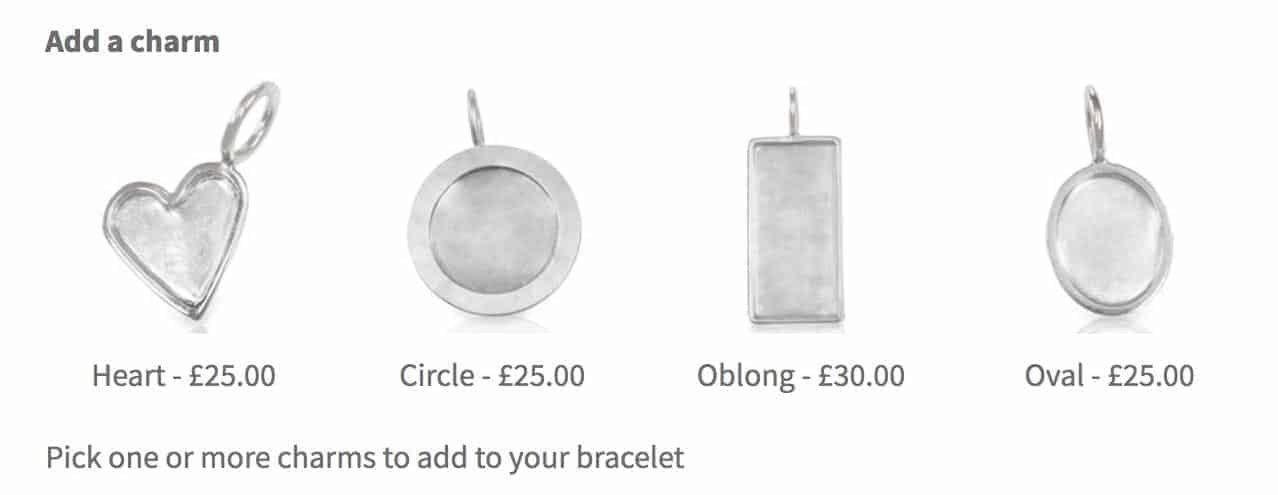
Jewellery designer product
Take a look at a working example of the jewellery product.
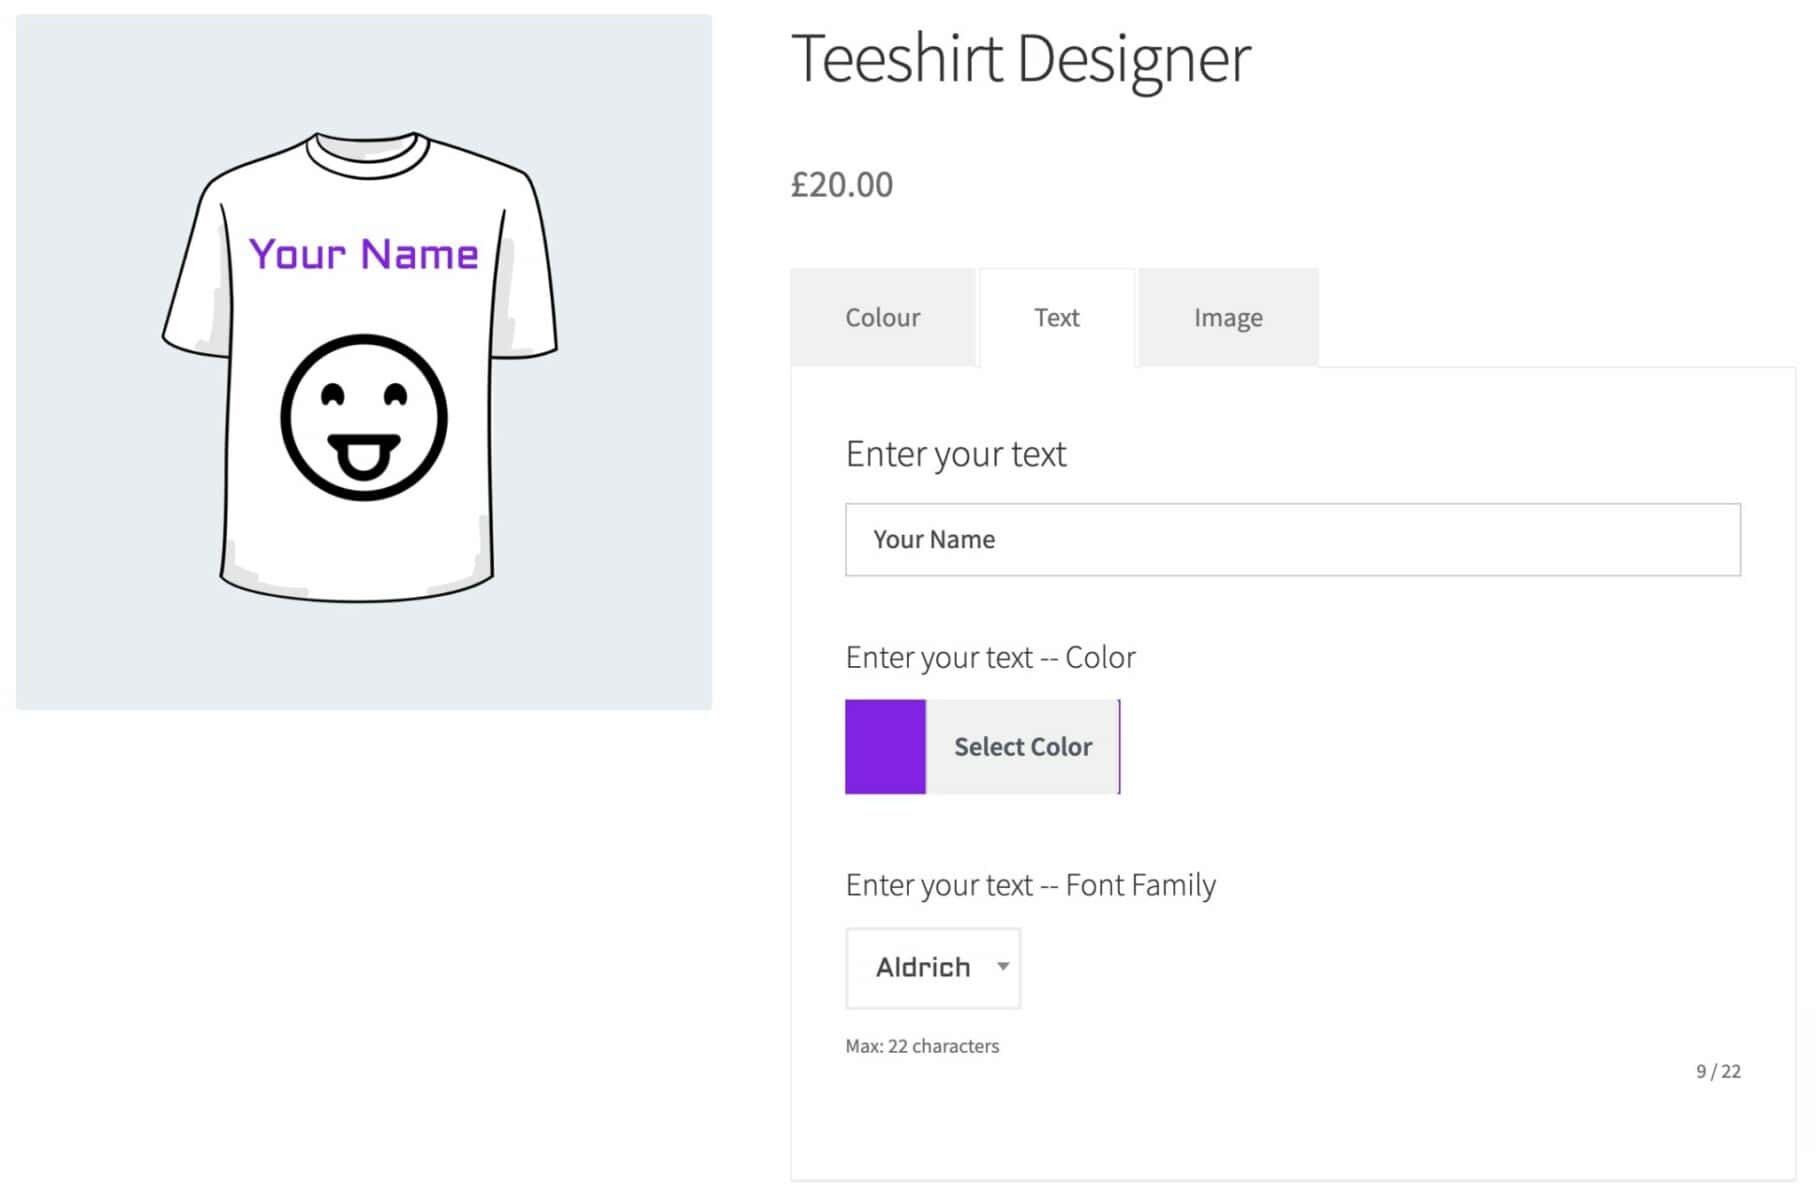
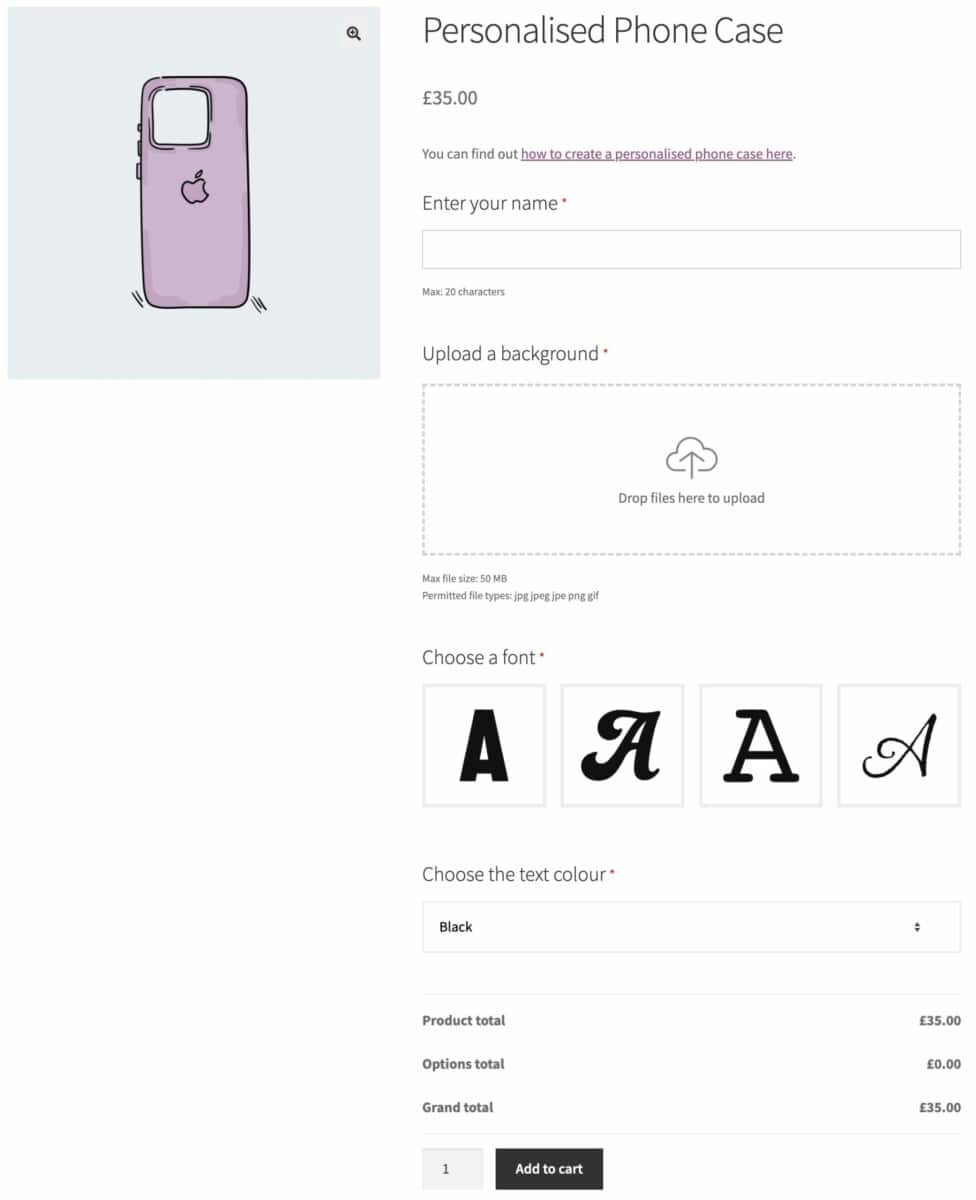
3. How to create personalized phone cases
In this example, we’ll look at creating a WooCommerce product customizer that includes the following features:
- Upload a background image
- Enter the name to be printed on the case
- Choose the font for a name
- Choose the colour for the name
The product will look like this on the front end:
Follow the steps above to create a product and then add the following extra fields:
Create a file upload field
First, create a file upload field so that the user can upload their background image.
- In the Product Add-Ons panel in the Product Data section, click ‘Add Field’
- In the ‘Field Type’ option, choose ‘Upload’.
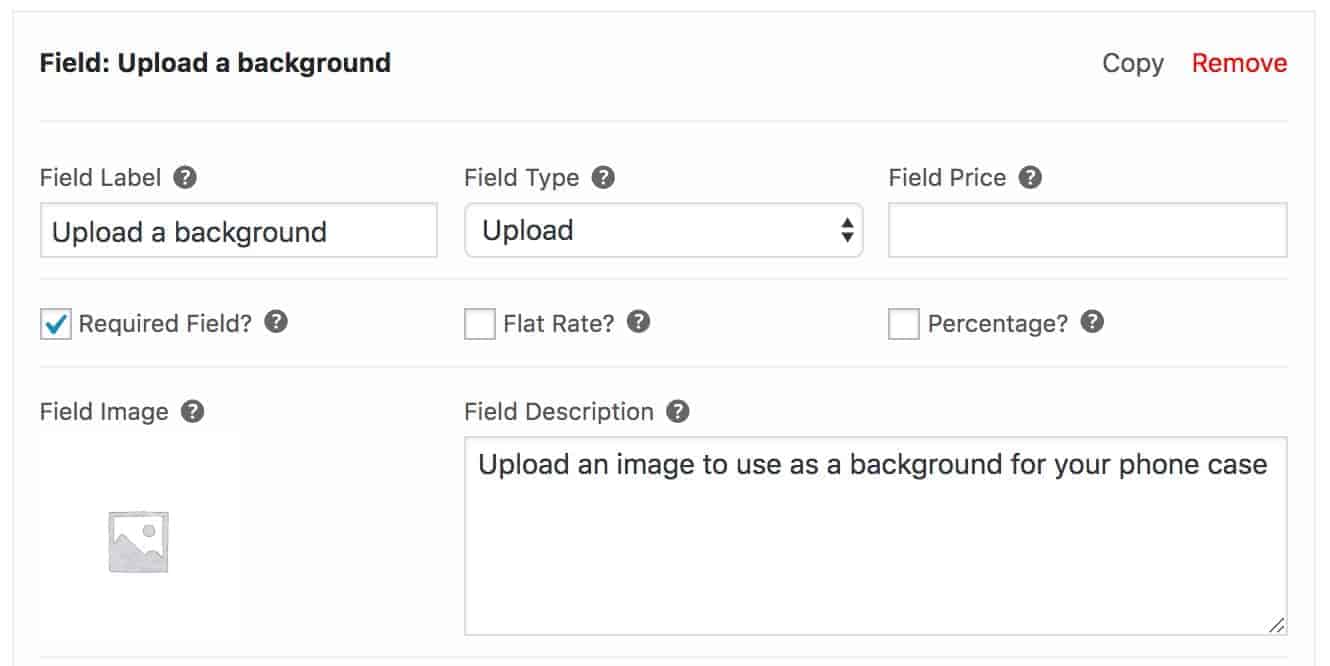
- Enter a title for the field in ‘Field Label’
- Check ‘Required Field’ to prevent the user from adding the product to the cart without uploading an image
- Enter some text in the ‘Field Description’ to help them know what to do with this field
Create a text input field
- Click ‘Add Field’
- In the ‘Field Type’ option, choose ‘Text’
- Enter a title in ‘Field Label’
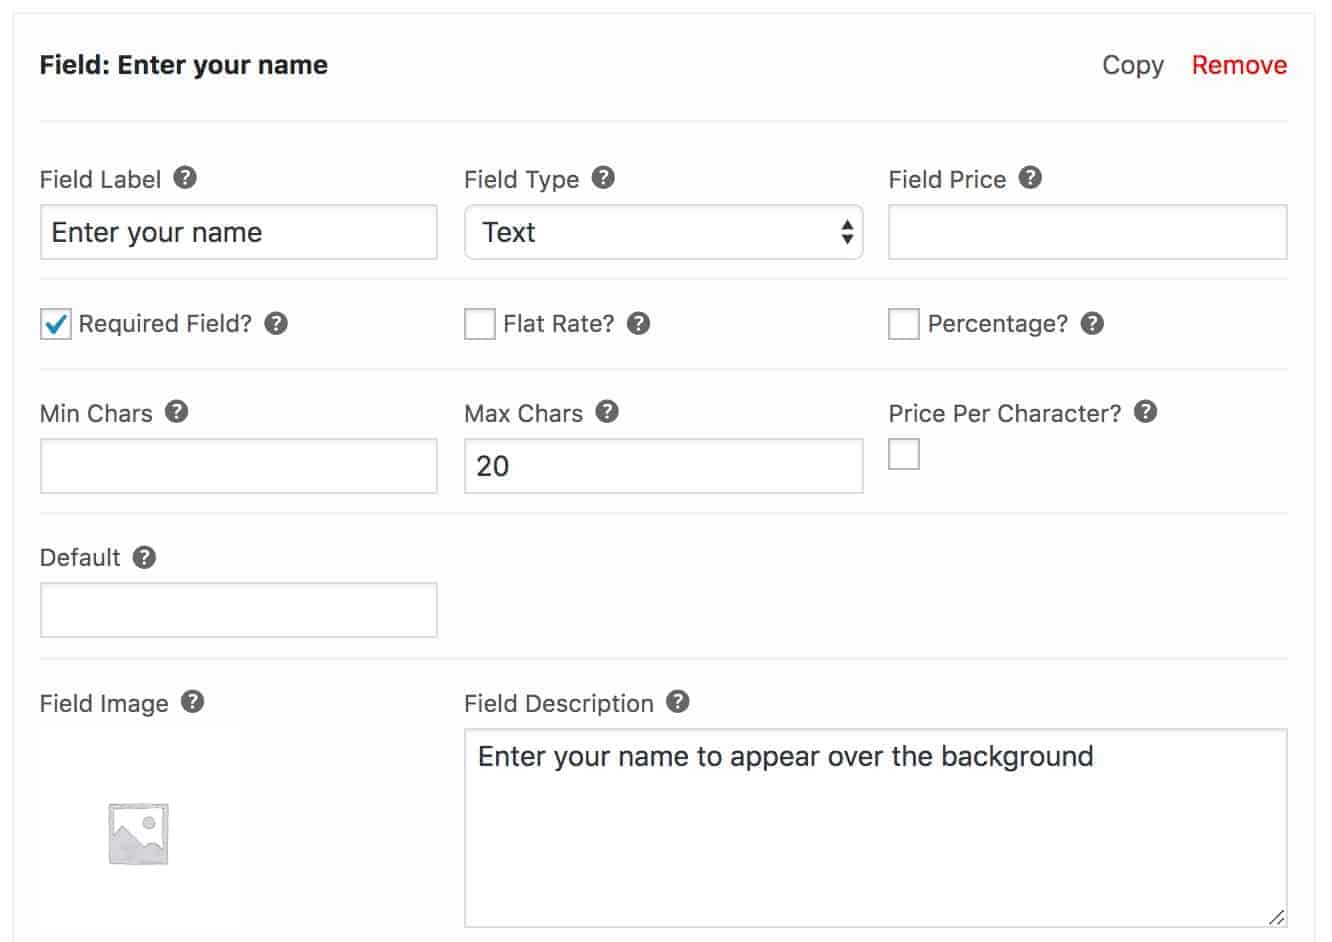
- Ensure the user enters their name by checking the ‘Required Field’ option
- Set a limit on the number of characters that the user can input by entering a value in the ‘Max Chars’ field
Create an image swatch field for the font selector
To let the customer choose the font to be used for their name, we’ll create an image swatch field displaying images of the letter ‘A’, each in a different font. In this way, we give the user a nice visual way of picking a font.
- Click ‘Add Field’
- In the ‘Field Type’ option, choose ‘Image Swatch’
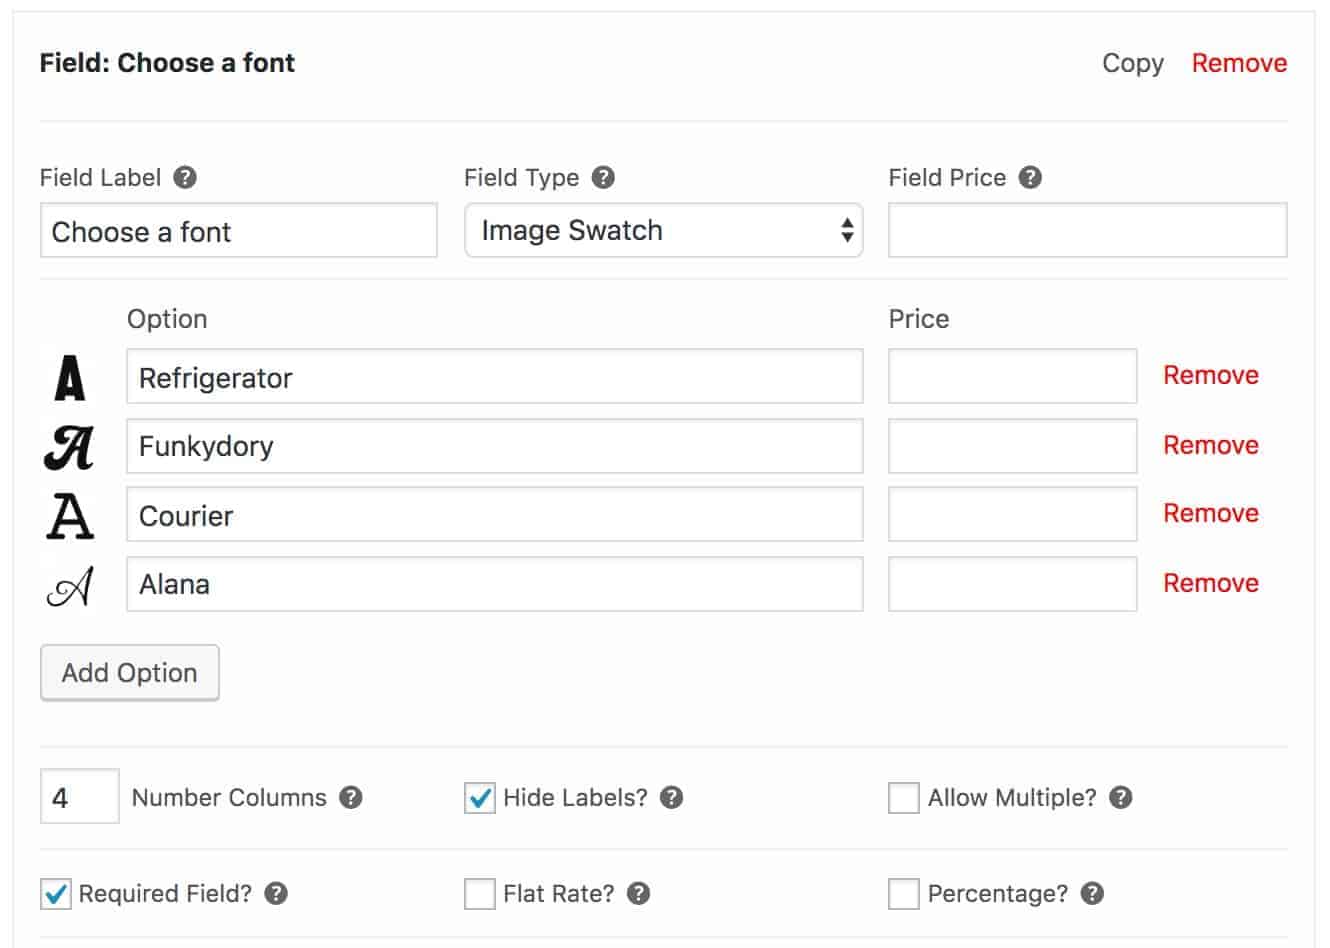
- Because we don’t need to display the font names to the customer, we can check the ‘Hide Labels’ field
- This is how the field looks on the front end:
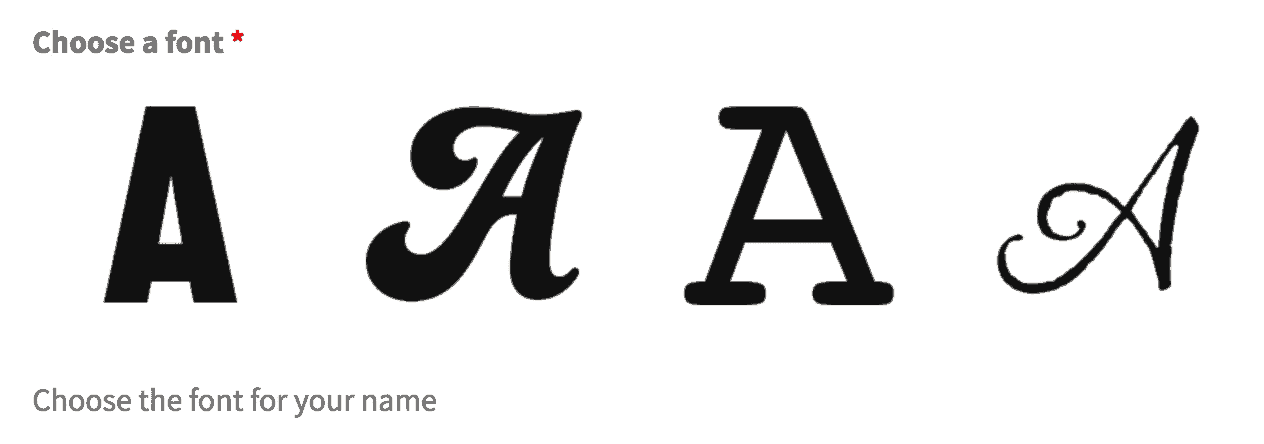
- The customer can click one of the images and the font name will be added to the product
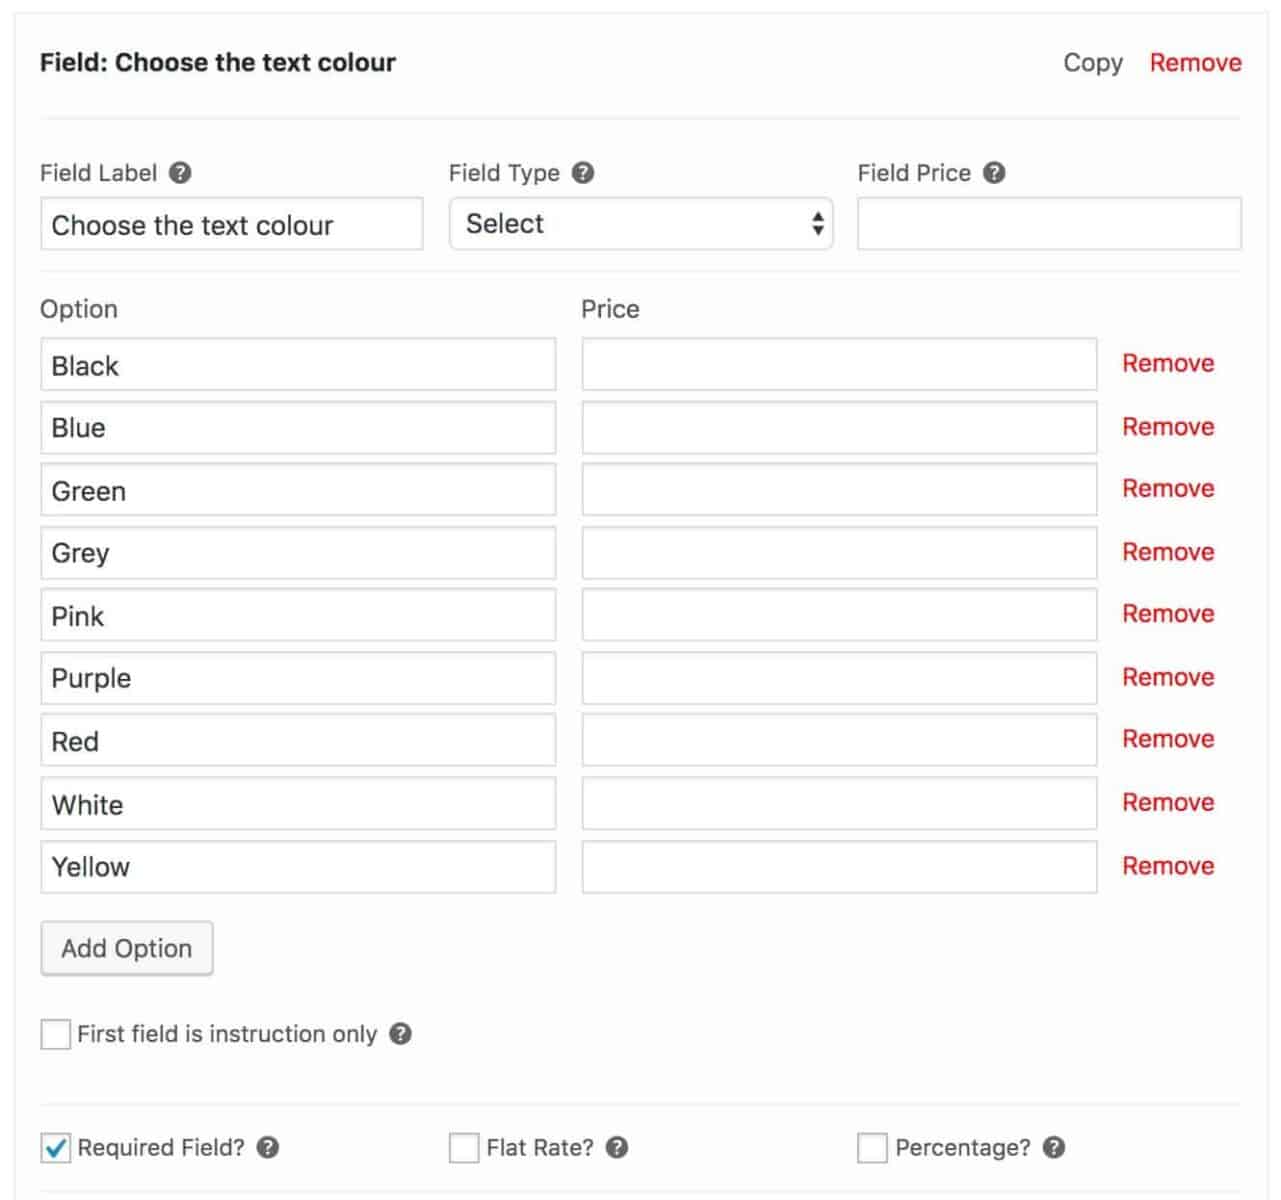
Create a select field
Finally, for the colour of the font, we’ll use a select field. Note that you can use an image swatch here to make it more visual but we’re using a select/dropdown field for variation.
- Click ‘Add Field’
- Choose ‘Select’ in ‘Field Type’
- Click ‘Add Option’ to add each new option
Personalized phone case demo product
Take a look at a working example of the personalized phone case product.
Product Add-Ons Ultimate in action: Ella’s Bubbles’ luxury bathtubs
Understanding the various industry applications of a WooCommerce product customizer is all well and good, but what about its real-life applications? Let’s take a look at how the WooCommerce Product Add-Ons Ultimate plugin has been successfully leveraged in the real world.
Ella’s Bubbles, a leading company in the luxury bathtub industry, offers walk-in bathtubs, a highly variable product with a wide range of SKUs across over 28 unique models.
To handle this complexity, they needed a flexible solution for product customizations, and the Product Add-Ons Ultimate plugin proved to be an ideal fit. The plugin allowed them to add images or descriptions based on user selections, set unique prices based on conditional logic, and ensure compatibility with other plugins.

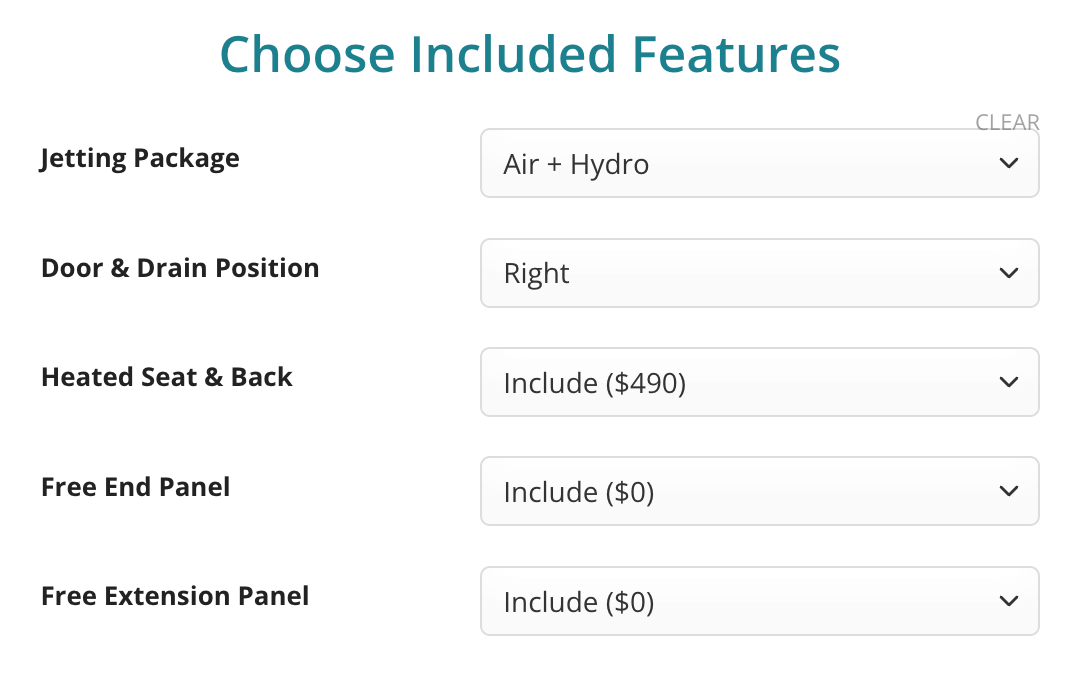
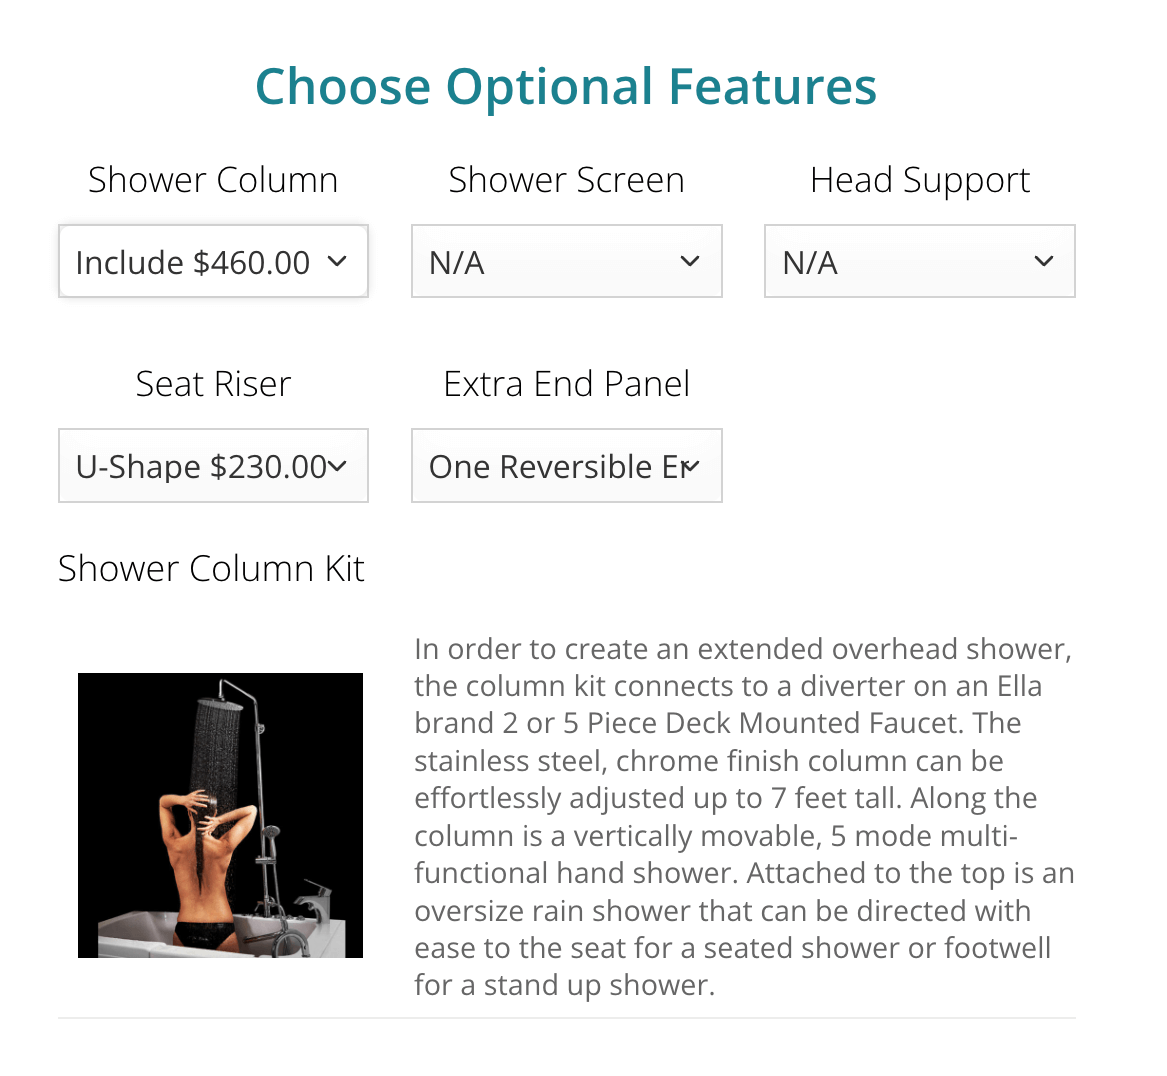
Product Add-Ons Ultimate is now an integral part of their product pages. For instance, on their Elite Walk-In Bathtub page, customers can choose jetting, door, and faucet options via default WooCommerce variations. The plugin then offers optional features in a luxurious manner, with a rewarding experience of image/description display upon selection.
The results of incorporating Product Add-Ons Ultimate into Ella’s Bubbles have been remarkable. It has enabled the inclusion of thousands of walk-in tub add-ons since its implementation, saving significant time for their order processing team. Ella’s Bubbles plans to continue expanding with the confidence that their product pages are well-managed and luxuriously simplified by the Product Add-Ons Ultimate plugin.
More case studies
If you like case studies with detailed guidance on how to build different personalized products in WooCommerce, check out some of these articles:
- Create a WooCommerce takeaway order form
- Composite products: lets users build their own products
- A guide to creating mixed case wine products in WooCommerce
- How to create a WooCommerce custom product
Buy WooCommerce Product Add-Ons Ultimate
I hope this article has given you plenty of insight into how to create a WordPress product customizer.
Overall, the benefits of using such a customizer are clear, from increased customer interaction to providing upselling opportunities and product personalization. That’s why Creating a WooCommerce product customizer using the Product Add-Ons Ultimate plugin can significantly enhance your online store’s customer experience.
As demonstrated with our t-shirt designer, personalized jewelry, and custom phone case examples, this tool can be applied to a variety of products and industries, making it a versatile and valuable addition to any WooCommerce store. So, why not transform your customer’s shopping experience from a passive activity into an interactive, memorable experience, building stronger connections between your customers and your brand? All you need to get started is the WooCommerce Product Add-Ons Ultimate plugin.
Bonjours Gareth
Y a-t-il possibilité que le slogan ou le texte que le client choisit puisse ce voir sur la photo du produits
Bonjour Serif
Non, il n’y a pas possible à ajouter un slogan sur la photo.
Just an update on this. It’s possible to preview text and uploaded images on the main product images using the following plugins:
https://pluginrepublic.com/wordpress-plugins/text-preview-plugin/
https://pluginrepublic.com/wordpress-plugins/image-preview-for-add-ons-ultimate/
Hello,
Is the adding responsive? Will it work with desktop and mobile screen sizes?
Hi Rodney
Yes, the fields are responsive and will mostly follow your theme’s styles.
Thanks
Gareth
How can I preview the product?
Hi Michael
There’s no image preview – is that what you’re looking for?
Thanks
Gareth
May I ask if the stock of product options are manageable? Thanks.
Hi
Yes, when you use the ‘Products’ field, your options are other products so the stock is reduced whenever an item is purchased, just as with a standard WooCommerce product.
Thanks.
Hello, I added groups and fields but they’re not showing in front . It only showing add to cart button. Anything wrong ? Thank you
Hi
In the first instance, please check https://pluginrepublic.com/documentation/add-on-fields-not-showing/.
If you need further assistance, please raise a support ticket via https://pluginrepublic.com/support/
Thanks.
Hi!
I have a shop with 100 products and would like to know if there is a way of using a “customization template” or do you have to apply the fields for every product?
Thank you!
Hi David
Yes, you can use Global Add-Ons: https://pluginrepublic.com/documentation/global-add-ons/. These allow you to create fields and apply them to multiple products – either all products, specific products by ID, or specific product categories.
Hope that helps.
Thank you for the information! It was really helpful. I’m still researching for what the client exactly needs, but will keep this in mind. Have a nice day!
I want 5$ per word to be automatically included in the total, if someone wants to add text on my product. Is this possible ?
Hi
You can specify a cost per character and have this added to the product price.
Thanks.
Hi, Is there is a way or any recommendation to have the preview of the product selected by the customer? Thank you
Hi
You can update the main product image based on the user’s selection in an image swatch field; or you can use the Image Preview extension for Add-Ons Ultimate to add an uploaded image to the main product image.
Thanks.
Hi
There Should be an option for preview
Slogan Text Should Display on Product Moreover There should be an option to chose which font size + common font style option to display on t-shirt With Preview
If Its Possible Please Let Me Know
Hi – yes, you can preview text on your image using the Text Preview extension: https://pluginrepublic.com/wordpress-plugins/text-preview-plugin/.
There’s a simple demo here: https://pluginrepublic.com/wordpress-plugins/text-preview-plugin/.
Thanks.
Hey, just wondering if there’s a way to import a SVG so that it outlines the shape (and create a custom 2d template) for the customer to import designs on it? (And that anything that’s out of the outline is masked)
Thanks
Hi
That’s not currently possible with this plugin.
Thanks.
Hi Gareth,
I was thinking: Is it possible in this setup to add a quantity selector like this (see screenshot in the link below):
https://imgur.com/a/uXip8dl
Looking forward to hear from you.
Martijn
Hi Martijn
Yes, you can also allow the user to select a quantity. There’s a setting for ‘Products Quantities’: https://pluginrepublic.com/documentation/product-fields/.
Thanks.
Great. Is that available in the Basic version? Or just in the Pro version?
This is available in the Pro version only.
Thanks.
How do you get the product image to change with the color of the t-shirt like in the example product?
Hi Nick
You can use an Image Swatch field and opt to change the main product image. If you need more help with this, please raise a support ticket here – https://pluginrepublic.com/support/ – and our team will get back to you.
Thanks.