WooCommerce custom t-shirt designer: tutorial + best WordPress plugins
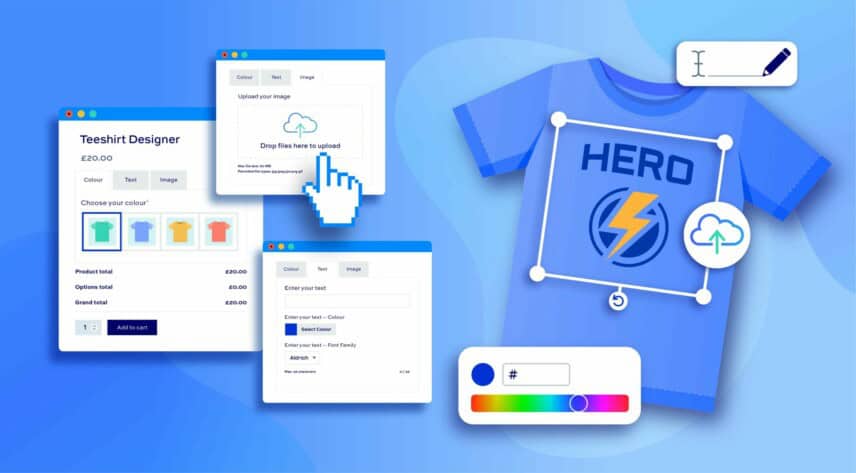
WooCommerce, by default, doesn’t let you set up a t-shirt designer in your store so you’ll need a plugin. In this article, we’ve got the most comprehensive tutorial on creating a custom t-shirt designer in WooCommerce – plus a list of the top plugins and their features.
T-shirts are one of the most sellable items for eCommerce stores with global revenue of a whopping $38.88 billion in 2022 according to Statista! Allowing customers to design their own t-shirts makes your store more engaging and can help you increase your overall sales.
This is a detailed tutorial but you can skip the parts that aren’t relevant for your specific requirements. And, if you prefer to watch a YouTube tutorial on creating a t-shirt designer in WooCommerce, check out the video below.
For all sections of the tutorial, you’ll need the WooCommerce Product Add-Ons Ultimate plugin.
WooCommerce custom t-shirt designer tutorial
This tutorial is divided into four sections as we build up the complexity of our t-shirt designer. We’ll add a lot of features to our designer – including adding text and images to a t-shirt, creating preview images, adding costs, and much more. You can pick and choose which features you want.
Note that this is compatible with any WordPress theme.
There’s a fully working demo version of the first three stages of the build here.
Step 1: Simple t-shirt designer
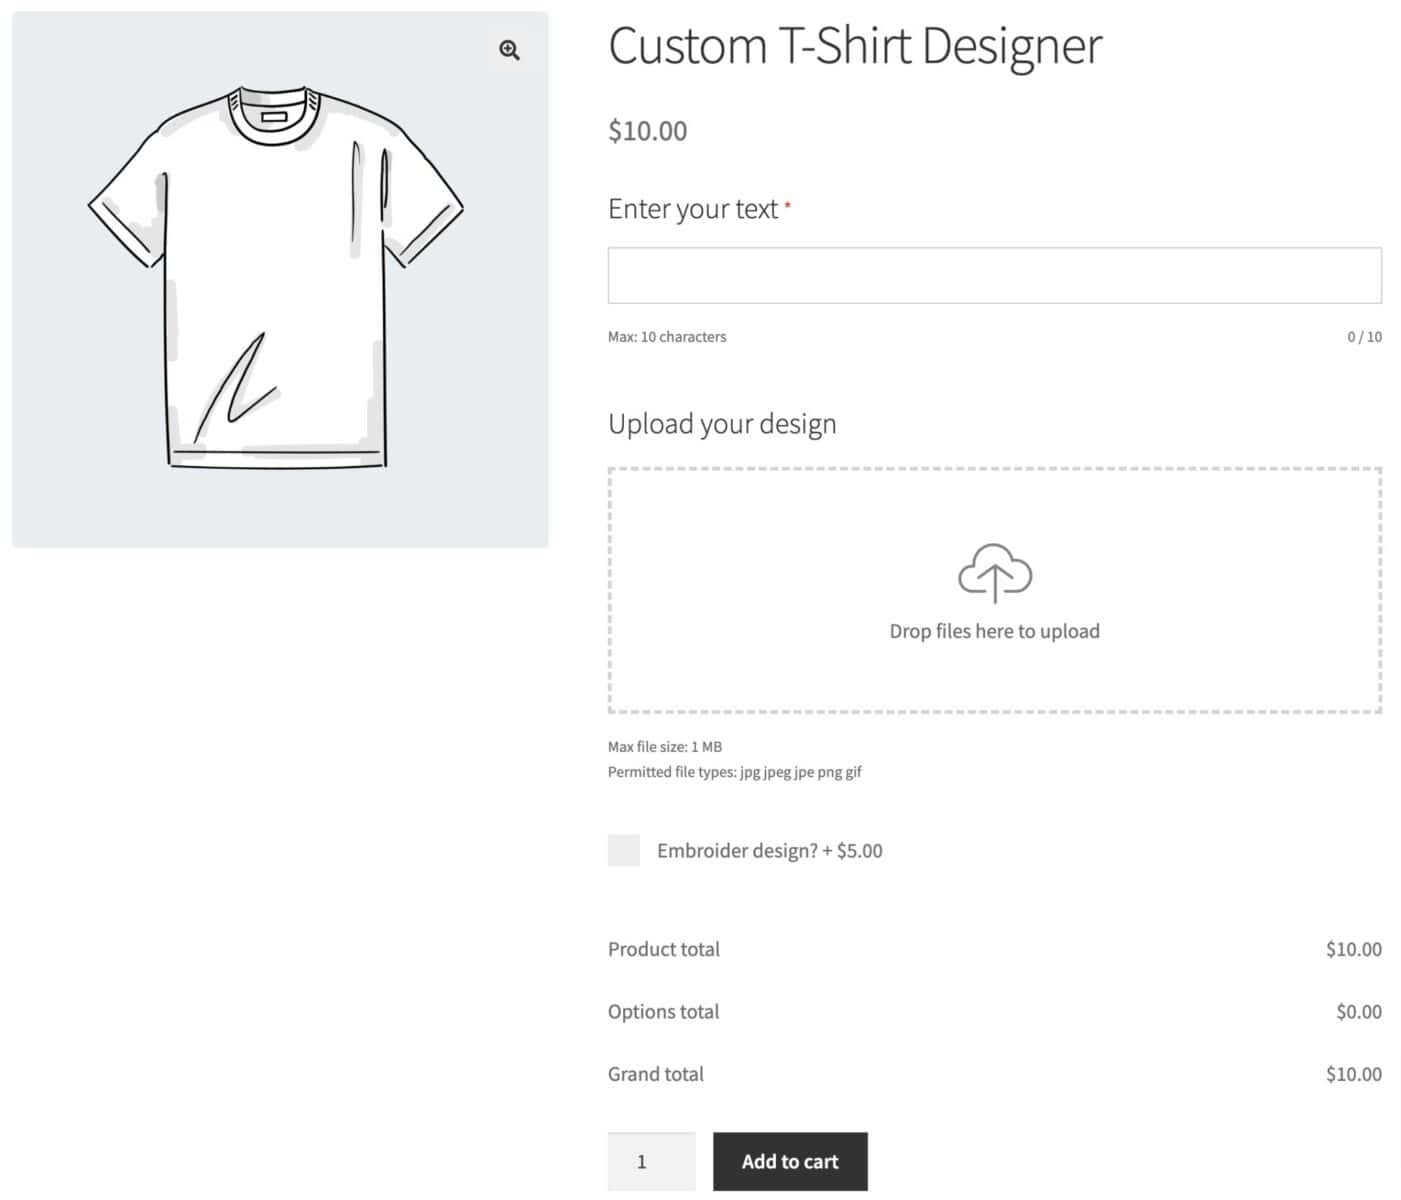
In this version of the WooCommerce custom t-shirt designer, the user will be able to add their own text and upload an image to be printed on their shirt. We’ll also add some fields for the user to choose some optional extras.
Note that this version doesn’t allow the user to preview their text and image. We’ll see how to do that in Step 3.
For the features covered in Step 1, you’ll only need the Basic version.
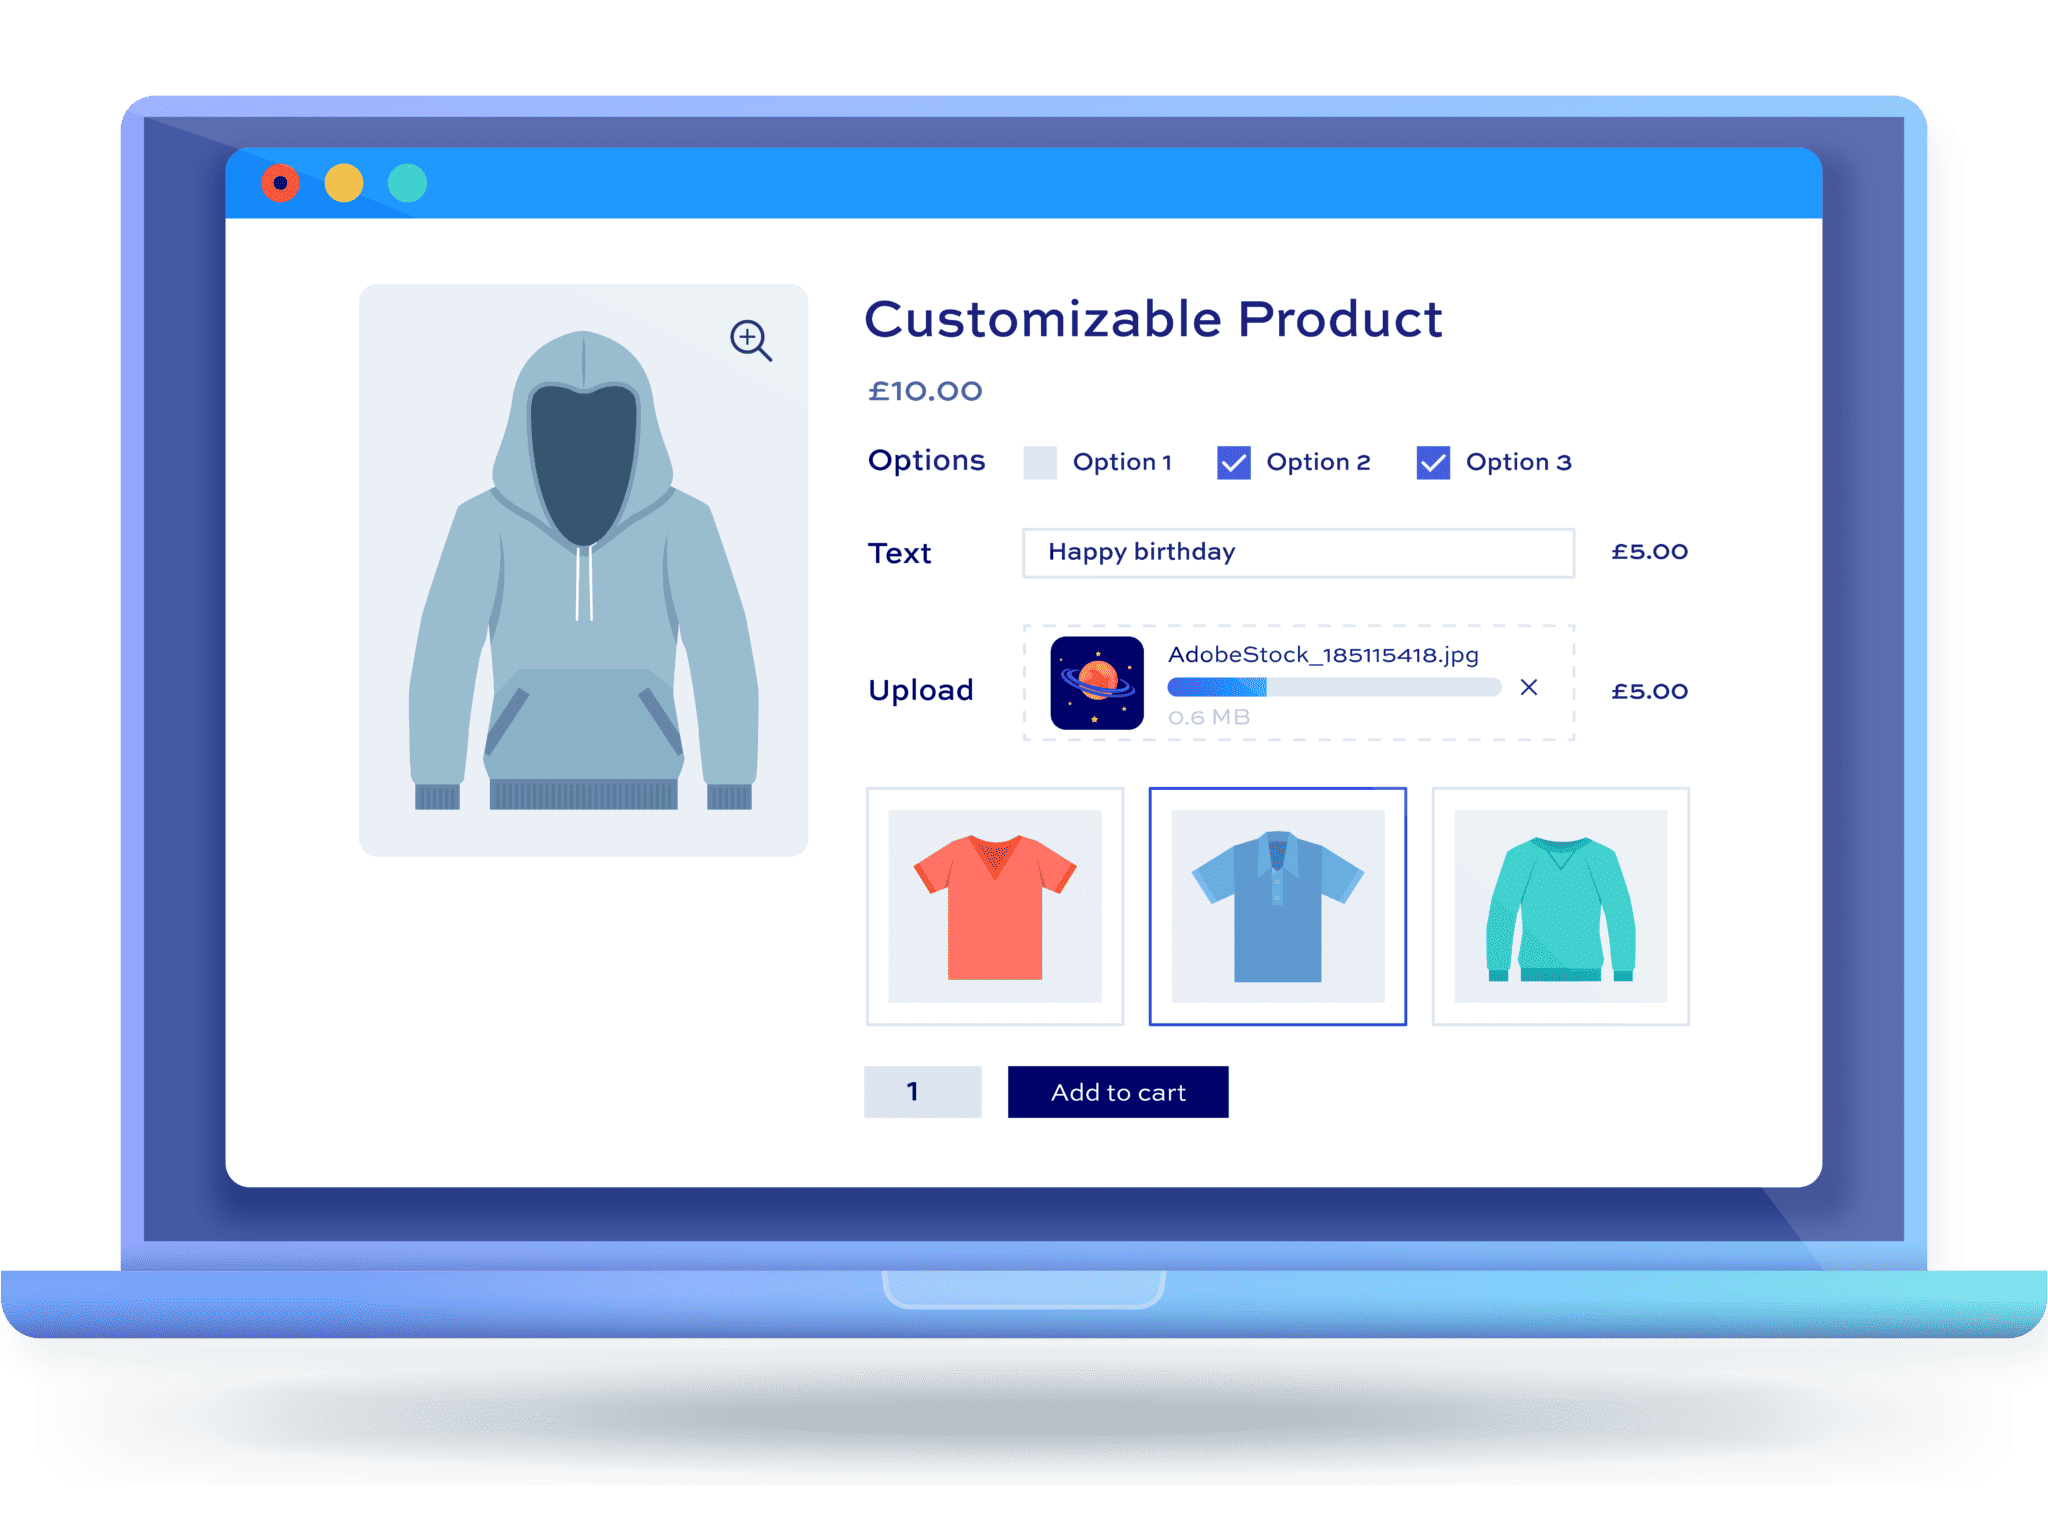
Our finished product at Step 1 will look something like this. We’ll have a text field, an upload field, and a couple of extra options.
Adding a text field
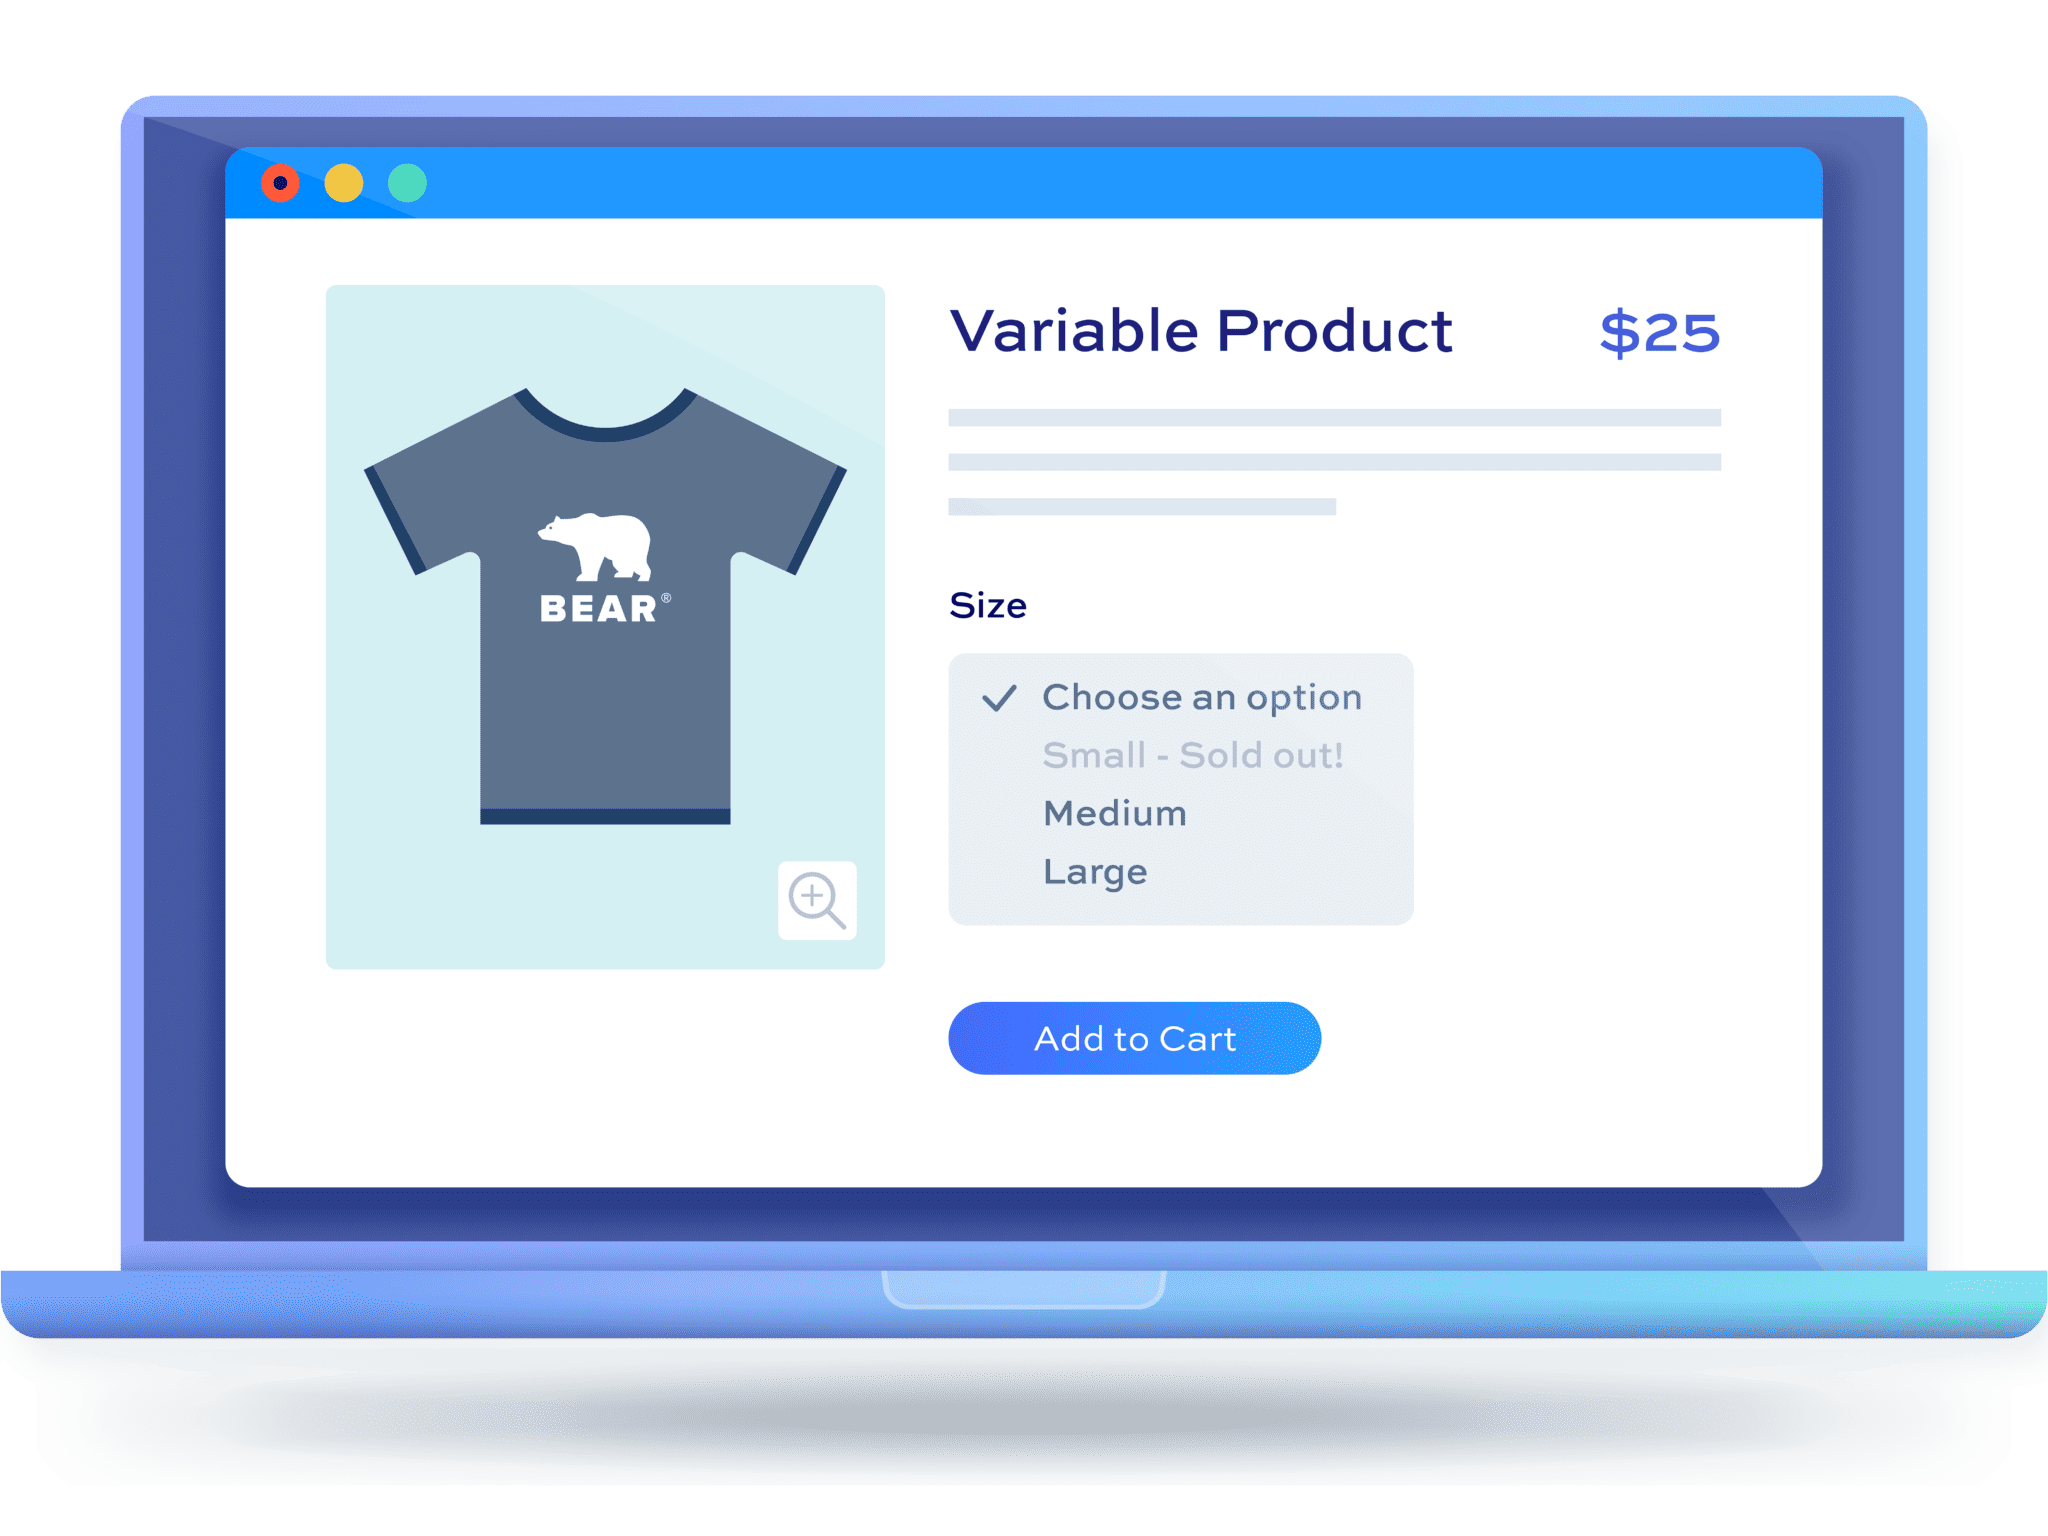
First, create your t-shirt designer product in WooCommerce and add a title, a price, a featured image and any other information you need. In our example, we’re just using a ‘simple’ product type but you can use ‘variable’ if you prefer (especially if you want the user to be able to select sizes etc).
Then to add your text field:
- Click on the ‘Product Add-Ons’ tab in the ‘Product data’ section
- Click ‘Add Group’ then ‘Add Field’
- Add a label, e.g. ‘Enter your text’
- Select ‘Text’ as the ‘Field Type’
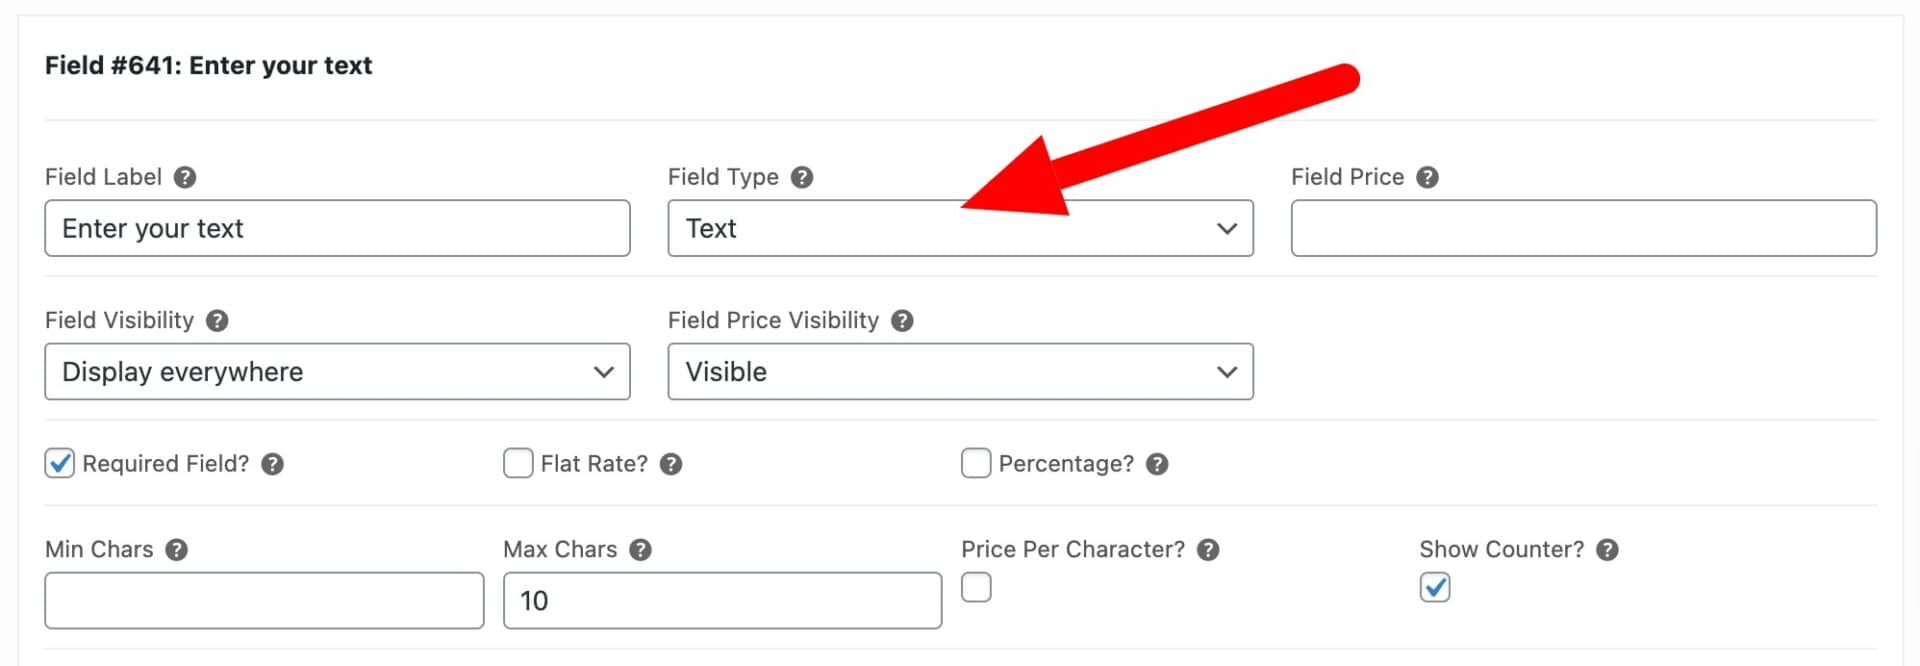
There are a number of additional parameters you can set for your field, like the price and the maximum number of characters. To find out more, there’s a detailed tutorial on adding a text field to a WooCommerce product here.
Adding an upload field
Now you can add an upload field:
- Click ‘Add Field’
- Enter a label, e.g. ‘Upload your design’
- Select ‘Upload’ as the ‘Field Type’
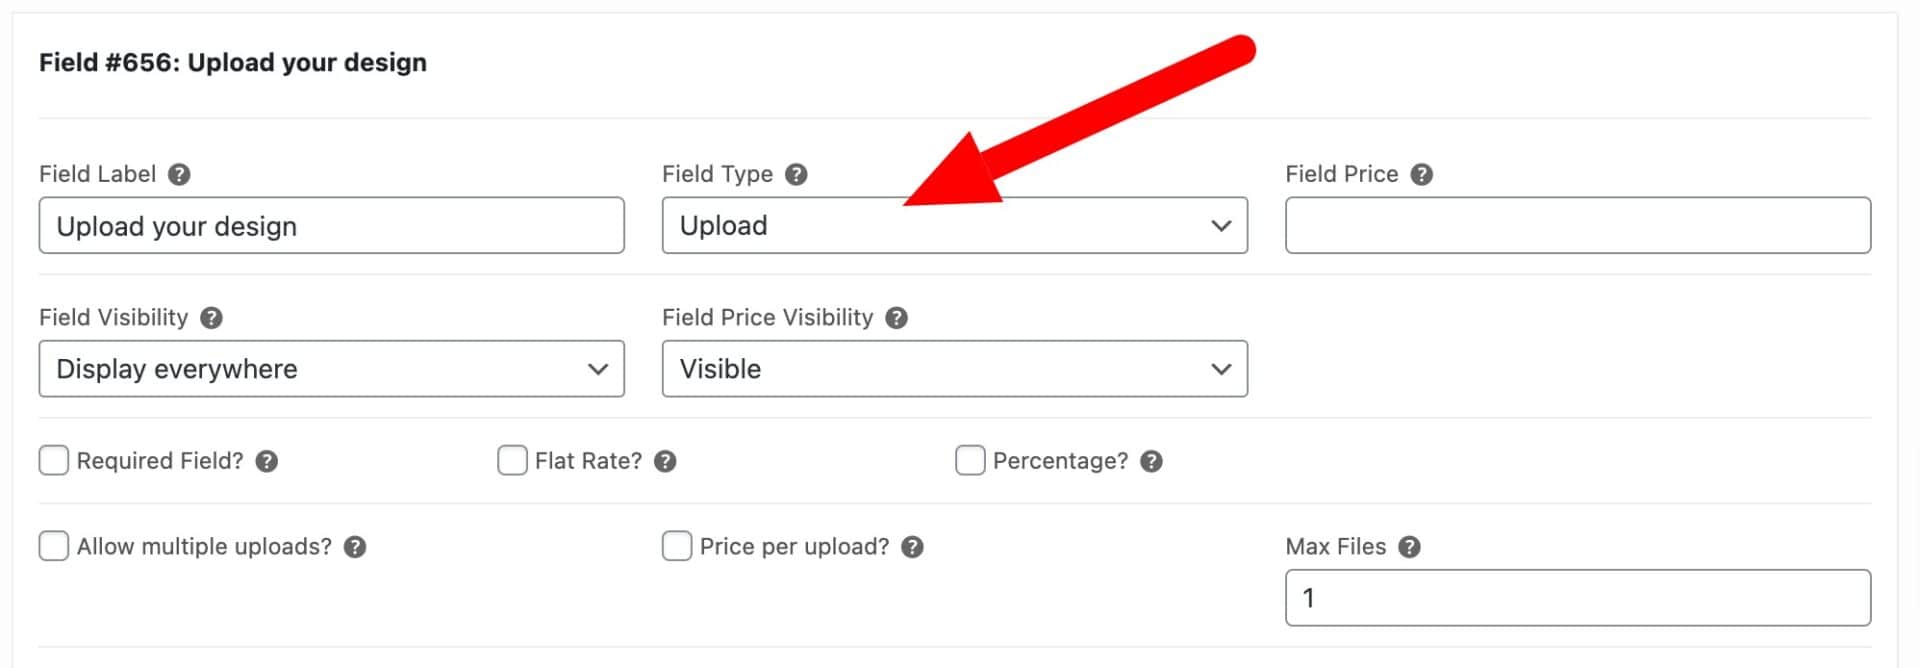
There is more information on adding an upload field to WooCommerce products here.
Adding some extra options
Finally, you can add some extra options if you like. In our example, we’ll add a checkbox for the user to select whether they want their design to be embroidered but you can choose whatever kinds of options you like:
- Click ‘Add Field’
- Enter a label, e.g. ‘Embroider design?’
- Select ‘Checkbox’ as the ‘Field Type’

There are more details on adding a checkbox field to WooCommerce here.
Publish your product and you have created a simple t-shirt designer:
Step 2: Visual t-shirt designer
The next stage of the design is more complex. In this version, the user can select some pre-defined graphics and preview how their selections will look on the t-shirt itself. They’ll also be able to switch between different views – front, back, and both sleeves. Finally, they can also choose the color and see it previewed with their other selections.
Although this is a much more advanced version of the designer, you’ll still only need the Pro version of the Add-Ons Ultimate plugin.
Adding pre-defined designs
Let’s start by giving the users some pre-defined designs to choose from. They can select a design and see it previewed on the front of the t-shirt.
- Create a new group and call it ‘Front’
- Add a new field
- Add a label for the field, e.g. ‘Slogan’
- Select ‘Swatch’ as the field type
- Click the ‘Add Option’ button to create the first design option
A new option row will appear where you can specify the first design. Click on the empty image thumbnail on the left of the row and upload an image for your first design. Note that this image should be the same size as your main product image and should be a transparent PNG file. This is to ensure that it will sit perfectly over the main t-shirt image so that the user can preview what it will look like.
There’s more information on how to layer images here.
In the next column, under the ‘Alt’ heading, you can add a cropped version of your design. This will be the image that displays in the swatch field itself, not on the main image preview, so you can afford to crop this image much smaller than the main image size.
Finally, add a label to describe the image in the ‘Label’ field.
Repeat for each design that you would like the user to choose from. Here’s what your field setting will look like:
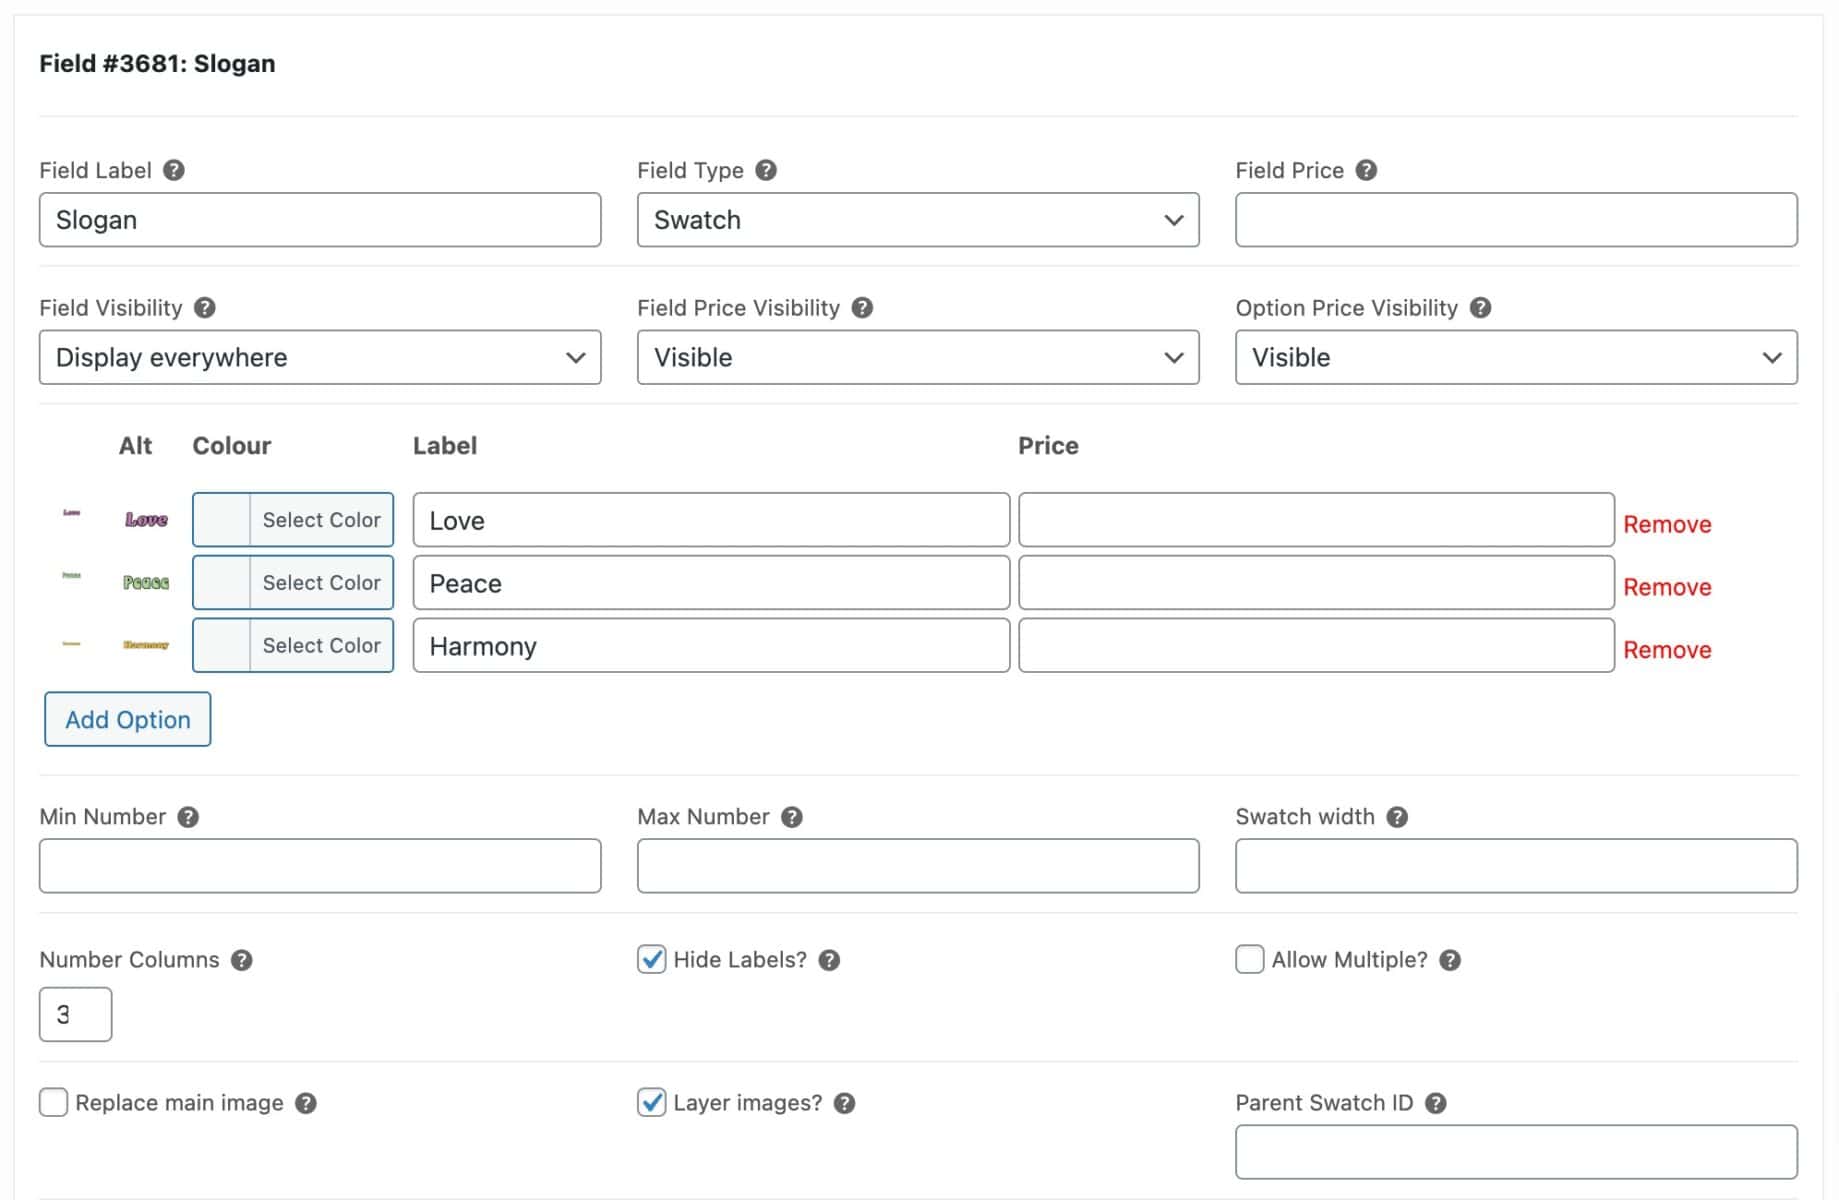
Note a couple of extra parameters: you can decide to hide the labels by checking the ‘Hide Labels’ option. And you should enable the ‘Layer Images’ option.
Save your product and preview it on the front end.
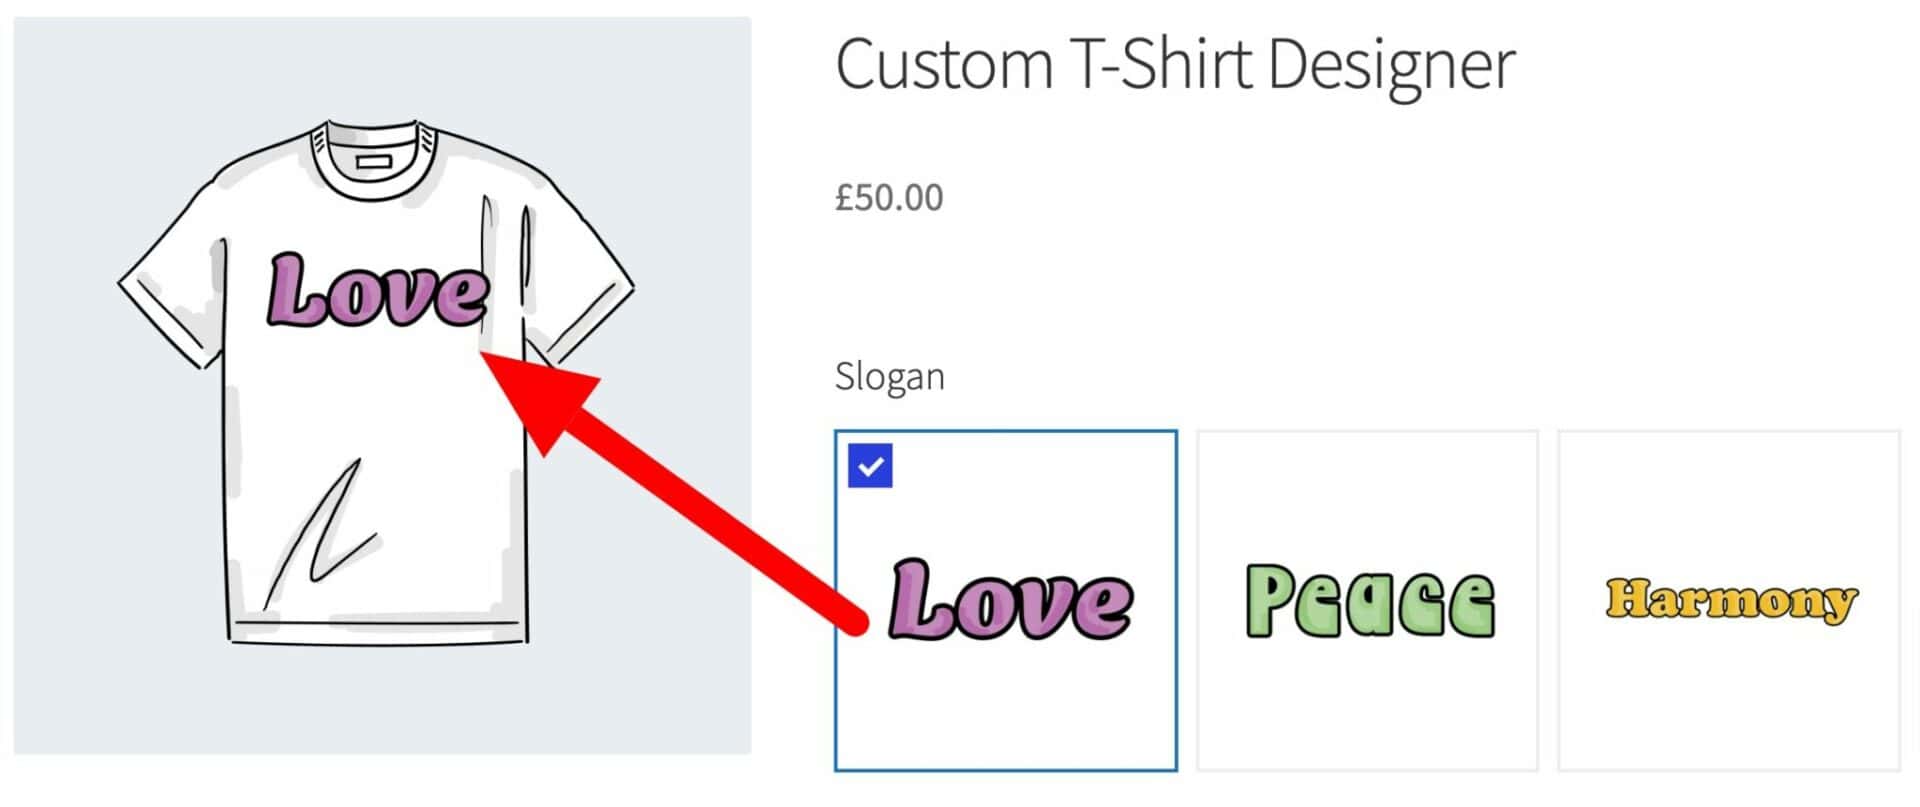
The user can choose a design and see it previewed on the main product image.
You can create multiple fields like this if you like. In our demo product, there are two fields where you can choose a design element for the front of the t-shirt.
If we only want to allow the user to customize elements on the front of the t-shirt, we can skip the next section. However, if you want to offer the possibility of customizing the front, back and sides of the t-shirt, read on.
Customizing multiple views
We need to create a new group where the user can select the view.
- Click ‘Add Group’ and call the new group ‘View’
- Drag and drop this group so that it is above your first group for ‘Front’
- Click ‘Add Field’ and give the field a label
- Choose ‘Swatch’ as the field type
Now we need to add an option for each view that the user can select. In our example, the user can select the front, back, left sleeve and right sleeve view, so we create four options.
- Click ‘Add Option’ to add an option
- Upload an image to represent the view to the first image upload field. This should be the same size as your main product image
- Add a label, e.g. ‘Front’
- Repeat for each option
Your field setting will look something like this:
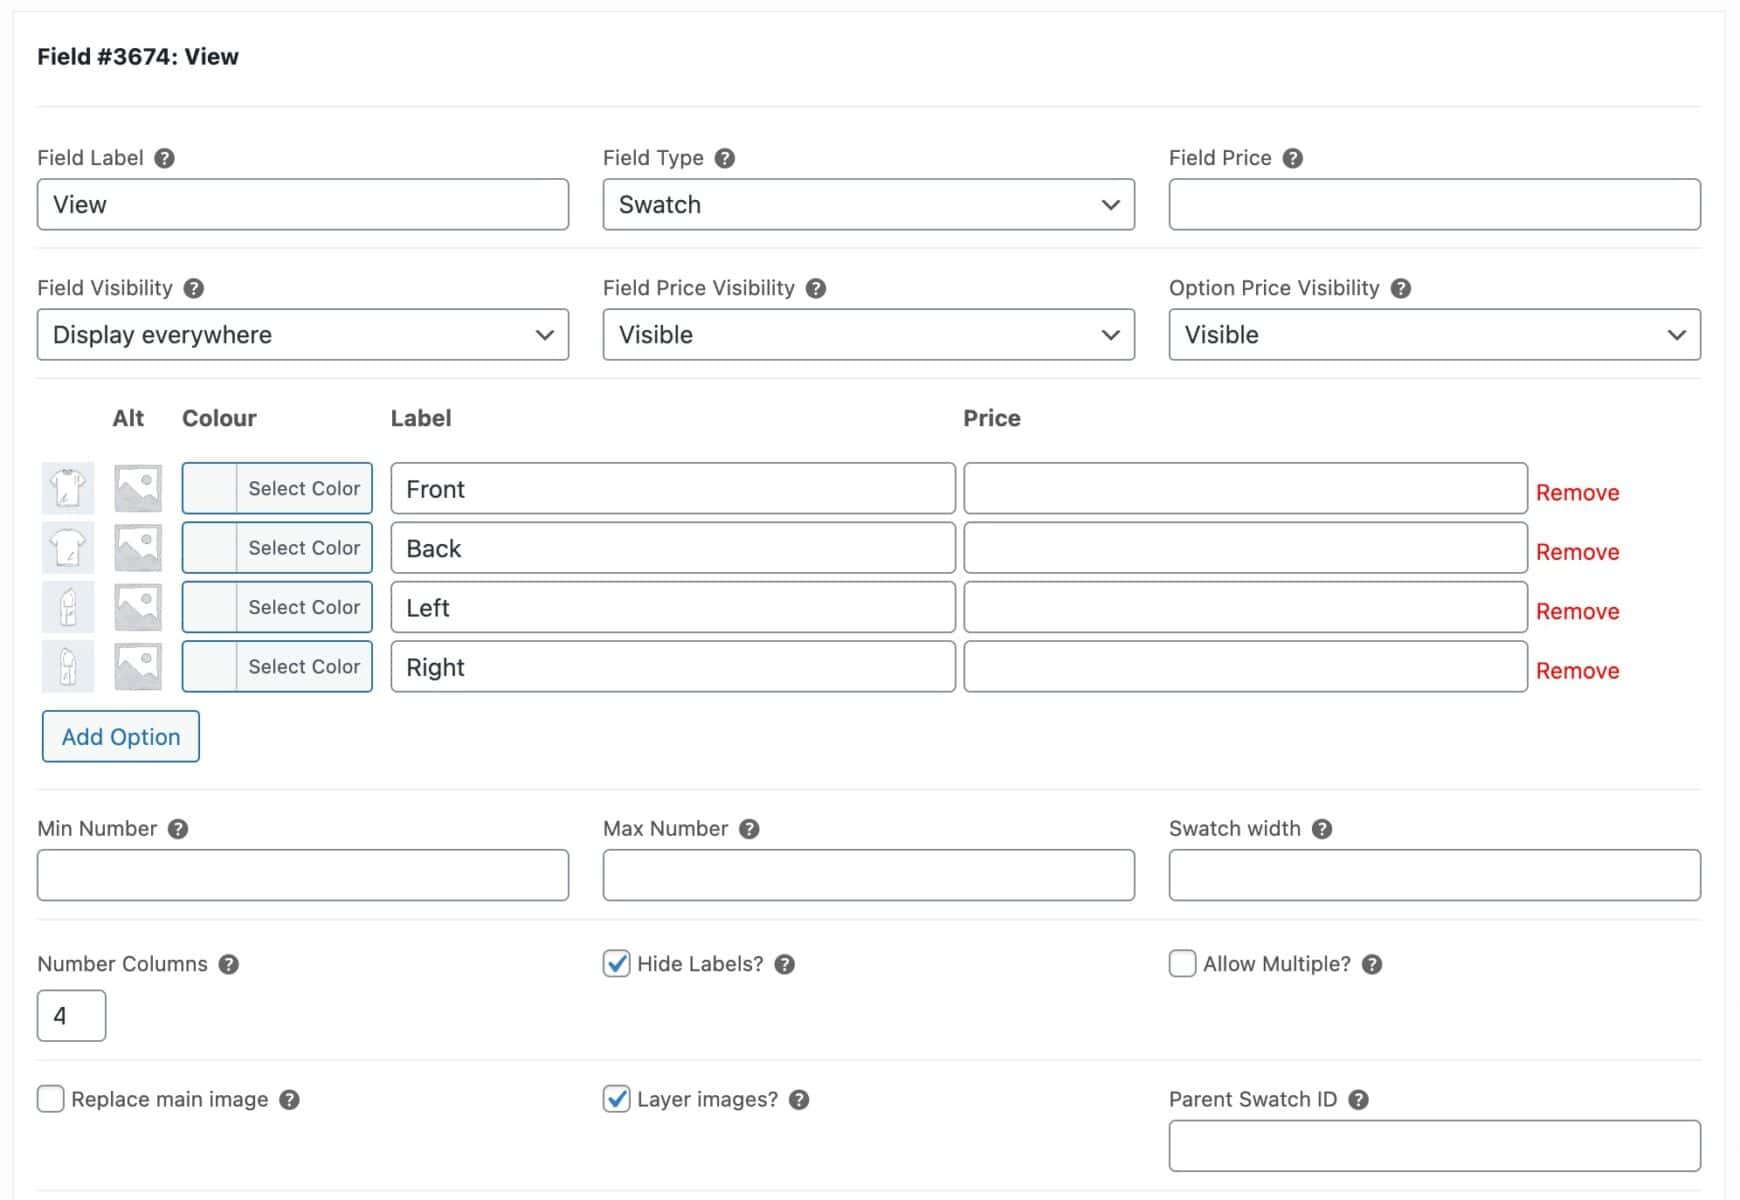
As with the previous step, enable the ‘Hide Labels’ and ‘Layer Images’ options.
Save the product. Now, on the front end, when the user selects one of the ‘View’ options, the main product image will update accordingly.
The user can still select the design for the front that we added in the previous field – but you’ll notice that the chosen design will remain on the image even when a different view is selected. We can fix that with conditional logic.
Using conditional logic to show and hide fields
Conditions allow us to show/hide fields or groups depending on the value of a specific field. In this case, this means that we only want to show the ‘Front’ group when the ‘Front’ view is selected. If any other view is selected, the ‘Front’ group will be hidden.
To add a condition to the ‘Front’ group:
- In the ‘Front’ group, click the ‘Add Condition’ button
- Choose ‘Show this group if’ from the first field
- From the next row, select the ‘View’ field in the left hand field
- Select ‘Front’ in the right hand field
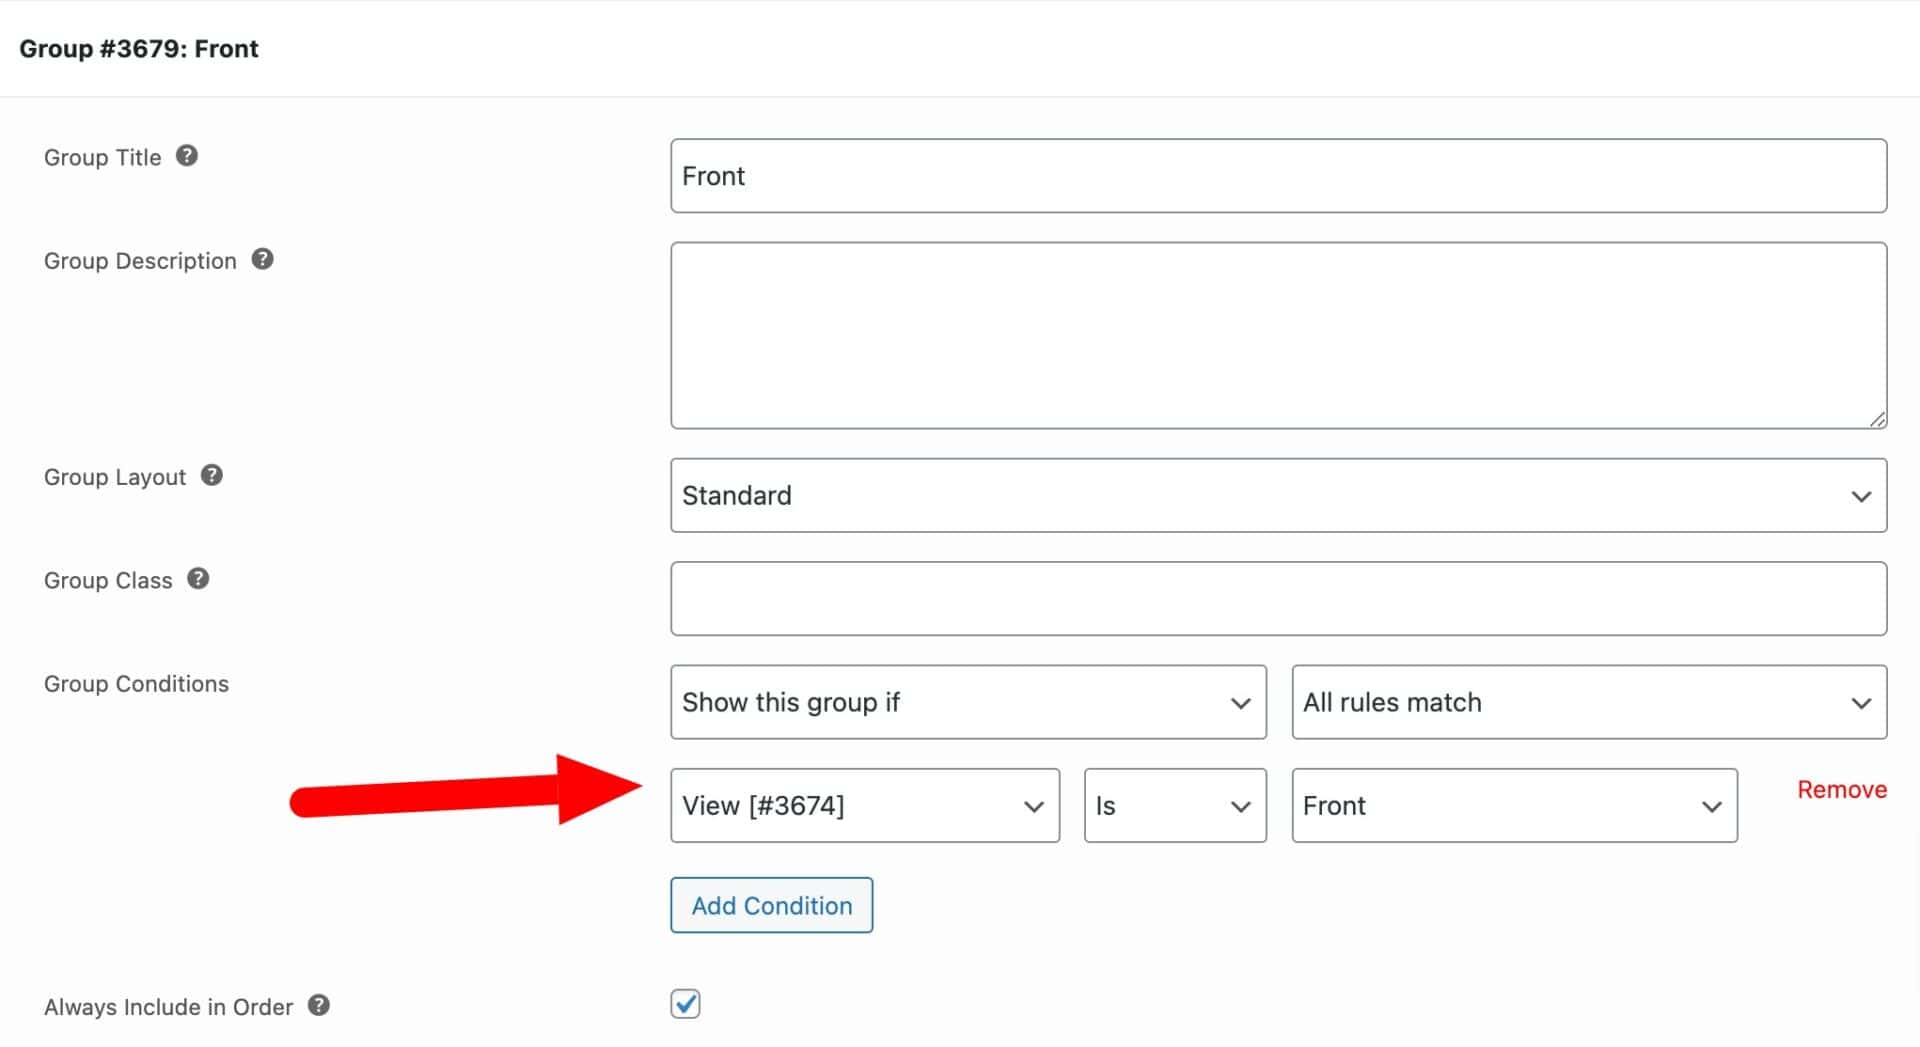
Finally, you can also enable the ‘Always Include in Order’ option to ensure that all details from fields in the group will get passed to the order.
If you save and publish your product now, you can choose a design from the field in the ‘Front’ group but if you switch to a different view, the design will disappear from the main product image.
Creating fields for the other views
You can repeat the steps above to create fields for other views. In our demo product, the user can pick from a couple of fields for the front of the t-shirt, choose another design for the back, and choose designs for each of the sleeves.
Add conditions to each of the groups to ensure that only the correct designs are displayed on the selected part of the t-shirt.
We’re going to add one more feature to this stage of our WooCommerce custom t-shirt designer.
Allowing the user to preview different color t-shirts
As with other features, this is optional. If you don’t want to give the user the ability to pick and preview different color t-shirts, you can skip this. Or you can just allow the user to select a color (e.g. as a variation) without seeing the main image update.
To add the ability to preview different colors, we’ll need to add a field for each view. So in our demo, we have four views – front, back, left and right – so we’ll need to create four corresponding color fields.
- In the ‘View’ group add a new ‘Swatch’ field
- Call it ‘Color’
- Add an option for each color that the user can pick from
- Upload an image for each option. The image should represent the color and view – so in the first ‘Color’ field, your images should represent the ‘Front’ view. Images should be the same size as the main product image
- Click on the color picker field and enter a color value
The setting will look like this:
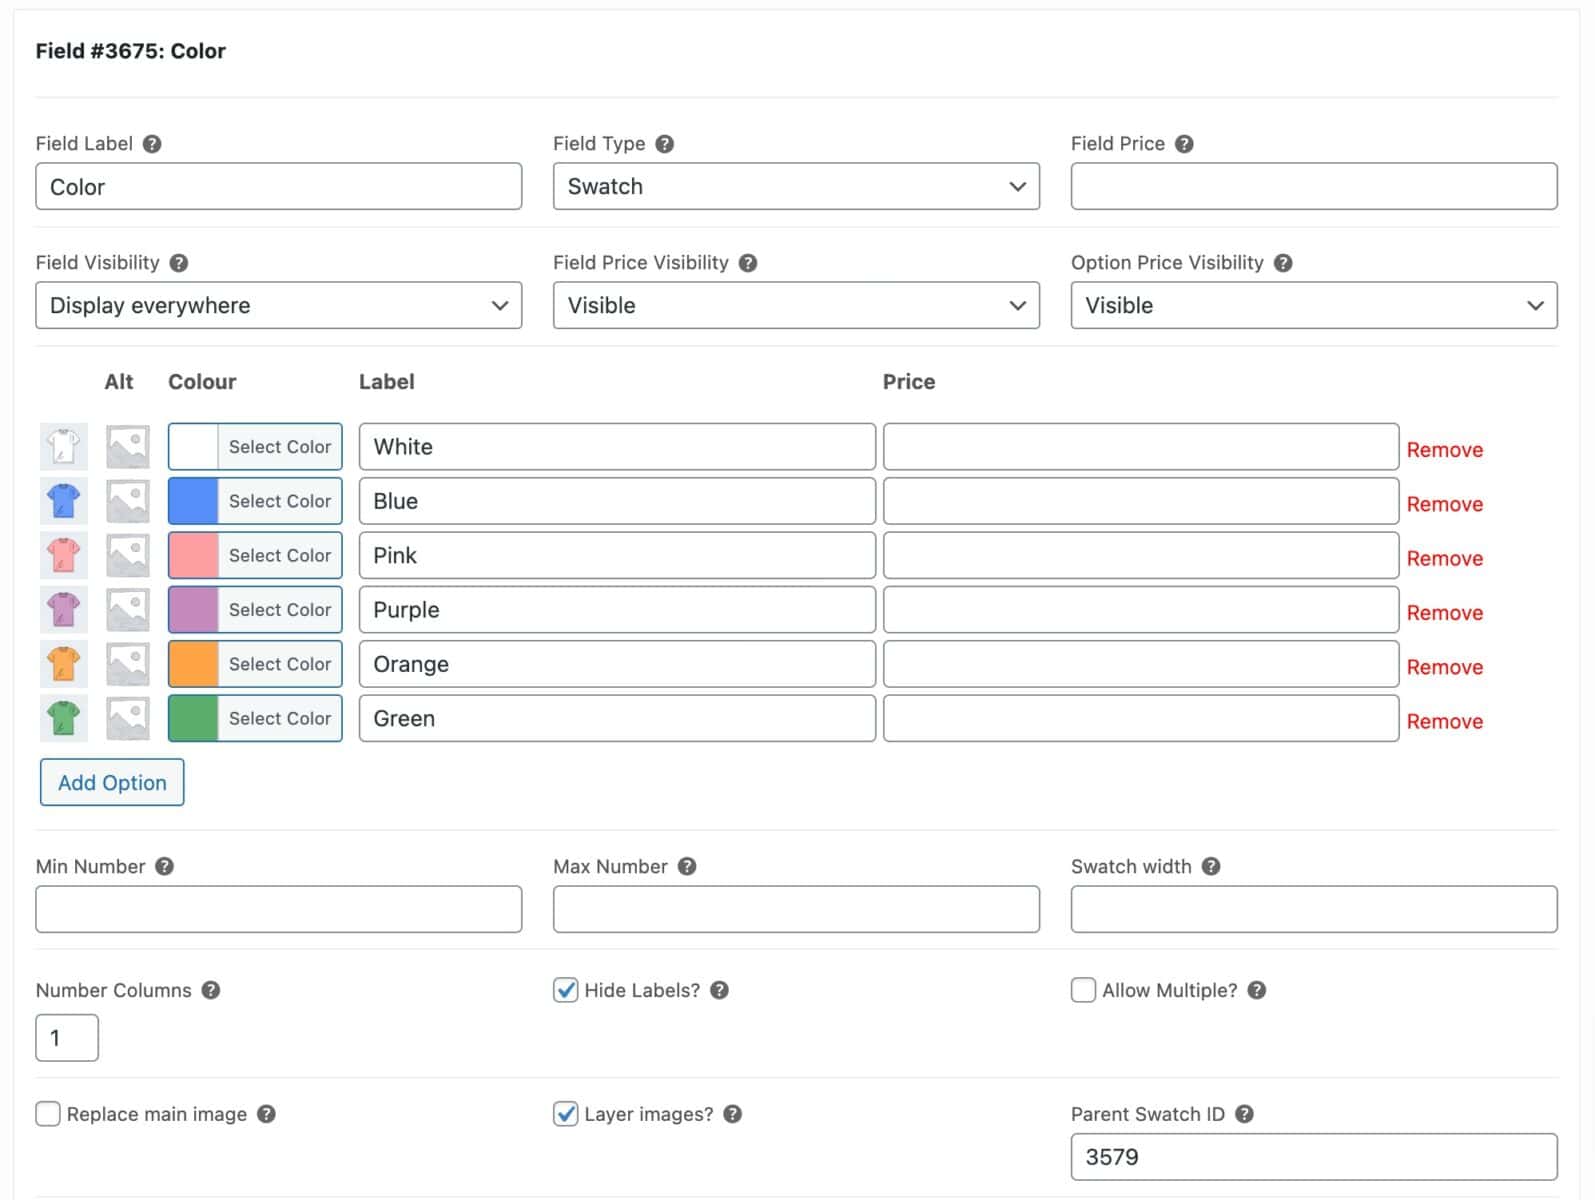
There are three further parameters to note:
- Check the ‘Hide Labels’ option
- Check the ‘Layer Images?’ option
- Finally, enter the field ID of your ‘View’ field in the ‘Parent Swatch ID’ field. This will link this color field to your ‘View’ field so that when the user selects the ‘Front’ view, this ‘Color’ field will be activated
We now need to duplicate this ‘Color’ field for each option that we have in the ‘View’ field. In each duplicated version, we need to update the image in each option to match the corresponding option in the ‘View’ field. So if the second option in the ‘View’ field is for the ‘Back’ view, then update the images in the duplicated ‘Color’ field with images that represent the back view. Here’s what the ‘Right Sleeve’ color field looks like in our example.
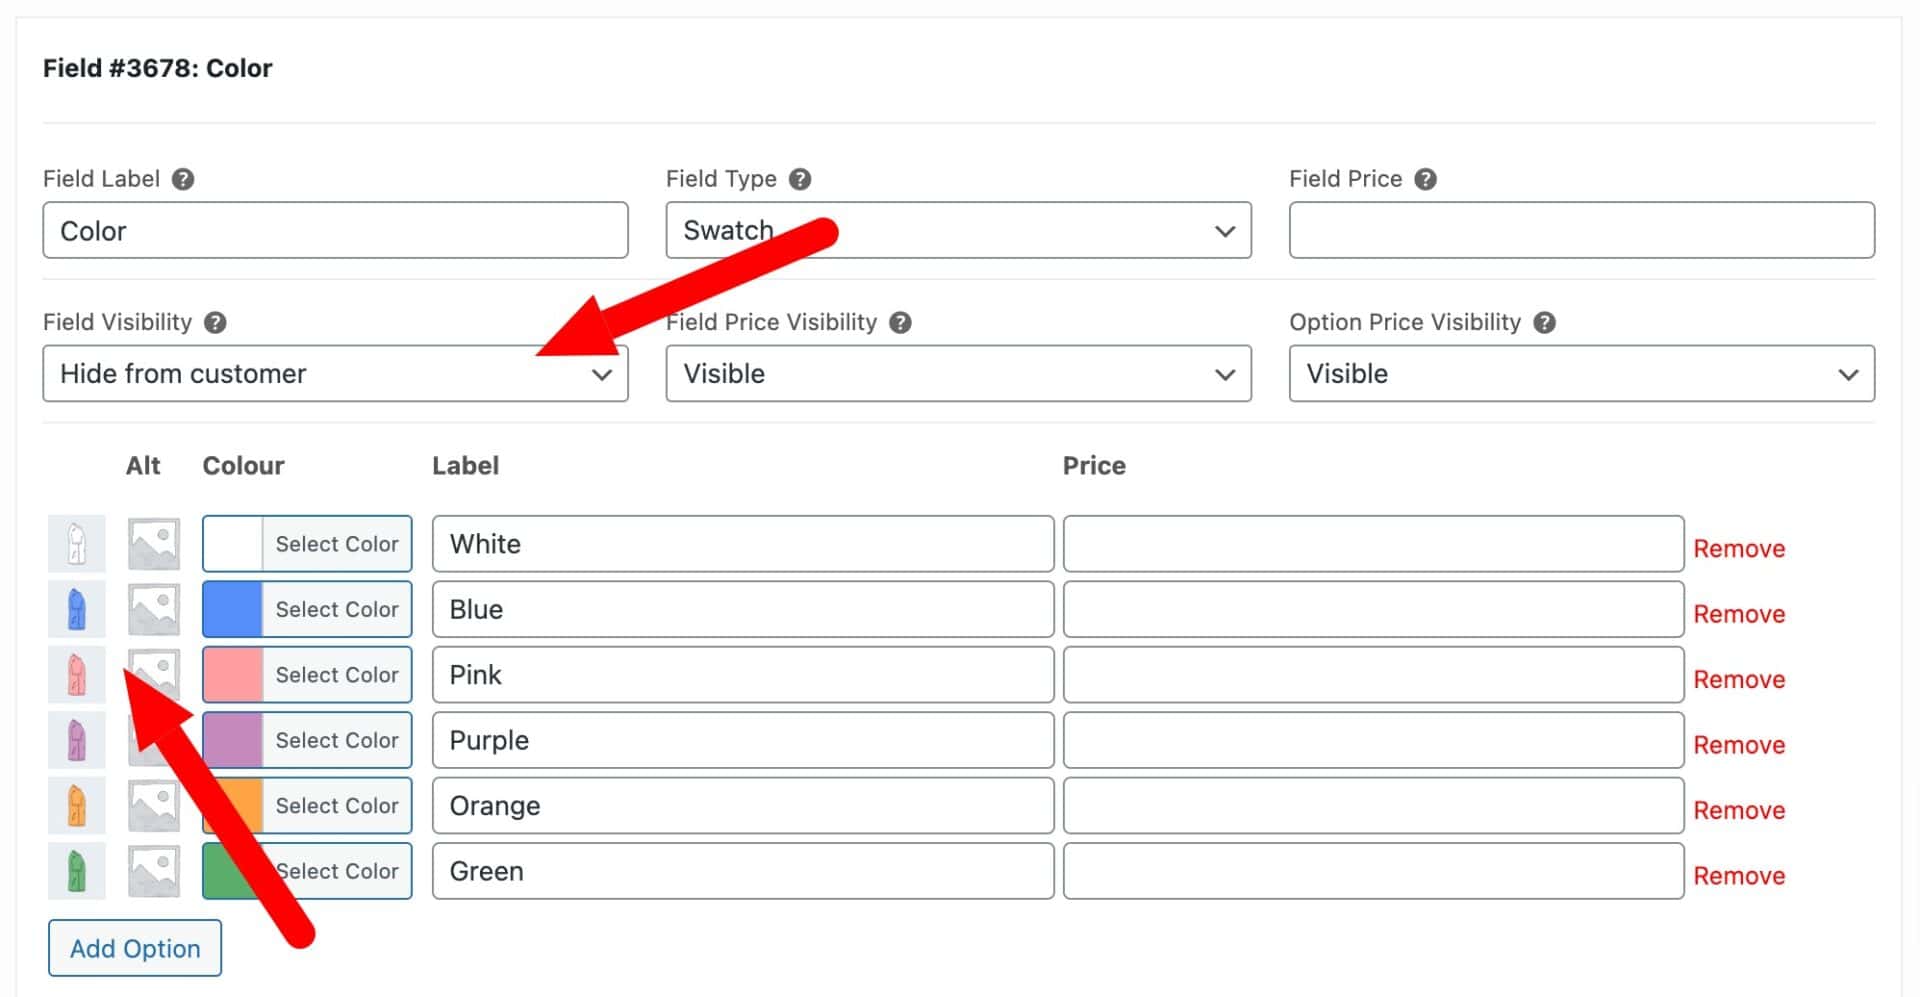
Note that the images in each option have changed to represent the right-side view. But the colors have remained the same.
We can also set ‘Field Visibility’ to ‘Hide from customer’ for the duplicated color fields.
Here’s how the color switcher fields for your t-shirt designer should look on your product.
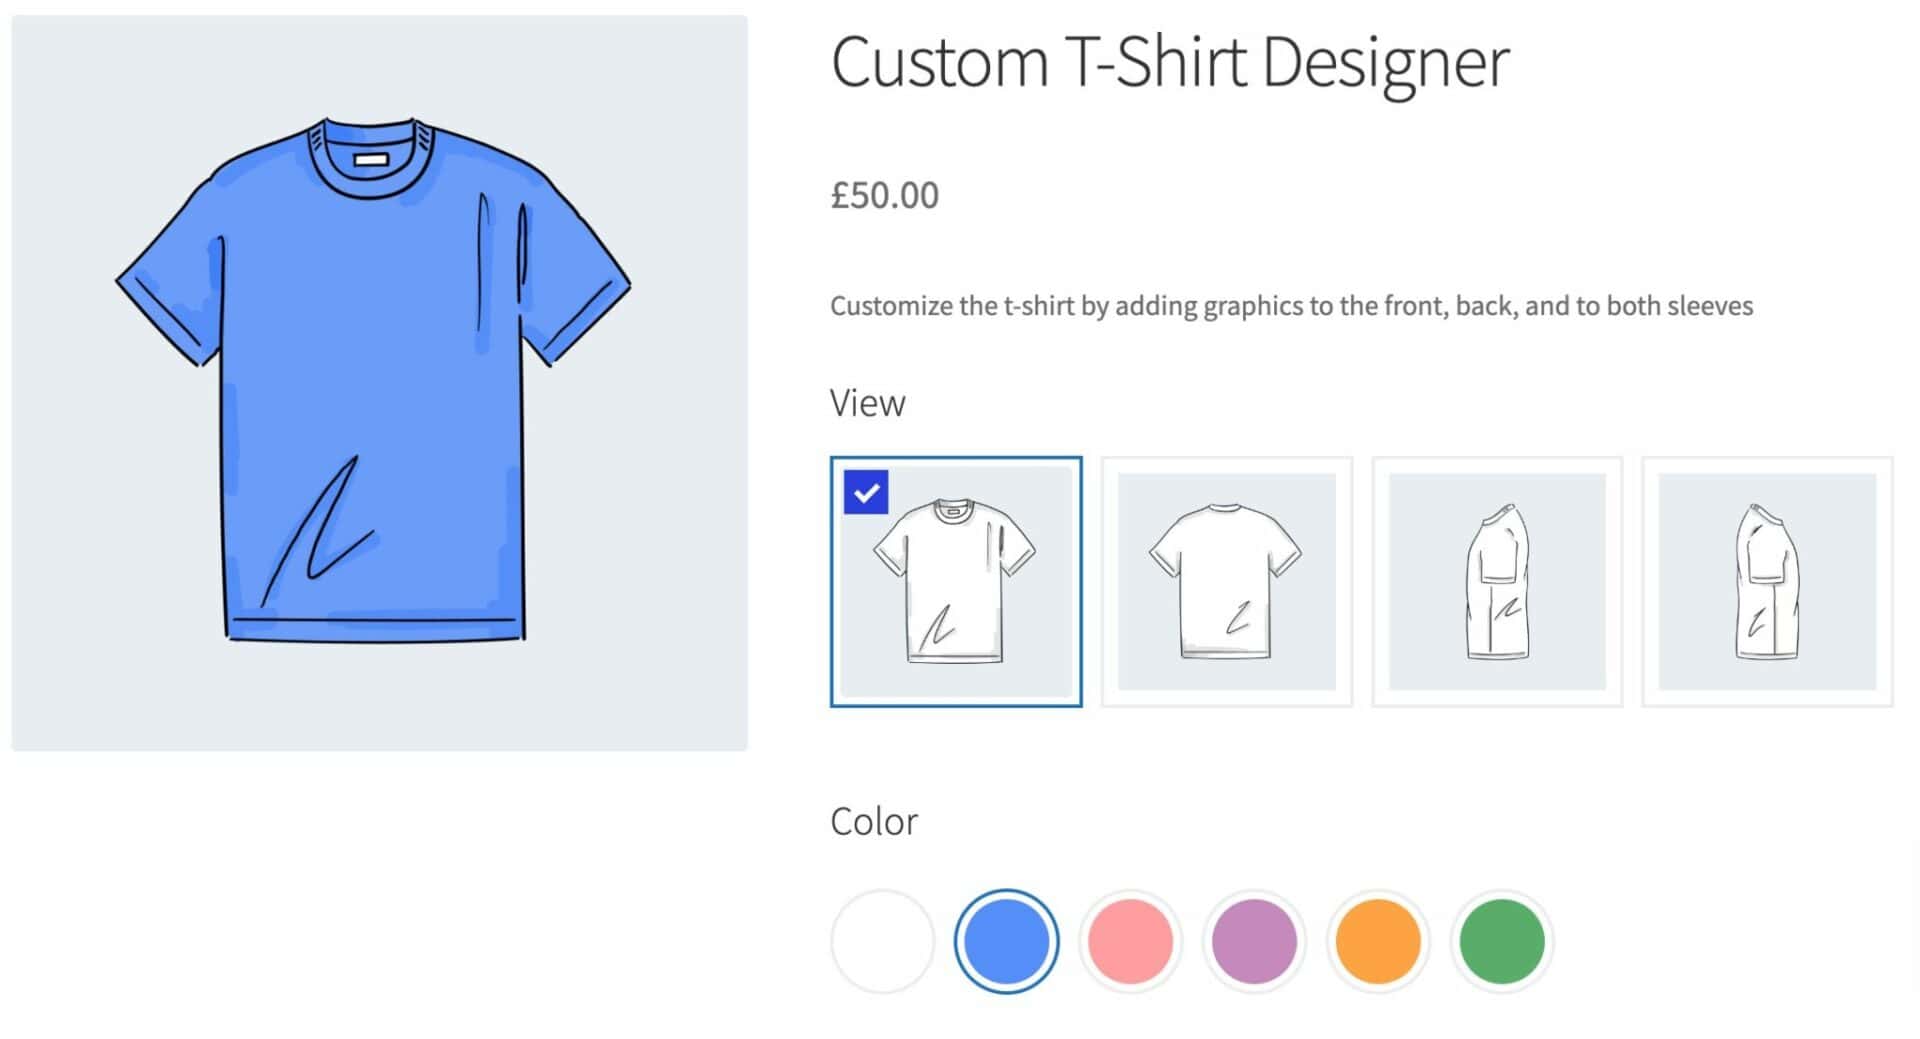
Choosing a layout for the t-shirt designer page
Finally, let’s choose a different layout for the fields on the front end. Because we’ve got so many groups and fields, they extend too far down the page for the user to be able to see the options at the same time as the main image.
So we’ll choose an ‘Accordion’ layout. Go to the ‘Product Add-Ons’ tab in the ‘Product data’ section and choose ‘Accordion’ from the ‘Display groups as’ setting. You could also choose a tabbed, stepped or lightbox layout instead if you liked.
That’s the end of Step 2. In this stage, we’ve configured our visual t-shirt product designer. The user can select from multiple views and colors, pick from different pre-defined designs, and see them previewed on the main image.
Everything up to this point can be achieved with the Pro version of the Add-Ons Ultimate plugin. In the next step, we’ll look at how to allow the user to preview their own text and images using some additional plugins.
Step 3: Custom t-shirt designer with text and image previews
The t-shirt designer that we’ve been building up to this point allows users to select and preview existing graphics. In this stage we’ll look at allowing users to enter their own text, upload their own images, and preview them on the main image.
Adding a live text preview to a t-shirt designer
Let’s look at how to allow users to enter their own text and see it previewed on the main product image. For this, you’ll need the Add-Ons Ultimate plugin plus the Text Preview extension.
For a text preview field where the user can add text to the front of the t-shirt:
- Add a new field to the ‘Front’ group
- Choose ‘Text Preview’ as the field type
- Add a label for the field like ‘Enter Slogan’
- Enter a ‘Max Chars’ value to limit the number of characters the user can enter
- Position the preview field by specifying a value for ‘Text center – X axis’ and a value for ‘Text center – Y axis’. These values are percentages of the main product width and height – so entering 50 for both will mean the text preview field is positioned in the center of the product image
- Set a maximum ‘Width’. Again, this is a percentage of the main product image width
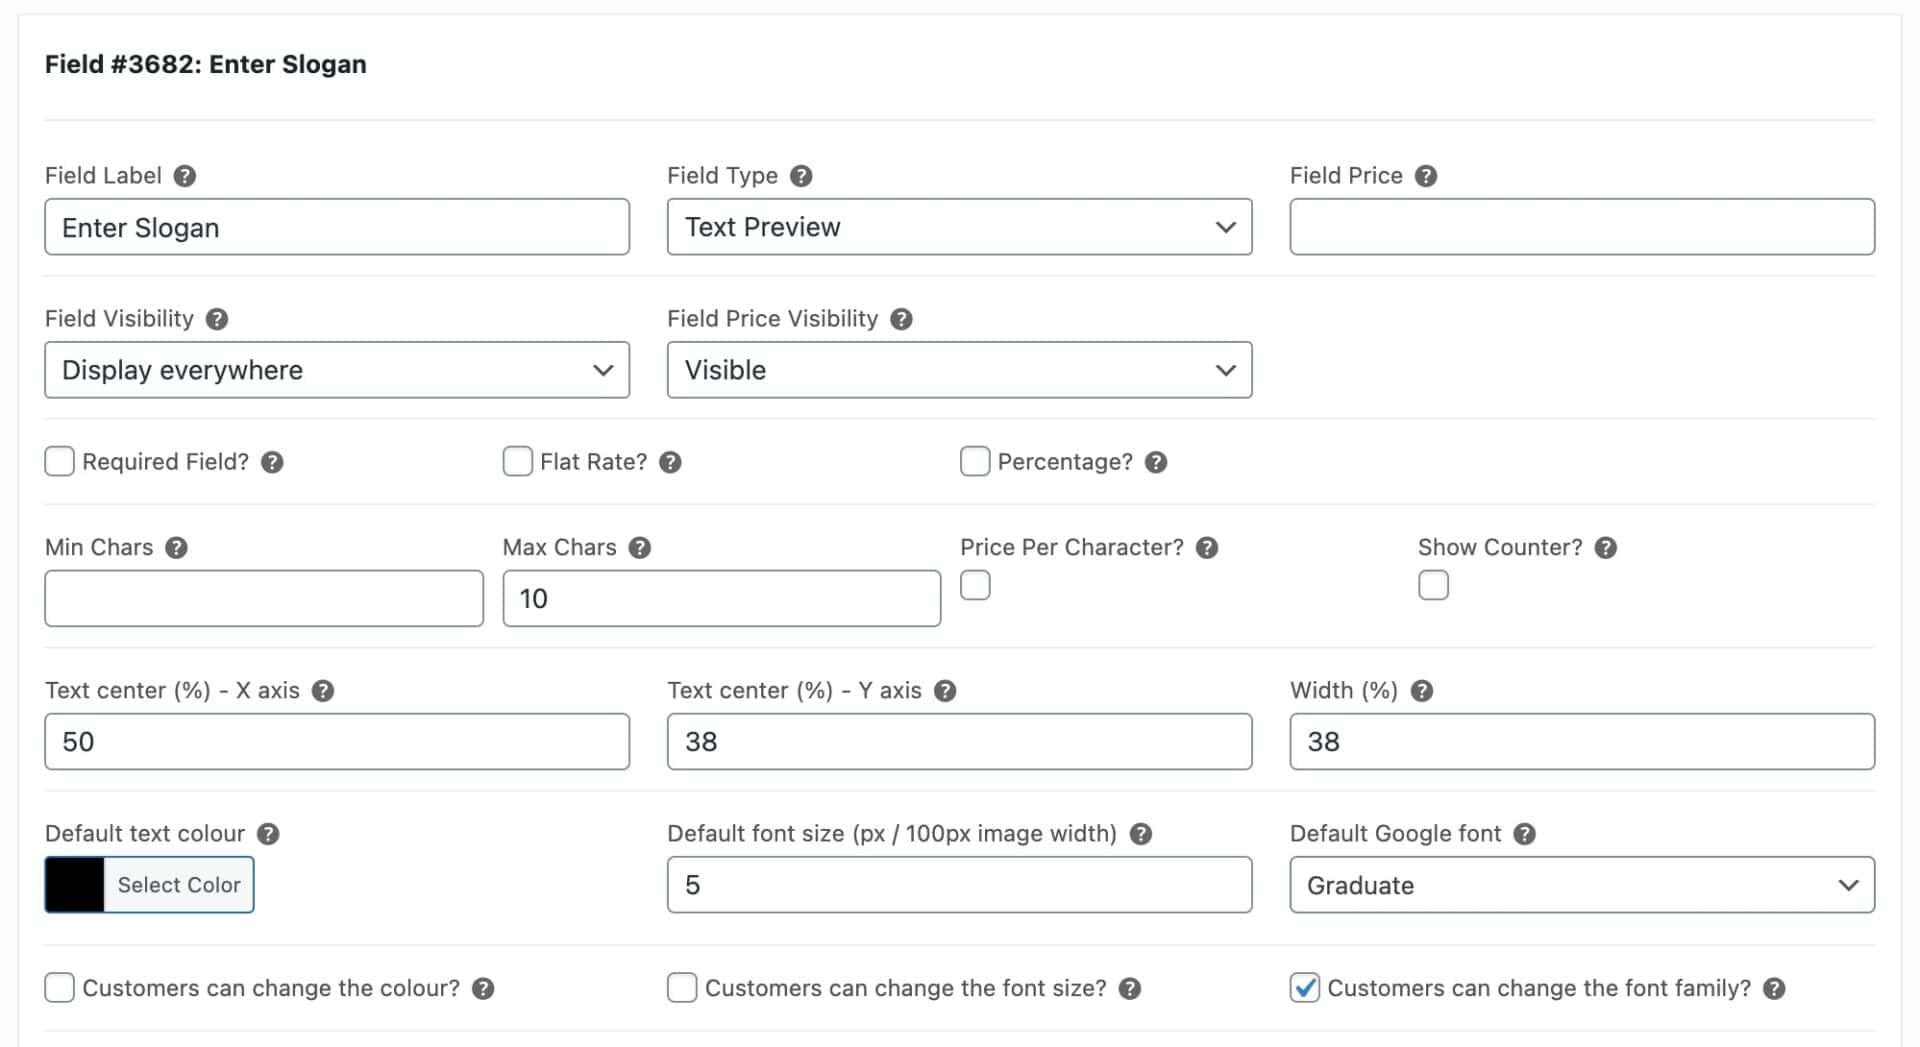
Finally, you can set some extra options regarding the font:
- ‘Default text color’ is the default color of the preview text
- ‘Default font size’ is a value for the relative size of the preview text
- ‘Default Google font’ is the font chosen by default
- ‘Customers can change the color?’ – select this to provide the user with a color setting
- ‘Customers can change the font size?’ – select this to allow the user to adjust font size
- ‘Customers can change the font family?- ‘ enable this to allow the user to select from a list of fonts
Save the product and check it on the front end. The user will be able to enter text in the field and see it displayed on the main product image over their t-shirt. They can also select font etc.
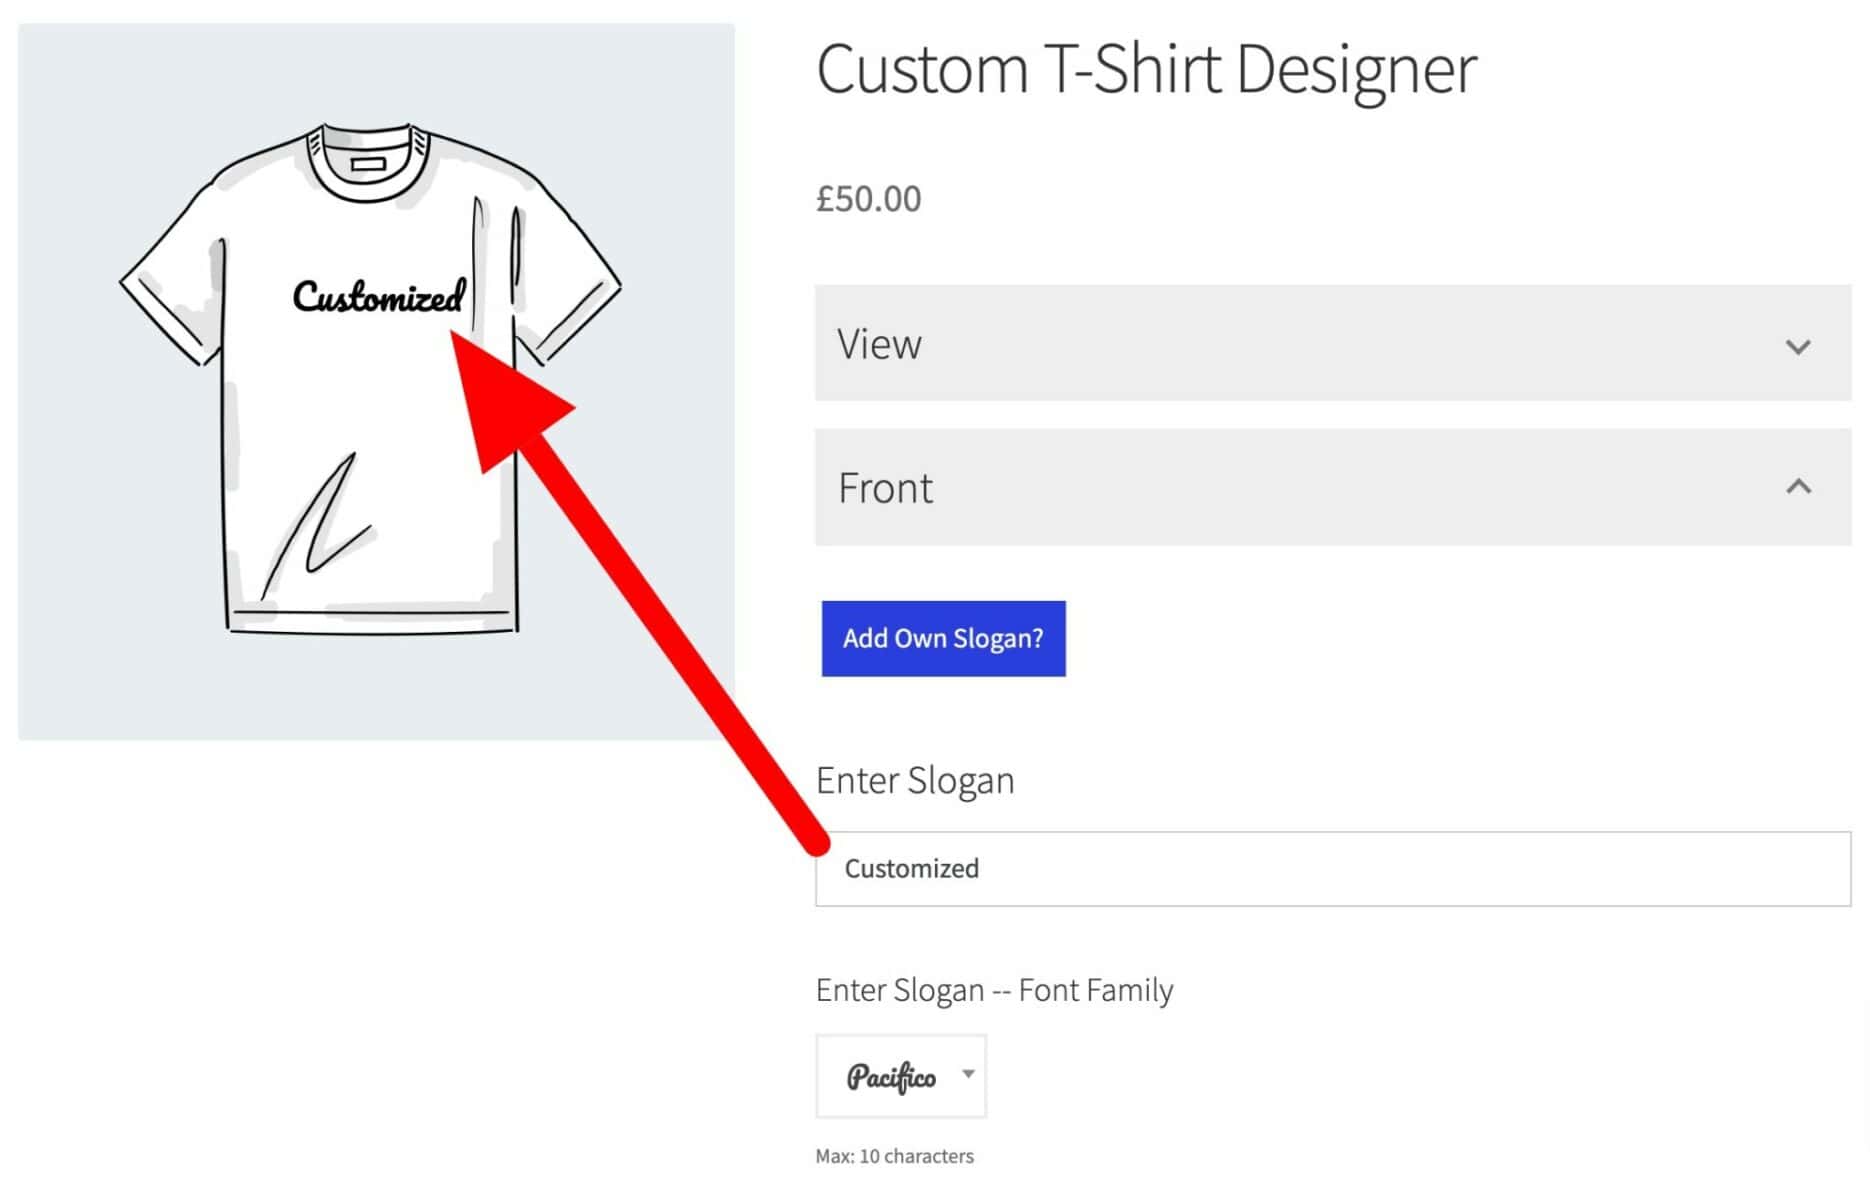
For this you need Add-Ons Ultimate and the Text Preview extension.
Adding an image preview to a t-shirt designer
We can also allow users to upload their own graphic and see it previewed on the main image.
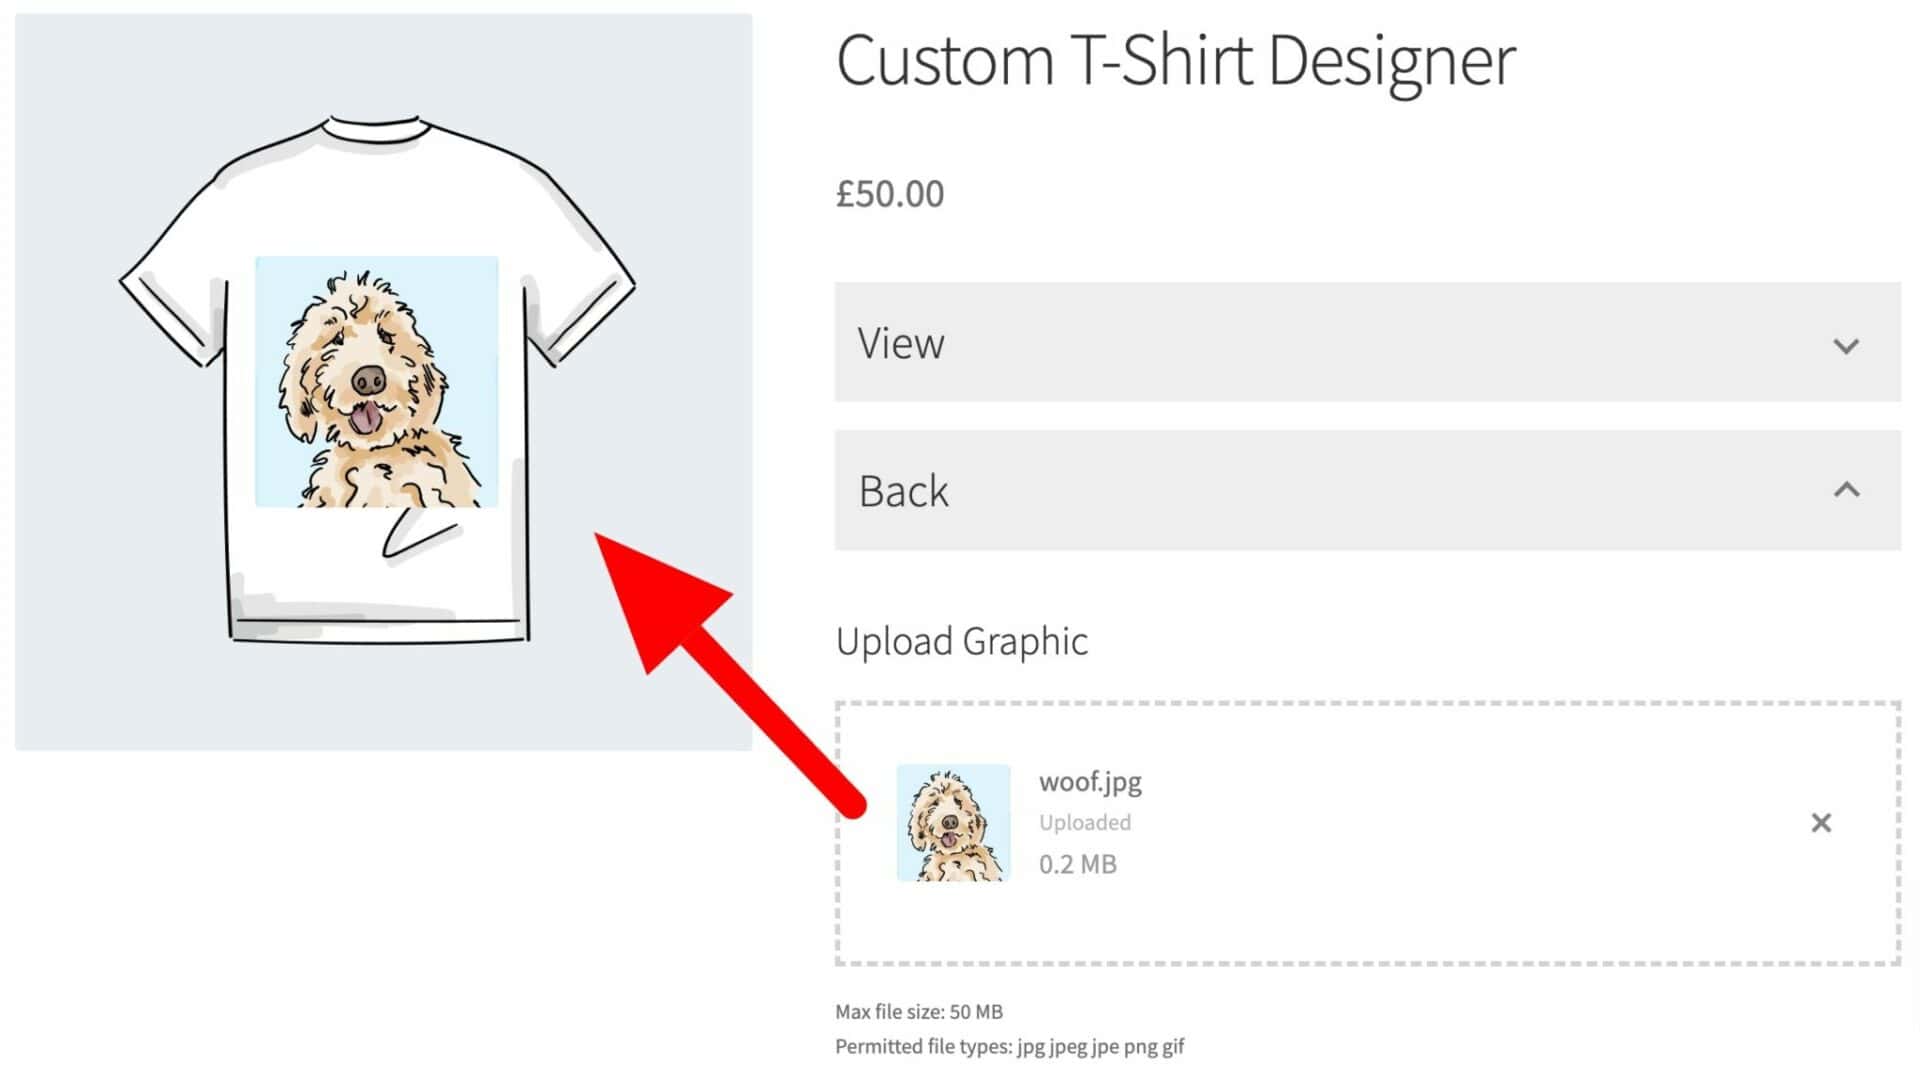
For this, you’ll need the Add-Ons Ultimate plugin plus the Image Preview extension.
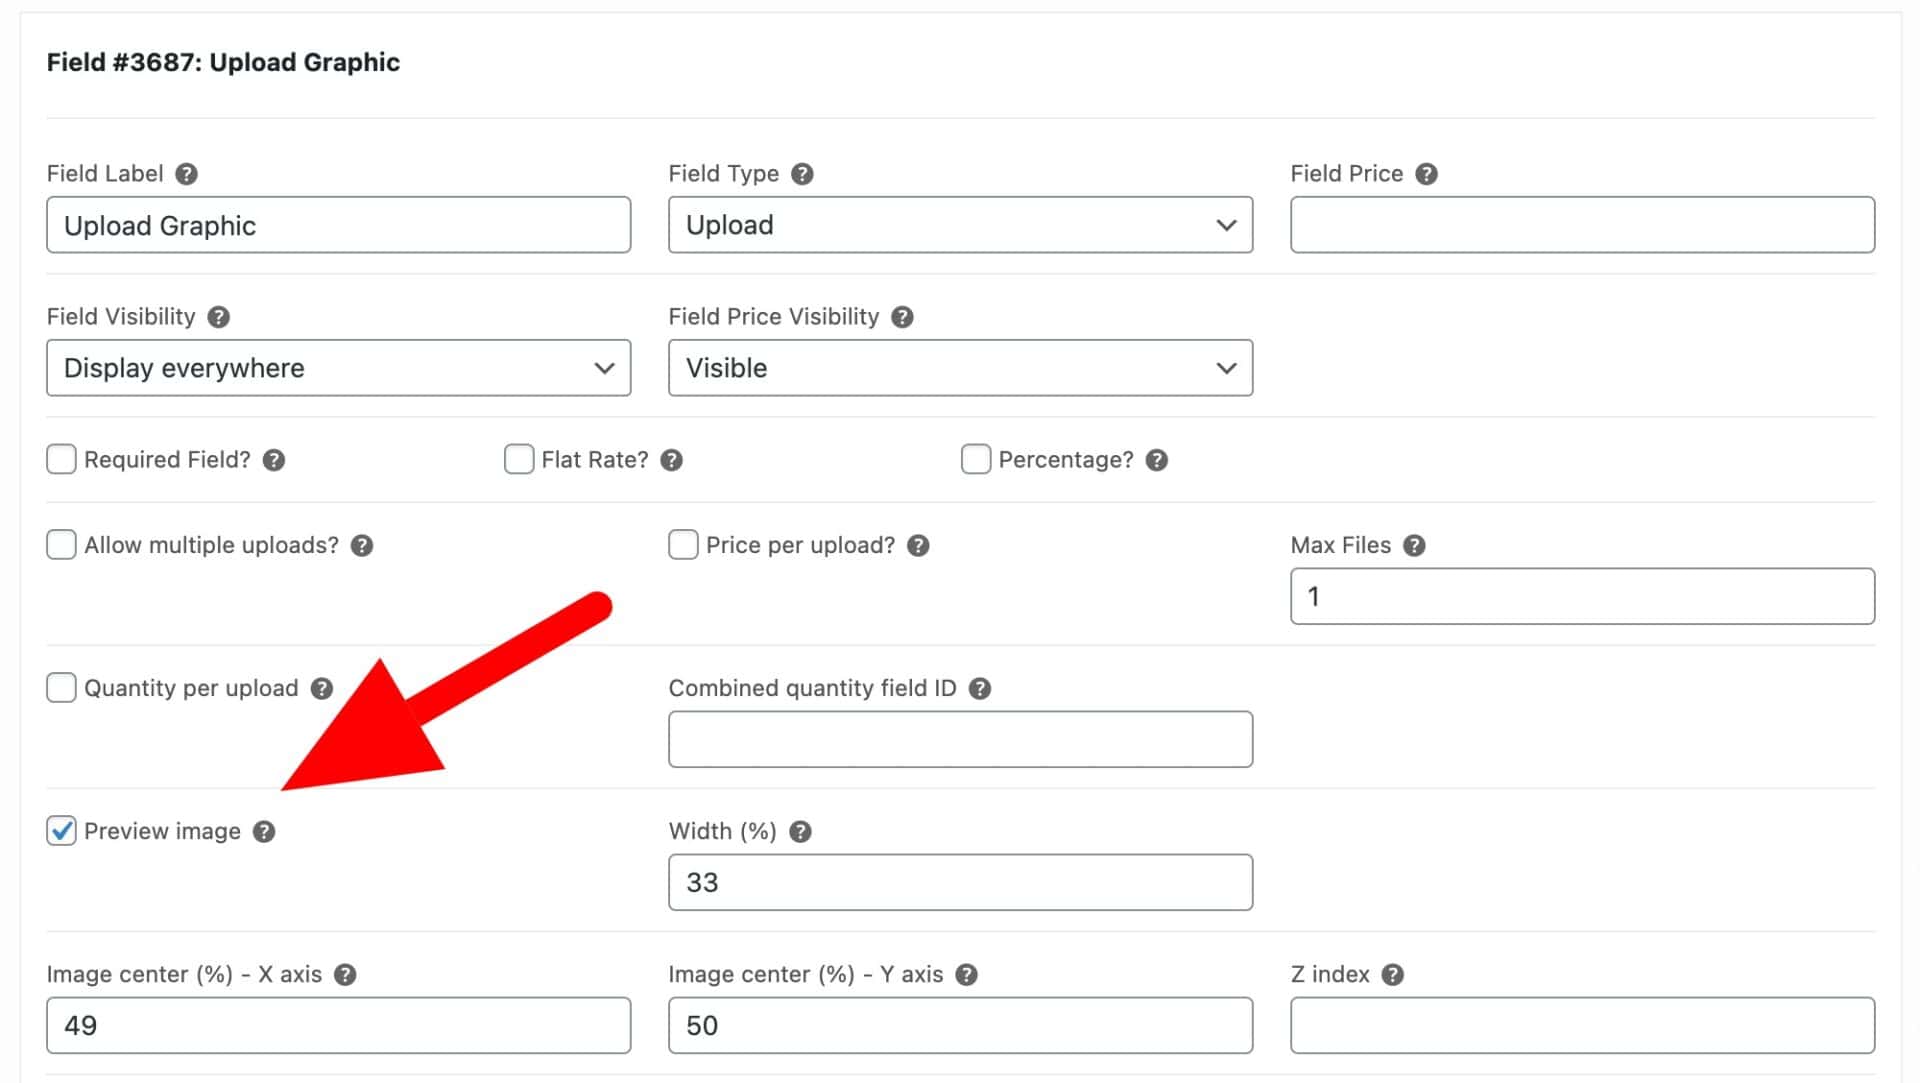
To create an image preview field:
- Add a new field and select the ‘Upload’ field type
- Select the ‘Preview image’ option
- Set the position of the preview image on the main product image by setting values for ‘Image center – X axis’ and ‘Image center – Y axis’. These values are percentages of the main product width and height – so entering 50 for both will mean the image preview field is positioned in the center of the product image
- Set a ‘Width’ for the preview image. Again, this is a percentage of the product image
Now, when you save the product, the user will be able to upload an image to the t-shirt designer and see it previewed on the main product image.
For this you need Add-Ons Ultimate and the Image Preview extension.
Setting conditions on preview fields
If you have added your preview fields to the same view as an existing field, you will see that it’s possible for the user to select a pre-defined graphic and to preview their own text or image. This is fine to have both field types on the page at the same time – but you might want to ensure that the user can only choose one field.
To do this, you’d just need to create a checkbox field and add conditions to the preview and swatch fields.
In the ‘Front’ group where we added our text preview field, we can add a checkbox field to give the user the ability to choose between an existing graphic and their own text:
- Add a new field with the ‘Checkbox’ field type
- Enter a name, e.g. ‘Enter Own Slogan?’
Now we can use the value of this checkbox to decide what fields to display:
- Add a condition to the Text Preview field we just added. The condition should be set to display the field if the ‘Enter Own Slogan’ checkbox is selected

- Add a condition to the existing swatch field to hide the field if the ‘Enter Own Slogan’ checkbox is enabled

Now different fields will display based on the value of the checkbox field.
Editing uploaded images
Finally in this section, let’s look at allowing users to edit their uploaded images.
For this, we’ll need the Advanced Uploads extension.
To automatically present the users with an edit screen when they upload their images, just enable the ‘Auto edit’ option. You can also specify parameters like minimum and maximum size and aspect ratio.
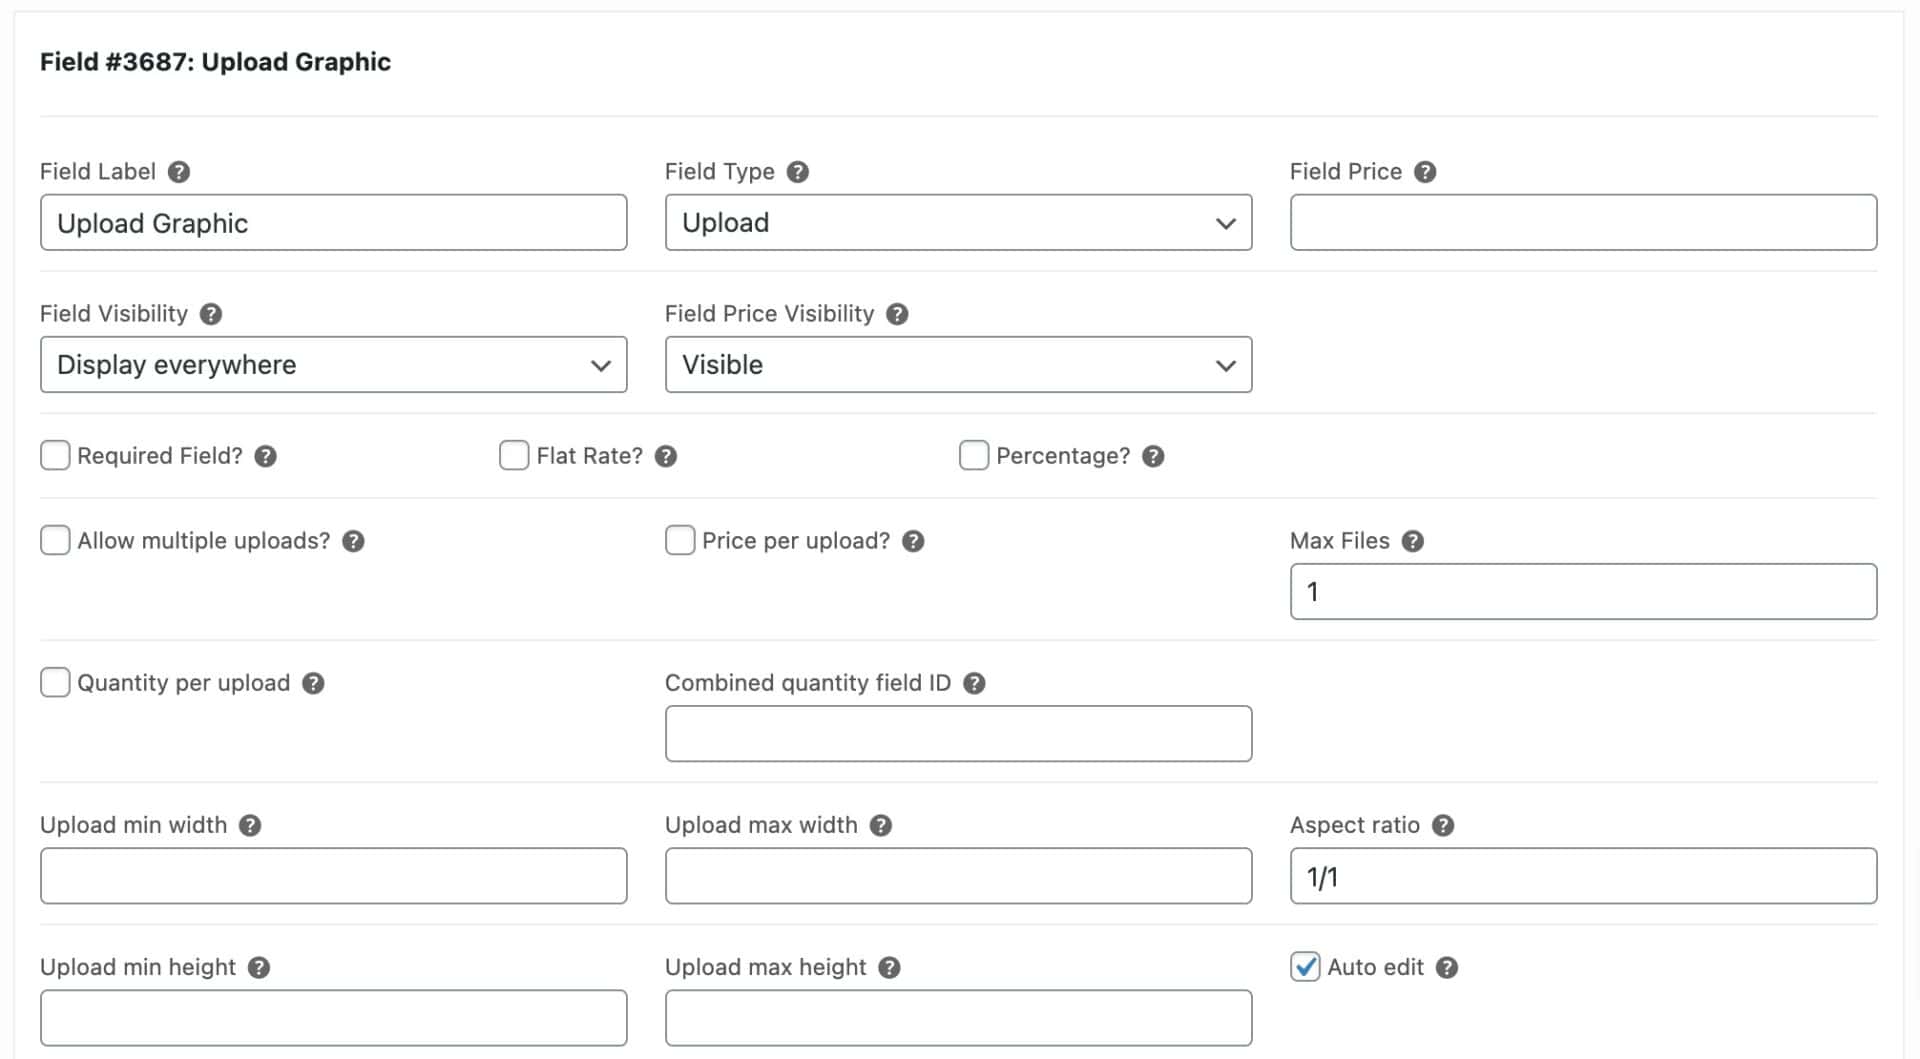
That’s the end of this section of the build. Our WooCommerce custom t-shirt designer now allows users to select pre-defined graphics or use their own text and images. We’ve made use of the following plugins:
- WooCommerce Product Add-Ons Ultimate (Pro version)
- Text Preview
- Image Preview
- Advanced Uploads
Note that all these plugins are available in a single bundle (along with a couple more extensions). The Product Add-Ons Ultimate Bundle contains Add-Ons Ultimate and all its extensions at a significantly reduced price.
Step 4: T-shirt designer with bulk order form
This next stage is, again, optional. It’s less about the design aspect of the t-shirt customizer and more about how the user can order the items.
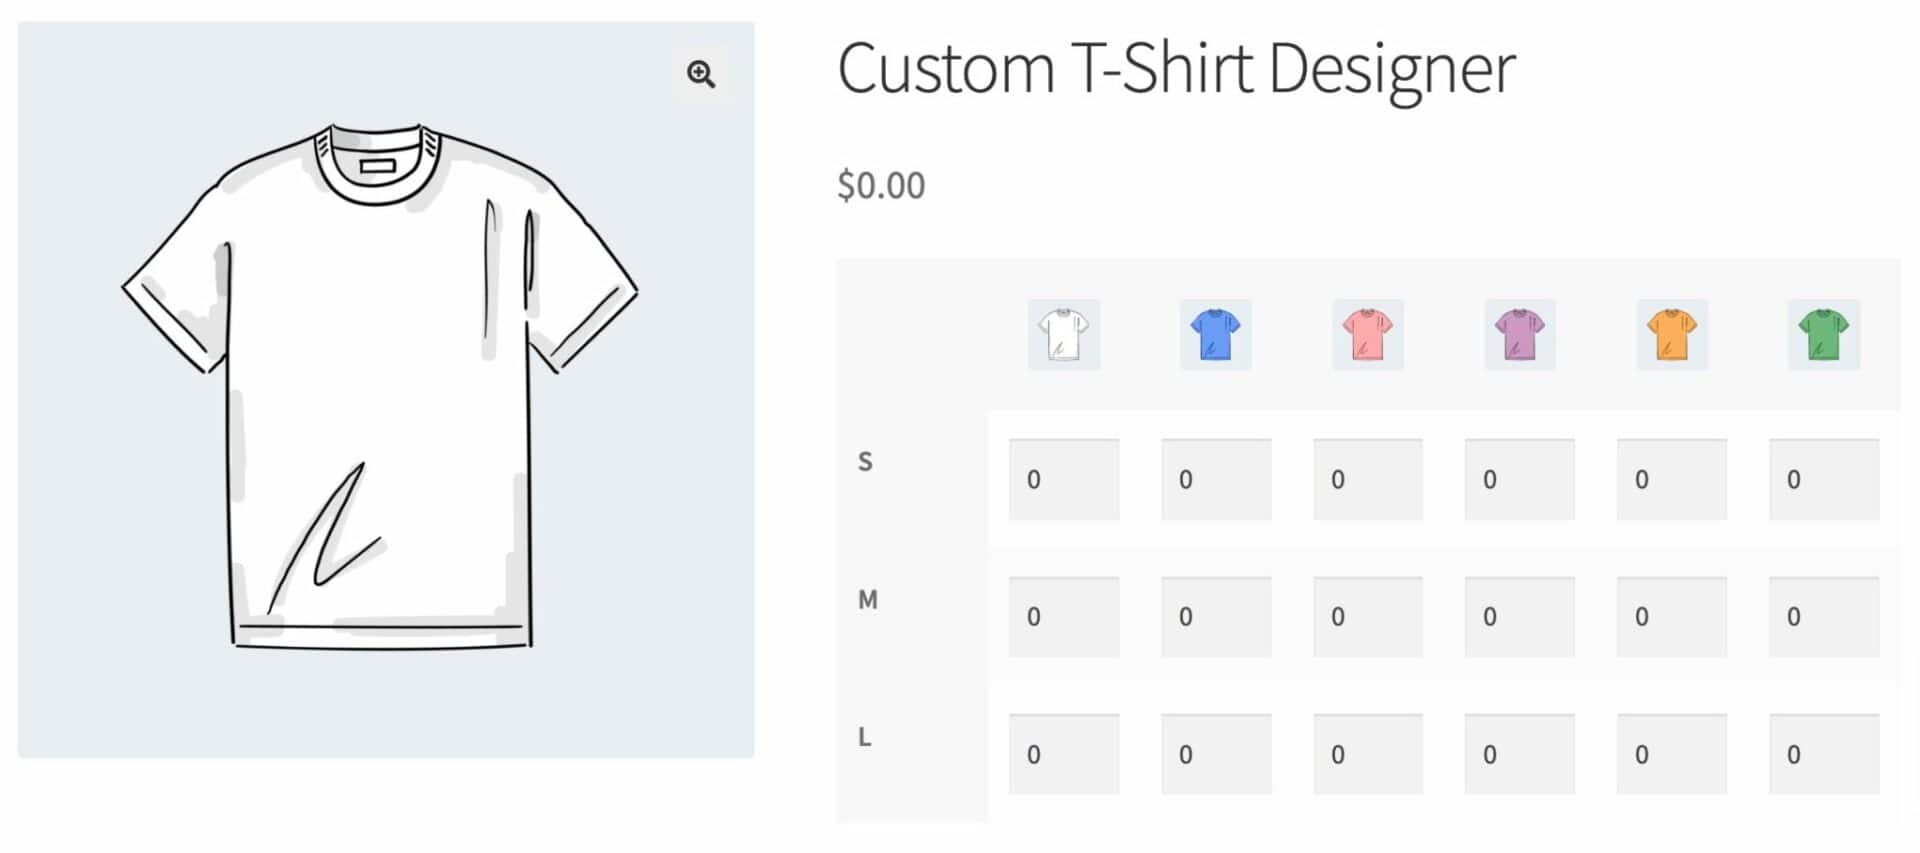
The WooCommerce Better Variations plugin allows you to create a bulk variation order form for your WooCommerce products. You can use this as part of your custom t-shirt designer if you want to allow users to order different variations in a single click.
The Better Variations plugin allows you to display a grid-based order form where users can enter a quantity for each product variation. For this to work, you’ll need to ensure your custom t-shirt product is a variable product. In this case, we’ll have an attribute for ‘Size’ and an attribute for ‘Color’.
The user can enter how many of each variation that they require and add them all to the cart in one click.
There’s a detailed tutorial on how to create a bulk variation order form for your WooCommerce products here.
So that’s the end of the tutorial. We’ve built up our t-shirt designer product in stages, starting with the most simple version, then adding layered images, preview text and images, and even a bulk order form.
We’ve used a number of different plugins – though only the Product Add-Ons Ultimate plugin is necessary for all stages.
Let’s take a quick look at some alternative plugins.
What to look for in a t-shirt designer plugin
There are many WooCommerce plugins out there that enable customers to design their own t-shirts in your store. While different businesses have specific needs, there’s a set of criteria that is important to consider when looking for a t-shirt designer plugin for your store.
These are some of the main features to look for in a WooCommerce t-shirt designer plugin:
Compatibility with WooCommerce
Some t-shirt designer plugins only integrate with WordPress, not WooCommerce. However, if you plan on selling t-shirts from your site, we recommend setting up WooCommerce first and then getting a plugin that integrates with it.
This approach makes more sense for any eCommerce business since you’ll be able to make use of the payment gateways that integrate with WooCommerce. This makes it possible to sell t-shirts and other products easily.
Lots of customisability and flexibility
The plugin you choose should make it easy for customers to design t-shirts exactly as they want them, with plenty of options to choose their colours and prints, add text, select fonts, upload custom images, and so on.
Of course, you may not want to display all these options if you don’t offer totally customised t-shirts. For example, if you only sell white t-shirts that customers can add text to or print custom images on, you won’t want to include a colour picker option. However, it’s always better to have more options than you really need!
Easy to set up and use
Flexibility and customisability are pretty useless if the t-shirt designer plugin isn’t easy to set up in the back-end and get started with. The plugin you choose to go with should make it easy for you to configure and display the different design options on your website.
This way, you can set up as many options as you’d like by yourself and change things up whenever you need to.
Professional display options
More customers will want to design their own t-shirts if the designer tool looks good and is intuitive to use on the live site. One way to ensure this is by choosing a plugin that lets you add display options like swatches and plenty of add-on fields that you can add to your product pages.
Flexibility beyond t-shirts
While we’ll list a few t-shirt-specific plugins in this list, our best advice is to get a plugin that lets you add design options for more custom products. The reason for this is that you may want to expand your business in the future.
So, by using a plugin that isn’t limited to t-shirts alone, you won’t have to buy a separate plugin if you choose to sell, say, custom totes or caps. For the same reason, we also don’t recommend using a t-shirt designer WordPress theme.
The best alternative custom t-shirt designer plugins for WooCommerce
Now that we have a better idea about what features to look for in a custom t-shirt designer plugin, let’s look at the top WooCommerce plugins that enable your customers to design their own t-shirts.
1. WooCommerce Product Add-Ons Ultimate
Out of the box, the WooCommerce Product Add-Ons Ultimate plugin comes with around 20 different add-on fields that you can use to display options for t-shirts. These include image swatches, checkboxes, dropdowns, colour pickers, upload fields, and more. We’ve covered its capabilities extensively in the tutorial above.
Other reasons to choose Add-Ons Ultimate include:
- It’s compatible with all themes
- It has a 14 day money back guarantee so you can try it risk-free
- It’s backed by a world-class support team who will help with any question or issue you might have
To access all features of the plugin, you’ll need the Pro version. This gives you access to extra field types, such as image swatches and child products.

You can set custom pricing options for different add-ons so the price of the t-shirt will automatically scale depending on how complex the t-shirt design is. For example, you can set a price per character for the text area field. When a customer adds text or a slogan to their t-shirt, they’ll be charged an additional fee based on the number of characters. If you like, you can also offer discounts on certain add-ons.
The WooCommerce Product Add-Ons Ultimate plugin also lets you use conditional logic and variation-specific fields to create a unique t-shirt design experience. For example, you can set the text field to appear only if users choose a small print.
If you want to give your customers even more flexibility to design t-shirts and see how they’ll look before they place their orders, you can integrate WooCommerce Product Add-Ons Ultimate with a number of useful plugins. These are:
- Text Preview for Add-Ons Ultimate
- Advanced Uploads for Add-Ons Ultimate
- Image Preview for Add-Ons Ultimate
Want to let your customers more than just t-shirts? The WooCommerce Product Add-Ons Ultimate plugin is perfect for creating all sorts of custom products in WooCommerce.
2. Product Add-Ons by WooCommerce

Product Add-Ons by WooCommerce is an official WooCommerce extension that lets you add extra options to products. These include gift wrapping, special messages, and other similar options.
With the Product Add-Ons extension, you can let customers personalise their t-shirts before placing their orders. The different options it offers include text boxes, dropdowns, sample images, checkboxes, and more.
The Product Add-Ons extension is affordable but also very limited for custom t-shirt designs as compared to the WooCommerce Product Add-Ons Ultimate plugin. For instance, it doesn’t let you charge additional fees or offer discounts based on the customer’s selections.
Product Add-Ons is a decent option for anyone that only wants to allow minor designs such as adding text or a slogan to a t-shirt.
3. Allada T-Shirt Designer
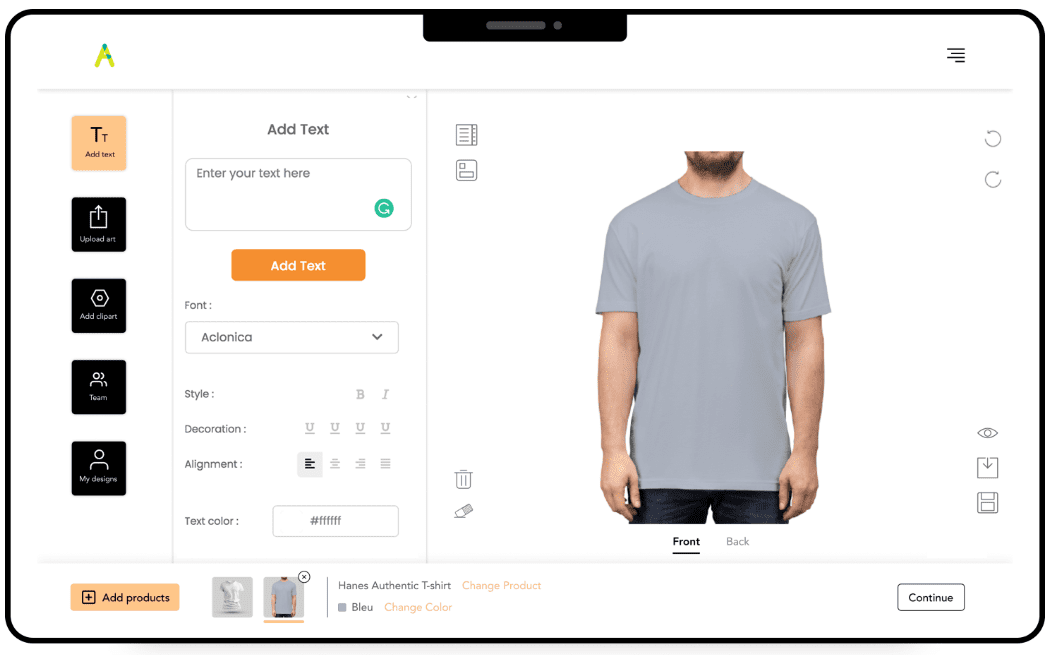
As the name suggests, Allada T-Shirt Designer can only be used for designing t-shirts and not other products. It integrates with WooCommerce, so you can use it to sell custom t-shirts on your online store.
Allada T-Shirt Designer comes ready with images of t-shirts from popular brands, organised by colour, model, and reference. This makes it easy for you to set up your store quickly and let customers design their t-shirts and place their orders.
The Allada T-Shirt Designer plugin gives customers lots of options to add and resize clipart and customise any text they’d like to have printed on the t-shirt with options for colour, font, and style. It also lets customers save their designs which is a handy feature should they want to order the same shirt in a different colour or size.
As we mentioned earlier, it might not be worth getting a plugin that’s limited to t-shirt design alone. If you scale your business by adding other customisable products to your catalog, you’ll have to get another plugin down the line.
4. YITH Product Add-Ons and Extra Options
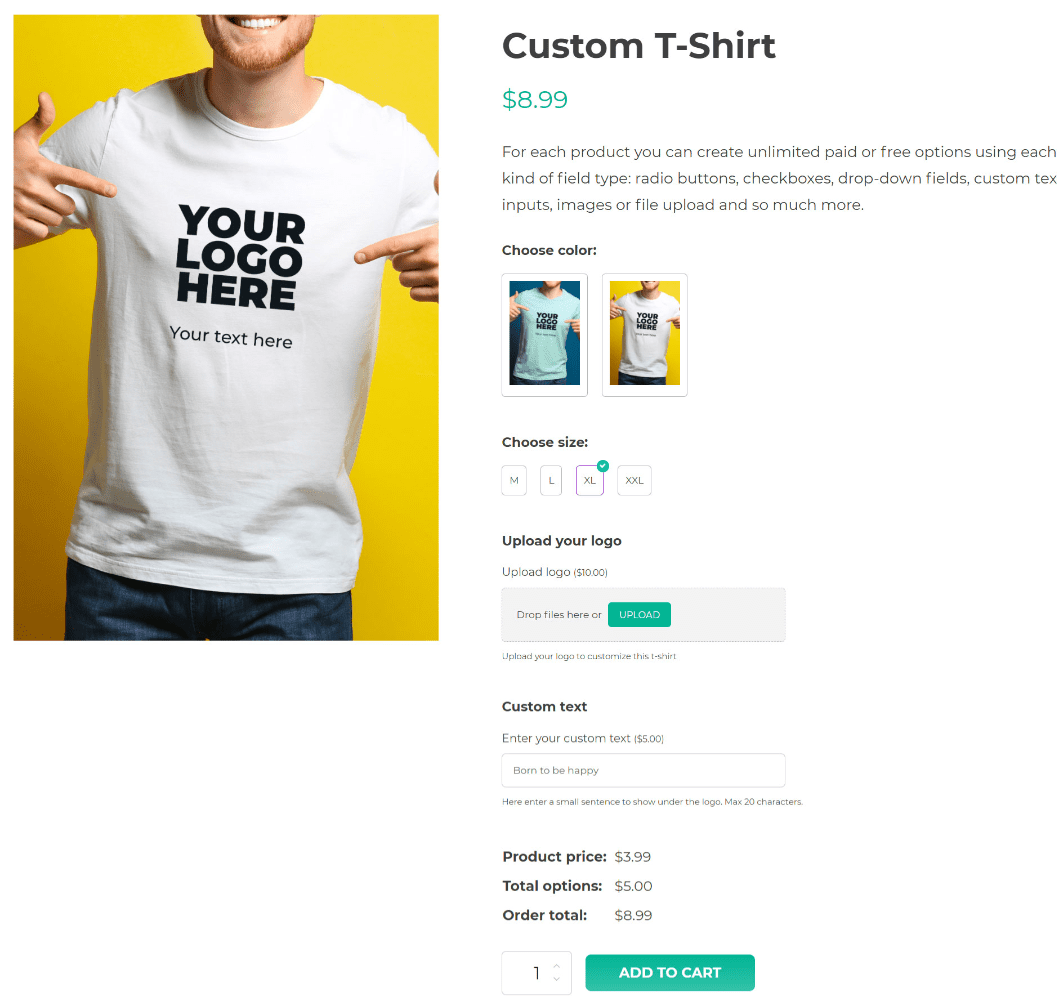
YITH Product Add-Ons and Extra Options is another plugin that lets you add extra add-ons to products.
Users can choose whether they want to customise their product by selecting a “customise product” box which will reveal different options that you set. For example, you can choose to reveal the Upload field or Text field when customers enable customisation.
Users can upload photos, images, or files to request a customised product.
5. WooCommerce Product Designer Tool
WooCommerce Product Designer Tool is a product customiser plugin that integrates seamlessly with WooCommerce.
It gives you many options to manage the design process with features such as a resolution warning, lock and unlock elements, and advanced image editing. The plugin also comes with over 10,000 customisable clipart and custom font upload features.
You can also allow customers to print their designs or save them as PDF files. However, this feature may not be useful to you if your main focus is sales.
Add a custom t-shirt designer to your WordPress site today
T-shirts are one of the most sellable items globally. Giving customers the option to design their own t-shirts before placing their orders can help you deliver an enhanced shopping experience and increase sales in your WooCommerce store.
WooCommerce Product Add-Ons Ultimate is the best t-shirt designer plugin available for WordPress sites. It offers plenty of customisation options for customers and makes it easy for shop owners to set it up however they’d like. The best part is that it isn’t limited to t-shirt design alone. You can use the WooCommerce Product Add-Ons Ultimate plugin to let customers design all sorts of products!
And, if you really want to create the ultimate t-shirt designer, consider getting the plugin’s extensions: Text Preview for Add-Ons Ultimate, Advanced Uploads for Add-Ons Ultimate, and Image Preview for Add-Ons Ultimate to take your t-shirt designer to the next level.
How much customisation do you need for your products? Choose between the basic and pro license for WooCommerce Product Add-Ons Ultimate and get started today. You can try out either plan with a 14-day refund guarantee.
