Conditional discounts for WooCommerce: complete guide [+ video]

Conditional discounts allow you to control how discounts work on your WooCommerce store. In this article we’ll show you how to create several different kinds of conditional discount – and each one only takes a few minutes.
WooCommerce has some basic discounting options as standard – you can set sale prices for individual products or you can create coupon codes – but out of the box it’s not possible to run any more customizable types of discount. Instead, to set up conditional discounts we’ll use the WooCommerce Dynamic Pricing and Discount Rules plugin.
In this tutorial, we’ll look conditional discounts, their benefits, and how to create all kinds of discount. There are step-by-step instructions for creating discounts plus an easy-to-follow video.
WooCommerce Dynamic Pricing and Discount Rules
Create conditional discounts for WooCommerce
Let’s start by looking at what conditional discounts are and how they can benefit your store.
WooCommerce conditional discounts and their benefits
Conditional discounts are a way of configuring price reductions in your store according to specific parameters. For instance, you might want to offer one or more of these types of discounts:
- Percentage discounts
- Fixed amount discounts
- Bulk discounts, where products are discounted based on the number of items the user purchases
- Tiered pricing, where products are priced based on the quantity of item purchased
- Discounts that only apply to certain categories
- Discounts that only apply to certain products
- Money off when a user spends over a certain amount
- Discounts for certain user roles
- Discounts that exclude certain user roles
- Sales that only run between certain times and dates
- Discounts for specific users
- Buy one get one free style offers
- Discounts for payment gateways
- Discounts based on order history
Conditional discounts allow you to do way more than simply offer a set price reduction. You can fine-tine the amounts, the times, who receives the discounts, and what products the discount applies to.
The benefit of discounting are well-documented. A successful discounting strategy will help you to:
- Increase your total sales
- Increase your average order value
- Generate new customers
- Improve existing customer loyalty
- Create brand awareness
- Move stock
Setting up conditional discounts means that you can create customized discount offers for your user. For instance, you can incentivise customers based on the quantity, user role, or the payment gateway they decide to use. As a result, it makes your website more appealing to buy from than your competitors and helps increase the average order value for your online store.
Conditional discounts for WooCommerce video
Find out how to set conditional discounts in WooCommerce by watching this video.
WooCommerce conditional discount plugin
While offering customised discount offers is a great way to make your online store stand out and make more sales, WooCommerce by default doesn’t let you do this. It only lets you create coupon codes.
Using coupons for discounts
Coupons are WooCommerce’s default way of providing discounts to customers. You can create multiple coupon codes each with different criteria. So you can set different types of discount, like percentage or fixed amounts, decide what products the coupons should apply to, and set limits on how many times the coupon can be used.
However, the major drawback with using coupons for a discounting strategy is that they require a code. This means that users have to know about the coupon code and apply it at the checkout field. You’re also not able to promote your discounts on the product page with messaging or formatting product prices to show reductions.
Conditional discount plugin
Instead, in order to make the most of discounts on your store, you’ll need the WooCommerce Dynamic Pricing and Discount Rules plugin.
WooCommerce Dynamic Pricing and Discount Rules
Create conditional discounts for WooCommerce
Dynamic Pricing and Discount Rules offers an all-in-one solution for creating powerful pricing incentives in WooCommerce. Discount types include:
- Simple discount by percentage
- Simple discount by fixed amount
- Bulk discounts
- Tiered pricing
- Buy X Get X
- Buy Y Get Y
- Discount on spend
- Discount on order total
You can create multiple discounts on your store simultaneously.

Creating conditional discounts – 10+ examples
Here, we’ll walk you through the steps you need to follow to apply conditional discounts on your WooCommerce store.
For this tutorial, you’ll need a WordPress site with the WooCommerce plugin installed as well as some WooCommerce products added to your online store.
Install and activate WooCommerce Dynamic Pricing and Discount Rules
Before starting with any of the discounts below, you’ll need to have the WooCommerce Dynamic Pricing and Discount Rules plugin installed on your WooCommerce site.
After purchasing, you’ll receive a confirmation email. Click on the link in the email to download the plugin and save it to your computer.
Navigate to Plugins → Add New from the WordPress admin panel and click on the ‘Upload Plugin’ button. Upload the zip file you just downloaded.
Finally, click on the ‘Activate’ button to enable the WooCommerce Dynamic Pricing and Discount Rules plugin on your site.
Let’s look at some examples of conditional discounts.
Example #1: Conditional discounts based on quantity
Using the WooCommerce Dynamic Pricing and Discount Rules plugin, you can create bulk discount rules for products on your online store. So you can provide progressively better discounts the more items the user purchases.
To create a conditional discount based on quantity in WooCommerce:
- Go to WooCommerce > Fees and Discounts and click ‘Add New’. This will allow you to create a new discount rule in WooCommerce
- Enter a title for the rule. This is for your own reference and won’t appear on the front end
- Choose ‘Bulk Pricing’ in the ‘Rule’ field
- Enter an optional label, e.g. ‘Bulk pricing deals!’, in the ‘Label’ field. This will appear as a sales badge on eligible products
- In the ‘Applies to’ field, choose ‘All items’. This will apply your discount to all products in your store. You can also choose ‘Specific categories’ or ‘Specific products’. See one of the examples below for applying discounts by category or product
- Create discount tiers by clicking the ‘Add New Tier’ button in the ‘Tiers’ section. For each tier, you’ll need to configure:
- ‘Min quantity’: this is the minimum number of items the user will need to purchase in order to qualify for the discount on this tier
- ‘Max quantity’: this is the maximum number of items for the tier
- ‘Adjustment type’: choose from percentage or fixed discount
- ‘Amount’: enter the value of the discount for this tier – either as a percentage or fixed amount based on the adjustment type
- ‘Label’: you can also enter a label per tier that will appear on the pricing table on the front end

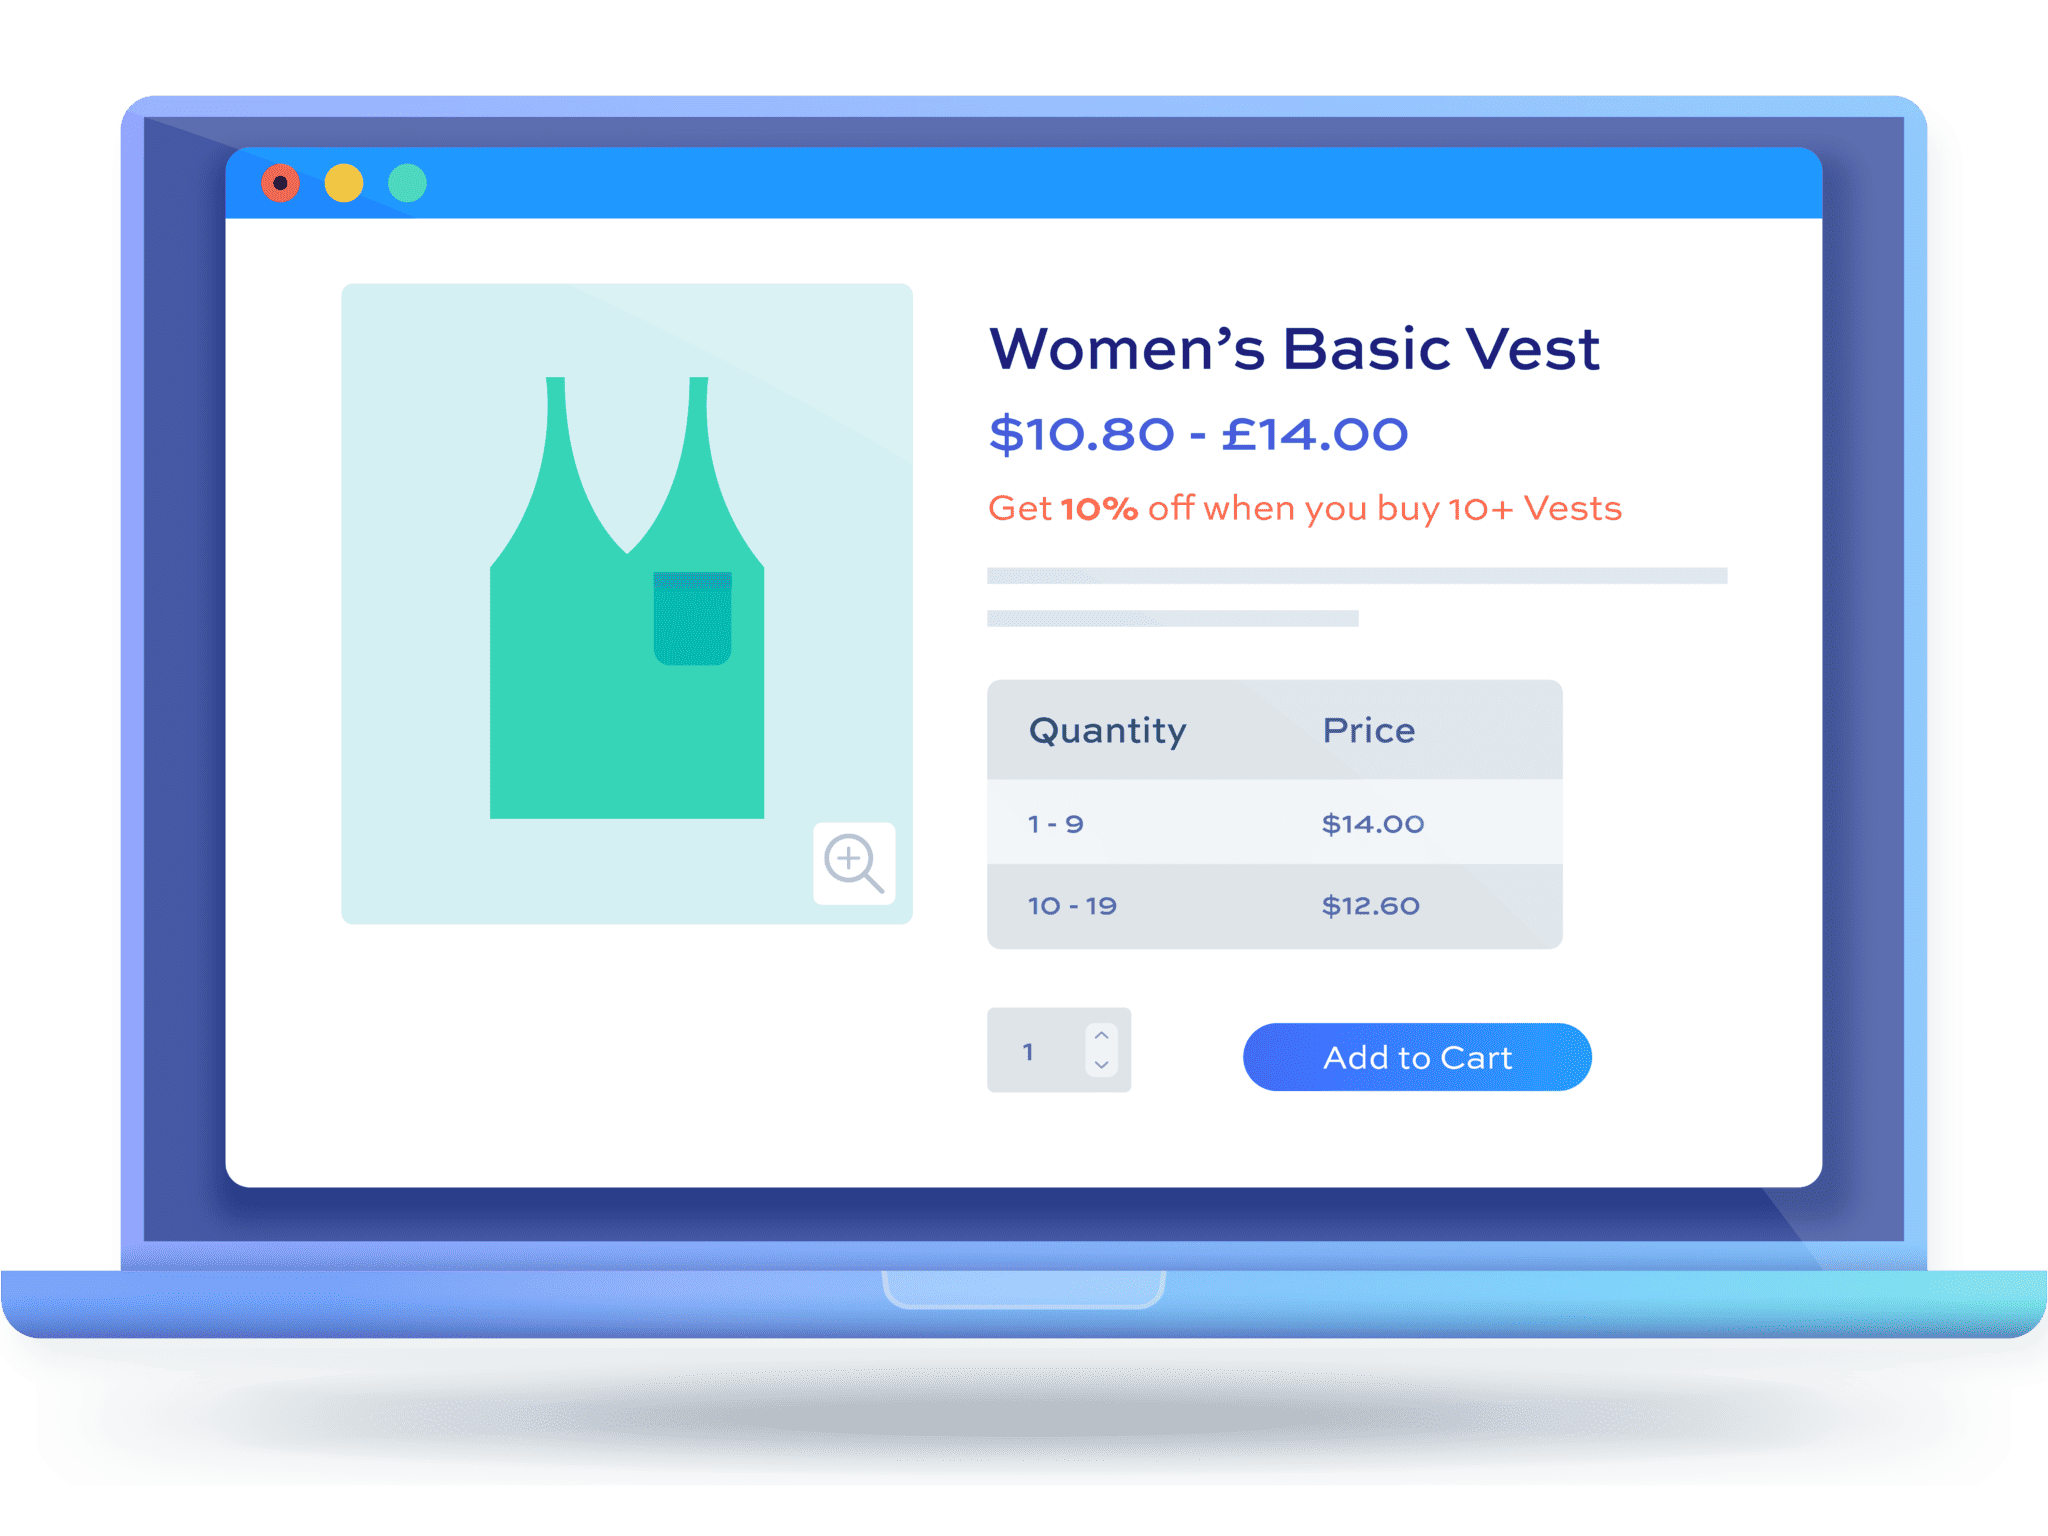
Now, when the user buys 10 or more items, they’ll receive a 5% discount; when they purchase 20 or more, they’ll get 10% off; and if they purchase more than 30, they’ll get 15% off.
The bulk discounts can be displayed for each customer in a pricing table on the product page. The styles will match your theme.

And when the user updates the quantity, the price will update too, clearly showing the original price and the discounted price.

There’s more information on quantity-based discounts in WooCommerce here.
Example #2: Conditional discounts based on the amount spent
Instead of setting a discount based on the quantity of items as in the example above, you can opt to set discounts that are conditional on the value of the items.
To create a conditional discount based on spend in WooCommerce:
- Go to WooCommerce > Fees and Discounts and click ‘Add New’
- Enter a title for the rule
- Choose ‘Discount on Spend’ in the ‘Rule’ field
- Enter an optional label, e.g. ‘Spend more save more!’ in the ‘Label’ field
- In the ‘Applies to’ field, choose which items to apply the rule to
- Create discount tiers by clicking the ‘Add New Tier’ button in the ‘Tiers’ section. For each tier, you’ll need to configure:
- ‘Min total’: this is the minimum value of items the user will need to purchase in order to qualify for the discount on this tier
- ‘Max total’: this is the maximum value of items for the tier
- ‘Adjustment type’: choose from percentage or fixed discount
- ‘Amount’: enter the value of the discount for this tier – either as a percentage or fixed amount based on the adjustment type
- ‘Label’: you can also enter a label per tier that will appear on the pricing table on the front end

In the example above, the price of the item will drop by $1 when the customer spends more than $100; it’ll drop by $2 per item for over $200; and $3 per item for spending over $300.
You can see this in a table on the product page.

If you prefer, you could apply the discount as a one-off reduction instead of per item. To do that, change the ‘Fixed adjustment type’ to ‘All’.

In the example above, the customer will receive a $10 discount when they spend over $100; a $20 discount when they spend over $200; and a $30 discount when they spend more than $300.
Example #3: Conditional discounts based on the overall cart value
The discount by spend rule above applies to specific products or categories. But you could set a condition on the overall cart value instead.
To create a conditional discount based on the total cart value:
- Go to WooCommerce > Fees and Discounts and click ‘Add New’
- Enter a title for the rule
- Choose ‘Order Total’ in the ‘Rule’ field
- Enter an optional label, e.g. ‘Order Discount’ in the ‘Label’ field
- Create discount tiers by clicking the ‘Add New Tier’ button in the ‘Tiers’ section. For each tier, you’ll need to configure:
- ‘Min total’: this is the minimum order total to qualify for the discount on this tier
- ‘Max total’: this is the maximum order total for the tier
- ‘Adjustment type’: choose from percentage or fixed discount
- ‘Amount’: enter the value of the discount for this tier – either as a percentage or fixed amount based on the adjustment type. This will be applied to the entire order total.
- ‘Label’: enter a label for each tier. This will appear in the subtotals fields on the cart and checkout pages as a description for the discount

In the example above, we’ve chosen a fixed discount for each tier and set the ‘Fixed adjustment type’ to ‘All’. So the user will receive a discount of $10 if they spend $100 or more in total; then $15 for $200 or more; and $20 for $300 or more.

You can see in the cart above, the user has spent a total of $140, which qualifies them for a $10 discount. This is applied and the total is now $130.
You can also see a notice at the top of the cart informing the user how much more they need to spend to qualify for the next discount tier. We’ll look at that later in the tutorial.
Find out more about applying discounts by order total in WooCommerce.
Example #4: Buy one get one free offers
Buy one get one free offers are a very common type of conditional discount: if you buy a certain number of items of a product, then you will receive one or more further items for free or at a reduced price. So this covers:
- Buy one get one free
- Buy two get one free
- Buy two get one half price
- And so on…
(Take a look at the example below for ‘Buy X Get Y’ style offers).
To create a conditional buy one get one free offer:
- Go to WooCommerce > Fees and Discounts and click ‘Add New’
- Enter a title for the rule
- Choose ‘Buy X Get X’ in the ‘Rule’ field
- Enter an optional label, e.g. ‘BOGOF’ in the ‘Label’ field
- In ‘Applies to’ choose which whether to apply the rule to all products, specific categories, or specific products. There’s more on conditional discounts by category and product in examples below
- In ‘Buy’, enter how many items the user needs to purchase to qualify for the offer
- In ‘Get’, select how many items the user will receive
- If you want to set a maximum number of items that the user, enter a value in ‘Max’
- Select the ‘Adjustment type’ – either percentage or fixed
- Enter the ‘Amount’ of the discount
- If you selected ‘Specific categories’ or ‘Specific products’ in ‘Applies to’ above, then enter the categories or products where the rule applies

In the example above, the user will receive a free hoodie when they buy a hoodie.

You can find out more about BOGOF discounts in WooCommerce here.
Example #5: Buy X Get Y offers
Buy X Get Y offers are a slightly different form of conditional discount to buy one get one free. In Buy X Get Y, the user can buy certain items in order to get other items at a discounted price.
Examples of Buy X Get Y would include:
- Buy one Polo shirt and get a free Belt
- Buy two Hoodies, get a Teeshirt half price
- And so on…
To create a conditional Buy X Get Y offer in WooCommerce:
- Go to WooCommerce > Fees and Discounts and click ‘Add New’
- Enter a title for the rule
- Choose ‘Buy X Get Y’ in the ‘Rule’ field
- Enter an optional label, e.g. ‘BOGOF’ in the ‘Label’ field
- In ‘Applies to’ choose either ‘Specific categories’ or ‘Specific products’. There’s more on conditional discounts by category and product in examples below
- In ‘Buy’, enter how many items the user needs to purchase to qualify for the offer
- In ‘Get’, select how many items the user will receive
- If you want to set a maximum number of items that the user, enter a value in ‘Max’
- Select the ‘Adjustment type’ – either percentage or fixed
- Enter the ‘Amount’ of the discount
- Enter the categories or products that the user needs to purchase
- And enter the categories or products that the user will receive at a discount

In the example above, the user will get 50% off Teeshirts when they buy two Hoodies.

Example #6: Conditional discounts for specific categories
We’ve looked at several examples of conditional discounts above. Some of these, like discounts based on the overall order total, apply to all products. However, for other rules you can choose to apply your discounts only to products in specific categories. The discount rule types that can be applied to specific categories include:
- Simple – just apply a percentage or fixed discount to certain products
- Bulk discounts
- Tiered pricing
- Discount on spend
Let’s take a look at how to set a simple percentage discount to products in a specific category:
- Go to WooCommerce > Fees and Discounts and click ‘Add New’
- Enter a title for the rule
- Choose ‘Simple’ in the ‘Rule’ field
- Enter an optional label, e.g. ‘Save 10% on Hoodies!’ in the ‘Label’ field
- In the ‘Applies to’ field, choose ‘Specific categories’
- Define the discount in ‘Adjustment type’ and ‘Amount’
- Select the categories that the discount will apply to

Now the user will receive 10% off any hoodies.

Example #7: Conditional discounts for specific products in WooCommerce
If you prefer, you can offer your conditional discounts on specific products. Like categories above, the discount rule types that can be applied to specific products include:
- Simple – just apply a percentage or fixed discount to certain products
- Bulk discounts
- Tiered pricing
- Discount on spend
Let’s take a look at how to set a simple fixed discount to specific products:
- Go to WooCommerce > Fees and Discounts and click ‘Add New’
- Enter a title for the rule
- Choose ‘Simple’ in the ‘Rule’ field
- Enter an optional label, e.g. ‘$5 Off’ in the ‘Label’ field. This will be displayed on all qualifying products
- In the ‘Applies to’ field, choose ‘Specific products’
- Define the discount in ‘Adjustment type’ and ‘Amount’
- Select the products that the discount will apply to

When the user lands on a product that qualifies for this rule, they’ll see the price adjusted accordingly.

And the product will be discounted in the cart.

Example #8: Conditional discounts for users in WooCommerce
A common requirement of conditional discounts in WooCommerce is that they should apply only for certain users. For example, you would like to apply bulk discounts to certain categories in your store – but only for your wholesale customers.
This is simple with the Dynamic Pricing and Discount Rules plugin. Follow any of the examples above to create your conditional discount rule, then:
- In the ‘Roles’ field, select which user roles the discount rule should apply to

Now, your discount will apply only if the user is a wholesale customer.
You can turn this around by excluding certain roles if you wish. Set up your conditional discount rule, then:
- In the ‘Exclude roles’ field, select which user roles the discount does not apply to

There’s more information on role-based pricing in WooCommerce here.
Example #9: WooCommerce discounts conditional on time and date
Now, let’s look at how to schedule discounts conditionally. So we’ll only run our discount between certain times and dates.
To schedule your discount:
- Select ‘Scheduled’ in the ‘Status’ field
- Enter the start time and date
- Enter the end time and date
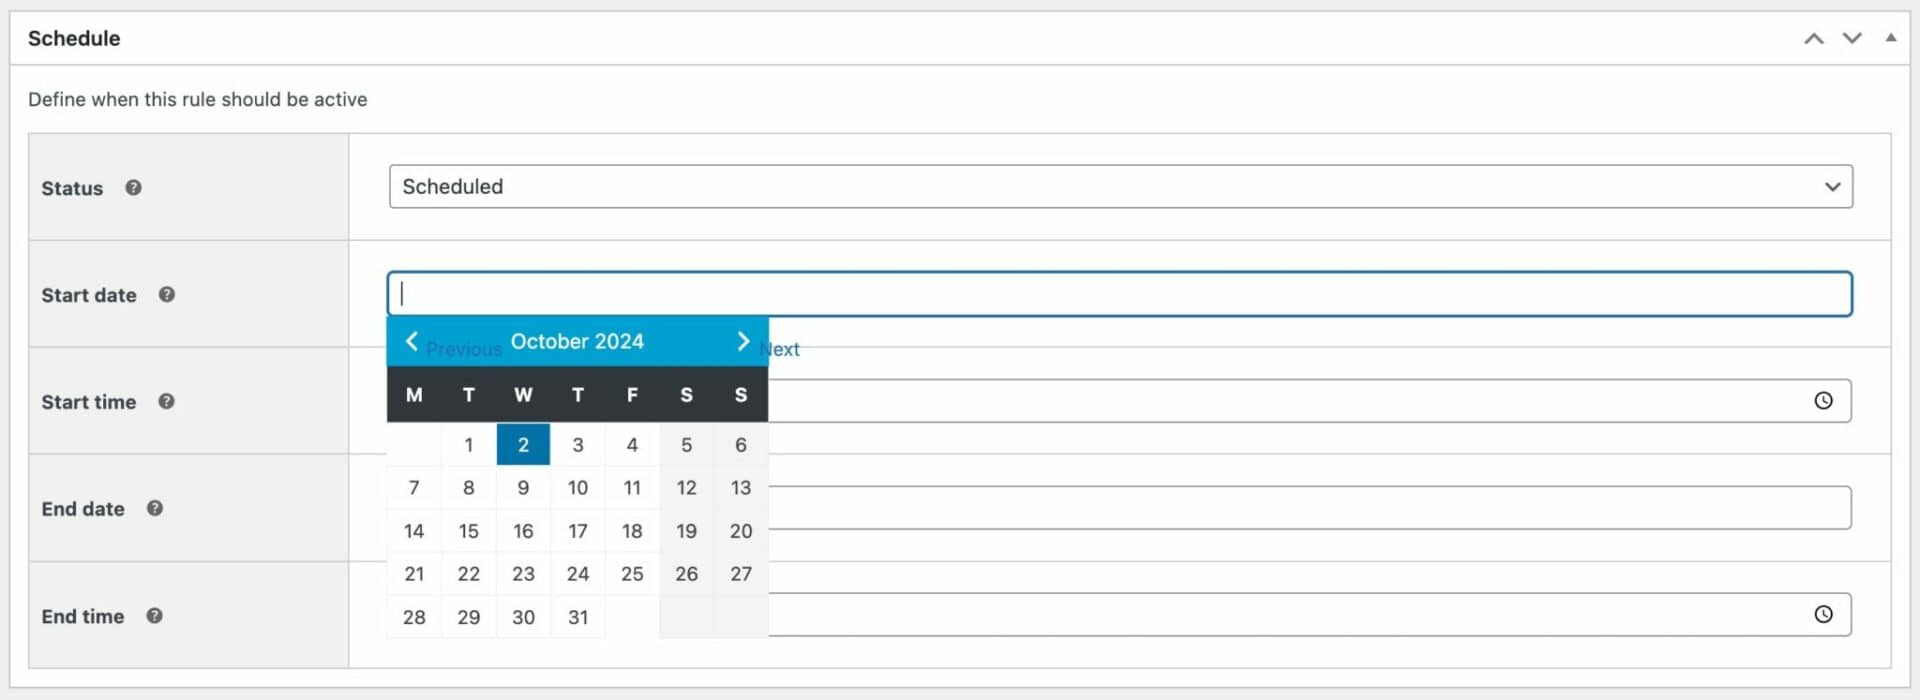
Now, your discount will start and end at your specified times.
There’s more information on how to schedule sales in WooCommerce here.
Example #10: Conditional discounts based on the WooCommerce payment gateway
As our final example, we’ll look at how to set discounts that are conditional on the WooCommerce payment gateway chosen by the user on the checkout page.
If you have several different payment methods for the user to choose from, you might want to encourage them to pick certain methods. For example, if you want to encourage users to pay by direct bank transfer rather than credit card (and therefore avoid transaction fees), you can offer them a conditional discount when the choose the bank transfer method.
To apply a conditional discount based on payment gateway in WooCommerce:
- Go WooCommerce > Settings > Fees and Discounts > Payment Gateways
- Select the payment gateway where you’d like to add a conditional discount (note: you could also add a fee if you wanted)
- In ‘Type’, select the type of discount – percentage or fixed
- In ‘Amount’, select the value of the discount
- You can choose whether to include shipping costs in the total cost of the cart
- You can also set conditions on the total value of the cart in ‘Minimum cart amount’ and ‘Maximum cart amount’ – so if you only want your payment gateway discount to apply for a total order value above a certain amount, you can enter that amount here

Now, the user will receive a $5 discount when they pay using the ‘Direct bank transfer’ gateway.

Example #11: Discounts conditional on order history
You might want to provide discounts only for customers’ first orders – or only if customers have spent a certain amount with you in previous orders.
To apply any discount based on a user’s order history:
- In the ‘Order History’ section, create a new conditional rule based on user’s previous orders
- In the ‘Rule’ field, choose from one of the following options:
- Last order value
- Last order quantity
- Number of previous orders
- Value of previous orders
- Then, set a comparison – either ‘Equals to’, ‘Less than’, or ‘Greater than’
- Finally, enter a value or quantity in the ‘Value’ field – so if you wanted to offer users a discount only if they had spent over $500 with you previously, you would enter ‘Value of previous orders’ is ‘Greater than’ 500
There’s a full tutorial on WooCommerce order history discounts here.
Additional options for conditional discounts
Now let’s look at a couple of additional settings to help encourage users to take advantage of your conditional discounts.
Content messaging
It’s critical to your discount strategy that your customers know what deals are available. With Dynamic Pricing and Discount Rules, you can add a short message to products that qualify for deals. These messages will be automatically styled to match your theme:

To create a message, just add your text to the ‘Message’ setting in your discount rule:

You can also include some dynamic text, including:
{amount}– the additional amount that the user needs to spend to qualify for the discount{quantity}– the additional quantity that the user needs to add to their cart to get the deal{discount}– the value of the discount available{label}– the text in the ‘Label’ field{products}– a list of the products that qualify for the deal{categories}– a list of the categories that qualify for the deal
Notices
Notices are dynamic text that display when the user adds a product to their cart. They inform the user how much more they need to spend or how many more items they need to add to their cart to achieve a discount.

In this example, there is a ‘Buy One Teeshirt, Get $5 off the Second’ deal. When the user adds one teeshirt, the notice prompts them to add the second one.
To add a notice, enter the text in the ‘Notices’ field.

This text can also include dynamic tags as above.
Set up conditional discounts in WooCommerce now
Offering conditional discounts on your WooCommerce site is a tried and tested way to increase sales. However, WooCommerce by default doesn’t let you create customised pricing rules. This is why you need the WooCommerce Dynamic Pricing and Discount Rules plugin for your online store.
You can easily implement sales and marketing strategies using special pricing on your online store with the plugin. The robust WordPress plugin offers easy-to-use functionality that lets you create powerful pricing incentives and advanced discounts on your WooCommerce site with dynamic, bulk, and role-based price adjustments.
WooCommerce Dynamic Pricing and Discount Rules
Create conditional discounts for WooCommerce now
Ready to start setting up conditional discounts on your online store? Get WooCommerce Dynamic Pricing and Discount Rules today!
FAQs
A conditional discount in WooCommerce is a price reduction that applies to certain products, categories or user roles. It can be scheduled to start and stop at certain times.
To add a discount rule in WooCommerce:
– Go to WooCommerce > Fees and Discounts and click ‘Add New’
– Select your discount rule type from the ‘Rule’ field – e.g. ‘Simple’, ‘Bulk Pricing’, ‘BOGOF’, ‘Order Total’
You can add an automatic discount to WooCommerce using the Dynamic Pricing and Discount Rules plugin. Go to WooCommerce > Fees and Discounts and click ‘Add New’ to start configuring your rule. If you would like the discount to start and stop automatically, you can choose ‘Scheduled’ in the ‘Status’ field.
To add a discount to a category in WooCommerce:
– Go to WooCommerce > Fees and Discounts and click ‘Add New’
– Select your discount rule type from the ‘Rule’ field
– Select ‘Specific categories’ in the ‘Applies to’ field
– Enter the categories for your discount
To add a discount percentage in WooCommerce:
– Go to WooCommerce > Fees and Discounts and click ‘Add New’
– Select ‘Simple’ in the ‘Rule’ field
– Choose ‘Percentage Discount’ as the ‘Adjustment Type’
– Enter the ‘Amount’ of your discount