The complete guide to offering free products in WooCommerce

There are a couple of different reasons that you might want to offer free products to customers through your WooCommerce store. You might want to provide free samples to users to look at before they commit to a purchase; or you might want to use free products as a marketing incentive. In this article, we’ll look at several different methods to offer free products.
WooCommerce does allow you to create free products easily: you can assign zero as a product price and users can add these products to their carts just like any other products.
However, if you require more complexity – e.g. adding free products automatically to the cart when the user selects a certain product, or only offering products for free if the user purchases a certain number of other items – then you’ll need an additional plugin. We look at all the options.
Let’s start by looking at the easiest way to create free products in WooCommerce.
How to create a free product in WooCommerce
This is the simplest method and doesn’t require any additional plugins. To create a free product in WooCommerce:
- Go to Products > Add New and create a new product
- Give the product a name, description, featured image, etc
- In the ‘Regular price’ field, just enter 0

When you publish this product, it will appear on your site alongside other products. The user will be able to add it to their cart and check out. If they only have free products in their cart, they won’t need to make a payment.
Using free products for samples
One simple usage of this method would be for free samples. If you are selling certain products, you might want to offer your users the option to order a free sample first. You can do that easily without any additional plugins.
Just create the product for your sample and assign 0 as the price. If you wish, you could add all your free sample products to a specific product category. You could even add relevant free sample products as ‘Cross-sells’ so that the user can purchase them directly from the product page.

This is a neat and easy way to offer free product samples in WooCommerce without an additional plugin.
However, you may want additional functionality. Let’s look at some further options.
Using free products as incentives in WooCommerce
Free products might often be used as free gifts or other incentives to the user. In this section, we’ll look at several different ways to use free products.
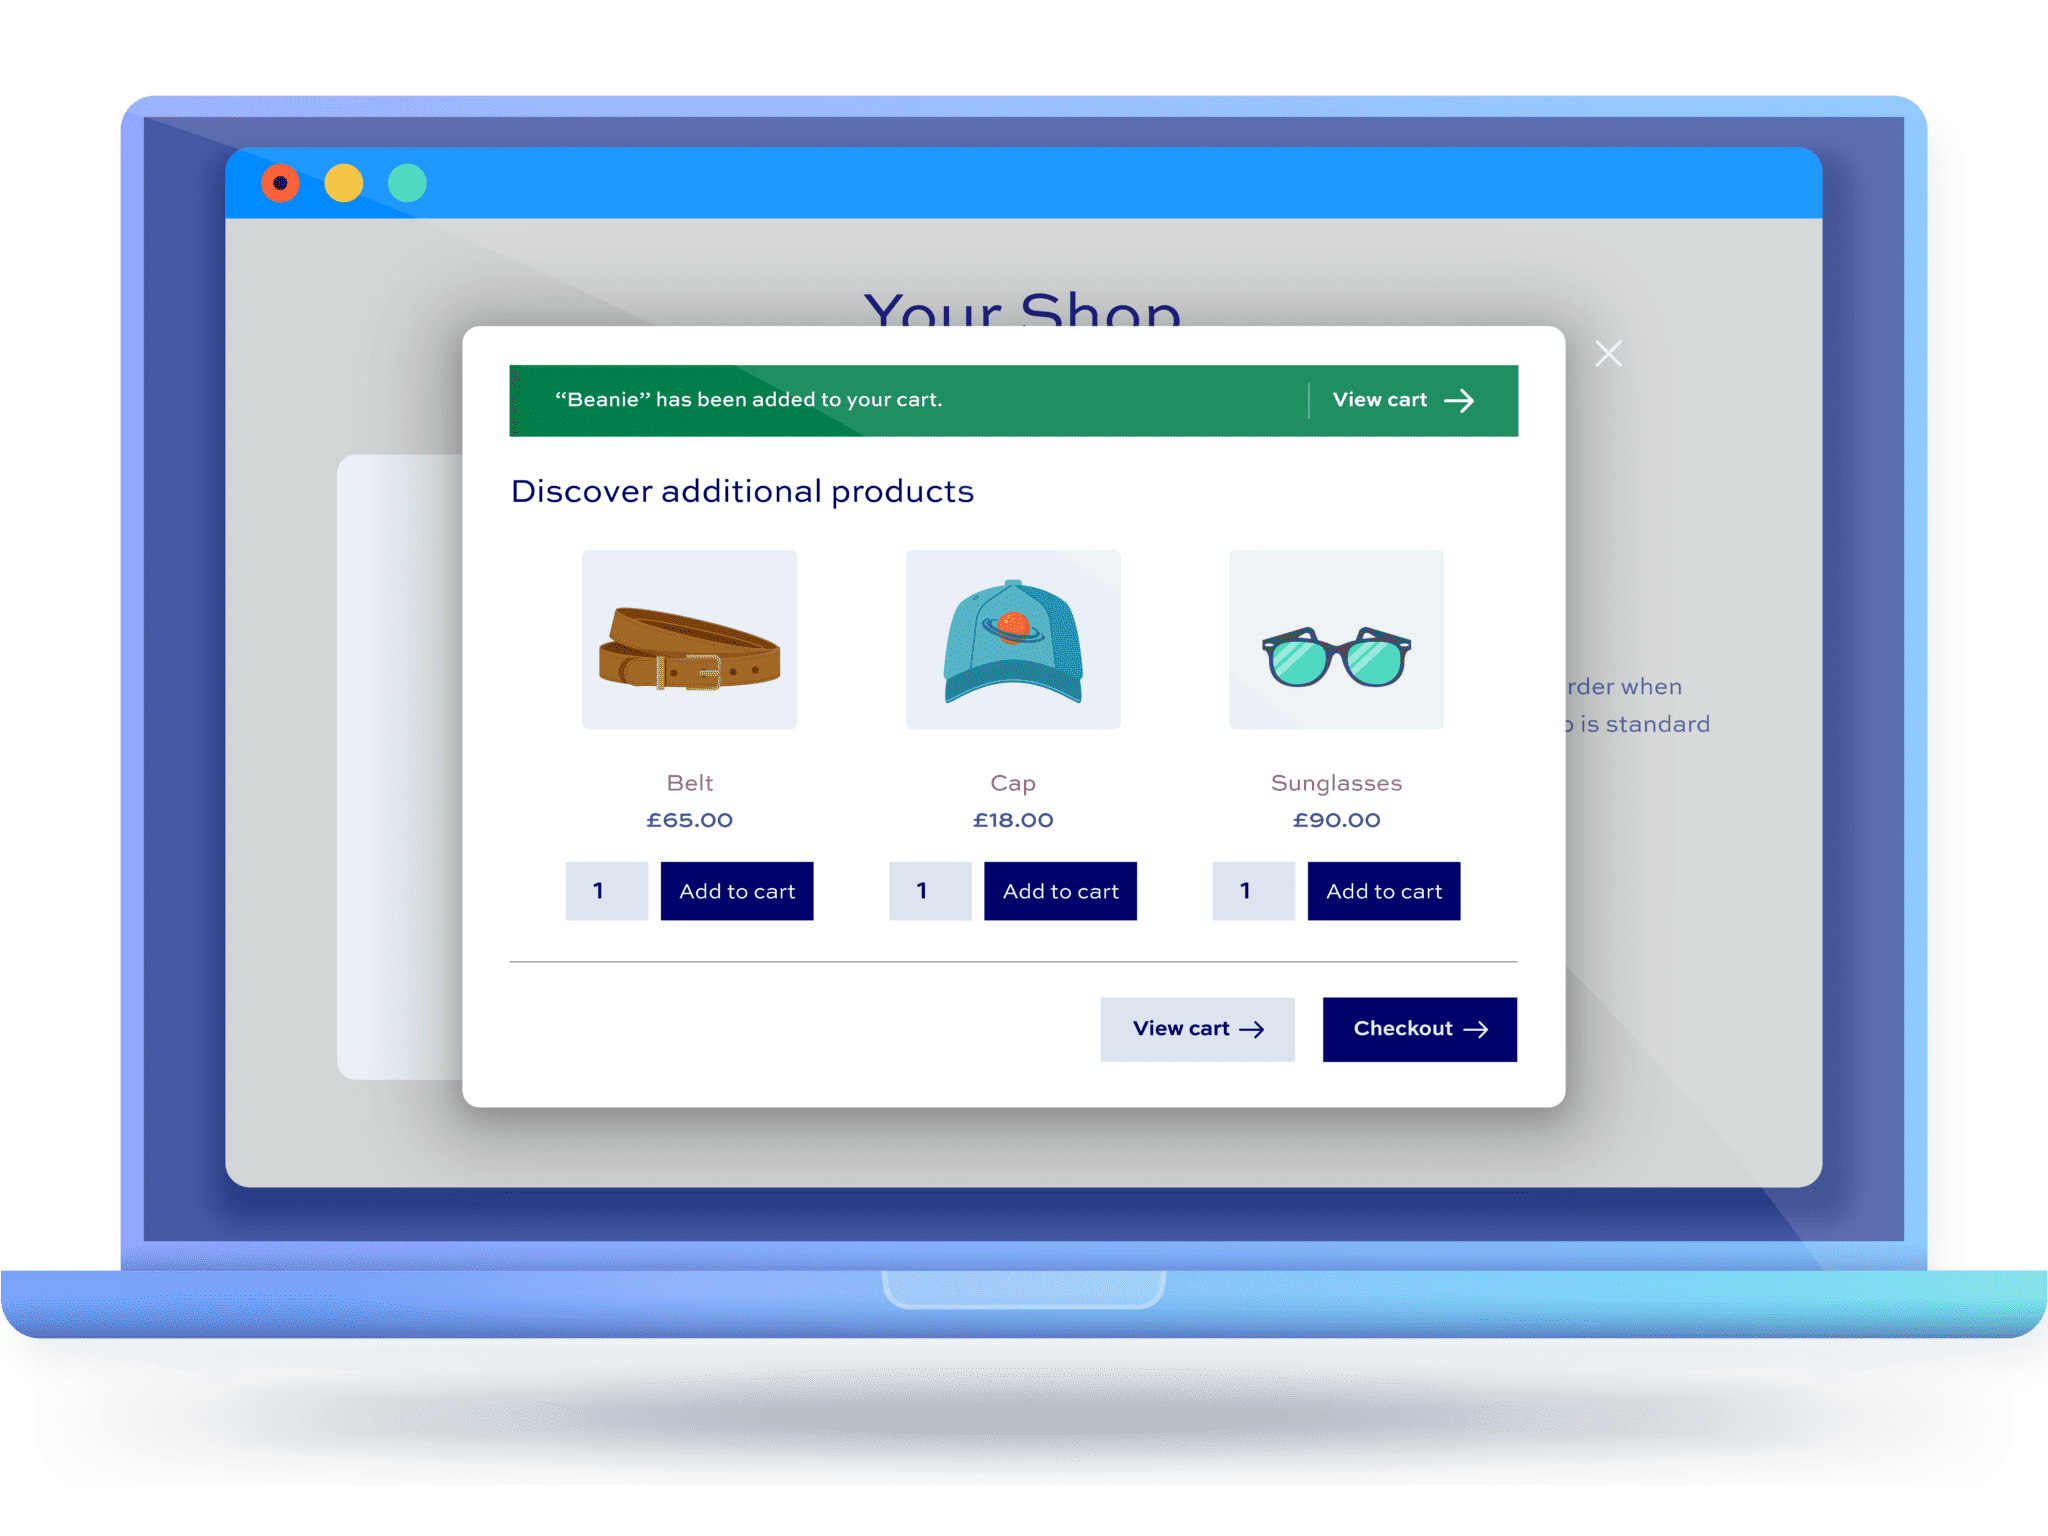
Method #1: Offer the customer free products before checkout
In this example, the user will be presented with a special screen offering free (or paid) products – after they click the ‘add to cart’ button.
So, once they have added a product to the cart, they’ll see an extra pop-up screen with one or more free products. This screen can appear on the product page (immediately after the user has clicked ‘Add to Cart’) or when the user lands on the cart or checkout pages.
You can also choose whether to enable it for all products, or just for specific products. For example, you could offer a free cap when the user purchases a belt. Or you could offer a free beanie when the user purchases any product.
You can also create different rules for different products – so if the user purchases any product in the ‘Hoodies’ category, they’ll be offered a free teeshirt. Or if they purchase a product from the ‘Accessories’ category, they could be offered a choice of free product.
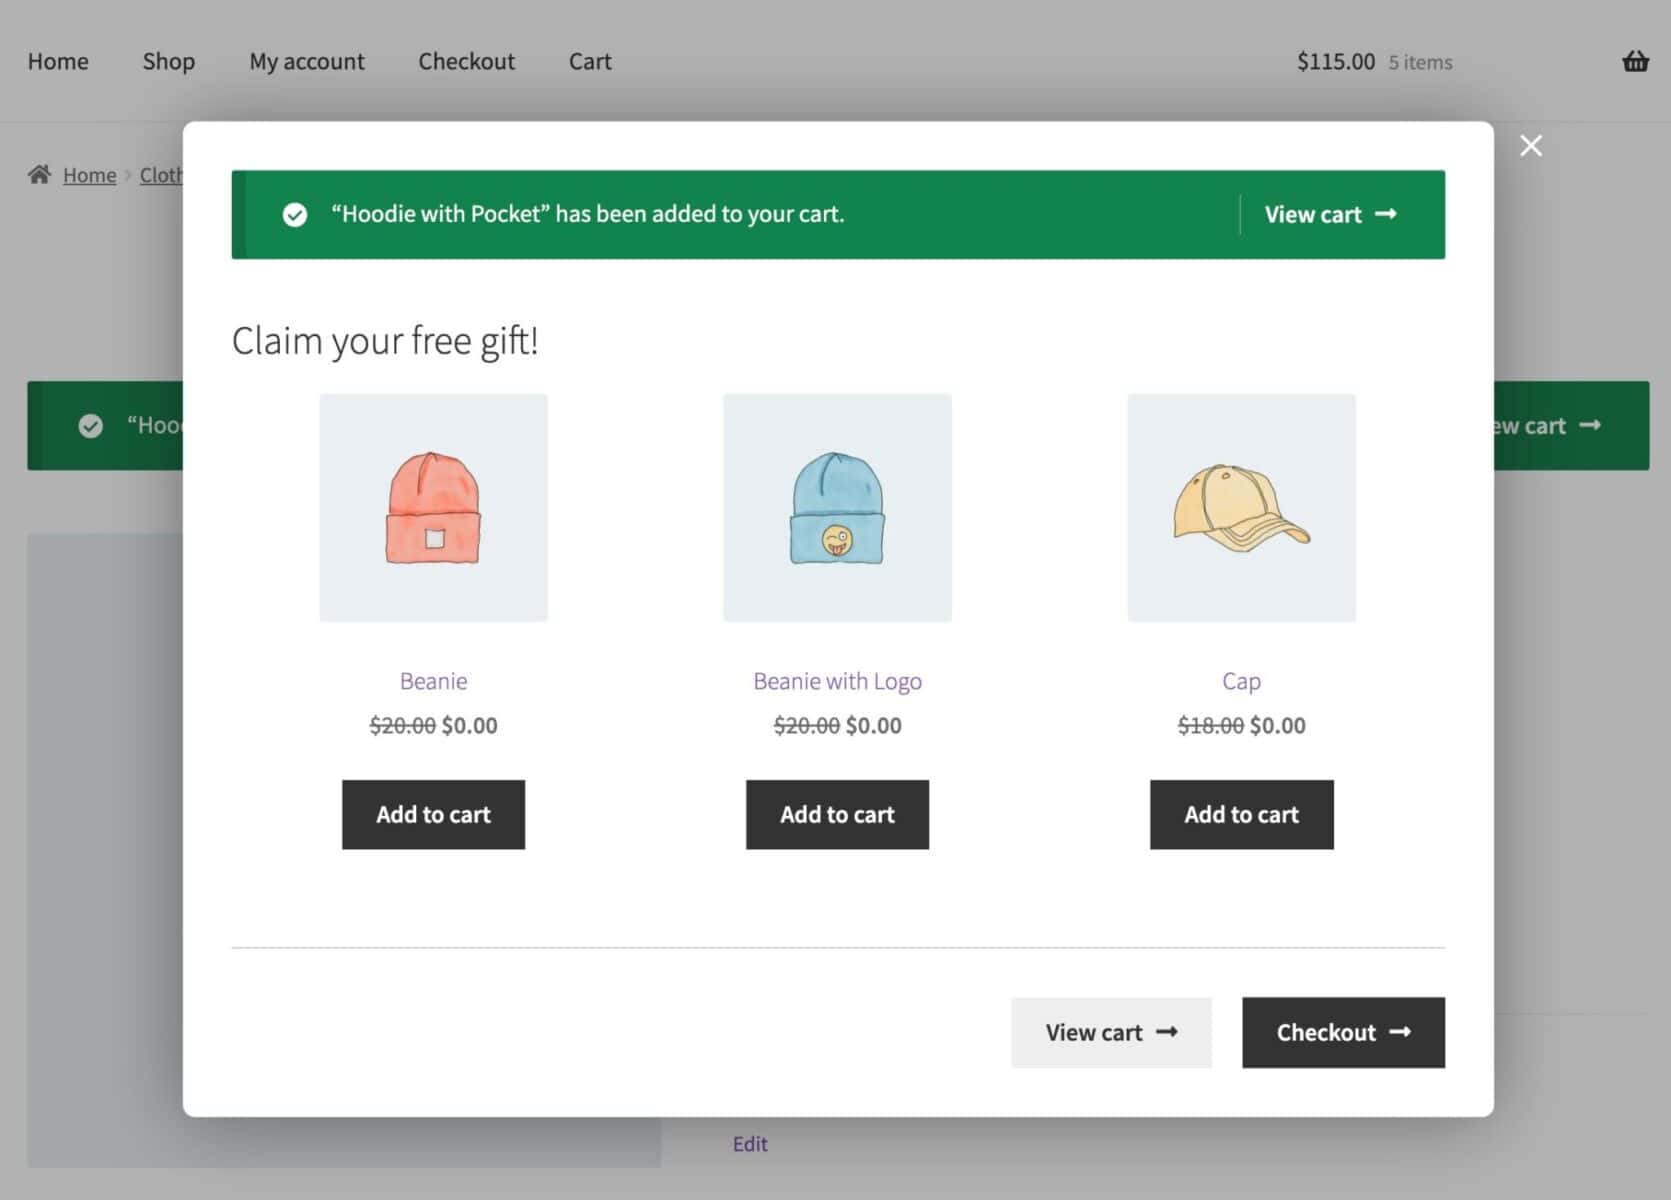
To create a screen like this, you’ll need the WooCommerce Order Bump plugin. This allows you to create multiple rules specifying which products are presented to the user.
You can present products at full price, at a discount, or for free.
Install and activate the Order Bump plugin
To create an order bump for your free products, you’ll first need to install and active the WooCommerce Order Bump plugin:
- Download the zip file using the link in your welcome email
- Go to Plugins > Add New in your WordPress dashboard
- Click on the ‘Upload Plugin’ button
- Drag and drop the zip file into the ‘Choose File’ area and click ‘Install Now’.

When the file has uploaded, click on the ‘Activate’ button.
Creating an order bump for your free products
To create an order bump for free products in WooCommerce:
- Go to WooCommerce > Order Bump and click ‘Add New Order Bump’
- Enter a title for the bump
- Select which products should trigger the bump. You can choose to trigger order bumps on all products, on products within specific categories or attributes, or on specific products
- Add a heading to be displayed on the order bump
- Choose which products will be displayed by selecting them in the ‘Bump Products’ field
- Select ‘Percentage’ as the ‘Discount Type’ and enter ‘100’ as the amount. This will ensure that any products in the bump will be free
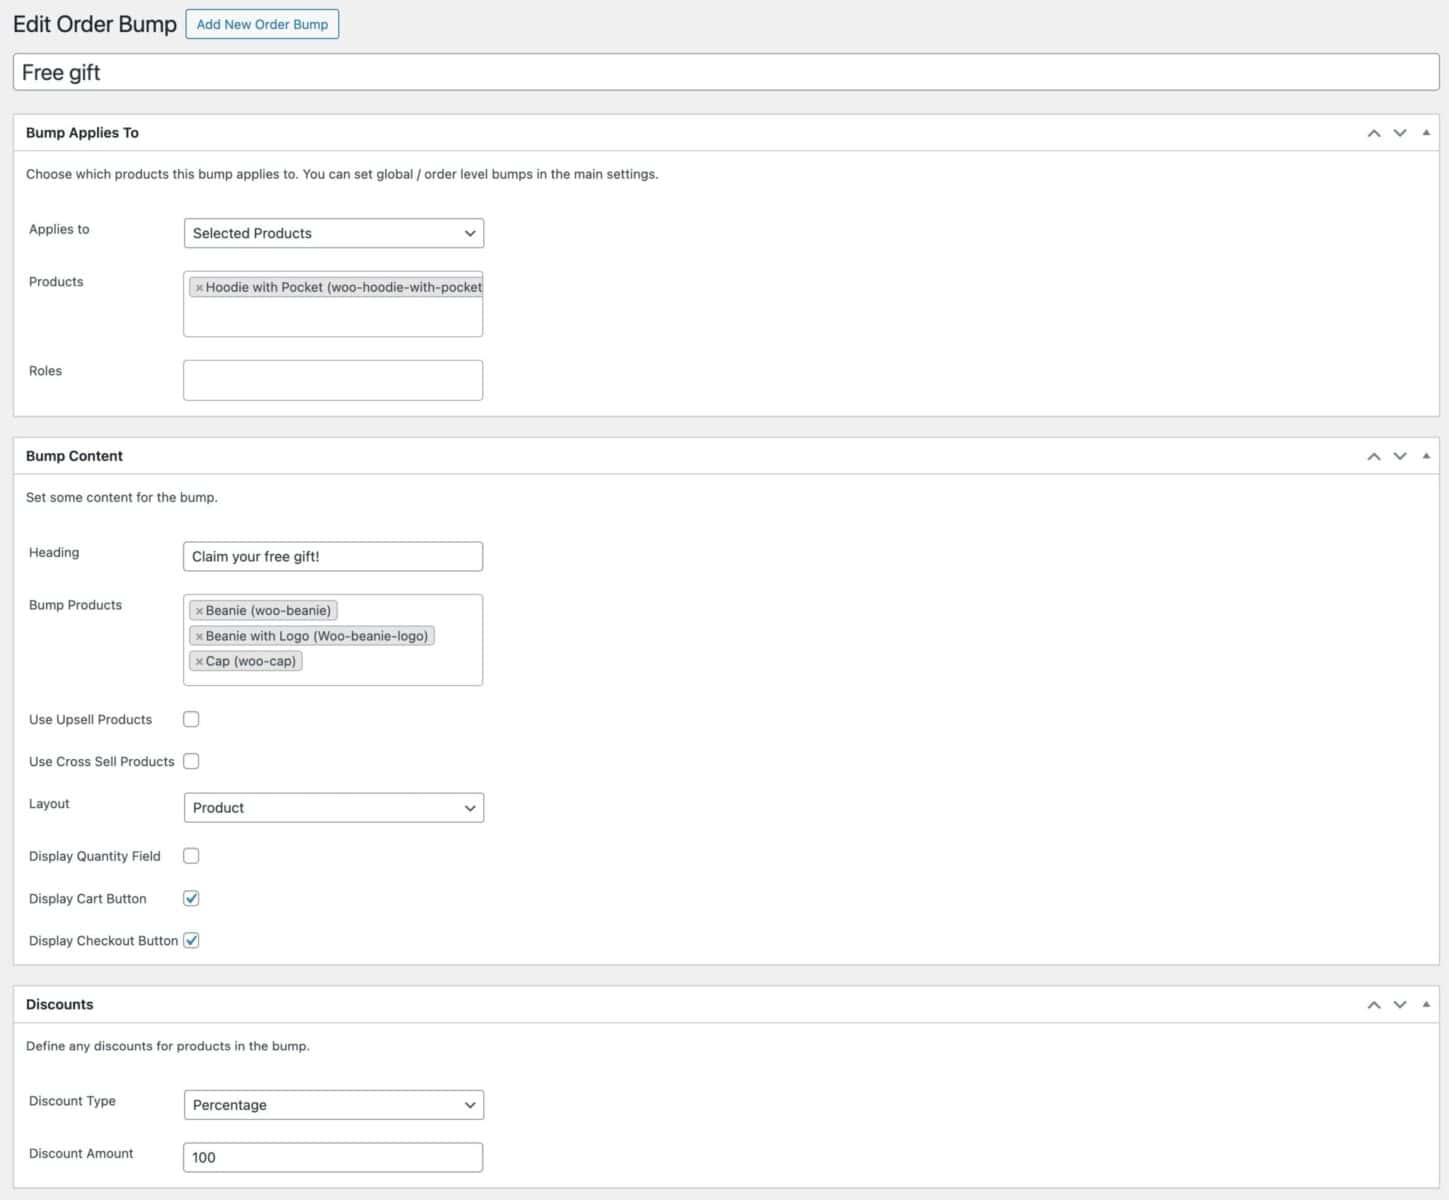
Now, when the user adds one of the qualifying products to their cart, they’ll be prompted to add a free product to their cart.
Method #2: Offer a free add-on product on the main product page
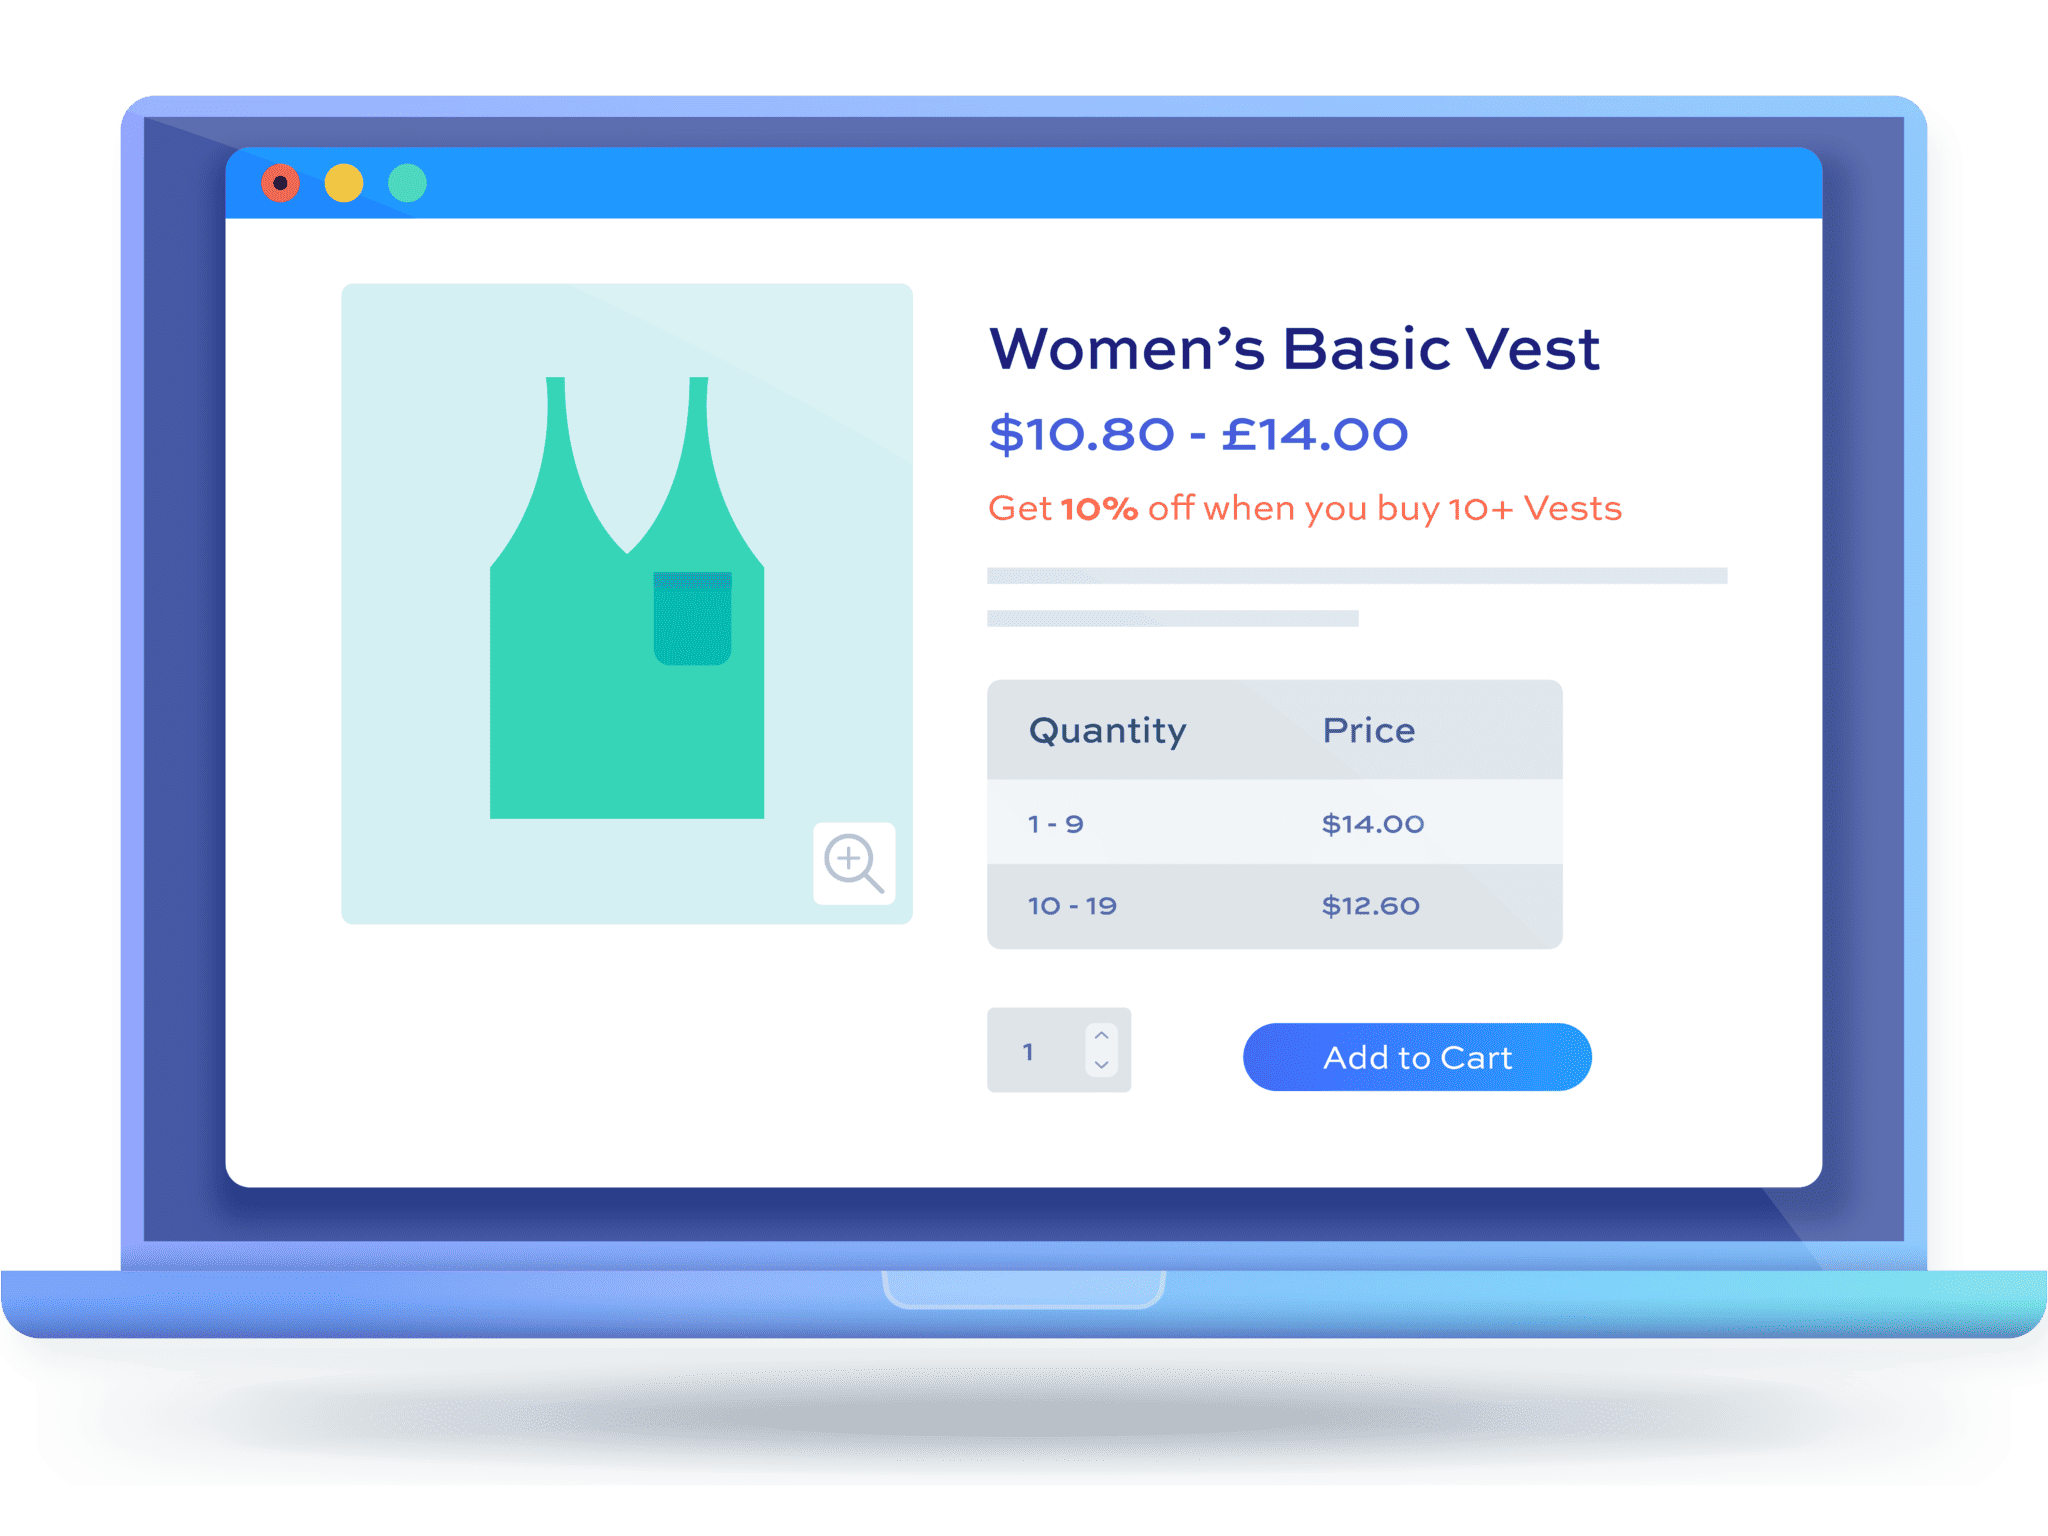
This method is slightly different from the first. In this version, you can add one or more free products to the main product page itself. A good use-case for this would be if you are offering free samplers when the user purchases a perfume or other cosmetic.
In our example, we’ll offer the user a free teeshirt when they buy a hoodie. The teeshirt can be a standard product available to purchase on the site – but when it’s offered alongside the main product, we’ll discount its price so that it’s free.

For this, you’ll need the WooCommerce Product Add-Ons Ultimate plugin. This plugin allows you to add extra options to your product pages and add other products as options.

Let’s look at how to create a free add-on product.
Install and activate the Add-Ons Ultimate plugin
To create options for your products, first you’ll first need to install and active the WooCommerce Product Add-Ons Ultimate plugin:
- Download the zip file using the link in your welcome email
- Go to Plugins > Add New in your WordPress dashboard
- Click on the ‘Upload Plugin’ button
- Drag and drop the zip file into the ‘Choose File’ area and click ‘Install Now’.
When the file has uploaded, click on the ‘Activate’ button.
Creating a free add-on product
With Add-Ons Ultimate activated, you can create your free add-on product. Let’s assume that you have already created your products – i.e. the main product and the product you’d like to offer alongside it for free. Then, to add one product to another:
- In the ‘Product data’ section of your main product, click on the ‘Product Add-Ons’ tab
- Click ‘Add Group’ and ‘Add Field’ to create your first field
- Choose ‘Products’ as the field type (note: if you want to offer all products within a certain category, you could choose ‘Product categories’ here)
- On the ‘Products’ tab, in the ‘Child products’ field, select which products you’re offering for free
- Choose a layout and define how many free products the user can add to their cart
- Finally, enter ‘100’ as the discount and ‘Percentage’ as the discount type to ensure the add-on products are free on the ‘Pricing’ tab
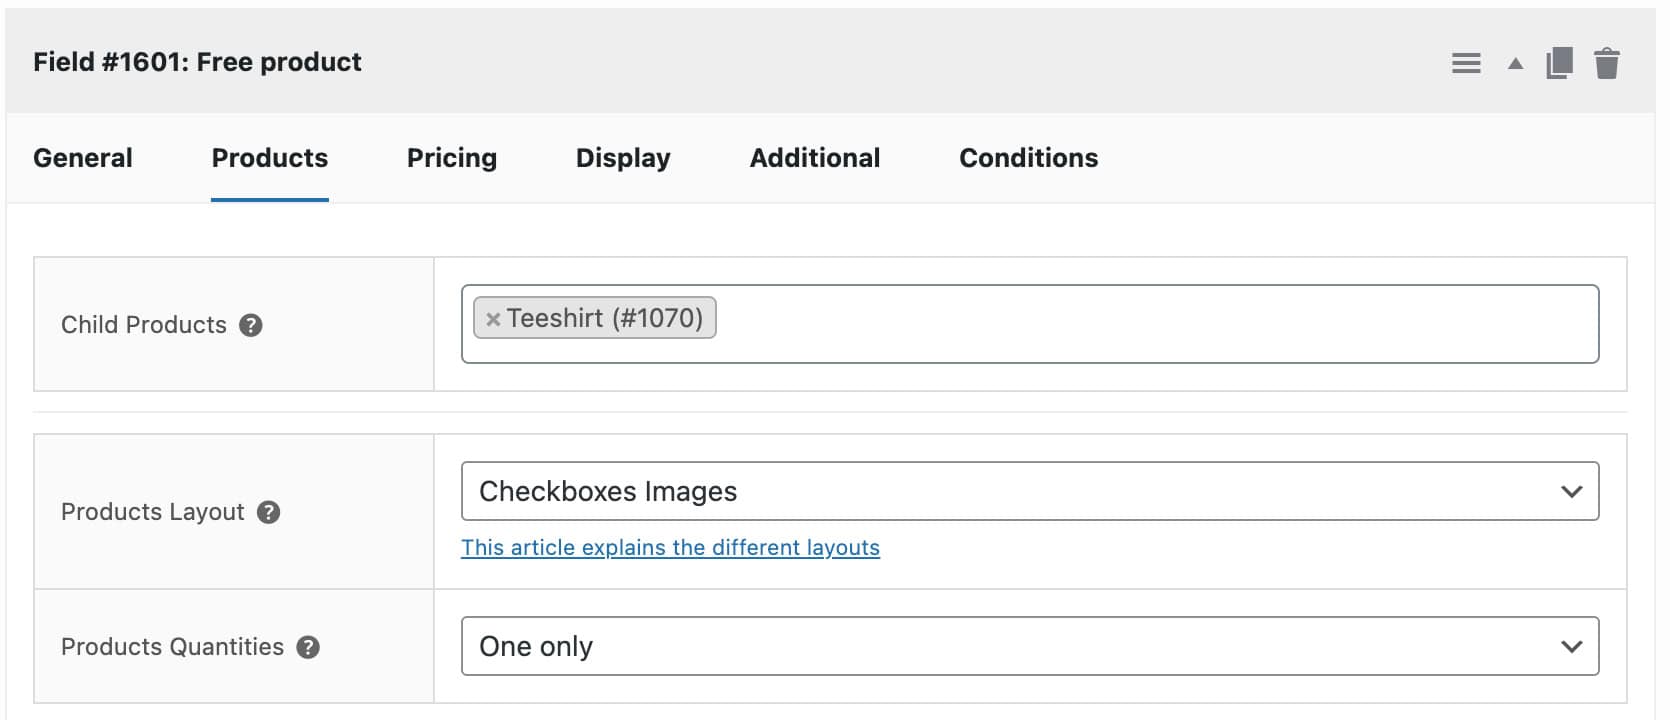
Now the user will be able to add their free product to their cart when they purchase the main product – but they won’t be able to buy just the free product on its own.
Method #3: Buy one get one free (same product)
In the next set of examples, we’ll look at how to offer the user free products as a purchase incentive to the customer. Free products are typically used to encourage customers to make purchases they might not otherwise have made, or to increase the number or value of items they’re purchasing.
All the following examples use the WooCommerce Dynamic Pricing and Discount Rules plugin. This plugin allows you to create different types of discount rule, like Buy One Get One Free, that allow you to offer free products. With some rules, you can also specify that the free product is added automatically to the cart – so the user doesn’t even need to select it.
WooCommerce Dynamic Pricing and Discount Rules
Easily offer free products in WooCommerce
Buy one get one free is one of the simplest ways of offering a free product. When your user buys one (or more) of a certain product, you offer them one (or more) of the same product – free of charge.
For example, if you are running a pizza restaurant you might want to try to increase sales midweek. So you could offer a ‘Buy one get one free’ deal on certain days. The Dynamic Pricing and Discount Rules plugin allows you to set the number of items the user must purchase to qualify for the deal and set the number of items that the user will receive for free (or just discounted). You can also set a maximum number of free items per transaction.

To create your buy one get one free product deal:
- Install and activate the WooCommerce Dynamic Pricing and Discount Rules plugin
- Go to WooCommerce > Fees and Discounts and click ‘Add Rule’. Rules are how you control your discounts. You can set as many or as few of them as you like
- Enter a title. This is just for your own reference and won’t appear on the front end of the site
- Select ‘Buy X Get X’ in the ‘Rule’ field. The ‘Buy X Get X’ rule type will allow you to one or more free items when the user purchases that item
- In the ‘Applies to’ field, choose what products the offer should apply to. Select ‘Specific products’ if you only want to offer free gifts when the user purchases certain items
- In the ‘Buy’ field, enter how many products the user needs to purchase in order to qualify for the deal. So, if you are offering a free pizza when the user buys one pizza, just enter ‘1’ here. If the user needs to buy two pizzas to qualify for a freebie, enter ‘2’ here and so on
- In the ‘Get’ field, enter how many products the user will receive as part of the deal
- You can specify a maximum number of items in the ‘Max’ field. So, if the user receives a free pizza for every pizza they buy you can leave this field empty. But if they are only entitled to one pizza, enter ‘1’ here
- Specify the type of discount in the ‘Adjustment type’ and ‘Amount’ fields. For free gifts, select ‘Percentage discount’ and ‘100’ in these fields
- Enter the products that qualify for the deal in the ‘”Buy” products’ field
The screenshot below shows the settings for a free product in WooCommerce

Adding the free product to the cart automatically
If you want the free product to be added to the cart automatically:
- Go to WooCommerce > Settings > Fees and Discounts > Dynamic Pricing
- Select the ‘Automatically add BOGO products’ option
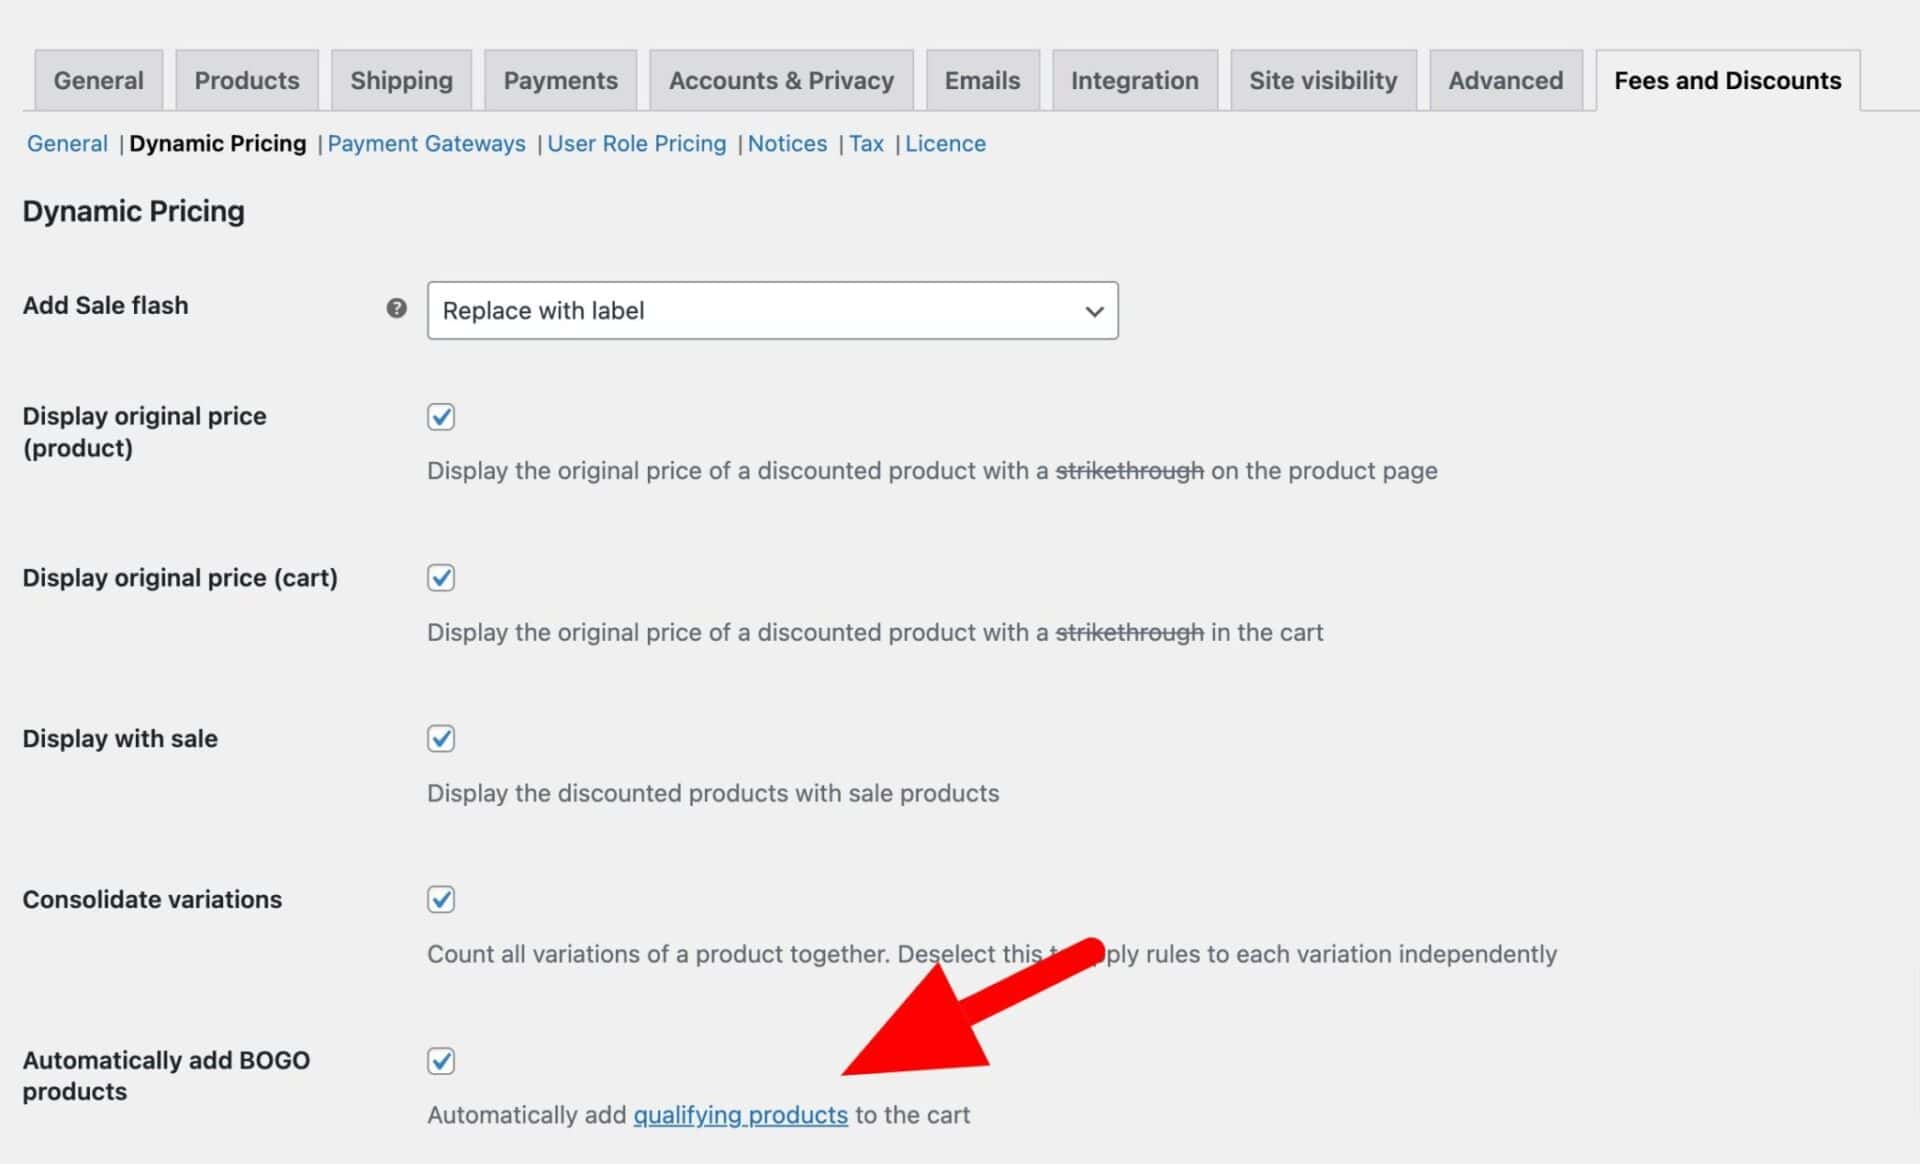
Now, when the user adds the first item the second (free) one will be added to the cart automatically.
Method #4: Buy one get one free (different products)
If you want you can change the deal slightly and offer a different product free. For example, you can run a deal to buy a pizza and get a free garlic bread. To do this, follow the steps in Method #3 above but:
- Choose ‘Buy X Get Y’ as the rule type. This specifies that the user must pick one product in order to obtain a different product for free
- Enter the free product in the ‘”Get” products’
If the user has a pizza and a garlic bread in their cart, the garlic bread will be discounted to free.
Method #5: Create a three for two deal (or similar)
You can change the numbers involved in a buy one get one free deal. So you could offer buy three get two products free, or buy four and get one product free, or any variation you like.
Again, just follow the steps in Method #3, but with the following changes:
- In the ‘Buy’ field, enter the number of items that the user needs to purchase
- In the ‘Get’ field, enter the number of products that the user will receive for free
This can work with the ‘Buy X Get X’ and ‘Buy X Get Y’ rule types. You can also specify multiple products in both ‘”Buy” products’ and ‘”Get” products’ – so the user could buy three different types of product and get two different types of product free.
Method #6: Buy one get one free (by category)
As a further refinement, you could specify categories instead of products. So the user could purchase any two items from the ‘Hoodies’ category in order to receive a free item from the ‘Teeshirts’ category. To do this, just update Method #3 as follows:
- In the ‘Applies to’ field, choose ‘Specific categories’
- You can enter categories in the ‘”Buy” categories’ and ‘”Get” categories’ fields
Video tutorial
You can check out this video for how to use the methods covered in this tutorial.
WooCommerce free products – a recap
WooCommerce allows you to set product prices to zero – so you don’t need an extra plugin if you just want that ability. However, if you want to control the circumstances around offering free products, you can choose from one of the following plugins:
- WooCommerce Order Bump allows you to offer free products through a pop-up window when the user adds certain products to their cart. You can control what products you offer for free.
- WooCommerce Product Add-Ons Ultimate allows you to add free products to product pages so that users can add their free product at the same time as they buy the main product
- WooCommerce Dynamic Pricing and Discount Rules allows you to create discounting rules like buy one get one free – so you can offer free products flexibly and easily