How to create configurable products in WooCommerce
Do you want to set up configurable products in your WooCommerce store? In this article, we’ll show you how to do this with a plugin.
As the largest eCommerce platform in the world, WooCommerce caters to all kinds of businesses that would benefit from offering configurable products, from pizzerias to bike shops. However, the default methods for setting up configurable products in WooCommerce are quite limited.
In this article, we’ll look at the key features that configurable products share and we’ll look at multiple examples of different types of products. We’ll check out what existing WooCommerce functionality would help us build this type of product – and why we need to use a product configurator plugin.
Finally, we’ll introduce WooCommerce Product Add-Ons Ultimate and show in a tutorial how to set up highly configurable products in your online store.
What are configurable products?
Typically, configurable products comprise one or more of the following elements:
- They can be customized by users from the front-end of the site
- They are composed of multiple components – for example, a laptop where users can specify which elements they require. Or modular furniture where the user selects different elements to fit together to create the final piece
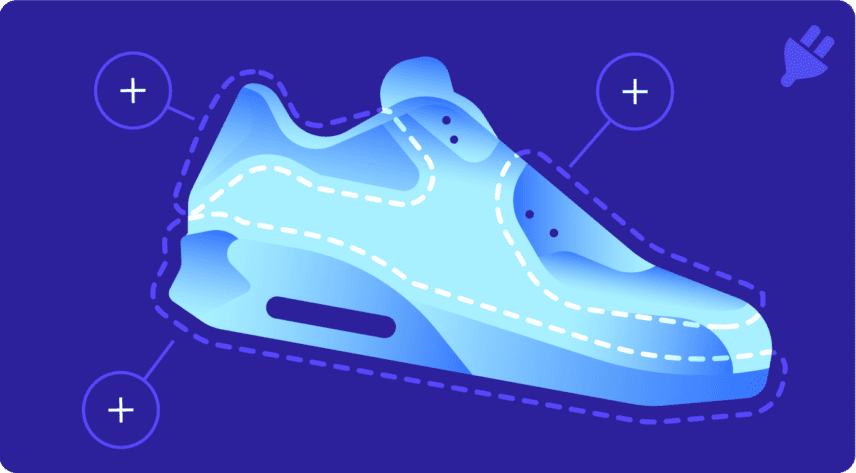
- And a key feature is the ability for the user to visually preview changes when they select a component – think of a watch where you can choose different styles for the strap and immediately view what that would look like. This is normally accomplished by using layers – multiple images with transparent backgrounds that sit on top of one another to build up the final image.
Creating configurable products without a plugin
WooCommerce provides a limited way for users to configure products through variable products.
A variable product lets customers customize or personalize their product before adding it to their shopping cart.
For instance, if you sell the same t-shirts in multiple colours, you can create a variable product for each colour. This approach is handy for inventory management because a separate SKU is assigned to each variation so stock levels can be tracked separately.
WooCommerce’s core functionality also allows you to assign different featured images to variations – meaning that users can preview their selections. But variable products fall short of being truly configurable products because the user isn’t able to configure components of the product separately.
So, while you could update your variations with color and image swatches, if your business depends on selling any form of configurable products, you’ll need a dedicated plugin to help you offer more options to customers.
What’s the difference between composite products and configurable products?
A composite product is assembled from several other products. This means that you can track each component as a separate SKU – and therefore track inventory and stock levels.
In this article, we showcase several examples of configurable products. Some of them could be considered composite products – that is, they are built up from other products, like a bicycle that’s made up of frame, handlebars and wheels; but others just use simple options, like a pizza that offers different options for toppings.
While there is a WooCommerce plugin dedicated to composite products, it doesn’t allow you to add other types of options or to preview selected product elements. And composite products may sometimes be overkill – you don’t always need each element of your product to have its own SKU.
Examples of configurable products
Here’s a quick overview of some different configurable products. They can all be customized by the user and they are all composed of multiple elements – though these elements may or may not be separate SKUs.
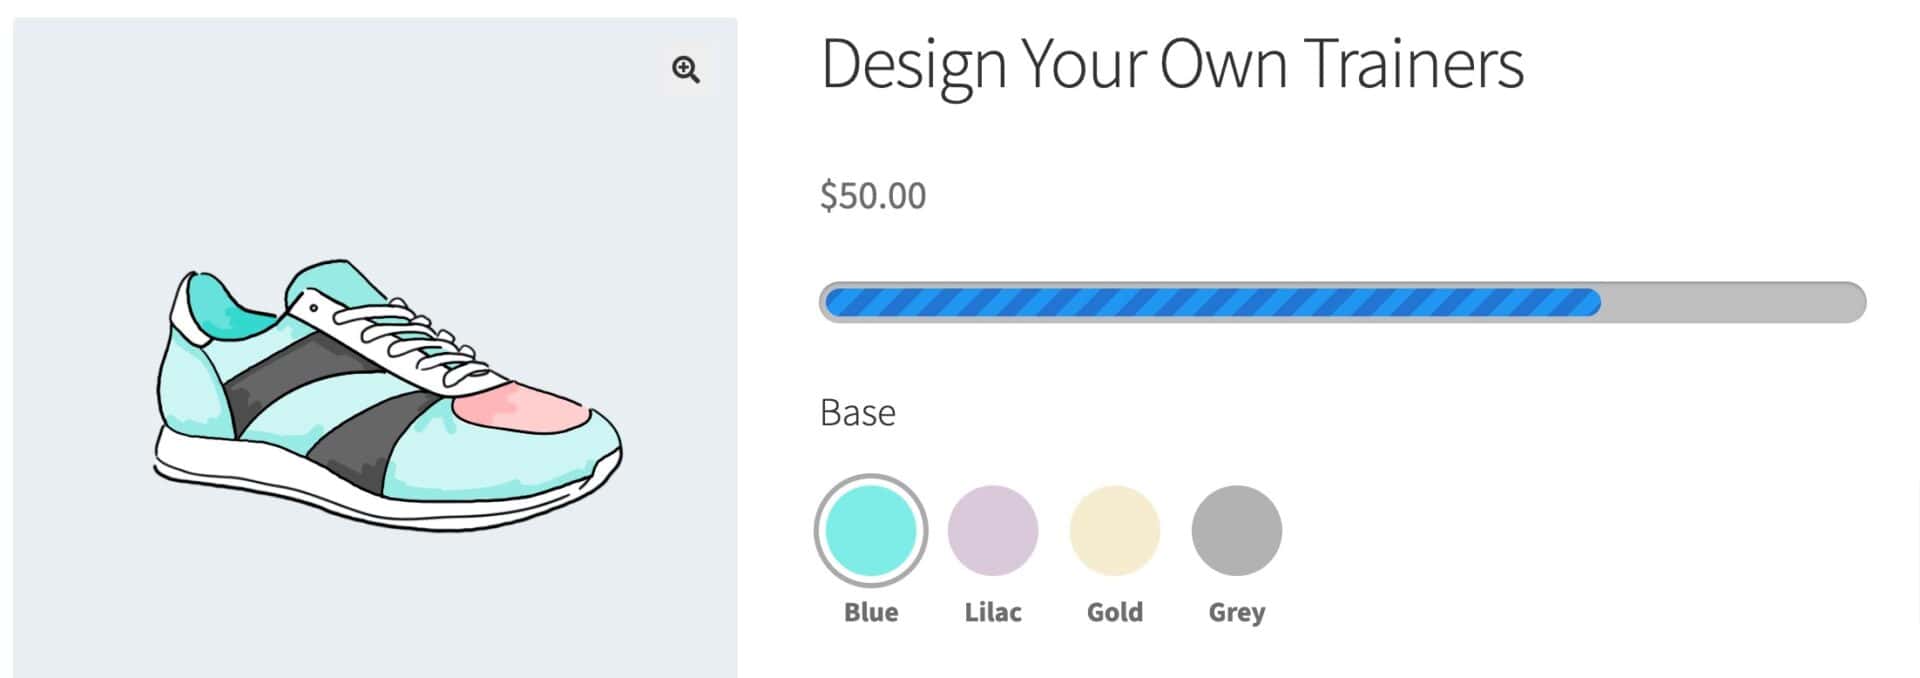
Design your own trainers
Let’s say you’re selling trainers on your site. You’d like the user to be able to configure their own perfect trainer by selecting different colors and styles. And you’d like the user to preview how their selections looked.
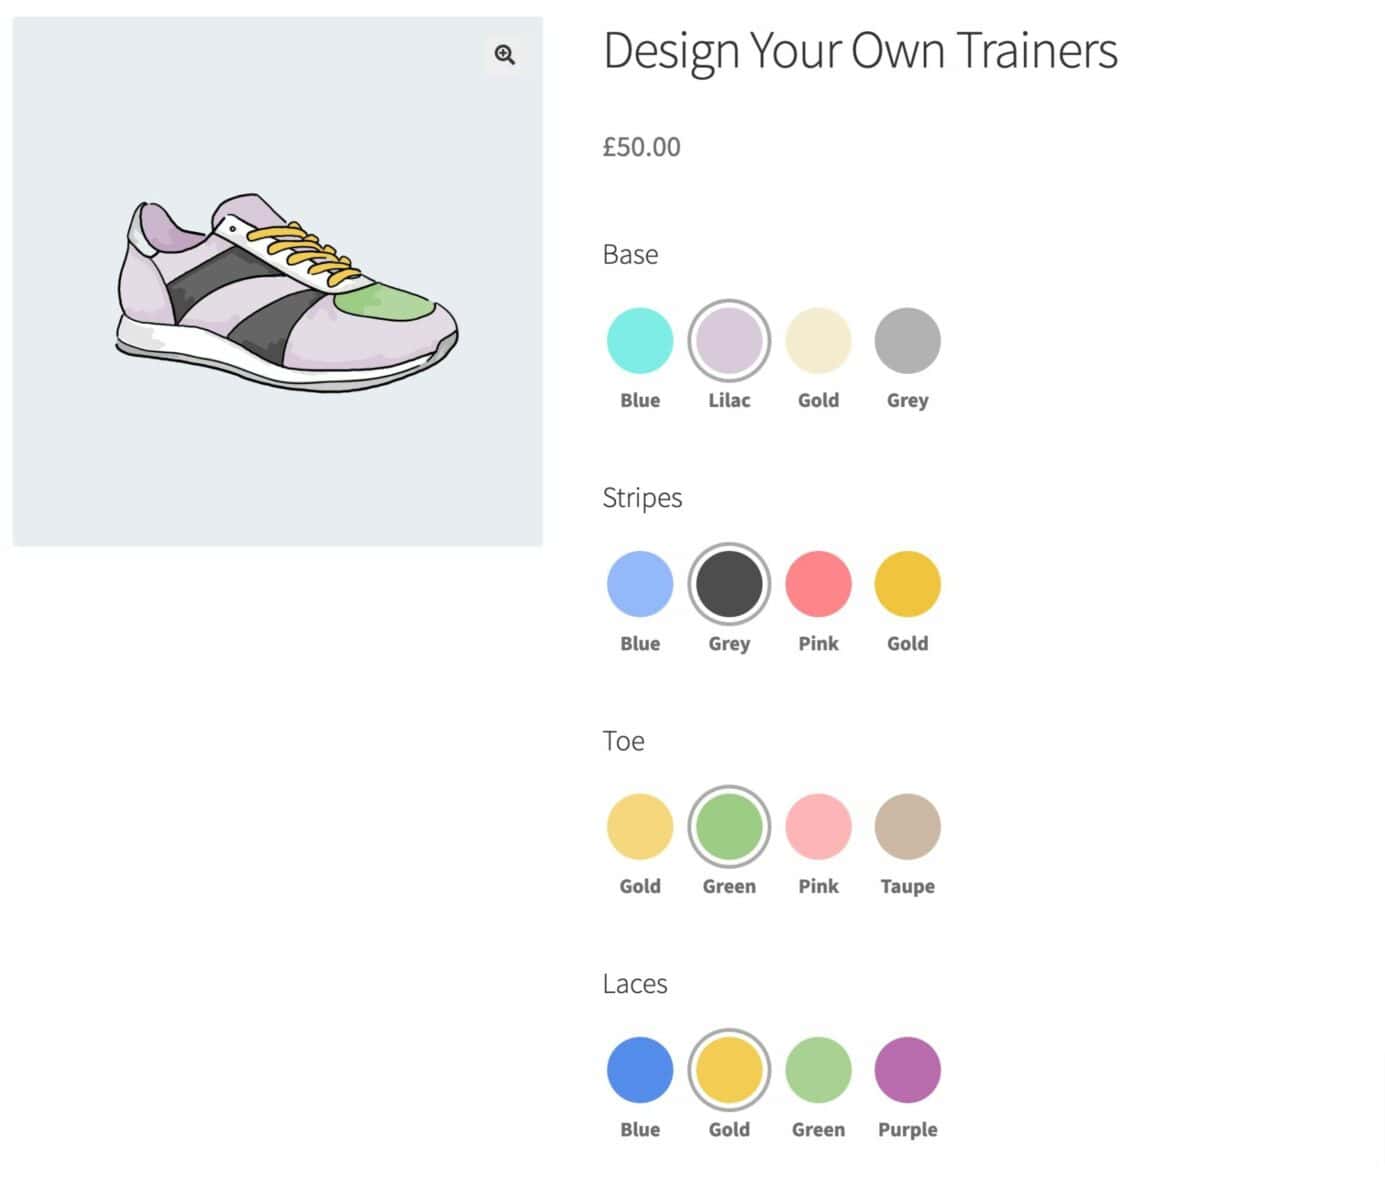
We’ll look at how to create a product like this in the tutorial later in the article.
Print-on-demand products
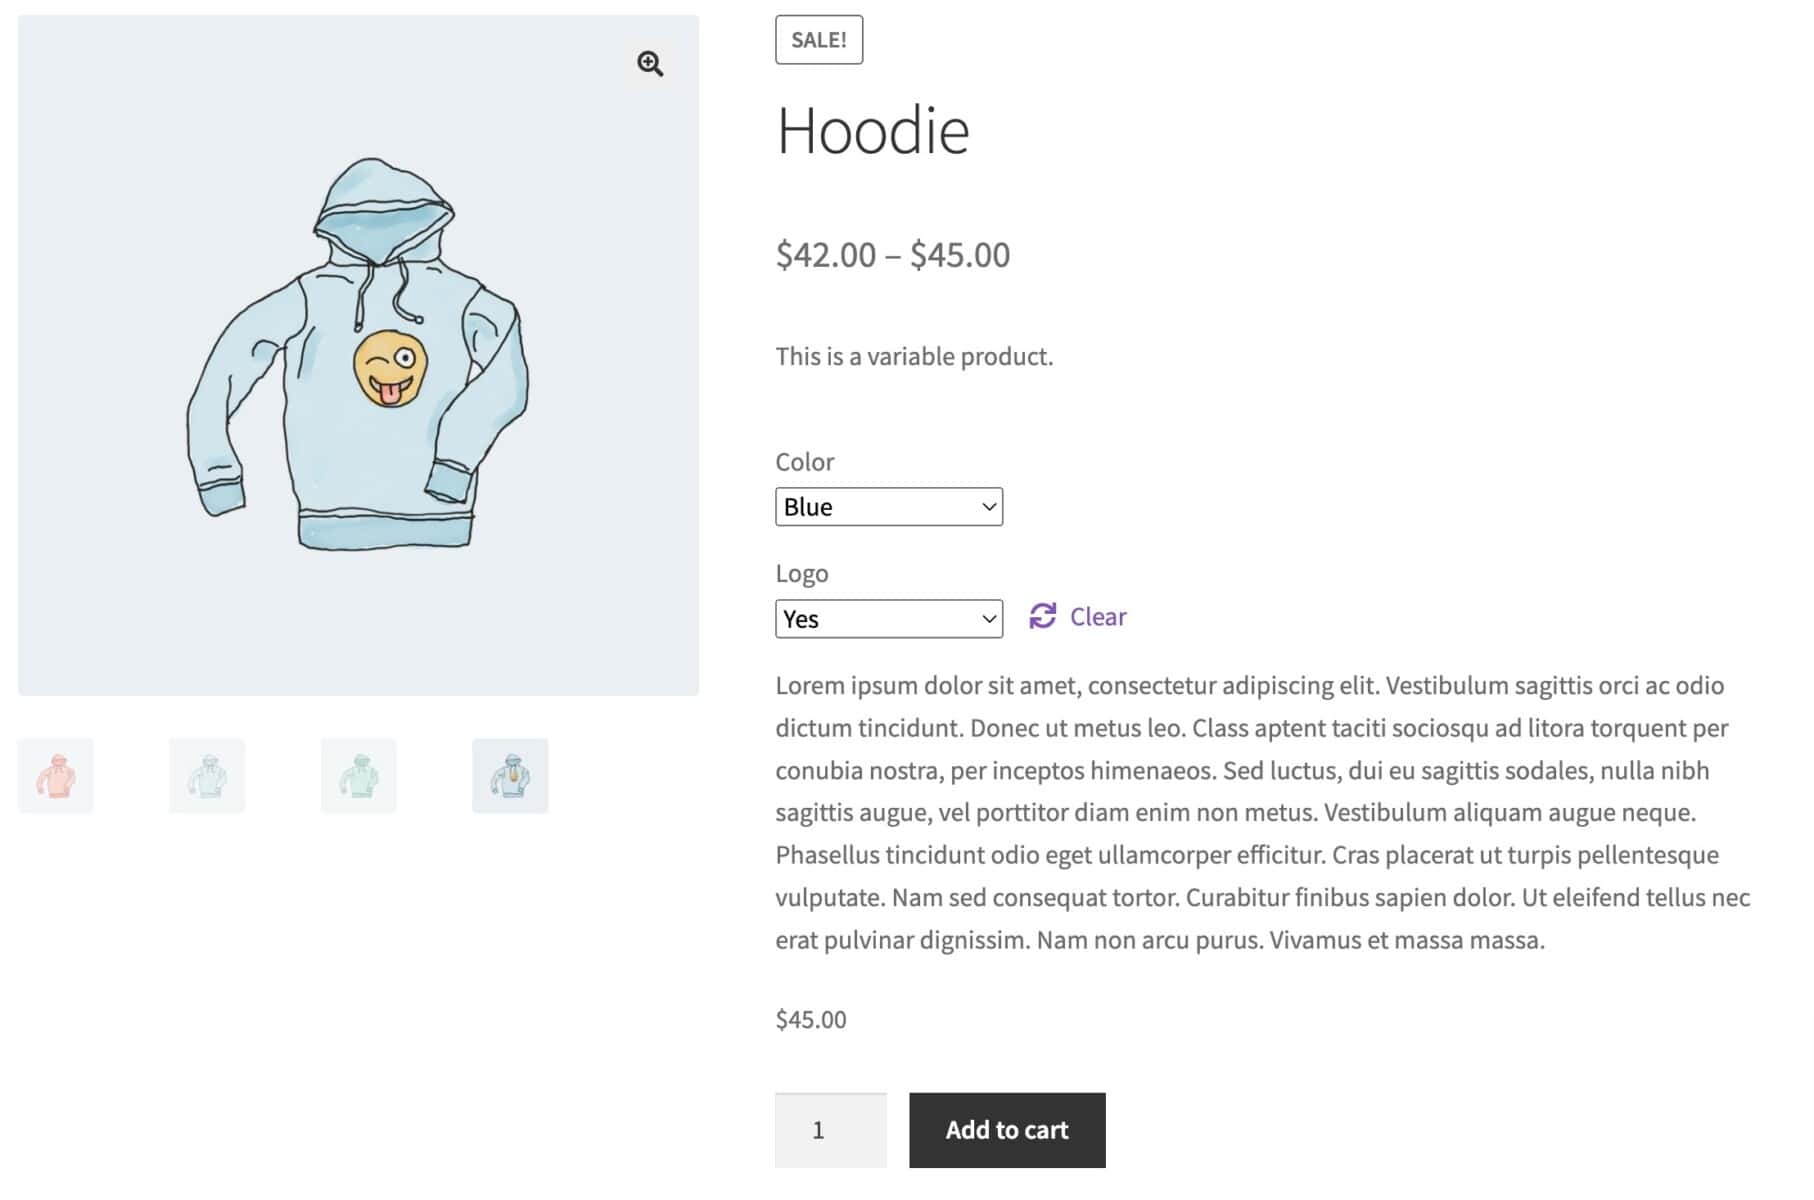
Another great example of a configurable product is print-on-demand t-shirts. While you can let shoppers select their desired color by creating a variable product, there’s no way to let them add custom text or upload their own images.
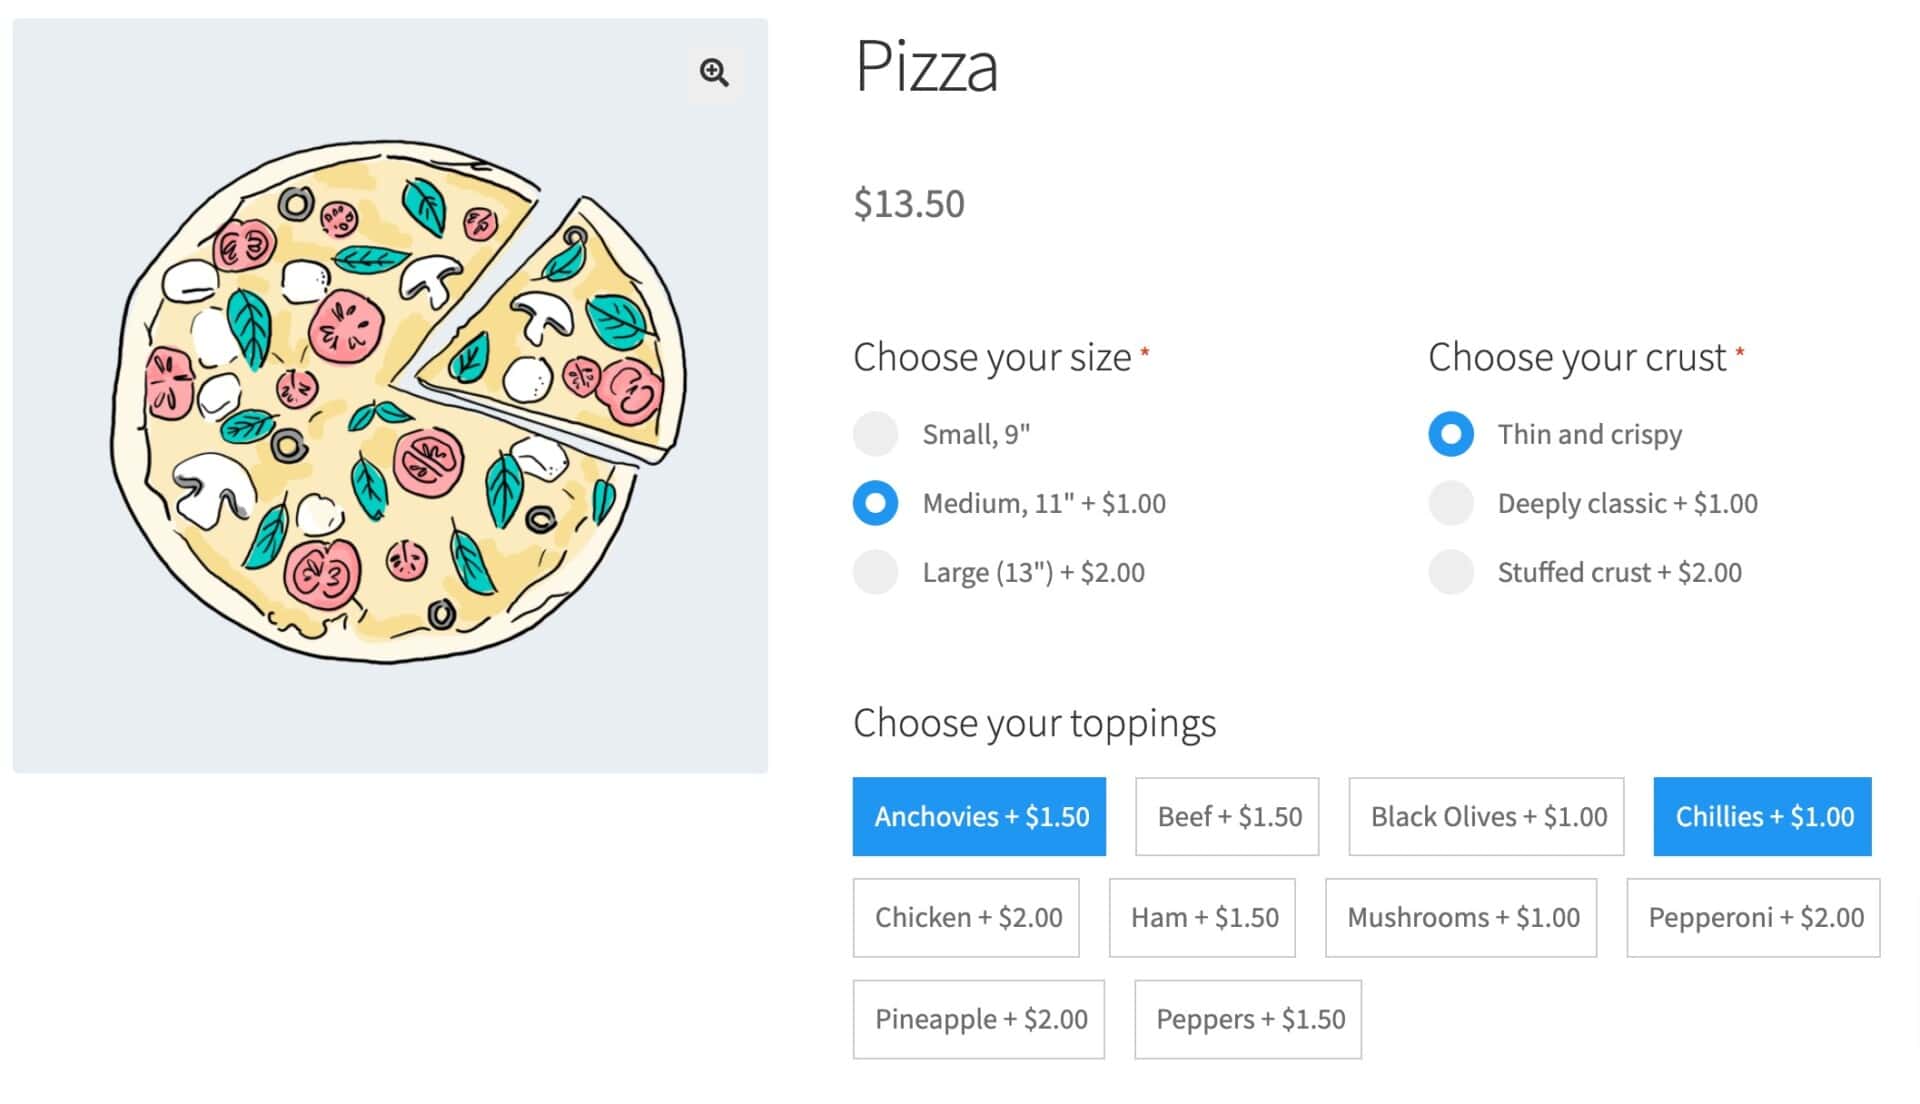
Choose your own toppings
Even an item as simple as pizza is a configurable product. The user personalizes the product by choosing their toppings. It’s not possible to do this using variations because the number of combinations is too high – you couldn’t create a variation for each one. Instead, the product uses radio buttons, text swatches (buttons), select fields (dropdowns), and customisable text fields for the user to select toppings independently.
Video: How to create configurable products in WooCommerce
Check out the video below for an overview of how easy it is to create configurable products in WooCommerce.
Using WooCommerce Product Add-Ons Ultimate for configurable products
This is where WooCommerce Product Add-Ons Ultimate comes in. It’s the perfect plugin for creating configurable products.

Add-Ons Ultimate is designed to let you add extra fields and custom options to ordinary WooCommerce products. This way, you can allow customers to easily personalize their orders before checking out from your online store.
The plugin has around 20 different add-on field types, including but not limited to:
- Text fields
- Select fields (dropdowns)
- Checkboxes
- Image upload fields
- Product and Product Categories fields
- Radio buttons
As well as its range of add-on fields, Add-Ons Ultimate has a number of other features that are especially useful in setting up a configurable product.
Global fields
The plugin lets you set up extra product options globally. This is great for quickly setting up product options for multiple products that have the same customization options. For example, setting up size and color options for all products in the Hoodies category.
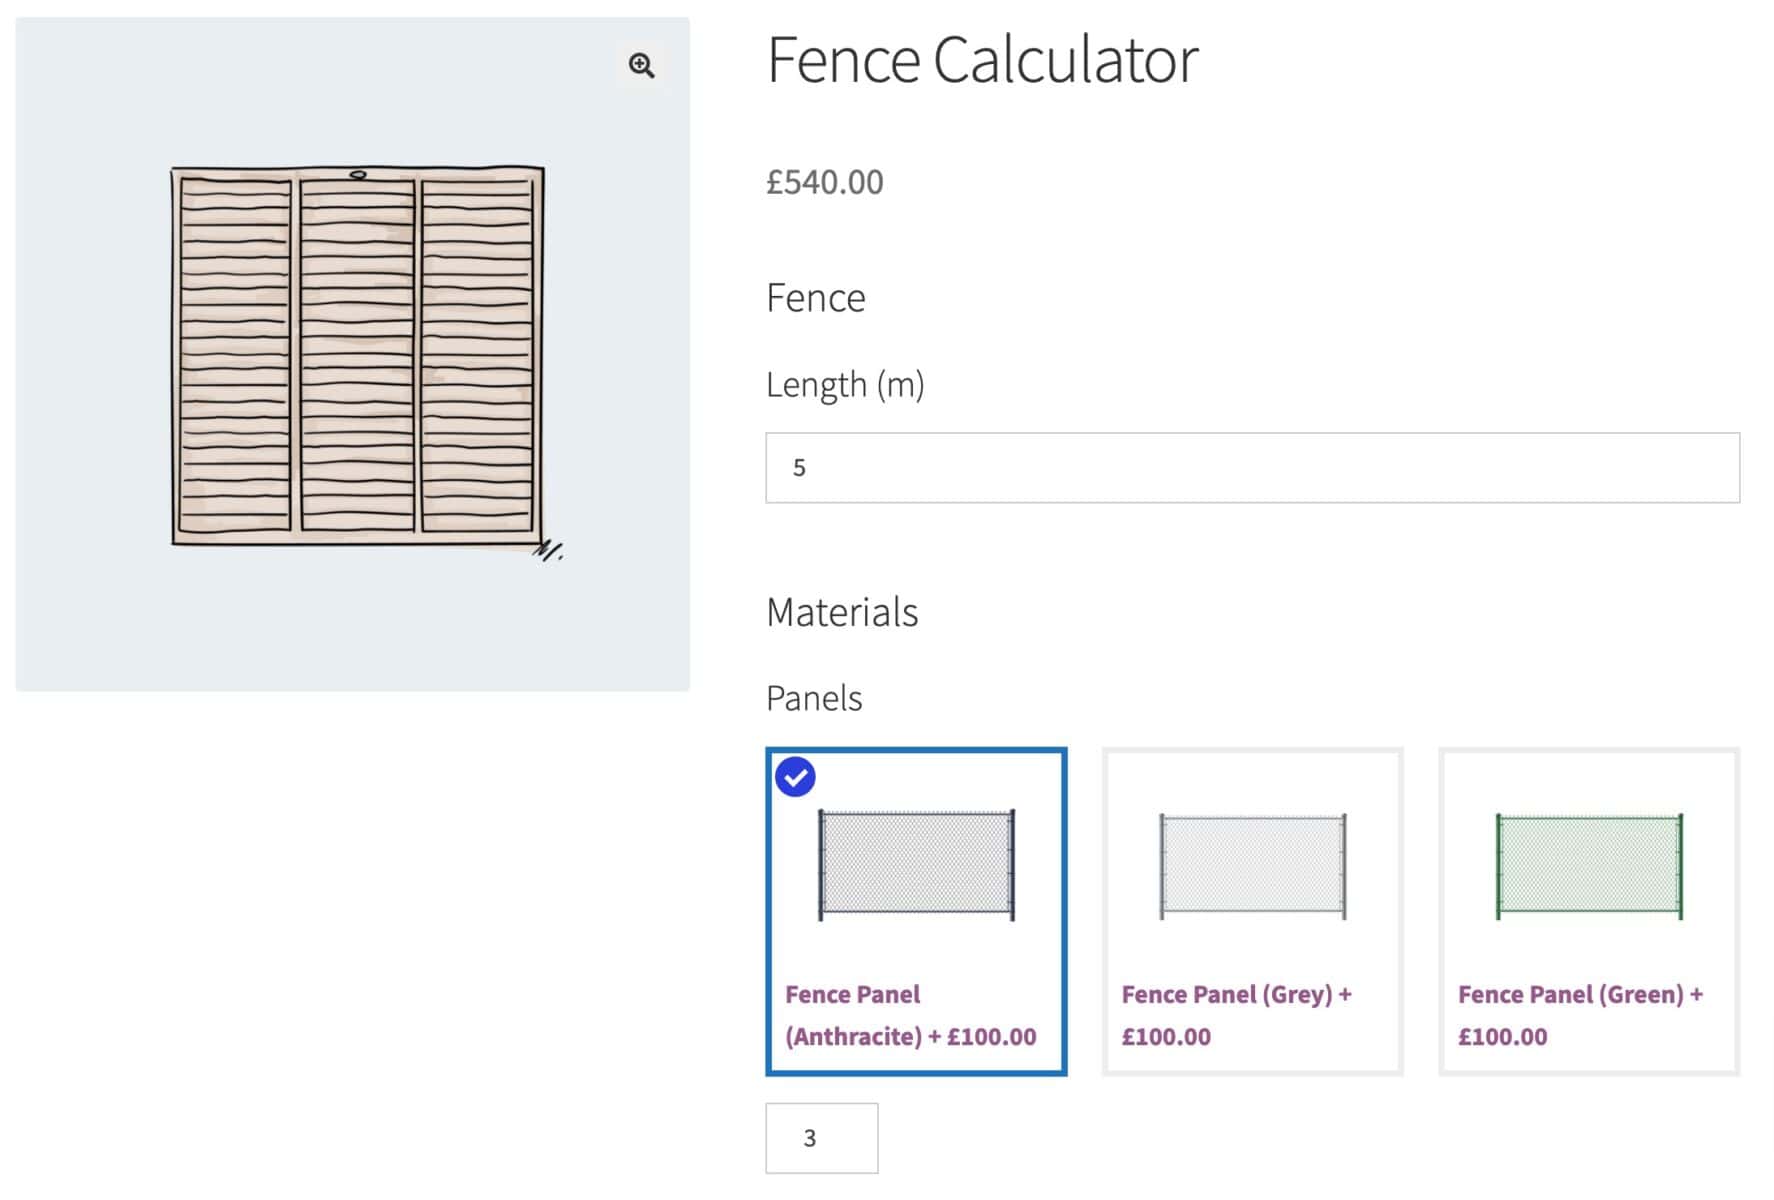
Conditional logic
This is an essential feature to have, as it allows you to show or hide fields depending on what the customer selects in other fields.
As an example, In this fence calculator product, a user can configure a fence. Note how additional fields only appear once you’ve entered a value in the ‘Length’ field.
Dynamic pricing for fields
Add-Ons Ultimate lets you adjust pricing for all extra options or fields you add to your WooCommerce product. This way, you can either charge a fee or offer discounts to customers depending on the product option they choose.
Calculation fields
Sometimes, simply adding prices based on options selected is not enough. Your pricing structure may be more complex and depend on multiple factors. In this example of a mattress configurator product, the overall product price is calculated based on the user’s required length, width and depth of mattress. Then, other options are factored in – like the firmness rating.
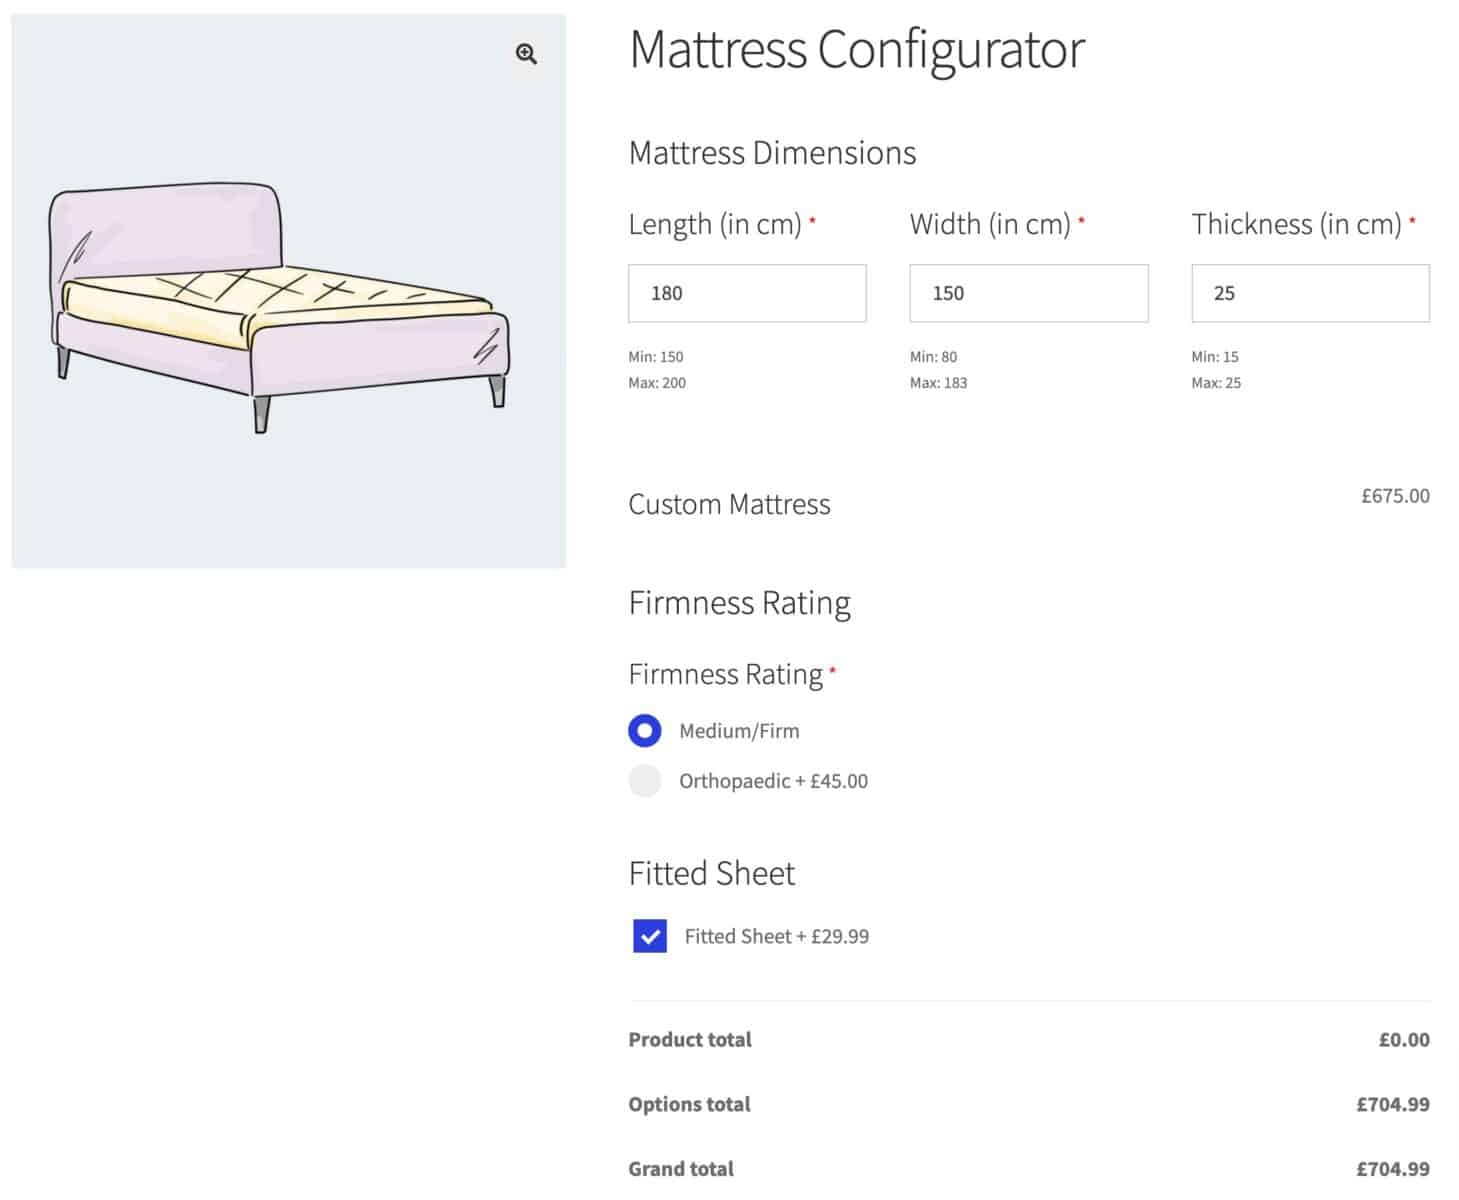
Calculation fields allow for highly complex pricing. You can even read prices from a lookup table using the Advanced Calculations extension.
Groups and layouts
Add-Ons Ultimate’s fields are always organised into groups. You can lay these groups out in different ways depending on the type of product you’re building. This means that you can have a stepped layout to help guide the user through multiple stages in the configuration process.
In the animation below, you can see how users configure their own bicycle by choosing components like frame, handlebars, wheels etc. Because the options in this product are more complex, we’ve organised them into groups which are presented to the users as steps. So the user gets a clear visual representation of where they are in the process of configuring their product.
If we wanted, we could even make it a requirement for the user to complete each step first before moving on to the next one.
Child products
Note that the build a bike product above would be considered a composite product – each of its components is a standalone product in its own right, with its own SKU, price and stock level.
Add-Ons Ultimate has a unique ‘Products’ field type, which allows you to use ‘child products’ as options in your configurable product.
Progress bars
For even more help guiding the user through the product, you can add a progress bar. This will graphically display how far the user is through the process. It’s particularly useful for more complex products.
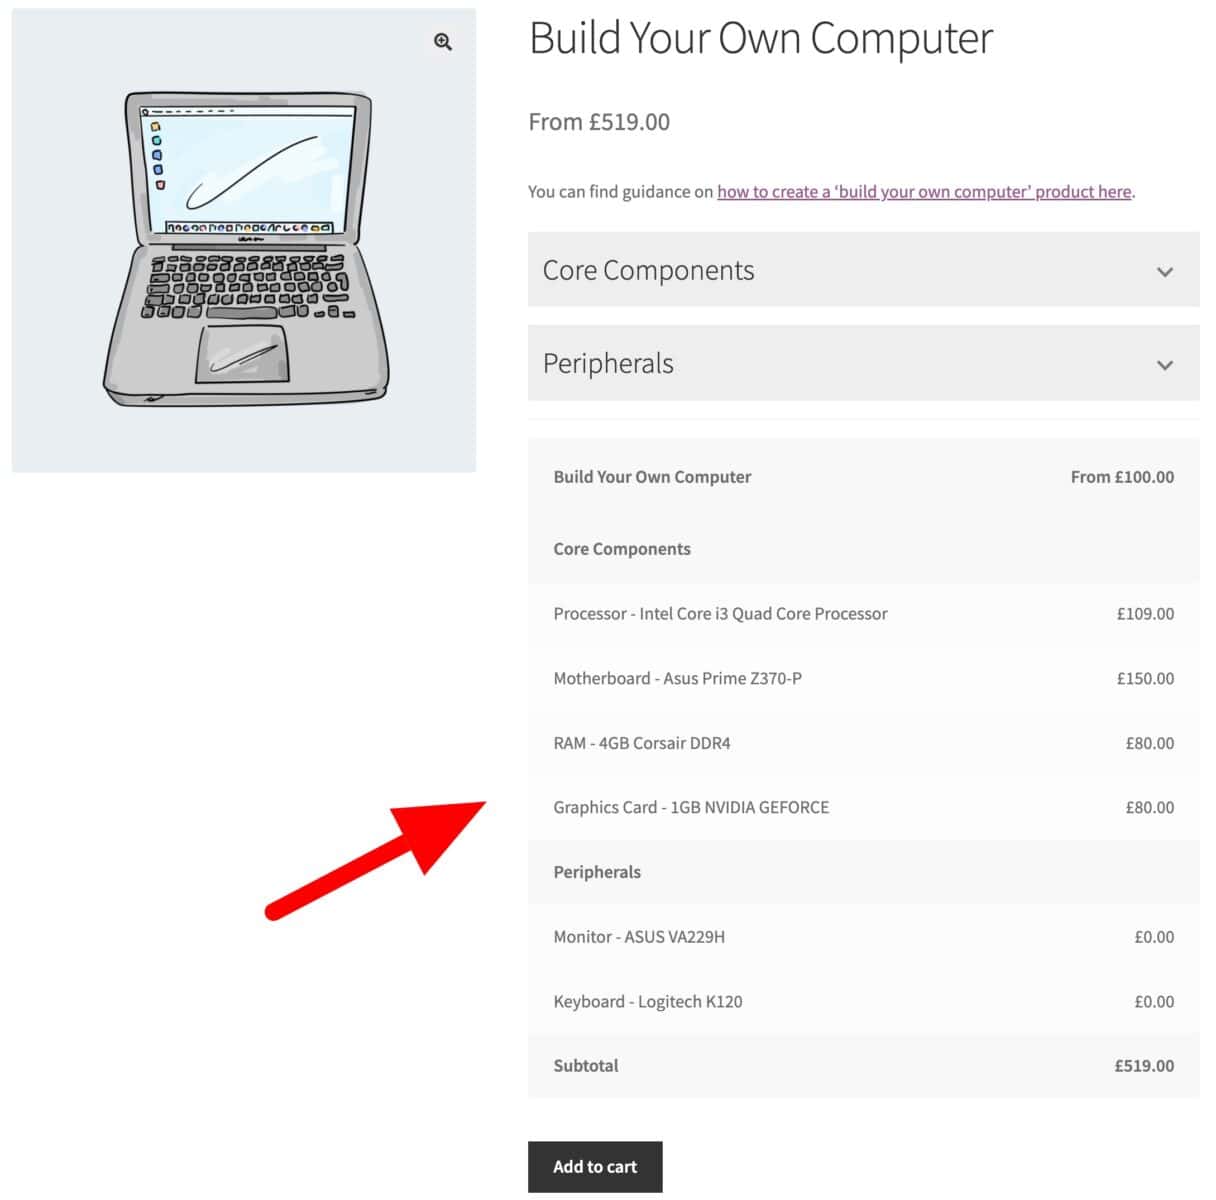
Summary panel
If you like, you can include a panel for the user that summarizes the options they’ve selected. In this example of a ‘build your own PC’ product, each option is listed just above the ‘Add to cart’ button. This is especially helpful for complex products where the user might need to keep track of what they’ve selected so far.
Tutorial: How to create a configurable product in WooCommerce
Okay, we’ve looked at a number of examples of configurable products, and we’ve seen what features Add-Ons Ultimate has to create such products.
Now, let’s take a look at how to actually create a configurable product in WooCommerce using Add-Ons Ultimate.
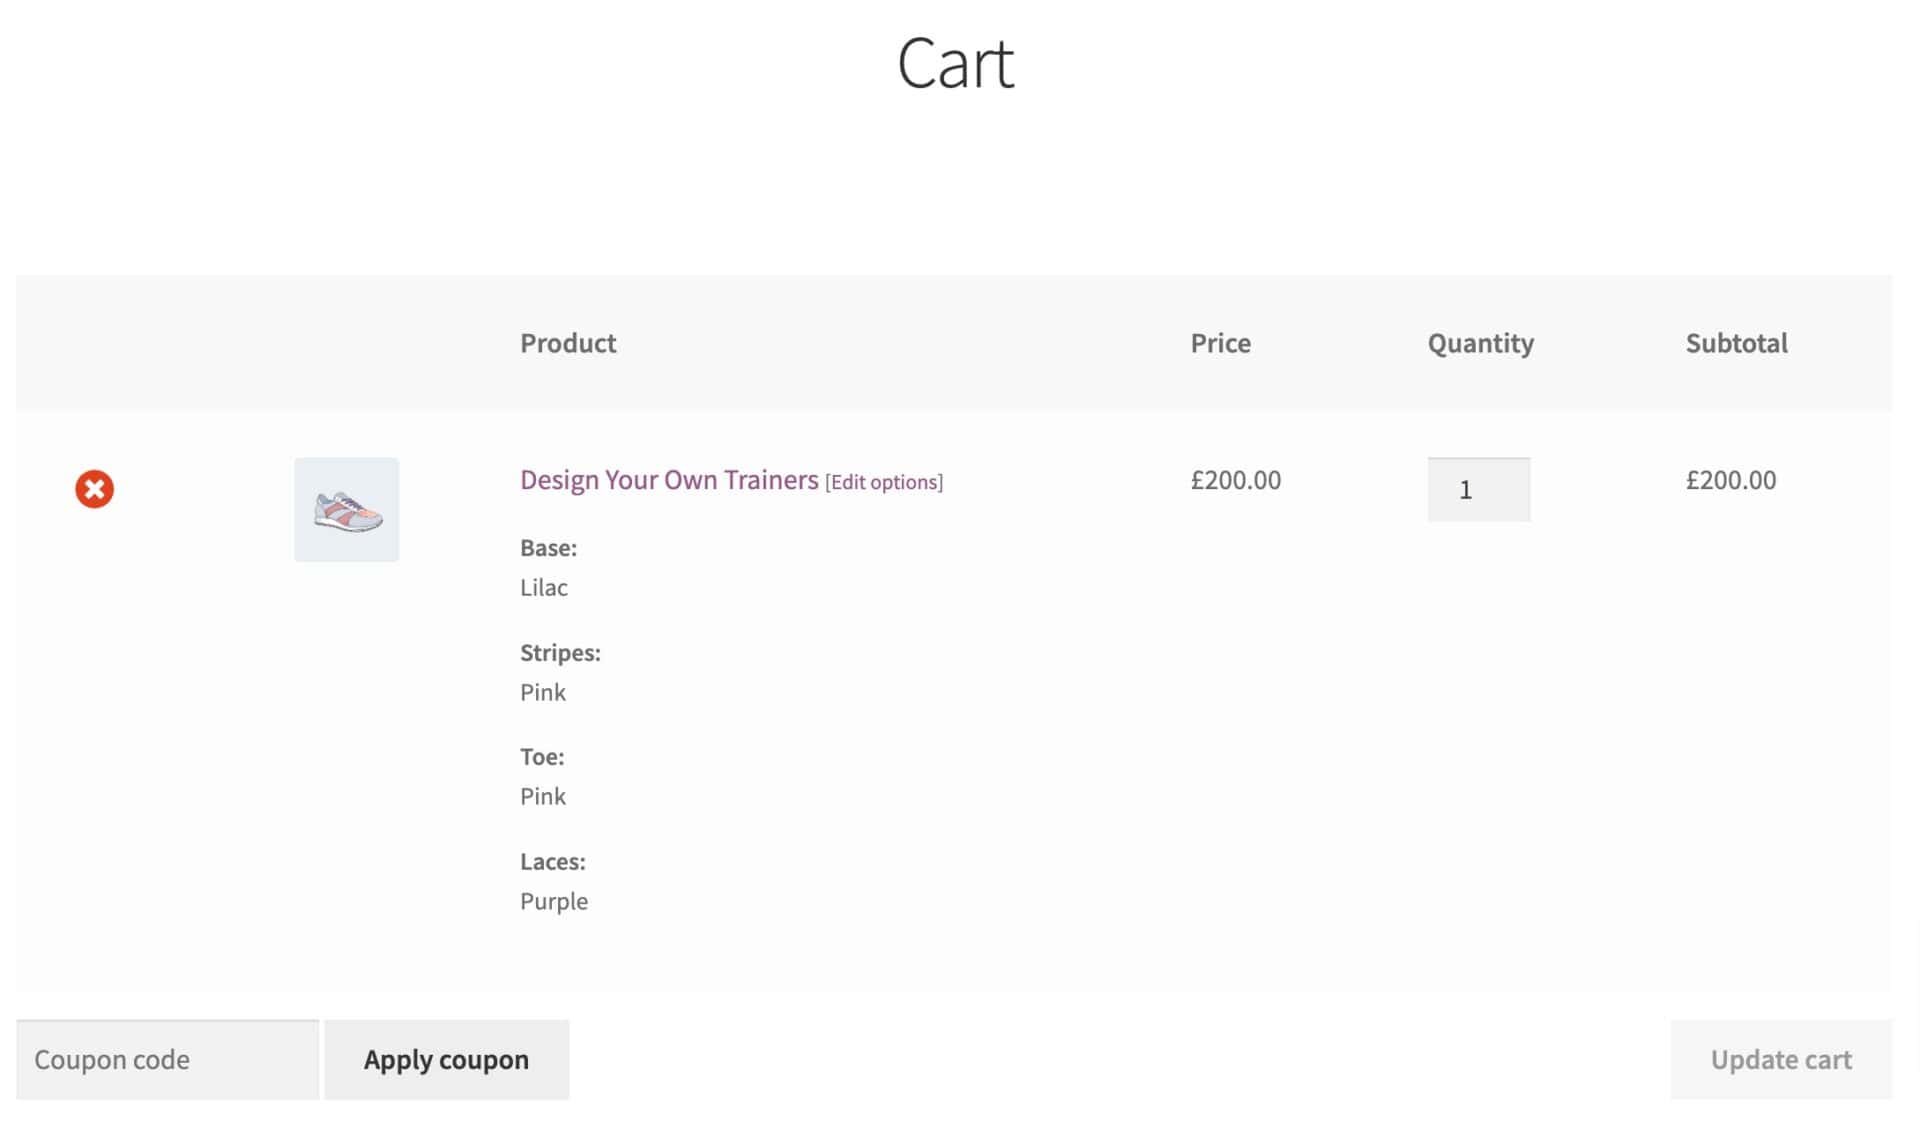
In our main example, we’ll create a product where the user can design their own trainers. The user will be able to choose colors for different elements – and they’ll preview those colors in the main product image so they know exactly what the final product will look like.
You can see a working version of this product here.
Step 1: Install the plugin
First, you’ll need to install and activate Add-Ons Ultimate. To do this, navigate to Plugins → Add New from the WordPress admin panel and upload the plugin’s ZIP file to your WooCommerce site.
Click on the Install Now button and then Activate the plugin to continue.
Now it’s time to verify the license key and unlock the plugin.
Navigate to WooCommerce → Settings → Product Add-Ons and click on the Licence link from the top.
Enter the license key given to you at the time of purchase and click on the Activate this license button to continue.
Step 2: Create your product
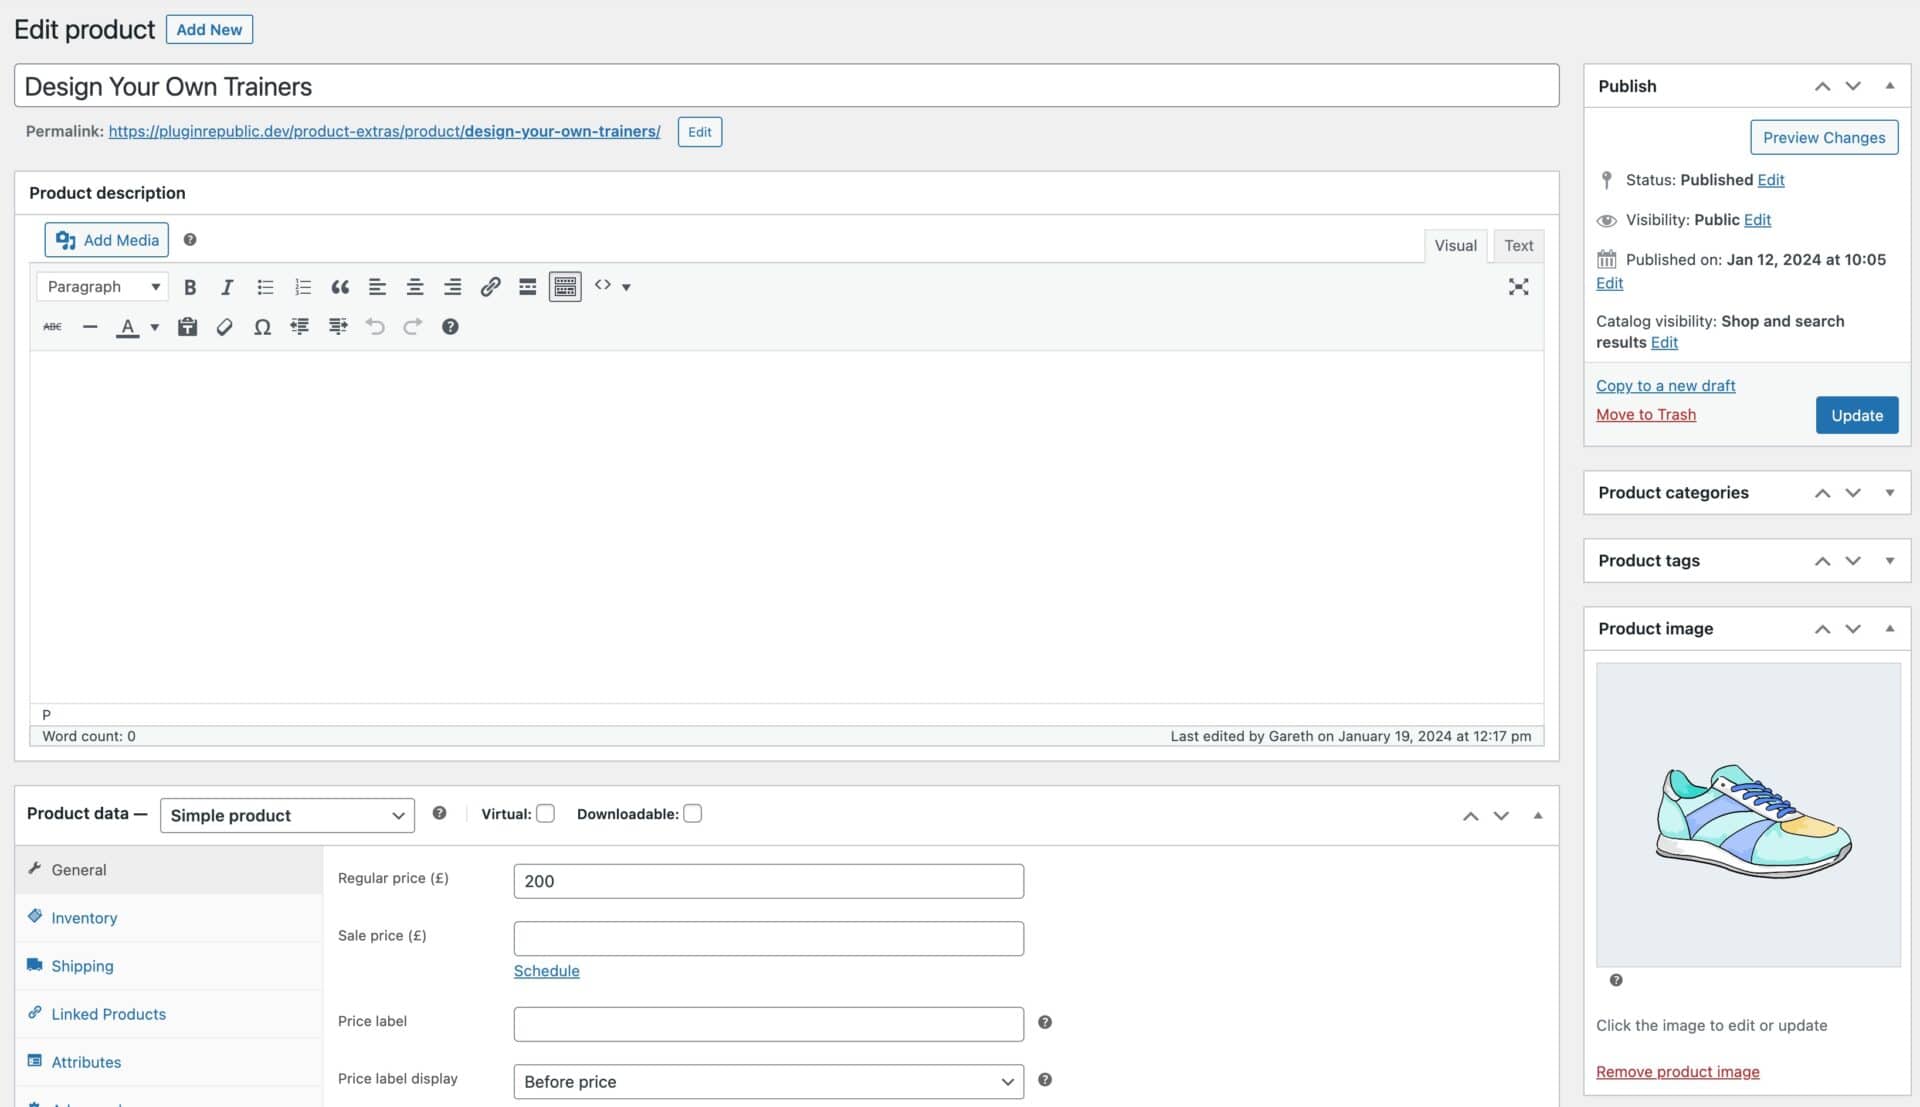
In our example, we’re creating a product for a pair of trainers that the user can customize themselves. So we’ll just add a product in the same way that we do for all WooCommerce products, enter a product name, price and description – just as we would for any standard product.
We’ll also upload a featured product image.
Step 3: Create your image layers
This step is optional – it’s only required if you want to be able to build up your product image in layers, so that each component forms part of the main image. If you don’t plan on using layered images you can skip to the next step.
Take a look at the animation below to see how our example product i is built in layers.
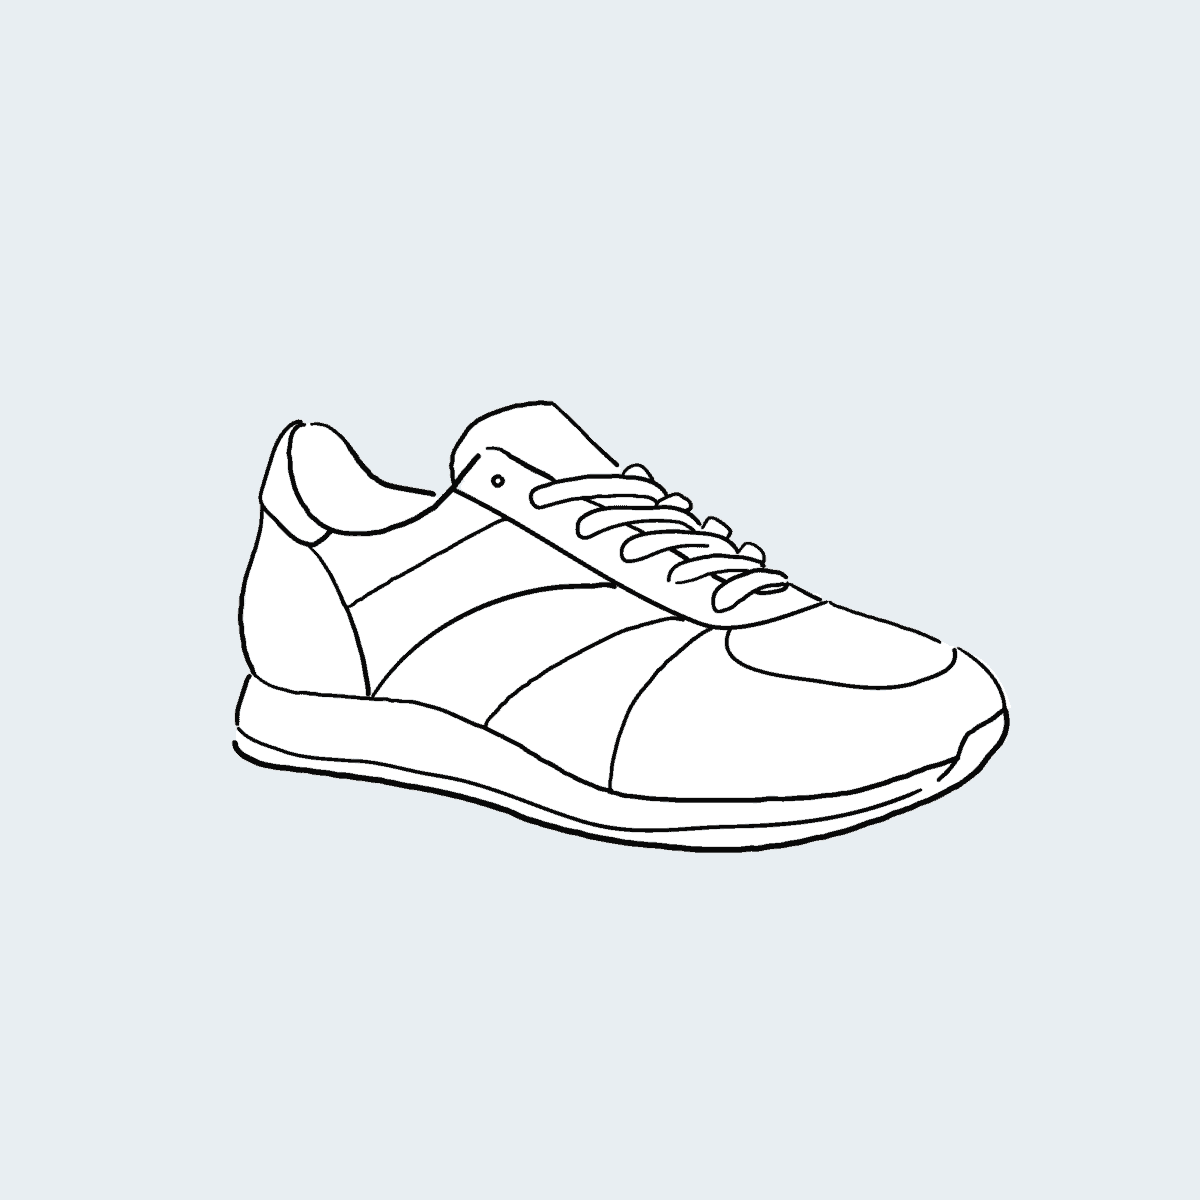
This is achieved by creating separate images for each component. So we have a base layer for the trainer where the elements are not colored in yet. Our base trainer is below.
Then we create images for each component that we want the user to be able to add. In this case, it means that we create components for the base color, the striped design on the side of the trainer, the toe of the trainer, and for the laces.
To see what we mean, here’s an example of a base color.

Each of these images must be PNG files with a transparent background. When the user selects an option – e.g. blue laces – the plugin will display the corresponding image above the base image. So the final image will be built up in multiple layers.
Step 4: Create the add-on fields
Now we can create options for each component.
- In your product edit screen, go to the ‘Product data’ section and click on the Product Add-Ons tab.
- Click Add Group then Add Field.
- Add a label for your field – in this case, we’ll add ‘Base’.
- Select a field type. There are multiple field types to choose from but for this product, we’ll choose ‘Swatch’.
- If you like, you can make it easier for your customers to understand what the fields are there for by using the Field Description or showcasing an image using the Field Image section.
- Enter the different options for the Swatch field. In this example, we’ll enter the names of the colors that the user can select for the base of the trainer. And we’ll use the color picker to select a color to represent each option.
- If we want, we can assign a different price to each option – maybe we want to be able to charge more for certain colors.
- Finally, if we’re using image layers, we can upload a file to each option. So we’d upload our transparent PNG file for the blue base to the first option, and so on.
- Repeat for all the options
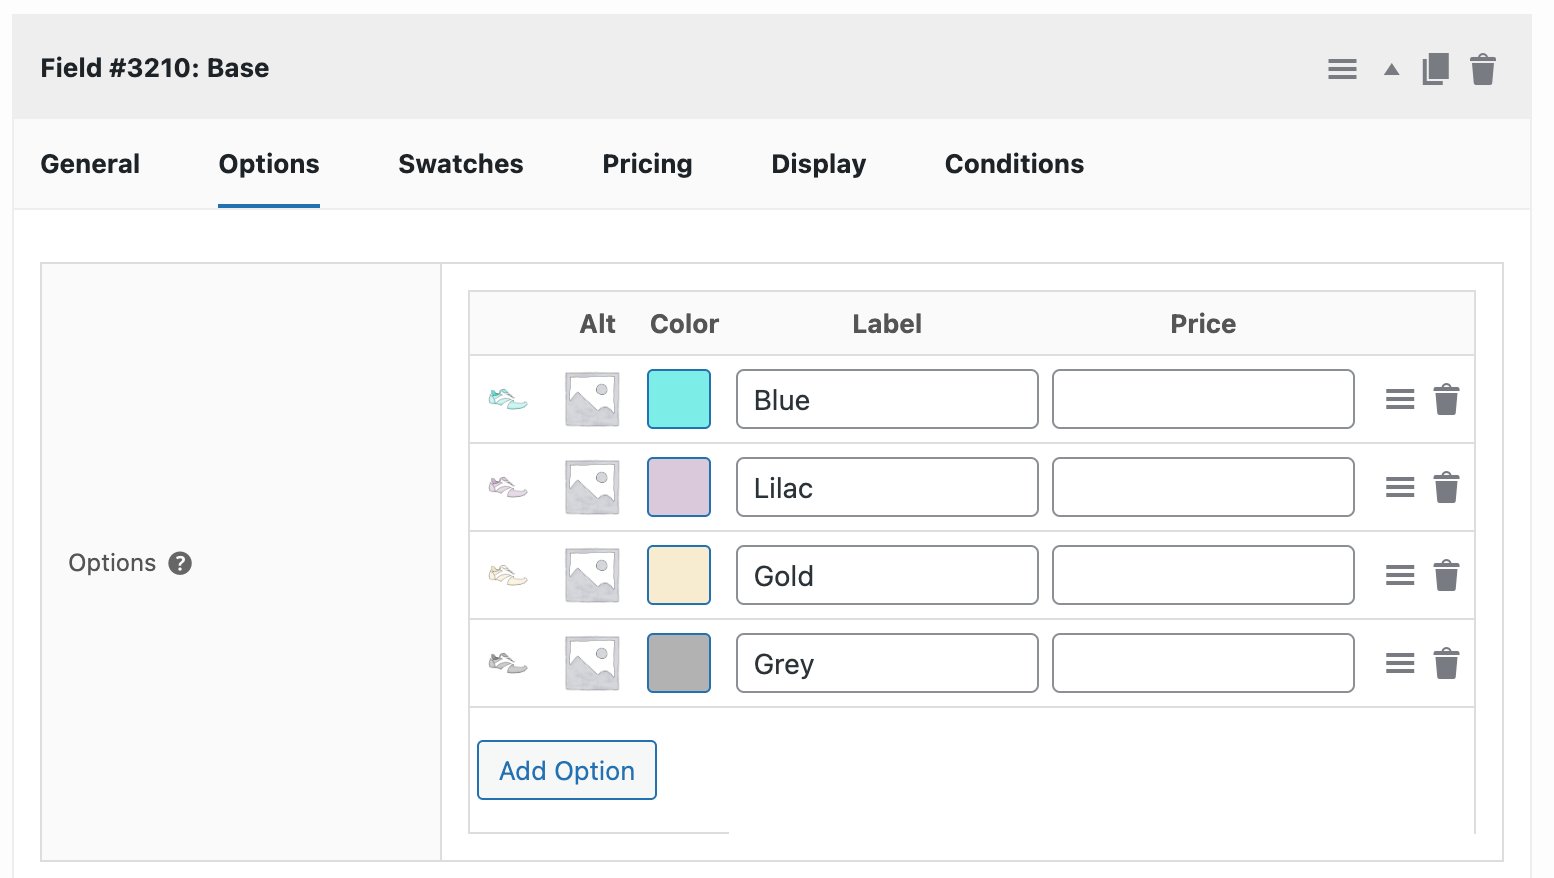
If we save the file and look on the front end, there’s now a field with a set of color options. If we click on one of the color options, the image will update and the selected component will be displayed.
We can then repeat the same process for all our fields – adding in options for the trainer’s stripes, toe, laces, etc.
Now, when the user selects all their options and adds the product to the cart, the product thumbnail will update to reflect the user’s choices and the options will be recorded in the order metadata.
Don’t forget to check out the finished product here.
Extending configurable products with live text and image previewing
The tutorial above showed how to create configurable products with WooCommerce Product Add-Ons Ultimate.
But what if you wanted to go a step further and let the user upload their own text or images as part of the product? You can do this with a couple of extensions for Add-Ons Ultimate: Text Preview and Image Preview.
In this example of a custom print product, the user can add multiple lines of text and see it previewed live on the main product image.
And in this example of a customizable greetings card, the user can enter text and upload an image. The text and image are both previewed live on the product image.
These are just two simple examples of how the Text Preview and Image Preview extensions can take your configurable products a step further
Recap: Creating configurable products in your WooCommerce store
WooCommerce is a fantastic plugin for selling your products online but its features are limited when it comes to allowing your customers to configure those products.
The WooCommerce Product Add-Ons Ultimate plugin offers the best solution for creating configurable products. It’s the only plugin on the market that allows you to add extra options to your products, lets you create composite products using child products as options, and allows you to create display layered images through the Swatches field type.