WooCommerce appointments: how to add appointment scheduling to your store
This tutorial shows you how to accept and manage online appointments through your WooCommerce store. We’ll use a spa as our example throughout, taking 60-minute treatments, but the same steps apply to any appointment business, so swap in your own services, hours, and prices as we go.
By the end, your customers will be able to pick a date, choose an available time slot, select their treatment, and pay for their appointment online, while you control your availability from the WordPress admin.
After completing this tutorial:
- Users will be able to:
- Pick a date and choose an available time slot
- See the price update automatically
- Select a specific treatment (optional)
- Pay for their appointment at the standard WooCommerce checkout
- As the store owner, you’ll be able to:
- Set your opening hours and run different slots on different days
- Limit how many appointments you take per slot
- Add buffer time between appointments for turnaround
- Manage every appointment from your WordPress dashboard
- As a bonus, we’ll also look at how to:
- Take a deposit instead of full payment
- Add optional extras to appointments
- Sync appointments with Google Calendar
- Send automatic email reminders
There’s a demo product here so you can see how it works. If you’re still deciding whether you need appointments or date-based bookings, we cover that in our guide to bookings vs appointments.
Why use WooCommerce for appointments?
With the right plugin, WooCommerce lets customers book and pay for appointments around the clock, without a single phone call. There are three big reasons to let customers book online:
- Your customers expect it. Most people now prefer to book online rather than call, and many will choose a business that offers online booking over one that doesn’t.
- You’ll reduce no-shows. Automatic reminders before each appointment cut missed bookings, with studies finding that reminders reduce no-shows by around a third. (BMC Ophthalmology)
- You’ll capture bookings around the clock. A large share of appointments are made outside opening hours, so a self-service system wins you business while you’re closed.
You also keep everything in one place. Appointments run through the same store, cart, and payment gateways you already use, so there’s no separate platform to manage and no commission to a third-party booking service.
How much does appointment scheduling software cost?
Using a WooCommerce plugin can work out cheaper than dedicated appointment scheduling software. Most appointment scheduling software is a recurring monthly subscription of around $5 to $137 a month – roughly $60 to $1,640 a year, and often charged per user or per location – while a WooCommerce booking plugin is an annual license or even a single one-off cost. (Capterra, correct as of June 2026).
Appointment booking suits any business that sells time. That includes hair salons and barbers, beauty and massage therapists, personal trainers and coaches, consultants and advisors, tutors and music teachers, photographers, and clinics.
In this tutorial, we’ll assume that you already have WordPress and WooCommerce installed and ready to go.
The Bookings for WooCommerce plugin
The Bookings for WooCommerce plugin lets you accept time-based appointments through standard WooCommerce products. It’s compatible with all themes and page builders, and it works with all WooCommerce payment gateways.
Once you’ve purchased Bookings for WooCommerce:
- Download the plugin’s zip file by clicking on the link on your order confirmation screen or in your welcome email. You’ll receive the email automatically a few seconds after you’ve completed the purchase
- Go to Plugins > Add New in your WordPress dashboard
- Click on the ‘Upload Plugin’ button
- Drag and drop the plugin’s downloaded zip file into the ‘Choose File’ area and click ‘Install Now’
- When the plugin has uploaded, click the ‘Activate Now’ button
With Bookings for WooCommerce activated, you can create your appointment product in the same way you would any other product.
Part 1: Accept appointments for a single treatment
We’ll start with a single treatment – a massage – that customers can book and pay for online. This is a complete booking system on its own, so a spa offering one service can stop at the end of this part. And this method will work for any type of appointment booking that you want.
In the second part, we’ll extend the process to allow the user to book one or more treatments from a single page.
Step #1: Create your appointment product
Create a new product under Products > Add New and give it a name like ‘Massage’. Set the product type to ‘Booking’ in the ‘Product data’ section. This turns a standard product into a bookable one and reveals the booking settings.

You now have a booking product. Next, let’s turn it into a time-slot appointment.
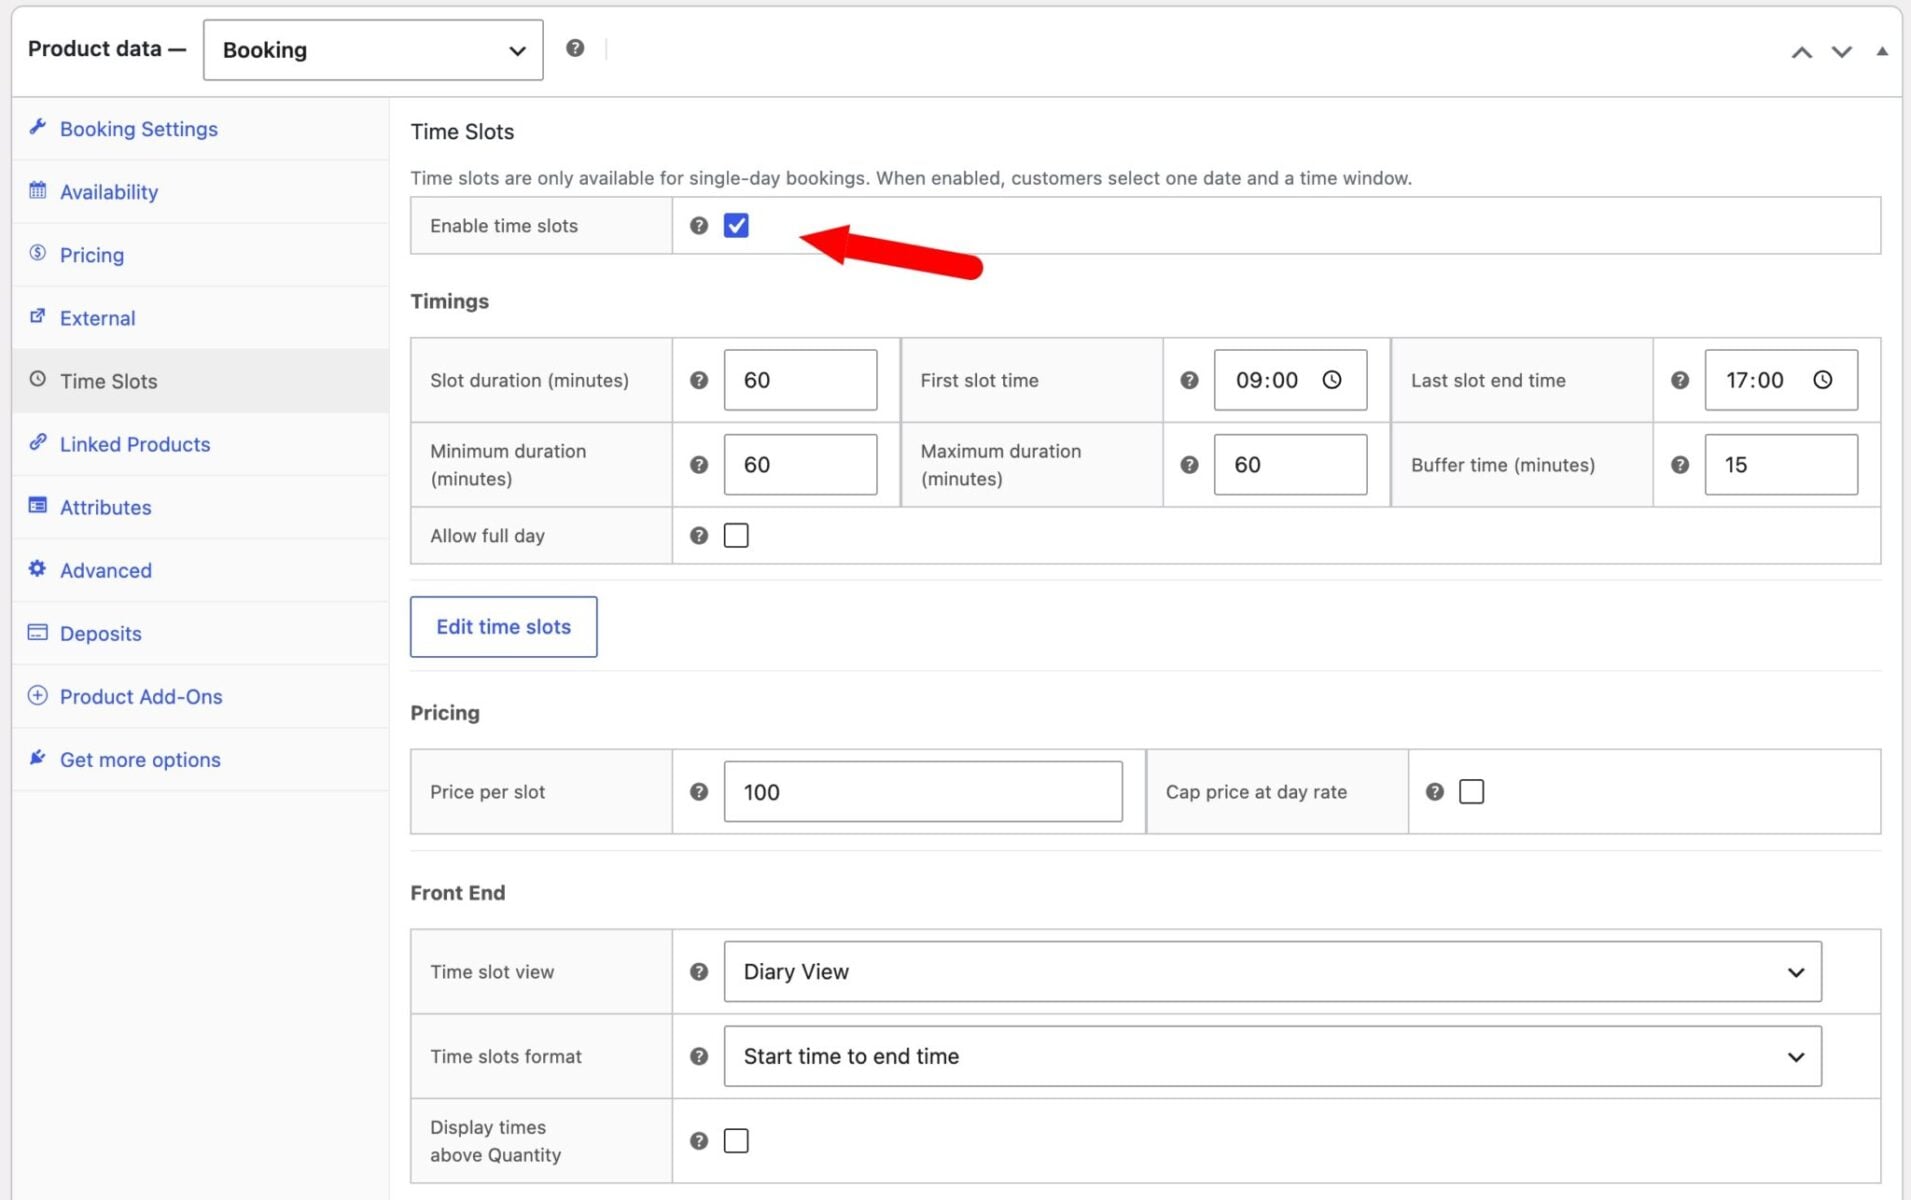
Step #2: Enable time slots
Set the booking unit to ‘Day’, then open the ‘Time Slots’ tab and switch on ‘Time Slots’. This divides each day into the fixed time windows your customers will book.
Now let’s define how long those slots are.
Step #3: Set your slot length, opening hours, and per-day schedules
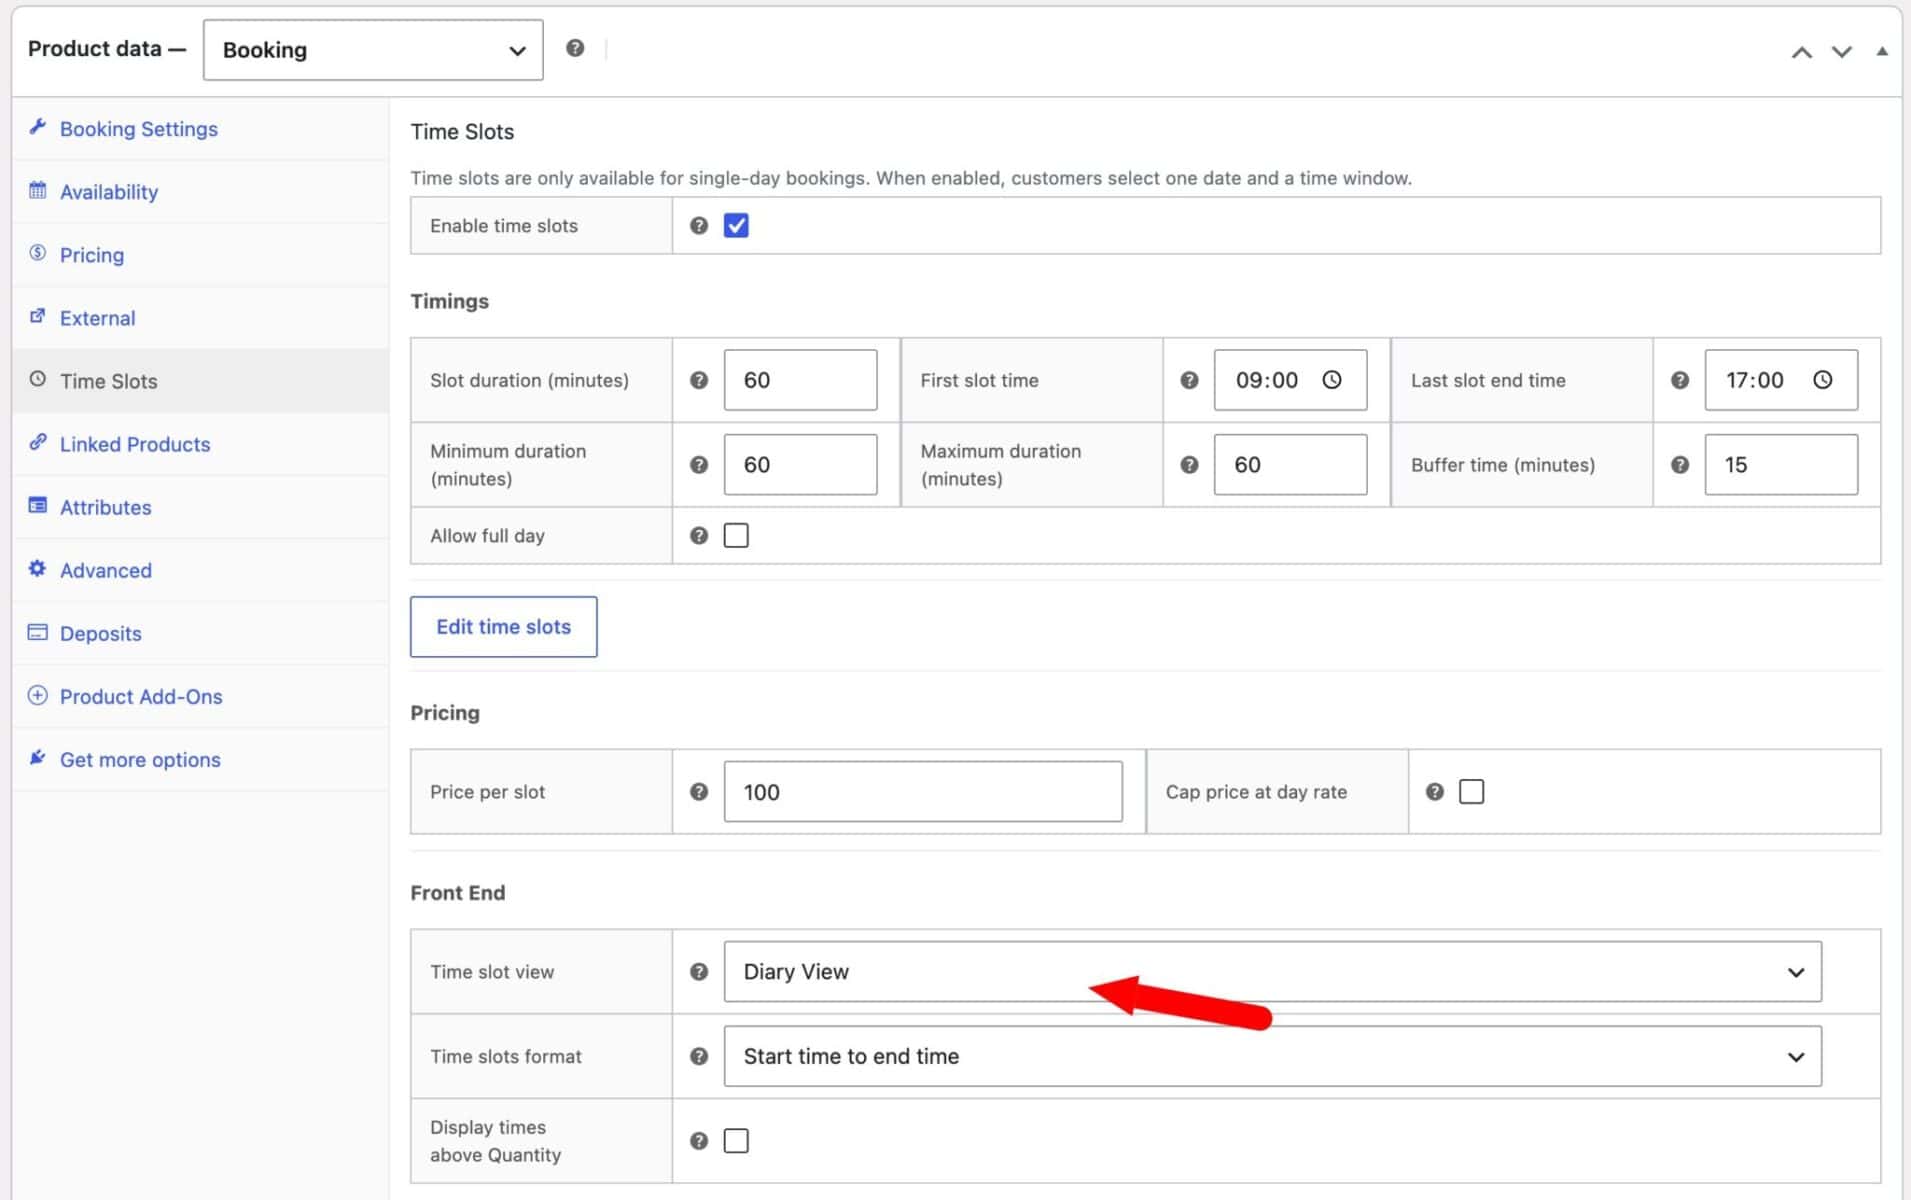
Choose how long each slot lasts and when slots start and finish. For our spa, we’ll set 60-minute slots to match a standard treatment, but you can set any length. You can also allow the user to book more than one slot at a time if you wish, e.g. if they want to book a whole morning session.
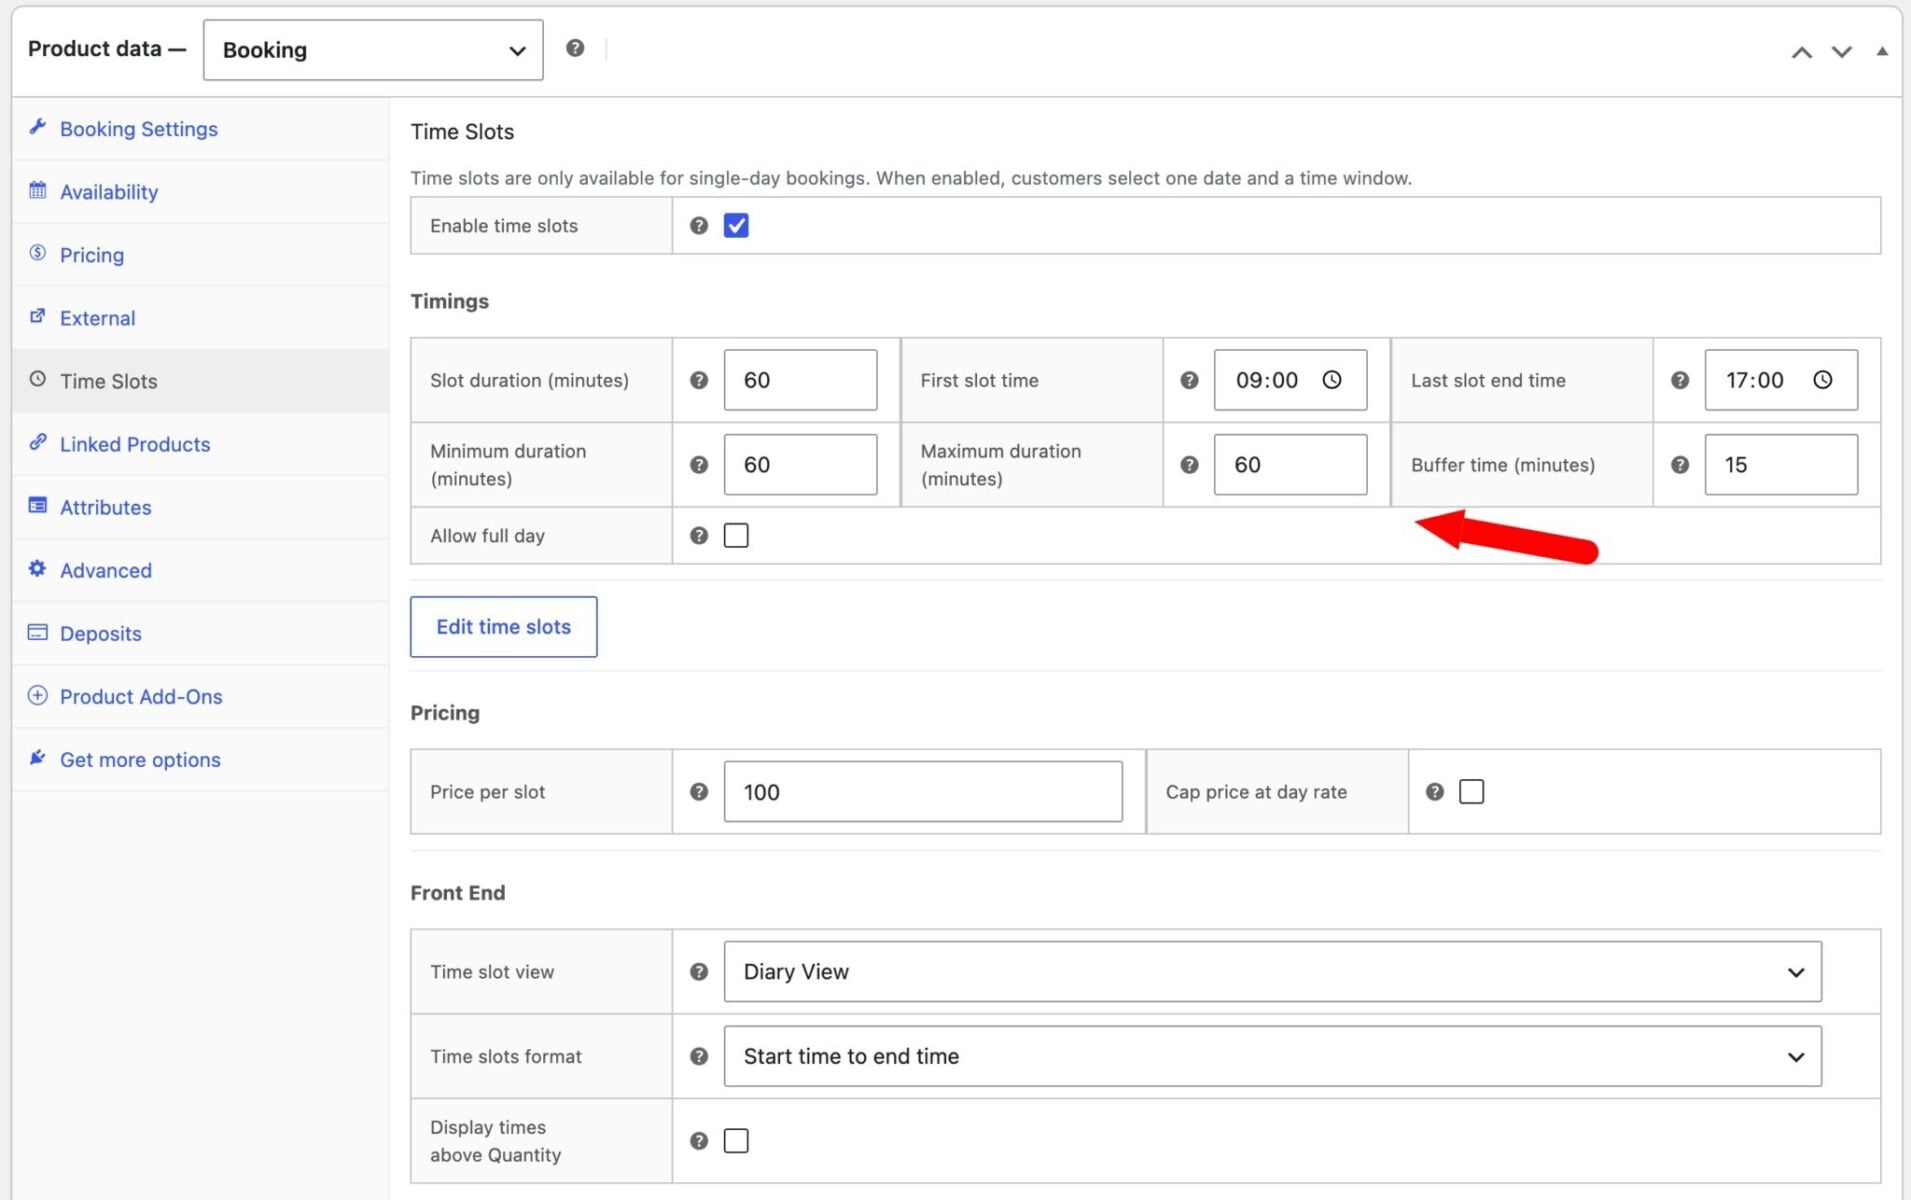
Add a buffer period after each appointment to give yourself turnaround time before the next one – say 15 minutes to reset the room between treatments. You can also set how far in advance customers must book and block out specific days or dates when you’re closed.
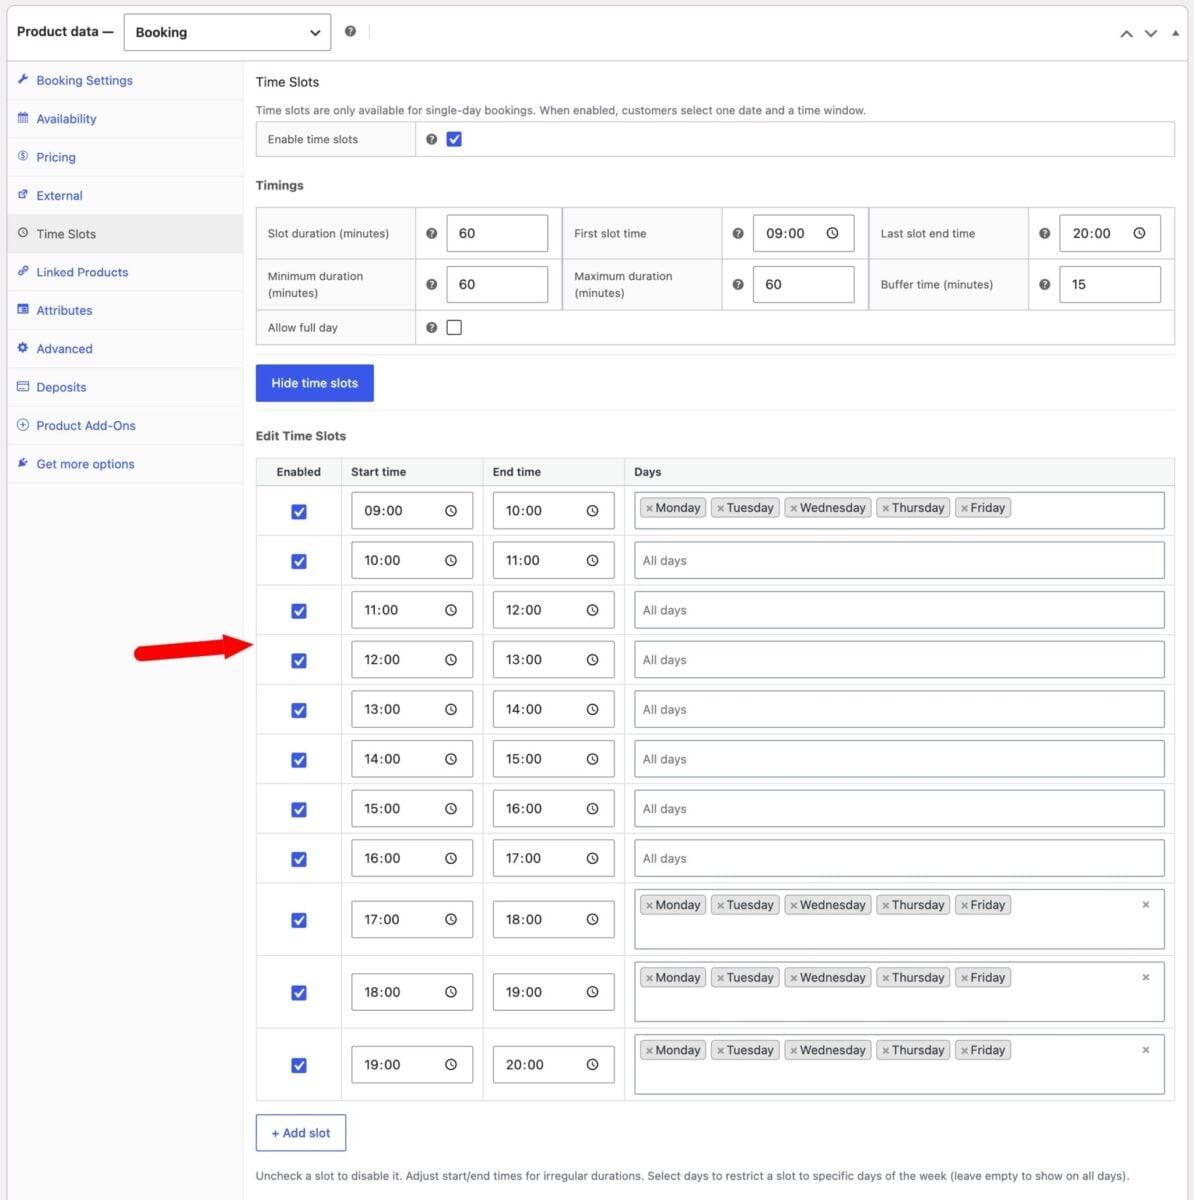
To run different hours on different days, use the irregular time slots option. Each slot has its own start and end times, an enabled toggle, and day-of-week restrictions, so our spa can run 9am–8pm on weekdays and 10am–5pm on Saturdays from the same product.
Just click the ‘Edit time slots’ button to display a list of slots automatically generated from your settings. You can edit these as you wish. If you want to restrict some appointments to certain days, just select those days in the ‘Days’ setting.
Save your settings. Your appointment product now offers the right slots on the right days. For more details, see the time slots documentation.
Now let’s set the price.
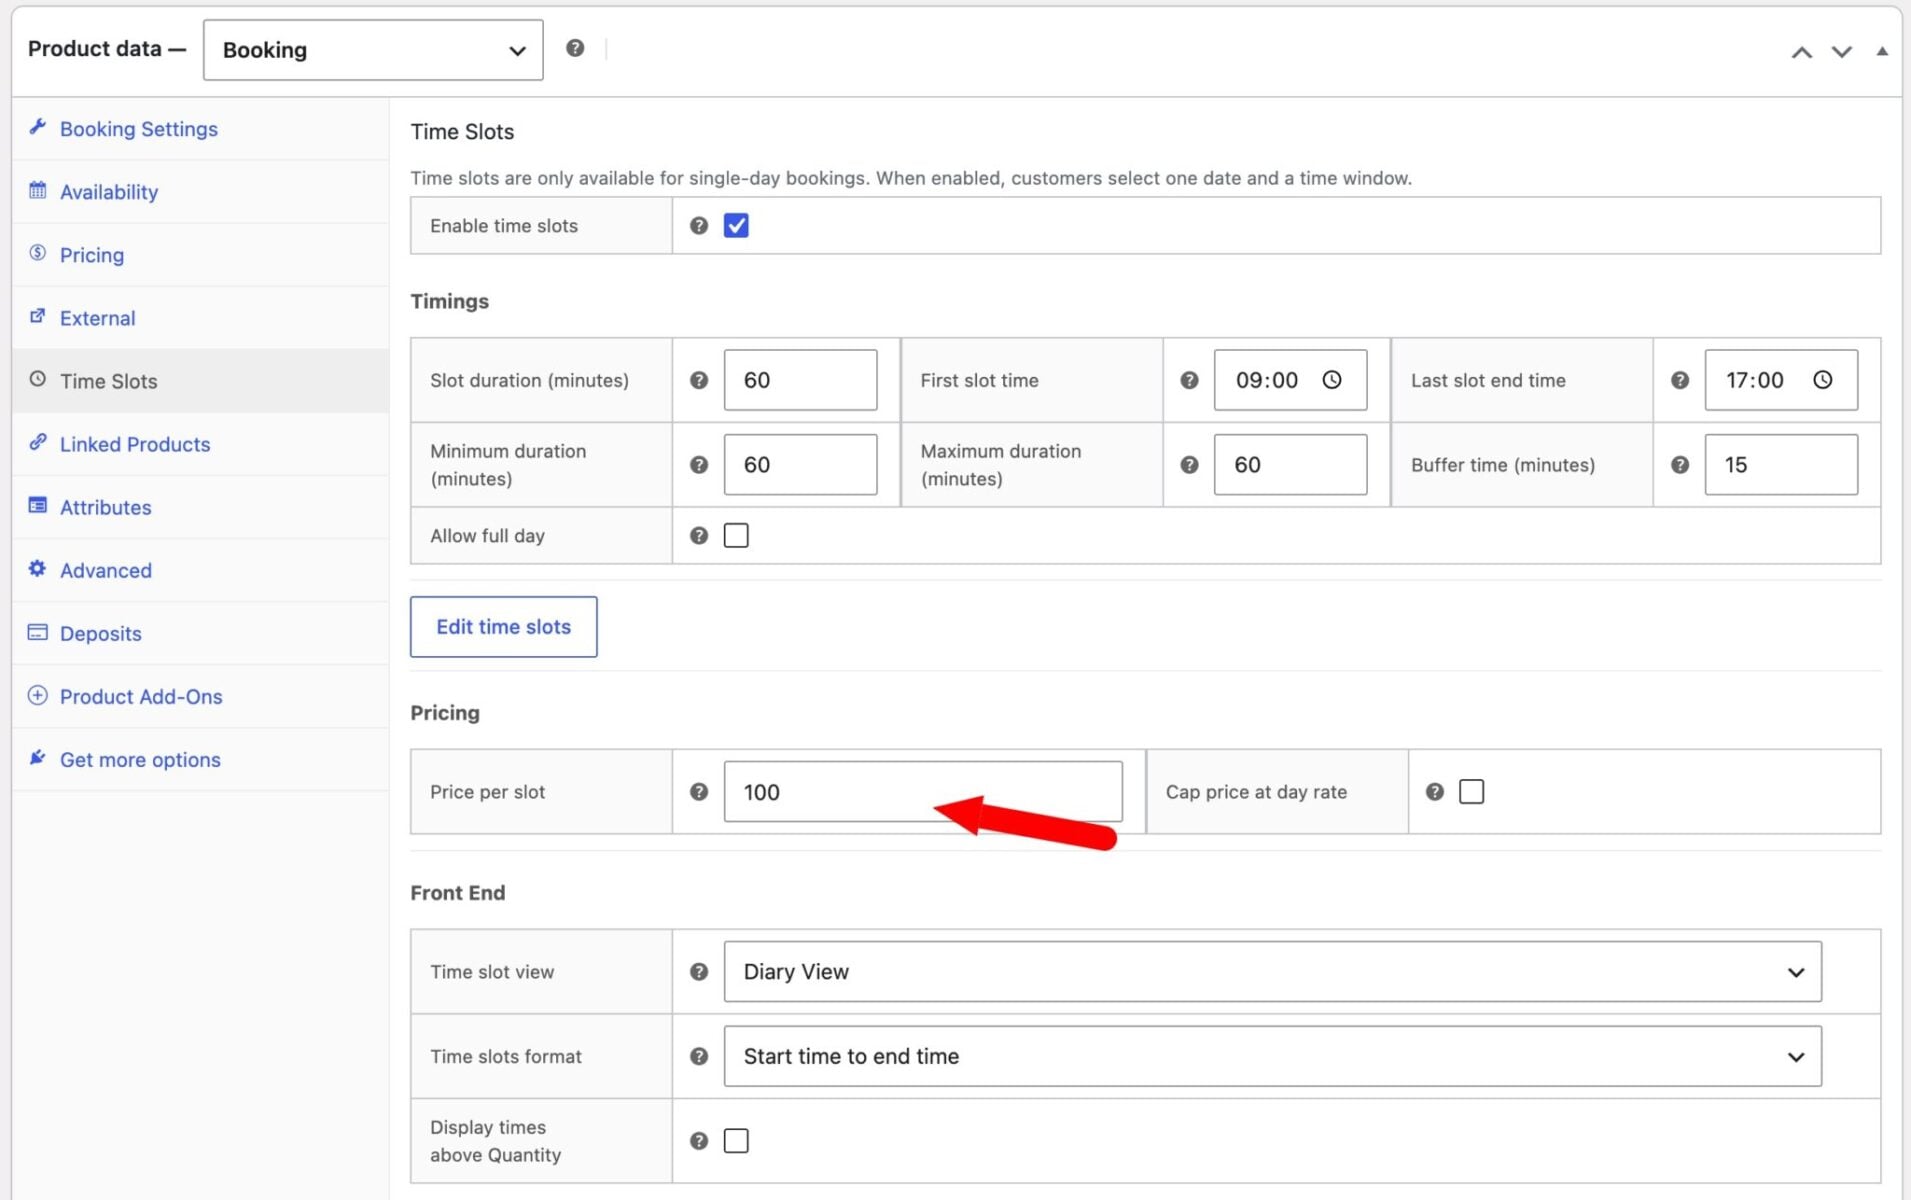
Step #4: Set your pricing
Define your price per slot – $100 for our treatment, for example – so each appointment is charged the same fixed amount. You can also set a per-slot cap, which means a customer booking several consecutive slots never pays more than your full-day rate.
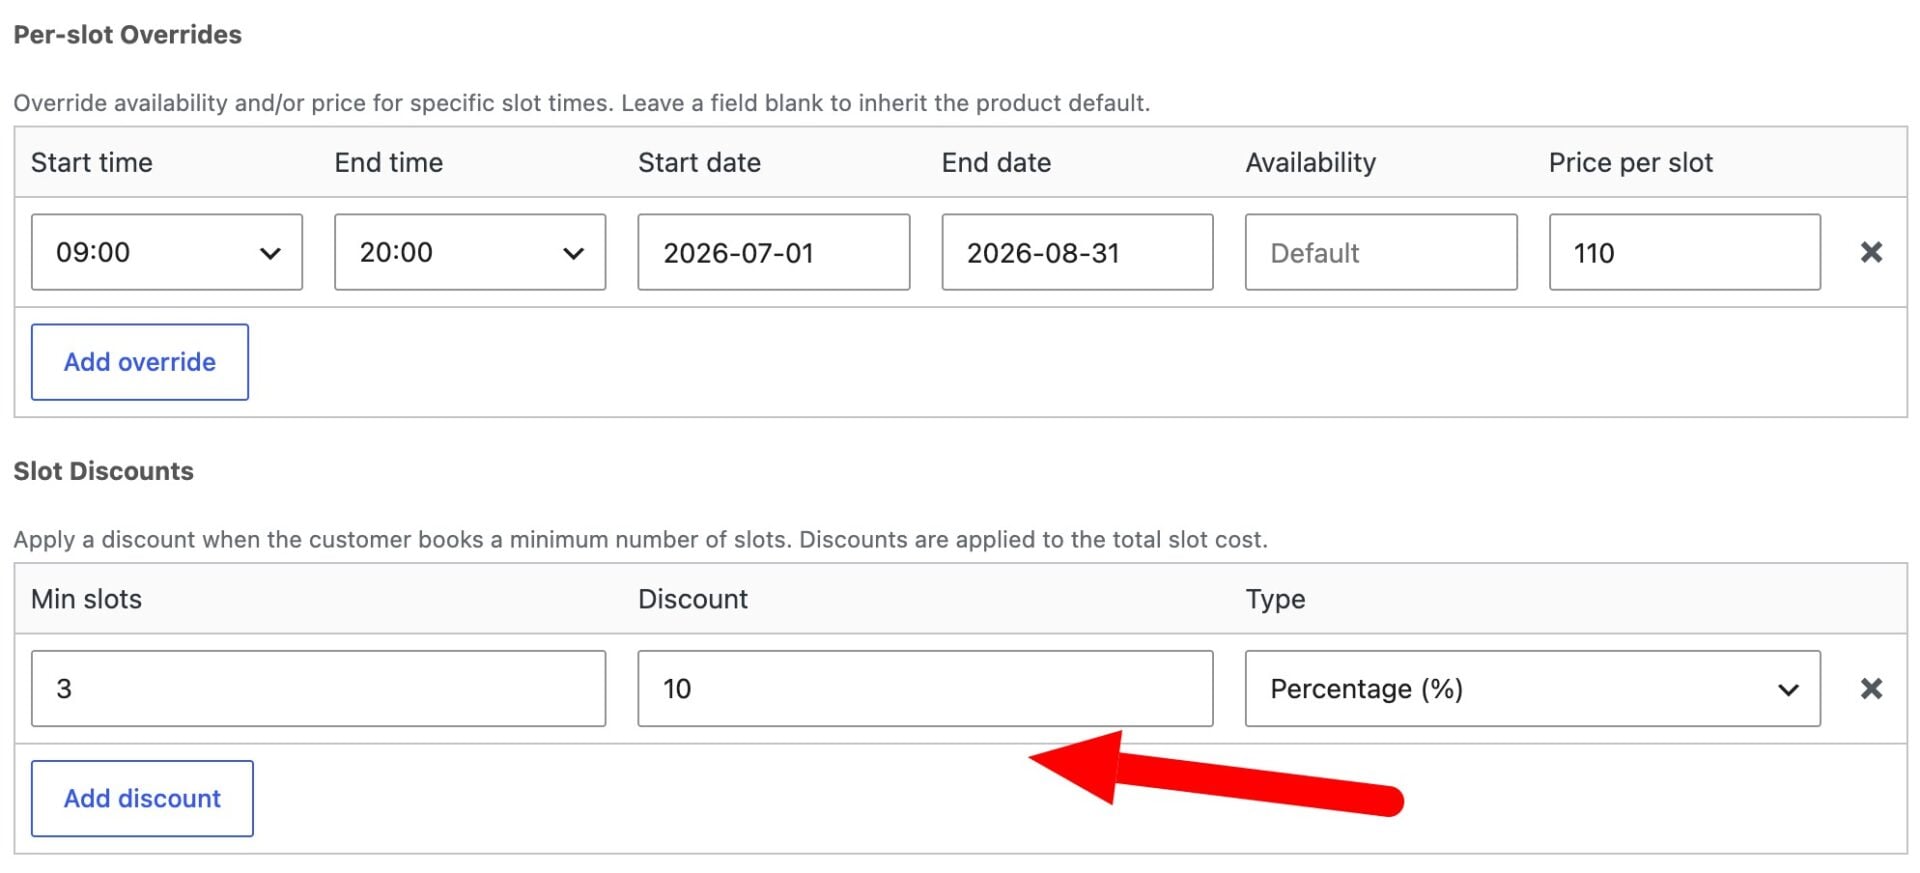
For one-off or seasonal rates, add a per-slot override to change the price or availability for an individual time. In the example below, we’ve increased the price per appointment in July and August.
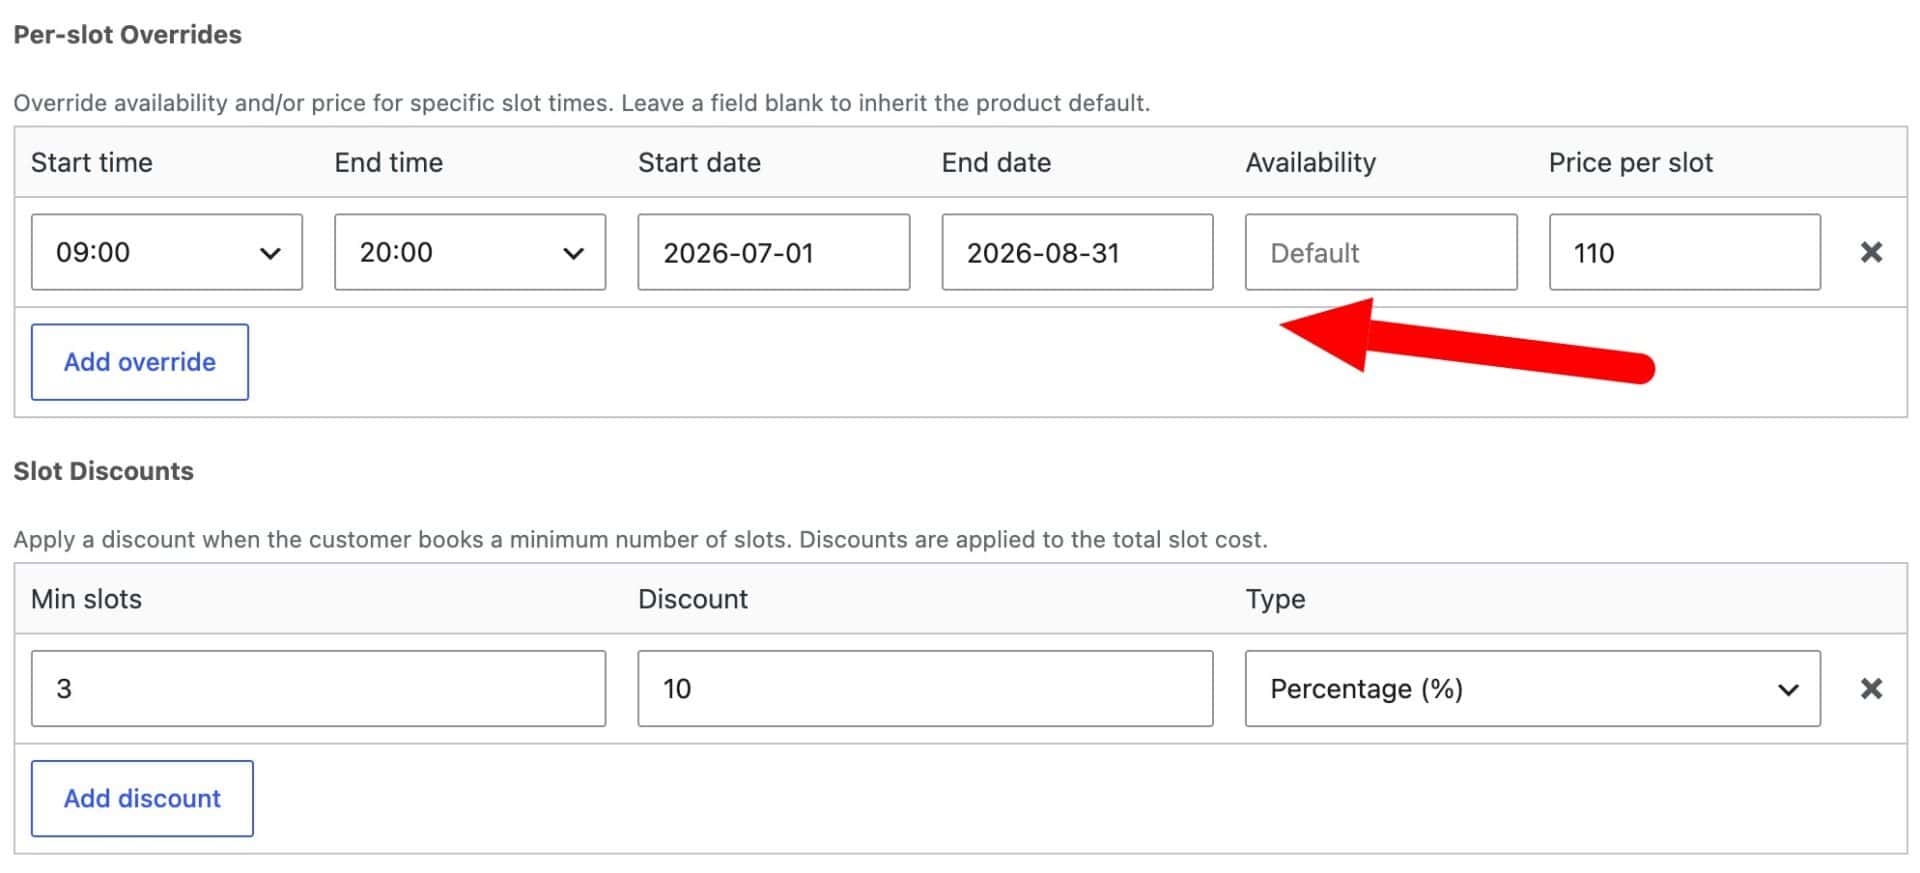
If you want to add a discount, click the ‘Add discount’ button. Then set one or more discounts based on the number of appointments the user is making. You can set percentage or fixed discounts.
With pricing in place, let’s choose how customers select their time.
Step #5: Choose how customers pick a time
Pick the time-selector view that suits your business. Bookings for WooCommerce offers five views, including a dropdown of start and end times, a visual grid, and a diary view.
A grid or diary view works well for appointment businesses because customers see every open slot at a glance.
Publish your product. You now have a working appointment product where customers can select a date, choose an available time slot, and pay online, while you stay in control of your schedule.
That’s a complete setup. If your spa (or other business type) offers a single treatment, you can stop here – customers can already book and pay for an appointment online. However, to offer a choice of appointments from one booking page, continue with Part 2.
Part 2: Offer multiple appointments from one booking page
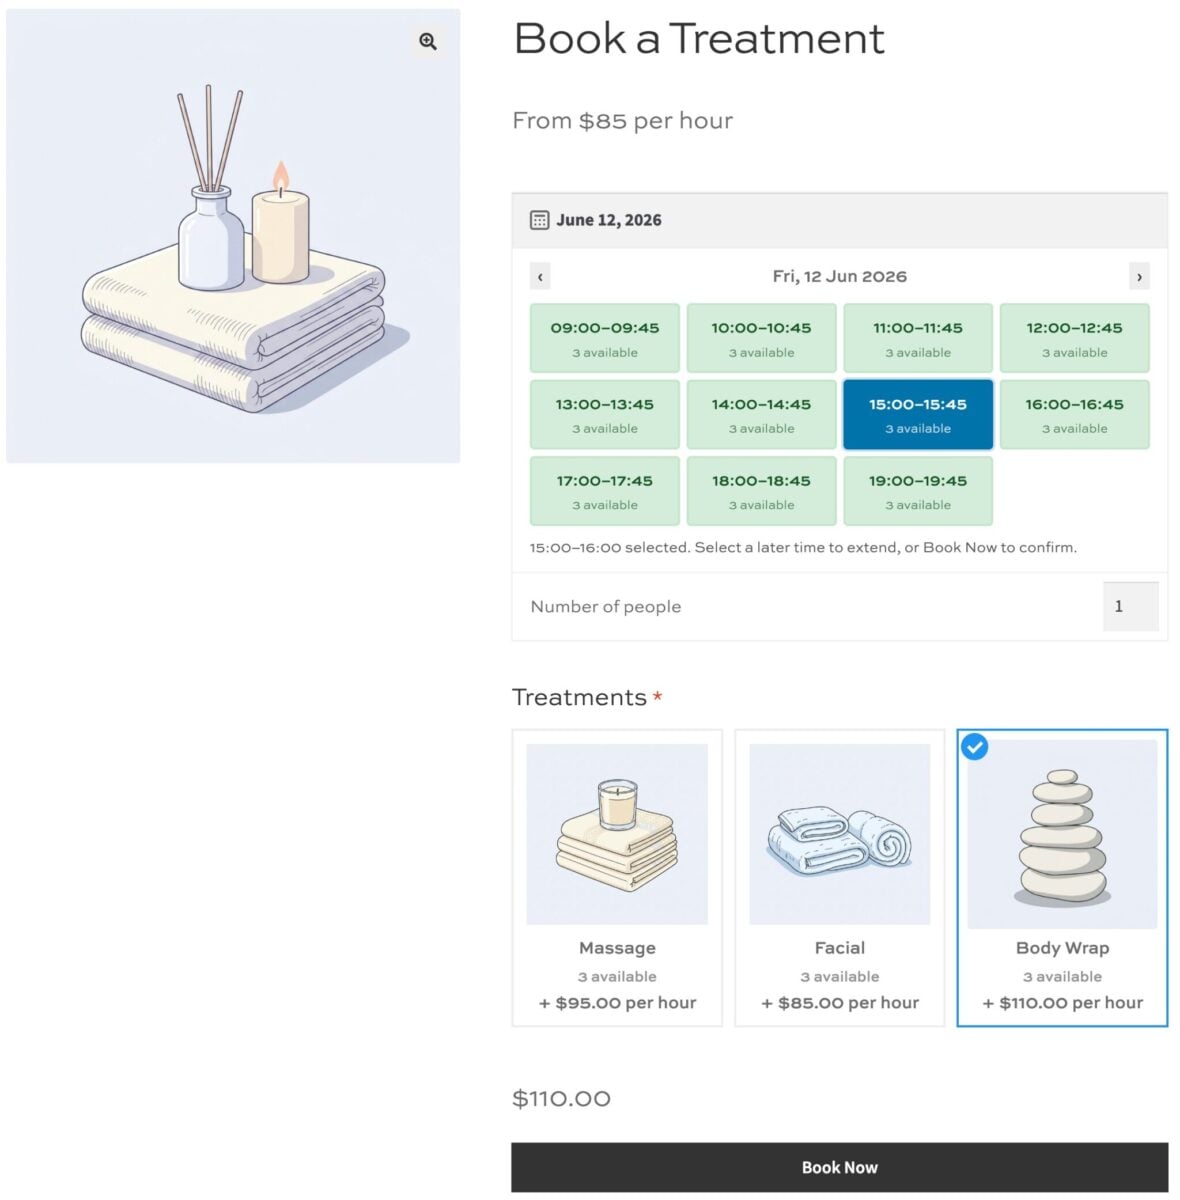
Most spas offer a menu, so in this part we look at how to let customers choose between several treatments – a massage, a facial, a body wrap – on one booking page. You’ll create each treatment as its own bookable product, then bring them together with WooCommerce Product Add-Ons Ultimate. This can apply to any business where multiple appointments are available at the same time.
You can buy the Product Add-Ons Ultimate plugin and Bookings for WooCommerce together at a discount as part of the WooCommerce Bookings and Product Add-Ons Bundle.
WooCommerce Bookings and Product Add-Ons Bundle
Create the ultimate bookings site in WooCommerce
The setup mirrors our surfboard hire tutorial, where each board is a separate product bookable together on one page.
Step #1: Create the remaining treatments
You already built a massage in Part 1. Now create your other treatments the same way – a facial and a body wrap, say – following Steps #1 to #5 above, each with its own price and specified capacity per slot.
If you want, you can keep the slot length and opening hours identical across all of them so they line up with the main page. But if some treatments aren’t available at certain times or on certain days, you can adjust this by clicking the ‘Edit time slots’ button.
Assign every treatment, including the massage, to the same product category – for example, ‘Treatments’ – because Product Add-Ons Ultimate will use that category to pull them in.
Step #2: Create the main appointment booking page
Create a new product under Products > Add New, name it something like ‘Book a treatment’, and set the product type to ‘Booking’. Set the booking unit to ‘Day’ and configure the same time slots you used for the treatments.
Leave the price and capacity empty, since these come from the treatment the customer selects. Enable ‘Allow zero cost’, then hide the duration, quantity, and cost fields to keep the page clean. Pick a time-selector view and save.
Step #3: Add the treatments as child products
Now you can add the treatment products that you’ve already created as “child products”. This means they’ll all be bookable from the main appointment booking page.
On the main booking page:
- Open the ‘Product Add-Ons’ section, click ‘Add Group’, then ‘Add Field’
- Give the field a label such as ‘Choose your treatment’
- Set the field type to ‘Product Categories’
- Enable ‘Required Field’
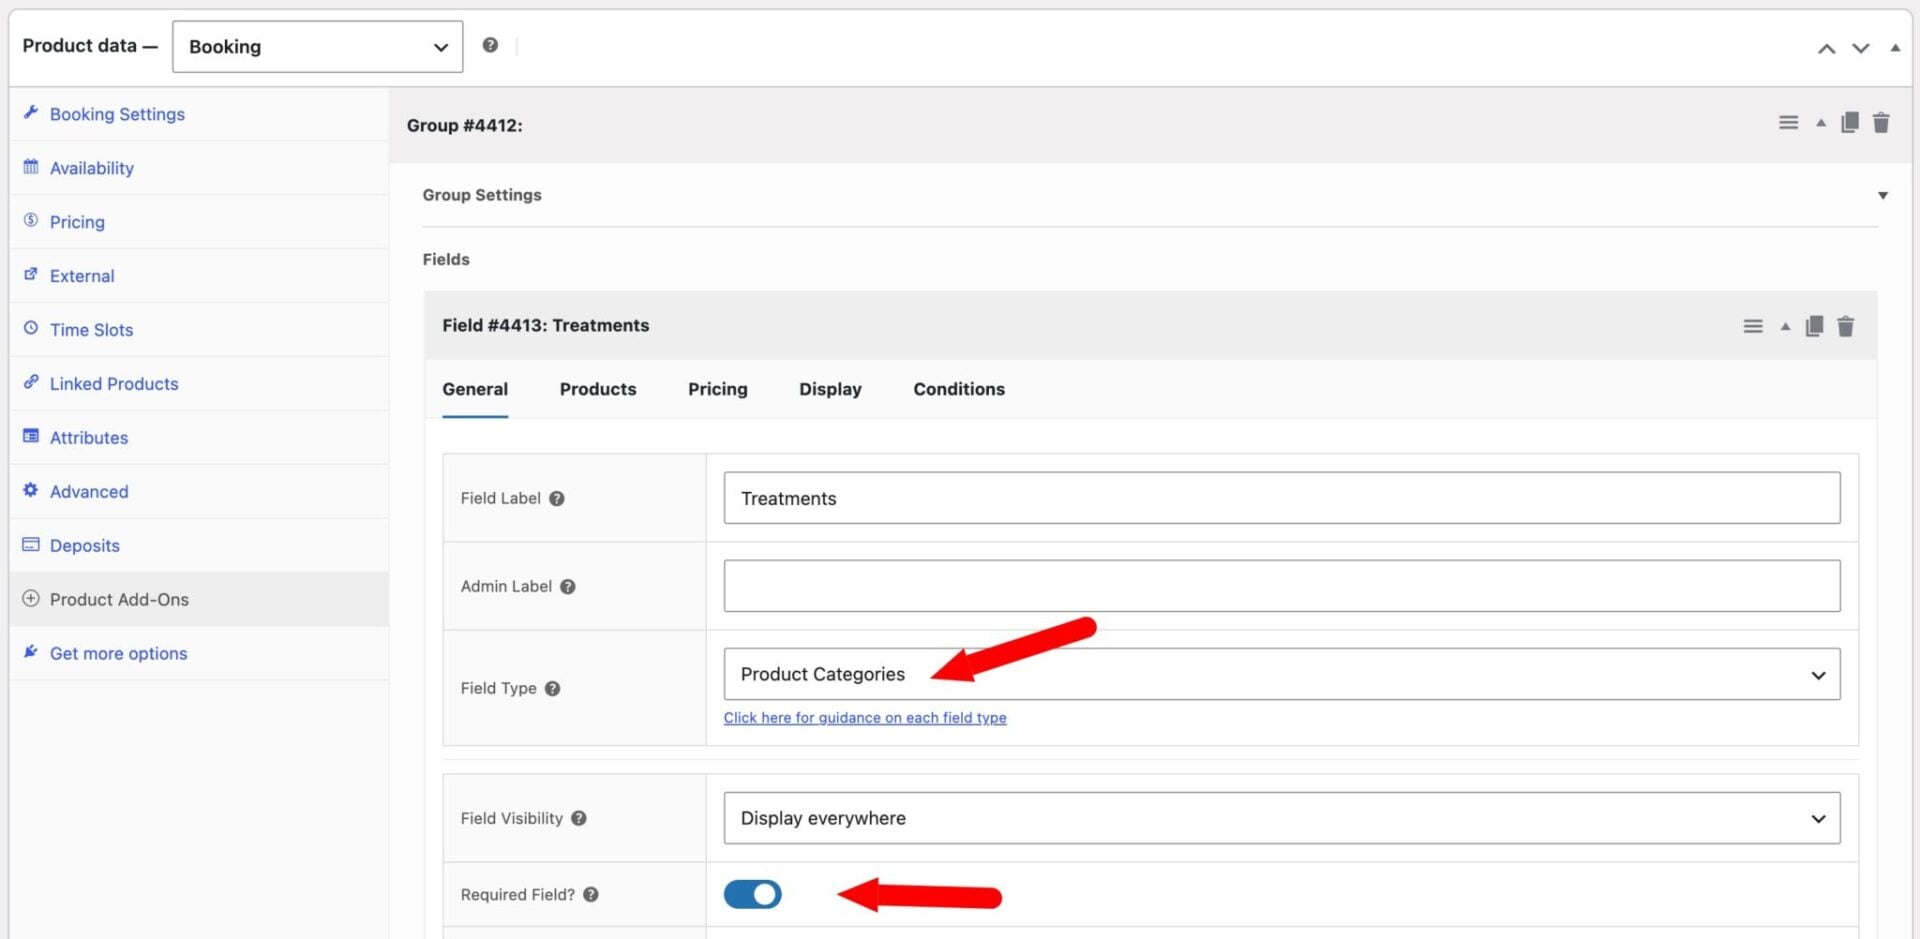
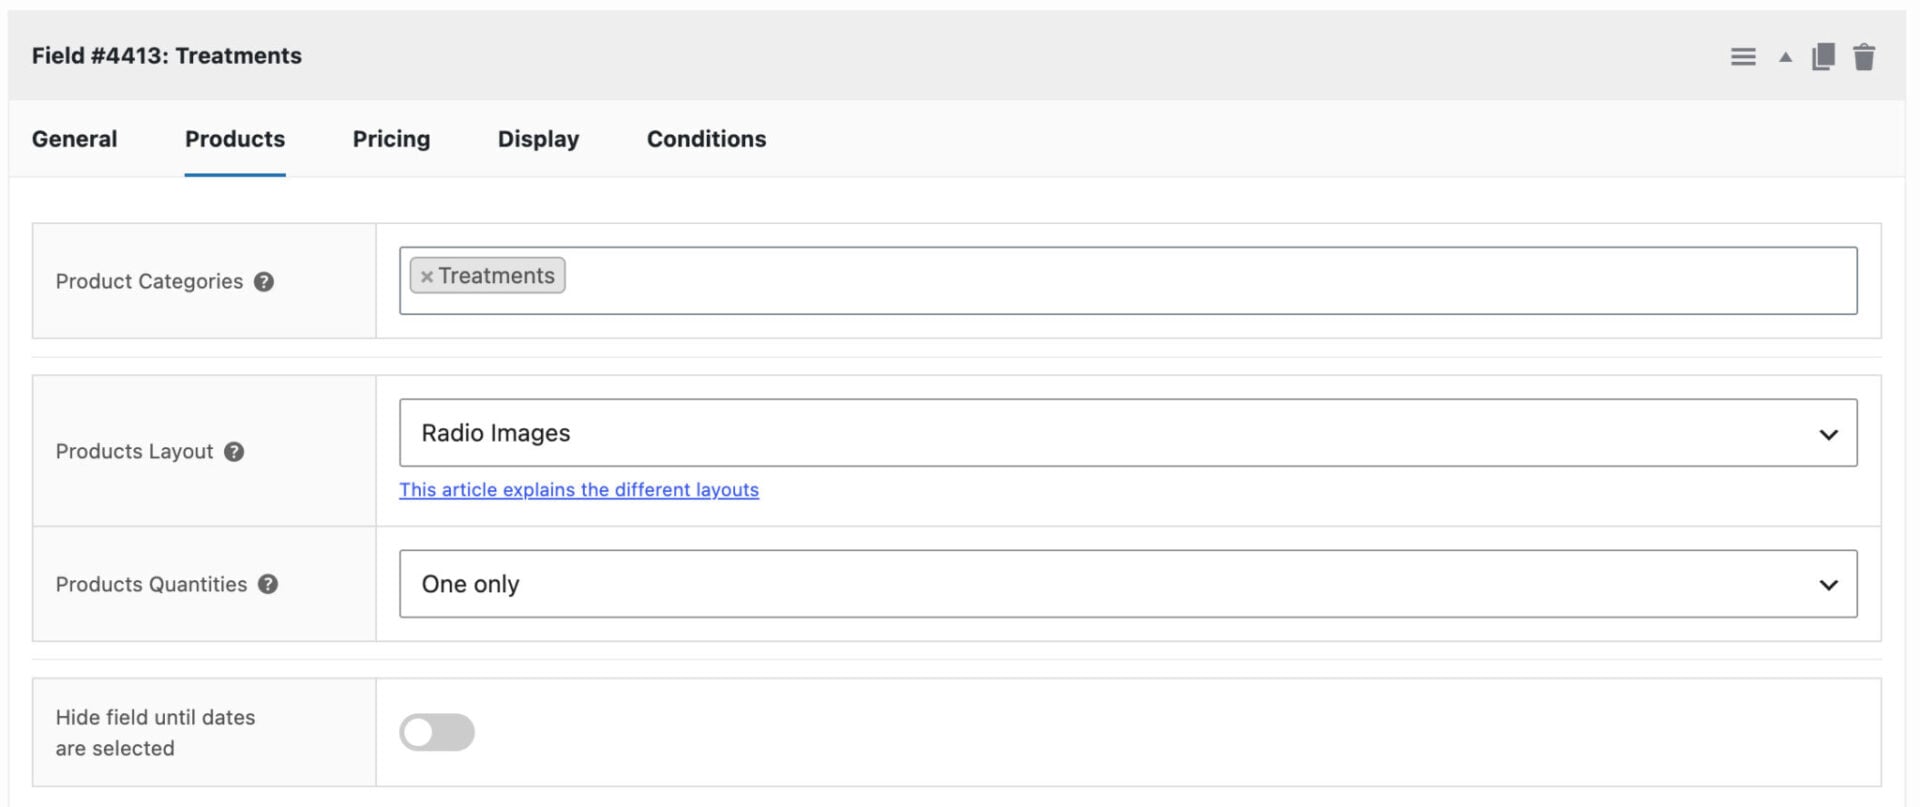
Then click on to the ‘Products’ tab and enter ‘Treatments’ in the ‘Product Categories’ field. Product Add-Ons Ultimate will in every product in that category and show it as a selectable option, so any treatment you add to the category later appears here automatically.
Finally, choose how the options look and behave:
- Set the products layout to ‘Checkboxes Images’ if the customer can choose more than one treatment, ‘Radio Images’ if they can only choose one, or ‘Components List’ to show a name and short description.
- Set products quantities to ‘One-only’ so customers choose a single treatment. Use ‘Independent’ instead if you’d like to allow them to book several treatments in one visit.
Save the product. Customers can now pick a date and time, choose their treatment, and see the price update to match.
You can check out the demo product here.
Bonus #1: Take a deposit instead of full payment
Collect a deposit at the time of booking and take the balance later by integrating the Deposits and Part Payments plugin. Set a percentage or fixed deposit, and optionally offer a discount for paying in full.
This works well for higher-value appointments or sessions booked well in advance. Now let’s look at how to add optional extras.
Bonus #2: Add optional extras and upgrades
The same Product Add-Ons Ultimate plugin can also add optional extras to each treatment. If you’re running a spa, that might mean add-on treatments such as hot stones, an aromatherapy upgrade or the option to rent extras like a private treatment suite or access to the thermal facilities.
Each extra can be charged as a one-off fee or per booking unit, and you can use conditional logic to show options only when they’re relevant.
Next, let’s sync your appointments with your calendar.
Bonus #3: Sync appointments with Google Calendar
Bookings for WooCommerce can automatically add each new appointment to your Google Calendar, then remove it again if the booking is canceled or refunded. The setup runs through the Google Cloud Console and takes a few minutes, but you only need to do it once.
To set it up:
- Step #1: Follow the guide here to create your Google Calendar API account
- Step #2: In WordPress, go to Bookings > External, paste in your Client ID and Client Secret
- Step #3: Set the default calendar ID to ‘primary’, save, then click ‘Connect to Google Calendar’ and approve access
Each bookable product can also push to its own calendar, so you could send different services to different calendars. For the full walkthrough with screenshots, see the Google Calendar sync guide.
You can also sync with any service that uses the iCal format, including Airbnb, Booking.com, and VRBO. Now let’s reduce no-shows with reminders.
Bonus #4: Send automatic email reminders
Send customers an automatic email reminder before their appointment to cut down on no-shows. Bookings for WooCommerce can also send confirmation and follow-up emails around the appointment date.
That’s how to set up and extend appointments in WooCommerce. Now let’s look at how to manage them.
Manage your appointments from the back end
Manage your orders under WooCommerce > Orders, where every appointment appears as a standard order with its date, time, and customer details.
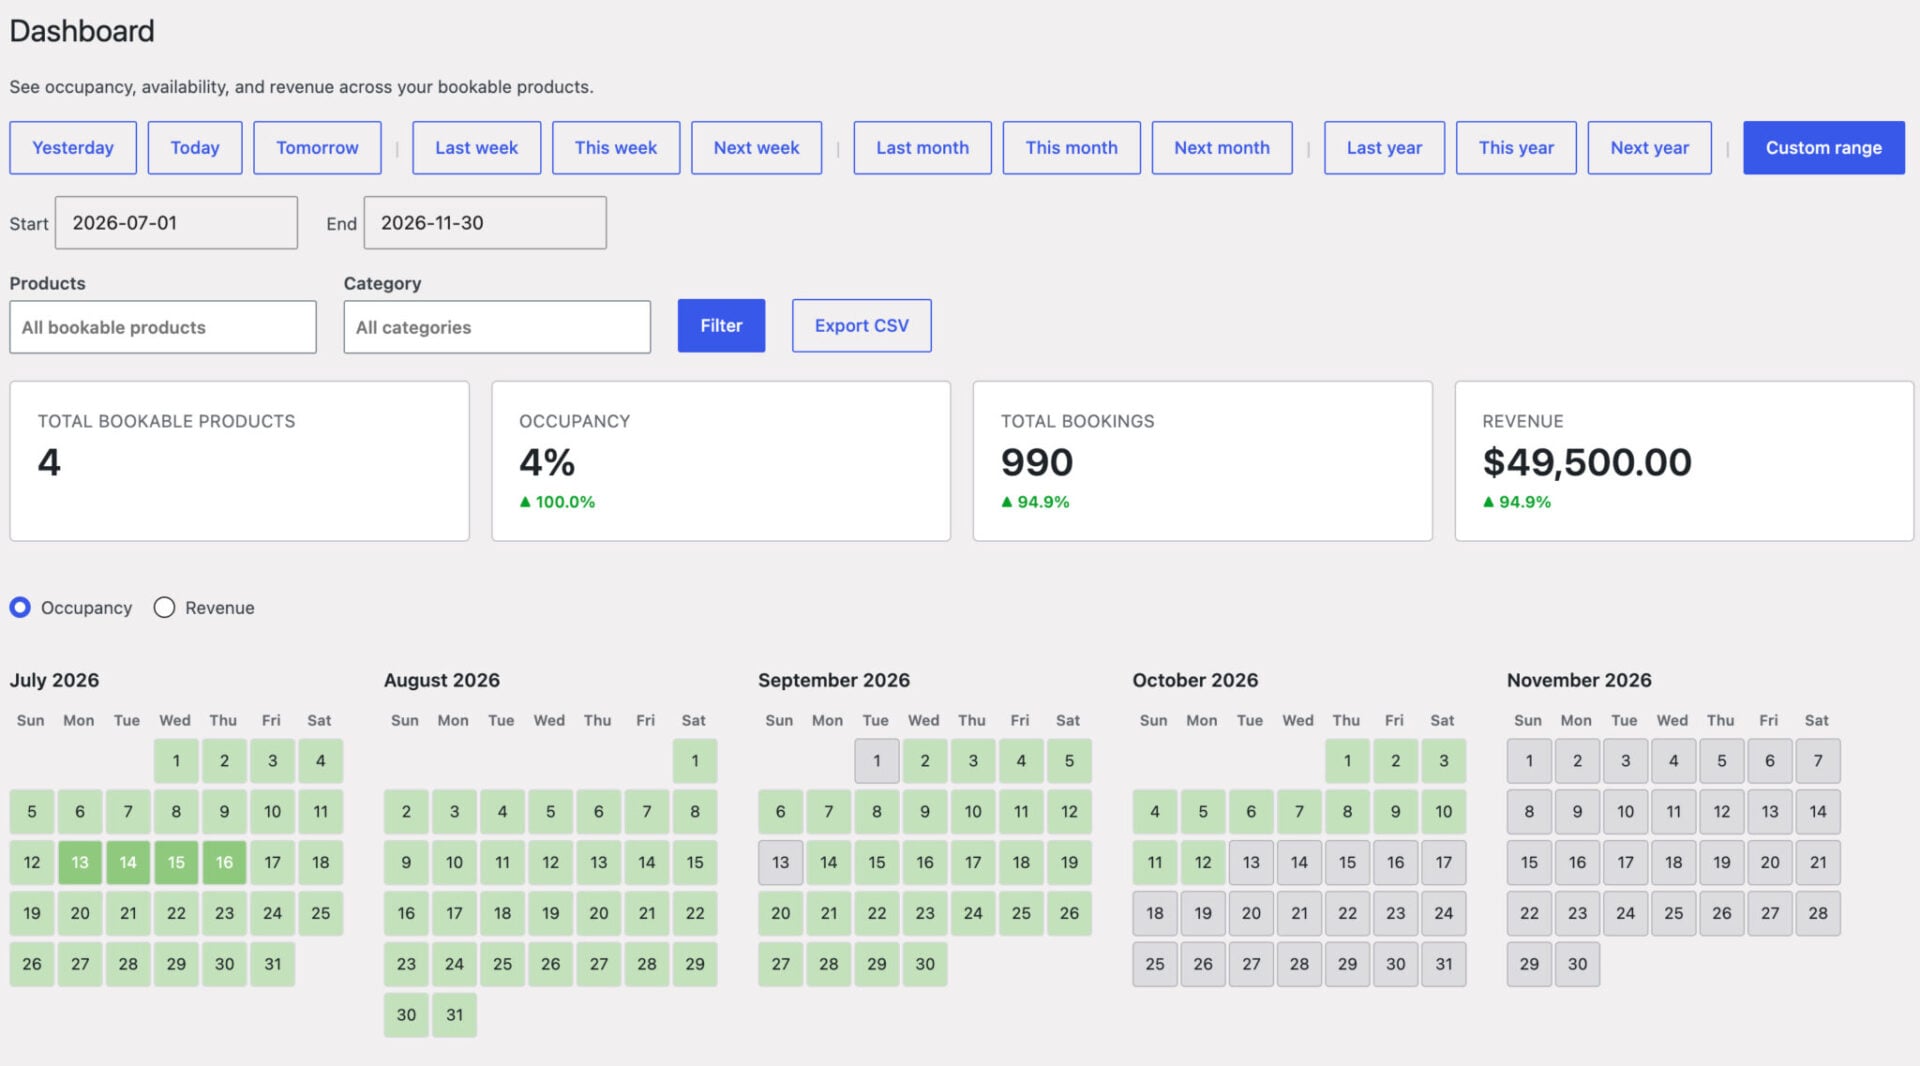
For a view across all your products at once, use Bookings > Dashboard. Choose a date range and it shows a calendar, week diary, or single-day diary as appropriate, with occupancy and booking tiles so you can see how full your schedule is without opening each day individually.
View availability from a single product’s ‘Availability’ tab to see the same views scoped to just that one – useful for checking or managing one appointment type without leaving its edit screen.
Add appointments manually under Bookings > Add Booking when a customer books by phone or in person. You can also approve bookings before payment and allow customers to cancel within a window you set. For more, see the guide to adding and editing bookings manually.

I am using the plugin for a client that rents salon suites to health and beauty professionals, so they can in turn service their own clientele. Bookings for WooCommerce is a perfect fit.
The 5 best WooCommerce appointment plugins
If you’re comparing options before you commit, here are five of the best WooCommerce appointment plugins. We’ve put our own Bookings for WooCommerce first, but each suits a different kind of business.
Bookings for WooCommerce is the best choice if you want appointments and date-based rentals in one plugin. It handles time slots, per-slot capacity, buffers, and pricing rules, and it’s the only one here with a lifetime license option.
WooCommerce Appointments by BookingWP is an appointment-only specialist with staff scheduling and two-way Google Calendar sync. Bookings & Appointments by PluginHive suits service businesses that manage several staff members.
YITH Booking & Appointment is an established all-rounder, while WooCommerce Bookings is the official Automattic extension.
| Plugin | Best for | Time-slot appointments | Google Calendar sync | Lifetime license | Price (from, per year) | Rating |
|---|---|---|---|---|---|---|
| Bookings for WooCommerce (Plugin Republic) | Appointments and rentals in one | Yes | Yes | Yes | $79 | 4.8 / 5 |
| WooCommerce Appointments (BookingWP) | Appointment-only businesses | Yes | Yes (two-way) | – † | $99 | N/A * |
| Bookings & Appointments (PluginHive) | Service businesses with staff | Yes | Yes | No | $149 | 4.96 / 5 |
| YITH Booking & Appointment | Established all-rounder | Yes | Yes | No | $169 | 4.4 / 5 |
| WooCommerce Bookings (Automattic) | The official Woo extension | Yes | Yes | No | $249 | 2.7 / 5 |
* BookingWP doesn’t have enough reviews on Trustpilot for a representative rating.
† Lifetime licensing isn’t stated on BookingWP’s site.
Ratings and prices are correct as of June 2026. Ratings are sourced from Trustpilot (Plugin Republic), PluginHive, YITH, and Woo.com respectively.
WooCommerce appointments FAQ
Yes. Customers select a date and time slot on the product page, see the cost calculated automatically, and complete their booking through the standard WooCommerce checkout, with no redirects or third-party platforms.
Yes. Appointments run through your existing WooCommerce payment gateways. You can take full payment upfront, or a deposit with the balance later by adding the Deposits and Part Payments plugin.
Yes. The irregular time slots option gives each slot its own start and end times and day-of-week restrictions, so you can run different schedules on different days from a single product.
Yes. Bookings for WooCommerce offers two-way Google Calendar sync, so appointments are added automatically and any edits or cancellations update your calendar.
Yes. Set the maximum bookings per slot to control capacity. Once a slot is full, it’s automatically blocked in the calendar, and you can add buffer time between appointments for turnaround.
WooCommerce appointments – recap
In this article, we looked at how to take appointments in WooCommerce using the Bookings for WooCommerce plugin. We created a time-slot appointment product, set our slot length and per-day schedules, controlled availability and capacity, and looked at how to manage everything from the WordPress admin. We also covered deposits, optional extras, Google Calendar sync, and email reminders.
Bookings for WooCommerce is compatible with all themes and page builders, including Astra, Flatsome, and Woodmart, and page builders like Elementor and Divi. If you have any questions, our world-class support team is on hand to help. And it’s backed by a 14-day money-back guarantee, so you can try it risk-free.