How to customize WooCommerce category pages

If you sell lots of different types of products, sorting them into categories is a good idea. By default, WooCommerce uses a grid-style layout on a product category page. While this works fine for some online stores, others need to create a custom WooCommerce category page.
A custom WooCommerce category is perfect for store owners who sell products such as hardware goods, tech, pet food, or flowers. This way, they can display additional product details on the shop page. What’s more, a large product catalog means more browsing time for the customer. For this reason, it’s important to optimize those pages to help customers make informed purchasing decisions.
In this tutorial, we’ll show you how to create a custom WooCommerce category page, step-by-step. Before we begin, let’s take a closer look at what the category page is. We’ll also look at why you might want to create a custom WooCommerce category page in the first place.
What a WooCommerce category page is
WooCommerce lets users list products from a specific category or subcategory in a grid-style layout. You can display a big product image along with a name, price, and purchasing options. Here’s what the default WooCommerce category page (which is just an archive page) looks like on the front-end:

Although this might work for selling visual products, it isn’t suitable for all types. This means the default WooCommerce category page might not work for you. It may even work against you depending on the type of store you run and the products you sell.
3 times to not to use the default WooCommerce category page
To give you food for thought, let’s look at some examples of products that aren’t suitable for the default WooCommerce category page.
1. When a product needs to display extra information
For products on your WooCommerce store that need to display detailed information, the default WooCommerce category page layout might not be optimal.
For instance, a flower store could display information such as the family of the plant, its life span, or important care details. This additional information can help your customers make the right decision when buying from you.
2. If you offer lots of variations of a product
If you sell products with different variations, it’s good usability to let customers select those variations without multiple page refreshes. Instead, customers could browse and add product variations to their cart from a single WooCommerce category page.
For instance, take an online fitness WooCommerce store selling equipment such as dumbbells, jump ropes, and yoga mats. If it lists product variations in a dedicated table, customers can checkout quicker.
3. For non-visual products
For products without captivating visuals, a grid-style layout focused on thumbnail images will hinder the purchasing decision. Instead, you’ll want to choose a different approach.
For example, hand tools such as wrenches don’t need large images. Instead, you can list them in a clean and organized manner alongside the product details. This gives customers a way to make an informed purchasing decision, and get to checkout faster.
Related Tutorial
If you’d like to know how to create a custom shop page in WooCommerce, check out this tutorial

Why you might want to create a custom WooCommerce category page
Customers visiting your store will spend a significant amount of time browsing products on your WooCommerce category pages. This is why creating the best shopping experience possible for customers is important. The easiest way of doing this is by creating a custom WooCommerce category page for your online store.
By creating a custom WooCommerce category page, you have more control over the look and feel of your WooCommerce store. This can help you represent your brand better and attract new visitors to your online store. You also improve product visibility within a category or subcategory and display products in an organized way on a custom WooCommerce category page. There’s also a benefit to your Search Engine Optimization (SEO).
If you sell products with variations, displaying them on a custom WooCommerce category page can help boost product variation visibility. For instance, if you sell hardware goods such as screws, displaying the different product variations such as ¼ inch screws, ⅛ inch screws, and ½ inch screws on a custom WooCommerce category page will make it easy for customers to add multiple product variations to their cart in just a few clicks.
Adding a custom WooCommerce category page to your store makes the shopping experience intuitive for customers. This can increase your average order value and help you make more sales. Additionally, with customers having no problems adding multiple products and product variations to the cart, you’ll be able to speed up the purchasing process on your WooCommerce store.
Introducing the WooCommerce Product Table Ultimate Plugin
If you’d like to create custom WooCommerce category pages for your online store, the WooCommerce Product Table Ultimate plugin will be ideal.
[IMAGE woocommerce-product-table-plugin]It can help you display different product categories, products, and variations on a WooCommerce product category page using a table-style layout. Customers can choose products using checkboxes and add them in bulk with a single click.
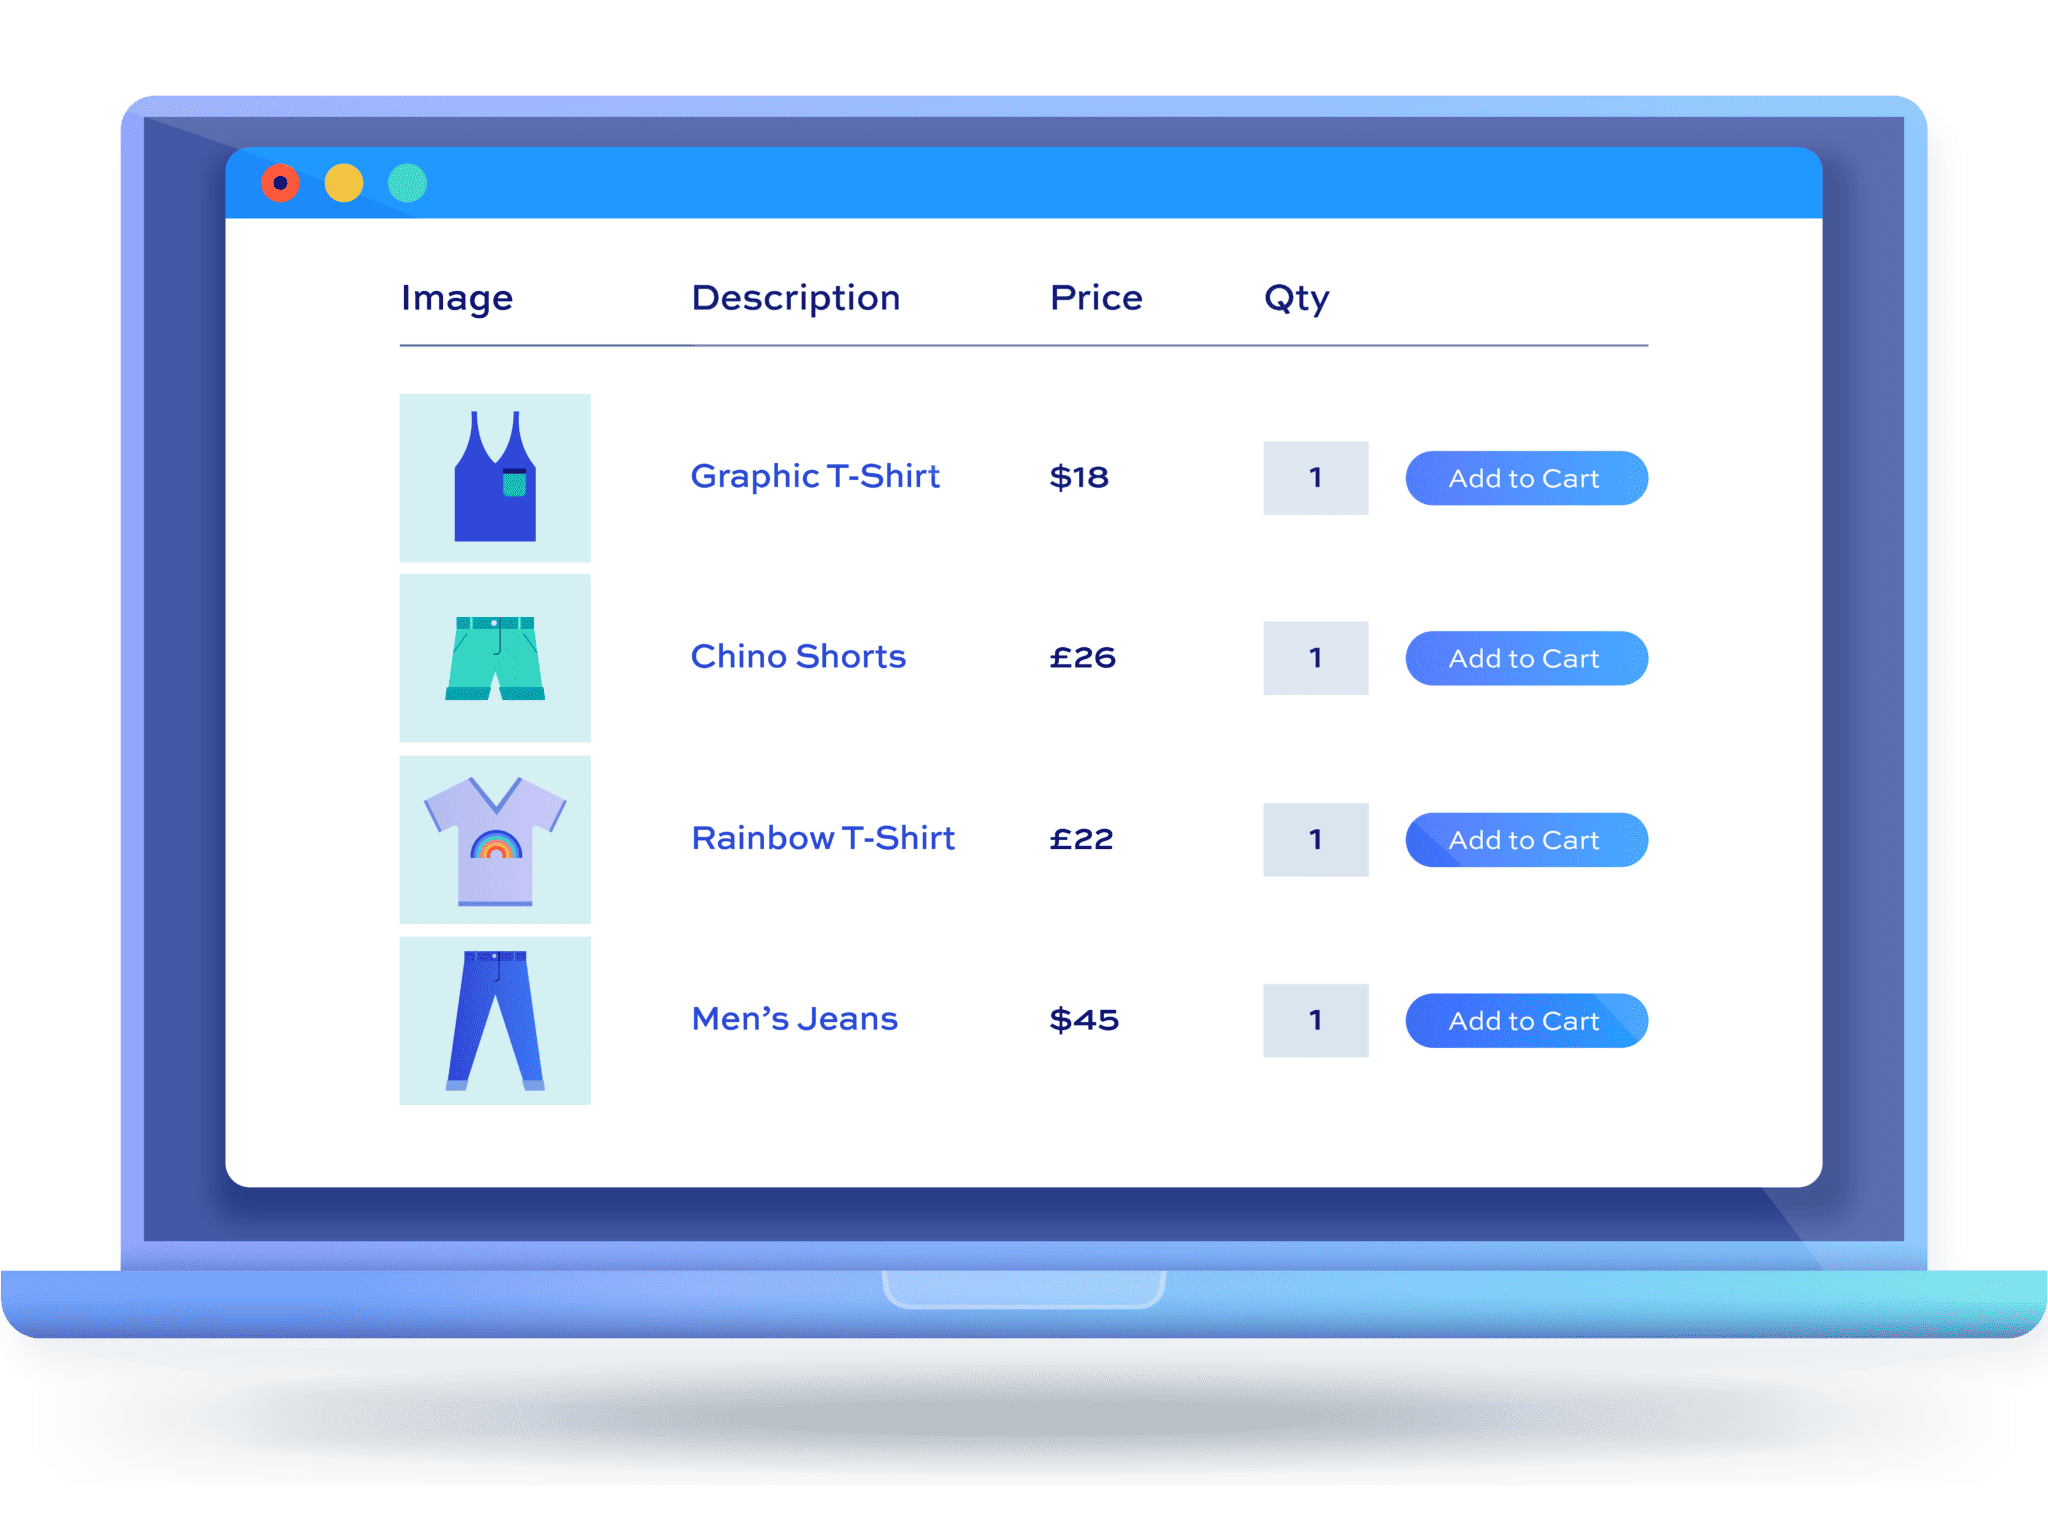
This gives a customer a straightforward way to buy multiple products, and add them to the cart. What’s more, it streamlines the shopping experience, which will boost sales and improve customer retention. If a customer has a good experience on your store, they could make a return visit to buy again.
In addition, the WooCommerce Product Table Ultimate plugin is a ‘no-code’ solution. Because you don’t need to use CSS, or edit theme files, you can create a custom WooCommerce category page without coding knowledge. What’s more, you can add a custom WooCommerce category page using a shortcode or a Block.
How to create a custom WooCommerce category page in 3 steps
Over the next few sections, we’ll use the WooCommerce Product Table Ultimate plugin to create a custom WooCommerce category page.
Before you get into the steps, you’ll want to have a WordPress site up and running, and the WooCommerce e-commerce plugin installed and activated. You’ll also want to have some products added to your WooCommerce store, sorted into categories.
1. Activate the WooCommerce Product Table Ultimate plugin
To begin, make sure you install and activate the WooCommerce Product Table Ultimate plugin. When you’re ready, grab your license key, and navigate to WooCommerce → Settings → Product Table Ultimate → License within WordPress. Here, fill in the ‘License Key’ box:
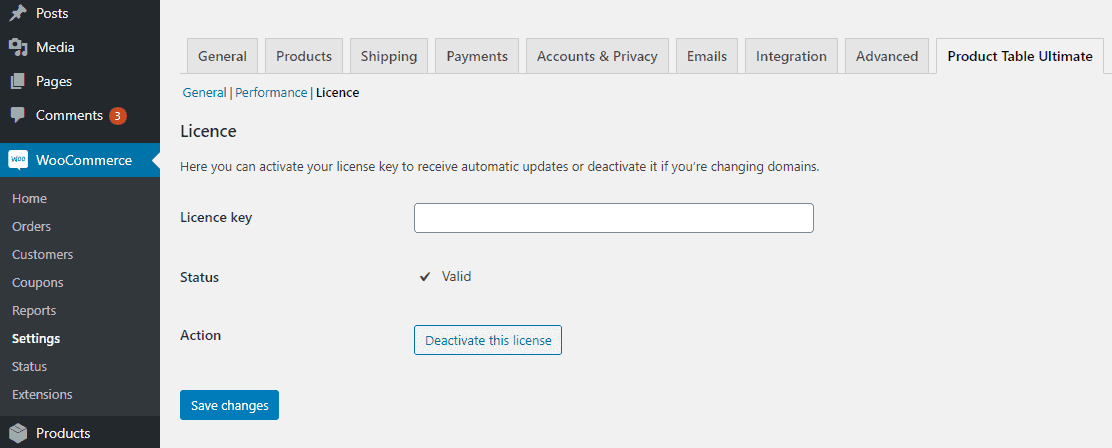
From here, save your changes. While there are lots of other options within the plugin’s settings, we can work with the default setup for this tutorial.
2. Create your custom WooCommerce category page
The next step is to create a new custom WooCommerce category page. Later, we’ll use the the WooCommerce Product Table Ultimate plugin to customize it further.
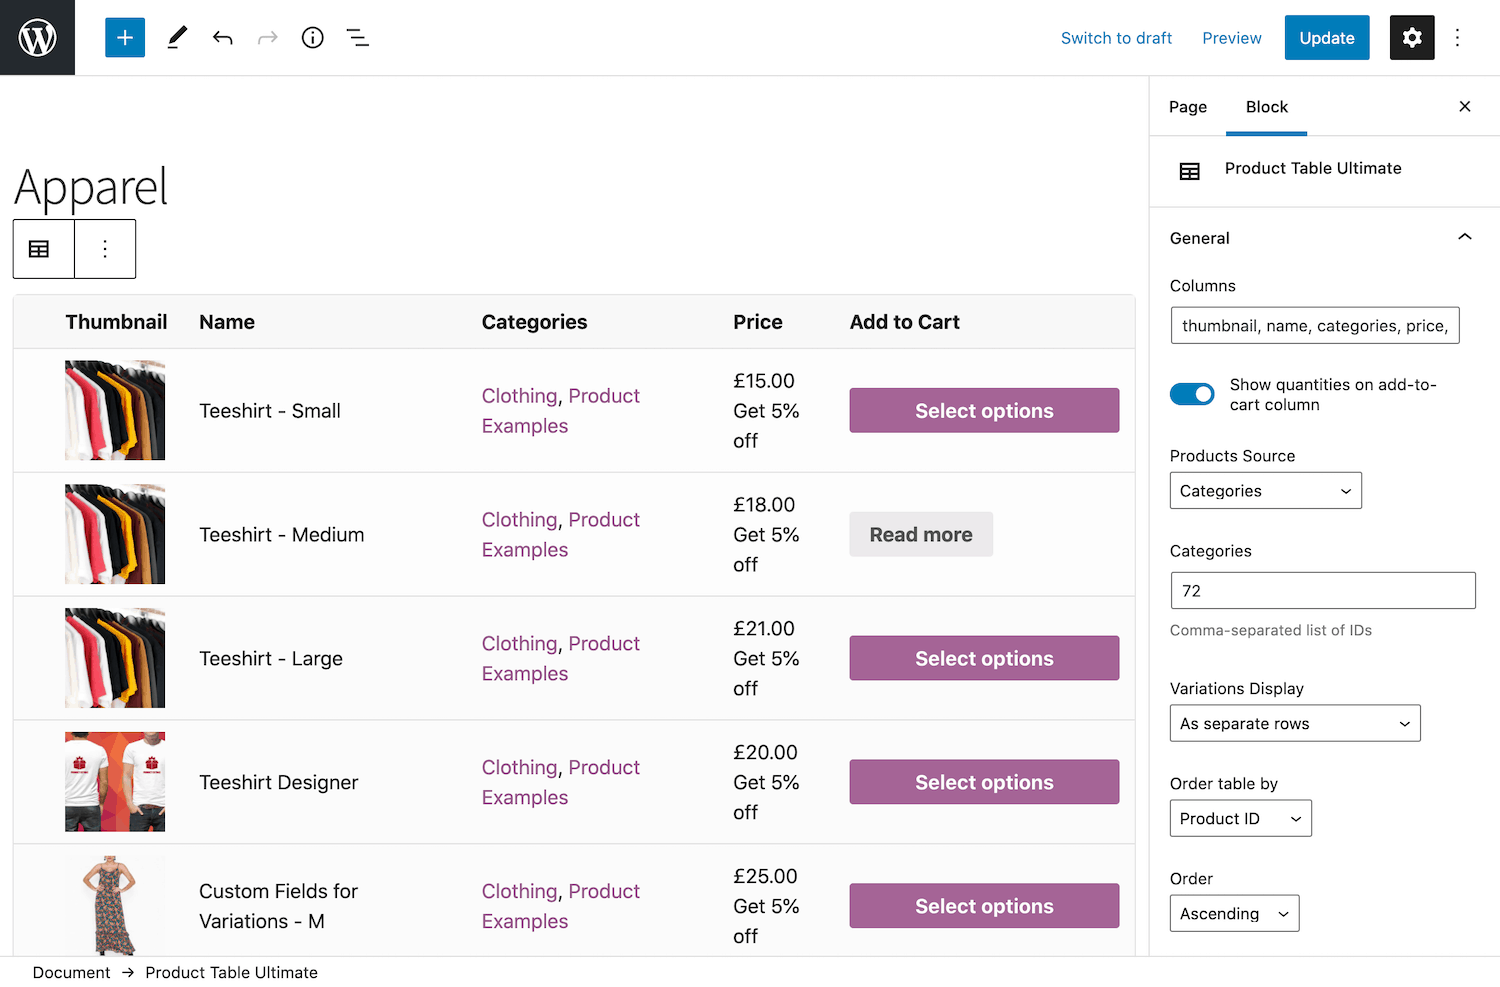
To start, head to Pages → Add New within WordPress to create a new shop page. Give the category page a new title, then look to add a Block to the custom WooCommerce category page.
Here, search for the ‘Product Table Ultimate’ Block. Once you add it to your shop page, you can showcase products and variations with simple organization on your custom WooCommerce category page. When you’re ready to move on, click the ‘Publish’ button. If your shop page isn’t yet live, you’ll want to choose to save the draft instead.
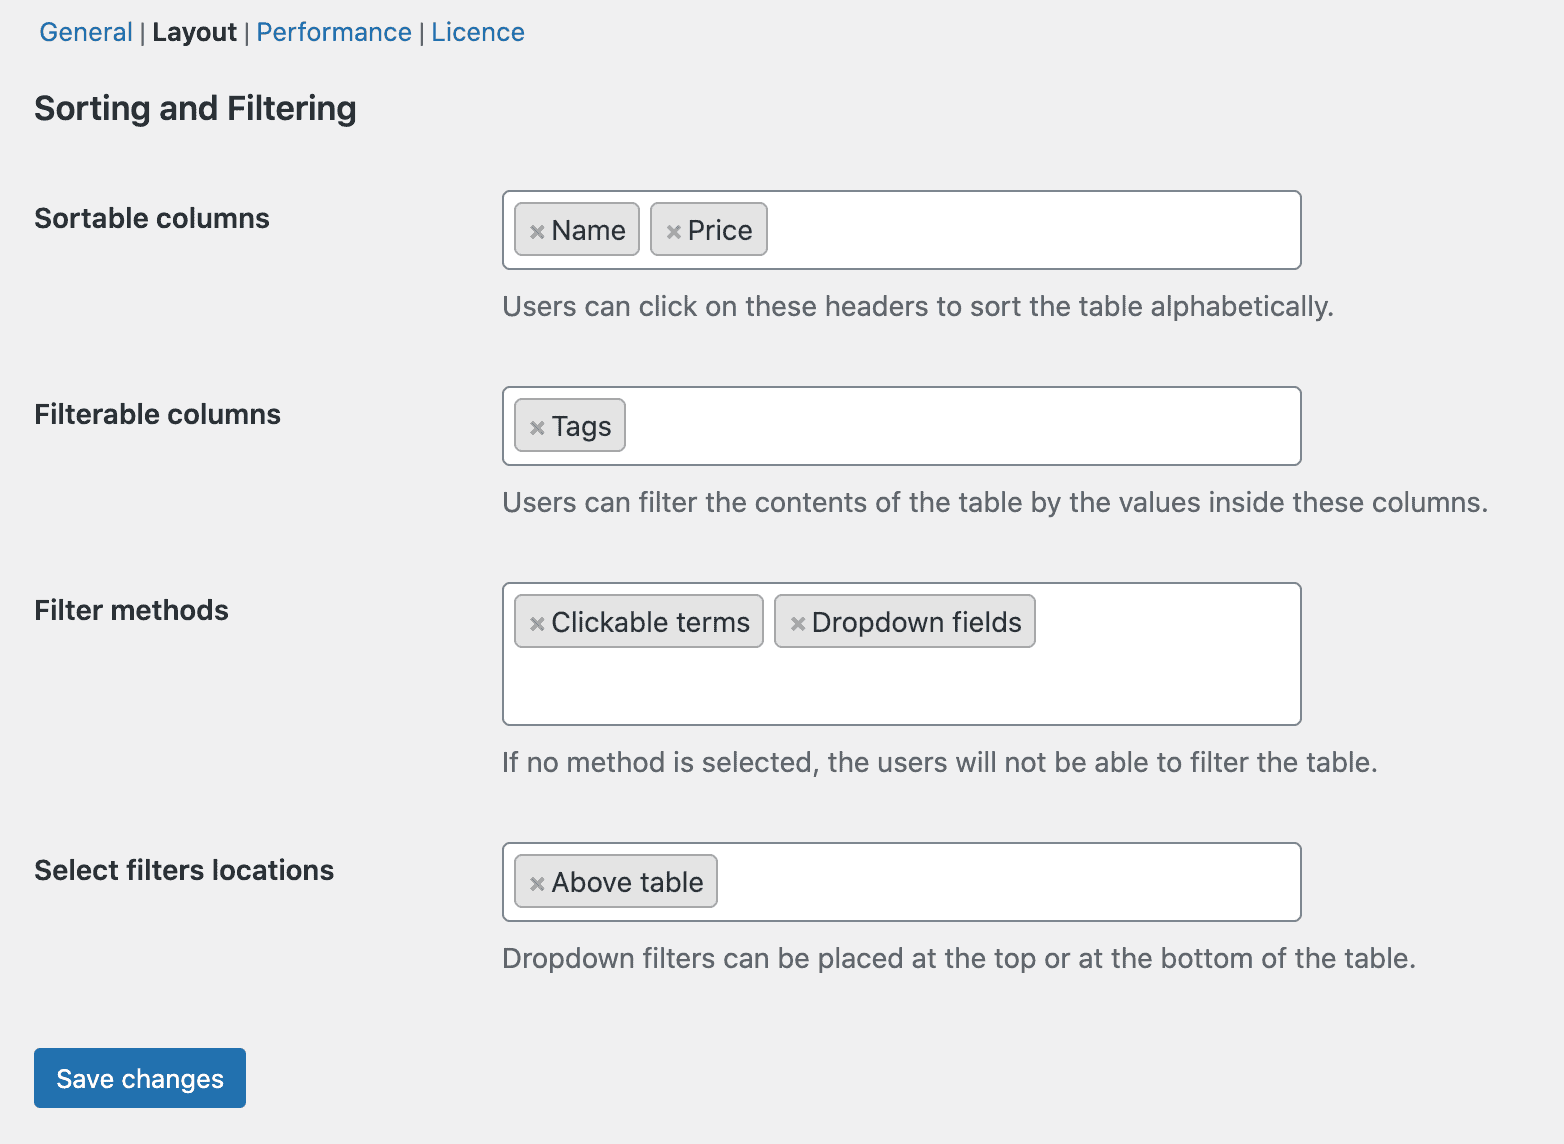
Once you have a custom WooCommerce category page, you can customize it using the different layout settings in the WooCommerce Product Table Ultimate plugin. To do this, navigate to WooCommerce → Settings → Product Table → Layout:
There are a few different fields here that we can talk about more. Let’s do this next.
Sortable columns
You’re able to display columns in the table that a user can sort. To do this, enter the name of the column in relevant text field. This will add a column heading to the product table on your storefront. From here, a customer can click the column headings, which will sort the rows.
This lets customers sort columns in either alphabetical or reverse alphabetical order. You can also implement a way to sort single products by price, from low to high or vice versa. This gives the customer a quick way to find the right product.
Filterable columns
You can also implement filtering for each column you specify. As such, customers can select a term that will display relevant items. You’re able to filter by Categories, Tags, and Attributes.
For example, take a WooCommerce store that sells shoes. It could have categories for running shoes, casual shoes, and snowshoes. A customer could click the Running shoes category to view only those items.
Filter methods
This section goes hand-in-hand with filterable columns. Here, you can offer the methods by which a user can filter items on the custom WooCommerce category page. There are two methods:
- Clickable terms. Each term will offer a hyperlink, which will activate the filter on-click. The exact terms are visible above the table.
- Dropdown fields. Here, users can select terms from a dropdown field, either above or below the product table on your custom WooCommerce category page.
However, it’s worth noting that a user won’t be able to filter the table if you don’t specify a method. As such, you’ll need to add a method if you use filterable columns.
Select filters locations
This option lets you select where to display the dropdown fields if you decide to use them as the filter method. You’re able to choose above the table, below the table, or both.
Regardless of which settings you alter on this page, you’ll want to save your changes when done.
3. Add the custom category page to WooCommerce
The final step is to add your custom category page to your online store. You can do this by going to WooCommerce → Settings → Product Table within WordPress:
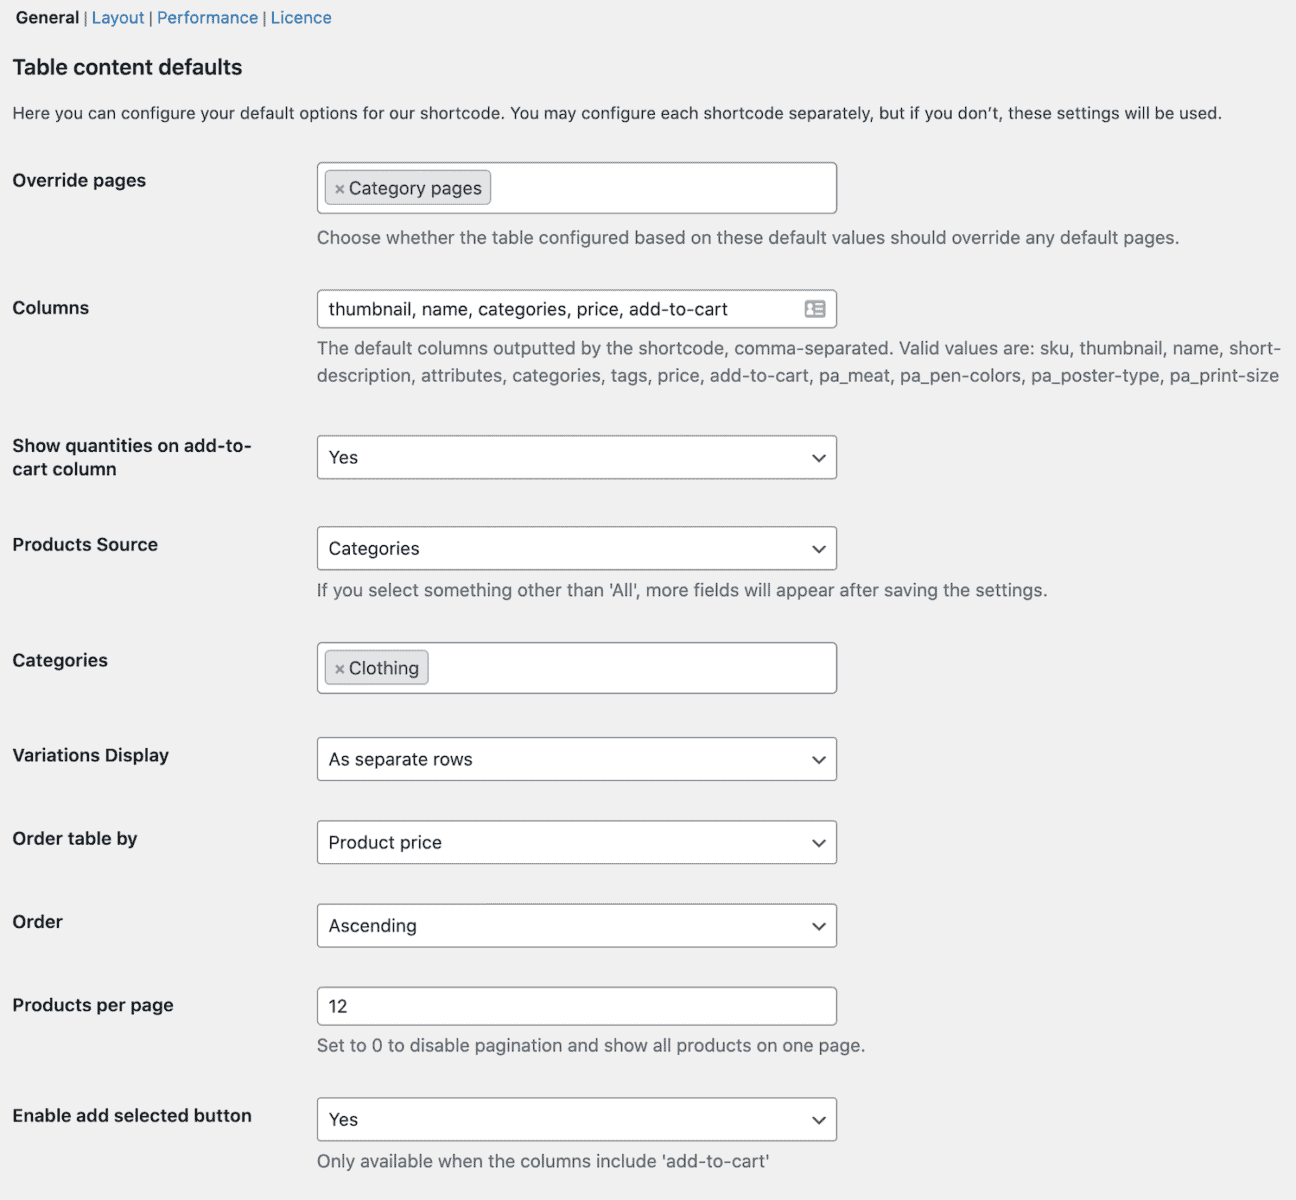
There are a number of options here to help you, although we only need one for this tutorial. To display your new page, set the ‘Override pages’ option to ‘Category pages’. This will make sure that your custom WooCommerce category page displays instead of the default one. Remember to save your changes after.
You can also add your custom WooCommerce category page to your primary navigation menu. This will make it easier for customers to find the category page regardless of where they are on your site. You can do this from the Appearance → Menus screen, and add the custom category page to your navigation menu as you would any other.
At this point, look to preview the custom category page, and make any changes you need within the plugin’s settings:
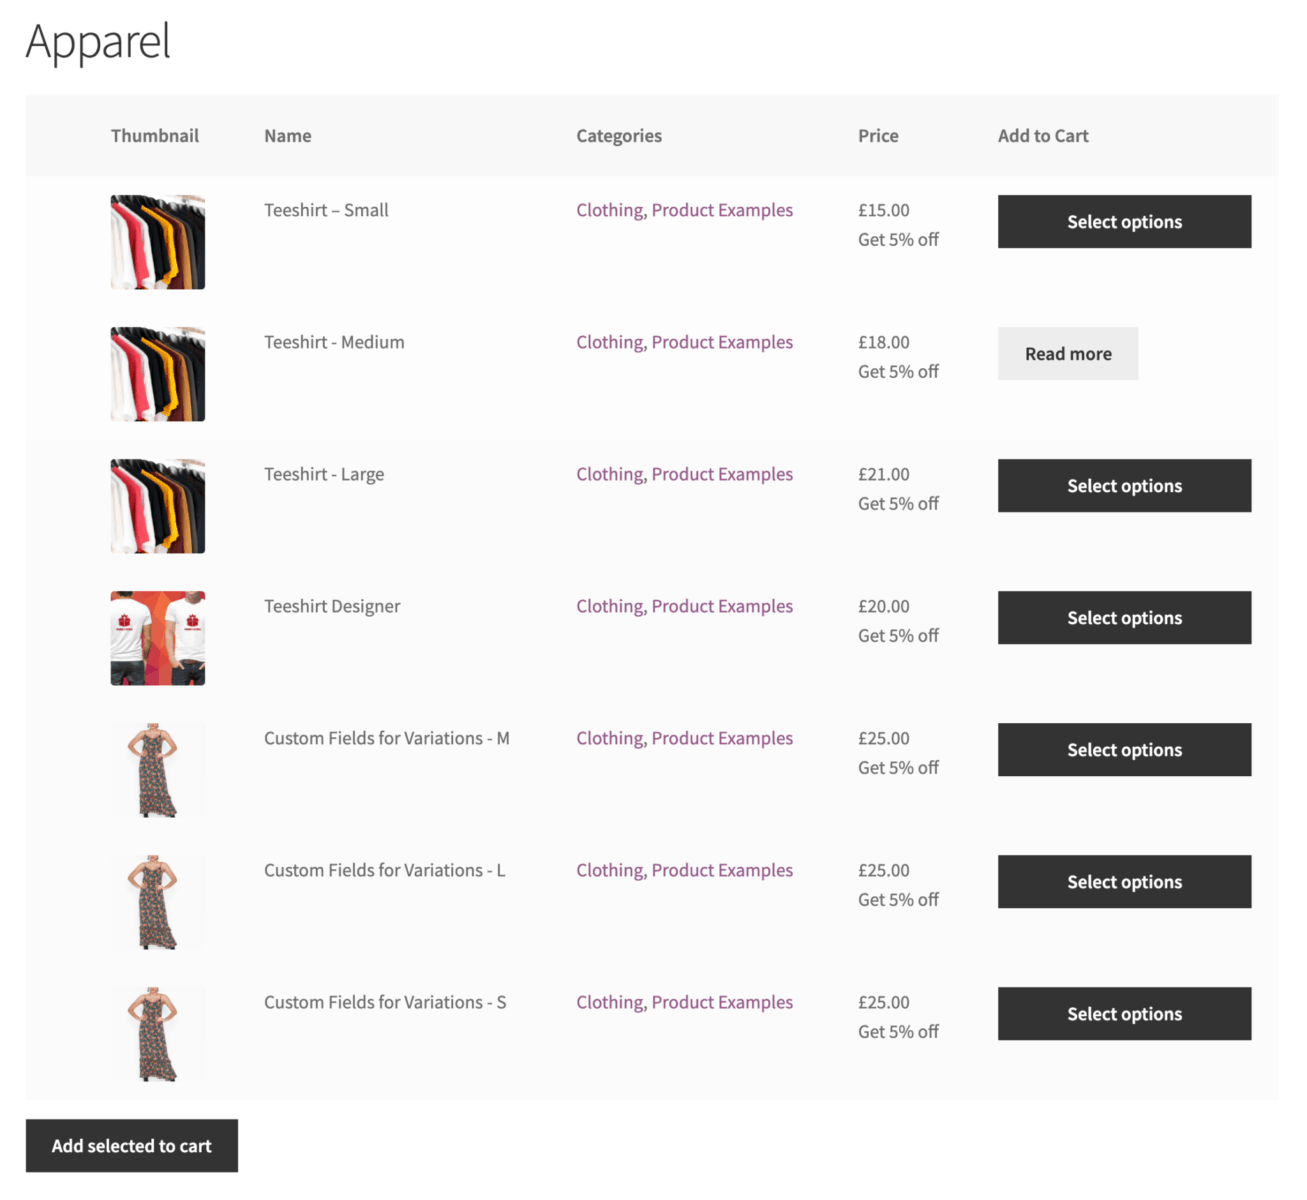
While we haven’t looked into many of the settings in this post, there are lots to uncover. As such, you can create a custom WooCommerce category page that’s unique to your site, needs, and customers.
Conclusion
A custom WooCommerce category page can help you improve both product visibility and make the checkout process more intuitive. For example, users can add multiple products to their cart from specific category pages with a minimal number of clicks.
While the default category page layout is good for visual products, you can also use a product table to display products in an organized way. This lets customers find what they’re looking for faster. What’s more, this can help you improve the user experience on your WooCommerce store and help boost sales.
If you’re ready to create a custom WooCommerce category page, we can help! Get the WooCommerce Product Table Ultimate plugin today!