How to create a WooCommerce product for die cut stickers

If you have a WooCommerce store selling stickers or decals (like Sticker Mule), you might want the option to let users upload their own designs. Most probably, you’ll want to allow users to select a size and choose the quantity of stickers as well. The price will be calculated according to a formula based on size and quantity. In this article, I’ll show you how to create a site like Sticker Mule in WordPress.
WooCommerce stickers product
Our finished WooCommerce stickers product will look something like this:
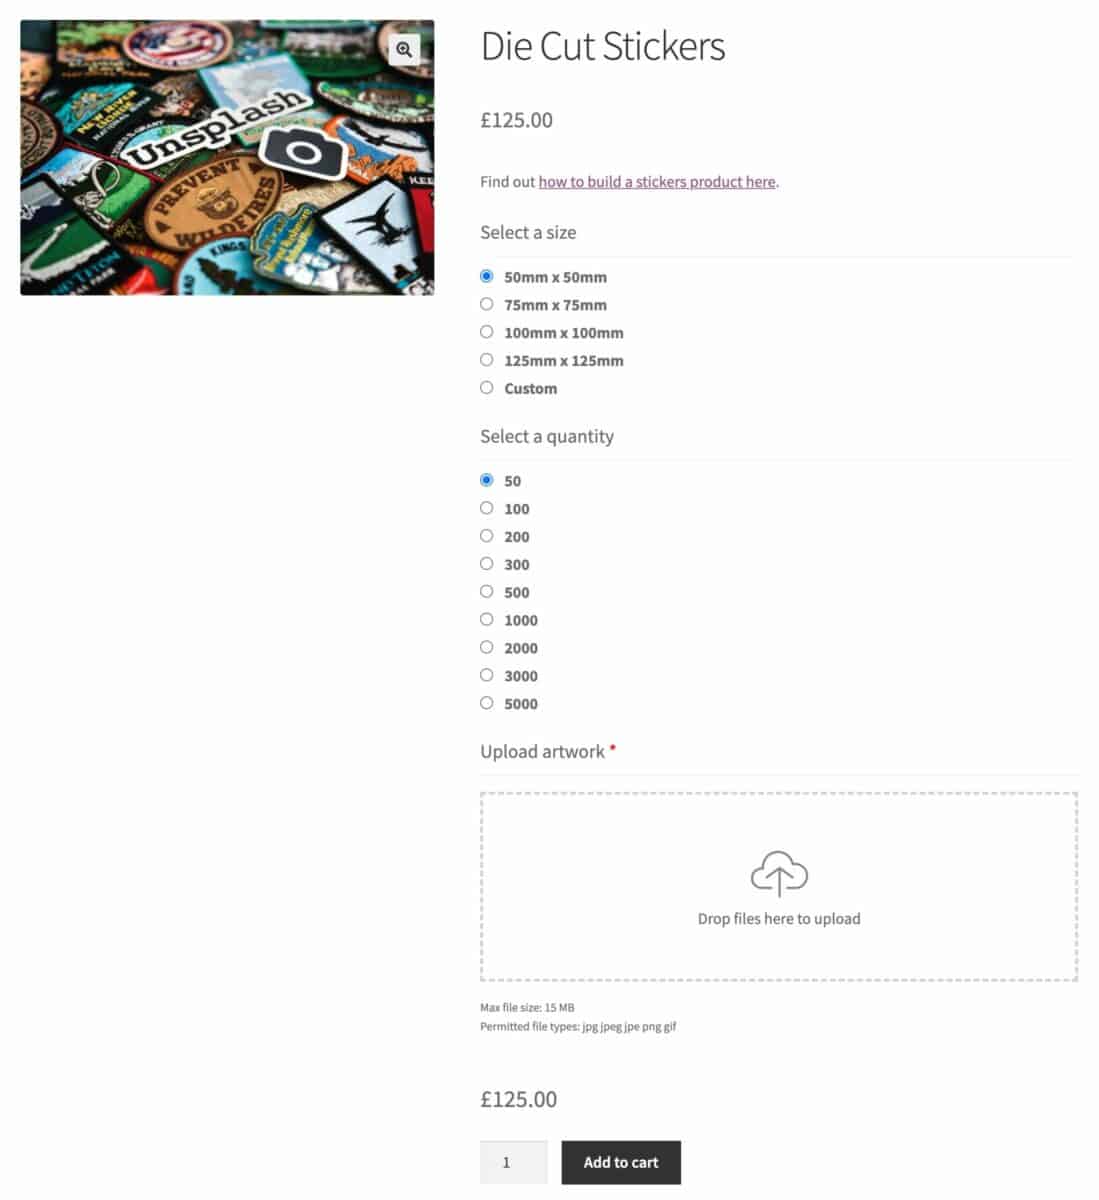
You can view a fully working demo product here.
WooCommerce product add-ons plugin
To be able to create the size, quantity and upload fields, you’ll need the WooCommerce Product Add-Ons Ultimate plugin. If you plan to use the calculation feature discussed below, you’ll need the Pro version of the plugin.

Product Add-Ons Ultimate allows you to add different fields to WooCommerce so that the user can customise your products.
Step One: create a new WooCommerce product
After installing and activating Add-Ons Ultimate, the first step is to add a new WooCommerce product. Give it a title and set the product price to 0. We’re going to calculate the price dynamically based on the size and quantity selected by the customer.
But because we don’t want the customer to get the idea that this is a free product, we’ll hide the price label. Add-Ons Ultimate gives us the option to either change the product price label or hide it altogether:
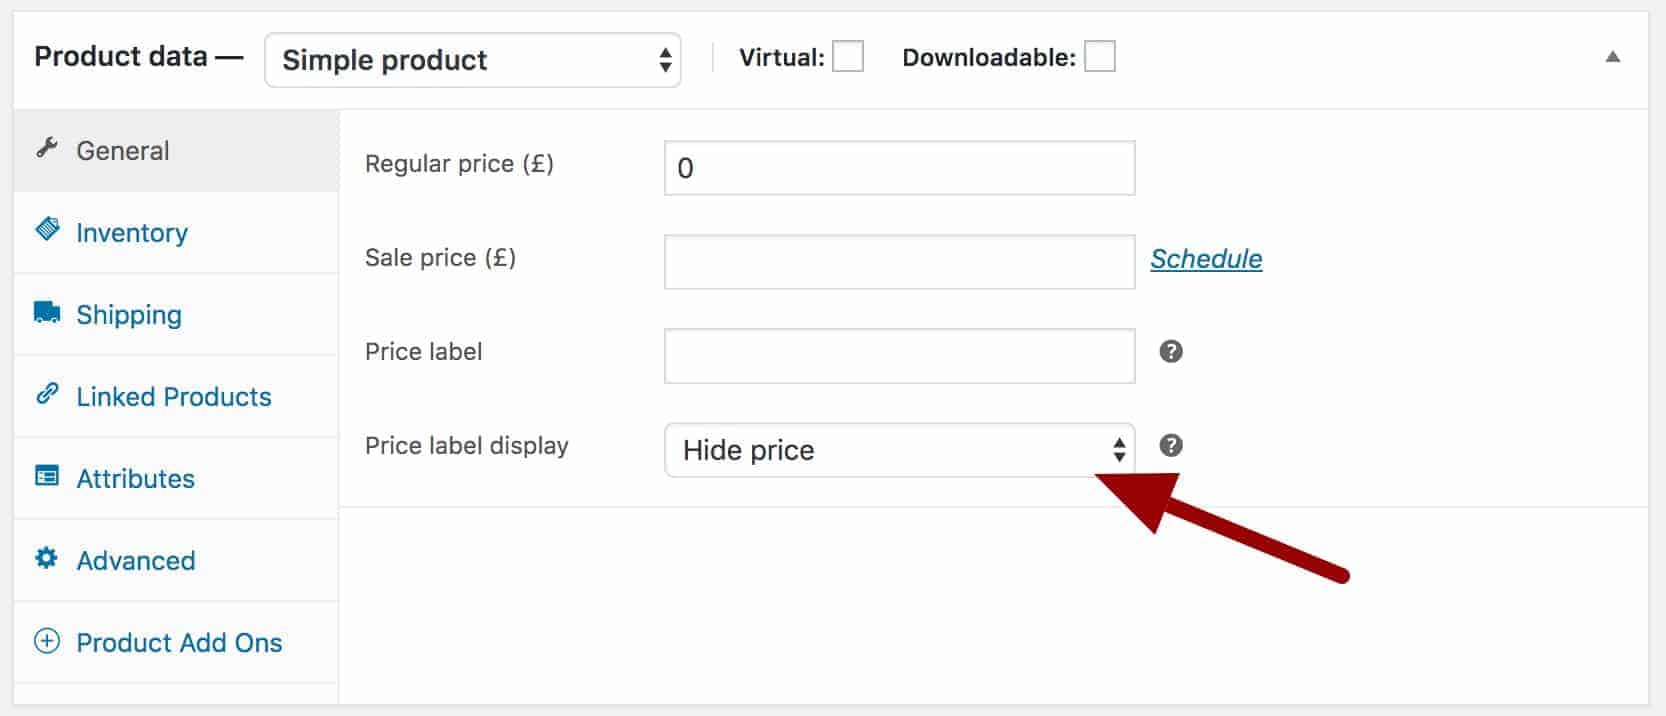
Instead, Add-Ons Ultimate will display the calculated price just above the ‘Add to Cart’ button.
Step Two: create your product add-on fields for size and quantity
Now we need to insert our add-on fields into our WooCommerce stickers product. There is comprehensive guidance on adding fields in this support document but, in essence, all you need to do is:
- Click the ‘Product Add-Ons’ tab in the ‘Product Data’ section
- Click ‘Add Group’ then ‘Add Field’
- Give your first field a title in the ‘Field Label’ field (e.g. ‘Select a size’), then choose ‘Radio Group’ as the ‘Field Type’
- Enter the sizes as options by clicking the ‘Add Option’ button
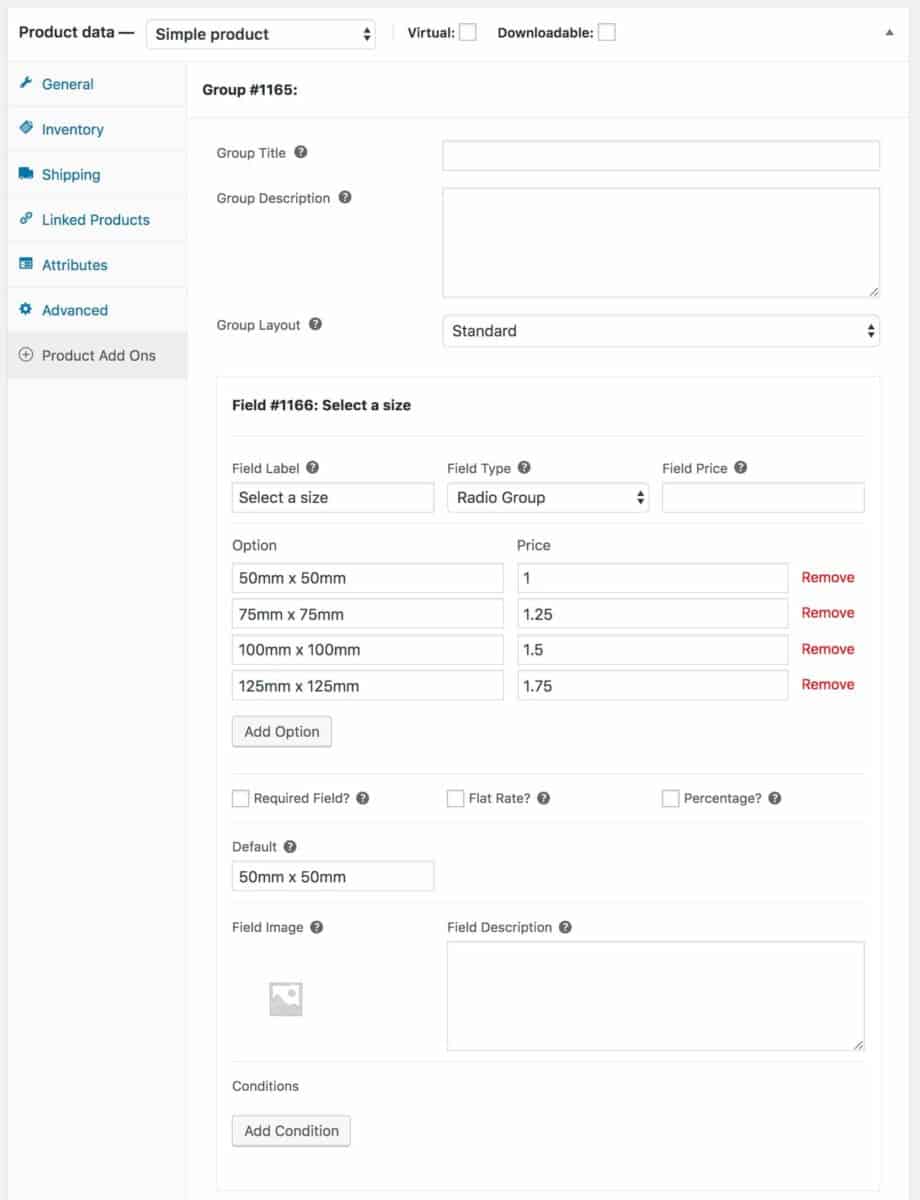
Note that I’ve also entered a price against each option. We’ll use this price in the product price calculation field later.
Repeat this step for the product quantities field:
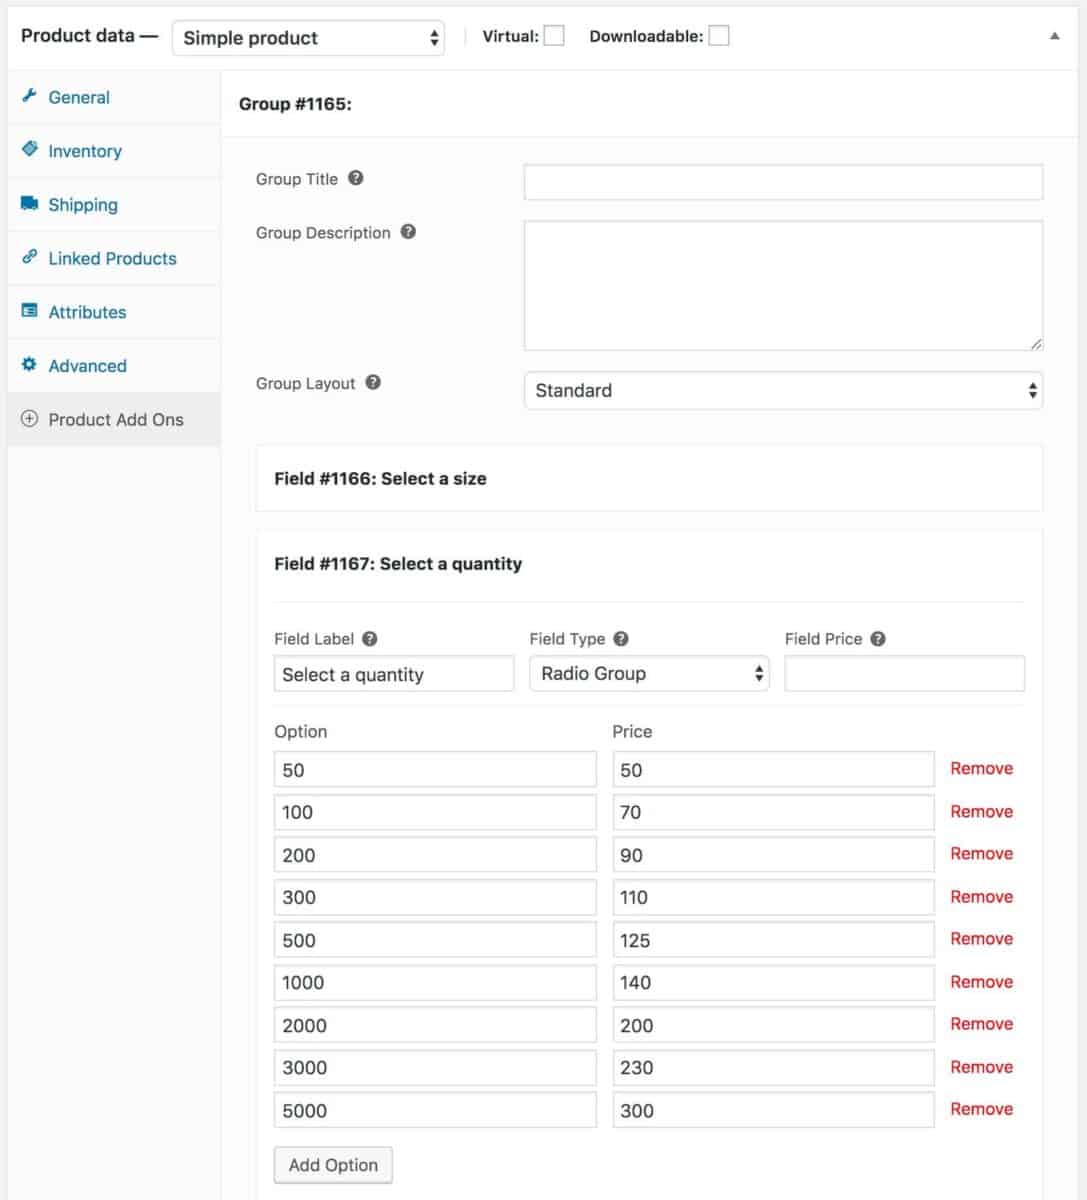
Again, note that I’ve put a price against each quantity.
Step Three: create a field for customers to upload artwork
Next, we’ll need to add a field for customers to upload their artwork. There’s a detailed article on uploading files to WooCommerce product pages here, but you can also follow the steps below:
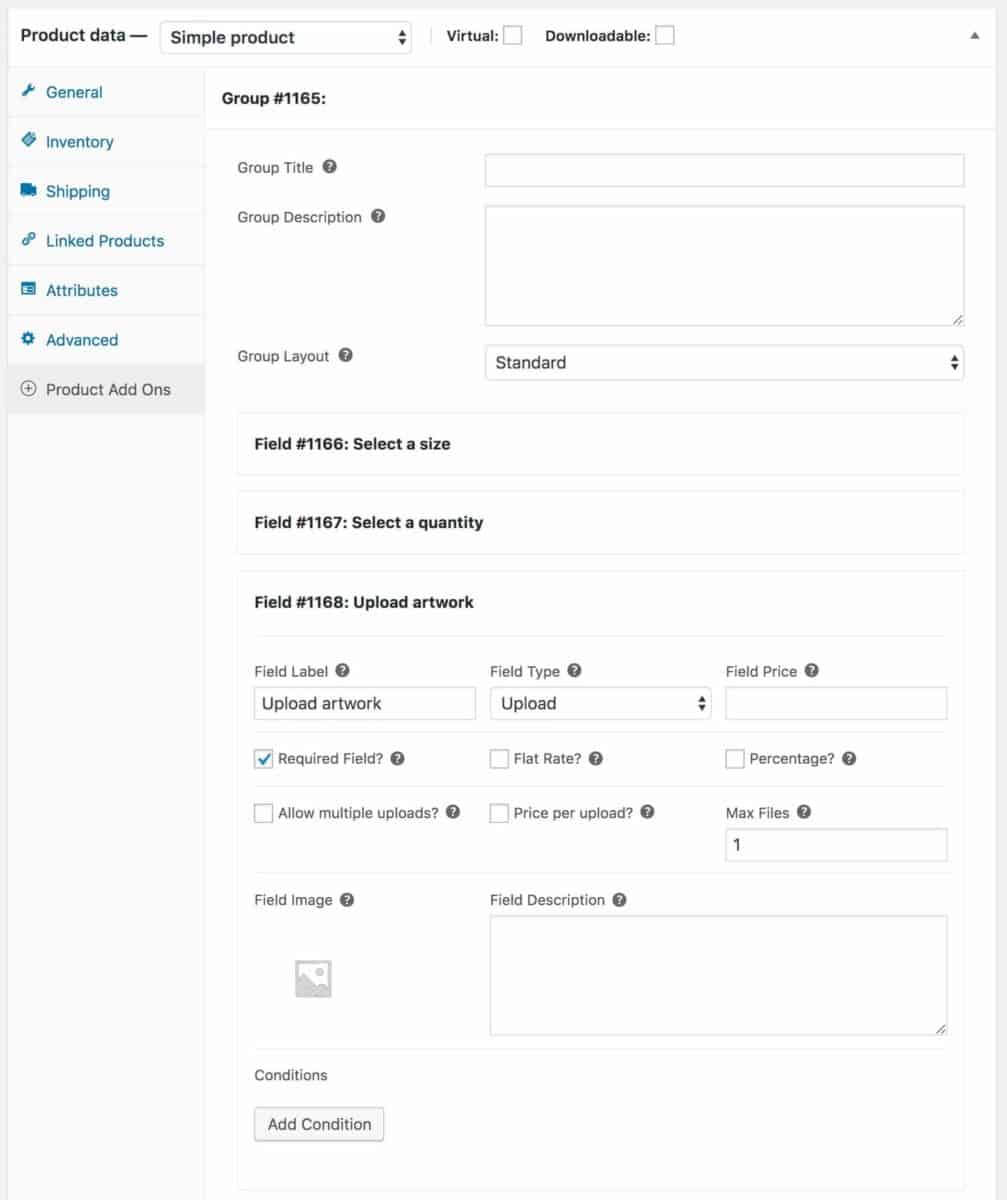
- Click ‘Add Field’ and choose ‘Upload’ as the ‘Field Type’
- Enter a label for the field
- Select the ‘Required Field’ checkbox if you want to ensure customers upload a file here
Step Four: create a price calculation field
Finally, we need to create a field that will calculate the price for our WooCommerce stickers product. You’ll need the Pro version of the Add-Ons Ultimate plugin if you want to use a calculation field.
Add the calculation field in the same way as above but choose ‘Calculation’ as the ‘Field Type’.

Let’s look at each of the field settings here:
Formula
This is where you enter the formula used to calculate the product price. There’s a fully detailed article on calculation field and measurements here but for the purposes of this demo we’re just multiplying the price of the selected ‘size’ option and the price of the selected ‘quantity’ option. Your price calculation may be more complex than this so it’s worth checking out the support article above for more information.
Hide calculation
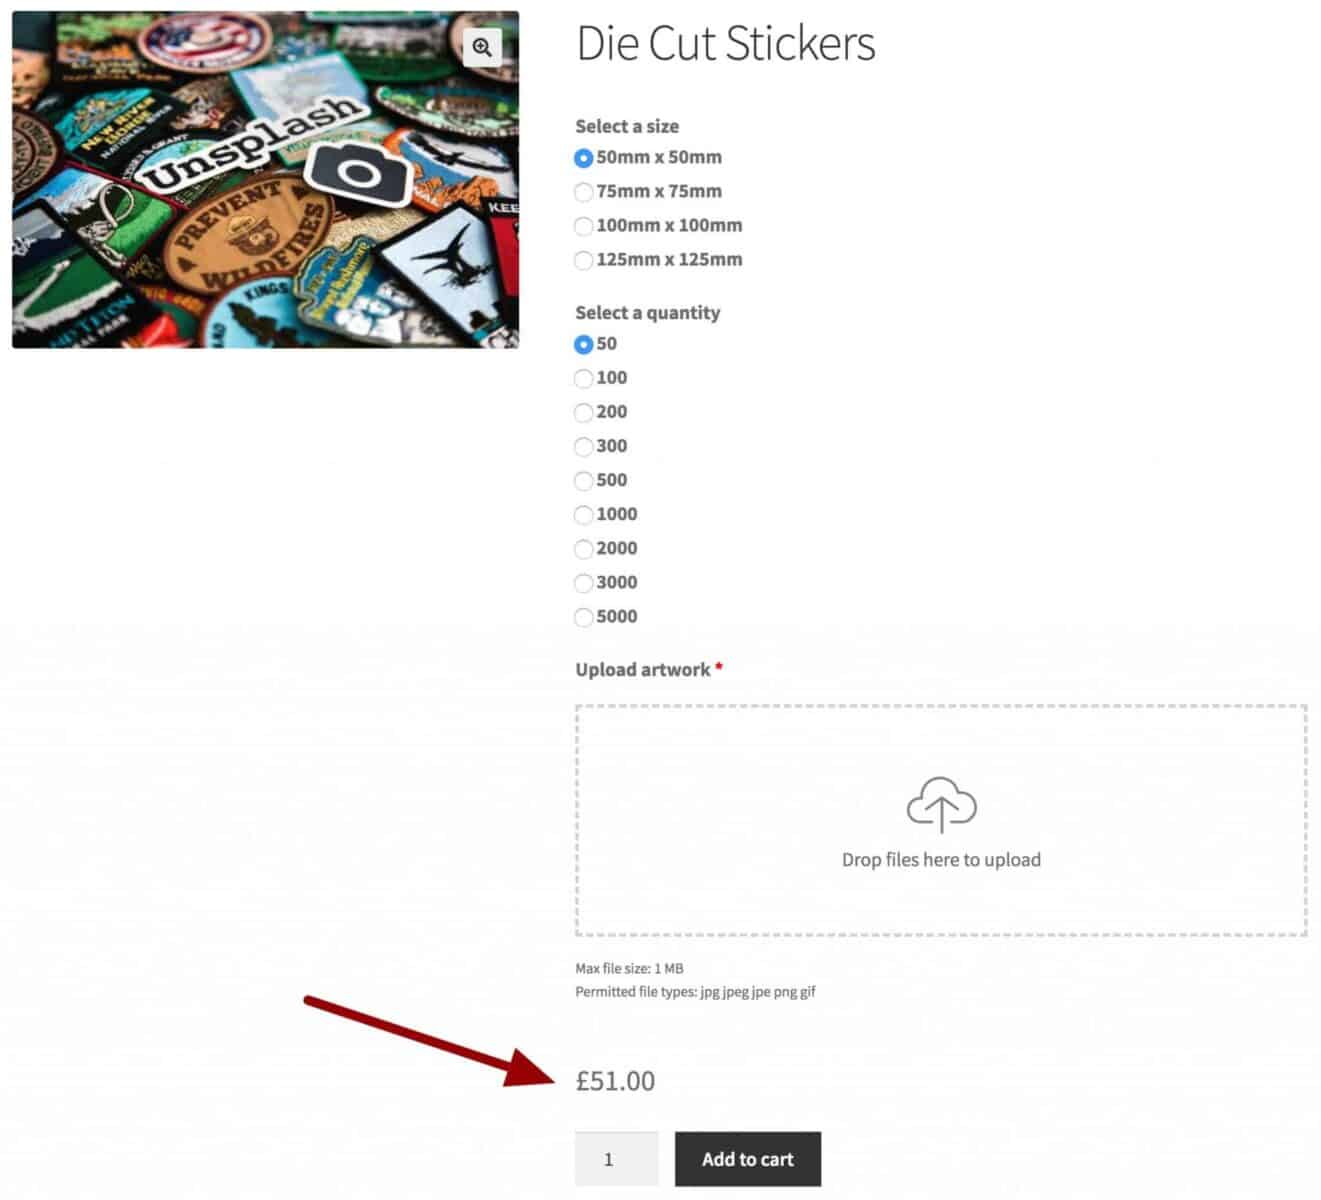
I’ve selected the ‘Hide calculation’ checkbox so that the calculation isn’t displayed as a field. We just use the result to update the product price.
Action
Because the calculation result is being used to update the product price, I’ve selected ‘Display as cost’ here.
Step Five: hide the option prices
By default, when you add prices to radio group options, they’ll be displayed along with the option labels. But because we are using the prices as part of a calculation, we don’t want to display them with the option labels.
To hide option prices, we just add this filter to our snippets file:
| <?php | |
| add_filter( 'pewc_show_option_prices', '__return_false' ); |
See this article on how to add snippets to your site.
Bonus Step: allow the user to enter custom sizes
Maybe we want to let the user enter their own sticker sizes. We can do this using conditional fields.
Let’s go back to the radio group we created for the sticker size and add a new option for ‘Custom’:

Now, let’s add number fields for the custom width and height of the stickers:

You’ll need to create two fields – one for width and one for height.
Then, you add a condition to these number fields so that they will only be displayed if the user has selected ‘Custom’ in the ‘Select a size’ field:

Create conditional calculation fields
If you’re giving users the option of entering custom sizes, you’ll probably need to create a custom calculation for the price. This means that you’ll need to the calculation field you created above if the user chooses a custom size.
To do this, just add a condition to the calculation field that will only display the field if the ‘Select a size’ field is not ‘Custom’.

You then create an alternative calculation field that will set the product price if the user has chosen a custom size.
In this field, the formula is different (taking into account the value of the width and height fields). It also has a condition to ensure that it only display if the user has chosen a custom size.

View the finished product
That’s it – we’ve created our WooCommerce stickers product in only a few short steps. Don’t forget to check out the finished product here.
Similar tutorials
If you would like to look at some further examples of using the calculation field, check out this article on WooCommerce measurement price calculators.
And check out this article for a complete guide to setting up a WooCommerce print shop.
And don’t forget the Product Add-Ons Ultimate plugin:
Hi, we are a graphic, print shop from Croatia. Because of the Corona, most of our clients are locked so we need to find a new way to keep our business alive. Since we have all the equipment to produce all kinds of stickers we plan to start a new web site. I found your plugin which seems to me as a part of the solution. Can you send me a few links of sites which use your plugin for stickers?
Thanks
Robert
Hi Robert
At the moment, I don’t have a list of companies using the plugin for stickers. Once someone purchases the plugin, I don’t necessarily see where they use it. Sorry not to be more helpful. Let me know if you have any other questions.
Gareth
Hello,
this plugin is able to cut and fit by the user the image uploaded?
thanks
javi
Hi Javi – no, the plugin doesn’t have the ability to edit the image.
Thanks.
How can customers input there own sizes and get a price?
Hi – you can use a ‘Calculation’ field to generate custom prices: https://pluginrepublic.com/documentation/calculation-fields/.
Thanks
Gareth
Hi Gareth,
You kindly answered my question regarding referencing a variable specific field but I think my explaining was not quite there, I do not need to hide or show based on specific variations, I am looking at using the variation information in a calculation field.
In the above example, you have used fields that I believe are on the add ons form i.e {field_1166_option_price} and {field_1167_option_price}. Underneath that you have Tags {product_price}, I believe {product_price} is the variation price from within woocommerce. I don’t want to reference a field in the addon or the variation product price, I am looking to pick up the attribute that helped create the variation and use its value.
As an example
Business Cards
Attribute “Cards per version” Value 250, 500, 1000
Product_price £10, £20, £40 for the above variation values.
I know I can pickup the variation product price £10, £20, £40. I need if possible to pickup the attribute Cards per version value 250,500,1000. Then use that in the calculation as the trigger as per below.
Addition field of single or double sided select box.
If double sided is selected then…
If Cards per version == 250 then Product_price * 2. That would = £20
if Cards per version == 500 then Product_price * 1.5.That would = £30
if Cards per version ==1000 then Product_price +10.That would = £50
If I use the product_price to do the same thing, then every time there is a price increase, I need to review all the calculations i.e value of 250 will not be £20 so an if product_price==£20….calculation would not be triggered if Product_price has changed to £20.50. Over simple and accepted I could use >= for a longer period but it will change over time. If I use the Card per version Value, then the argument for the calculation will always remain correct.
So as per yesterdays query, can I reference “Cards_per_version” which is a global attribute as opposed to product_price variation value? I have noticed you mention globals but not understood it properly yet.
Many thanks again for your help.
Thanks for the clarification. No, it’s not currently possible to get the value of an attribute in this way and use it in a calculation. I think it should be possible with some customisation but it’s not something that’s currently available as part of the plugin’s standard features.
Thanks.
What if you were to do a option of different materials that would alter the price?
Hi Jake
Yes, you can set the price using a calculation field that takes account if different material prices.
Thanks.
How would this be done thanks
Hi,
Thank you for you for the article. This is an awesome plugin and considering it for my client.
However, I have a one question. In the demo here,
https://pluginrepublic.dev/product-extras/product/die-cut-stickers/
If the user enters 350 in the quantity input, although the total price is calculated, the radio button still indicates the quantity as 50.
how can we make the radio button auto select the corresponding quantity according to the price is calculated? i.e. 300 in this example
Thank you
Hi
Thanks – yes, I’ve updated the demo product now so that the quantity is controlled just by the radio buttons. The standard WC quantity field isn’t required here. If you wanted to allow the user to enter a custom quantity, this would also be possible with the plugin.
Thanks.