How to create a fencing calculator in WordPress
This tutorial will show you how to create a fence cost calculator in WordPress.
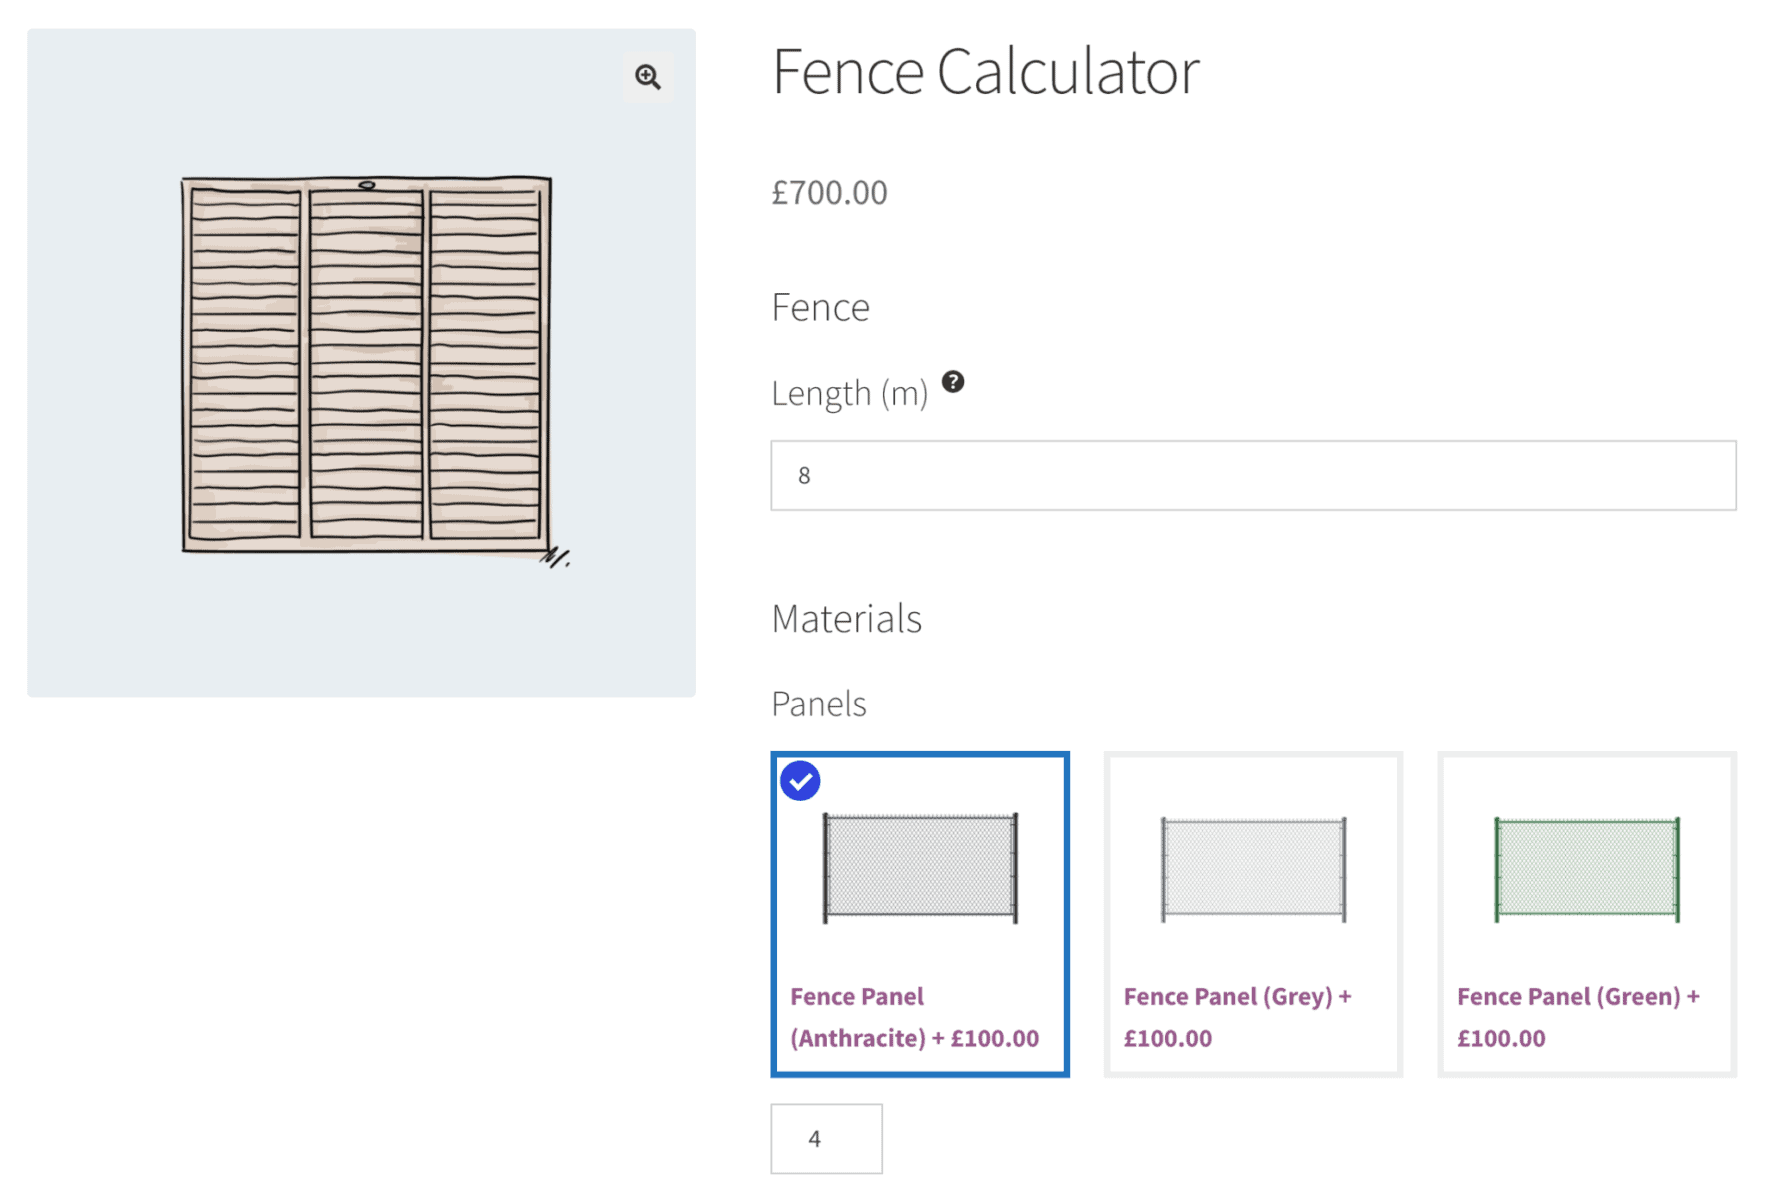
Your customers will enter the length of fencing they require and the calculator will automatically work out what components they’ll need, plus the overall cost of the fence.
We’ll walk through this step by step, showing you how to create a product in WooCommerce that will allow users to enter a value, e.g. 5, that represents the length of fencing they require. The fencing calculator will work out how many panels, posts, and fixings are required and calculator the cost of the fence.
Not only that, the calculator will automatically set quantities for each product so that your user just need to click the ‘add to cart’ button once in order to add everything they need to their shopping cart.
You can see a demo of the fencing calculator product here. Just enter a value in the ‘Length’ field and the calculator will set quantities for all the required components.
Remember: this method can be used for any type of online calculator that will calculate the number of components required in a product based on a measurement supplied by the user.
Create your fencing calculator product
To create your fence calculator product, you’ll first need to have WooCommerce installed on your WordPress site. WooCommerce is the world’s leading ecommerce platform and you can find guidance on how to install and create a product here.
Once you’ve installed WooCommerce and created a product, you’ll need to add one further plugin: Product Add-Ons Ultimate.
Product Add-Ons Ultimate allows you to add extra fields to WooCommerce products, e.g. a field for the user to enter how meters of fencing they require.

Create your fencing components
Once you’ve created your main product for your fencing calculator, you’ll need to create products for each component in your fence. In our example, we’ll have a choice of different fencing panels, a fence post, and some screws to help fix the panel.
Create your products, add images and set product prices, then publish the products. We’ll use these products as extra options in our main fencing calculator product.
Setting product dimensions
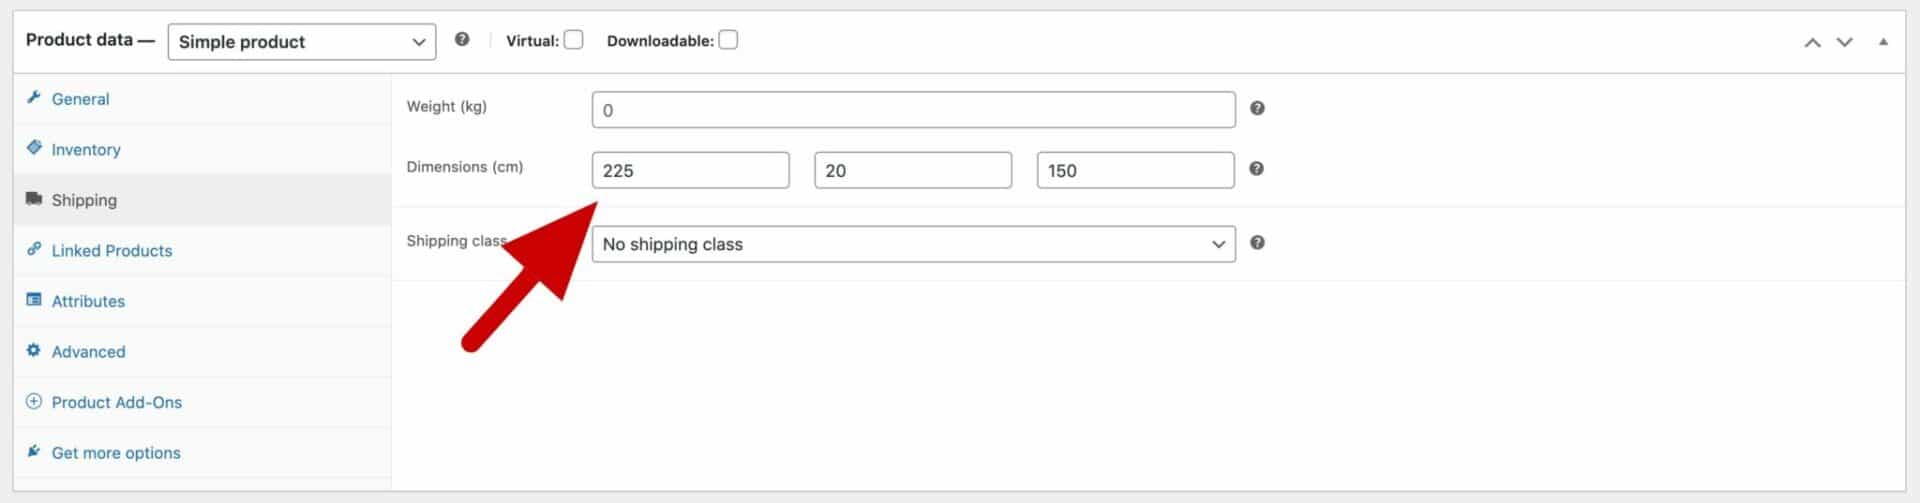
If your component products are used in the calculator, you’ll need to enter certain dimensions. For example, if the length of the panel is used in the calculator, you will need to enter a value for ‘Length’ in the Shipping tab.
Configure the fencing calculator options
With all our products created, we can now configure options in Add-Ons Ultimate for the calculator. Add-Ons Ultimate allows you to add various different fields as options within a WooCommerce product.
Step 1: Add a field for the length of fence required
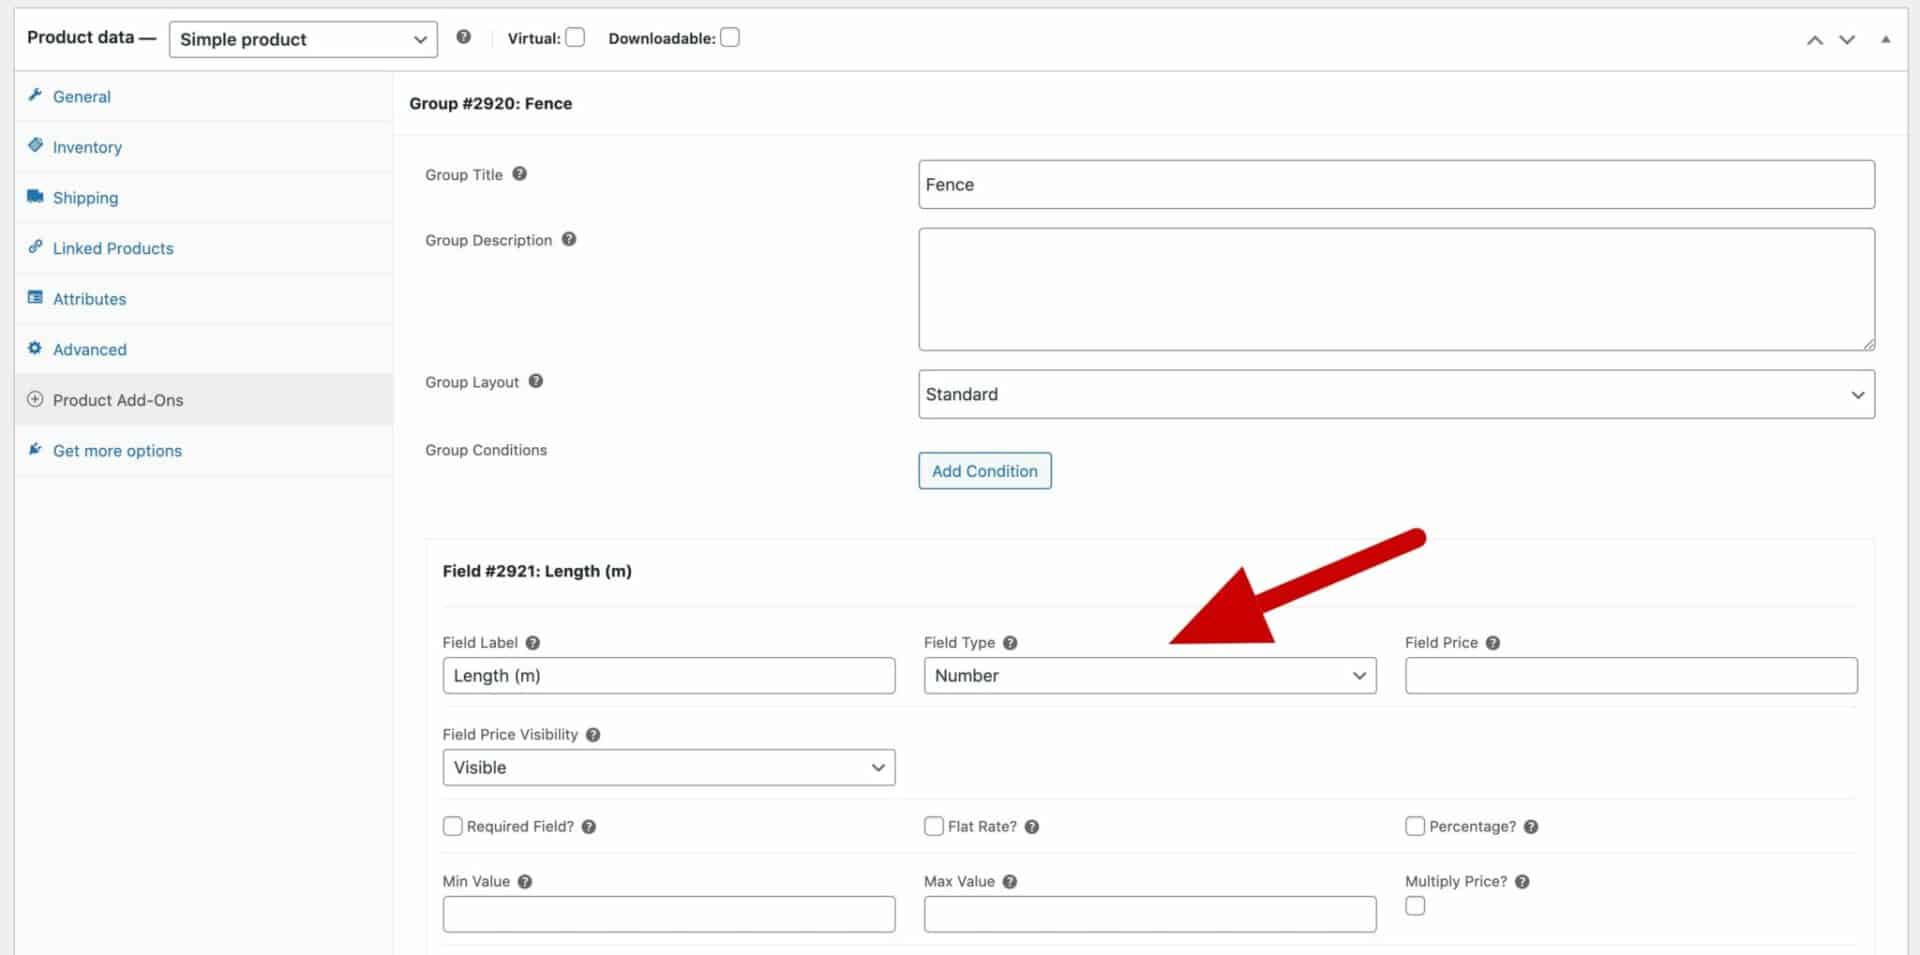
The first field we need to add is a ‘Number’ field. In your fencing calculator product edit screen, click on the ‘Product Add-Ons’ tab in the Product data section.
Click ‘Add Group’ and give it a title, e.g. ‘Fence’, then click ‘Add Field’.
Choose a title, e.g. ‘Length’, and select ‘Number’ as the field type. This will ensure the user can only enter a numerical value.
Step 2: Add fields for each component
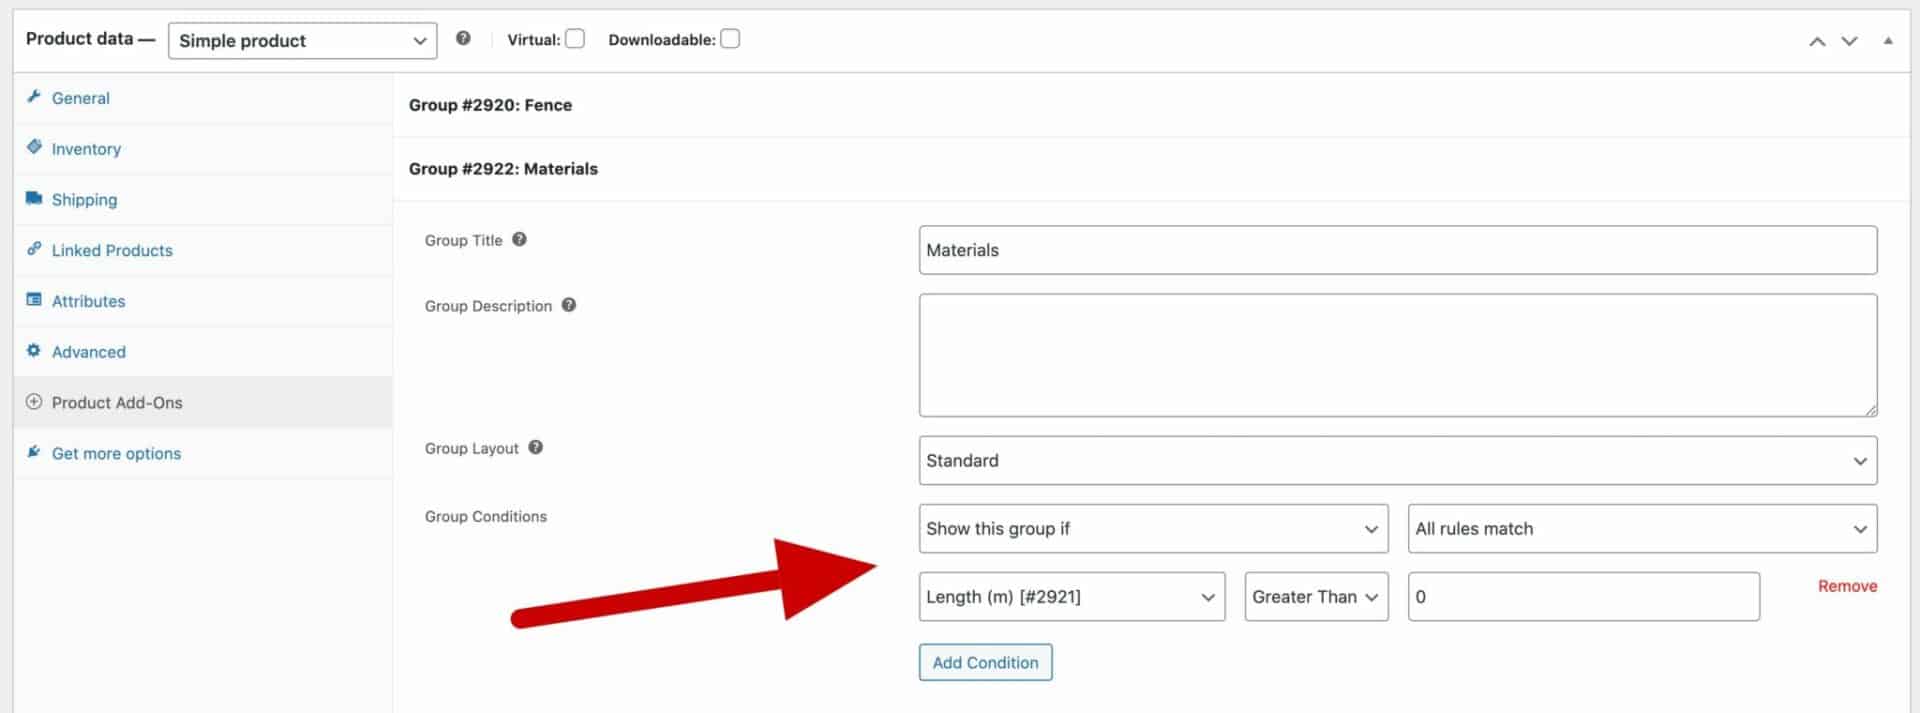
Now you can create a new group and call it ‘Materials’. In this group, add a field for each component of your fence, e.g. panels, posts, screws, etc.
Note that you can set a condition on this group so that it only displays when the user enters something in the ‘Length’ field. This makes for a better UX. You can find out more about conditions in add-ons here.
Each of the fields in the group should be a ‘Products’ field type. So, for your ‘Panels’ field, enter ‘Panels’ as the field name, select ‘Products’ as the field type, and enter each of the panel products you create earlier in the ‘Child products’ field.
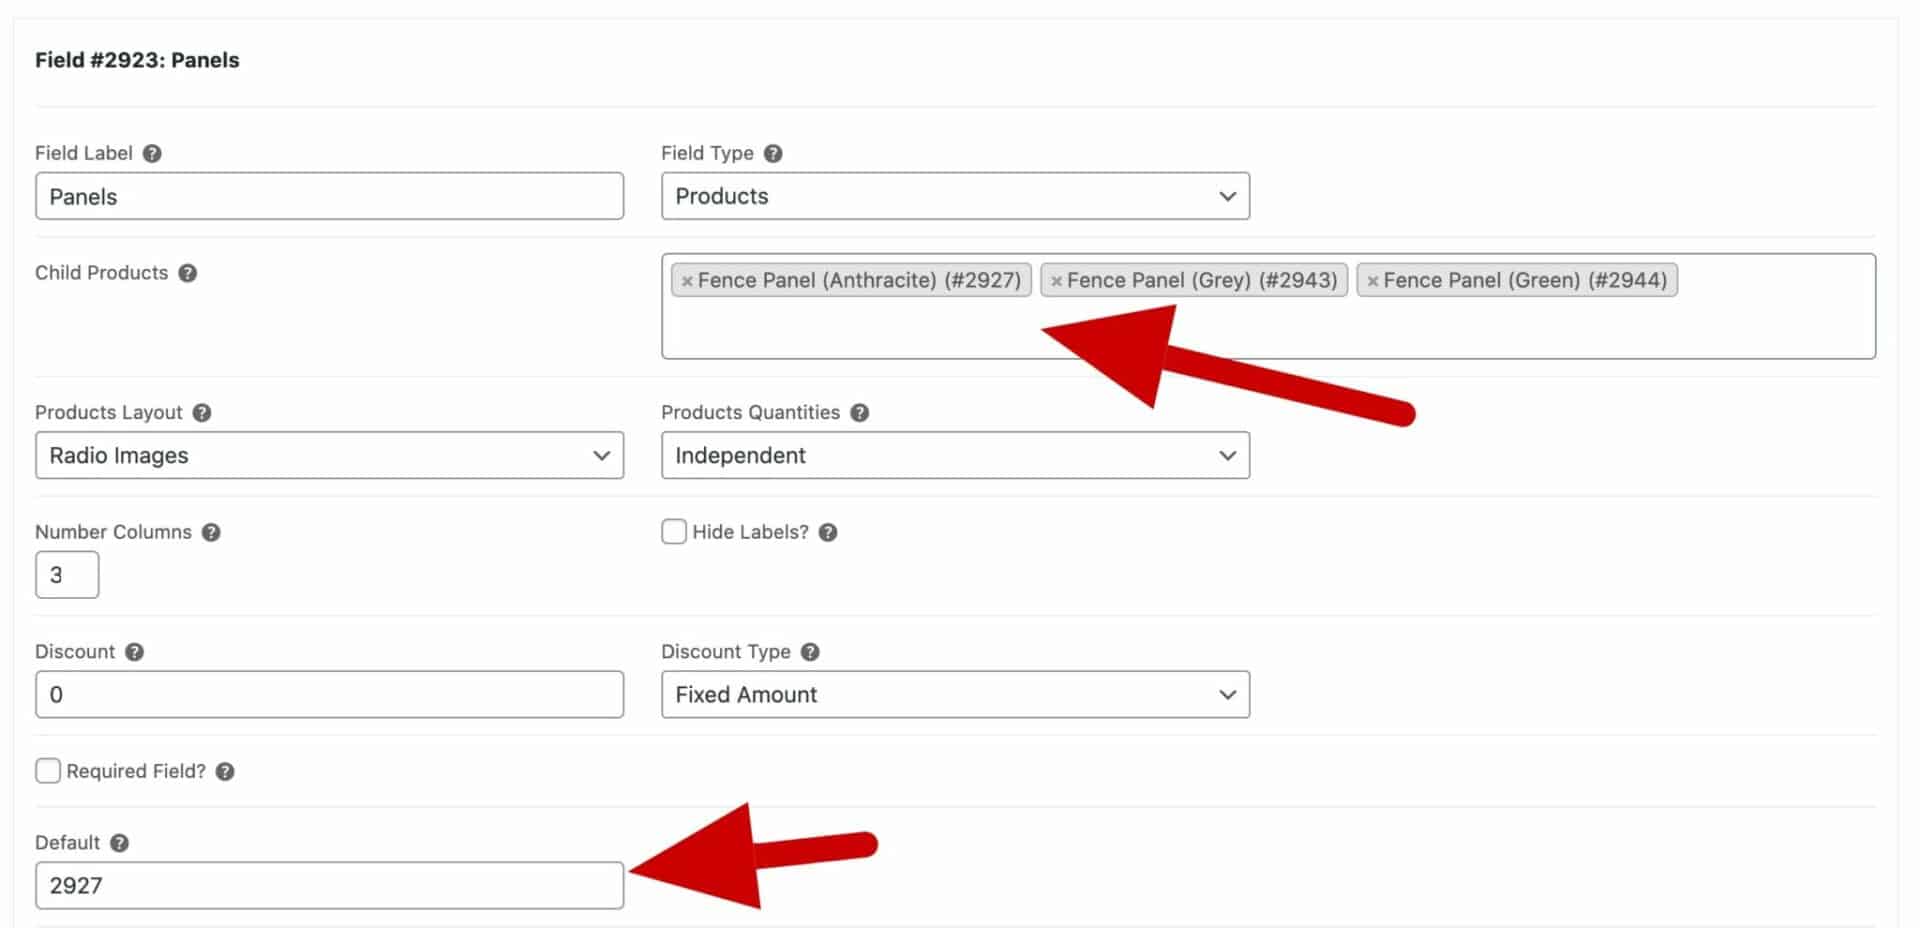
You should also set a default value in the ‘Default’ field. Enter the ID of the product that should be the default choice here. You should do this even if you only have one product in the field.
Note that having more than one child product means the user can choose between different options for the components – e.g. they can choose between different coloured fence panels.
Continue to add a field for each component.
Step 3: Create your calculation fields
Now we can create some fields that will do the actual calculation in our fencing calculator product. Create a new group called ‘Summary’. We’re going to create several calculation fields.
The ‘Panels Required’ field
Create a field called ‘Panels Required’ and set its type to ‘Calculation’. Calculation fields allow you to use various parameters, including user inputs, and calculate values as a result.
This field is going to take the value entered by the user for ‘Length’ and calculate how many panels are needed based on that value. It’s going to use the dimensions entered in the component products.
Here’s what our field looks like:
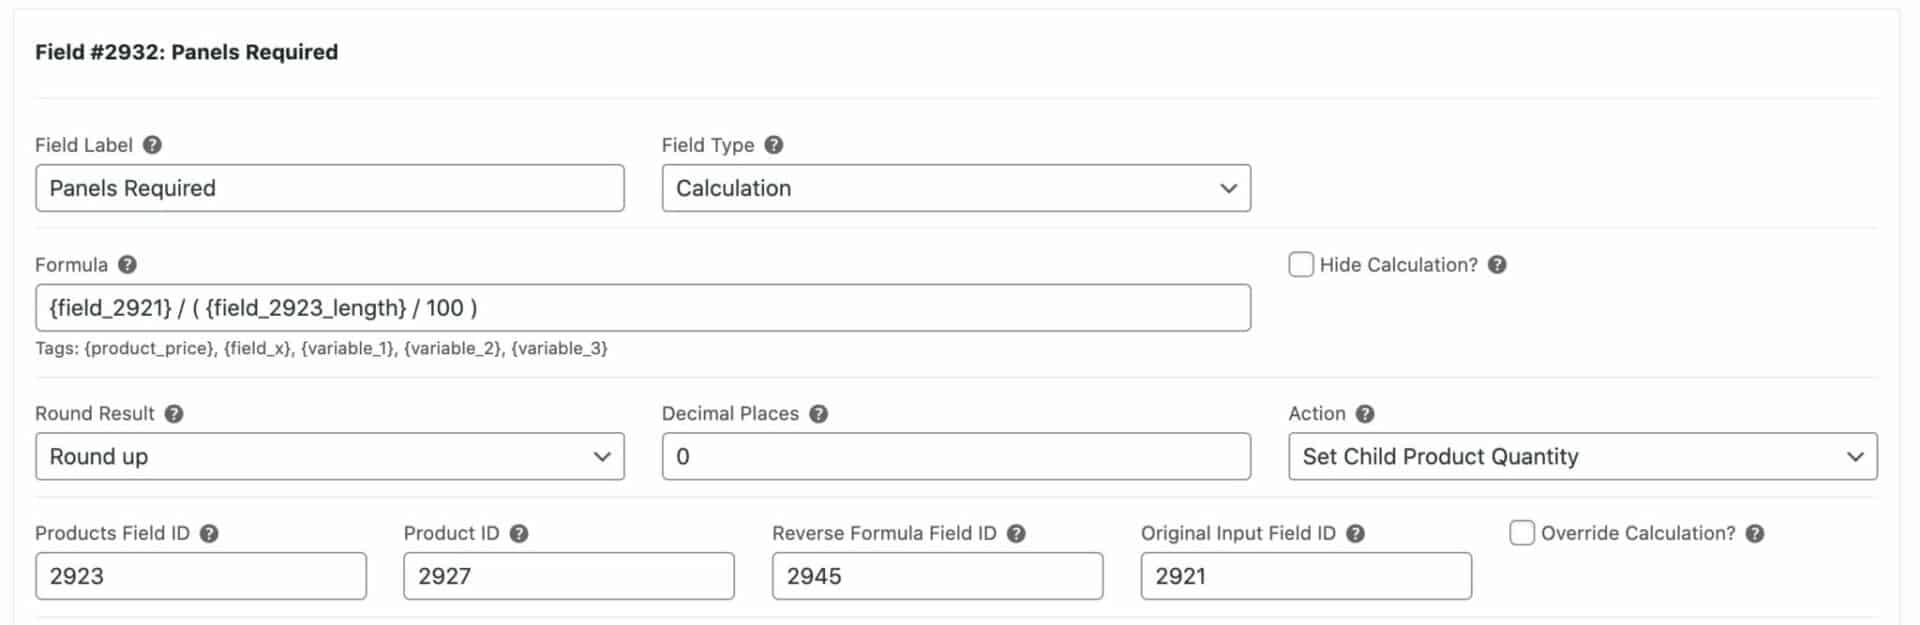
In the ‘Formula’ field, we’ve entered the following: {field_2921} / ( {field_2923_length} / 100 )
In this, the {field_2921} tag refers to the value of the ‘Length’ field. The {field_2923_length} tag will get the ‘Length’ dimension of whichever product is selected in field #2923 (which is the field where the user selects which panel they want). We divide that value by 100 because our dimensions are entered in cm.
So that formula will return a value. For instance, if the user enters 5 as the length of fencing required and selects a fence panel which is 225cm long, the field will divide 5 / 2.25. Because we want to ensure that we have enough panels (possibly exceeding the required length) we set the ‘Round Result’ field to ‘Round up’.
Now, we’d like to use the result returned by this field to set the quantity of fence panels that should be added to our cart. So in the ‘Action’ field we choose ‘Set Child Product Quantity’; we enter the ID of the Products field where we want to set the quantity (in this case that’s field 2923) in ‘Products Field ID’.
In ‘Product ID’ enter the product ID of the default product in the products field.
We’ll look at the remaining fields later.
With these settings, the fence calculator will automatically calculate the cost and number of items required when the user enters a value for the required length.
The ‘Posts Required’ field
The ‘Posts Required’ field is simpler. Basically, in our configurator, the number of posts we need is one more than the number of panels required.
Here’s the settings used in the demo product.
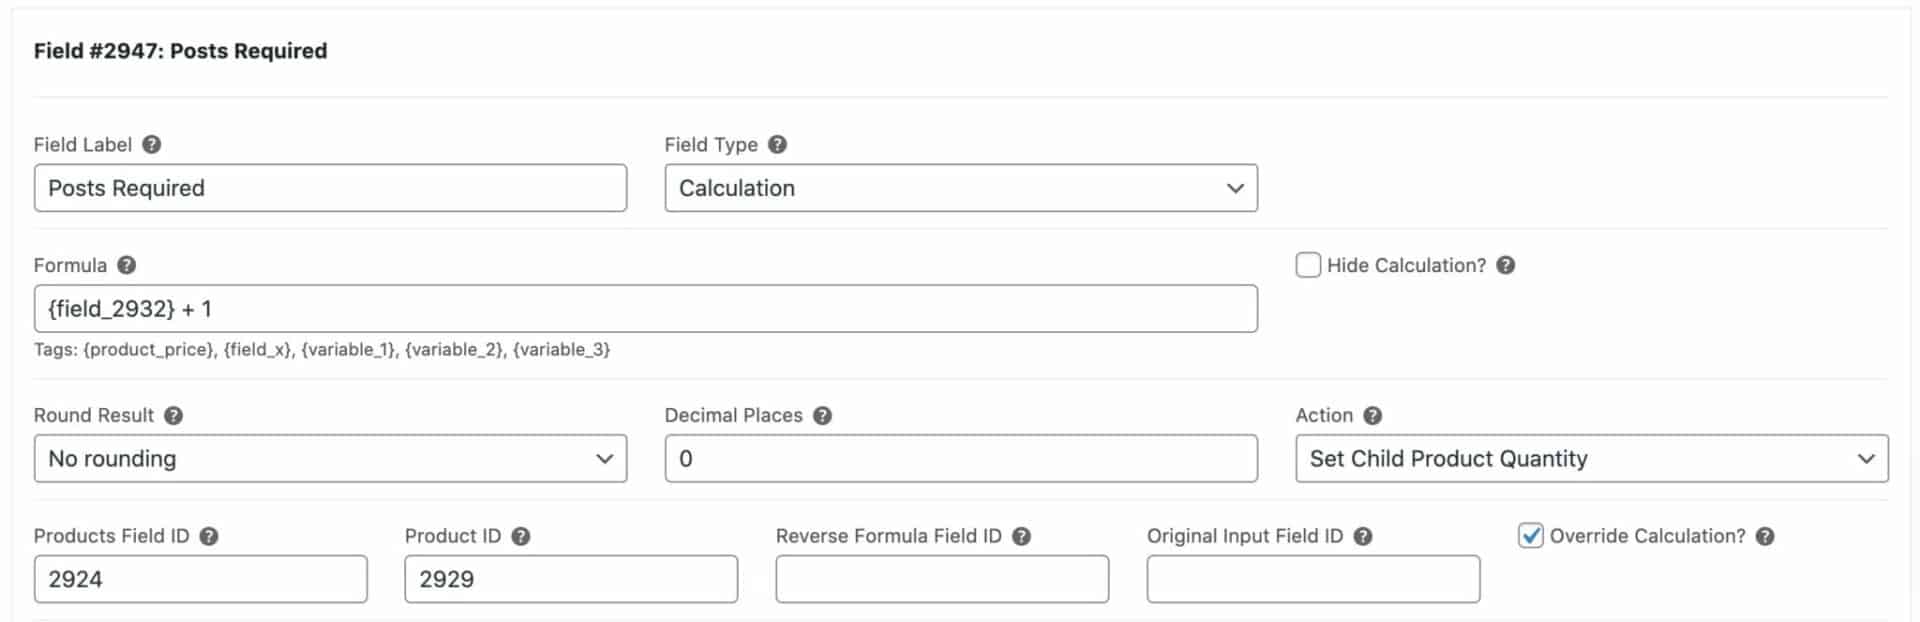
We can see that the formula simply takes the value returned by the ‘Panels Required’ field and adds 1. We’ve defined ‘Products Field ID’ as 2924 which is the ID of our field for the posts product.
Note that the ‘Override Calculations’ setting is checked. This means that users can enter their own quantities and override the calculation result from this field. So if our fence calculator works out that the user needs 5 posts, but the user wants to buy 6, they can update the quantity.
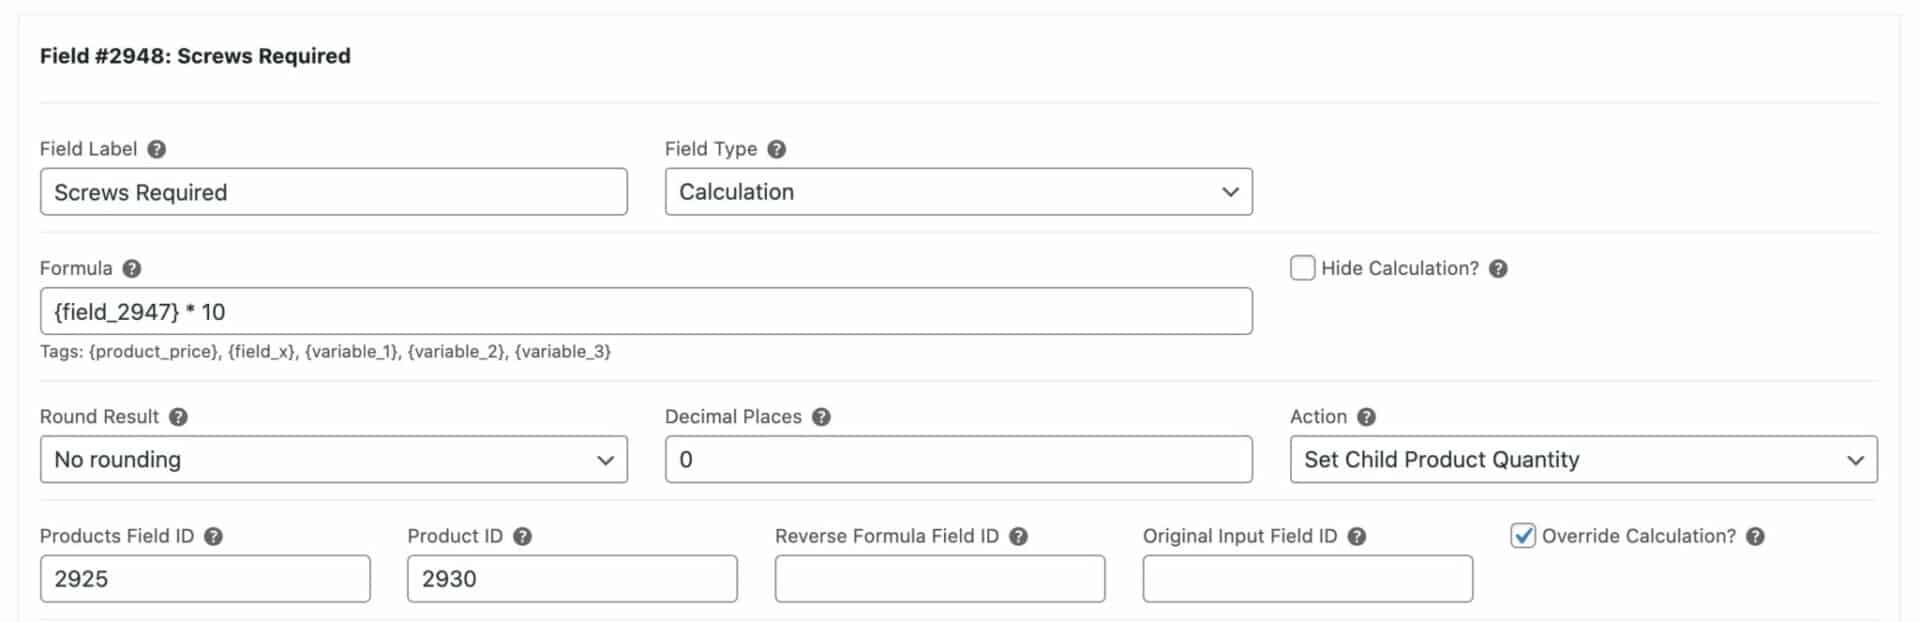
The ‘Screws Required’ field
This field is very similar to the ‘Posts Required’ field above.
‘Reverse Formulas’
It might be that the user doesn’t just want to enter the required length. Instead, they might wish to enter the number of panels and see what length and components are calculated.
To do this, you can enable a feature called ‘Reverse Formulas’. This creates a two-way relationship between an input field (in this example, the Length field for user input) and a quantity field (in this case, the quantity of fencing panels).
By having a two-way relationship, we can calculate the number of panels required when we enter a length; and, we can update the length if the user adjusts the quantity of panels. You can see it work on the demo product by entering a value in ‘Length’ first, then adjusting the quantity of panels. You’ll see the value in the ‘Length’ field being automatically updated.
To create a two-way relationship like this, you’ll need to create another calculation field:
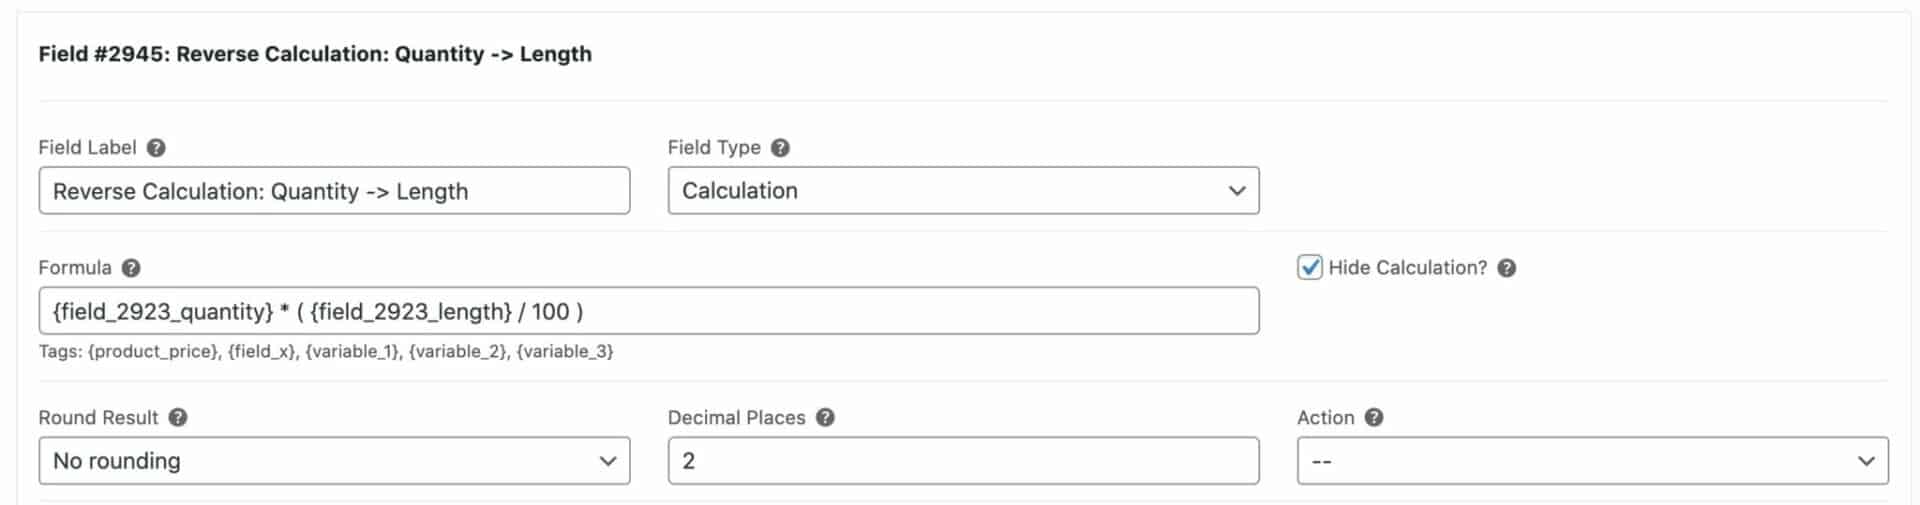
In this field’s formula, we multiply the quantity of panels by the length of a single panel (divided by 100 to give our result in metres).
Then we go back to our ‘Panels Required’ field and enter the ID of this field into the ‘Reverse Formula ID Field’. You should also enter the ID of the ‘Length’ field in ‘Original Input Field ID’. The calculator will update the value of this field with the result of the calculation in the reverse formula field.
Fencing calculator – recap
Okay, that’s how to create a fencing calculator in WordPress. Our fencing calculator worked out cost and components needed based on a single user input.
You’ll need WooCommerce Product Add-Ons Ultimate: