It’s simple to create a new booking product using the Bookings for WooCommerce plugin. To create your booking product:
- Click Product > Add New
- Give your product a name and add a description in the same way that you would for a normal WooCommerce product
- In the Product Data section, choose Booking for the product type
- You’ll see some new options appear
Use the following options to configure your booking:
Bookings Settings
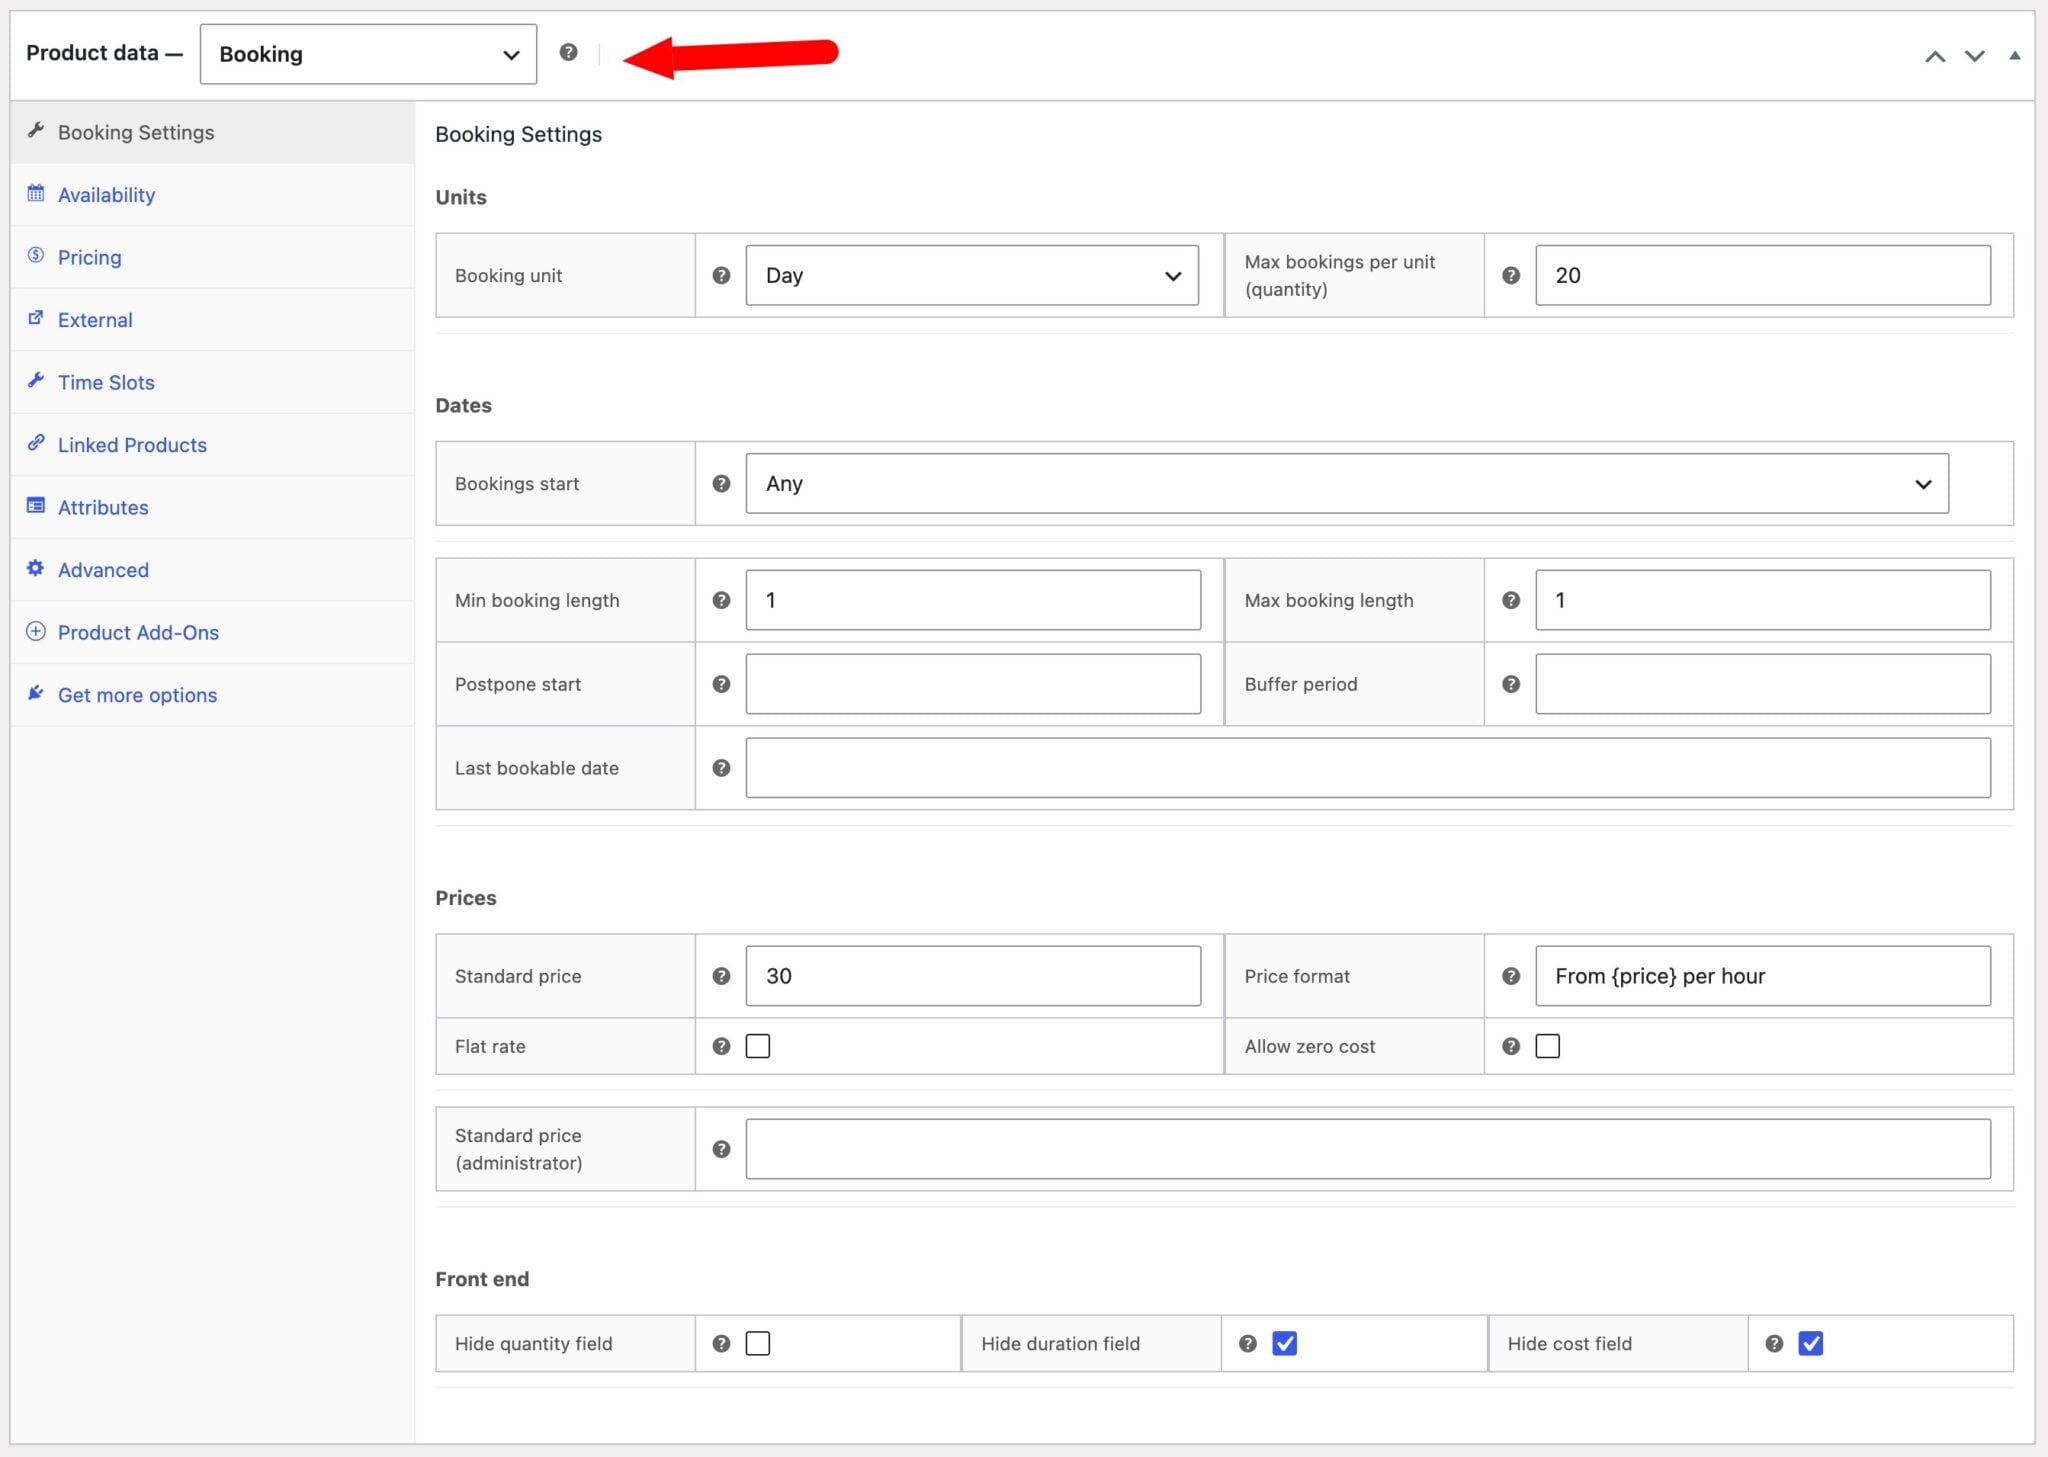
On the Bookings Settings tab you’ll find key settings for your booking including date and pricing options.
Units
Booking unit
Controls the time unit used for this product – either Day, Night, or Week. A “day” booking runs from midnight to midnight, a “night” booking covers one overnight stay (check-in to check-out), and a “week” booking spans seven days. This setting determines how the calendar displays availability and how the booking cost is calculated.
If you want to use time slots, set this to Day and enable the time slots on the Time Slots tab.
Max bookings per unit (quantity)
Sets how many separate bookings can be made for the same time slot. For example, setting this to 3 allows three different customers to book the same day before that date becomes unavailable. Defaults to 1, which means each date can only be booked once. So if you are renting out a single room, this should be set to 1. If you are renting out 10 bikes, this should be set to 10
Dates
Allow overlaps
Available for overnight bookings only. When enabled, a new booking can begin on the same day that an existing booking ends, so check-out and check-in on the same date are permitted. Leave this unchecked if you need a full day between consecutive bookings for cleaning or preparation.
Bookings start
Restricts which day of the week a booking can begin. Select a specific day (e.g. Monday) to enforce weekly rental patterns, or leave it set to “Any” to allow bookings to start on any day.
Min booking length
Sets the minimum number of units (days, nights, or weeks) a customer must book. Customers will not be able to select a booking shorter than this length. Leave blank or set to 1 if there is no minimum requirement.
Max booking length
Sets the maximum number of units a customer can book in a single reservation. Leave blank or set to 0 if there is no upper limit. This is useful for properties that only accept short-term bookings.
Postpone start
Defines a minimum notice period in days before a booking can begin. For example, setting this to 2 prevents customers from booking dates within the next two days, giving you time to prepare. Set to 0 to allow same-day bookings.
Buffer period
Adds a gap (in units) after each booking during which the product cannot be re-booked. This is useful for scheduling cleaning, maintenance, or travel time between reservations. Set to 0 if no buffer is needed.
Buffer periods are always measured in days.
Last bookable date
Prevents customers from making bookings beyond a specific date. This is useful for seasonal rentals or products with a defined availability window. Leave blank to allow bookings indefinitely into the future.
Disable days of the week
Check the days of the week on which this product should never be available for booking. Any day ticked here will be greyed out in the customer-facing date picker and cannot be selected, regardless of whether it has existing bookings. Use this to enforce patterns such as weekend-only or weekday-only availability.
Prices
Standard price
The base price charged per booking unit (day, night, or week). This is the default price customers see when making a booking. If your standard cost is $50 per night, ensure you have chosen ‘night’ as your booking unit and enter 50 in this field. If your standard cost is $275 per week, ensure you choose ‘week’ as the booking unit and enter 275 here.
The price can be overridden for specific date ranges using Custom Pricing in the Pricing tab.
Standard price (per role)
Allows you to set a different base price for specific customer roles (e.g. wholesalers, members). If a role-specific price is set, it will be used instead of the standard price for customers with that role. Leave blank to fall back to the standard price for that role.
Flat rate
When enabled, the standard price is charged as a single fixed fee regardless of how many units the customer books. This is useful for things like event tickets or transfers where the price is the same whether the booking is for one night or seven. When disabled, the total cost is the standard price multiplied by the number of units.
Price format
Allows you to customise the label shown alongside the booking price on the product page. Use {price} as a placeholder for the calculated price — for example, From {price} per night. Leave blank to use the default price display.
Front end
Hide quantity field
When enabled, hides the “Max bookings per unit” quantity selector from the customer-facing booking form. Use this when bookings are always single-unit and showing the field would add unnecessary complexity to the form.
Hide duration field
When enabled, hides the duration selector from the customer-facing booking form. Use this when the booking length is fixed or determined by the date picker alone, and the duration field would be redundant or confusing.
Hide cost field
When enabled, hides the calculated cost from the customer-facing booking form. Use this if you prefer to reveal pricing only at the cart or checkout stage, or if the cost is always £0 (free booking).
See this article for a comprehensive guide to pricing in Bookings for WooCommerce.
Availability
This shows the product’s own scaled-down version of the Dashboard, scoped to just this product. Depending on the date range you select, it displays as a calendar, a week diary, or a single-day diary, with a table of upcoming bookings underneath.
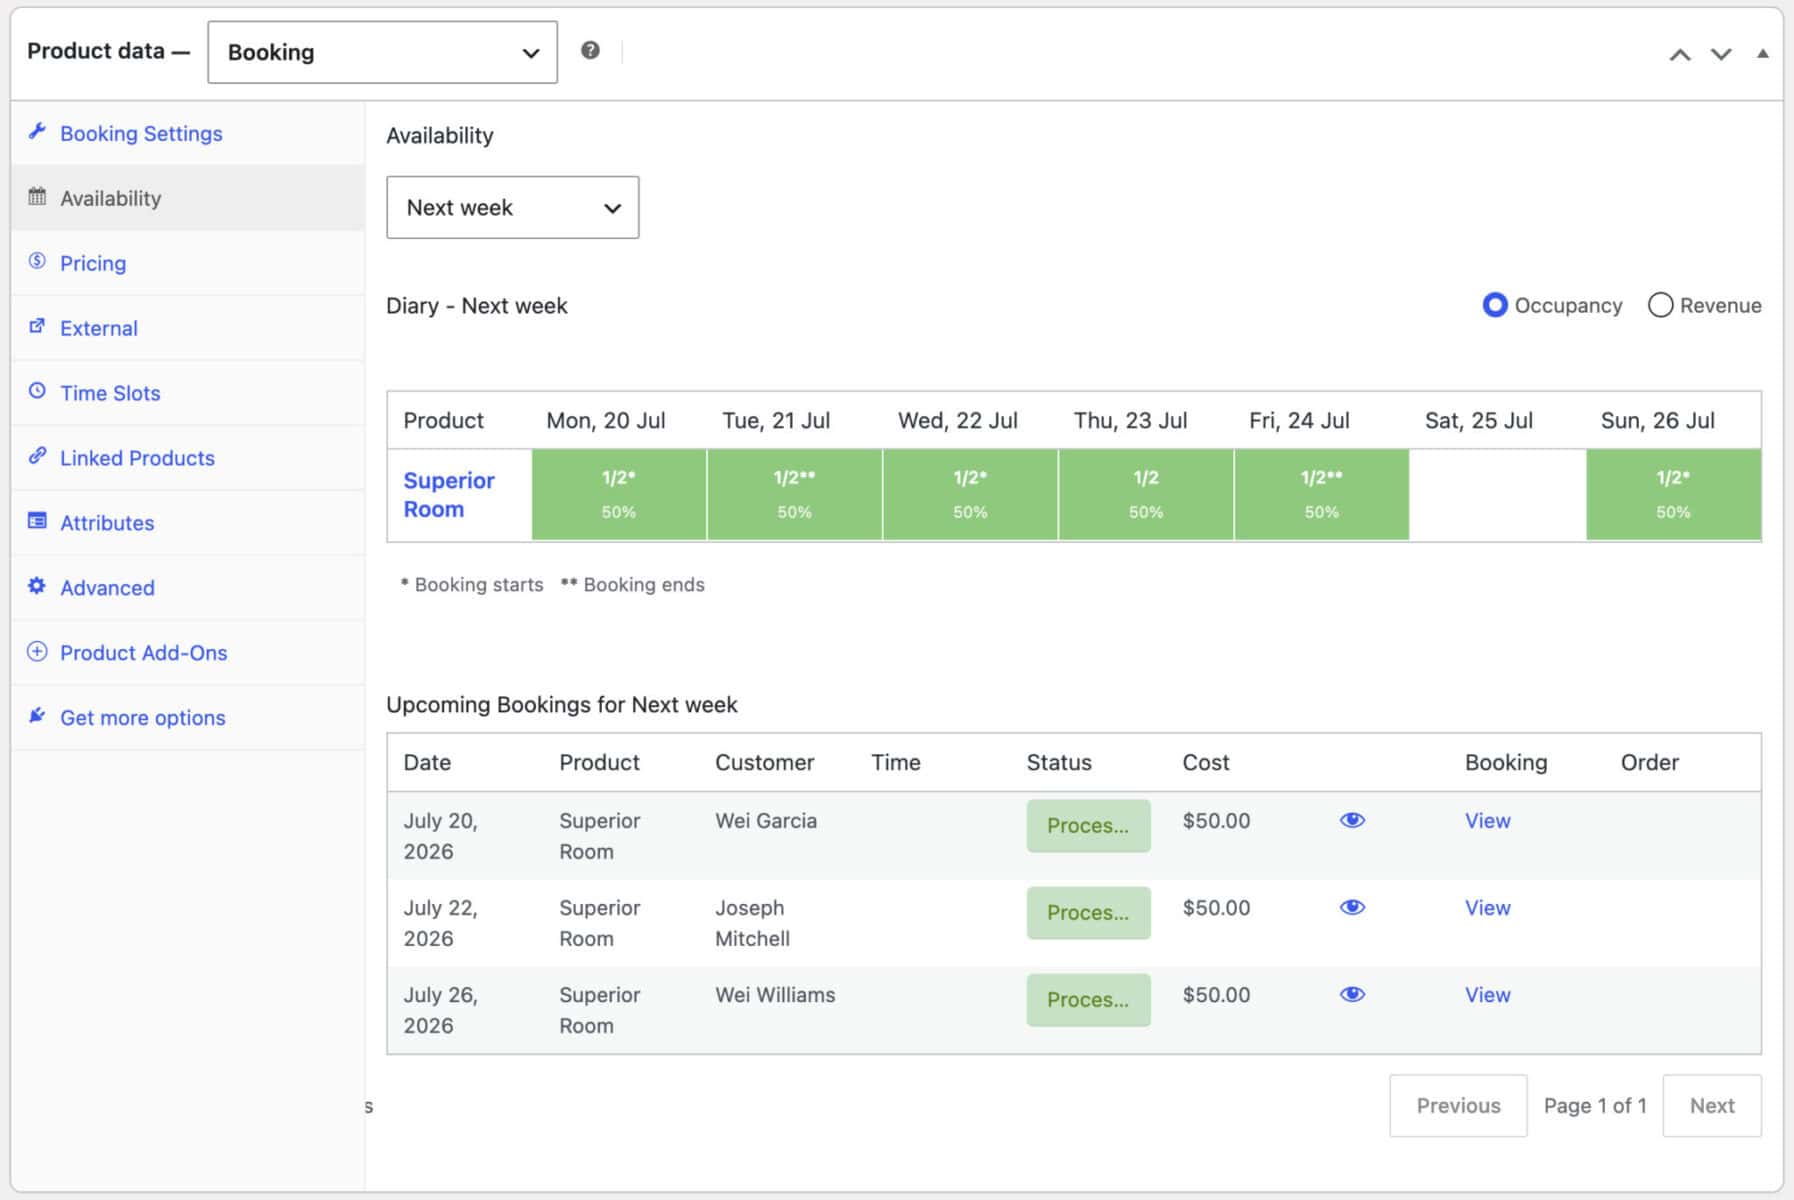
Time-slot products default to ‘Today’ so you see the time grid straight away, while day, night, and week products default to ‘This month’ so you see a full calendar. Switch between date ranges using the dropdown above the calendar.
Click any day, time slot, or row to open a panel showing the bookings for that date, with an ‘Add booking’ button so you can create one without leaving the product edit screen. Adding a booking refreshes the view in place, rather than reloading the whole page.
For an overview across every bookable product at once, rather than just this one, see Bookings > Dashboard.
Pricing
The pricing tab allows you to set non-standard pricing (e.g. seasonal prices) and discounts.
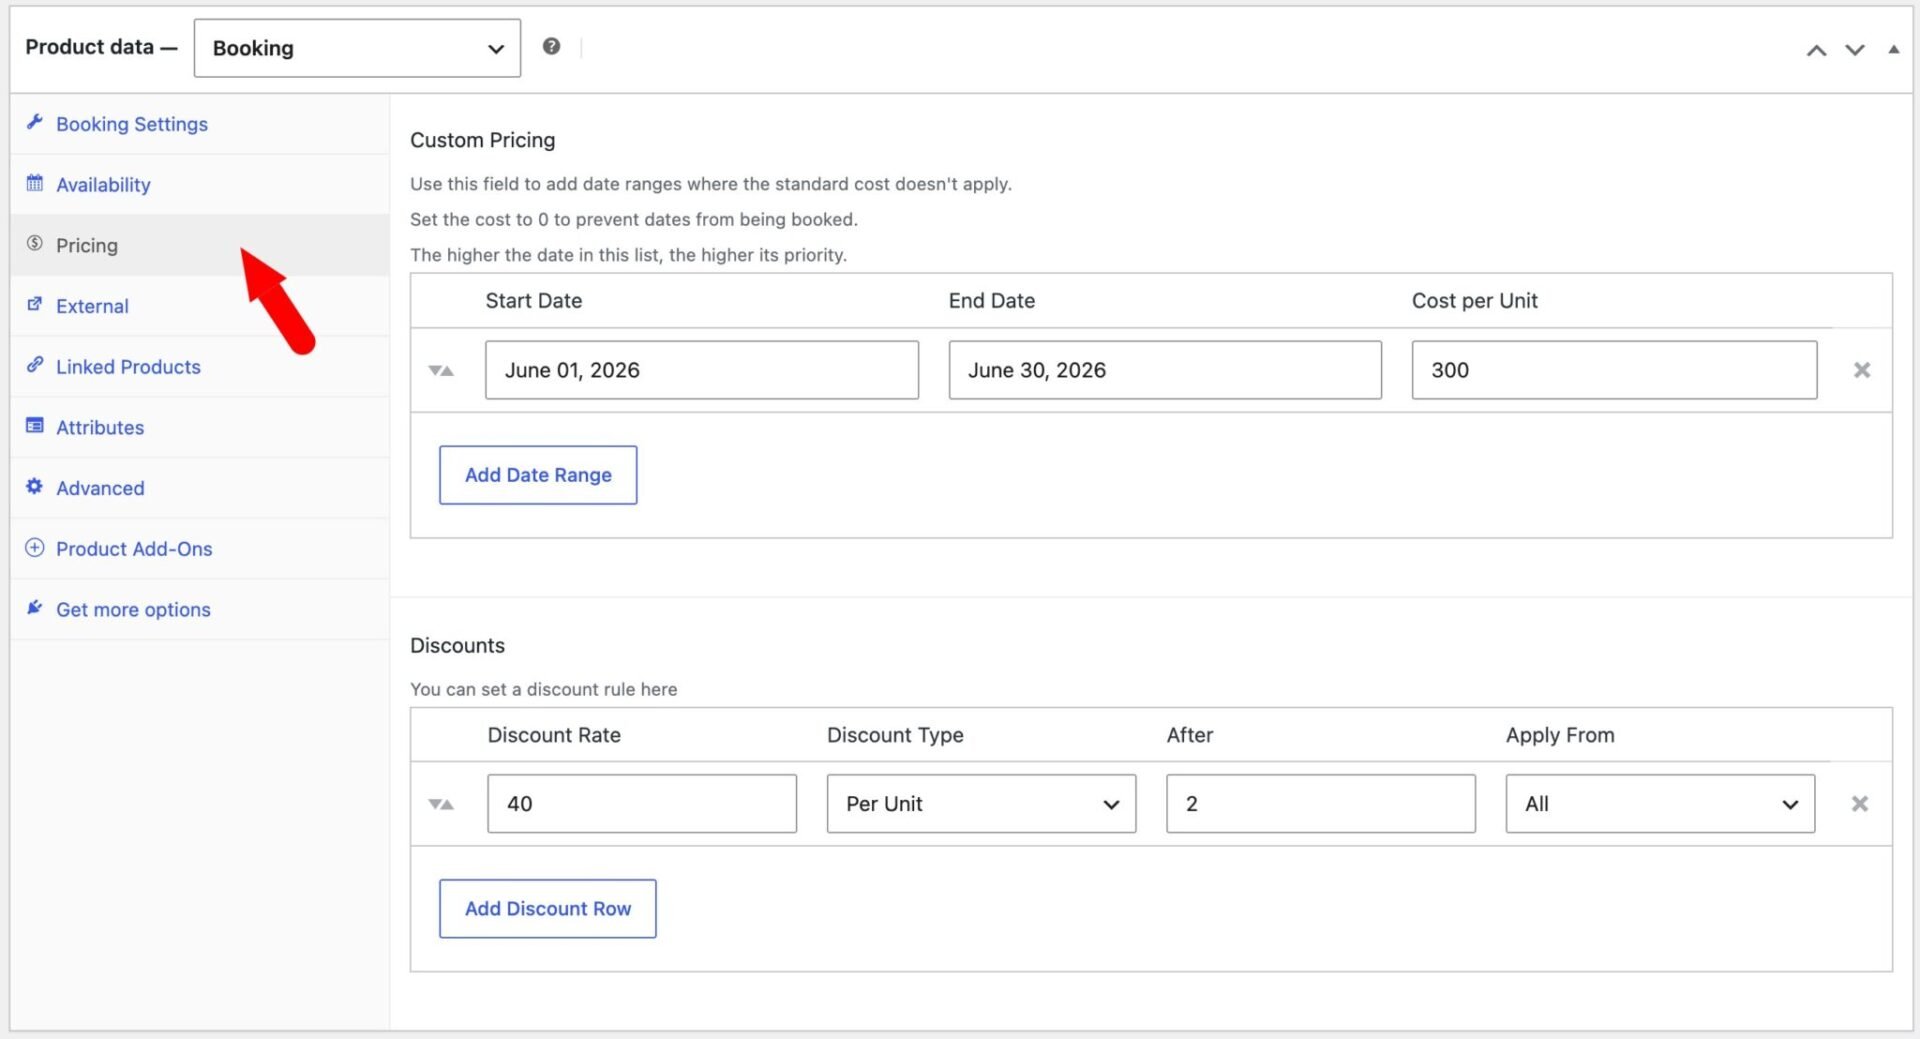
Custom Pricing
Use this section to define date ranges where a different price per unit applies instead of the standard price set in the Bookings tab. Each row takes a Start Date, End Date, and a Cost per day/night/week. Rows higher in the list take priority over lower rows, so if date ranges overlap, the topmost matching rule wins.
Setting the cost to 0 on a date range will block those dates from being booked entirely – customers will not be able to select any date within that range. This is useful for blocking out closed periods, maintenance windows, or holiday blackouts without removing the product entirely.
Rows can be reordered by dragging the sort handle on the left, and removed using the × button on the right. Click Add Date Range to add a new row.
Discounts
Use this section to set up length-of-stay discounts that are applied automatically when a booking reaches a certain number of units. Each discount row has four fields:
Discount Rate: the size of the discount to apply. The meaning of this value depends on the Discount Type selected.
Discount Type: how the discount rate is interpreted. Percentage reduces the total cost by the given percentage. Fixed deducts a flat amount from the total cost. Per Unit deducts the rate multiplied by the number of booking units.
After: the number of units (days, nights, or weeks) a booking must reach before the discount is applied. For example, entering 7 means the discount only activates on bookings of 8 or more units.
Apply From: controls which part of the booking the discount is applied to. All applies the discount to the entire booking cost. Partial applies it only to the units beyond the threshold set in the After field — units up to that threshold are charged at the standard rate.
Multiple discount rows can be added to create tiered pricing — for example, a 10% discount after 3 nights and a 20% discount after 7 nights. Rows can be reordered by dragging.
External
The External tab is used for settings for external, third-party sites like Airbnb, Booking.com, etc
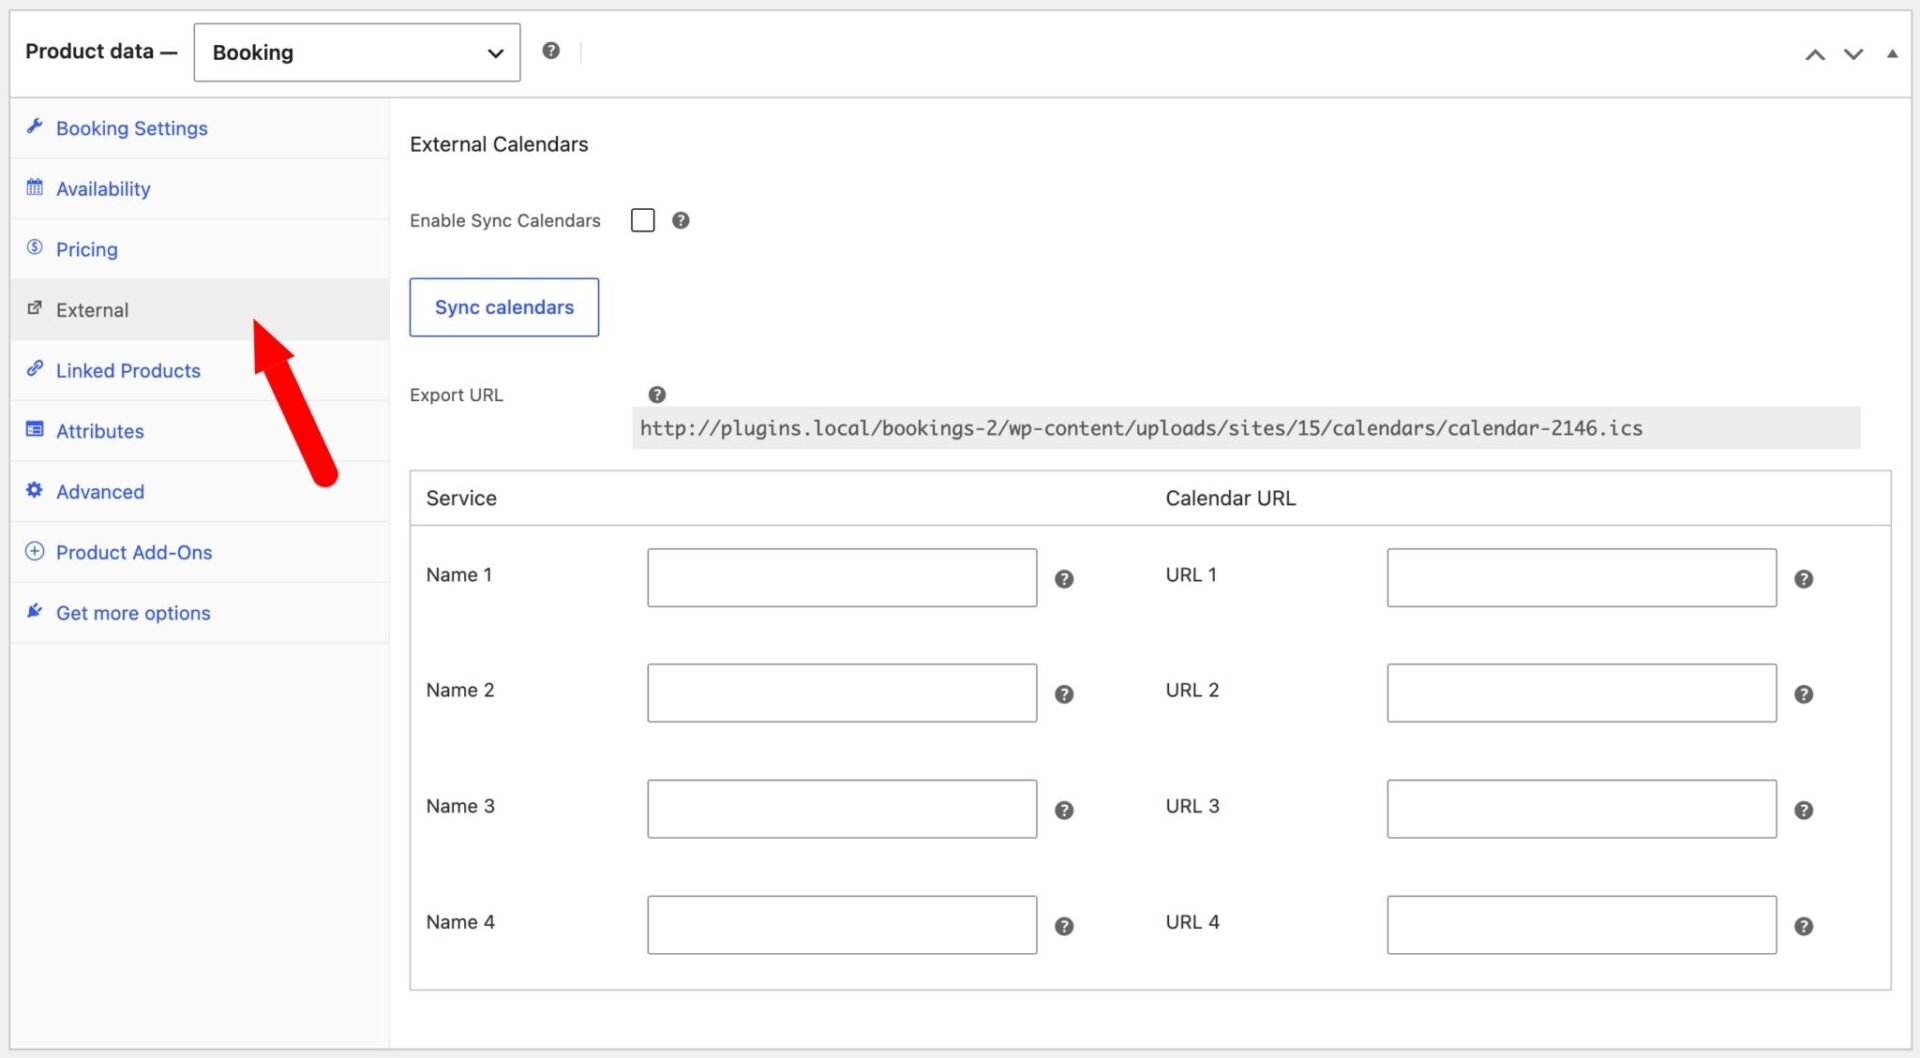
Enable Sync Calendars
Enables two-way calendar synchronisation between this product and external booking platforms such as Airbnb or Booking.com. When enabled, a unique Export URL is generated for this product – add this .ics link to any external service so it can read your bookings. Note that calendar sync works best when the booking unit is set to Day and Max bookings per unit is set to 1; a warning will be shown if either condition is not met.
Export URL
A read-only .ics feed URL that other services can subscribe to in order to import bookings for this product. Copy this link and paste it into the “import calendar” or “blocked dates” field of your external platform. The feed updates automatically as new bookings are made.
Sync calendars (button)
Manually triggers an import of all external calendars configured in the table below, pulling in any blocked dates that have been added on those services since the last sync. Use this after first adding a new external calendar URL to immediately import its current bookings, without waiting for the next scheduled sync.
Service / Calendar URLs
Each row connects this product to one external booking platform. Enter a Name (e.g. Airbnb, Booking.com) to identify the service, and paste the platform’s .ics feed URL into the Calendar URL field. Dates that are blocked in the external calendar will be marked as unavailable for this product. Up to four external calendars can be connected per product.
See this article for more information on syncing with third-party booking sites.
When you’ve set up your product, click Publish and it’s live.
Time slots
See this article for how to create time slots for your booking.
How to make dates unavailable
Maybe there are some dates that you don’t want to make your property or facility available. You can block out dates where bookings can’t be made by adding non standard date ranges with a cost of 0. This will prevent these dates from being selected as a start or end date. Please note that you will need to book out time either side of the blocked dates if your booking duration is longer than one unit.
To make some dates unavailable, use the ‘Custom Pricing’ section on the ‘Pricing’ tab. Click on ‘Add Date Range’ to create a new row, then add the first and last dates that you want your property to be unavailable. Enter cost as 0.
How to allow bookings on the weekend only
You can make your property available for weekend rental only by setting the start date and the maximum booking length.
For example, if you would like bookings to start on a Friday and end on a Sunday:
- Set the ‘Booking unit’ to night
- Set the ‘Bookings start’ field to ‘Friday’
- Set the ‘Max booking length’ to 2
Users will only be able to start their booking on Friday and will have to end it by Sunday. If you would like to ensure that they can’t book a single night, then set the ‘Min booking length’ to 2 as well.