How to create a booking page for skip/dumpster hire in WooCommerce
If you run a skip or dumpster hire business, taking bookings online can save you hours of back-and-forth calls and emails. In this tutorial, you’ll learn how to set up a fully functional skip/dumpster rental page in WooCommerce – including daily pricing, rental period limits, longer-hire discounts, and extra options like skip placement and waste type.
You’ll need two plugins: Bookings for WooCommerce to handle the date-based rental logic, and WooCommerce Product Add-Ons Ultimate to add the extra options. You can buy each plugin separately or as part of the WooCommerce Bookings and Product Add-Ons Bundle.
WooCommerce Bookings and Product Add-Ons Bundle
Create a booking page for skip/dumpster hire
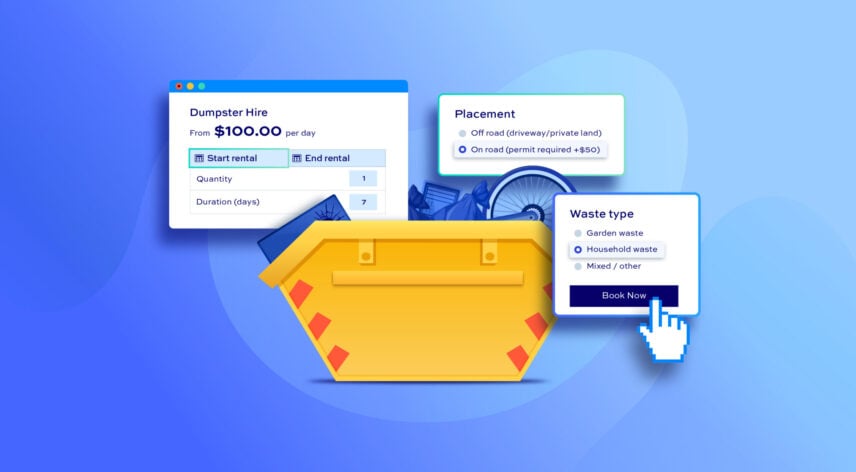
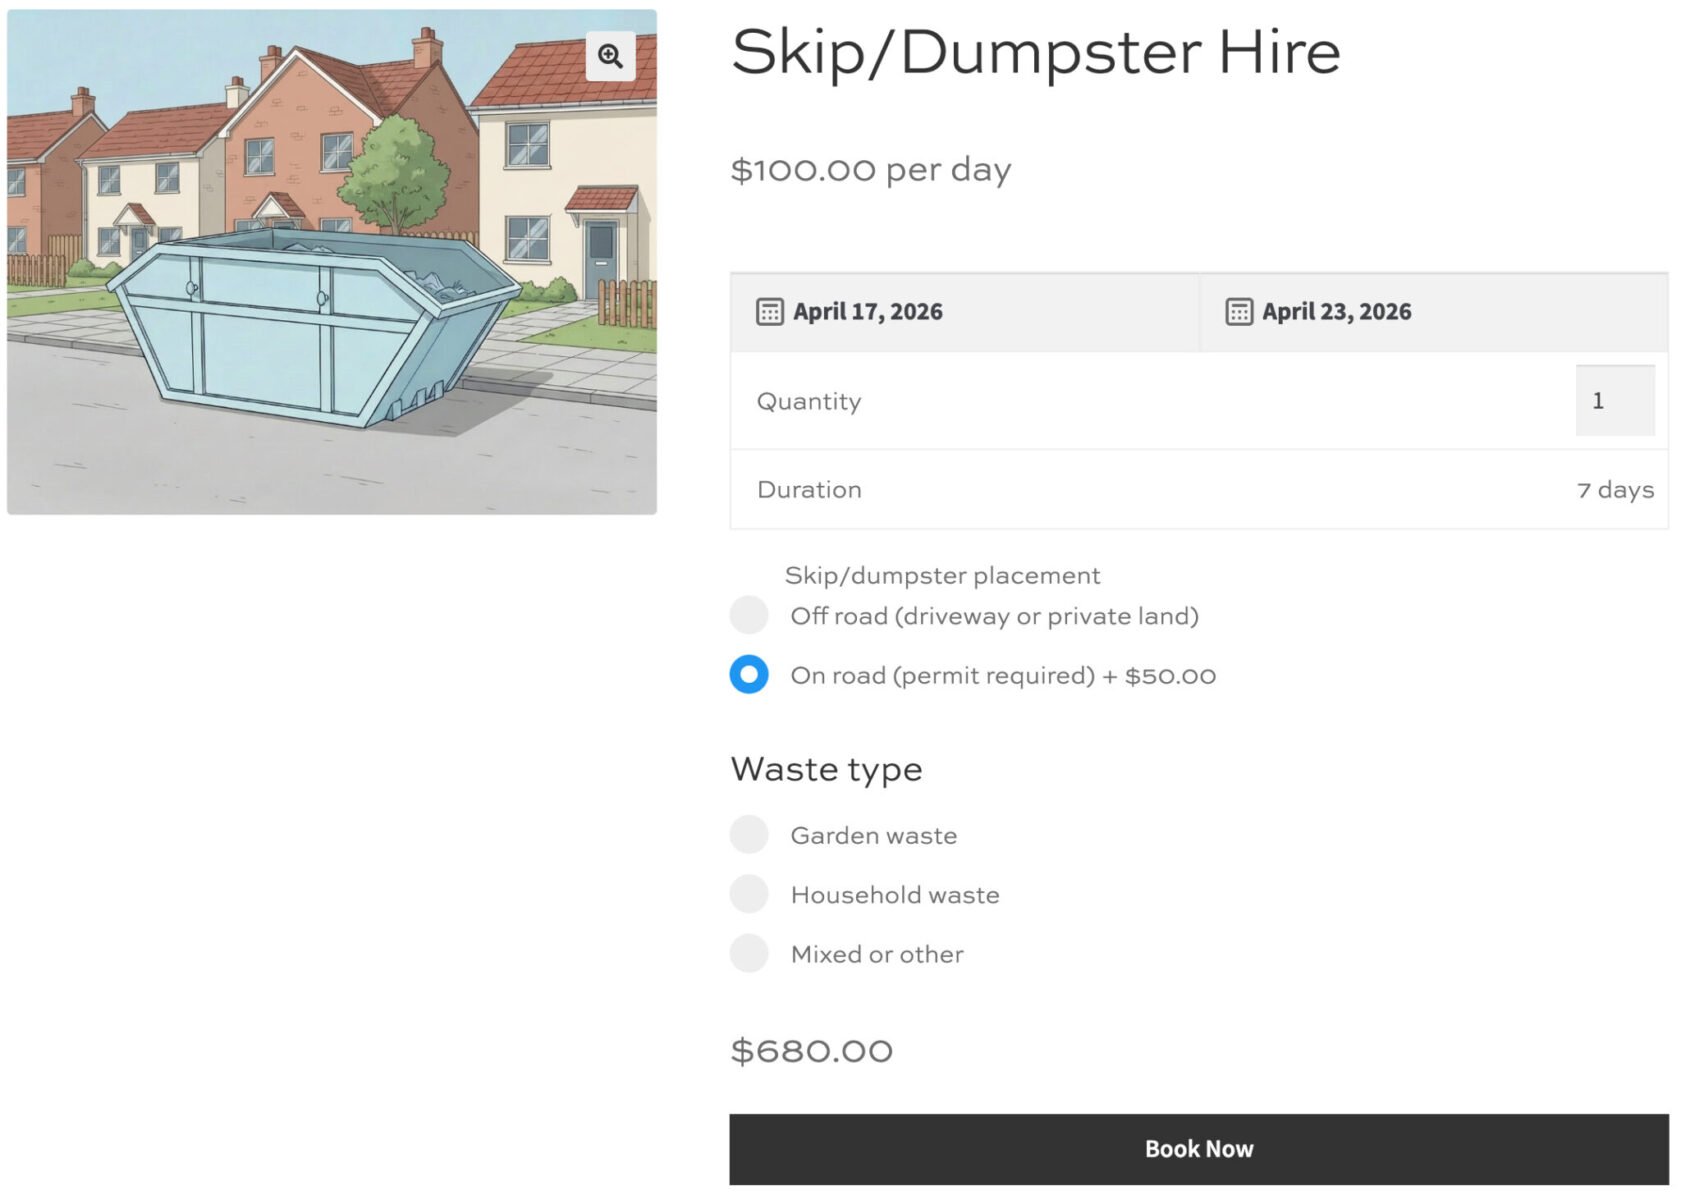
When a customer visits your skip/dumpster hire product page, they’ll see a date picker to choose their start and end dates. The total cost is calculated automatically based on how many days they select, with any applicable discounts applied. Below the date picker, they’ll choose where the skip/dumpster will be placed and what they’re putting in it, before adding to cart and checking out.
There’s a demo product here.

Skip/dumpster rental tutorial
Before starting, make sure you have:
- WooCommerce installed and active
- Bookings for WooCommerce installed and activated
- Product Add-Ons Ultimate installed and activated
When you purchase the plugins, you’ll receive a zip file by email. Download the zip then install the plugins by going to Plugins > Add New > Upload Plugin in your WordPress dashboard.
Step #1: Create the skip/dumpster hire product
Go to Products > Add New. Give the product a name – for example, “6-yard skip/dumpster hire” – and add a description explaining what’s included in the hire.
In the Product data section, open the product type dropdown and select Booking. Add a product image, then move on to configure the booking settings in the next step.

Step #2: Set up daily pricing
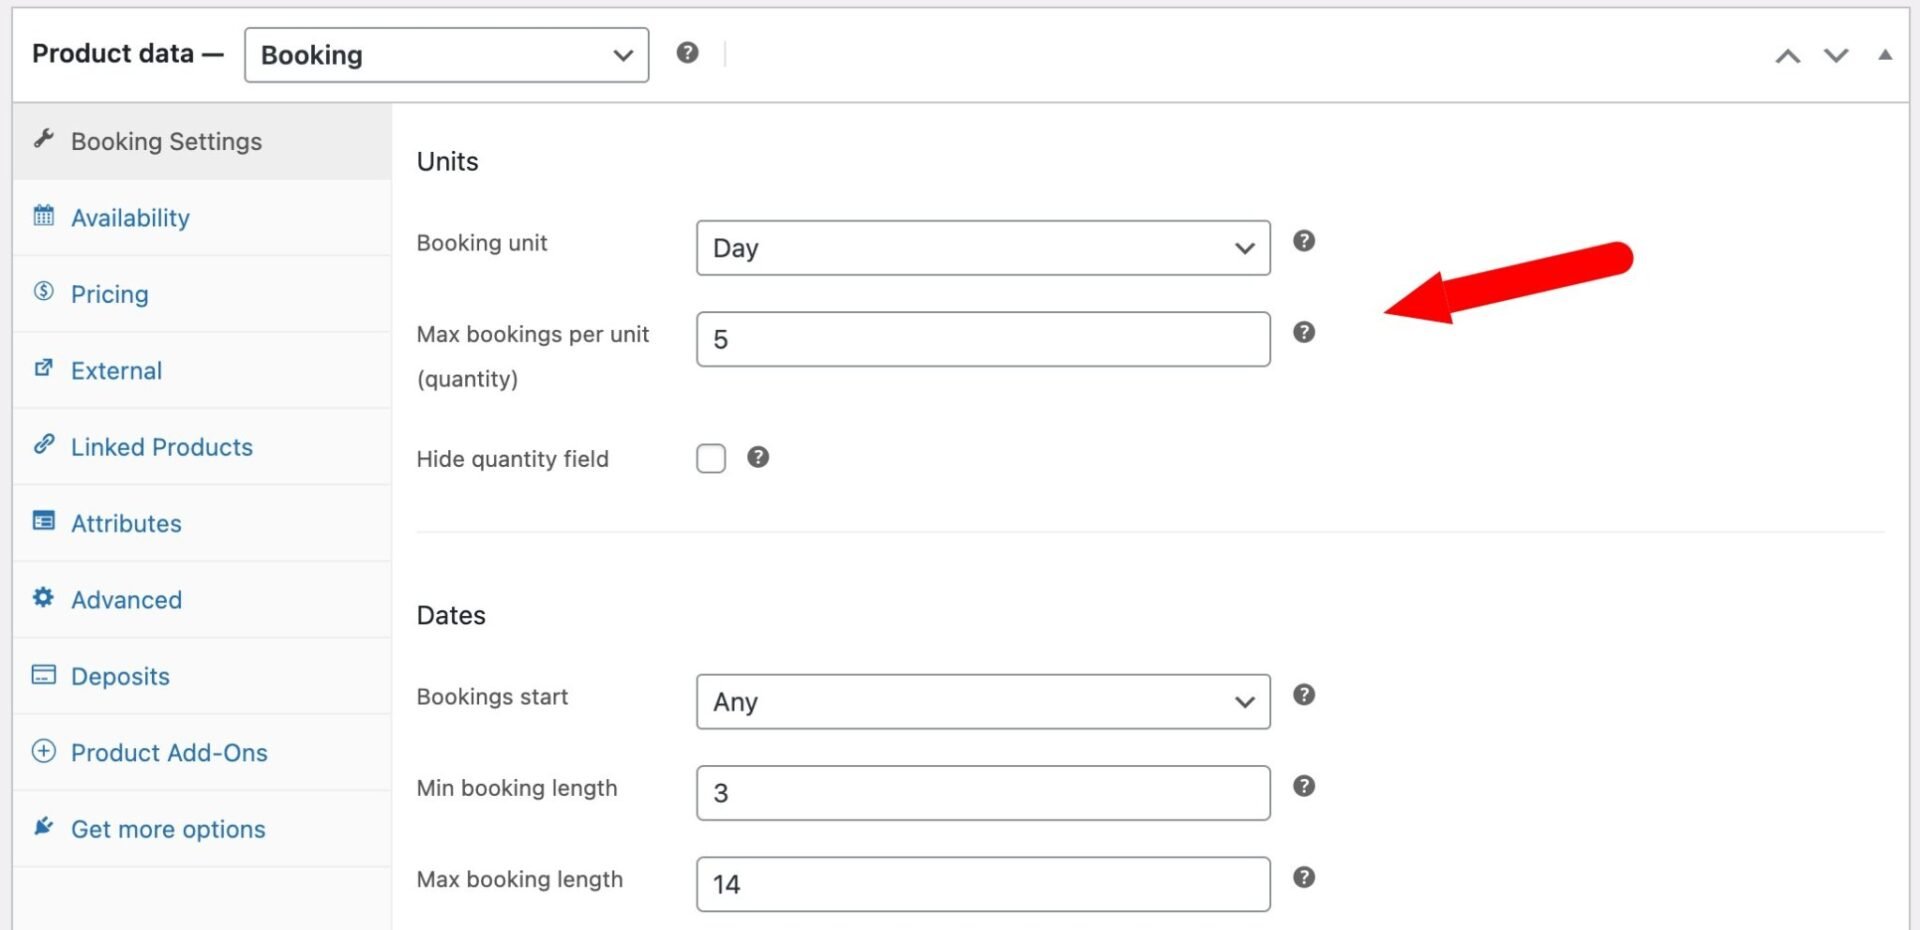
Set the Booking unit to Day and enter your daily hire rate in the ‘Standard cost’ field.

This tells the plugin to multiply the price by the number of days selected, with the total updating automatically on the product page as the customer picks their dates.
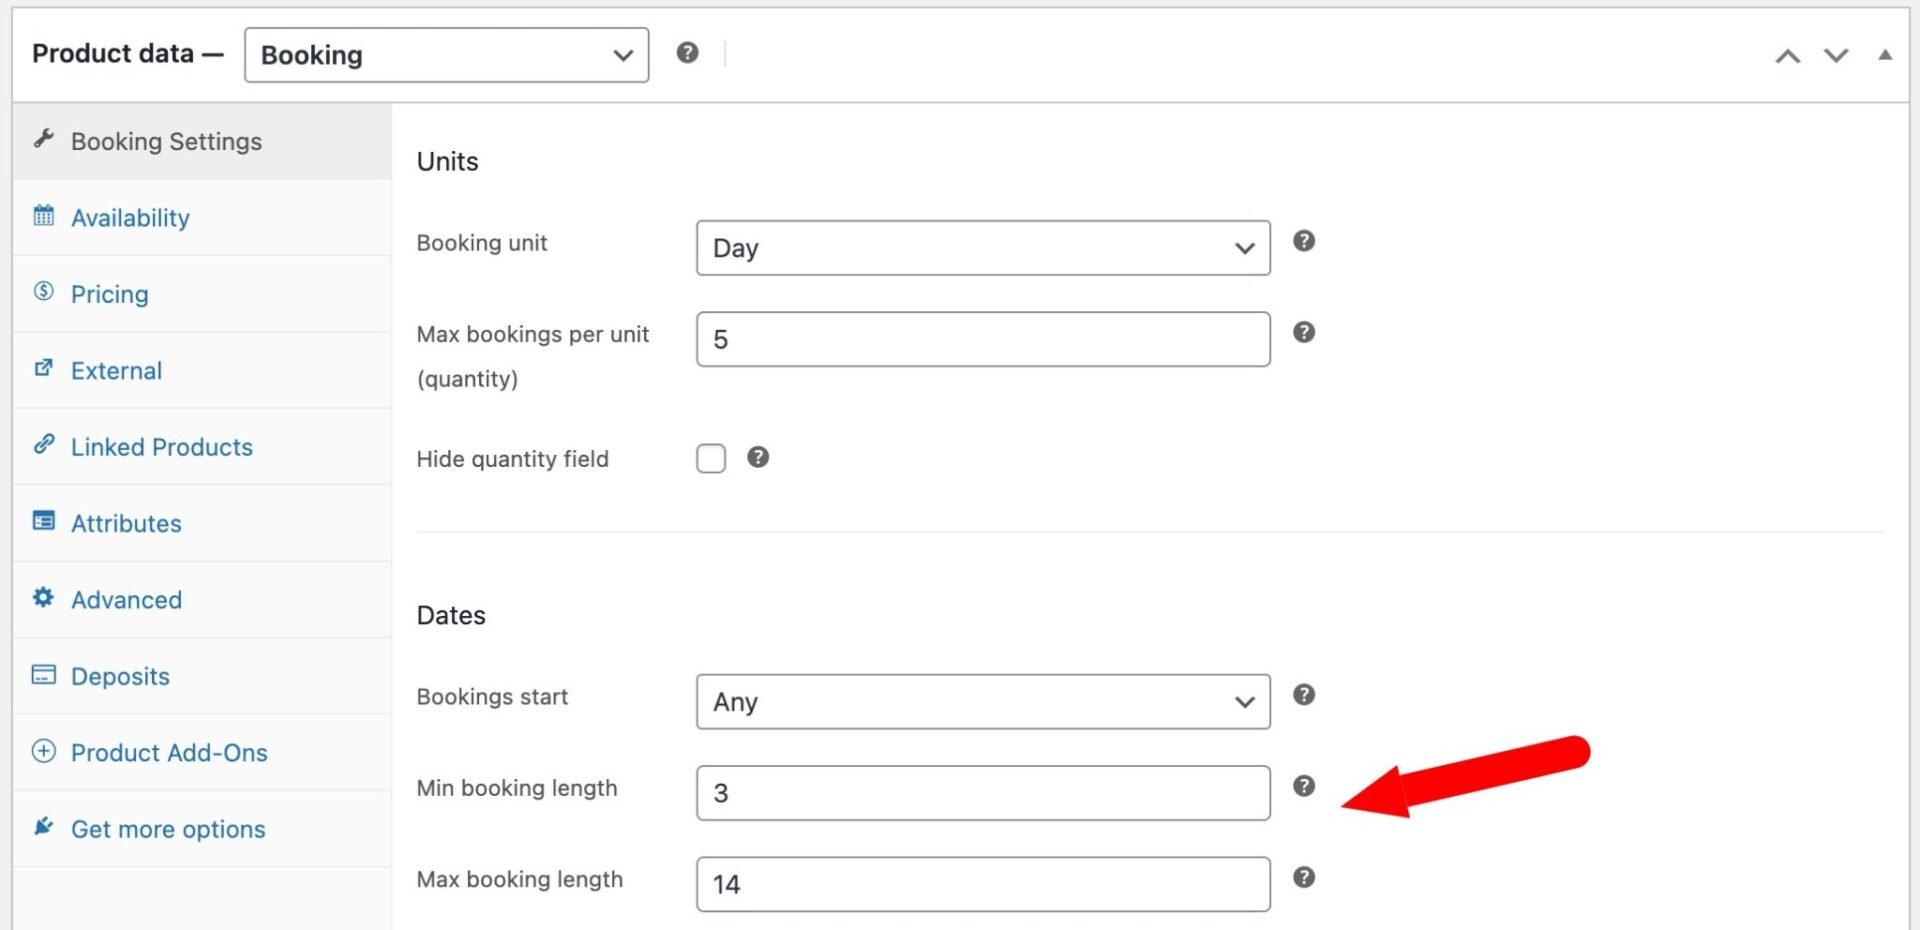
Step #3: Set the minimum and maximum rental period
You can use the ‘Min booking length’ and ‘Max booking length’ fields to determine many days a customer can hire the skip/dumpster for.
For example, you might set a minimum of 3 days (so customers can’t book for just one day) and a maximum of 14 days. Once saved, the calendar will prevent customers from selecting a date range outside these limits.
Step #4: Choose between price per day or flat rate
By default, the plugin multiplies your daily rate by the number of days selected. So a $50/day skip/dumpster hired for 7 days would cost $350. This is the standard per-day pricing model.
If you’d prefer to charge a fixed fee regardless of duration – for example, a flat $200 for any hire up to 7 days – you can enable the Flat rate option in the Bookings settings. This charges the base price once, no matter how many days are selected. The two approaches suit different business models, so choose the one that matches how you price your hires.
Step #5: Can you set a discount for longer hires?
Yes. Bookings for WooCommerce has a built-in discount feature that lets you reduce the price for longer rentals:
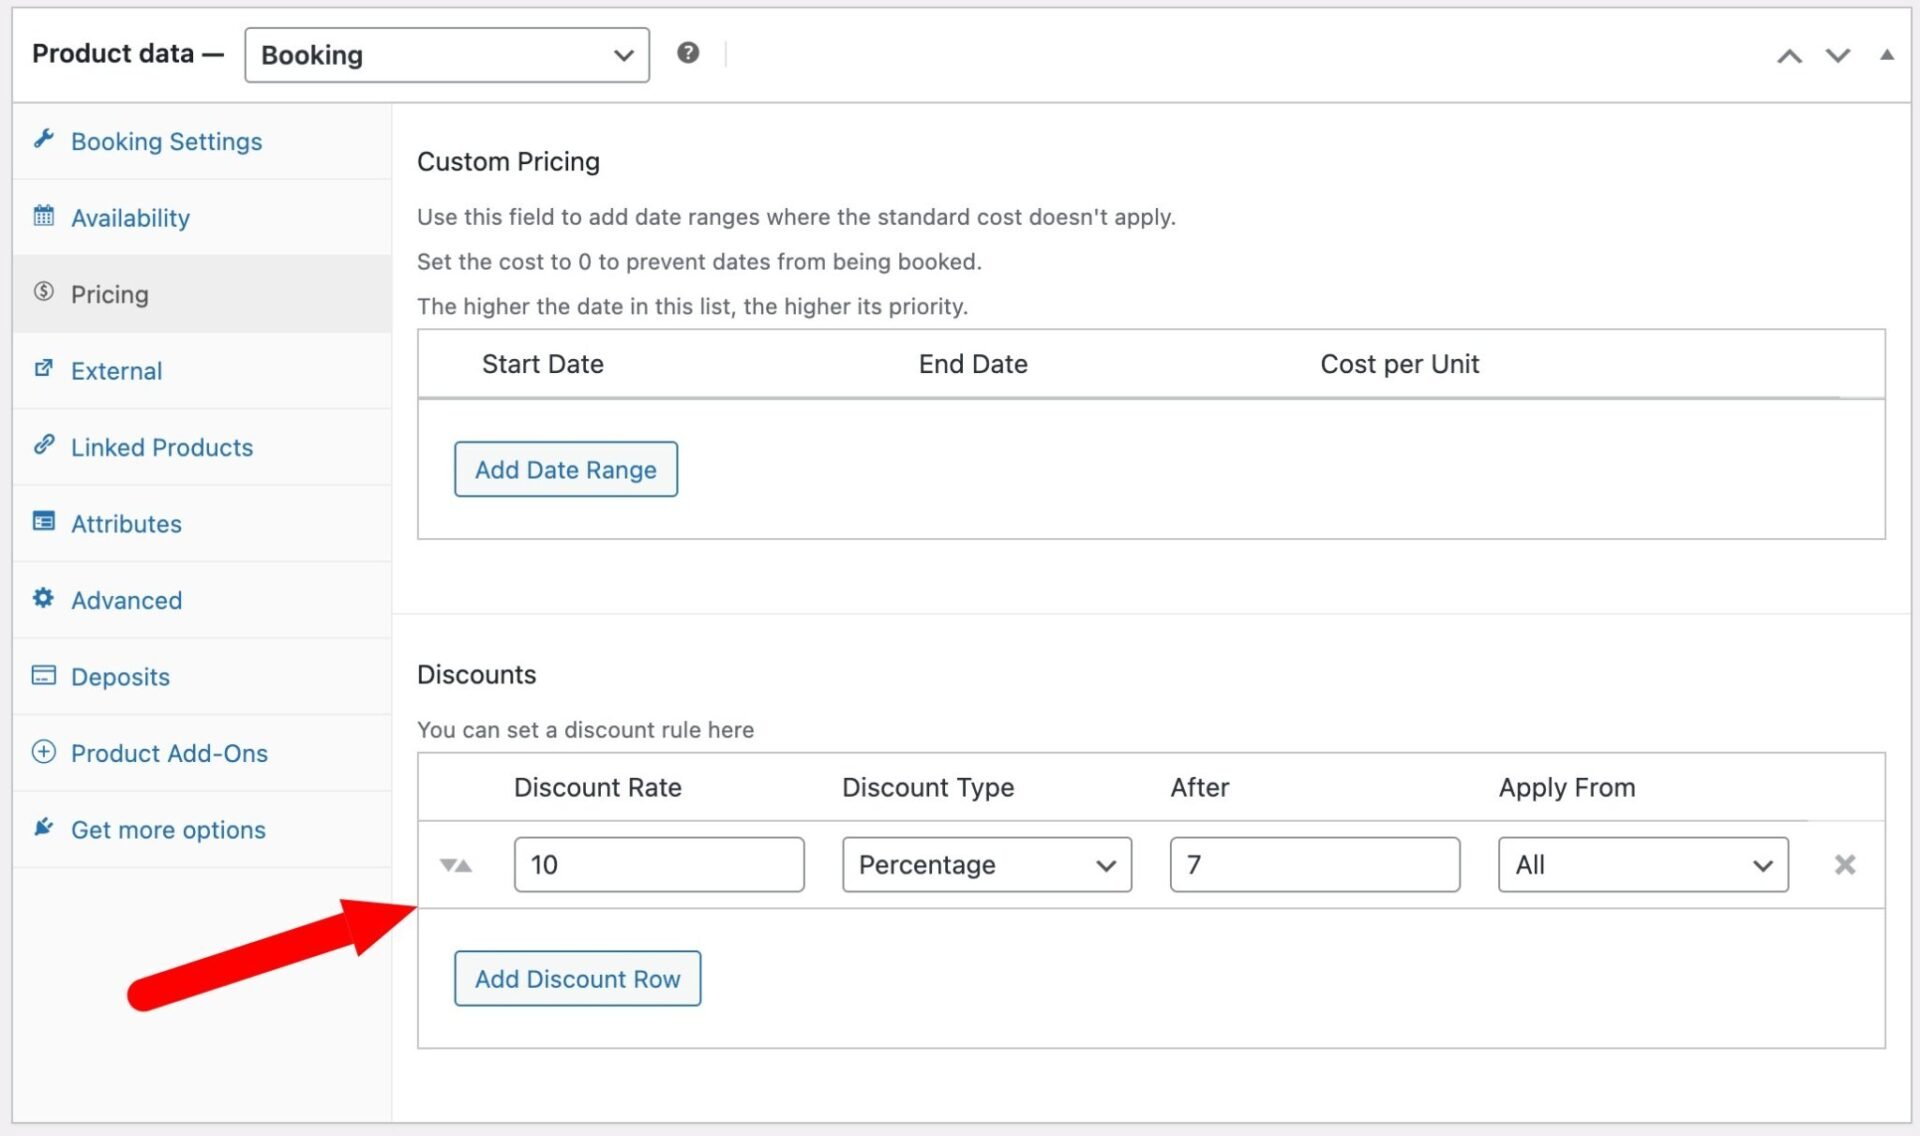
- Click the Pricing tab
- Click Add discount to create a new tier
- Set the minimum number of days and the discount amount. For example, you could offer 10% off for hires of 7 days or more
- To add a second tier – say, 20% off for 14 days or more – click Add discount again and configure the second rule
You can set each discount as a percentage or a fixed amount per booking unit, depending on your preference. The customer will see the discounted price reflected in the total as soon as they select a qualifying date range.
Step #6: Can multiple skips/dumpsters be hired on the same day?
Yes. The ‘Max bookings per unit’ setting on the Booking Settings tab controls how many skips/dumpsters you have available. Set this to the number of skips/dumpsters in your fleet – for example, if you have 5 skips/dumpsters, enter 5.
Once all five are booked on a particular day, those dates are automatically blocked in the calendar for new customers. The calendar can also display partial availability, so customers can see at a glance how many skips/dumpsters are still available on a given date.
Step #7: Add extra options with Product Add-Ons Ultimate
Product Add-Ons Ultimate integrates directly with Bookings for WooCommerce, letting you add extra questions and optional charges to the product page.
In this tutorial, we’ll add two sets of options – one for skip/dumpster placement and one for waste type – but you can add as many as you like.
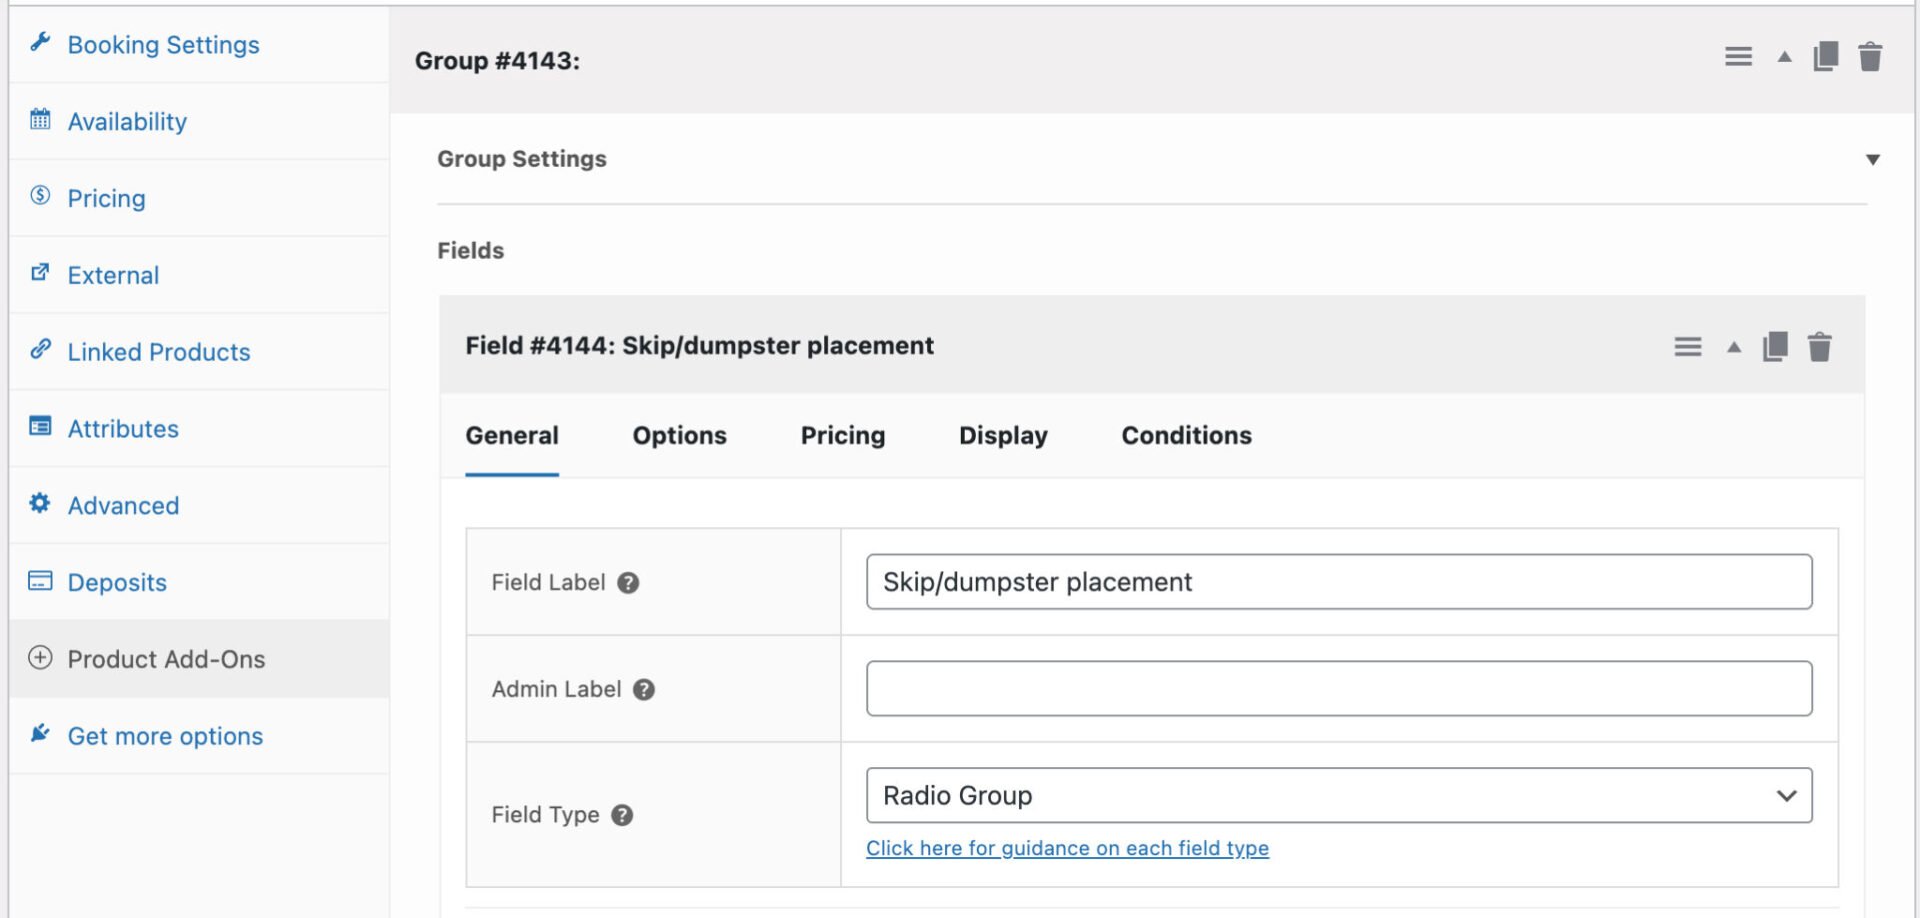
In the Product data section, click the Product Add-Ons tab. Click Add Group to create your first group of options.
Field 1: Skip/dumpster placement: on road or off road?
- Click Add Field and give the field a label such as “Skip/dumpster placement”
- Set the field type to Radio buttons or Select (dropdown). You could also use a swatch if you have images or icons to represent the options
- Add two options: “Off road (driveway or private land)” and “On road (council permit required)”
- If you charge extra for on-road placement, click the Pricing tab for that option and enter the surcharge amount
- Set the field to Required so customers must make a selection before adding to cart.
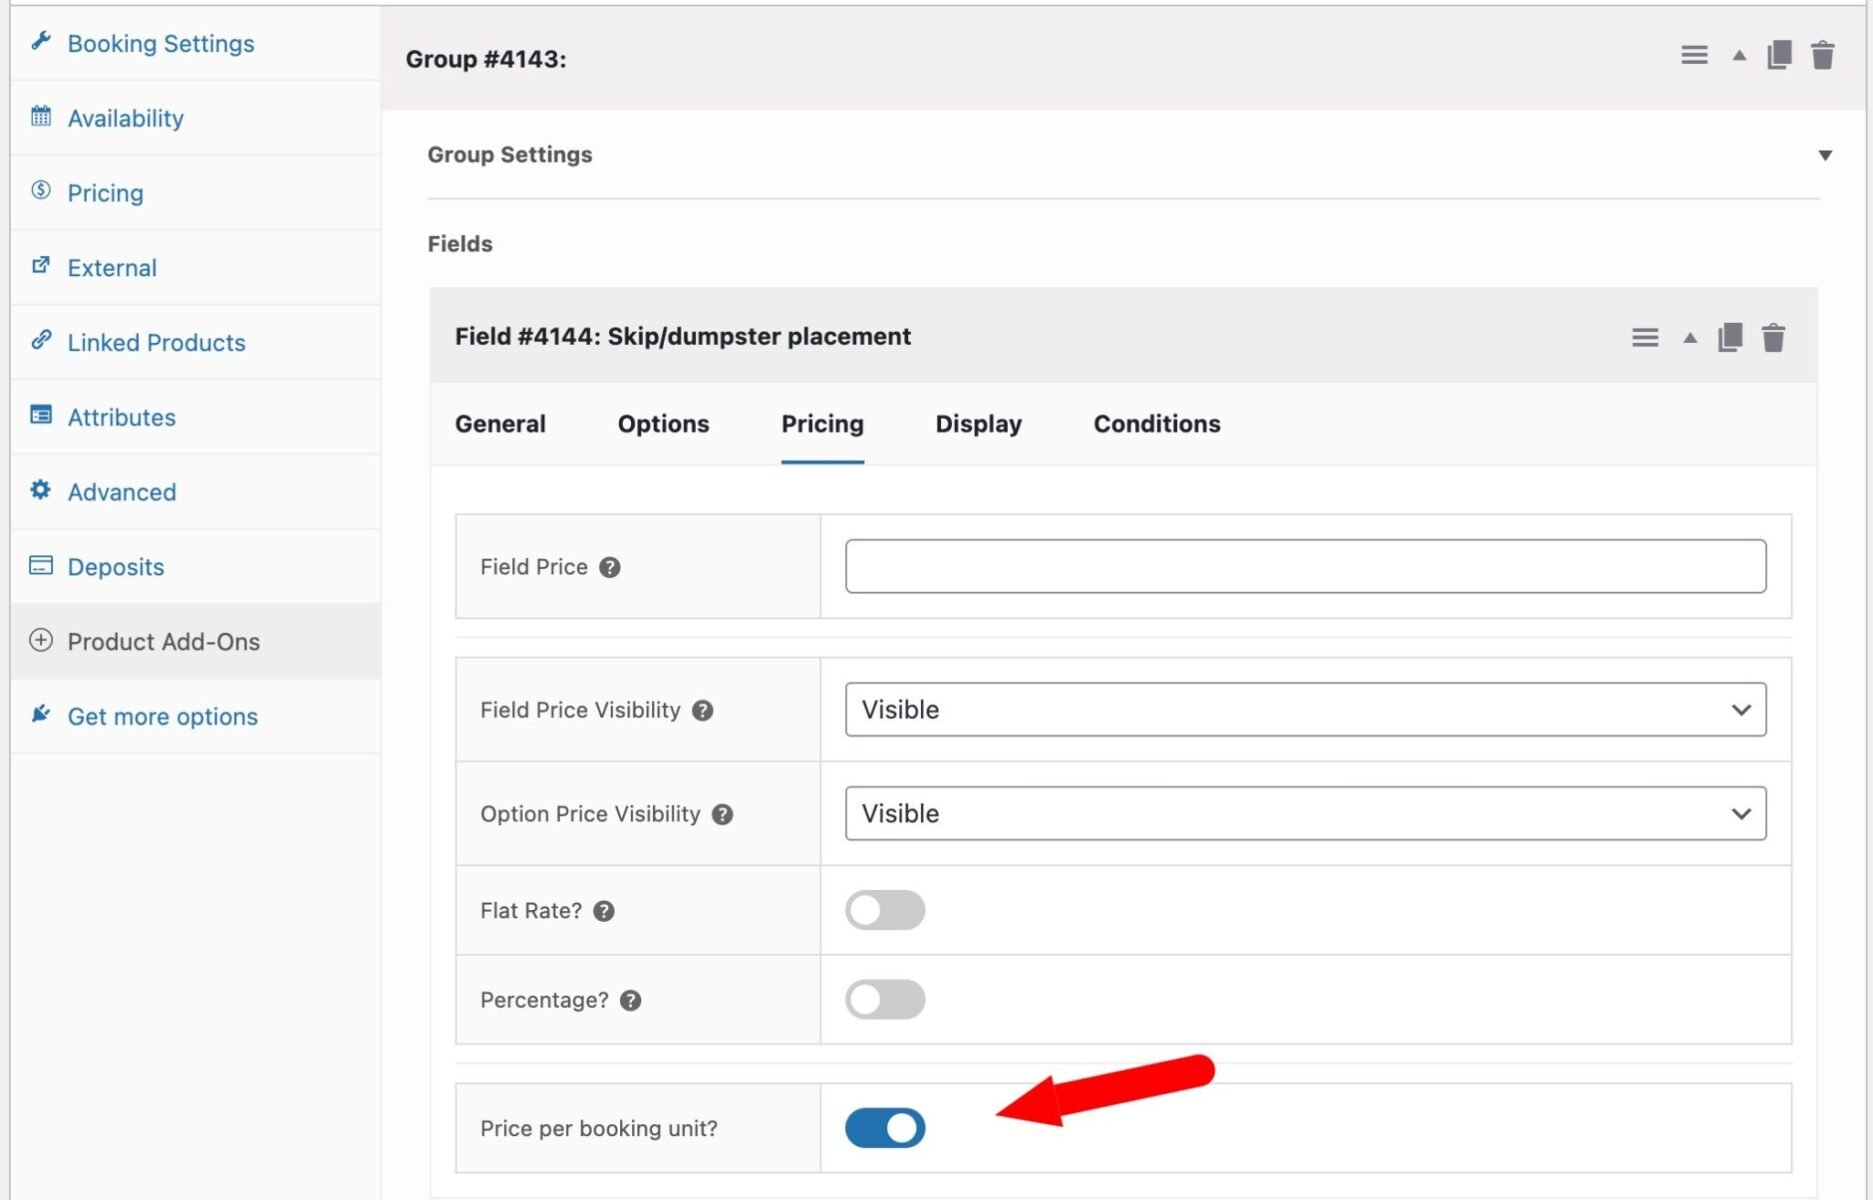
Note: if you want to charge options per day, just enable the ‘Price per booking unit’ option. This will multiply the price of the selected option by the number of days in the overall booking.
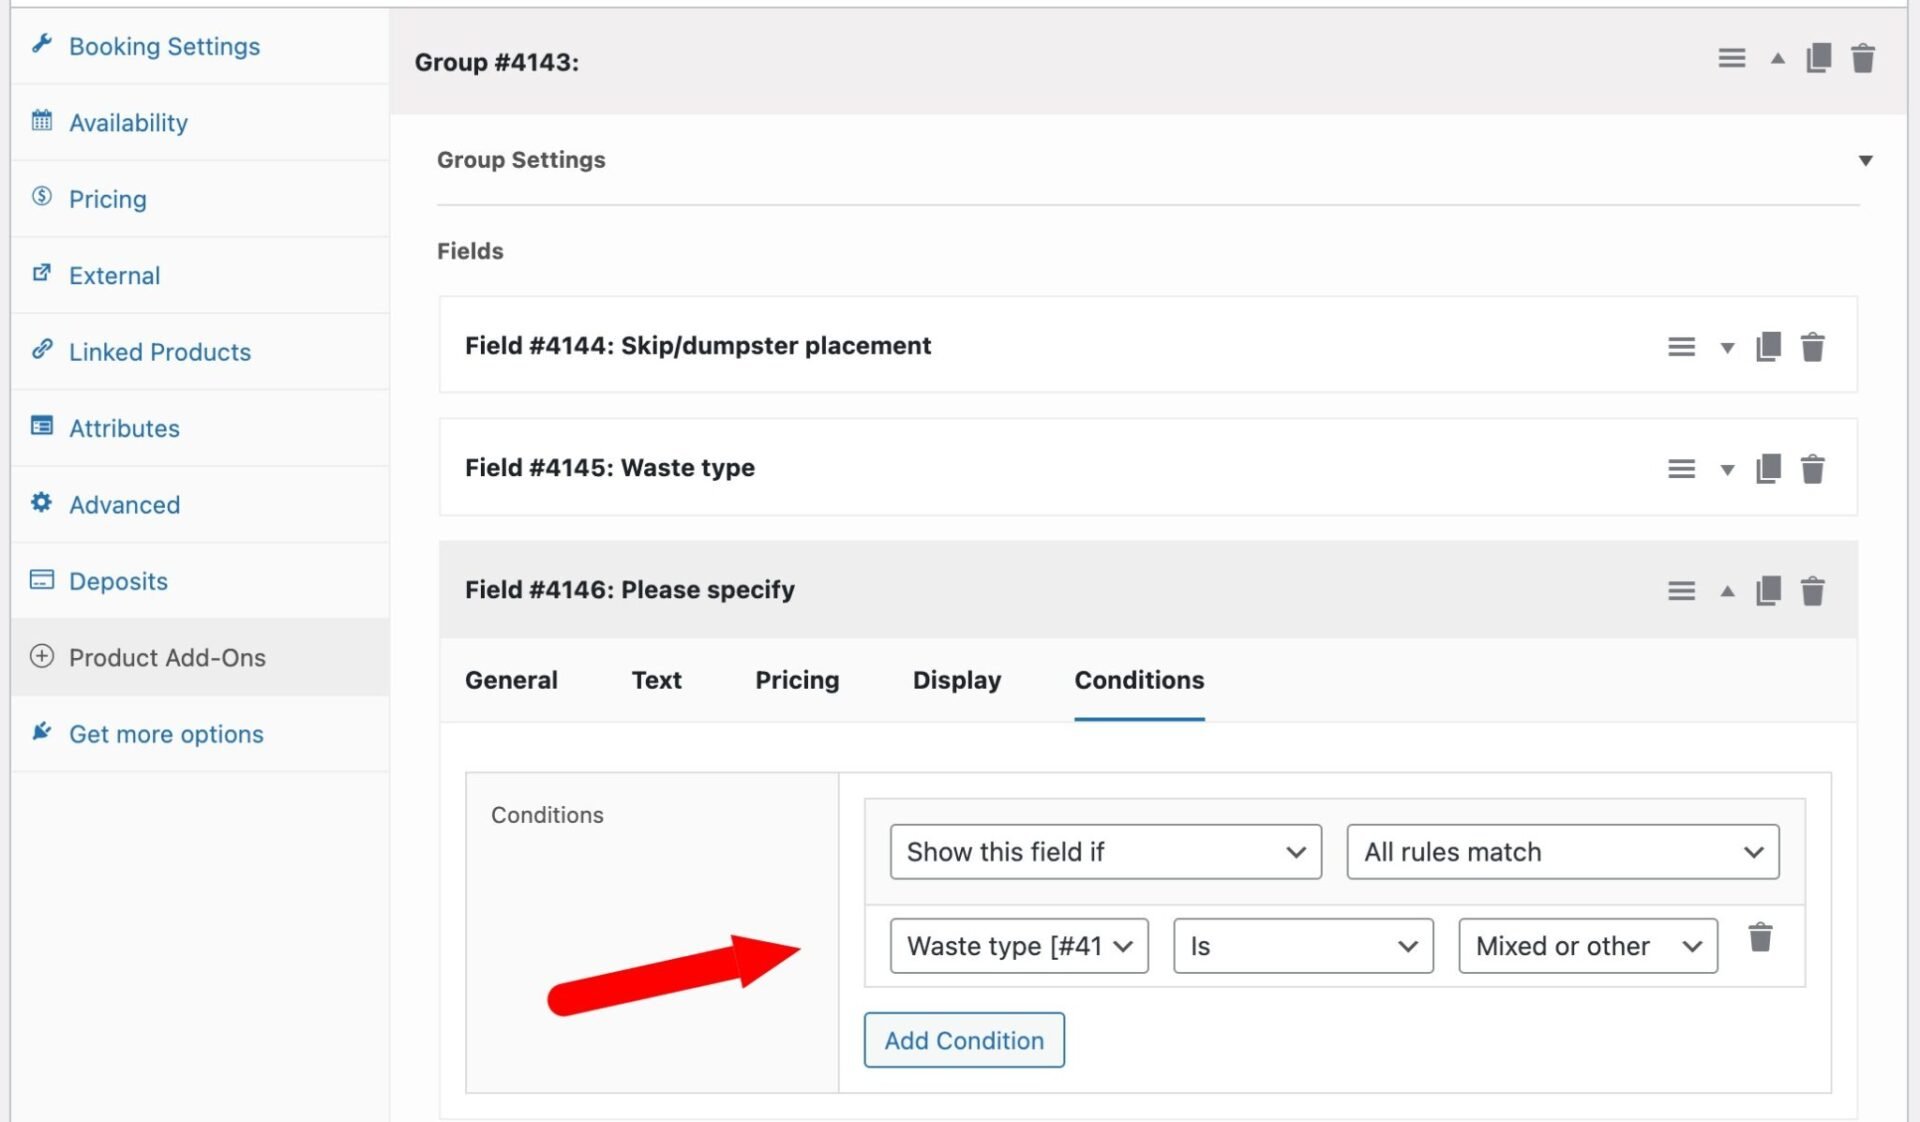
Field 2: What’s going in the skip/dumpster?
- Create a second field and call it “Waste type”
- Choose either Radio or Select field
- Add options as required, e.g. “Garden waste”, “Household waste”, and “Mixed or other”
- These can be free options if you just need the information, or you can attach different prices to each option if your pricing varies by waste type
- Set the field to Required if required
If you’d like to capture more detail when “Mixed or other” is selected, you can add a text field and use the Conditions tab to show it only when that option is chosen. Go to the Conditions tab on the text field, set the condition to Show if “Waste type” is “Mixed or other”, and save.
Step #8: What does the product page look like?
Once saved, visit the product page on the front end. Customers will see two date pickers – one for the hire start date and one for the end date – with unavailable dates greyed out. As they select their dates, the total cost updates in real time, including any applicable discount.
Below the date pickers, the skip/dumpster placement and waste type options appear. The total updates again if a surcharge option is selected, such as an on-road placement fee.
Here’s an example of what the pricing looks like in practice: a 7-day hire at $100/day would normally cost $700, but with a 10% discount for 7+ days applied, the customer sees $630 in the total – plus any add-on fees.
Step #9: How do you manage bookings in the admin?
All bookings appear under the Bookings menu item in your WordPress dashboard. Each booking shows the customer’s name, the hire dates, the product, and the order details.
From the product edit screen, there’s also a back-end ‘Availability’ tab showing a calendar, week diary, or single-day diary depending on the date range. This lets you see at a glance which dates are taken and how many skips/dumpsters are available.
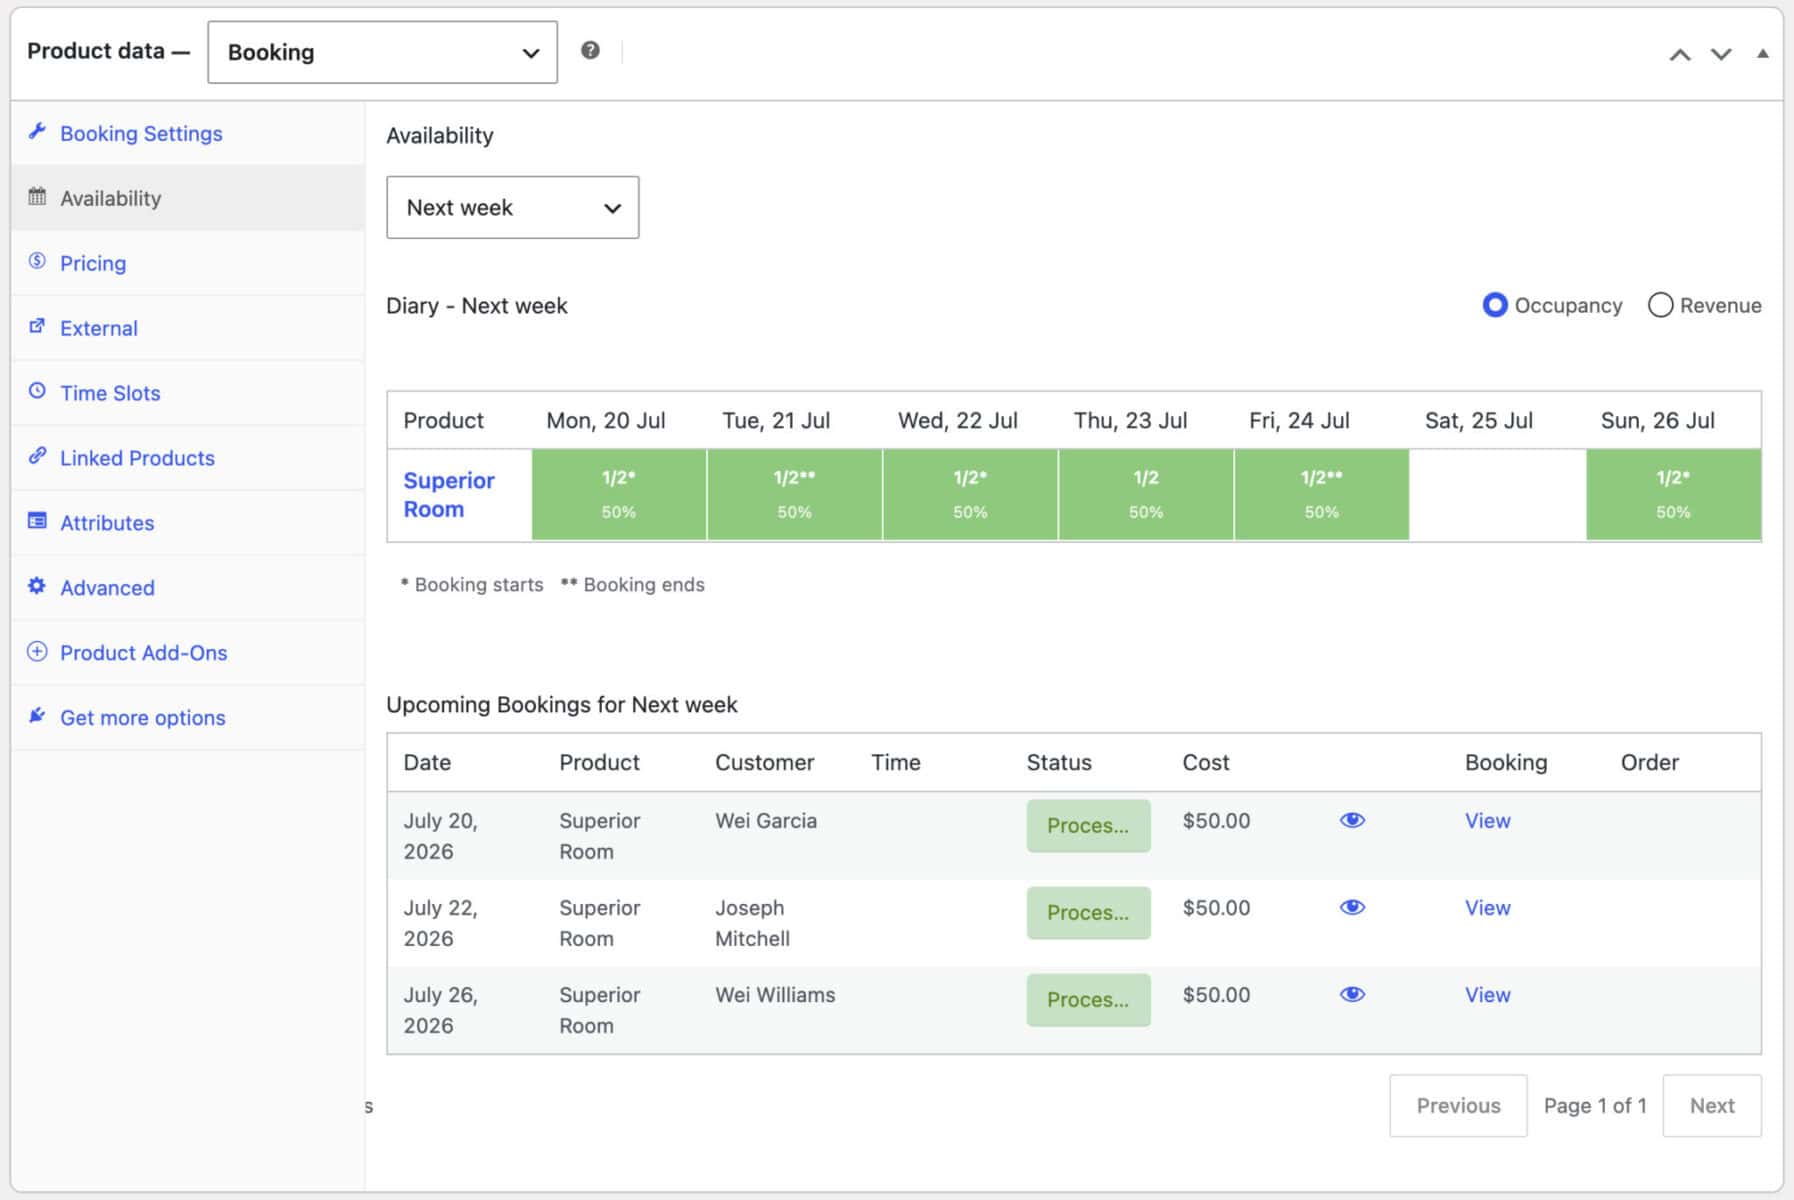
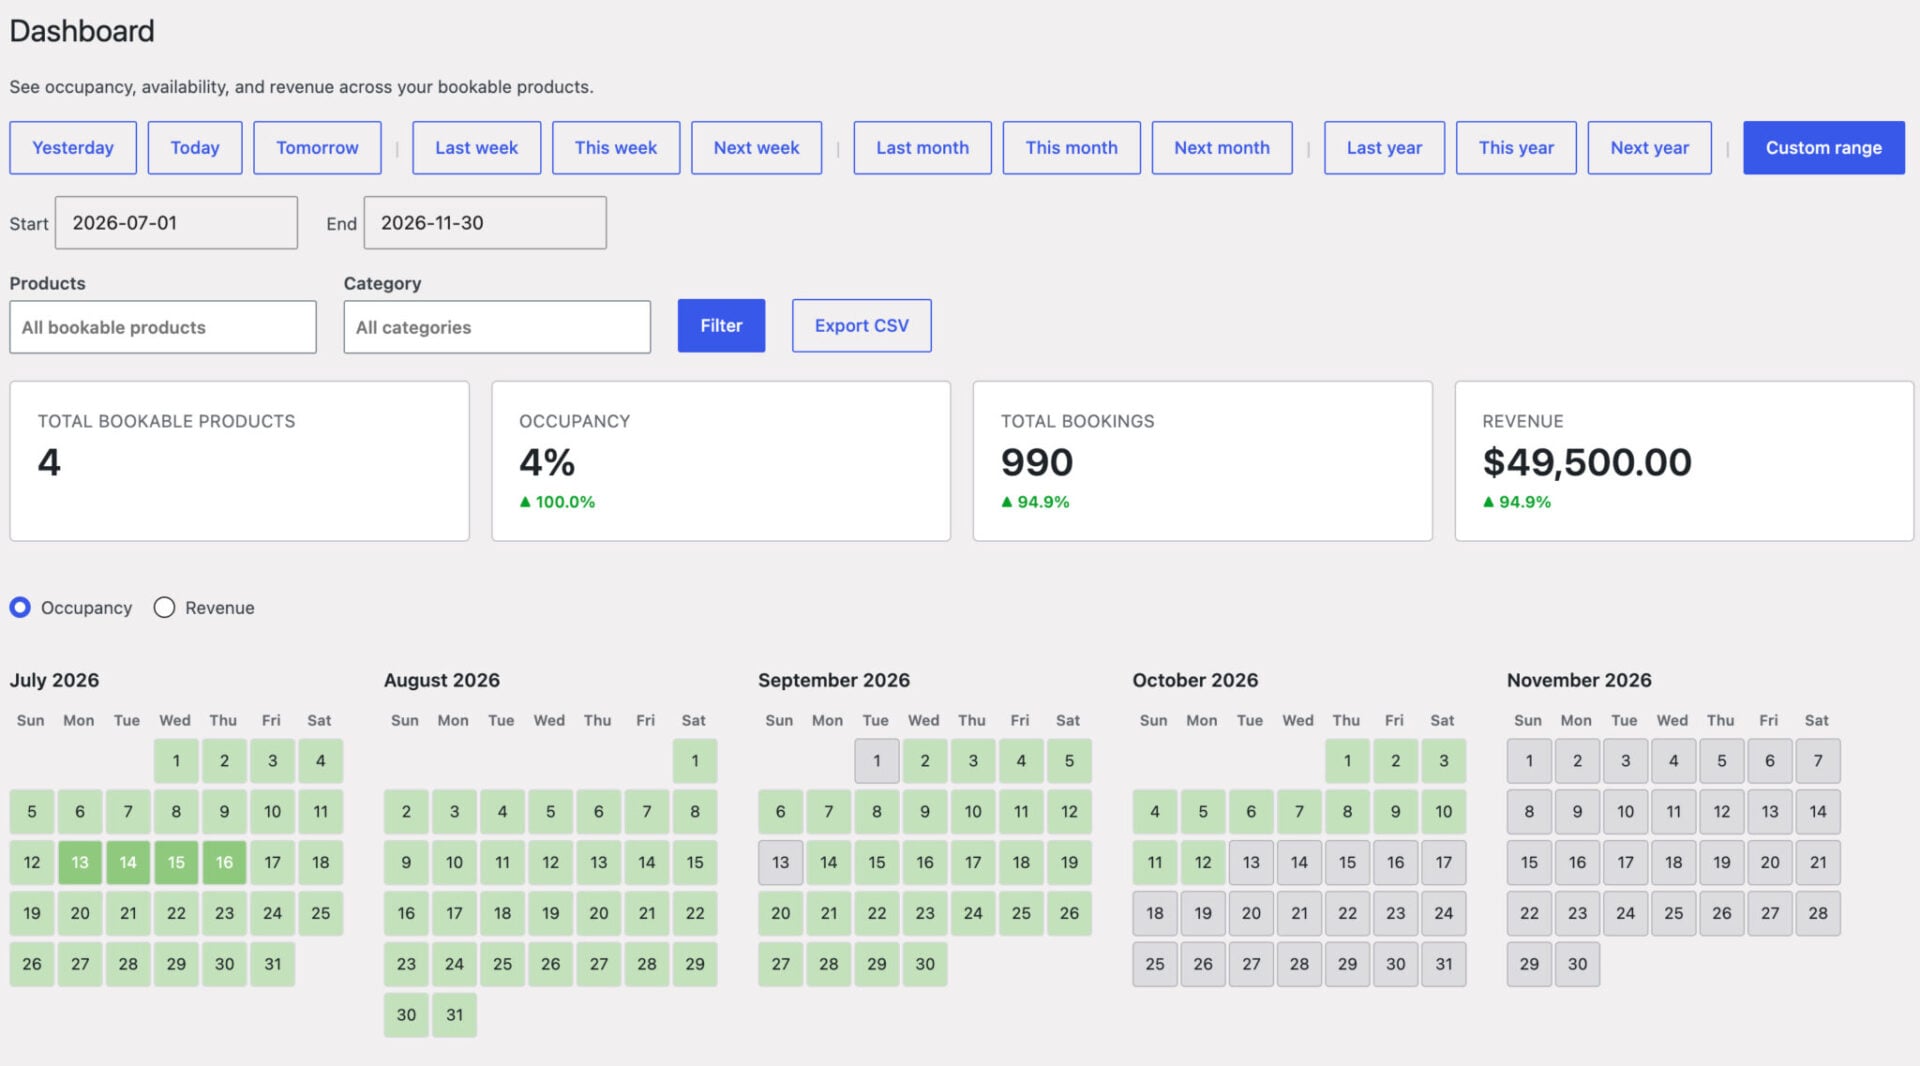
If you have multiple skip/dumpster products, Bookings > Dashboard gives you a single overview across all of them, with summary tiles for occupancy and bookings so you can plan your schedule without checking each product individually.
You can also create manual bookings from the back end – useful if a customer calls in rather than booking online.
Next steps
Once your basic setup is working, there are a few ways to extend it. You could create separate products for each skip/dumpster size – a 4-yard, 6-yard, and 8-yard skip/dumpster – each with its own daily rate and availability. Bookings for WooCommerce also integrates with the WooCommerce Deposits and Part Payments plugin if you want to take a deposit upfront and collect the balance before delivery.
You can also block out specific dates on any product – for example, if a skip/dumpster is already reserved for maintenance or a pre-arranged delivery – using the Block dates feature in the Bookings settings.
Both Bookings for WooCommerce and WooCommerce Product Add-Ons Ultimate work with all WordPress themes and page builders, including block themes. Every purchase is backed by a 14-day money-back guarantee and world-class support from the Plugin Republic team.
Buy them separately or as part of the WooCommerce Bookings and Product Add-Ons Bundle:
WooCommerce Bookings and Product Add-Ons Bundle
Create a booking page for skip/dumpster hire