How do you set up equipment rental in WooCommerce?
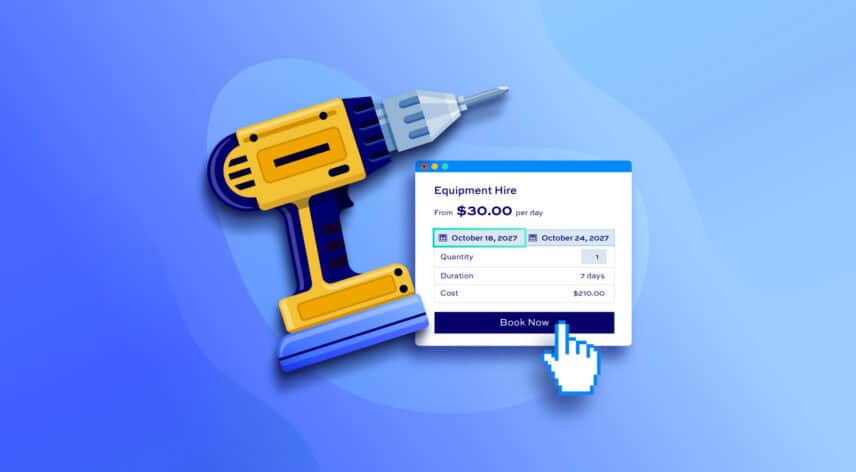
You can rent out equipment directly through your WooCommerce store, with no separate rental platform and no monthly SaaS subscription. This tutorial shows you how to set up bookable rental products for anything from power tools and construction equipment to party gear, camera kits, bikes, and outdoor equipment like kayaks and camping gear.
The global construction equipment rental market alone was worth $213.68 billion in 2025, and is projected to reach $339.04 billion by 2033. Equipment hire is a growing business, and WooCommerce gives you an easy way to take a share of it without leaving your existing store.
There’s a demo product here so you can see how a rental product works.
After completing this tutorial:
- Users will be able to:
- Pick a start and end date, or a time slot, from a calendar on the product page
- See real-time availability before they book
- Pay for their rental through the standard WooCommerce checkout
- As the store owner or admin, you’ll be able to:
- Set stock limits so you never overbook a piece of equipment
- Take a deposit or a refundable security deposit at the time of booking
- Manage every rental from one dashboard
As a bonus, we’ll also look at how to:
- Take part payments and refundable security deposits
- Bundle equipment together into rental packages
In this tutorial, we’ll assume that you already have WordPress and WooCommerce installed and ready to go.
Why use WooCommerce for equipment rental?
WooCommerce lets you run your rental business from a store you already own, rather than paying for a separate SaaS rental platform. There’s no per-booking fee and no monthly subscription on top of your plugin license.
With the Bookings for WooCommerce plugin, any WooCommerce product can become a bookable rental item. You keep full control over your pricing, your customer data, and your checkout experience.
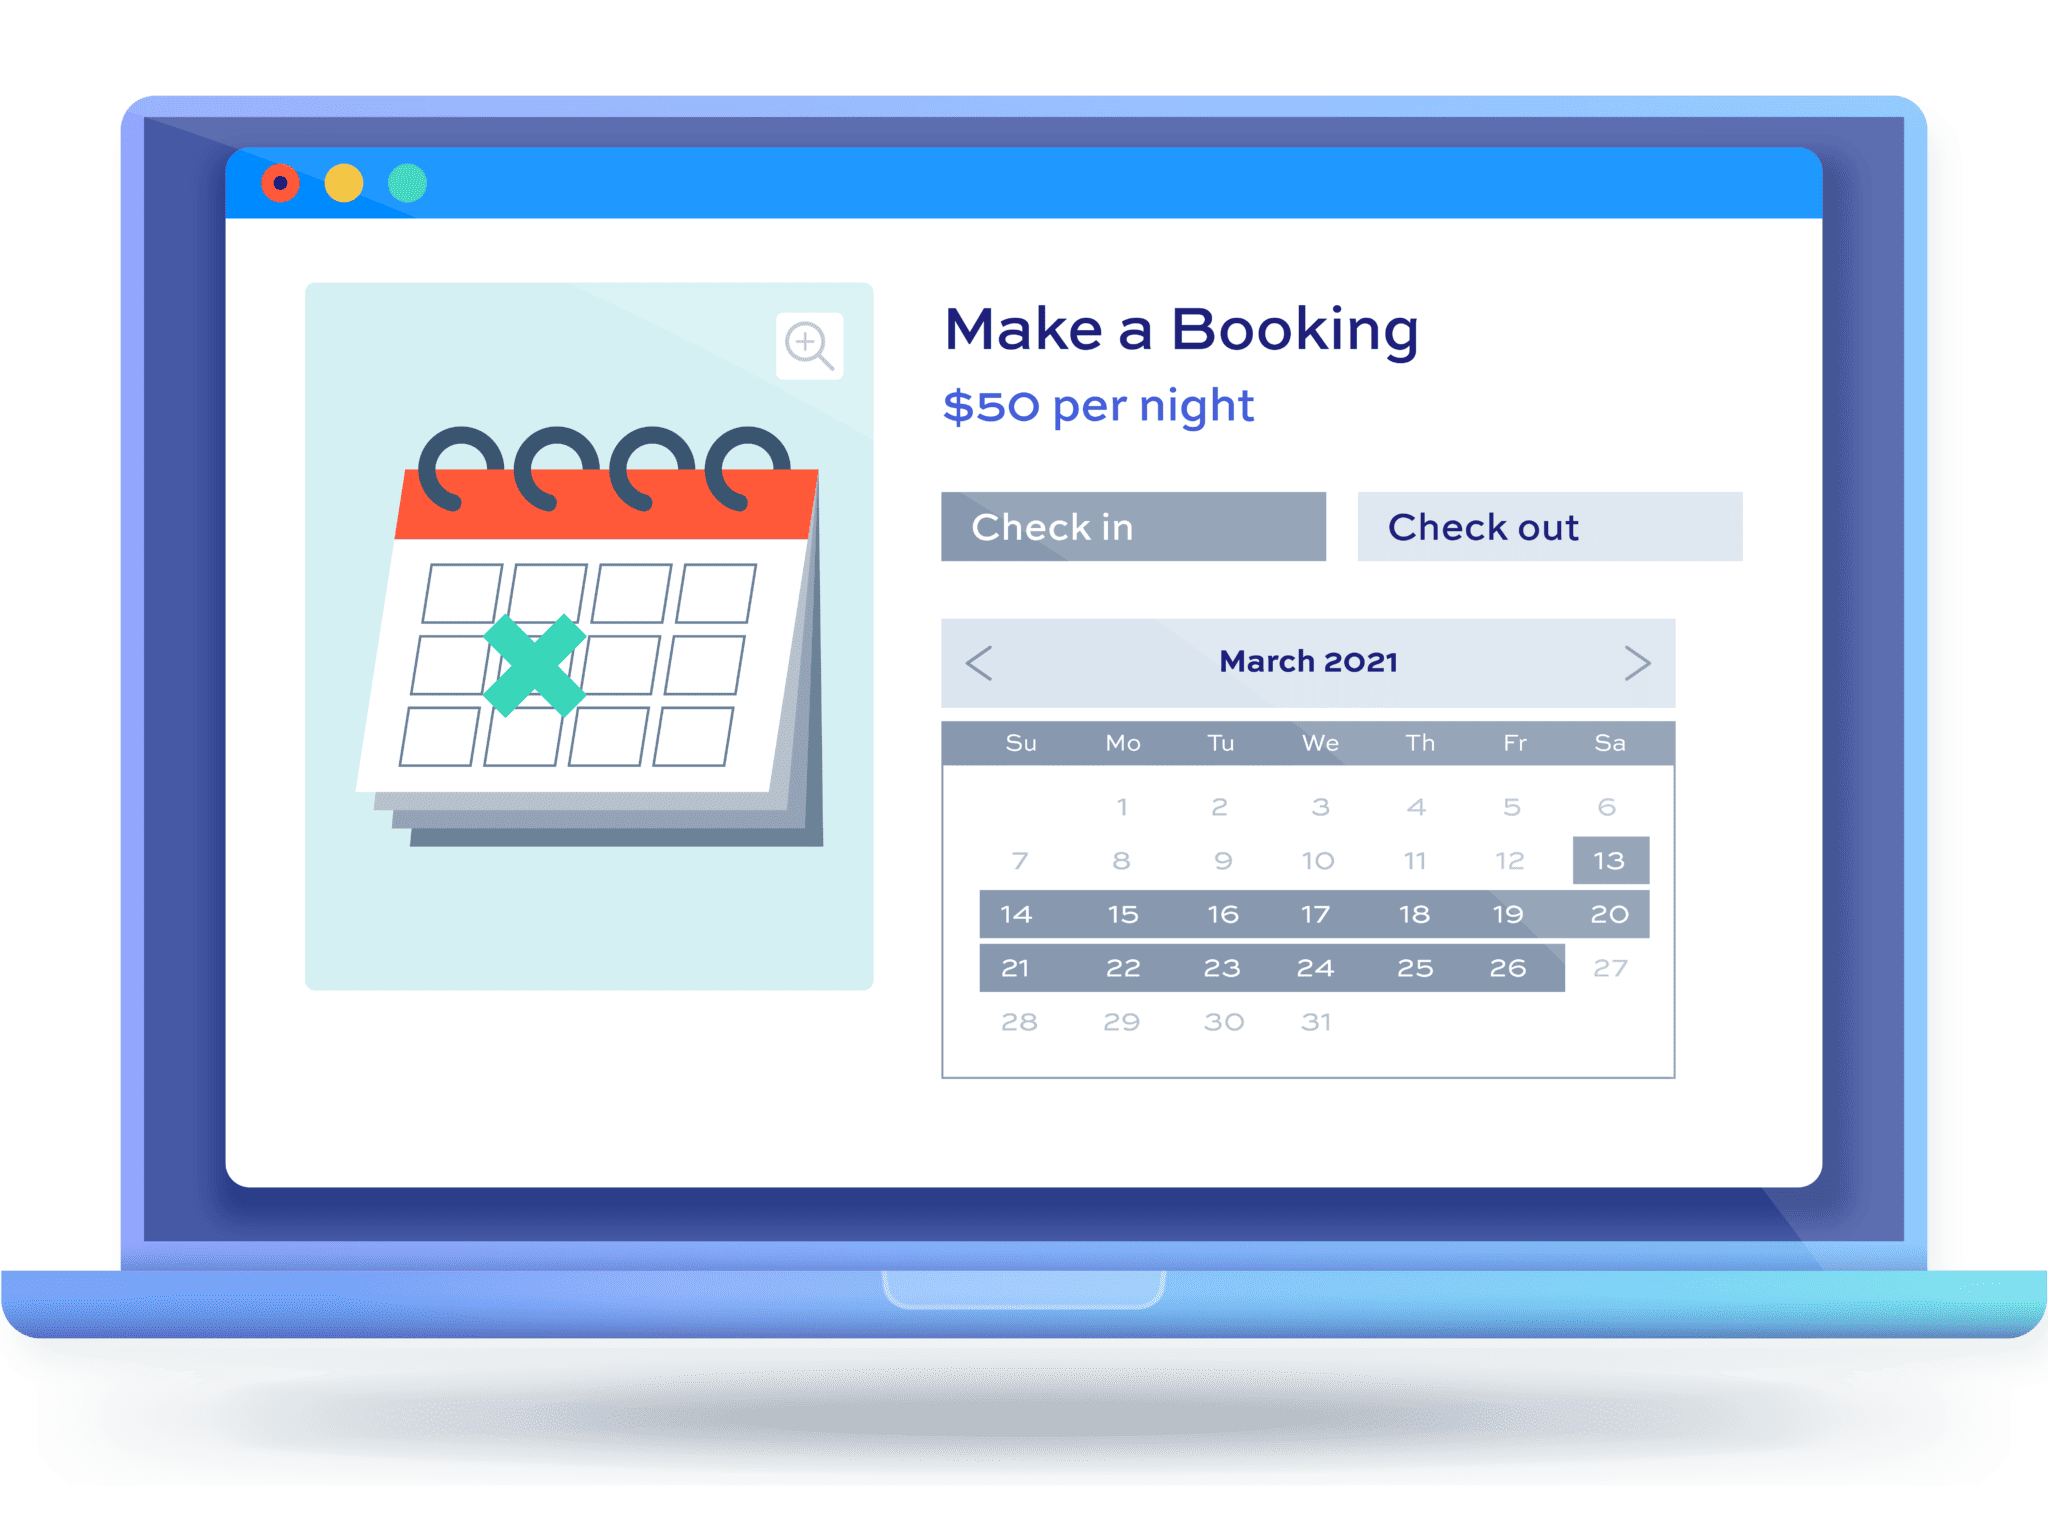
Set up your equipment as a bookable product
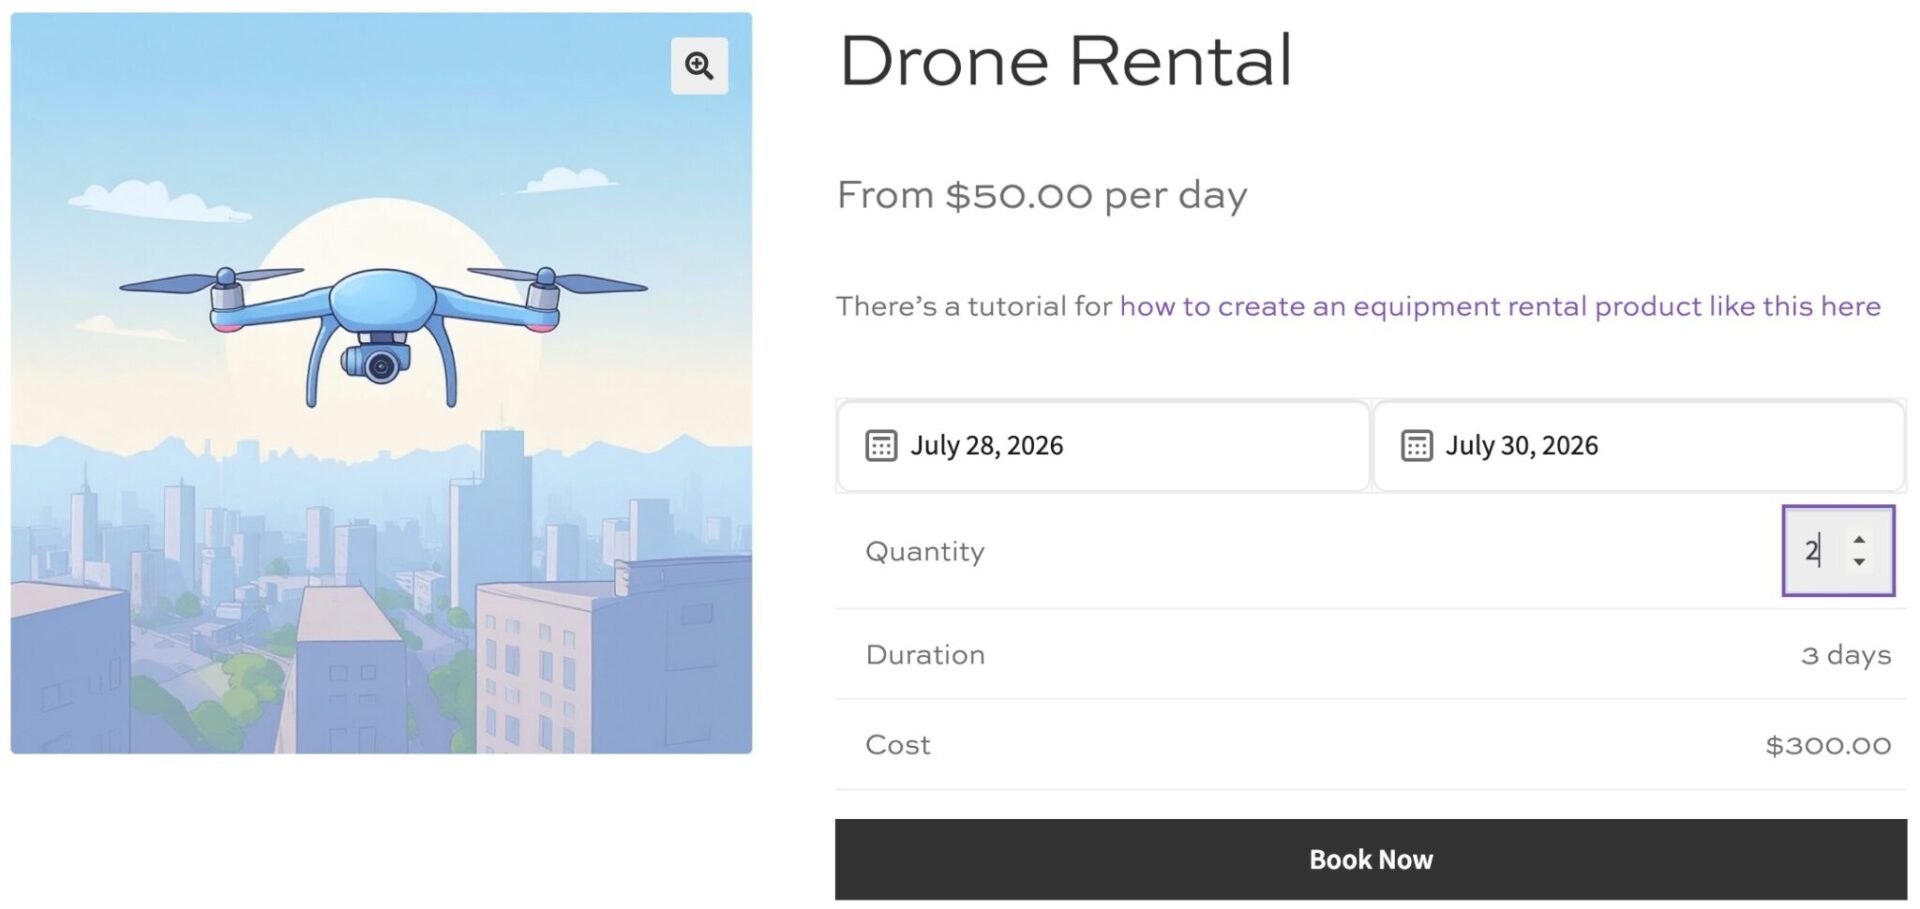
Let’s start by creating a bookable rental product. We’ll use a drone as our example, but the same steps work for any piece of equipment you rent out by the day, night, or week.
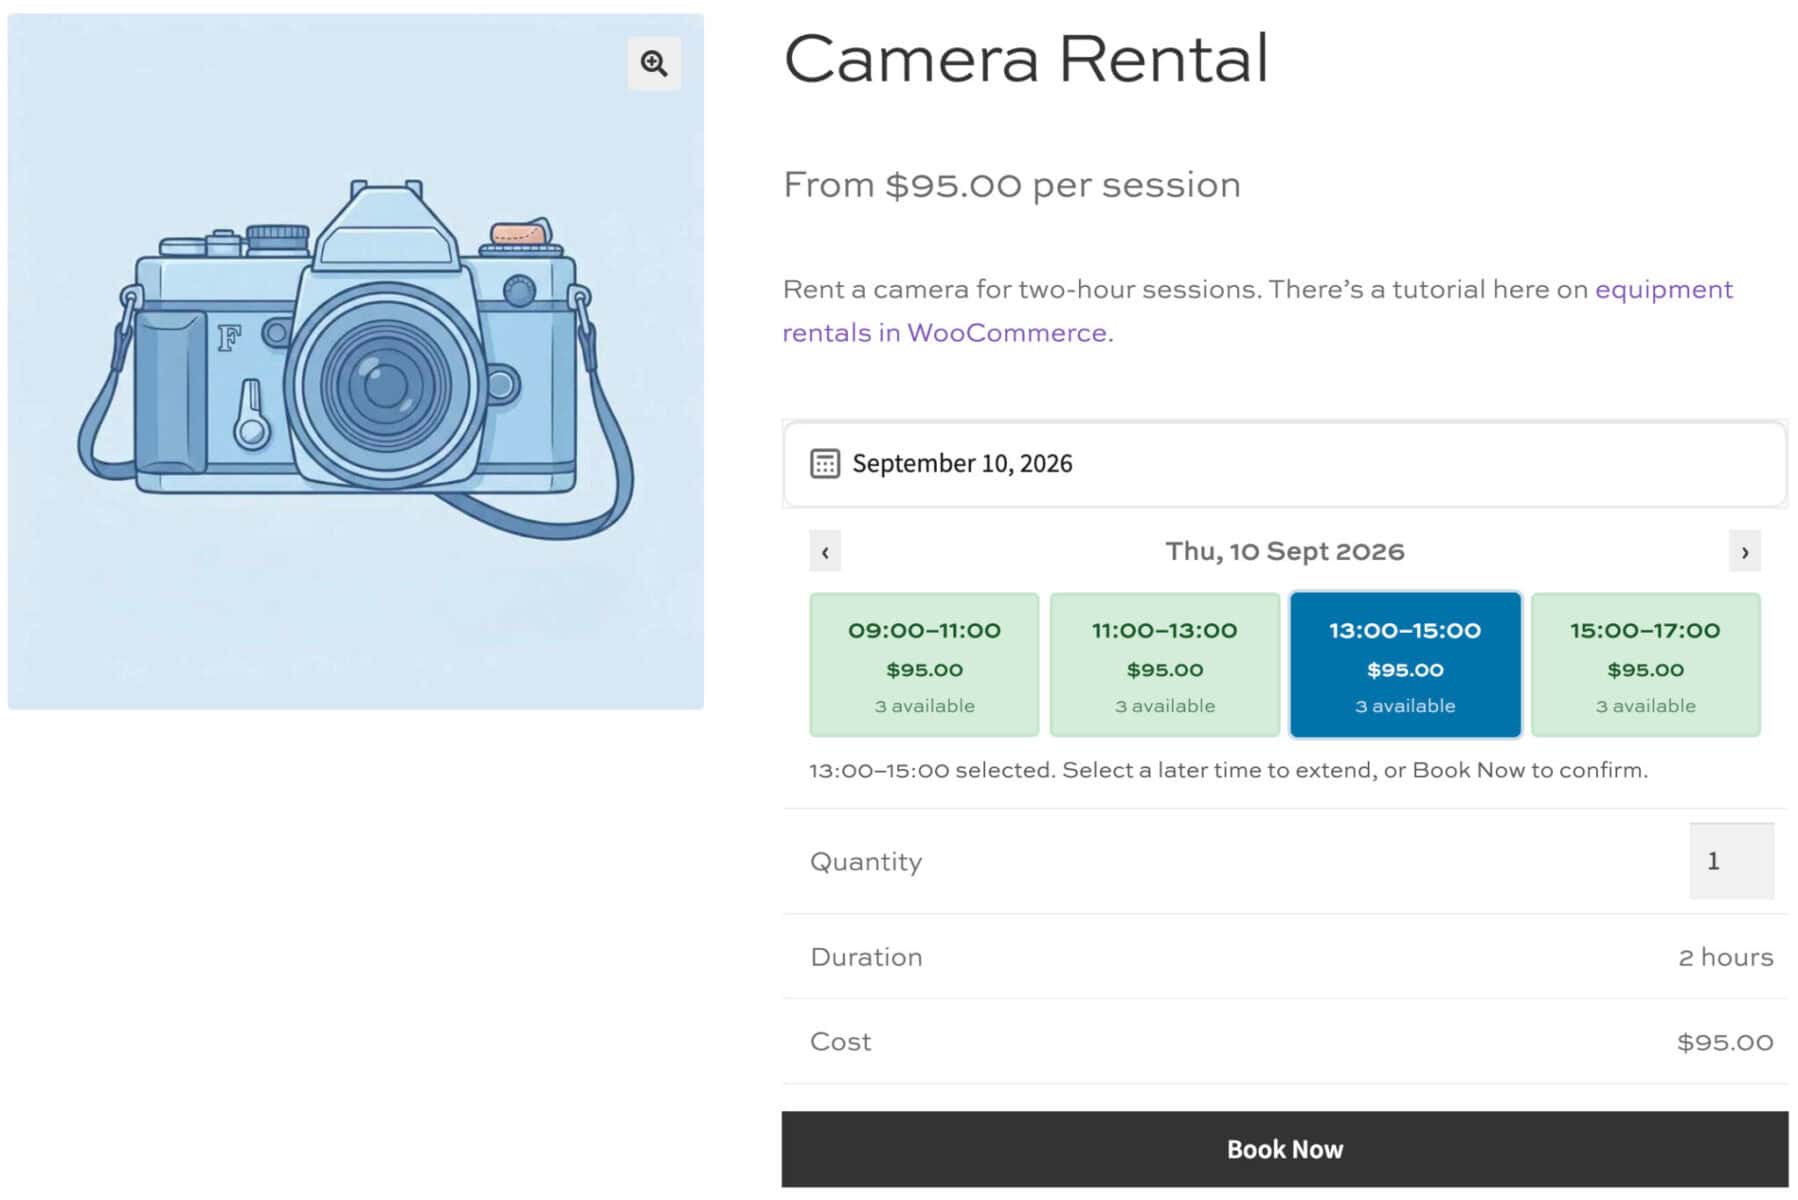
If you need hourly hire instead – for equipment like cameras, AV gear, or PA systems – you can skip ahead to the time slots section below.
Step #1: Install and activate Bookings for WooCommerce
Once you’ve purchased Bookings for WooCommerce:
- Download the plugin’s zip file by clicking the link on your order confirmation screen or in your welcome email. You’ll receive the email automatically a few seconds after you’ve completed the purchase
- Go to Plugins > Add New in your WordPress dashboard
- Click the ‘Upload Plugin’ button
- Drag and drop the plugin’s downloaded zip file into the ‘Choose File’ area and click ‘Install Now’
- When the plugin has uploaded, click the ‘Activate Now’ button
Step #2: Create your rental product
Go to Products > Add New and give your product a title, e.g. ‘Drone’. Add your product images and description as you would for any WooCommerce product.
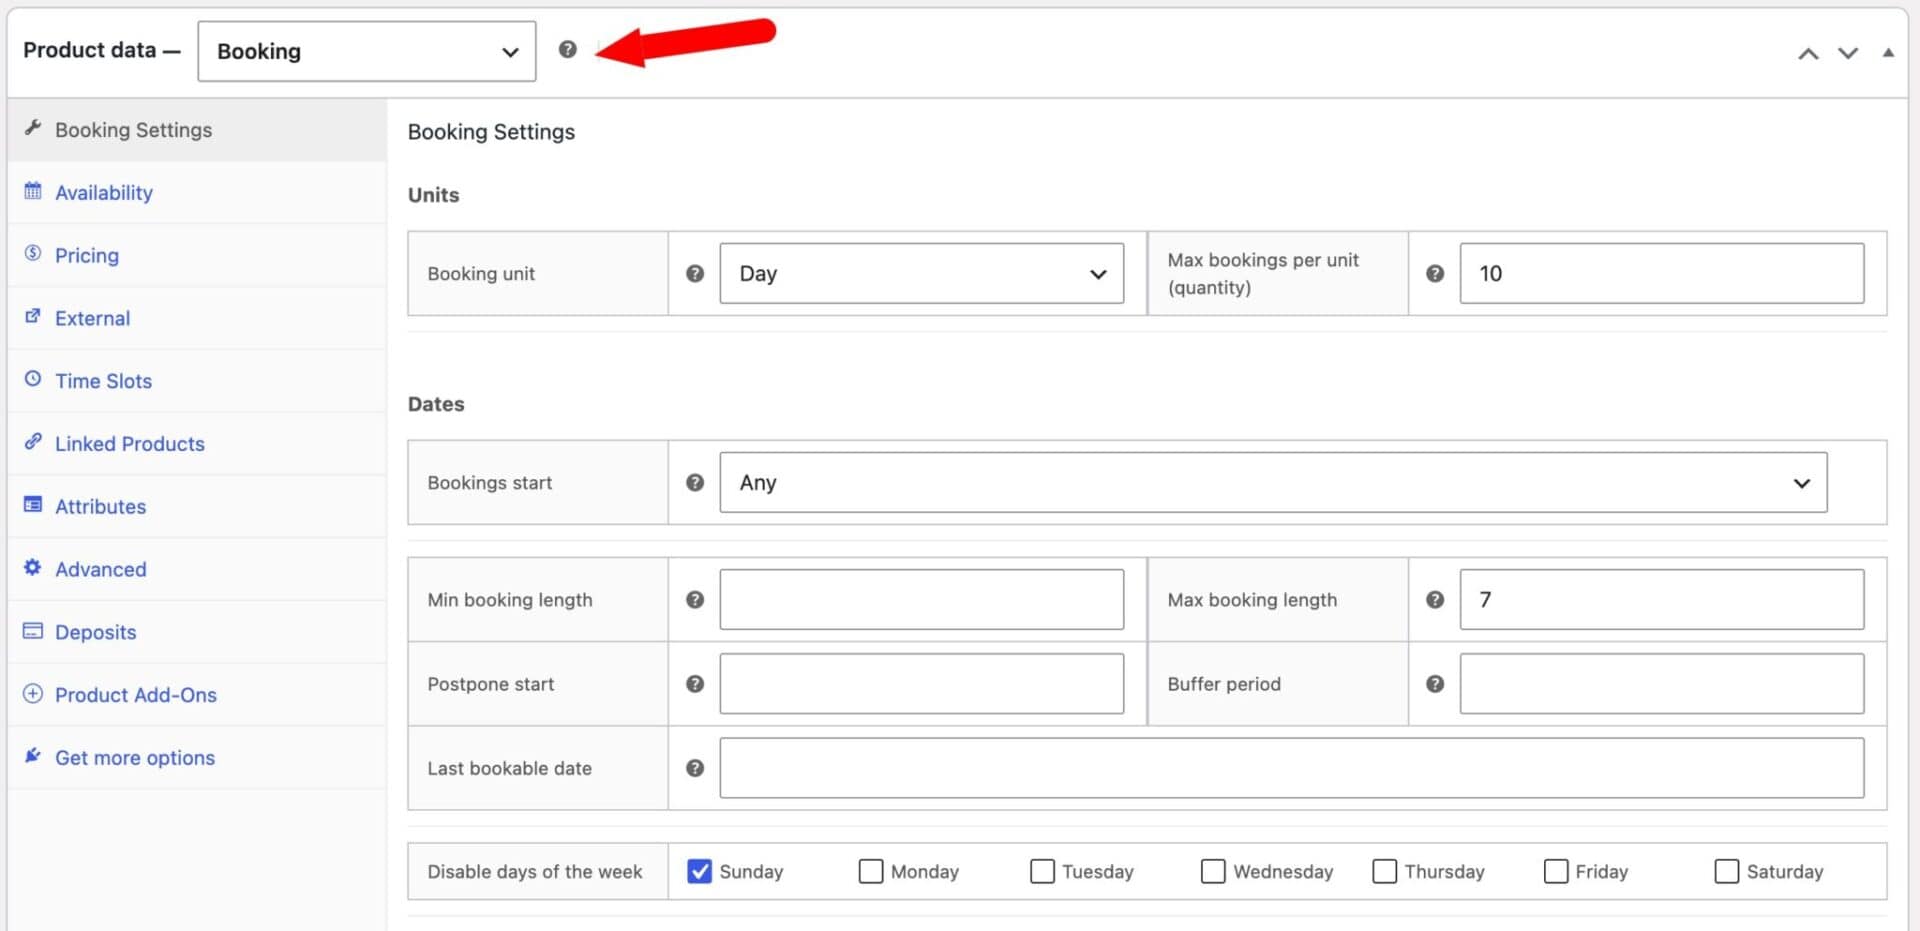
Scroll down to the Product data metabox and select ‘Booking’ from the product type dropdown. This turns your simple product into a bookable one, with a new set of booking settings.
Step #3: Choose your booking unit
Click the Booking Settings tab and set the ‘Booking unit’ field to ‘Day’, ‘Night’, or ‘Week’. For our drone, we’ll choose ‘Day’ since it’s typically hired for a day or two at a time.
Step #4: Set quantity, duration, and buffer periods
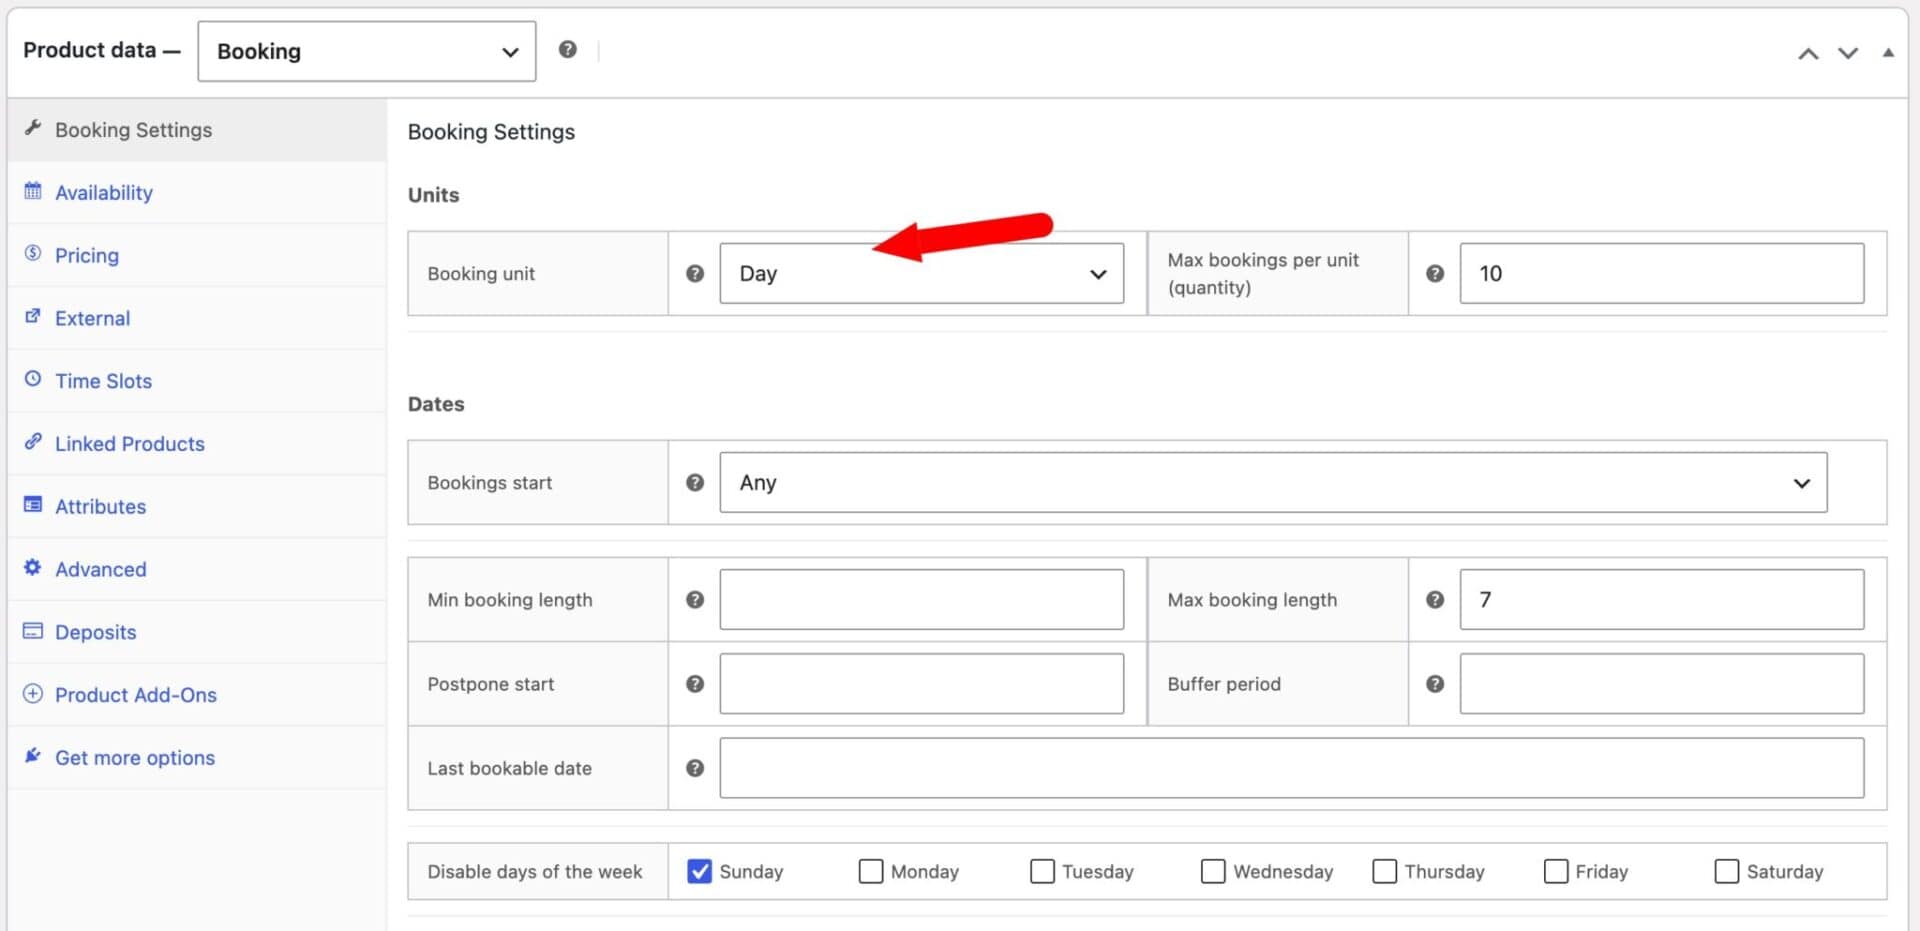
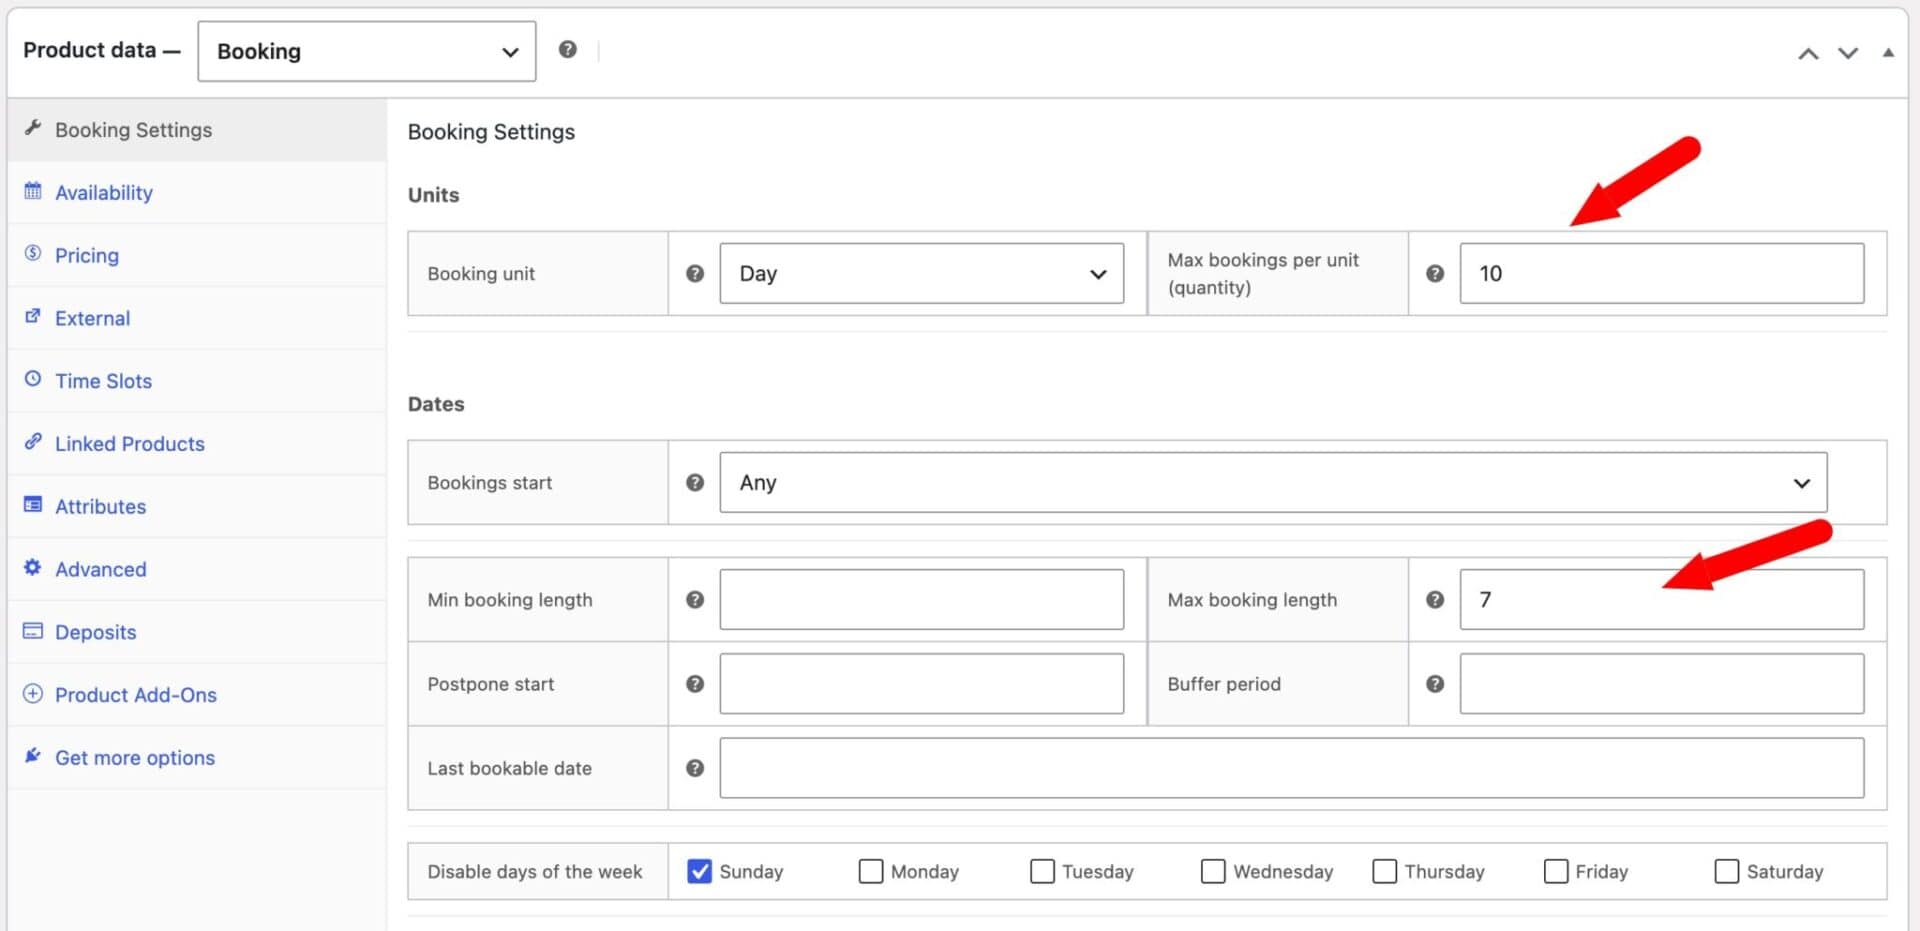
Enter the number of units you have available in the ‘Max bookings per unit (quantity)’ field. If you have ten drones to rent out, enter 10 here.
Use the ‘Min booking length’ and ‘Max booking length’ fields to set how long a single booking can run. You can also set a ‘Buffer period’ – the time you need after a booking ends to check the equipment back in before it goes out again.
Step #5: Set your price and publish
Enter your price per booking unit in the ‘Standard cost’ field – this is the amount charged per day, night, or week. Click ‘Publish’ to save your product.

You now have a bookable rental product where customers can select their hire dates and see the total cost calculated automatically. There’s a demo product here if you’d like to see this in action.
Step #6: Optionally set seasonal and custom pricing
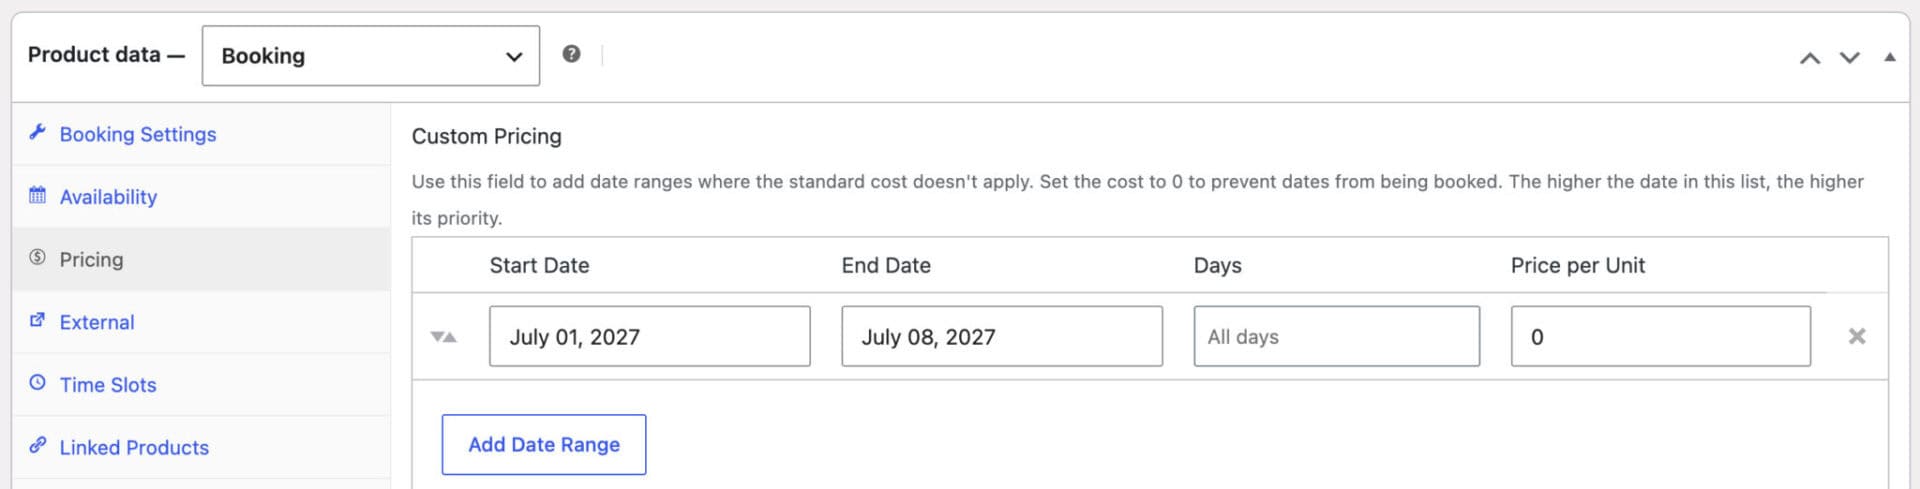
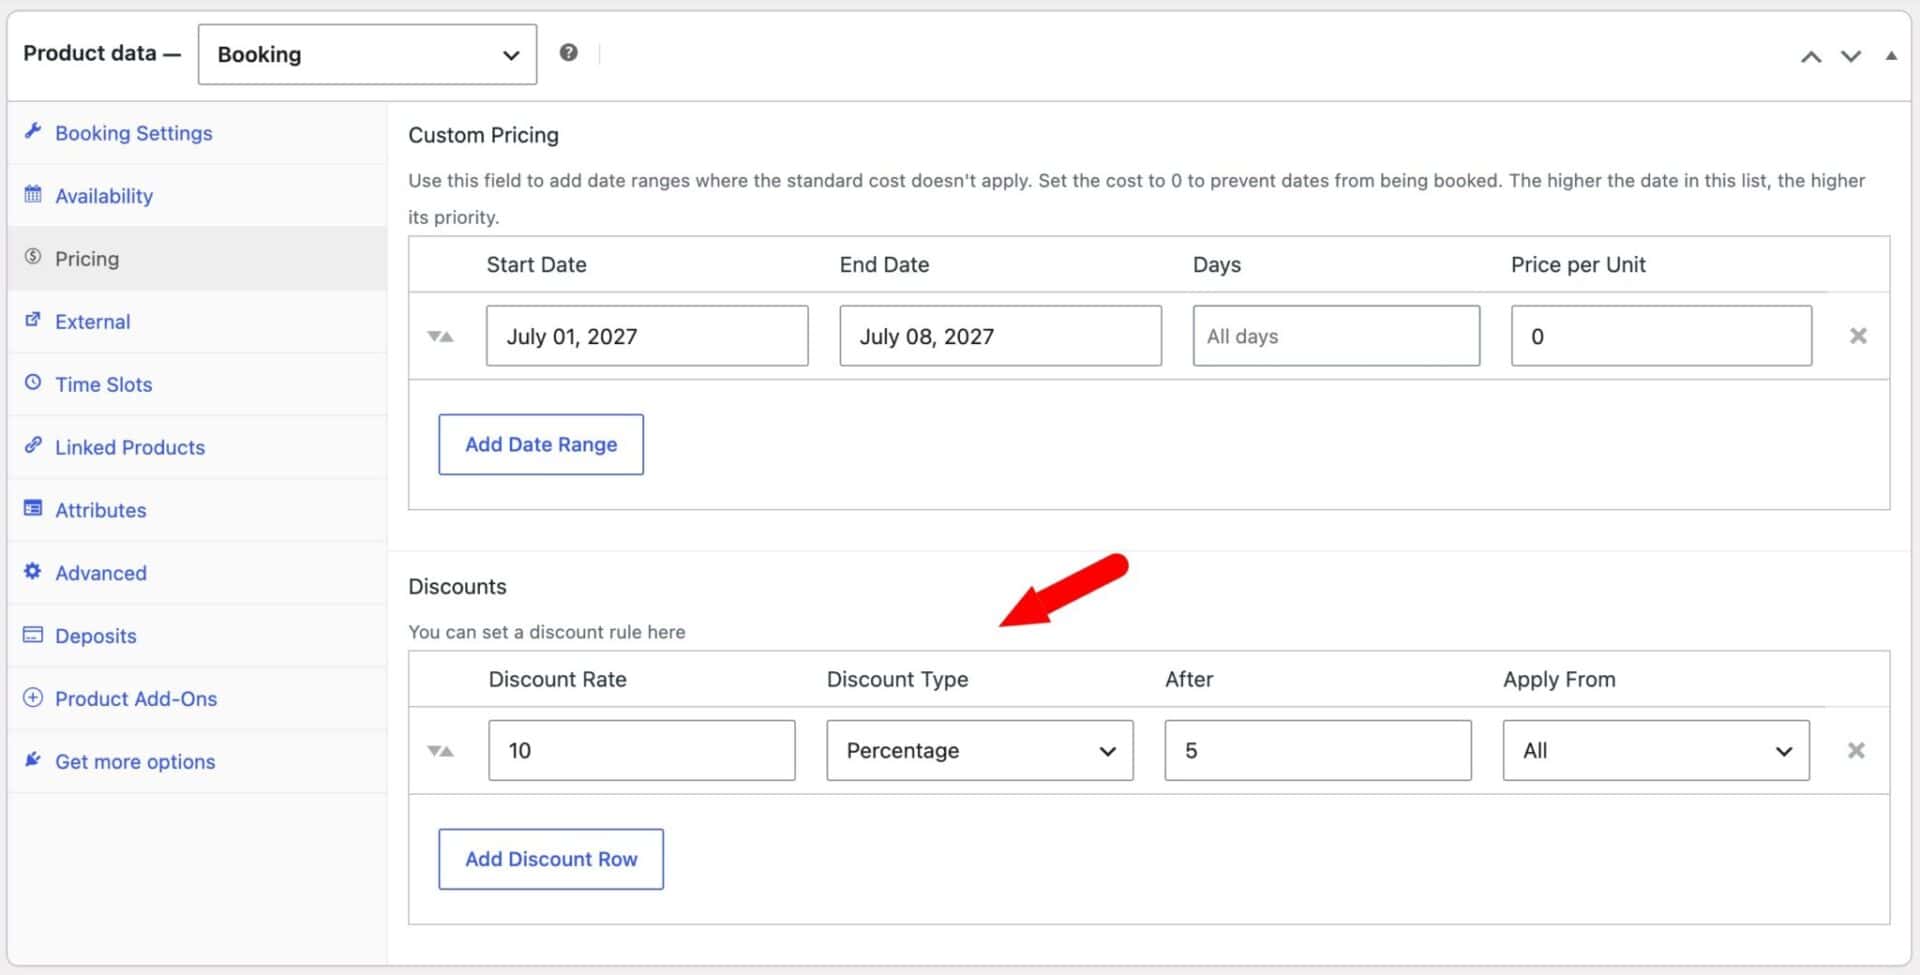
Equipment demand often changes throughout the year – drone hire tends to spike during wedding season and around public events. Use the ‘Pricing’ tab to charge more, or less, during specific date ranges.
Click ‘Add Date Range’ and specify a start and end date, then enter your adjusted price in the ‘Cost Per Unit’ field. To block a date range from being booked at all, set the ‘Cost Per Unit’ field to 0.
You can also specify certain days within the date range – so if you want every Saturday off in July, you can set the start and end dates and choose ‘Saturday’ in the ‘Days’ column.
You can also offer duration discounts under the Discounts section. For example, offer a 10% discount for any drone hire of five days or longer by setting the ‘Discount Rate’ field and specifying the minimum duration required to qualify.
Now let’s look at how to take hourly bookings for equipment that’s hired by the session rather than the day.
Take hourly rentals with time slots
Some equipment doesn’t suit day-based hire. Camera and AV kits, party equipment like PA systems and bounce houses, and short equipment loans are usually booked by the hour or by a fixed session. The Time Slots feature handles this by dividing a bookable day into fixed-length windows.
We’ll use a camera kit as our example here, hired out in two-hour sessions. There’s a demo product here.
Step #1: Set your booking unit and quantity
Time slots work within a Day-unit booking product, so create your product as before and set the ‘Booking unit’ field to ‘Day’.
Enter the number of units you have available in the ‘Max bookings per unit (quantity)’ field, just as you would for a day-based rental. If you have three camera kits to rent out, enter 3 here – this limits how many customers can book the same time slot.

Step #2: Enable time slots
Click the Time Slots tab in the Product data metabox and toggle ‘Time Slots’ on. This replaces the single date picker with a time-based booking form on the front end.
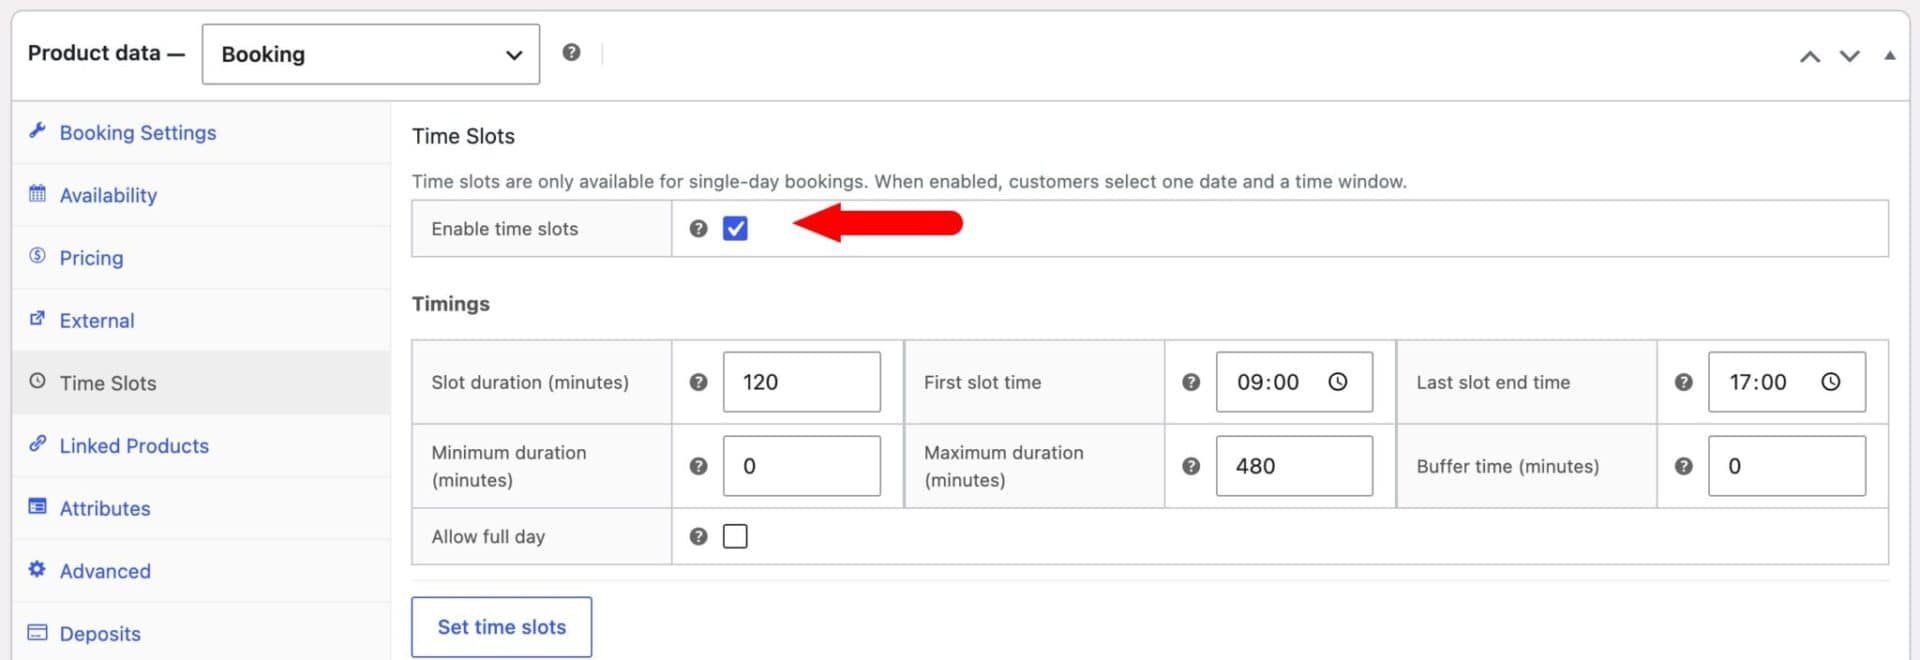
Step #3: Set your slot length, opening hours, and duration limits
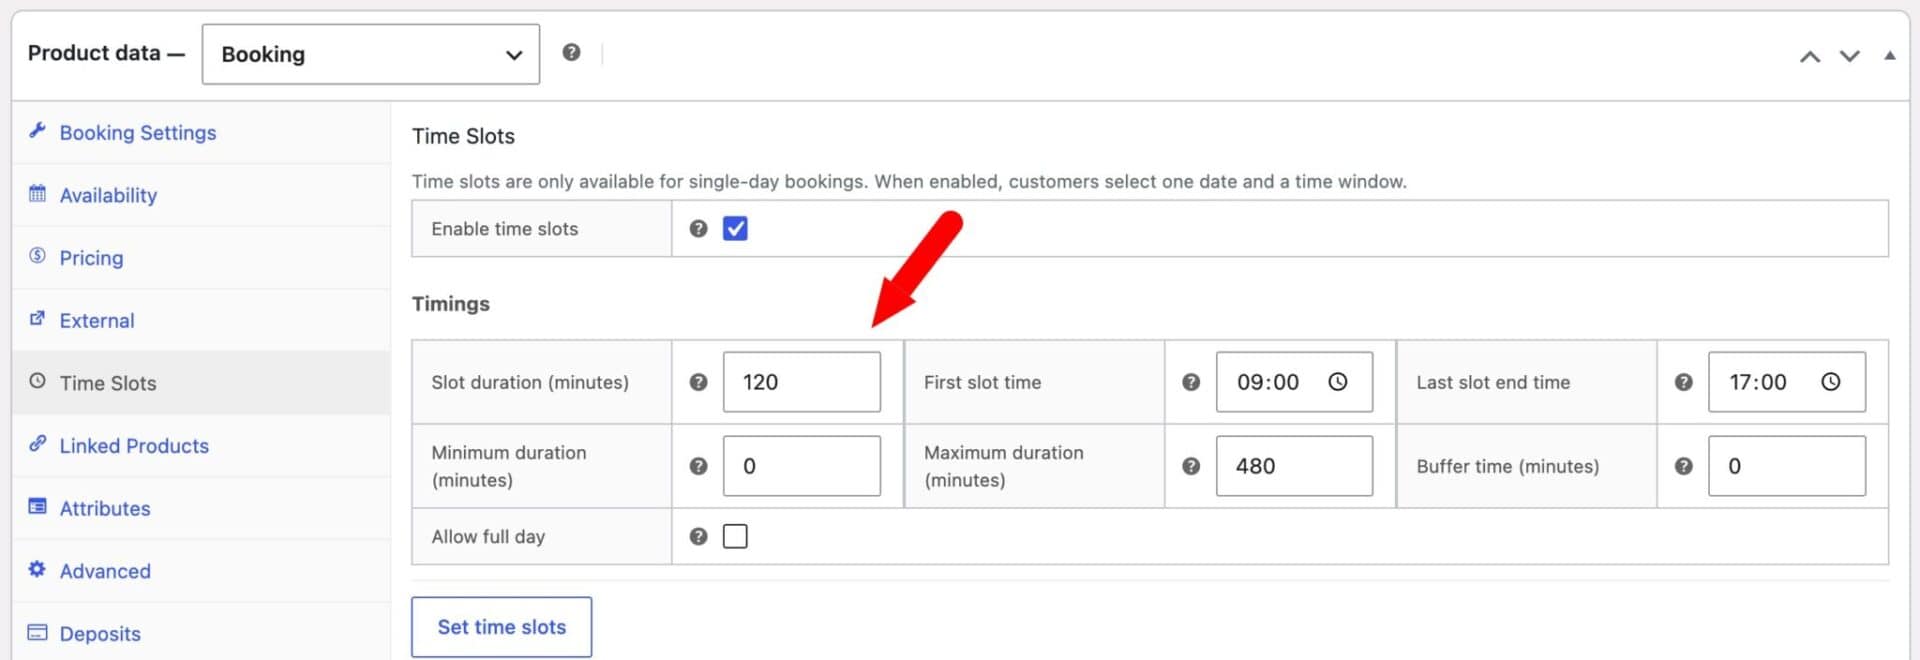
Enter your slot duration in minutes – 120 minutes for a two-hour camera session, for example. Set your opening and closing times to define the hours slots are generated for.
Use the ‘Min booking length’ and ‘Max booking length’ fields to control how long a booking can run, entered in minutes – for example, a minimum of 120 minutes and a maximum of 480 minutes. You can also set a ‘Buffer period’ to give yourself time to check the equipment back in and prepare it before the next slot starts.
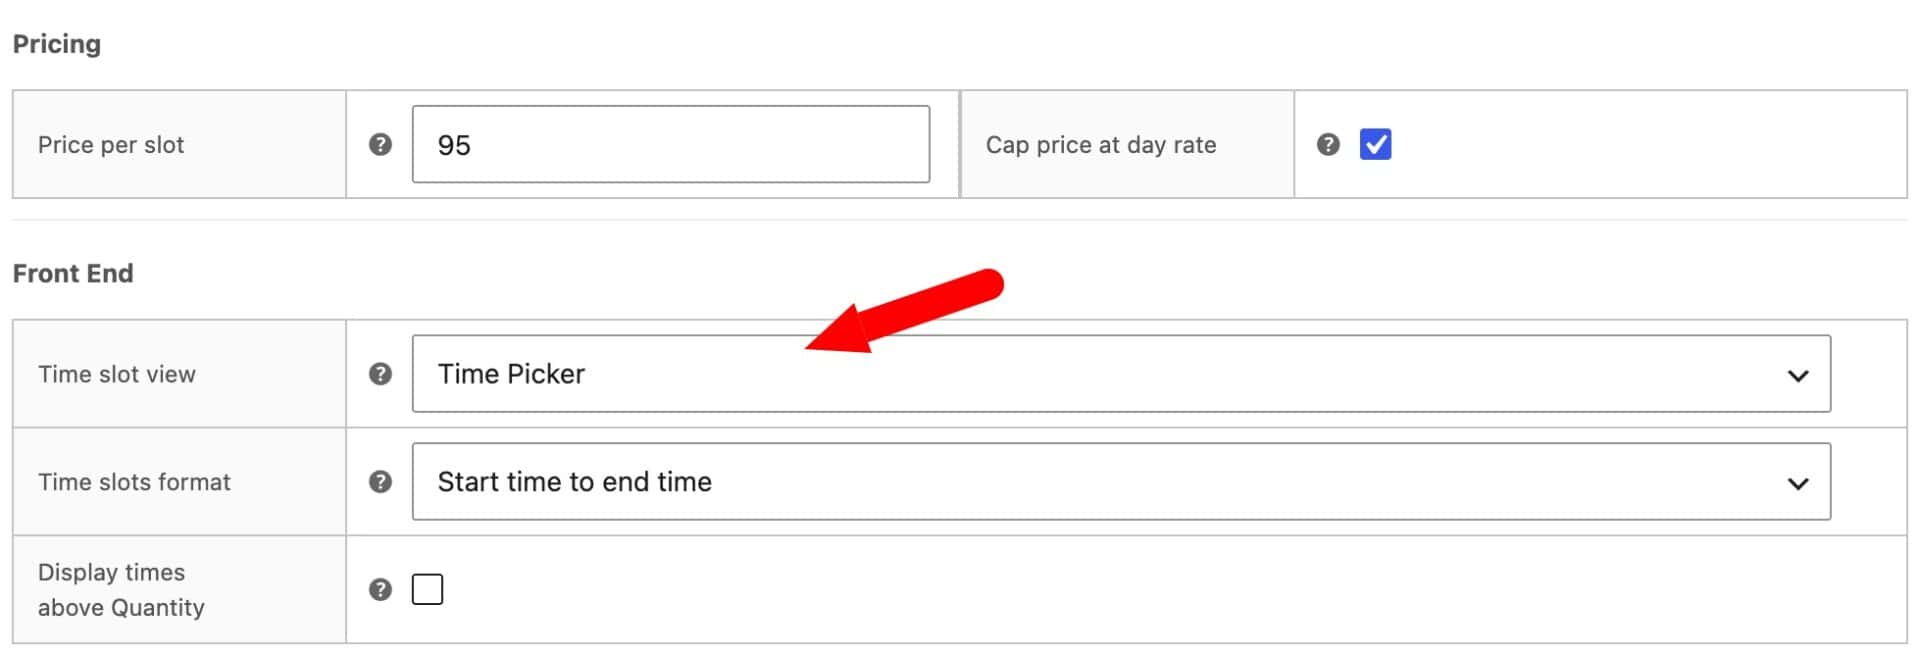
Step #4: Set your price per slot
Enter the price you want to charge per slot in the pricing section. You can also set a price cap, so a customer booking enough consecutive slots to cover a full day is never charged more than your standard day rate.
A ‘Cap price at day rate’ option is also available, letting customers book every slot from open to close in a single click. This suits equipment that’s typically hired for a full event day, such as marquees, PA systems, or catering equipment.
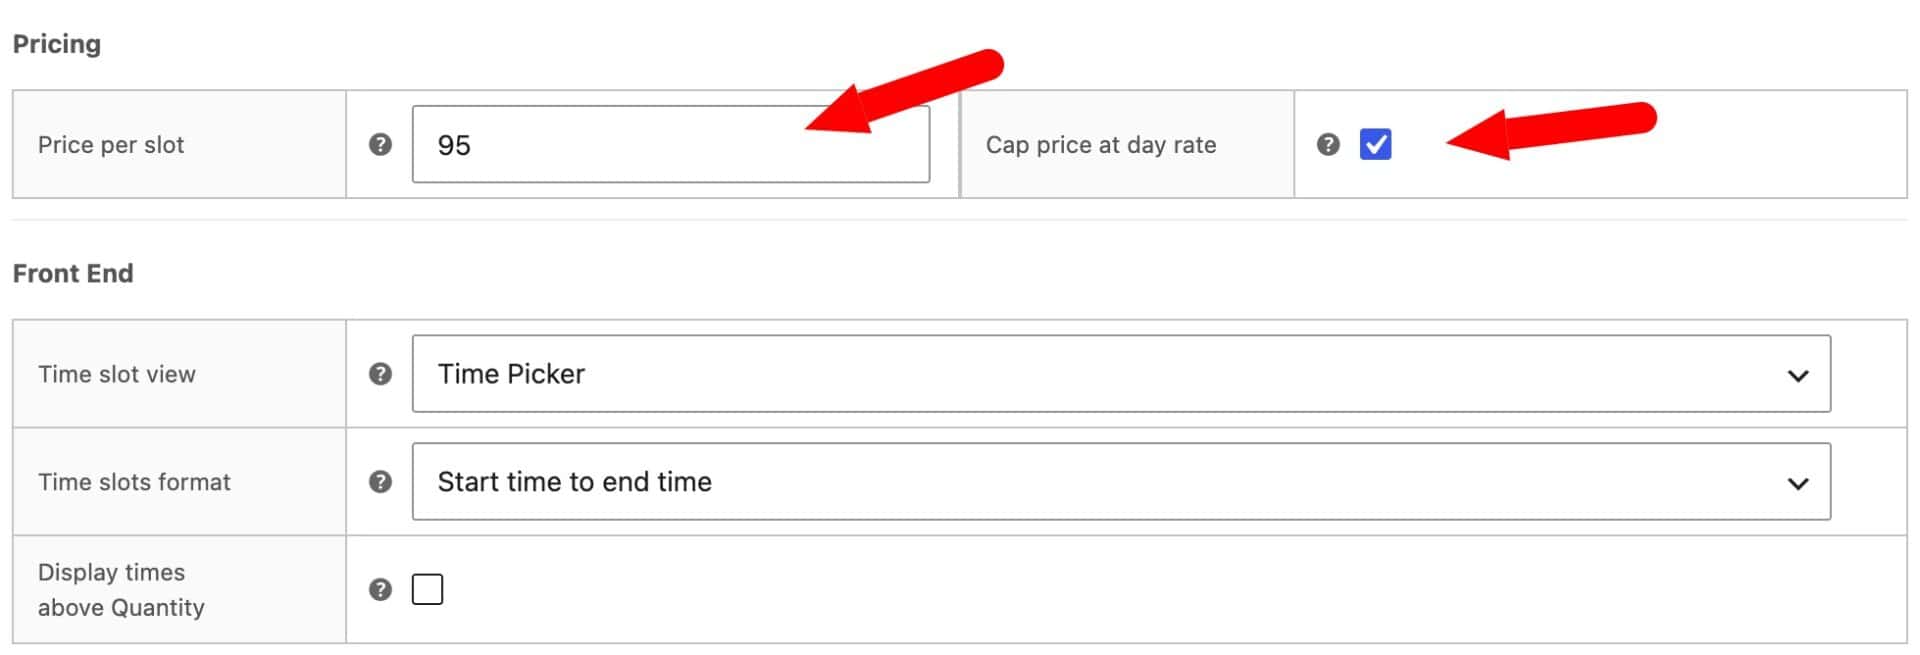
To set the price charged for the day rate, enter a ‘Standard price’ on the Booking Settings tab – this becomes the whole-day price, separate from your per-slot pricing.
Choose how the time selector appears to customers – a start/end time dropdown, a visual grid, or a diary view. All five selector views are included, so you can match the booking experience to your product without any extra setup.
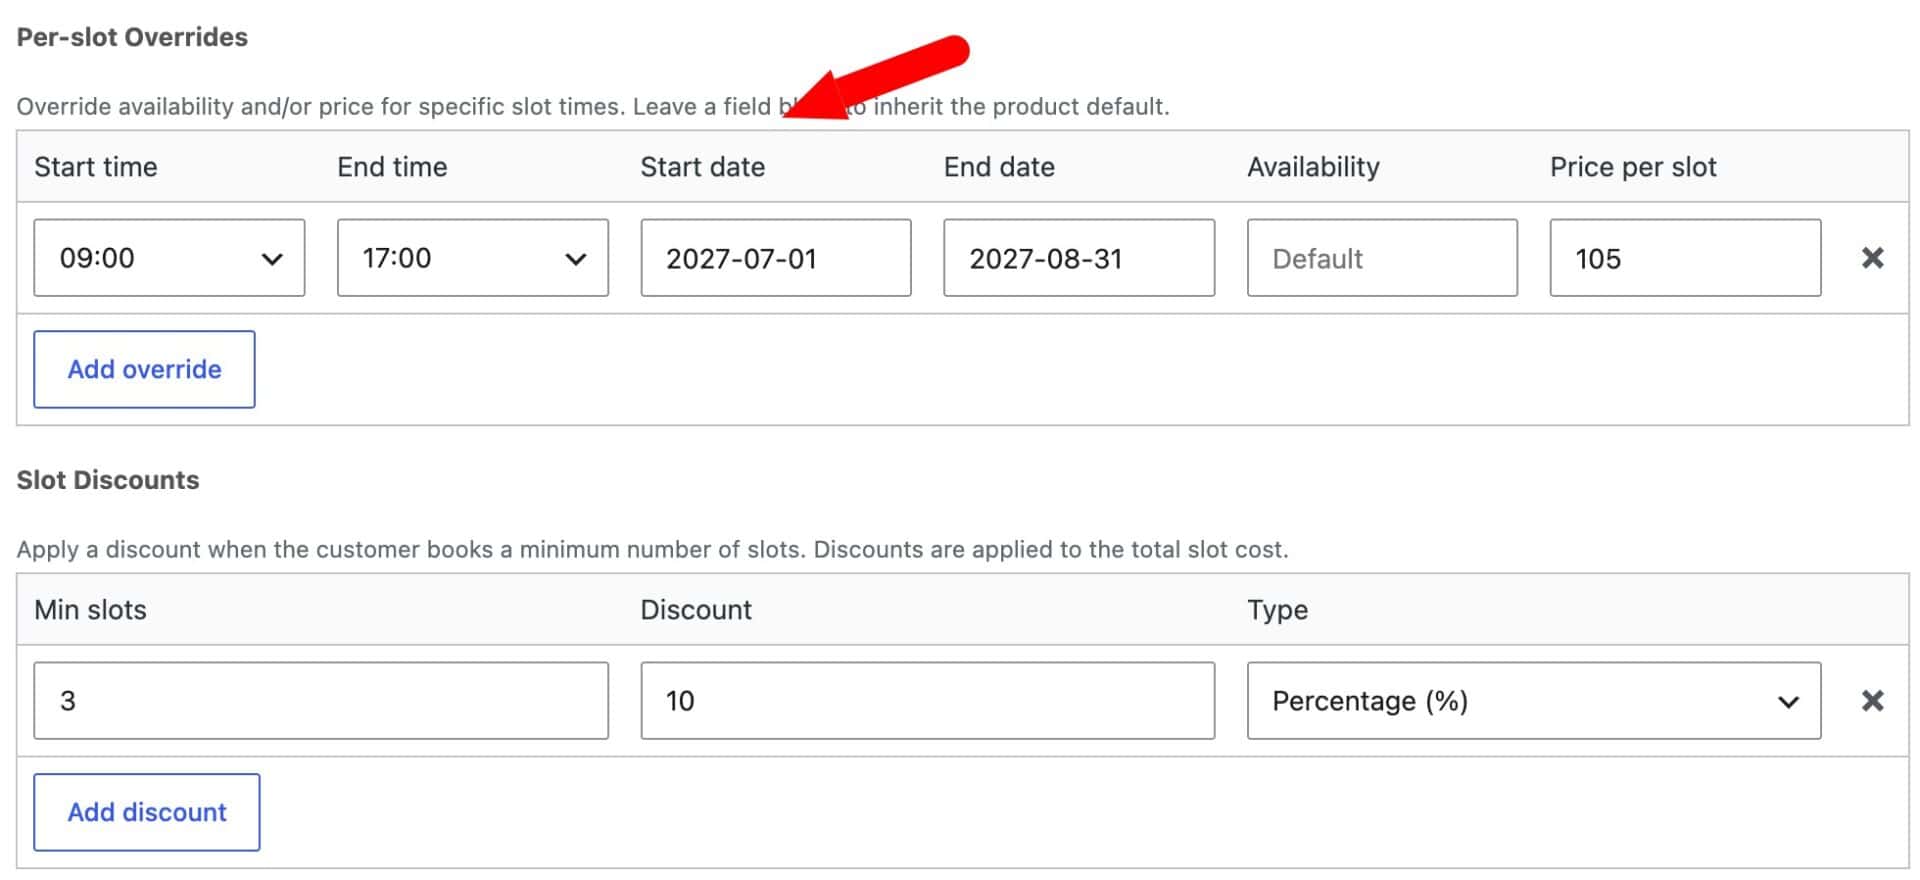
Step #5: Optionally set per-slot overrides
If you need to charge more for certain times, or restrict availability for specific slots, use per-slot overrides. For example, you could set a premium rate for weekend camera hire, or block out slots on days you’re closed.
Overrides can apply to a single slot or a date range, and can be restricted to specific days of the week. This gives you the same seasonal flexibility for time-slot products that the Custom Pricing tab gives you for day-based ones.
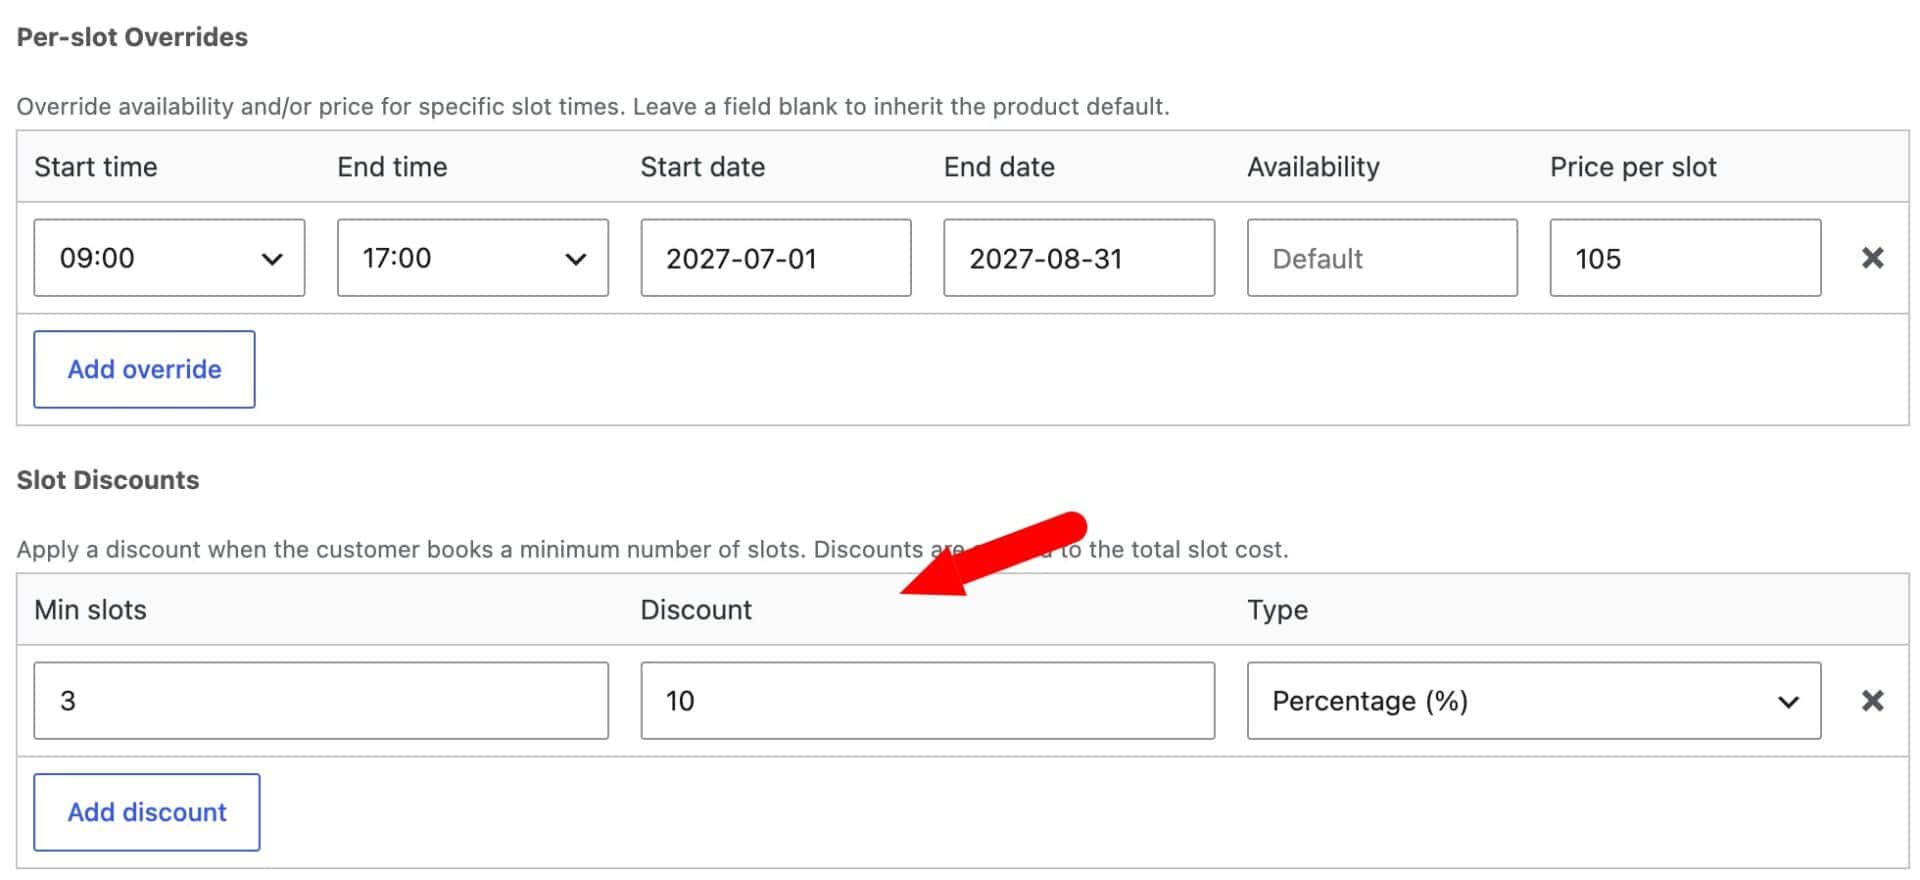
Set discounts for multiple slots
You can also set discounts based on the number of slots booked, using a percentage or a fixed amount. For example, offer a discount when a customer books three or more consecutive camera sessions in one go, encouraging longer bookings the same way duration discounts do for day-based rentals.
You now have a working hourly rental product. Now let’s look at how to close your rental products on specific days of the week.
Disable specific days of the week
You may not want to take bookings every day – you might be closed on Sundays, or need a day set aside for equipment maintenance and cleaning between hires. The ‘Disable days of the week’ setting lets you rule out specific days for a product, whether it’s booked by the day or by time slots.
Click the Booking Settings tab on your product and select the days you want to disable. Customers won’t be able to select those days on the front end, whether they’re picking a date range or a time slot.
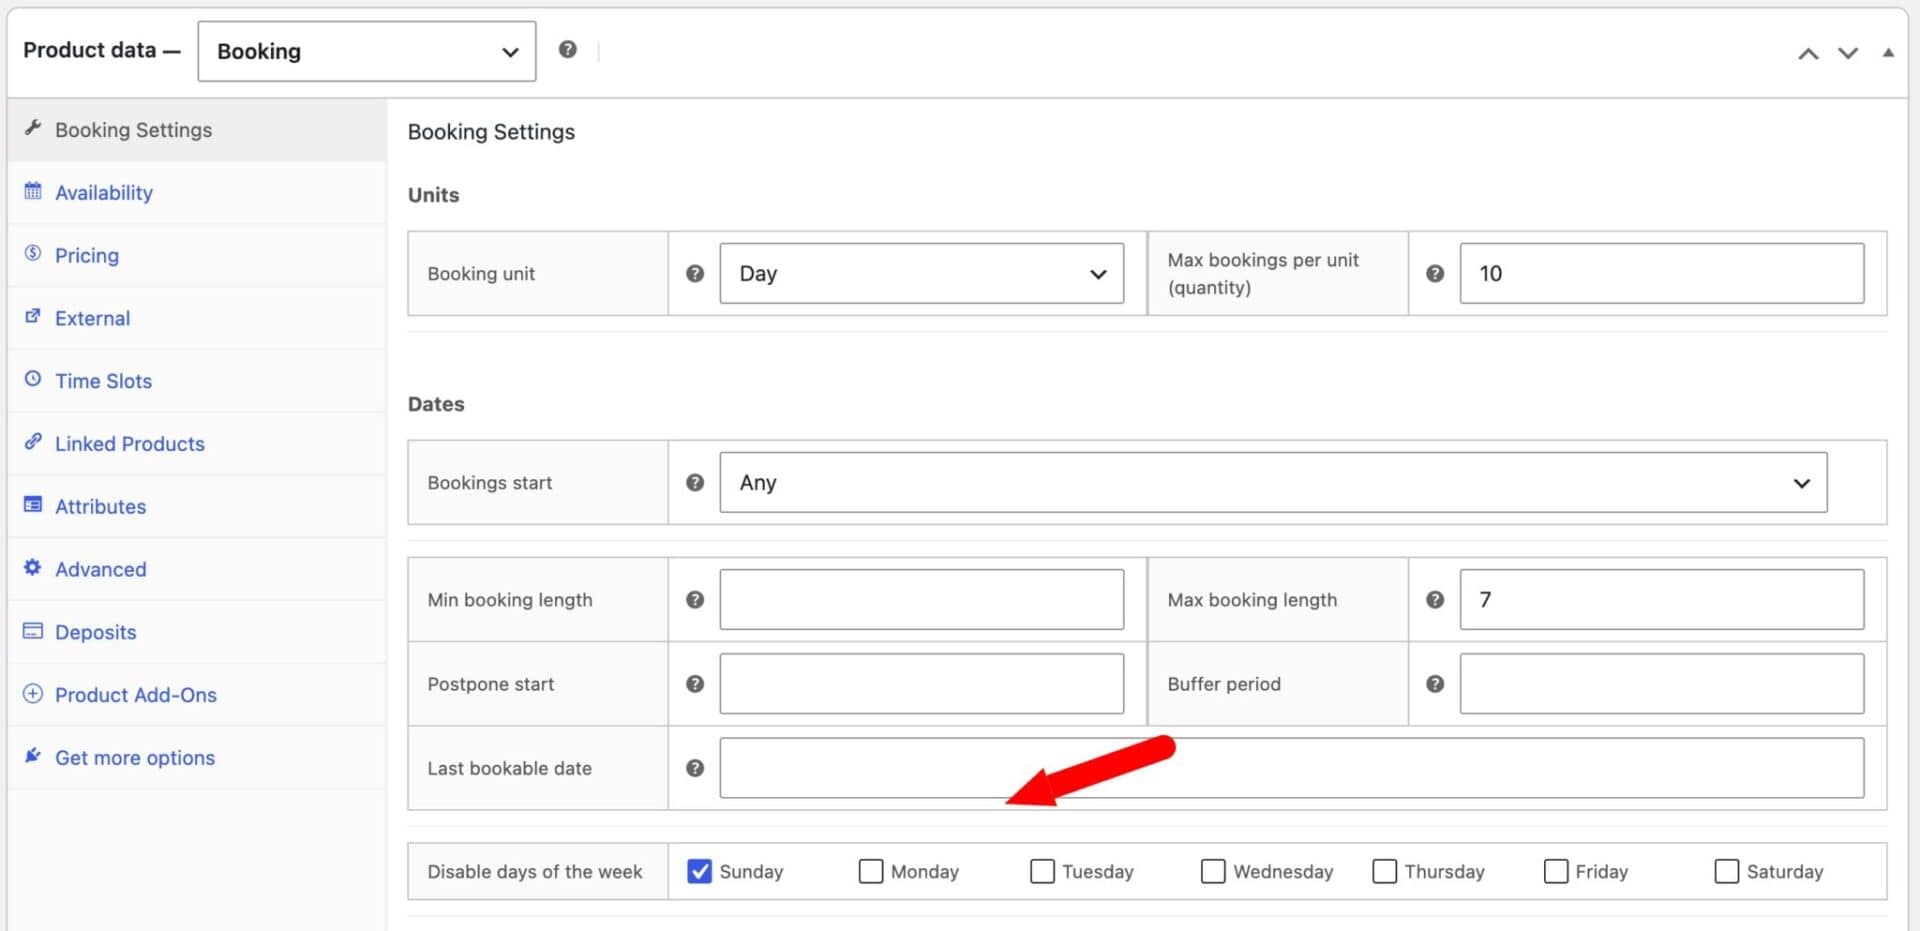
This is separate from blocking individual dates using the Custom Pricing tab – use disabled days for a recurring weekly pattern, like every Sunday, and blocked dates for one-off closures, like a public holiday.
Bonus #1: Take deposits and security deposits
Rental businesses typically need one of two different kinds of deposit.
Part payments on rental products
A part payment is an upfront payment toward the cost of the rental itself, with the balance collected later. Use this for higher-value equipment like drones or professional camera kits, where you want to reduce your risk if a customer cancels. This works through the Deposits and Part Payments plugin, where you can set a percentage or fixed amount and collect the remaining balance closer to the booking date. There’s a tutorial here.
Security deposits on equipment rental
A security deposit is different: it’s a refundable amount held against damage or late return, and you give it back once the equipment comes back in good condition. This suits anything that can be damaged or lost in use – power tools, bikes, camping gear, AV equipment. It’s set up using WooCommerce Product Add-Ons Ultimate to add the deposit as a separate line item at checkout, which you can then refund in full, refund partially, or withhold directly from the WooCommerce order screen.
We’ve covered the full setup for this in a dedicated tutorial: how to accept security deposits for rentals in WooCommerce. The two approaches aren’t mutually exclusive – you can take a security deposit at the time of booking and still collect part payment on the rental cost itself.
Bonus #2: Bundle equipment together
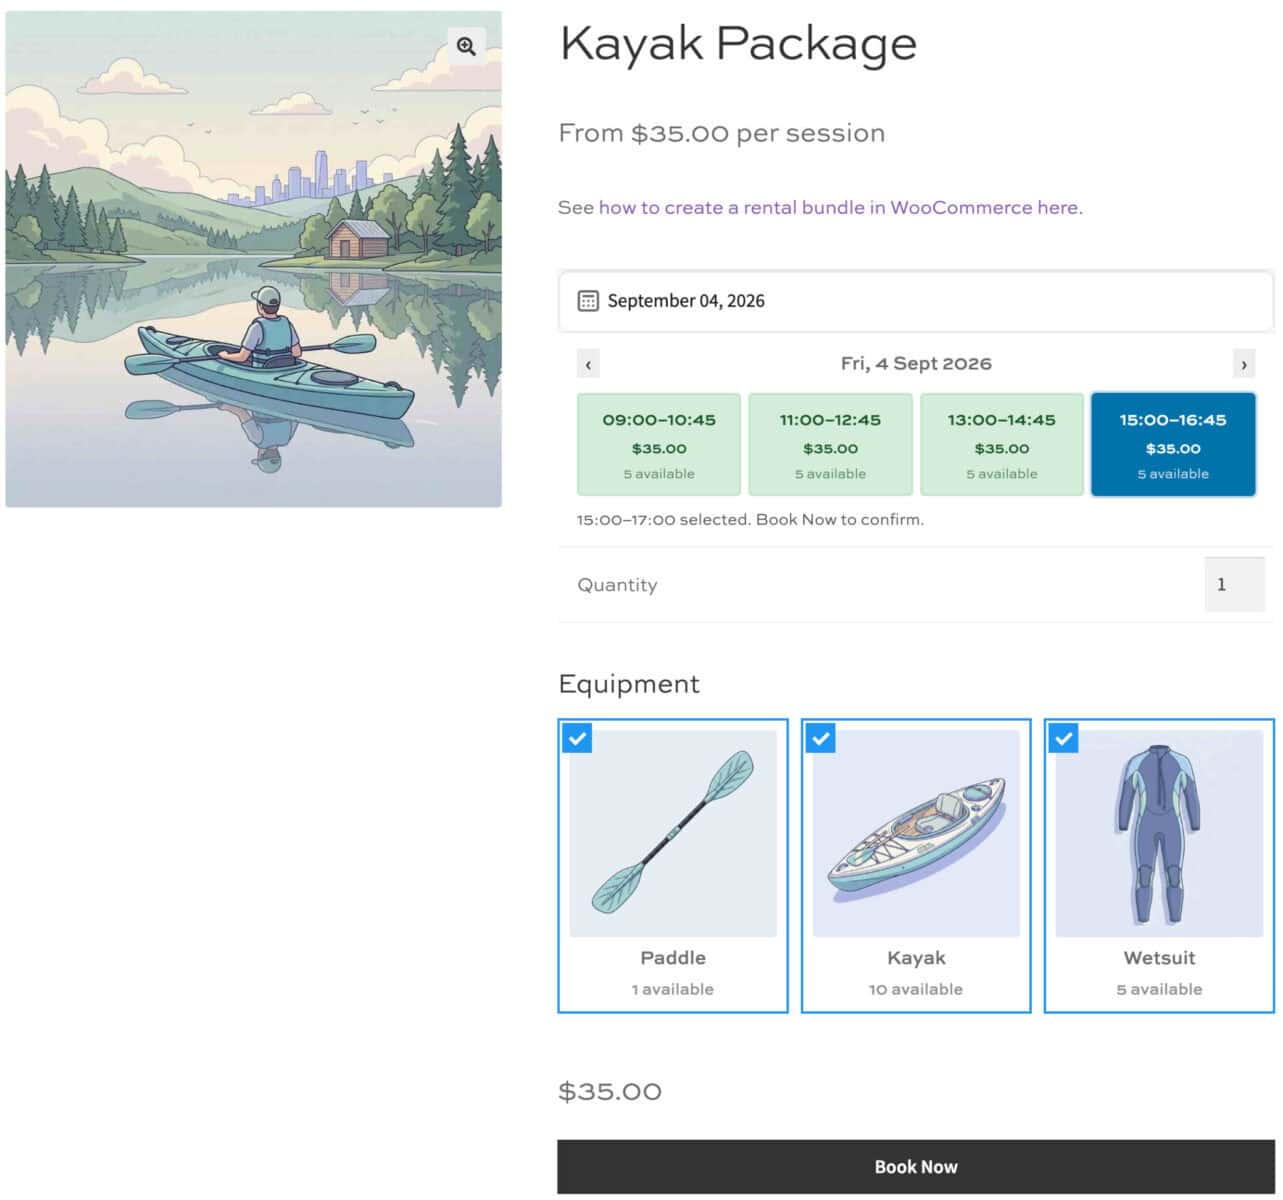
Some equipment is more useful, and more profitable, sold as a set. Use Product Add-Ons Ultimate to create rental bundles – a camera body bundled with a lens and tripod, or a party package covering a tent, tables, and chairs.
Bundled items can be booked together as a single rental, or made available separately depending on how you set up the bundle. This works well for bikes, too – bundle a bike with a helmet and lock so customers don’t need to add three separate products to their cart.
There’s a how-to guide on how to create a rental bundle in WooCommerce here.
Now let’s look at how to manage your bookings once they start coming in.
Manage your rentals from the back end
Once you’ve got your rental products up and running, you’ll want to be able to manage them from the back end. The Bookings Dashboard gives you occupancy, revenue, and upcoming bookings across every product in one place.
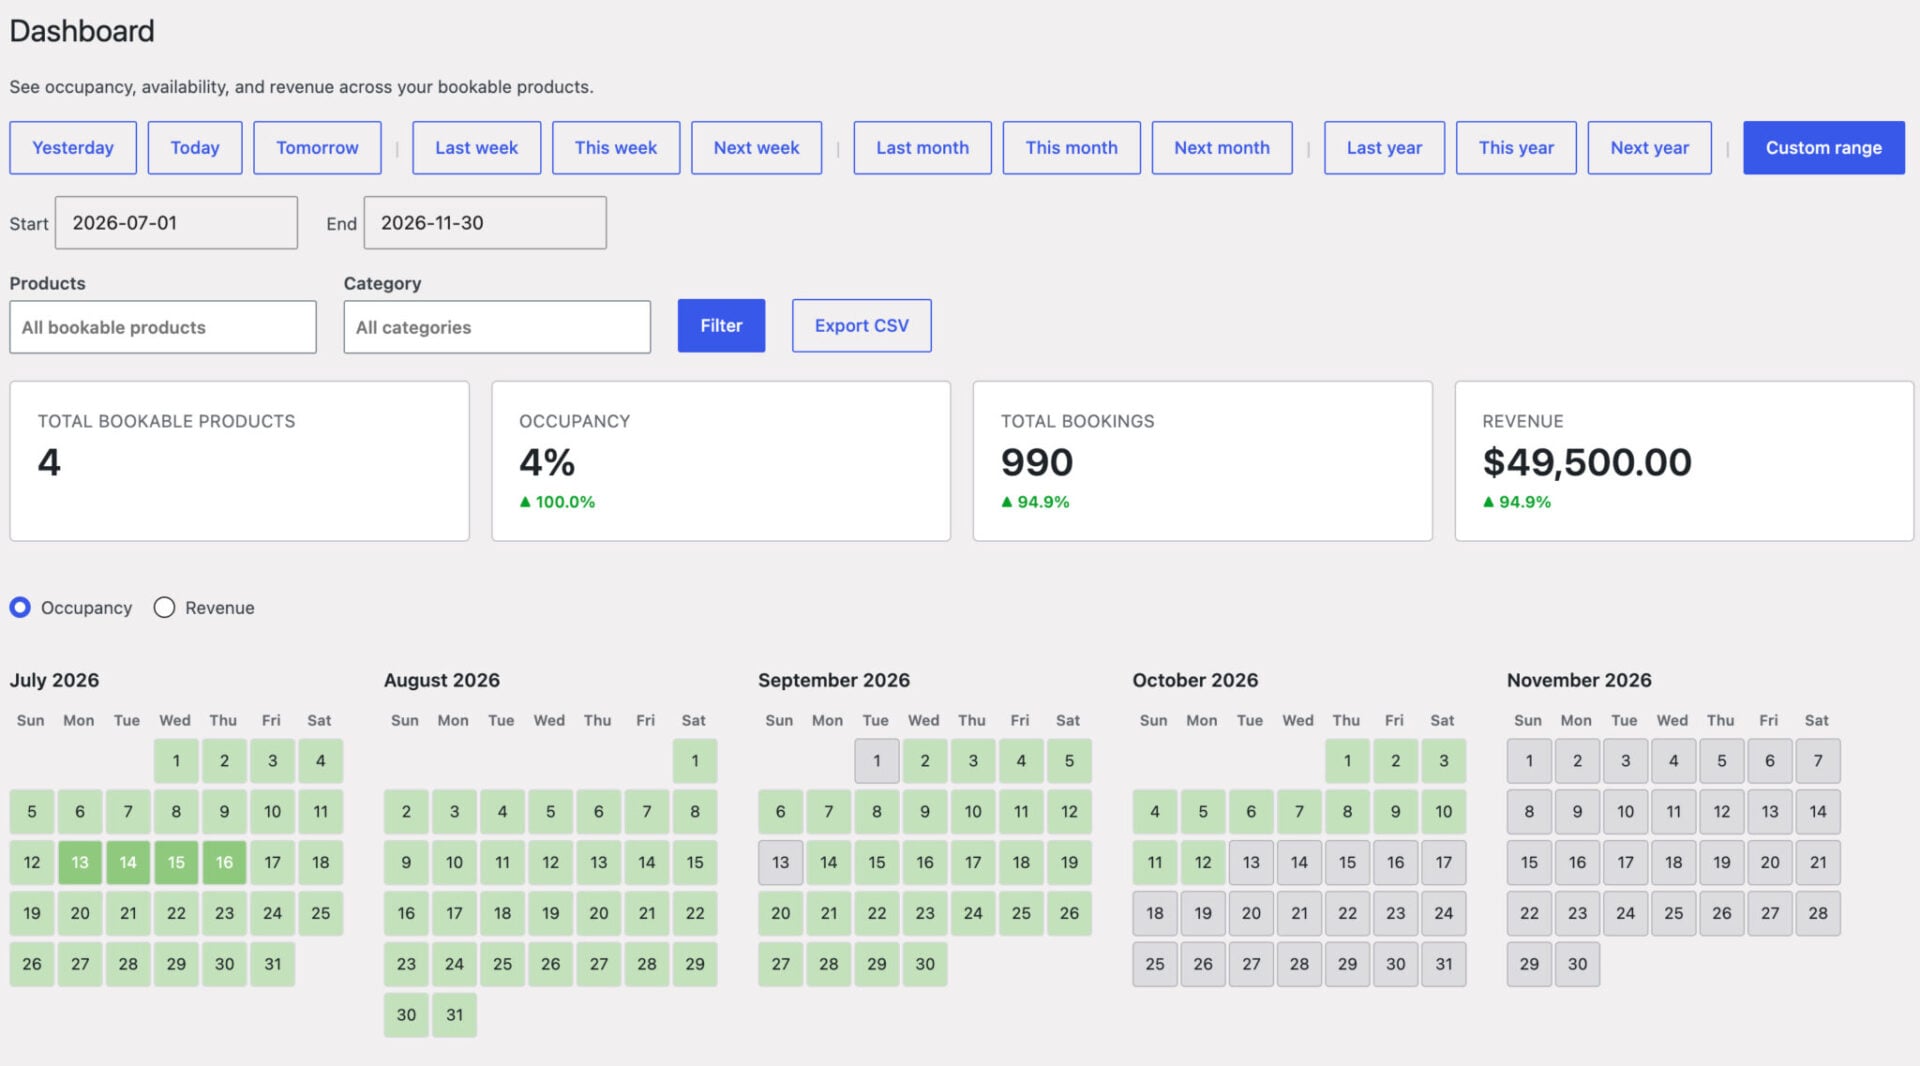
This is especially useful once your inventory is mixed – you might spot that your kayaks are fully booked next weekend while your tents still have plenty of availability, all from the same screen. You can also add a booking manually from the Dashboard.
View availability per product
If you only need to check or manage a single item, you can click into that product’s own Availability tab rather than working from the full Dashboard. Each month’s availability is shown at a glance, so you can see straightaway which days are free, partly booked, or fully booked.
Click into a specific day to drill down further, and use ‘Add booking’ to add a booking manually for that product if needed – useful for phone or walk-in bookings you want to keep in sync with your online availability.
Sync with Google Calendar
Bookings for WooCommerce also syncs with Google Calendar, so pickups and returns appear on your own calendar automatically as bookings come in.

I have a small camera rental site. I tested multiple bookings plugins and this was the best bookings plugin by far.
Equipment rental in WooCommerce – recap
So that’s how to set up an equipment rental business in WooCommerce, using Bookings for WooCommerce to handle day-based hire for things like power tools and party equipment, and time slots for hourly hire of camera gear and other session-based rentals. We also looked at how to take deposits and security deposits, bundle equipment together, and manage everything from the Bookings Dashboard.
Bookings for WooCommerce is compatible with all themes and page builders, including Astra, Flatsome, and Woodmart, and page builders like Elementor and Divi. If you have any questions, our world-class support team is on hand to help. And the plugin is backed by a 14-day money-back guarantee, so you can try it risk-free.