Set up equipment rentals in your WooCommerce store: two methods
The equipment rental industry is one of the fastest growing ever – construction equipment rental alone has a market size valued at over $200 billion!
This is why it’s never been a better time to create your own online equipment rental marketplace. You can grab the attention of prospective clients who are looking to rent out equipment for projects and make it profitable for your business to purchase equipment and rent it out to customers.
In this in-depth guide, we’re going to explore what makes the equipment rental industry so successful and see how you can set up your own marketplace using WooCommerce. We’ll also cover some best practices to optimize your equipment rental business.
The benefits of adding equipment rentals to your WooCommerce store
Before we jump into how you can rent out equipment on a WooCommerce store, let’s go over the advantages of this industry and what you can win from it.
- The demand is great and it keeps growing: The initial capital required for new construction machines is extremely high which is why contractors and construction companies shift towards construction equipment rental.
- It doesn’t require high investment: You can start renting out general equipment like power tools, lawn tractors, vehicles, compact tractors, or small excavators instead of buying expensive construction machinery right off the bat.
You have a wide target audience: Besides contractors and construction experts, you can also rent equipment that’s mainly used by homeowners and businesses for events, such as tents, tables, chairs, lights, decorations, plates, glassware, portable restrooms, concession equipment, or other types of furniture used for events globally.
Tutorial #1: Add equipment rentals to your WooCommerce store
While WooCommerce offers a great platform for selling products and online services, it’s not designed to list products that require a booking or extra details from the customer before they purchase the product.
The good news is that you can use a WooCommerce plugin to accept bookings for the equipment listed as products in your store.
The Bookings for WooCommerce plugin is designed to help you sell date-based booking products.
The plugin offers an intuitive solution that lets you accept calendar-based bookings for your WooCommerce products. You can use it to list any construction equipment for rent by publishing it as a WooCommerce product and letting users book it using a calendar on the front end.
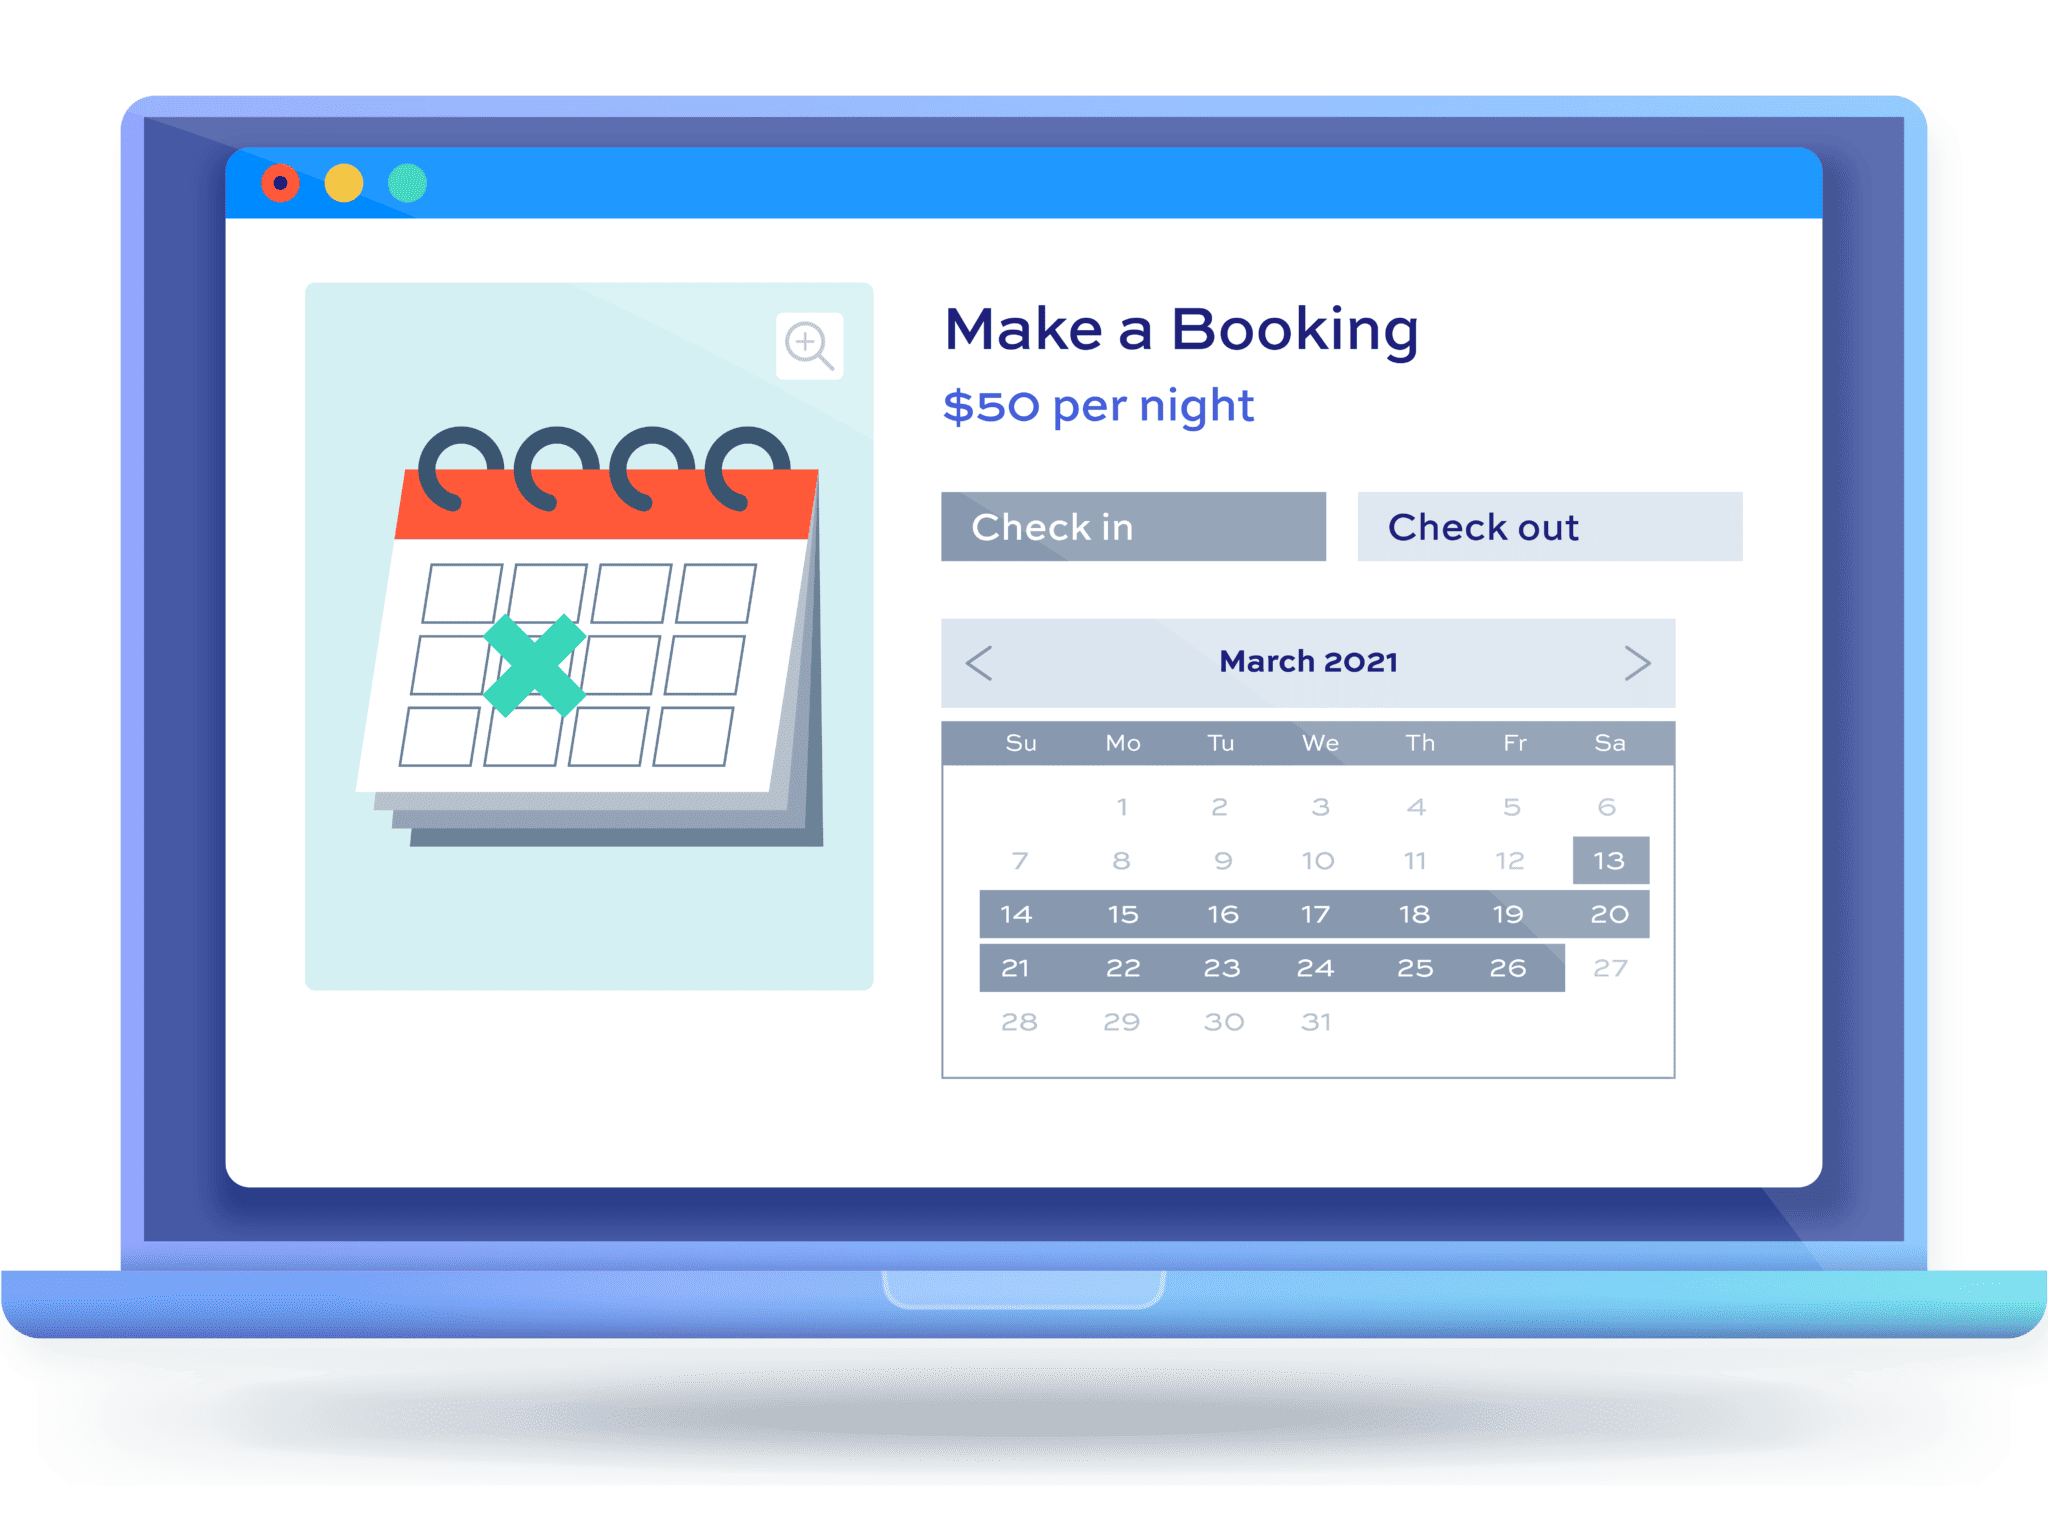
This way, customers can select both: their booking starting date and their booking ending date using the separate “check-in” and “check-out” fields on the front end of your equipment rental website.
The Bookings for WooCommerce rental plugin offers one of the easiest ways to sell products that can be rented, such as accommodations, vehicles, and equipment. The plugin comes with a wide range of features that let you create a seamless booking experience on your equipment rental marketplace such as:
- Automatic booking cost calculation.
- Setting available quantity for each product.
- Separate start and end calendars.
- Buffer periods before and after bookings.
- User-friendly on the front and back ends.
Made by Plugin Republic, Bookings for WooCommerce is the perfect tool for any website owner looking to rent out equipment or any kind of rental on their online store.
Now let’s see this plugin in action!
Step #1: Install and activate the Bookings for WooCommerce plugin
To get started, install and activate the Bookings for WooCommerce plugin on your website.
- Download the plugin’s .ZIP file using the link given to you at the time of purchase.
- Next, navigate to Plugins → Add New from the WordPress admin panel.
- Upload the plugin on your WooCommerce site, and make sure to activate the plugin before continuing. Once the plugin is installed on your WordPress site, activate it.
- Finally, head over to WooCommerce → Settings → Bookings and paste your license key in the Licence key field.
Click on the Save changes button to continue.
Step #2: Add your equipment as a bookable product
- Navigate to Products → Add New to add your equipment as a bookable product on your online store.
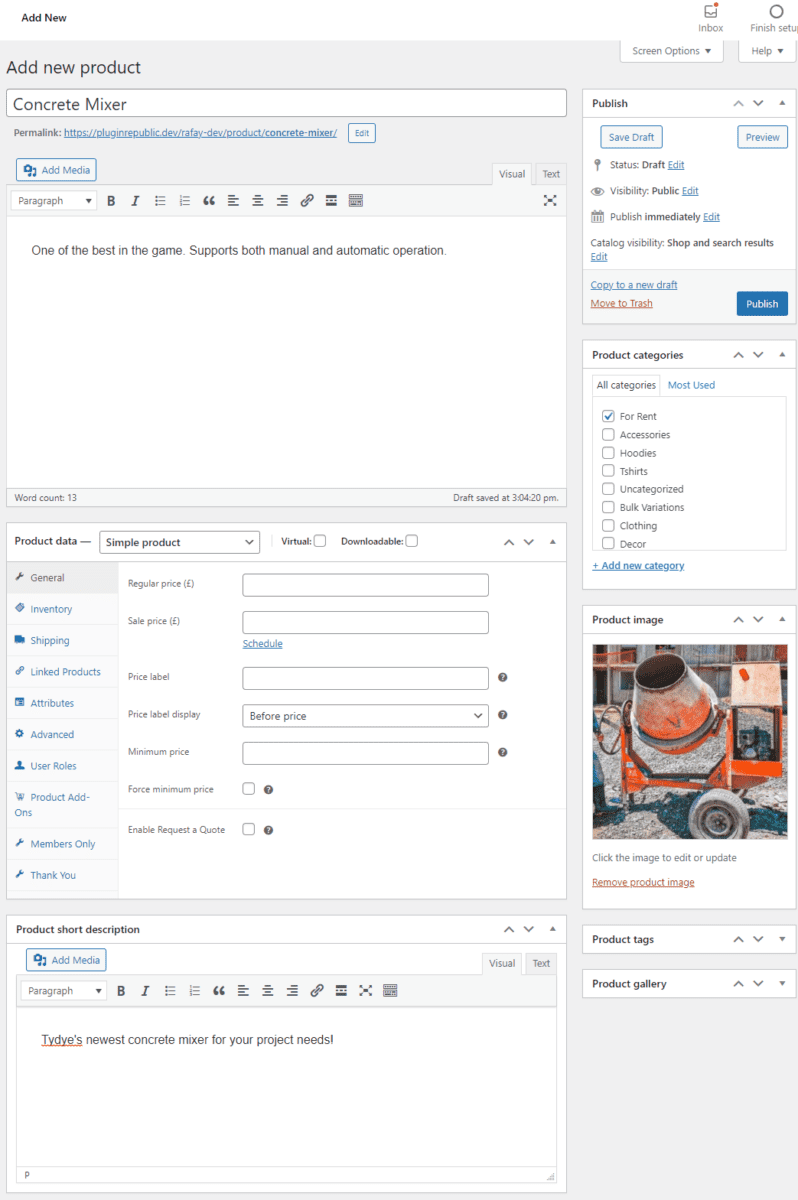
- Set basic product details such as the product title, images, and descriptions.
- Now, scroll down to the Product data metabox and select Booking using the product type dropdown menu.
This will transform your simple product into a bookable product that users can book for a specific time period.
Step #3: Set important parameters
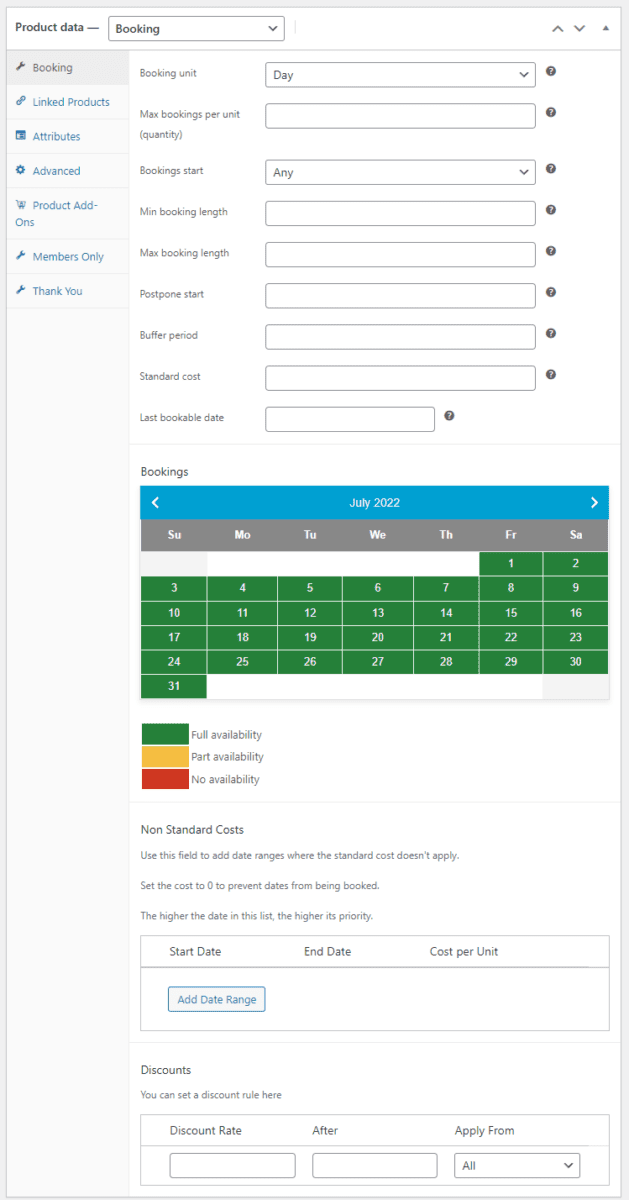
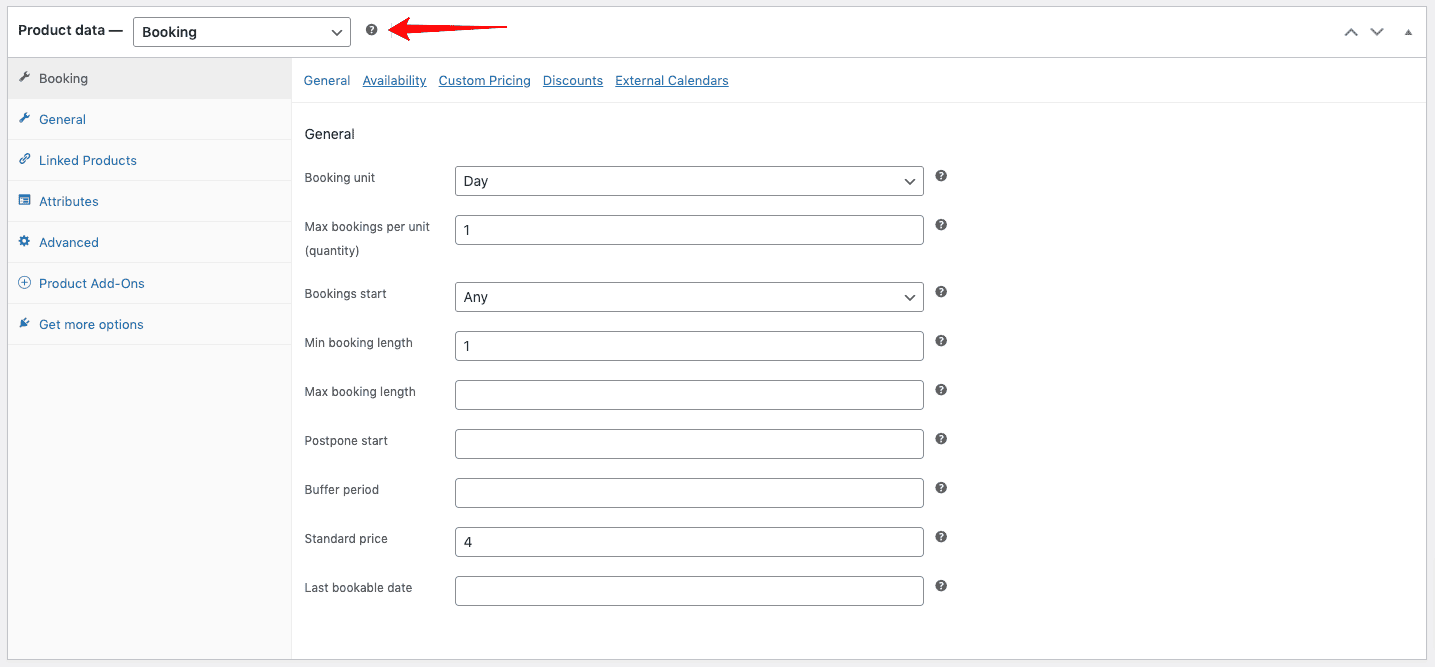
Now that your equipment is set as a bookable product, it’s time to configure important parameters for your rental product.

Set the Booking unit dropdown menu to either Day, Night, or Week. This will define if users can book equipment for multiple nights or days or if they want to rent it out on a weekly basis. You can also specify how many times a user can rent out your equipment in a day, night, or week using the Max bookings per unit (quantity) field.
- The Max booking length field lets you put a maximum limit on the total number of days, nights, or weeks a user can book your equipment for. For instance, if you want to only allow users to book your equipment for 14 days, you can set the field to 14. Similarly, you can also set the Min booking length field to specify the minimum limit that a user has to book the equipment.
- Using the Bookings start dropdown menu, you can specify the day of the week a booking starts. This makes it easier to start charging users according to your own business policies.
- The Postpone start lets you set a minimum notice period before a user can book your equipment. For example, you can set a 2-day notice so it’s easier for you to manage product availability and all logistics involved in handing over equipment to users who rent them. You can also use the Buffer period field to specify the time needed for your business to handle all operations after a booking ends.
Finally, using the Standard cost field, you can specify the price per unit of booking for your equipment. In addition to this, it’s also possible to set the Last bookable date so you can rent out equipment for a specific period of time. For instance, you can rent out equipment until the lease period ends. This way, you can pay off your equipment lease fees using the revenue generated by renting it on your WooCommerce site.
Step #4: Customise the booking experience
Now, with all the important parameters of the bookable product set up, it’s time to start customizing the WooCommerce booking experience. The Bookings for WooCommerce rental plugin offers a wide range of options that let you change the overall look and feel of your bookable product on the front end.
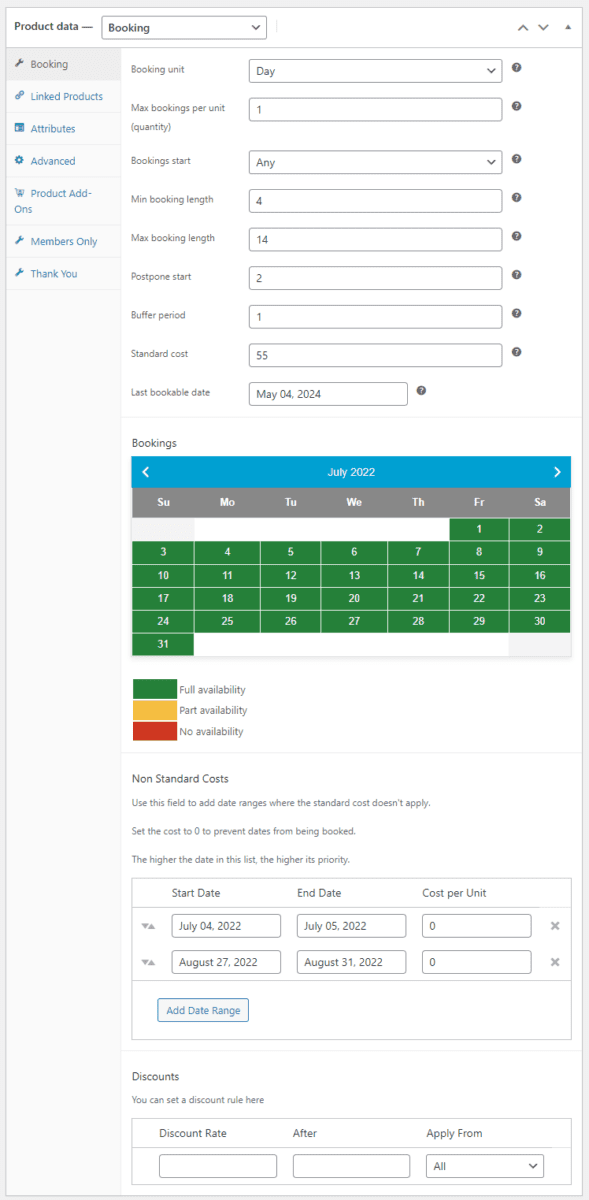
To begin with, you can add in your availability and block the dates that you don’t want to rent your equipment out in the back end.
- To do this, click on the Add Date Range button and specify the start and end dates.
- You can set the Cost Per Unit field to 0 to prevent specific dates from being booked by customers or clients on the front end of your WordPress site. For instance, you can block WooCommerce bookings for holidays like the 4th of July or for Christmas.
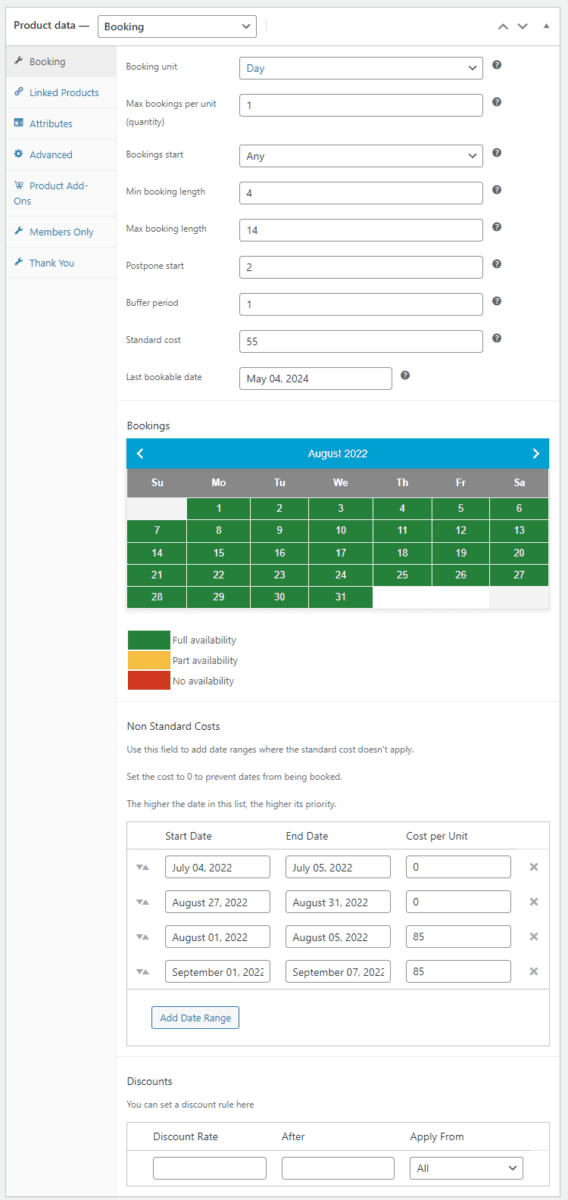
- You can also set up a time period when you want to charge more (or less) than usual. This way, you can offer more flexible pricing depending on peak or off seasons. For instance, if every first week of a month is busy for your business, you can charge an additional fee for each booking per unit. To do this, simply set the dates by creating a new date range and specify the additional expense in the Cost Per Unit field.
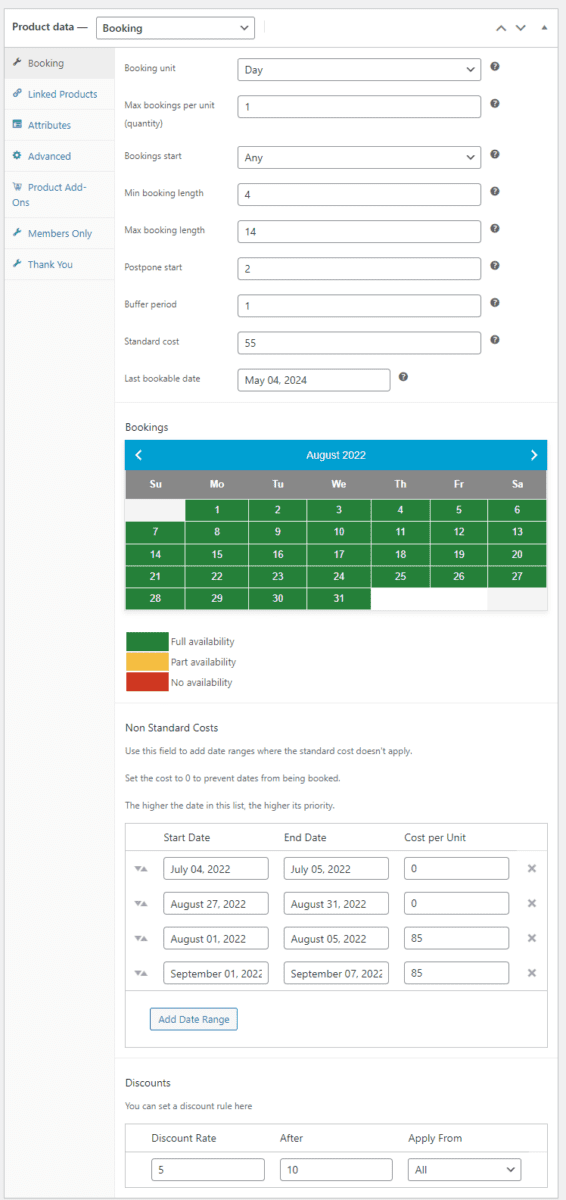
Another great feature of the Bookings for WooCommerce plugin is that it lets you offer discounts to users who rent out your equipment. For example, you can offer a 5% discount if customers book the equipment for at least 10 days. To do this, set the Discount Rate field under the Discounts section and specify the minimum duration required to qualify for the discount and the percentage value of the discount.
Make sure to click on the Publish button to save changes on the front end of your WooCommerce site.
Step #5: Preview
Now, users can rent out your equipment directly from your e-commerce site using an intuitive calendar-based booking interface.
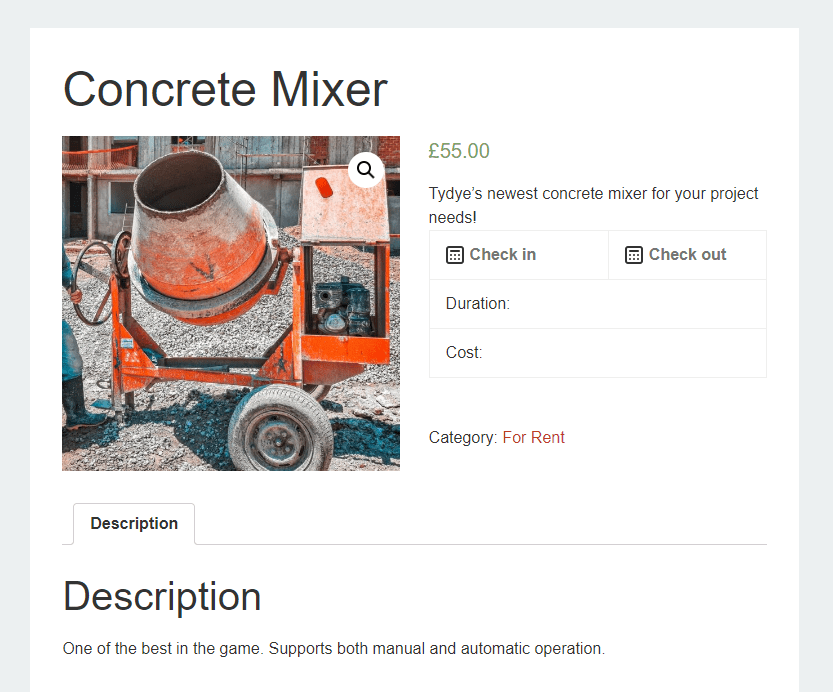
Users can view two separate fields, the “Check-in” and the “Check-out” field that let them select their own booking start and end date.
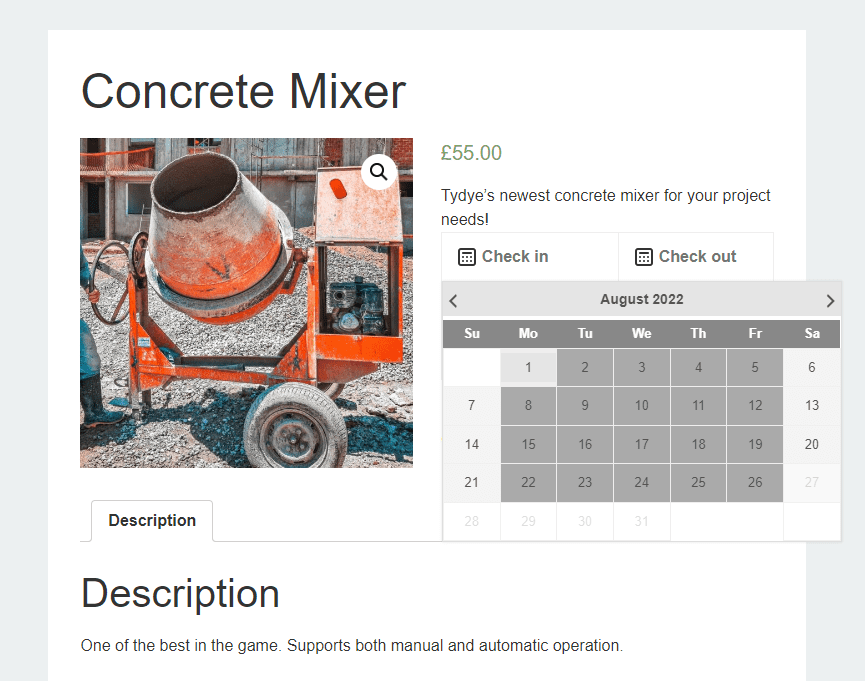
Customers can only select the available dates, while for the days you don’t want to rent out equipment will be marked “not available” or appear grayed out.
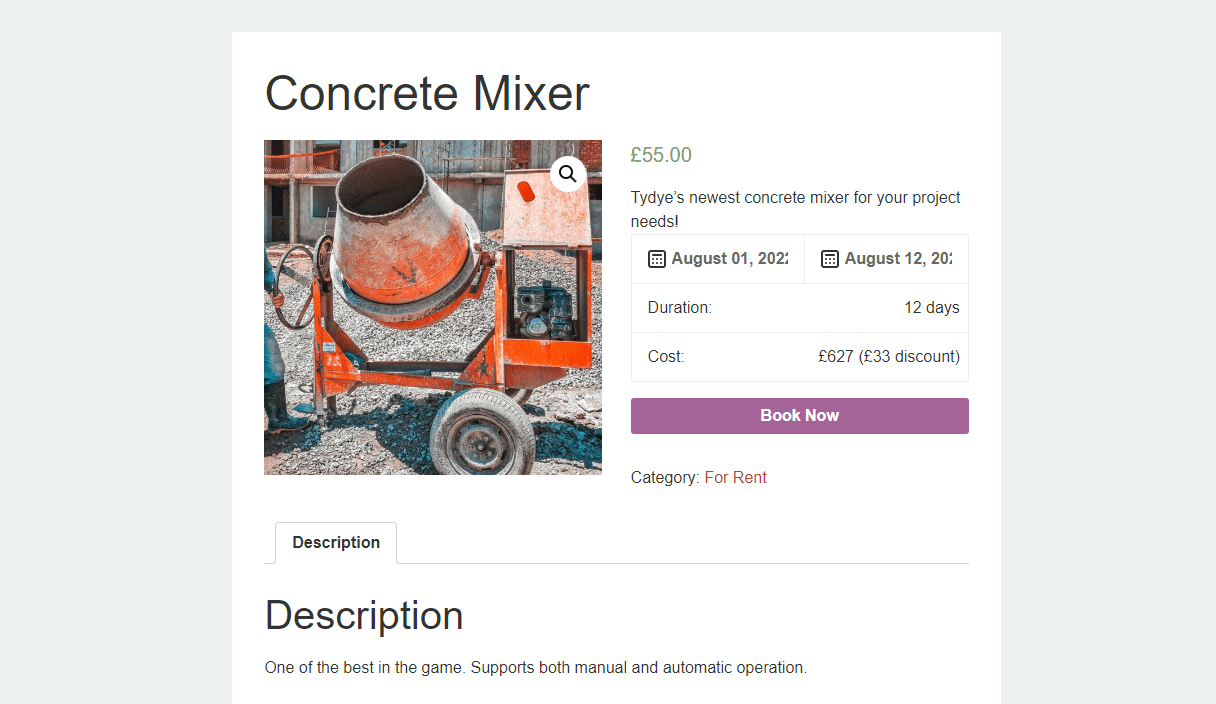
Once the users select their desired booking details, they will be given a total price for the booking plus the discount they receive, if any.
The great thing about the Bookings for WooCommerce plugin is that it’s not only intuitive to set up but also helps you create user-friendly and easy-to-use bookable product pages on your online store.
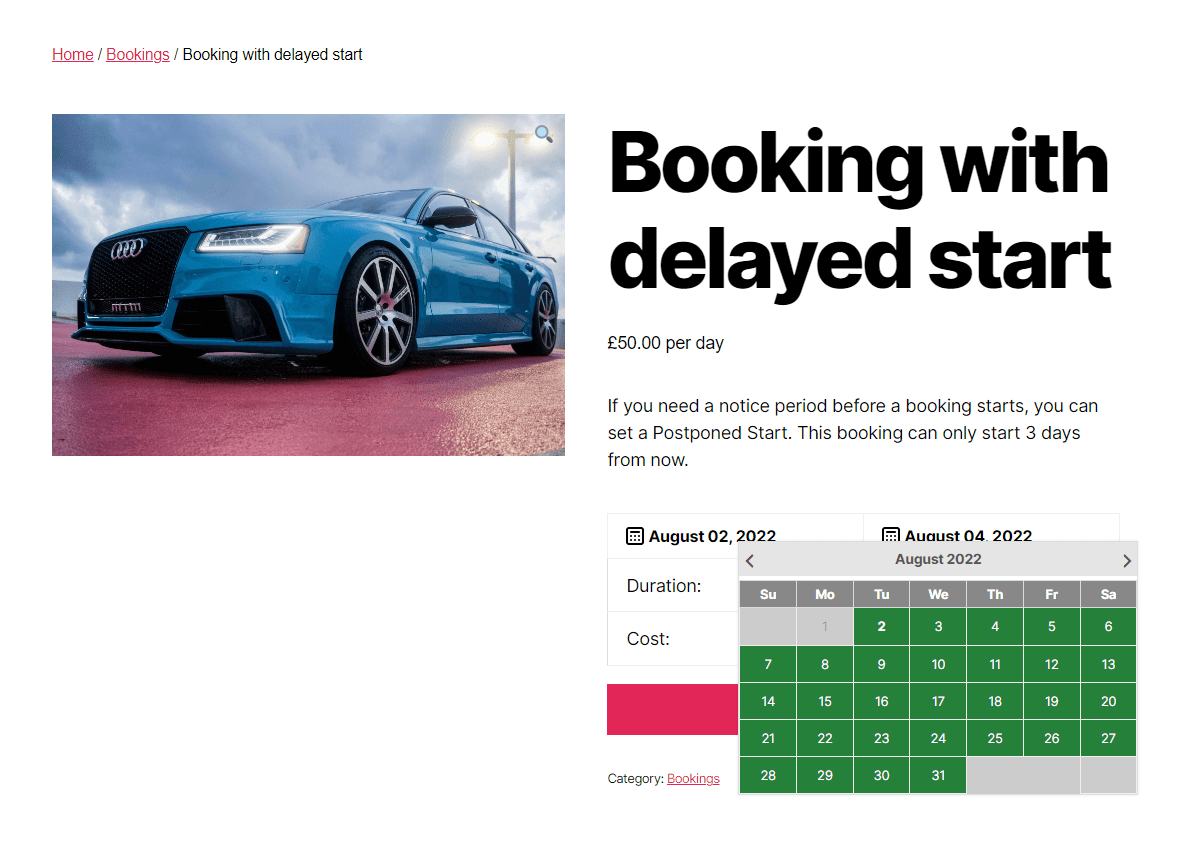
For instance, you can create a bookable product with a delayed start. This will let you manage all logistical and management aspects of sending out the bookable product to your customers once they check in their dates. This also means if a customer wants to make a booking today, they can only book it after the specified delay time.

You can also set up bookings that require a different unit per price. This means you can rent out accommodation or hotel rooms by charging customers a price per week.
This level of flexibility in terms of setting up bookable products online makes the Bookings for WooCommerce plugin suitable for all kinds of rental items. This can include anything from vehicle rentals and equipment rentals to hotel bookings.
Method #2: Hire out products and equipment
In this tutorial, we’ll use a drone as our example rental product but this could apply to any kind of rentable product: e.g. party equipment, bikes, hot tubs, surfboards, etc.
Our equipment rental product will have the following features:
- Users will be able to select a start date and end date for their rental period
- We’ll be able to assign a cost per rental period unit, e.g. per day or per week
- Users will be able to select more than one item to hire during the booking period
- We’ll track inventory of the items across the entire rental period to ensure that users aren’t able to rent an item that’s out of stock
- We’ll also look at assigning different costs for our products at different times of the year
WooCommerce equipment rental plugin
As with the first tutorial, we’ll need WooCommerce and the Bookings for WooCommerce plugin:
Step #1: Create a rental product in WooCommerce
Let’s start by setting up the product page for our rental product. In this example, we have a total of ten drones that we can rent out at any one time but we don’t need to create a separate product page for each one. Instead, we just create one product page and assign an inventory of 10.
There’s a demo version of this product here.
To create our rental product, just create a new WooCommerce product and set the ‘Product Type’ to ‘Booking’.
You can then start to enter some data related to your rental product:
- Booking unit
The booking unit is the basic duration unit that your equipment rental is measured in. We’ll select ‘Day’ here for our rental product. - Max bookings per unit (quantity)
This is the same as inventory, i.e. the number of times this product can be rented out per booking unit (day, night, week). For our drone product, we’ll enter 10 here as we have 10 units that we can rent out at any time - Booking start day
If you wish, you can specify a day of the week that each booking must start on. So if we only wanted to allow our equipment rental to start on Monday, we could enter that here. - Minimum and maximum booking lengths
Use this setting to define a minimum or maximum booking length for the equipment hire. - Postpone start
If you need to have a notice period before a rental can start, you can enter a value here - Buffer period
Likewise, if you need a period after each rental ends, you can enter a value here. For example, you might need to check the returned equipment before making it available for the next rental - Standard cost
This is the cost per booking unit – in our example, the cost per day for each drone
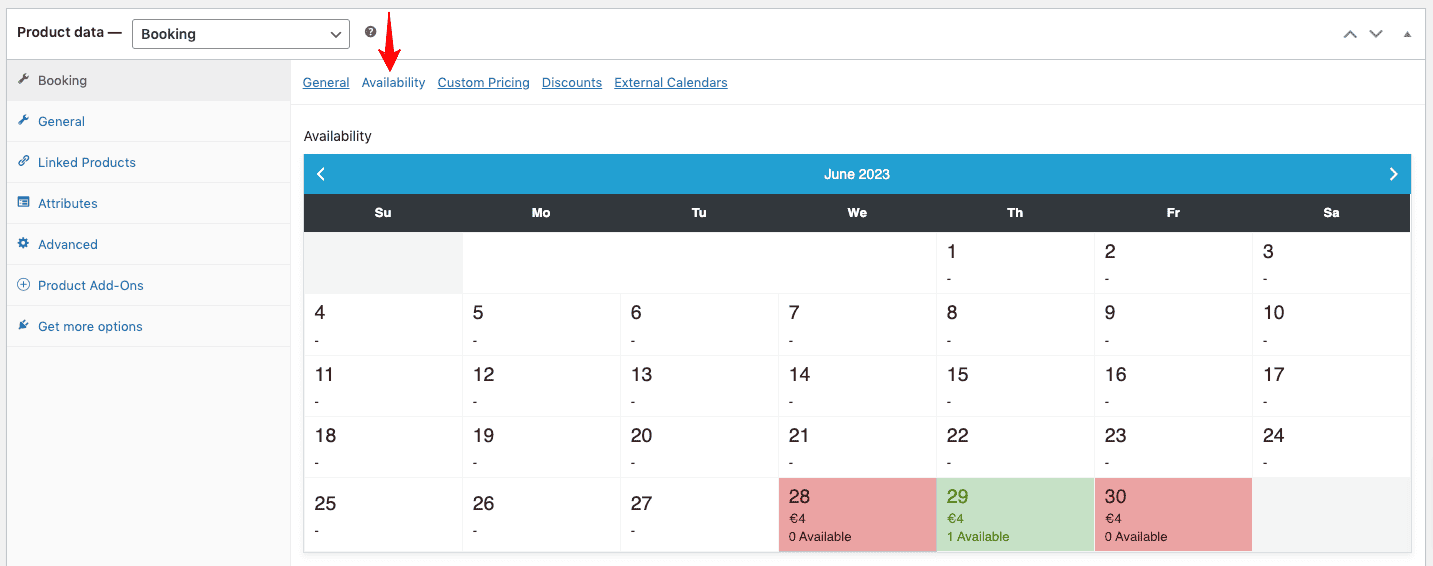
Here are our updated settings. Note that you can see the rental status of the product on the Availability tab. This allows you to track the inventory status of your equipment day by day.
We can see this rental product on the front end now:
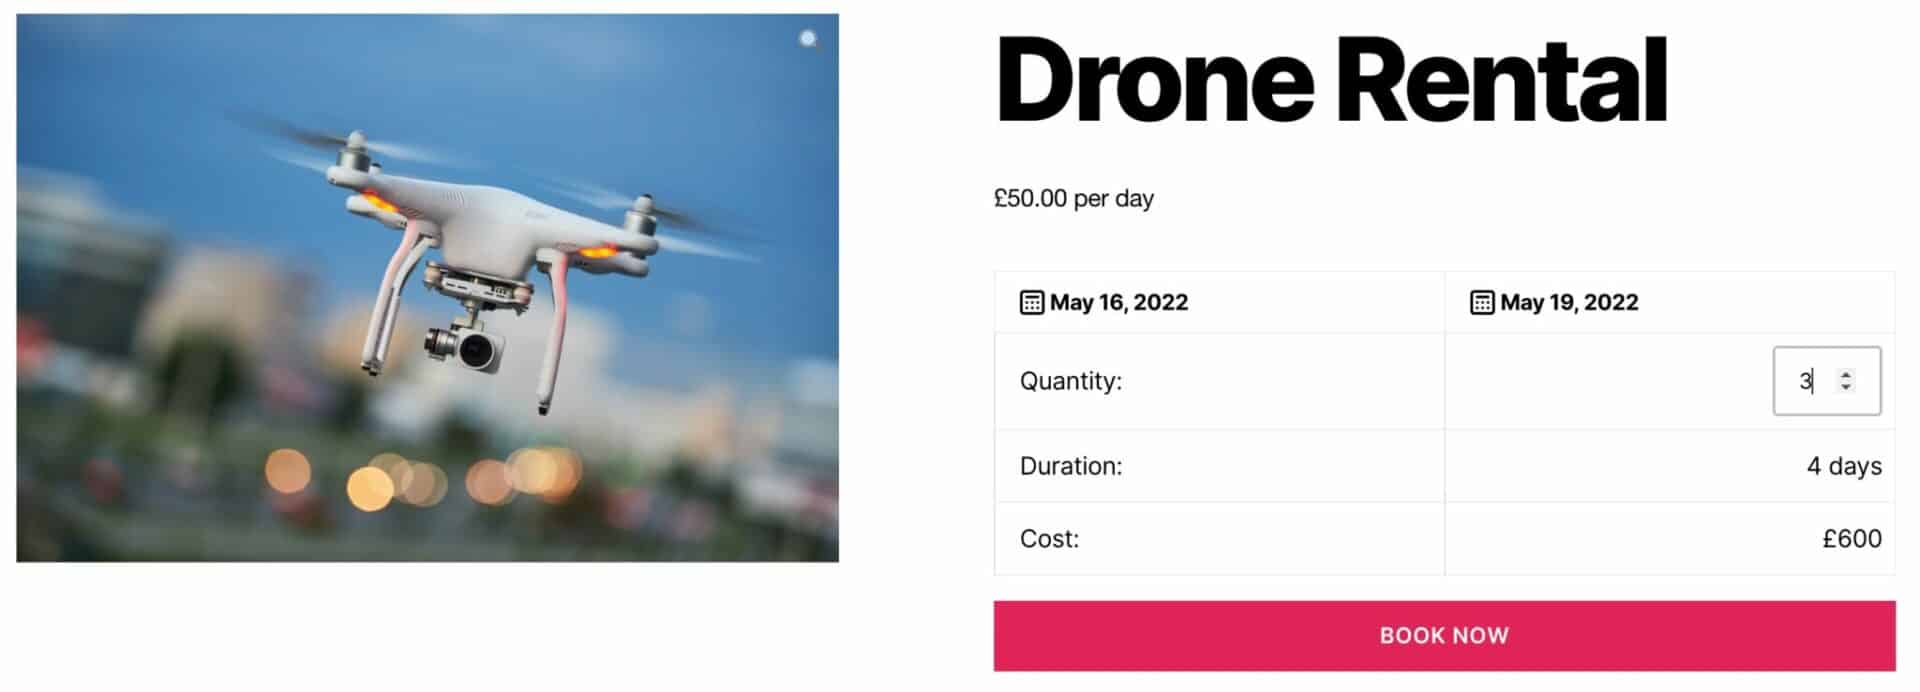
Now the user can select the start and end dates for the booking; they can choose how many drones they want to rent; and the plugin will calculate the duration and the cost.
When the user checks out, the plugin will adjust the inventory for the product across the period of the rental.
Step #2: Assign different rental costs for different times of the year
Let’s imagine that we want to set higher prices for our equipment at certain times of the year. We can do this on the Custom Pricing Tab using the ‘Custom Pricing’ setting:
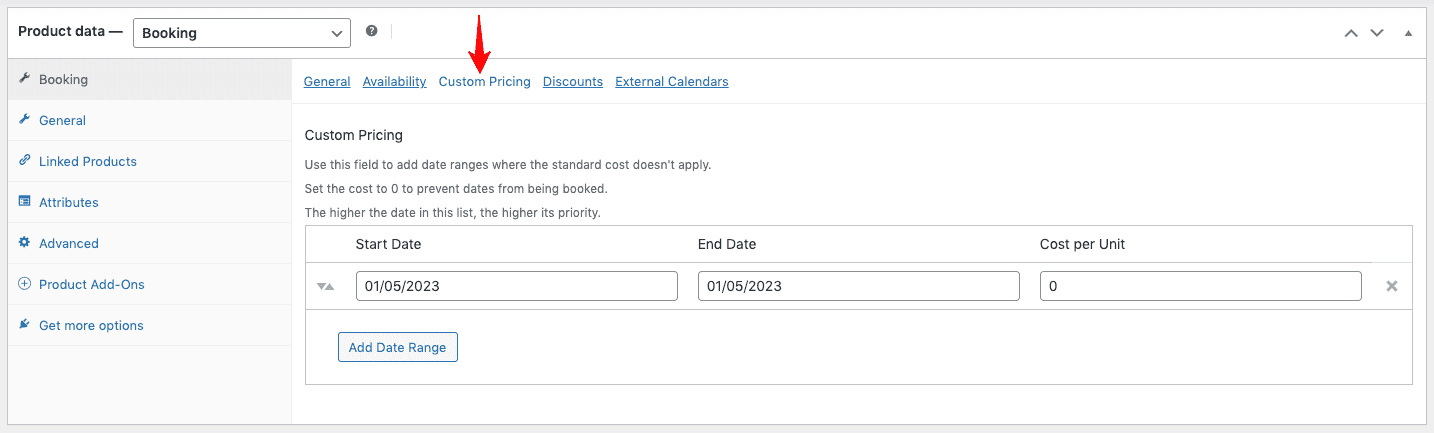
Just enter a date range where you’d like to charge a non-standard cost. Enter the new price in the ‘Cost Per Unit’ field.
If you’d like to make rentals unavailable during a certain period, just enter 0 in the ‘Cost Per Unit’ field.
Optimizing your WooCommerce rental system: Best practices
It’s crucial to offer a seamless booking experience on your equipment rental marketplace so it encourages more sales. This is one of the best ways to create a successful equipment rental marketplace where users can easily book the equipment they need, whenever they need it.
However, you also need to consider some best practices to follow when creating your WooCommerce equipment rental marketplace to ensure its success.
Let’s go over a few of them in detail:
Make sure it’s mobile-friendly
One of the major aspects of any type of online booking process is that it should be fully mobile-friendly. Since most users browse the internet on their mobile phones, you need to offer them an easy way to rent out your equipment without having to open your site on another device that supports it.
It’s one of the best ways to encourage more bookings and generate more revenue for your business. In fact, a study found that the total number of bookings coming from mobile devices went from 41% to 60% after the introduction of a mobile app.
Support major payment gateways
Another important aspect of any successful equipment rental marketplace is that it supports all the top, most popular, and relevant payment gateways. You want to make it easy for users to pay you when booking equipment and offer a frictionless checkout experience.
Collaborate with other businesses
You also want to collaborate with businesses that are relevant to yours to personalize and enhance the booking experience. For instance, if you rent out construction equipment, you can talk to construction companies and offer them to rent out their equipment as an additional service.
Similarly, if you rent out decorations for events, you can talk to event planners, venues, and schools and rent out their equipment for them. This not only helps your business generate more revenue but also helps you establish yourself as an expert in your industry.
Offer discounts
Ideally, you also want to offer customers discounts on longer rental periods. This is because it encourages customers to book your products for a longer period of time while also paying you more money. This is a great way to increase your average order value and enable a steady source of income for your business.
Create an inviting equipment rental marketplace
Make sure you’re offering your customers a user-friendly and welcoming experience that will leave them satisfied. If the booking process is smooth and according to their expectations, not only will they come back for more, but also recommend you to friends, family, and colleagues.
Set up equipment rentals with ease
Setting up equipment rentals makes it easy for customers to book equipment for a certain period of time without having to worry about purchasing it from the outset. This way, you can charge customers for each day, night, or for each week they rent out your equipment. As a result, you can pay off taxes, maintenance costs, or equipment insurance costs without having to let go of your valuable assets.
A great way to do this on your eCommerce site is by using the Bookings for WooCommerce plugin. It offers you all the functionality you need to create a bookable product in WooCommerce that lets users select their booking start and end date directly from the product page using a calendar widget. This makes it the perfect solution for creating a personalized, optimized booking experience for renting equipment online without having to touch a single line of code.
The plugin is backed by our 14-day money-back guarantee so you can try it without risk. It’s compatible with all themes and page builders – and we have a world-class support team on hand to help you with any questions or configuration issues.
Hi!
How am i supposed to manage and update bookings on the back office?