WooCommerce composite products: how to build your own product [+video]

Looking for a way to allow your customers to configure their own products?
WooCommerce composite products let your customers configure their own products. This tutorial will show you step-by-step how to set up composite products and explore some real-life composite product scenarios.

WooCommerce Product Add-Ons Ultimate
Discover our WooCommerce composite products plugin today
It can be a barrier to sales if customers like what you are selling but it’s not quite right. You could lose business by not presenting a more tailored customizable product offering. By giving customers the flexibility to make their own choices and build composite products exactly how they want them, you are more likely to persuade them that your product is the right one for them.
WooCommerce composite product examples
There are many different ways you could introduce composite products in your WooCommerce store. Some examples include:
Use our step-by-step guides to learn how to build the above composite products. The techniques in these examples can be applied to any composite product you want to build.
The linked tutorials above all contain demo products showing you exactly how the finished product works.
We’ll also look at other aspects of composite products – like how to track stock of your components and some different ways to display fields on the product page and in the cart.
What are WooCommerce composite products?
Essentially, WooCommerce composite products are a way of assembling a customized product out of several other products. For example, a gift hamper in which the customer chooses which products are included or a computer in which the user configures all the components – from motherboard to keyboard.
Composite products are sometimes referred to as kit-builders, kit-building products, or custom product builders. The user builds up the composite product out of multiple sub-products.
Types of WooCommerce Products: Composite, Grouped, and Product Bundles
To fully understand composite products, it’s important to distinguish them from other, similar product types – i.e. grouped products and product bundles.
- Grouped products: This is a collection of individual products that can be purchased as a group – such as a set of wine glasses.
- Product bundles: These are individual products that are categorically connected and are often purchased together – such as a shampoo and conditioner bundle.
Why use composite products?
Using composite products in WooCommerce provides several key advantages for store owners and customers.
- It allows store owners to create complex product kits by combining multiple individual items, offering a customizable product experience to the customers.
- Customers can build their own product packages, choosing the specific items they want, which can enhance the shopping experience and increase satisfaction.
- It makes inventory management easier as each component in the composite product is tracked separately. This feature also allows for more accurate pricing and shipping calculations since the cost and shipping of each individual item are considered.
When should you use composite products?
You should take advantage of this option if you want to:
- Offer customizable, multi-component products
- Maintain precise inventory control
- Provide an enhanced and flexible shopping experience to your customers
If your store sells complex products or services that require customer input, or if you want to provide flexible pricing options, where the total price adjusts based on the components chosen by the customers, creating composite products is how you will achieve this.
Composite products also help when you have a more advanced shipping system that requires accurate calculations based on the individual components selected, as each part may have different weights and dimensions.
How to create WooCommerce composite products
WooCommerce doesn’t have the ability to create composite products. To create them, you’ll need the Pro version of the Product Add-Ons Ultimate plugin to provide the extra functionality you’ll need.
Product Add-Ons Ultimate allows you to add extra fields and options to WooCommerce so that customers can personalize your products.
The Pro version of the plugin allows you to add ‘child products’ as options within a main product. Child products will be the components of your composite products.
The benefits of using child products
A key feature of WooCommerce composite products is the ability to treat each component of the build-your-own product as a standalone product in its own right.
Track stock levels of add-ons
Using child products as your add-ons means that you can track your stock levels.
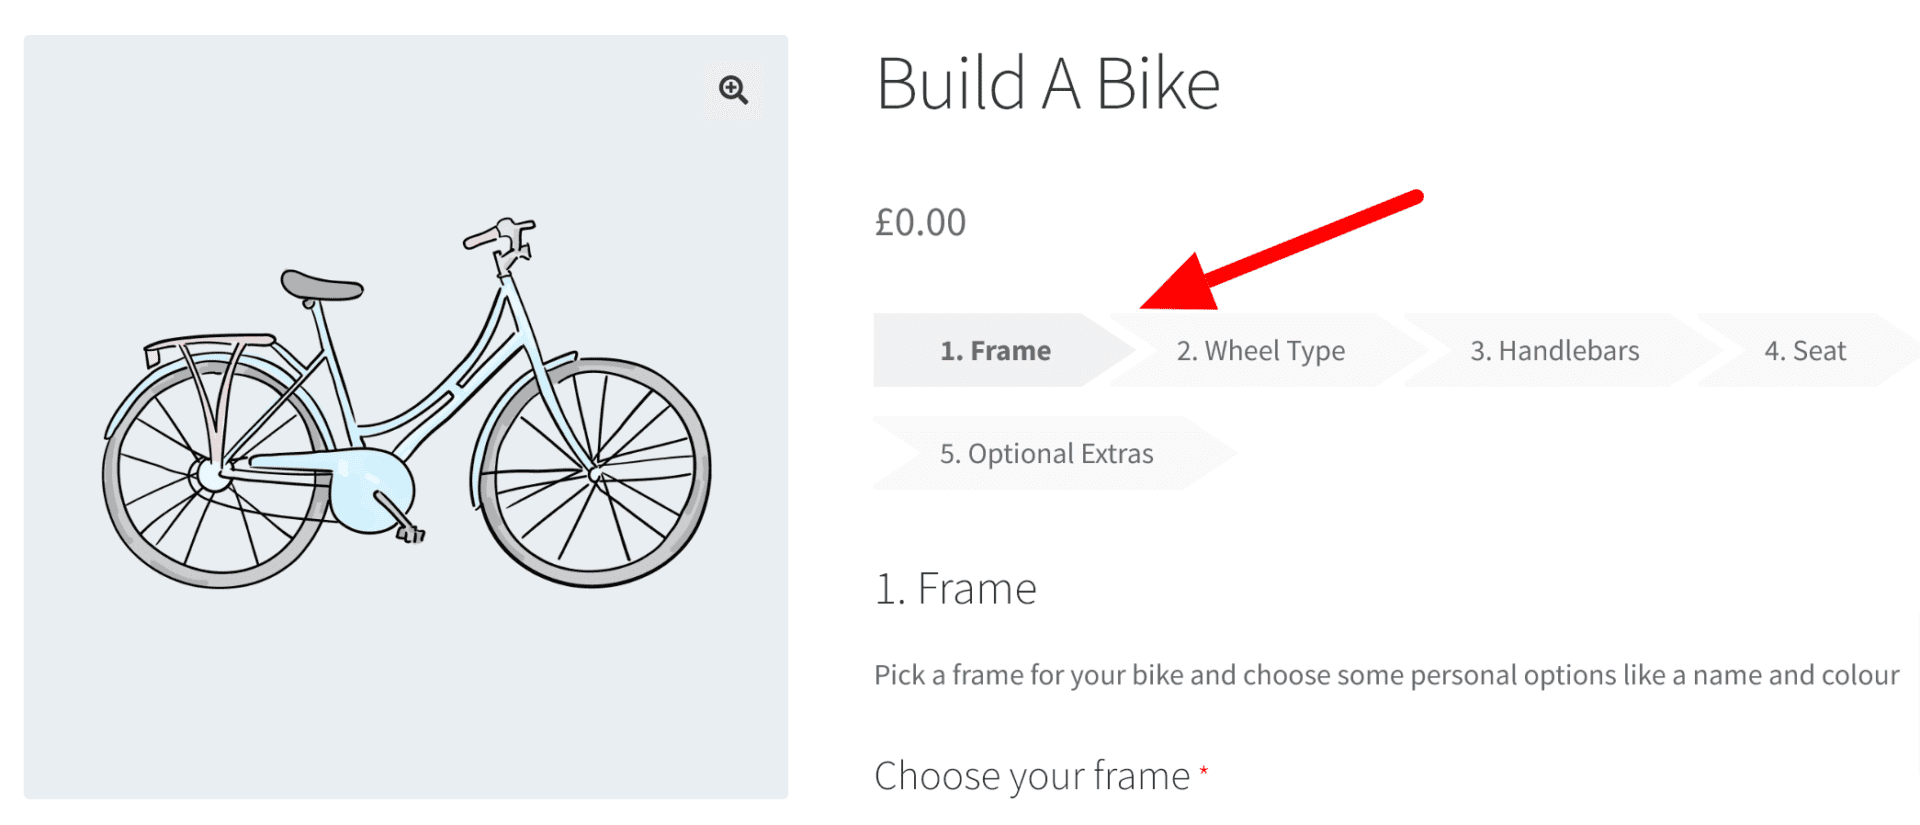
Let’s take the example of a custom PC product that allows the user to choose their own processor, graphics card, and RAM.
The customer should be able to build their own PC from one page – the ‘Build Your Own PC’ product page. On this page, they should have options to pick the processor they want, the graphics card, the RAM, etc.
However, let’s imagine that you only have a limited number of each processor available. So having these set up as products means that you can track their inventory level. When they’re out of stock, they won’t be available to the customer.
Assign SKUs to your add-ons
Because child products are also standard products, you can assign them with SKUs.
Set weight and dimensions of add-ons
If you’re using child products as add-ons, you can assign them weight and dimensions like length and width. This means that you can ensure your add-on options will affect shipping costs.
See more information on how to sell by weight in WooCommerce.
Hiding your child products
If your components are not available to be purchased separately and can only be bought as part of the composite product, you can choose to hide them. This will prevent these products from appearing in shop archives. But you still get all the benefits above of using real products as add-ons.
If you don’t want users to be able to find or access the hidden products at all, even with the direct URL, you can check the ‘Redirect hidden products’ option in WooCommerce > Settings > Product Add-Ons.

So, even if the user knows the direct URL to the hidden product, they won’t be able to view it or purchase it unless it’s part of the composite product.
Other features
The Pro version of Product Add-Ons Ultimate gives you the ability to use child products, which is essential for your composite products. And it has a number of other, advanced features to make your products even more powerful, including:
Product categories
The ability to specify product categories so that all products within the category are listed as components. Saves having to list individual sub-products one by one.
Minimum and maximum quantities
Add-Ons Ultimate gives you several options for specifying quantities for your components. You can:
- Link the quantity to the main product
- Ensure that the component can only be ordered in a quantity of one
- Allow the customer to choose how many of each component they want to add to their composite product
- Allow the customer to choose the component’s quantity – but set minimum and/or maximum quantities
Variations
You can use either simple or variable products as your child products.
Conditional logic
Conditional logic is an essential feature of any advanced composite product. Certain components might only be available depending on the customer’s choices. For example, a gift box might be limited to particular products depending on the box size.
Conditional logic makes this possible.
Find out more about conditional logic here.
Grouping
Components can be organized into different fields and groups. This streamlines the purchasing process for the customer.
Groups can be displayed in a single column, as tabs, in an accordion layout so that users can toggle visibility on and off or in a stepped layout.
Composite product pricing
You can price your composite products in a couple of different ways:
- Either set a fixed product price for your composite product or keep the price the same regardless of the components the customer chooses.
- Or let the combined price of the component products determine the price.
Discounts
Maybe you want to offer your customers a discount for purchasing products as part of a kit. With Add-Ons Ultimate, you can specify a discount for a child product bought as part of a composite product that wouldn’t be available if the product was purchased by itself.
Component display options
You can choose between different layout options for your components. All options allow you to display product images for each component.
Required fields
Do you need to ensure that some or all components are selected? Add-Ons Ultimate allows you to specify which fields are required.
WooCommerce composite products video
You can check out this video for an overview of many features covered in this article.
WooCommerce composite product price totals and summary panel
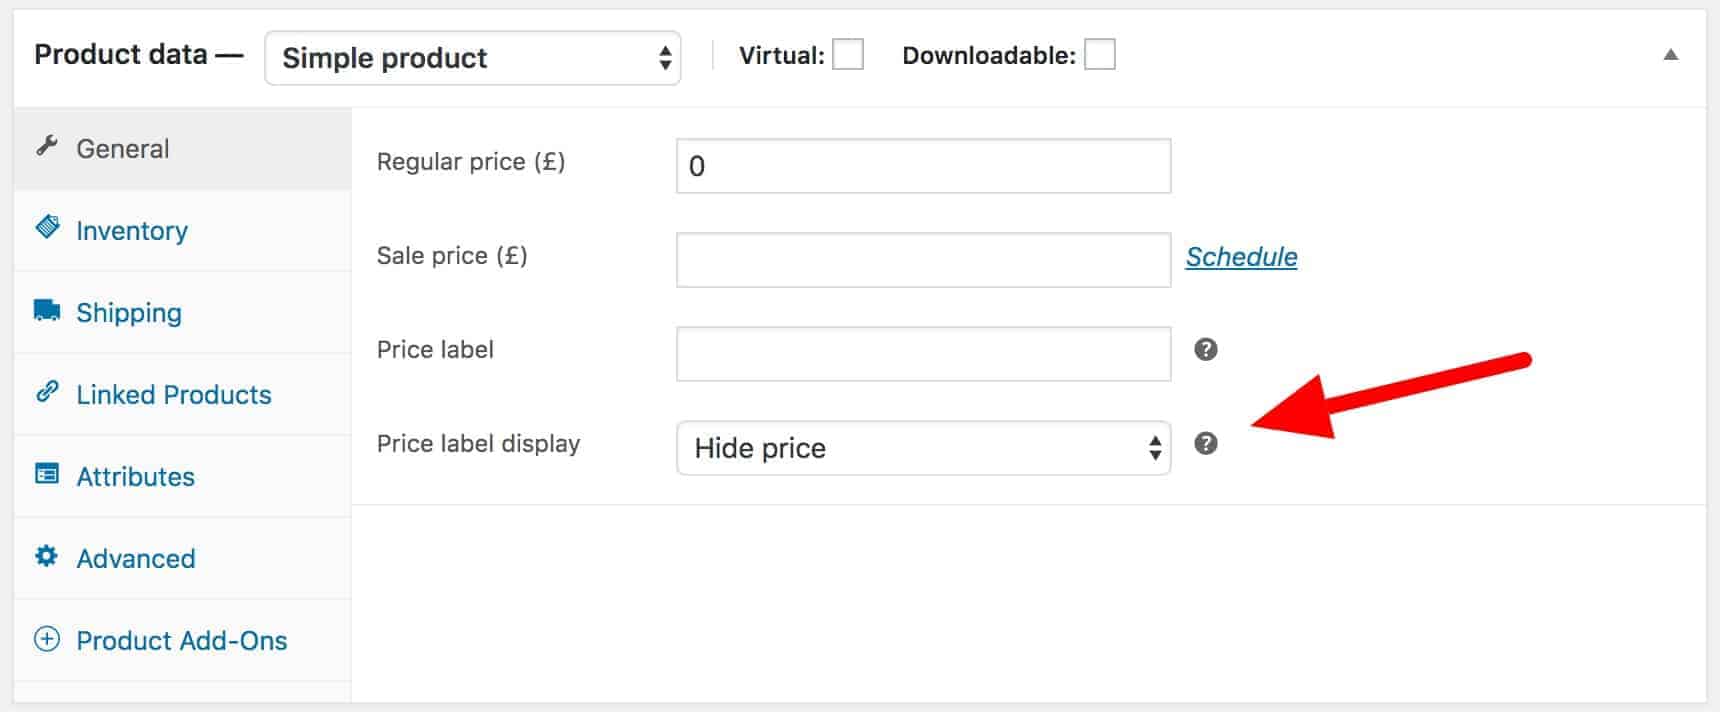
The product price
You can choose an alternative label for the composite product price (or even hide it altogether).
Combined product price totals
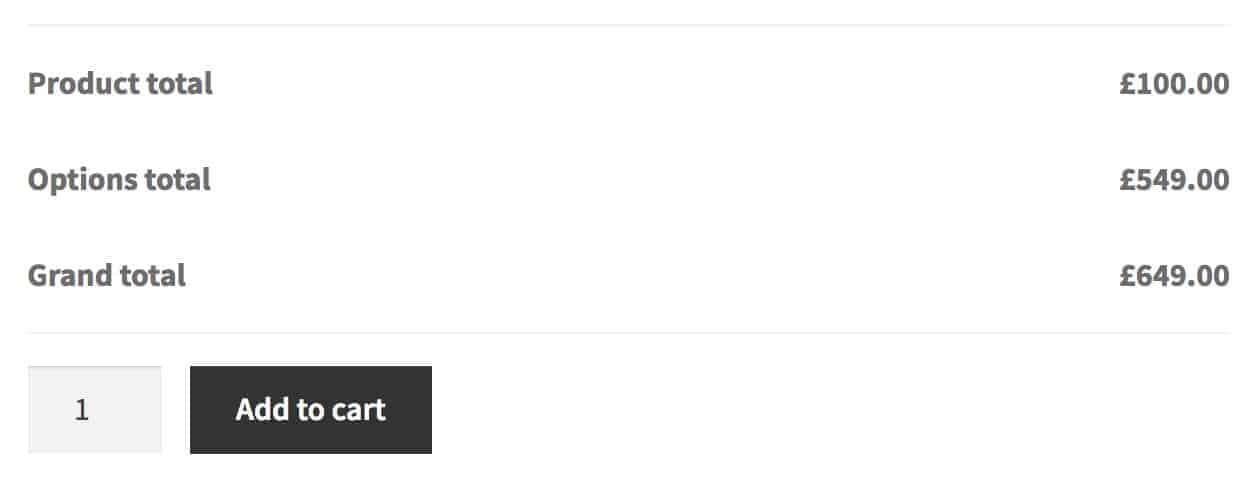
On the front end, note the pricing table just above the Add to Cart button. Add-Ons Ultimate breaks down the costs of each component in your composite product.
The table shows the base cost of the product, the combined cost of any selected components, and the combined total.
You can edit the labels if you wish, or hide the table and just display the combined total.
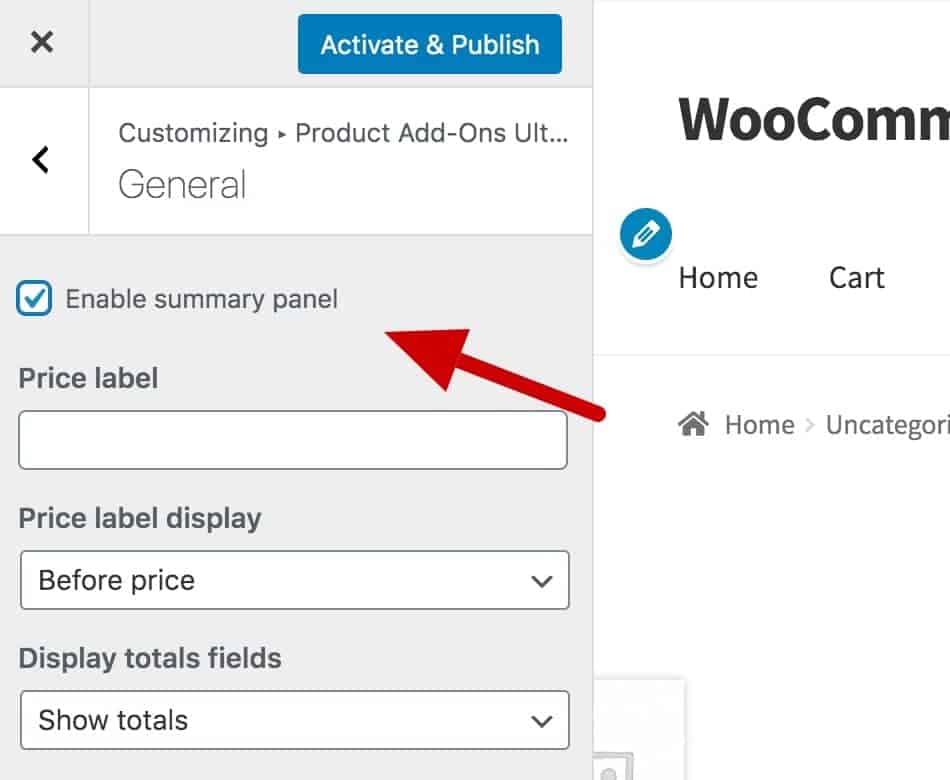
Product summary panel
Alternatively, you can provide the user with a summary of their selected options in a single panel.
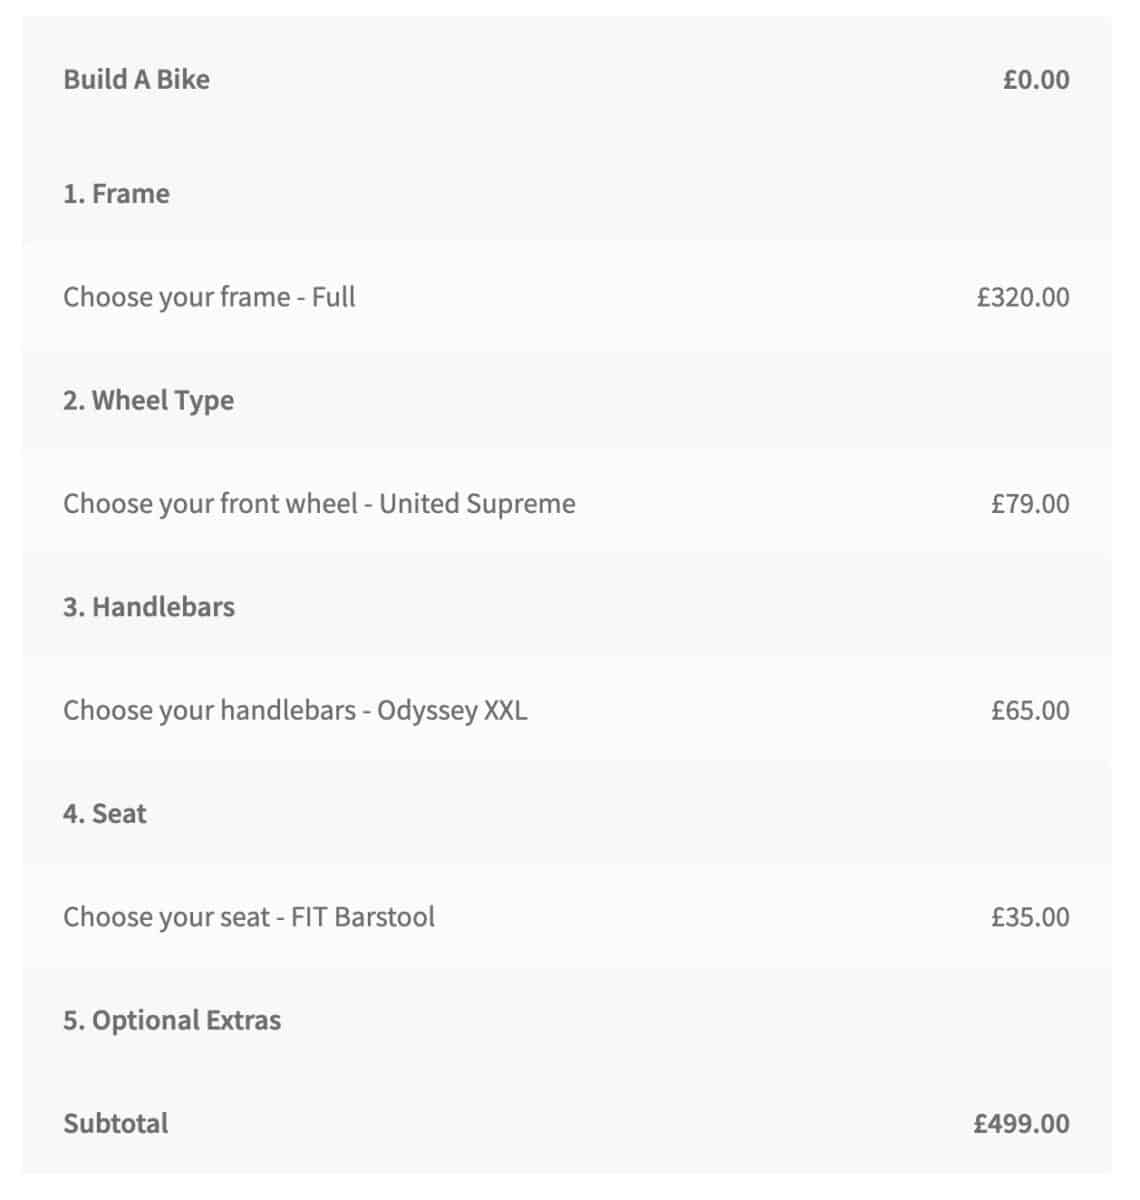
To enable this summary panel, go to the Customizer then click the Product Add-Ons Ultimate > General tab. Select the ‘Enable summary panel’ option.
Composite products in the cart
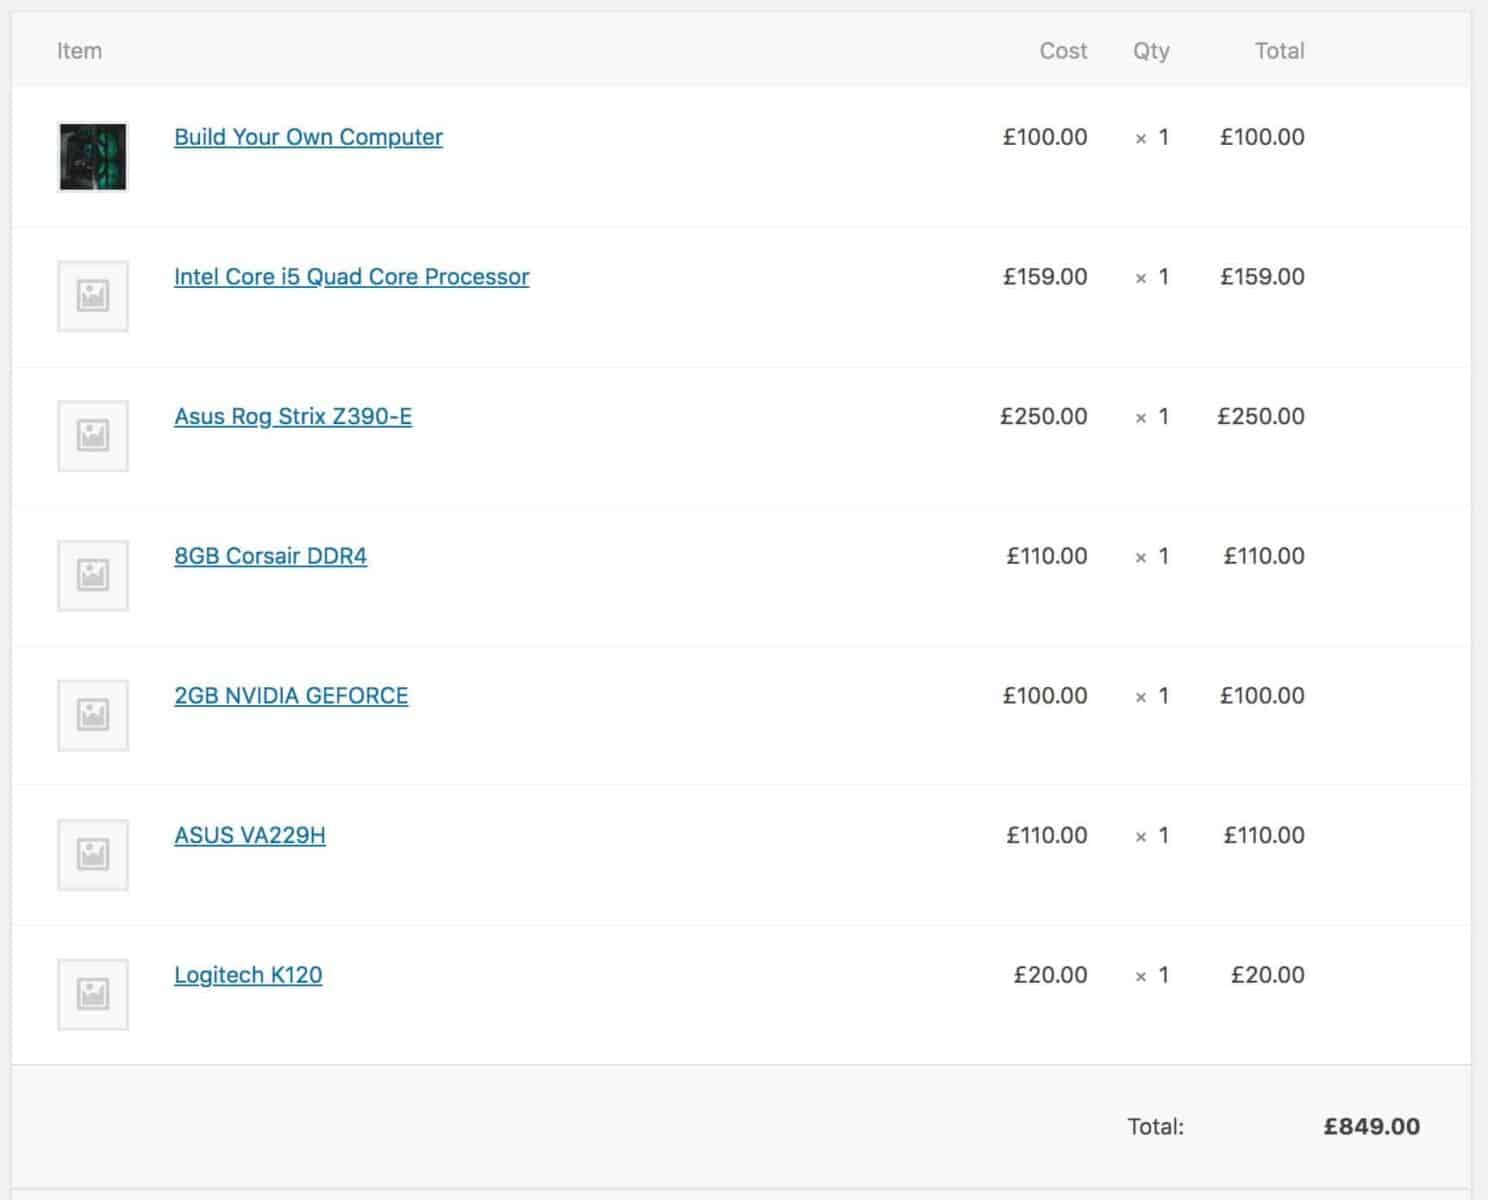
By default, all component products will be listed as separate line items in the cart.
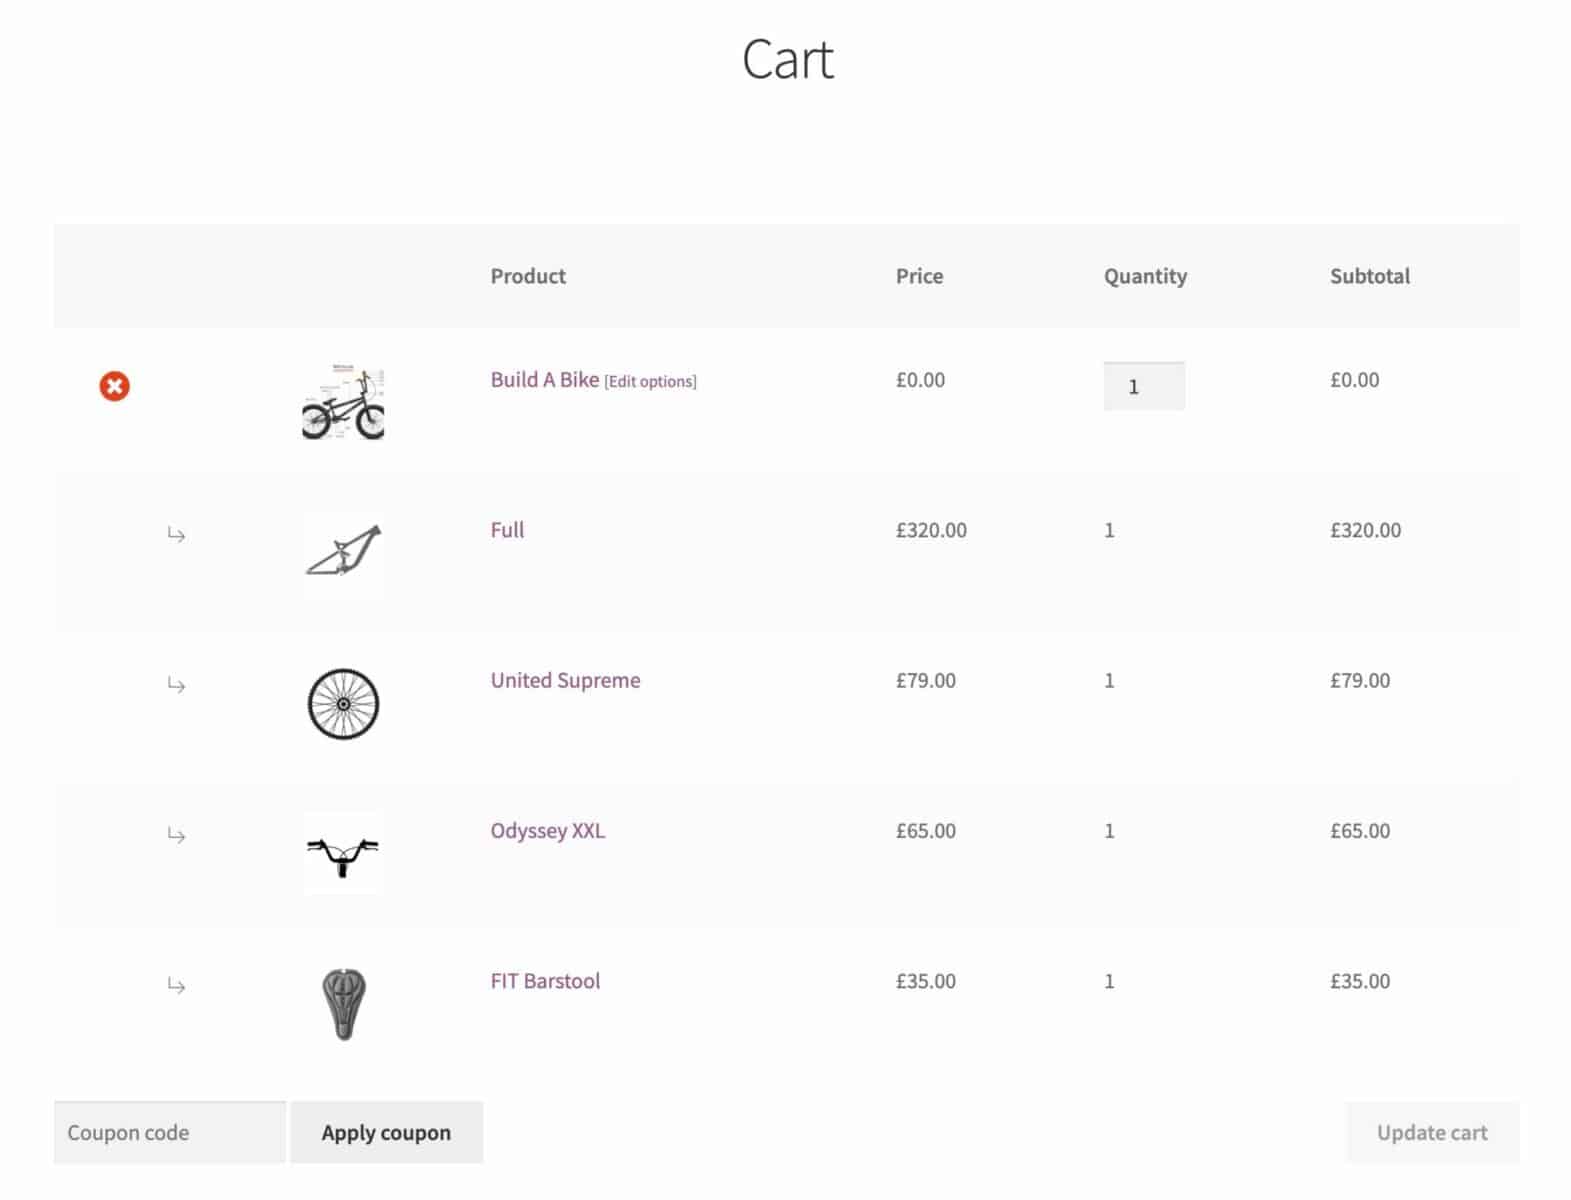
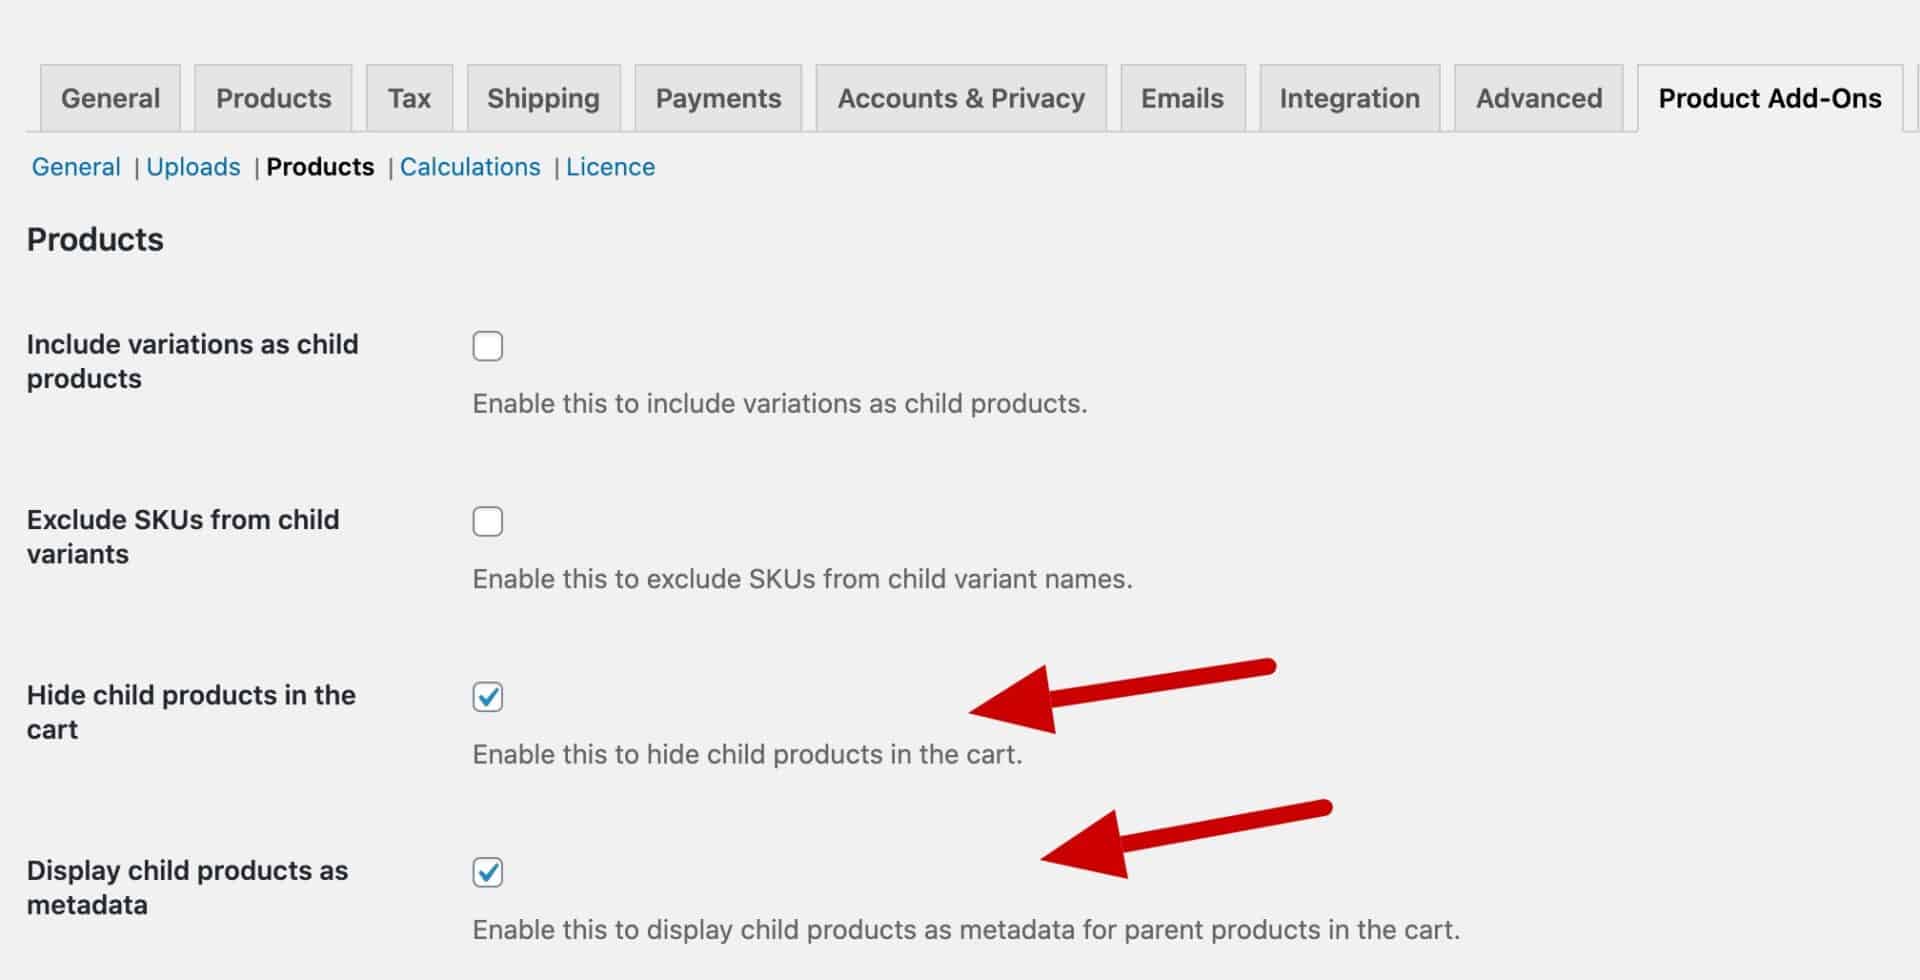
However, when you have a lot of components in your composite product, this can make the cart cluttered. By checking a couple of options in the settings, you can remove the child products as line items and display them as metadata within the main product – like this:
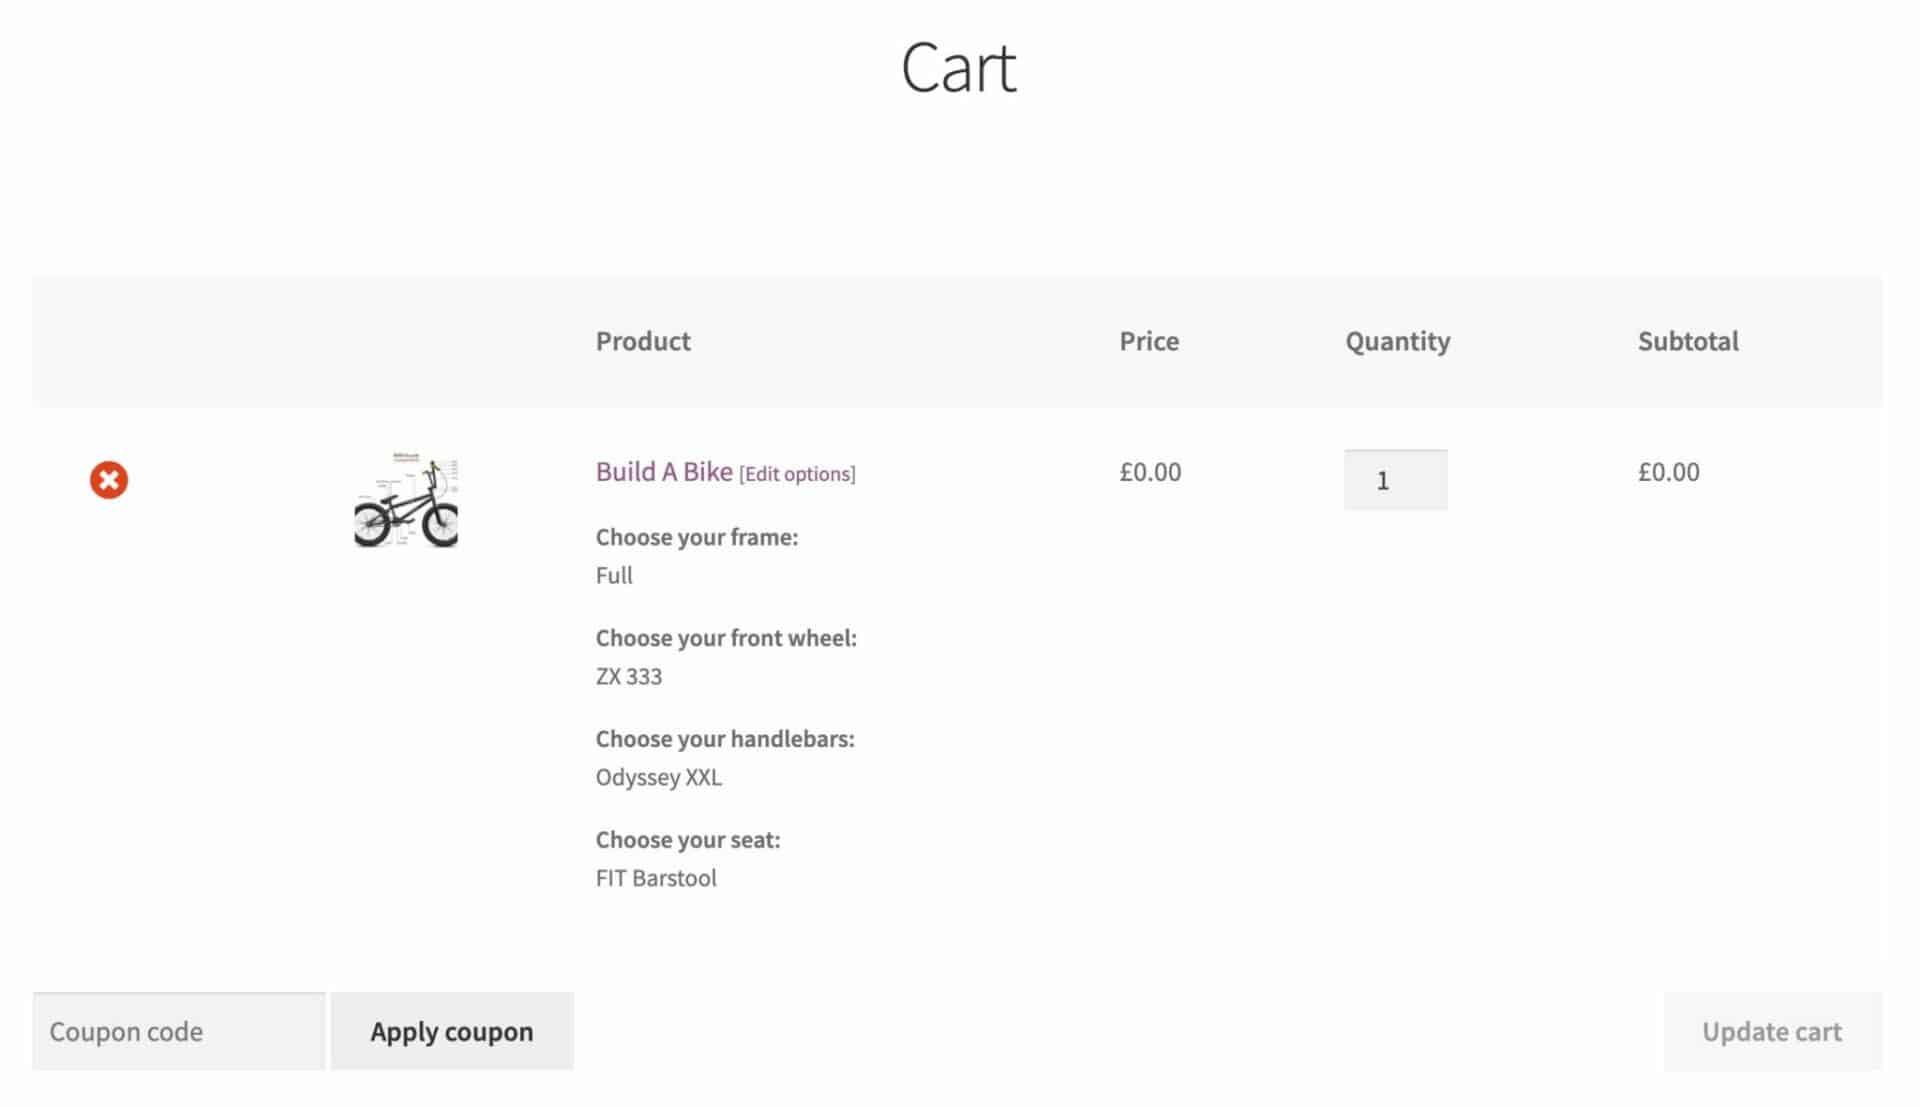
To achieve this, just go to WooCommerce > Settings > Product Add-Ons > Products and check the following options:
- Hide child products in the cart
- Display child products as metadata
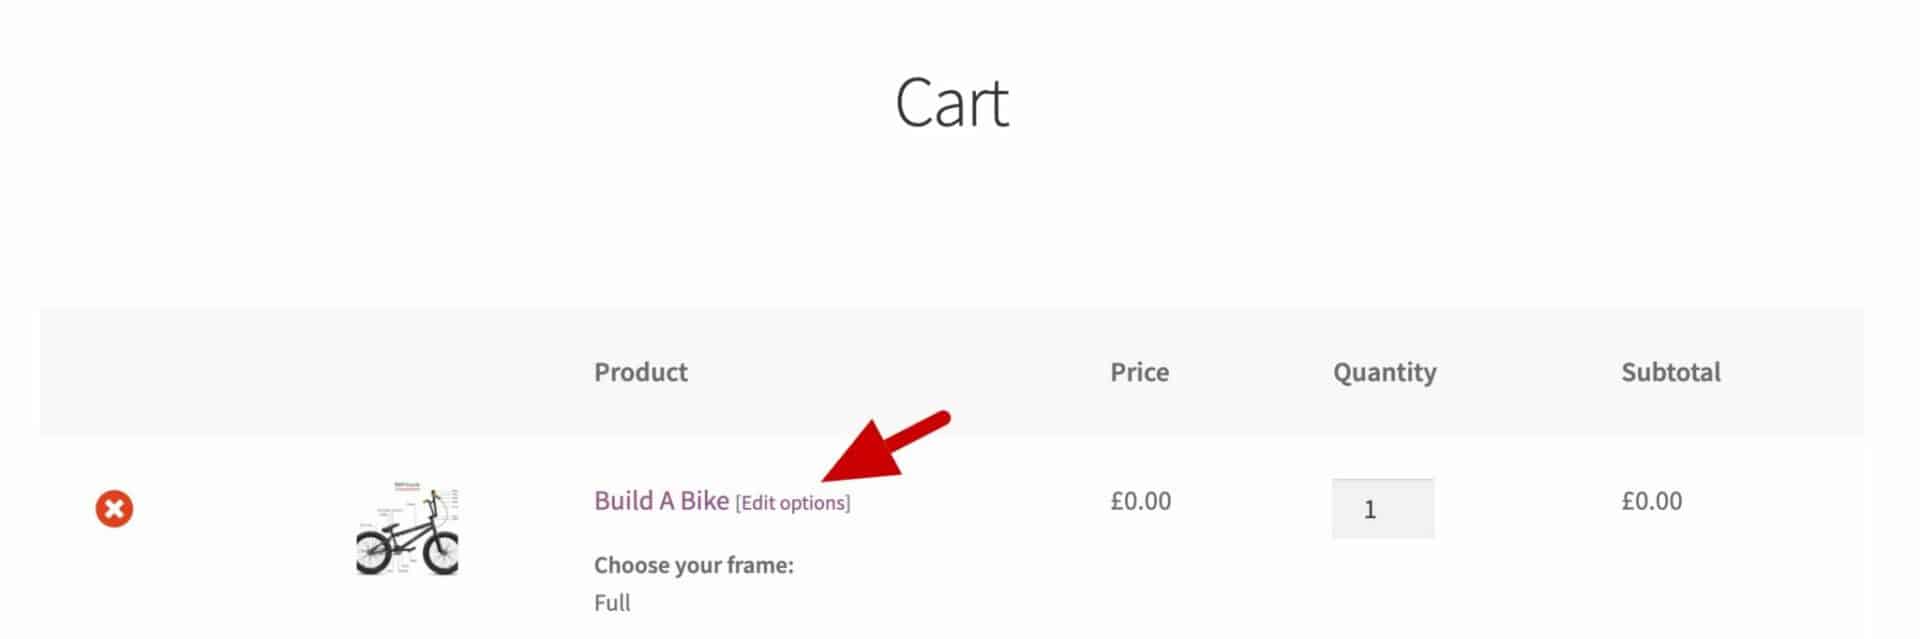
Editing composite products
It’s easy to allow your customers to edit composite products, even after they’ve already added them to the cart.
Go to WooCommerce > Settings > Product Add-Ons and check ‘Enable editing’.
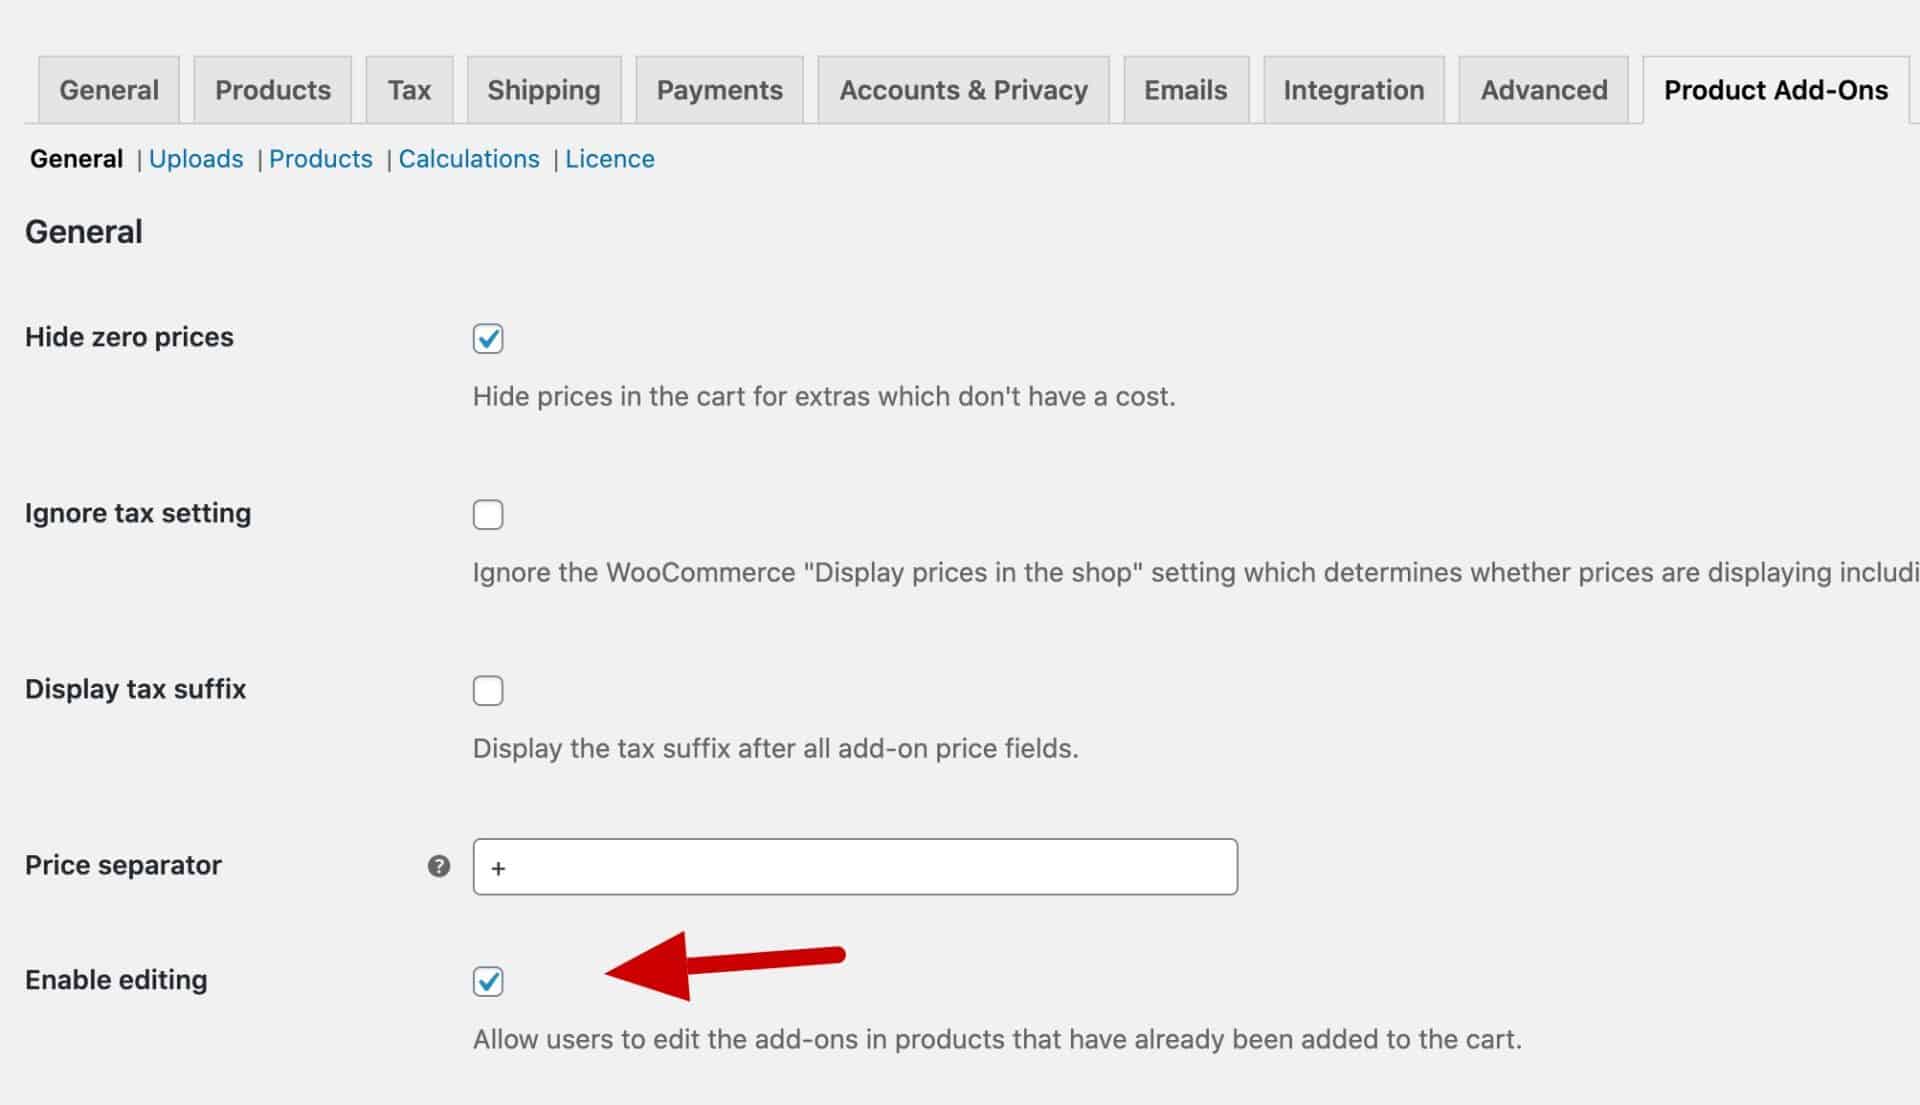
Customers will then see an option to edit their options for products in the cart.
Receiving orders containing composite products
When a customer purchases a composite product, you’ll receive a standard WooCommerce email itemizing every component.
And in the order screen, you’ll also be able to see each component.
Because the components are products in their own right, stock and inventory levels are adjusted, and the correct weight is calculated for shipping purposes.
WooCommerce Product Add-Ons Ultimate for building your own products
If you want to create exciting WooCommerce composite products for your online store, all you need is Product Add-Ons Ultimate and to follow the step-by-step instructions above. Doing so will give your customers a unique and satisfying shopping experience, help you to better manage your inventory, and allow for precise pricing and shipping calculations, too.
WooCommerce Product Add-Ons Ultimate
Personalize products with extra custom fields and options
Create your WooCommerce composite products today!
Learn more about our plans and view prices
Further reading
If you like case studies like this, you might like the following posts too:
- There’s an article on creating mix and match wine cases here
- How to create a takeaway order form for restaurants
- How to build a ‘create your own cereal’ product in WooCommerce
- How to create a mix and match product in WooCommerce
Hey There,
Do you know of a composite plugin that would adjust the product photo as the component selections were being made? For example if I have a primary and secondary color choice that I could see each selection populate the designated section of the photo (line drawing vector in this case) so that customers could actually “see” the product they are designed prior to purchase?
Hi Garreth,
If I insert a product as a child product in product add-ons, I can have this child product use the tiered pricing option in Dynamic Pricing and Discount Rules. So that I can give Tiered discount when a customer purchases more child products?
Hi
Thanks for leaving a comment. Could you submit this as a support ticket: https://pluginrepublic.com/support/? It’ll be much easier to correspond that way.
Thanks.