How to create a Sticker Mule type interface in WordPress

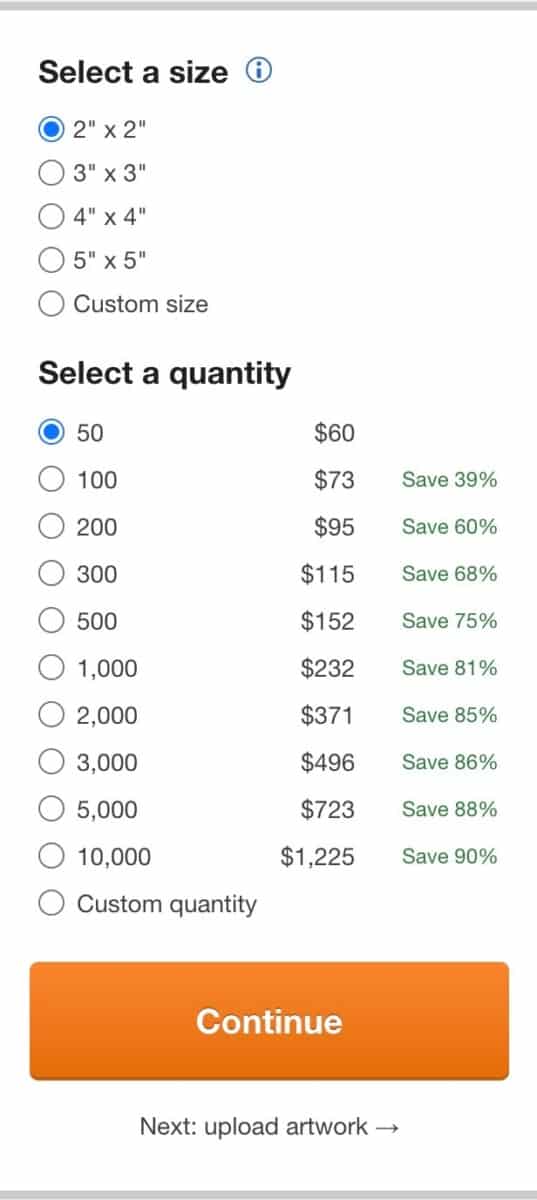
If you want to create an interface similar to stickermule.com for your die-cut stickers in your WordPress site, this guide will provide the steps you can follow to create the required fields. This includes looking at how Sticker Mule pricing works – with a method you can implement on your own site.
There’s a demo product here to show you the final result.
To achieve this, you will need WooCommerce plus the following plugins:
WooCommerce Product Add-Ons Ultimate
Personalize products with extra custom fields and options
Note that you’ll need the Pro version of Add-Ons Ultimate. You can use either the Basic or Pro version of Advanced Calculations.
Create your product
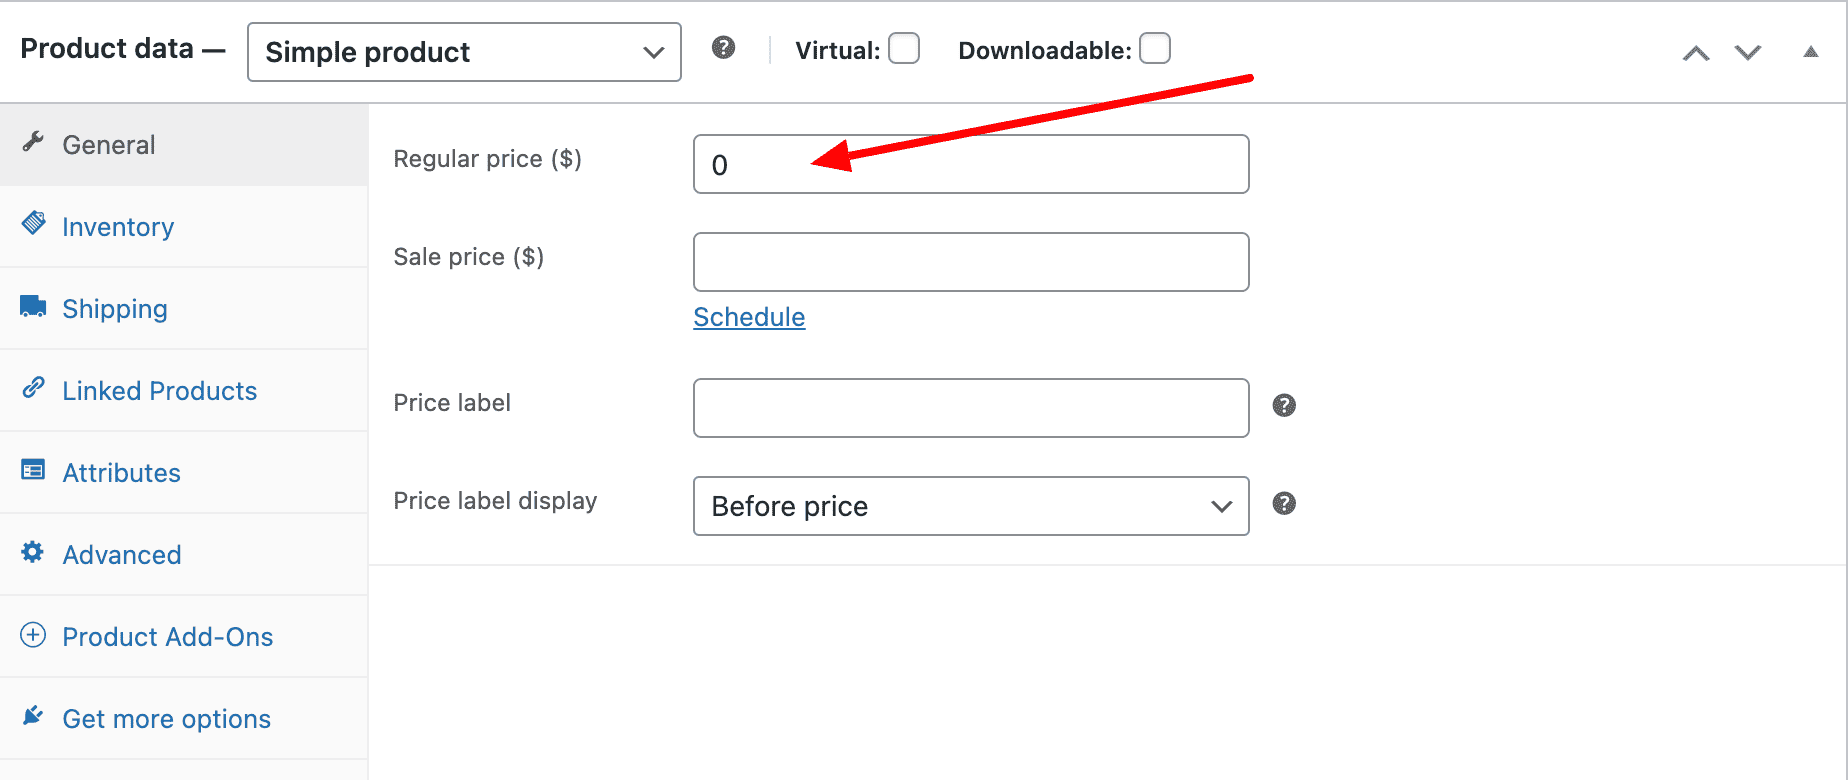
Firstly, create a product and set the product price to 0. We will utilize calculations and lookup tables to determine the final price.
We’ll set the regular price to 0. Sticker Mule pricing is complex and we’ll look at how to set this up later.
Include your add-on fields
Now, let’s proceed to create the fields directly in the product settings (Product data > Product Add-ons). Alternatively, you can utilize Global add-ons, which is particularly beneficial when you want to implement the same interface for multiple products.
Here’s an article on Adding your first Product Add-Ons field and the Field types you can add to a product.
Please ensure that you set up these fields in the specified order and assign them the appropriate Field Types:
Select a size
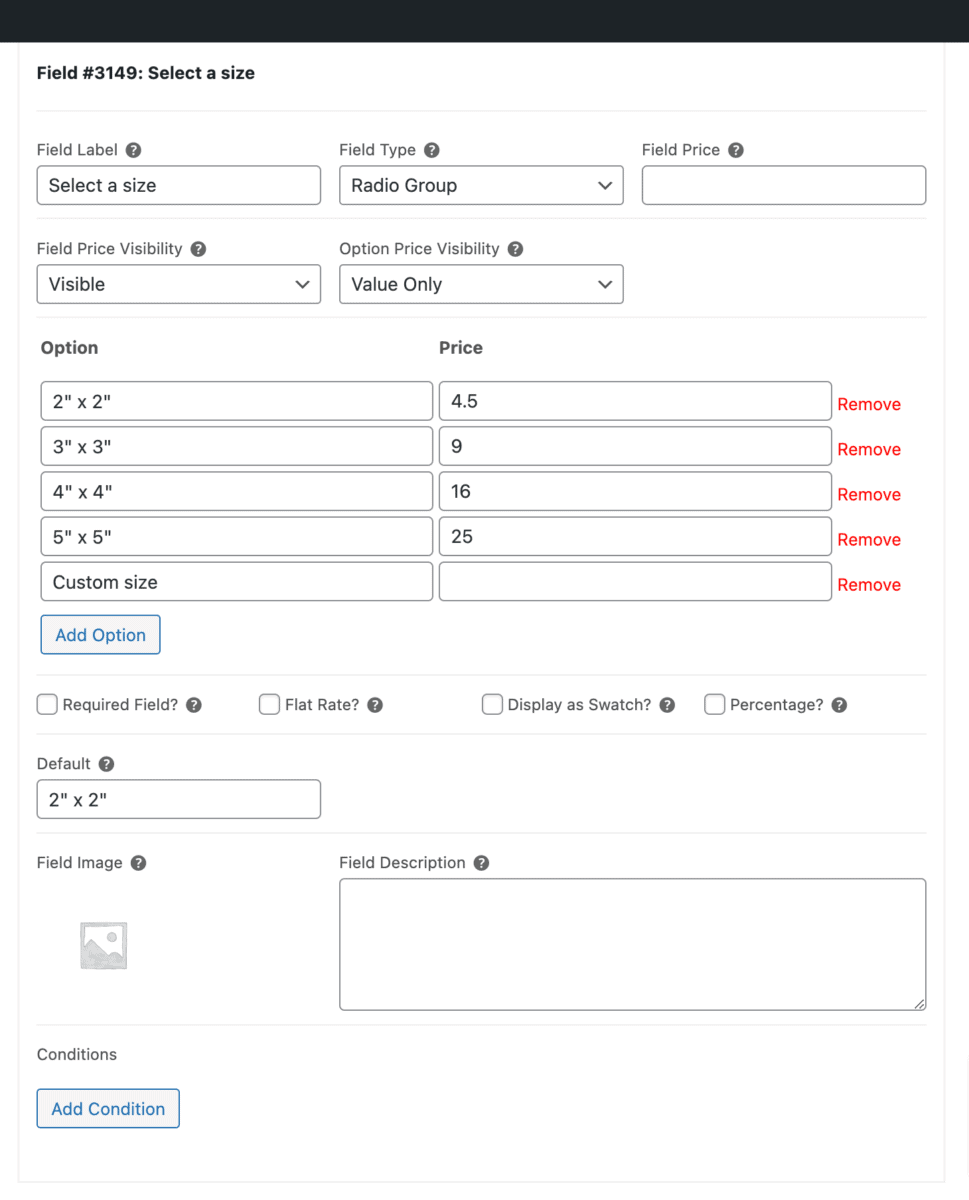
In the Option Label, specify the items you want to display for the size selection. The last option, ‘Custom size,’ allows users to enter a custom Width and Height. When this option is selected, two additional fields will appear.
The Option Price fields have values, which will be utilized in the calculation lookup. You can set any unique numeric value that corresponds to the calculation table header values for the size (X-axis). As the ‘Option Price Visibility’ is set to ‘Value Only,’ this field will not add to the product cost.
You can also set a default value to pre-select an option when the page loads.
Width
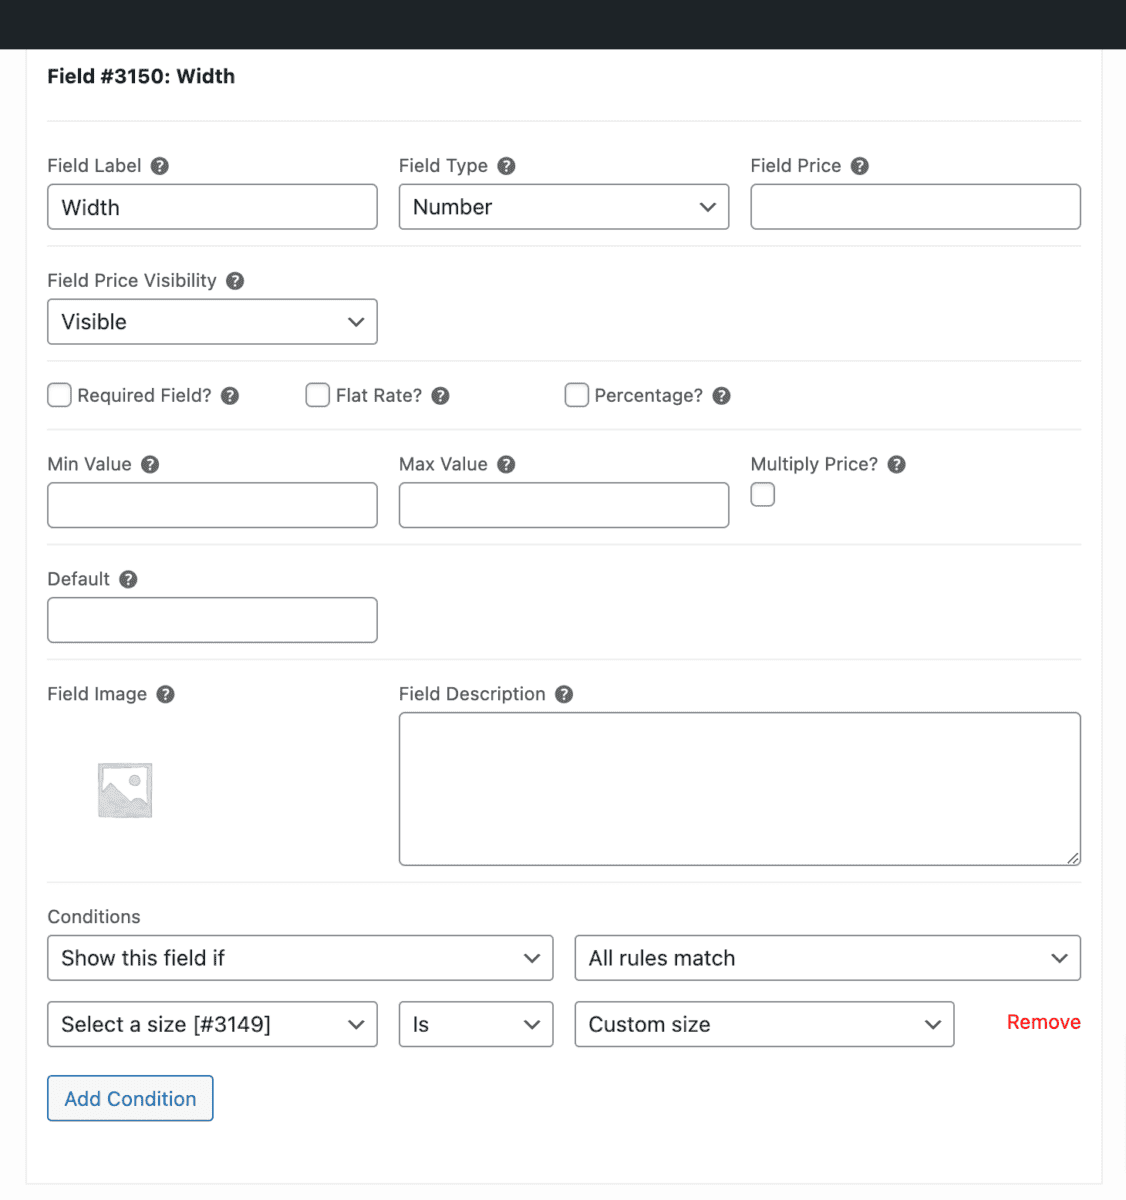
This field will only show when ‘Custom size’ is selected.
Height
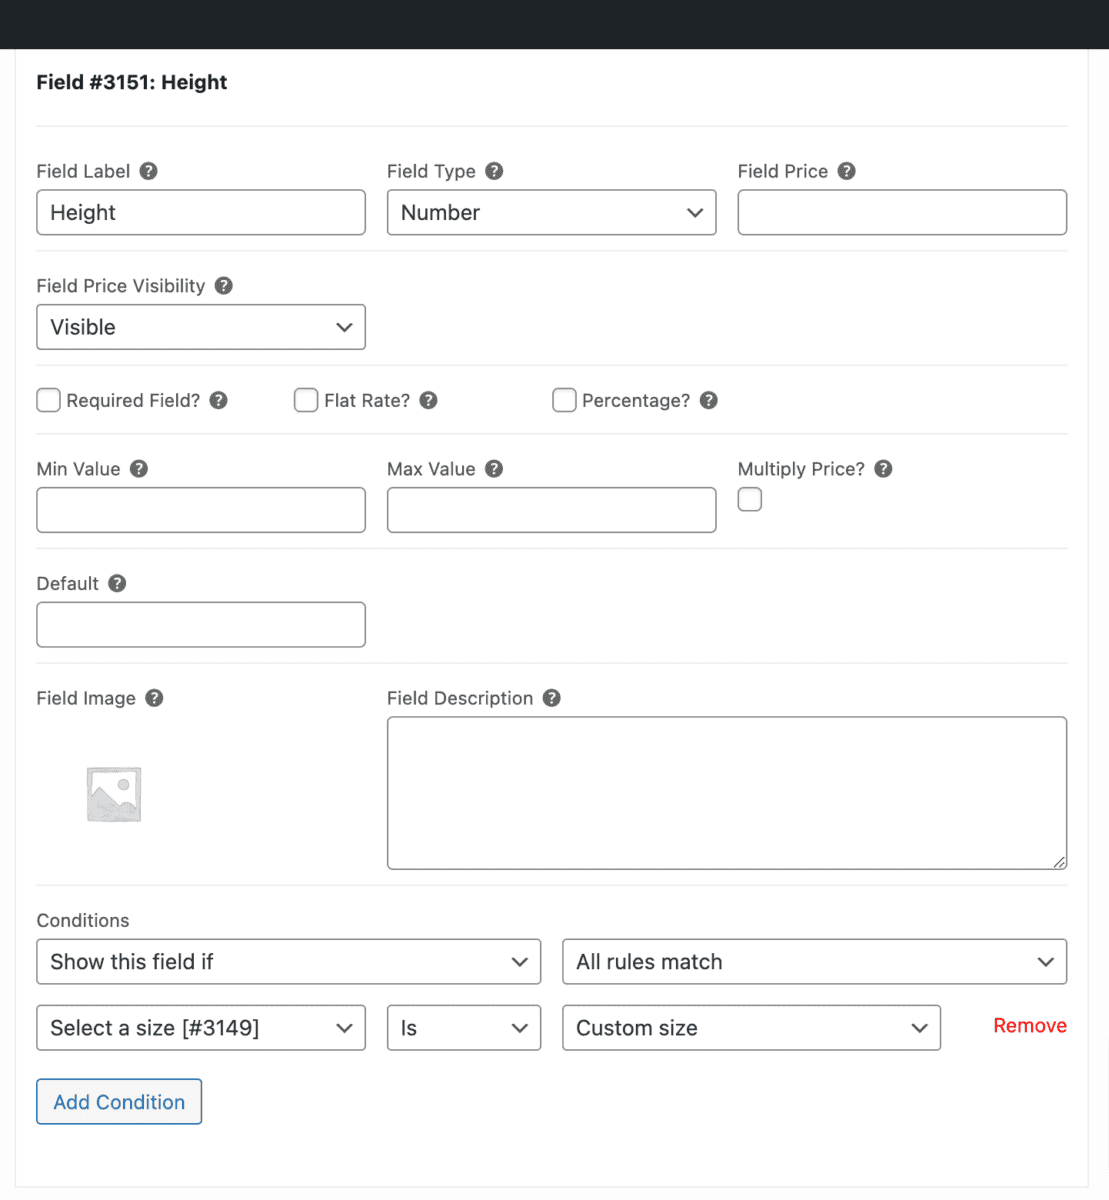
This field will only show when ‘Custom size’ is selected.
Size Selected
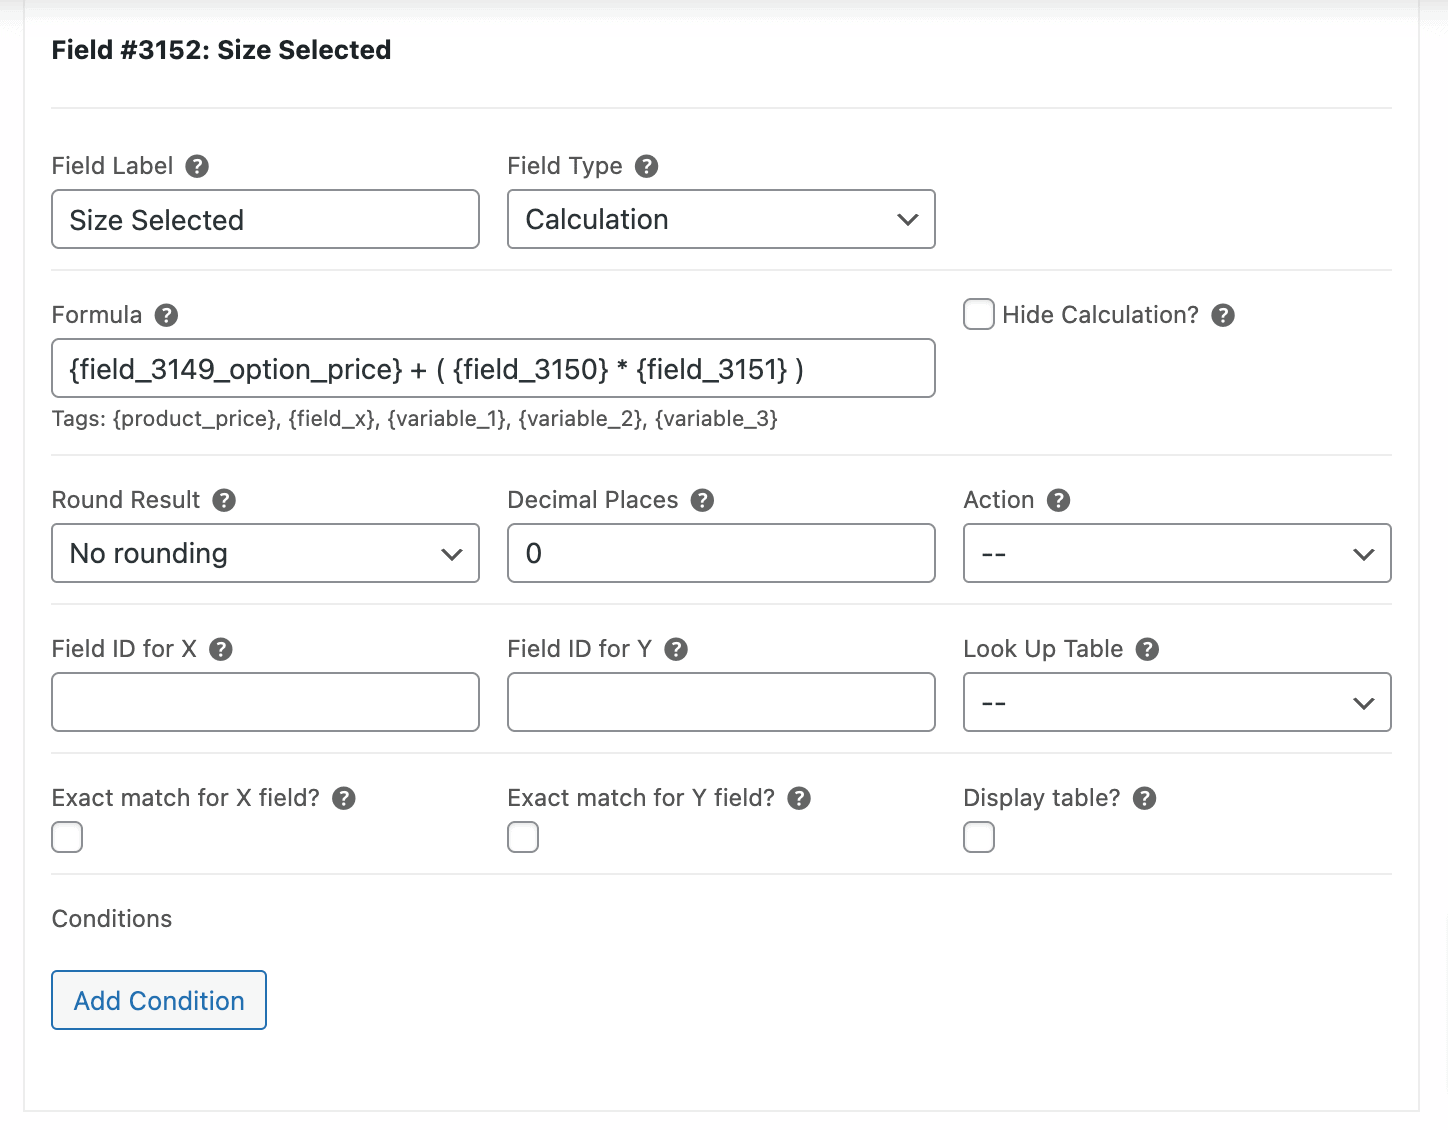
As there are two ways to select a value for the Size, this calculation will store the actual input value, which will be utilized in a lookup calculation.
In the formula, you will observe that it references the selected Option Price from the ‘Select a size’ field, along with the ‘Width’ and ‘Height’ fields (Width x Height). This calculation will evaluate to only one of the input values.
Remember: you’ll need to update the field IDs in the example to your own field IDs.
Select a quantity
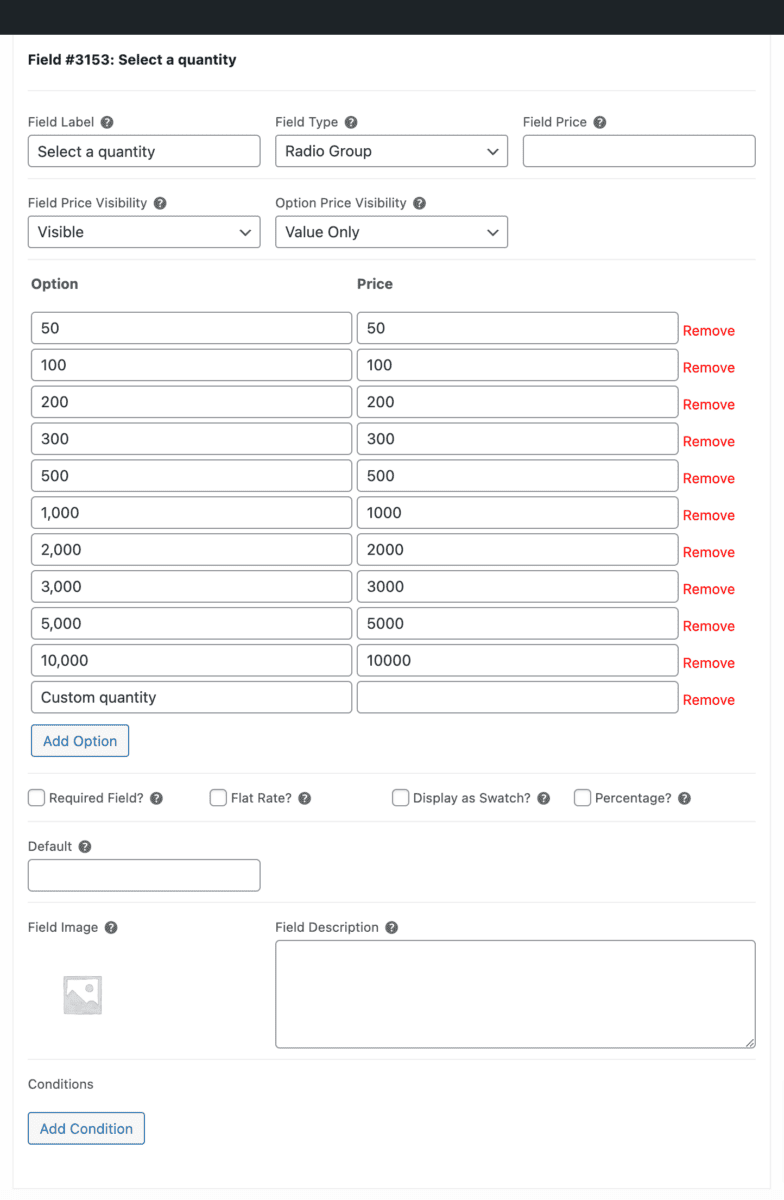
In the Option Label, specify the items you want to display for the quantity selection. The last option, ‘Custom quantity,’ allows users to enter a custom value. When this option is selected, an additional field will appear.
The Option Price fields have values, which will be utilized in the calculation lookup. You can set any unique numeric value that corresponds to the calculation table header values for the quantity (Y-axis). As the ‘Option Price Visibility’ is set to ‘Value Only,’ this field will not add to the product cost.
You can also set a default value to pre-select an option when the page loads.
Quantity
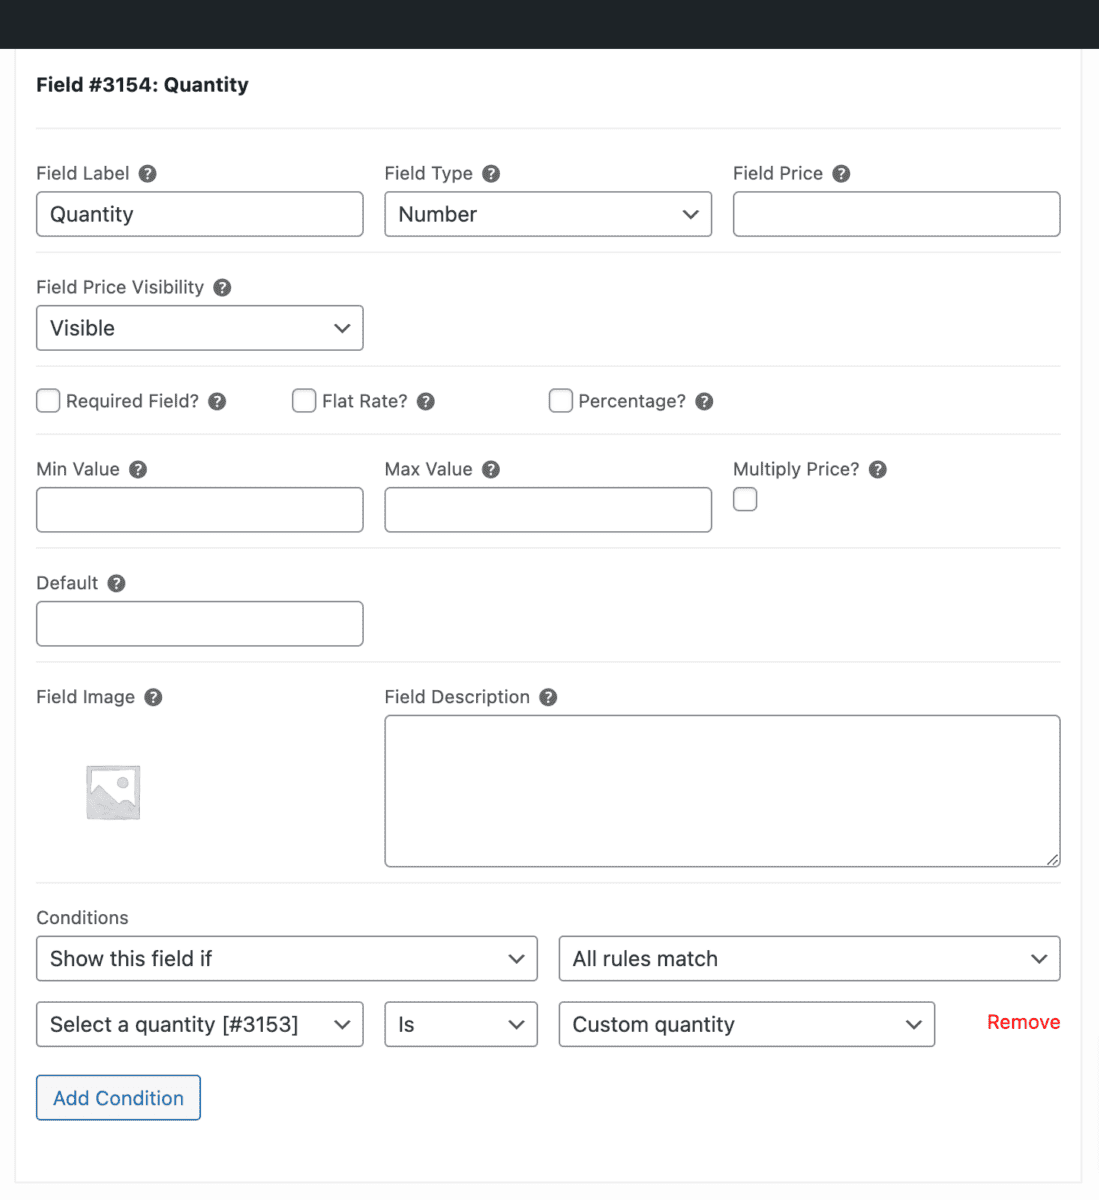
This field will only show when ‘Custom quantity’ is selected.
Quantity Selected
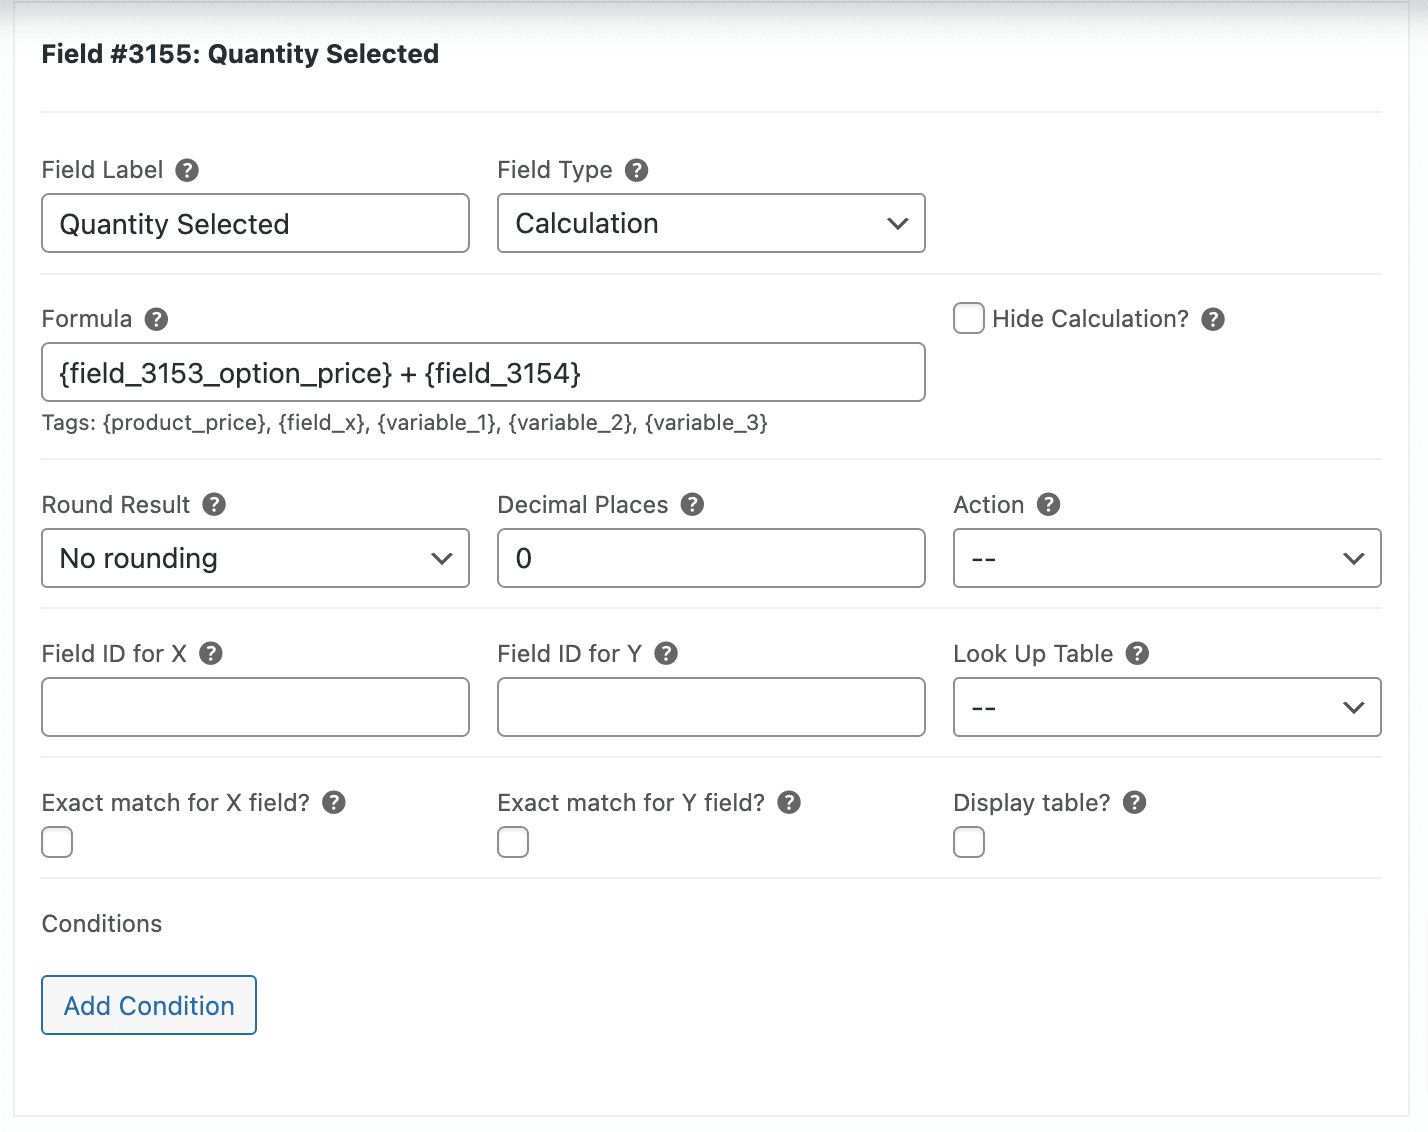
As there are two ways to select a value for the Quantity, this calculation will store the actual input value, which will be utilized in a lookup calculation.
In the formula, you will observe that it references the selected Option Price from the ‘Select a quantity’ field, along with the ‘Quantity’ field. This calculation will evaluate to only one of the input values.
When setting calculation formulas and field conditions, it is important to ensure that they reference the correct field IDs. Keep in mind that your site will generate new IDs for your groups and fields.
Add a code snippet
Once you have completed the setup process described above, please proceed to add the following code snippets:
| <?php | |
| add_filter( 'prefix_filter_field_option_name', function( $option_value, $key, $item, $product ) { | |
| $qty_radio_field_id = 3153; // Quantity (Radio Group) field | |
| if ( $item['field_id'] == $qty_radio_field_id ) { | |
| $option_value .= '<span class="qty-discounted-price"> | |
| </span>'; | |
| $option_value .= '<span class="qty-percent-savings"> | |
| </span>'; | |
| } | |
| return $option_value; | |
| }, 10, 4 ); | |
| add_action( "wp_footer", function() { | |
| ?> | |
| <script> | |
| jQuery(document).ready(function($) { | |
| let qty_radio_field_id = 3153; // Quantity (Radio Group) field | |
| if ( ! $('.pewc-field-'+qty_radio_field_id).length ) { | |
| return; | |
| } | |
| let custom_qty_label = "Custom quantity"; // option label | |
| // field_id property can be set so it overrides the search | |
| let required_fields = [ | |
| { name: "Select a size", type: "radio", field_id: "" }, | |
| { name: "Width", type: "number", field_id: "" }, | |
| { name: "Height", type: "number", field_id: "" }, | |
| { name: "Size Selected", type: "calculation", field_id: "" }, | |
| { name: "Select a quantity", type: "radio", field_id: String(qty_radio_field_id) }, | |
| { name: "Quantity", type: "number", field_id: "" }, | |
| { name: "Quantity Selected", type: "calculation", field_id: "" } | |
| ]; | |
| let qty_radio_field_offset = parseInt( $('.pewc-field-'+qty_radio_field_id).attr('class').split(" ").find(function(value, index, array) { | |
| return value.search("pewc-field-count") != -1; | |
| }).replace("pewc-field-count-", "") ); | |
| let size_radio_field_offset = qty_radio_field_offset - 4; | |
| $('[class*="pewc-field-count"').each(function(i) { | |
| if ( i >= size_radio_field_offset && (i - size_radio_field_offset) < required_fields.length ) { | |
| if ( required_fields[i - size_radio_field_offset].type == $(this).attr("data-field-type") | |
| && required_fields[i - size_radio_field_offset].field_id == "" ) { | |
| required_fields[i - size_radio_field_offset].field_id = $(this).attr("data-field-id"); | |
| } | |
| } | |
| } ); | |
| // disable function if all required fields are not set | |
| for ( let i = 0; i < required_fields.length; i++) { | |
| if ( required_fields[i].field_id == "" ) { | |
| console.log("fields are not set"); | |
| return; | |
| } | |
| }; | |
| // Size Selected (Calculation) | |
| // Quantity Selected (Calculation) | |
| $('.pewc-field-'+required_fields[3].field_id+', .pewc-field-'+required_fields[6].field_id).change(function() { | |
| setTimeout(function() { | |
| // Select a quantity (Radio Group) | |
| $('.pewc-field-'+qty_radio_field_id+' input').each(function() { | |
| let size = $('.pewc-field-'+required_fields[3].field_id).attr('data-field-value'); | |
| let qty = $(this).attr('data-option-cost'); | |
| let price, price_discount, discounted_price; | |
| let is_custom_qty = false; | |
| if ( $(this).attr('value') == custom_qty_label ) { | |
| qty = $('.pewc-field-'+required_fields[6].field_id).attr('data-field-value'); | |
| is_custom_qty = true; | |
| } | |
| $(this).parent().find('.qty-discounted-price').text(""); | |
| $(this).parent().find('.qty-percent-savings').text(""); | |
| if ( size != 0 && qty != 0 ) { | |
| try { | |
| let column = Object.keys( pewc_look_up_tables['sticker_price'] ).find(function(value, index, array) { | |
| return ( parseFloat(value.trim()) >= size ); | |
| }); | |
| size = column.trim(); | |
| let row = Object.keys( pewc_look_up_tables['sticker_price'][column] ).find(function(value, index, array) { | |
| return ( parseFloat(value.trim()) >= qty ); | |
| }); | |
| qty = row.trim(); | |
| let size_spaces_price = ''; | |
| for ( let i = 0; i < 5; i++ ) { | |
| if ( pewc_look_up_tables['sticker_price'][size_spaces_price + size] != undefined ) { | |
| break; | |
| } | |
| size_spaces_price += ' '; | |
| } | |
| let size_spaces_discount = ''; | |
| for ( let i = 0; i < 5; i++ ) { | |
| if ( pewc_look_up_tables['sticker_price_discount'][size_spaces_discount + size] != undefined ) { | |
| break; | |
| } | |
| size_spaces_discount += ' '; | |
| } | |
| price = pewc_look_up_tables['sticker_price'][size_spaces_price + size][qty]; | |
| price_discount = pewc_look_up_tables['sticker_price_discount'][size_spaces_discount + size][qty]; | |
| discounted_price_amount = price - (price * (price_discount / 100) ); | |
| } catch (err) { | |
| console.log("error: " + err); | |
| price = 0; | |
| price_discount = 0; | |
| discounted_price_amount = 0; | |
| } | |
| if ( discounted_price_amount != 0 && ! isNaN(discounted_price_amount) ) { | |
| if ( ! ( is_custom_qty && $('.pewc-field-'+qty_radio_field_id).attr('data-field-value') != custom_qty_label ) ) { | |
| $(this).parent().find('.qty-discounted-price').text(pewc_vars.currency_symbol + discounted_price_amount); | |
| } | |
| } | |
| if ( price_discount != 0 && price_discount != undefined ) { | |
| if ( ! ( is_custom_qty && $('.pewc-field-'+qty_radio_field_id).attr('data-field-value') != custom_qty_label ) ) { | |
| $(this).parent().find('.qty-percent-savings').text("Save " + price_discount + "%"); | |
| } | |
| } | |
| } | |
| }); | |
| }, 500); | |
| }); | |
| $('.pewc-field-'+required_fields[3].field_id).trigger('change'); | |
| $('.pewc-field-'+required_fields[6].field_id).trigger('change'); | |
| }); | |
| </script> | |
| <?php | |
| }); |
In the snippet above, you will need to replace 3153 with the field ID of your ‘Select a quantity’ field.
How to add a code snippet to your site
Add some CSS styles
You will need to add this CSS to properly align the discount details in the ‘Select a quantity’ field:
| .qty-discounted-price { | |
| display: inline-block !important; | |
| width: 30% !important; | |
| position: absolute !important; | |
| right: 80px !important; | |
| } | |
| .qty-percent-savings { | |
| position: absolute !important; | |
| right: 0 !important; | |
| color: green !important; | |
| } |
How to add CSS to your WordPress site
Create your lookup tables
The next step involves setting up the calculation tables. You will need to create two tables: sticker_price and sticker_price_discount. If you like you can download our sample CSV here.
These tables are essential for creating your own version of Sticker Mule’s pricing.
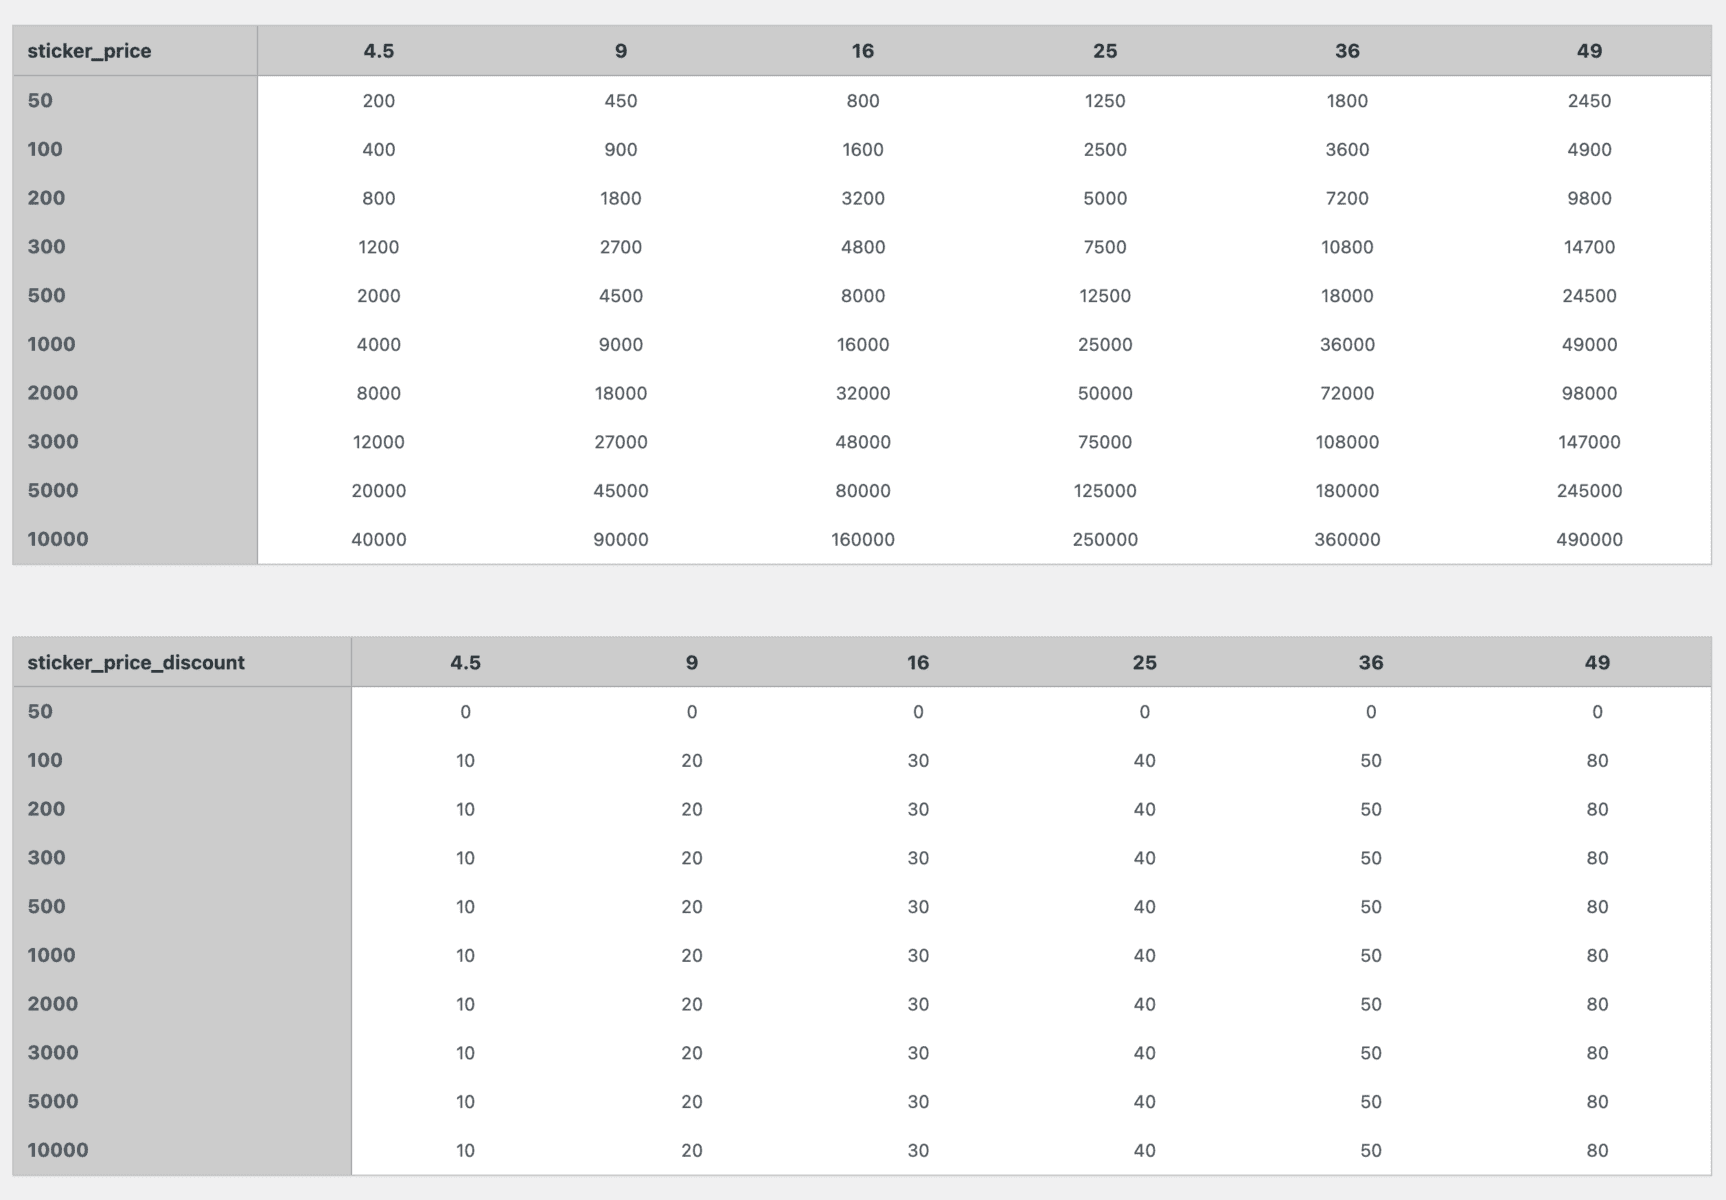
sticker_price
This table will contain the prices for the size and quantity selections:
- X axis for the Size
- Y axis for the Quantity
sticker_price_discount
This table will contain the discount rate (percentage) for the size and quantity selections.
See: Uploading CSV files to Advanced Calculations
Create calculation add-on fields
Finally, you can create another group with calculations to display and set the final price.
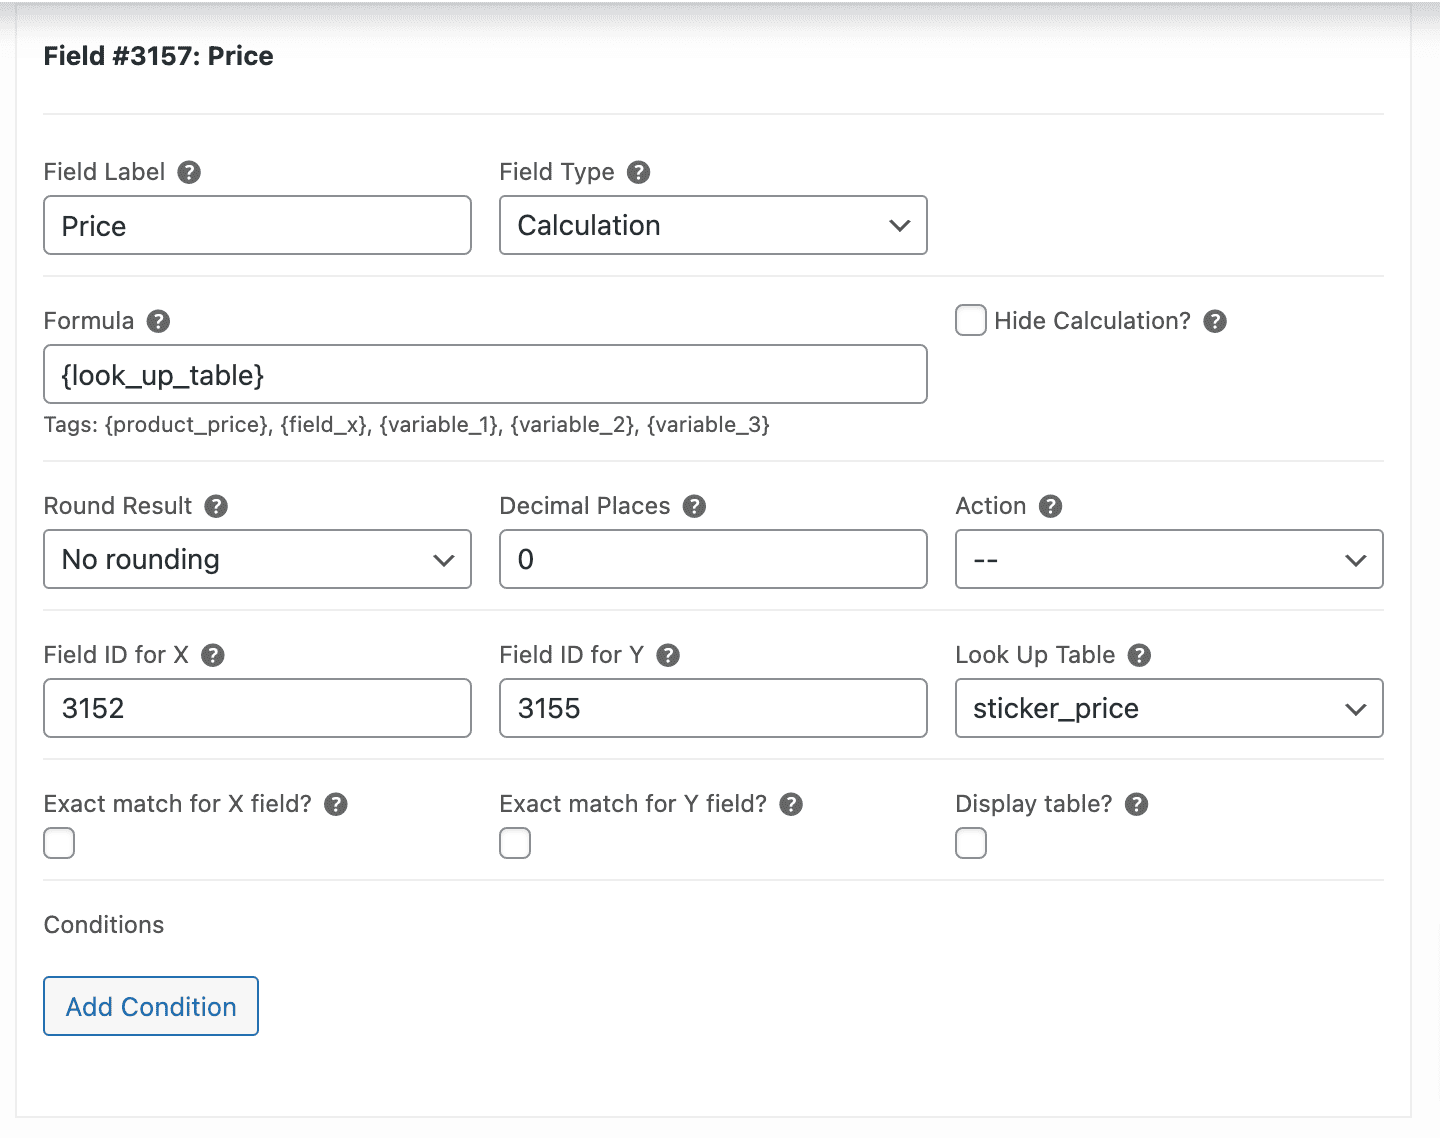
This is a calculation lookup and will reference the sticker_price table.
The ‘Field ID for X/Y‘ values are referencing the ‘Size selected’ and ‘Quantity selected’ fields.
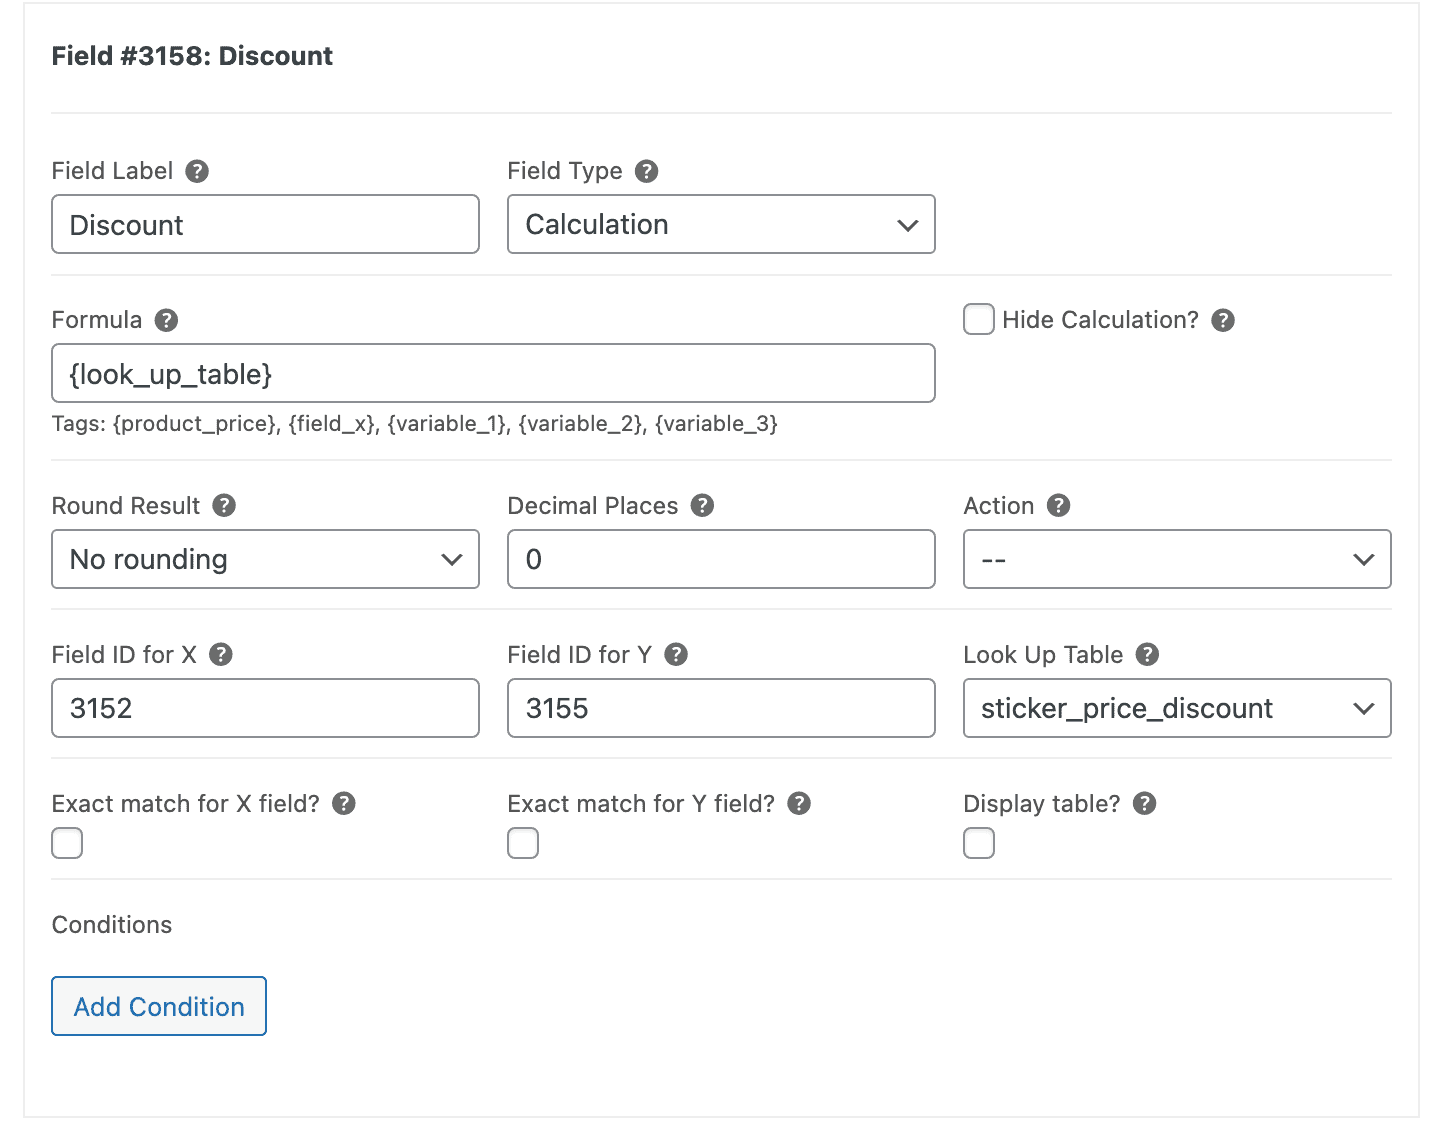
This is a calculation lookup and will reference the sticker_price_discount table.
The ‘Field ID for X/Y‘ values are referencing the ‘Size selected’ and ‘Quantity selected’ fields.
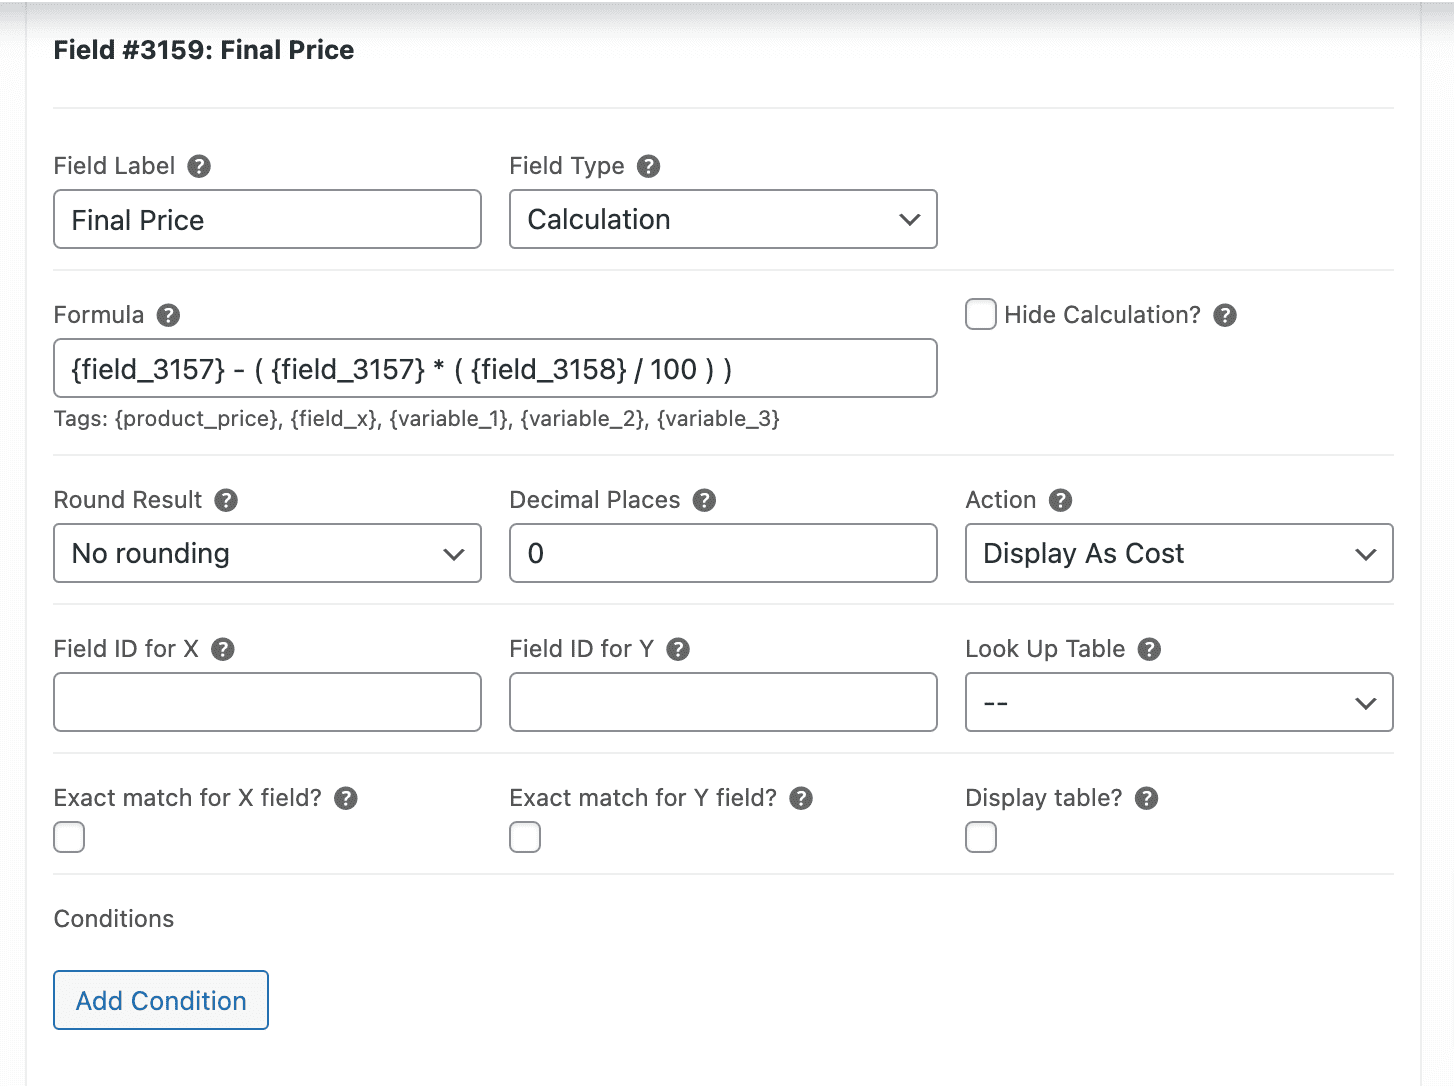
This step adds the final cost to the product. In the formula, it references the calculation lookup fields to retrieve the price and apply the discount.
Please note that the ‘Action’ setting is configured as ‘Display as Cost.’ This will add to the product price, which we’ve previously set to 0. Alternatively, you can choose to set it as ‘Set Product Price’.
See the following articles:
Product Add-Ons Ultimate settings
Please have these settings enabled in WooCommerce > Settings > Product Add-ons:
- Reset field values
- Optimise Conditions
- Optimise Calculations
- Zero value for missing fields
The final result
On the product page, it will look something like this:

Recap
So that’s how to create a Sticker Mule type interface in your WooCommerce store. You’ll need Product Add-Ons Ultimate (Pro) and Advanced Calculations:
WooCommerce Product Add-Ons Ultimate
Personalize products with extra custom fields and options
