How to sell sports, activities and holiday camps in WooCommerce
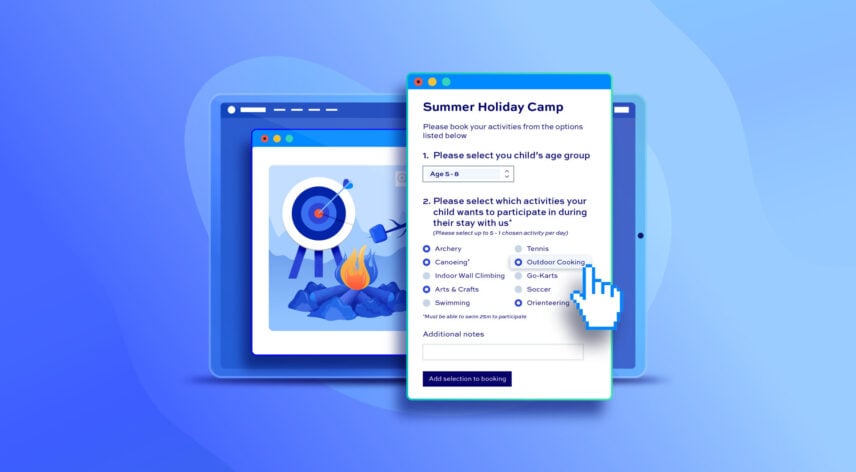
If you’re running holiday camps, sports camps or multi-day courses, you probably want to sell them from a single WooCommerce product page. Customers pick which sessions they want by checkbox with each session tracking its own capacity behind the scenes. WooCommerce doesn’t allow you to do this by default – so you’ll need the WooCommerce Bookings and Product Add-Ons Bundle.
After completing this tutorial:
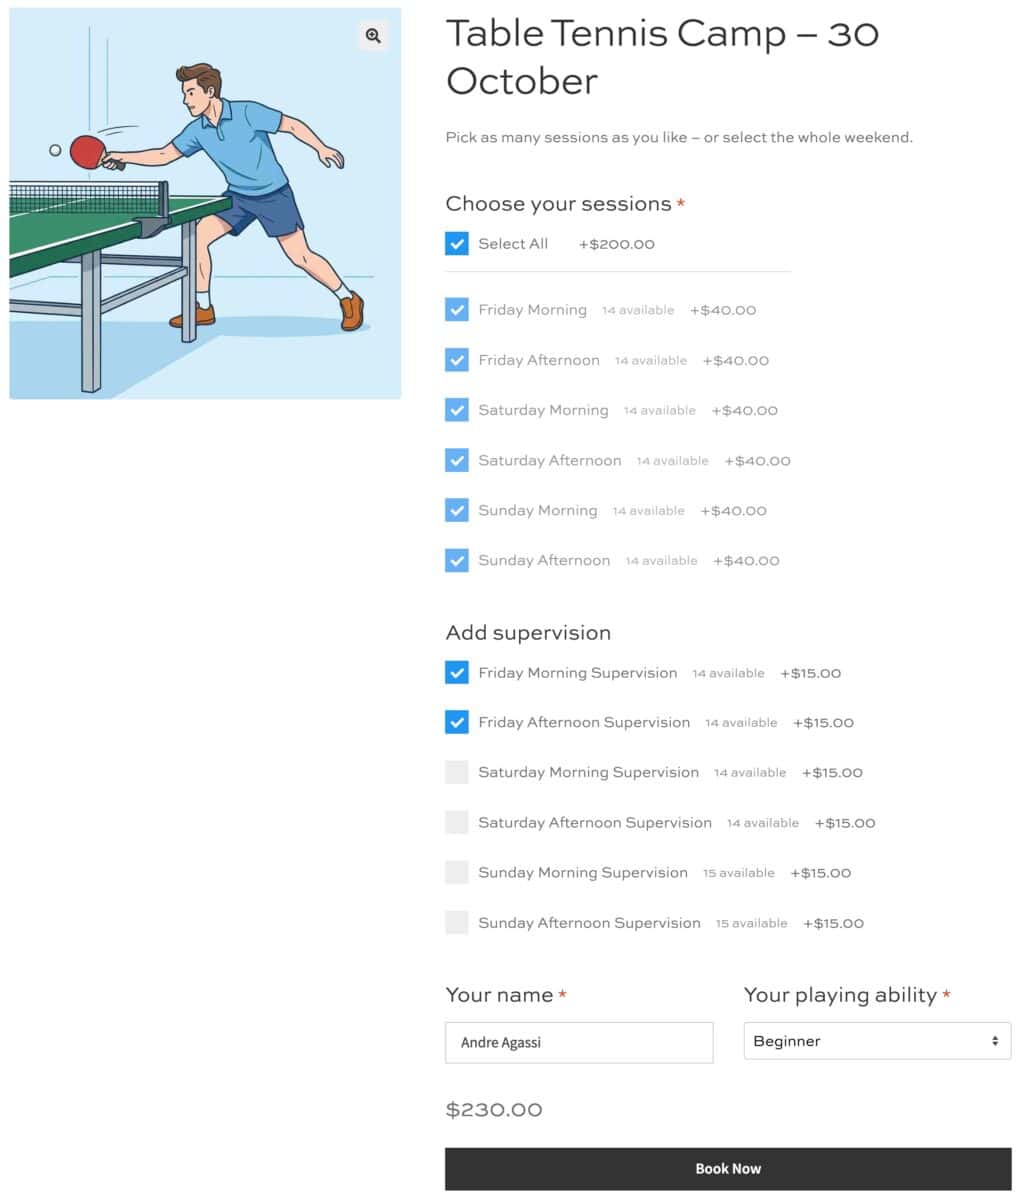
- Users will be able to:
- Pick individual sessions they want to attend (or select the whole camp at a discount)
- Add optional activities, e.g. child supervision slots alongside their sessions
- Enter further information, like their child’s name and playing ability
- As the store owner or admin, you’ll be able to:
- Track capacity for each session separately, including morning and afternoon slots on the same day
- Duplicate a camp and easily re-date it for the next camp, rather than building each new camp from scratch
- Offer an automatic discount when a customer books the entire camp
- View bookings for each camp through your Bookings Dashboard
Demand for camps keeps growing. The American Camp Association reports that more than 26 million children and adults take part in a camp experience every summer in the US alone. Offering the ability to book multiple sesssions from a single page makes it easier for your customers to book and for you to manage the bookings.
To build this, you’ll need Bookings for WooCommerce and WooCommerce Product Add-Ons Ultimate. These are available together at a discount as the WooCommerce Bookings and Product Add-Ons Bundle.
WooCommerce Bookings and Product Add-Ons Bundle
Create the ultimate bookings site in WooCommerce
In this tutorial, we’ll assume you already have WordPress and WooCommerce installed and ready to go.
Install the plugins
Once you’ve purchased Bookings for WooCommerce and Product Add-Ons Ultimate:
- Download each plugin’s zip file by clicking the link on your order confirmation screen or in your welcome email. You’ll receive the email automatically a few seconds after you’ve completed the purchase
- Go to Plugins > Add New in your WordPress dashboard
- Click the ‘Upload Plugin’ button
- Drag and drop the plugin’s downloaded zip file into the ‘Choose File’ area and click ‘Install Now’
- When the plugin has uploaded, click the ‘Activate Now’ button
Repeat this for both plugins. Both need to be active before you start building your camp product.
What is a multi-session camp product?
A multi-session camp is a holiday or sports camp or course spread out over a fixed period of time, e.g. a week or weekend, with separate bookable sessions. For example, a table tennis camp runs Friday, Saturday and Sunday, each day split into a morning and an afternoon session.
The customer visits one product page for the whole event and picks which sessions they want by checkbox, with an option to select everything at a discount. Each session has its own limited capacity, so morning and afternoon need to be tracked separately.
Using this method means that each session tracks its own capacity independently. Your customer is presented with a single product page with a clear list of sessions and prices, and a straightforward “book everything” option if they want the whole camp.
The building blocks
- The camp product: a booking product with fixed dates, e.g. 30 October to 1 November
- Each session: a booking product with its own capacity, marked as a resource so it’s hidden from the shop pages and only ever booked through the main ‘Camp’ product. Each session has a preset date
- The ‘Products’ field: a Product Add-Ons Ultimate field on the camp product listing the sessions as checkboxes, with ‘Select All’ optionally enabled for a full-camp discount
Create a table tennis camp running 30 October to 1 November
Let’s build a real example: a table tennis camp with morning and afternoon sessions across three days.
Step #1: Create the session resource products
We need a separate bookable resource for each of the available sessions, e.g. Friday morning, Friday afternoon, Saturday morning, Saturday afternoon, Sunday morning, and Sunday afternoon:
- Create a new product, e.g. “Friday Morning”
- Set ‘Product type’ to ‘Booking’
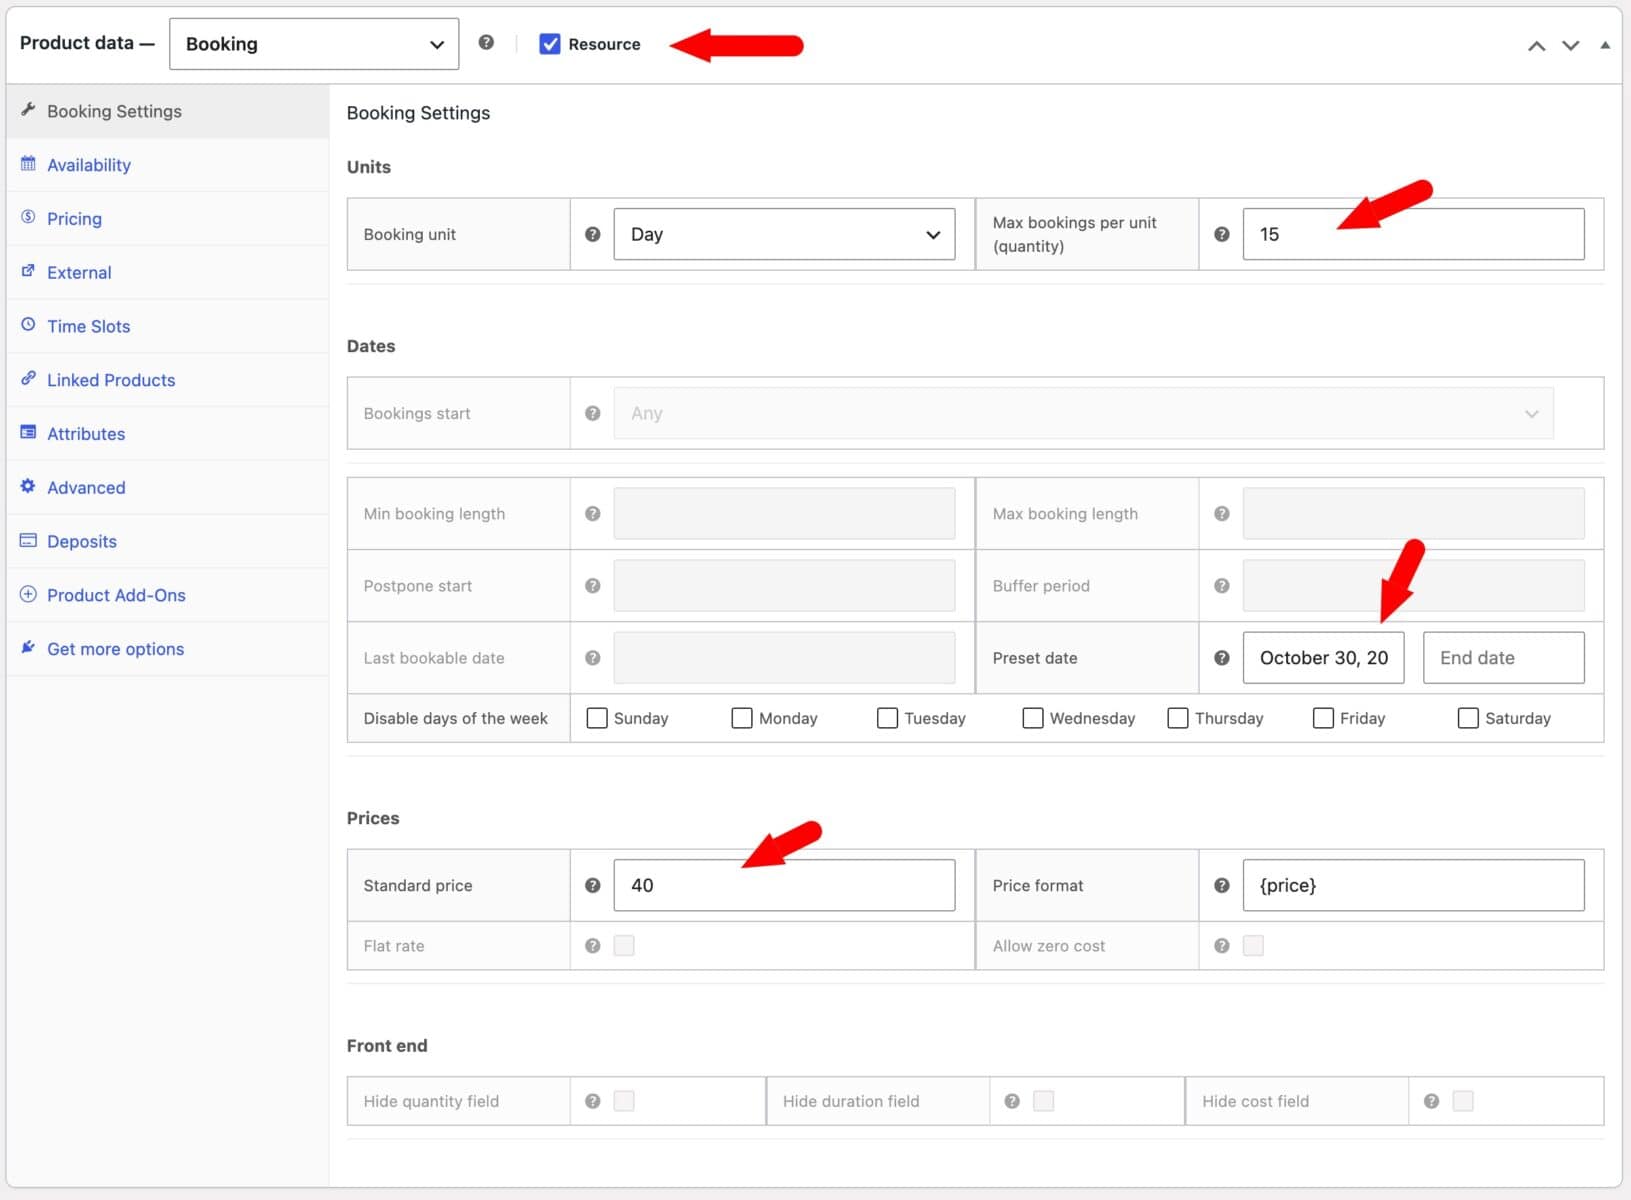
- Check ‘Resource’ in the ‘Bookings’ tab. Resources are hidden from the shop automatically, so your sessions will not show up as separate products customers can browse
- In ‘Max bookings per unit’ set the capacity for the session – e.g. 15 if you have 15 places on that session
- Set ‘Standard cost’ to the session price, e.g. $15
- In ‘Preset date’ set the start date to the date the session runs on
- Publish
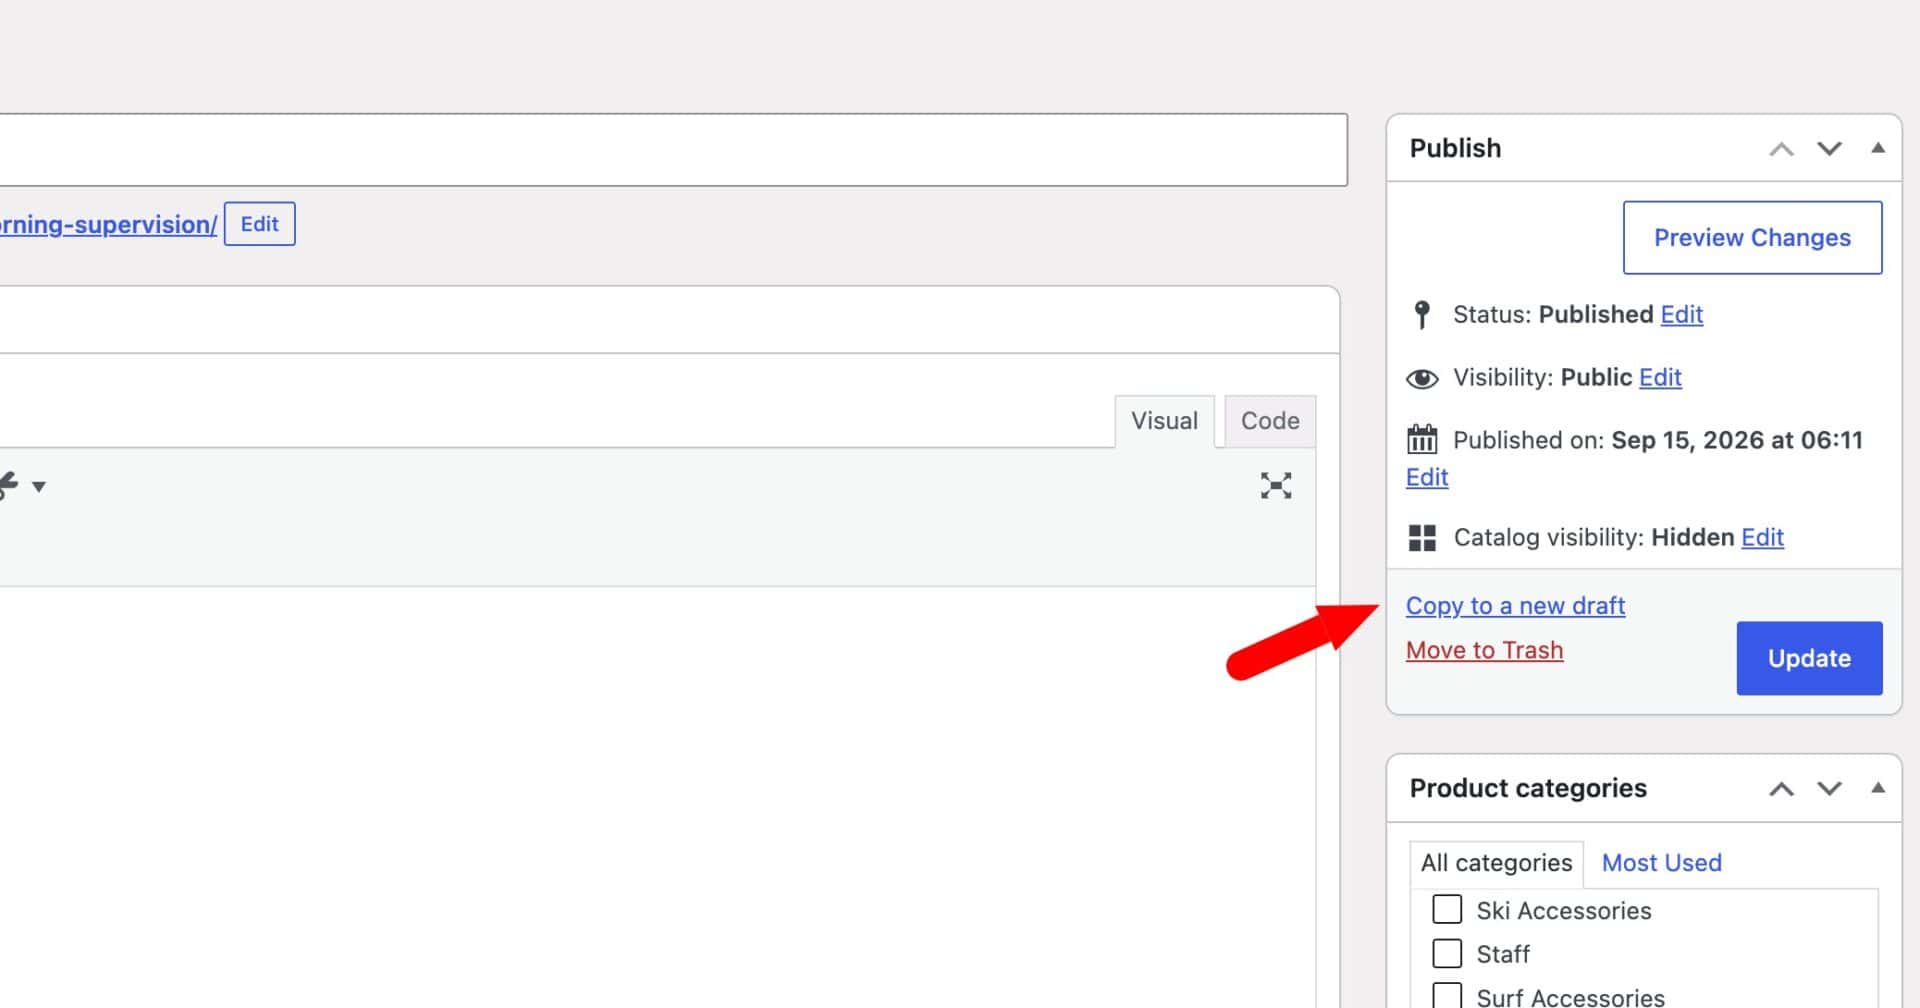
You can repeat this to create products for all your sessions very easily just by duplicating the first session product. After you’ve created your first session:
- Click the ‘Copy to a new draft’ link
- A duplicate copy of your product will be created
- Change the price, availability and/or preset date as necessary
Step #2: Create the main ‘Camp’ product
Next, create the ‘Camp’ product. This is the main product page that customers will actually see and book from, the one that lists all sessions as options.
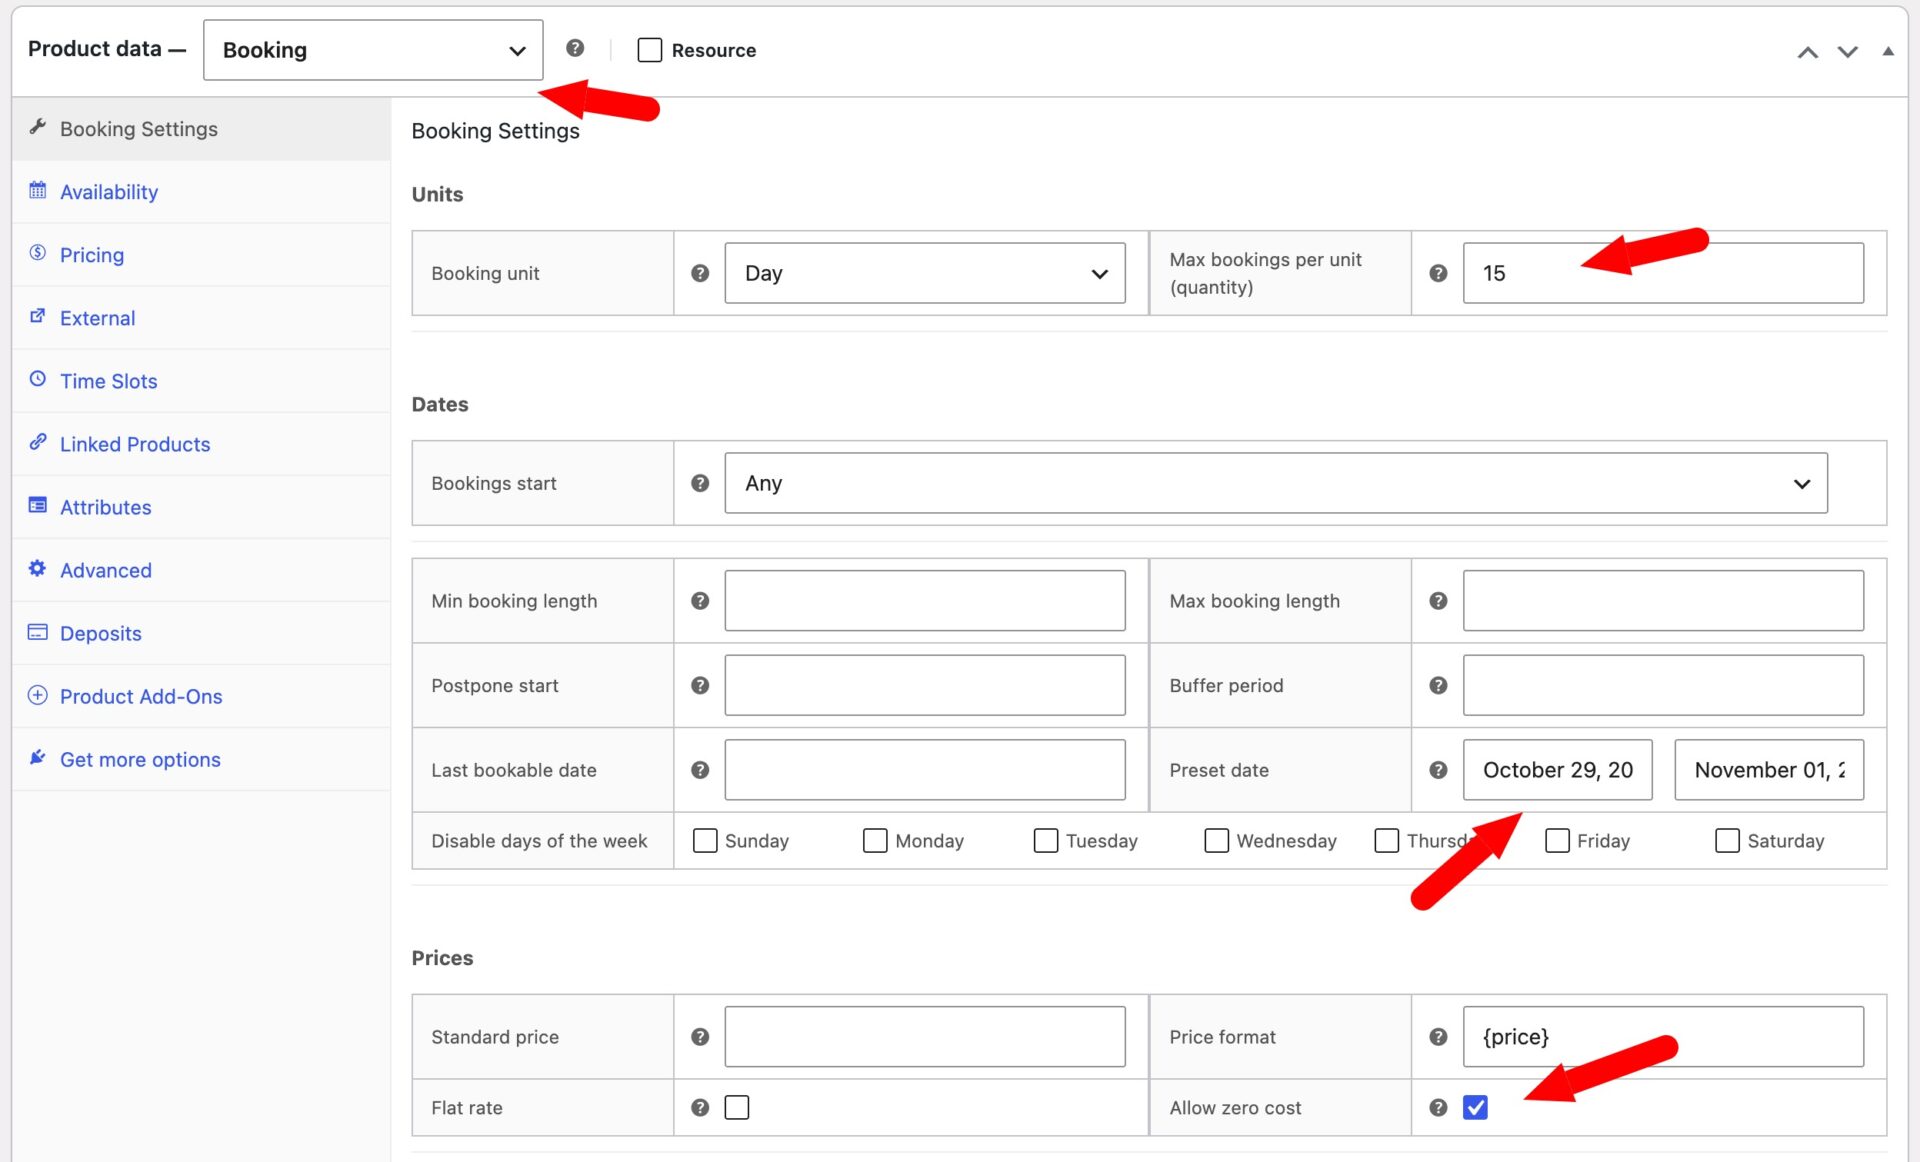
- Create a new product, e.g. “Table Tennis Camp – 30 October to 1 November”
- Set ‘Product type’ to ‘Booking’
- In ‘Max bookings per unit’ set the total maximum capacity for all sessions – e.g. ’15’ if you have 15 places per session
- Set ‘Standard cost’ to 0 in the ‘Bookings’ tab, since the real price comes from the sessions the customer selects, not the camp product itself
- Check ‘Allow zero cost’ in the ‘Pricing’ section
- Set ‘Preset date’ with a start date of 30 October and an end date of 1 November. This hides the camp’s own calendar on the front end and fixes its dates without the customer needing to pick anything
Next, let’s connect it to the six sessions you just created.
Step #3: Add the sessions as a to the main camp product page
The sessions are added to the main camp product page as ‘child products’. This means that have all the properties of a bookable WooCommerce product – e.g. price, capacity, etc – but can only be booked as options within the main product page itself.
Still editing the camp product, add a field that lists your six sessions as checkboxes, so the customer can pick which ones they want to book:
- Go to the ‘Product Add-Ons’ tab
- Click ‘Add Group’ then ‘Add Field’
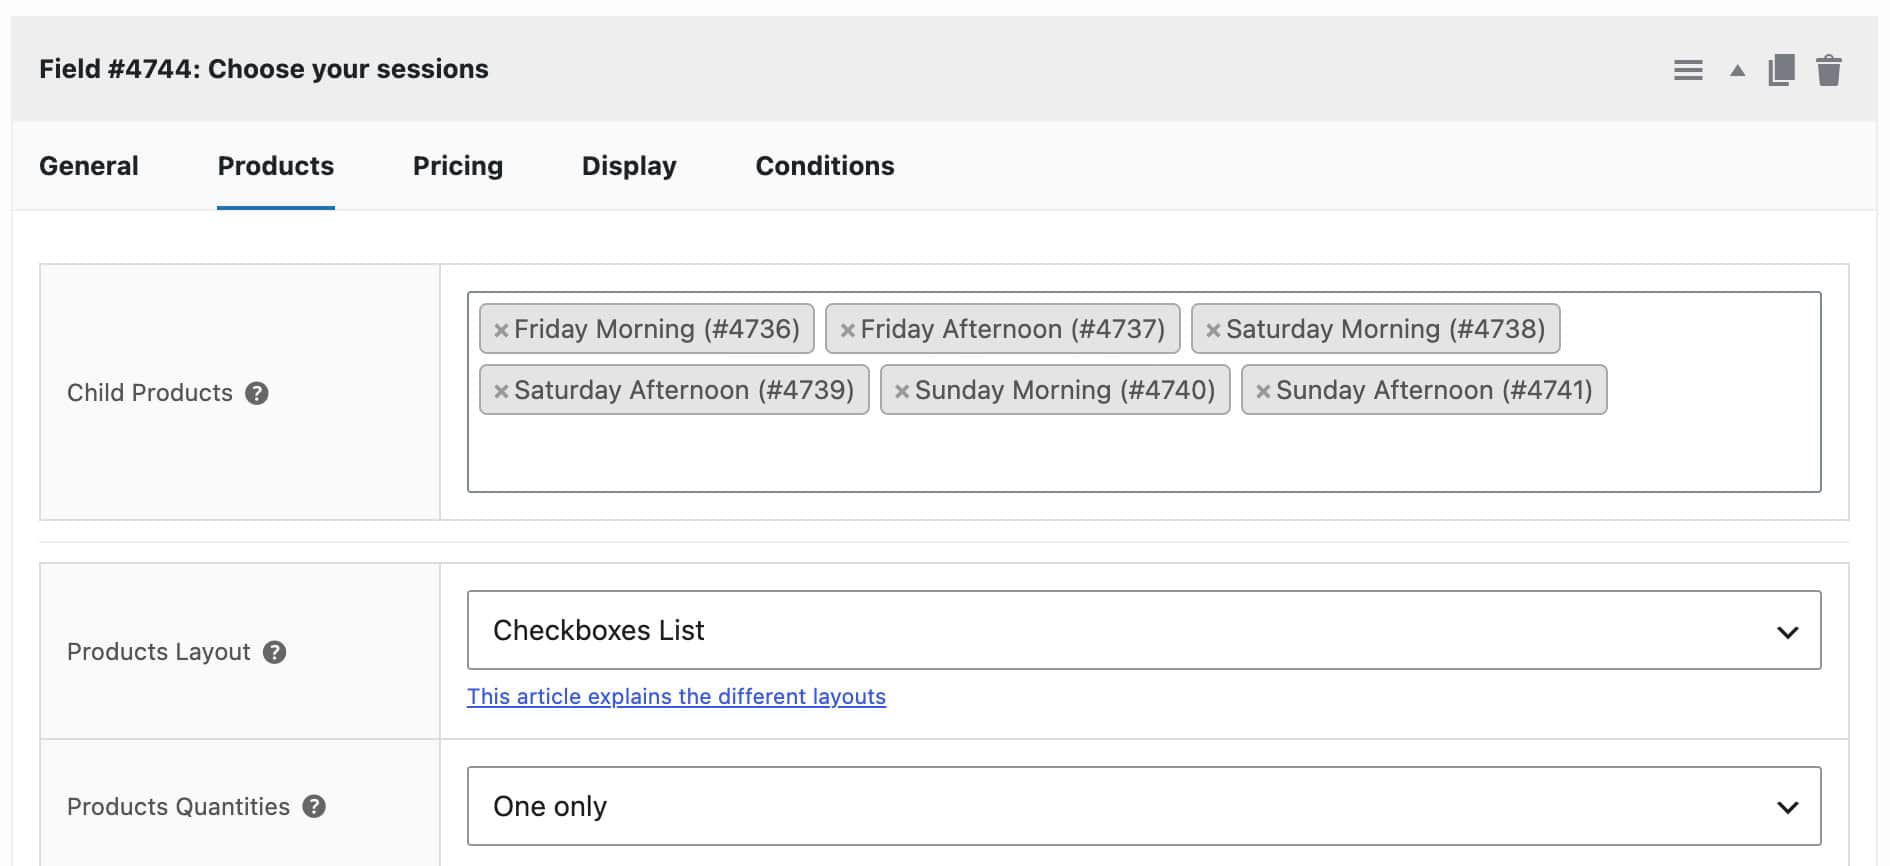
- Set ‘Field Label’ to something like “Choose your sessions” and set ‘Field Type’ to ‘Products’
- Click on the ‘Products’ tab and choose all six session resources as ‘Child Products’
- Set ‘Products Layout’ to ‘Checkboxes List’
- Set ‘Products Quantities’ to ‘One only’
Optionally enable the Select All discount
If you want to allow the user to select all sessions with a single click:
- Toggle on ‘Enable Select All Option’
- Set ‘Select All Label’, e.g. “Select All”
If you want to offer a pricing incentive, you can:
- Set ‘Select All Price Adjustment’ to ‘Percentage’, ‘Fixed’ or ‘Set’
- Enter a value in ‘Select All Price’, e.g. 10

Step #4: Optionally add extra activities
You might want to offer more than one activity per page. Or, if you’re running a kids’ holiday camp, you might be offering child care or supervision sessions before or after the main day’s events.
You can do this by following exactly the same pattern as above. In our demo product, customers can book supervision sessions before and after the main sessions.
- Create resource products for each supervision slot, e.g. “Supervision – Fri AM Start (30 Oct)” and “Supervision – Fri PM End (30 Oct)”, and so on for each day. Give each its own capacity and preset date matching that day
- On the camp product’s ‘Add-Ons’ tab, click ‘Add Field’ again, either in the same group or a new one, and repeat Step #3 above with ‘Field Label’ set to something like “Add child supervision”, listing the supervision resources as children
- Add a Select All option here too if you want a discount for booking supervision across the whole weekend, following Step #4 above
Because this is a second, independent Products field, customers can mix and match. They can book some table tennis sessions, some supervision slots, or both, entirely independently of each other.
Step #5: Optionally collect player name and ability
Now let’s look at how to collect additional information about the camp attendees. In our example, we’ll ask for the customer’s name and skill level but you can collect any kind of information you need.
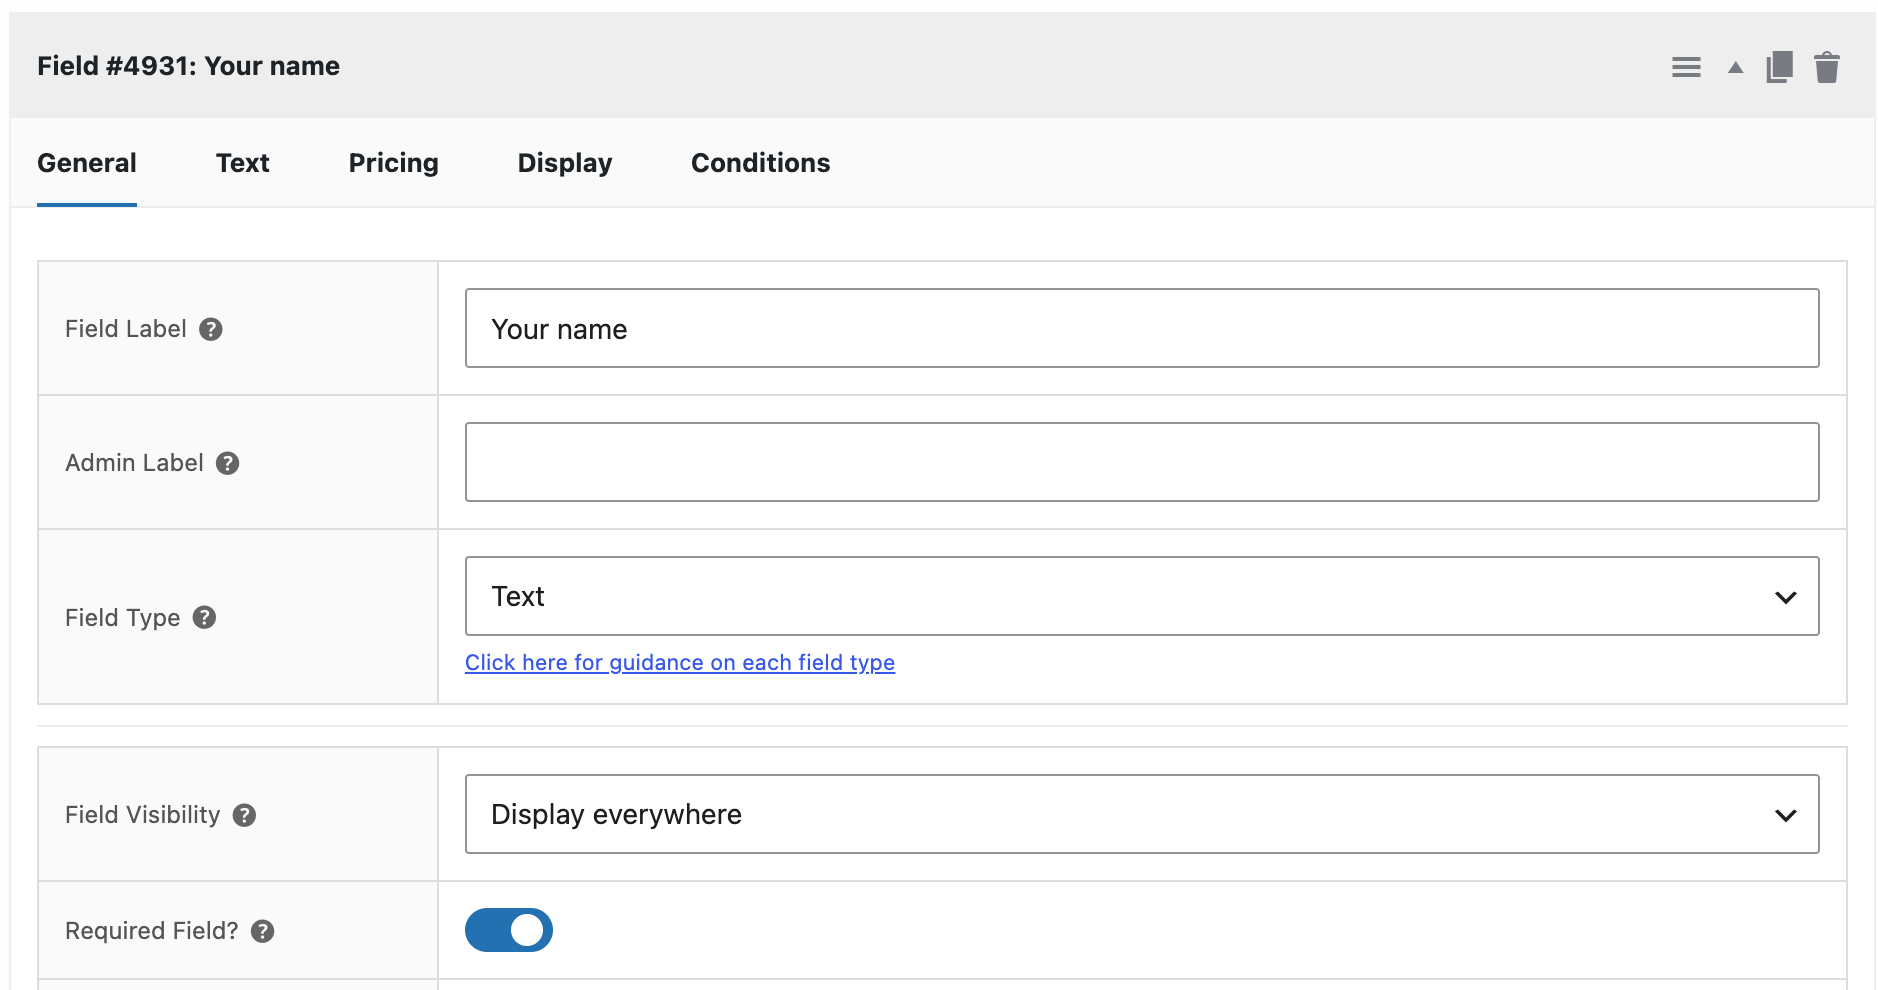
- Click ‘Add Field’
- Set ‘Field Label’ to “Player name” and ‘Field Type’ to ‘Text’. This gives a plain text box with no options table, just min and max character settings if you want to enforce them
- Click ‘Add Field’ again for playing ability. Set ‘Field Label’ to “Playing ability”, and ‘Field Type’ to ‘Select’ for a dropdown, or ‘Radio Group’ if you’d rather show the choices directly on the page
- On the field’s ‘Options’ tab, click ‘Add Option’ for each ability level, e.g. “Beginner”, “Intermediate”, “Advanced”, leaving ‘Price’ blank on each since this field is just collecting information, not adding cost
Now your camp product collects everything you need: which sessions the customer wants, whether they need supervision, and each child’s name and playing ability.
Step #6: Easily duplicate camps and sessions
Assuming that you aren’t running a single camp, you probably want an easy way to re-use the sessions you’ve already created for further camps. You can do this very quickly:
- In WooCommerce > Settings > Product Add-Ons enable the ‘Duplicate child products’ setting
- Go to the camp product that you need to replicate and click ‘Copy to a new draft’
- The entire product and its sessions will be duplicated. You just need to edit each one with the new date and any other changes like price or capacity

Bonus #1: Expand to a full holiday camp with multiple activities
You can use exactly the same method to accept bookings for multiple sports and activities. The plugin also allows you to places in fields in tabs and sections – to make it easier for your customers to find exactly what they need.
So if your camp runs several activities in the same week, e.g. table tennis, swimming, and football, you can let parents book across all of them from one product page, rather than creating a separate product per activity.
- Create resource products for each session of every activity on offer that week, following Step #1 above. Give each its own capacity and preset date, whichever activity it belongs to
- Add a separate Products field for each activity on the camp product’s ‘Add-Ons’ tab, e.g. “Choose your table tennis sessions”, “Choose your swimming sessions”, and “Choose your football sessions”, each listing only that activity’s resources as ‘Child Products’
- Add a Select All option to each field if you want a discount for booking every session of that activity, following Step #4 above
Customers can mix and match across the whole camp: a couple of table tennis sessions, one swimming session, and every football session, all added to the cart from a single page.
Manage activities from the back end
For a view of all booked activities, go to Bookings > Dashboard.
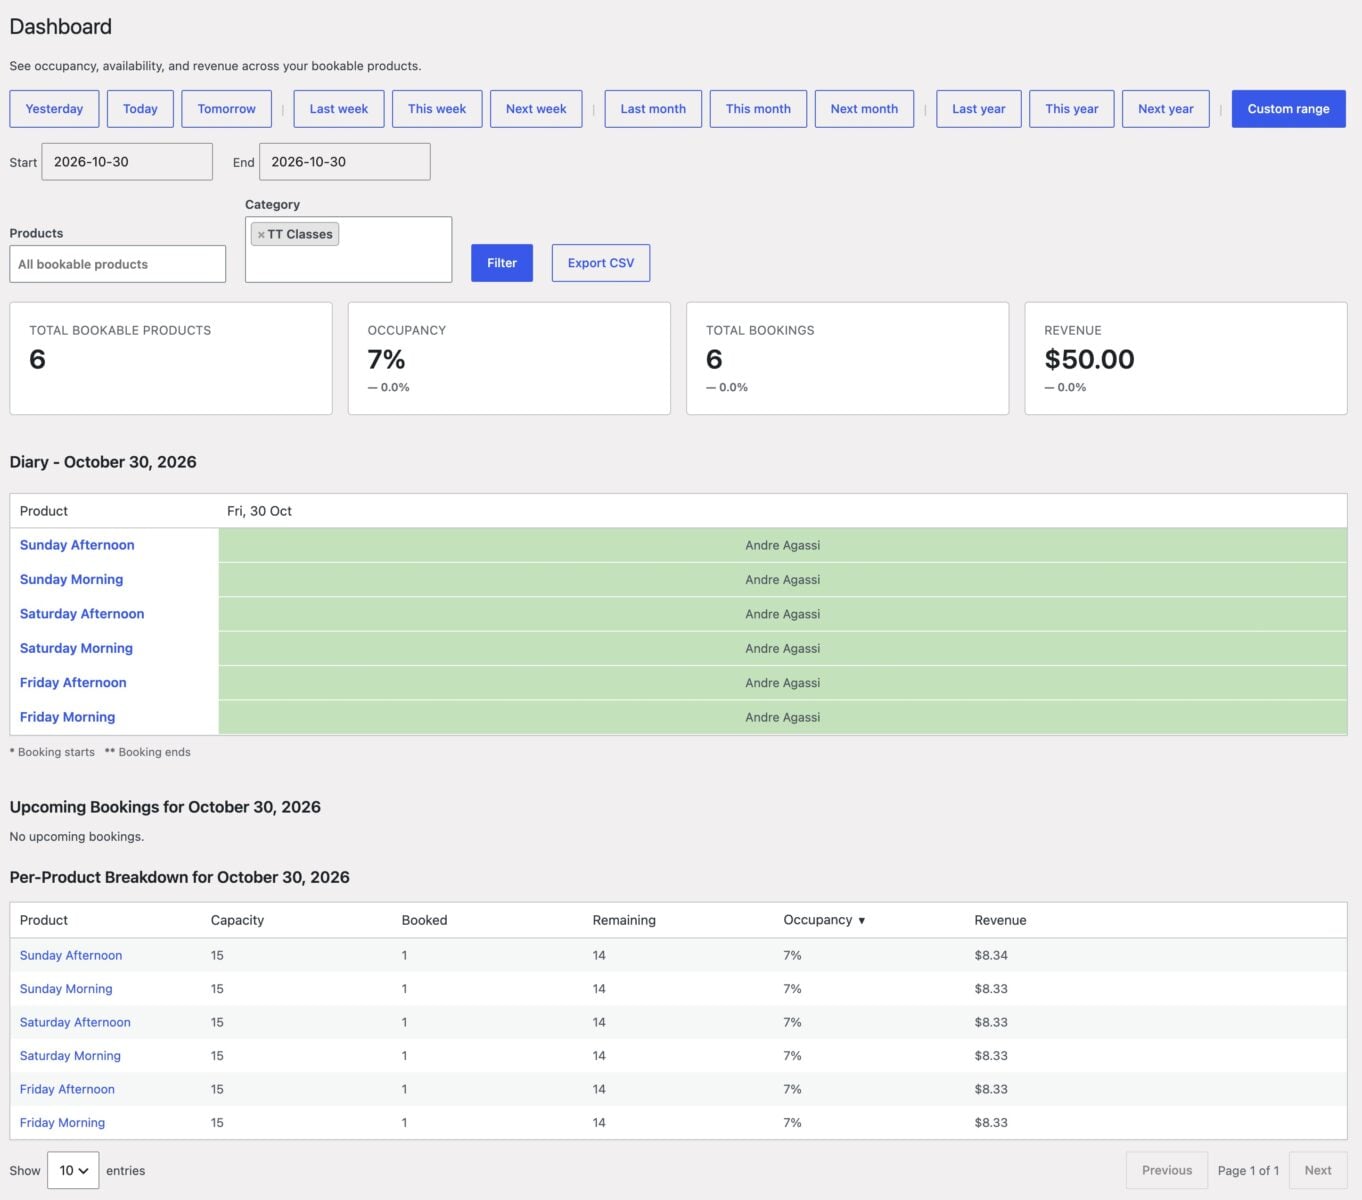
Here you can filter by date range, product and/or product category. You’ll see how full your schedule is per day, who is booked in per session, and so on.
You can add bookings manually if you wish under Bookings > Add Booking if a customer books by phone or in person.

We use Add-Ons Ultimate for two school clubs so parents can add their child's details to each club when purchasing it. The plugin works great and the schools find it easy to create lists of pupils attending each club.
Holiday camps and activities – recap
That’s how to sell multi-session holiday camps and activities in WooCommerce, where customers pick individual sessions or book the whole camp at a discount, and you keep independent capacity for every morning and afternoon slot. We used Bookings for WooCommerce and Product Add-Ons Ultimate. These are available together as the WooCommerce Bookings and Product Add-Ons Bundle.
All our plugins are compatible with all themes and page builders, including Astra, Flatsome, and Woodmart, and page builders like Elementor and Divi. If you have any questions, our world-class support team is on hand to help. And they’re backed by a 14-day money-back guarantee, so you can try them risk-free.
WooCommerce Bookings and Product Add-Ons Bundle
Create the ultimate bookings site in WooCommerce