WooCommerce venue booking: how to take venue hire bookings online
You can take venue hire bookings directly through your WooCommerce store, with live availability, a hire fee plus per-head pricing and a deposit at checkout. This tutorial shows you how to set it up for a wedding and events venue, but the same steps work for village halls, function rooms, meeting rooms and party venues.
We’ll use Bookings for WooCommerce to build a venue that couples can book by the day and party hosts can book by the hour. Its ‘People’ feature lets you charge separately for adults, children and evening guests.
After completing this tutorial:
- Your customers will be able to:
- Check live availability and pick a date from a calendar
- Optionally book the venue for a full day or for a few hours
- Choose how many adults, children and evening guests are coming
- Add catering and extras, priced per guest
- Pay a deposit now and the balance later
- As the venue owner, you’ll be able to:
- Charge a hire fee plus a per-head price for each type of guest
- Cap bookings at your venue’s capacity
- Block time after each event for teardown and cleaning
- Charge more in peak season
- Export final guest numbers for your caterer
- As a bonus, we’ll also look at how to:
- Let couples request a quote before they book
Never miss a booking - let your customers book 24/7
There’s a demo product here so you can see how a venue booking page works.
Why take venue bookings through WooCommerce?
WooCommerce lets you take venue bookings on your own site, without paying a commission to a third-party platform. You keep the revenue and the customer data, and you use the store, checkout and payment gateways you already have.
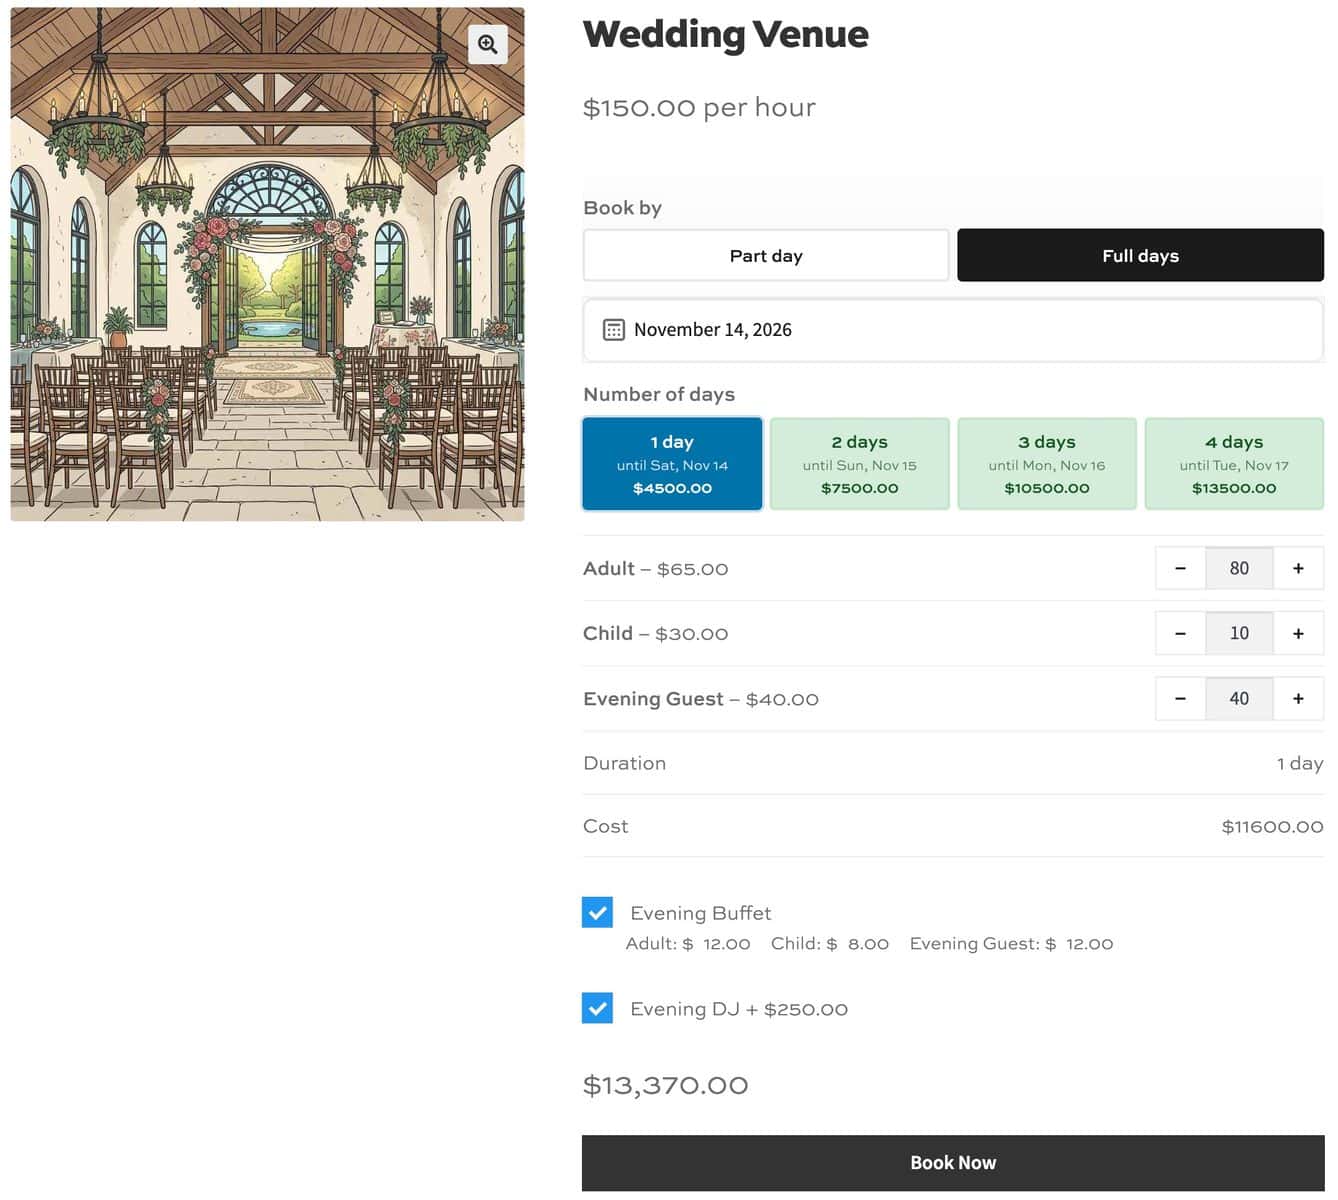
It also ends the back-and-forth of inquiry emails. Customers see which dates are free, choose their guest numbers and extras, get a price – and pay instantly.
Venue pricing is usually more complex than just a flat fee for a room. According to The Knot Real Weddings Study, only 7% of couples said their reception venue fee covered the space alone, while 74% said it included rentals and 41% said it included catering. Your booking system needs to handle the fee, the guests and the extras together.
What does a venue booking system need?
A venue booking system needs to handle more than dates. It should let you:
- Limit capacity: stop bookings going over the number of guests your venue can hold
- Offer hourly and daily hire: take full-day weddings and three-hour parties on the same product
- Block setup and teardown time: leave a gap between events so your team can reset the space
- Charge peak rates: price summer weekends higher than winter weekdays
- Charge per head: add a price for each guest on top of the hire fee, with different rates for adults and children
- Report guest numbers: give your caterer and staff accurate headcounts
Bookings for WooCommerce covers all of these on its own. For extras and deposits, you’ll also need a companion plugin:
- Sell extras: offer catering, entertainment and equipment at the point of booking with Product Add-Ons Ultimate
- Take deposits: secure the date with part of the price and collect the rest later with WooCommerce Deposits and Part Payments
Which venues can take bookings online?
Any venue that hires out a space by the day or the hour can take bookings through WooCommerce. For example:
- Wedding venues: barns, country houses and estates that host one wedding per day, with day and evening guests
- Village and community halls: spaces hired by the hour for parties, clubs and classes, and by the day for fairs and events
- Pub and hotel function rooms: private dining rooms and event suites booked for birthdays, wakes and celebrations
- Meeting and conference rooms: rooms hired by the hour or day, with per-delegate catering
- Party venues: soft play centers, studios and private hire spaces with a per-child price
- Photography studios: spaces hired by the hour for shoots or by the day for longer productions
The setup is the same in each case.
How do you set up a wedding venue booking product?
Bookings for WooCommerce allows you to accept date-based and time-based bookings through your WooCommerce store – so it integrates with all themes, page builders and payment gateways.
Here’s how to create a venue that can be booked by the day or by the hour, with per-head pricing for each type of guest.
- Install Bookings for WooCommerce
Install Bookings for WooCommerce then activate it from your WordPress dashboard.
- Create the venue product
Create a new product and select ‘Booking’ as the product type.
- Set the hire fee and booking unit
Choose ‘Day’ as the booking unit, enter 1 for the quantity and enter your daily hire fee.
- Offer hourly hire as well
Add time slots with their own price, then allow whole-day bookings so customers can choose either.
- Block time for teardown
Add a buffer period so the day after each booking is reserved for resetting the venue.
- Set peak pricing and closed days
Add a higher hire fee for peak season and disable the days you’re closed.
- Charge per person for each guest type
Enable ‘People’, set your capacity and give each type of guest its own price.
- Add catering and extras
Use Product Add-Ons Ultimate to sell a buffet per person and extras like a DJ.
- Take a deposit
Use WooCommerce Deposits and Part Payments to take a deposit and schedule the balance.
Here’s each step in more detail.
In this tutorial, we’ll assume that you already have WordPress and WooCommerce installed and ready to go.
Step #1: Install Bookings for WooCommerce
Once you’ve purchased Bookings for WooCommerce:
- Download the plugin’s zip file by clicking on the link on your order confirmation screen or in your welcome email. You’ll receive the email automatically a few seconds after you’ve completed the purchase
- Go to Plugins > Add New in your WordPress dashboard
- Click on the ‘Upload Plugin’ button
- Drag and drop the plugin’s downloaded zip file into the ‘Choose File’ area and click ‘Install Now’
- When the plugin has uploaded, click the ‘Activate Now’ button
You now have Bookings for WooCommerce active on your site. Let’s create the venue.
Step #2: Create the venue product
We’ll use a wedding and events venue called Oakfield Barn as our example. With Bookings for WooCommerce activated, you can create your venue in the same way you would any other product:
- Go to Products > Add New
- Enter the venue name, description and images
- Select ‘Booking’ from the ‘Product type’ field in the ‘Product data’ section

A set of booking tabs appears in the ‘Product data’ section. Now let’s set the hire fee.
Step #3: Set the hire fee and booking unit
On the ‘Bookings Settings’ tab:
- Select ‘Day’ from the ‘Booking unit’ field
- Enter 1 in the ‘Max bookings per unit (quantity)’ field (assuming you only have one venue.)
- Enter 3000 in the ‘Standard price’ field
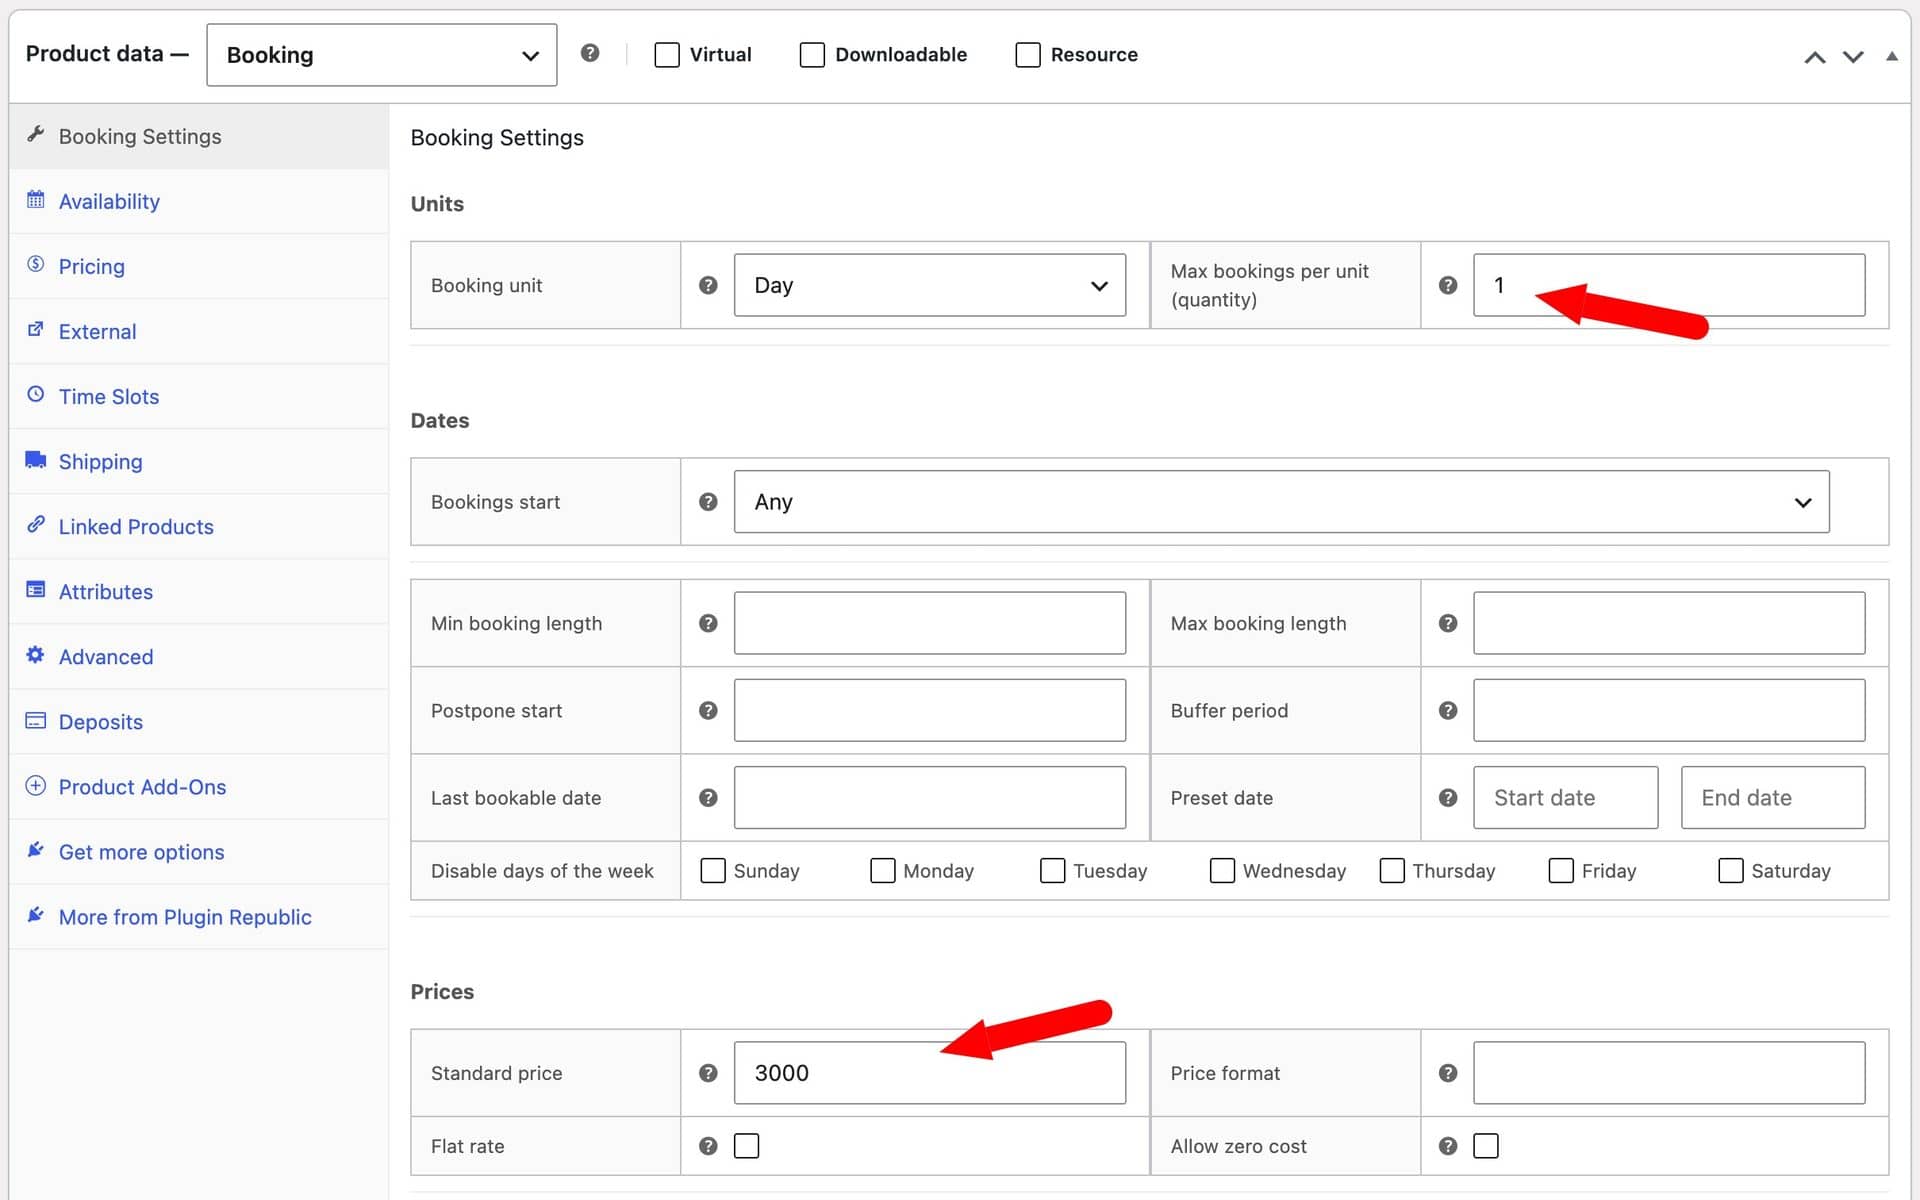
The ‘Max bookings per unit’ setting makes sure each date can only be booked once. If you have multiple venues, you can hire them all out from the same product page – just enter the number of venues. Your venue now has a daily hire fee of $3,000.
Step #4: Optionally offer hourly hire as well
Many venues take bookings by the day and also allow smaller events by the hour. With mixed duration bookings, one product can offer both, so your customers can book part-day or multiple-day events from the same product page.
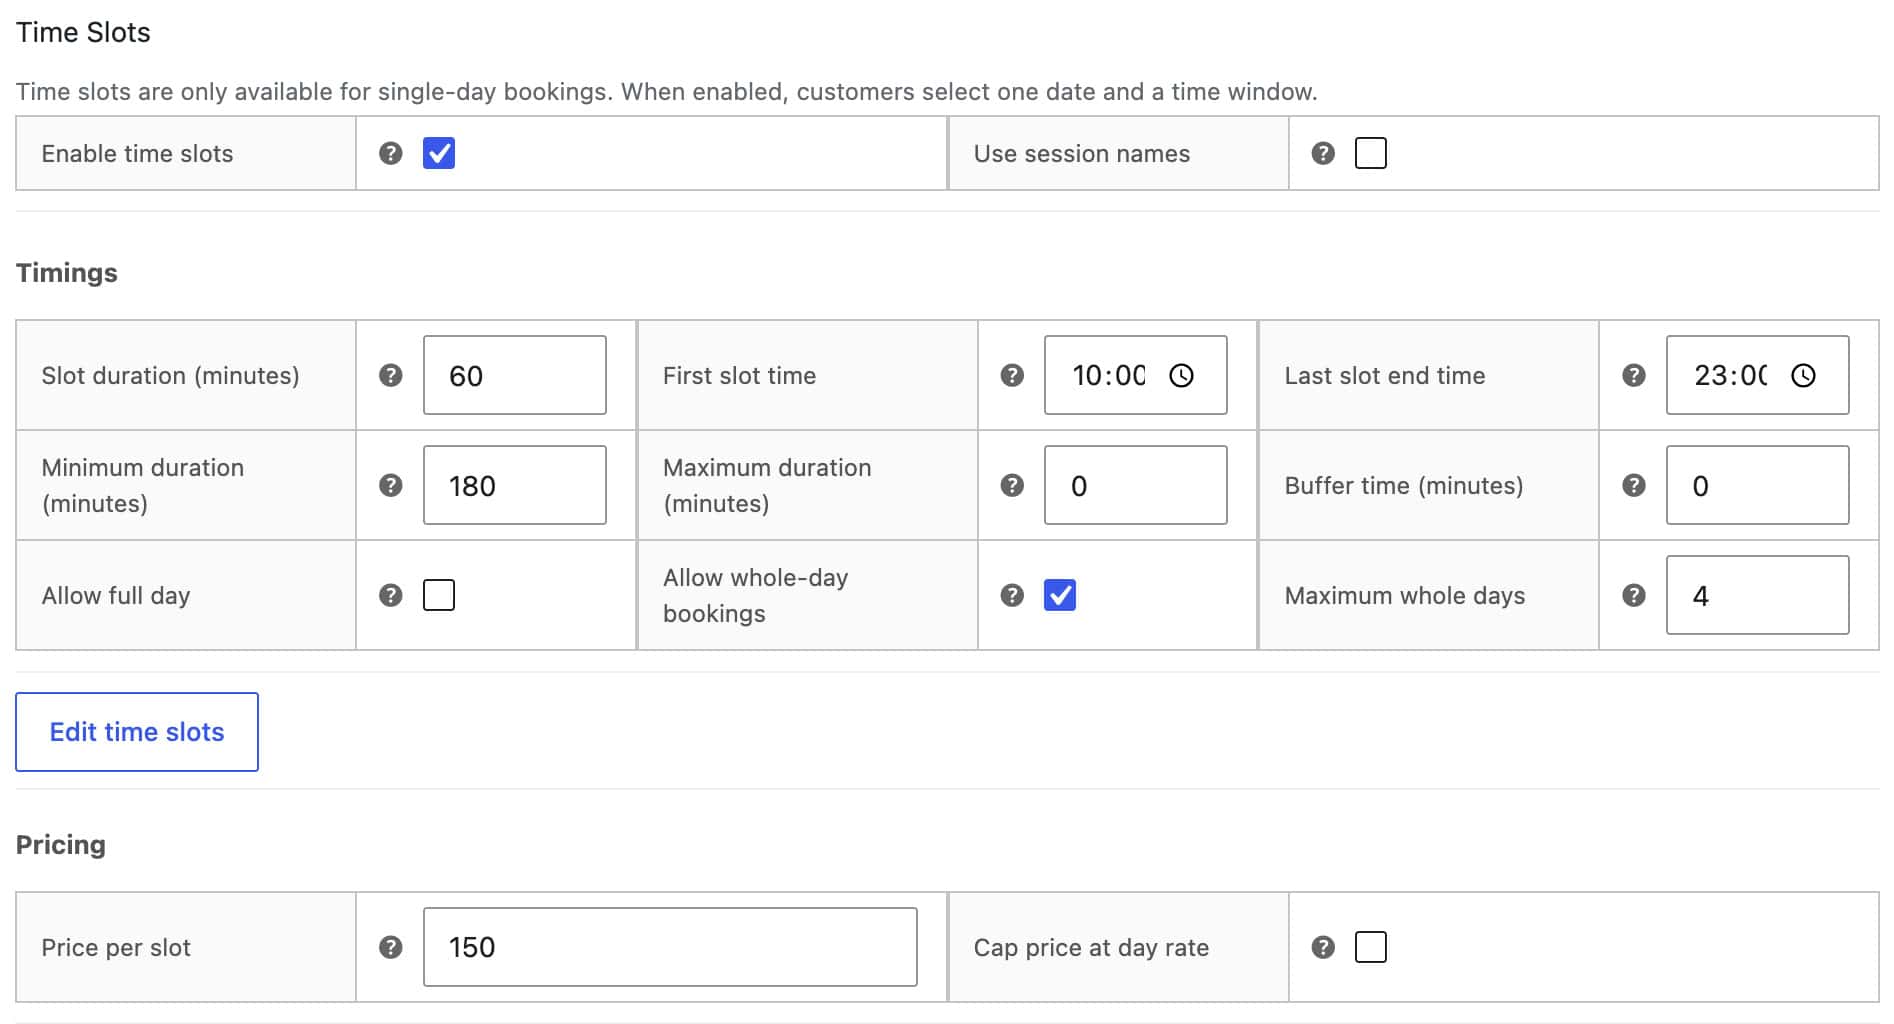
Click the ‘Time Slots’ tab, then:
- Check the ‘Enable time slots’ field
- Enter 60 in the ‘Slot duration (minutes)’ field
- Enter 10:00 in the ‘First slot time’ field and 23:00 in the ‘Last slot end time’ field
- Enter 150 in the ‘Price per slot’ field
- Enter 180 in the ‘Minimum duration (minutes)’ field to require at least three hours
- Check the ‘Allow whole-day bookings’ field
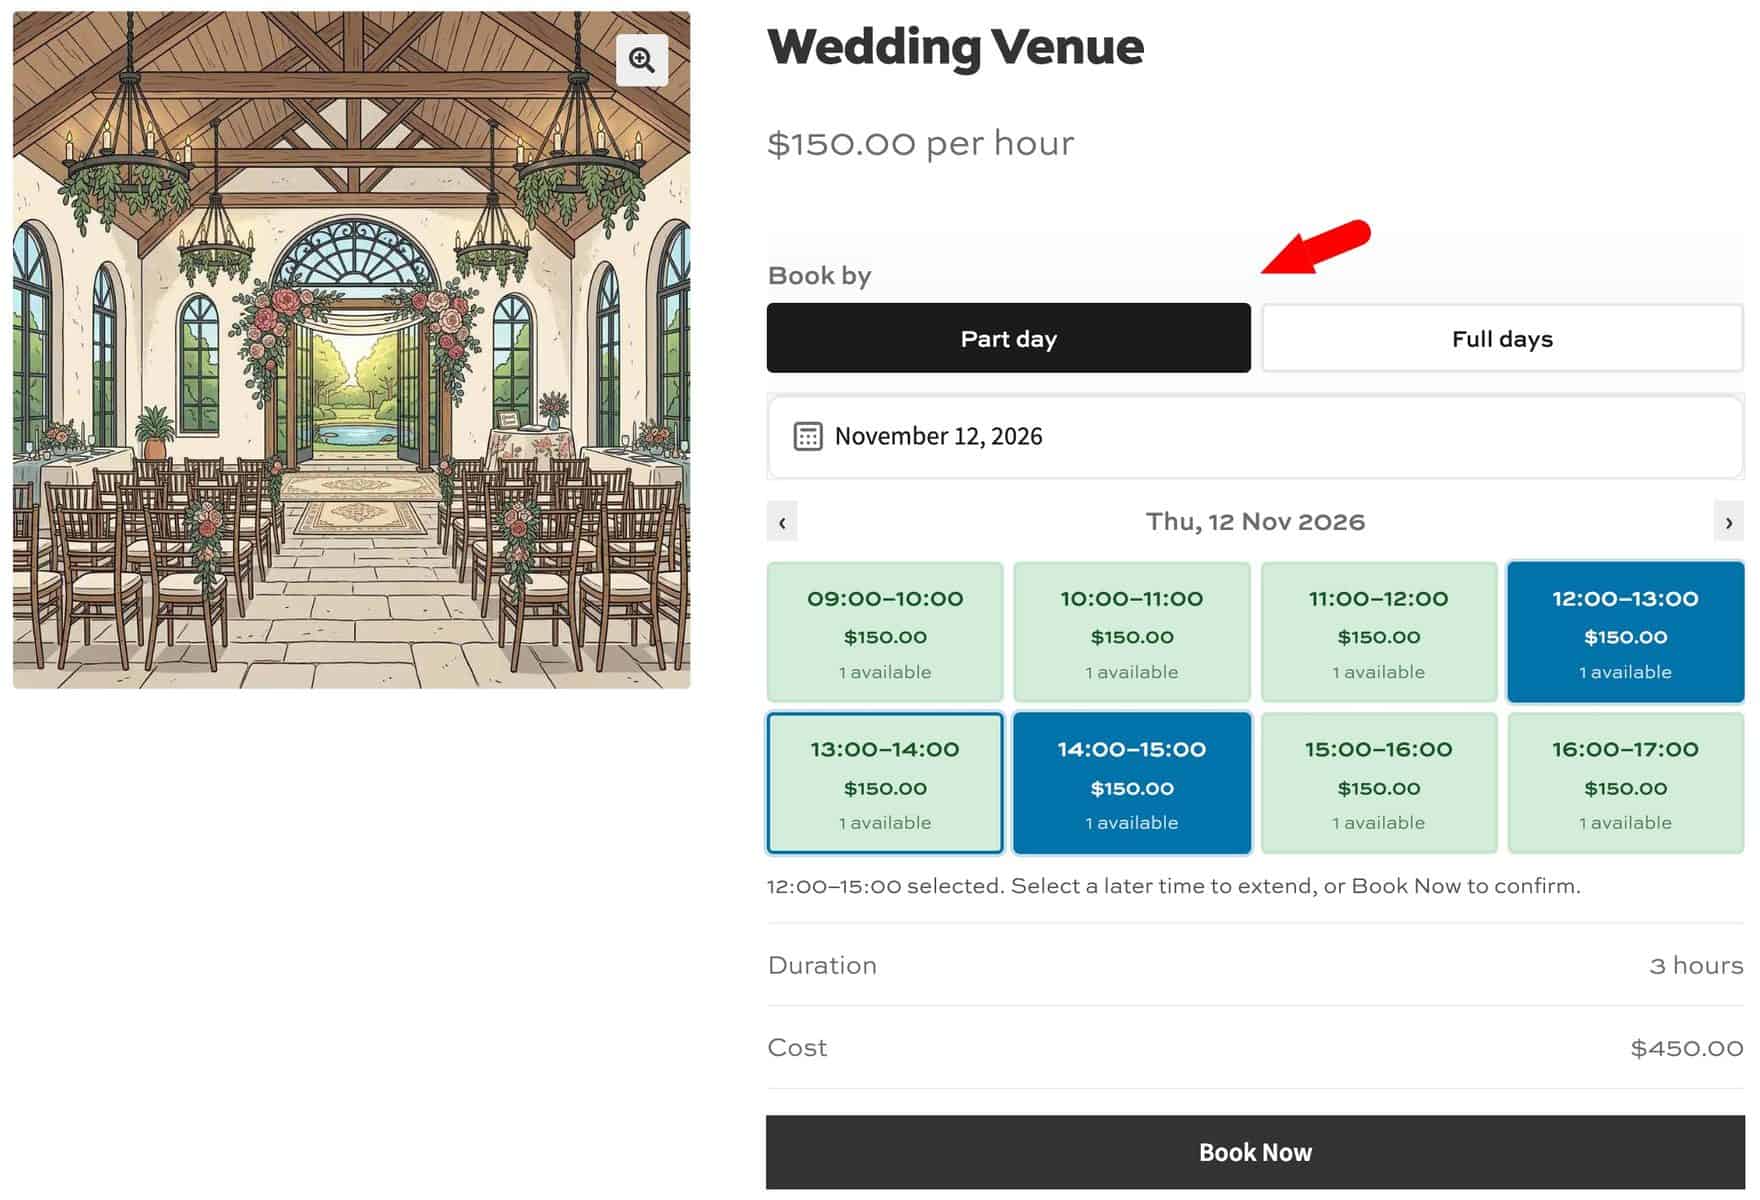
Customers now see a choice between ‘Part day’ and ‘Full days’ on the product page. Both share the same availability, so a three-hour party on a Saturday stops that Saturday being booked as a whole day.
To use your own wording, go to WooCommerce > Settings > Bookings > Calendar and scroll down to ‘Time Slot Labels’. Enter ‘Hourly’ in the ‘Time slots option label’ field and ‘Daily’ in the ‘Whole days option label’ field. Note that these labels apply to all your mixed duration products.
You now have a venue that can be booked for a few hours at $150 per hour or for a whole day at $3,000. Now let’s leave time to reset the venue between events.
Step #5: Optionally add a buffer period for teardown
Weddings often finish late and you might need time to clear up before the next booking can take place. To add a one-day buffer period after any booking, click the ‘Bookings Settings’ tab and enter 1 in the ‘Buffer period’ field in the ‘Dates’ section.
The day after each booking is now blocked, so another event can’t be booked the day after an existing booking. You can also enter a value in ‘Postpone start’ to stop customers booking at short notice.
Step #6: Set peak pricing and closed days
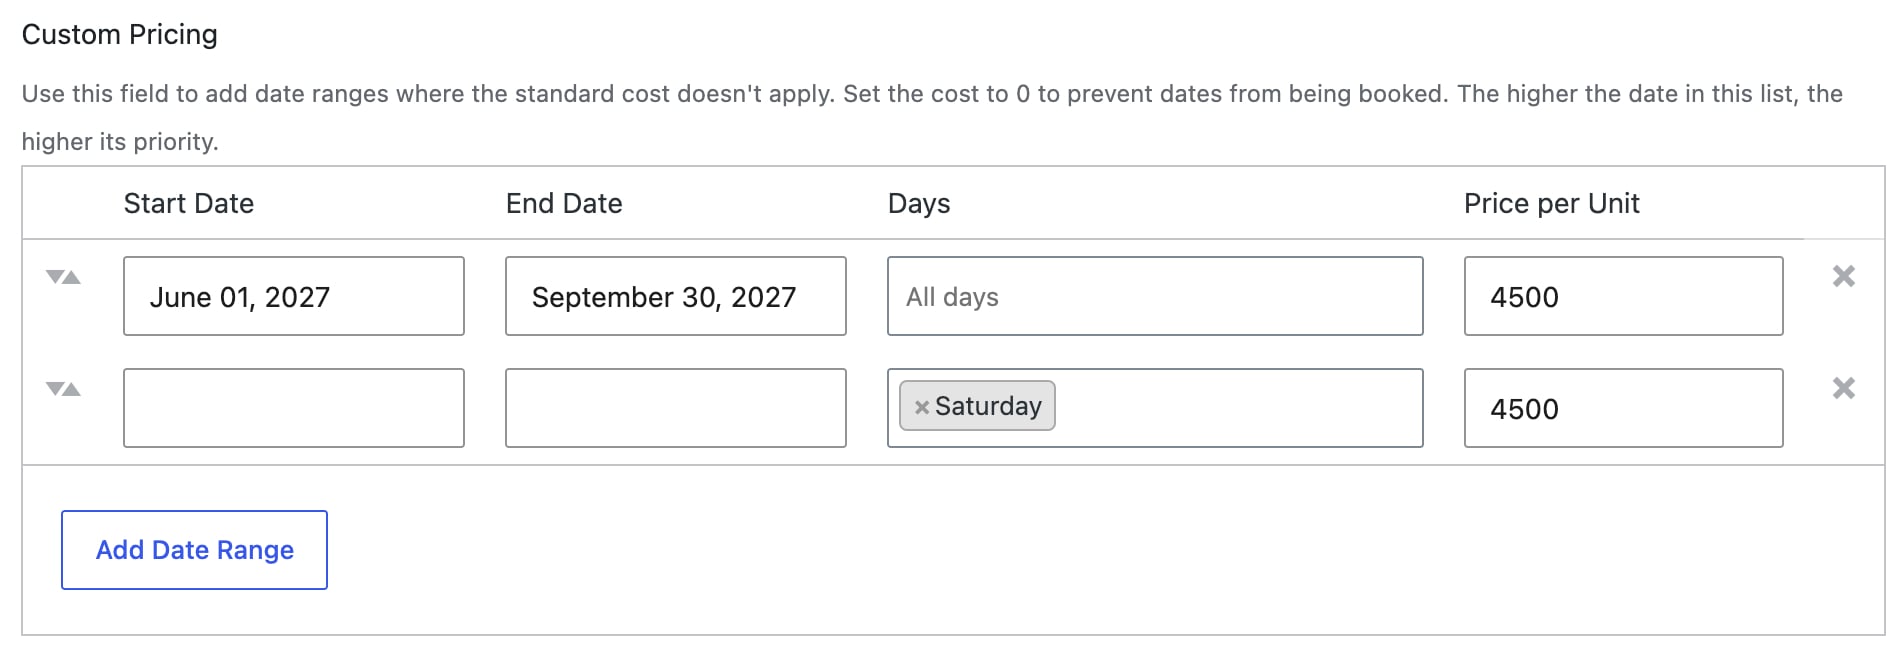
If you want to charge higher rates for different times of the year, e.g. the summer, click the ‘Pricing’ tab and add a row under ‘Custom Pricing’ with a start date of 1 June, an end date of 30 September and a cost of 4500.
Custom pricing only changes the hire fee. The per-head prices you’ll add in the next step stay the same on every date, so your peak premium goes on the venue rather than the catering.
You can also set different prices for different days of the week. Leave the Start Date and End Date fields empty if per-day pricing is not limited to a certain date range, then select the days of the week for the special pricing and add the price per unit.
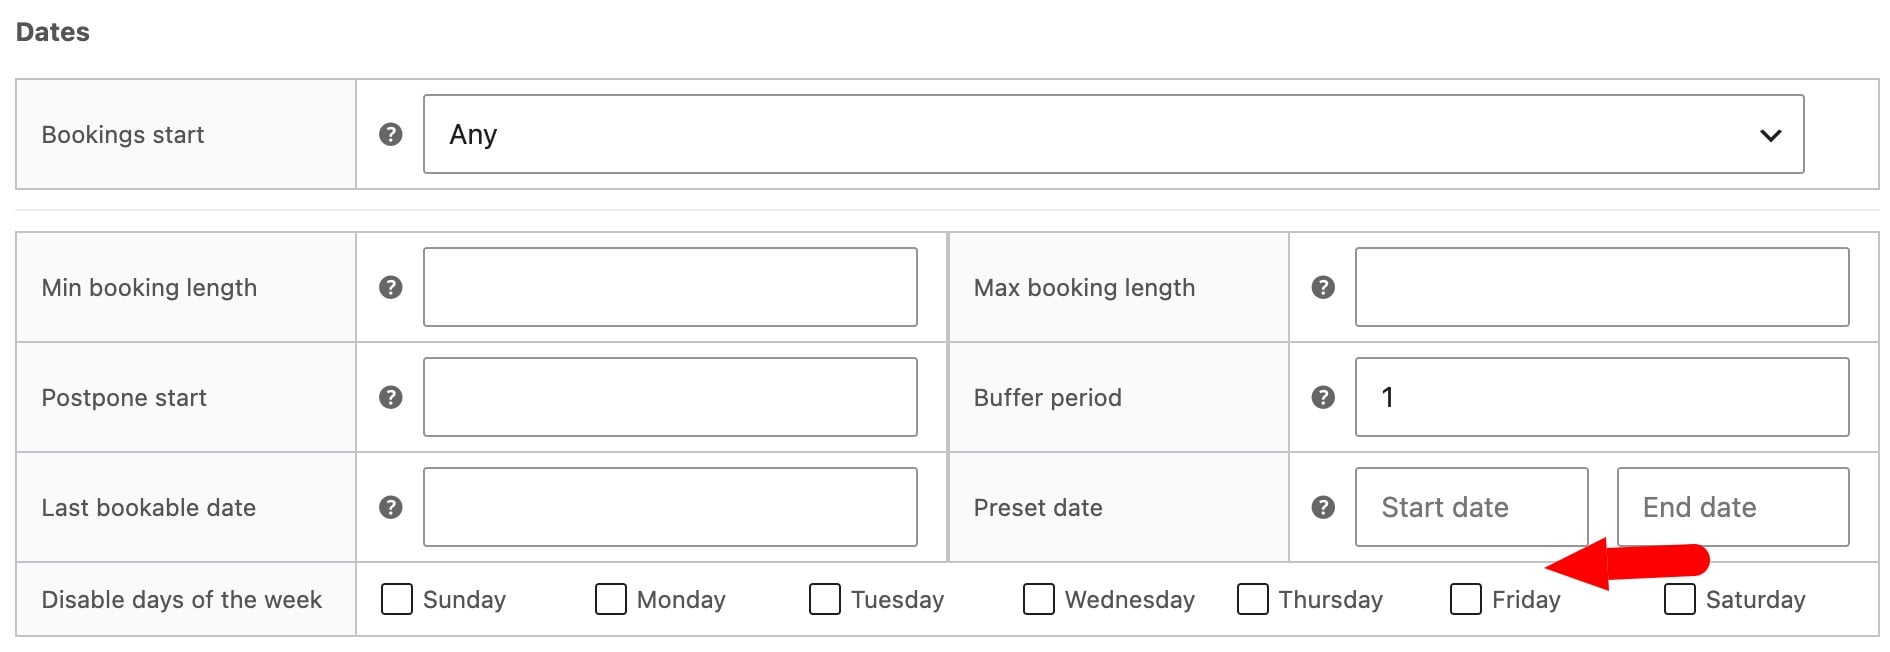
To close on certain days, click the ‘Booking Settings’ tab and tick them under ‘Disable days of the week’. For example, tick Monday if you never host events on Mondays. Your venue now charges $4,500 per day in peak season and can’t be booked on the days you’re closed.
Step #7: How do you charge per person for venue hire?
The ‘People’ feature lets customers tell you who’s coming and allows you to charge a separate price for each type of guest. This means you can charge a hire fee plus a per-head price, all on the same booking.
Here’s how to set how many guests the venue can hold.
First, set up your people types:
- Go to Bookings > People. ‘Adult’ and ‘Child’ are there by default
- Click ‘Add people type’ and add any extra people types you might want, e.g. ‘Evening guest’
- Optionally, enter a ‘Description’ for each type, such as ‘Ages 3–12’ for Child
- Click ‘Save changes’
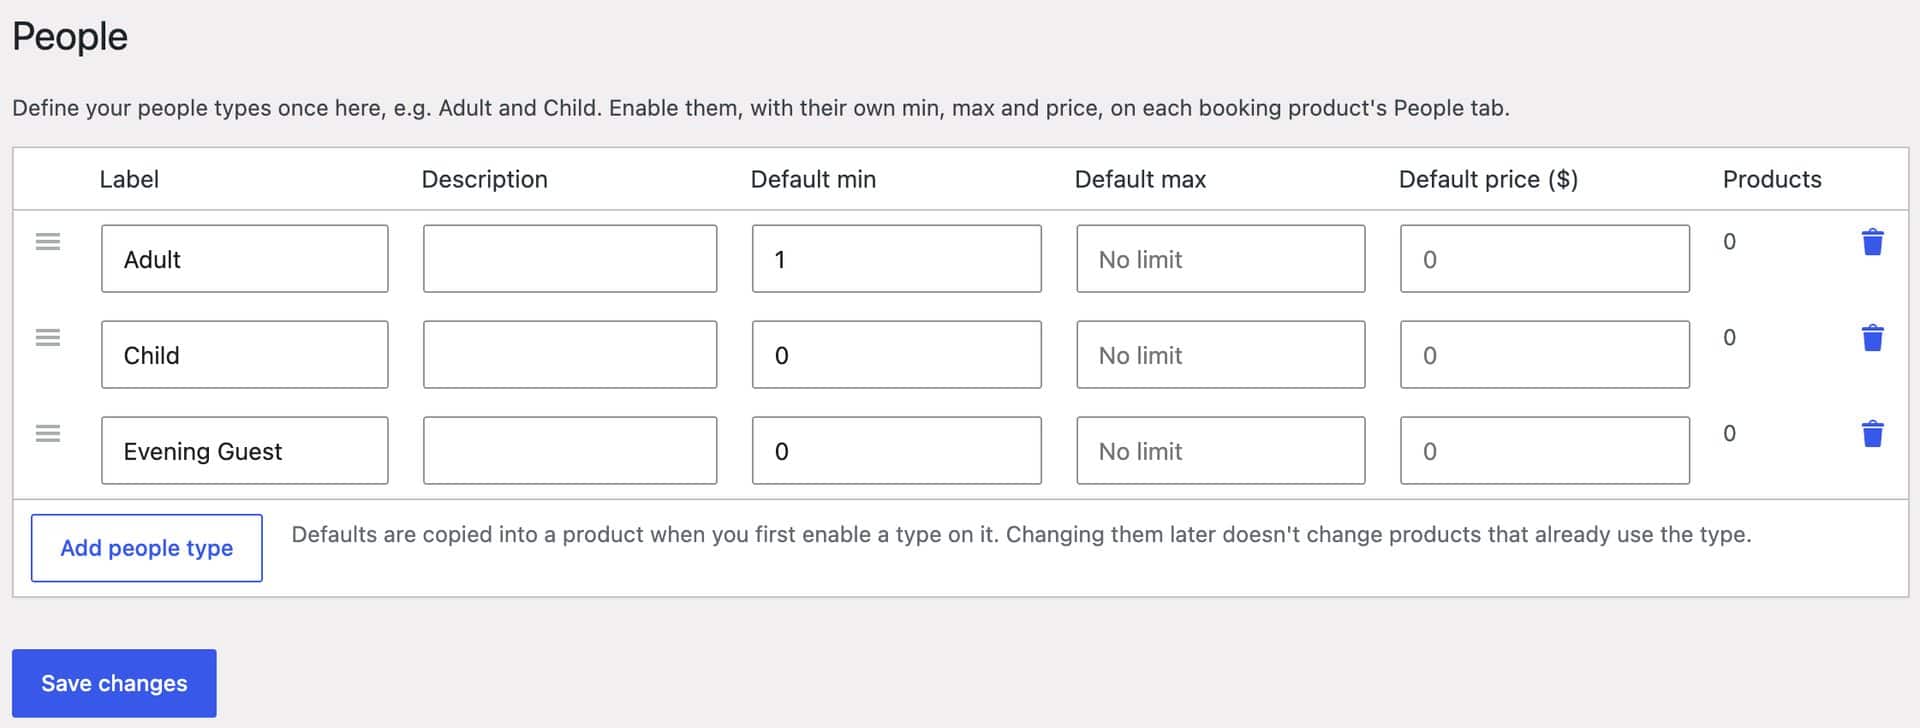
Your people types are shared across all your products, so you only need to create them once. Now let’s add them to the venue:
- Edit your venue product and click the ‘People’ tab in the ‘Product data’ section
- Check ‘Enable people’
- Enter 150 in the ‘Max people per booking’ field to match your capacity
- Select ‘Once per booking’ in the ‘Charge standard price’ field
- Check ‘Enabled’ next to Adult, Child and Evening guest
- Enter a ‘Price’ for each type, for example $65 for Adult, $30 for Child and $40 for Evening guest
- Select ‘Once per booking’ in the ‘Price basis’ field for each type
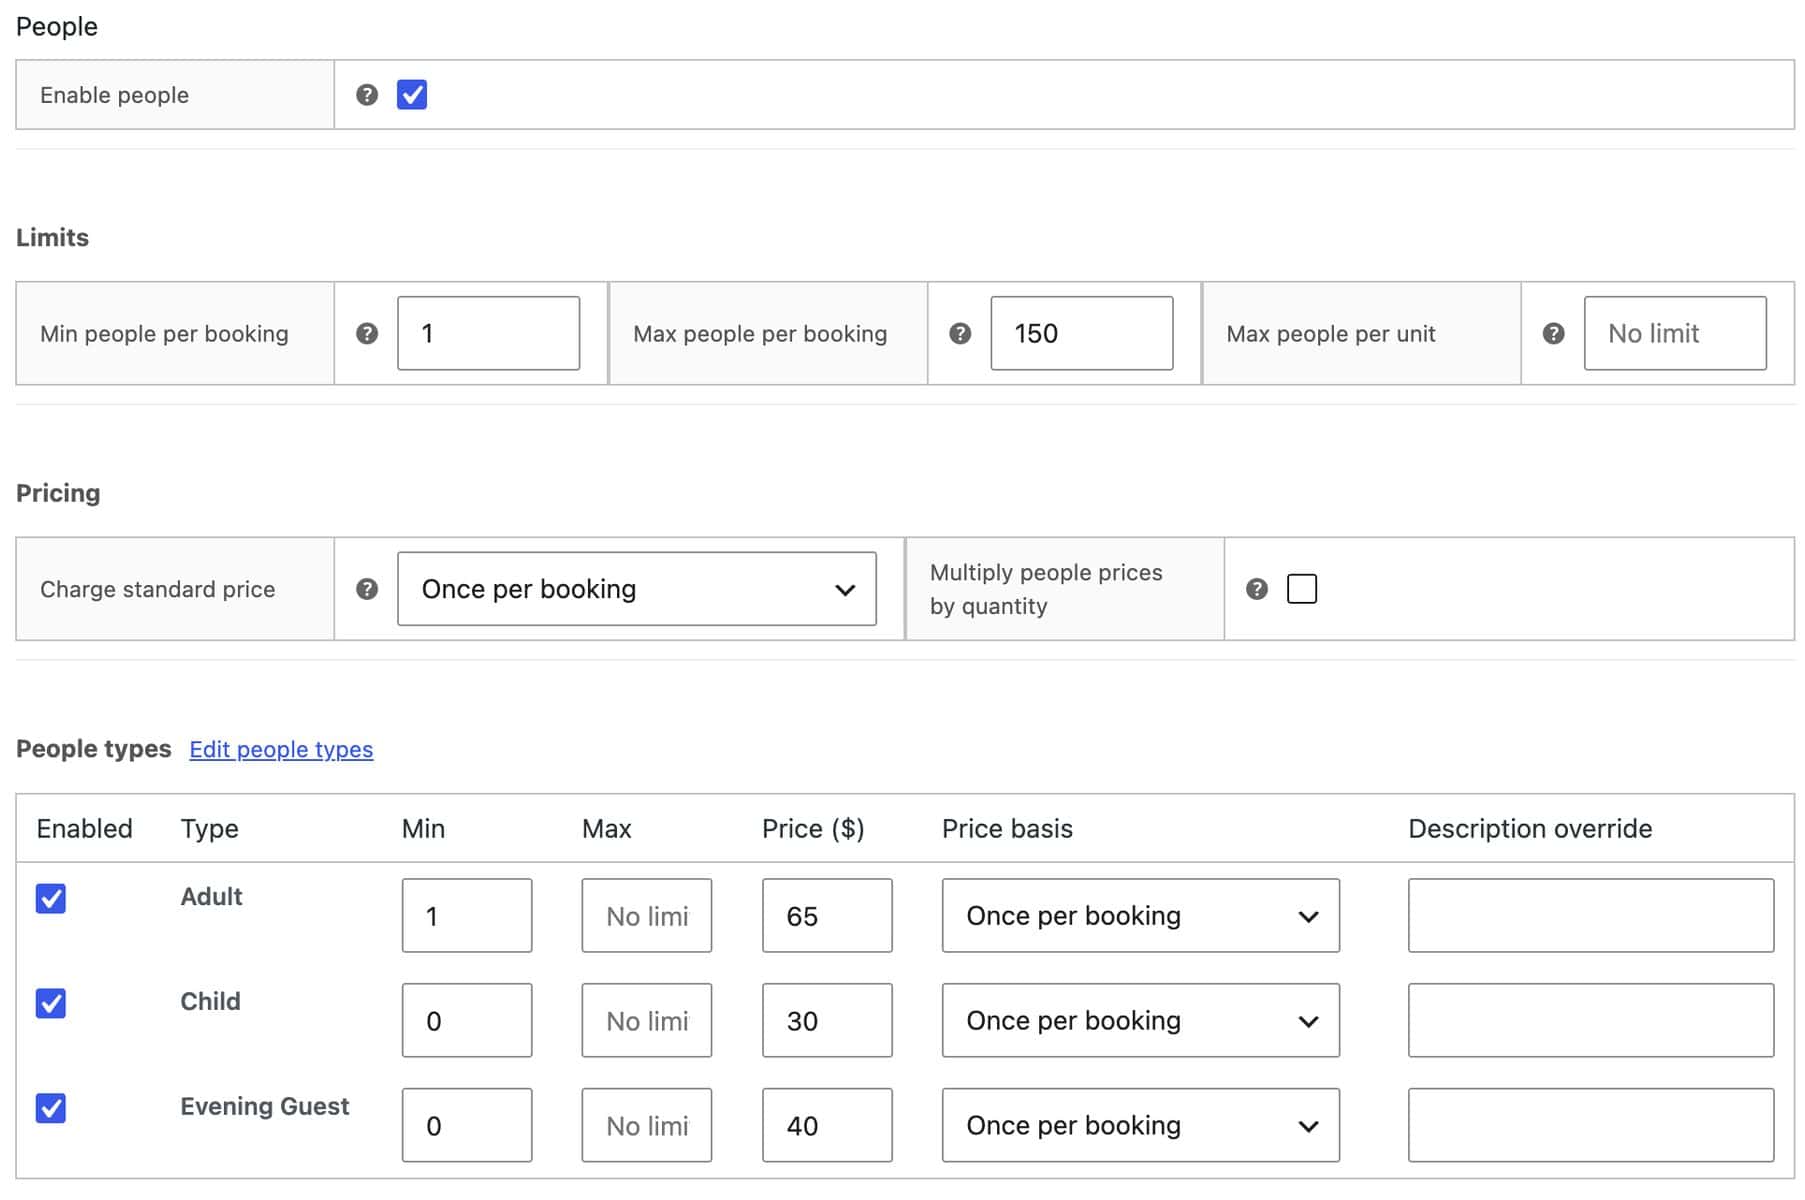
‘Once per booking’ in the ‘Charge standard price’ field means the hire fee isn’t multiplied by the number of guests. It’s still charged for each day booked, so a two-day wedding weekend pays the hire fee twice.
Choosing ‘Once per booking’ as the price basis charges each guest once per event. The alternative, ‘Per booking unit’, would multiply each guest’s price by every day or hourly slot booked.
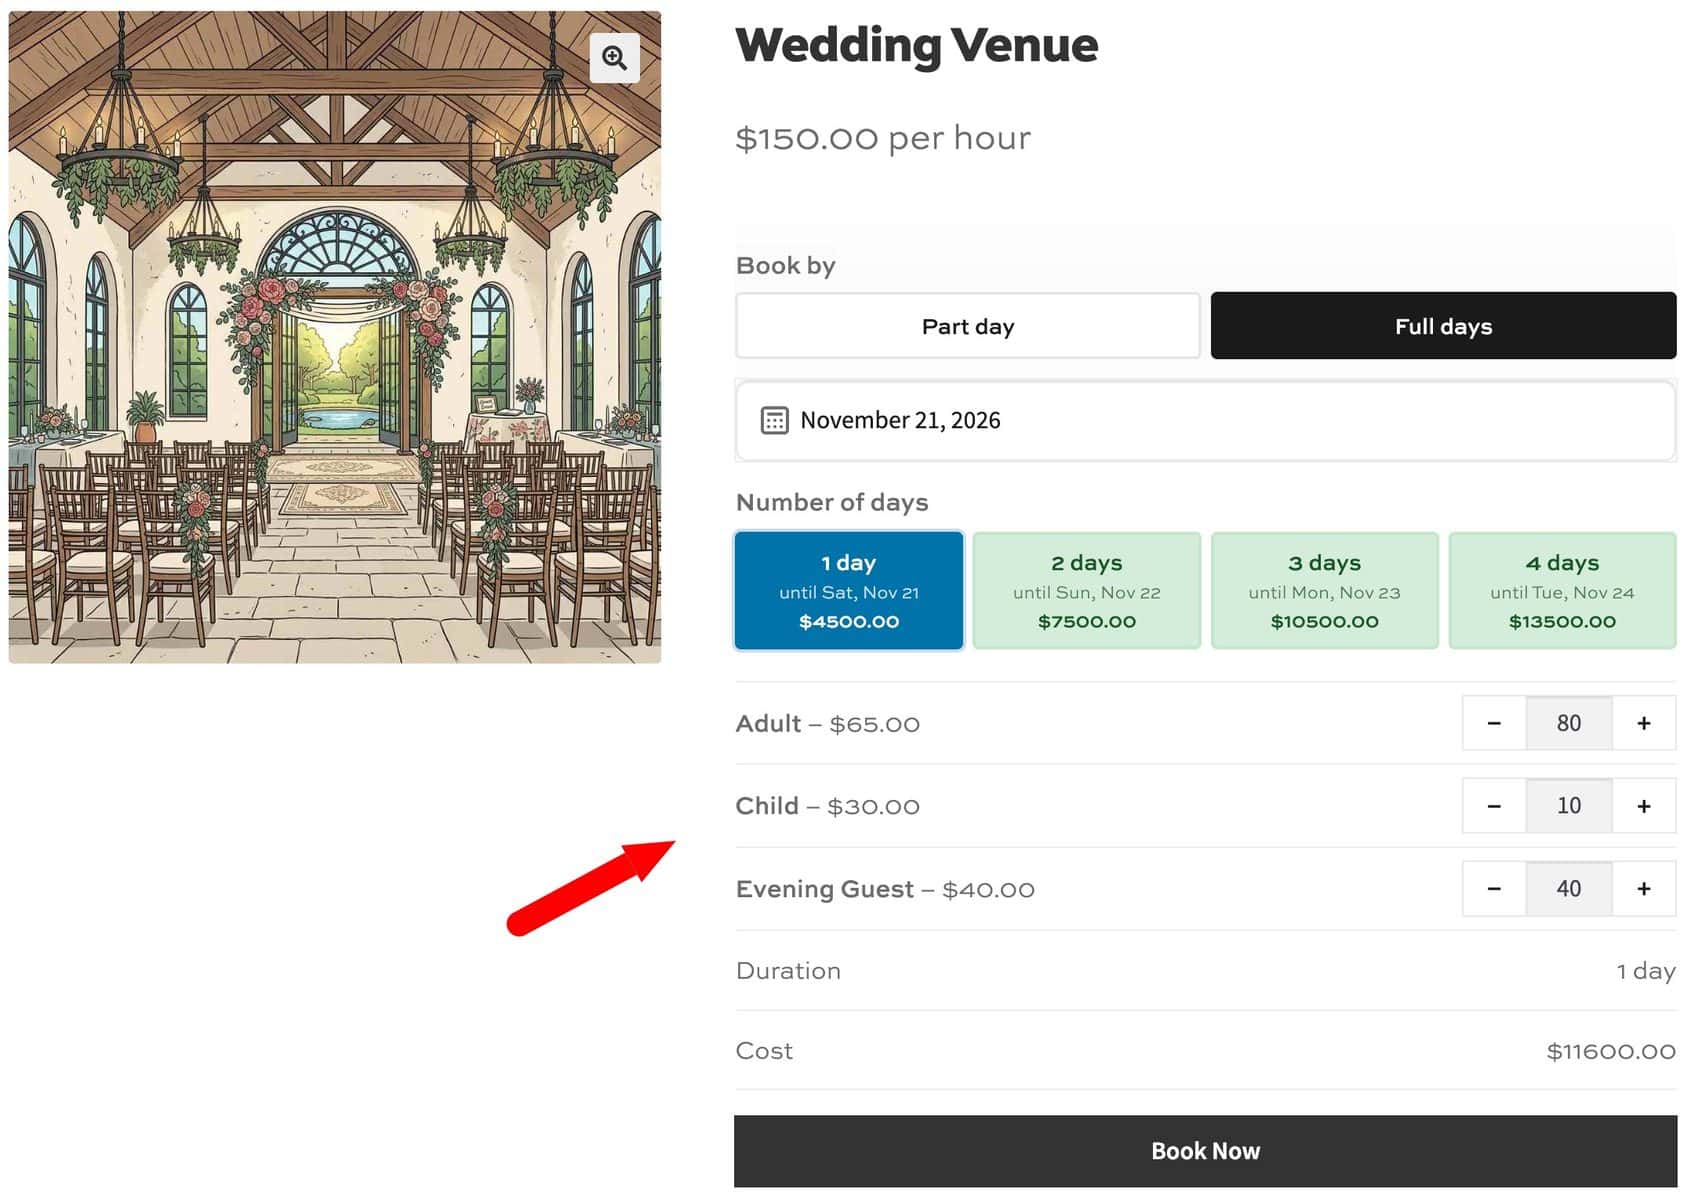
For example, a peak season wedding with 80 adults, 10 children and 40 evening guests costs $4,500 + $5,200 + $300 + $1600 = $11,600.
Save your product. Customers now see a field for each type of guest, with plus and minus buttons and the price beside it. The total updates as they change their numbers, and they can’t add more guests than your venue can hold.
Step #8: Add catering and extras with Product Add-Ons Ultimate
Most venues sell more than just the space. With WooCommerce Product Add-Ons Ultimate, you can add catering, entertainment and other extras directly to the booking form. It’s compatible with all themes and page builders, and it integrates with Bookings for WooCommerce.
Add-on fields can be priced per person, with a different price for each type of guest. Let’s look at how to add a couple of example options. You can add as many or as few as you like.
Example #1: An evening buffet priced per person
- Click the ‘Product Add-Ons’ tab in the ‘Product data’ section and add a checkbox field called ‘Evening buffet’
- Enter 12 in the field’s price
- Enable ‘Price per person?’
- Enter 8 as the price for Child, and leave the other types blank to use the field’s price
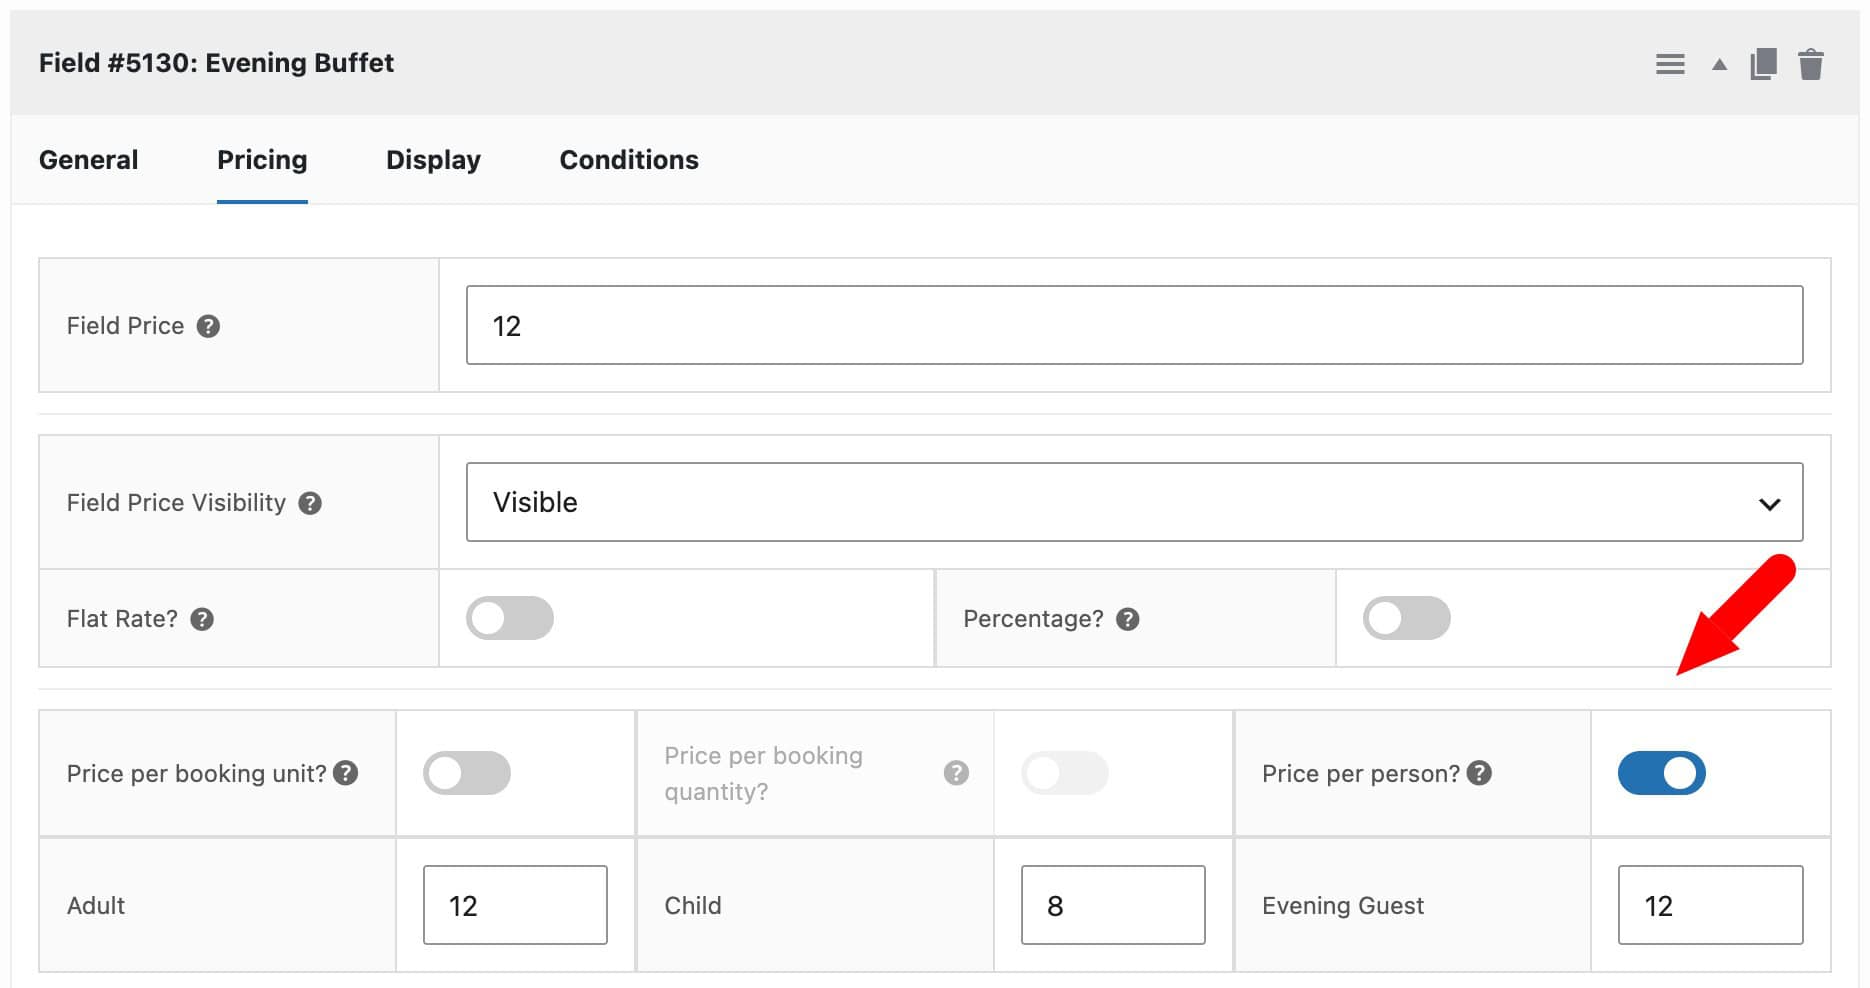
With 80 adults, 10 children and 40 evening guests, the buffet adds $1,520 to the booking. Leave ‘Price per booking unit?’ unchecked so the buffet isn’t charged for every day or slot.
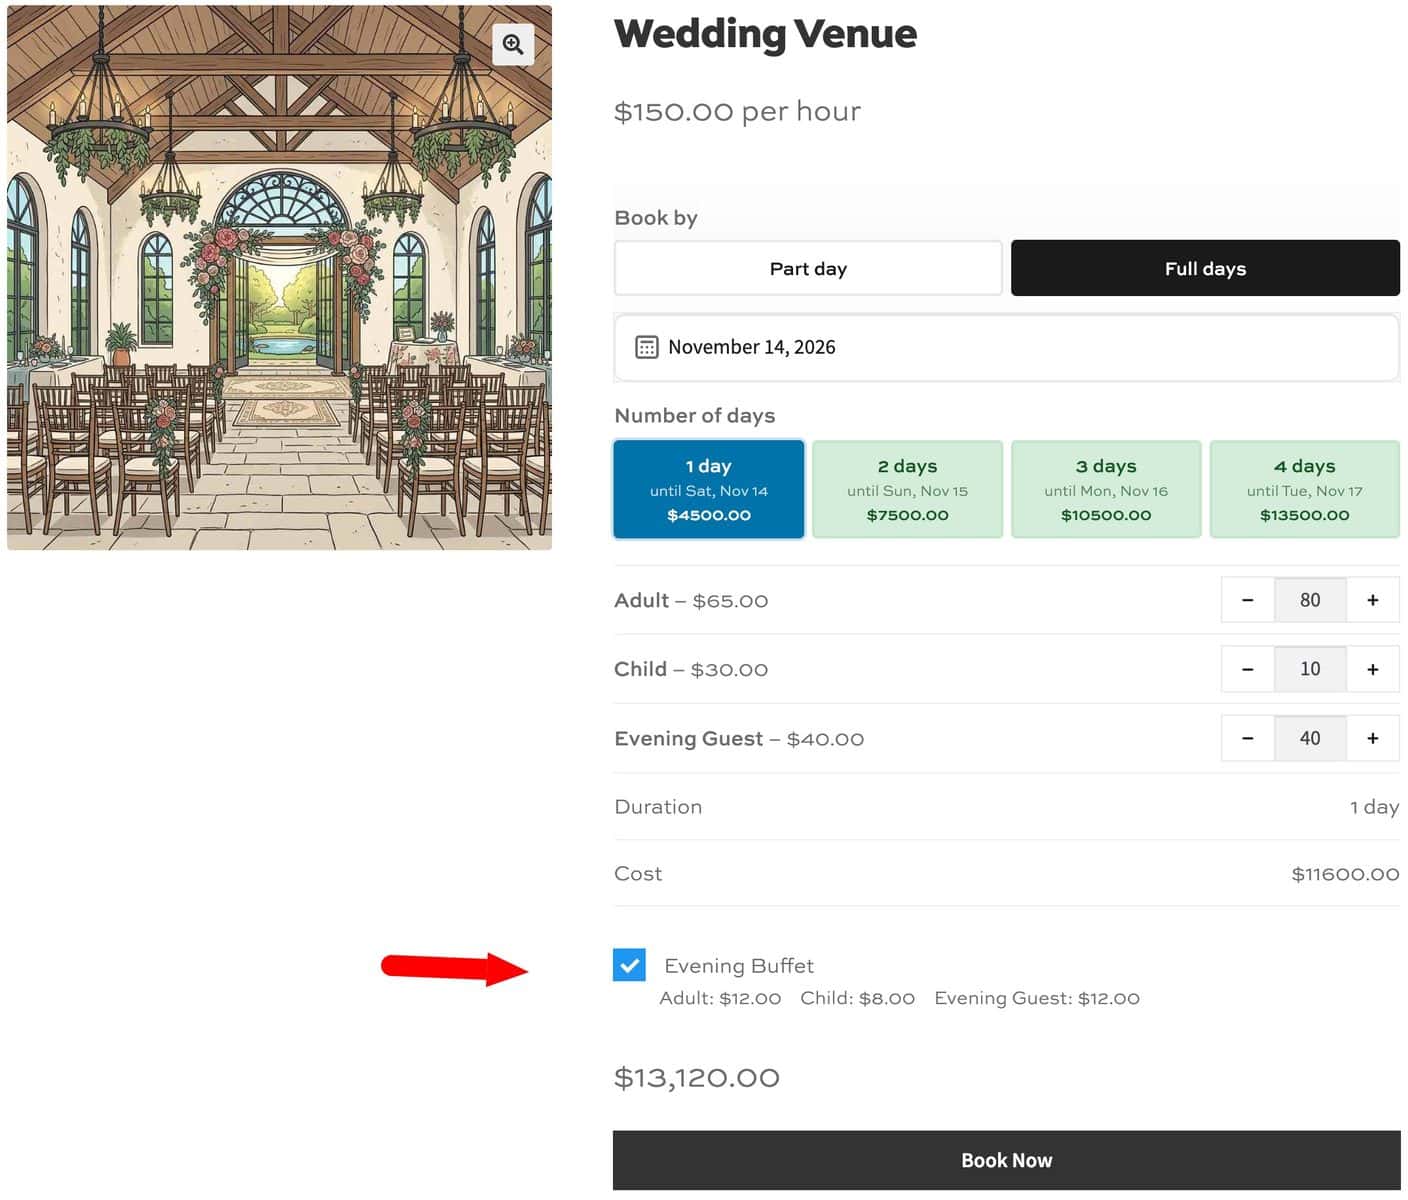
Example #2: Flat-rate extras
Add fields for extras that cost the same however many guests attend, such as a DJ, a late license or a ceremony setup fee. Leave ‘Price per person?’ unchecked so each one is charged once.
Save and publish your product. Couples can now choose their date, enter their guest numbers and add catering and extras, with the total updating as they go.
Step #9: Optionally take a deposit
Venue bookings are high-value and often made months ahead, so most venues take a deposit to secure the date. WooCommerce Deposits and Part Payments lets customers pay part of the price now and the rest later, and it works with all bookable products.
Once you’ve installed the plugin in the same way as Bookings for WooCommerce:
- Go to WooCommerce > Settings > Deposits
- Select ‘Some Products’ in the ‘Accept Deposits?’ field
- Choose a fixed amount or ‘Percentage’ in the ‘Deposit Type’ field, then enter a value in the ‘Deposit Amount’ field
- Select ‘Deposit Only’ in the ‘Default Payment Method’ field if every booking must start with a deposit
- Save your settings
Then edit your venue product, click the ‘Deposits’ tab and check ‘Enable deposits’. Optionally, set a ‘Remaining balance due date’ and a ‘Reminder date’ so couples are reminded to pay before their wedding.
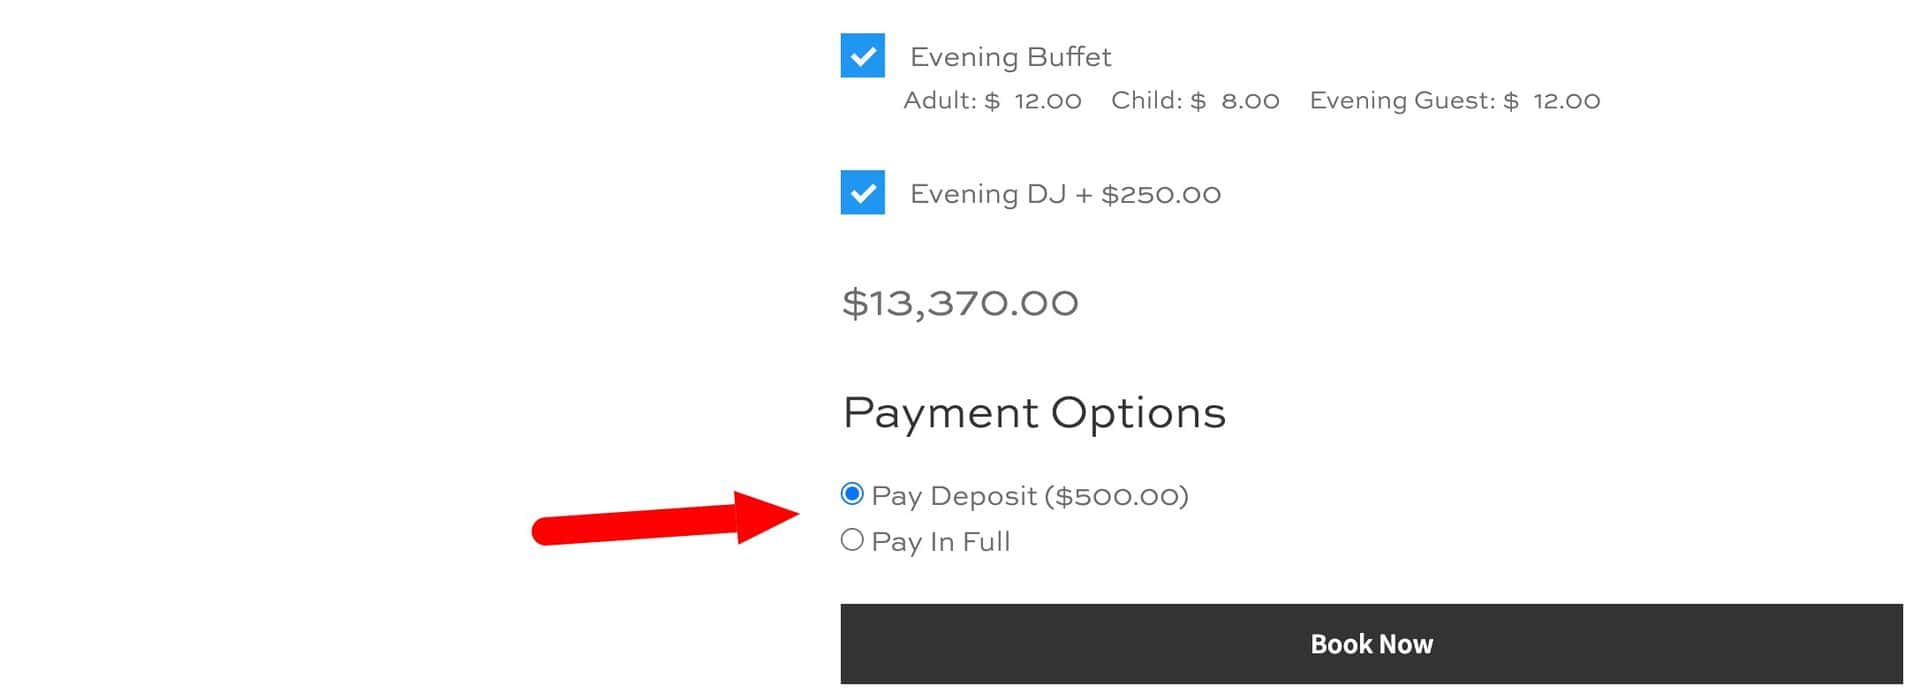
When a customer books, the plugin creates one order for the deposit and a second, scheduled order for the balance. Customers can pay the balance from their account at any time. Our guide to WooCommerce bookings deposits covers every option, including installments.
That’s how to create a venue booking product in WooCommerce using the Bookings for WooCommerce plugin.
How do you manage venue bookings?
Once your venue bookings are coming in, you’ll want to be able to manage them from the back end.
Manage orders
Every booking appears as part of a standard WooCommerce order under WooCommerce > Orders. You can view customer details, take payment and issue refunds in the same way as any other order.
Guest numbers appear on the order screen and in order emails, for example ‘Adult: 80’. Under Bookings, the list of bookings also has a ‘People’ column showing the total and the breakdown.
View bookings on the Dashboard
Go to Bookings > Dashboard to see availability, occupancy and revenue across your venues. Click any day to open a panel showing each booking on that date, including its guest numbers.
Add bookings manually
To take a booking by phone or after a viewing, go to Bookings > Add Booking. Select the venue, pick the date and enter the number of each type of guest.
The price in the Dashboard’s ‘Add booking’ window doesn’t include people prices, so check it and edit it before saving. Whole-day bookings on a mixed duration product can’t be created from the back end, so place the order on the product page instead.
Export guest numbers for your caterer
Go to Bookings > Export, enter a start and end date and click ‘Export CSV’. The file includes a column for the total number of people and one for each type, so you can send accurate adult, child and evening guest numbers to your caterer.
Send automatic reminders
Bookings for WooCommerce can send emails before and after a booking starts or ends. Enable them under WooCommerce > Settings > Emails.
Add the {people} placeholder to an email’s ‘Content’ setting to include each type of guest. For example, you could email couples a few weeks before their wedding to confirm their final numbers.
Bonus #1: Let couples request a quote first
Some couples want to talk through their plans before committing. WooCommerce Request a Quote adds an ‘Add to Quote’ button so they can send you their date, guest numbers and extras for a price instead of booking straight away.
To set it up:
- Go to WooCommerce > Settings > Request a Quote
- Select ‘Specific Products’ in the ‘Enable Quotes on’ field
- Edit your venue product and check ‘Enable Request a Quote’
- Optionally, check ‘Display the Add to Cart button’ so couples can choose between booking now and asking for a quote
Each request arrives under WooCommerce > Orders as a ‘Quote request’. Adjust the prices if you need to, then choose ‘Send updated quote to customer’ from the ‘Order actions’ dropdown.
The couple receives a ‘Checkout now’ link to pay the quoted price, and the quote becomes a standard order. Our Request a Quote guide covers the full setup.
WooCommerce venue booking – recap
In this article, we looked at how to take venue hire bookings in WooCommerce. We created a wedding and events venue that can be booked by the day or by the hour, with a buffer for teardown, peak season pricing, per-head prices for adults, children and evening guests, catering and extras priced per person and a deposit at checkout. We also looked at how to manage bookings, export guest numbers and let couples request a quote.
Bookings for WooCommerce gives you hourly and daily hire, capacity limits, people types with their own prices and live availability, all through your existing store.
Bookings for WooCommerce is compatible with all themes and page builders, including Astra, Flatsome and Woodmart, and page builders like Elementor and Divi. If you have any questions, our world-class support team is on hand to help. And it’s backed by a 14-day money-back guarantee, so you can try it risk-free.
Never miss a booking - let your customers book 24/7