How to set up an escape room booking system in WooCommerce
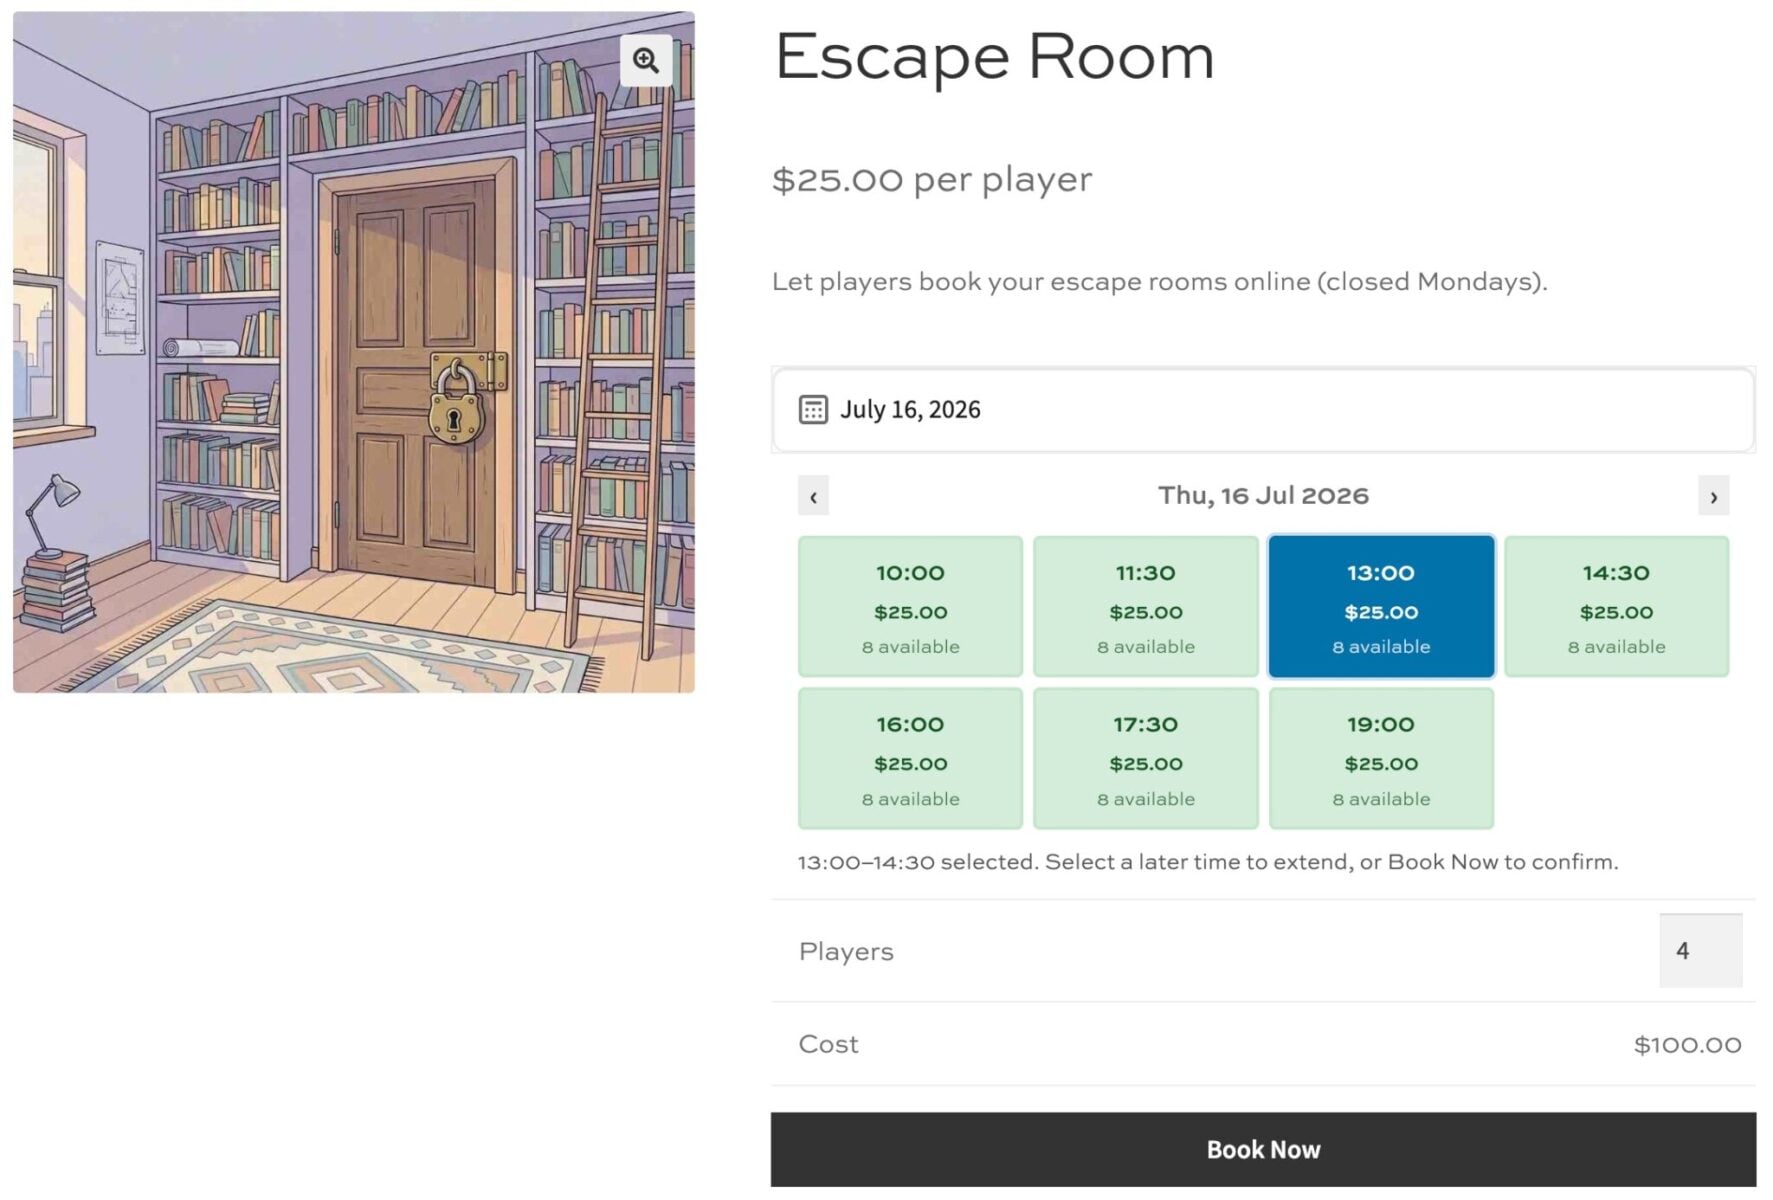
This tutorial shows you how to sell time-slot bookings for your escape rooms directly through WooCommerce, with group capacity, session timings, and an optional security deposit all handled automatically.
After completing this tutorial:
- Customers will be able to:
- Pick a date and an available time slot for the room they want to play
- Book as a private group or join a shared session, depending on how you set the room up
- As the store owner or admin, you’ll be able to:
- Set a different capacity, price, and schedule for each room
- Control exactly when each room is open, including day-specific session times
- View every booking on a single dashboard and add walk-in or phone bookings manually
As a bonus, we’ll also look at how to:
- Collect a refundable security deposit at checkout
In this tutorial, we’ll assume that you already have WordPress and WooCommerce installed and ready to go. We’ll use the Bookings for WooCommerce plugin to handle the booking logic.
Event bookings made up 15.2% of the global online booking systems market in 2025, according to Dataintelo. But dedicated booking SaaS tools can work out expensive once you factor in monthly fees and commission on each booking. Running your booking system through WooCommerce keeps everything – bookings, payments, and customer data – on your own site, with a more cost-effective plugin purchase instead of a monthly SaaS subscription.
Once you’ve purchased Bookings for WooCommerce:
- Download the plugin’s zip file by clicking on the link on your order confirmation screen or in your welcome email. You’ll receive the email automatically a few seconds after you’ve completed the purchase
- Go to Plugins > Add New in your WordPress dashboard
- Click on the ‘Upload Plugin’ button
- Drag and drop the plugin’s downloaded zip file into the ‘Choose File’ area and click ‘Install Now’
- When the plugin has uploaded, click the ‘Activate Now’ button
Quick how-to guide to create an event booking in WooCommerce
Here’s a quick overview of how to create event bookings in WooCommerce.
- Create a product for each room
Set up a separate bookable product for every escape room so each one gets its own calendar and capacity.
- Set the maximum number of players
Decide whether you’re charging a flat rate per room or a per-person rate with shared capacity.
- Enable time slots
Set your session length, buffer time, and opening hours so customers can pick a slot.
- Add day-specific times (optional)
Override hours on individual days, e.g. later starts on weekends.
Now let’s walk through each of these steps in detail. There’s also a demo product here to see it all in action.
Step #1: Create a product for each escape room
Create one bookable product per room. This gives each room its own calendar, capacity, and time slots, so a booking for ‘The Secret Door’ never blocks availability for ‘Pharaoh’s Curse’.
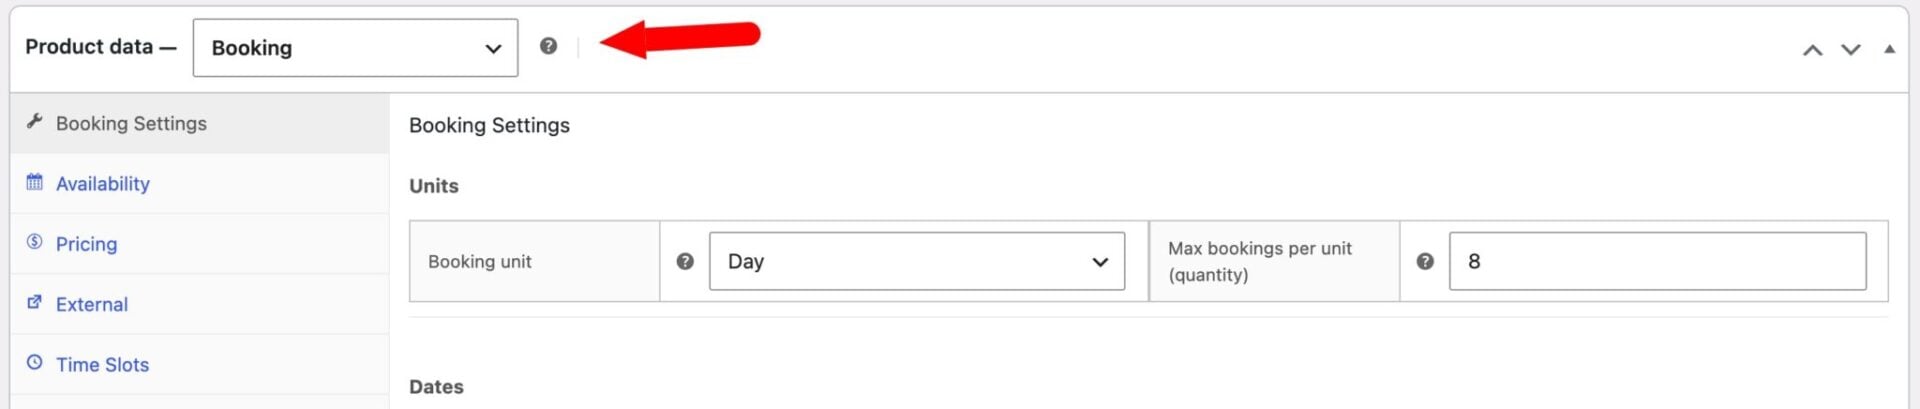
Go to Products > Add New and give your product a name, e.g. ‘The Secret Door’. In the ‘Product data’ section, select ‘Booking’ from the ‘Product type’ dropdown. Repeat this for every room you offer.
Step #2: Set the booking unit
The ‘Booking Settings’ tab in the ‘Product data’ section is where the ‘Booking unit’ lives, and it defaults to ‘Day’ – exactly what you need for an escape room, so there’s nothing to change here. This is what makes time slots available later in the setup, since slots divide a single day into fixed windows.
You now have a day-based bookable product for your room, ready for capacity and timing.
Step #3: Set the maximum number of players
How you handle group size depends on whether you sell the room as a private hire or let smaller groups share a session.
Option #1: Charge a single price for the room
If you rent the whole room out to one group at a time, you don’t need a quantity or participant field at all. Set ‘Max bookings per unit’ to ‘1’ so only one group can book each time slot – you’ll set your flat price for the room in the ‘Time Slots’ section a little later.
Mention your room’s recommended group size (e.g. ‘best for 4–8 players’) in the product description, since this option doesn’t enforce a headcount – it simply reserves the whole slot for whoever books it.
Option #2: Set a room capacity and allow smaller groups to share
If you’re happy to mix smaller groups into the same session, set ‘Max bookings per unit’ to your room’s total capacity, e.g. ‘8’. You’ll set the ‘Price per slot’ to a per-person rate in the ‘Time Slots’ section a little later, so the cost is multiplied by the quantity each customer selects.
A group of three and a group of four can now book the same slot, and the slot closes automatically once the combined total reaches your capacity.
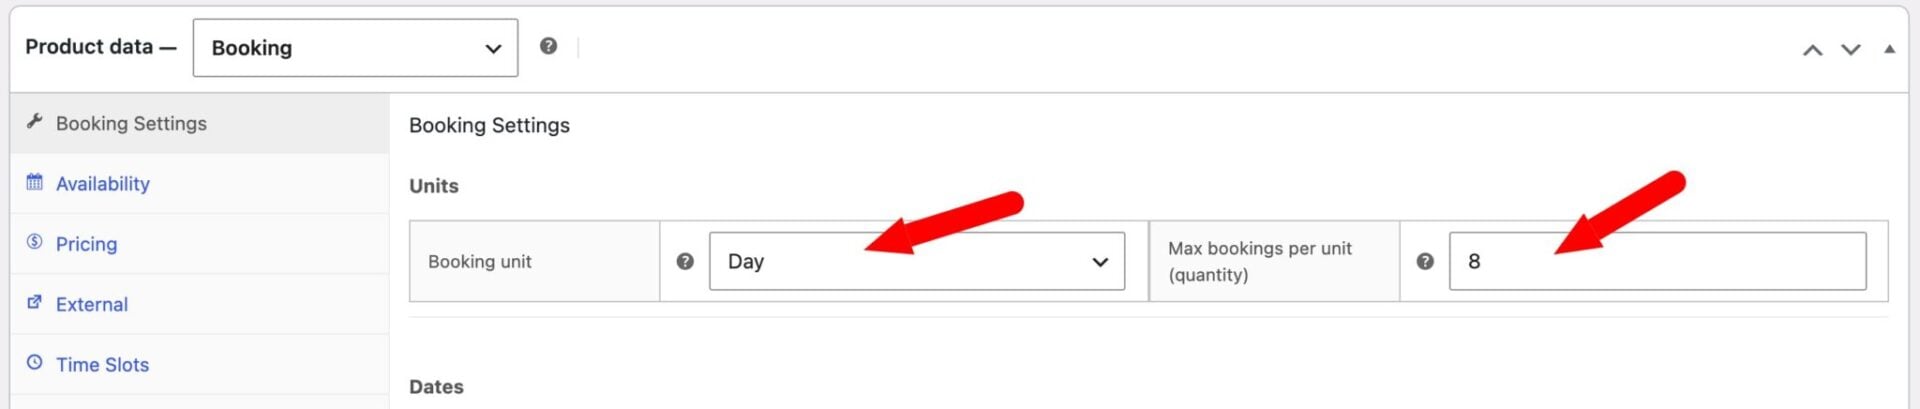
Either way, you now have a room with its group size controlled. Next, let’s add the time slots.
Step #4: Enable time slots and set your session length and hours
Open the ‘Time Slots’ tab and check ‘Enable time slots’. A new set of options appears once this is switched on.
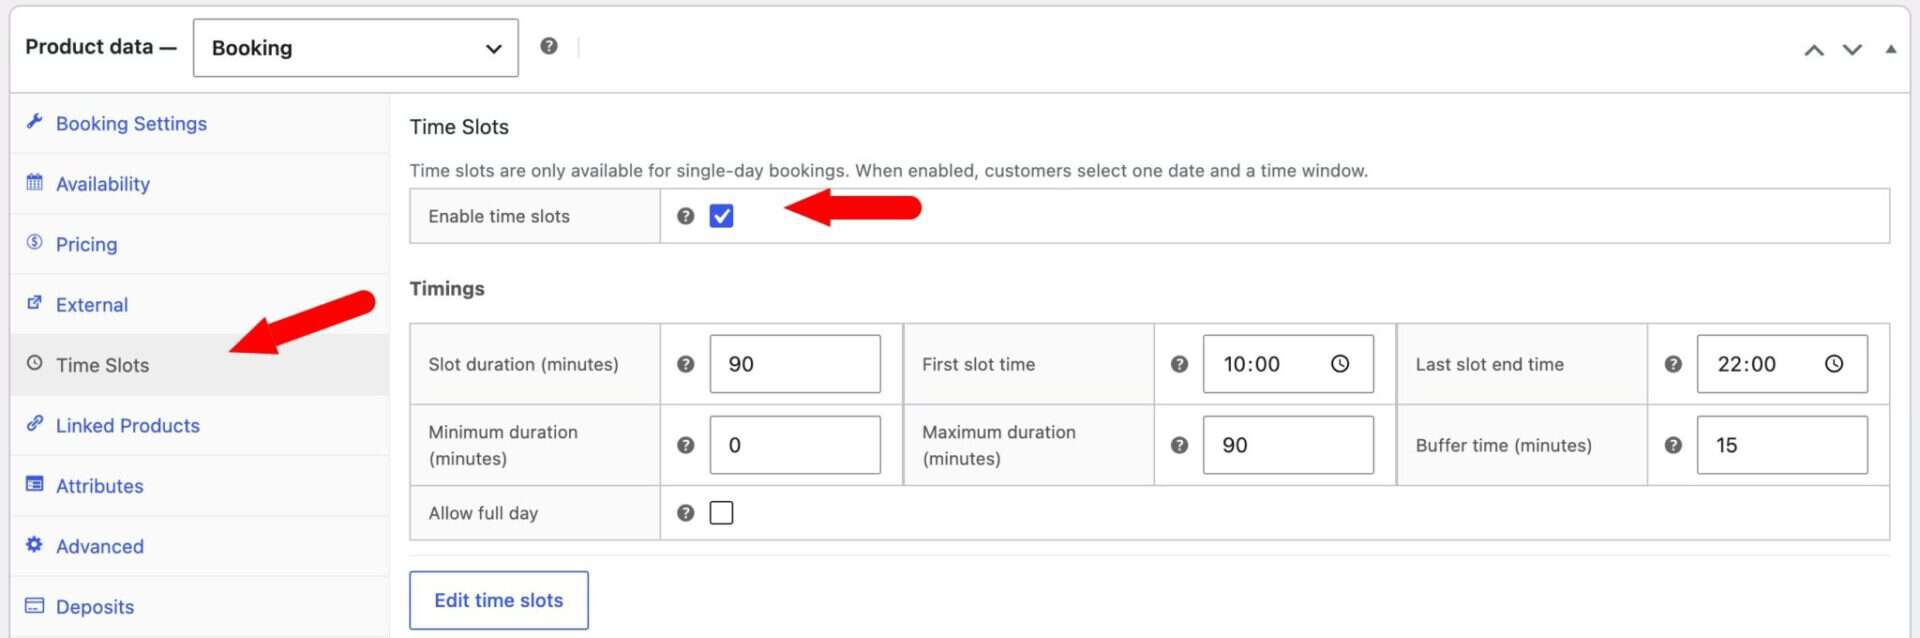
Set your session length
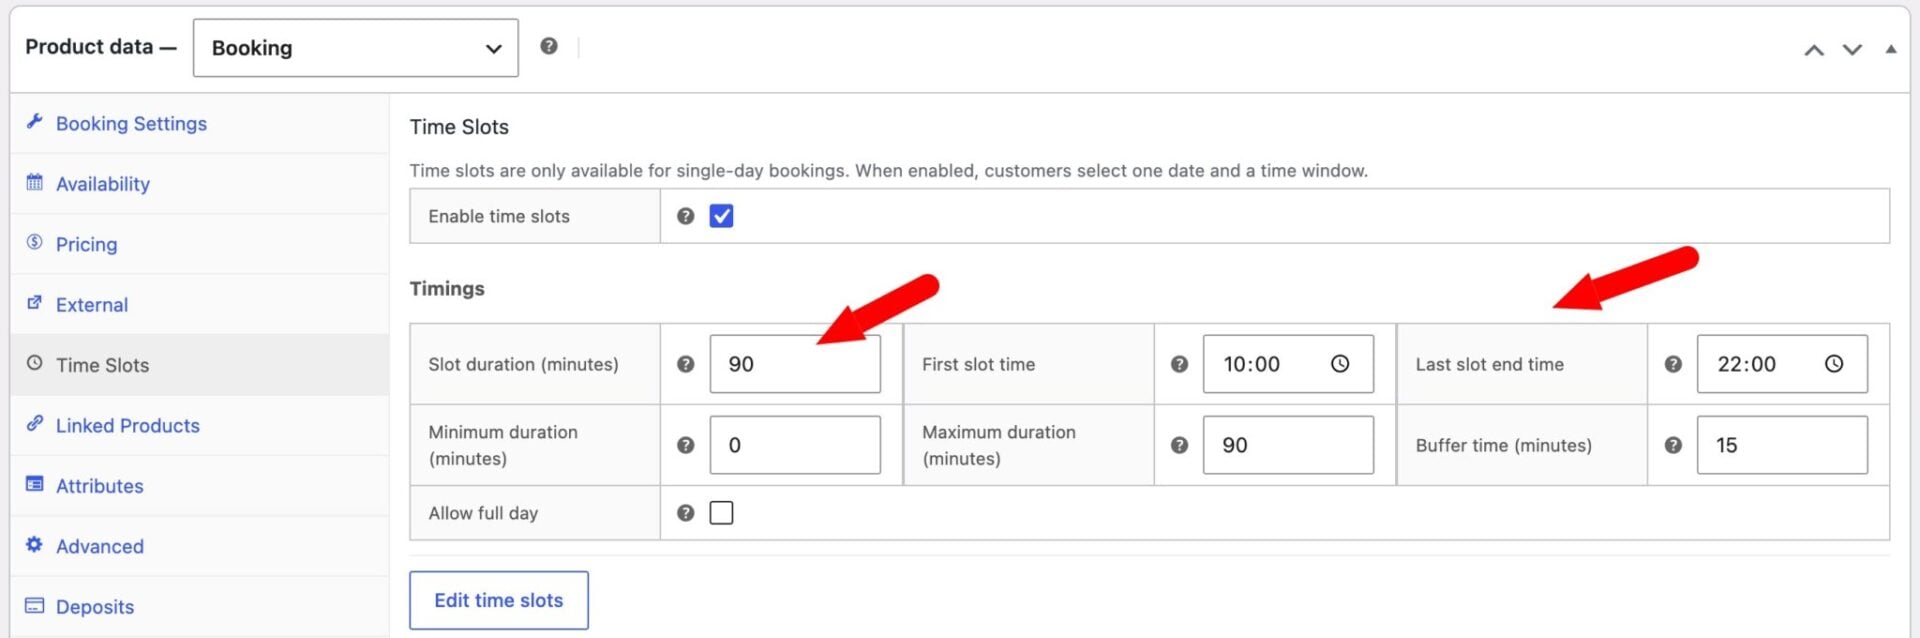
Set the ‘Slot duration’ field to match your room’s playtime in minutes – for example, ’90’ for a 90-minute room. If you need time to reset props and clues between groups, add a ‘Buffer time’ too, e.g. ’15’ minutes, so the next slot doesn’t start until the room is ready.
Set ‘Maximum duration’ to the same value as ‘Slot duration’ – ’90’ in this example. This stops customers from booking back-to-back sessions in one go, so each group only ever books a single slot.
Set your opening hours
Set your ‘First slot time’ and ‘Last slot end time’ fields to define your opening hours, e.g. ’10:00′ and ’22:00′.
Set your price
Set the ‘Price per slot’ field to your rate for the slot – a price for the entire room if you went with Option #1 in the previous step, or a per-person rate if you went with Option #2, since that’s multiplied by the quantity each customer selects.

Choose how customers select a slot
Under ‘Time slot view’, choose ‘Time Picker’. Since your session length is fixed, customers don’t need to pick a duration – a visual grid of the day’s available slots is the quickest way for them to see what’s free and select a start time.
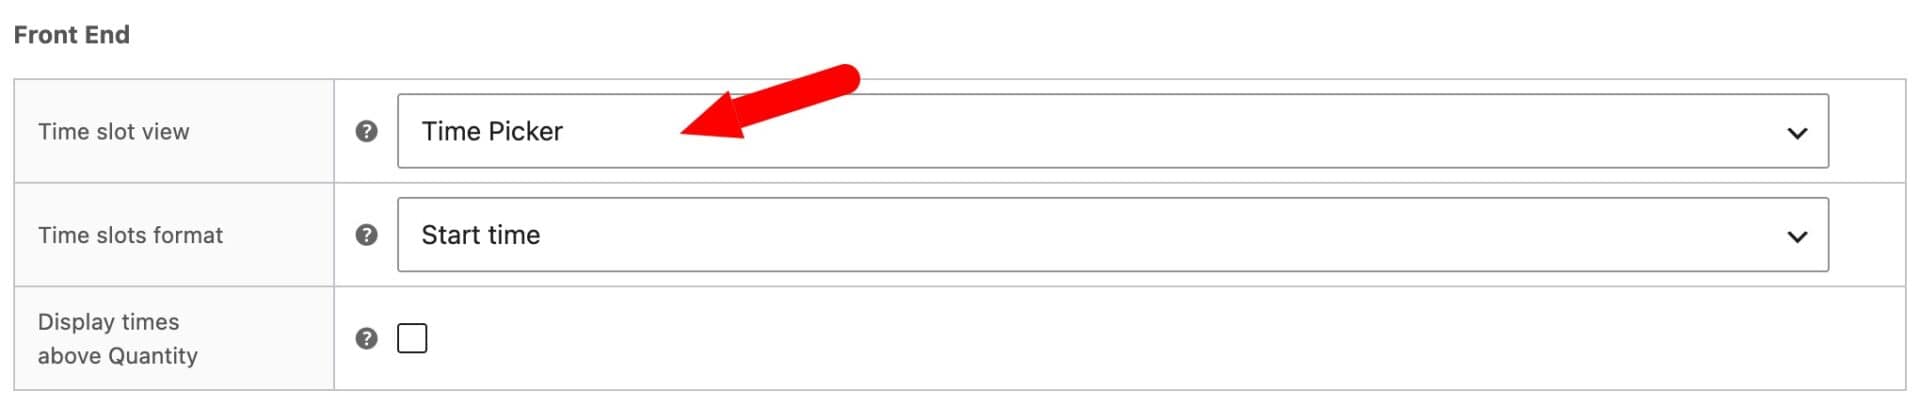
Save your settings.
You now have a room open for bookings across the day, split into fixed 90-minute sessions with a reset window built in.
Step #5: Set day-specific times (optional)
Your escape room venue might run a different schedule on weekends or add a late slot on Fridays. Click ‘Edit Time Slots’ in the ‘Timings’ section to open a table with one row per session.
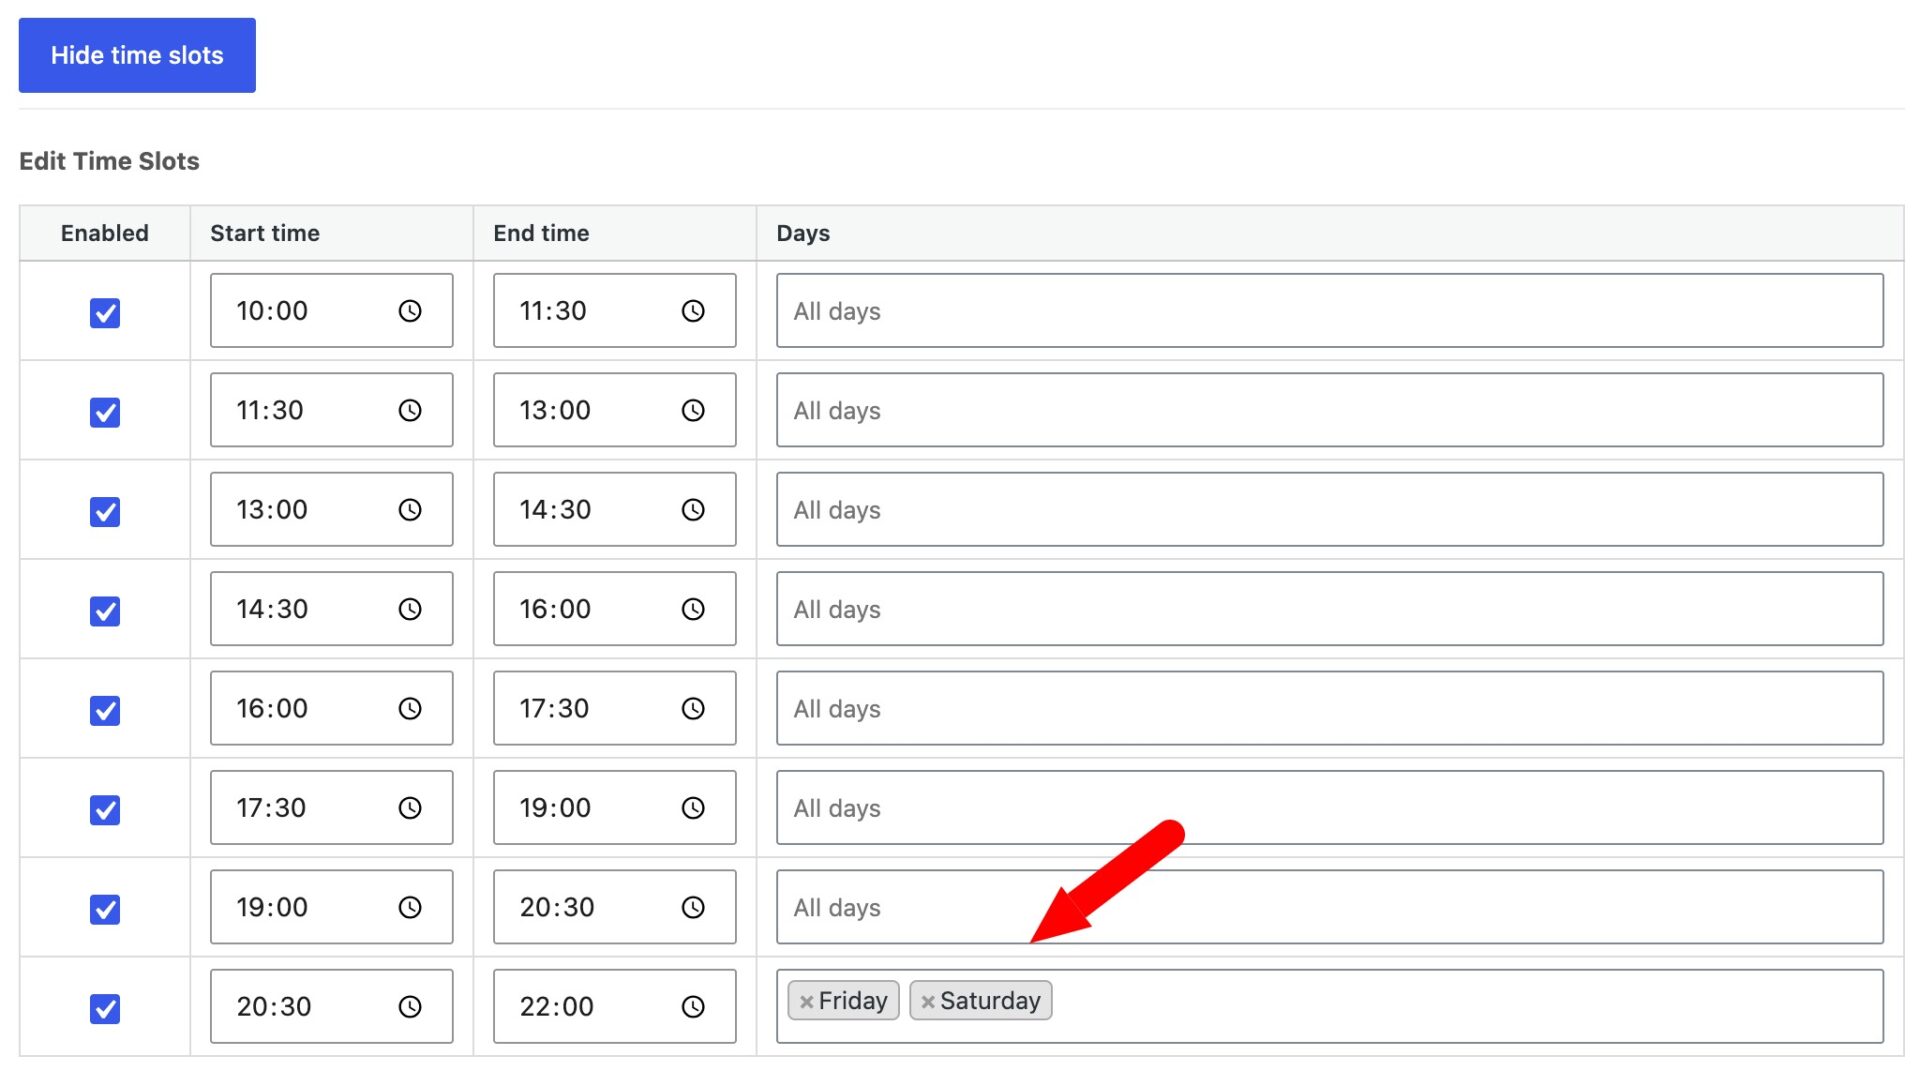
From here, you can disable sessions you don’t need, override individual start and end times, and use the ‘Days’ column to restrict a session to specific days of the week. So you could add a late 22:00 slot on Fridays and Saturdays only, or close the room on Mondays for maintenance.
Now let’s look at an optional way to fine-tune pricing and availability for individual slots.
Step #6: Set different availability or price per slot (optional)
Sometimes you’ll want to charge more for peak-time sessions, or cap availability on a specific date without changing your whole schedule. The ‘Per-slot overrides’ table, further down the ‘Time Slots’ tab, lets you do this without touching your default settings.
Click ‘Add override’ to add a row. Set the ‘Start time’ and ‘End time’ the override applies to, and optionally a ‘Start date’ and ‘End date’ to limit it to a specific period – leave the dates blank to apply it indefinitely. Then set an ‘Availability’ figure to cap how many bookings that slot can take, a ‘Price per slot’ to charge a different rate, or both. If two overrides overlap, the first matching row in the table takes priority.
Blocking out a session
To close a slot entirely – for a private hire, maintenance, or a public holiday – add an override for that slot’s start and end time, set the ‘Start date’ and ‘End date’ to the single day in question, and set ‘Availability’ to ‘0’. The slot will show as unavailable to customers on that date only, and reopen automatically the next day.
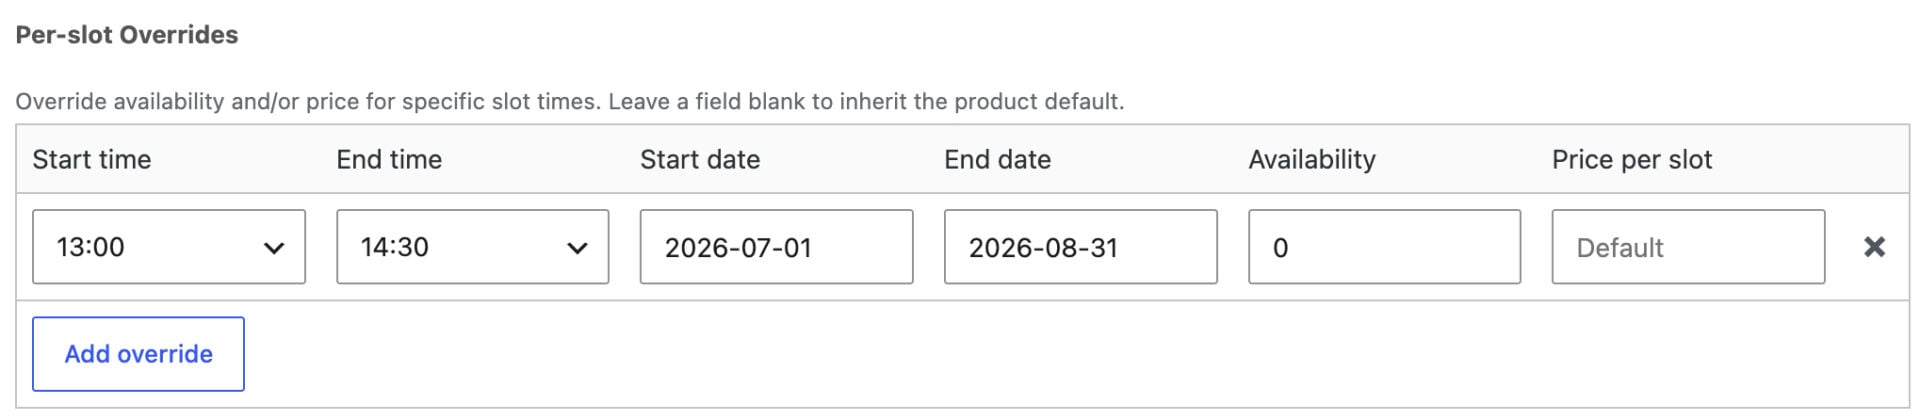
Adjusting availability for a single session
If you’re short-staffed or want to reduce capacity for one session without affecting the rest of your schedule, add an override for that slot with a lower ‘Availability’ figure, e.g. ‘6’ instead of your usual ‘8’, so only a smaller group can book that specific session.
Seasonal or peak-time pricing
To charge more for weekend evenings, school holidays, or any other peak period, add an override with a higher ‘Price per slot’ and a date range covering the period. For example, an override for the 20:00 slot with a higher price and a ‘Start date’ and ‘End date’ spanning the summer holidays. Add a separate row for each period or slot you want to price differently, since each override only covers the range you set.
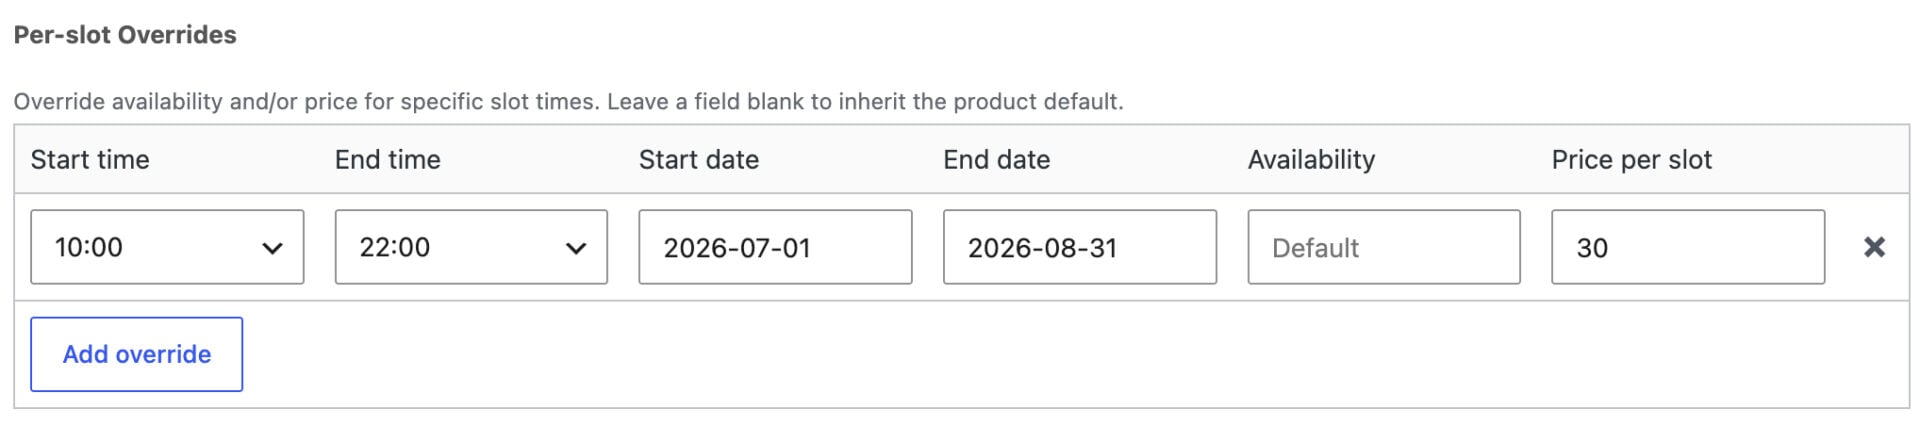
Closing on certain days of the week
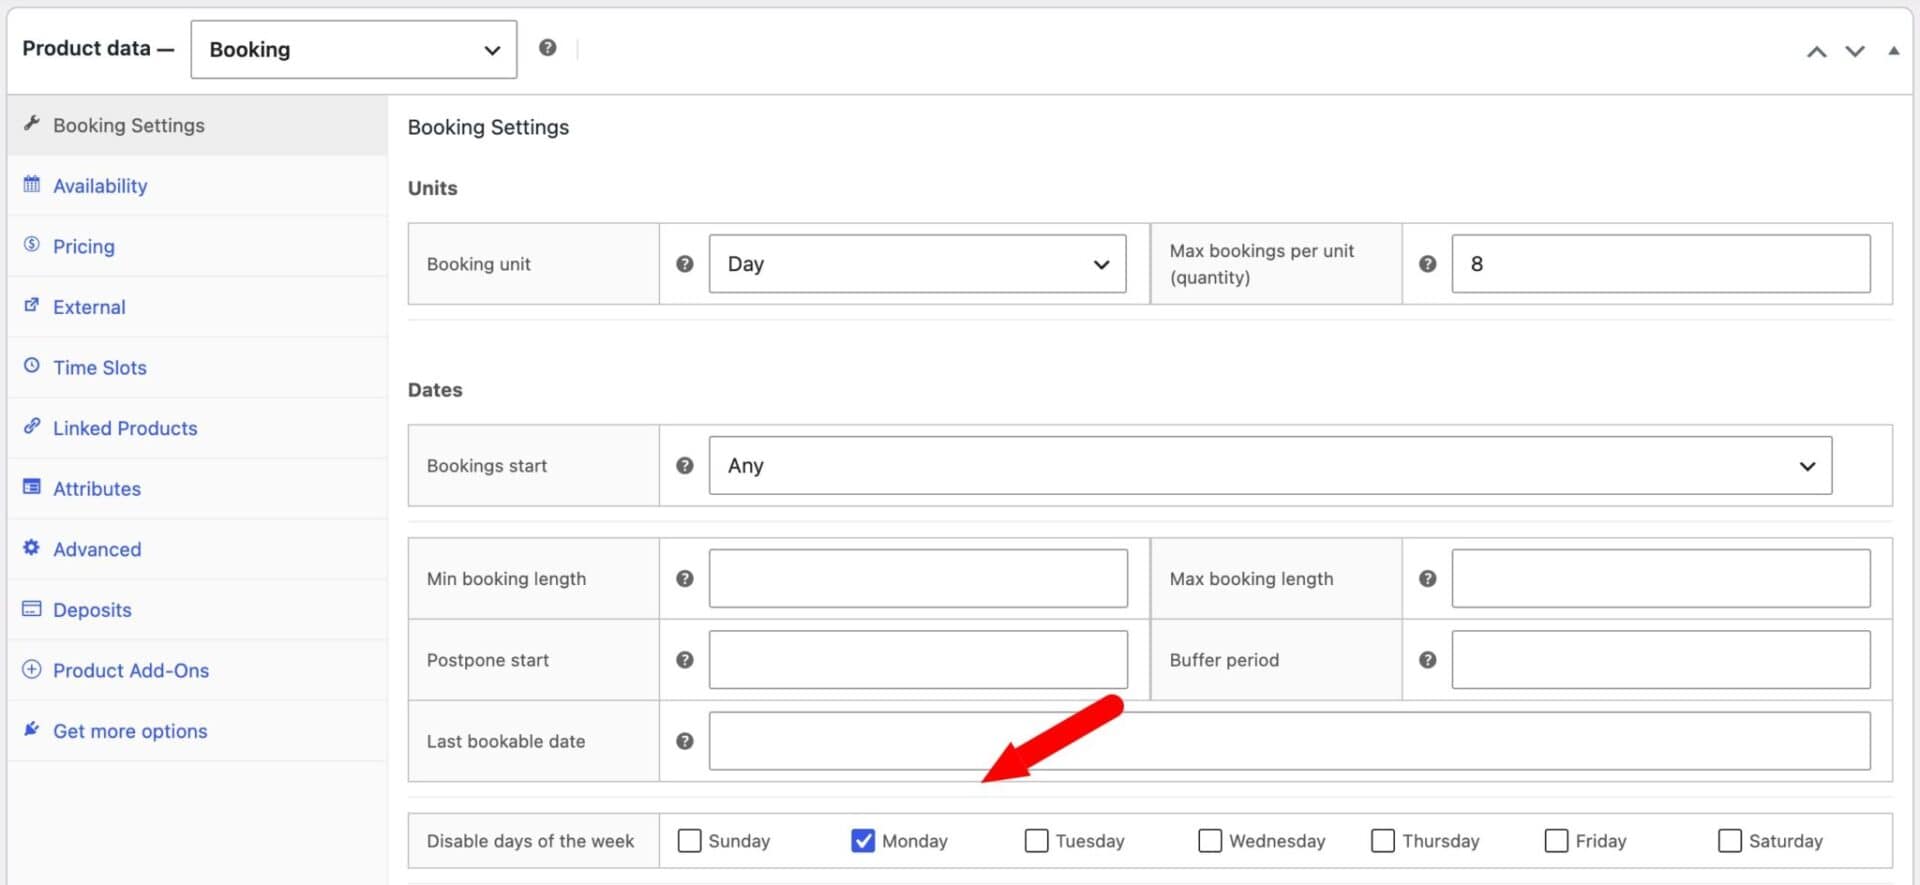
If your venue is closed every Monday(s), for example, you don’t need to override every Monday slot individually. Open the product’s ‘Booking settings’ tab and check the day under ‘Disable days of the week’. That day will be greyed out on the customer-facing calendar and can never be booked, no matter what your time slot settings say.
Publish your product. You now have a working escape room booking product where customers can pick a date, choose an available time slot, and pay online, while you stay in full control of the schedule.
Now let’s look at how to add an optional security deposit.
Bonus #1: Accept a security deposit
Escape rooms rely on props and puzzle equipment that need protecting, so it’s worth collecting a refundable deposit at checkout. This uses Bookings for WooCommerce alongside the Product Add-Ons Ultimate plugin, available together in the Bookings and Product Add-Ons Bundle.
Step #1: Create the deposit product
Go to Products > Add New and give the product a name, e.g. ‘Security Deposit’. Make sure the product type is set to ‘Simple product’, then enter your deposit amount in the ‘Regular price’ field – $50.00, for example.
Set ‘Catalog visibility’ to ‘Hidden’ so the deposit doesn’t appear as a standalone product in your shop. Click ‘Publish’ and make a note of the product ID shown in the URL when editing it (e.g. post=4063) – you’ll need it in the next step.
Step #2: Attach the deposit to your room product
Open one of your escape room products and click the ‘Product Add-Ons’ tab in the ‘Product data’ section. Click ‘Add Group’, then click ‘Add Field’ to create a new field.
On the ‘General’ tab, set the ‘Field Label’ to ‘Deposit’ and set ‘Field Type’ to ‘Products’. Toggle ‘Required Field’ on if every booking must include the deposit.
Step #3: Configure the deposit as a child product
Click the ‘Products’ tab within the field settings. Search for and select your ‘Security Deposit’ product under ‘Child Products’, or enter its product ID directly.
Set ‘Products Layout’ to ‘Radio List’ and ‘Products Quantities’ to ‘One only’, so the deposit appears as a single, pre-selected option rather than something customers can adjust. Click ‘Update’ to save, then repeat this for each room product.
Visit the product page on the front end to confirm the deposit shows up as a pre-selected option below the booking calendar, and check that it appears as its own line item in the cart alongside the room cost.
When a group’s session is over and you’re happy no props were damaged, refund the deposit from WooCommerce > Orders. Open the order, click ‘Refund’ on the items table, and enter the deposit amount against the Security Deposit line item only – leaving the room booking’s refund fields at zero. Choose a manual refund for bank transfer or cash, or a gateway refund if you took payment via Stripe or PayPal, bearing in mind your gateway may charge a fee on refunds.
There’s a full tutorial on accepting a security deposit for your booking here.
Managing your escape room bookings
Once your rooms are live, you’ll manage every booking from Bookings > Dashboard in your WordPress admin. This gives you an at-a-glance view of occupancy, revenue, and upcoming sessions across all your rooms.
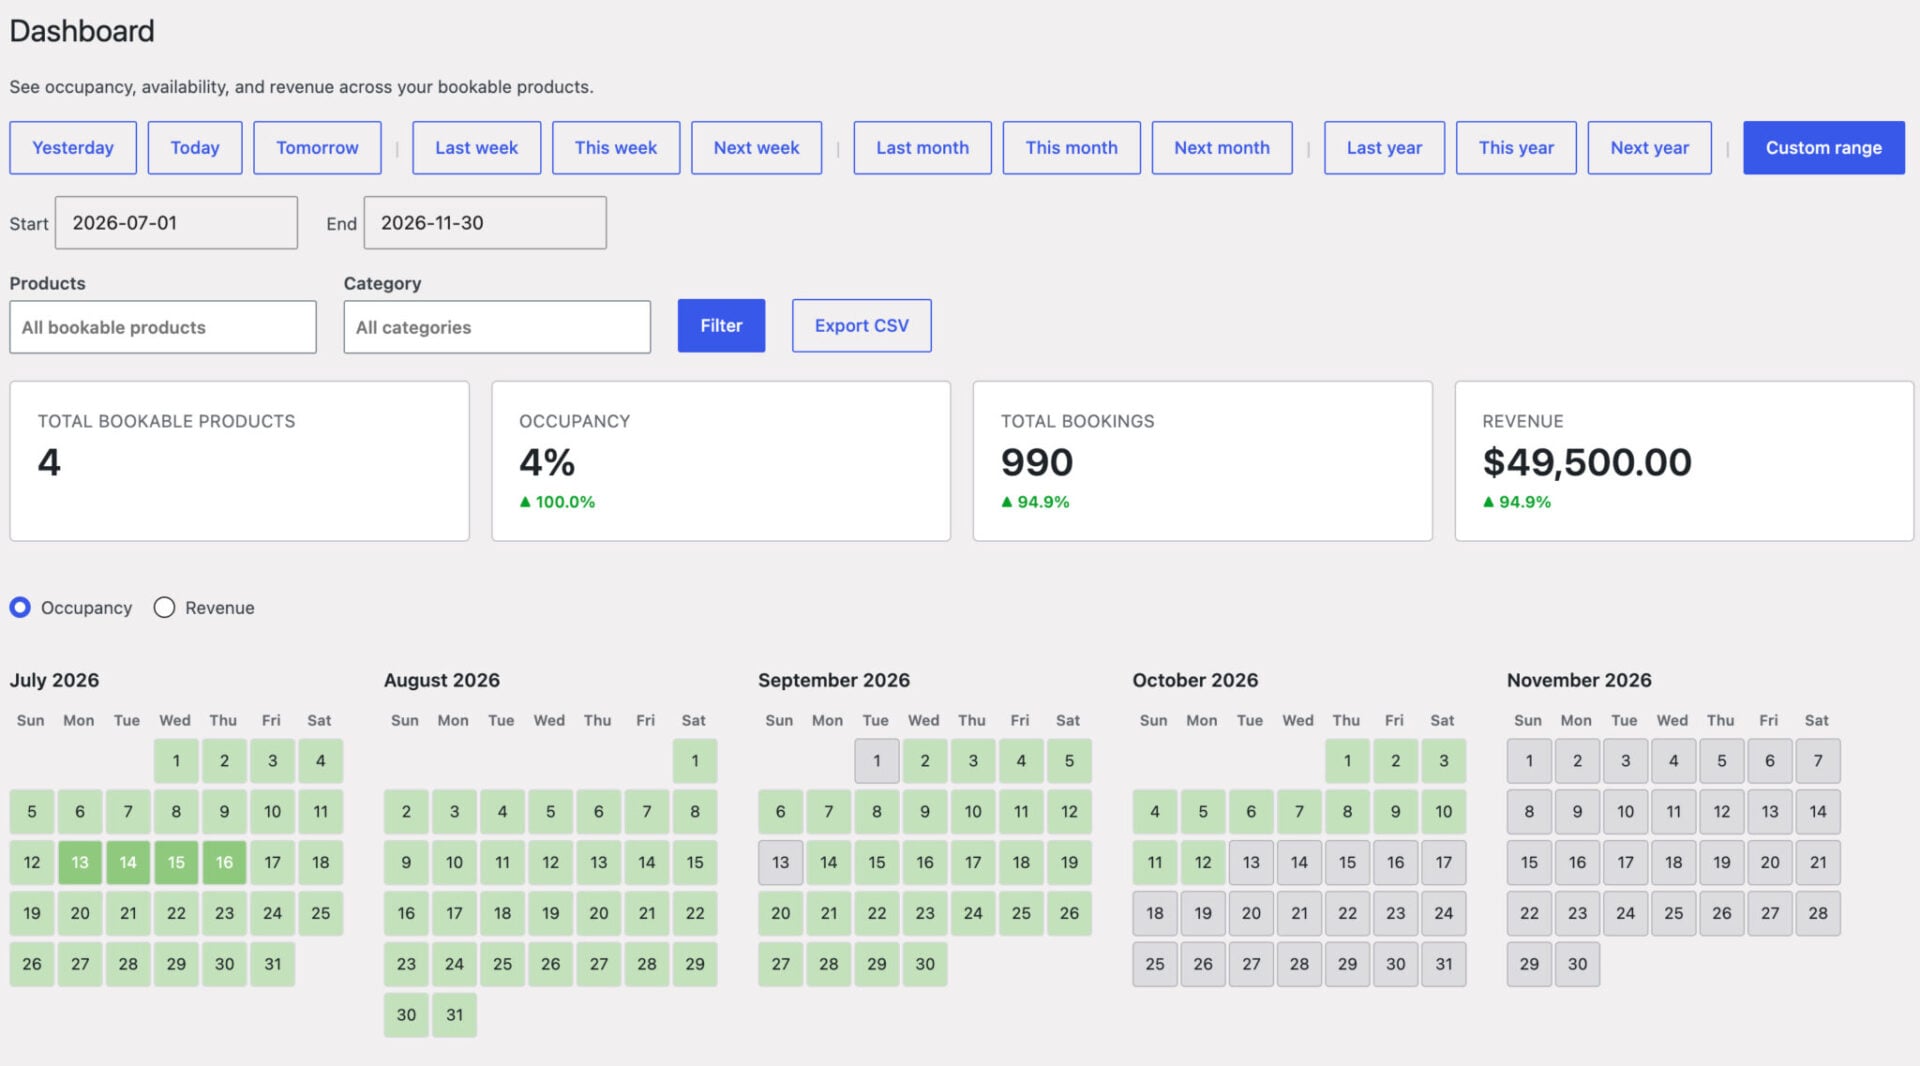
Choose a date range using the buttons along the top – Today, This week, This month, or a custom range. The Dashboard automatically shows the most useful view for that range: a Diary view with a time-grid for a single day, a Week diary for a few days, or a full Calendar for longer ranges. The Diary view is particularly useful for escape rooms, since it shows exactly which time slots are booked and which are free across all your rooms at once.
Four summary tiles at the top give you a quick read on the business: total bookable rooms, occupancy, total bookings, and revenue for the selected range, each with an indicator showing whether it’s up or down on the previous period. If you run several rooms, use the ‘Products’ or ‘Category’ dropdowns to filter the view down to a single room.
Adding a booking manually
For phone or walk-in bookings, click any time slot in the Diary or Week diary view to open the day detail panel, then click ‘Add booking’ next to the relevant room. Set the start and end time, quantity, and price – overriding the price if needed – then search for the customer’s email or enter a new one.
Tick ‘Create a WooCommerce order for this booking’ if you want to record payment against it too. Availability is re-checked when you save, so you can’t accidentally double-book a slot even if you’ve had the page open for a while.
You can also export all your bookings to a CSV file from the ‘Export CSV’ button, and check a single room’s schedule without leaving its edit screen using the ‘Availability’ tab on the product itself.
Escape room bookings – recap
So that’s how to set up a time-slot booking system for your escape rooms using the Bookings for WooCommerce plugin. We looked at how to create a bookable product for each room, control group capacity either as a private hire or a shared session, and set up time slots with day-specific hours. We also covered how to collect a refundable security deposit and manage every booking from the Bookings dashboard.
Bookings for WooCommerce is compatible with all themes and page builders, including Astra, Flatsome, and Woodmart, and page builders like Elementor and Divi. If you have any questions, our world-class support team is on hand to help. And all our plugins are backed by a 14-day money-back guarantee, so you can try them risk-free.