WooCommerce surfboard hire: let customers book multiple boards at once
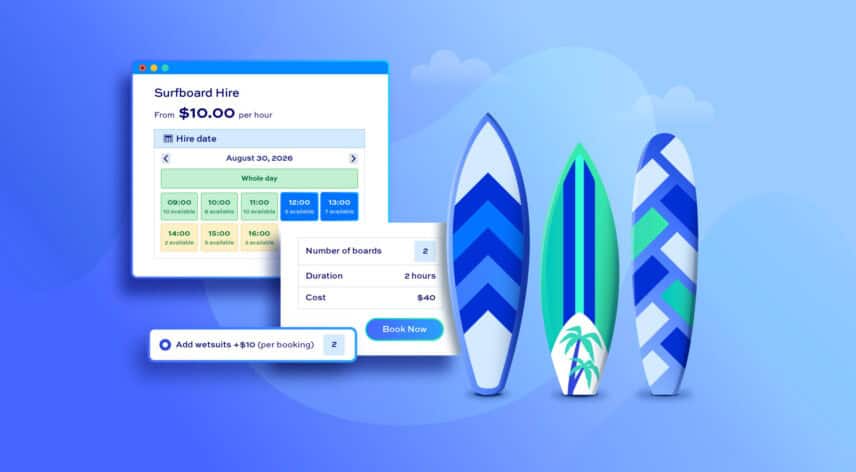
Running a hire business means your customers often want to book more than one item at a time from the product page. A group of friends heading to the beach might want two longboards, a fish, and a funboard – and they want to book them all in one go, not visit four separate product pages. The same applies to any water sports or surf school hire shop: kayak rental businesses, paddleboard hire, jetski rental, equipment-heavy surf schools – or in fact any hire shop where customers are likely to want to rent several items in a single booking.
WooCommerce doesn’t offer the ability to book multiple items from the same page out of the box, so you’ll need two extra plugins to make it happen: Bookings for WooCommerce and Product Add-Ons Ultimate.
You can buy both these plugins together at a discount as part of the WooCommerce Bookings and Product Add-Ons Bundle.
WooCommerce Bookings and Product Add-Ons Bundle
Create the ultimate bookings site in WooCommerce
We’ll use a surfboard hire shop as the example throughout this tutorial, but the setup translates directly to any hire or rental context.
Each surfboard model is created as its own bookable product, then brought together on a central booking page where customers can choose what they want to hire and in what quantity.
What you’ll learn:
In this tutorial we’ll cover how to:
- Set up each surfboard model as a bookable product with hourly and full-day pricing
- Configure time slots, slot overrides, and length-of-stay discounts
- Create a single booking page where customers can hire multiple boards at once
- Set seasonal pricing and offer discounts
- Add extra hire options such as wetsuits
- Check availability and manage bookings manually
There’s a fully functioning demo product here.
Tutorial
Step #1: Install and activate the plugins
Before you start, you’ll need both plugins installed and activated on your WordPress site. Purchase and download the WooCommerce Wholesale & B2B Plugin Bundle. You’ll receive an email with a link to two zip files – one per plugin. Download these.
Ten go to Plugins > Add New > Upload Plugin to install each one. Once both are active, you’re ready to start building your products. We’ll begin at Products > Add New.
Step #2: Create a bookable product for your first surfboard
Our first task is to create bookable products for each item that we want our customers to be able to hire out. We can create one then duplicate it for all other products.
Go to Products > Add New. Give the product a name – for example, “Malibu Longboard” – and add a description and featured image in the same way you would for any WooCommerce product.
Assign the product to a category – for example, “Surfboards.” This is important because Product Add-Ons Ultimate will use this category later to pull all your boards into the main booking page automatically.
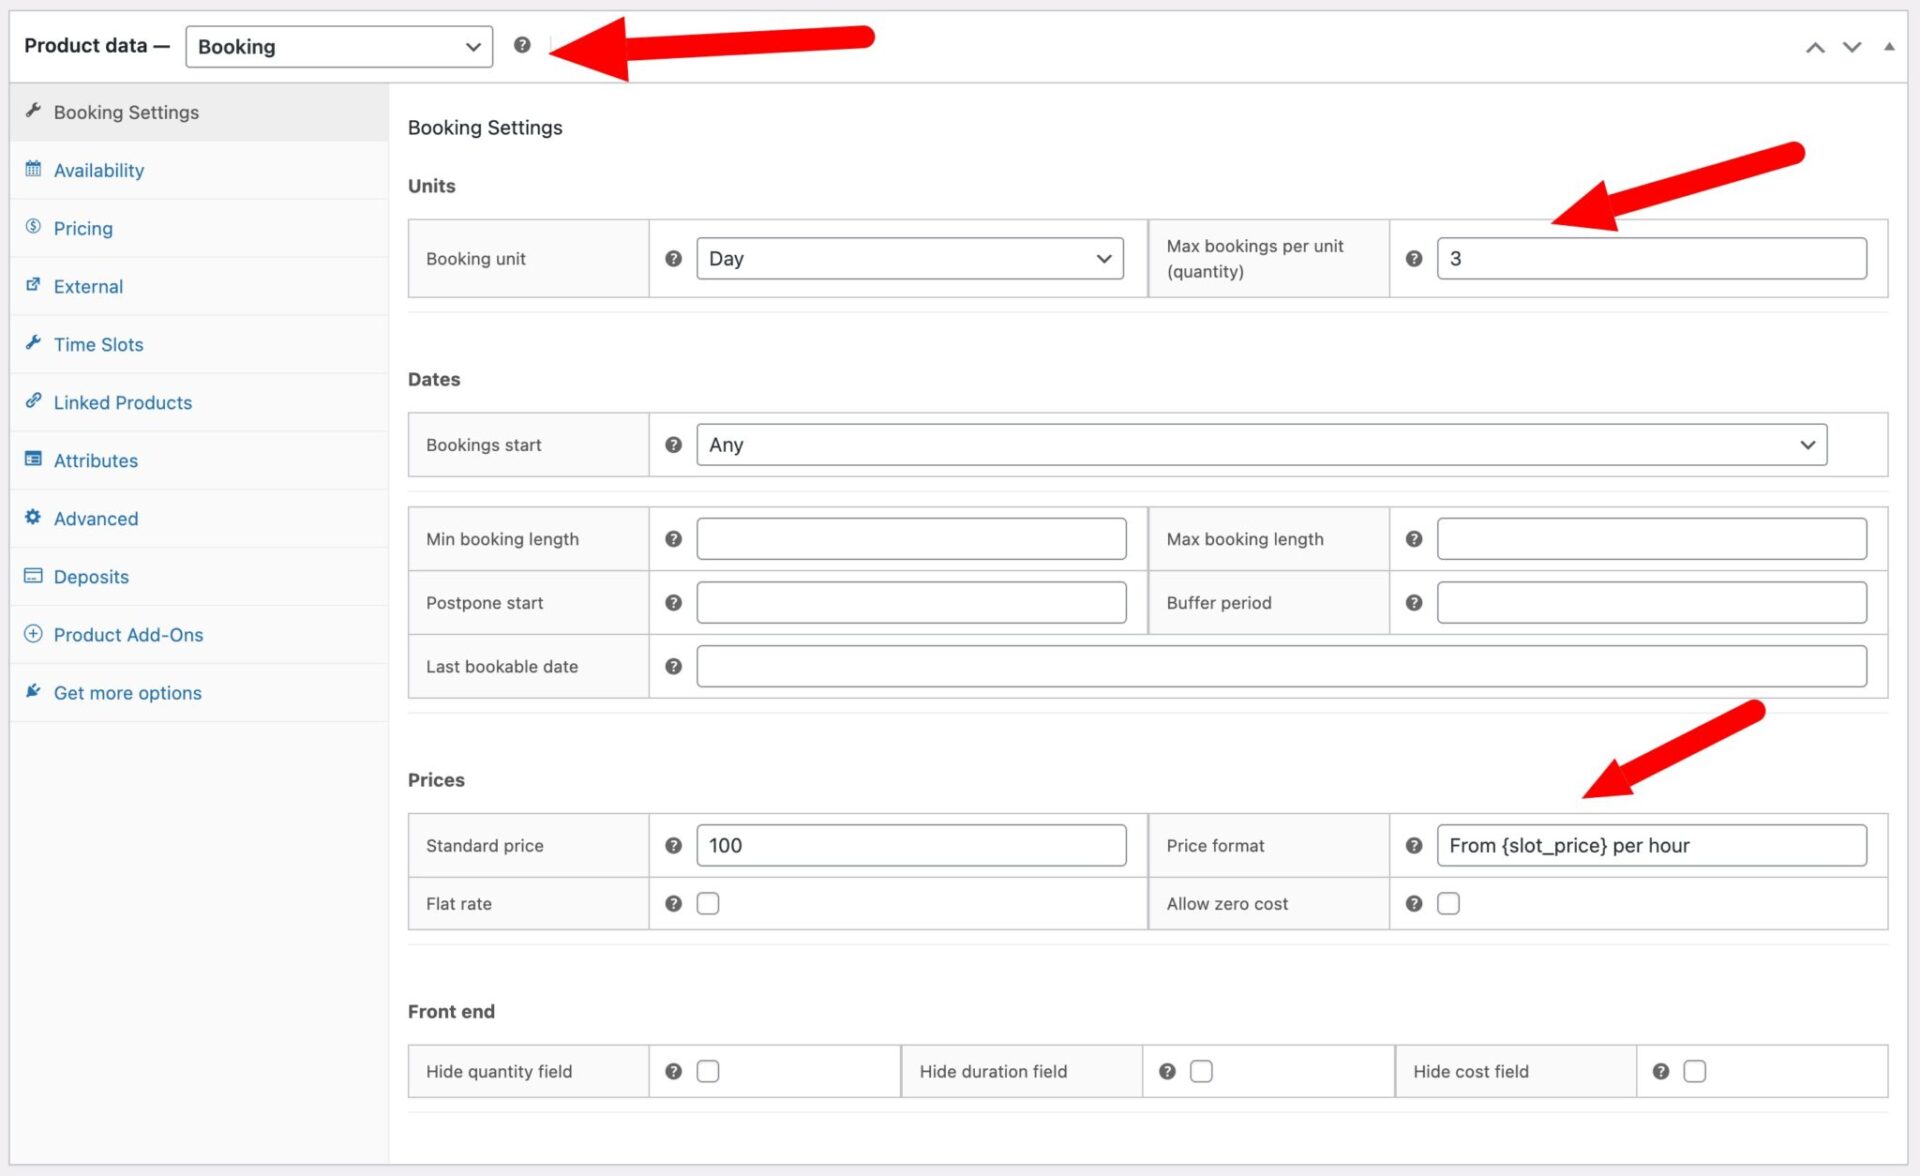
Next, scroll down to the Product Data panel and select Booking from the product type dropdown. You’ll see a set of new tabs appear for configuring the booking.
Now configure the key settings on the Booking Settings tab:
- Make sure the Booking unit on the Booking Settings tab is set to Day – time slots are only available when this is the case
- Max bookings per unit: Set this to the number of boards of this model you have available. If you own three Malibu Longboards, enter 3. This is how the plugin tracks availability and prevents overbooking.
- Standard price: Enter the full-day hire rate for this board. This will also act as the price cap for a full-day slot booking, which we’ll configure in the next step.
- Price format: Use this field to display a helpful label alongside the price on the product page. For example, entering
From {slot_price} per hourgives customers an immediate sense of what they’ll pay before they’ve selected a time slot.
Save the product and move on to time slots.
Step #3: Configure time slots
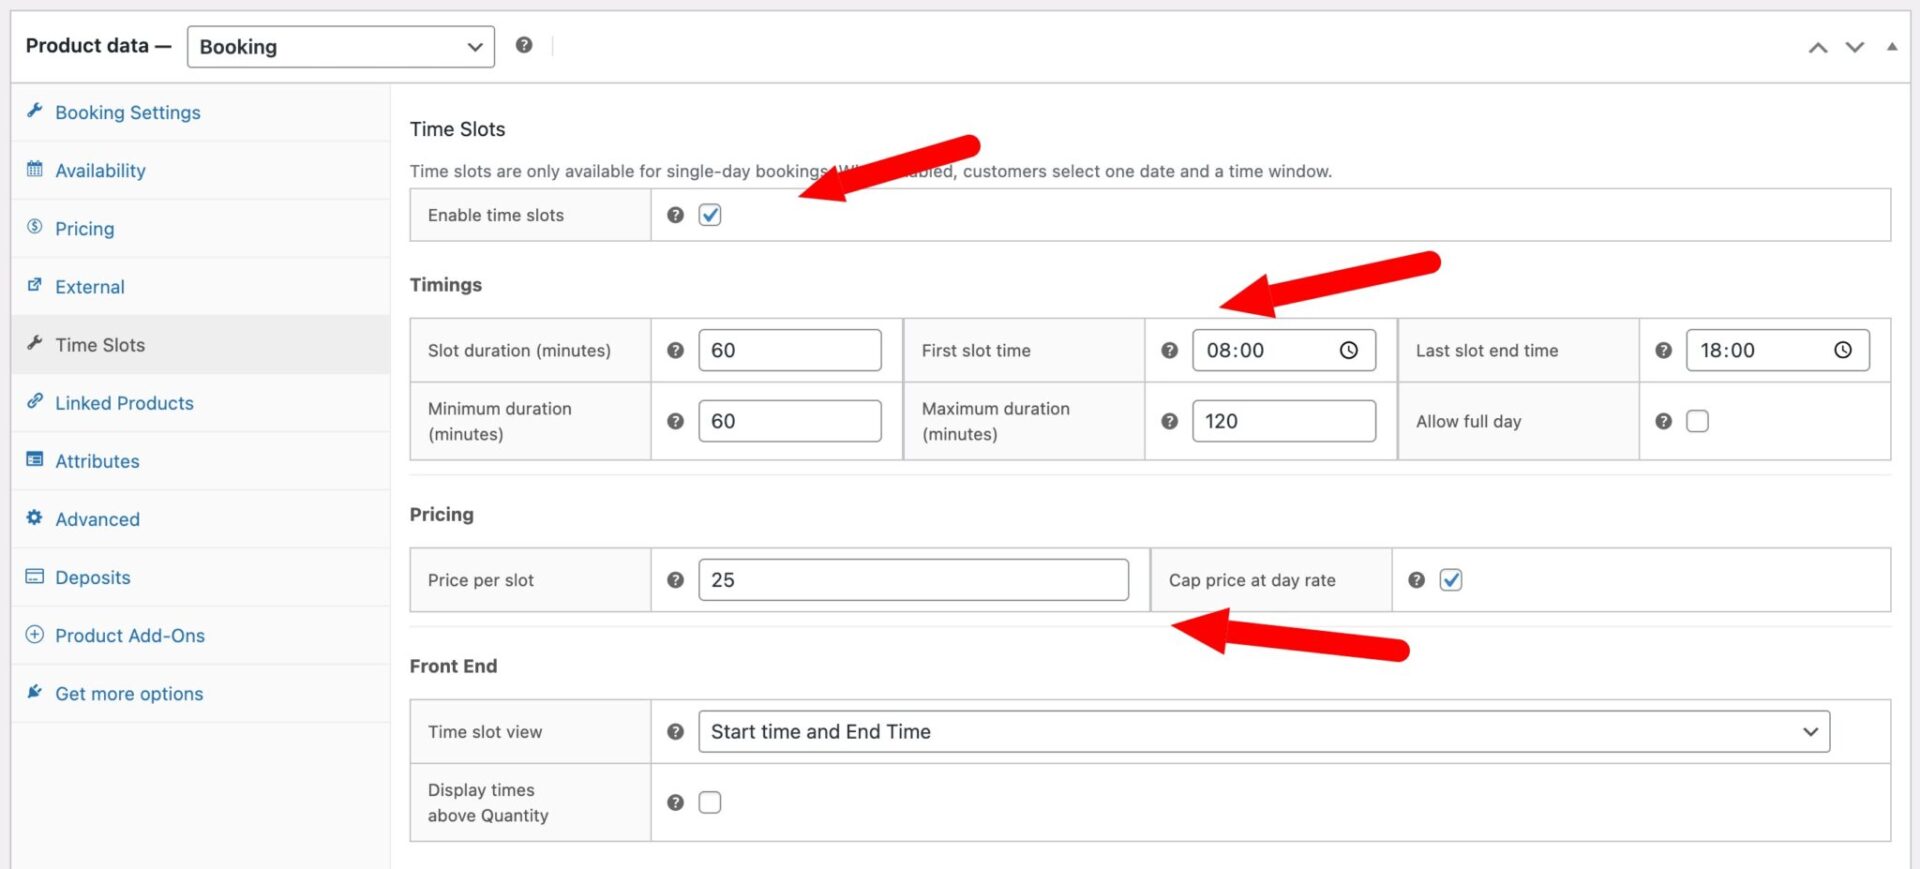
With the booking product saved, click on the Time Slots tab. Check Enable time slots and then configure the timings:
- Slot duration: 60 minutes – or however long you want your hire sessions to last
- First slot time: 08:00 – or whatever time your first session starts
- Last slot end time: 18:00 – whatever time your last session finishes
This creates 10 hourly slots running from 08:00 to 18:00. Customers will see these as their available booking windows for the day.
You can also set Minimum duration (minutes) and Minimum duration (minutes) – so if you want a minimum of one hour per booking and a maximum of two hours, set these to 60 and 120 respectively.
Now set the Price per slot – this is the hourly rate for this specific board model. You can set a different price for every model you create. We’ll take a look at discounts below.
To allow customers to book the entire day in one go, check Allow full day. Then enable Cap price at day rate. This ensures that if a customer books enough consecutive slots to cover the whole day, the total is capped at the Standard price you set in Step #2 – they won’t end up paying more per slot than the flat day rate.
Save the product.
Step #4: Repeat for each surfboard model
Follow Steps 2 and 3 for each of your remaining boards – for example, a Fish, a Funboard, and a Gun. Each board gets its own product with its own pricing, stock quantity, and imagery.
Keep the time slot settings consistent across all boards: the same slot duration, first slot time, and last slot end time. This is important because the main booking page you’ll create in the next step will use the same time slot configuration, and the child product bookings need to align with it.
Step #5: Create the main booking page
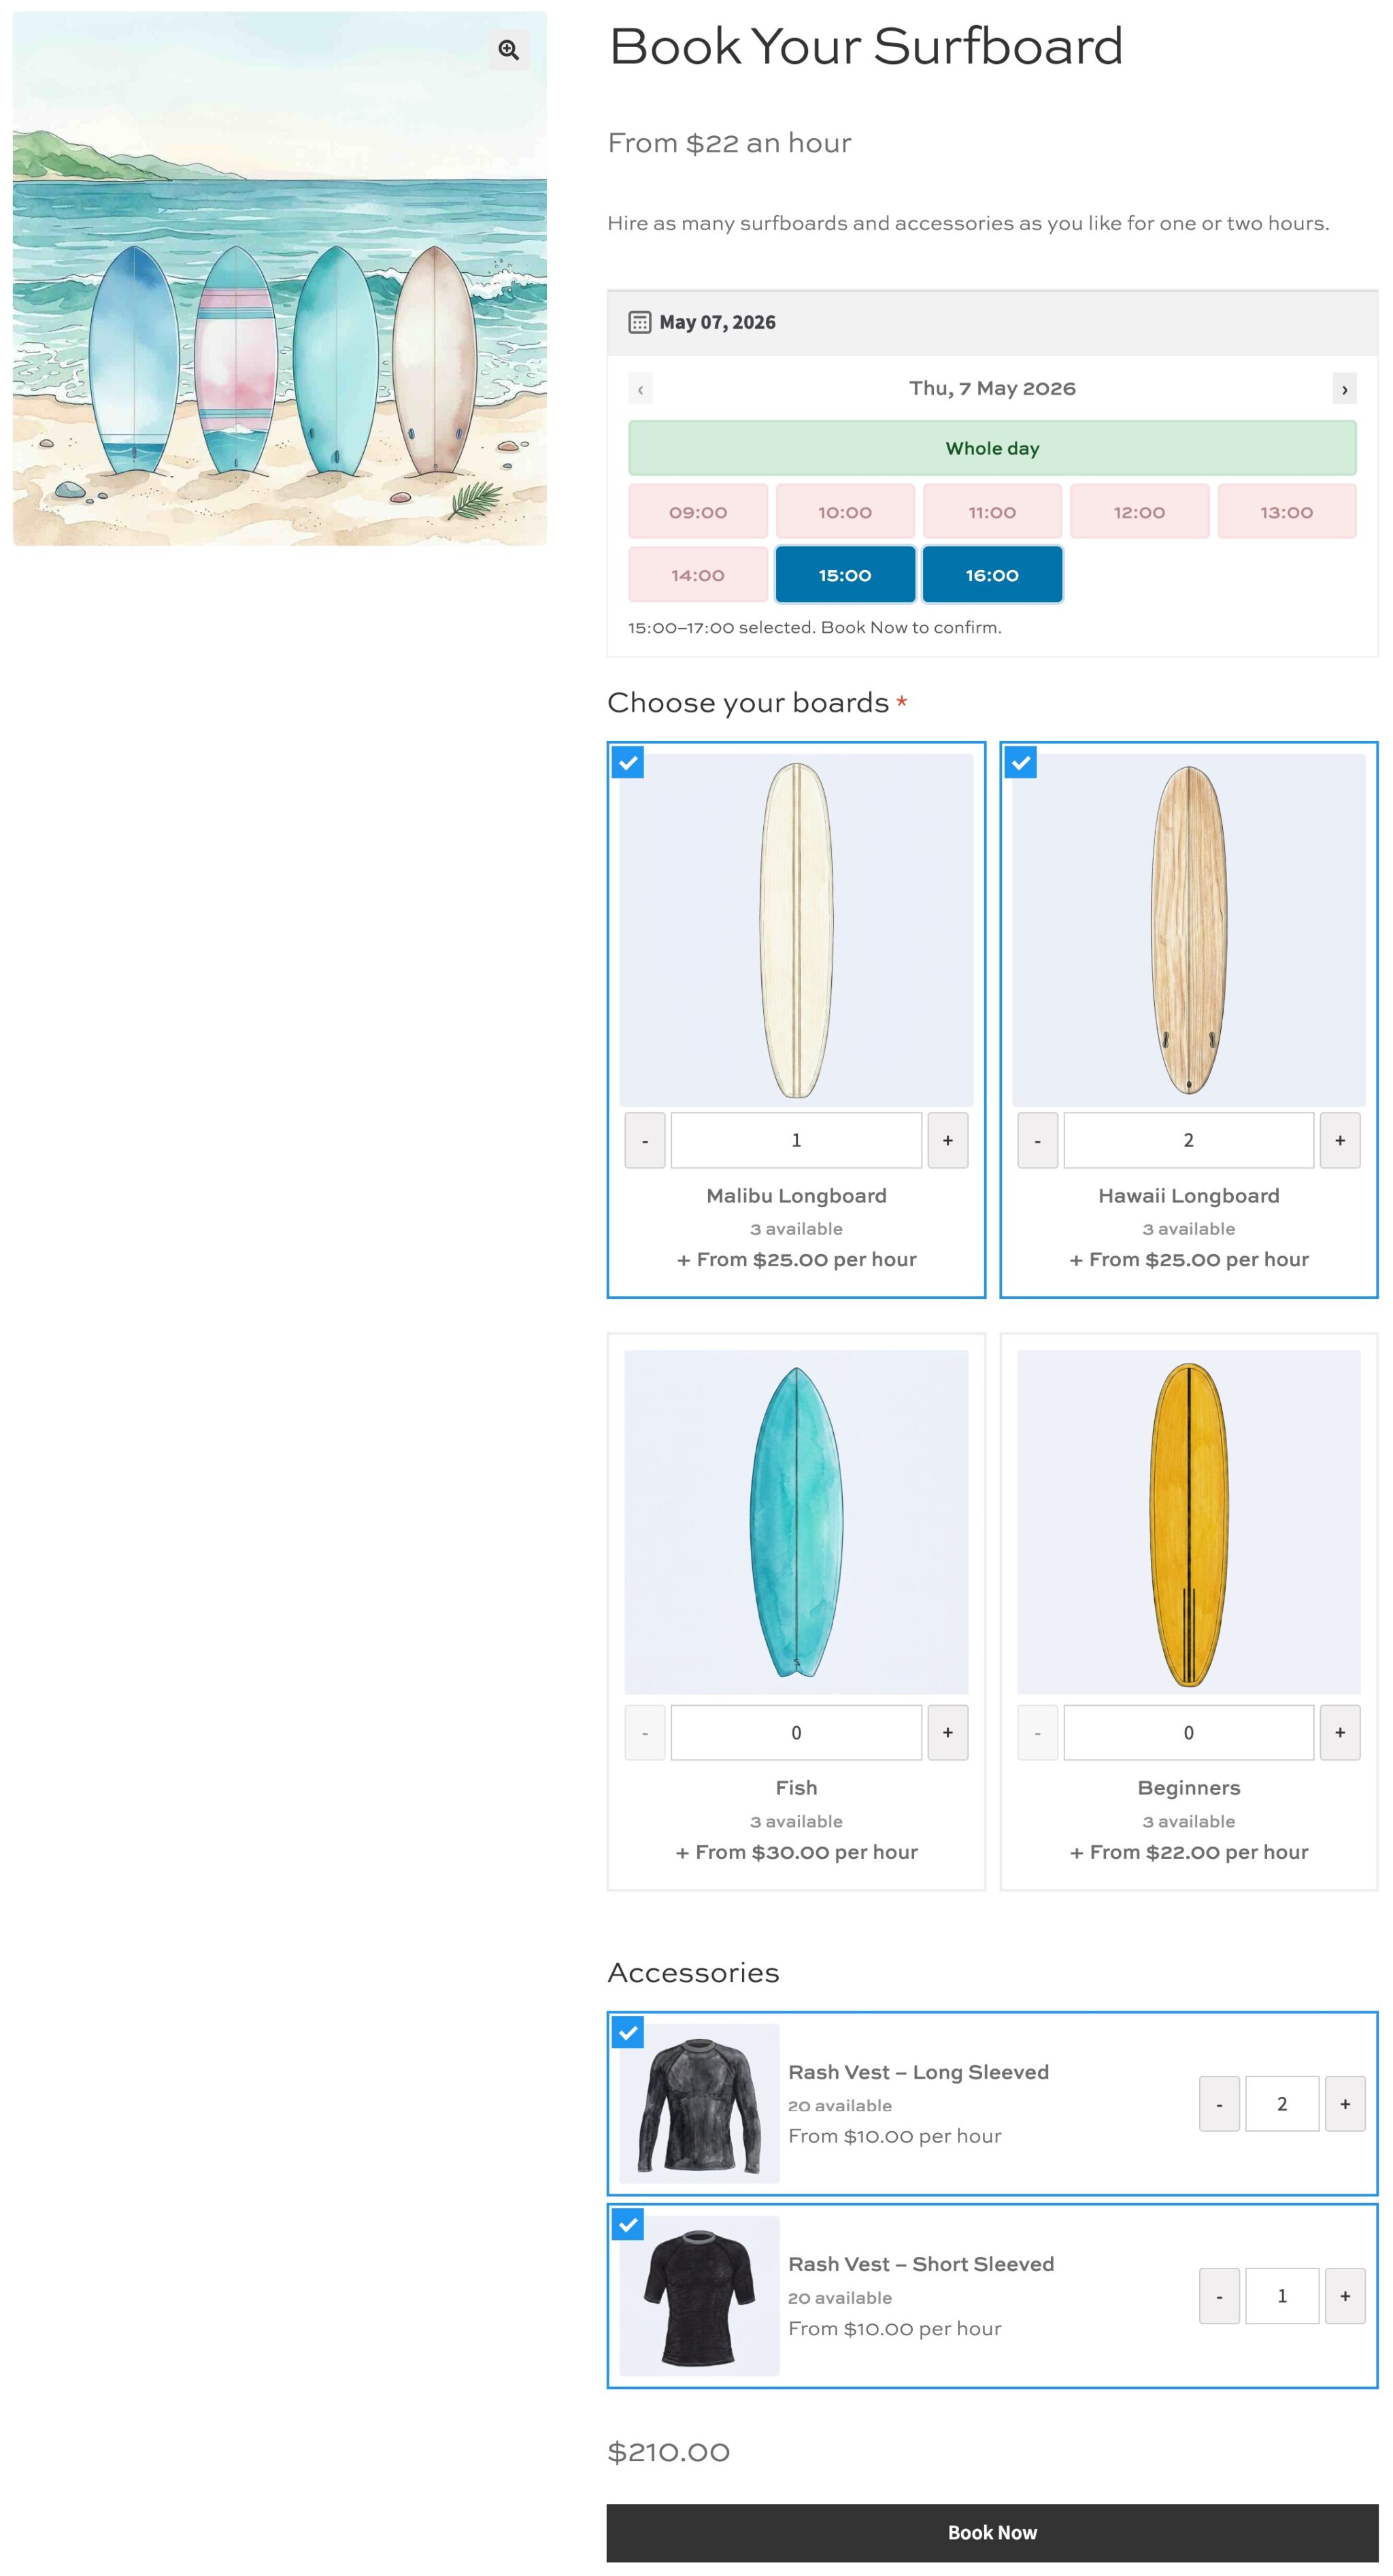
Now create the product that will serve as your customer-facing hire page. Go to Products > Add New and give it a name your customers will understand – for example, “Book Your Surfboard.”
Add a description and image just like you would for any product.
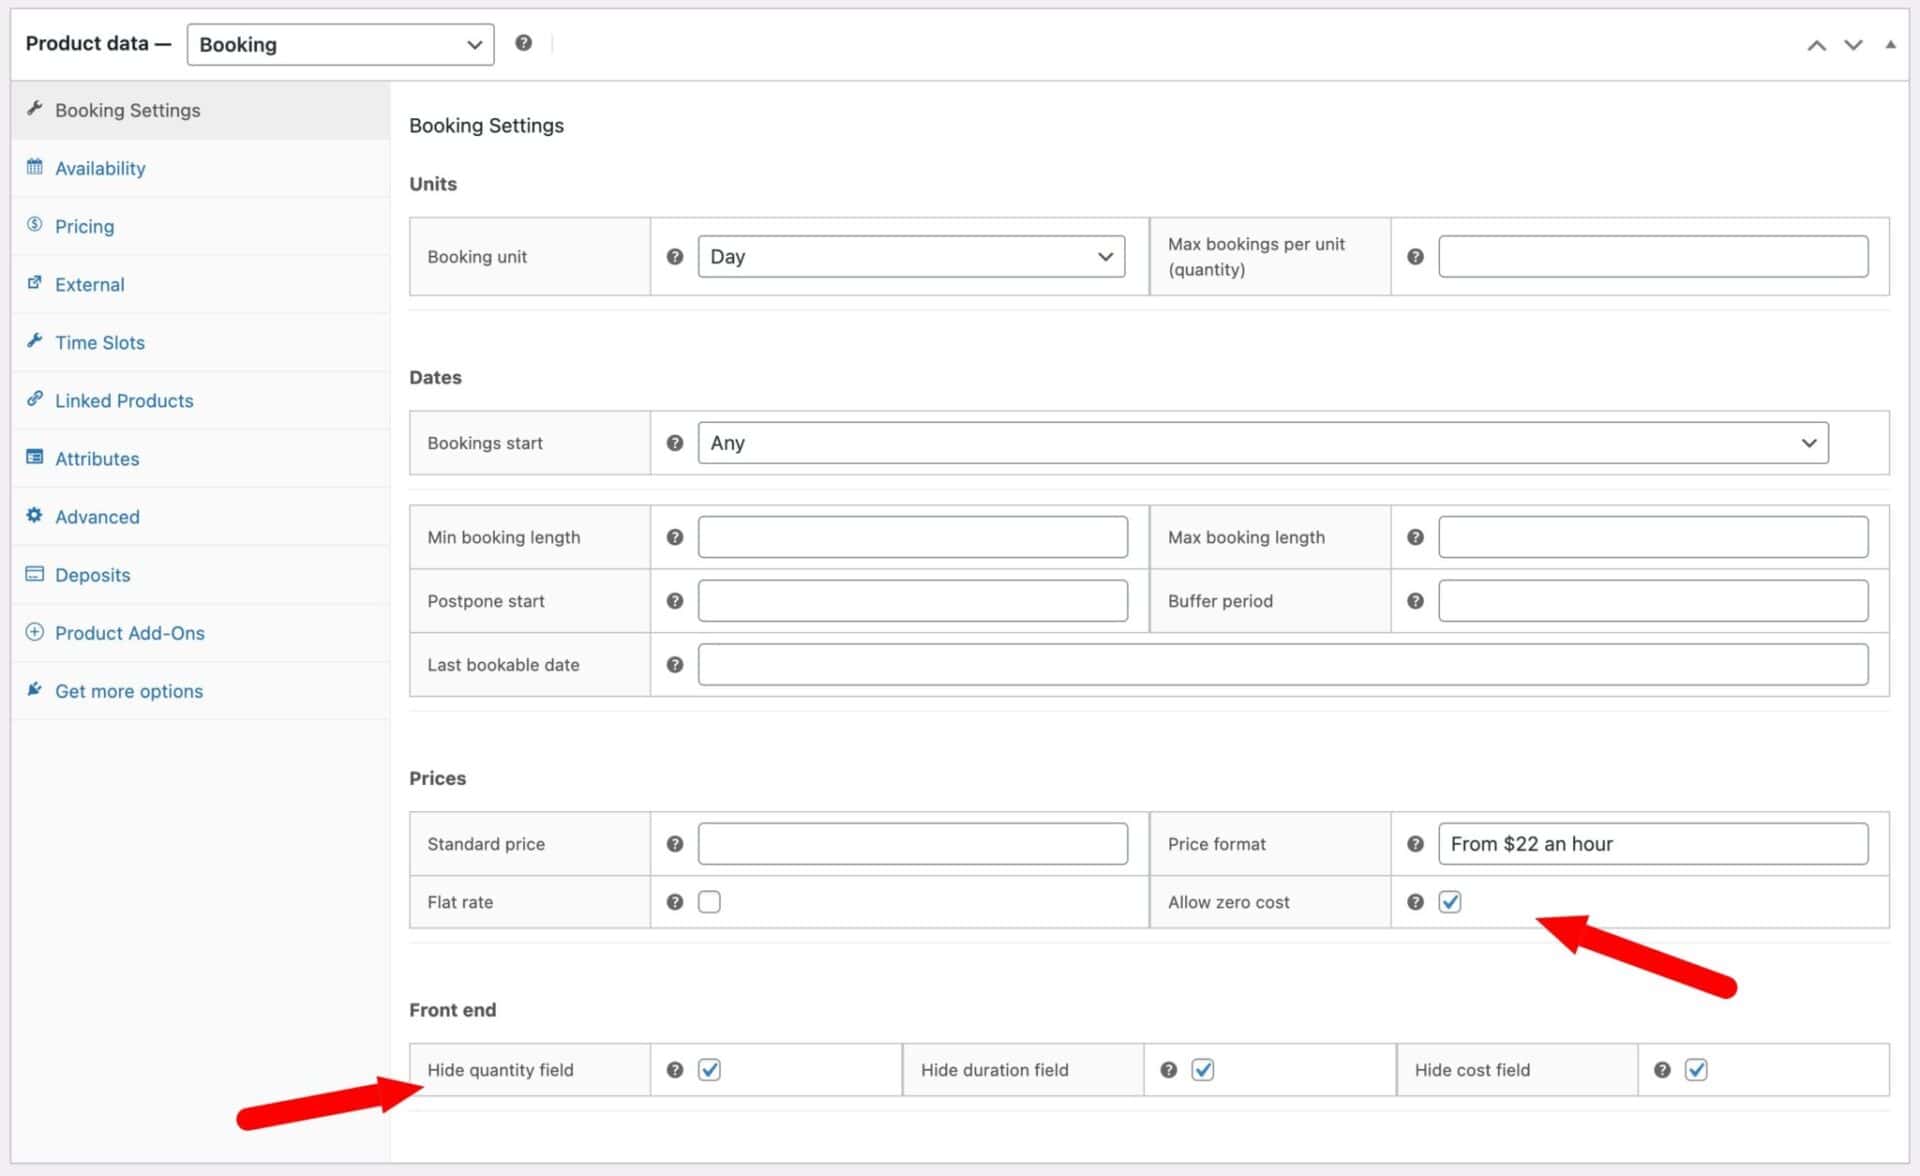
Set the product type to Booking and configure the Booking Settings tab as follows:
- The Booking unit on the Booking Settings tab should be set to Day
- Max bookings per unit: Leave this blank as the availability will be set on each individual board
- Standard price: Leave this setting empty as the price will be determined by the boards
- Price format: Use this field to display a helpful label alongside the price on the product page. For example, enter
From $22 per hourif your cheapest hour rate is $22 - Enable Allow zero cost: this is important because the overall product price is being set by the boards
- Enable Hide duration field, Hide quantity field and Hide cost field in order to keep the product page clean
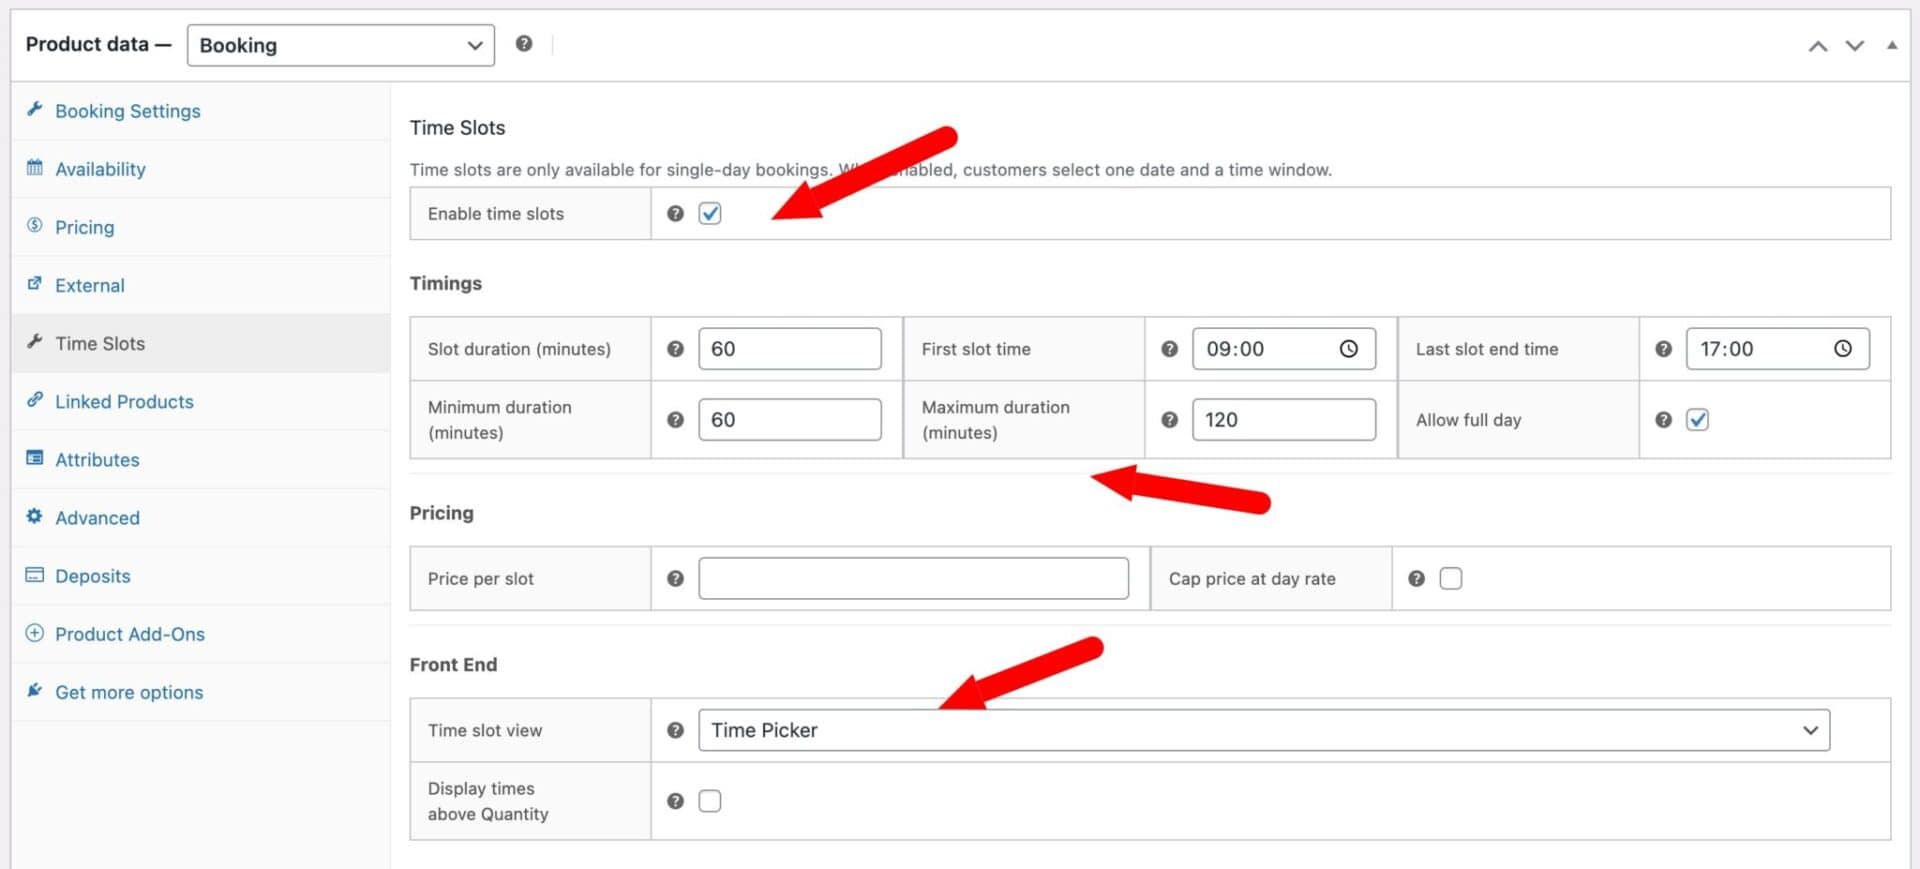
Now, you configure the Time Slots tab with the same settings you used for the individual boards:
- Slot duration: 60 minutes
- First slot time: 08:00
- Last slot end time: 18:00
- Enable Allow full day if required
This parent product is responsible for capturing the date and time selection. You do not need to set any pricing here – all pricing is handled by the individual child products (the surfboard bookable products). The total at checkout will reflect the rates set on each board the customer selects.
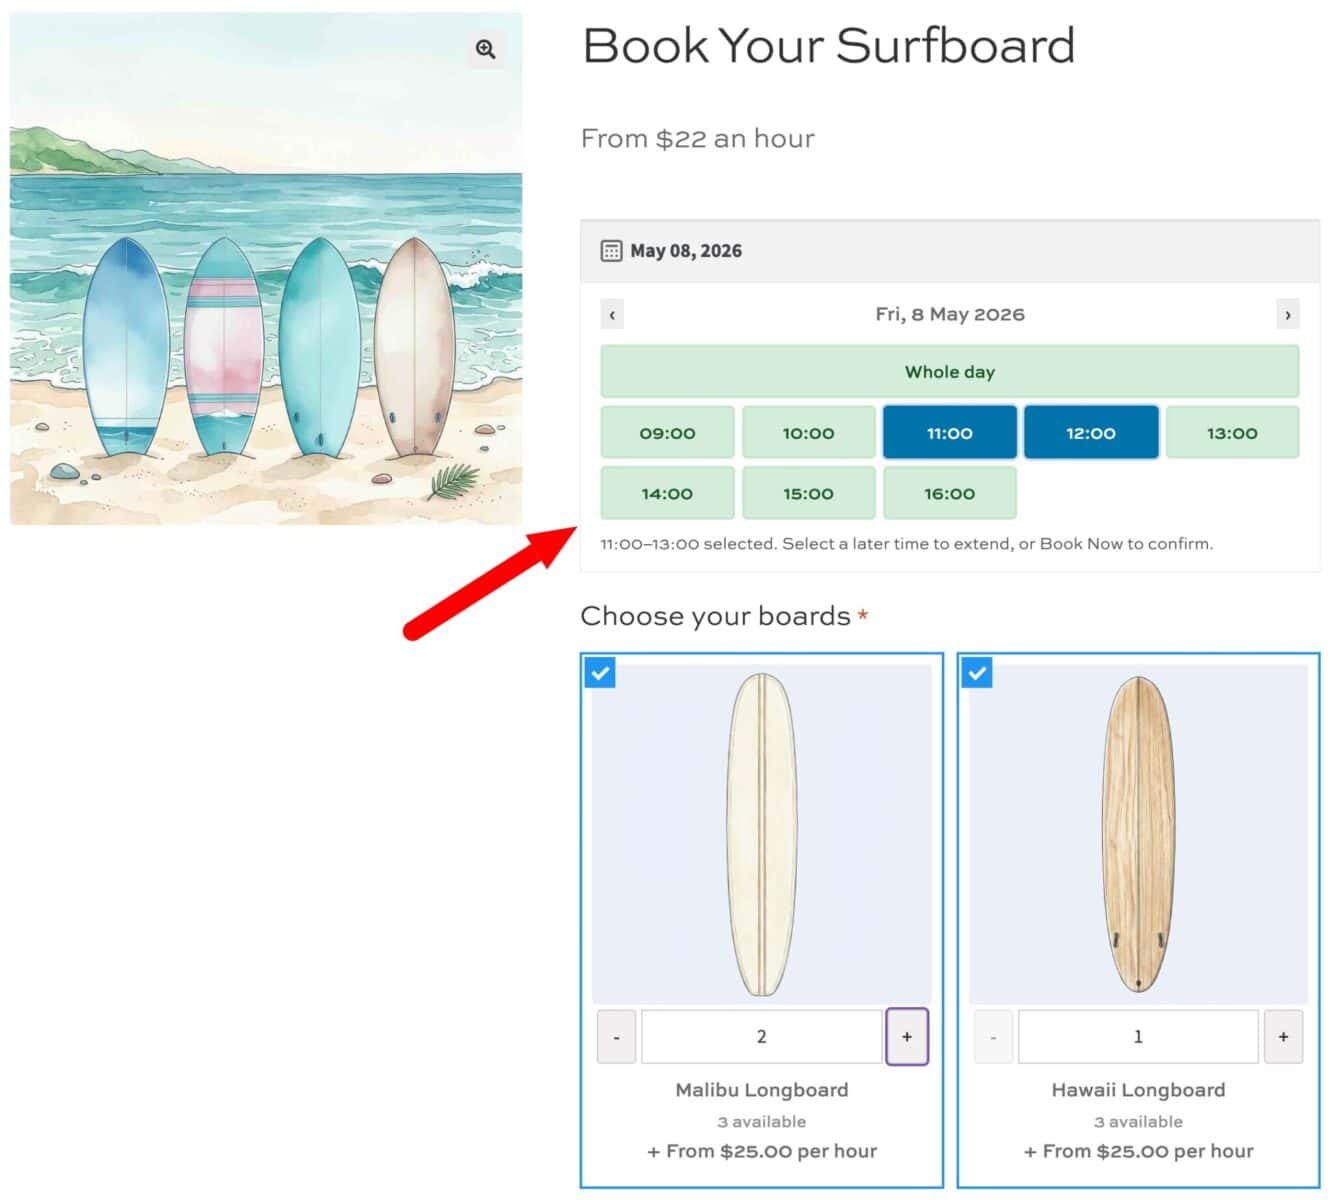
Finally, choose a Time slot view to control how the time selection appears to customers:
- Time Picker displays a visual grid of slot cells. Customers click to select a start time and click again to extend the range. It’s intuitive for shorter bookings and gives a clear at-a-glance picture of what’s available.
- Diary View presents a vertical list of slots with availability indicators. It works well for businesses with a fuller day of bookings where customers want to see availability across all slots before committing.
Save the product.
Step #6: Add child product fields using Product Add-Ons Ultimate
Now you can add each board as a hireable product:
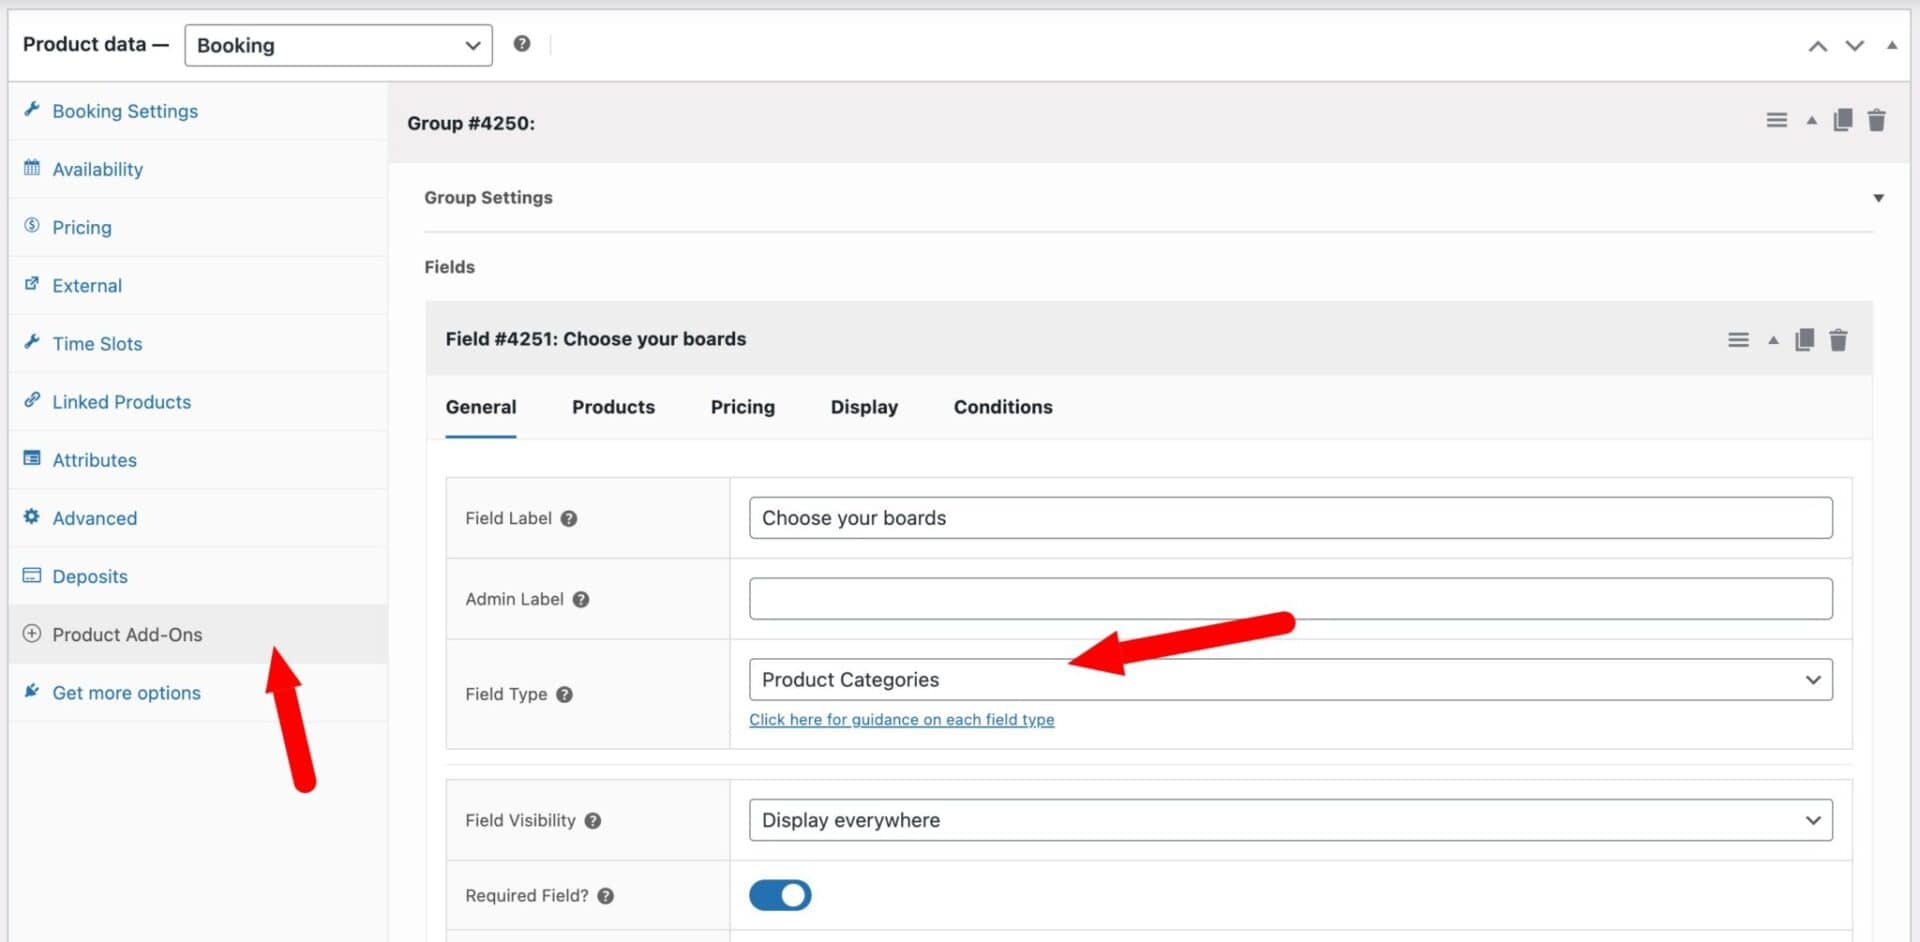
- Click on the Product Add-Ons section
- Click the Add Group button then click Add Field
- Give your field a label and enable the Required field option
- Set the Field Type to Product Categories
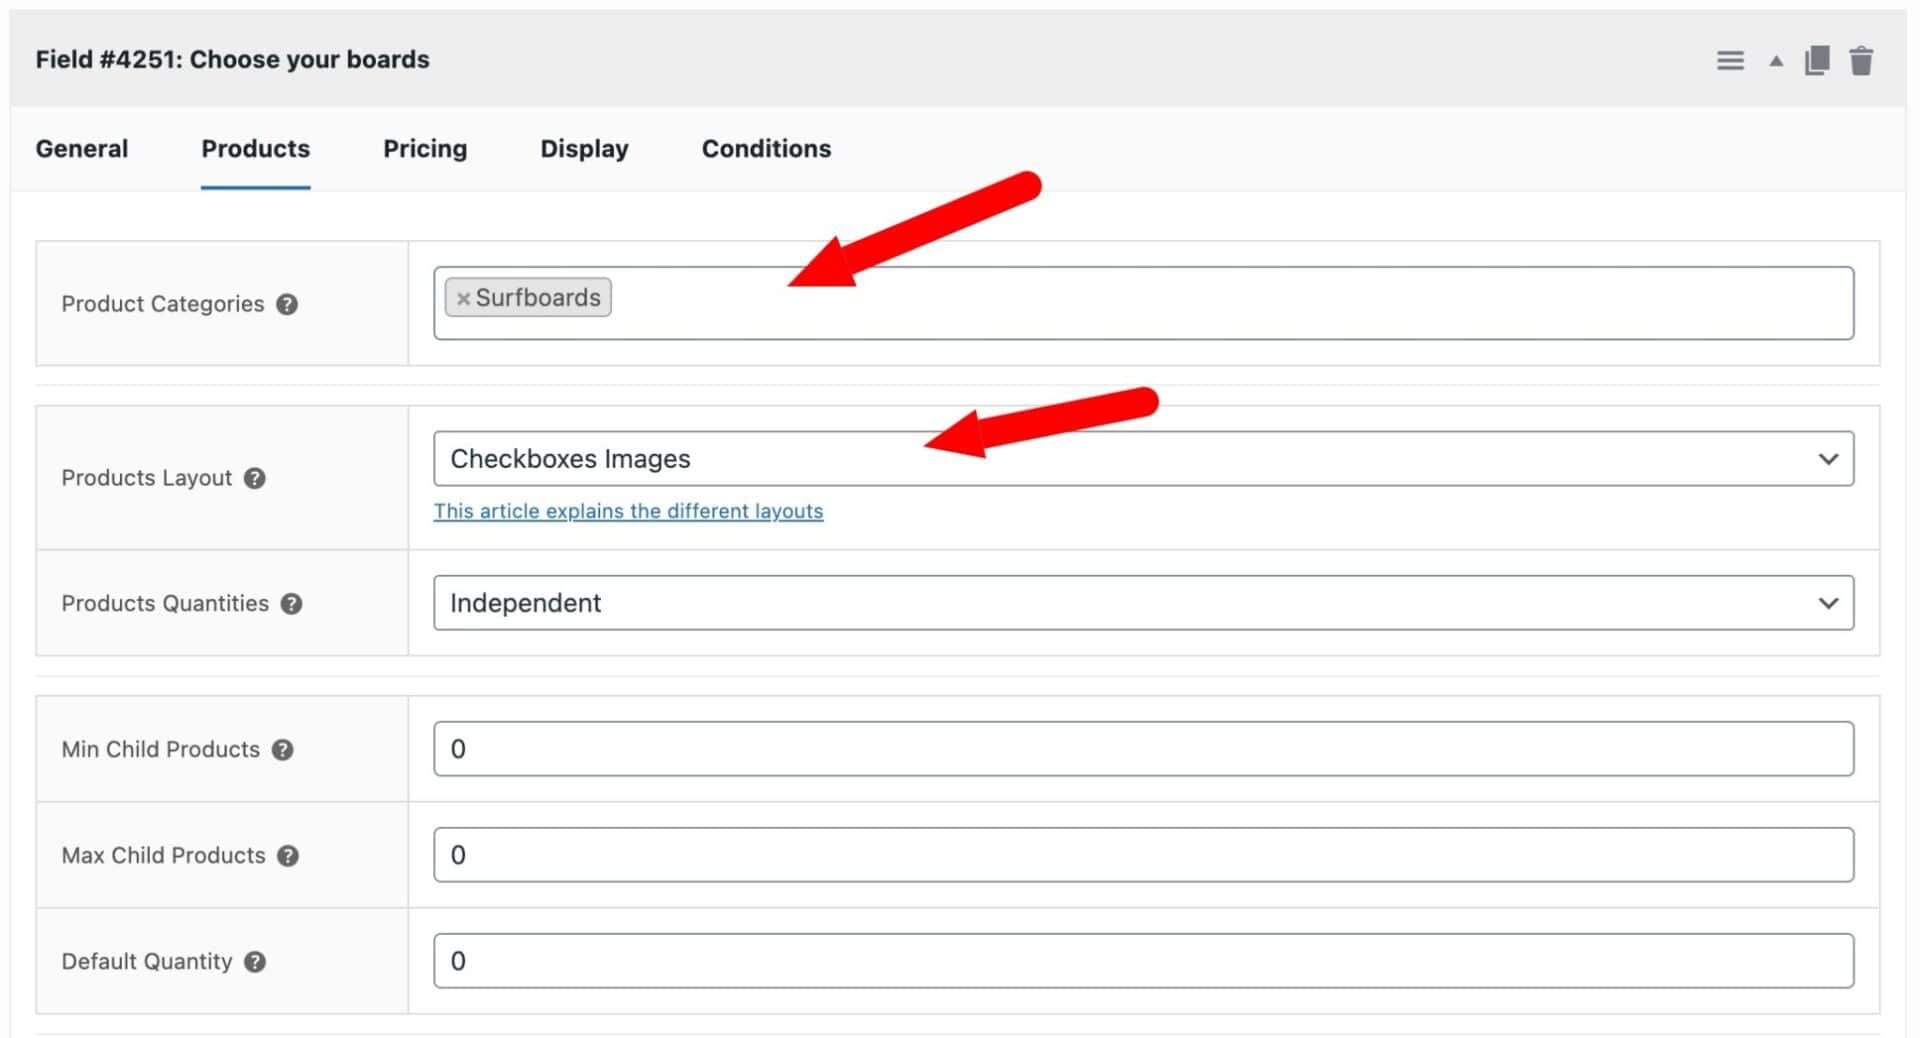
Click on the Products tab that appears and enter “Surfboards” in the Product Categories field. Product Add-Ons Ultimate will now pull in every product assigned to that category and display it as a selectable option on the booking page. The key benefit of using the category approach rather than selecting individual products is that it stays up to date automatically – if you add a new board and assign it to the Surfboards category, it appears on the booking page without any extra work.
Now choose your display and quantity settings:
Products layout controls how the boards appear to customers:
- Checkboxes Images displays each board with its thumbnail image. Customers can select as many as they like. For a hire shop with good product photography, this is the most visually compelling option
- Checkboxes List works the same way but without the images – useful if you’d prefer a more compact layout.
- Components List display each board with a thumbnail, product name and short description
Products quantities controls how the quantity of each board is handled:
- Independent lets customers choose a different quantity for each board – for example, two Longboards and one Fish – regardless of the parent product quantity. This is the right choice for a hire shop where customers may want multiple units of the same model.
- Linked always matches the child quantity to the parent product quantity, which isn’t suitable here since each board should be selectable independently.
- One-only restricts the customer to adding a single child product in total, which would prevent customers from hiring more than one board.
Set Products quantities to Independent and save.
Setting discounts and overrides
If you want to allow discounts for the length of booking or set different prices for different dates or times of the day, you can use the options below.
Step #1: Set slot overrides for off-peak and seasonal pricing
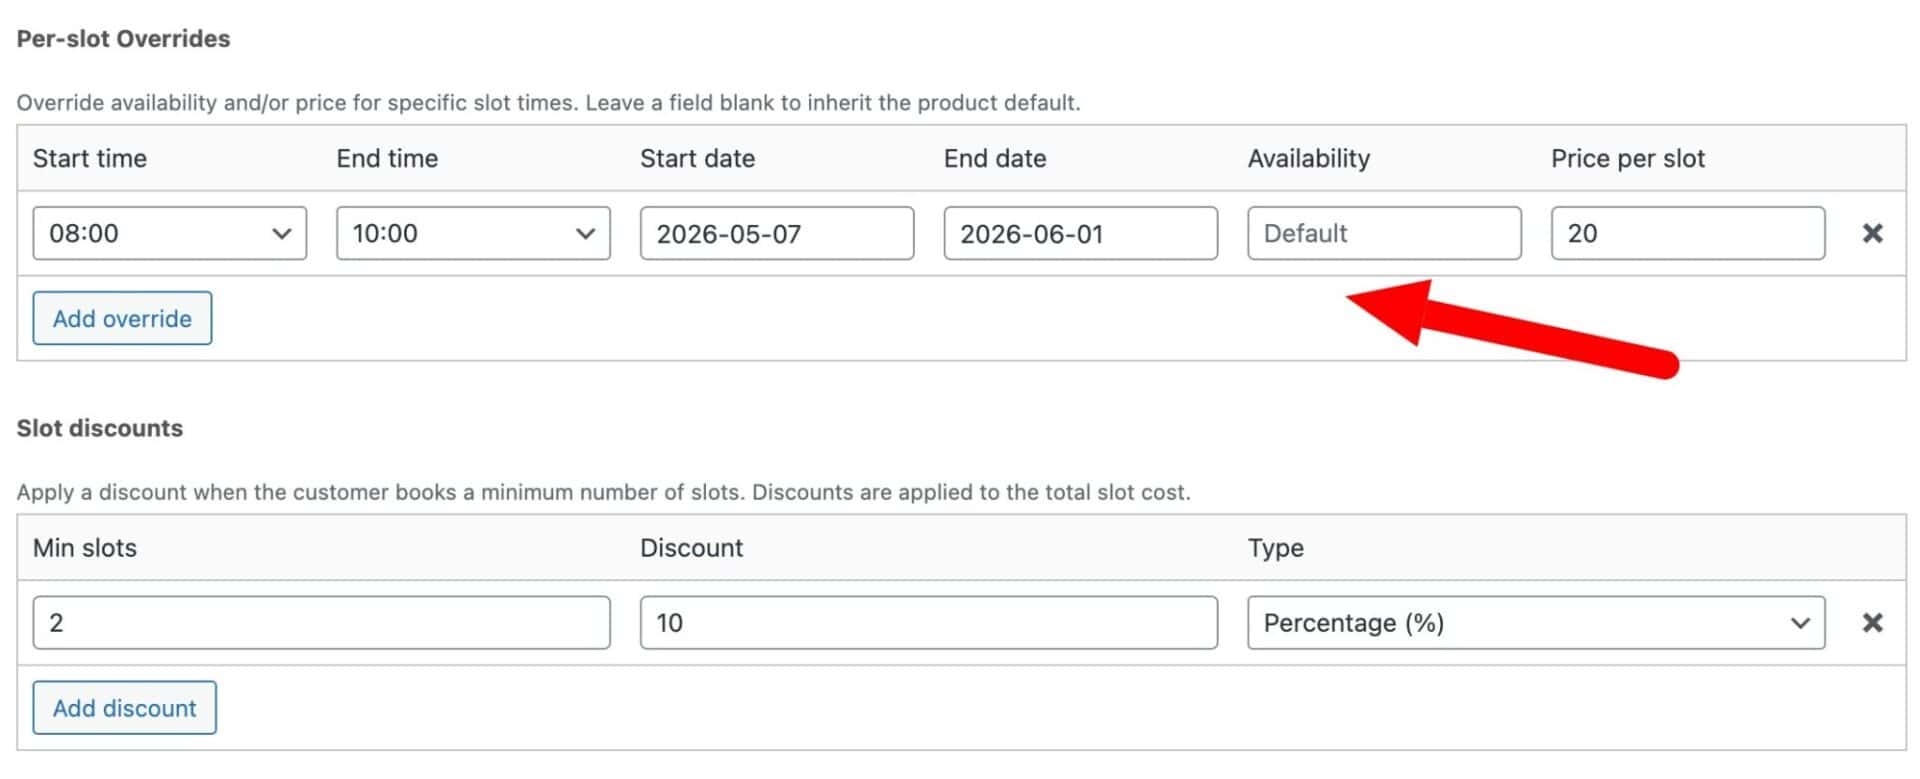
Open one of your surfboard products and go to the Time Slots tab. Scroll down to the Per-slot overrides section.
To offer cheaper early-morning rates, add a row for the 08:00–09:00 slot and another for 09:00–10:00. Enter a reduced Price per slot for each – for example, 20% less than your standard hourly rate. Leave the Start date and End date fields blank so the discount applies year-round.
To apply a summer price increase, add further override rows for those same slots (or any slots you want to adjust), this time entering a Start date and End date that cover your busy season. Set a higher Price per slot – for example, 10% above your standard rate. These overrides will activate automatically at the start of the season and revert when the end date passes.
One important note on ordering: the plugin applies the first matching override it finds in the list. If you have overlapping rules, make sure the more specific rule (such as the seasonal one) sits above the more general one.
Repeat this process for each of your board products.
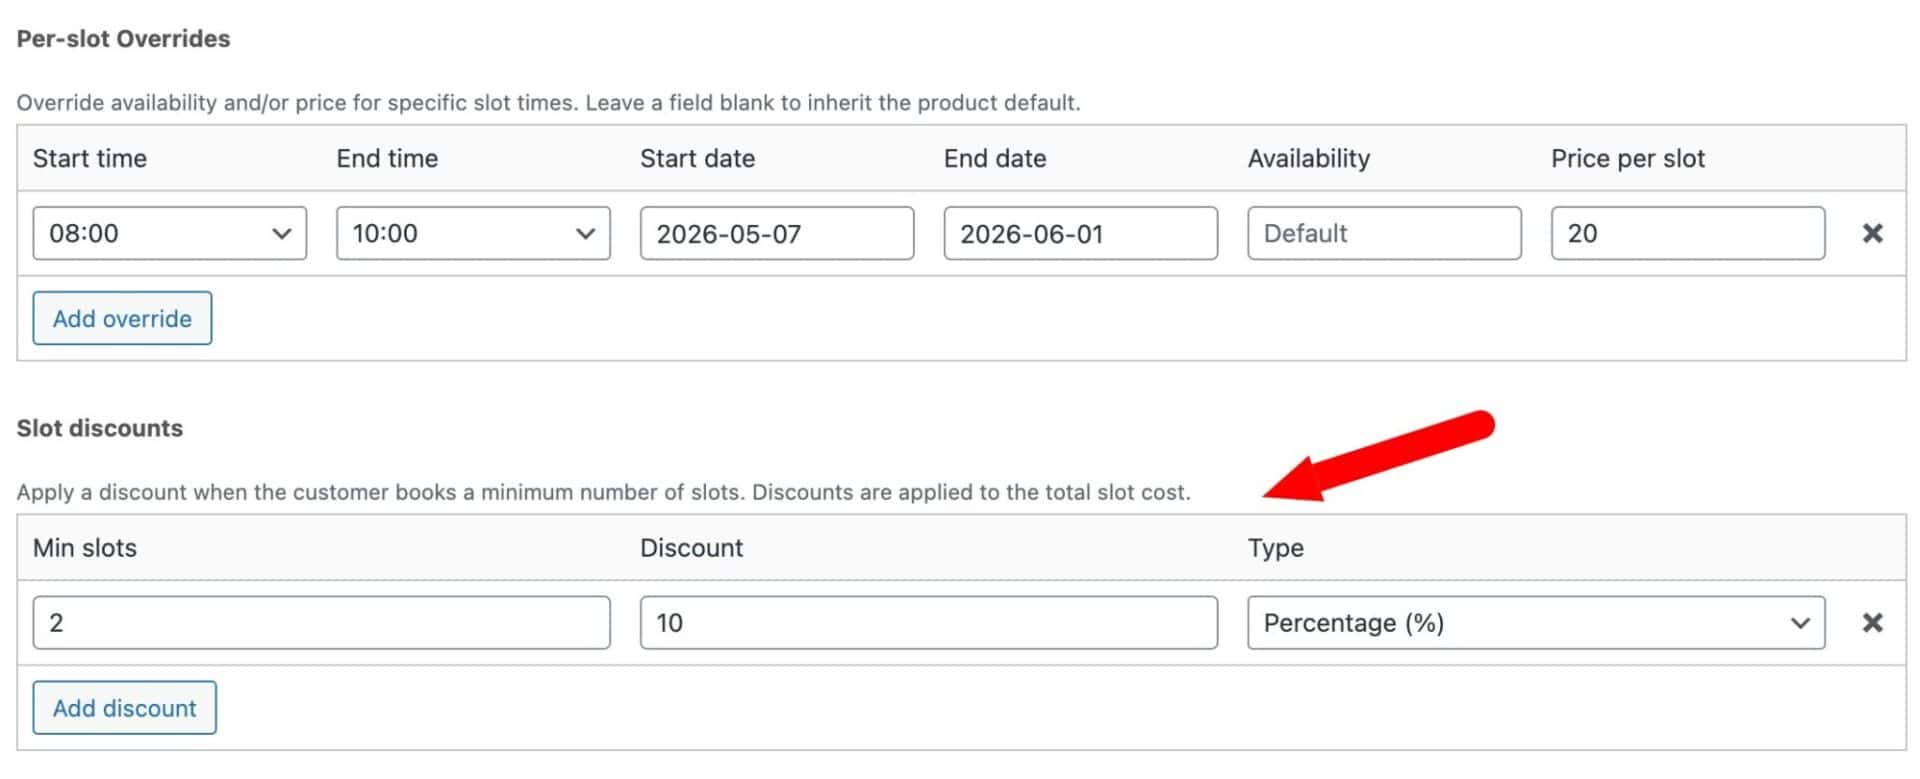
Step #2: Set a multi-hour discount
Open one of your surfboard products and go to the Time Slots tab. Scroll down to the Slot discounts section and click Add discount. Each row has three fields:
- Min slots: The minimum number of consecutive slots the customer must book for the discount to apply. Set this to 2 to reward customers who book two or more hours.
- Discount: The amount to deduct. Enter 10 for a 10% saving.
- Type: Set to Percentage (%) to deduct a percentage of the total slot cost, or Fixed to deduct a set amount.
You can add multiple discount tiers to reward longer bookings further – for example, 10% off for 2 slots and 20% off for 4 slots. If a customer qualifies for more than one tier, the highest qualifying discount is applied.
Repeat for each board product.
Can I add extra hire options too?
Yes – extras like wetsuits work in exactly the same way as the boards. Create each wetsuit size or type as a bookable product and configure the Time Slots tab with the same settings: 60-minute slots from 08:00 to 18:00. Assign the wetsuit products to a “Wetsuits” category.
Then go back to your main booking page and add a second Product Categories field in the Product Add-Ons section, pointing it at the “Wetsuits” category. Customers will see the wetsuit options alongside the boards and can add them to their booking in the same step.
You can use the same approach for any other extras – paddle hire, board bags, surf lessons. Each set of accessories can have their own category and field.
How do I check availability?
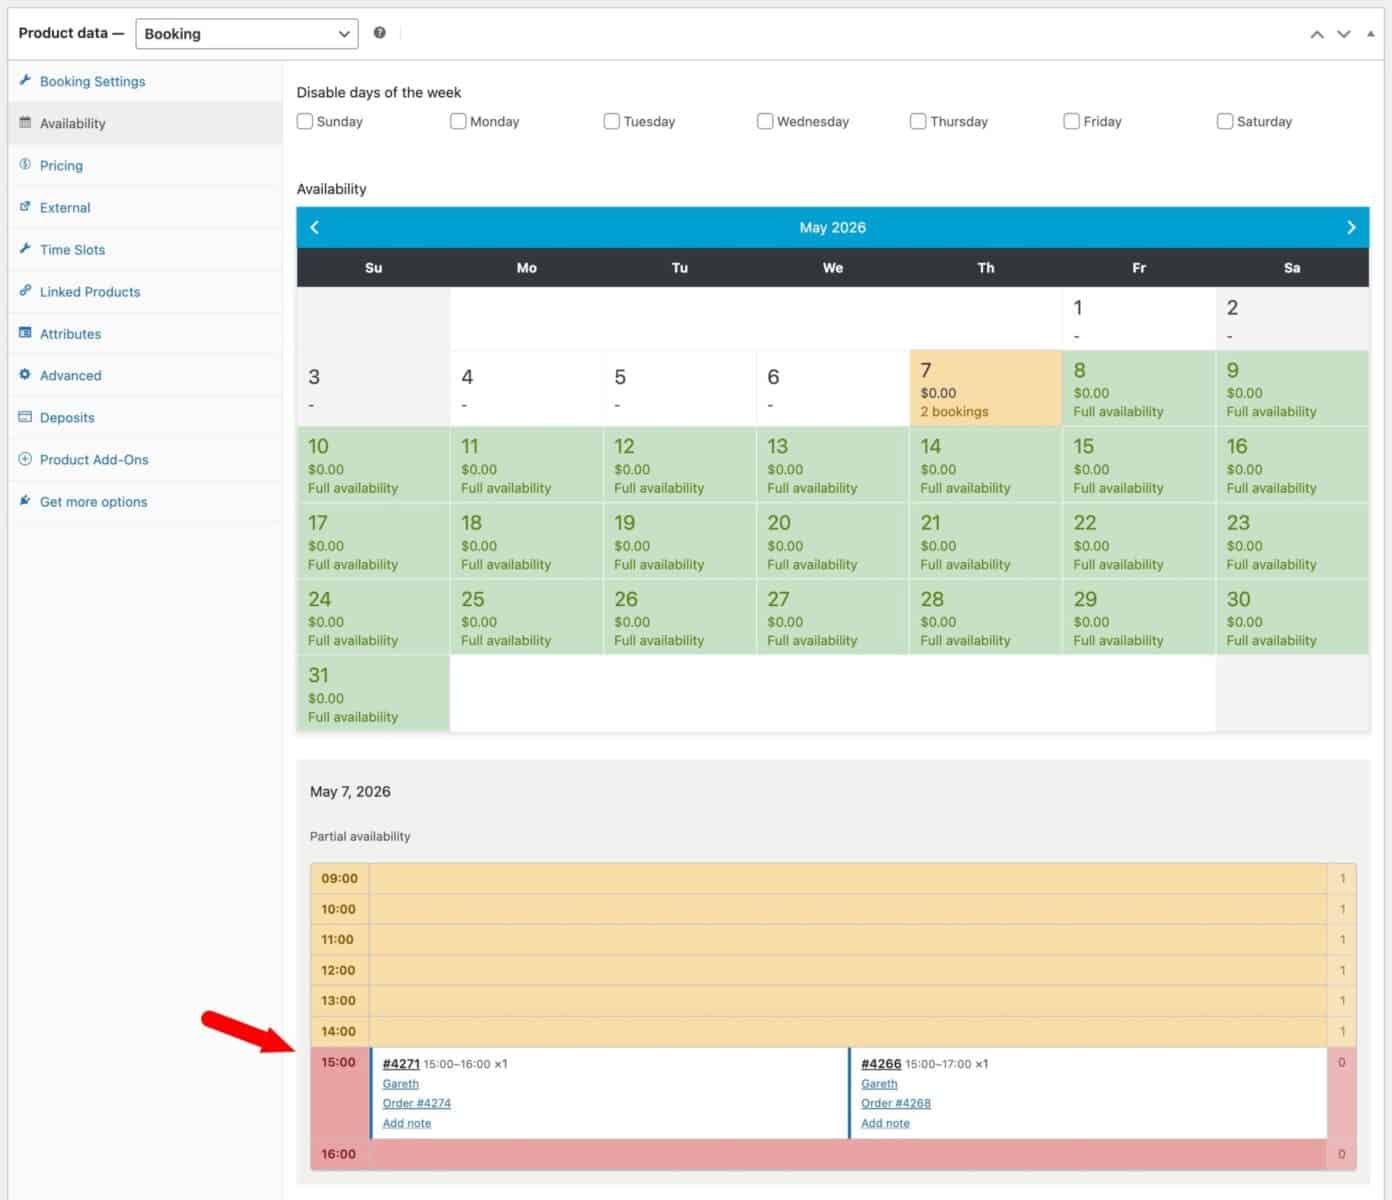
Each individual board product has an Availability tab in the product editor. This shows a color-coded calendar for that product:
- Full availability means the date is open and can still be booked
- Part availability means some slots on that date have been taken but others remain
- No availability means the date is fully booked
Click any date on the calendar to see more detail about what’s booked on that day. This is useful for spotting peak periods at a glance, confirming stock before taking a manual booking over the phone, or checking whether a particular slot is free without having to navigate to the front end.
How do I manage bookings manually?
To view all bookings, go to WooCommerce > Bookings in your WordPress admin. This shows a list of all current bookings across your products.
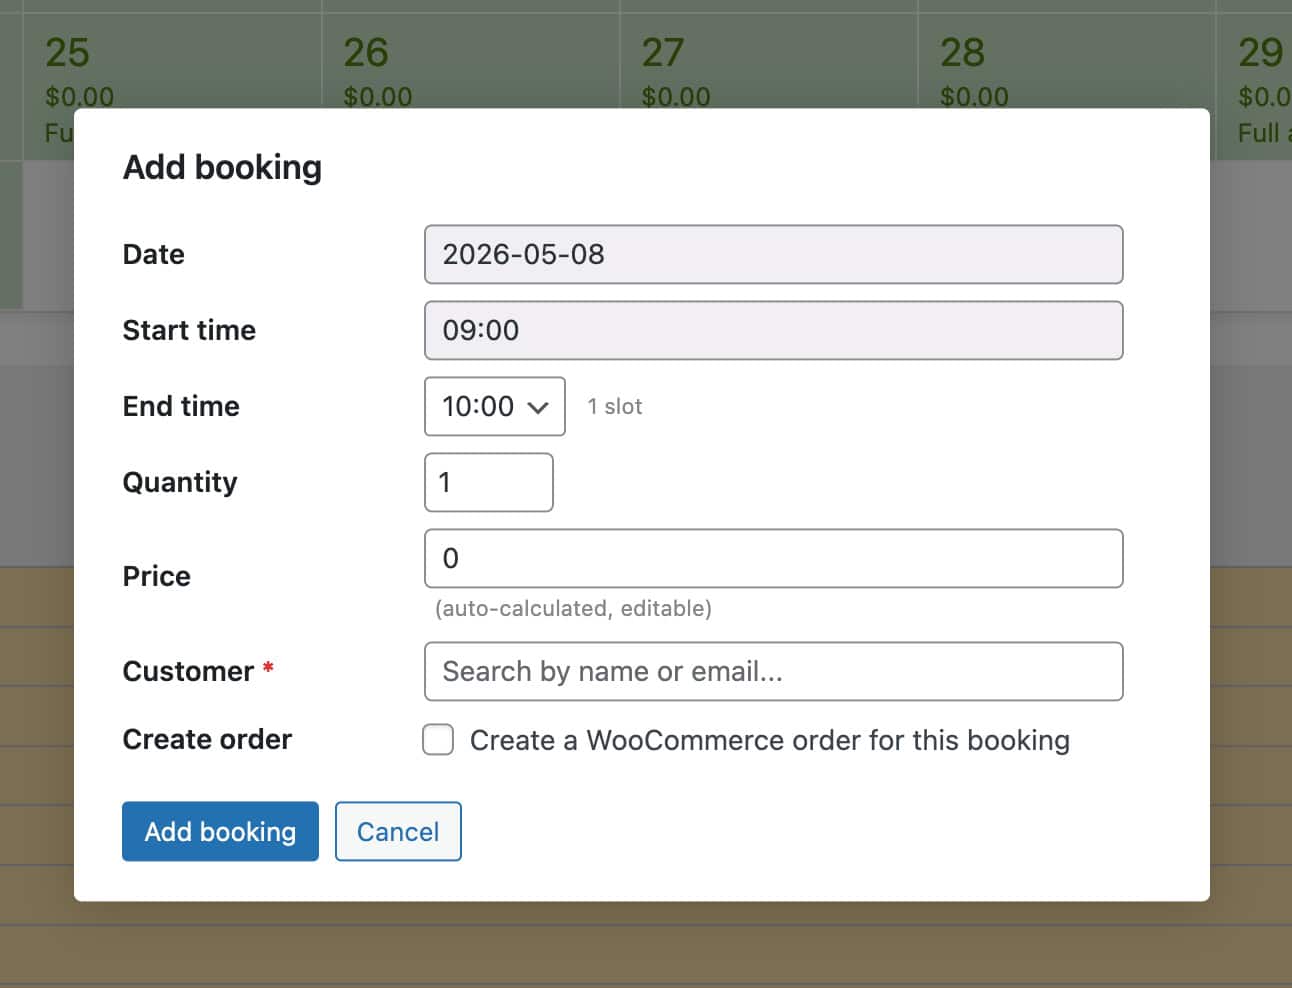
Add a booking
You can add a booking direct from the availability calendar – for example, when a customer calls to reserve a board. Just select the date and hover over the time of the booking, then click ‘Add booking’. A modal window will allow you to add all the details directly.
Alternatively, click Bookings > Add New Booking, select the product, and choose the date and time slot. You can assign it to an existing customer account or enter details for a new one.
Edit a booking
To edit an existing booking, go to Bookings click on the booking in the list. From here you can change the date, adjust the time slot, or update the customer details. To cancel or delete a booking, use the status controls on the same screen.
Any changes you make manually are reflected in the availability calendar immediately, so there’s no risk of double-booking a board that’s already been reserved by phone.
Further reading
If you’d like to explore more ways to use Bookings for WooCommerce, these tutorials cover a range of hire and rental scenarios:
- Create a boat hire product page using Bookings for WooCommerce – how to set up hourly and full-day hire for boats, with time slots, seasonal pricing, and extras such as life jacket hire
- How to accept security deposits for rentals in WooCommerce – how to collect a refundable deposit at checkout alongside the hire fee, using the Deposits Part Payments plugin
- Accept online bookings for campervan rentals with WooCommerce – a walkthrough for multi-day vehicle rentals with availability calendars and pickup/dropoff options
- How to create a bike rental store in WooCommerce – covers setting up multiple bike types as bookable products with pricing, stock limits, and a clean front-end booking experience
- Set up equipment rentals in your WooCommerce store: two methods – a broader overview of the two main approaches to equipment rental in WooCommerce, useful if you’re still deciding on the right setup for your store
WooCommerce surf hire shop – recap
In this article we looked at how to create a fully functioning surf hire shop in WooCommerce where customers can book multiple items from the same page. We looked at how to set up each product with pricing for hourly bookings, how to set discounts and seasonal prices, how to add extra options, and how to manage bookings direct from the WordPress admin.
All you need are the Bookings for WooCommerce plugin and the WooCommerce Product Add-Ons Ultimate plugin – available together as the WooCommerce Bookings and Product Add-Ons Bundle.
WooCommerce Bookings and Product Add-Ons Bundle
Create the ultimate bookings site in WooCommerce
This setup works with all themes and page builders. If you have any questions along the way, our support team is on hand to help – plus every Plugin Republic plugin comes with a 14-day money-back guarantee, so you can get started risk-free.