Create a boat hire product page using Bookings for WooCommerce
If you run a marina, lake or river activity center, or any business that hires out kayaks, canoes, boats, then taking bookings online can save you hours of back-and-forth phone calls and emails. WooCommerce doesn’t let take bookings by default – so you’ll need an extra plugin. This tutorial walks you through setting up a boat hire product page using Bookings for WooCommerce – including:
- Configuration and pricing
- Date and time-based availability
- The customer-facing booking experience
- Managing bookings in the back end
By the end you will be able to:
- Accept online bookings for boat hire by the hour or session
- Control how many boats are available at any given time
- Set pricing that calculates automatically based on duration and group size
- Charge more during peak season without manually updating prices
- Restrict availability for specific slots or dates
- Give customers a clear, intuitive way to choose their time
- View availability per day and per session clearly and intuitively in the WordPress admin
- Charge for optional extras like equipment or food
- Charge for a refundable security deposit
Why use Bookings for WooCommerce for boat hire
Running boat hire manually means fielding calls, maintaining a paper diary, and chasing payments. Bookings for WooCommerce handles all of that through your WooCommerce store.
- Customers can book and pay online at any time without contacting you
- Real-time availability prevents double-booking across your entire fleet
- Pricing is calculated automatically based on duration and the number of boats selected
- Seasonal pricing rules apply and expire on the dates you set, with no manual intervention required
- Every booking flows into WooCommerce as an order, so you get confirmation emails, order management, and reporting out of the box
- You can use any WooCommerce payment gateway you like to accept payment – from credit cards and PayPal through to bank transfer and cash on the day
Tutorial: Create a boat hire product in WooCommerce
In this tutorial, we’ll assume you already have WooCommerce installed and active on your site. You can also view the demo product here.
Step #1: Install Bookings for WooCommerce
After you have purchased your copy of Bookings for WooCommerce, you can install and activate it by following the simple steps below:
- Download the zip file using the link in your welcome email or direct from your Account page
- Go to Plugins > Add New in your WordPress dashboard
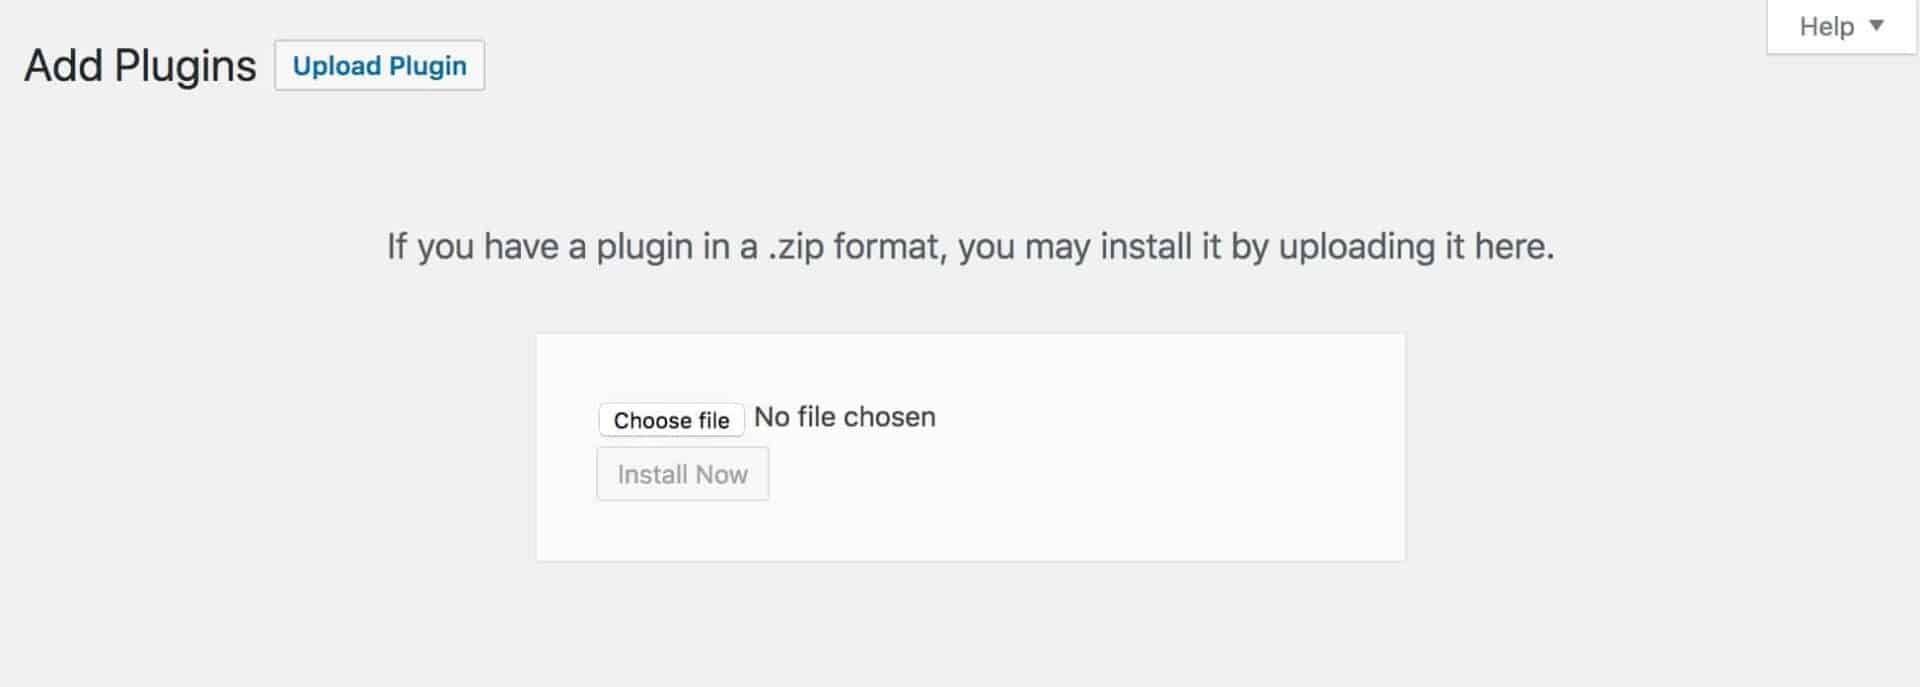
- Click on the ‘Upload Plugin’ button
- Drag and drop the zip file into the ‘Choose File’ area and click ‘Install Now’
- When the plugin has uploaded, just click on the ‘Activate’ button
Once the plugin is activated you can start to create your boat hire product.
Step #2: Create a boat hire product in WooCommerce
With Bookings for WooCommerce active, you need to create a product for your boat hire. You can create as many of these as you like – so if you have different models of boat or different equipment altogether that you’re hiring out, you can create a page for each.
Create a new product in WooCommerce:
- Go to Products > Add New in your WordPress dashboard
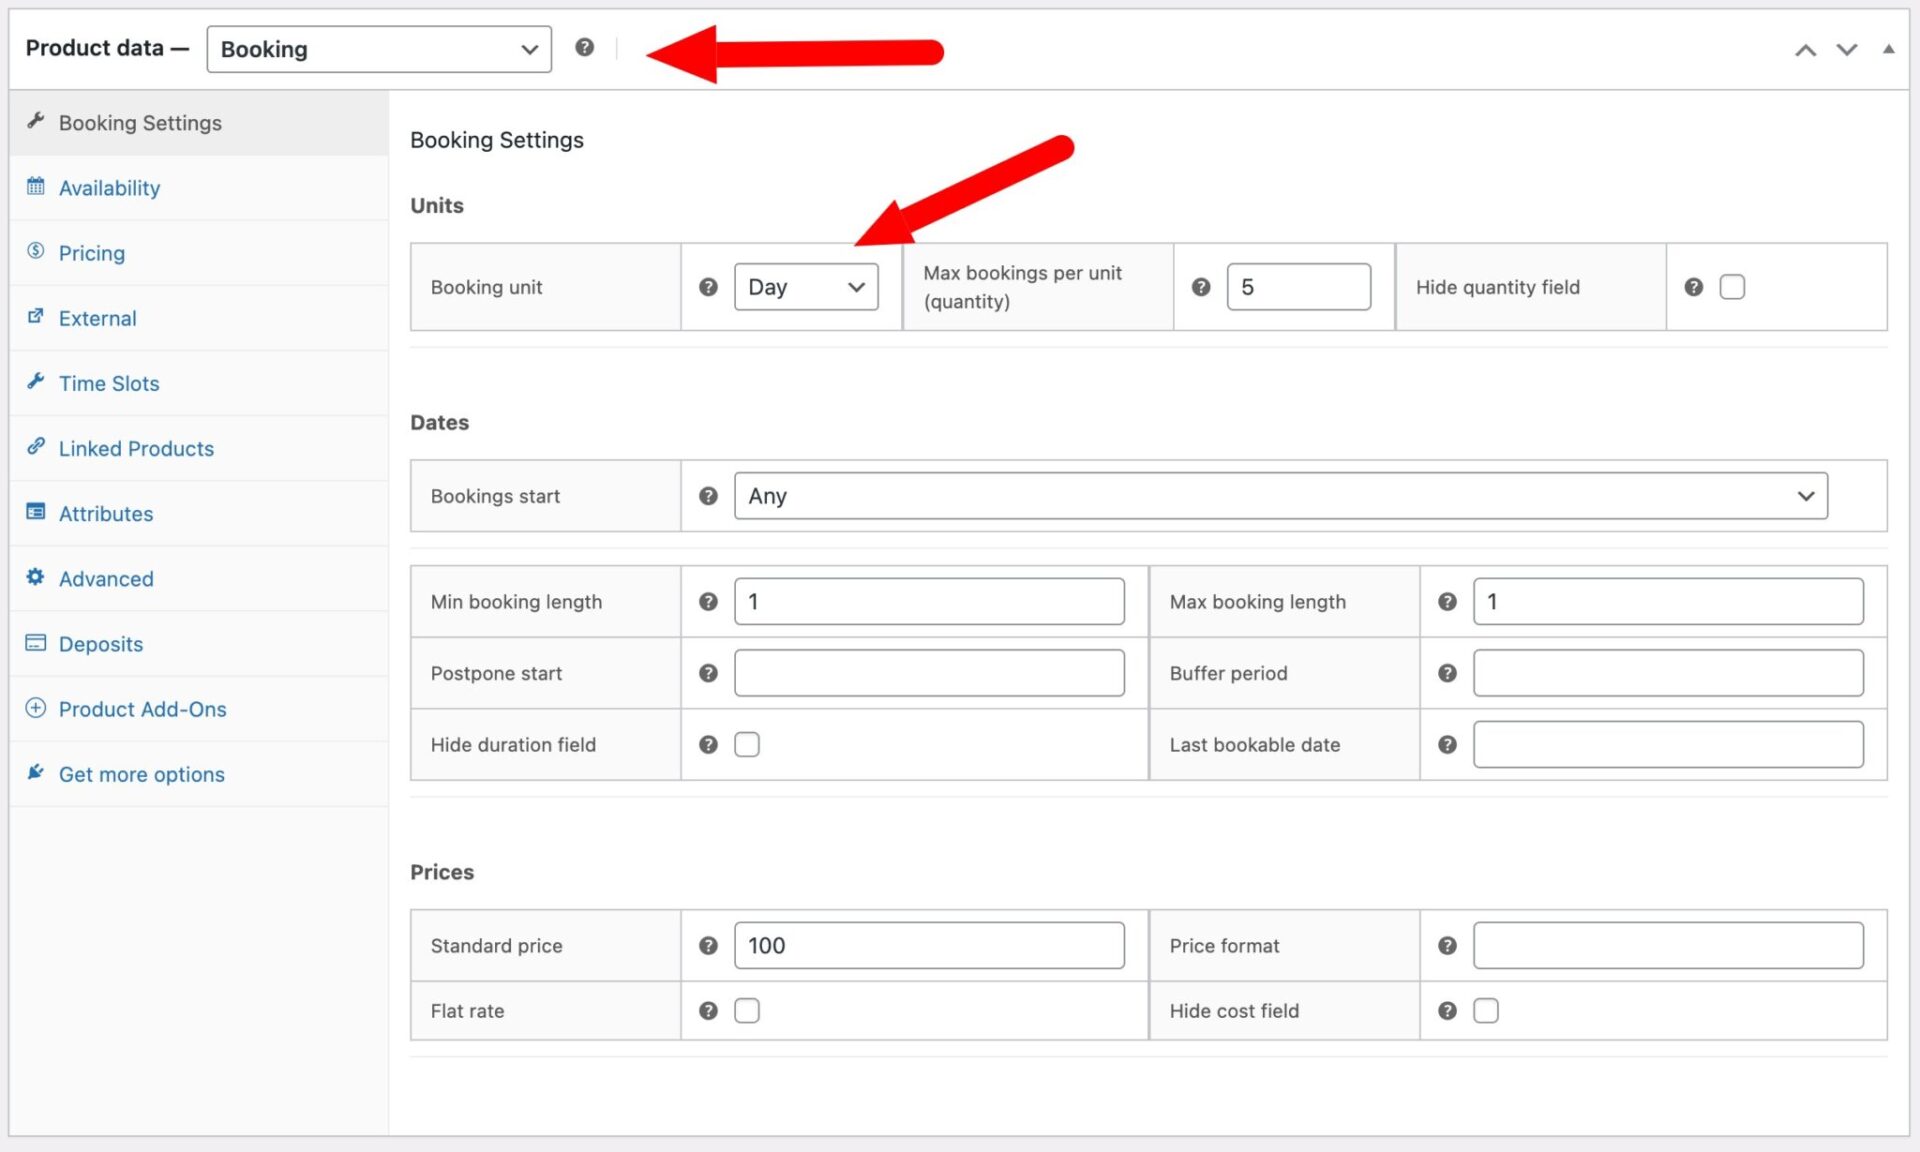
- Set the product type to Booking using the product type dropdown
- Add a product name, description, and photos of your boats
- On the Booking Settings tab, set the Booking unit to Day
Setting the booking unit to Day is required before you can enable time slots. This tells the plugin that customers are booking within a single day rather than across multiple days.
Step #3: Configure the main booking settings
One of the most important steps is to define how many boats you have available. If you have multiple boats of the same spec – e.g. the same capacity, design, etc – then you can hire them out from the same product page. You don’t need a separate page for each boat.
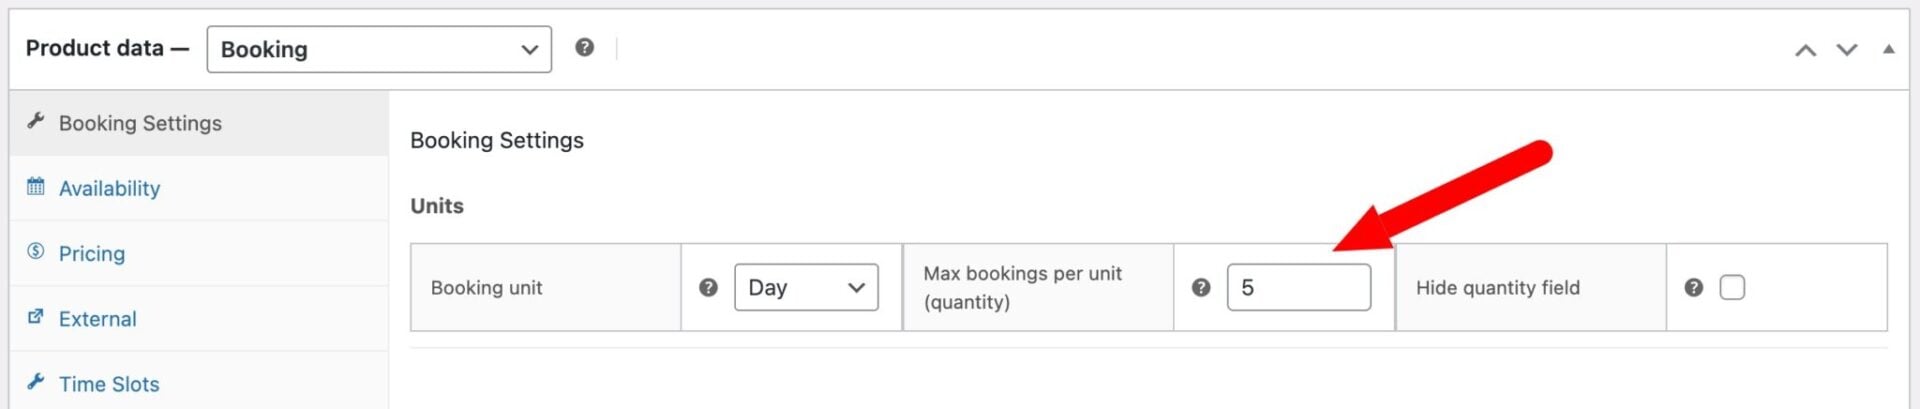
The Max bookings per unit field on the Booking Settings tab controls how many customers can book the same slot at the same time. In other words, this is where you define how many boats you have available.
- Set Max bookings per unit to the number of boats, e.g. 5
- Once a time slot reaches 5 bookings it will show as unavailable to new customers
- If you need to hold a boat back for maintenance on specific dates, you can reduce availability for individual slots using per-slot overrides (see below)
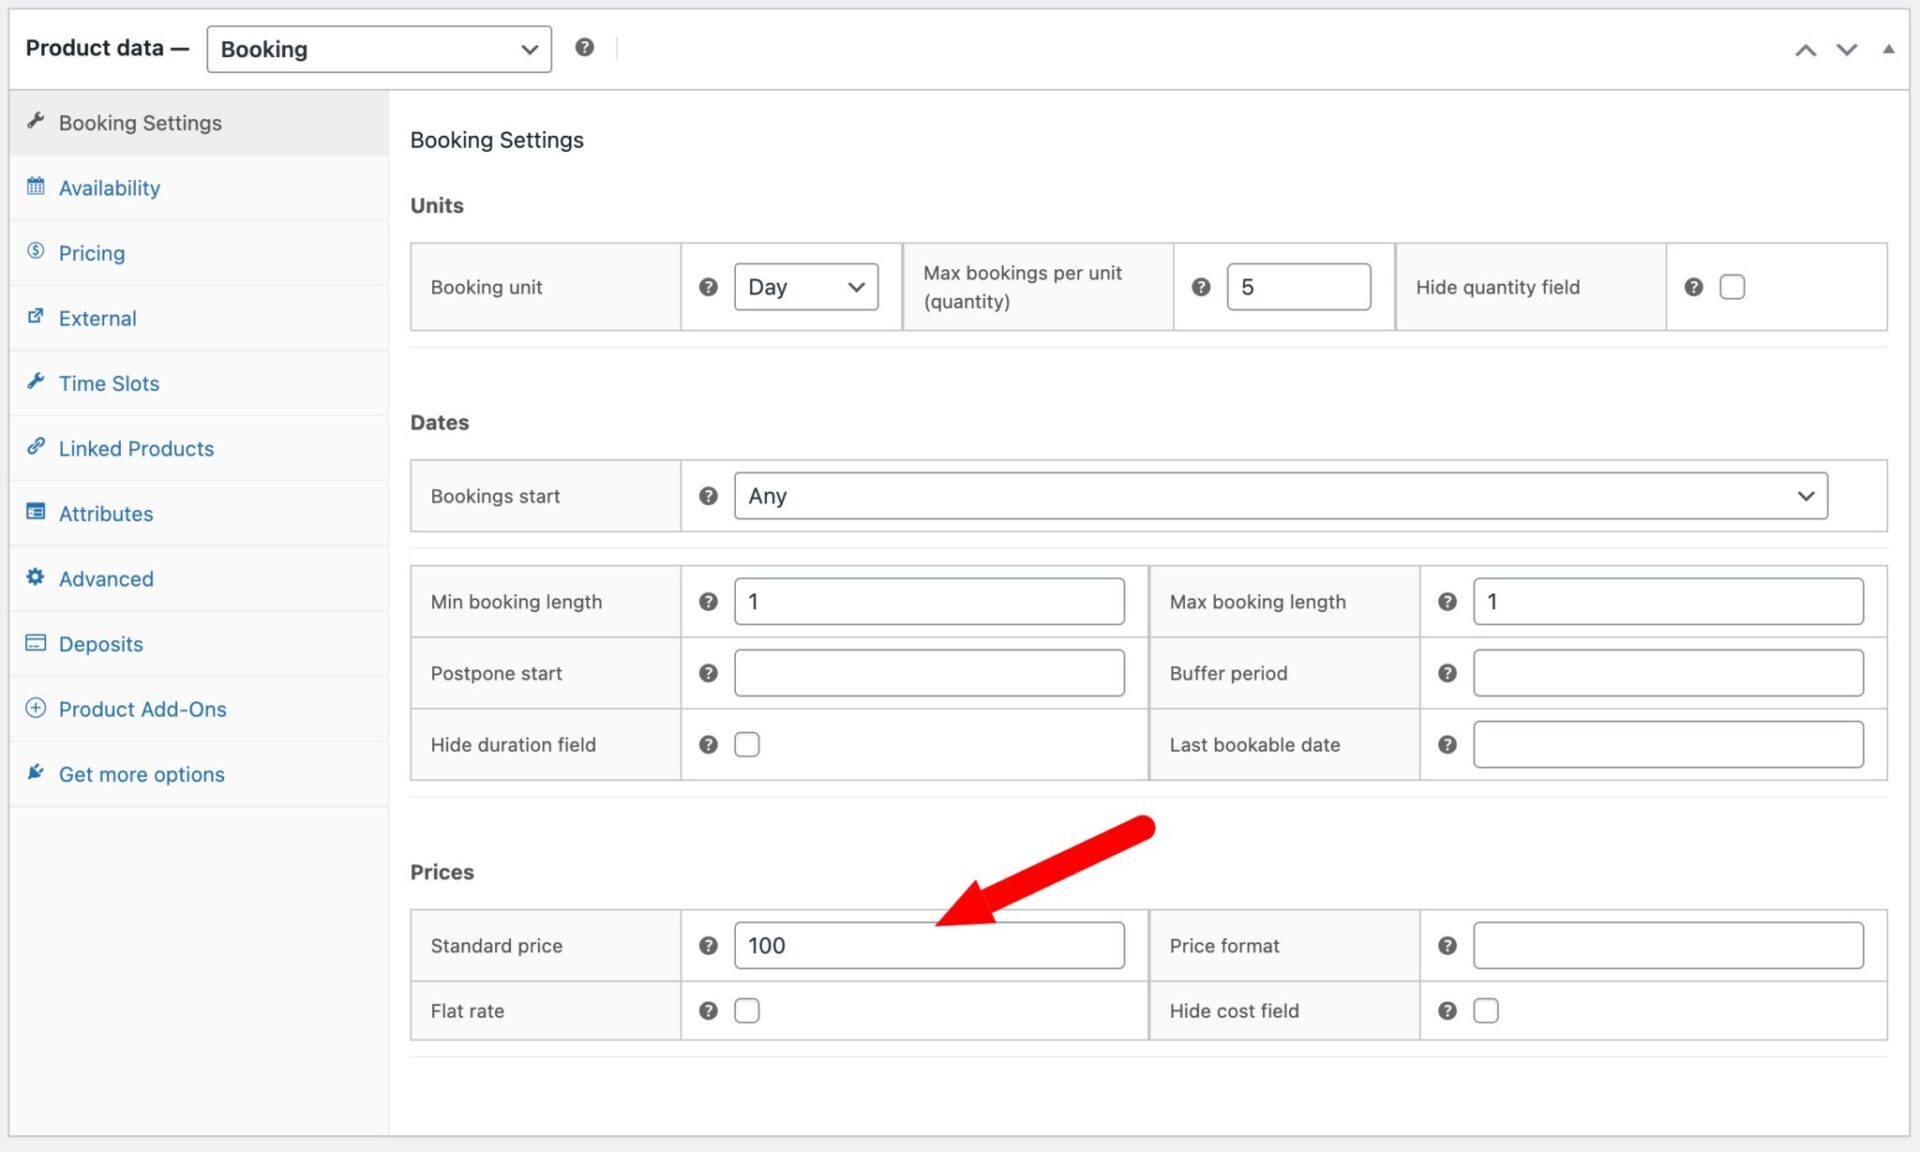
Also on the Booking Settings tab, you can configure some basic information about dates and the duration of hires. In our example, we’re looking at hiring out boats for a day or less, so you can set Min booking length and Max booking length to 1. This is required for using time slots.
Finally, you can also define the day rate – the cost for booking a boat for an entire day – in the Standard price field.
Step #4: Configure time slots
With your basic booking settings configured, you can now define time slots. Time slots divide each bookable day into fixed windows that match your hire periods – e.g. per hour, per 90 minutes, etc.
To create time slots in Bookings for WooCommerce:
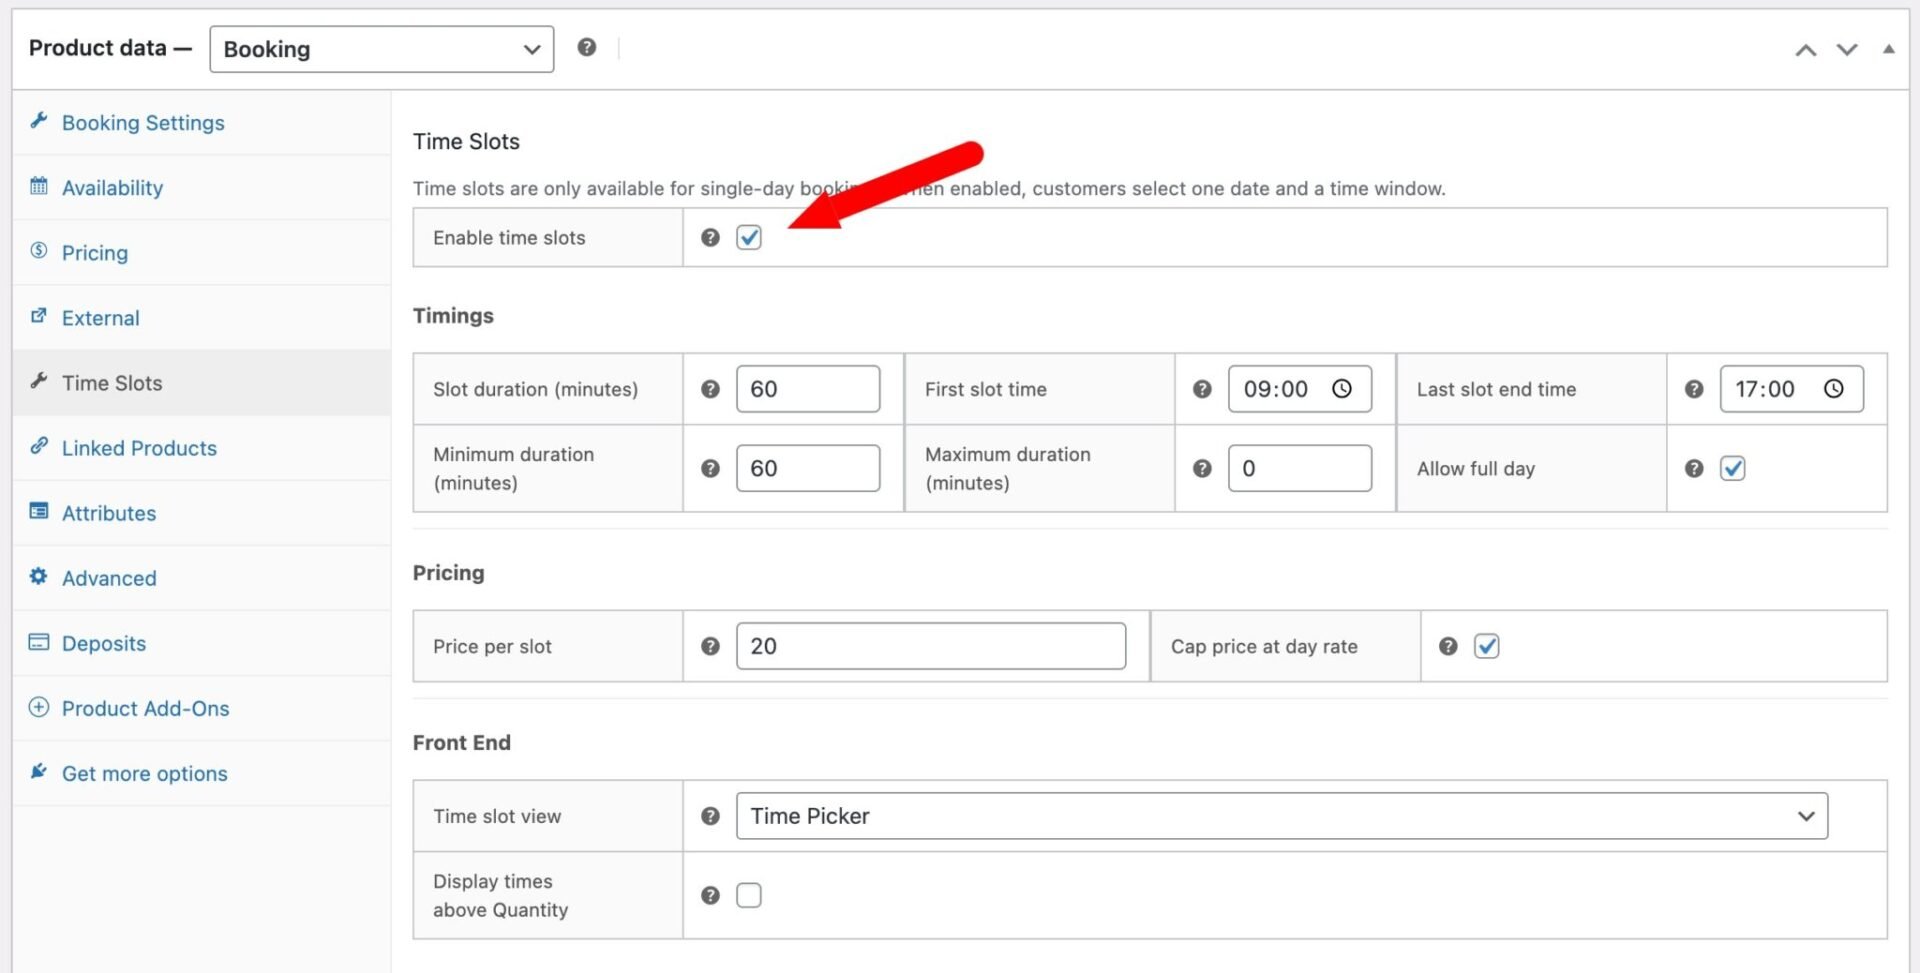
- On the Time Slots tab, check Enable time slots
- Set First slot time to your opening time, e.g.
09:00 - Set Last slot end time to your closing time, e.g.
17:00 - Set Slot duration to match your standard hire period, e.g.
60for hourly hire
With these settings, the plugin automatically creates 8 slots running from 9:00 AM through to 4:00 PM. A customer booking a 2-hour session occupies two consecutive slots.
If you want to enforce minimum or maximum hire lengths:
- Set Minimum duration to
60if you do not offer anything shorter than an hour - Set Maximum duration to
180if you do not allow bookings longer than 3 hours
To offer a full-day hire option, check Allow full day. This adds a Whole day option to the time selector that books the entire window from your first slot to your last in a single selection. This will override the Maximum duration setting – so users can still book a whole day even if the maximum hourly session is 3 hours.
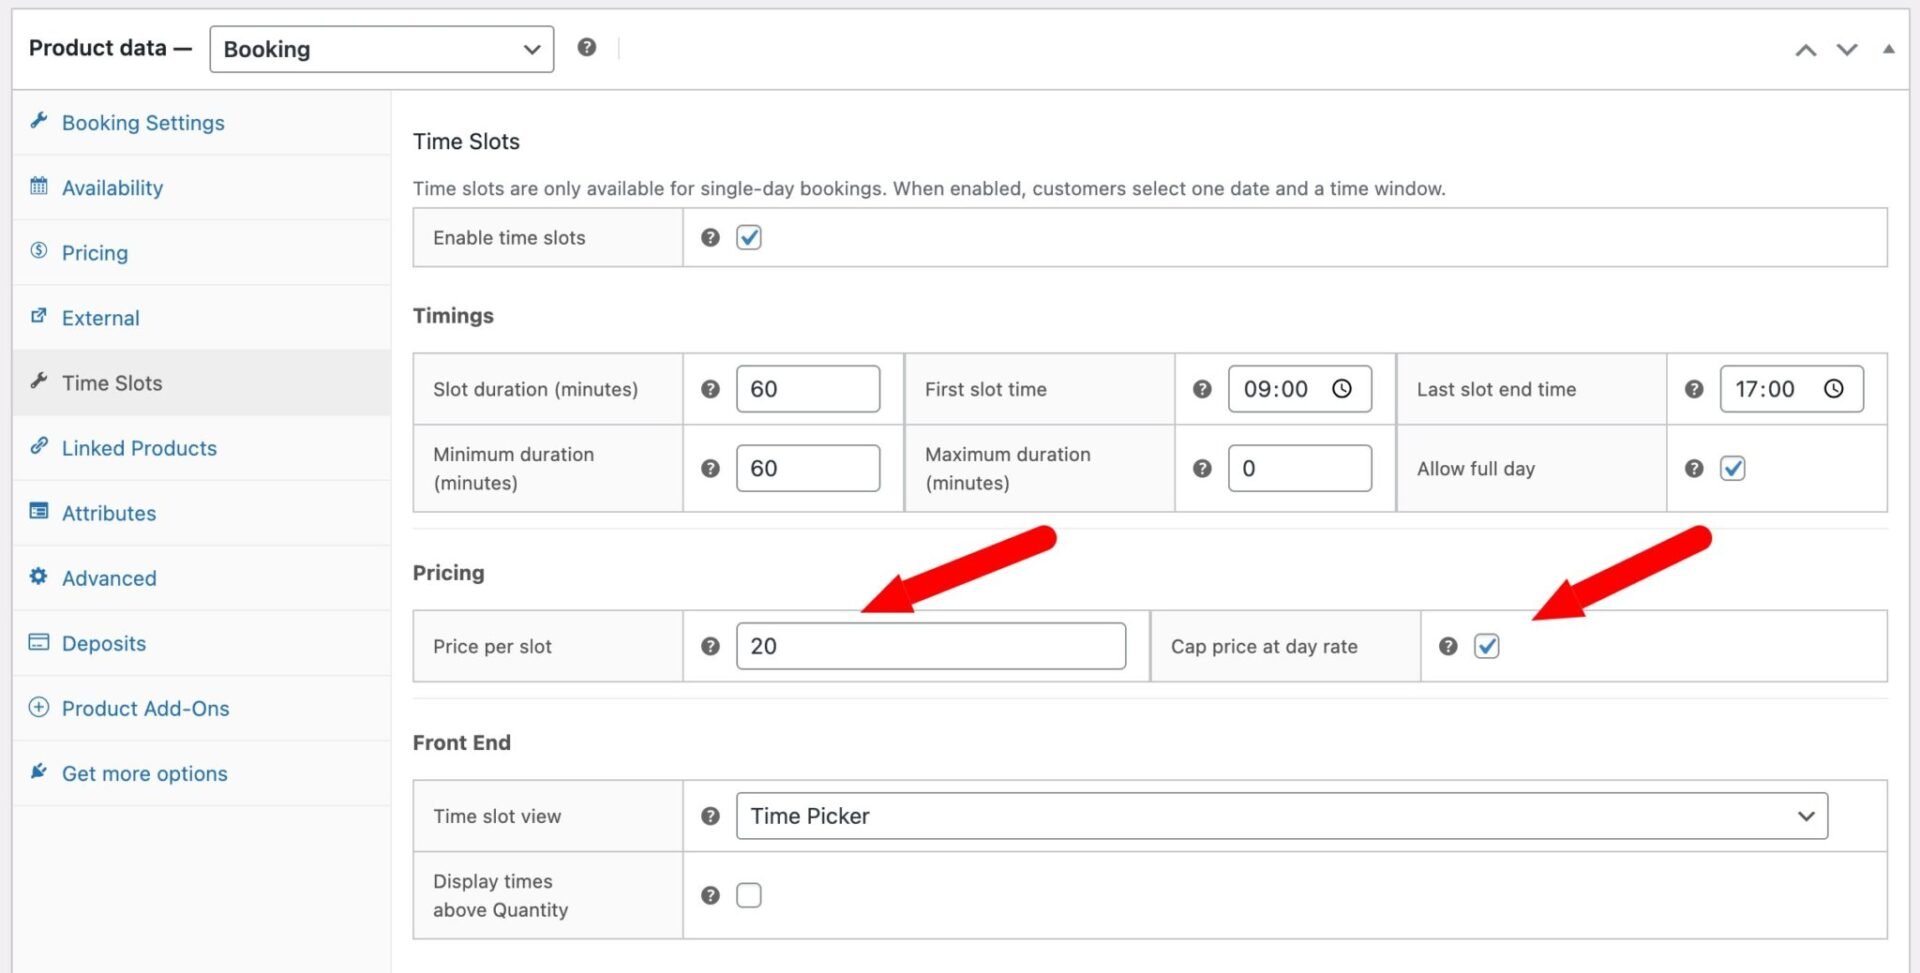
Step #5: Set prices for your time slots
Once you’ve defined the timings for each slot, you can set prices:
- Set a Price per slot on the Time Slots tab, e.g.
20.00for $25 per hour per boat - The plugin multiplies this by the number of slots booked, so a 2-hour booking costs $40 automatically
- If you want to offer a full-day rate that is lower than the per-slot total would suggest, enter the full-day price as the product’s standard price and check Cap price at day rate. The plugin will charge whichever is lower.
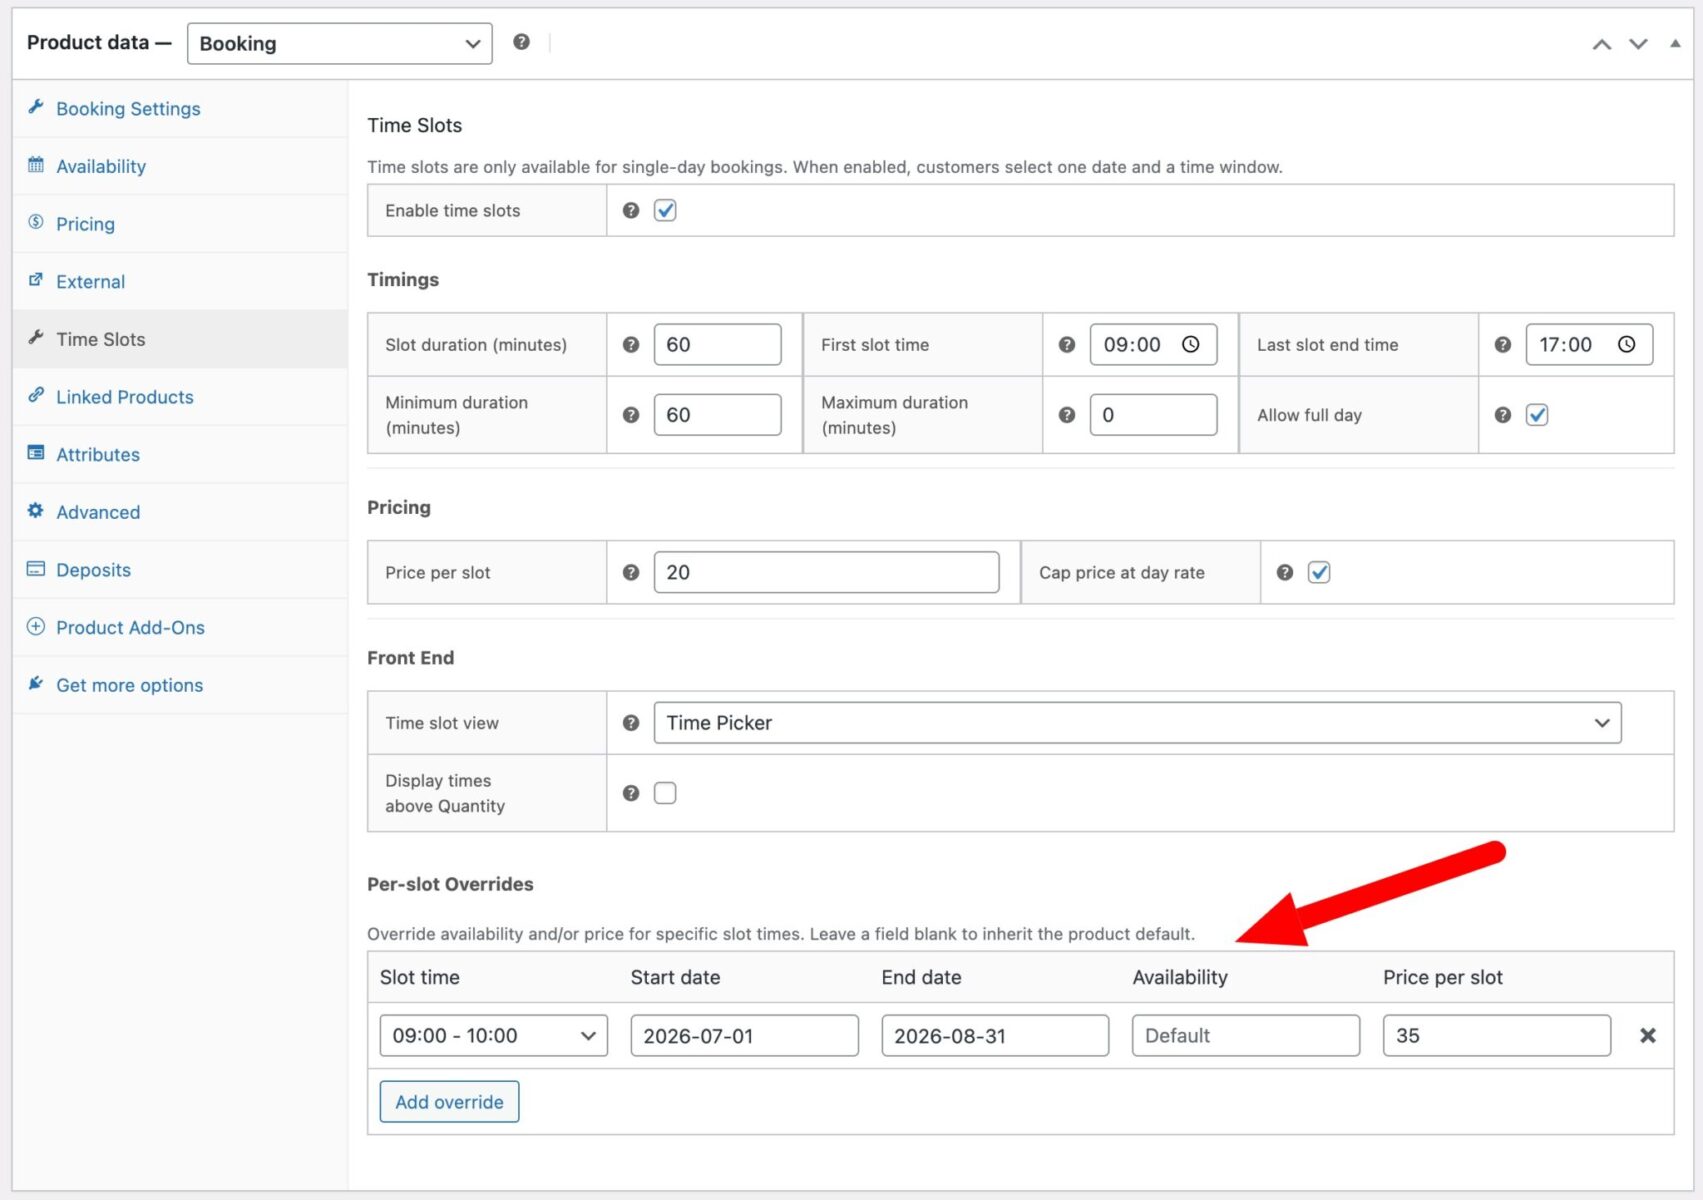
Seasonal and non-standard pricing
If you want to set different prices for different times of the year – or even charge more for certain hours of the day – you can do with the Per-slot Overrides setting.
Peak season pricing can be configured using per-slot overrides without touching your base price.
- Scroll to the Per-slot overrides table on the Time Slots tab
- Click Add override
- Select the slot you want to reprice, e.g.
09:00 - 10:00 - Set a Start date of
2026-07-01and an End date of2026-08-31 - Enter the higher Price per slot, e.g.
35.00
Repeat this for each slot in your day. Between July 1 and August 31 customers will be charged $35 per hour. Outside that window the standard $20 rate applies automatically. You can add additional override rows for other seasonal periods such as public holidays or school vacation weeks.
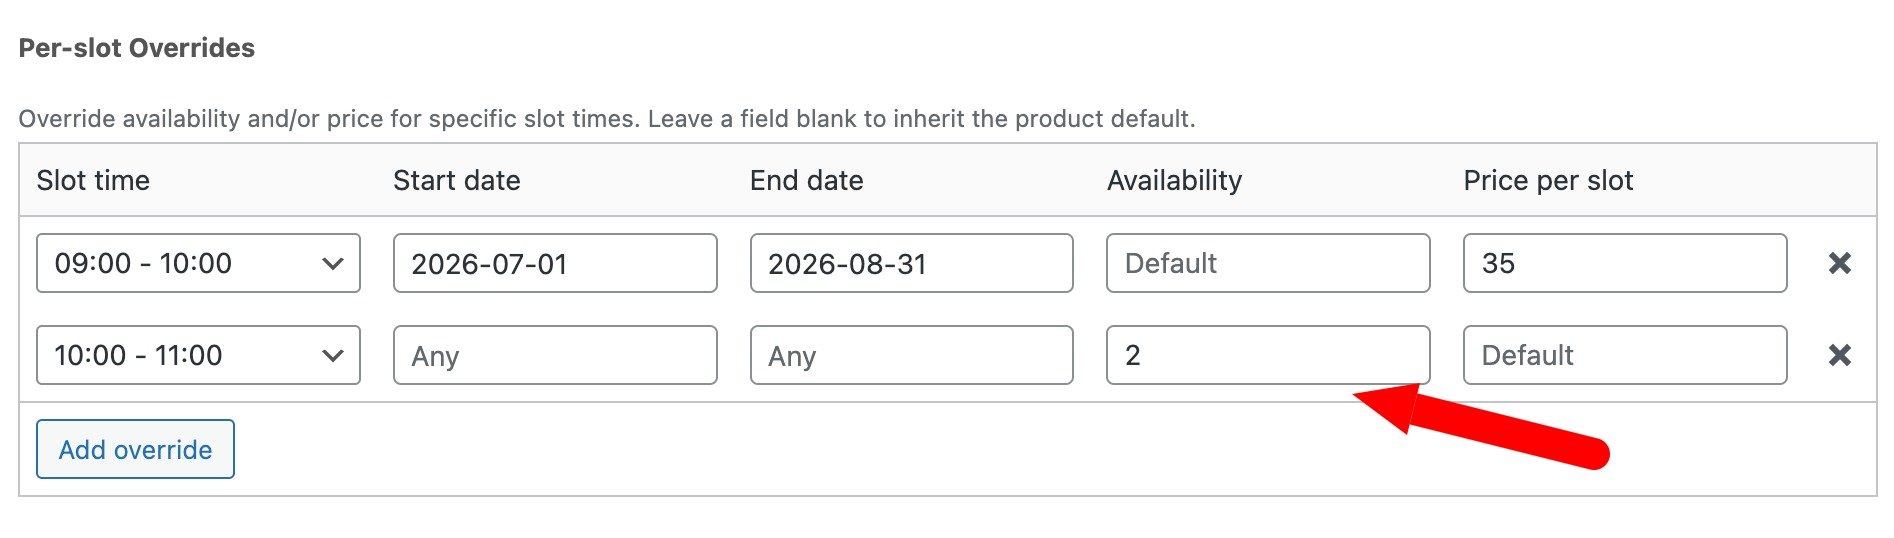
Adjust availability for specific times and dates
Per-slot overrides can also reduce the number of available boats for a particular slot or date range.
- Click Add override
- Select the slot you want to restrict, e.g.
09:00 - 10:00 - Set a Start date and End date if the restriction only applies during a certain period
- Enter a lower Availability value, e.g.
2to hold 3 of your 5 boats back
This is useful if you run guided tours that use several boats on a fixed schedule, or if part of your fleet is out of service for maintenance during a known period. If you need to block a slot entirely, set the availability to 0.
Step #6: Define how customers select their times
The Time slot view setting controls the booking UI your customers see. The right choice depends on how your hire operation works.
- Start Time and End Time: this is straightforward and allows the customer to select the start time then the end time of their boat hire. The options will adjust based on availability for specific times.
- Start time and Duration: the customer picks when they want to arrive, then selects how long they need from a dropdown
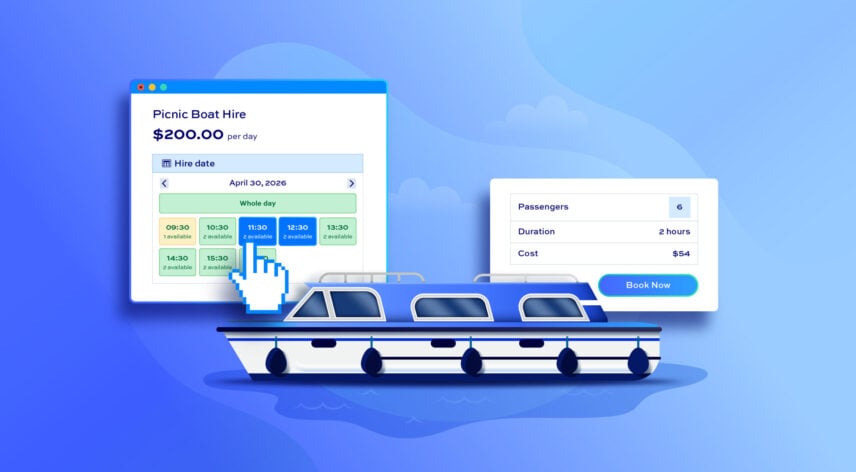
- Duration, Quantity, Start time: the customer commits to a duration first, enters how many boats they need, and then sees which start times are available for that combination. Useful when availability varies by group size and you want customers to understand their options before choosing a time.
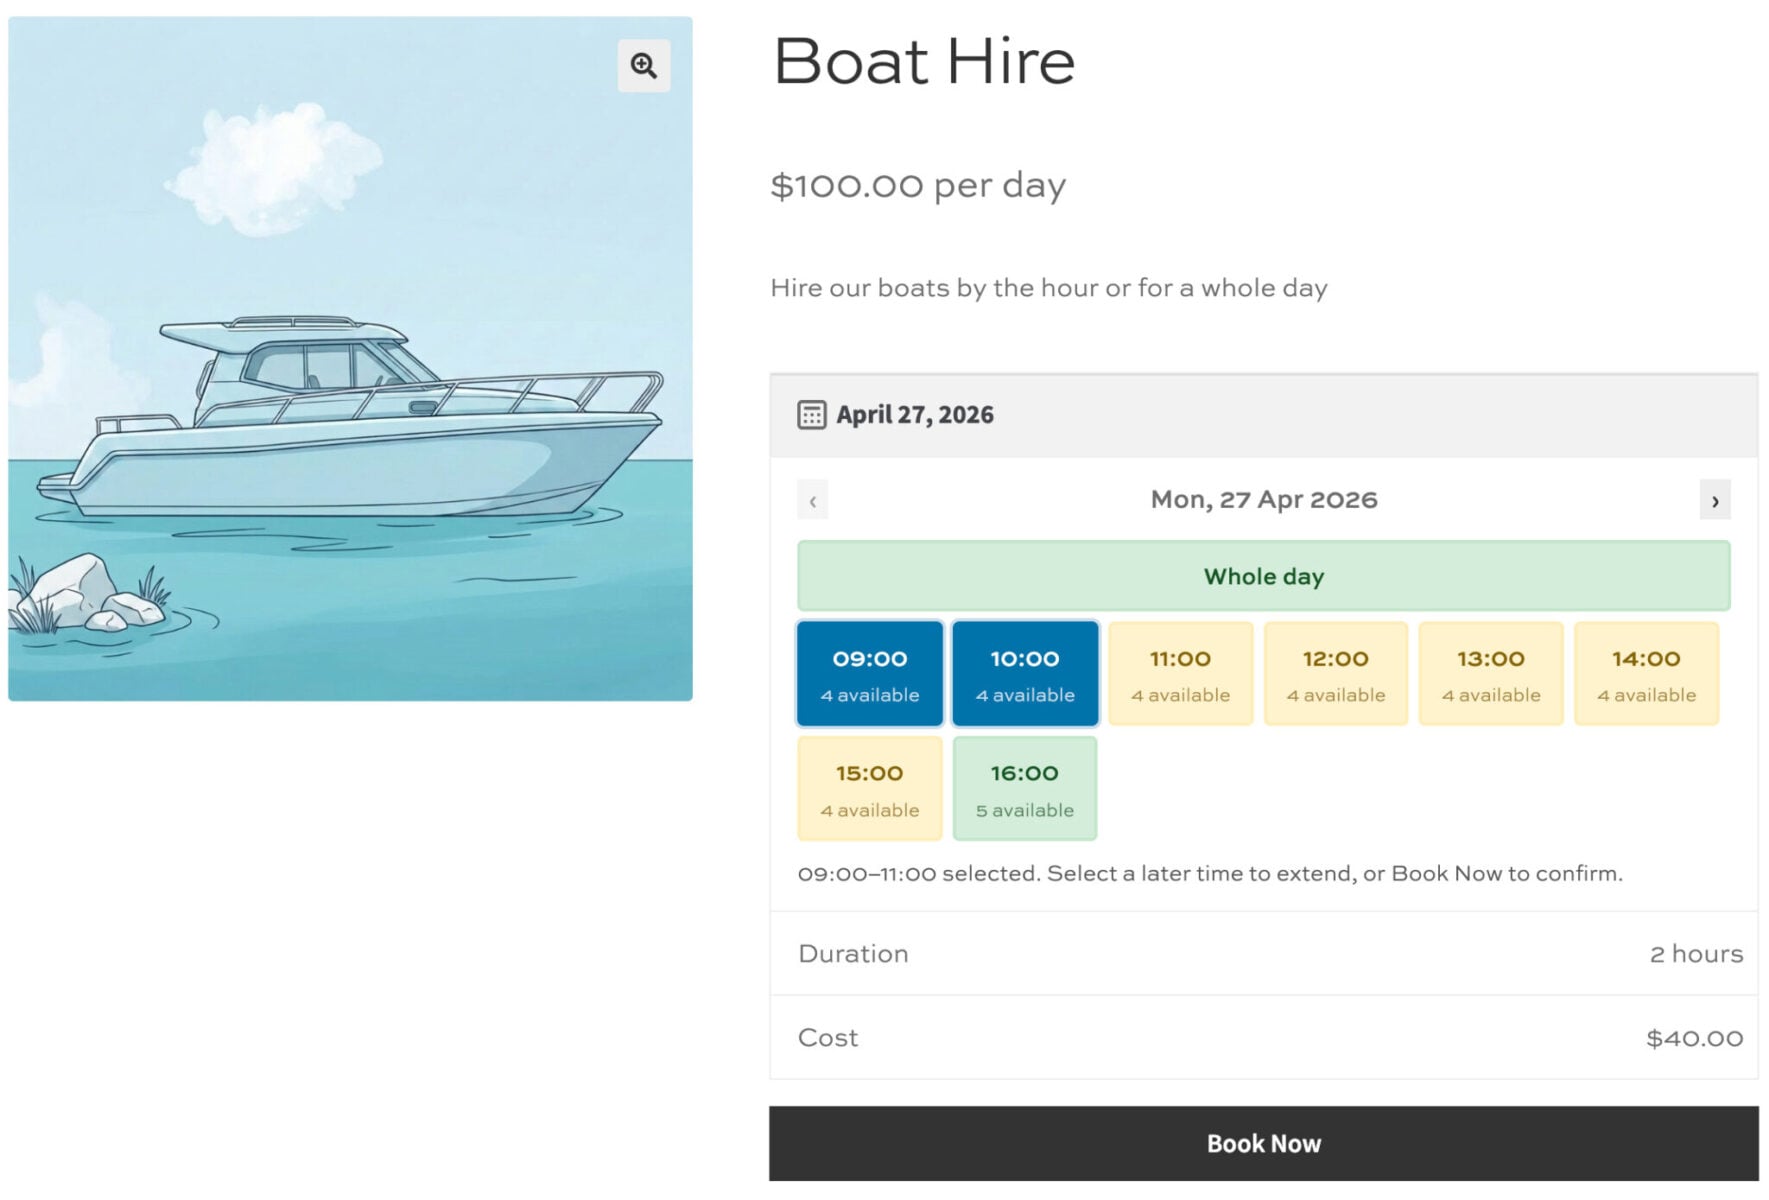
- Time Picker: a visual grid showing all slots in the day. The customer clicks a start slot and clicks again to extend their selection. This is helpful for users who want to see how much time they are blocking out.
- Diary View: a vertical list of slots with availability indicators. This works similarly to the Time Picker but in a list format that may suit simpler schedules.
The last two options have the added benefit of allowing the user to scan through dates without returning to the date picker – making it easier for them to find the times and dates they want.
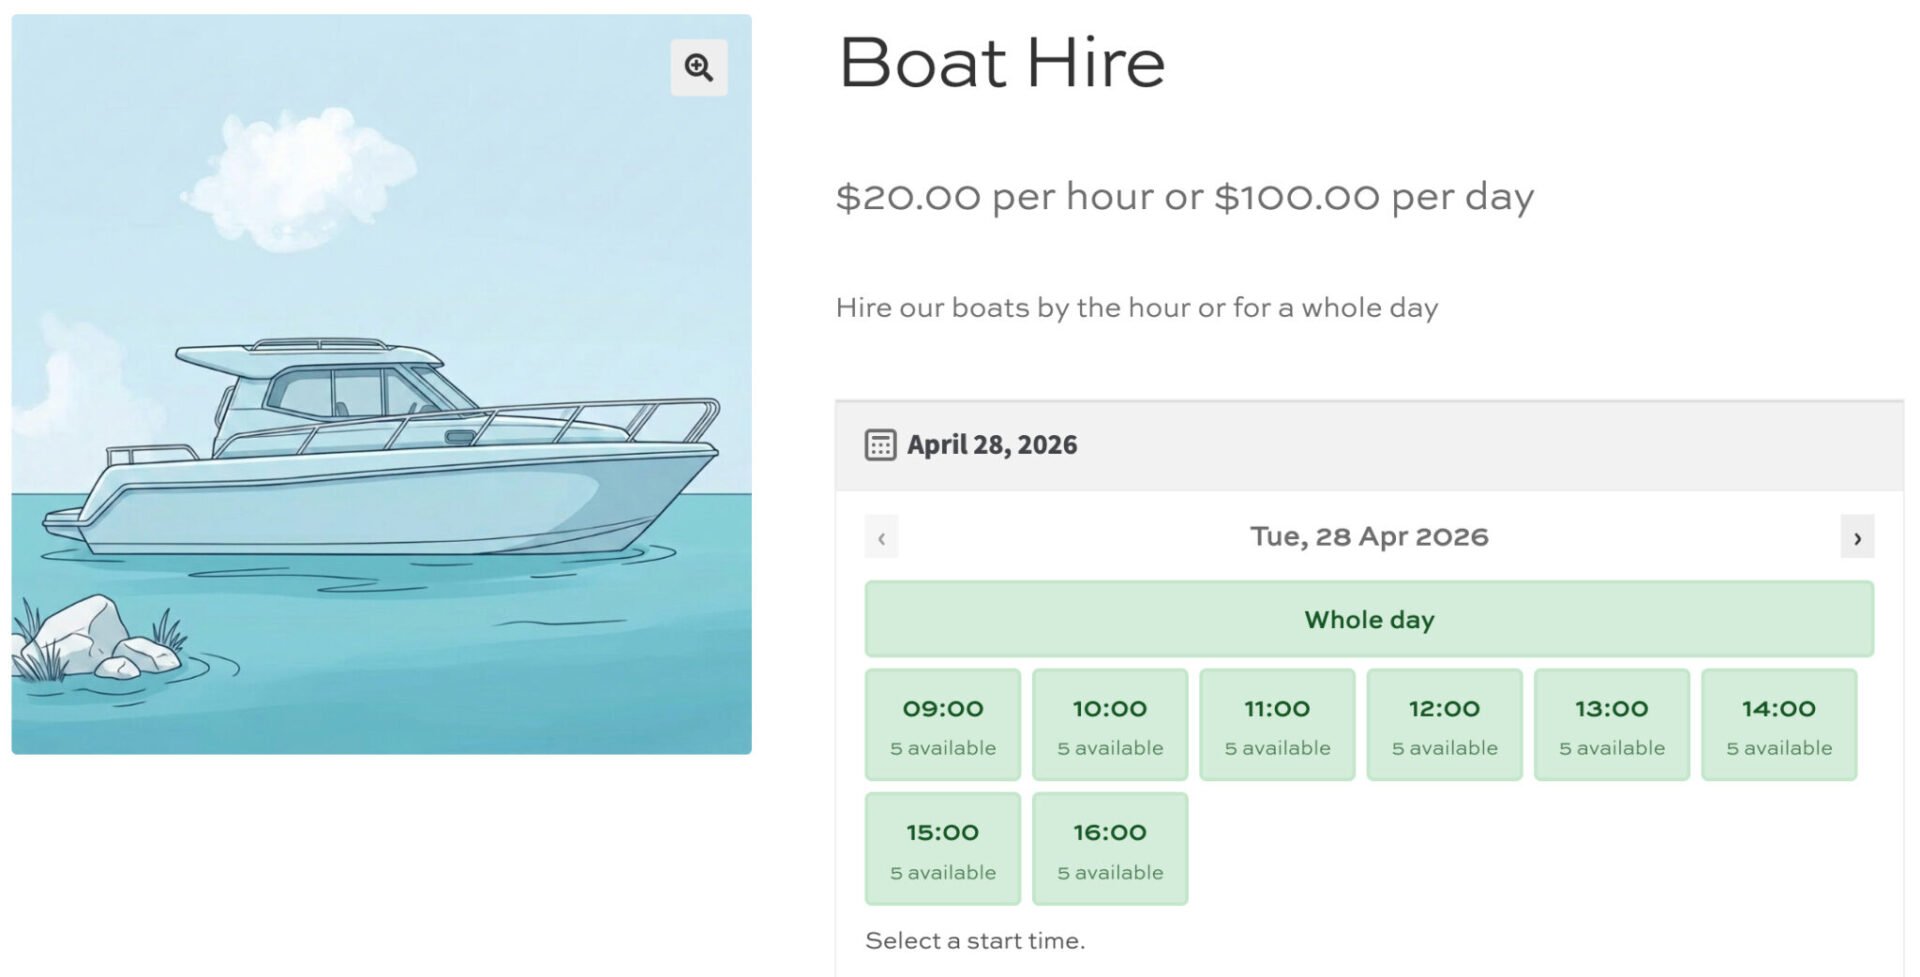
When you’ve updated all your settings, you can publish your product. Customers can now hire boats direct from your WooCommerce product page.
How to manage bookings on the back end
Bookings for WooCommerce makes it clean and easy to manage your boat hires direct from your WooCommerce dashboard.
View availability per product page
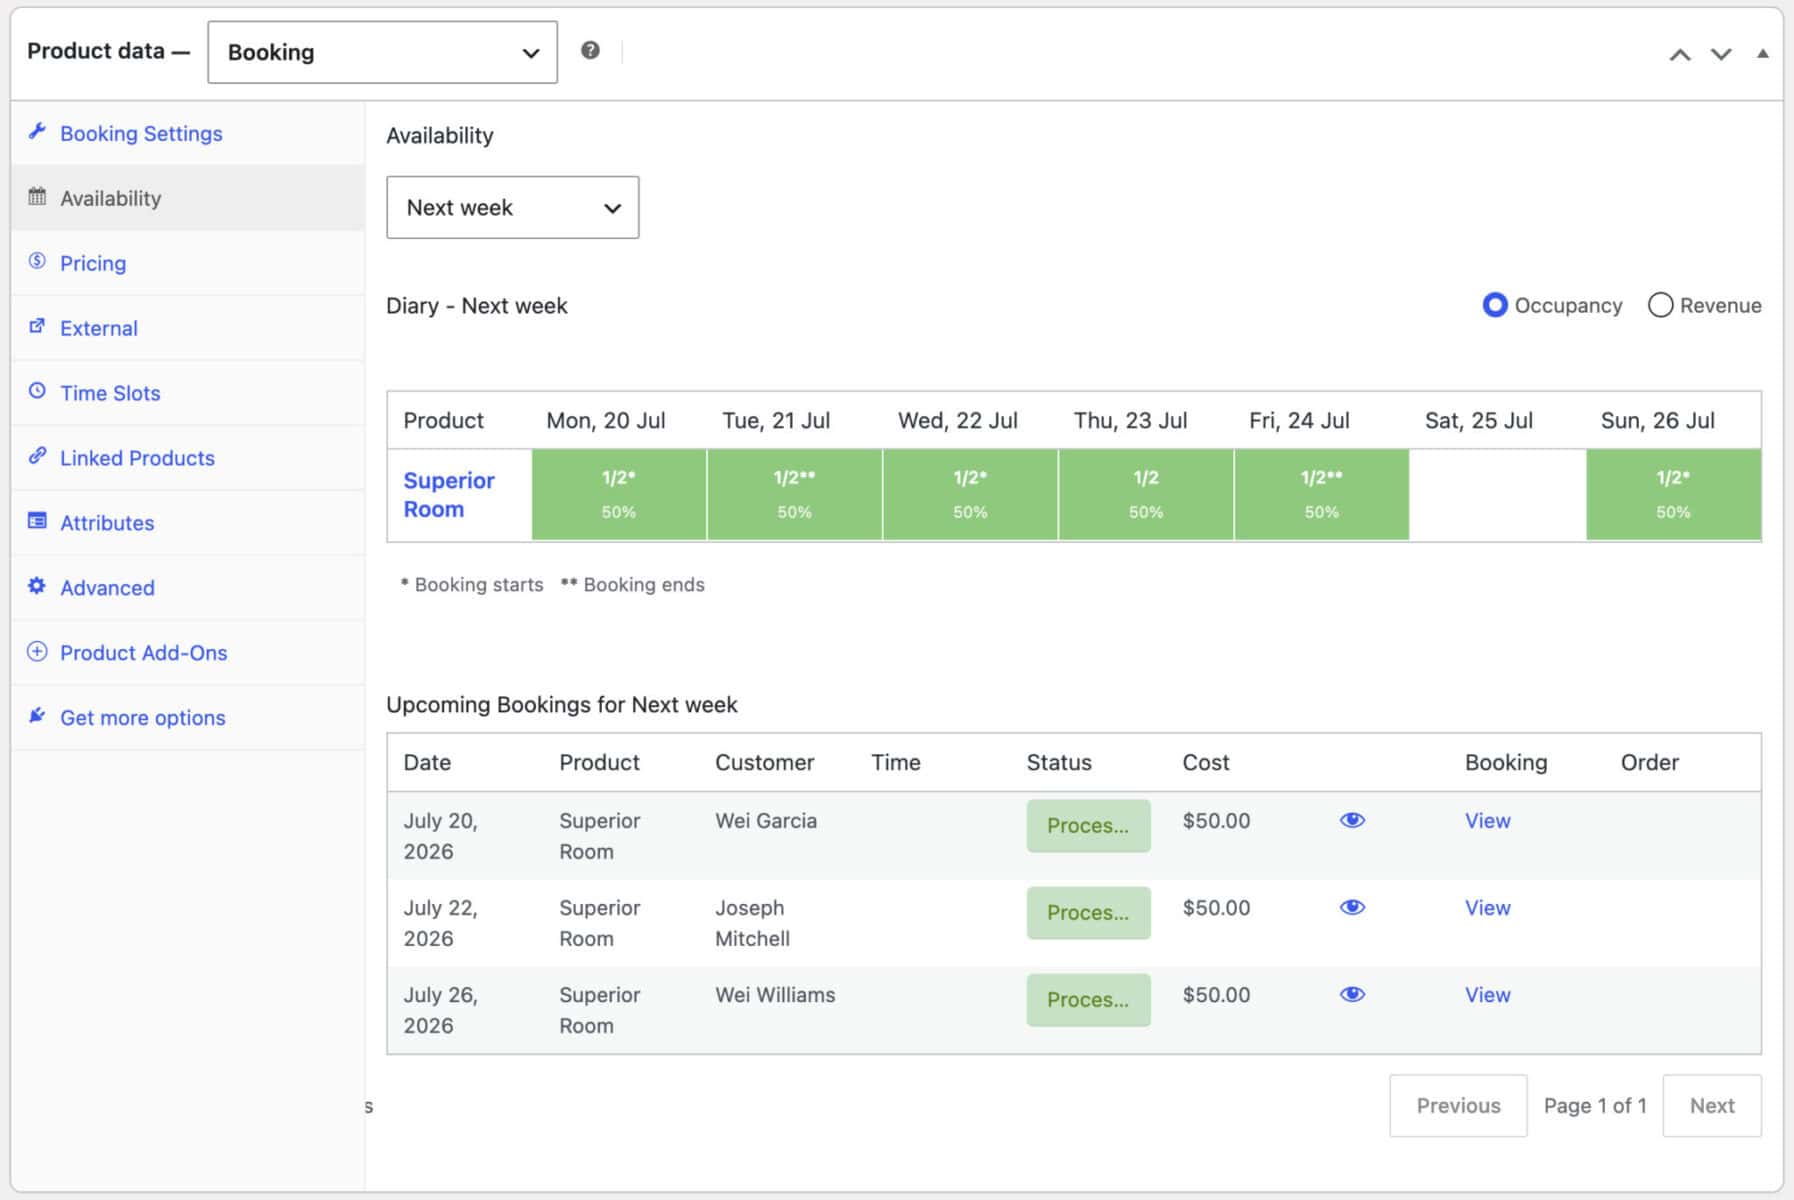
Once your product is live and bookings start coming in, you can monitor availability directly from the product edit screen. The ‘Availability’ tab shows a calendar, week diary, or single-day diary view depending on the date range you choose, scoped to that boat, so you can see which days and slots are booked at a glance.
Click any day or slot to open a panel showing the bookings for that time, with an ‘Add booking’ button so you can add one manually – useful for phone or walk-in bookings, or for blocking out time for maintenance.
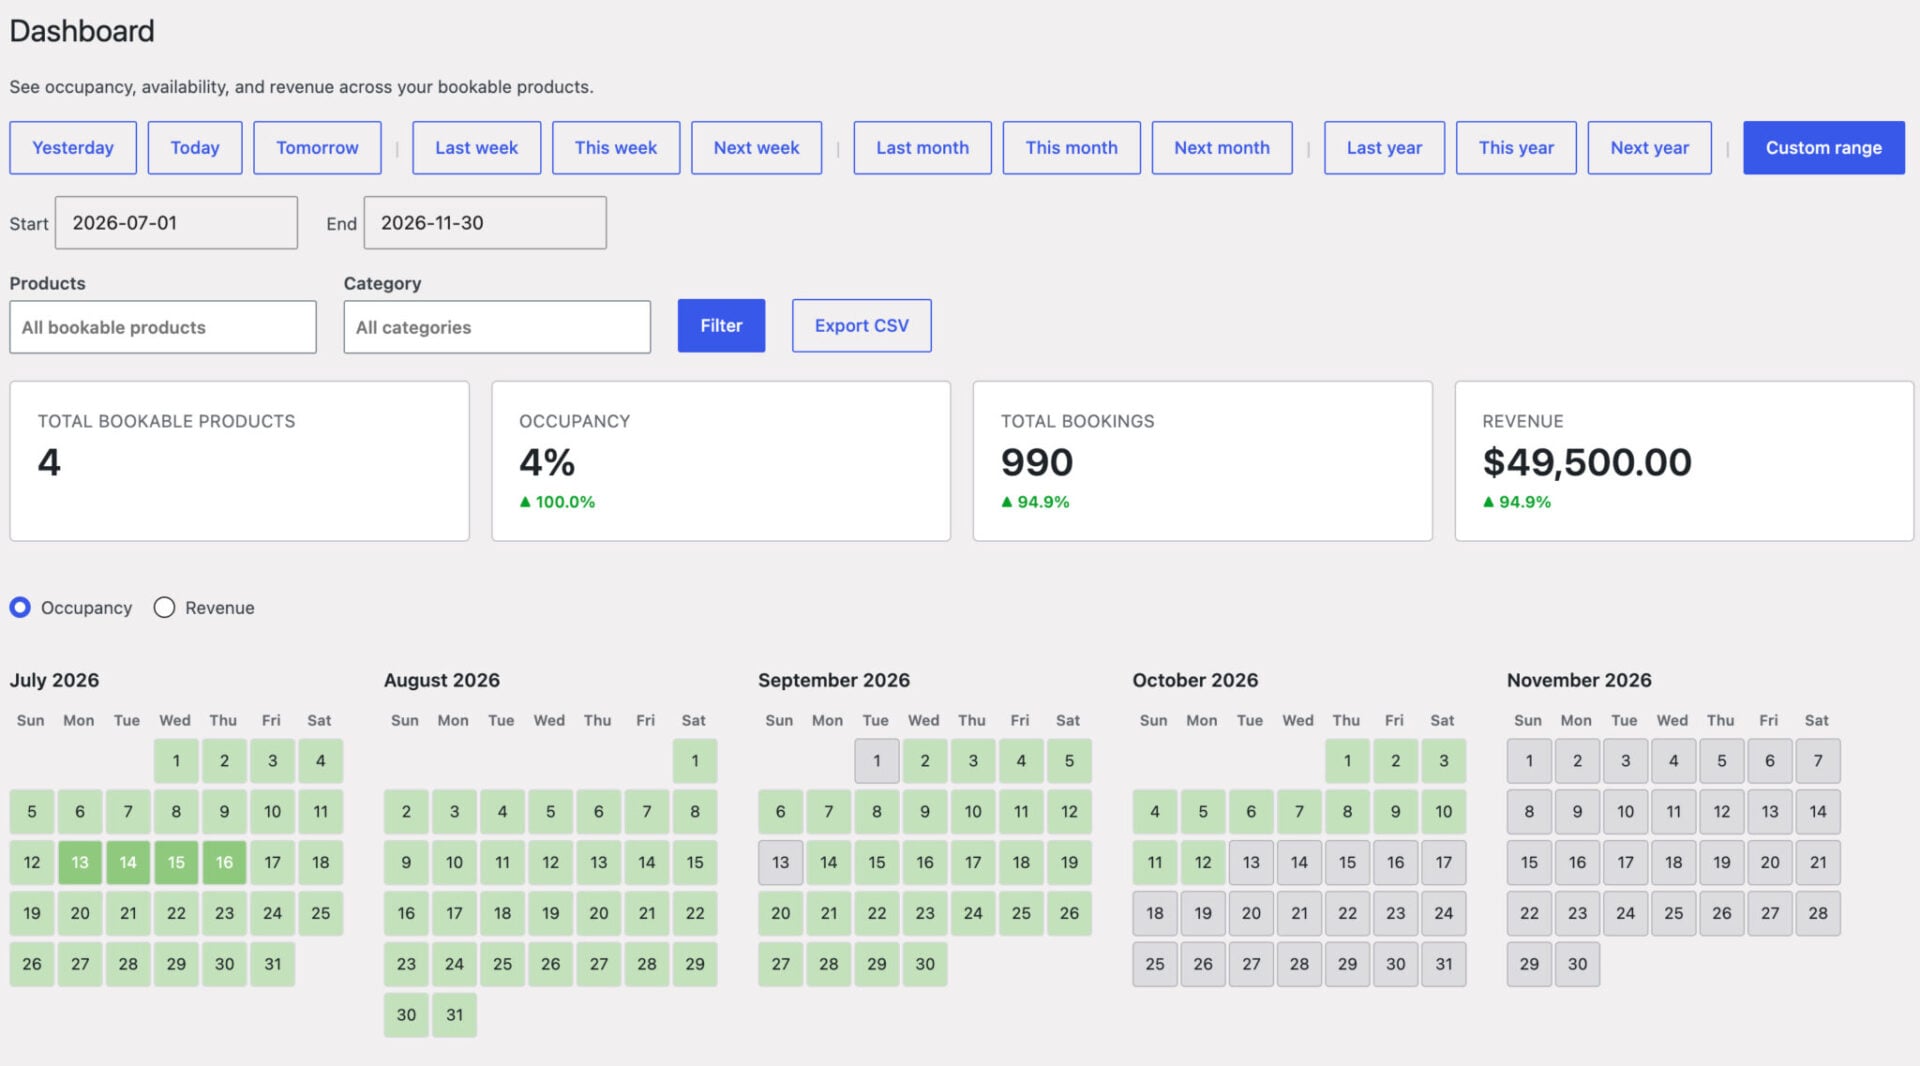
For a fleet-wide view across every boat you hire out, go to Bookings > Dashboard. This gives you the same views, plus summary tiles for occupancy and revenue, and lets you filter and search across your whole hire diary without wading through other WooCommerce orders.
Receiving bookings as orders
When a customer completes a booking on the front end, Bookings for WooCommerce creates a standard WooCommerce order containing the booking details. You can find these under WooCommerce > Orders in your dashboard.
Each order includes:
- The booked date
- The start and end time of the hire
- The number of boats booked
- Any optional extras the customer selected
- The total amount charged
WooCommerce sends the customer an order confirmation email automatically. You can customize the content of this email from WooCommerce > Settings > Emails in the same way as any other WooCommerce email.
Bookings can be managed through the order status workflow. Moving an order to Cancelled frees up the slot so it becomes available to other customers again.
Viewing and managing individual bookings
All bookings are also listed under Bookings in your WordPress dashboard, separate from the main WooCommerce orders screen. This view lets you filter and search bookings by date, product, or status, and gives you a dedicated place to manage your hire diary without wading through other WooCommerce orders.
From the individual booking screen you can:
- View the full booking details including date, time, and customer information
- Change the booking status
- Add notes that are visible to the customer or kept internal for your records
Adding bookings manually
If a customer contacts you by phone or email, you can create a booking on their behalf without them going through the front end.
- Go to Bookings > Add Booking in your WordPress dashboard
- Select the product and choose the customer, or enter their details manually
- Set the booking date, start time, and end time
- Save the booking
The slot availability updates immediately, so the time you have manually assigned will no longer be available to customers booking online. You can choose whether to send the customer a confirmation email when saving the booking.
This is also useful for blocking out time for maintenance or private events without needing to adjust your per-slot override settings.
How to add extra options to boat hires
You can use WooCommerce Product Add-Ons Ultimate to let customers customize their booking at the point of purchase.
- Fishing equipment rental: add a checkbox option priced per item, so customers can indicate they need rods, reels, and tackle included with their hire. This saves them bringing their own gear and gives you an additional revenue stream.
- Catering: add a dropdown with options such as a standard packed lunch or a premium picnic hamper. Customers select their preference at checkout and the cost is added to the booking total automatically.
Extras are collected alongside the hire fee in a single checkout and appear itemized on the booking confirmation email, so both you and your customer have a clear record of everything included in the booking.
WooCommerce Products Add-Ons Ultimate is fully compatible with Bookings for WooCommerce and you can buy them together at a discount as part of this bundle.
Accept a security deposit for your boat hire
Product Add-Ons Ultimate will also allow you to take a refundable security deposit for your boat hire. Check out this article on how to take a security deposit in WooCommerce for more information.
WooCommerce boat hire – video
You can follow along with this video tutorial on how to create a boat hire product page in WooCommerce.
WooCommerce boat hire – recap
So that’s how to create a boat hire product using the Bookings for WooCommerce plugin. You accept bookings online, set how many boats are available, define flexible pricing rules, and make it easy for users to pick their times. You just need the Bookings for WooCommerce plugin:
- Accept online bookings for boat hire by the hour or session
- Control how many boats are available at any given time
- Set pricing that calculates automatically based on duration and group size
- Charge more during peak season without manually updating prices
- Restrict availability for specific slots or dates
- Give customers a clear, intuitive way to choose their time
- View availability per day and per session clearly and intuitively in the WordPress admin
- Charge for optional extras like equipment or food
Bookings for WooCommerce is compatible with all themes and page builders. We have a world class support team who can help you with any aspect of creating your boat hire products – and the plugin has a 14 day money back guarantee so you can try it out risk free.