WooCommerce restaurant ordering: How to boost your food business

Accept online orders is becoming increasingly important for restaurant owners – whether you are offering takeaways, deliveries, or you want to allow customers to order online from their table. This tutorial will show you how to accept restaurant ordering in your WooCommerce store.
This tutorial will cover a number of areas. You can jump to the relevant section using the menu below.
WooCommerce restaurant ordering – why do you need it?
The coronavirus pandemic changed business for everyone – especially restaurant owners. It’s essential for restaurants to be able to accept online orders for takeaways and deliveries. But restaurants are increasingly asking their customers to order online from inside the restaurant – helping with social distancing rules.
WooCommerce vs third party solutions
There are plenty of existing options out there for restaurant owners. Sites like Deliveroo and Uber Eats provide a hosted solution for restaurants who want to start delivering.
But there are a couple of drawbacks to these solutions:
- They take a commission, which affects your profitability
- They only deal with deliveries, which doesn’t help you with customers who want to collect their own meal or if you are trying to implement an ordering system within the restaurant
With this in mind, it’s worth using an established ecommerce solution like WooCommerce to create your own restaurant ordering system.
Using your own system, you won’t be paying any commission to third party providers and you have better control over how to create and use your ordering system.
Your order system will also be integrated with your website, meaning your marketing is more focused. It also means that you can diversify your business, if you wish, by selling merchandise or other goods.
And because WooCommerce is so widely used, you have massive flexibility over things like payment gateways and delivery options.
Using WooCommerce for your restaurant ordering system
You could feasibly just use WooCommerce and allow your customers to browse your restaurant site in the same way that they would browse most other ecommerce sites.
However, this is probably not the most user-friendly approach. Your customers will expect to see all your dishes listed on a single page.
The solution to this is the WooCommerce Product Table Ultimate plugin.
WooCommerce Product Table Ultimate plugin
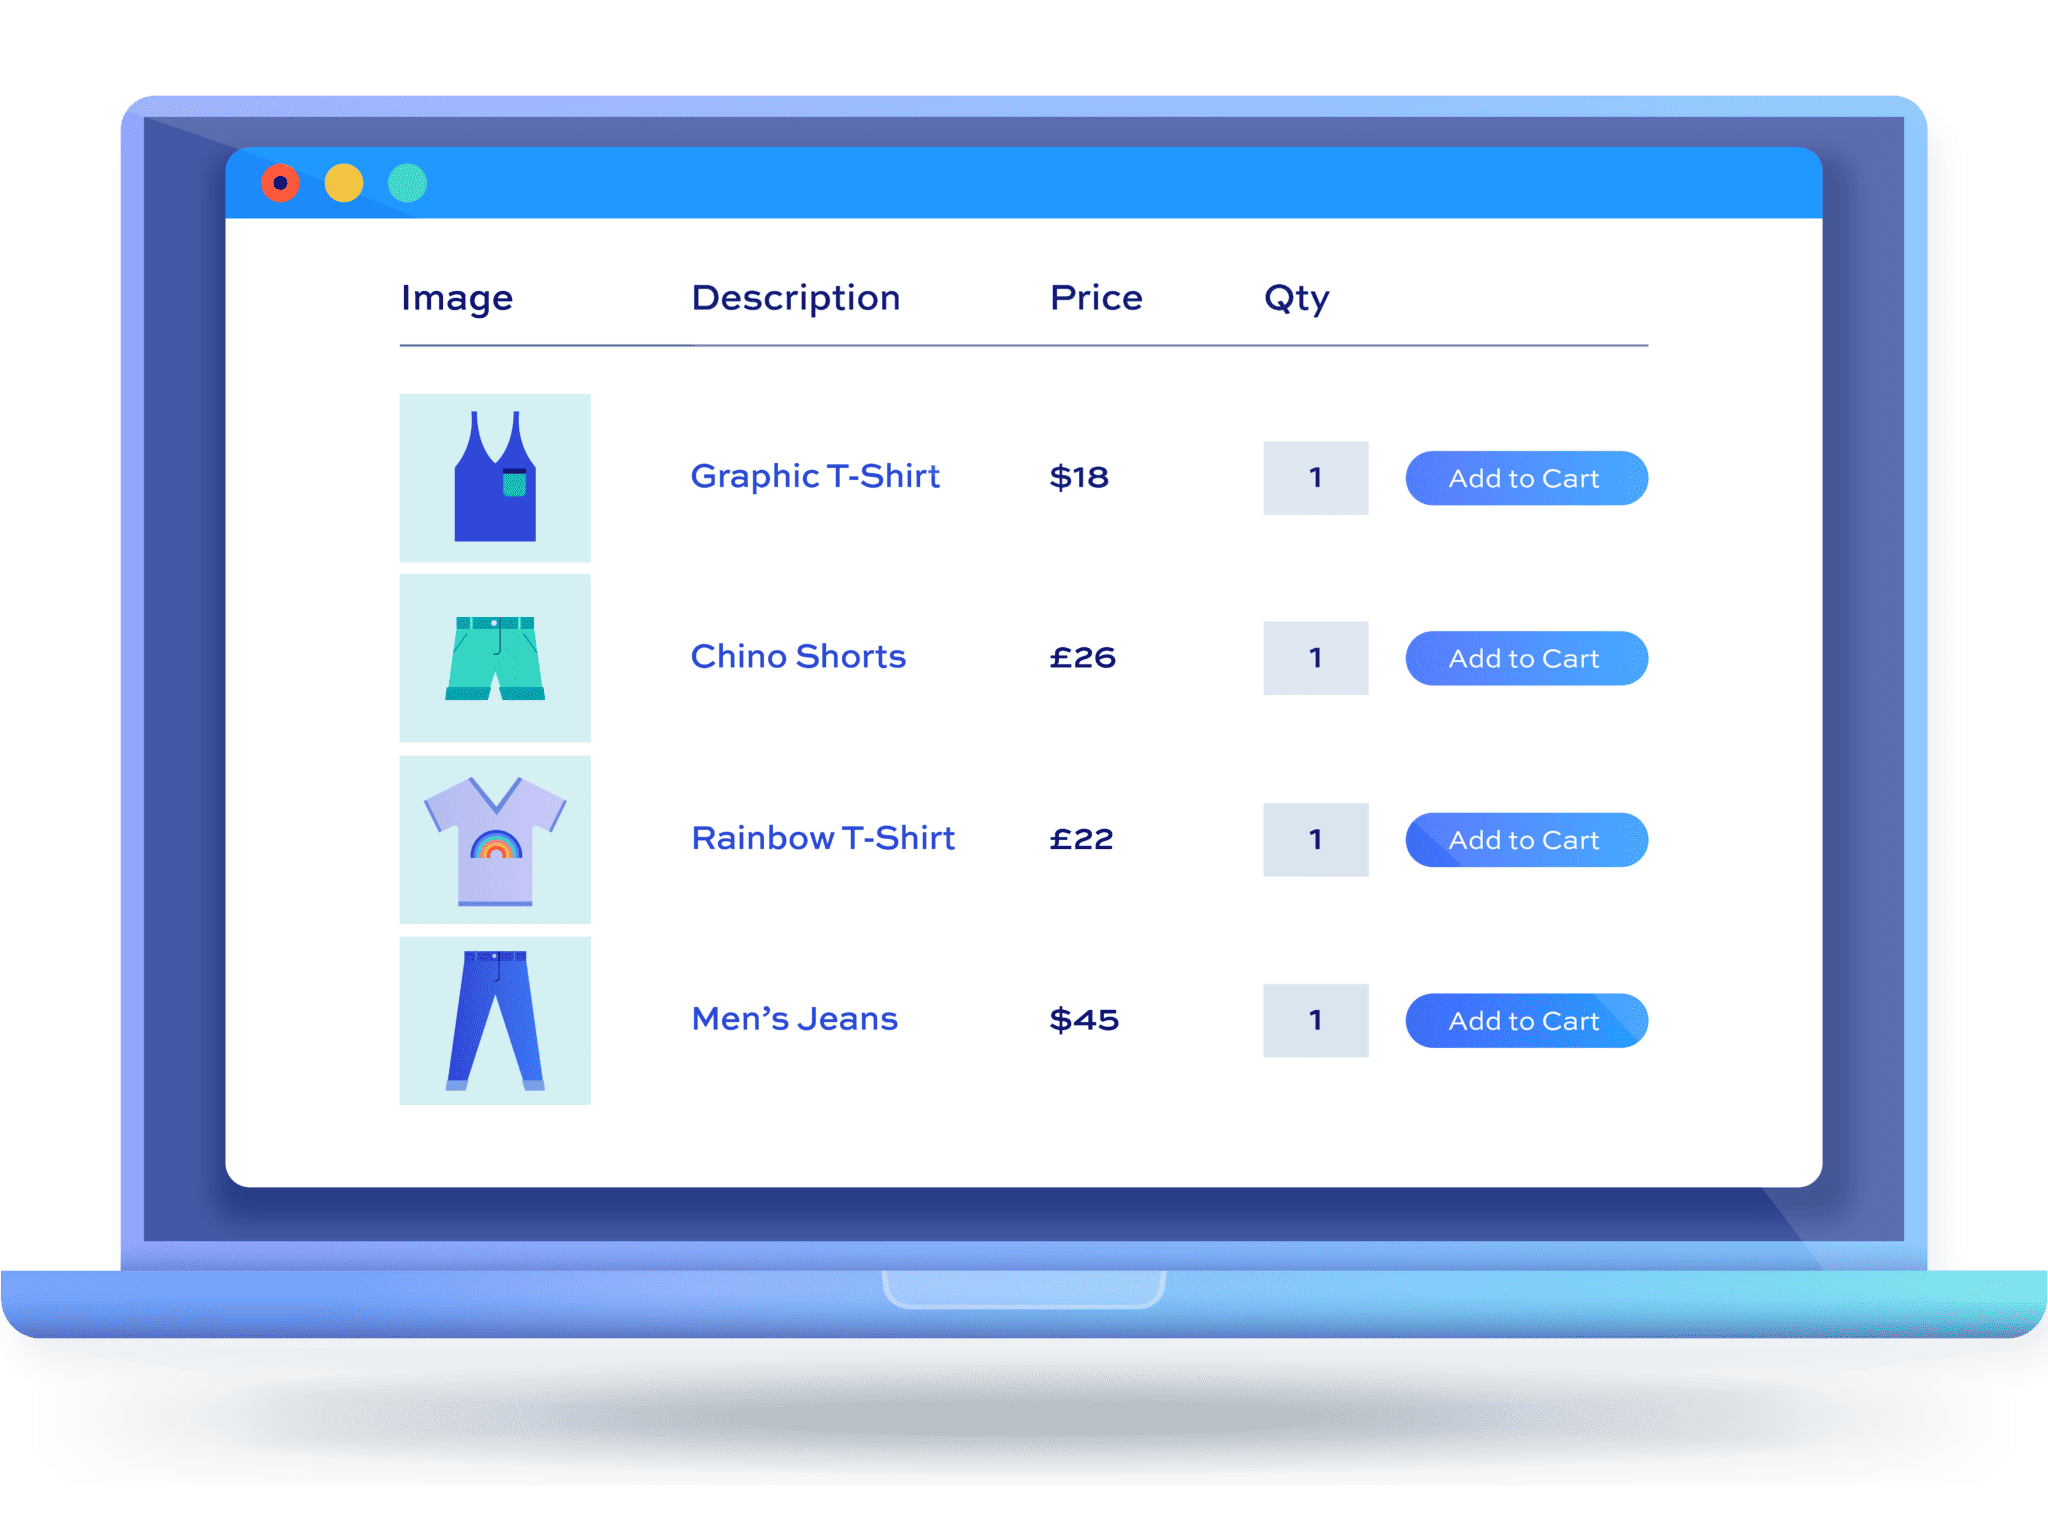
Product Table Ultimate will allow you to list your dishes in an easy to read table so that your customers can select their dishes from one page and add them to their cart with one click.

Each dish is listed on its own row, with columns for an image, name, description, etc.
You can divide your menu into sections – e.g. appetisers, mains, desserts, etc. And you can include variable products, meaning that you can offer different sizes, for example – like a 12oz burger or 16oz burger.
Product Table Ultimate also integrates with the Add-Ons Ultimate plugin, meaning you can include products with add-on fields – making it easy to offer your customers extra options like sauces and toppings.
Customers can just scroll down your entire menu, using checkboxes to select multiple dishes in one go, adjusting quantities, and using a single button to add all their selections to their cart in one go.
How to create a restaurant order form in WooCommerce
Okay, let’s start looking at the details of how to create your restaurant order form using WooCommerce and the Product Table Ultimate plugin. I’ll assume that you’ve set up your site and installed WooCommerce.
When we’ve gone through the basic steps, we’ll look at some extra features like add-on fields and configuring your delivery/collection options.
To see what the finished product will look like, you can take a look at the demo page. Please note that this demo uses the WooCommerce Storefront theme but you can use any WooCommerce compatible theme that you like.
Step 1: Add your products
With WooCommerce installed, you can start to add your products. There’s a comprehensive guide here on how to add WooCommerce products.
You’re going to add each one of the dishes that you offer as a product. We’ll look at a couple of examples now.
Let’s create our first dish – a Greek salad. Just follow these steps:
- Go to Products > Add New
- Add the name of your dish, in this example ‘Greek Salad’
- Add the price you’re charging
- Upload a photo to the ‘Product Image’ section. I found loads of good food stock images at Adobe Stock.
- Add a brief description of the product in the ‘Short Description’ field
- Set a product category (see below)

That’s it. You can now publish the product.
Product categories
In our demo page, we’ve got four sections: starters (appetisers), mains, sides and desserts. These are just product categories. You can create as many categories as you like. I’ll show you how to display your menu in sections below.
Creating variable products
You can create a variable product in exactly the same way. In our demo, we’ve used variations for the Beefburger product to allow the customer to select their preferred size of burger.

When the customer views the menu, they’ll be able to choose the size of burger. We’ll look at the options for displaying products on the front end in the next step.
Step 2: Configuring your Product Table Ultimate settings
Once you’ve got all your dishes entered, we’ll take a look at some options for how to display them as a nice restaurant menu for your customers to browse.
Your first step is to ensure you have the WooCommerce Product Table Ultimate plugin installed and activated.
With the plugin installed, you can configure the settings for your table. Go to WooCommerce > Settings > Product Table. You can see that there are only a few settings, making it quick and easy to set up.

Let’s take a look at the settings we’ll need for our restaurant ordering form.
Columns
In the columns field, you just need to enter a list of the columns you’d like to appear in your table. In our demo, we’re displaying the following columns:
- Thumbnail
- Name
- Description
- Category
- Add to cart button
So to display these, we just enter the following list in the ‘Columns’ field. Note that items are separated by a comma.
thumbnail, name, categories, short-description, add-to-cart
Show quantities on add-to-cart column
Because we’d like to allow our customers to choose the quantity of each dish they’d like to order, we set the ‘Show quantities on add-to-cart column’ field to ‘Yes’. This just means that there’ll be a quantity field next to each add to cart button.
Products Source
The ‘Products Source” field allows us to choose which products to display in our table. For now, we’ll set this to ‘All’.
Variations Display
The ‘Variations Display’ field allows us to choose how to display variable products. We’re going to display variation options as a dropdown that expands when we click on ‘Select Options’ so we set this to ‘As dropdowns in parent row’. Other options are available – feel free to experiment.
Enable Add Selected Button
The final setting we’ll look at here is ‘Enable Add Selected Button’. Set this to ‘Yes’ to display a checkbox at the start of each row. This will allow customers to select multiple dishes then add them all to their order with one click.
For information on the other settings, take a look at the documentation.
Step 3: Display your products on the front end
Okay, we’ve created all our dishes as products and we’ve configured our settings for the Product Table Ultimate plugin. All we need to do now is display the order form on the front end.
We’ll look at two methods to add your table: using a shortcode and using a Gutenberg block.
Whichever method you use, the first steps to display your WooCommerce restaurant ordering form on the front end are the same:
- Go to Pages > Add New to create a new page on your site
- Enter a title for the page, e.g. ‘Our Menu’
Now let’s look at the two methods.
Using a shortcode
The advantage of using a shortcode is that it keeps your content neater while you’re editing. If you’re comfortable with shortcodes, then you won’t have any problems with this method.
If you’re using a shortcode, then just enter the following shortcode in the page content:
[product_table_ultimate]
Using a Gutenberg block
The advantages of using a Gutenberg block to add your product table are that you get a visual representation of the table in the back-end, helping you design your page, and you can easily adjust the settings for your table without needing to type in parameters to the shortcode.
To add your table, just click the ‘New Block’ icon and search for the ‘Product Table Ultimate’ block.
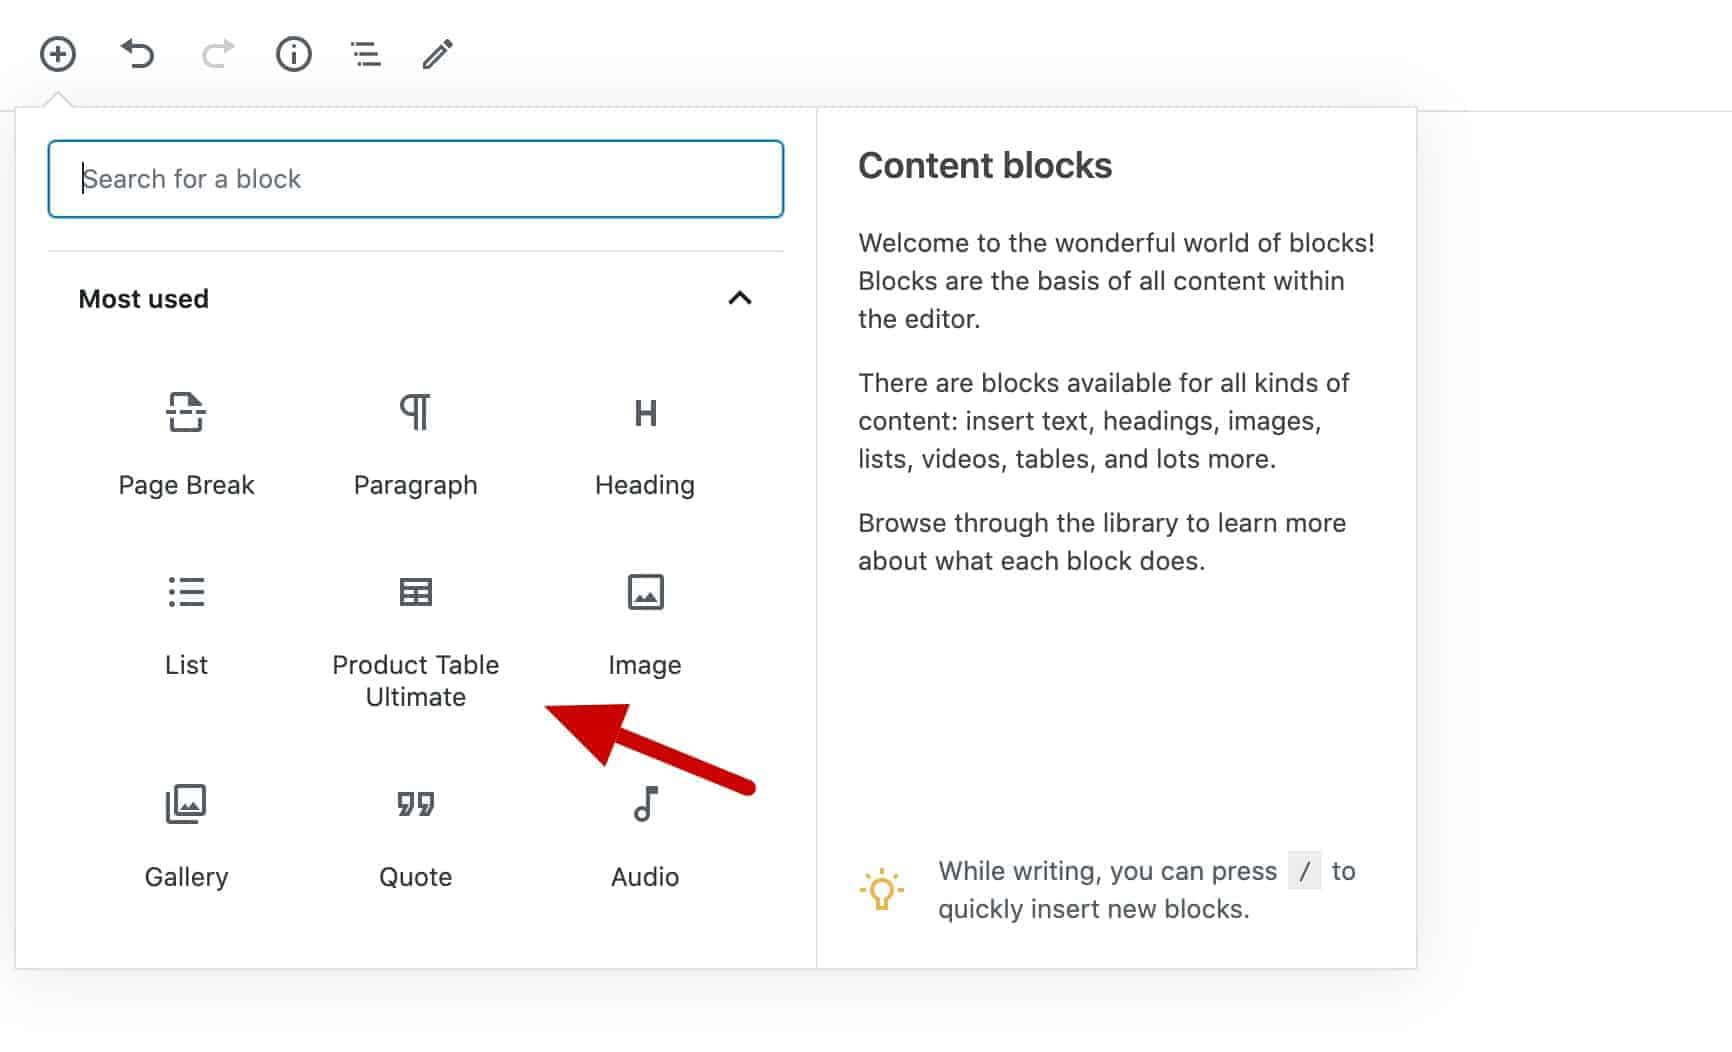
The table will be inserted to your page and you’ll be able to edit its parameters in the ‘Document’ menu on the right.
Publish your page
Whichever method you’re using, you can now publish your page and view it on the front end. You’ll see all your dishes listed in a neat table ready for your customers to start ordering.
Now let’s take a look at some further options for displaying your menu. These apply to the shortcode and the Gutenberg block.
Displaying categories as separate sections
The first thing that might strike you is that all your products are listed in one table, most probably in alphabetical order. This might not be the ideal way for your customers to browse the menu.
Let’s look at how to split the table into sections – one for starters, one for main courses, etc. This will make it better for your customers to decide what they want to eat.
Go back to the page where you added your shortcode. Instead of displaying one table with all your dishes, we’re going to display a table for each category. We’ll do that by entering a special parameter in the shortcode to let WordPress know which category to display.
First, you need to confirm the ID number of each of your WooCommerce categories. In a new tab, open Products > Categories to see a list of each category.
Hover over the first category. At the bottom of the screen, you’ll see a URL for that category page. Part of the URL will be ‘tag_ID=’ followed by a number. That number is your category ID. In this case, it’s 34 but it’ll almost certainly be different for your category.

Toggle back to the tab that has your page with your table. If you’re using a shortcode, update it like this:
[product_table_ultimate source="categories" categories="34"]
You can see that we’ve added a couple of parameters: source="categories" tells the table that it’s going to display products from specified categories; then categories="34" tells the table that it should only display products from the category with an ID of 34.
If you’re using the Gutenberg block, you can update the settings like this:

Update the page then preview it. You should see that the table is now only displaying products from the specified category.
You can copy the shortcode and paste it for each category. Just change the category ID each time.
Your page will look something like this.

Add some instructional text
When you’ve added all your categories in separate tables, it’s worth adding some titles and brief text to guide customer around the menu.
Integrating with Product Add-Ons Ultimate
The Product Add-Ons Ultimate is a crucial plugin that allows you to add extra fields to your products. For a restaurant ordering site, this makes it easy to offer extra toppings, sides, and other options for each dish.
Let’s take a look at an example. First, you’ll need the WooCommerce Product Add-Ons Ultimate plugin.

Creating add-on fields for your product table
In our example, we’re going to let the customer choose some optional extras for their burger – e.g. ketchup, cheese, bacon.

When the customer clicks the ‘Select options’ button next to the product, a new dropdown section will open to show the extra options. The user can just check which extras they want to add to their dish, click ‘Add to cart’, and the extras will be included in the order.
To add your extra fields:
- Install and activate Product Add-Ons Ultimate
- Edit the product where you’d like to offer extra options and click on the ‘Product Add-Ons’ tab
- Click ‘Add Group’ and ‘Add Field’ then create your add-on field as required – in this case, we’re setting the field type to ‘Checkbox’ but you can choose from over a dozen field types, including select fields, radio groups, text fields, etc

When you’ve added your extra fields, update the product. Now, on the front end, you’ll see a ‘Select Options’ button next to the product. Clicking this will open the extra fields up for the customer to make their choices.
Add a mini cart
So far, we’ve been through everything you need to know about creating a restaurant ordering system in WooCommerce. But let’s look at a few more options that will improve the customer experience and your sales figures.
It’s a good idea to help the customer keep track of what they’ve ordered. It’s easy to forget what you’ve added to the cart, particularly if you’re ordering a lot of food.

The ideal solution for this is to add a mini cart to your page. There are a few options here, each with pros and cons:
- Standard mini cart: many WooCommerce themes, like Storefront, will have a mini cart that you can add to your menu. The user just needs to hover over to see what’s in their cart. The advantage to this is that you’re not taking up screen area with a cart widget so you can make your product table the full width of the page. The disadvantage is that the cart contents aren’t always visible.
- Sidebar: WooCommerce has a mini cart widget. If you don’t mind if your product table isn’t the full width of the page, then this is a great option. It means the cart contents are always visible.
- Floating: maybe the best of both worlds is to have a floating cart widget. There are a couple of options out there for this.
Delivery and collection options
If you’re running a delivery or collection service in your restaurant, you’re going to want to fix times for your customers to receive their meals. This is especially important for busy kitchens who don’t want to be cooking everyone’s meal at the same time.
With this in mind, it’s worth installing another plugin that will allow you to manage your delivery and collection times. There are several free and premium plugins available that will allow you to do just this.
Bonus idea – create an incentive scheme (memberships, free delivery)
Finally, you can also think about offering some incentives to improve customer retention. Even apparently small things like offering free delivery to certain customers can make a big difference.
Create a membership site. Customers who join could have preferential pricing or free delivery, for example. This would help to build loyalty and encourage customers to choose your restaurant over others when they’re deciding to place an order. Take a look at this article for an overview of creating a membership site with WooCommerce.
Further reading
For more information on product tables, take a look at this article on how to display WooCommerce products in a list.
Creating a WooCommerce restaurant ordering system – recap
In this article, we looked at how to create a restaurant ordering system in WooCommerce to allow your users to place an order for a delivery, collection or in-house.
We looked at how to use the Product Table Ultimate plugin to present all your dishes in a table where the customer could select multiple dishes in one go.
We also looked at some additional functionality, like adding extra options to dishes, implementing a mini cart, and setting delivery options.
So all you need to do is to get the WooCommerce Product Table Ultimate plugin and create your own restaurant ordering form.
Nice article, can you suggest any delivery plugin?
Thank you
Thanks. Yes, you could take a look at https://iconicwp.com/products/woocommerce-delivery-slots/.
You talk about collection and delivery in the article, but not order at table as mentioned in your introduction. On checkout we’d be looking at the customer having to select from a predefined list of table names/numbers. Is there a recommended plugin for that?
Hi
Yes, there are several checkout field editor plugins available that would allow you to add a list of table numbers on the checkout page. An example plugin would be https://woocommerce.com/products/woocommerce-checkout-field-editor/ but there are several others.
Hope this helps.
Interested in buying but would there be a lifetime updates + Unlimited Site , Delivery / Pick up option Plugin ?
Hi
There’s a Lifetime Pro licence option which gives you lifetime updates and support for unlimited sites for the plugins discussed in this article. We’re not currently offering a delivery / pick-up plugin.
Thanks.
If you came up with a delivery and reservation plugin, I’d buy your unlimited lifetime plugin bundle or even if you can get me a timeline for launching those, I’d be happy to buy. Thanks 🙂
If you came up with a delivery and reservation plugin, I’d buy your unlimited lifetime plugin bundle or even if you can get me a timeline for launching those, I’d be happy to buy. Thanks 🙂
Thanks. I don’t currently have any plans to build a delivery/reservation plugin but, out of curiosity, what features would you be looking for from such a plugin?
Thanks.
I want to add multiple products under one product. Like, I want to sale ingedients of my food dish. There will be no cost of dish but each ingredient use in the making of dish will have its own price. The users can selrct one or more ingredients of a dish. Can this plugin help?
Basially I want to redevelop this website with woocommerce. Please check the functionality of this website.
http://clients.chefdine.com.au/
Thank-you.
Hi
Yes, the Pro version of Product Add-Ons Ultimate will allow you to see each ingredient as part of the main dish: https://pluginrepublic.com/wordpress-plugins/woocommerce-product-add-ons-ultimate/.
Thanks.