How to let customers choose product dimensions in WooCommerce

Custom product dimensions let customers order exactly the size they need, at the right price, with accurate shipping details. In this tutorial, we’ll set up a timber product where customers choose a wood species and section size, enter the length they need and see the price update straight away.
After completing this tutorial:
- Users will be able to:
- Choose a timber species, thickness and width
- Enter the length they need and see the price update as they type
- As the store owner or admin, you’ll be able to:
- Charge by volume, length, area or perimeter using simple formulas
- Set the product’s length, width, height and weight from the customer’s choices, so shipping is calculated correctly
- See the customer’s dimensions on every order
- As a bonus, we’ll also look at how to:
- Add a minimum charge and a cutting fee
- Charge for edge profiles using a lookup table
There’s a demo product here so you can see it in action. There’s also a config file available from within the add-ons library you can use to import these exact fields directly into your own product.
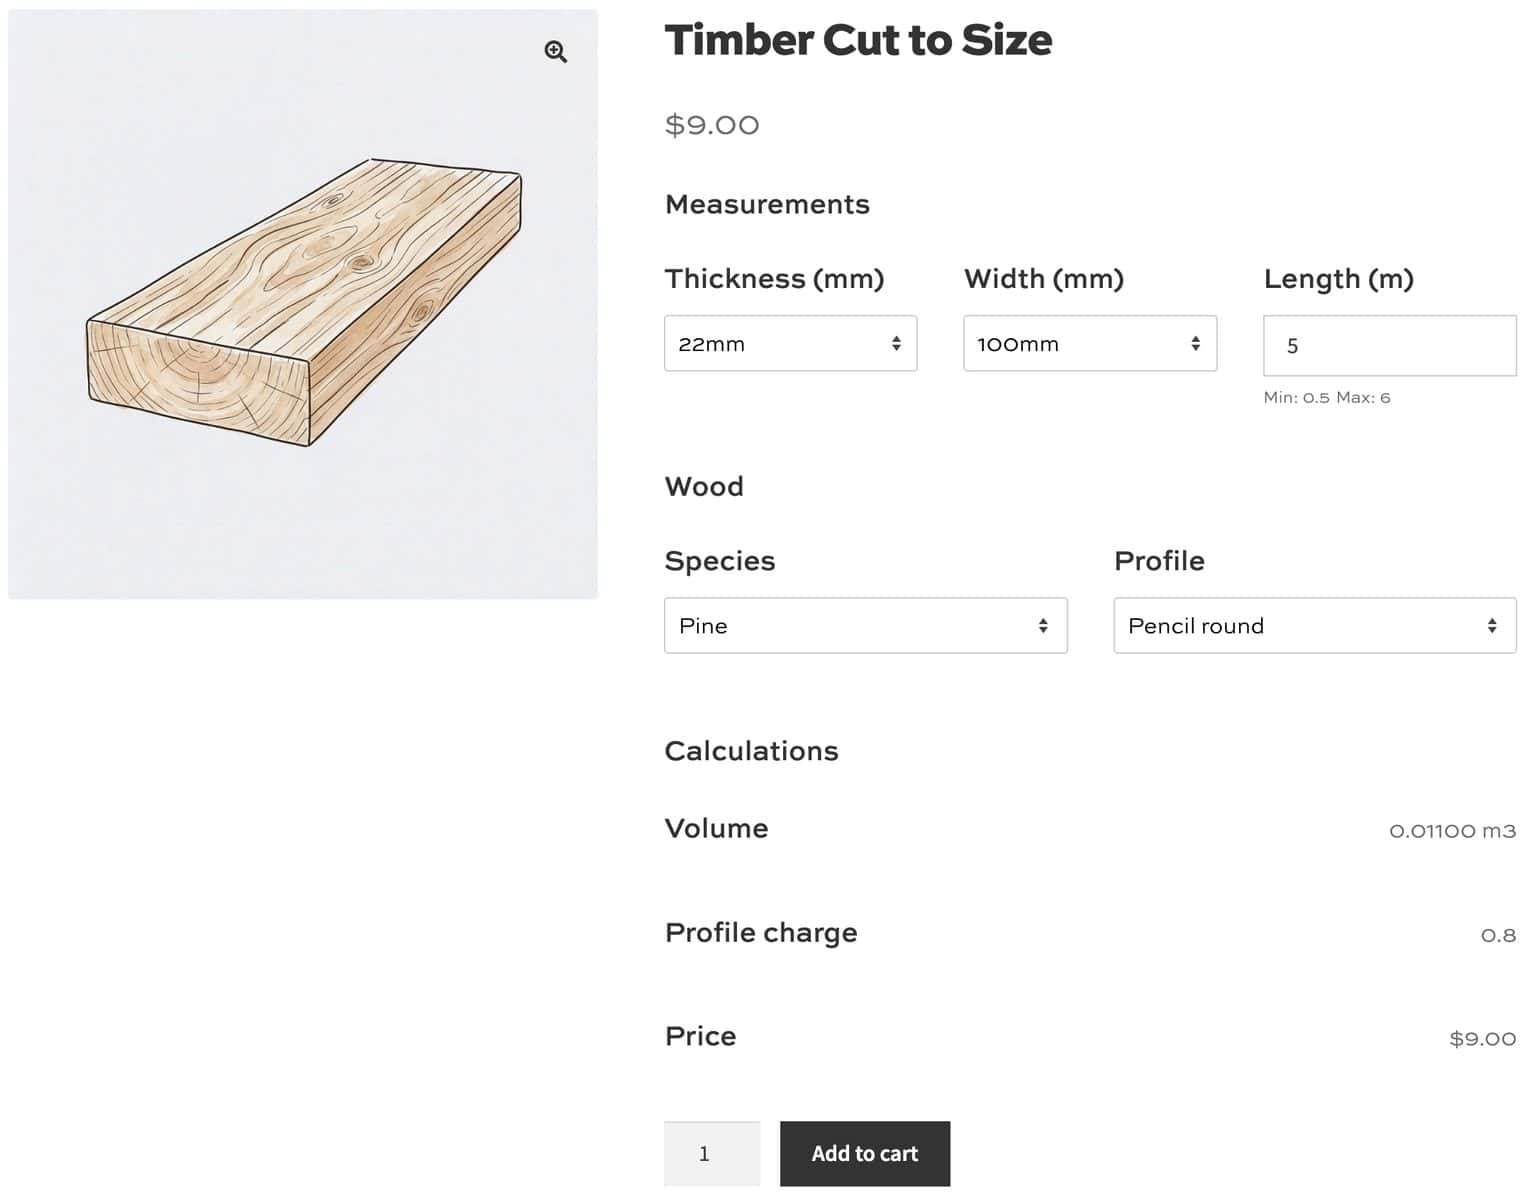
Building supplies are increasingly bought online. Kingfisher, which owns B&Q and Screwfix, reported that e-commerce made up 22% of its group sales in the six months to July 2026, up from 20% a year earlier.
What’s the difference between WooCommerce’s dimensions and customer dimensions?
WooCommerce’s built-in length, width, height and weight are set once per product on the ‘Shipping’ tab. They’re used to calculate shipping and customers can’t usually change them.
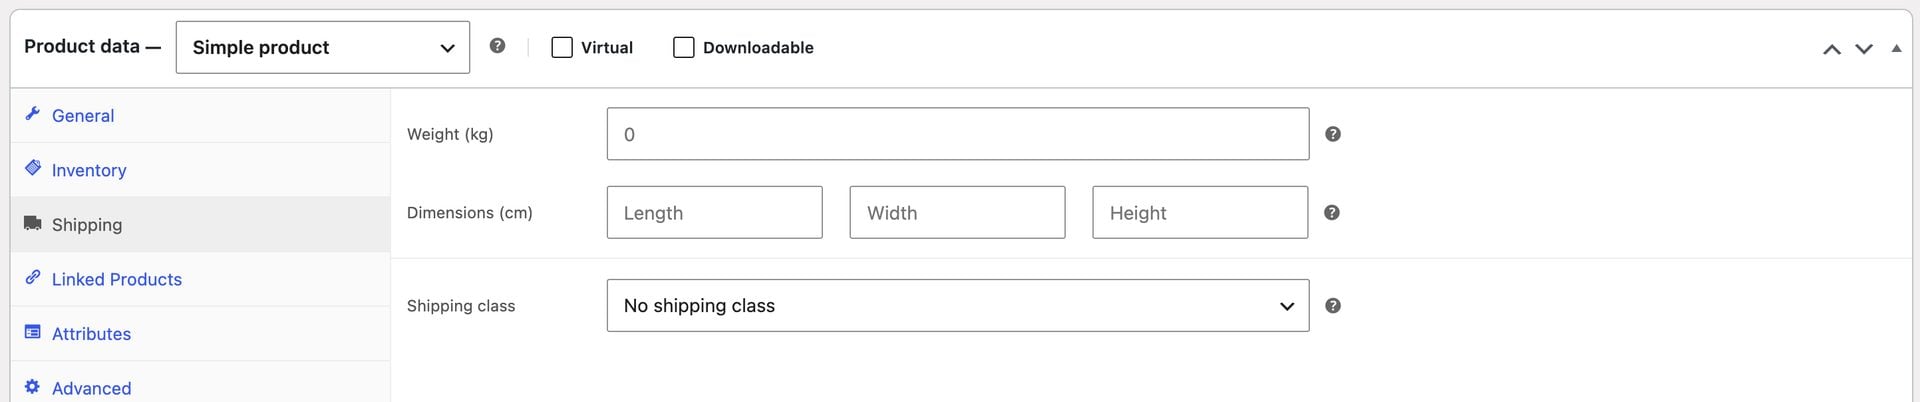
In this article, we’ll see how to set these dimensions dynamically. Customers will enter their required measurements and the price, shipping dimensions and weight will then be calculated.
Which products can you sell with custom dimensions?
You can use custom dimensions for any product you cut, measure or mix to order. We’ll use timber in this tutorial, but the same setup works for all of these:
- Fabric and upholstery: charge per meter for the length the customer orders from a roll
- Flooring and carpet: charge per square meter from the room’s width and length, with an optional wastage allowance
- Worktops and countertops: charge by length and depth, plus a fee for each cut-out or edge profile
- Sheet materials: price plywood, MDF, acrylic and polycarbonate by area and thickness
- Metal bar, tube and pipe: charge per meter by diameter, with the weight calculated from the length
- Rope, chain and cable: charge per meter and calculate the weight, so heavy orders pay the right shipping
- Topsoil, gravel and decorative stone: calculate the volume from area and depth, then the weight for delivery
- Foam cut to size: price cushions and mattress toppers by volume
- Picture frames: price custom frames by the perimeter of the artwork
What do you need to let customers choose product dimensions?
By itself, WooCommerce doesn’t customers specify product dimensions so you’ll need an extra plugin. WooCommerce Product Add-Ons Ultimate lets you add fields to your product pages, including calculation fields that set the price and the product’s dimensions.

If you want to go a step further, you can also set prices from a lookup table using the Advanced Calculations extension. We’ll look at that in the bonus section.
How do you set up custom dimensions for timber in WooCommerce?
Here’s a quick overview of how to sell timber cut to length, priced by volume, in WooCommerce
- Install Product Add-Ons Ultimate:
Install and activate the plugin.
- Create your timber product
Add a simple product for your timber.
- Add fields for species, thickness and measurements
Add fields for the customer’s choices. These can be select fields with a limited number of options or a number field where the user can enter a numeric value.
- Add calculation fields for the volume and price
Work out the volume, then multiply it by the species’ price.
- Set the product’s dimensions and weight
Add calculation fields that update the product’s length, width, height and weight.
Here’s each step in more detail.
In this tutorial, we’ll assume that you already have WordPress and WooCommerce installed and ready to go.
Step #1: Install Product Add-Ons Ultimate
Product Add-Ons Ultimate lets you add custom fields to any WooCommerce product. It’s compatible with all themes and page builders, so it works with your existing store.
Once you’ve purchased Product Add-Ons Ultimate:
- Download the plugin’s zip file by clicking on the link on your order confirmation screen or in your welcome email. You’ll receive the email automatically a few seconds after you’ve completed the purchase
- Go to Plugins > Add New in your WordPress dashboard
- Click on the ‘Upload Plugin’ button
- Drag and drop the plugin’s downloaded zip file into the ‘Choose File’ area and click ‘Install Now’
- When the plugin has uploaded, click the ‘Activate Now’ button
You now have Product Add-Ons Ultimate installed and activated. Next, let’s create the product.
Step #2: Create your timber product
Go to Products > Add New and create a simple product for your timber. Add a title, description and images in the same way you would for any other product.
Leave the regular price at zero (or set it to a minimum value) since your calculation field will determine the overall price. On the ‘Shipping’ tab, leave the length, width, height and weight empty. We’ll set these dynamically using the customer’s choices in Step #6.
Now let’s add the fields where customers make their choices.
Step #3: Add fields for species, thickness and width
Click on the ‘Product Add-Ons’ tab on the ‘Product data’ panel. Add a select field labeled ‘Species’ with these options:
- Pine: 450
- Larch: 650
- Oak: 1800
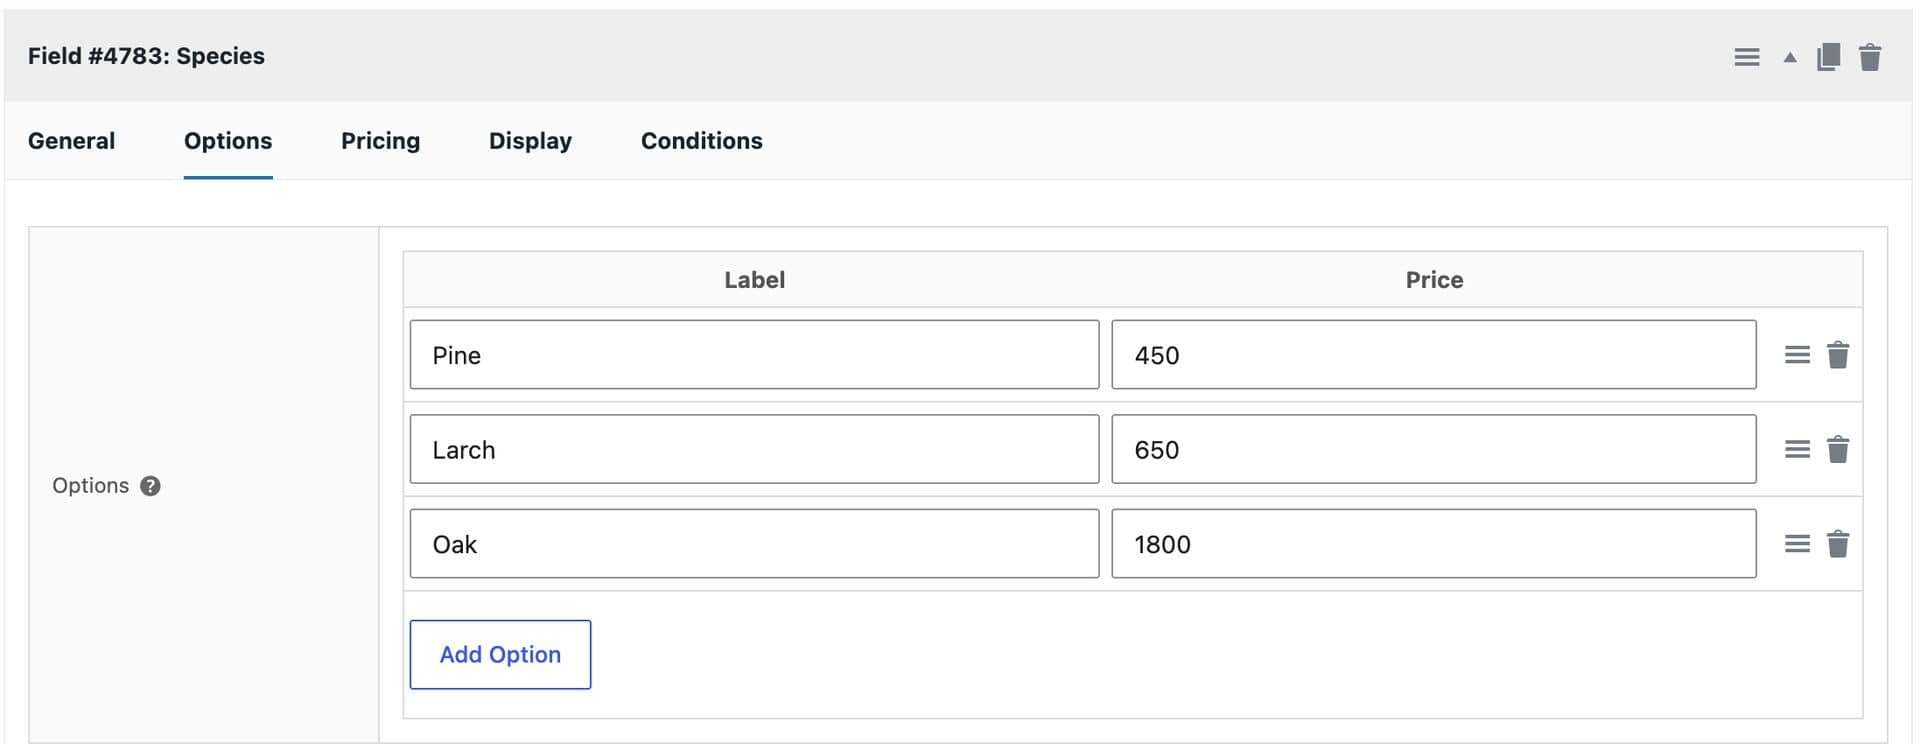
The number next to each option is its price per cubic meter, entered in the option’s ‘Price’ column. Set ‘Option Price Visibility’ to ‘Value only’ on the field’s ‘Pricing’ tab, so the value can be used in your calculations but won’t be added to the cart.
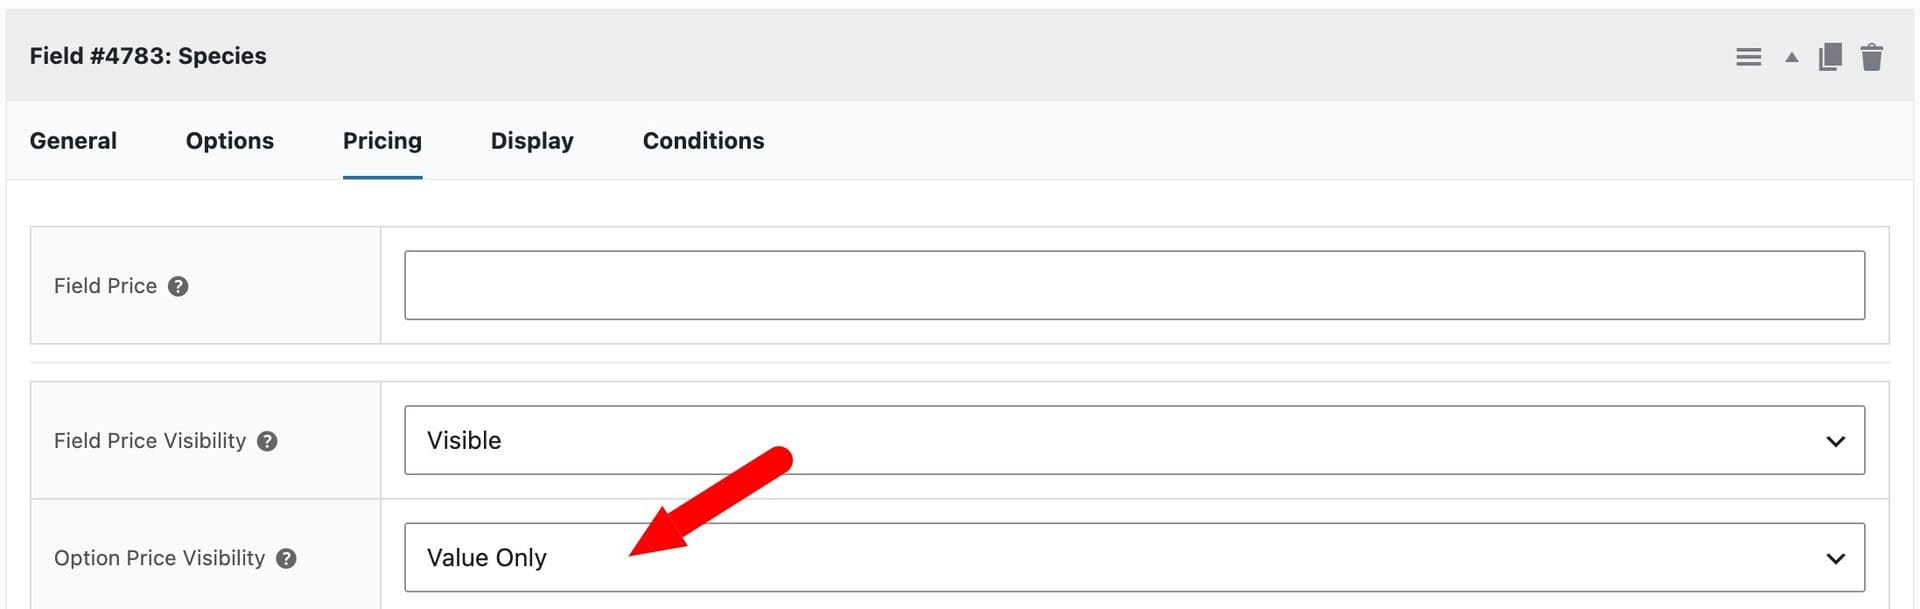
Add two more select fields in the same way:
- Thickness (mm): 22, 47 and 75, with each option’s price set to the same number
- Width (mm): 100, 150 and 200, with each option’s price set to the same number
Set ‘Option Price Visibility’ to ‘Value only’ on both. Your calculations can then use the thickness and width in millimeters.
Your product now has fields for species, thickness and width. Next, let’s add the length.
Step #4: Add a length field
Add a number field labeled ‘Length (m)’. Set a minimum value of 0.5, a maximum of 6 (or whatever upper and lower limits work best for you) and allow one decimal place, so customers can order lengths like 2.4m.
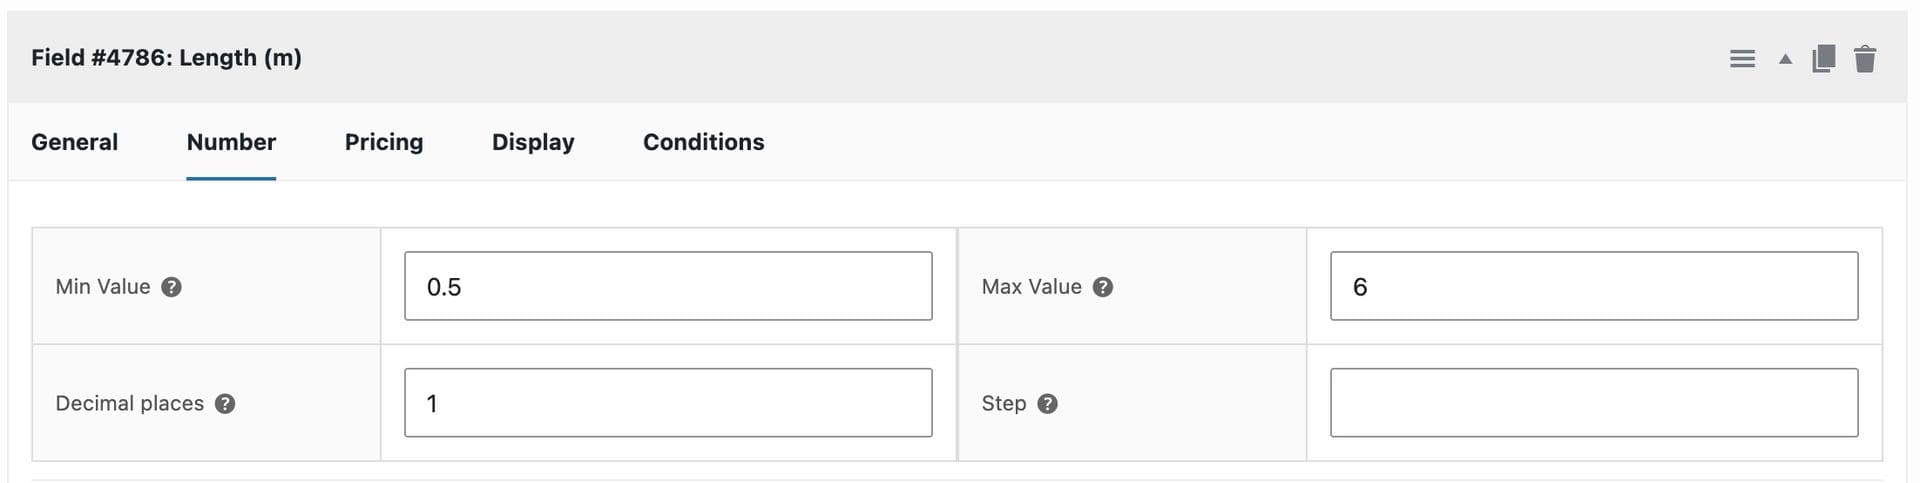
The plugin is unit agnostic, so you can use meters, feet, inches, muggles – anything you like. The plugin just works with the numbers. We cover imperial measurements in the FAQs.
Customers can now enter the length they need.
Now, let’s work out the price.
Step #5: Add calculation fields for the volume and price
Add a calculation field labeled ‘Volume’. Click on the ‘Calculations’ tab.
Below the ‘Formula’ field, there’s a formula builder. This features a set of buttons that allow you to start building your formula. The ‘Fields’ row shows a button for each field you’ve added to the product, labeled with the field’s name and ID. In this example, you’ll see buttons for each of the fields you added above, such as ‘Length (m) (#4786)’.
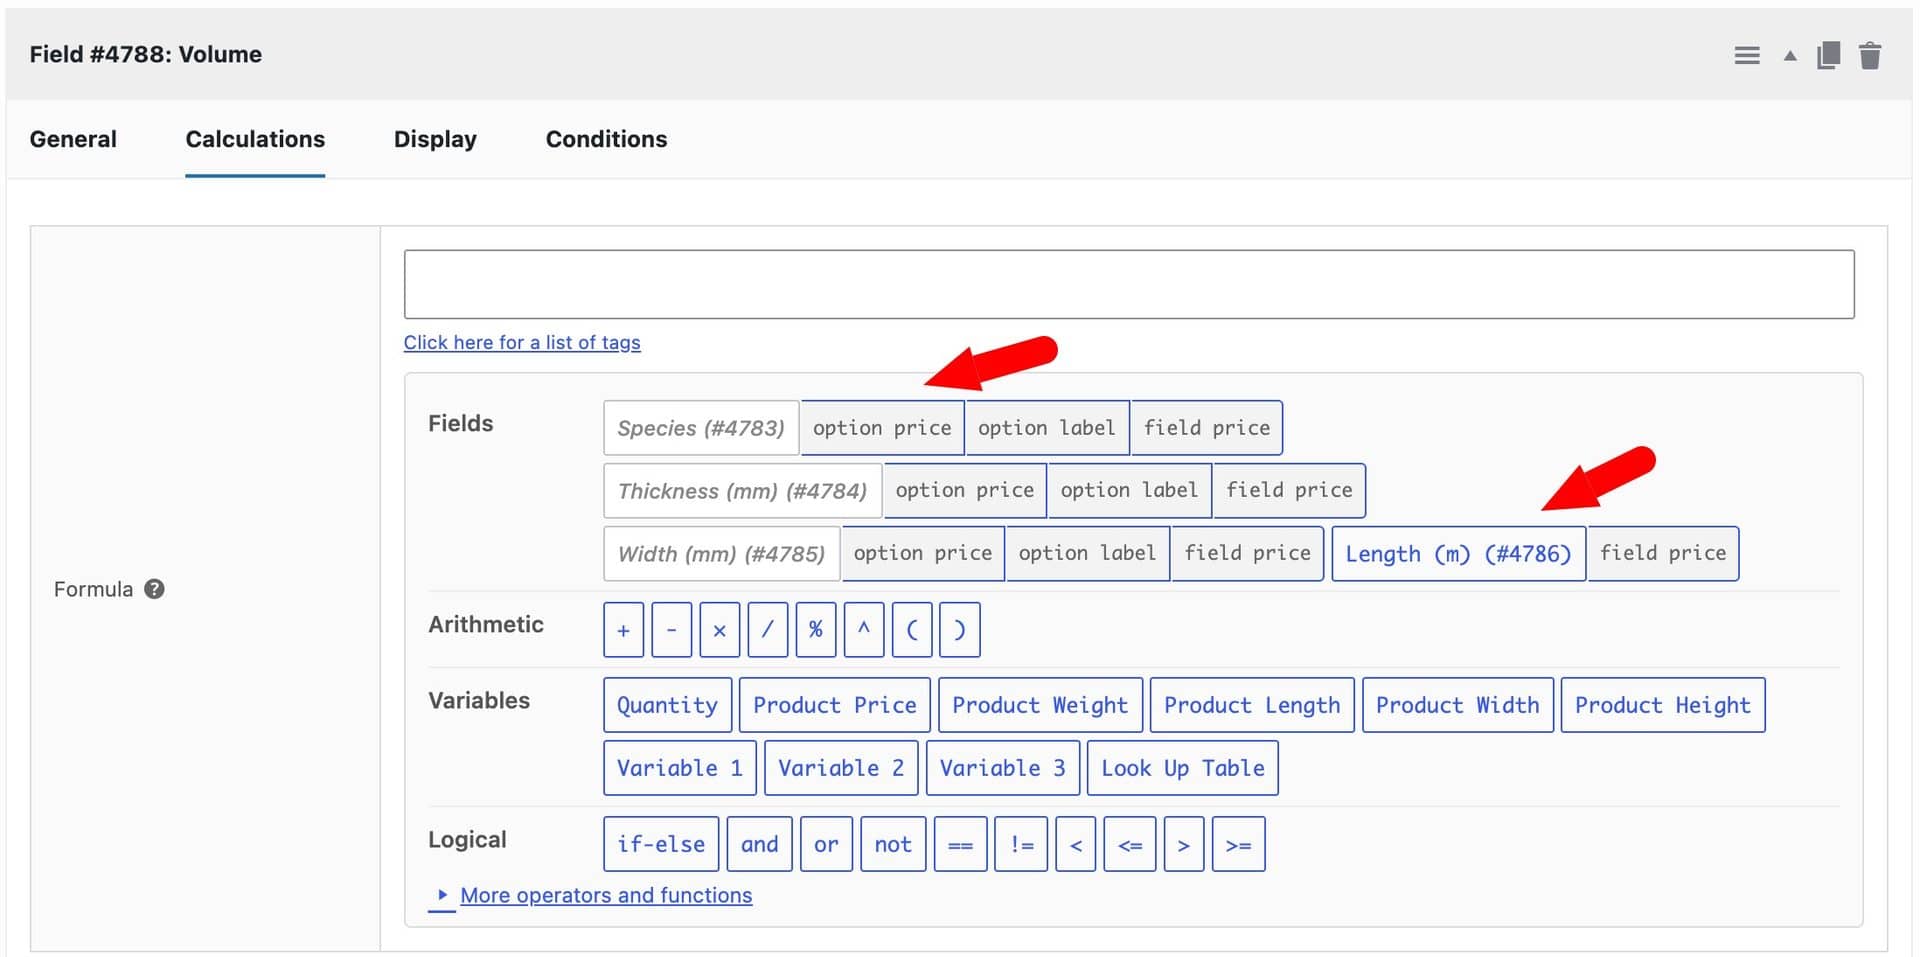
The volume is the length multiplied by the width and the thickness. The length is already in meters, but the width and thickness are in millimeters, so each of those is divided by 1,000 to convert it to meters. The result is the volume in cubic meters.
In plain English, the formula is: length × (width option price ÷ 1,000) × (thickness option price ÷ 1,000).
Click a button to insert that field’s placeholder into the formula. Use the buttons to build this formula:
{field_4786} * ({field_4785_option_price} / 1000) * ({field_4784_option_price} / 1000)Here, {field_4786} is the length, {field_4785_option_price} is the width and {field_4784_option_price} is the thickness. Your field IDs will be different, which is why it’s best to insert them with the buttons.
Note that directly under the ‘Formula’ field, you’ll see a preview of the formula in more natural language. This makes it easy to check that you’ve used the right fields.
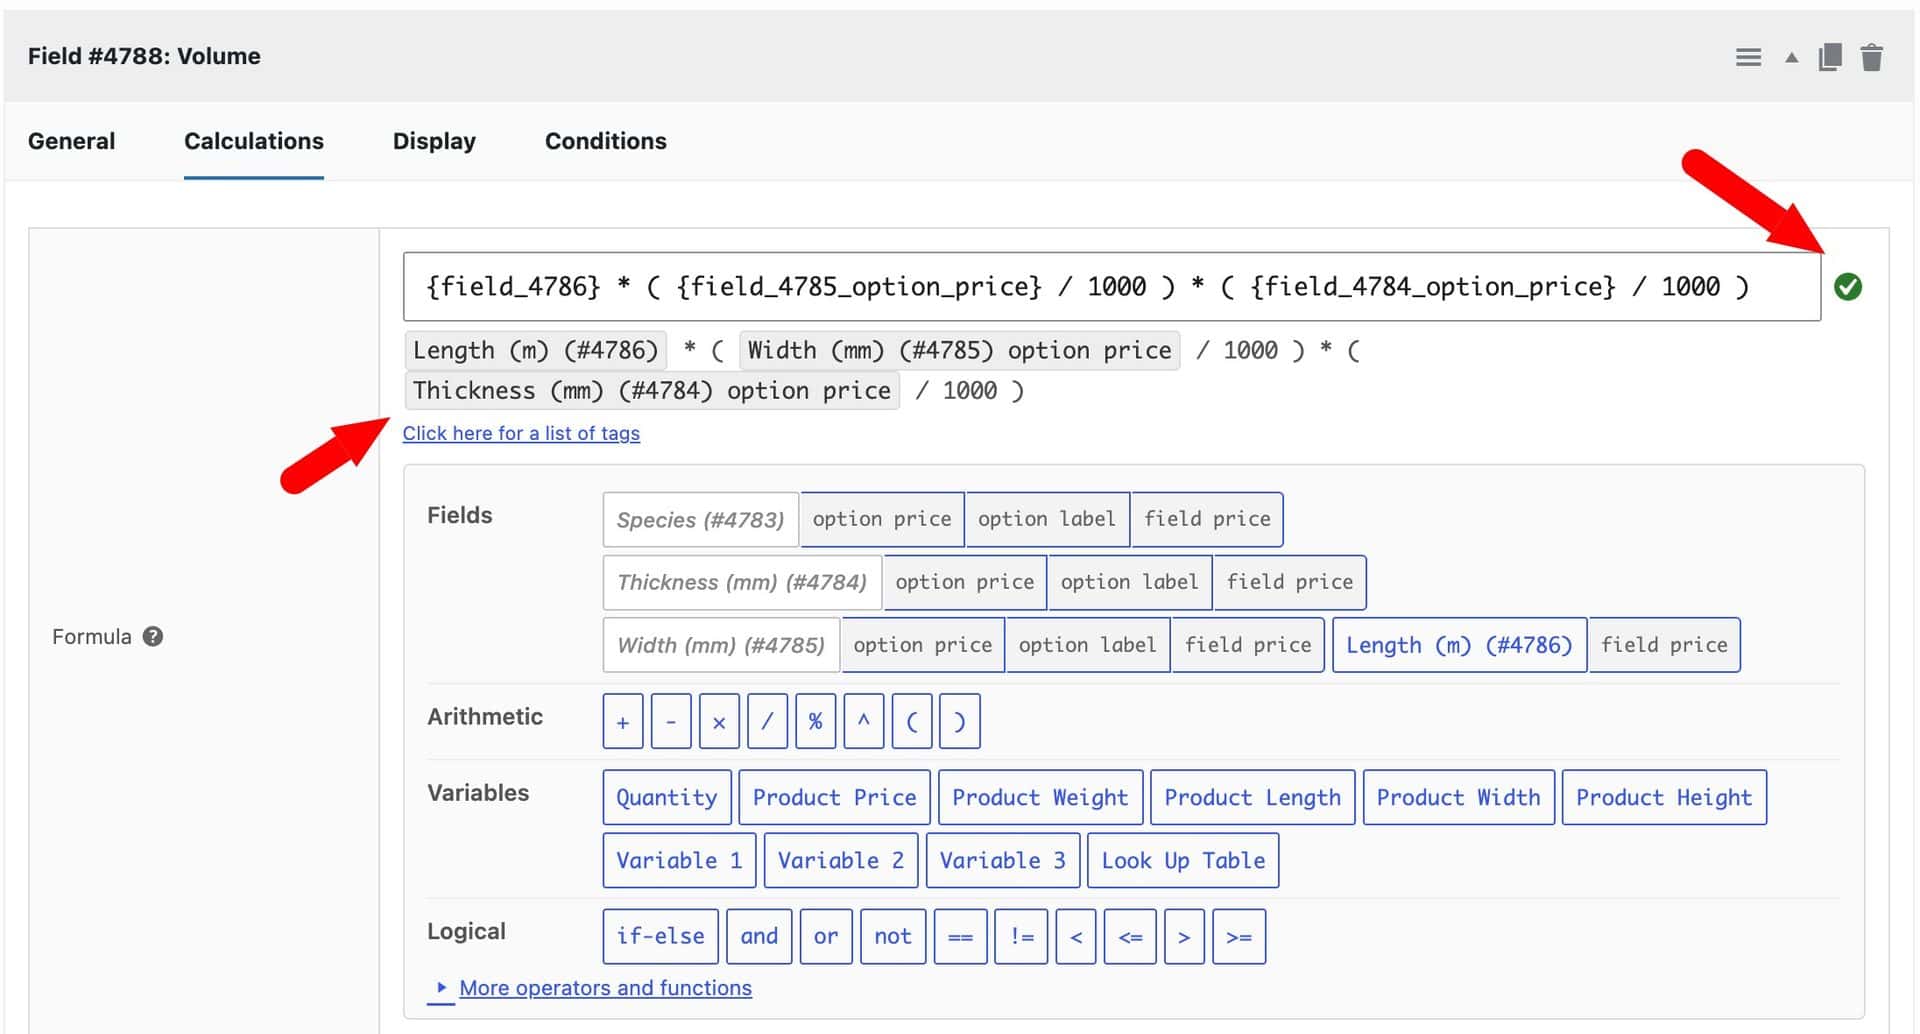
Enter ‘m³’ as the field’s suffix so customers can see the units. Set ‘Decimal Places’ to 5.
As you build your formula, the plugin will automatically check it and let you know if it’s valid or if there are any errors.
Next, add a second calculation field labeled ‘Price’, with this formula:
{field_4788} * {field_4783_option_price}This multiplies the volume by the species’ price per cubic meter. Set the ‘Action’ field to ‘Display As Cost’ so the result becomes the product price.
For example, a customer who orders 2.4m of 47 x 150mm pine gets a volume of 0.01692 m³ and a price of $7.61.
You now have a product that prices timber by volume. Next, let’s make sure shipping uses the right dimensions.
Step #6: Set the product’s dimensions and weight
Add four more calculation fields to set the product’s dimensions from the customer’s choices. Each one uses an ‘Action’ that adds its result to the product’s dimensions:
- Length:
{field_4786} * 100, with the ‘Action’ set to ‘Add to Product Length’ - Width:
{field_4785_option_price} / 10, with the ‘Action’ set to ‘Add to Product Width’ - Height:
{field_4784_option_price} / 10, with the ‘Action’ set to ‘Add to Product Height’ - Weight:
{field_4788} * 550, with the ‘Action’ set to ‘Add to Product Weight’
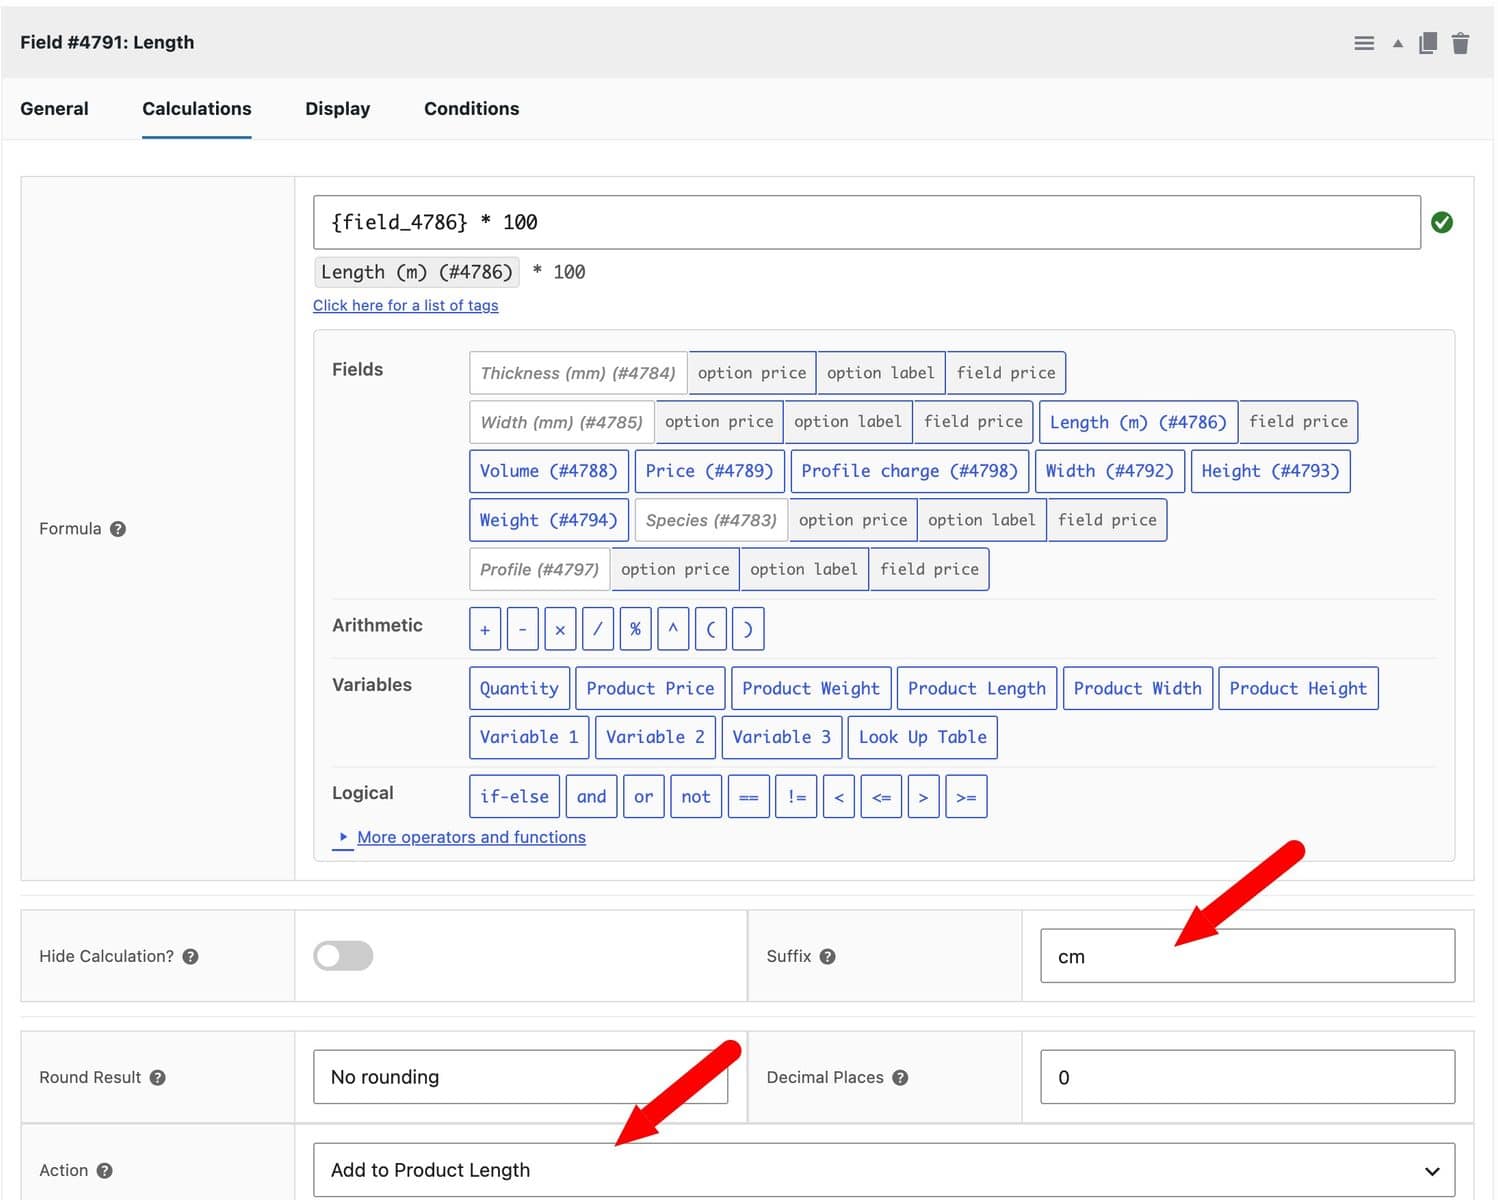
These formulas assume your store uses centimeters and kilograms, which you can check at WooCommerce > Settings > Products. If your store uses different units, change the formulas to match.
The weight formula uses 550 kg per cubic meter as an average density for timber. Use the right density for the materials you sell.
Add a suffix to each field, such as ‘cm’ or ‘kg’. If you don’t want customers to see these values, check ‘Hide Calculation’.
Your product’s length, width, height and weight now update as the customer makes their choices, so your shipping rates are based on what they actually order.
Step #7: Publish and test your product
Publish your product and view it on the front end. Choose a species, thickness and width, then enter a length.
That’s how to let customers choose product dimensions in WooCommerce. Now let’s look at some other ways to calculate prices.
How do you price by area, perimeter or volume?
Use the same setup with a different formula. For example:
- Area:
{width} * {length} * {rate}for flooring, worktops and sheet materials priced per square meter - Perimeter:
({width} + {height}) * 2 * {rate}for picture frames and edging priced per meter - Volume:
{length} * {width} * {depth} * {rate}for foam, beams and sleepers priced per cubic meter - Weight from volume:
{area} * {depth} * {density}for topsoil and gravel, with the ‘Action’ set to ‘Add to Product Weight’
Replace each name in braces with the placeholder for your own field.
How do you use existing product dimensions in a formula?
You can also reference values of product dimensions directly in a formula using four reserved tags:
{product_length}{product_width}{product_height}{product_weight}
To add them to your formula, just click on one of the buttons in the ‘Variables’ row in the formula builder.
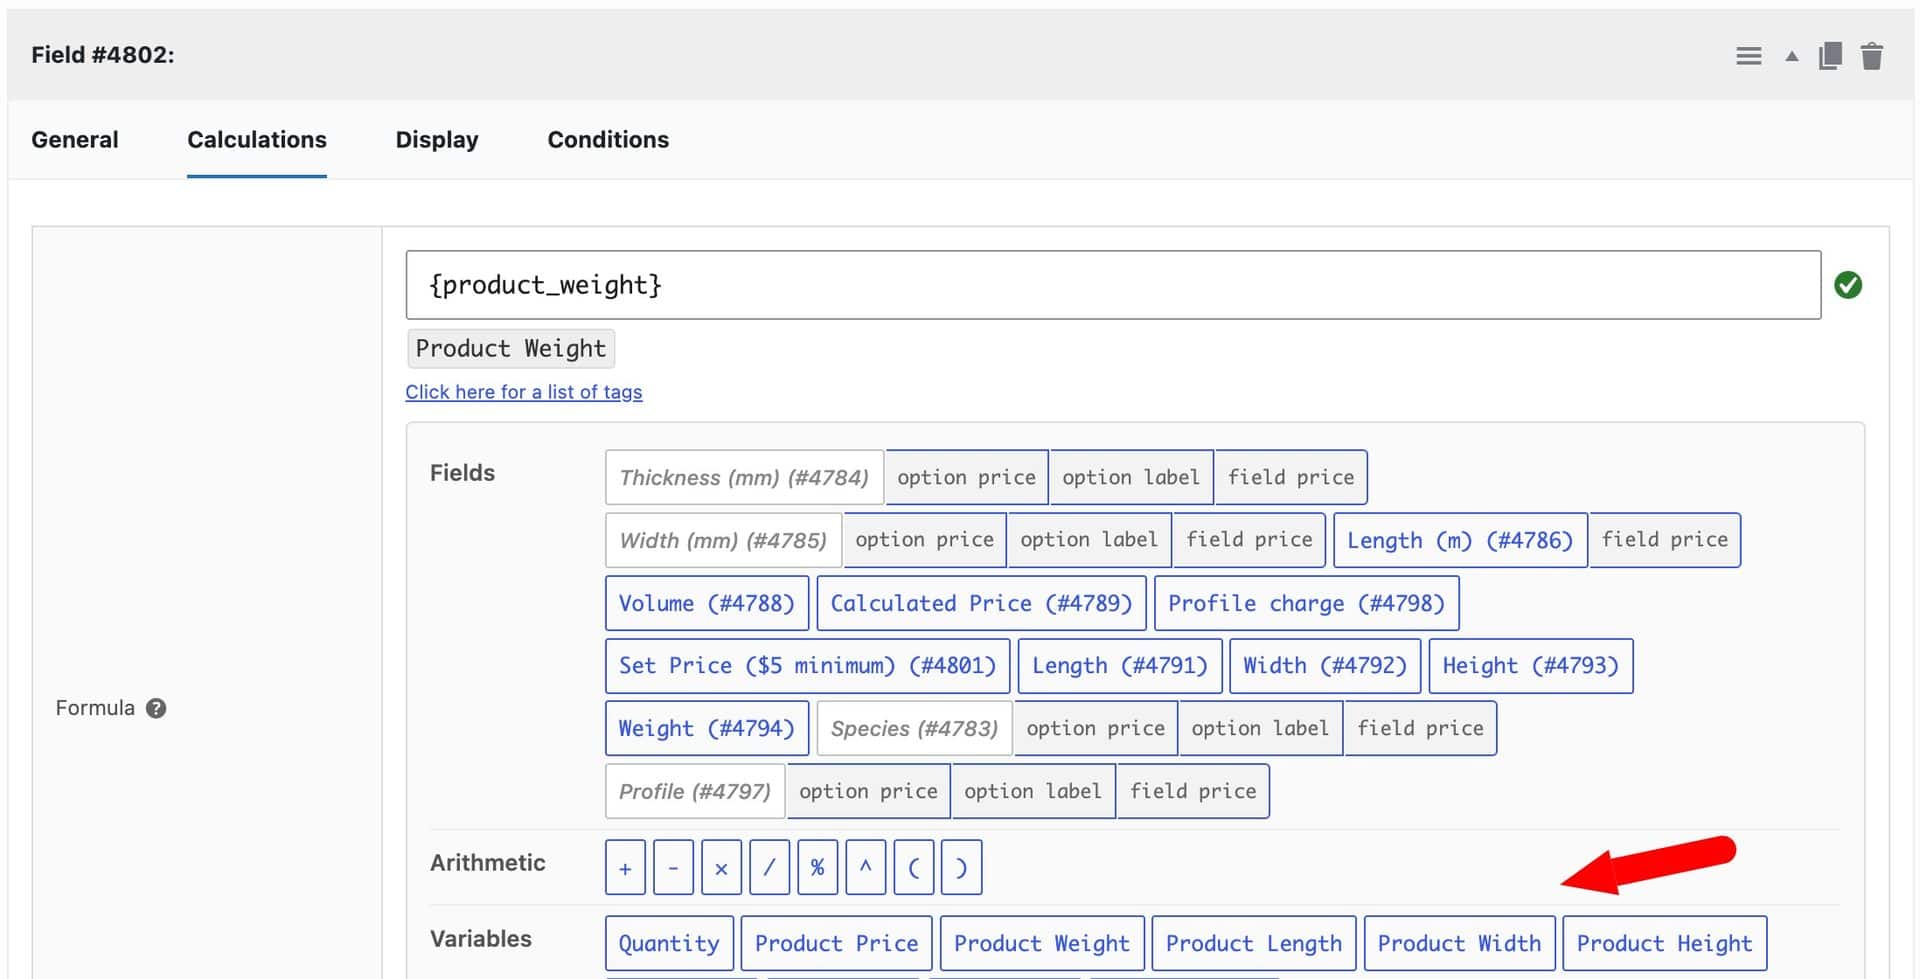
These tags always pull the value originally saved on the product itself, not anything set dynamically by the customer. For example, if you sell a storage box and want to calculate its volume automatically, you could add a Calculation field with this formula:
{product_length} * {product_width} * {product_height}Set the field’s ‘Suffix’ to something like “cm³” so the result displays clearly, and set ‘Display As Cost’ to ‘No action’ if you only want to show the figure rather than add it to the price.
You can combine these tags with customer input too. For example, to charge a per-unit rate based on a product’s existing weight and the quantity ordered:
{product_weight} * {quantity} * 2.5This charges $2.50 for every kg of the product’s base weight, multiplied by how many the customer orders.
Bonus #1: How do you add a minimum charge or cutting fee?
Use max() in your price formula to set a minimum charge. This formula charges at least $5, however short the length:
max({field_4788} * {field_4783_option_price}, 5)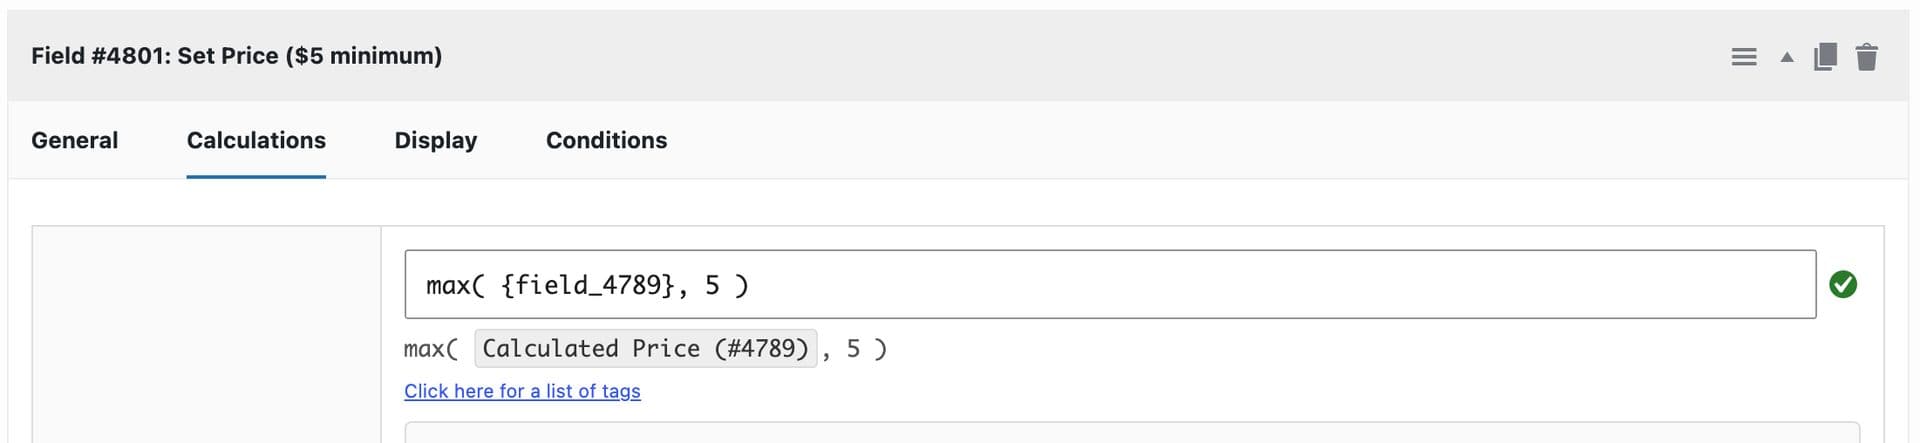
Use min() in the same way to cap a charge. For example, you could cap a delivery surcharge on long lengths.
To add a cutting fee, add a number field labeled ‘Number of cuts’ and a calculation field that multiplies it by your fee. Set its ‘Action’ to ‘Display As Cost’ as well.
Bonus #2: How do you charge for profiles with a lookup table?
You can use a lookup table when a charge doesn’t follow a simple formula and when you have a more complex set of variables. For custom timber, then profiles are a good example.
Many timber merchants let customers choose a profile, such as a rounded or chamfered edge, which is machined onto the timber after it’s cut. The cost of machining depends on the profile and the section size, so it’s easier to keep in a table than to work out with a formula.
Advanced Calculations lets you import a lookup table from CSV or build it in your dashboard.
Step #1: Create a flat table of profile charges
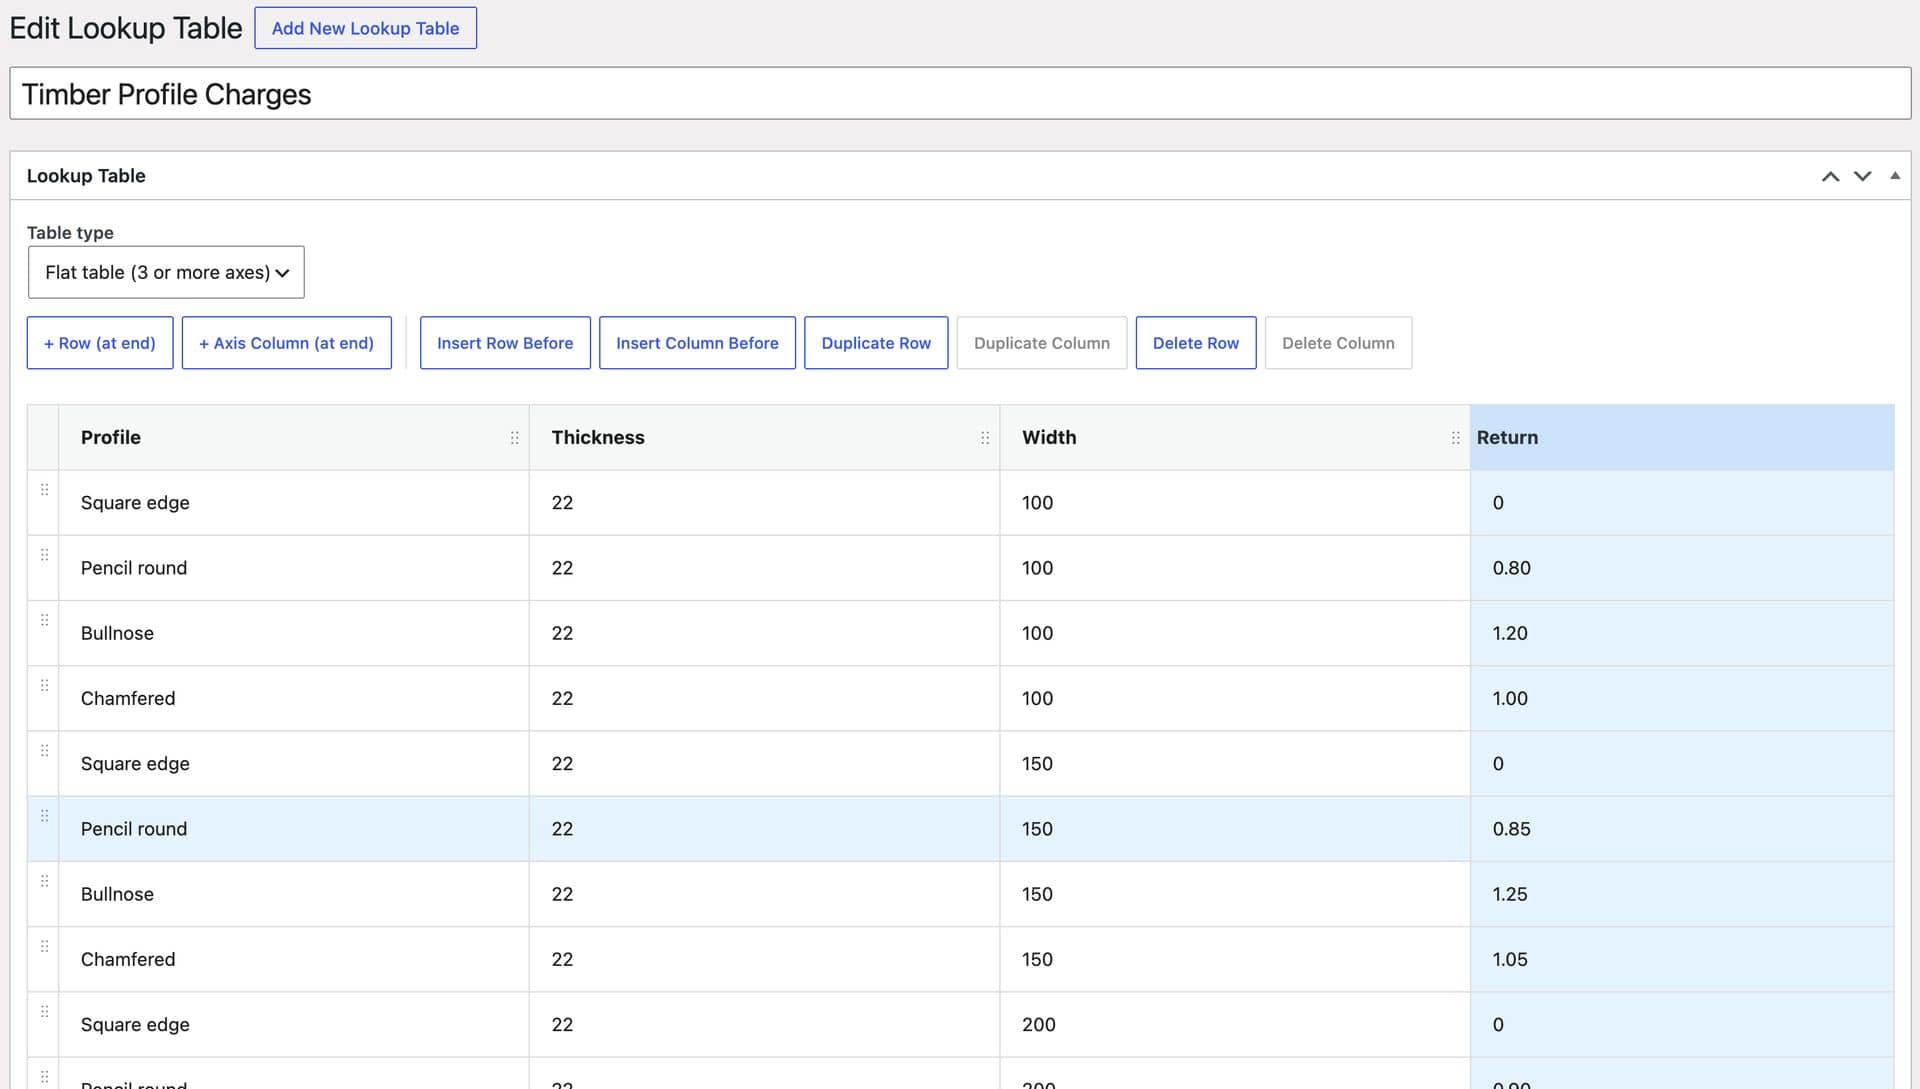
Go to Product Add-Ons > Lookup Tables and create a flat table with a column for the profile, the thickness and the width, and a final ‘Return’ column for the charge per meter:
| Profile | Thickness | Width | Return |
|---|---|---|---|
| Square edge | 22 | 100 | 0 |
| Pencil round | 22 | 100 | 0.80 |
| Bullnose | 22 | 100 | 1.20 |
| Chamfered | 22 | 100 | 1.00 |
| Square edge | 47 | 150 | 0 |
| Pencil round | 47 | 150 | 1.10 |
| Bullnose | 47 | 150 | 1.60 |
| Chamfered | 47 | 150 | 1.40 |
Add a row for every combination of profile and section size you sell.
Step #2: Add a profile field
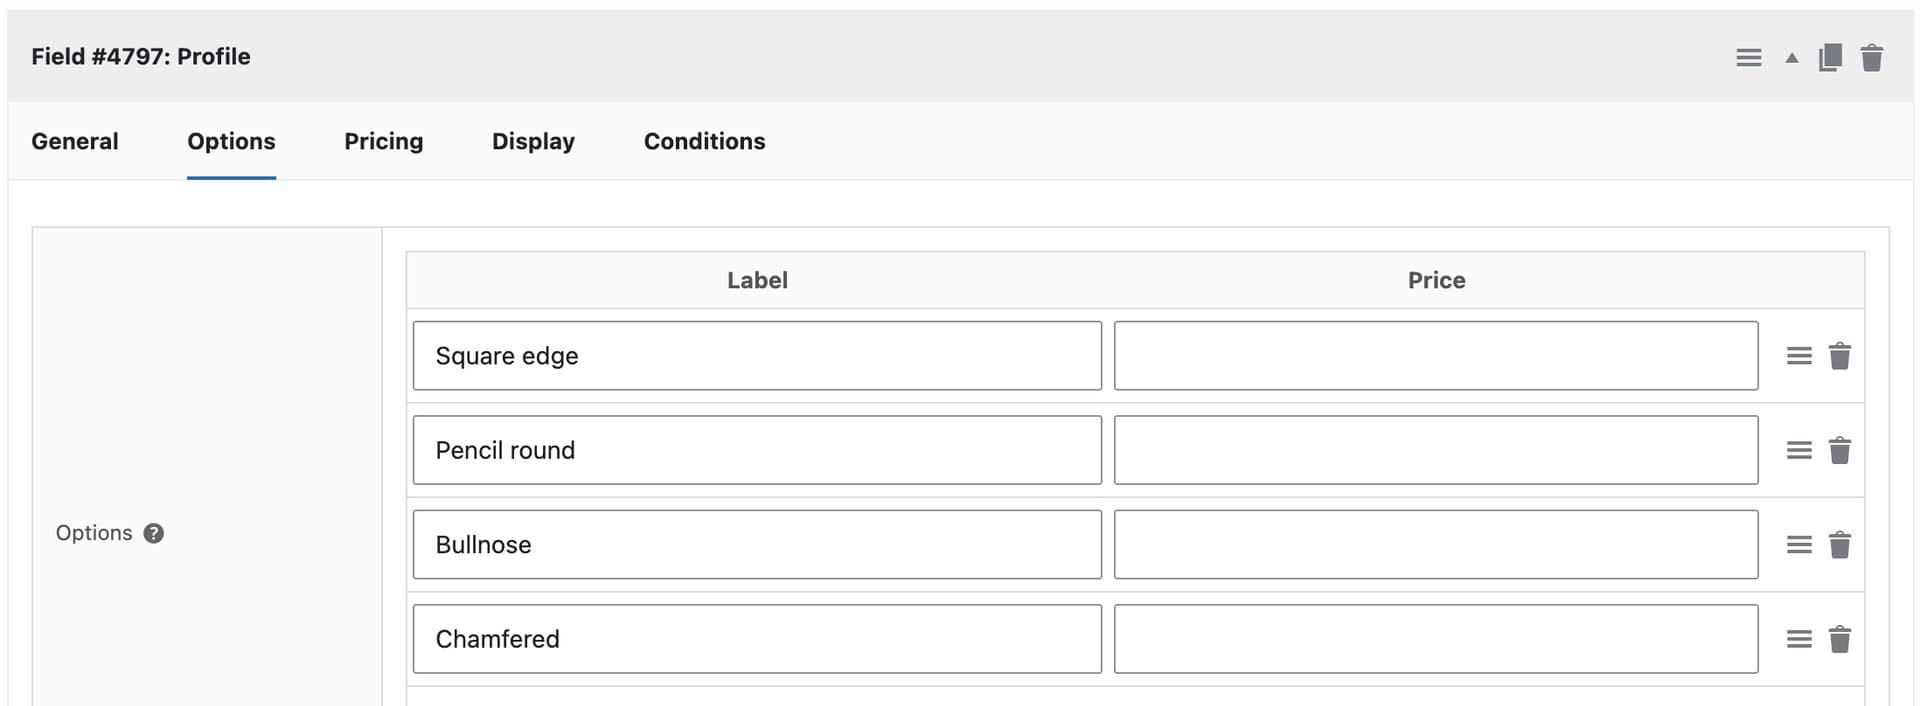
Add a select field labeled ‘Profile’ to your timber product, with the options Square edge, Pencil round, Bullnose and Chamfered. Make sure each option’s text matches your table exactly.
Step #3: Look up the profile charge
Add a calculation field labeled ‘Profile charge’ and enter {look_up_table} in the ‘Formula’ box. Select your profile table, then choose the ‘Profile’, ‘Thickness (mm)’ and ‘Width (mm)’ fields under ‘Axis Fields (in column order)’, using the ‘(option label)’ version of each.
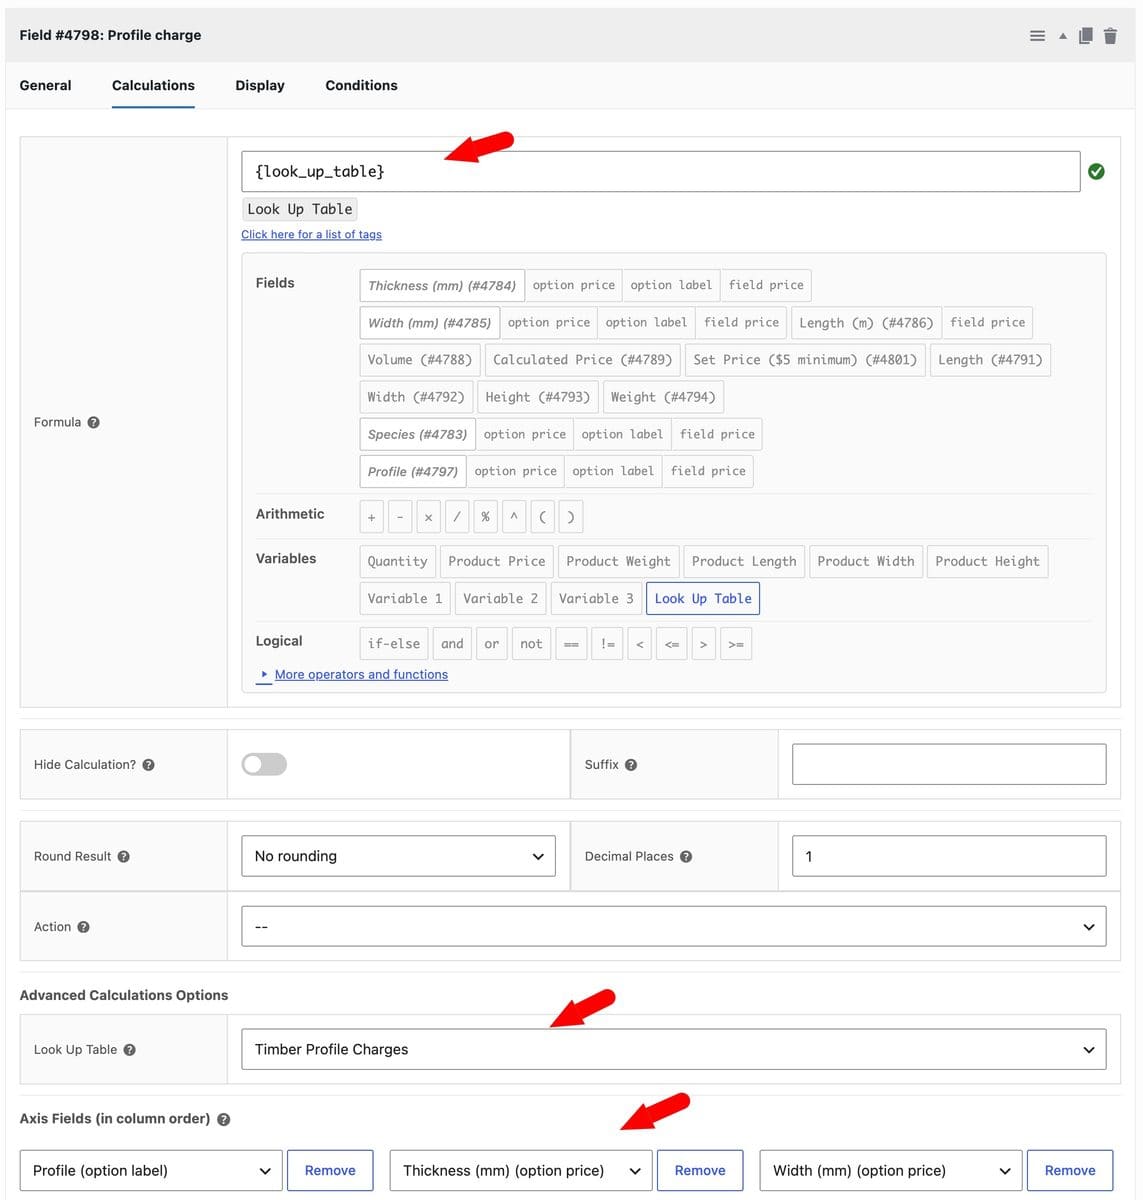
Leave its ‘Action’ empty, since we’ll use the result in the price formula.
Step #4: Add the profile charge to the price
The profile charge is per meter, so multiply it by the length and add it to the price of the timber. Change the formula in your ‘Price’ field to:
{field_4788} * {field_4783_option_price} + {field_4786} * {field_4798}Here, {field_4798} is the ‘Profile charge’ field. For example, 2.4m of 47 x 150mm pine with a bullnose edge costs $7.61 for the timber plus $3.84 for the profile.
Our guide to lookup table pricing in WooCommerce covers lookup tables in more detail.
How do customers’ dimensions appear in the cart and orders?
Product Add-Ons Ultimate shows the customer’s choices in the cart, at checkout, on the order screen and in order emails. You can see the species, thickness, width and length for every item, so you know exactly what to cut.

We were working on a site for a local glass company to implement a cut-to-size glass ordering system and needed to figure out how to implement a system in WooCommerce that would be able to deal with so many variables such as height, width, area, perimeter, price per square metre for over 60 products. Also additional patterns or finish types for those products such as cornering, processing, toughening, etc needed to be incorporated. We considered Gravity Forms but needed something that was much more user friendly. The ability to use global add-ons and to then be able to select which specific products can make use of the add-ons has been invaluable.
FAQs
Yes, if you only sell a few fixed sizes. Create a variation for each size and set its dimensions and weight on the variation. Custom dimensions work better when customers need any size within a range, since you’d otherwise need a variation for every possible length.
Yes. Product Add-Ons Ultimate is unit agnostic, so customers can enter measurements in any unit. There are two common approaches:
– Fractions of an inch: add a number field for whole inches and a select field for the fraction. See our guide to using fractions in measurements
– Feet or meters: add a radio group where customers choose their unit, with the conversion factor in each option’s price, such as 0.3048 for feet to meters. See our guide to converting between feet and meters
Set a minimum and maximum value on each number field. Customers can’t add the product to their cart with a value outside that range.
Yes. The ‘Add to Product’ actions update the product’s length, width, height and weight in the cart. Any shipping method that uses dimensions or weight then calculates its rate from the customer’s choices.
Check the ‘Shipping’ tab on your product. The ‘Add to Product’ actions add to any length, width, height or weight already set there, so leave those values empty.
Yes. Add number fields for the width and length, then a calculation field that multiplies them by your price per square meter or square foot. Use a select field for the thickness if your price depends on it.
Custom product dimensions in WooCommerce – recap
In this article, we looked at how to let customers choose product dimensions in WooCommerce. We set up a timber product priced by volume, then set its length, width, height and weight from the customer’s choices so shipping is calculated correctly.
WooCommerce Product Add-Ons Ultimate lets you add number, select and calculation fields to any product. Use Advanced Calculations if you’d like to set prices from a lookup table.
Product Add-Ons Ultimate is compatible with all themes and page builders, including Astra, Flatsome and Woodmart, and page builders like Elementor and Divi. If you have any questions, our world-class support team is on hand to help. And the plugin is backed by a 14-day money-back guarantee, so you can try it risk-free.
Hi is this plugin https://pluginrepublic.com/wordpress-plugins/advanced-calculations/ required this plugin too https://pluginrepublic.com/wordpress-plugins/woocommerce-product-add-ons-ultimate/. ?
how about i purchase this plugin only https://pluginrepublic.com/wordpress-plugins/advanced-calculations/ ? is it doesnt work?
Hi Yoki
The Advanced Calculations plugin requires the Pro version of Product Add-Ons Ultimate. You cannot run Advanced Calculations without the Pro version of Add-Ons Ultimate.
To achieve all the features discussed in this article, you’ll need both plugins.
Thanks.