Your complete guide to creating WooCommerce product boxes

Want to start selling WooCommerce product boxes at your store? Your customers don’t want a one-size-fits-all solution, and offering custom boxes lets you give your customers the power to build their own boxes of products.
Essentially, your shoppers will be able to choose whichever items they want to fill out their “box”. You can also set limits, like only letting shoppers choose a certain number of items or controlling which items can be part of your product boxes.
However, WooCommerce doesn’t offer this as a built-in feature, which is why you’re probably reading this post.
To help you fix that, we’ll show you how to create your own product boxes on your WooCommerce store.
We’ll start by sharing some examples of how product boxes work. Then, we’ll show you step-by-step how to create your own boxes on WooCommerce without writing any code.
What are WooCommerce product boxes? With examples
A product box is essentially a customizable collection (or “box”) of products that shoppers can create to meet their needs. You’ll also commonly see these called WooCommerce product boxes, WooCommerce Product Bundles, a WooCommerce gift box, or a WooCommerce build your own box.
A common example from day-to-day life would be heading to your local cupcake shop. You can buy a box of a dozen cupcakes and fill it out with whichever cupcakes you want. The shop doesn’t force you to choose a specific set of 12 cupcakes.
More generic examples are:
- WooCommerce Gift Box – shoppers can design their own custom gift boxes and mix and match any products. You can even add an option for gift wrapping.
- WooCommerce Starter Kit – create a custom starter kit of everything people need in one box.
- WooCommerce build your own box – take away the gift box or starter kit branding and just make it a generic box (like a mixed case of wine). Or, you can even let people design their own product, like choosing the ingredients to go in a custom cereal or building other composite products.
To see some live examples of the types of boxes you’ll be able to build with the knowledge you gain in this post, click below:
The benefits of offering product boxes
Product boxes make a great option for both you and your customers.
From the customer’s perspective, they’re happy because they get to choose exactly which item(s) they want to purchase, rather than being forced into a pre-set configuration where they may or may not want all the items in the bundle.
From the store owner’s perspective, you’re happy because boxes encourage shoppers to purchase more items, which can increase your revenue and average order value.
Related Tutorial
Check out this article on WooCommerce product bundles for more ways to create bundled products

How to create WooCommerce product boxes
Next, let’s move into the tutorial section of this post and we’ll show you how to create your own WooCommerce product boxes.
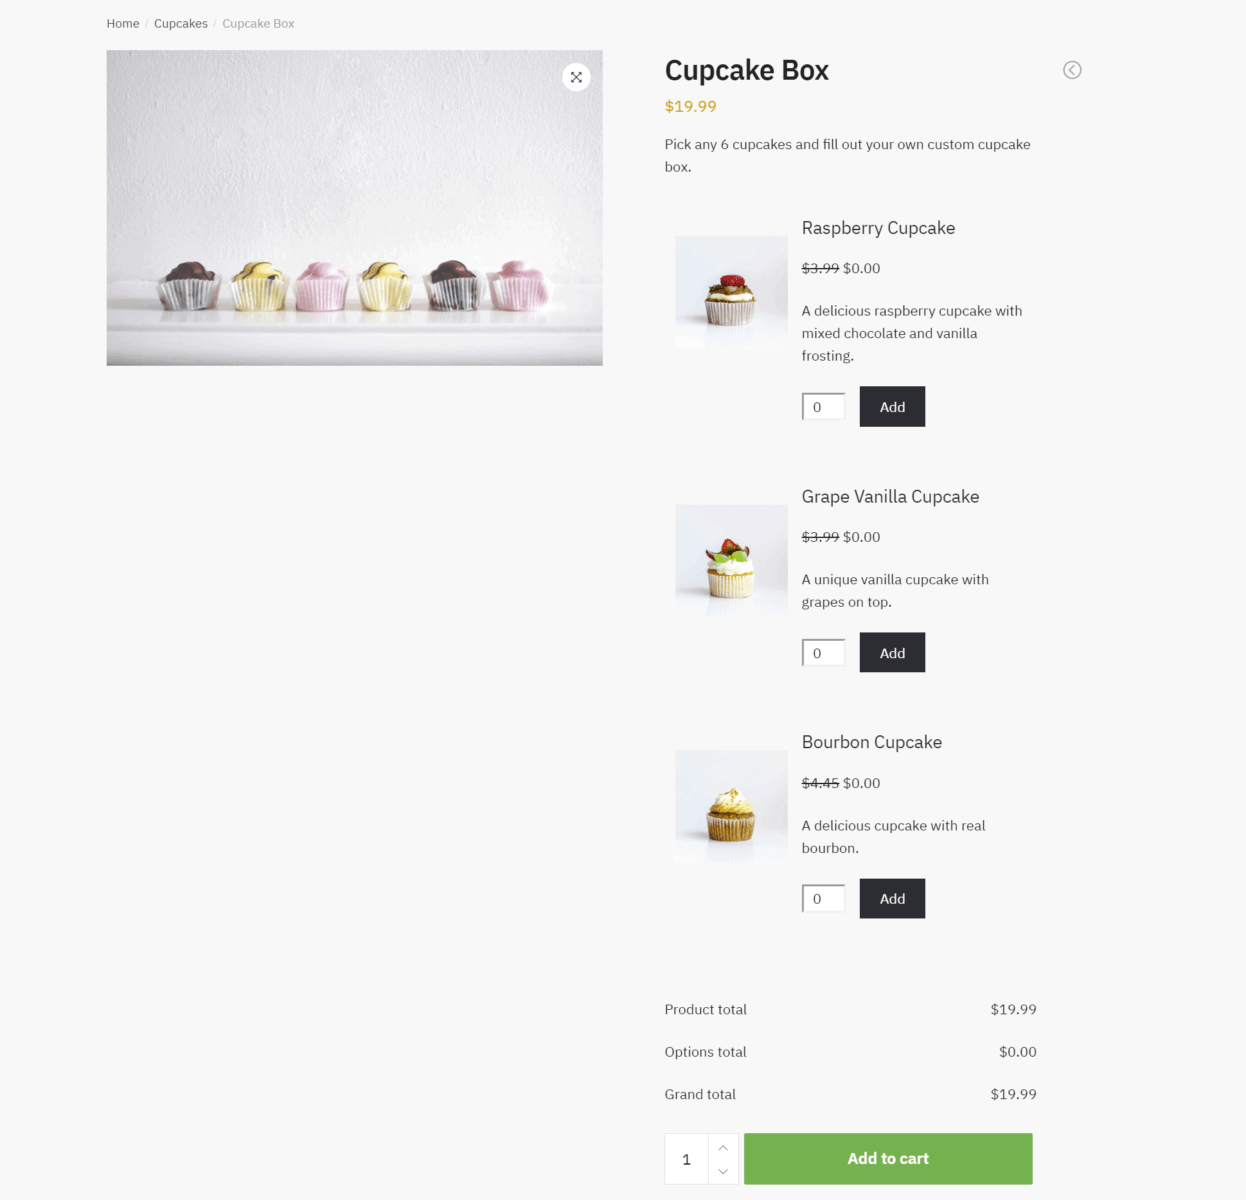
In the tutorial, we’ll use a customizable cupcake box as our example. However, you can apply the concepts that you learn to any type of product box.
To easily create customizable WooCommerce product boxes, you can use Add-Ons Ultimate, a WooCommerce Product Add-Ons plugin.
Please note that you’ll need the Pro version of the plugin to make use of all the features in this tutorial.

WooCommerce Product Add-Ons Ultimate
Personalize products with extra custom fields and options
With the plugin, you’ll be able to offer boxes comprised of any of the individual products on your WooCommerce store. You can charge a flat-rate for your boxes or add up the price of individual items and apply a discount.
Because of its flexibility, you can use WooCommerce Product Add-Ons Ultimate to create different types of product boxes, and we’ll show you how to set up three different scenarios in this post:
- Create a product bundle with a flat price and a hard quantity. E.g. “Choose any 6 items and pay just $100”.
- Make a product bundle with a hard quantity and a different price depending on the items that a shopper selects. You can use the real price of each individual item in the bundle and apply a flat-rate or percentage discount to encourage shoppers to use the bundle approach. E.g. “Add any 6 items to your box and get 10% off the total price of your bundle”.
- Create a product bundle where shoppers can choose any number of items. You can also set a minimum number of items and offer a flat-rate or percentage discount. E.g. “Add at least 6 items to your box and get 10% off”.
Here’s how to set it up…
Step 1: Add each item as a WooCommerce product
To get started, you need to add each item that you want to offer in your WooCommerce product boxes as a separate product (if you haven’t already).
For this cupcake box example, that would mean adding each individual cupcake as a separate WooCommerce product:
Step 2: Create your WooCommerce box product
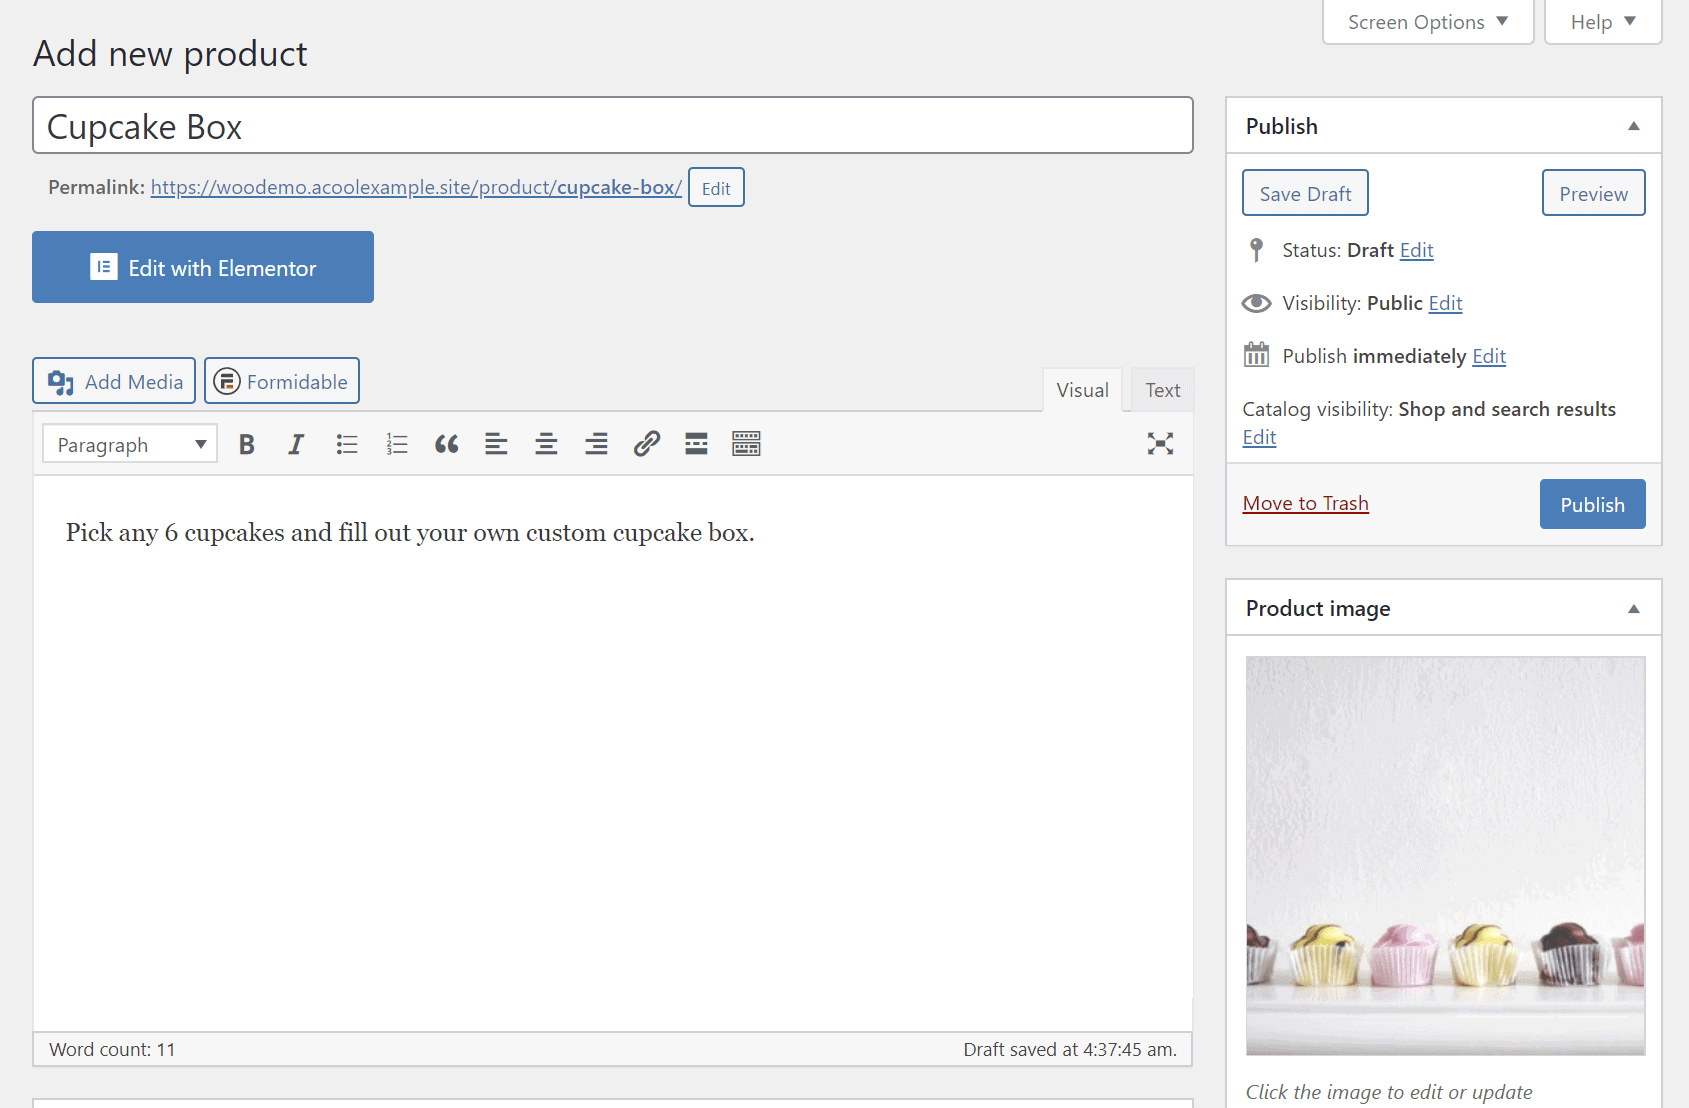
Once you’ve added all the items that will go into your box as individual products, you need to create another product for the box itself.
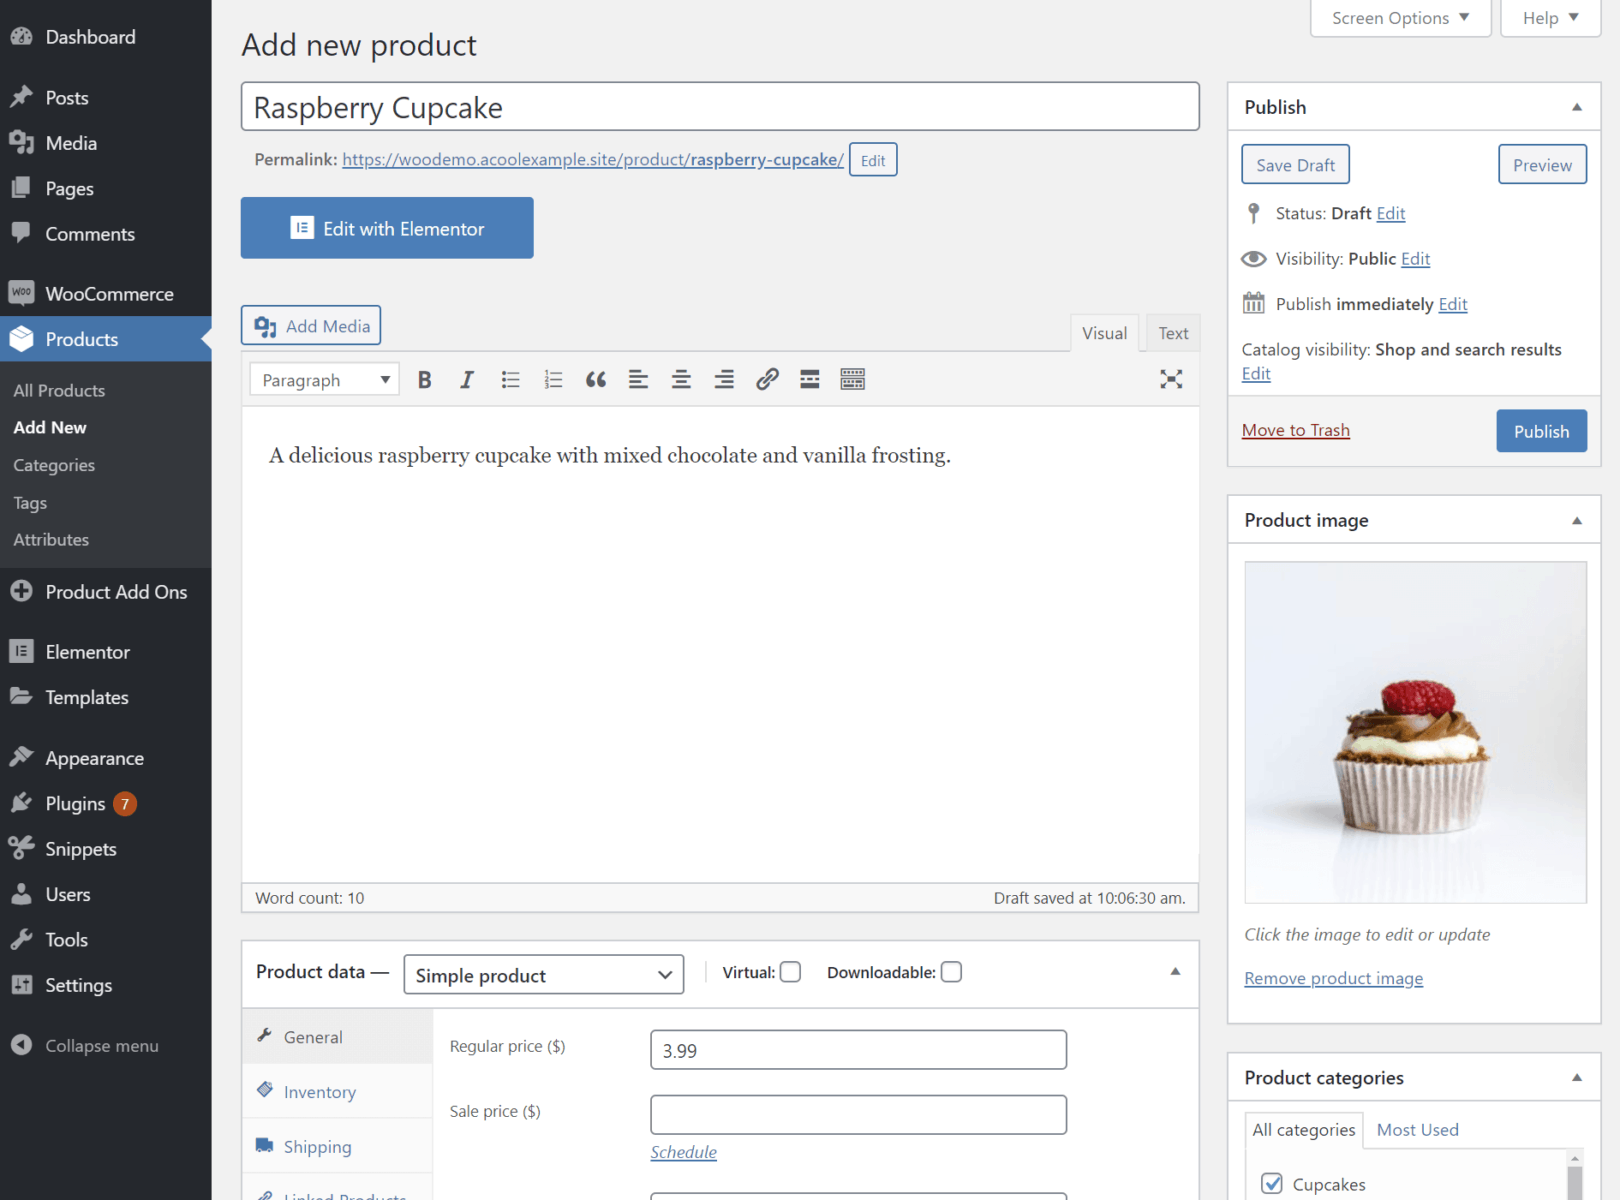
For this example, it’s a “Cupcake Box”, but you could make it a “Gift Box”, “Starter Kit”, etc.
Get started by adding the basic description and images:
Then, go to the Product data meta box to configure the product box functionality.
In the General tab, set the Regular price equal to the flat-rate price you want to charge for your box. For this first example, we’re creating a flat-price box that uses the same price no matter which items are in it. We’ll show you variable pricing next.

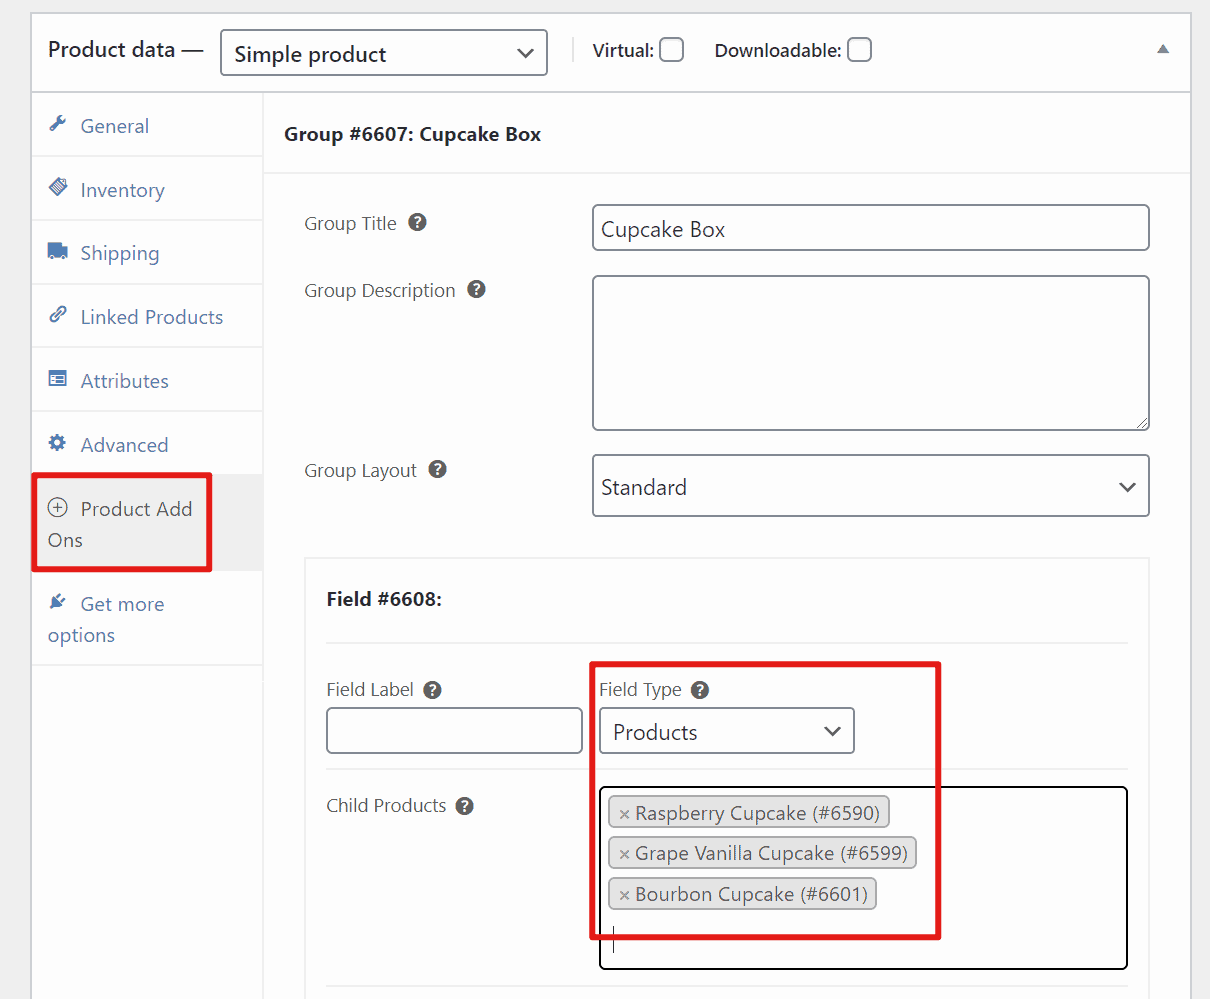
Then, open the Product Add-ons tab to create your product box. In that interface:
- Click Add Group.
- Click Add Field.
- Set the Field Type drop-down equal to “Products”.
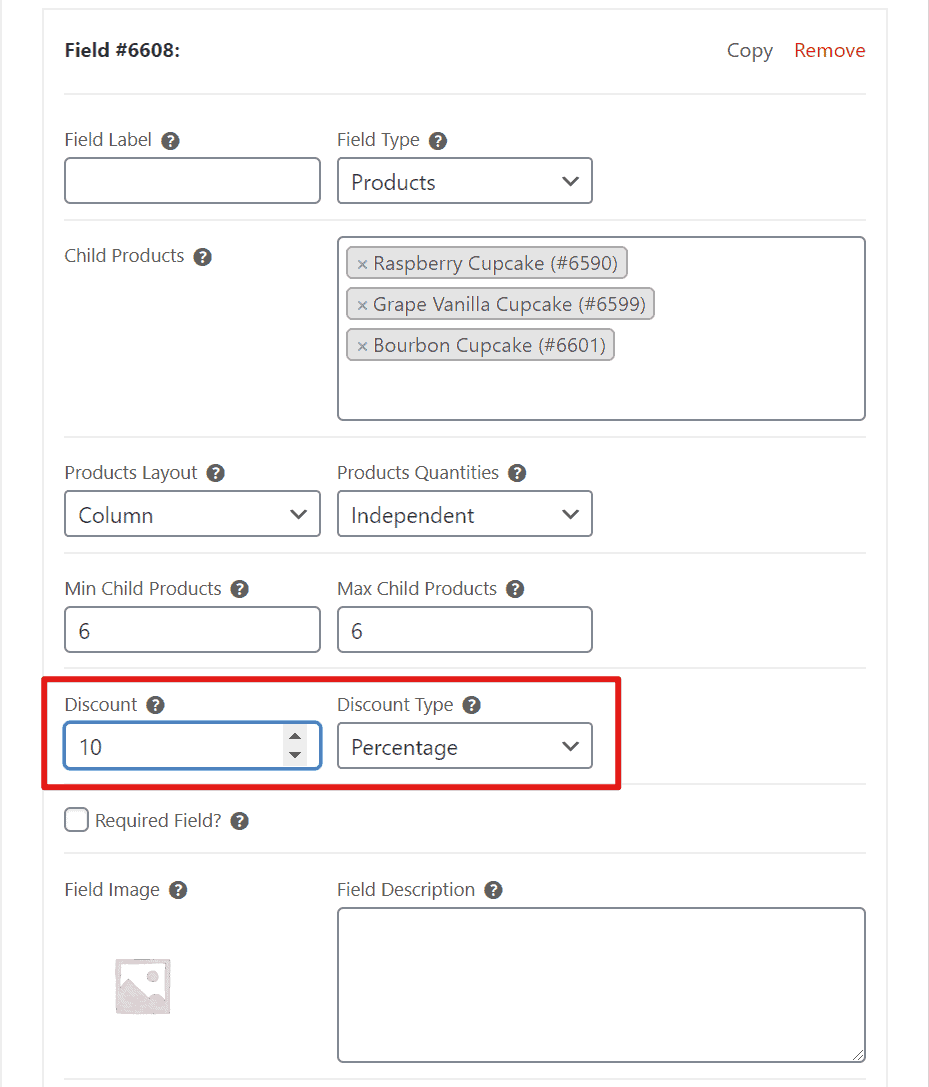
- Enter the names of all the products that you want to include in your product box in the Child Products settings area.
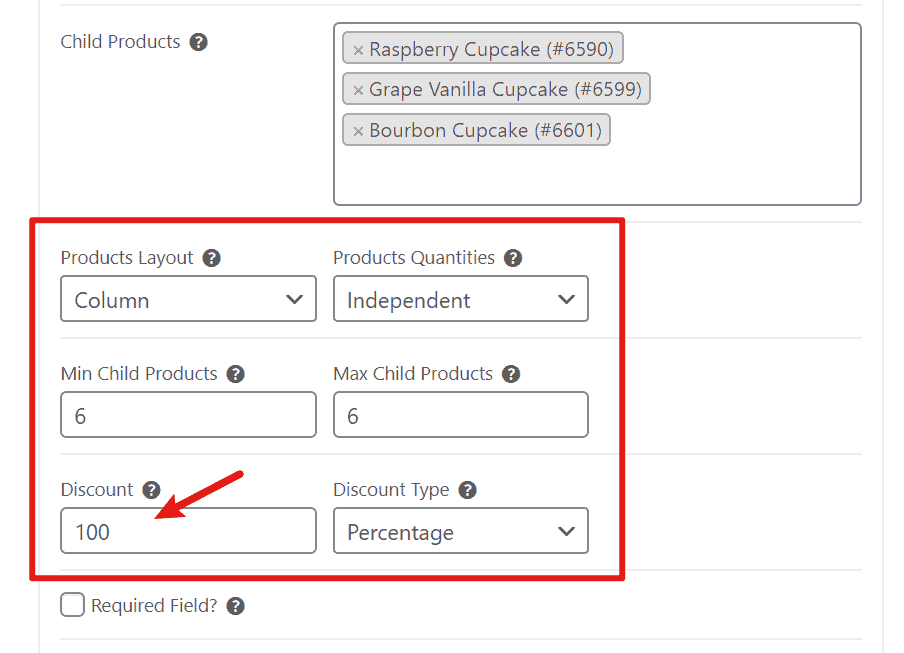
Underneath that, you can control the behavior of your WooCommerce product box:
- Products Layout – choose how to display the individual products that can be added to the box. If you have a lot of products, you might want to use a multiple-column layout.
- Product Quantities – choose “Independent” to let shoppers select different quantities for each item in the product box. You can also link them to make them all the same quantity or fix the quantity of each item at “1”.
- Min Child Products and Max Child Products – select the minimum and maximum number of items a shopper can choose. If you want to force users to select a fixed number of products, you can enter the same number for both. For example, to make all shoppers choose six cupcakes, you could enter “6” in both boxes.
- Discount – if you’re combining the value of all the products, you can offer a fixed or percentage discount on the final value. For a flat-rate product box, you want to set this to a 100% discount because you already set the flat-rate in the General tab and you don’t want to charge extra for the individual products.
And that’s it! Once you publish your product, you’ll have your front-end WooCommerce product bundle:
How to create variable price WooCommerce product boxes with fixed item quantity
In the first approach, we created a WooCommerce product box with a flat price regardless of which six cupcakes a shopper chose.
In this second scenario, you’ll learn how to create a variable price that’s based on the actual prices of the items in the box. So if a person chooses six expensive cupcakes, it will cost more than choosing six cheaper cupcakes.
You can then add a flat-rate or percentage discount on top to encourage people to use the product bundle.
You’ll set this up almost identically to the previous section – you just need to configure the prices differently.
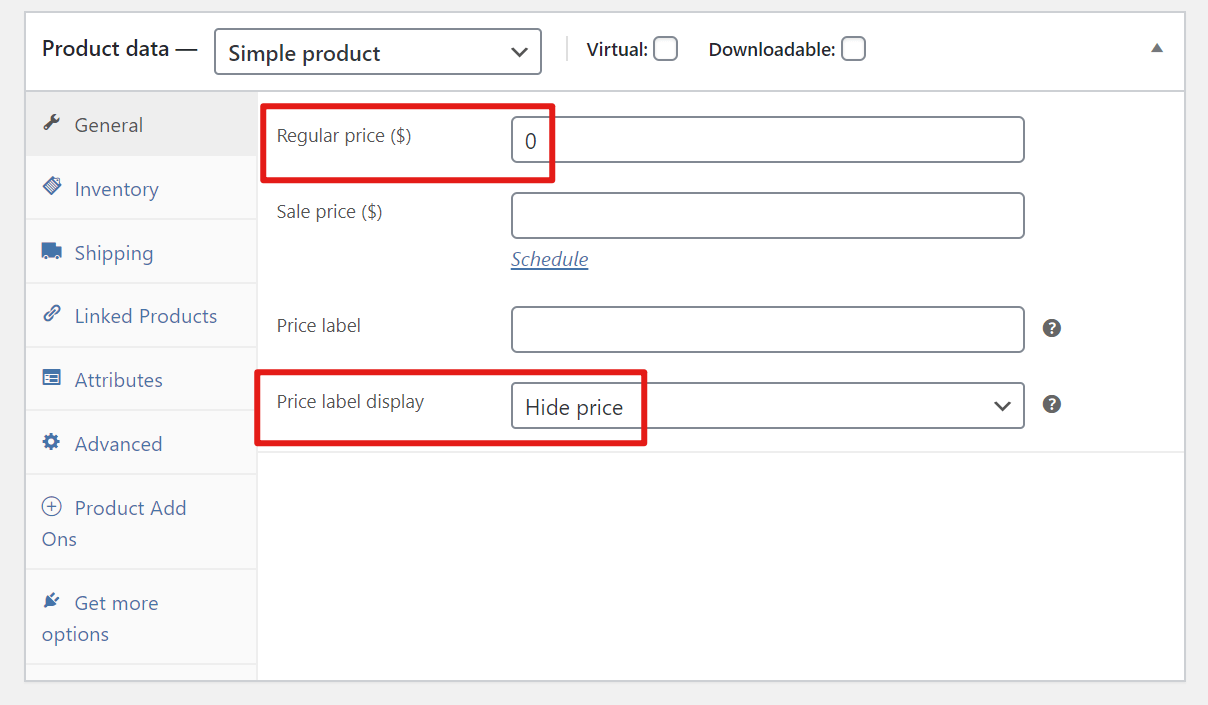
First, in the General tab, set the Regular price equal to “0” and set the Price label display drop-down equal to “Hide Price”:
Then, in the Product Add Ons tab, set the Discount field equal to the flat or percentage discount that you want to offer. For example, to offer a 10% discount off the total value of all the items in a user’s product bundle, enter “10 / Percentage”:
Now, shoppers will see a variable price based on the product prices of the specific cupcakes that they select:

How to create variable price WooCommerce product boxes with variable item quantity
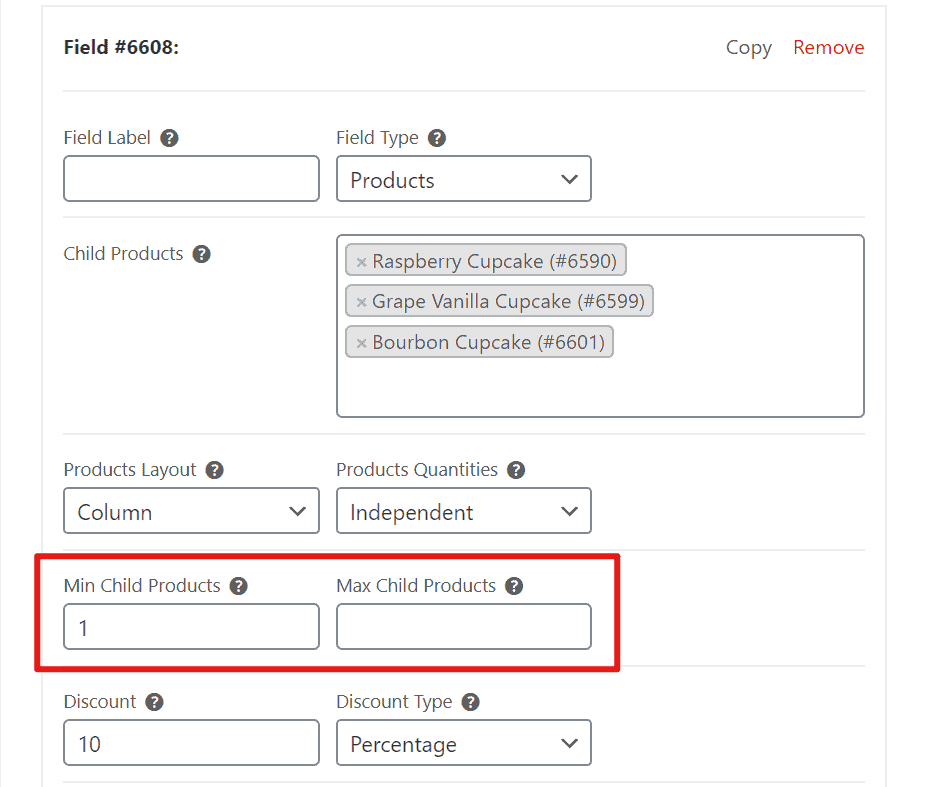
If you want to use the variable pricing approach but also let shoppers choose as many items as they want to add to their product box, you can keep the same settings from the previous section but with one tweak.
Instead of setting both the Min Child Products and Max Child Products equal to “6” to force shoppers to choose exactly six cupcakes, you can set the Min Child Products to whatever minimum you want to require and leave the Max Child Products blank so that shoppers can choose as many items as they want. Or, you could add a limit, but make it much higher:
Start creating WooCommerce product boxes today
Offering WooCommerce product boxes is a great decision because:
- They give your customers more flexibility by letting shoppers design their own boxes rather than forcing them into a pre-set configuration.
- You can encourage customers to purchase larger quantities by pushing them towards the box instead of individual products. That’s great for your average order value.
To create your own flexible WooCommerce product boxes, you can use the WooCommerce Product Add-Ons Ultimate plugin. With it, you can:
- Make any of your individual products eligible to be included in your boxes and arrange those products in different layouts.
- Charge a flat-rate no matter which items are in the box or calculate the price based on the actual items (including applying a discount).
- Force customers to choose a specific number of items or let them add any number of items to their box.
To learn more and purchase the plugin, click below:
WooCommerce Product Add-Ons Ultimate
Personalize products with extra custom fields and options
Hi, product looks interesting. What if let’s say you have a gift box business, you choose either a gift box, or a hamper, on the starting phase, then you go to choose your products. However, there might be 150 products too choose from. Are you able to say show the standard archive page, in the sense of having the filtering on the left or right, and being able to add those products that way? Instead of tick boxes or similar?
Hi Gabi
Thanks for your question. Not exactly – you can show the products in a grid but there’s no method to filter. It could be added as a customisation, but it’s not part of the standard features.
Thanks
Gareth
Are you able to limit the number of each individual products being added to the gift box?
Hi Ian
Yes, you can set a minimum and maximum number.
Thanks
Gareth
Is it possible for you to show me a screenshot of these options please.
Hello, i am looking to do this same cupcake example product box with a fixed price. The thing is my client doesnt want the customer’s to see the products individually (as they are not sold separatley)neither show an individual pricing. (Even if it is crossed out by the 100% discount) Is this possible?