WooCommerce product bundles: the complete guide
Product bundles are one of the most effective ways to increase average order value in a WooCommerce store. By grouping related products together – and possibly offering a discount for buying the set – you give customers a reason to spend more while making their shopping experience easier.
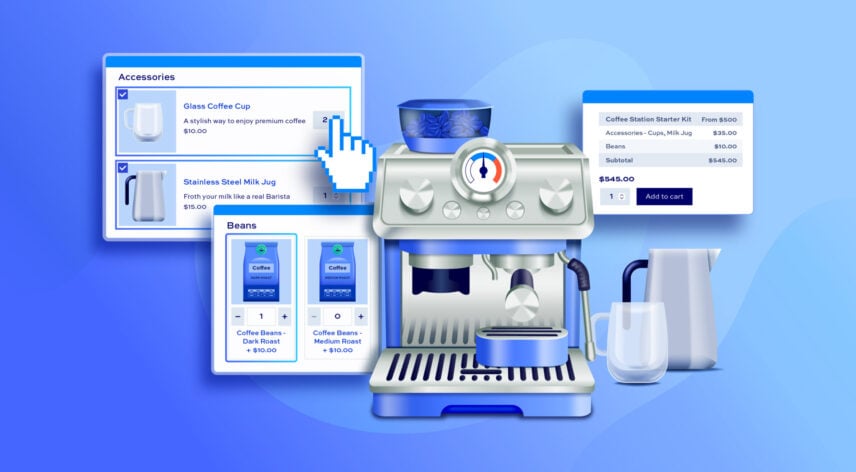
In this guide, we’ll show you how to create a WooCommerce product bundle using WooCommerce Product Add-Ons Ultimate. We’ll use a coffee station kit as our example, walking through everything from setting up your products to configuring discounts, layouts, and cart display. There’s a fully functioning demo product here as well.
We’ll also compare the best WooCommerce product bundle plugins to help you choose the right one for your store.
What is a WooCommerce product bundle?
A product bundle is a single product listing that includes – or lets customers choose from – a set of related products. Bundles can be fixed (every item is pre-selected) or configurable (customers pick which items to include).
Common examples include gift sets, starter kits, “build your own” boxes, and complete the look product pages. They’re popular across a wide range of industries, from food and drink to tech accessories, homeware, and beauty.
Why use product bundles?
The main reason is commercial: bundles increase average order value. Instead of a customer buying one item, they buy several – often at a small discount that feels like a good deal for them and is still profitable for you.
Bundles also help customers discover products they might not have found on their own. A well-curated set takes the guesswork out of buying and makes the shopping experience feel more considered.
There’s a stock management benefit too. Slow-moving products paired with popular ones in a bundle can shift inventory that might otherwise sit unsold.
What does WooCommerce include by default?
WooCommerce includes a “Grouped product” type out of the box. This lets you display related products together on one page, but it’s limited – there’s no bundled pricing, no discount functionality, and no way to require customers to choose a minimum set of items.
For anything more than a basic product grouping, you’ll need a plugin.

WooCommerce product bundles video
You can follow the video below to see how the product bundle in this tutorial is set up. Or scroll down for the step by step tutorial.
Tutorial: how to create product bundles
WooCommerce Product Add-Ons Ultimate lets you use other products in your store as selectable options on a product page. This makes it ideal for configurable bundles, where customers choose which items to include – and where each child product retains its own inventory, SKU, price, weight, and dimensions.
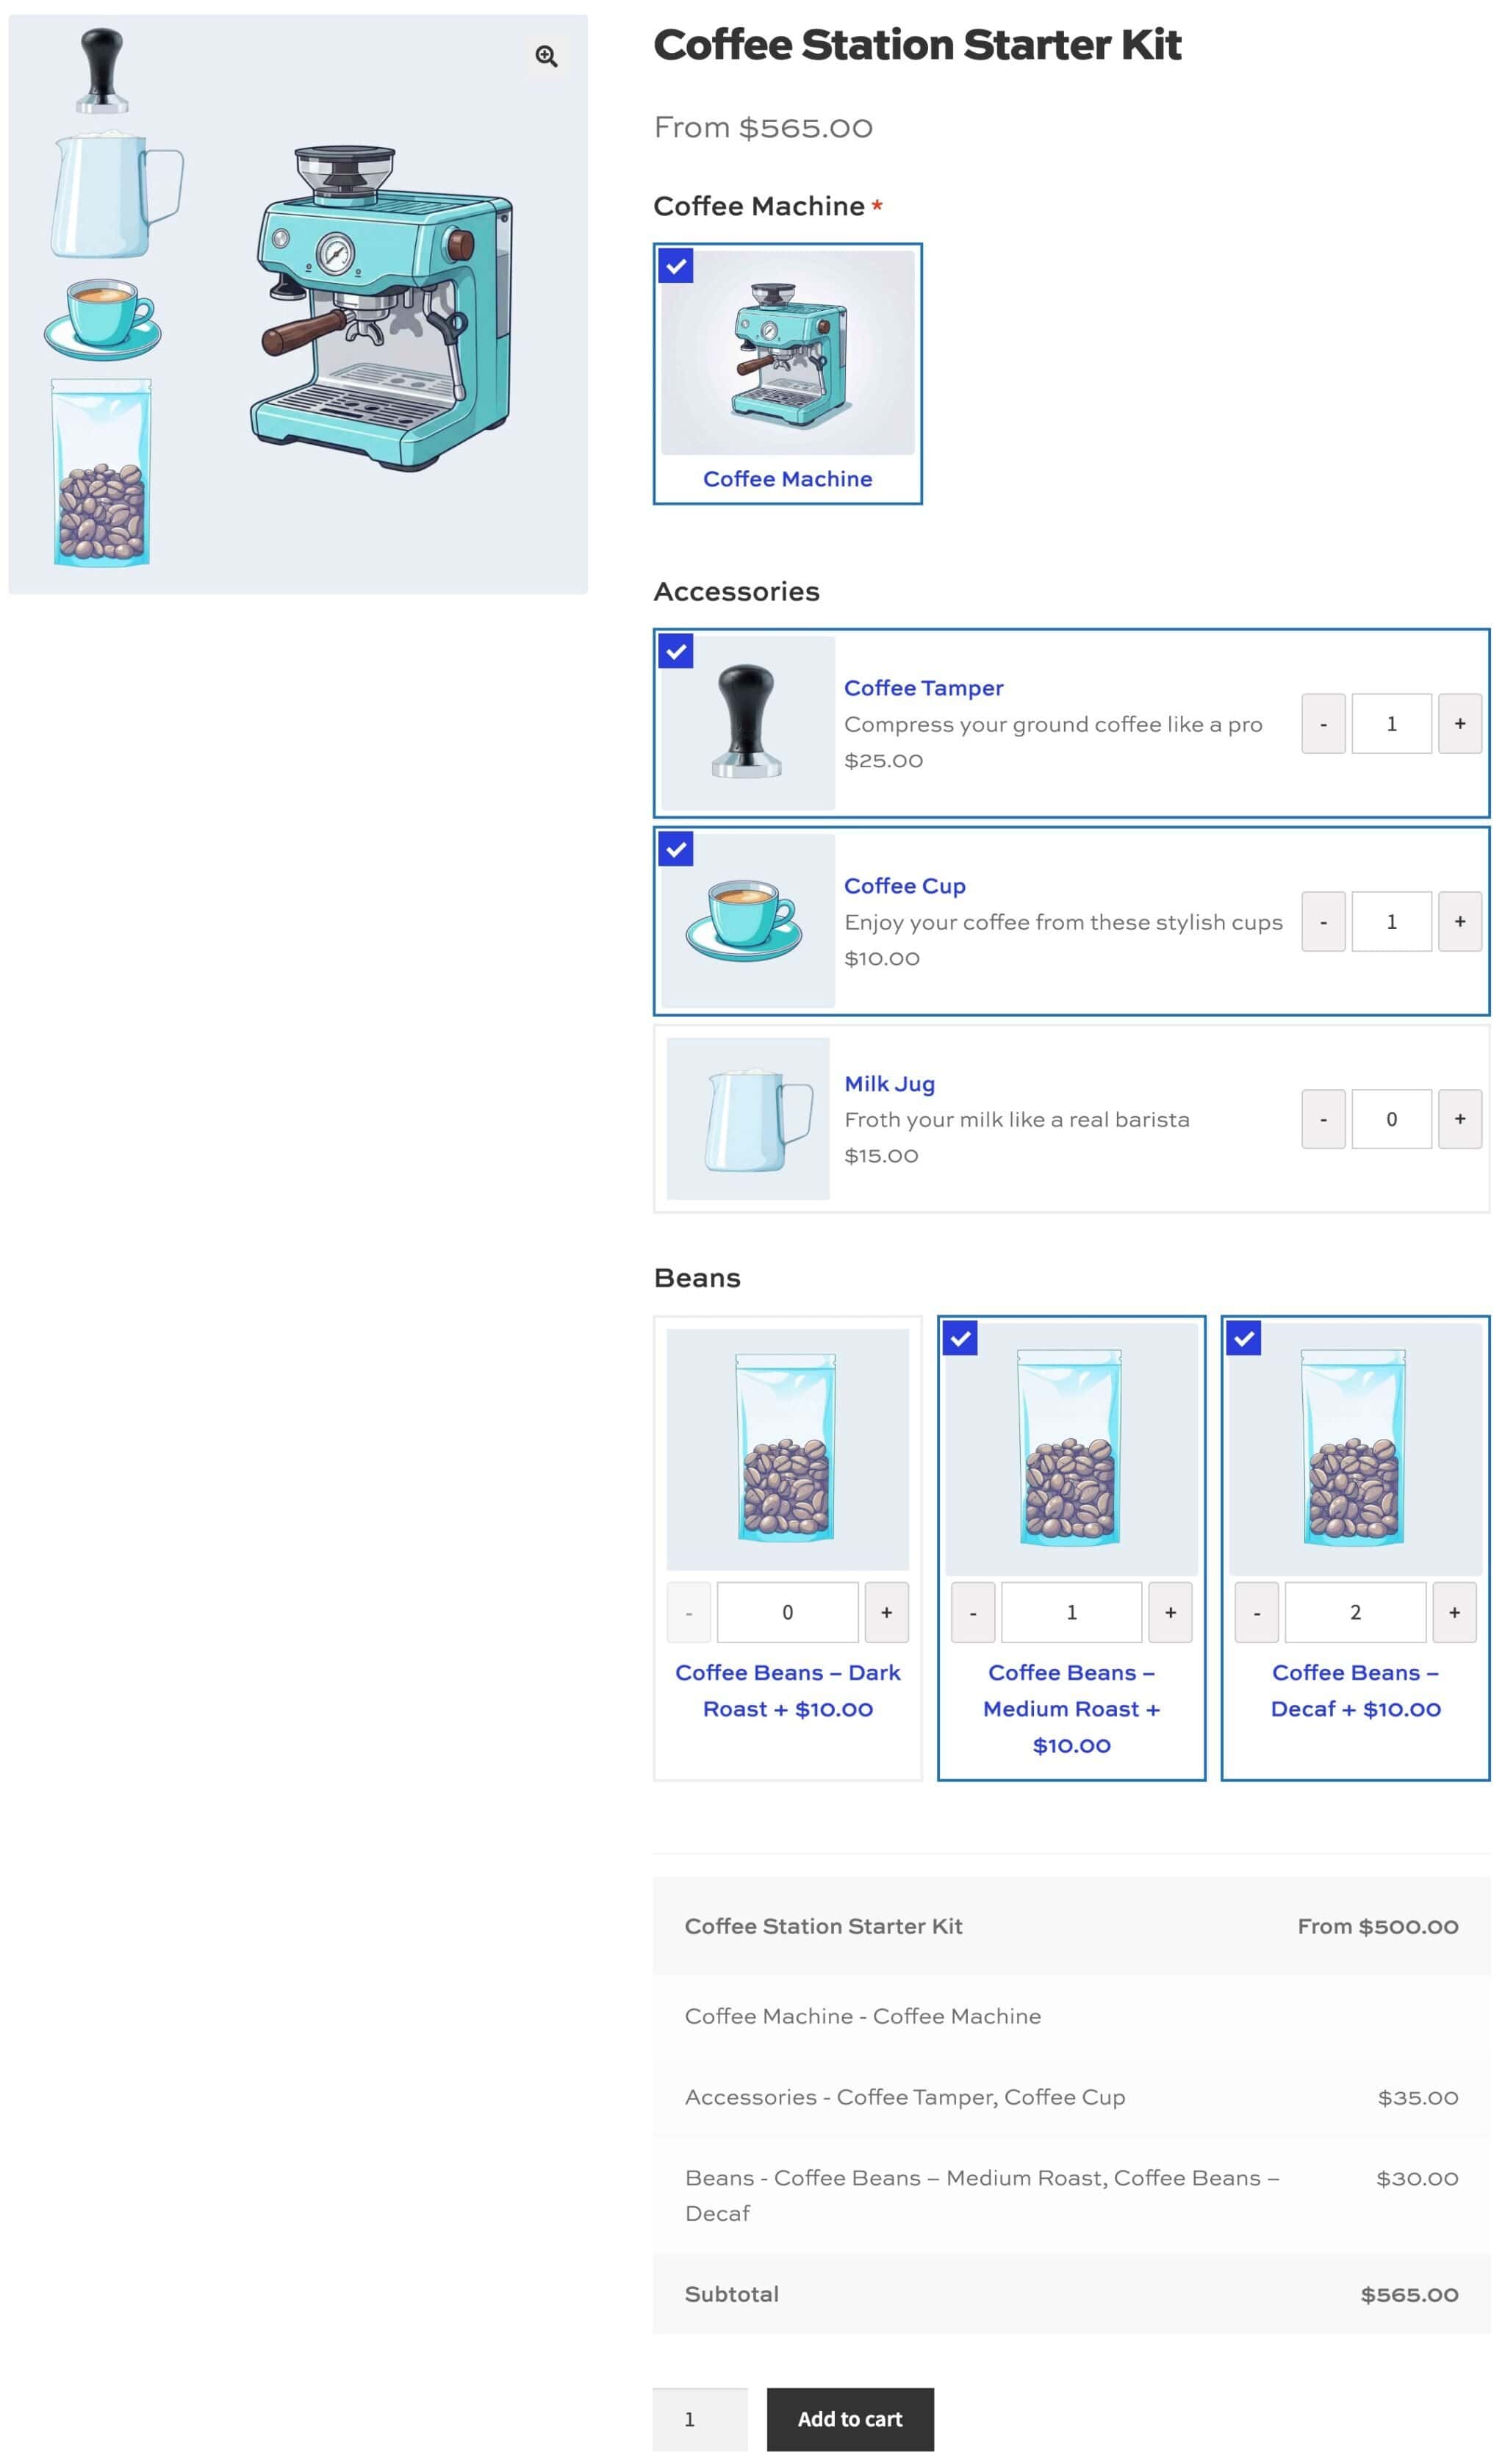
Our example is a Coffee Station Starter Kit. The parent product is the bundle listing itself; the child products are the items customers can add to it – a coffee machine, a coffee tamper, a milk jug, a coffee cup, and a bag of coffee beans.
We’re using a coffee starter kit as the example in this tutorial but obviously you can apply this to any type of product bundle you like.
WooCommerce product bundles pricing methods
Before we start on the tutorial itself, let’s look at pricing. WooCommerce Product Add-Ons Ultimate gives you several options for structuring the price of your product bundle.
The table below shows the four main approaches for product bundle pricing:
| Pricing method | Parent product price | Child product prices | Result |
|---|---|---|---|
| Fixed price | Fixed – e.g. $500 | 100% discount applied | Customer always pays the fixed price, regardless of which items they select |
| Fixed price – discounted | Discounted – e.g. $450 | Percentage or fixed discount | Customer gets items at a discounted fixed price – you decide the discount |
| Minimum price | Fixed – e.g. $500 | Priced independently, with or without discount | Customer pays the basic price plus the cost of any accessories they add |
| Item-based price | $0 | Priced independently, with or without discount | Customers pay the total value of the items they select |
Essentially, we can choose to set the price on the parent product, on the child products, or on a combination of both. We can also apply discounts to one or more components if we wish.
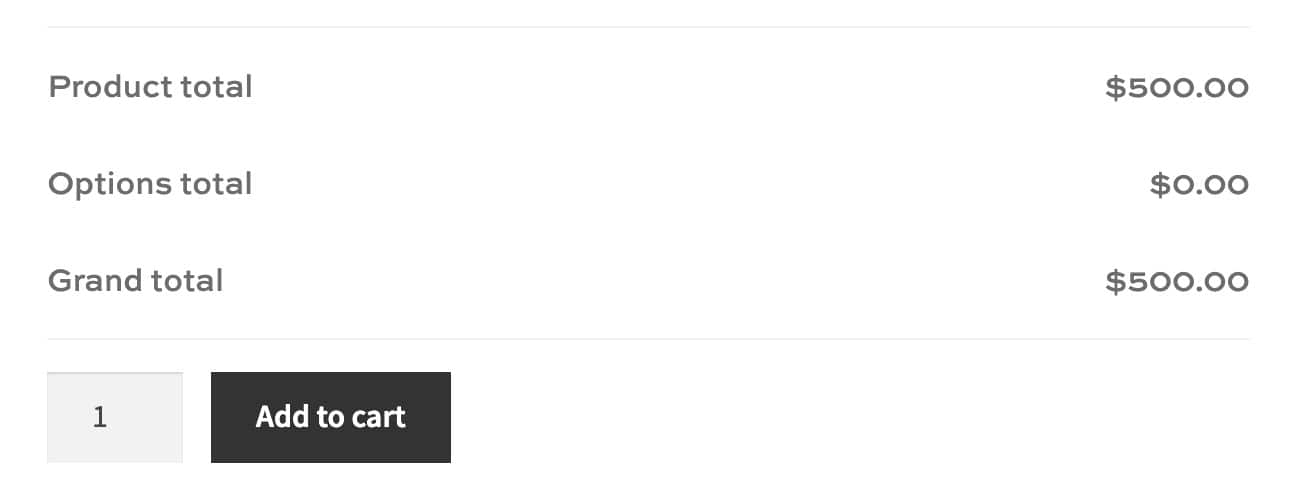
For our coffee station, we’re using the minimum price approach. The parent product is set to $500 – covering the cost of the coffee machine – and the accessories and beans are priced independently so customers pay extra for what they add.
Whatever pricing method you use, you can also choose how to itemize the overall product cost for the customer. We’ll look at that later on.
Now let’s set up our products.
Step #1: Create your child products
Each component of the bundle is a product in its own right. So before setting up the bundle, create each component as a standard WooCommerce product. Give each one a product image, price, weight, and dimensions – these will all carry through to the bundle.
If you don’t want customers to purchase these items individually (maybe you only want them to be available as part of the bundle), set their catalog visibility to “Hidden” in the product’s Publish panel. You can also go to WooCommerce > Settings > Product Add-Ons > Products and enable “Redirect hidden products” to prevent direct access via URL.
Step #2: Create the parent product
Create a new simple product and call it “Coffee Station Starter Kit.” This is the product customers will land on and add to their cart.
Set a product image and description as you normally would. The price of the parent product can be left at zero if you want customers to pay for the child products they select – or you can set a fixed bundle price (more on this in Step #5).
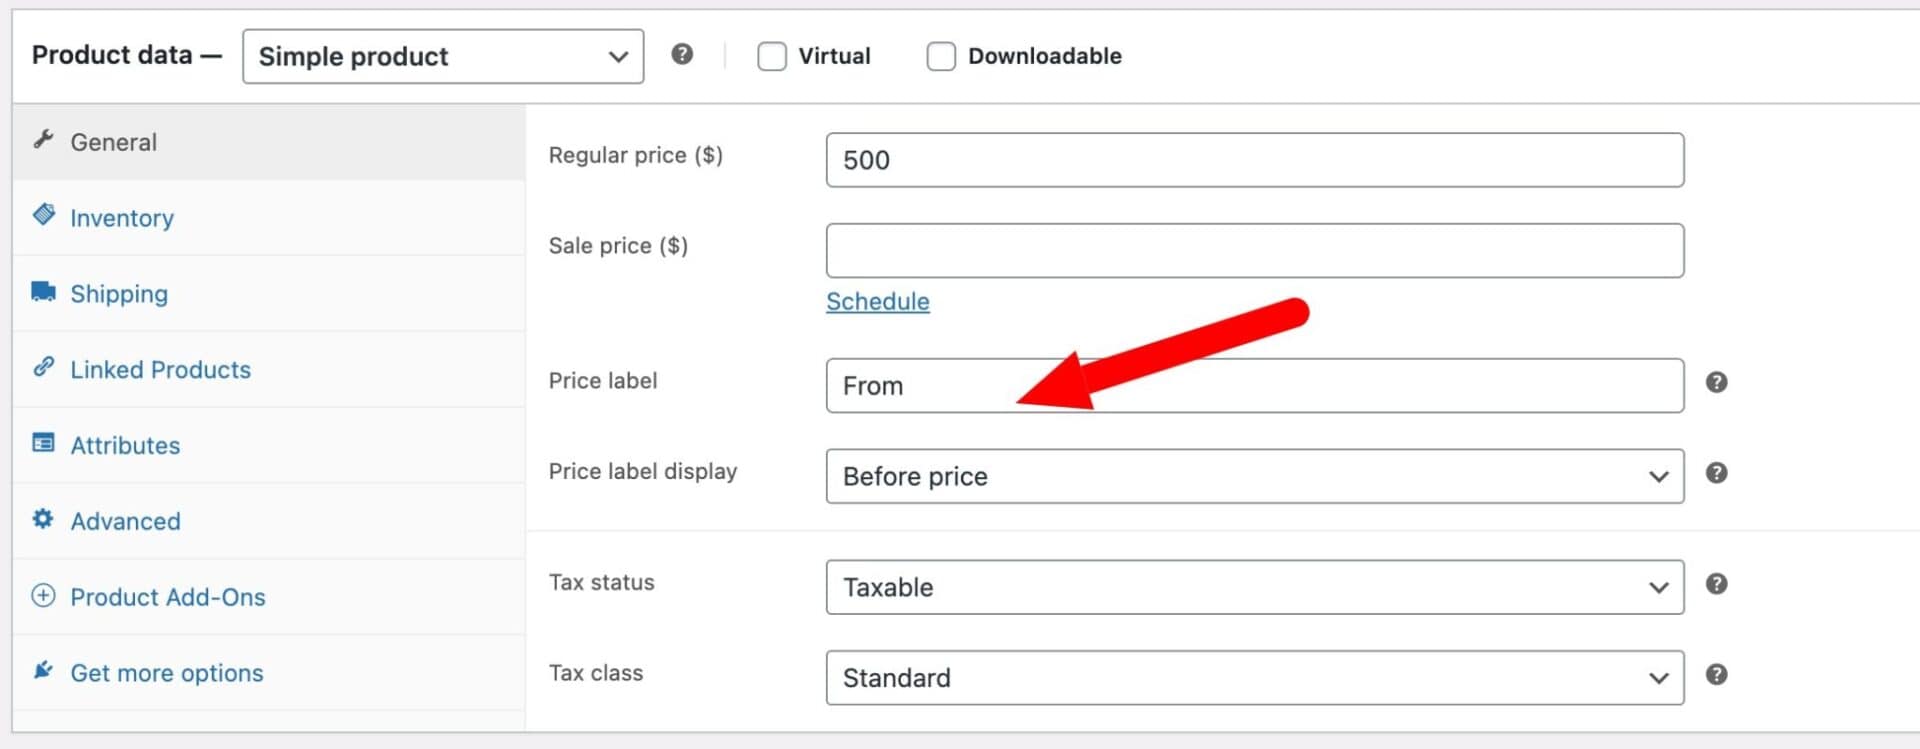
Because the price will increase depending on what options the user selects, we’ll add a label to the price field to indicate this.
In the “Price label” field, enter “From” and set “Price label display” to “Before”.
This is how it will look on the front end.
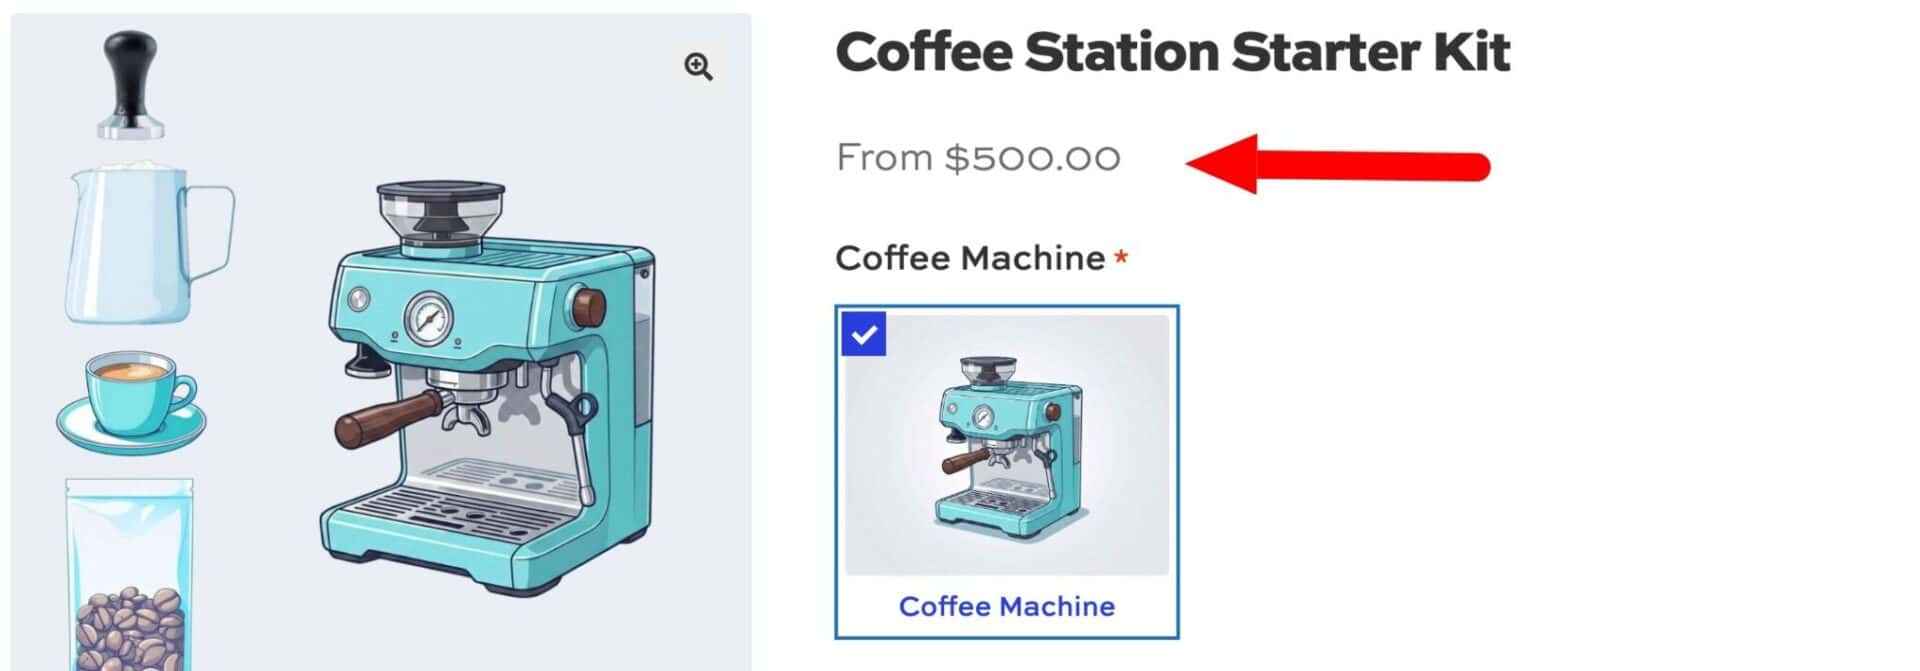
The price will also update dynamically depending on which options the user selects.
Step #3: Add your bundle product fields
Now we can add each component product to the main product. We do this using the ‘Products’ and/or ‘Product Categories’ field types in Add-Ons Ultimate.
In our example, we’re going to add three separate fields to our coffee station bundle. Your use case might be completely different – you could use a single field and allow the user to choose one or more items from that field. You can specify minimum and maximum quantities if needed.
Or you can add as many fields as you like, each with its own specifications. In this way, you can require users to pick a certain number of items from different fields, creating different combinations. Product Add-Ons Ultimate is totally flexible in this regard.
Let’s add our fields.
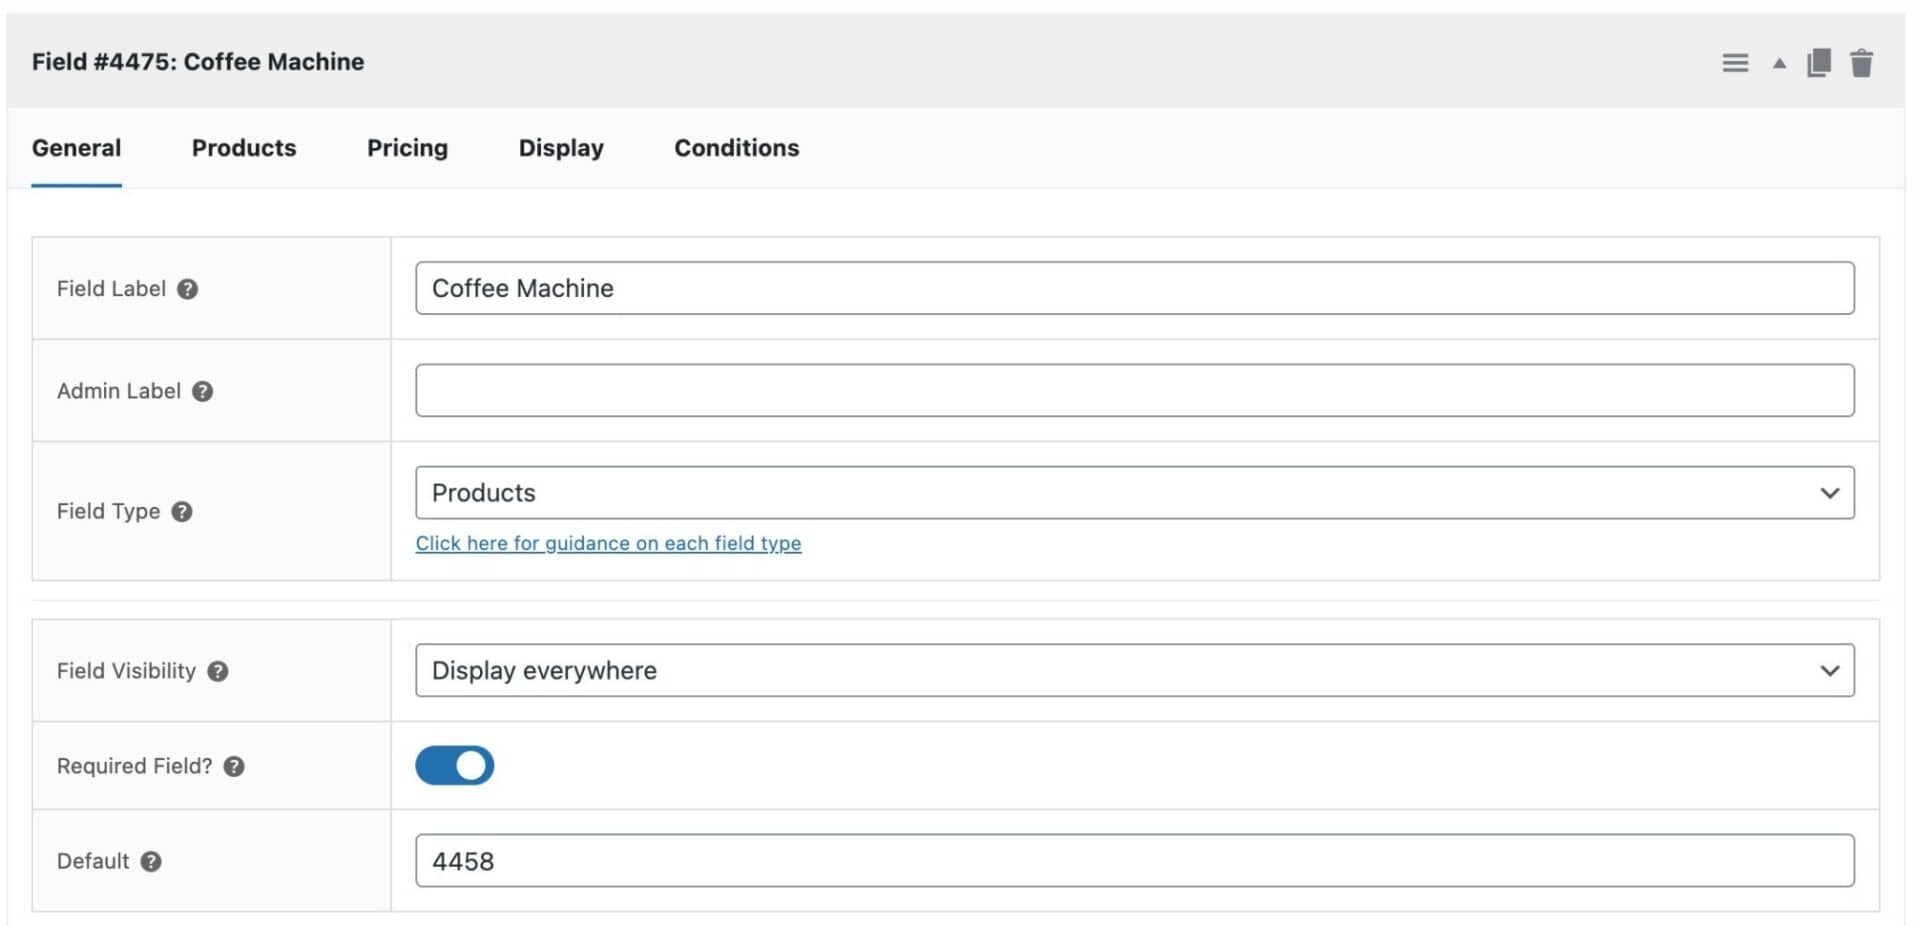
Field 1: Coffee machine
This field contains the coffee machine. You can include a single machine or offer a choice of models – for example, a basic model and an advanced model – so customers can select the one they want.
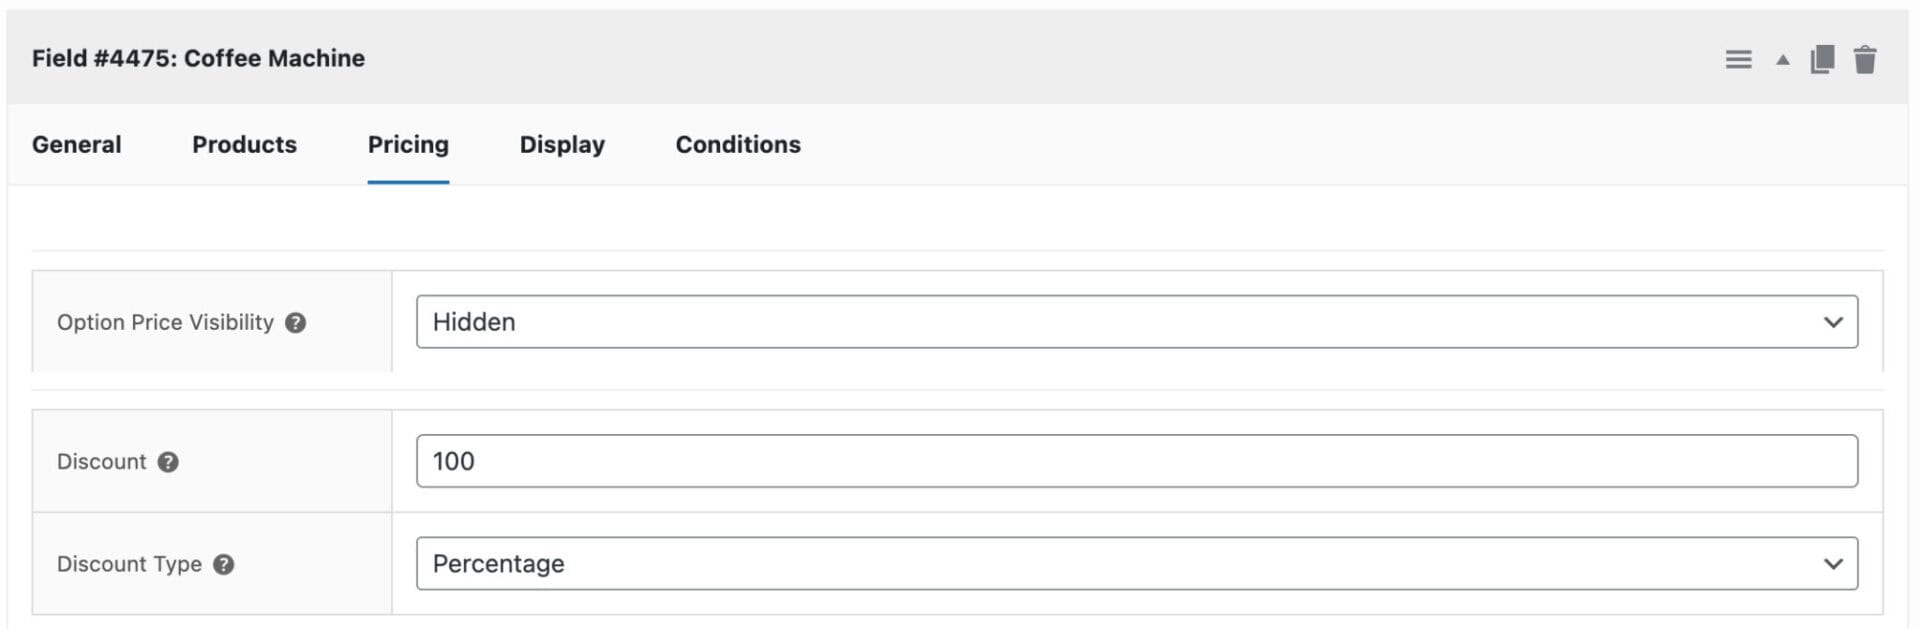
Because the $500 base price of the parent product already covers the machine, we’ll apply a 100% discount to this field and set Option Price Visibility to “Hidden” so no additional price is shown. The field is set to required – ensuring that the customer must select an option from this field.
To add the coffee machine field to the product bundle:
- In the ‘Product data’ section click the ‘Product Add-Ons’ tab, then click ‘Add Group’ then ‘Add Field’ to create the field
- Add a label in the “Field Label” setting
- Choose “Products” as the field type – this will allow you to add one or more specific products as options
- Enable “Required field”. We’re making this field required because we want to require the user to purchase the machine – the other items are optional
Switch to the “Products” tab.
- In the “Child Products” setting, search for and select your coffee machine product. In our example, we’re only offering a single model but, if you want to offer a choice, you can more than one product to this field – for example, a basic model and an advanced model
- Select an option in “Products Layout”. This will determine how the products are displayed on the front end. There’s more information on each layout type later in this article
- Select an option in “Products Quantities”. This setting determines how many of each item the user will be able to select. Because our bundle will only allow the user to select one coffee machine, we set this to “One only”. There’s more information on this setting further down the page.

Now switch to the “Pricing” tab
- Apply a 100% discount
- Set Option Price Visibility to “Hidden” – since the $500 parent product price already covers the machine, there’s no need to show an additional price here
At this stage, our product page will look like this on the front end.

Now let’s add the next two fields then look at some options for displaying pricing to the customer.
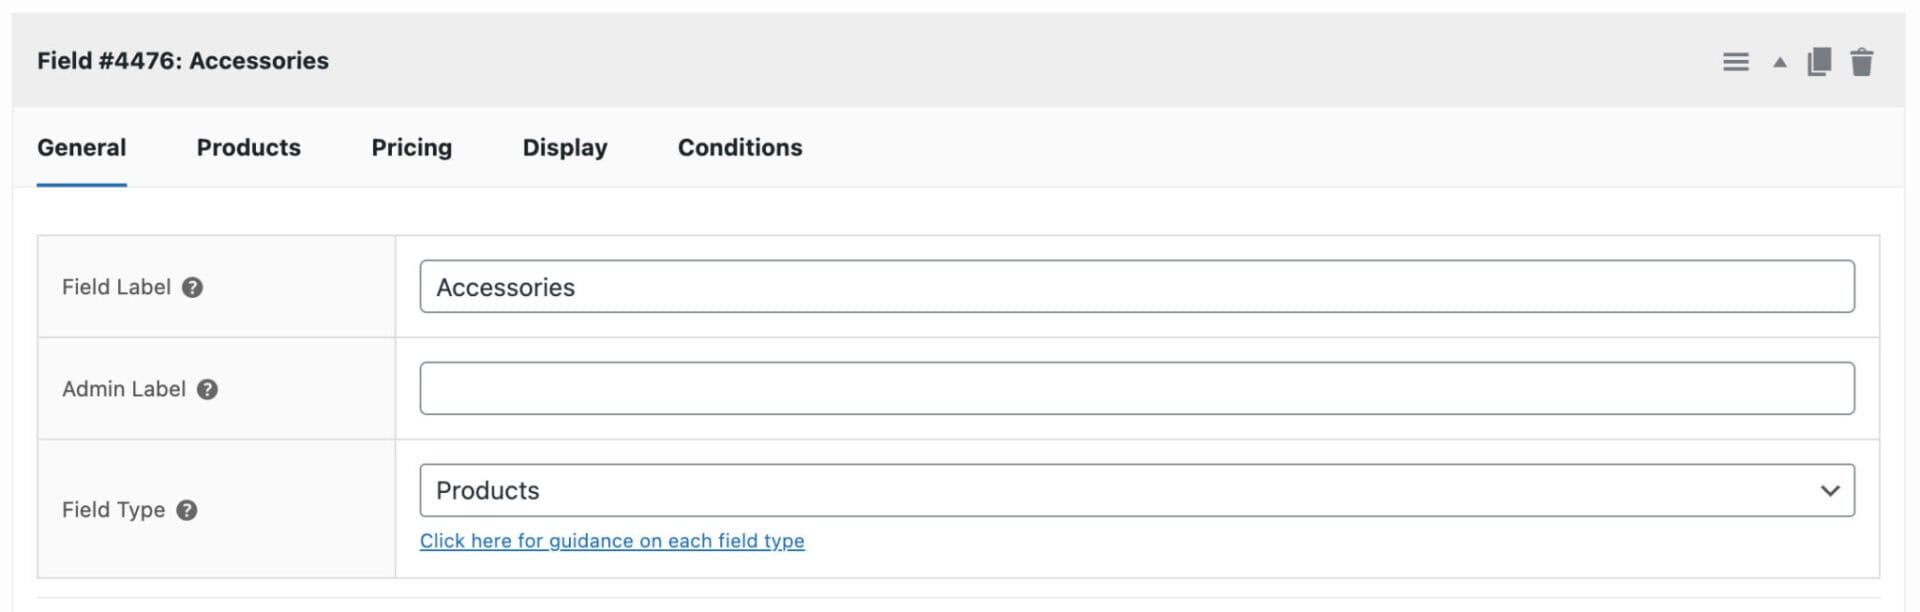
Field 2: Accessories
This field will include accessories for the coffee machine, e.g. a tamper, milk jug, and coffee cups. You hand-pick exactly which products appear as options and set how many items the customer can select.
Set a Default Quantity of 1 so that each accessory is pre-selected, giving customers a suggested bundle they can adjust – removing items they don’t want or increasing quantities if they need more. Product Quantities is set to Independent so customers can choose how many of each item to add.
To add the “Accessories” field:
- Click “Add Field” to add a new field
- Enter a “Field Label”
- Select “Products” as the field type (or “Product Categories” if you want to pull in all products from a specific category)
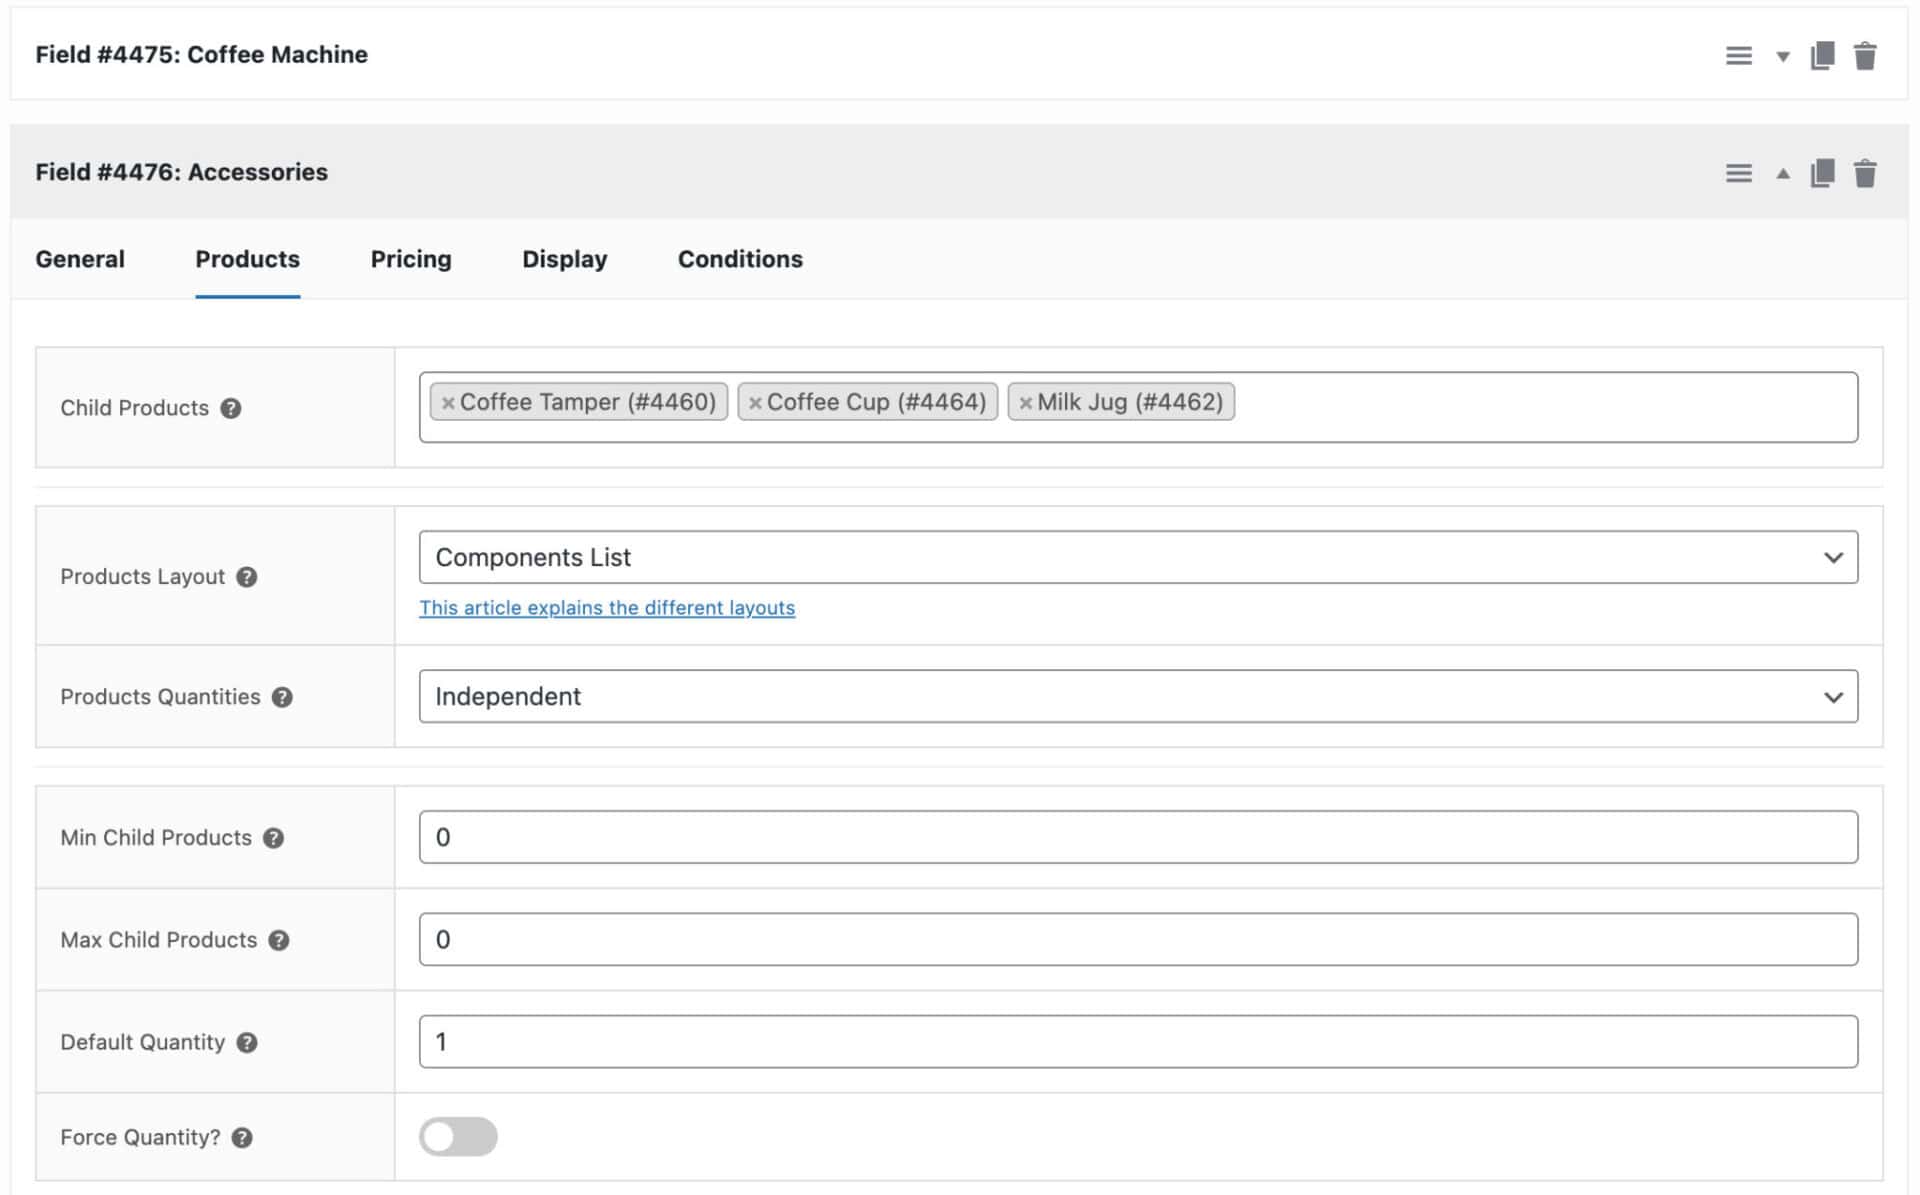
Switch to the “Products” tab:
- In the “Child Products” setting, search for and select the tamper, milk jug, and coffee cup
- Choose an option in “Products Layout”. In this example, we’re using the “Components List” option, which displays each accessory with its thumbnail, name, price, and a quantity field, making it easy for customers to review and adjust their selections.
- Set Product Quantities to “Independent”
- Set the Default Quantity to 1 so that each accessory is pre-selected when the customer lands on the page – they can remove anything they don’t want or increase quantities as needed
- If you want to enforce a specific quantity, enable the “Force Quantity” setting. This will mean that the customer won’t be able to adjust the quantity from its default value – so you can determine exactly how many items from this field are added to the cart
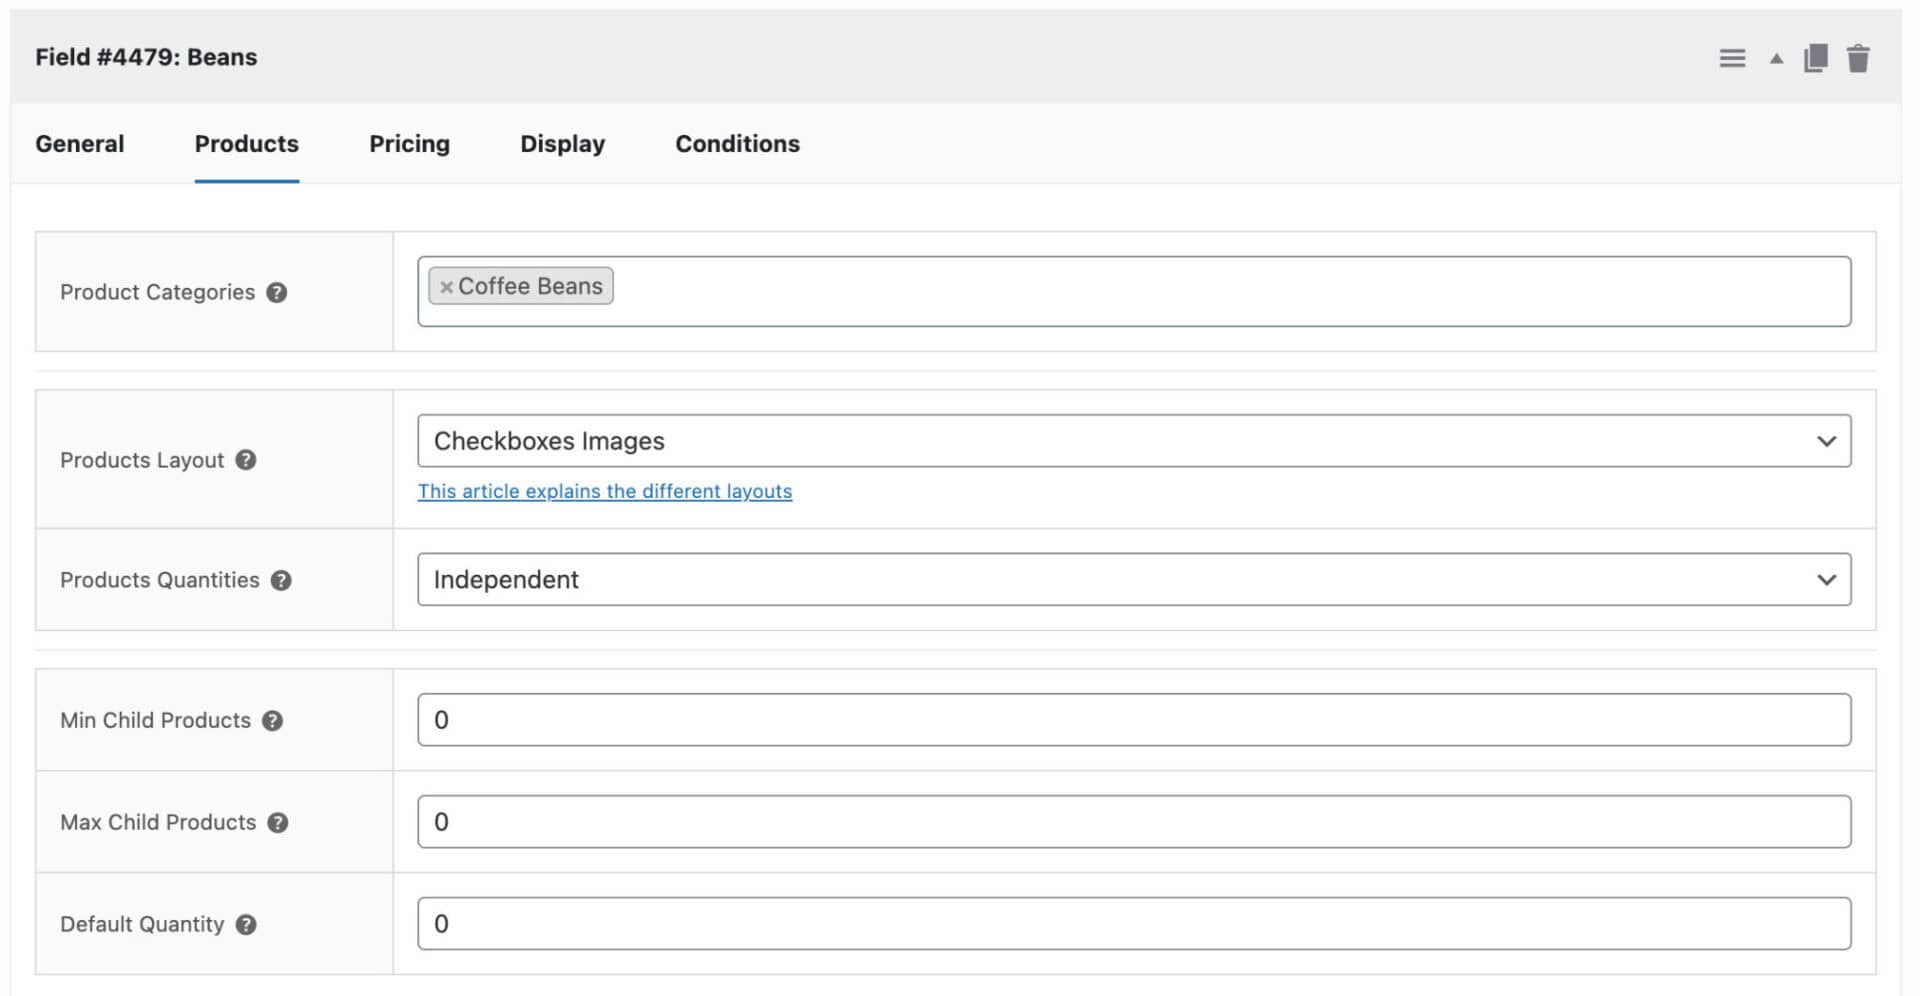
Field 3: Beans
For this field, instead of selecting individual products, we’ll specify a category – in this case, “Beans” – and the field automatically includes every product within it.
This is extremely helpful because it means that if you add new coffee products to the “Beans” category in the future, they’ll automatically appear in the bundle without you needing to edit the field.
To add the “Beans” field:
- Click “Add Field”
- Enter a “Field Label”
- Select “Product Categories” as the field type

Switch to the “Products” tab:
- In the “Categories” setting, select the “Beans” category. All products assigned to that category will automatically appear as options
- Set Product Quantities to “Independent” so customers can add multiple bags of different varieties
If you want to incentivise customers to build a larger bundle, you can apply a percentage or fixed discount to Fields 2 and 3 instead – for example, 10% off all accessories, or $2 off each bag of beans. The discounted price will update automatically on the product page as customers make their selections.
For Field 1 (coffee machine), Checkboxes Images works well – customers can see each model and select the one they want. For Field 2 (accessories), we’re using the Components layout so customers can see each item with its price and a quantity field, making it easy to review and adjust. For Field 3 (beans), Checkboxes Images is a natural fit, letting customers browse bean varieties visually and select as many as they like.
Setting required options
If you want customers to select at least one item – or a minimum number of items – check the “Required field” option. You can also set minimum and maximum numbers of child products when using the Checkboxes layout with Independent quantities. Individual child products can be pre-selected by default, so they appear checked when the customer lands on the page.
In our coffee station bundle, Field 1 is required and pre-selected with the coffee machine. Fields 2 and 3 are optional, so customers can build their bundle as they see fit.
Controlling quantities in WooCommerce product bundles
The “Product quantities” setting determines how child product quantities relate to the parent:
| Setting | How it works |
|---|---|
| Independent | Customers choose how many of each child product they want, regardless of the parent quantity |
| Linked | Child product quantity always matches the parent so if the customer buys two Coffee Station Kits, they get two of each selected child product |
| One-only | Only one child product can be added to the cart, regardless of the parent quantity |
Step #5: Configure the price summary
As customers make their selections, Product Add-Ons Ultimate can display a running price summary on the product page. You can configure this in WooCommerce > Settings > WooCommerce Product Add-Ons Ultimate (or via Customizer > WooCommerce > WooCommerce Product Add-Ons Ultimate).
There are three display options:
Subtotals breakdown – the default. Shows a line-by-line breakdown of the base product price and the value of each add-on field, so customers can see exactly how the total is calculated. This is a good choice for bundles where transparency builds confidence.
Total only – displays a single running total that updates as customers make their selections, without breaking it down by field. This gives a cleaner look if you’d prefer not to show individual field prices.

Summary panel – a more detailed alternative that itemises each selected add-on alongside its cost. This is useful for complex bundles with many options, giving customers a clear overview before they add to cart.

You can also edit the label text against each subtotal line – for example, changing “Base price” to “Coffee Station Kit” – to make the summary feel more on-brand.
As well as these options, the main product price under the product name will update dynamically as the user makes selections.
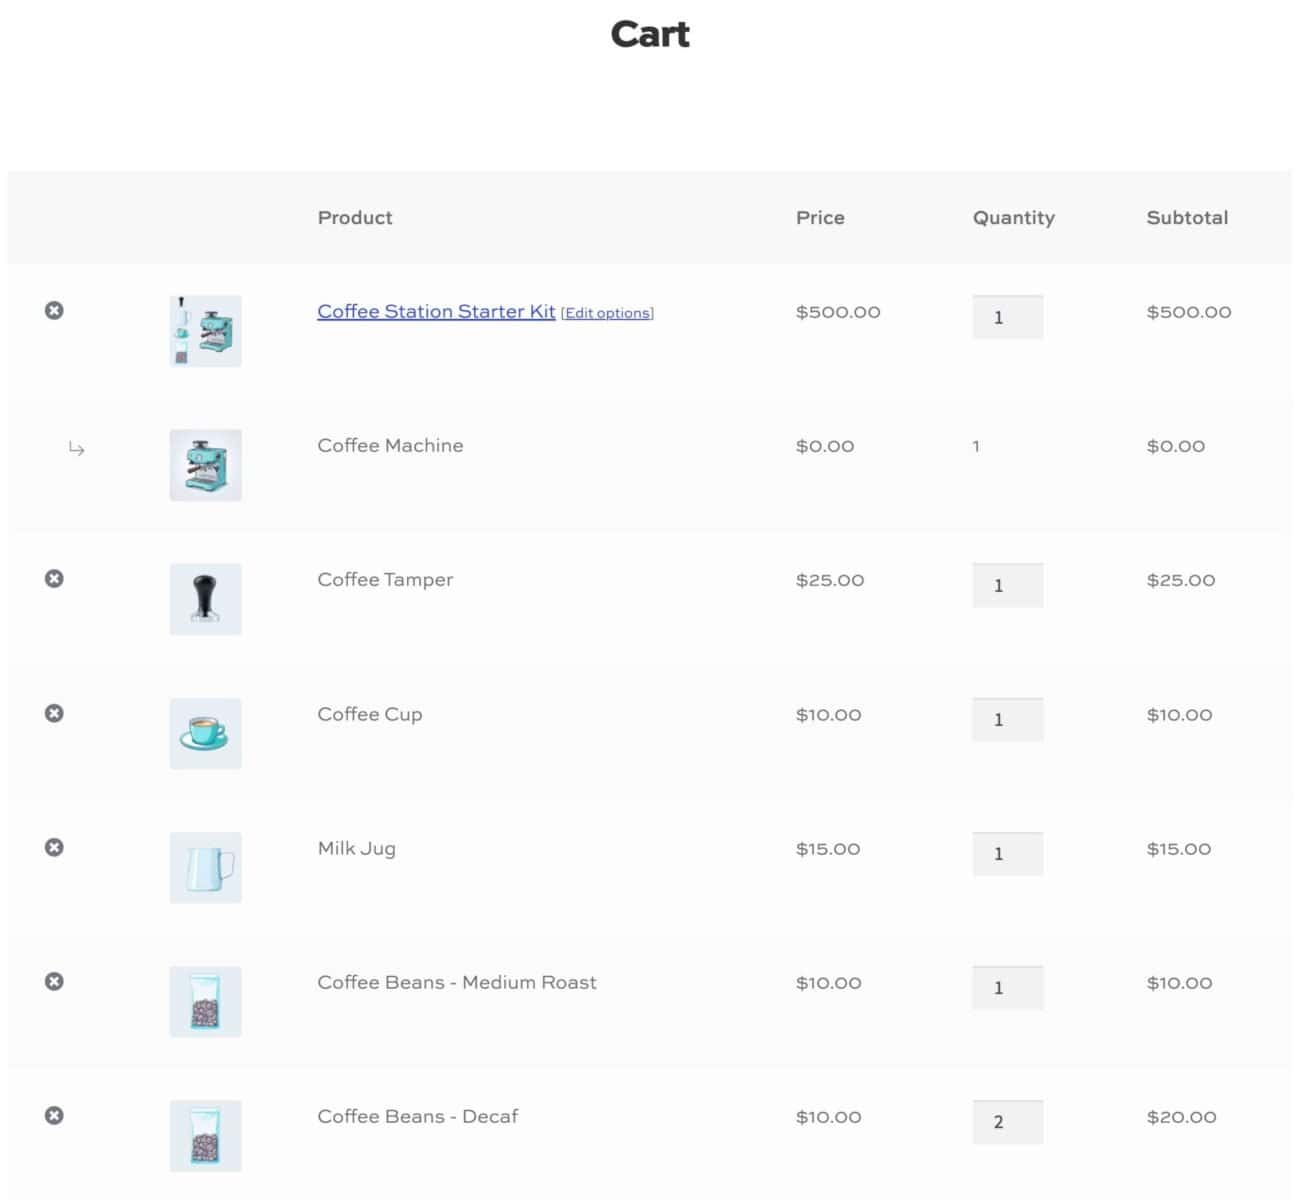
Step #6: Configure cart display
By default, child products appear as separate line items in the cart, grouped beneath the parent product. This is transparent and reassuring for customers because they can see exactly what’s in their order.
If you’d prefer a cleaner cart, you can change this behaviour in WooCommerce > Settings > Product Add-Ons > Products. The options are:
- Hide child products in the cart: child products appear as metadata on the parent product line item rather than as separate lines. The cart looks simpler, and the item count in the mini cart reflects only the parent.
- Display child products as metadata: enable this option to list each component product as metadata within the main product. The price of component products are added to the parent product price – so the customer sees a single line item in their cart with one aggregated price
The same display settings apply to order confirmation pages and emails, so the customer’s order summary will be consistent throughout.
Step #7: Add other field types
Product Add-Ons Ultimate includes over 20 field types – not just Products and Product Categories. You can add these to the same product to enhance the bundle experience.
For example, a text field could let customers add a personalized gift message. A file upload field could allow them to attach a photo for a custom print. A checkbox could let them opt into gift wrapping for a small extra charge.
These additional fields work alongside the Products field seamlessly, making it easy to build a highly customized bundle experience without any custom code.
Stock management
Because child products are real WooCommerce products with their own inventory, stock is managed automatically. If a child product runs out of stock, it’s simply no longer available as an option in the bundle – though the parent product remains purchasable and customers can still choose from the remaining items.
This means you don’t need any special configuration for stock. As long as each child product has stock management enabled in its own product settings, the bundle will always reflect current availability.
If a child product allows backorders, that setting is respected within the bundle too.
Shipping
Child products can have their own weight and dimensions set in the “Shipping” tab of each product. When a customer adds a bundle to their cart, WooCommerce automatically accounts for the combined weight and dimensions of the parent product and all selected child products when calculating shipping costs.
No additional configuration is needed. It works out of the box.
What are the different layouts for WooCommerce product bundles?
When we were setting up our fields, we selected options in the “Products Layout” setting. Add-Ons Ultimate gives you more options for how to display components in your product bundles – and you can choose to display each field differently if want, depending on your requirements.
Each field has its own layout setting. The options are:
| Layout | Selection type | Images? | Best for |
|---|---|---|---|
| Checkboxes Images | One or more items | ✓ | Most components – visual and easy to use |
| Checkboxes List | One or more items | ✗ | Components with long product names or which don’t have or require a thumbnail |
| Radio Images | One item only | ✓ | Fields where only one option is valid |
| Radio List | One item only | ✗ | Single-select fields without images |
| Select | One item only | ✗ | Long lists of options in a compact space |
| Column | One or more items | ✓ | Variable products as bundle items |
| Components | One or more items | ✓ | Displaying items with thumbnail, name, price, and quantity field in a list |
So that’s how to set up product bundles using the Add-Ons Ultimate plugin. Let’s take a look at how it compares to its main competitors.
WooCommerce product bundles plugin comparison
There are several WooCommerce product bundles plugins available. Here’s how the main options compare.
| Feature | Product Add-Ons Ultimate (Plugin Republic) | Product Bundles (Woo) | WPC Product Bundles (WPClever) | Bundled Products (Iconic) |
|---|---|---|---|---|
| Price | From $79/year | $79/year | Free (premium available) | From $49/year |
| Bundle type | Configurable – customer selects from child products | Fixed or pick-and-mix | Fixed, with optional quantities | Fixed bundles |
| Customer-configurable bundles | ✓ | ✓ | Limited | ✗ |
| Discount options | % or fixed per child product; fixed bundle price via parent | Per item or whole bundle; bulk quantity discounts | % or fixed per item | Fixed bundle discount |
| Product layouts | 7 – checkboxes images, checkboxes list, radio images, radio list, select, column, components | Limited | List or grid | List |
| Stock management | ✓ – out-of-stock items disabled as options | ✓ | ✓ | ✓ – shows “Out of stock” per item |
| Shipping – child product dimensions | ✓ – automatic | ✓ | ✓ | ✓ |
| Required/optional items | ✓ | ✓ | ✓ | ✗ |
| Customer quantity control | ✓ – independent, linked, or one-only | ✓ | ✓ | ✗ |
| Variable products as bundle items | ✓ | ✓ | Premium only | ✓ |
| Conditional logic | ✓ | ✗ | ✗ | ✗ |
| Other field types (text, uploads, etc.) | ✓ – 20+ field types | ✗ | ✗ | ✗ |
| Lifetime licence | ✓ | ✗ | ✗ | ✗ |
| Money-back guarantee | 14 days | 30 days | ✗ | 30 days |
Which WooCommerce product bundles plugin is right for you?
Product Add-Ons Ultimate is the best choice if you want configurable bundles where customers choose which items to include, with full control over layouts, required fields, quantity rules, and discounts. It’s also the only option if you need conditional logic – for example, showing different bundle options based on a customer’s earlier selections. The 20+ additional field types mean you can build a rich, personalized bundle experience on a single product page.
Product Bundles by Woo is a strong choice for fixed or pick-and-mix bundles with straightforward inventory management. It’s particularly well-suited to stores that already use other Woo extensions, given the deep integration across the Woo ecosystem. Bulk quantity discount rules are a standout feature not available in the other plugins.
WPC Product Bundles is worth considering if budget is a priority – the free version covers the basics well.
Iconic Bundled Products is a simple, focused plugin that works well for fixed bundles with a single discount applied to the whole set. It doesn’t support configurable bundles or customer quantity control, but if your use case is straightforward, it’s an affordable and well-supported option.
Conclusion
WooCommerce product bundles are a proven way to increase average order value, improve the customer experience, and make the most of your product catalogue. Whether you need a simple fixed bundle or a fully configurable “build your own” experience, there’s a plugin to suit your needs.
WooCommerce Product Add-Ons Ultimate
Create product bundles in WooCommerce quickly and easily
WooCommerce Product Add-Ons Ultimate works with all WordPress themes and page builders, comes with a 14-day money-back guarantee, and is backed by world-class support. Try it now risk-free.