How to show popular products in WooCommerce [step-by-step]

Displaying “popular products” in WooCommerce can be a great opportunity to upsell or cross-sell products to customers. It helps boost sales and can help you improve the customer experience and product visibility on your WooCommerce site.
While WooCommerce by default offers some functionality to display popular products using shortcodes, you can use plugins to take this to the next level.
In this article, we’ll show you three methods to display popular products on your WooCommerce store and demonstrate how you can level up your popular product display with the help of WooCommerce Product Table Ultimate and WooCommerce Order Bump.
Why display popular products in WooCommerce?
Let’s take a closer look at some of the major advantages of displaying popular products on your WooCommerce store:
- Boost sales and average order value (AOV). If you’re advertising a list of popular products clearly on your shop’s product pages, the main shop page, or the checkout pages, it creates more opportunities for upselling or cross-selling. As a result, it helps increase sales and encourages shoppers to spend more which ultimately boosts the average order value.
- Improve customer experience. Displaying best-selling products to your customers as recommendations can streamline the shopping experience on your online store. It helps your customers quickly find what they’re looking for.
- Showcase social proof. By displaying products that are popular with your existing customers, you can increase customer trust by demonstrating the high quality of the products that you stock at your online store.
- Increase product visibility. Products that you list as “popular” don’t necessarily have to actually be selling well. You can use a “popular products” list as a way of increasing visibility for your underperforming or new product lines in order to help give them a boost.
You can use a “popular products” list as a way of increasing visibility for your underperforming products or new product lines to help give them a boost.
How to show popular products in WooCommerce: Step-by-step tutorial
Here, we’ll show you the best way to identify which products to show as “popular products” on your WooCommerce store. Then we’ll look at different ways you can display them on your online store for maximum impact.
Identifying popular products
One of the easiest ways to identify which products on your WooCommerce site should be selected as the “popular products” is to analyze which products are selling the best. Fortunately, WooCommerce by default has built-in functionality that lets you do this.
To get started, navigate to WooCommerce → Reports and click on the Sales by product link under the Orders tab.
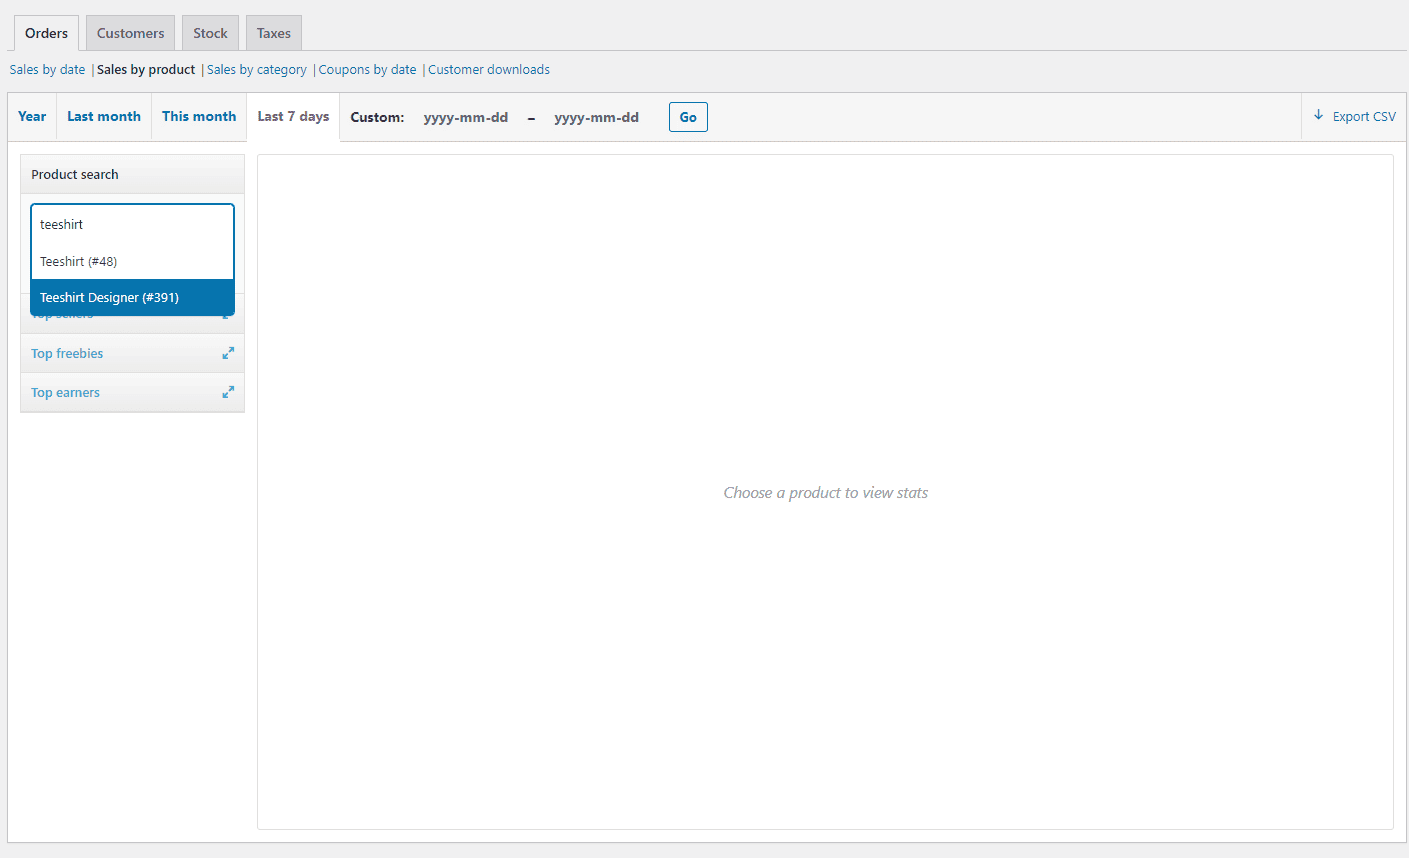
Here you can see how well individual products on your WooCommerce site are performing. The Product search tab lets you select specific products from your online store to see how well they are selling. You can also check which products from your WooCommerce site are selling the best using the Top sellers tab.
If you offer free products on your WooCommerce site, you can view which ones are the most popular by checking the Top freebies tab. Additionally, you can also see which products are earning your store the most revenue using the Top earners page.
You can also adjust the period that you want to check the product sales data for. For example, you can only view the product’s performance for the last 7 days, the current month or the previous one, the current year, or define a custom time range yourself.
When selecting popular products from your WooCommerce site, it’s important to monitor and update your list of popular products regularly. This ensures that your product recommendations remain relevant to your audience.
It’s also important to keep up with the ongoing industry trends and seasonal demands to better identify which products are likely to become popular items on your online store. Remember that you don’t necessarily need to display your best-selling products as “popular products” on your WooCommerce site. Instead, it’s better to display underperforming products or new product lines to give their sales a boost.
Displaying popular products using shortcodes
One of the easiest ways to display a list of popular products on your WooCommerce site is by using shortcodes, and here are the benefits of using them:
- Flexible placement. Shortcodes can be used anywhere on your WooCommerce site to display popular products. You can even include them in the sidebar by using WooCommerce’s built-in shortcodes widget.
- Straightforward setup. You don’t have to install any third-party services to display popular products on the front-end. You can use built-in WooCommerce shortcodes even if you don’t have any coding knowledge for displaying popular products.
- Fully customizable. You can use different shortcodes to display different product lists on different pages of your store, creating a more tailored experience for your customers.
To start displaying your popular products using shortcodes, you will first need to identify the shortcode you want to use. Here are two of the most commonly used shortcodes:
[products limit="3" columns="3" skus="xxx, yyy, zzz"]This shortcode lets you adjust the number of products you want to display and how many columns you want to show them in.

Replace “xxx, yyy, zzz” with product SKUs and add them to the shortcode to display specific products from your WooCommerce site.
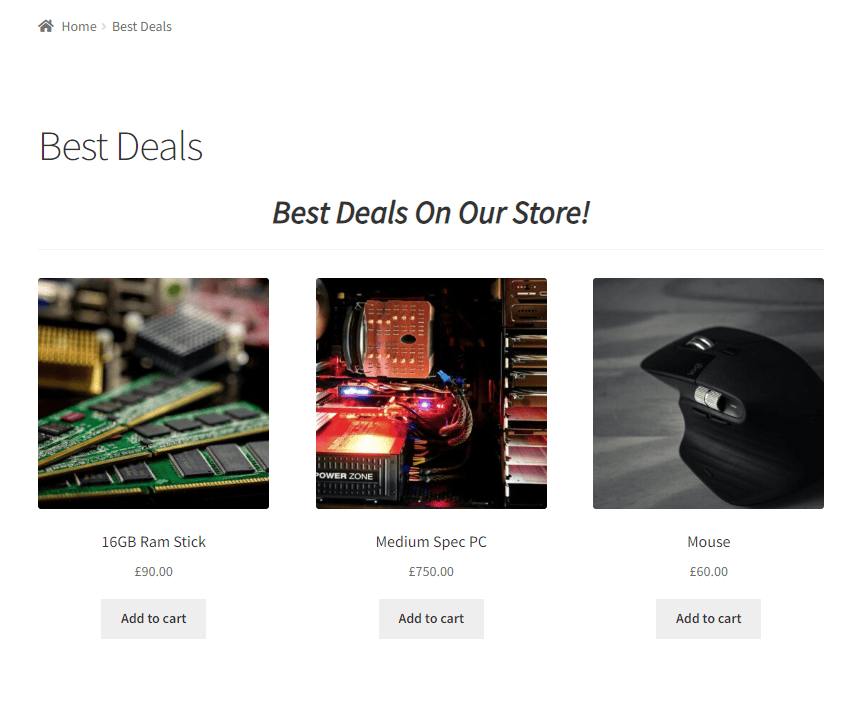
[products orderby="popularity" limit="5"]You can also use this shortcode to display your store’s top five most popular products by sales.

You can adjust the limit and add a “column” parameter similar to the other shortcode we created earlier.
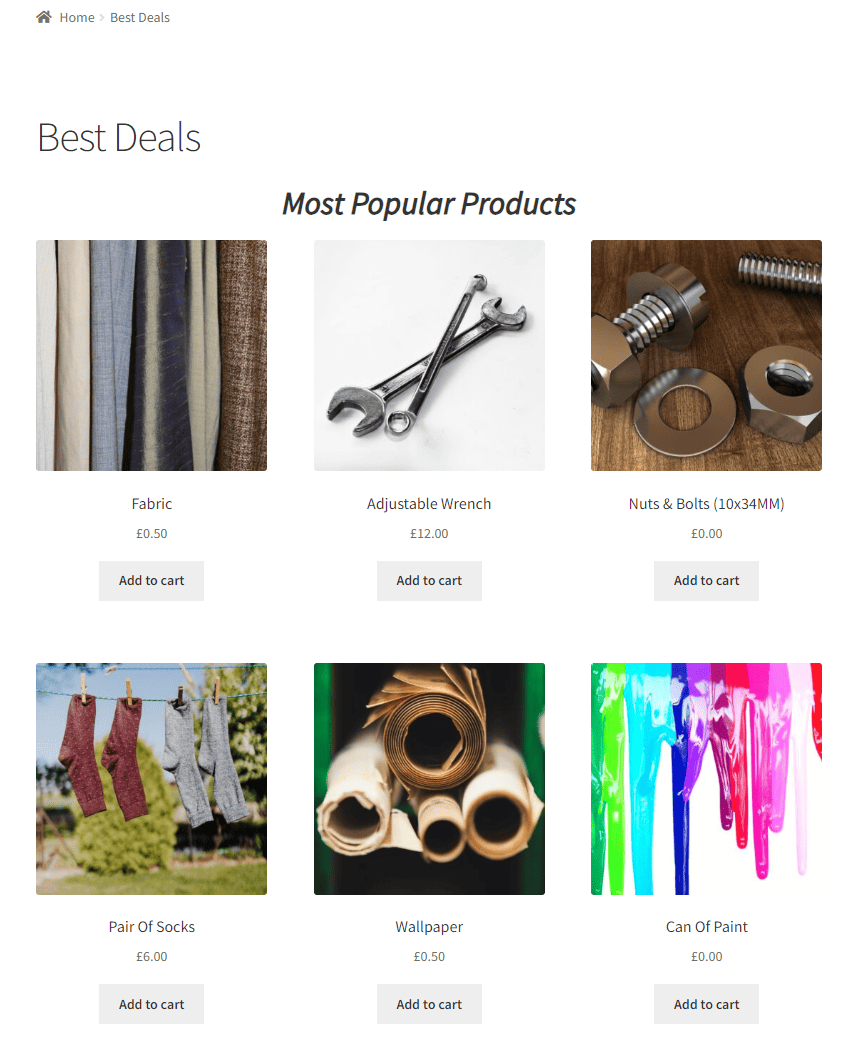
Now with a better understanding of the shortcode you want to use to showcase popular products, we can start adding the shortcode to any page, post, or widget.
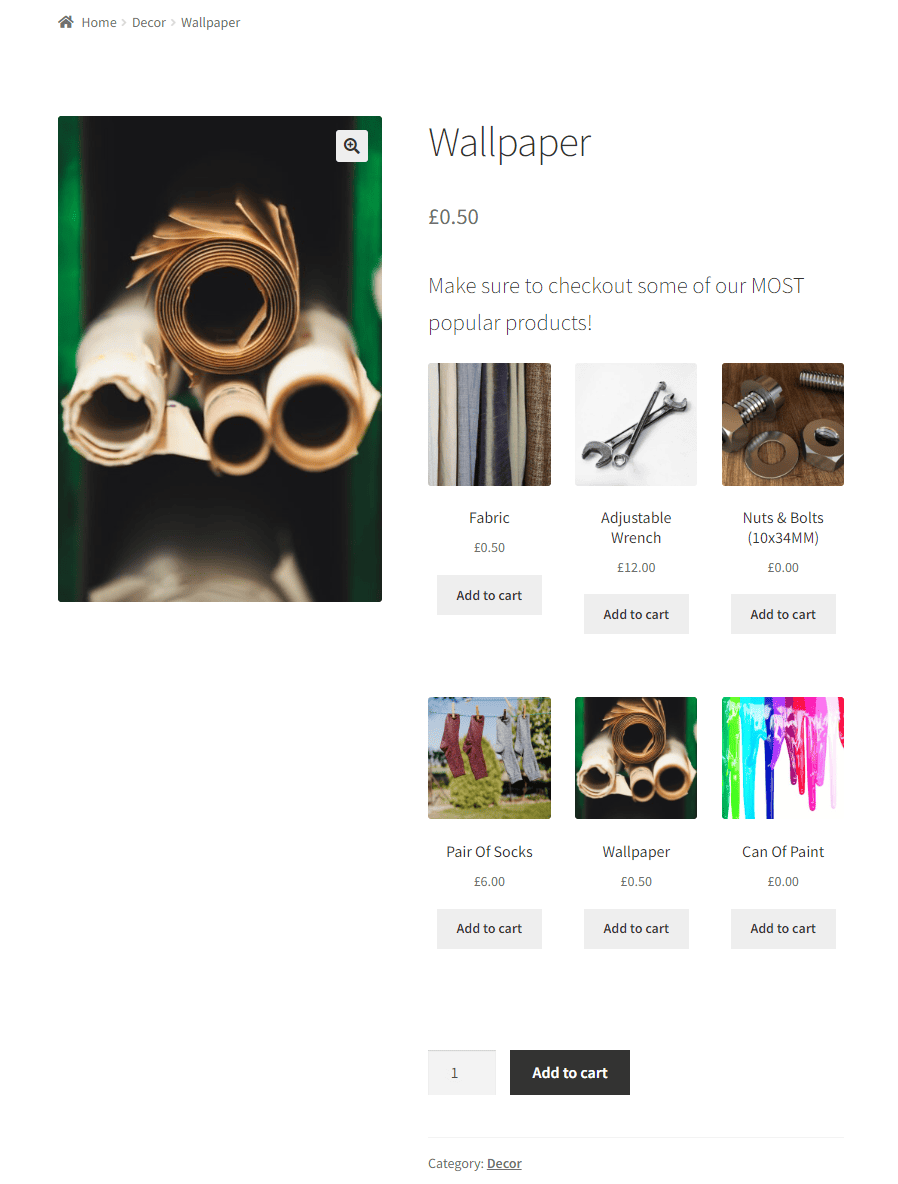
To add a shortcode to any product page, simply use the shortcode in the product’s description at the back-end of your site.
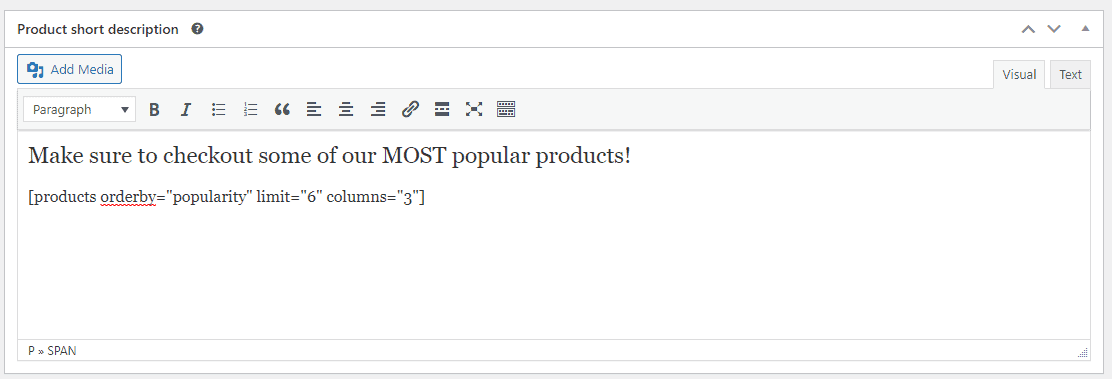
You can also display a custom call to action (CTA) message to capture the customer’s attention.
Additionally, you can add the WooCommerce popular products display shortcode to a widget. For this, navigate to Appearance → Widgets and add a new shortcode widget to any part of your WooCommerce site.
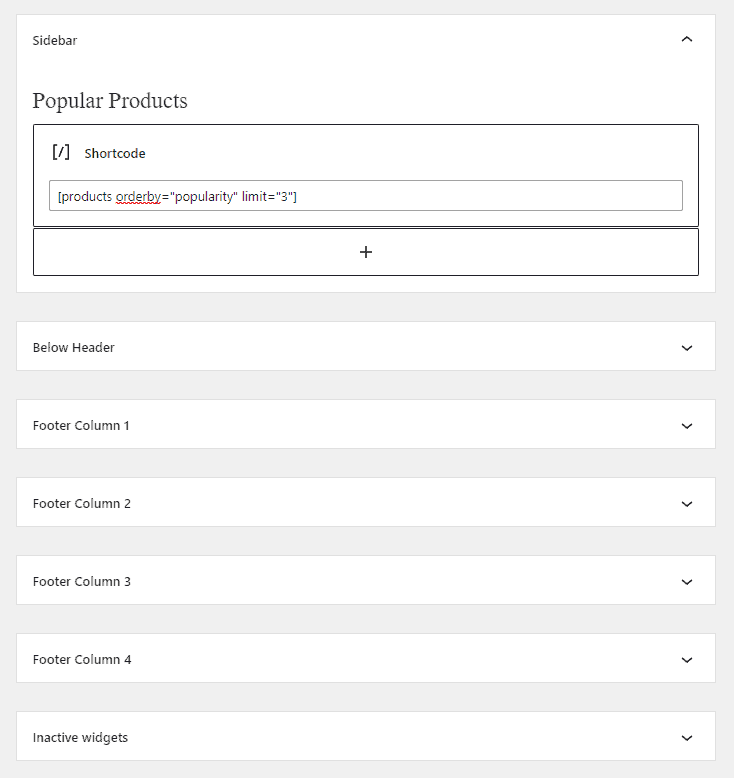
Paste the shortcode in the text editor and click on the Update button to continue.
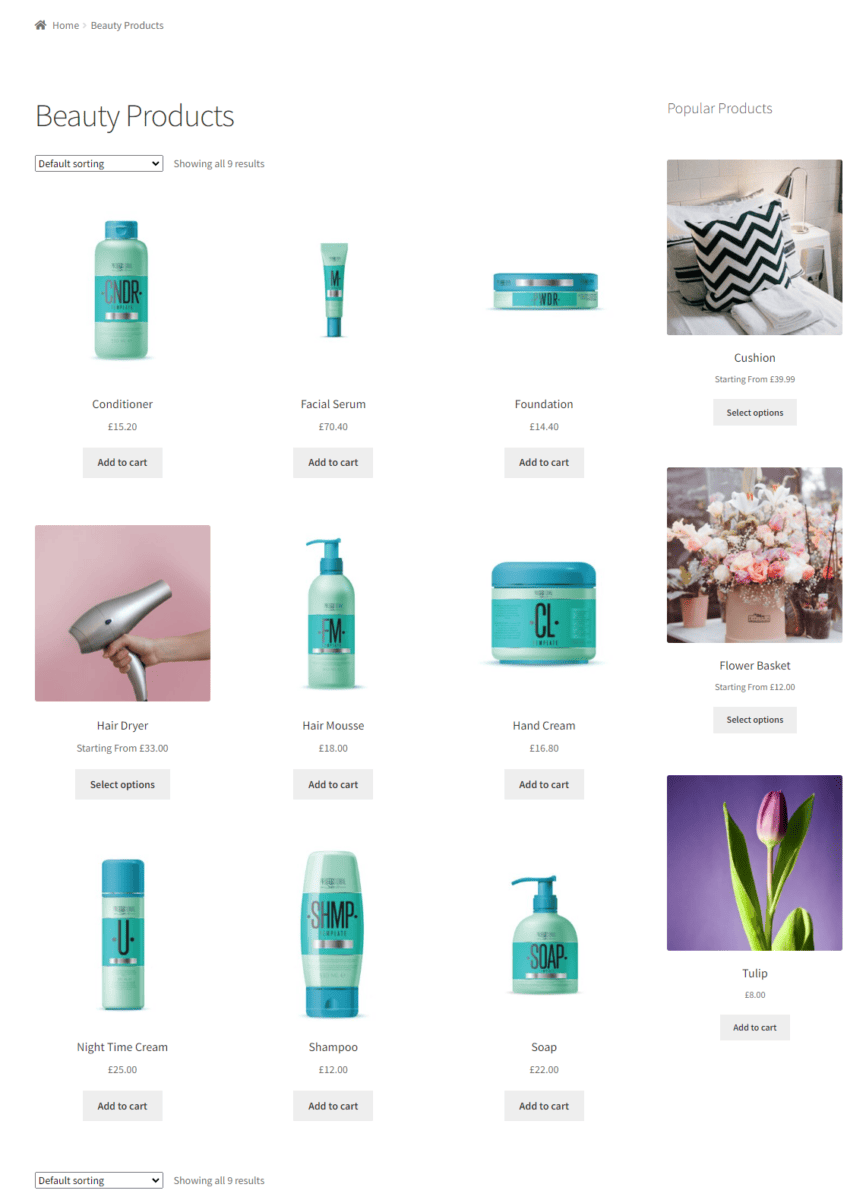
This will let you display popular products as widgets anywhere on your WooCommerce site.
Limitations of using shortcodes
While displaying popular products using shortcodes works, there are some potential limitations to using these on your online store:
- Limited visual display options. While shortcodes work great for displaying popular products, they don’t offer a lot of customization options in terms of how they appear on the front-end.
- Manual process. Another major disadvantage to using WooCommerce shortcodes is that you have to manually add them to each page of your site. For instance, If you want to add popular products to many different pages, you’ll need to add the shortcode manually each time. This can be time-consuming, especially if you have a large product catalog.
However, the good news is that you can overcome both of these limitations with the help of dedicated plugins that we’ll cover in the following sections.
Displaying popular products with WooCommerce Product Table Ultimate
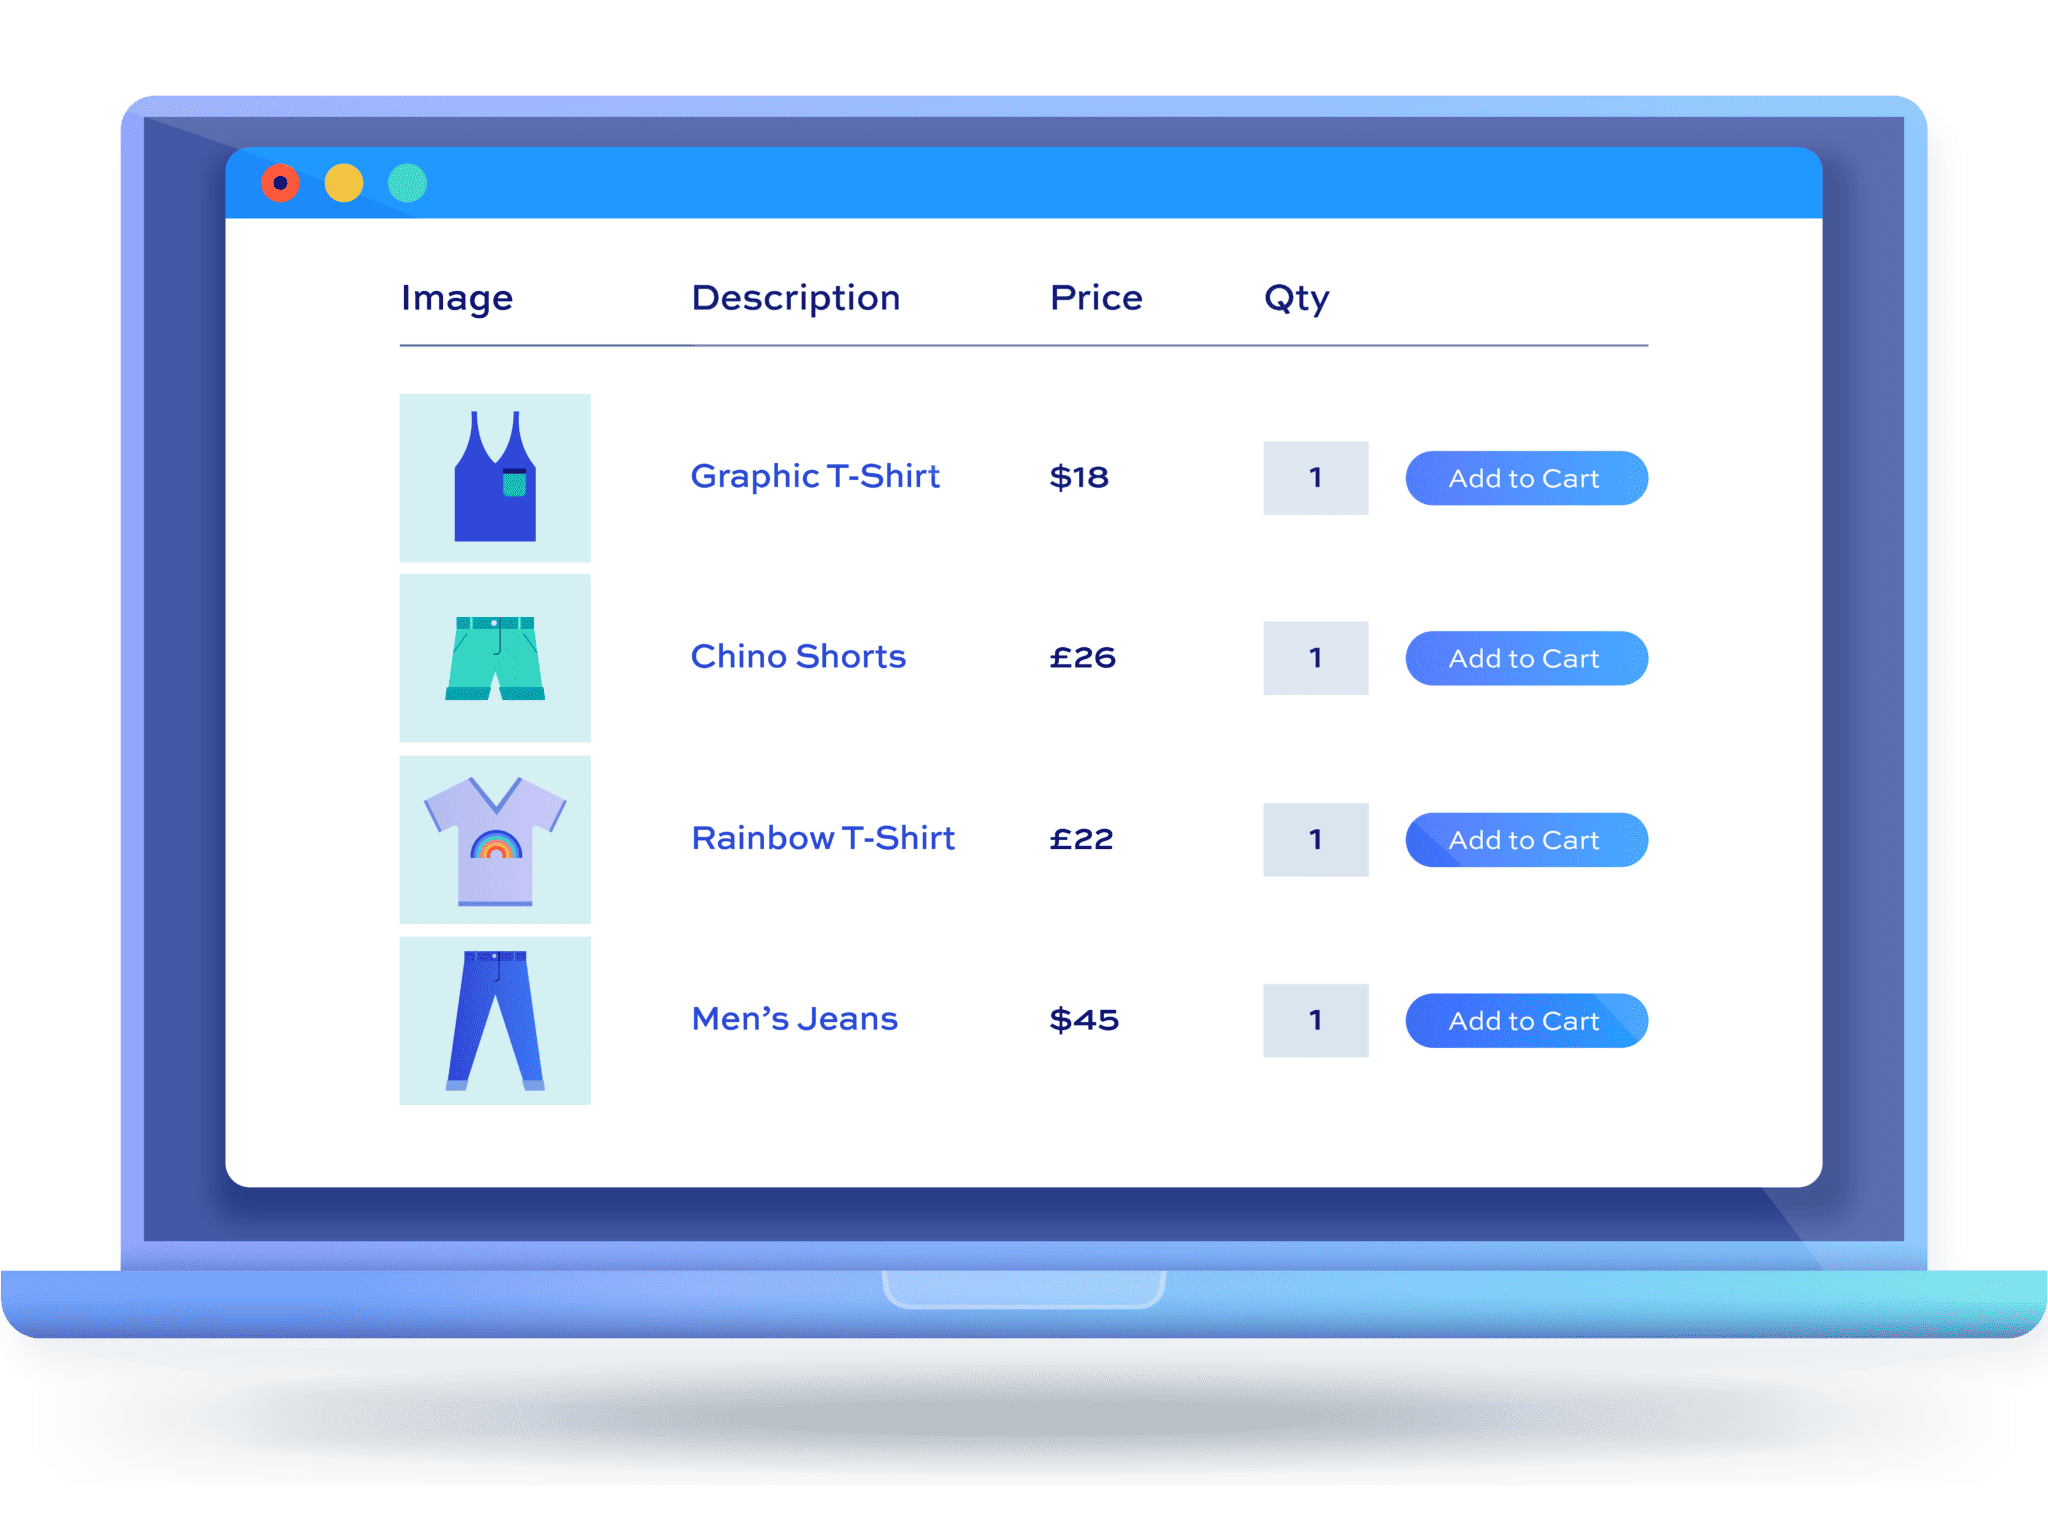
One of the alternative ways to displaying popular products on your WooCommerce site is by using the WooCommerce Product Table Ultimate plugin, which lets you create fully customizable product tables.
The intuitive plugin helps store owners overcome the display issues of using shortcodes by giving you more flexibility over how you display your store’s popular products.
Let’s talk about some of the main features of the WooCommerce Product Table Ultimate plugin that make it the perfect option for displaying popular products in WooCommerce:
- Sortable and filterable product tables. The robust plugin makes it possible to display a wider range of popular products on your online store. The built-in search bars and filters make it easier for customers to find exactly what they’re looking for.
- Bulk ordering capabilities. You can also include “add all to cart” buttons on product tables created with the plugin. This way, customers can add multiple products to the cart in a single click, making upselling and cross-selling easier than ever.
- Customizable display options. Since product tables are fully customizable, you can choose which product data you want to display and configure the exact products you want to show in the “popular products” product table.
How to set up a popular products table
The WooCommerce Product Table Ultimate plugin is also very easy to set up on your WooCommerce site, even if you’re not tech-savvy. To get started, get the plugin and install it on your WooCommerce site.
Next, navigate to WooCommerce → Settings → Product Table Ultimate and click on the Licence link from the top.
Enter the license key given to you at the time of purchase and click on the Activate button to continue.
Now that the plugin is installed and activated on your WooCommerce site, it’s time to start configuring your product tables. For this, navigate to WooCommerce → Settings → Product Table Ultimate and click on the General link from the top.
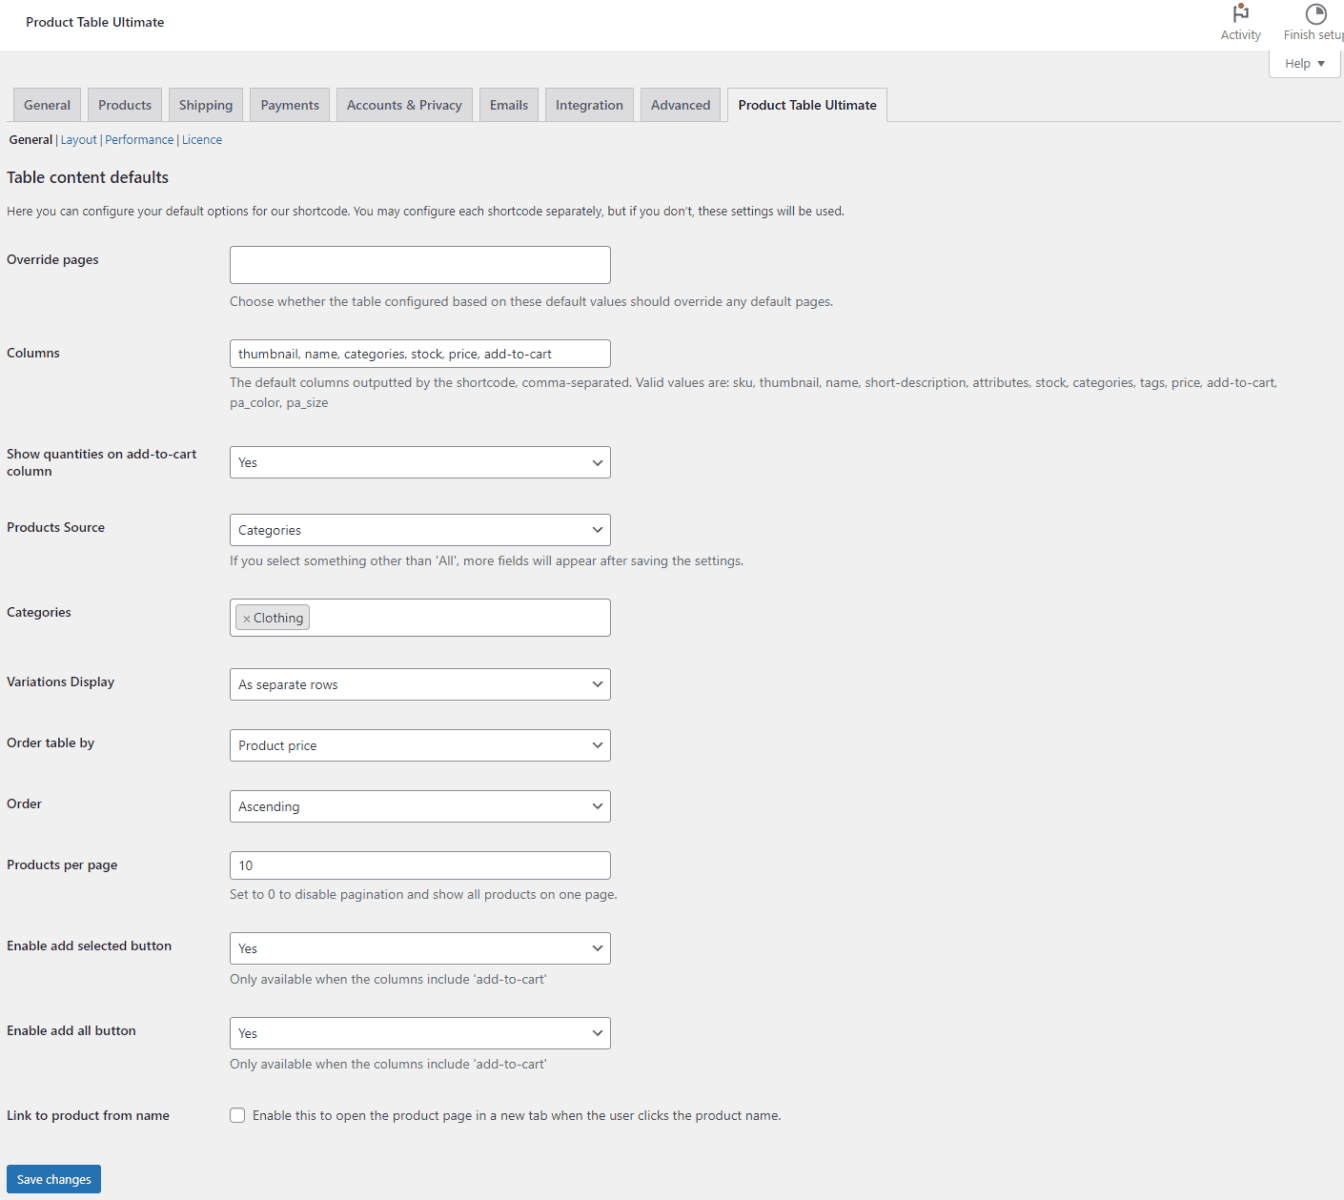
You can specify which columns to show on the product table by default using the Columns field. The Product Source field lets you specify which products you want to display in the product table. You can also choose how variable products appear in product tables using the Variations Display dropdown field.
Additionally, you can select Yes for both the Enable add selected button and Enable add all button dropdown fields. This will display checkboxes next to each product row and let shoppers add multiple products to their cart at once in one click. Once you’re ready, make sure to click on the Save changes button to continue.
Now there are two ways you can display the product table anywhere on your WooCommerce site:
With a shortcode
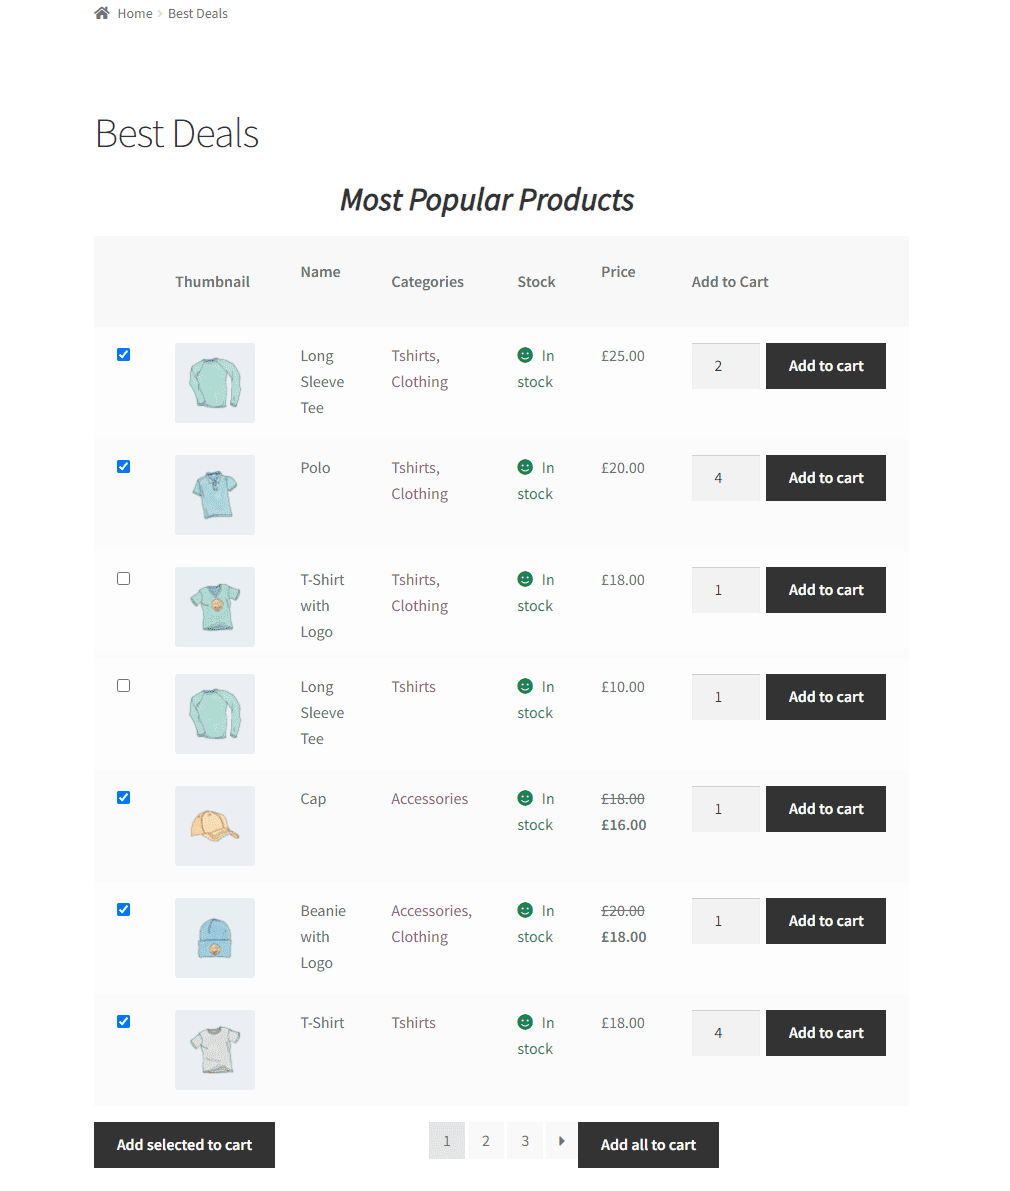
One of the most simple ways to display a product table anywhere is by using the [product_table_ultimate] shortcode. You can add this shortcode to any page, post, or widget.

While the shortcode will display the product table you configured using the plugin’s settings, you can also fine-tune the table using shortcode parameters.
Using the block editor
You can add the Product Table Ultimate block to any page or post on your WooCommerce site to display product tables.
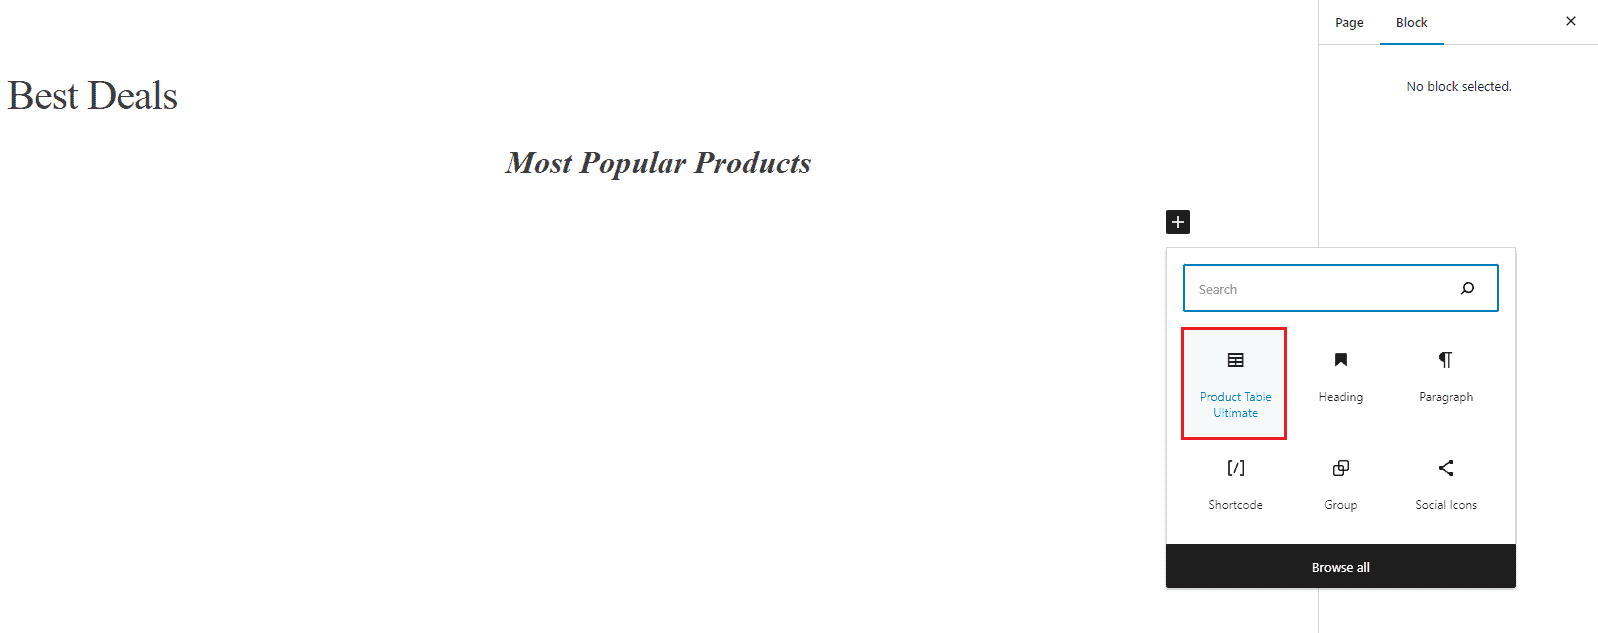
By default, the table will be displayed according to your table settings but you can override these by configuring the block settings.
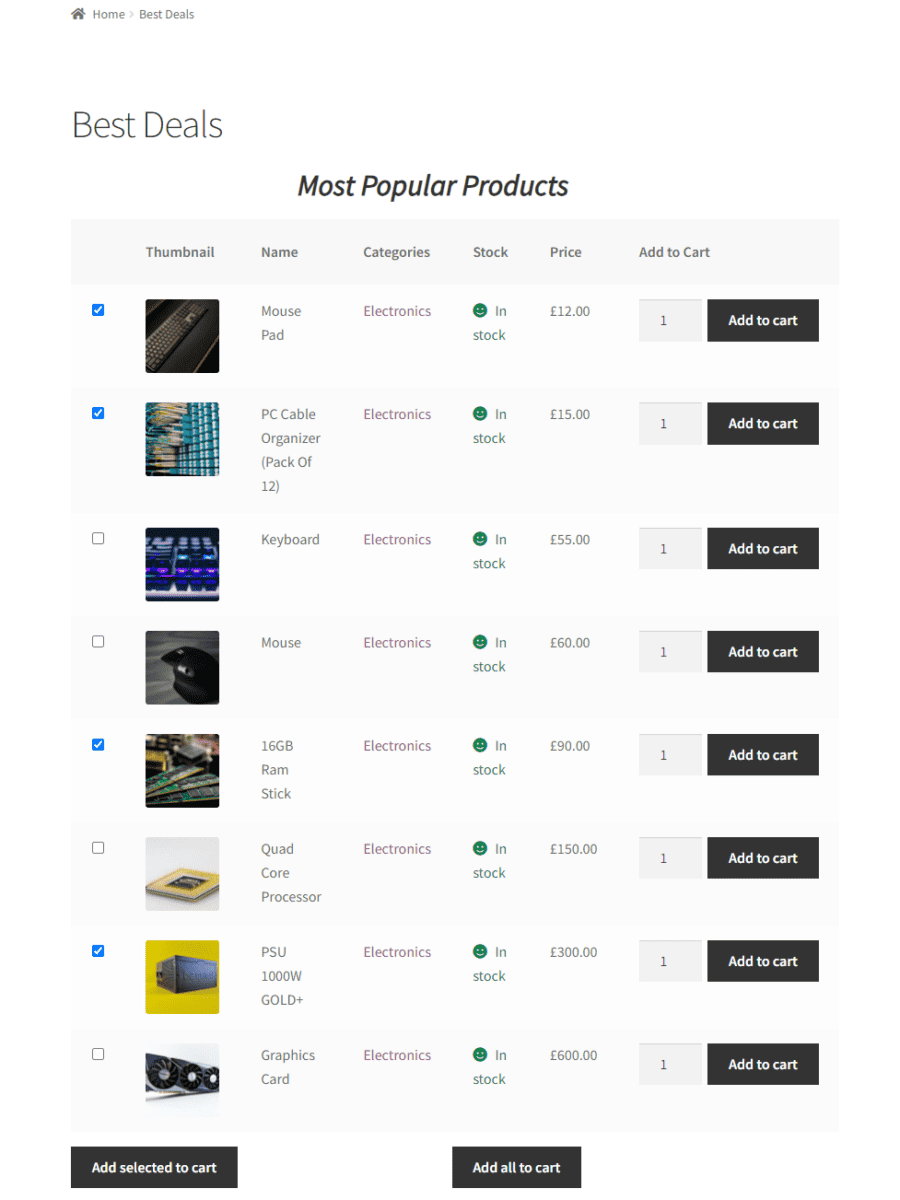
Displaying popular products with WooCommerce Order Bump
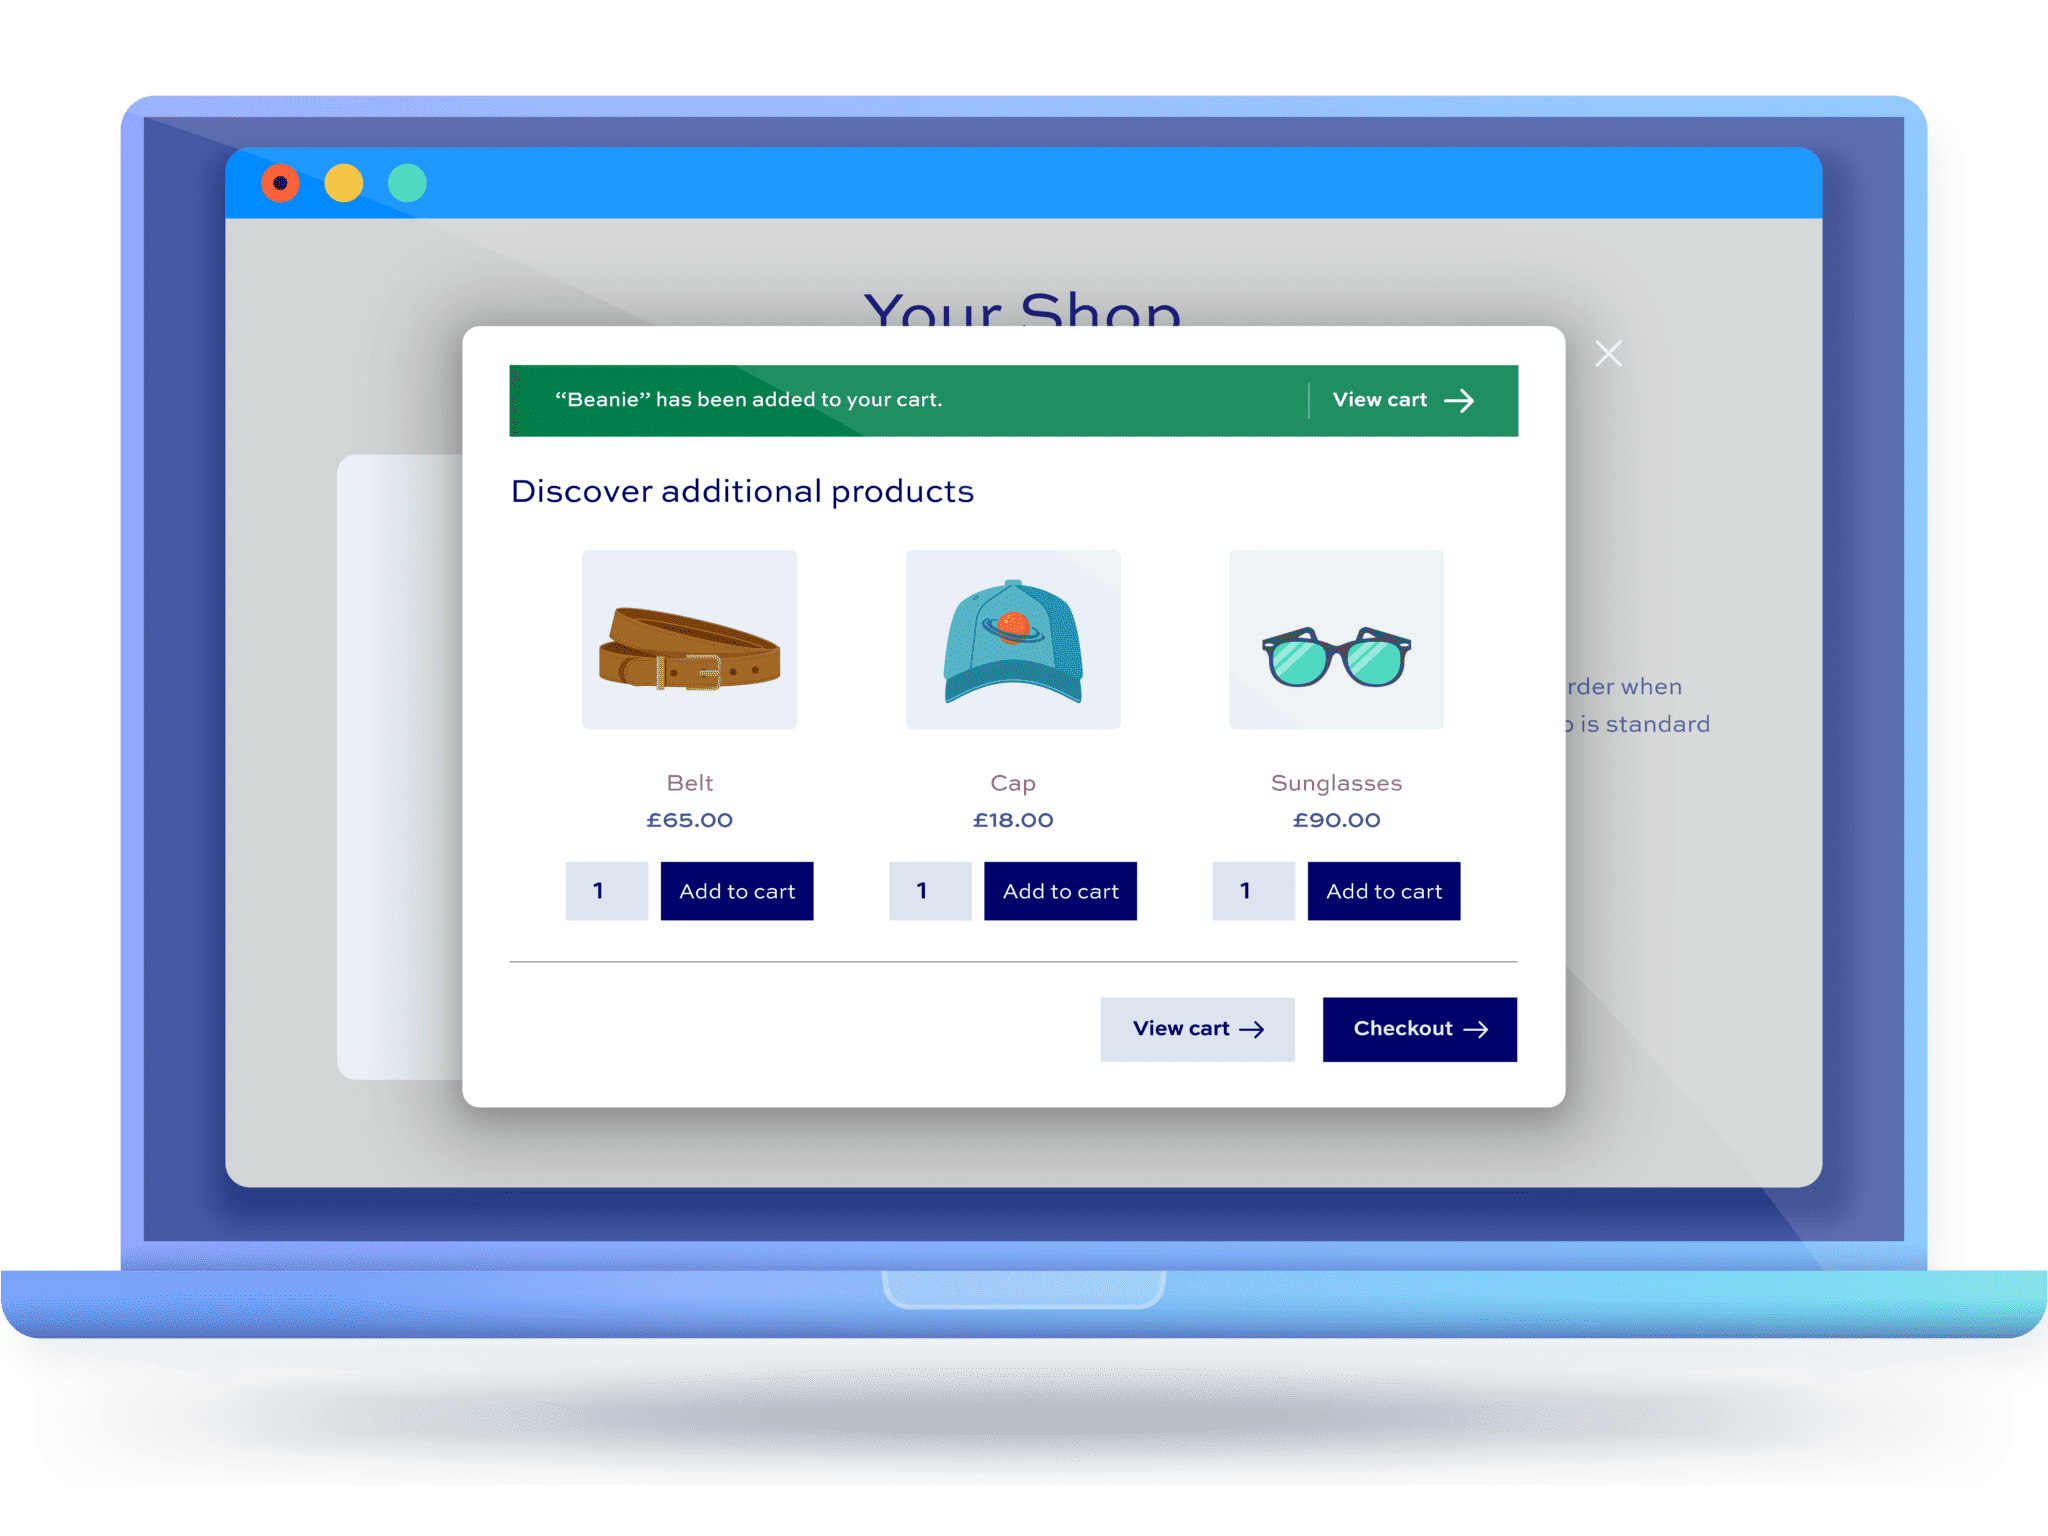
Another method for displaying popular products on your online store is with the WooCommerce Order Bump plugin, which allows you to set up modal pop-ups with recommended products at key points in the shopping journey.
WooCommerce Order Bump
Increase sales and maximize revenue with the WooCommerce Order Bump plugin
The WooCommerce Order Bump plugin offers a one-off solution for displaying popular products in a more visually-appealing way and also makes it easy to recommend popular products to your single product pages, cart page, and checkout page in bulk. This means you can overcome the laborious setup issues of the default WooCommerce shortcode method.
Let’s discuss the WooCommerce Order Bump plugin’s main features that make it an ideal option for store owners looking to display popular products better:
- Flexible layout options. The WooCommerce Order Bump plugin offers multiple layout options for displaying a modal pop-up with your shop’s popular products. This way, you can display your popular products in a more visually appealing way on the front-end to encourage upsells and cross-sells.
- Custom discounts. You can also create discounts for popular products displayed in your order bump. Discounts not only help your customers feel more valued but encourage them to add more products to their cart before checking out.
- Apply order bumps in bulk. Using the plugin you can create order bumps that display for all products in your catalog, specific products, or products that share a specific category or attribute.
This gives you more control over which products are displayed as popular products on your online store.
How to set up a modal pop-up with recommended popular products
Setting up order bumps on your WooCommerce site using the WooCommerce Order Bump plugin is straightforward.
Once you install the plugin, navigate to WooCommerce → Settings → Order Bump and click on the Licence link from the top.
Enter the license key given to you at the time of purchase and click on the Activate button to continue.
Now that the WooCommerce Order Bump plugin is installed and activated on your WooCommerce site, navigate to WooCommerce → Order Bumps and click on the Add New button to get started.
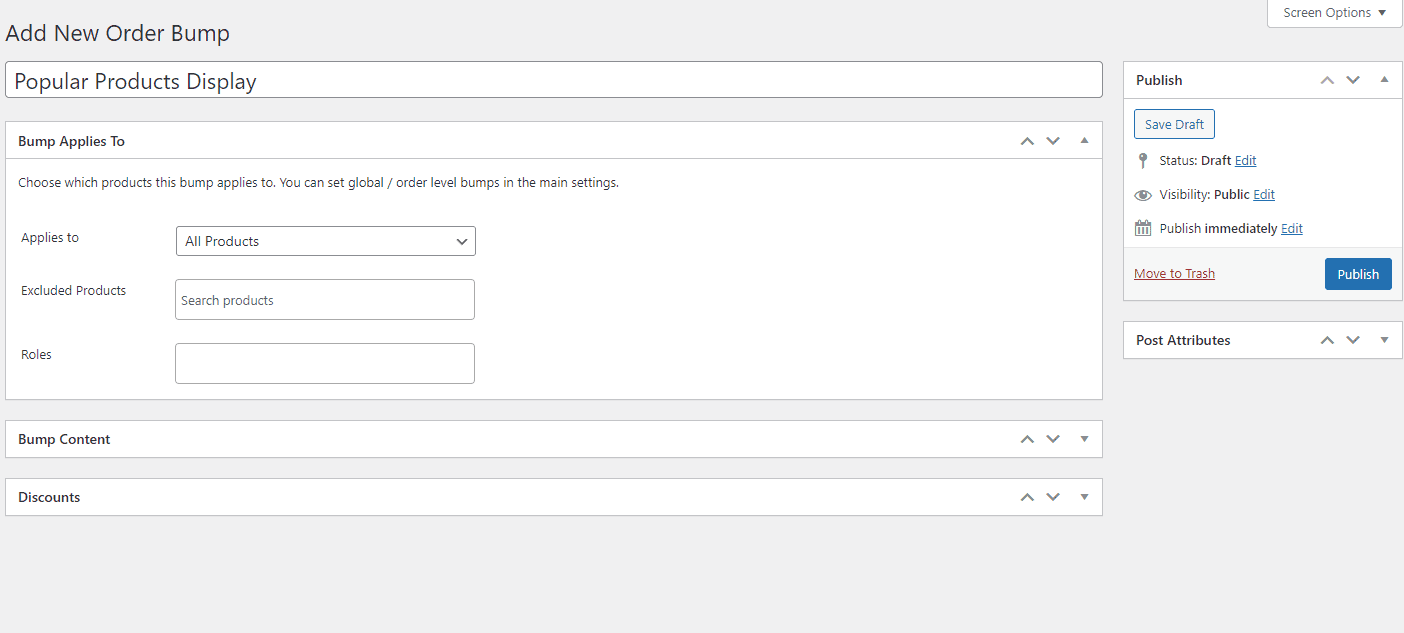
After giving your order bump a title, you can choose which products will trigger the popular products order bump display using the Applies to dropdown menu.
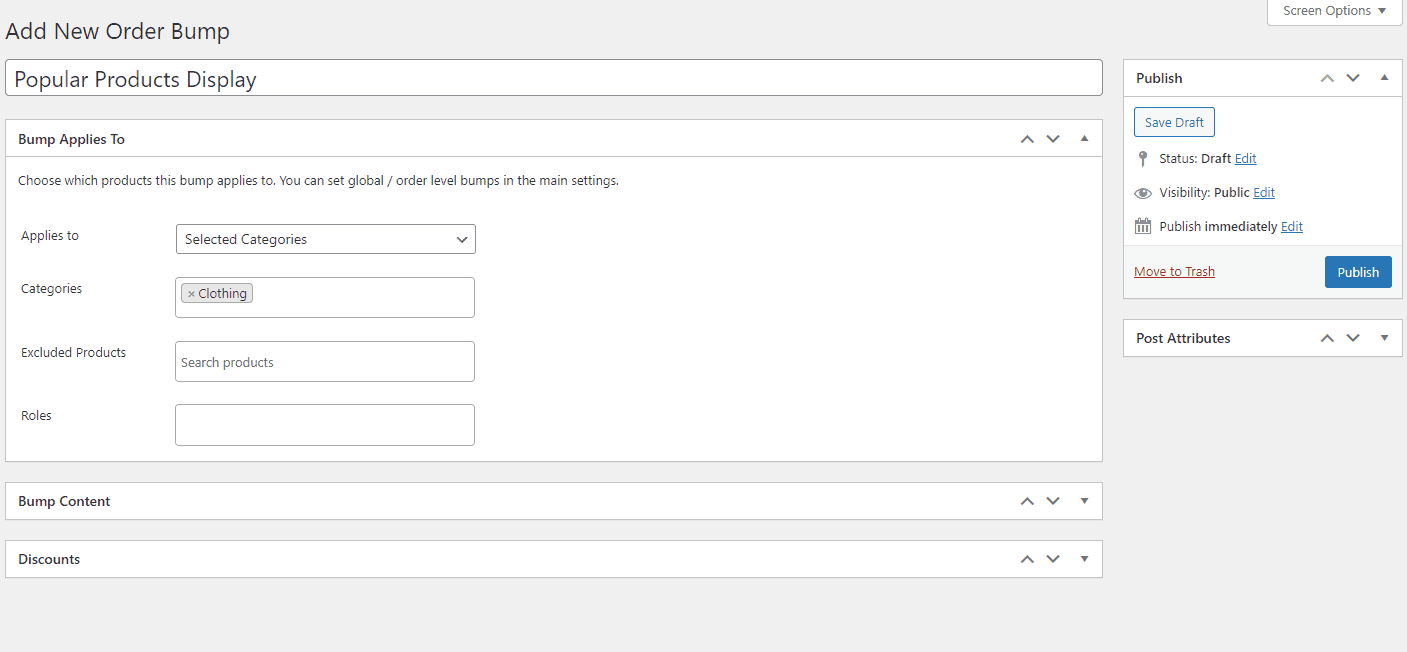
For instance, if shoppers add any products from the “Clothing” product category, the most popular products from that specific category will be displayed in a modal popup. You can also specify which products to exclude from triggering the modal popup display such as out-of-stock products.
Using the Bump Content metabox, add a Heading that shoppers will see on the front-end and specify the “popular products” in the Bump Products field.
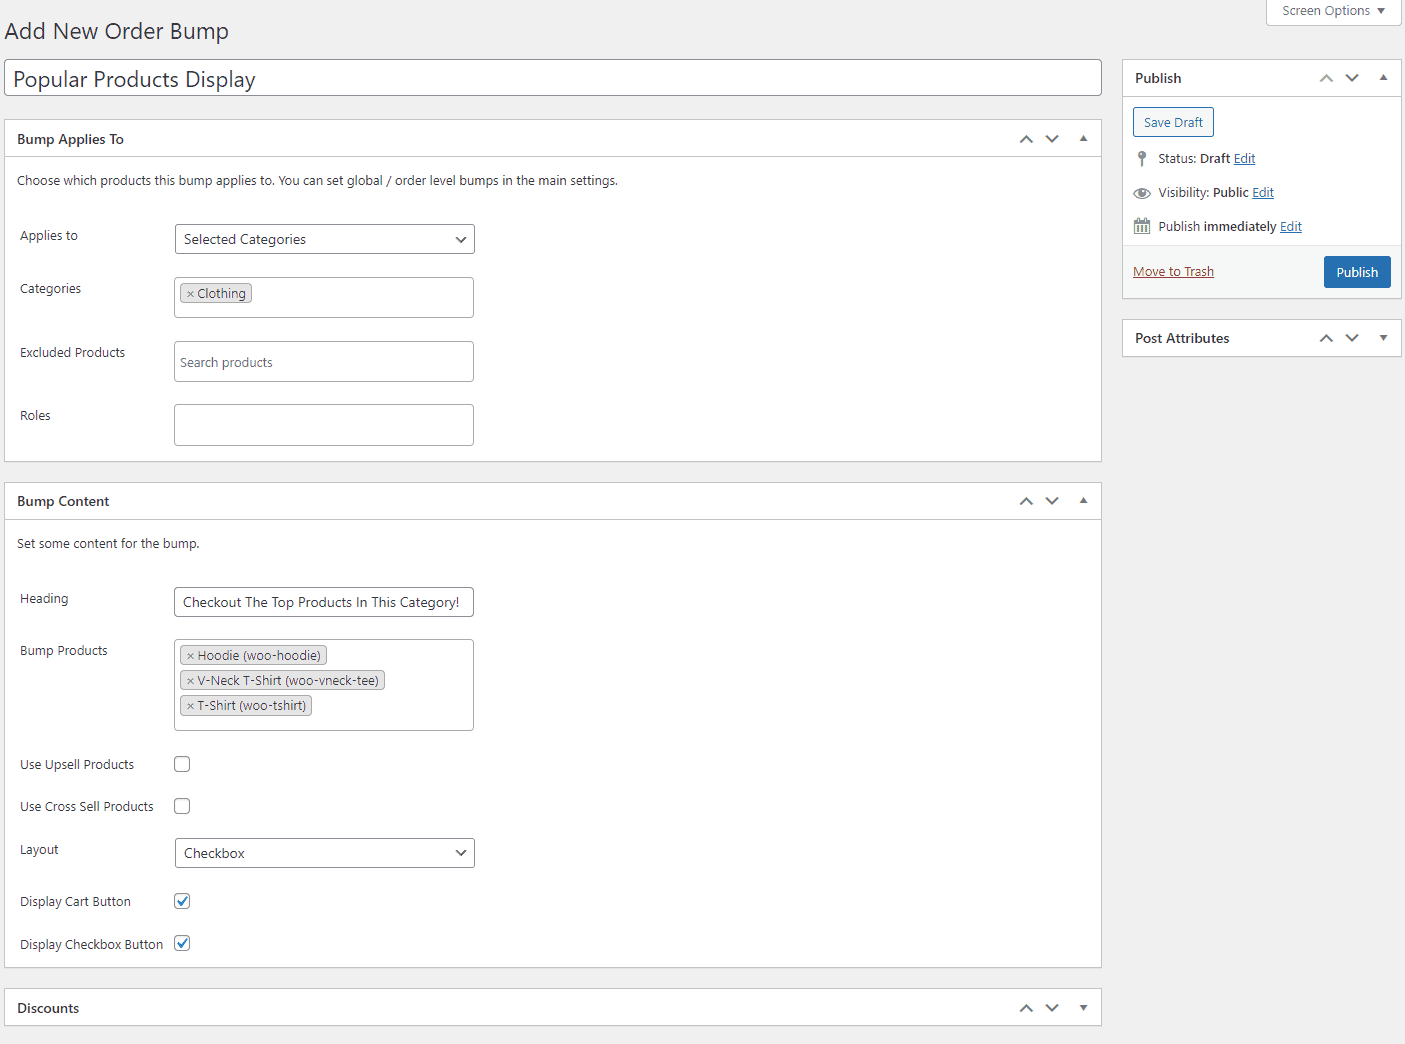
While you can add custom products, you can also use the upsells or cross-sells products that are attached to the products in the customers’ cart. The Layout dropdown field lets you choose the layout of the modal popup and how the bump products appear in them.
In addition to this, you can also select the Display Cart Button and Display Checkbox Button checkboxes to display the cart button and checkboxes. This lets shoppers add multiple products to their cart at once.
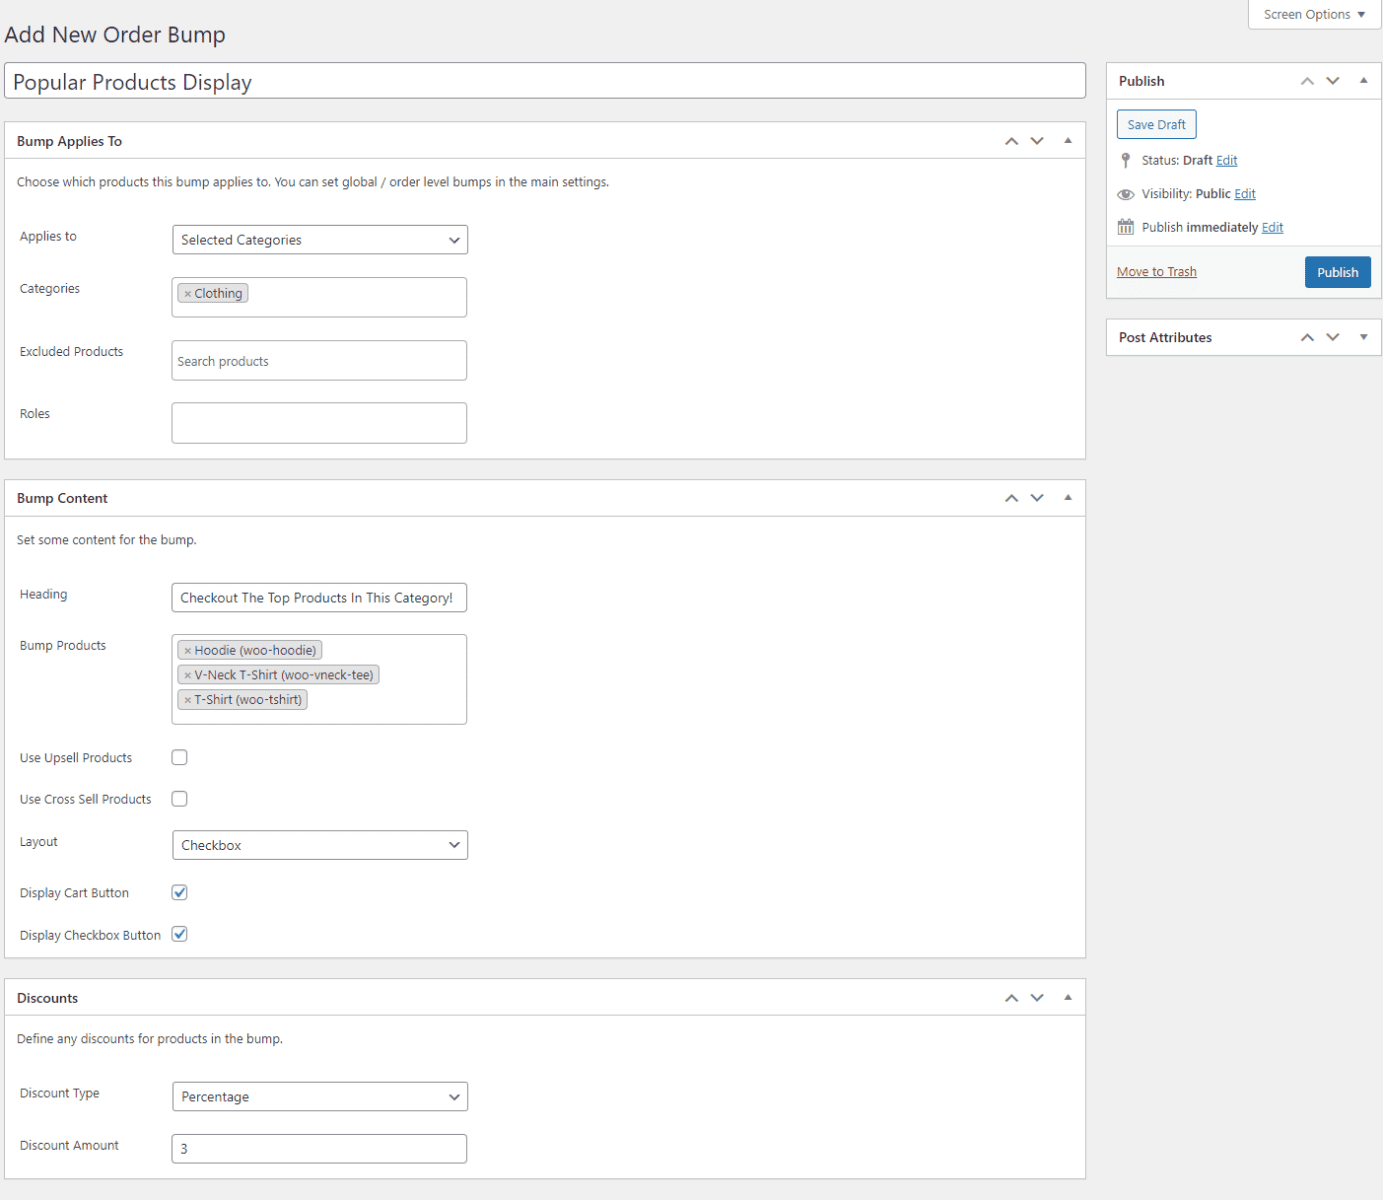
The Discounts section lets you add either a fixed or percentage-based discount to your order bumps. This is great for encouraging shoppers to make purchases and helps increase the average order value on your online store.
Once you’re ready, make sure to click on the Publish button to continue.
To choose where the popular products display will pop up on the front-end of your WooCommerce site, navigate to WooCommerce → Settings → Order Bump.
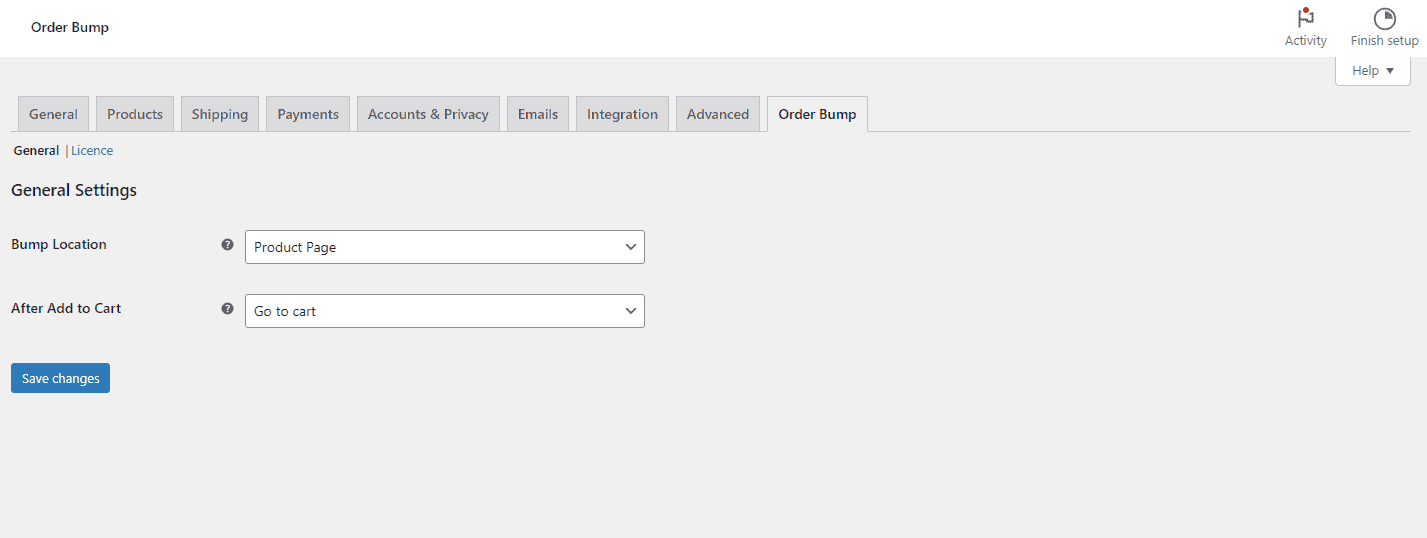
Using the Bump Location dropdown field, you can display the order bump on either the single product pages, the cart page, or the checkout page. You can also choose what happens next after the customer adds products to their cart using the order bump.
Once you’re ready, make sure to click on the Save changes button to continue.
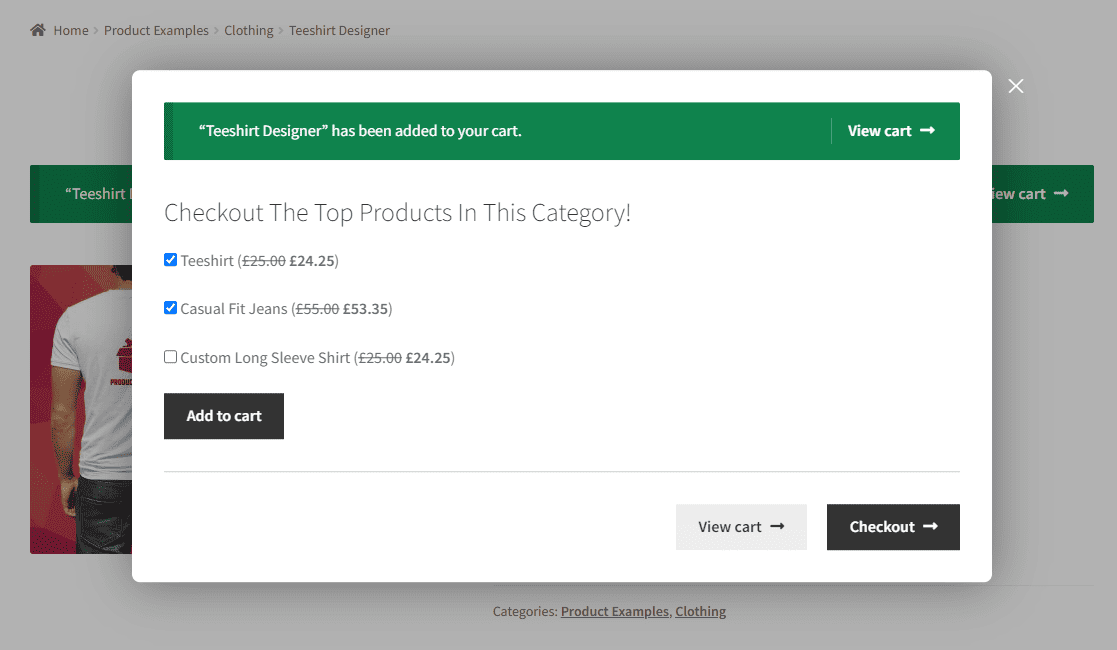
The Checkbox layout lets customers quickly select more products after they add the primary product they were interested in to their cart.
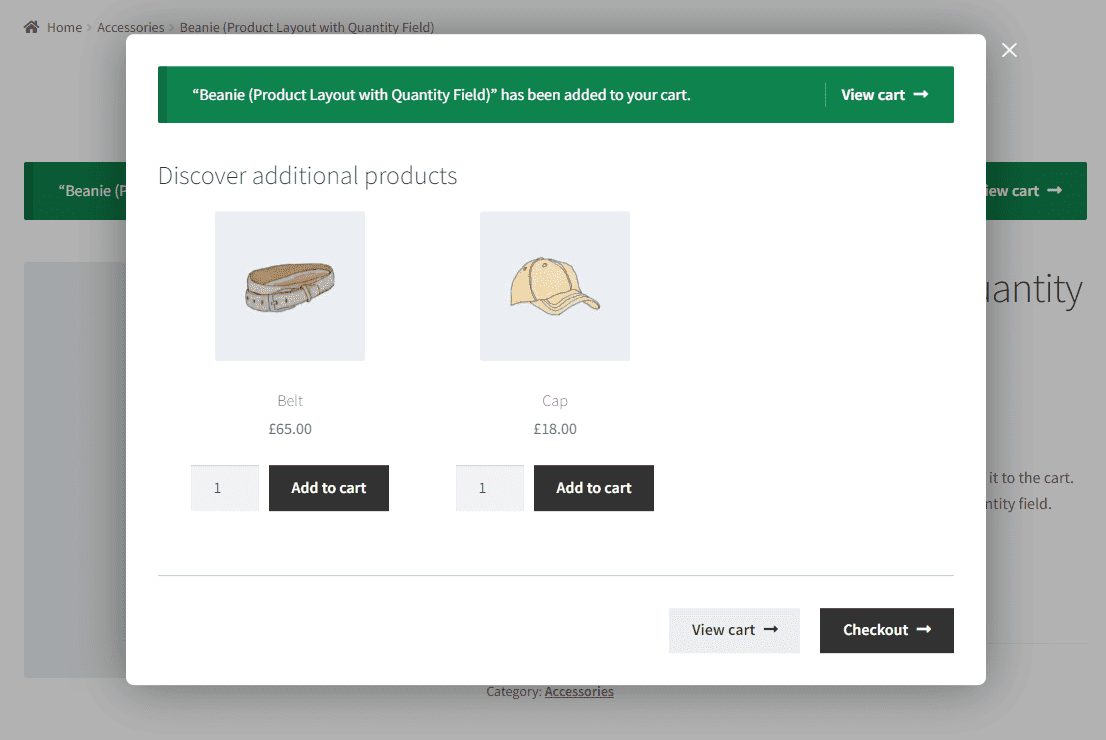
The Product layout lets you display additional quantity selectors and show popular products in a more visually-appealing way.
Maximize the impact of popular products on your WooCommerce store
Displaying popular products or listing your top-selling products on your WooCommerce site is a great way to boost sales, increase average order value, enhance product visibility and user experience, and show social proof to customers to increase customer trust.
While you can use WooCommerce default shortcodes to display popular products anywhere on your WooCommerce site, you are limited with design options and it requires a lot of manual labor, especially if you have a large product catalog. This is why it’s best to use dedicated plugins like WooCommerce Product Table Ultimate and WooCommerce Order Bump to improve this functionality.
Ready to showcase popular products in a better and easier way? Get started with WooCommerce Product Table Ultimate and WooCommerce Order Bump today!
