How to sell bookings for courses through WooCommerce

WooCommerce is an ideal solution to allow your users to book courses or any kind of training event, such as classes, seminars, lectures, workshops, and so on.
In this article, we’ll look at different options for selling your courses online through WooCommerce. This includes a simple method using just WooCommerce itself, plus more advanced options using additional plugins.
We’ll look at how to:
- Take date-based bookings using a calendar
- Set maximum availability per course
- Define which days course are avaiable
- Allow users to book multiple places at once
- Collect additional information from the user – and offer them extra options
- Restrict course availability to site members
All the options above are compatible with all WordPress themes and page builders. Let’s start by looking at a simple method to accept course bookings.
Three tutorials: how to let users book courses with WooCommerce
In this section, we’ll step through three different methods for selling courses with WooCommerce.
Example #1: Take bookings in WooCommerce – no extra plugins required
This first example doesn’t require any additional plugins. You can create this using standard WooCommerce functionality. There are some limitations but this is a good option if you’re not offering loads of courses and you just want a way to manage simple bookings.

Step #1: Create a new product
Just create a new product in WooCommerce:
- Go to Products > Add New
- Give your product a title to describe the course or class
- Enter a price for the course
- Add an image, some descriptive text, and any other relevant information
Step #2: Set capacity for your course
If numbers are limited on your course, you can define the capacity using standard WooCommerce inventory functionality. To ensure you don’t oversell your course:
- Click the ‘Inventory’ tab in the ‘Product data’ section
- Enable the ‘Stock management’ option
- Enter the number of places on your course in the ‘Quantity’ field.
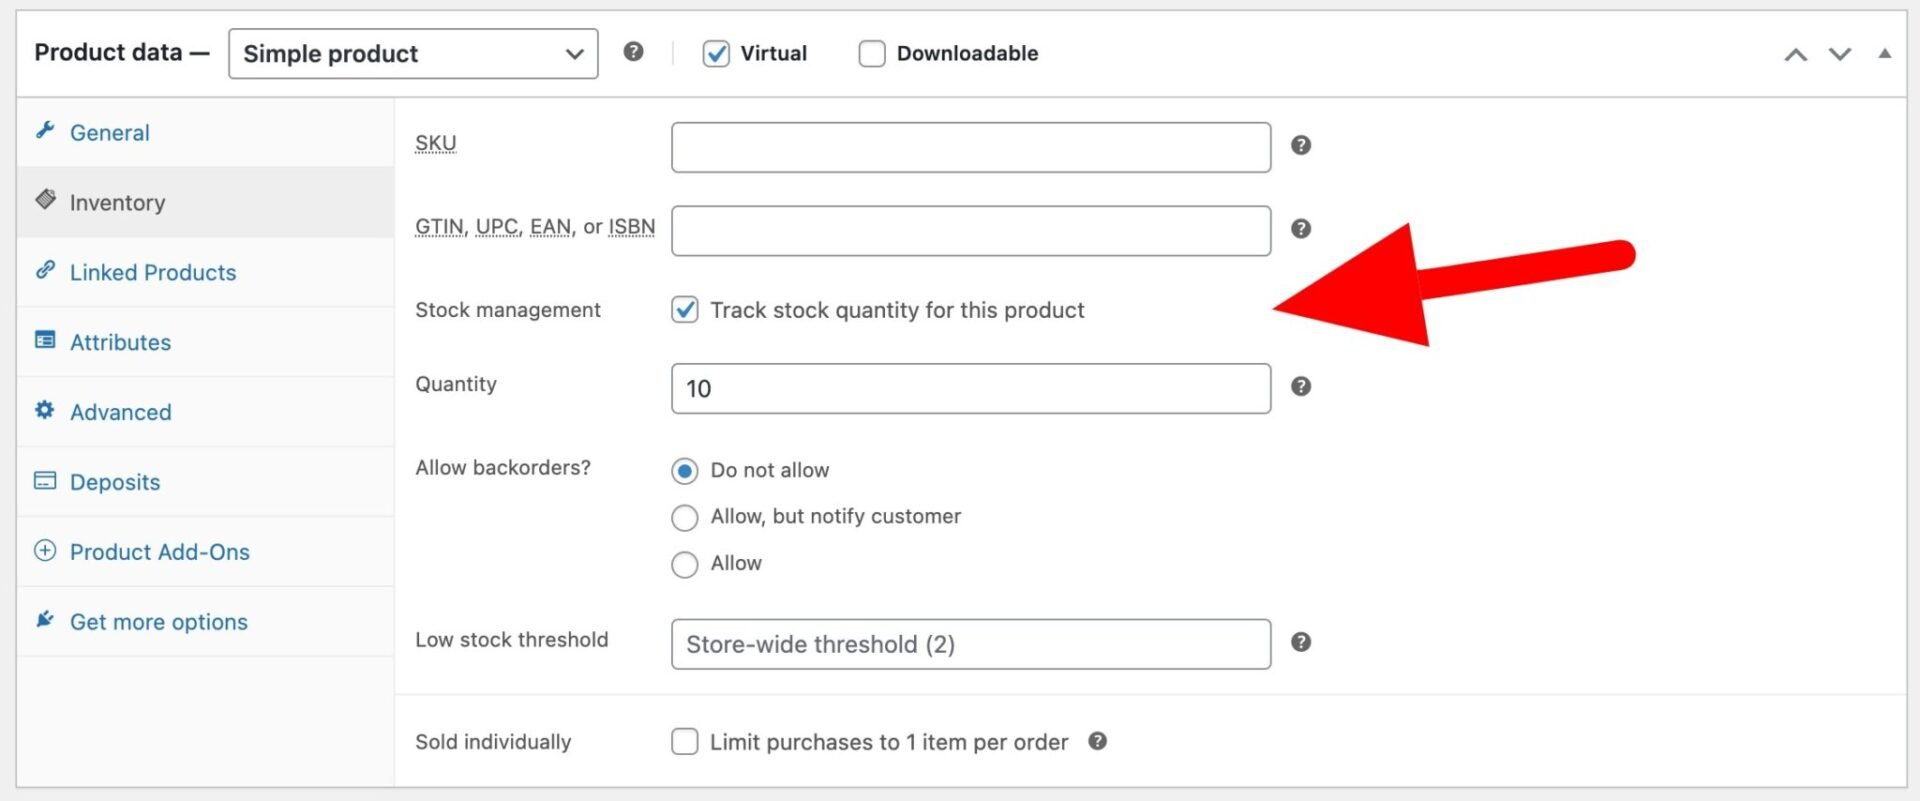
Publish your product. Now, if users want to book onto the course they can just purchase one or more places and check out as normal in WooCommerce.
Step #3 (optional): Set capacity for different levels or tiers
If you’re running a single course with multiple tiers, e.g. you’re running an art class for beginners and advanced students simultaneously, but you want to limit how many students you have per tier, you can do this using variable products:
- Change the product type to ‘Variable’ in the ‘Product data’ section
- In ‘Attributes’, create a new attribute for your tiers or levels
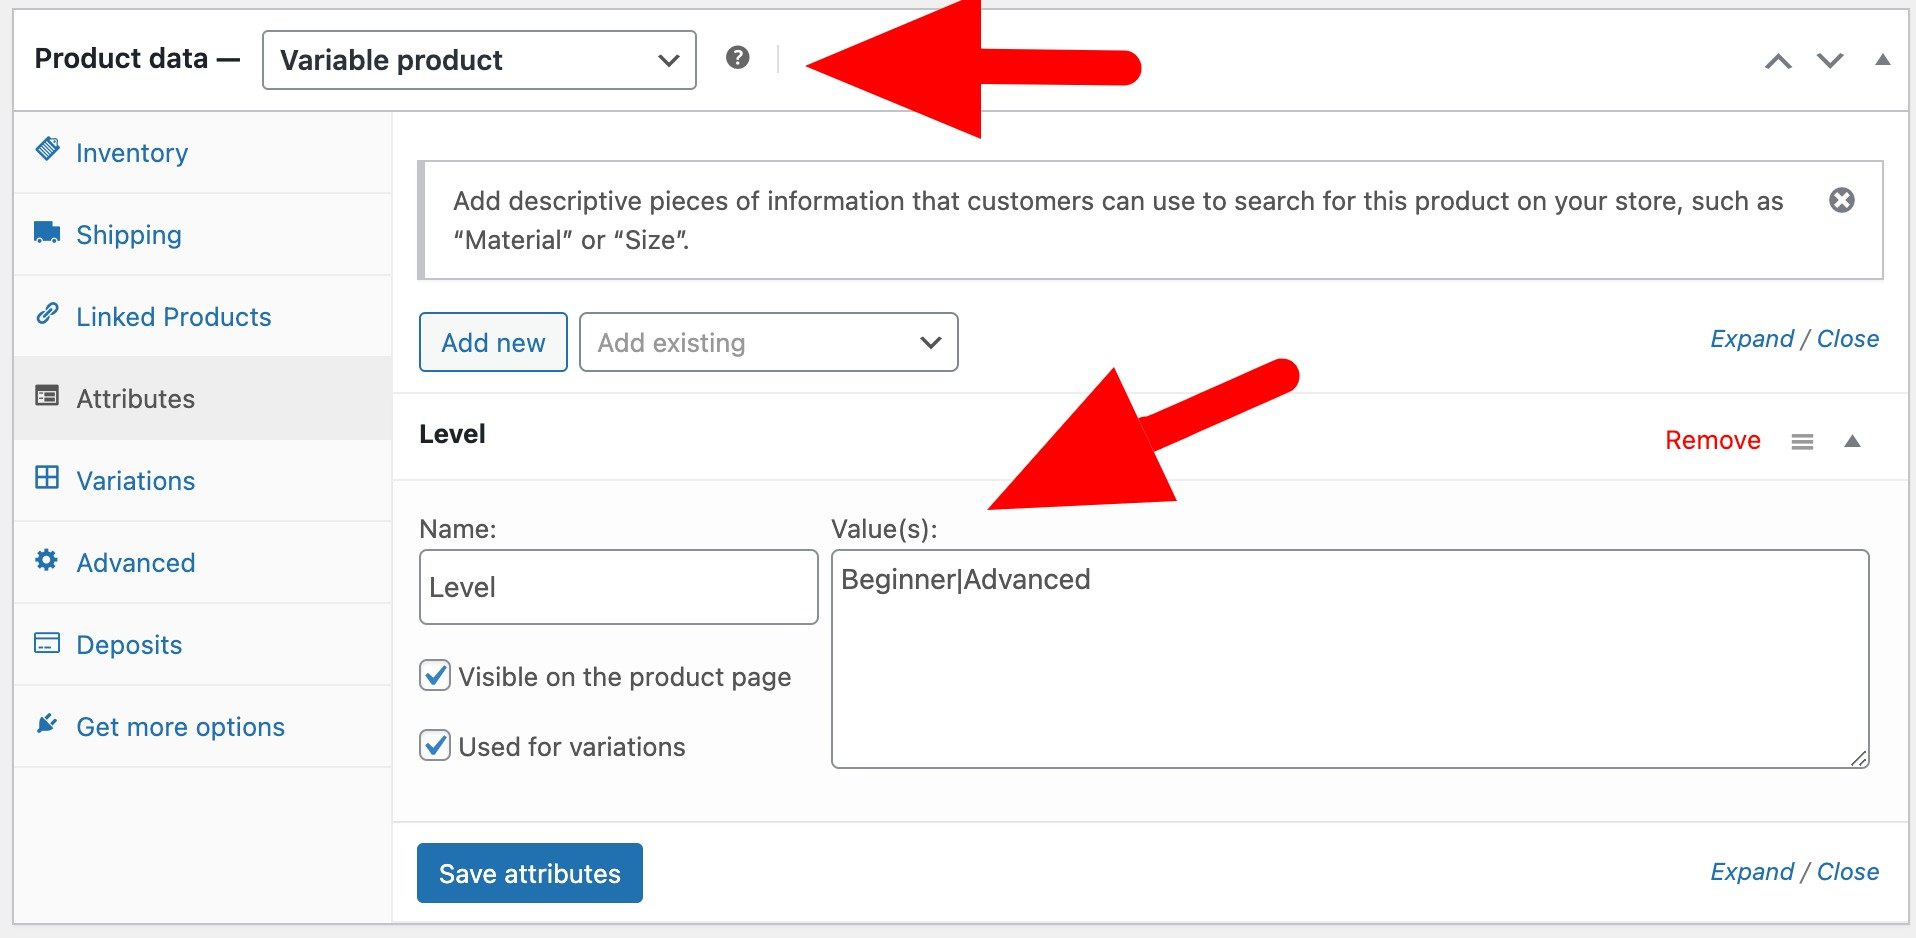
- In the ‘Variations’ tab, create variations for each level by clicking the ‘Generate variations’ button
- Then enter details for each level – ensure you set a price and stock level to manage capacity
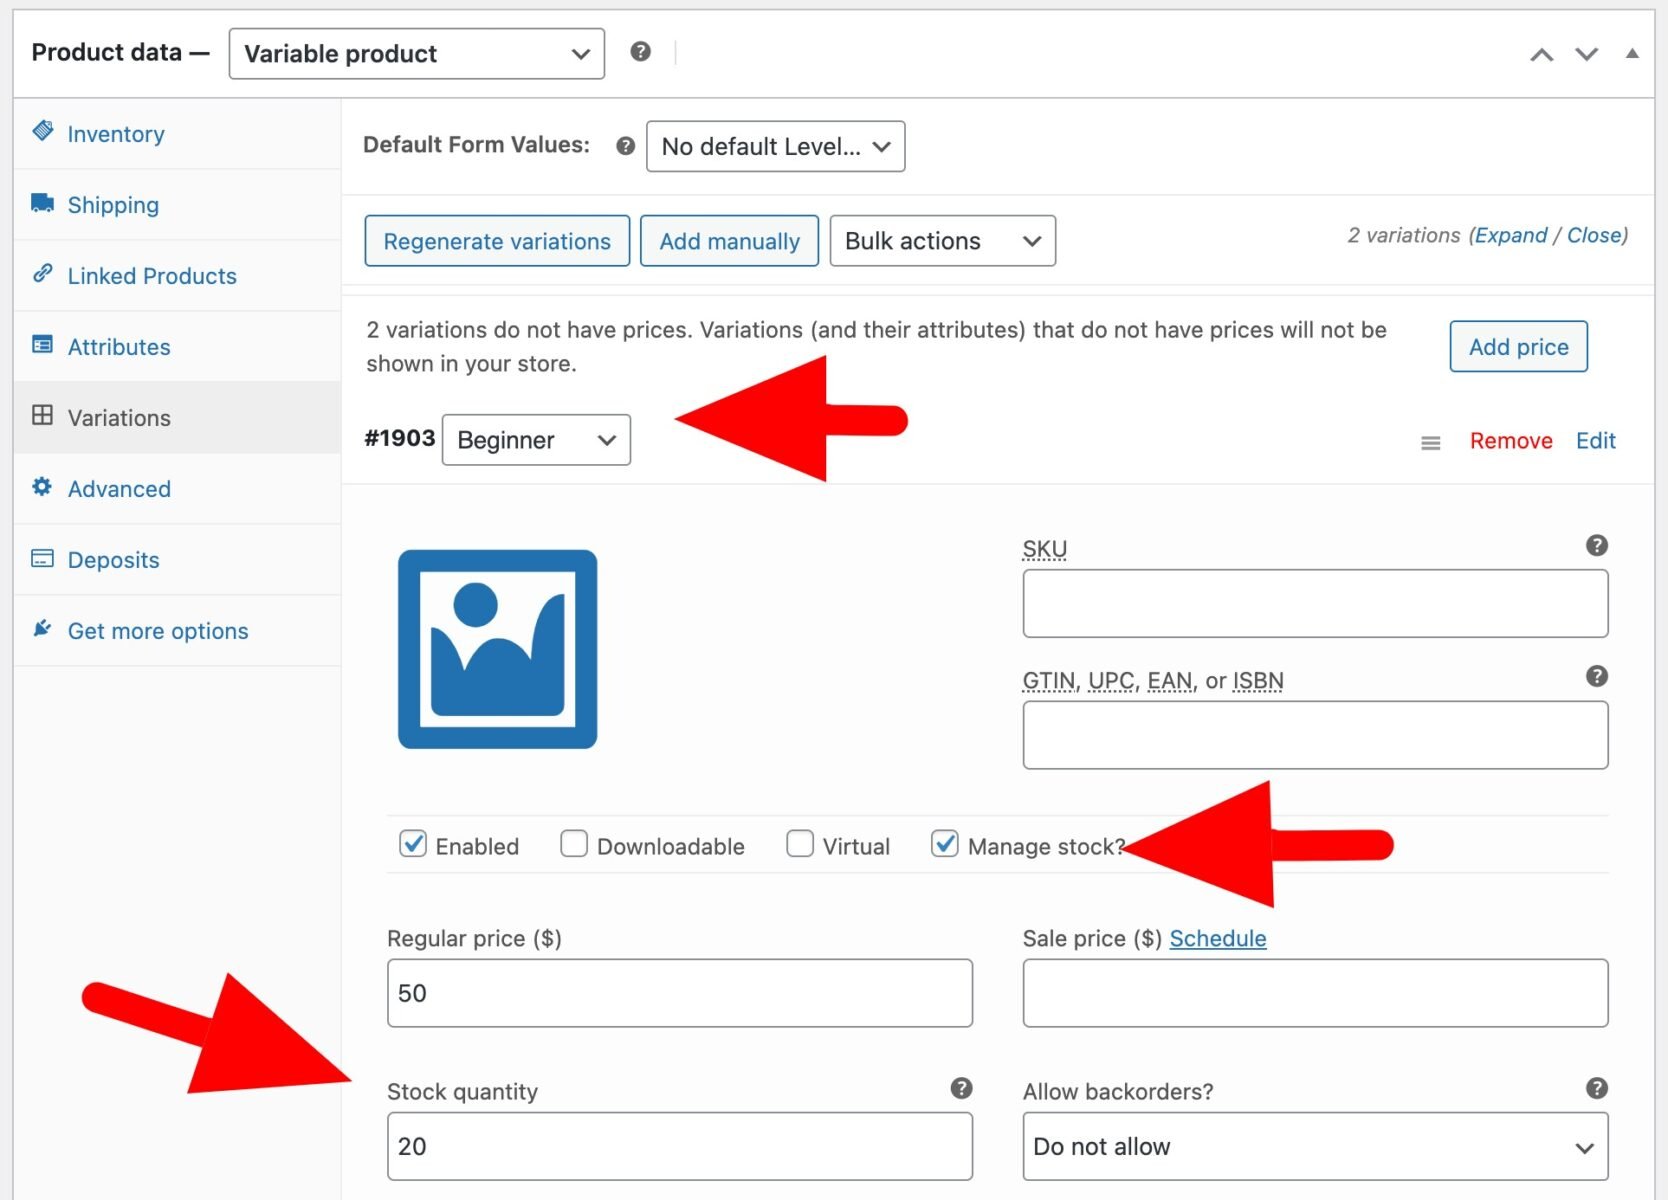
Now users will be able to select their level and you can manage availability for all levels. When places run out on one tier, further users won’t be able to book.

Example #2: Use a WooCommerce bookings plugin
The first method is great if you’re not offering lots of courses. However, if you are running regular courses and you’d like users to be able to book onto specific dates, ideally using a calendar, then you’ll need a WooCommerce bookings plugin.
The Bookings for WooCommerce plugin is ideal for selling courses and classes. You can create multiple bookable products, set class sizes and limits, and define which days they run.
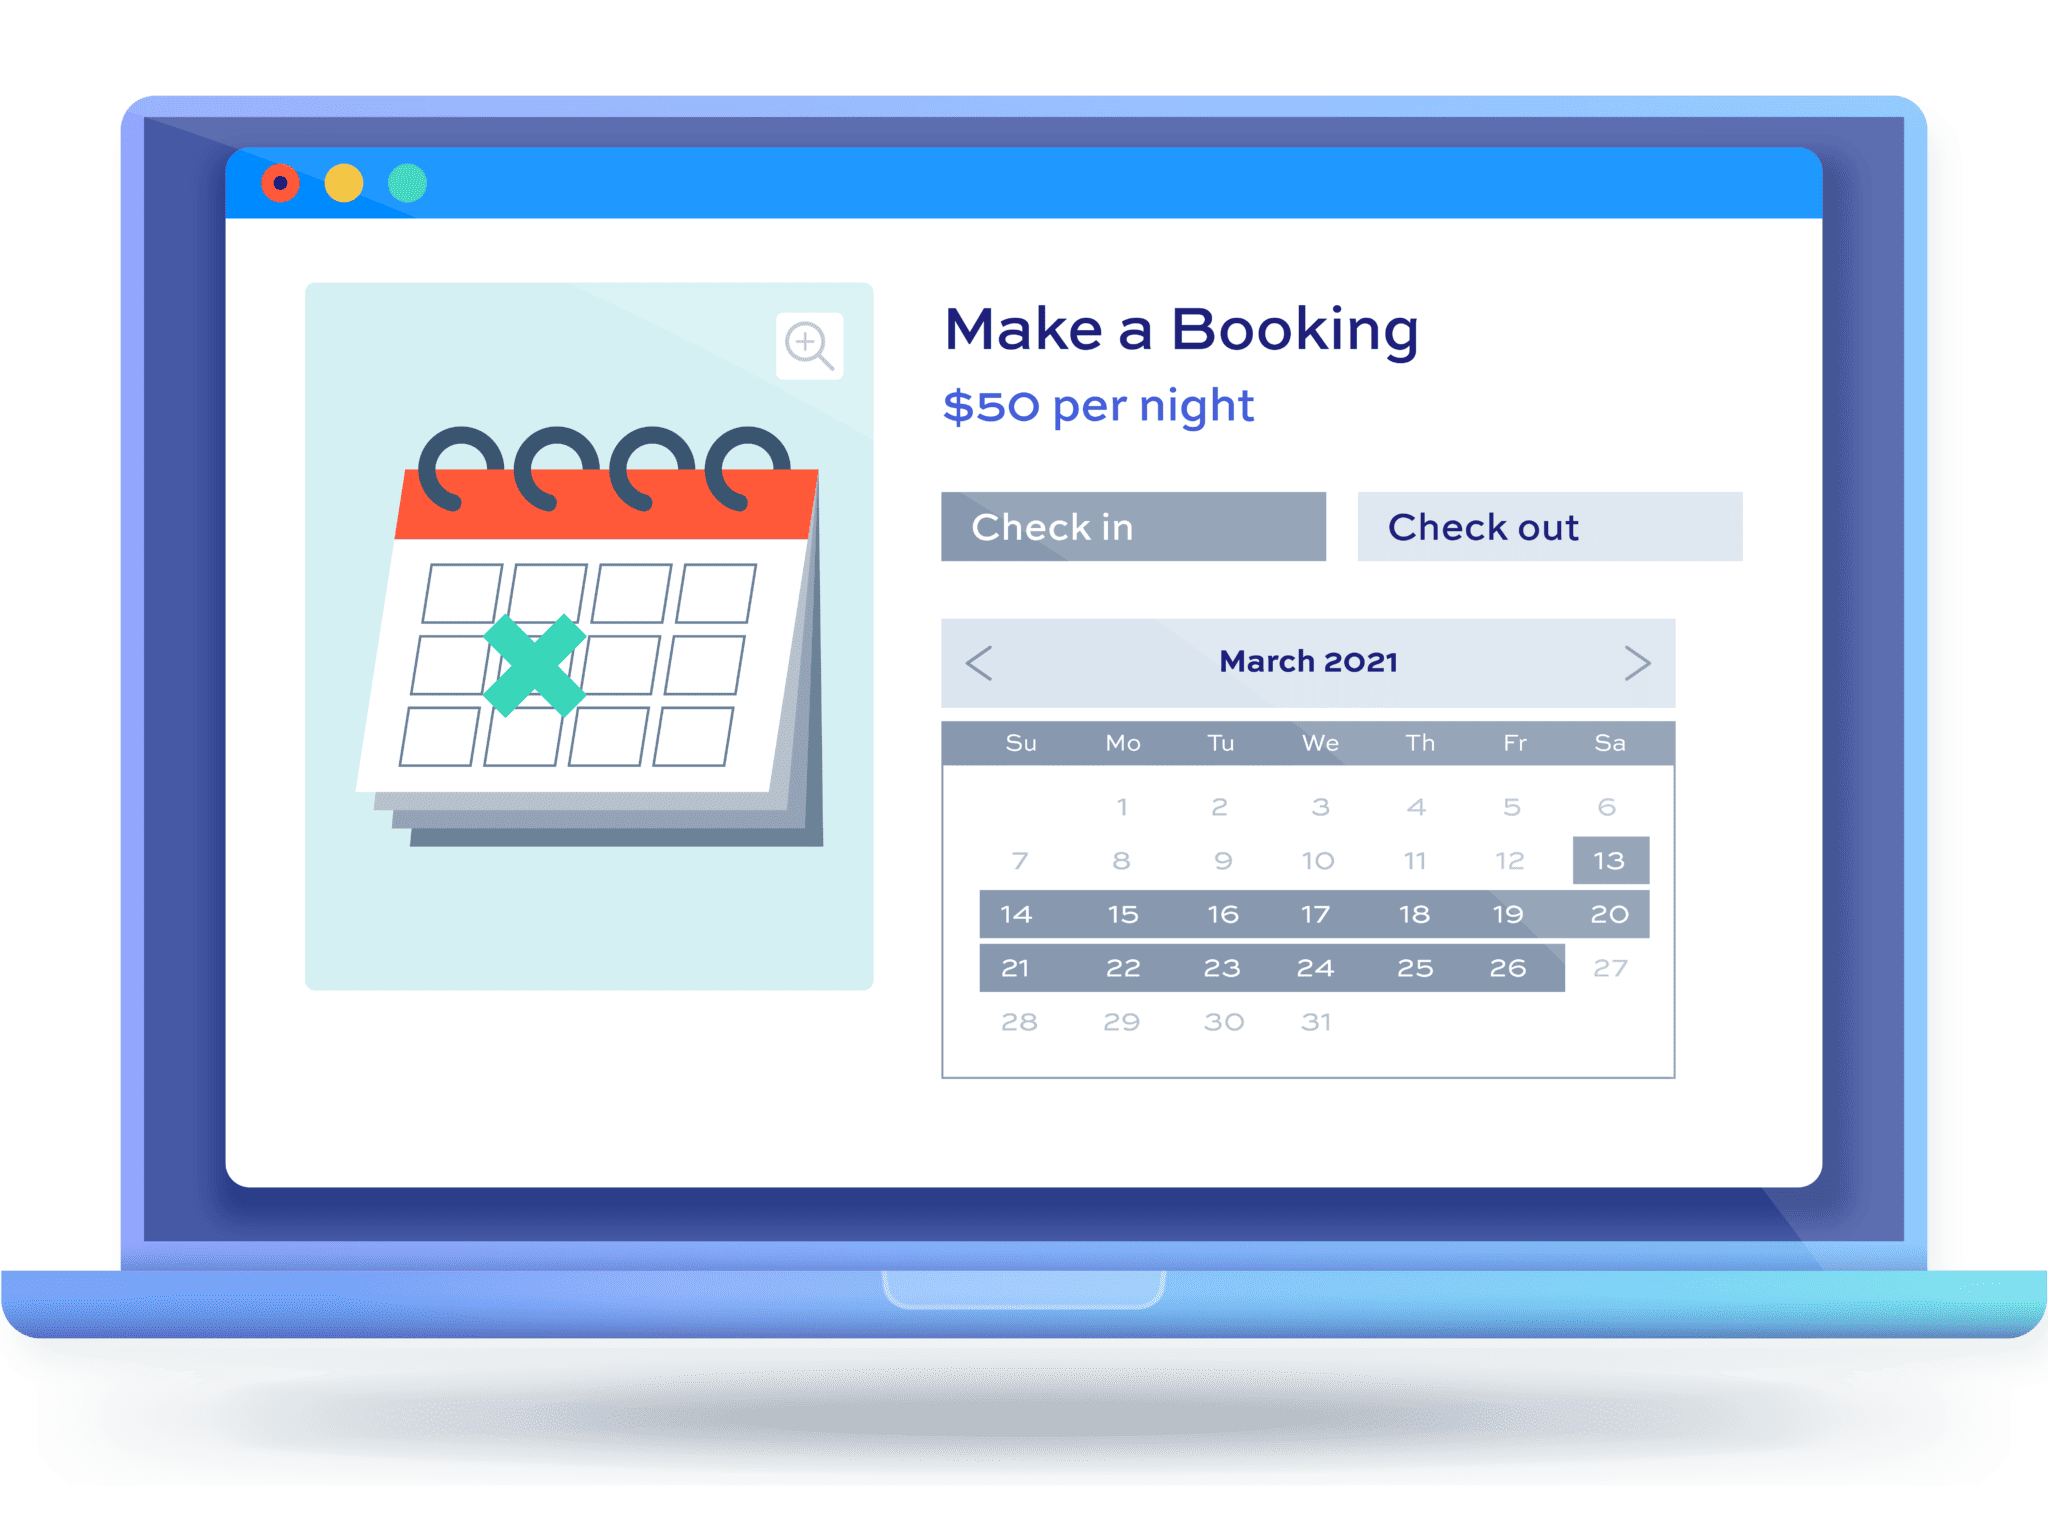
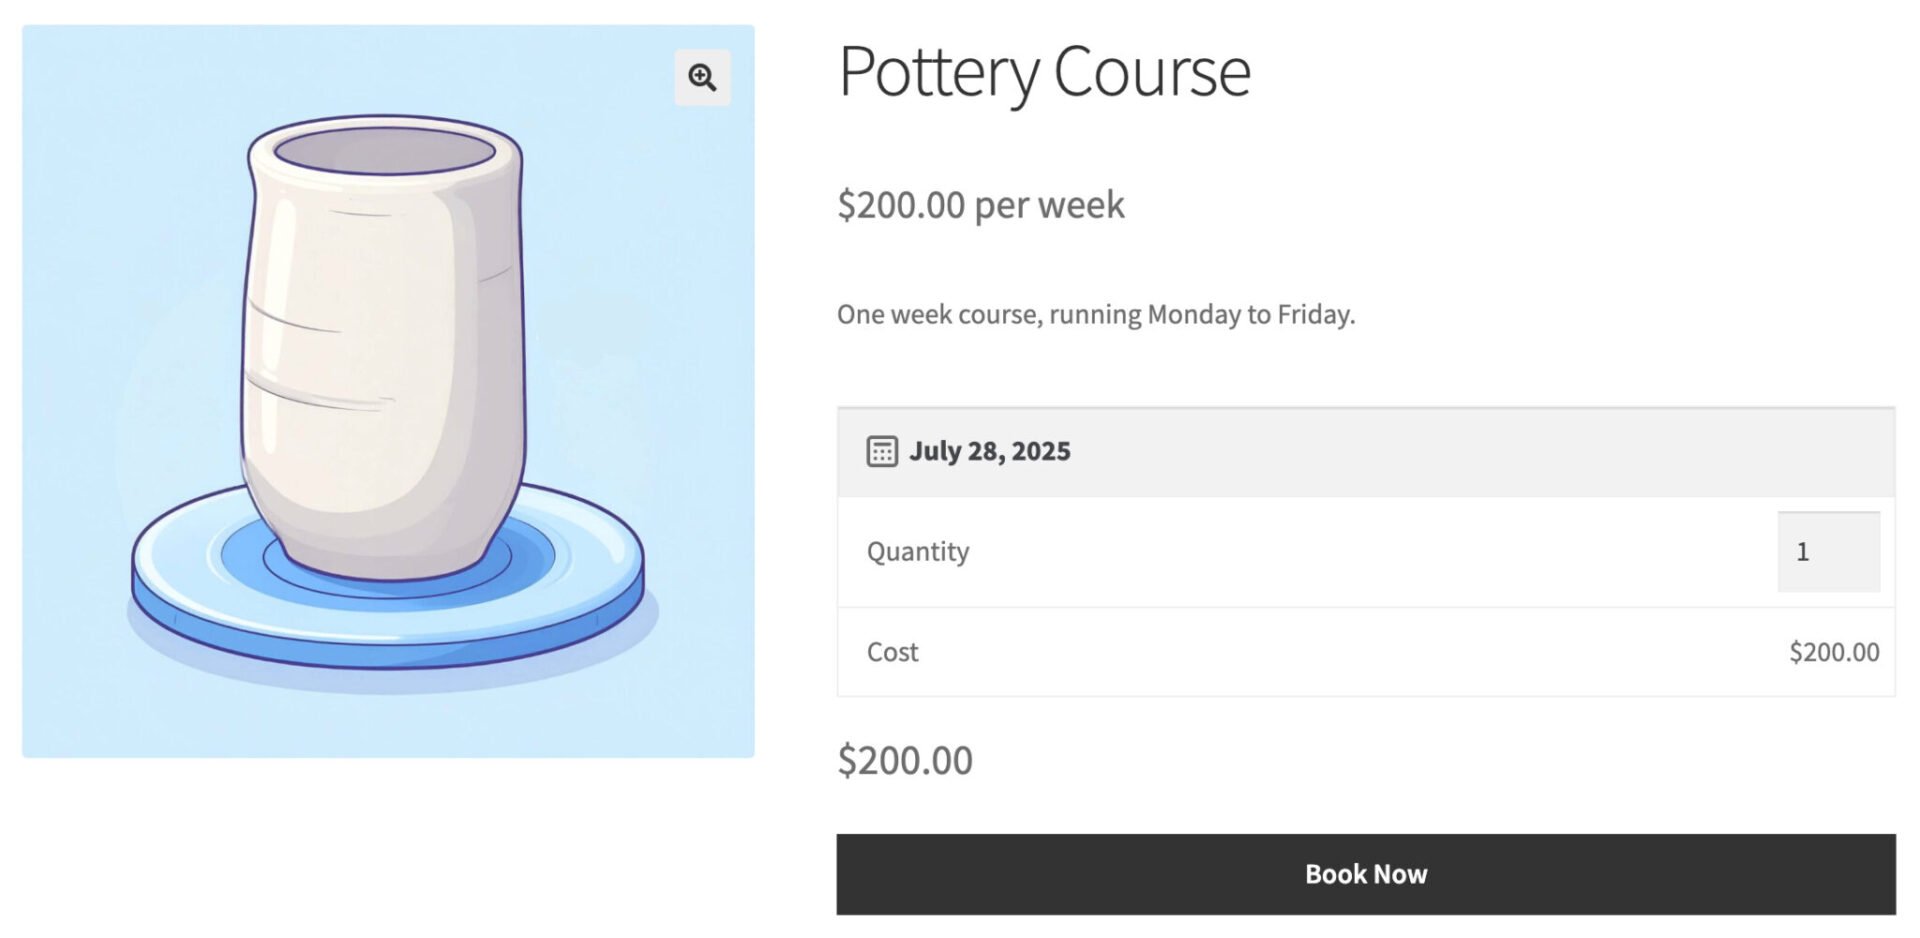
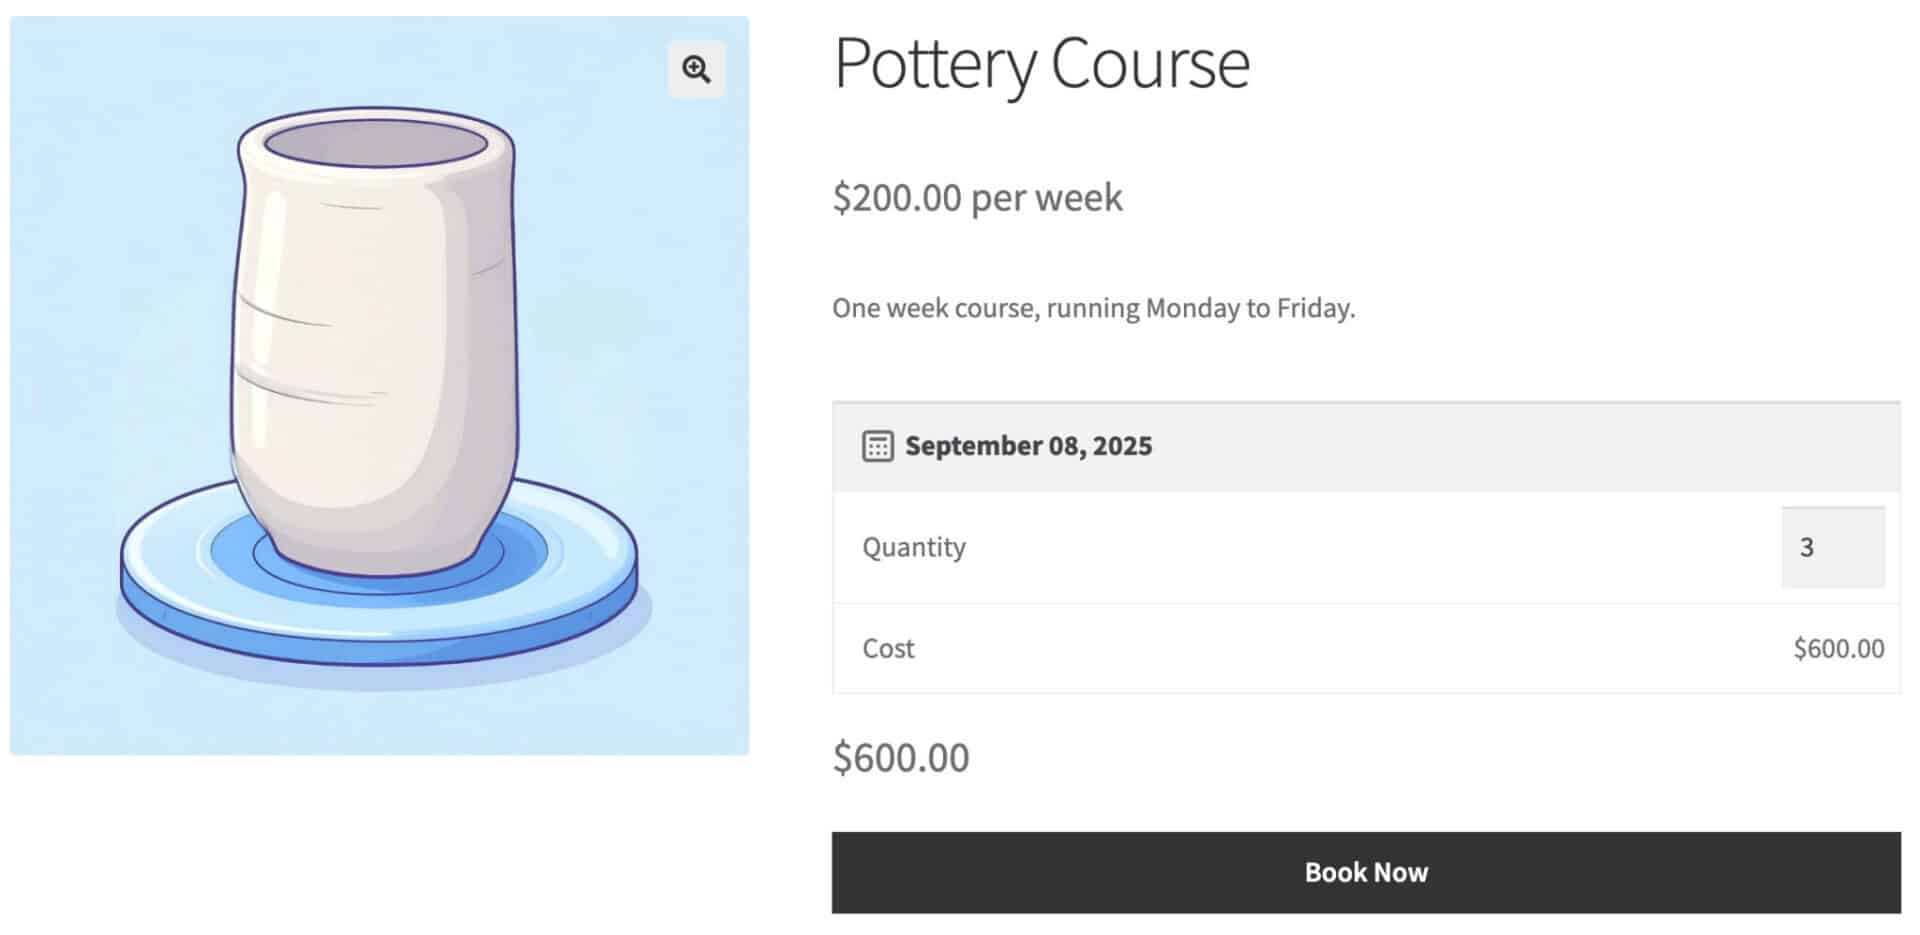
In this example, we’ll use Bookings for WooCommerce to sell places on a pottery course. The course runs weekly, starting Mondays, and there are 30 places available per week.
Step #1: Install and activate Bookings for WooCommerce
Once you’ve purchased Bookings for WooCommerce, you can install it on your site as follows:
- Download the plugin files as a zip from your welcome email or the thank you page after you check out
- Go to Plugins > Add New and click the ‘Upload Plugin’ button
- Drag the zip file to the upload area on the screen – the plugin files will upload
- Click the ‘Activate’ button when it appears
Step #2: Create your bookable product
Now you can create a bookable product for your course:
- Go to Products > Add New
- Give your product a title, e.g. ‘Pottery Course’, a featured image, descriptive text, and so on – just as you would with a standard product
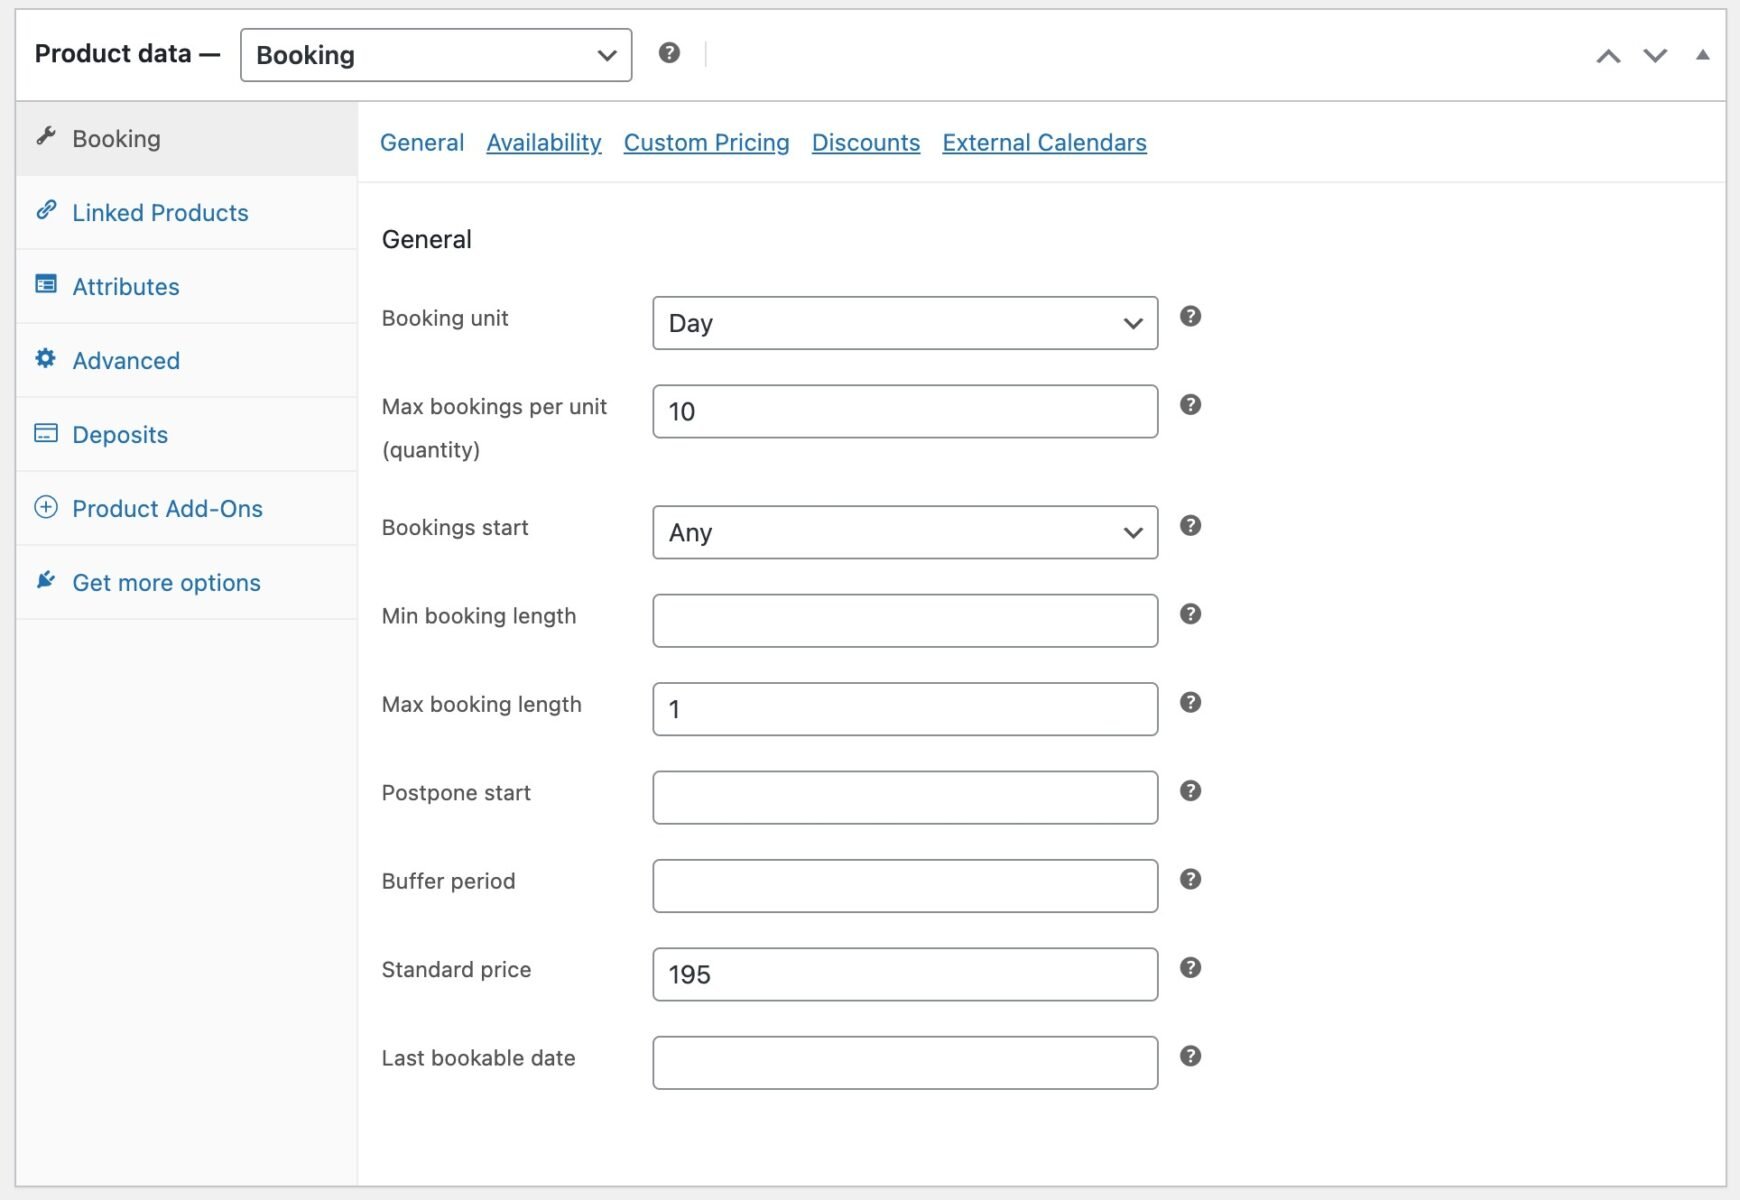
- Select ‘Booking’ as the product type in the ‘Product data’ section
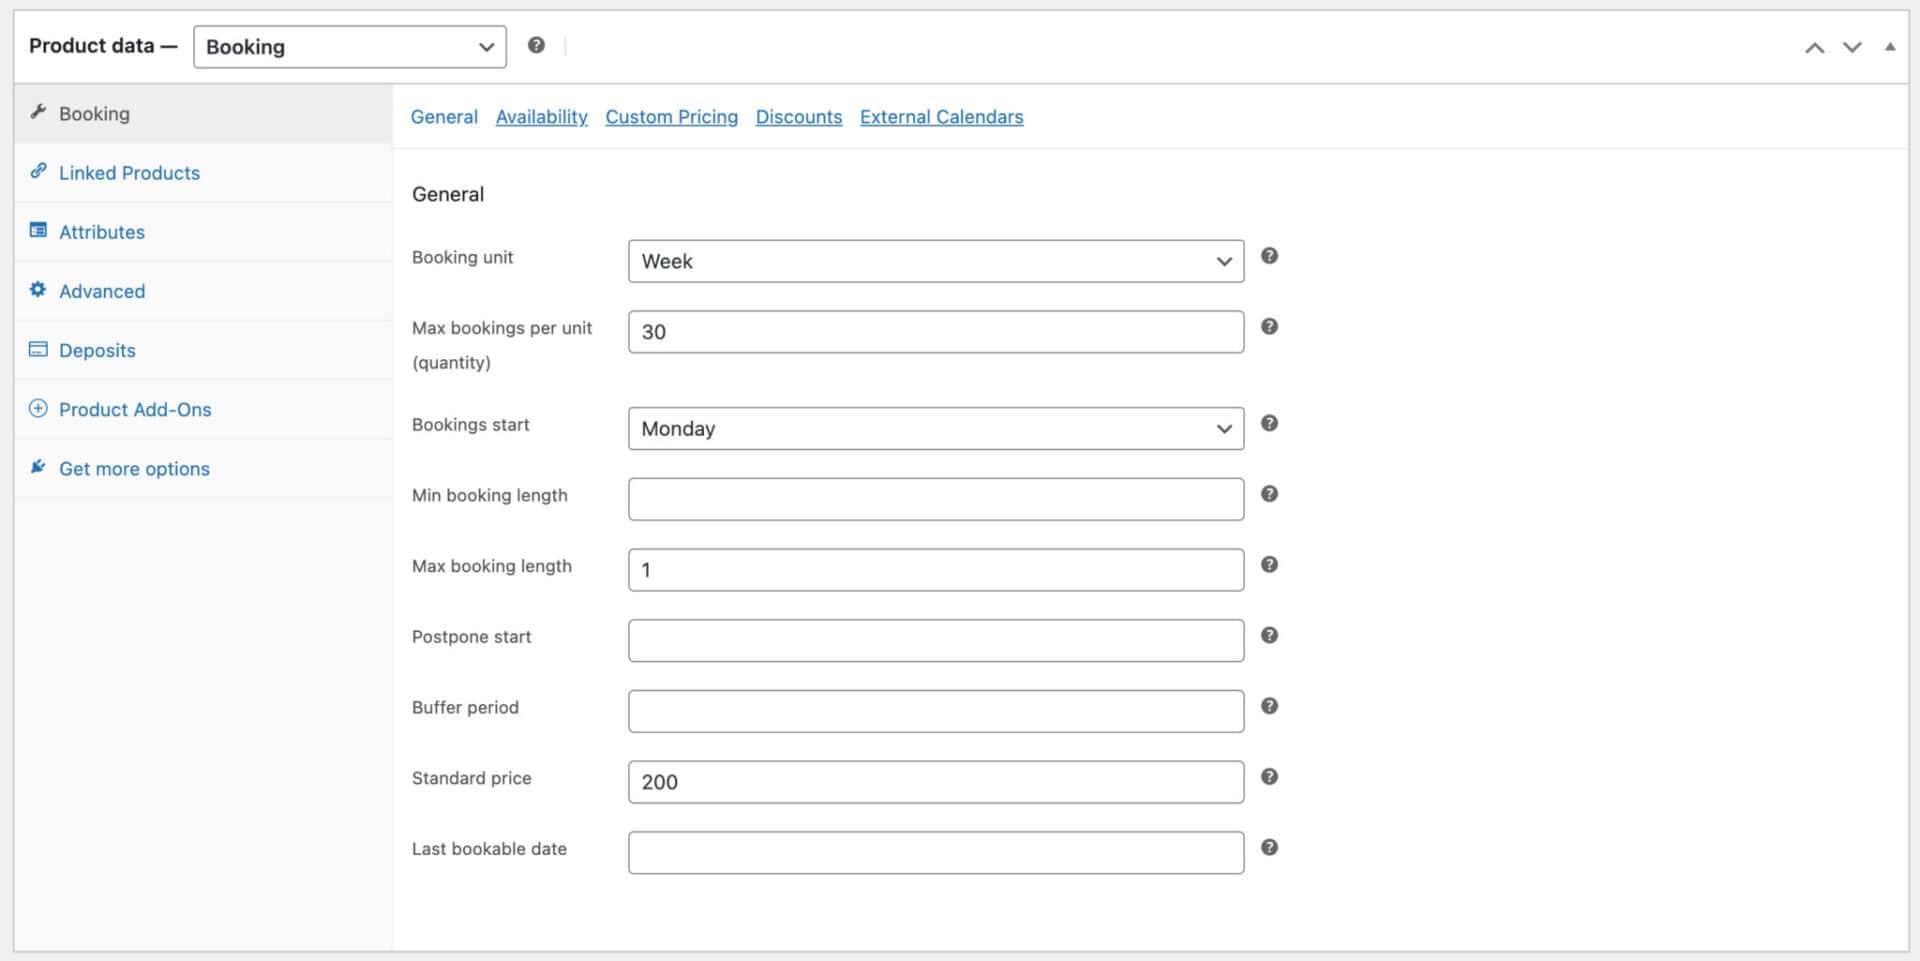
You’ll see that you have some additional options, including:
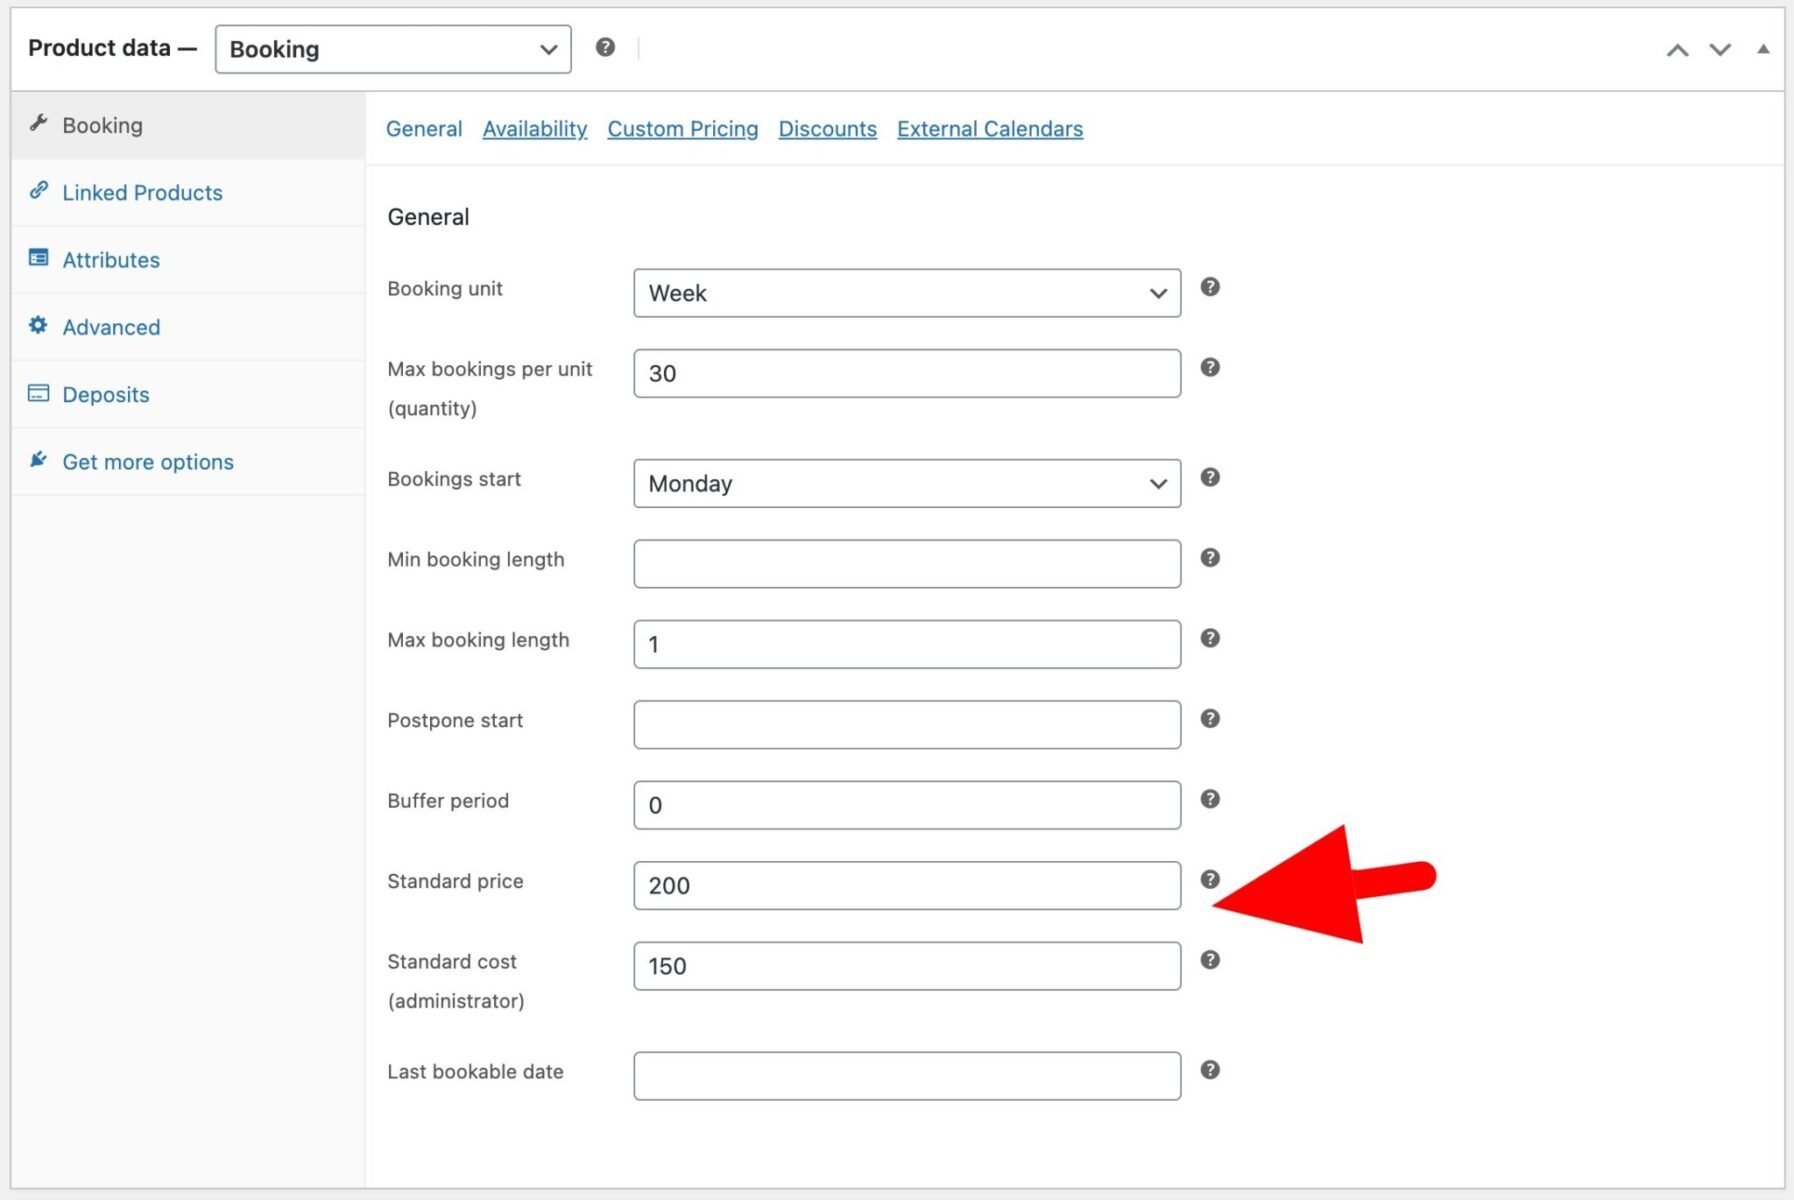
- Booking unit: you can choose from ‘Day’, ‘Night’ or ‘Week’ to specify how the booking duration is measured
- Max bookings per unit: if you have a set number of places on your course, you can specify how many in this setting. In our example, we have 30 places per course – so we entered 30 here
- Bookings start: if your course always starts on the same day of the week, you can specify it here
- Max booking length: you can specify how long your course will run for (based on what you chose in the ‘Booking unit’ setting above)
- Standard price: enter the value per booking unit here. So if your course costs $200 per week, enter 200 here
When we publish the product, users can now book their course using a calendar to pick the start date. They can also choose how many students they’d like to enrol as part of the same booking.
Take a look at the demo product here.
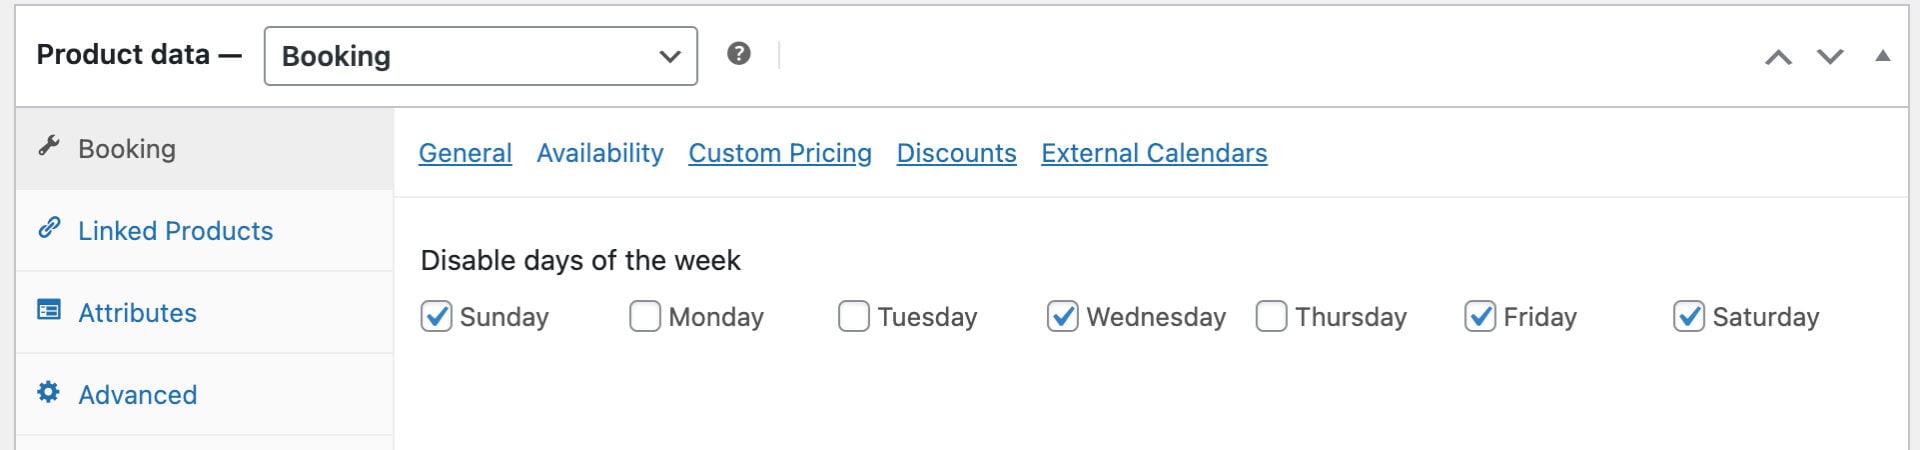
Example #3: Classes on specific days of the week
You might be running the same course or class on different days of the week. So users could book on to Monday or Tuesday, for example. In this example, users can book onto a coding workshop on Mondays, Tuesdays or Thursdays.
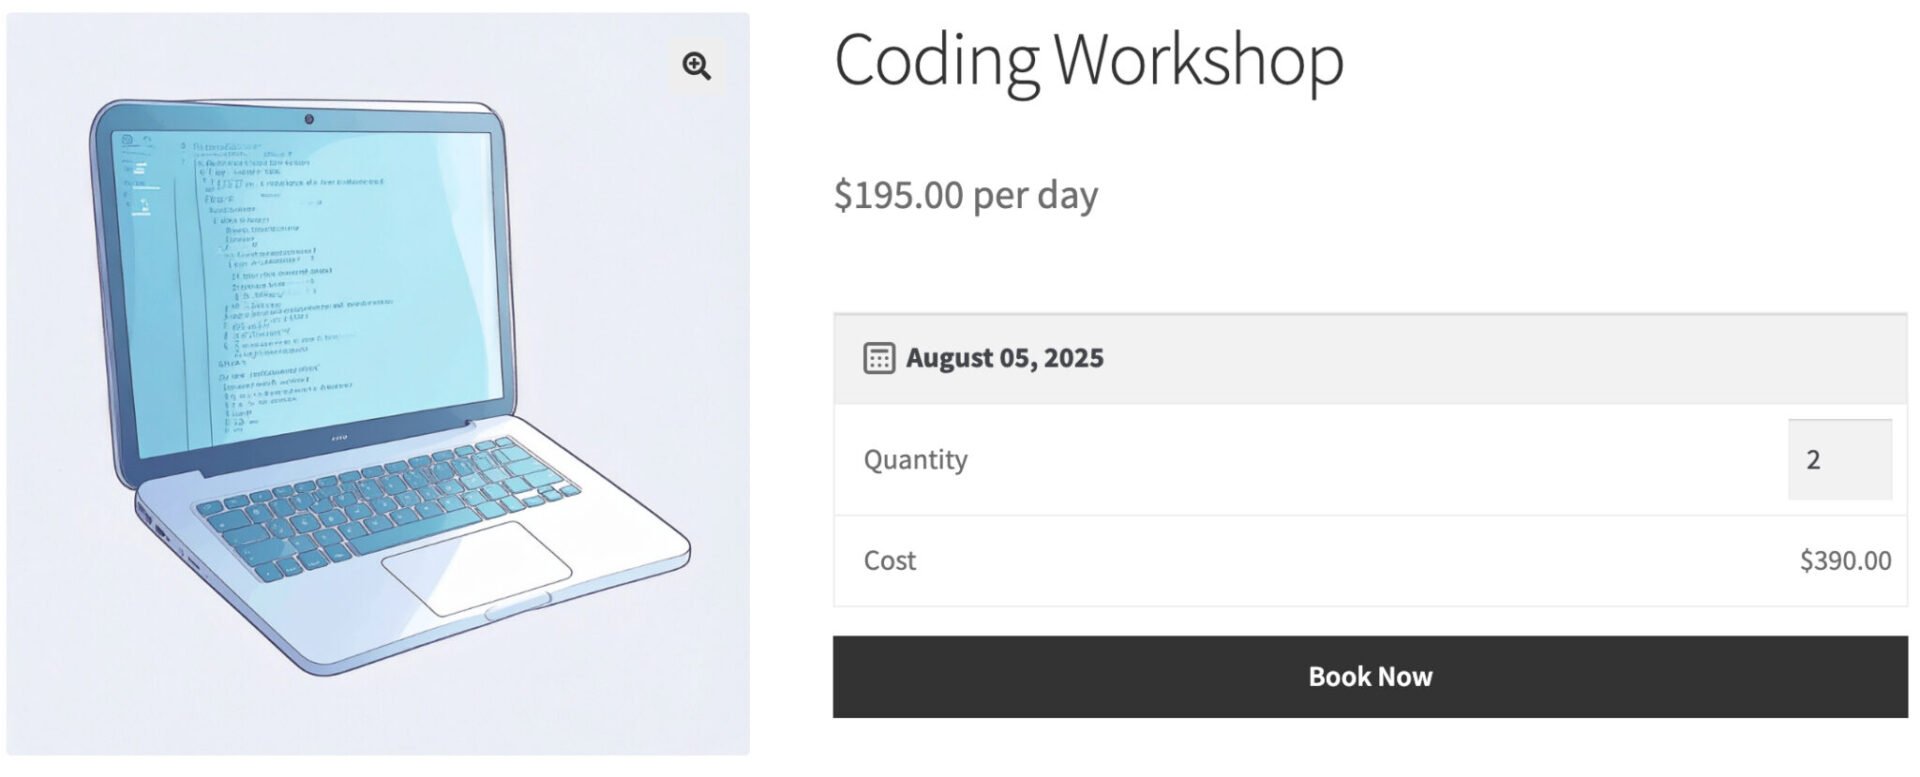
To create a course product that can only be booked on specific days of the week, follow the steps in Method #2 above with the following changes:
- Set ‘Booking unit’ to ‘Day\
- Set ‘Bookings start’ to ‘Any’
Then click the ‘Availability’ tab and disable the days where the course isn’t running.
You can check out the demo product here.
Bonus #1: Add extra options to your course booking pages
Let’s look at a couple of additional features we can add to our course booking pages. In the first example we’ll look at how to collect information from students, like their name. In the second example, we’ll look at how to add extra options to a booking so users can personalize the course – and you can upsell.
Collect student details for enrolment
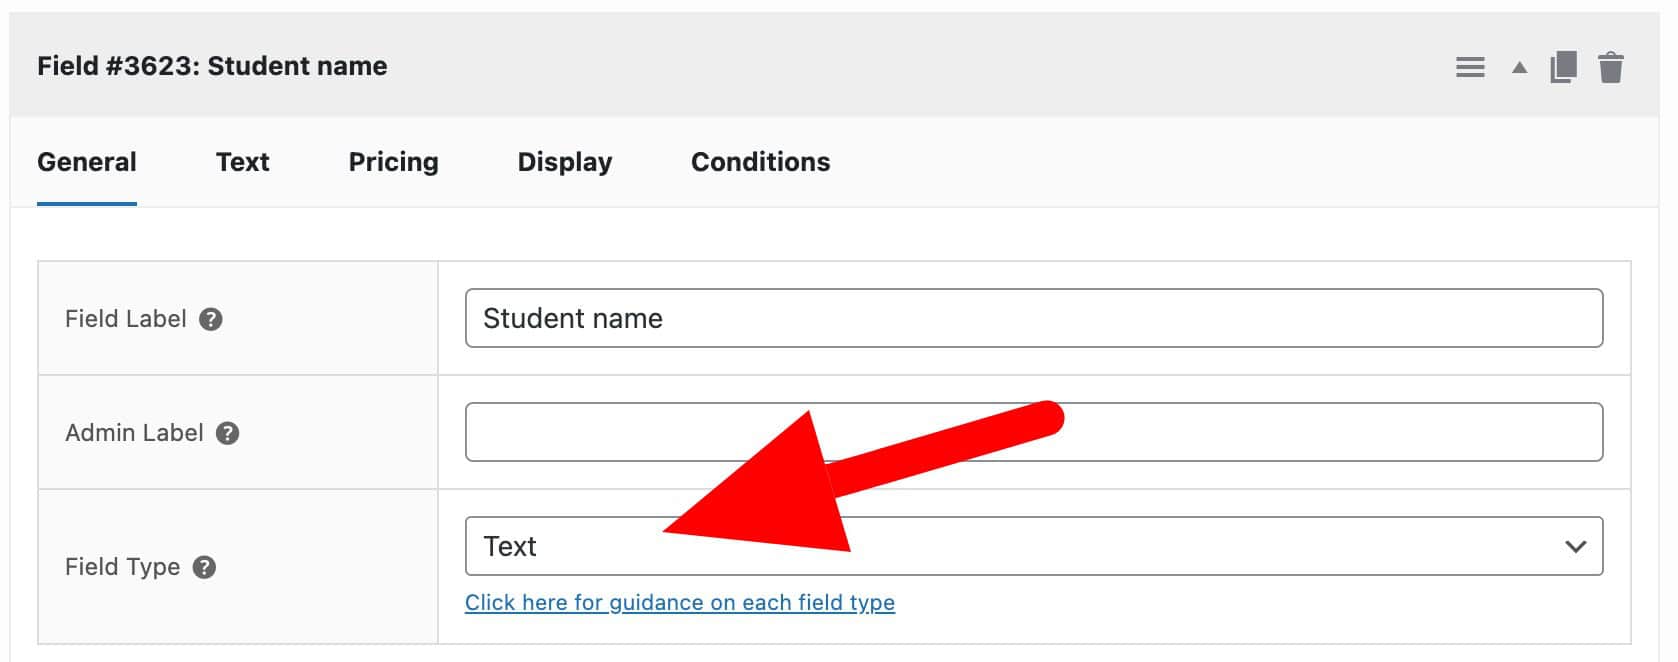
With any of the examples of courses and classes so far, you might want to collect certain information from each participant. You can do this using the WooCommerce Product Add-Ons Ultimate plugin.

WooCommerce Product Add-Ons Ultimate allows you to add extra form fields to product pages – so you can use it to collect enrolment and other details from your course students.
Let’s update our pottery class product from the tutorials above to add a field for the user to enter their name and to describe their experience.

In the screenshot above, you can see that there’s a field to collect the user’s name and for them to register what level they’re at. If they are booking more than one place, they’ll be able to enter the information for all participants.
To add extra fields to your course booking product:
- Click the ‘Product Add-Ons’ tab in the ‘Product data’ section
- Click ‘Add Group’ then ‘Add Field’
- Select the field type – in this case, ‘Text’ – and add a label
- Repeat for any other fields you want to add
If you want to collect the same information for multiple users, enable the ‘Repeatable’ option for the group:
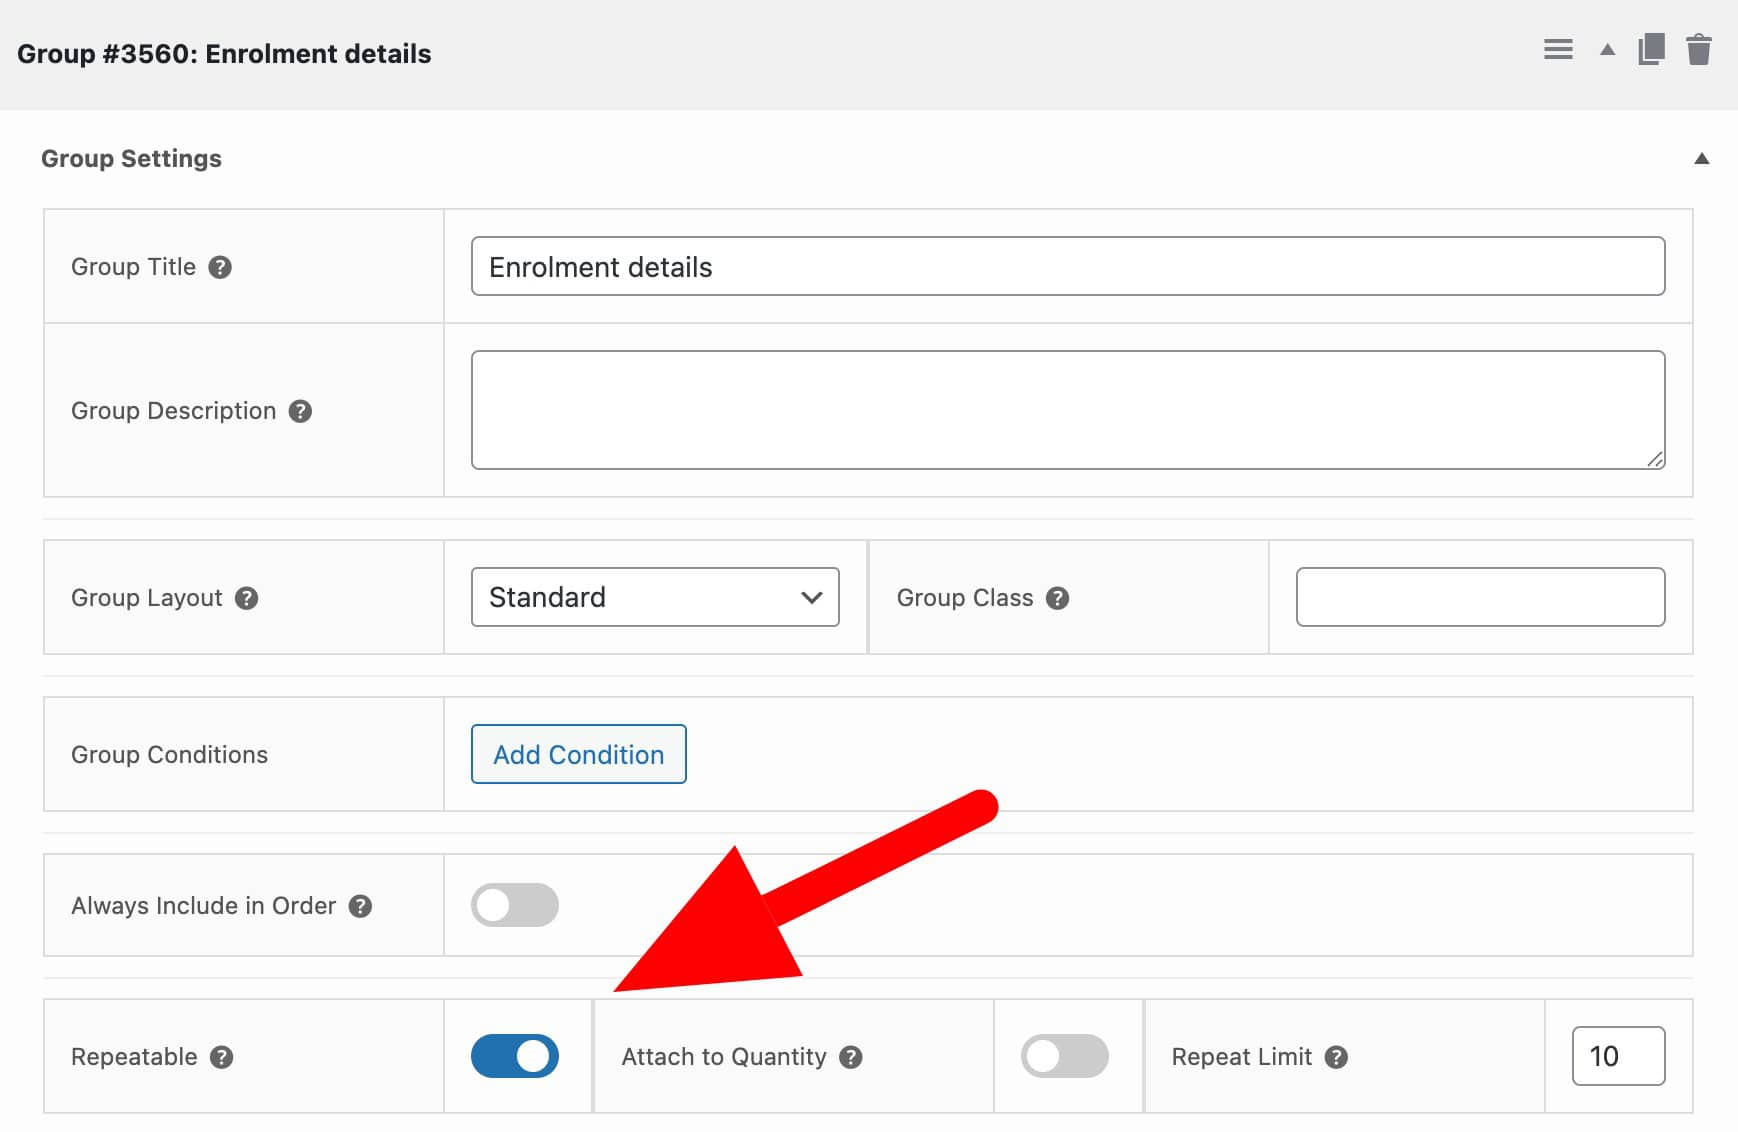
Now, when a user books, they can add the names of any students who will be attending.
Upsell optional extras when users book
Product Add-Ons Ultimate can also be used to sell upgrades, merch and additional options for your courses and classes.
In this example, users can book a week on a writer’s retreat and opt to upgrade their room for an additional charge.
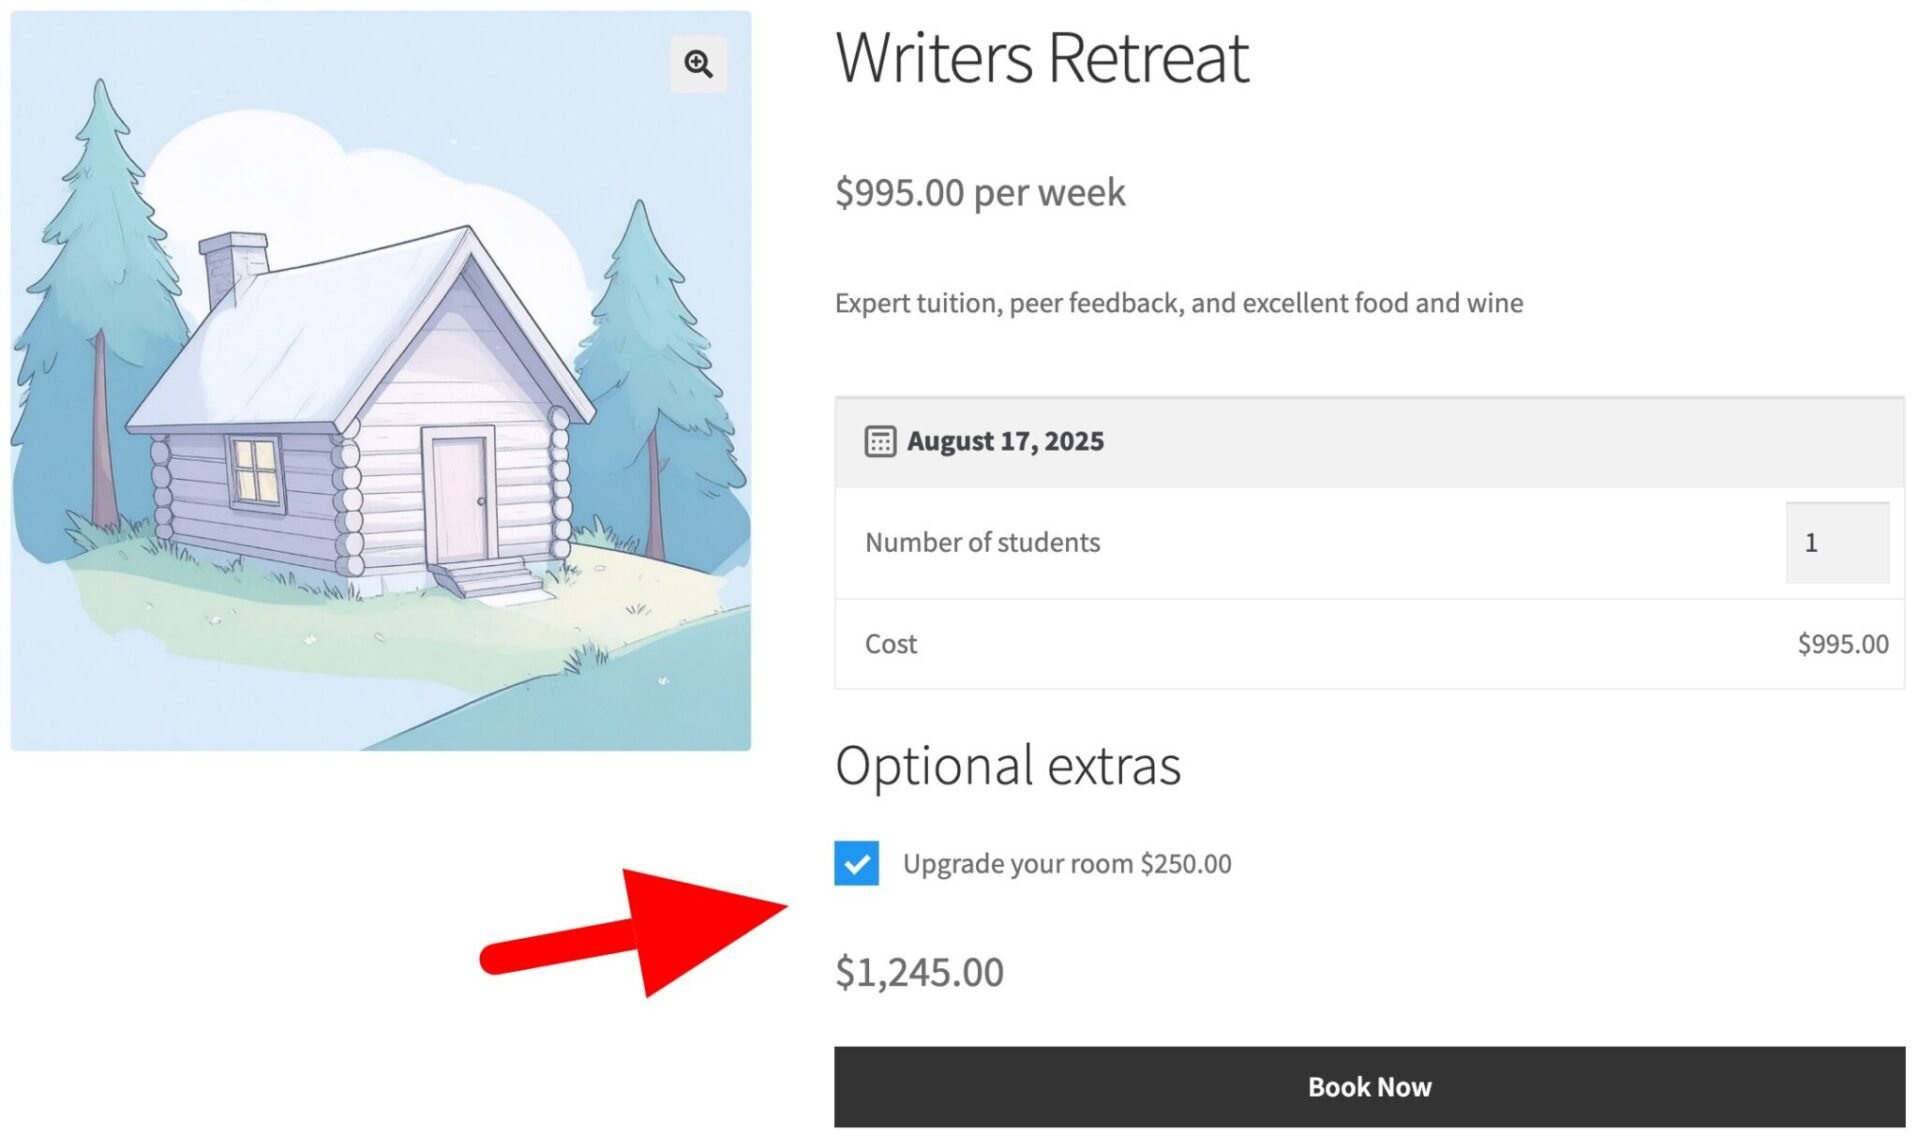
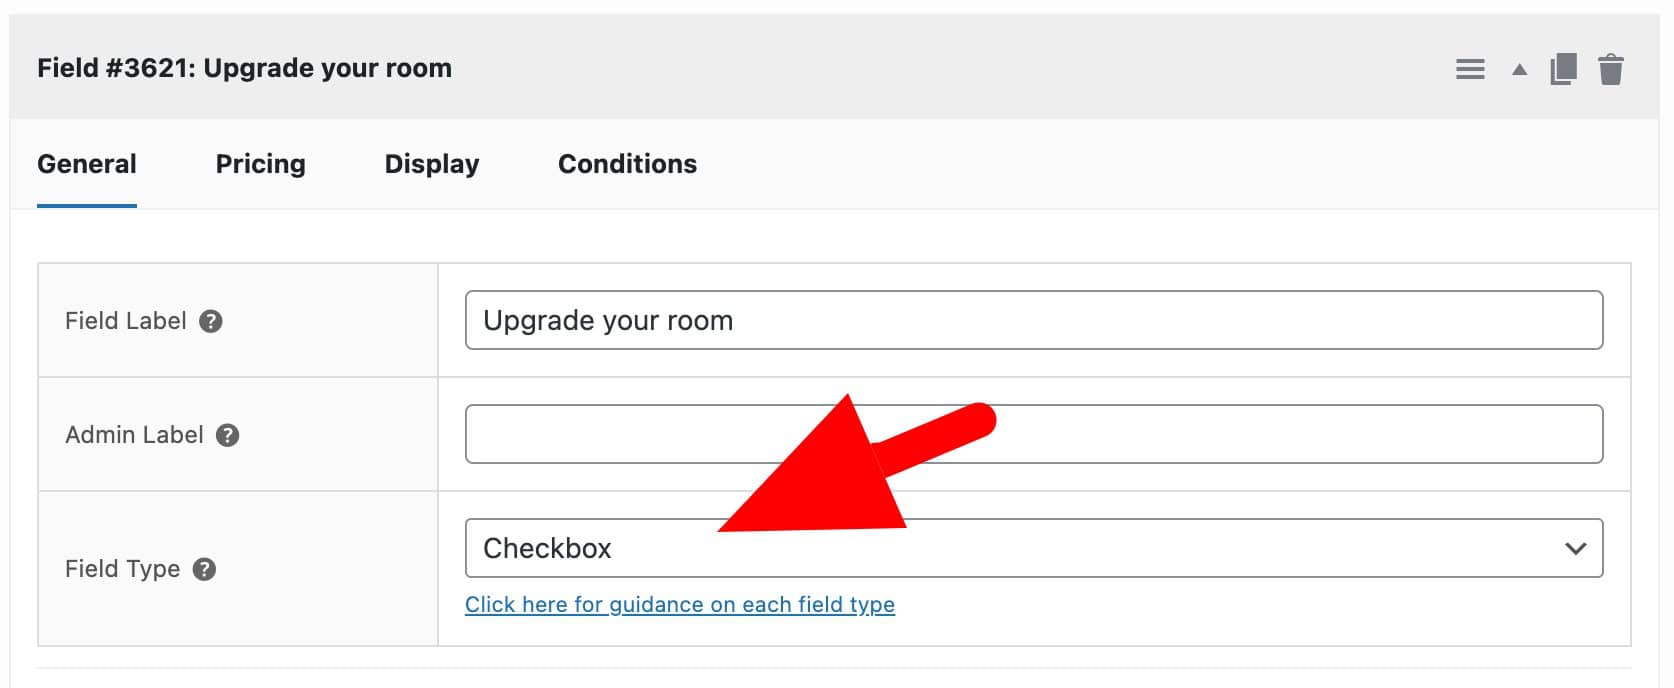
To add a simple checkbox option like this:
- Click the ‘Product Add-Ons’ tab in the ‘Product data’ section
- Click ‘Add Group’ then ‘Add Field’
- Select the field type – in this case, ‘Checkbox’ – and add a label
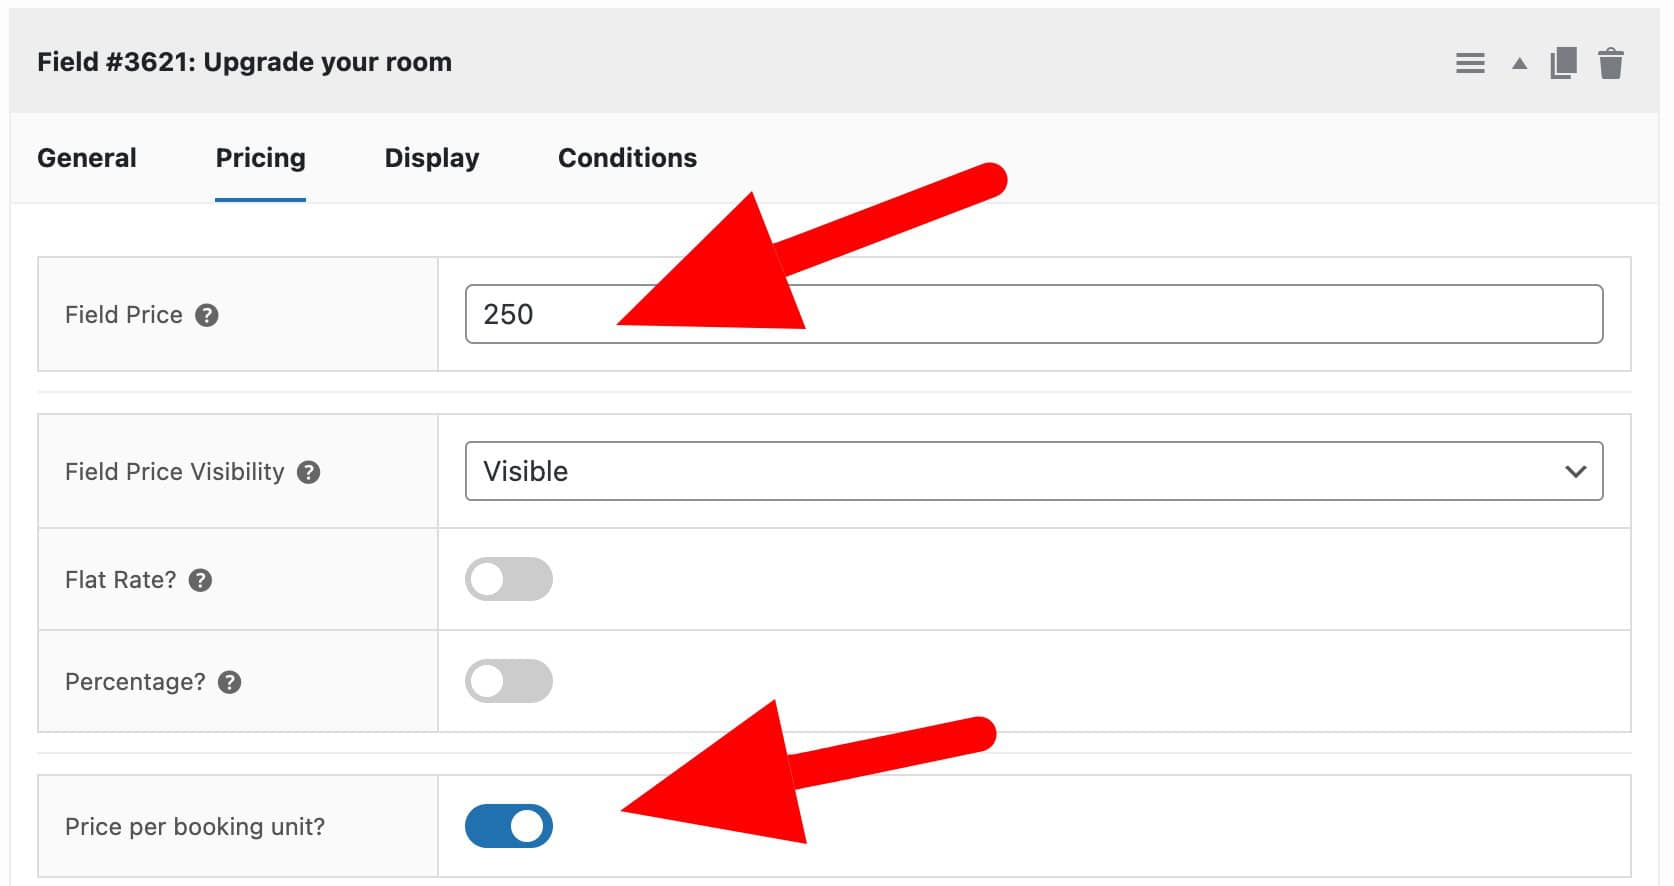
- Set a price for the option in ‘Field Price’
You can use this offer additional training materials, equipment, merchandise – or any other kind of optional extra on your courses.
Bonus #2: Courses with membership perks
So far, we’ve looked at courses that are available to any user. However, you may want to limit availability of your courses to certain users – or to offer special discounts to members.
Offer discounts on courses to members
First, let’s look at how you can provide discounts to certain users for your courses and classes. Bookings for WooCommerce allows you set role-based prices for courses – so a customer with the role of ‘Gold’ could get a different price for the course.
To enable role-based pricing for courses in Bookings for WooCommerce:
- Go to WooCommerce > Settings
- Select which roles should have differential pricing in the ‘Roles’ field

- Edit the course product page
- Enter the discounted pricing for each user role
Offer courses exclusively to members
You can take this a step further and ensure that only members of your site can book courses. To do this, you’ll need a WooCommerce membership plugin: WooCommerce Members Only.
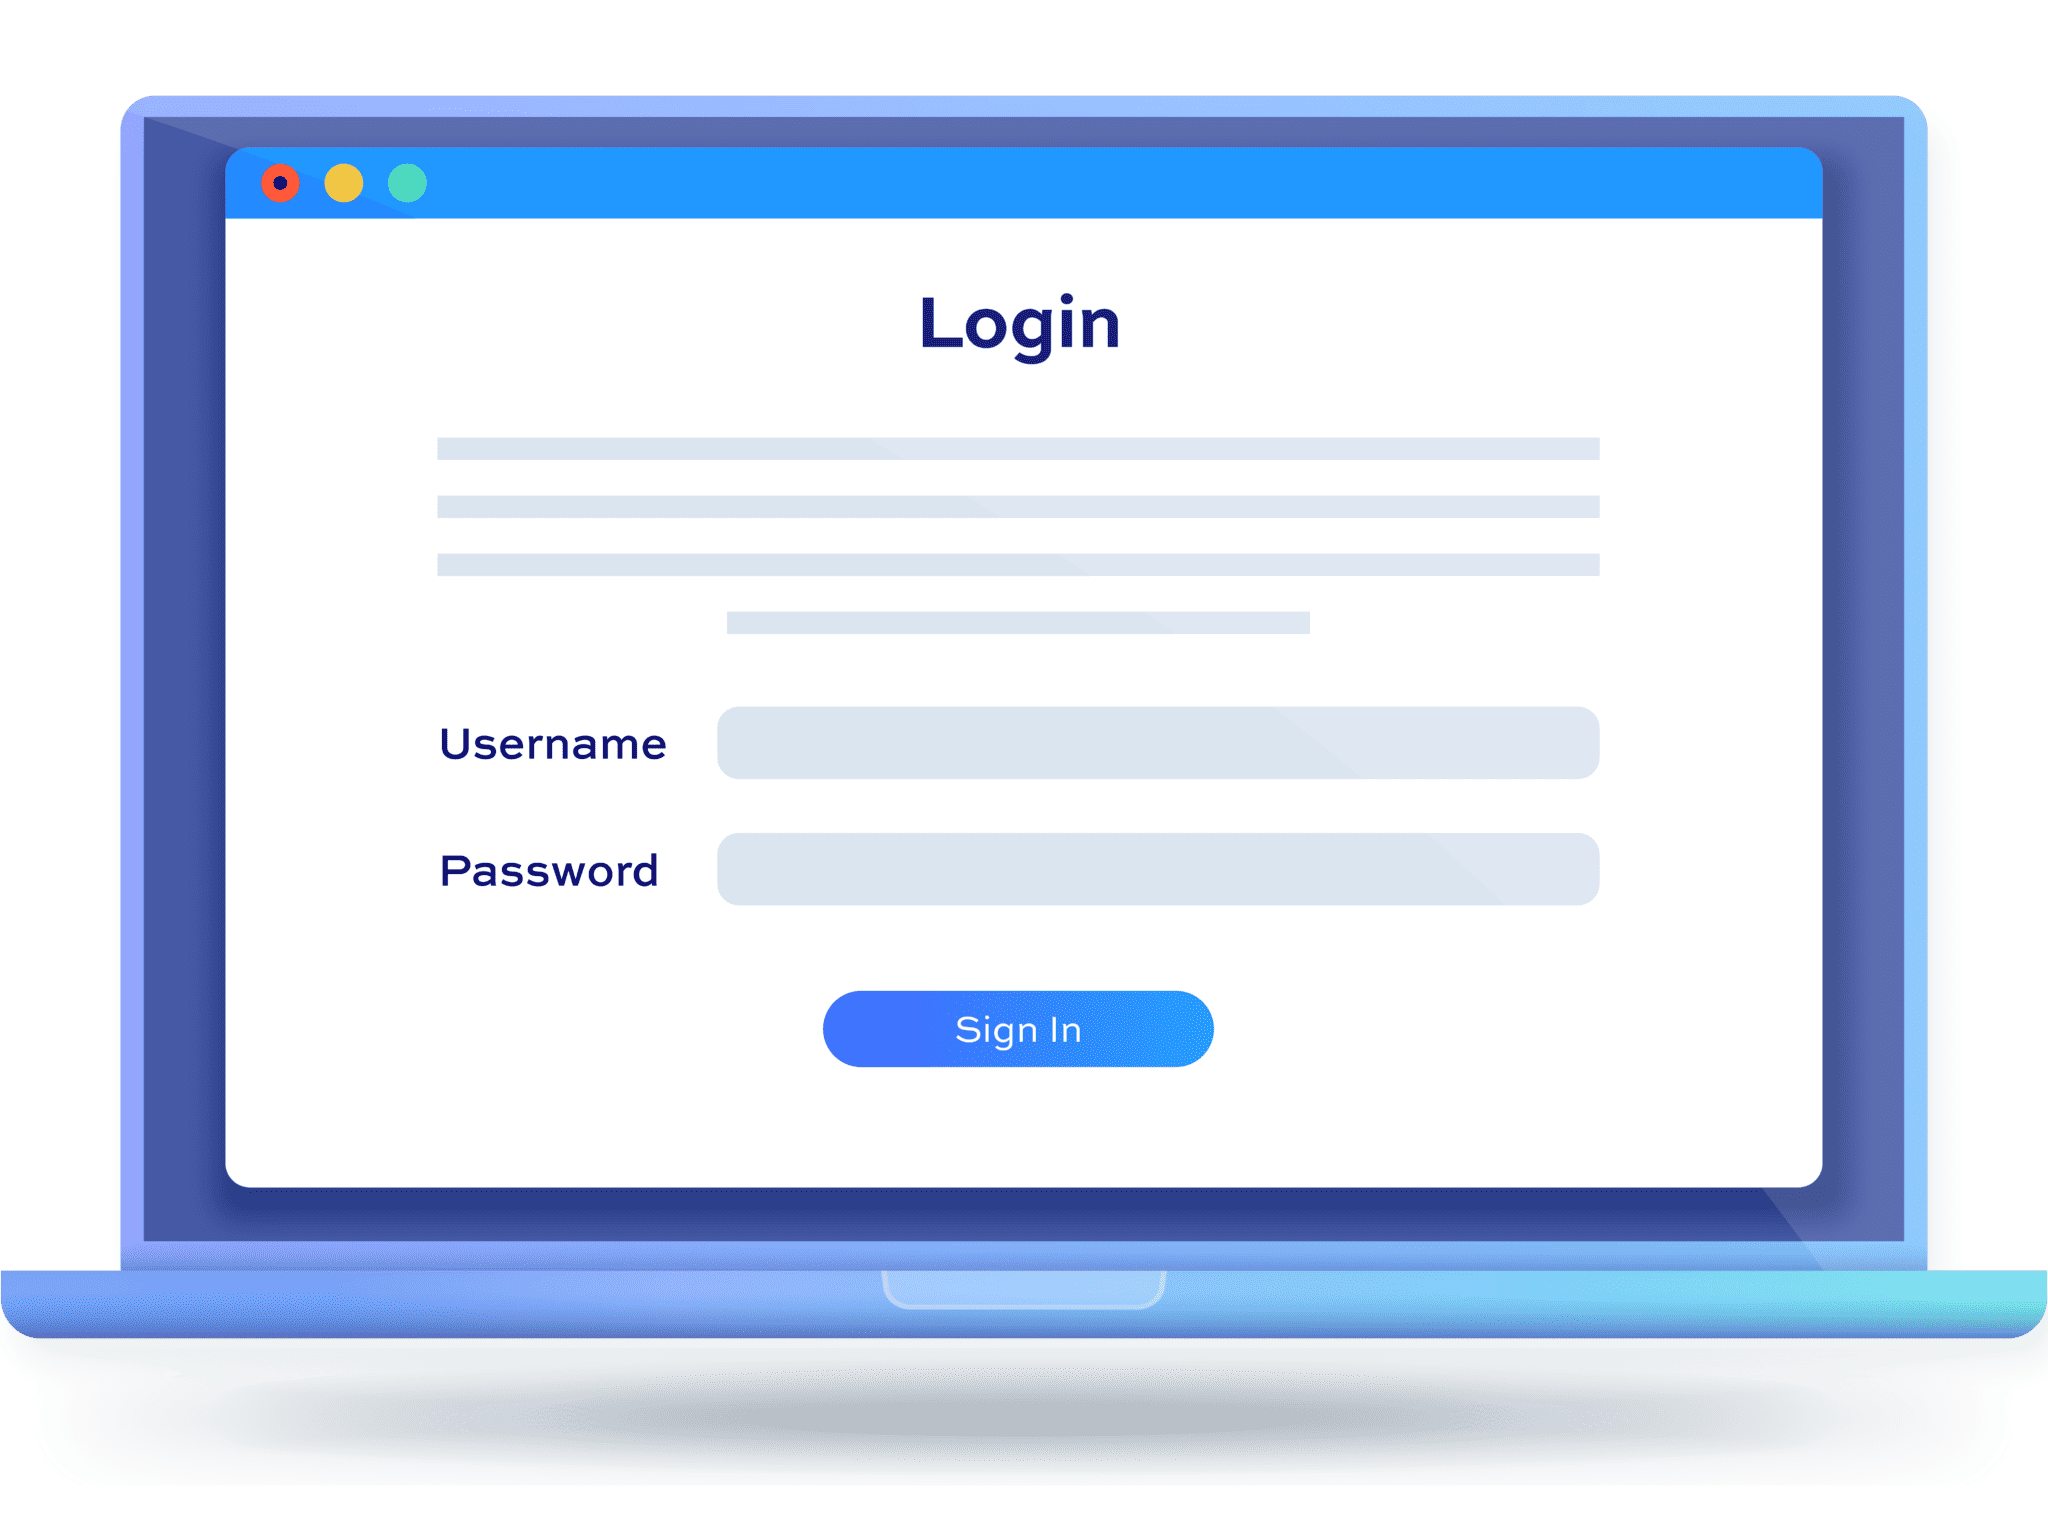
Once you’ve installed and activated Members Only, you can ensure that only members of your site can book your courses.
Define how to limit access to your courses
You can limit access to your courses in different ways:
- Go to Members Only > Settings
- In ‘Restriction Method’ choose from one of the following:
- Log-in status: choose this to prevent guest users from access your courses
- Password: choose this to protect courses from users who don’t have the correct password
- User role: choose this to specify which user roles can access your courses
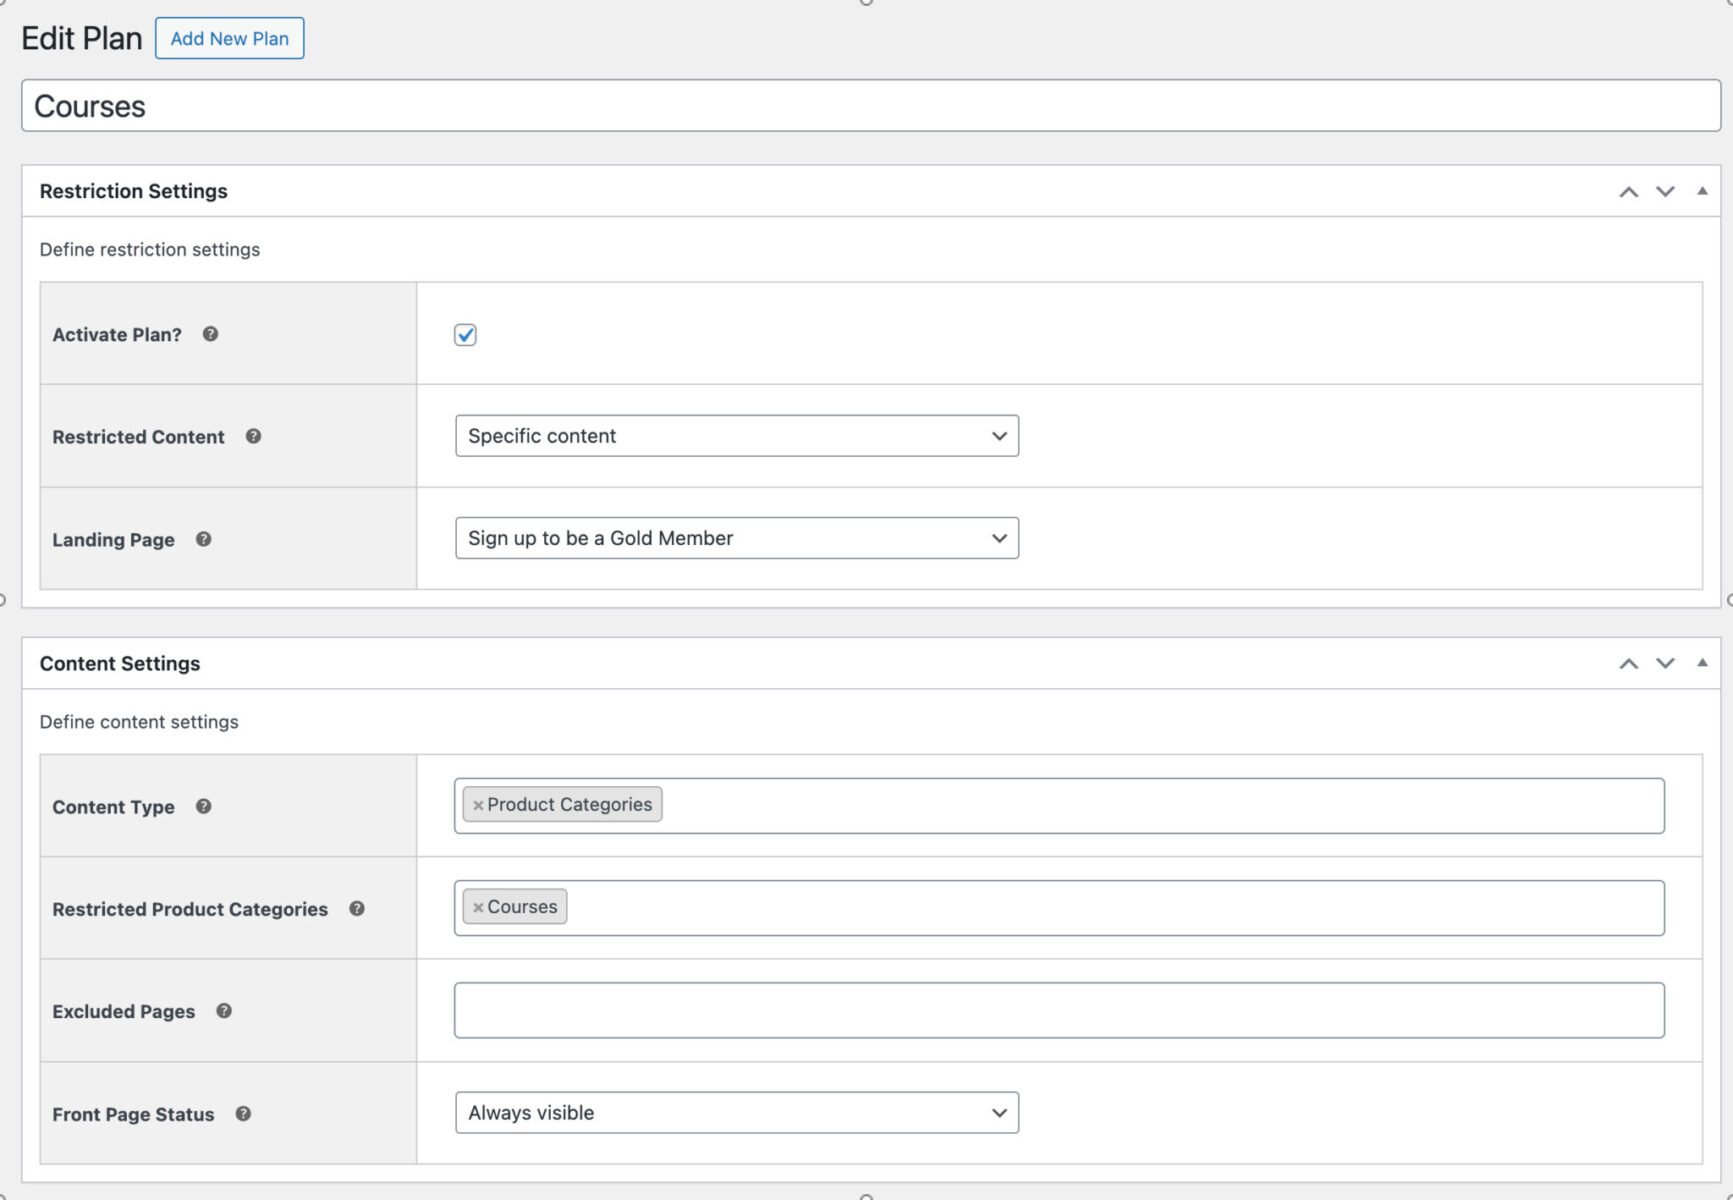
Create a membership plan
Once you’ve defined the restriction method, you can define what courses to restrict:
- Go to Members Only > Plans and click ‘Add New’
- In ‘Restricted Content’, choose ‘Specific content’
- In ‘Content Type’, select ‘Product Categories’
- In ‘Restricted Product Categories’, choose the relevant categories for your courses
Now, only members with the correct permissions will be able to book courses on your site. Find out more about WooCommerce Members Only here.
Use WooCommerce to take bookings for courses and classes – recap
In this article, we looked at how to take bookings for your courses and classes in WooCommerce. We looked at a simple method using just WooCommerce, then more advanced methods using the Bookings for WooCommerce plugin.
Bookings for WooCommerce allows you take multiple bookings for courses. Users can select their dates using a calendar – and you can limit the number of places per course so that you never get overbooked.
Bookings for WooCommerce is compatible with every WordPress theme and page builder. It’s backed by our world-class support – and a 14-day money-back guarantee, so you can try it without risk.