Selling beauty products online – your complete guide
This article will walk you through all aspects of selling beauty products and cosmetics online. We’ll be using the world’s most popular ecommerce platform – WooCommerce.
Whether you are already running a bricks and mortar beauty product shop and you want to expand online, or you are looking to start selling makeup and cosmetics from home, this tutorial should tell you everything you need to know about going online.
We’ll look at how to get started with WooCommerce, plus several extended features.
These include how you can offer discounted pricing to certain customers and even create an entire wholesale area if you wish. This will apply to you especially if you are running a B2B beauty products business.
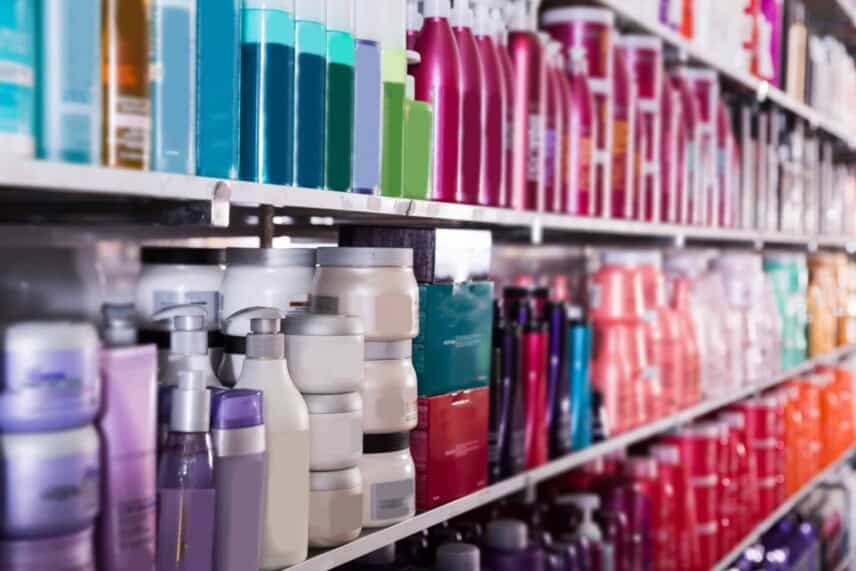
Selling beauty products online makes it easy for your customers to buy from you, especially if you have a large stock range and part of this tutorial will show how you can display your products to make it easier for customers to find what they want.
There’s a demo site for you so that you can see how each aspect of the store works in real life.

Let’s get started.
Using WooCommerce to sell beauty products online
If you don’t already know, WooCommerce is the most popular ecommerce platform in the world. It’s been downloaded over 120 million times from the WordPress plugin repository.
Its popularity means that there’s a huge community around WooCommerce. This in turns means that you have great choice around things like themes and plugins.
Setting up WooCommerce
For how to set up WooCommerce, you can take a look at this detailed guide on how to set up WooCommerce. This includes a seven point guide to installing and configuring WooCommerce.
Choosing a theme
It’s sometimes feels that there are more WordPress themes than there are stars in the sky.
For the demo site, I’ve just used Storefront, the default WooCommerce theme, but of course you’re welcome to choose whichever theme you like.
Storefront is a great place to start because it’s simple to use. You can add all your products and get the site running – then choose a different theme afterwards if you like.
Adding your products
Once you’ve installed and set up WooCommerce, you can start to add you products. There’s a tutorial here on how to add products to WooCommerce.
If you have a lot of products, you can also consider importing them through a CSV file. WooCommerce has a built-in importer/exporter feature and you can find documentation for that here.
Let’s take a look at extending some features of our store.
Discounts for bulk purchases
Bulk discounts is a common feature for any online store selling beauty products. When a user orders more of a product, they get a discounted price.
We’ll take a look at a number of options for creating discounts in your store. Then we’ll use these options when we look at setting up a wholesale beauty products store online.
First, let’s look at how we can set up bulk discounts in our cosmetics store by using a plugin that’s designed expressly for this purpose: WooCommerce Dynamic Pricing and Discount Rules.
How to set up bulk discounts in your cosmetics store
Using the Dynamic Pricing and Discount Rules plugin, it’s easy to set up bulk discounts for our products.
Let’s take a simple example and apply discounts for the following quantities:
- Buy between 11 and 20 items, get a 10% discount
- Between 21 and 50 items, get a 15% discount
- Buy more than 50 items, get a 20% discount
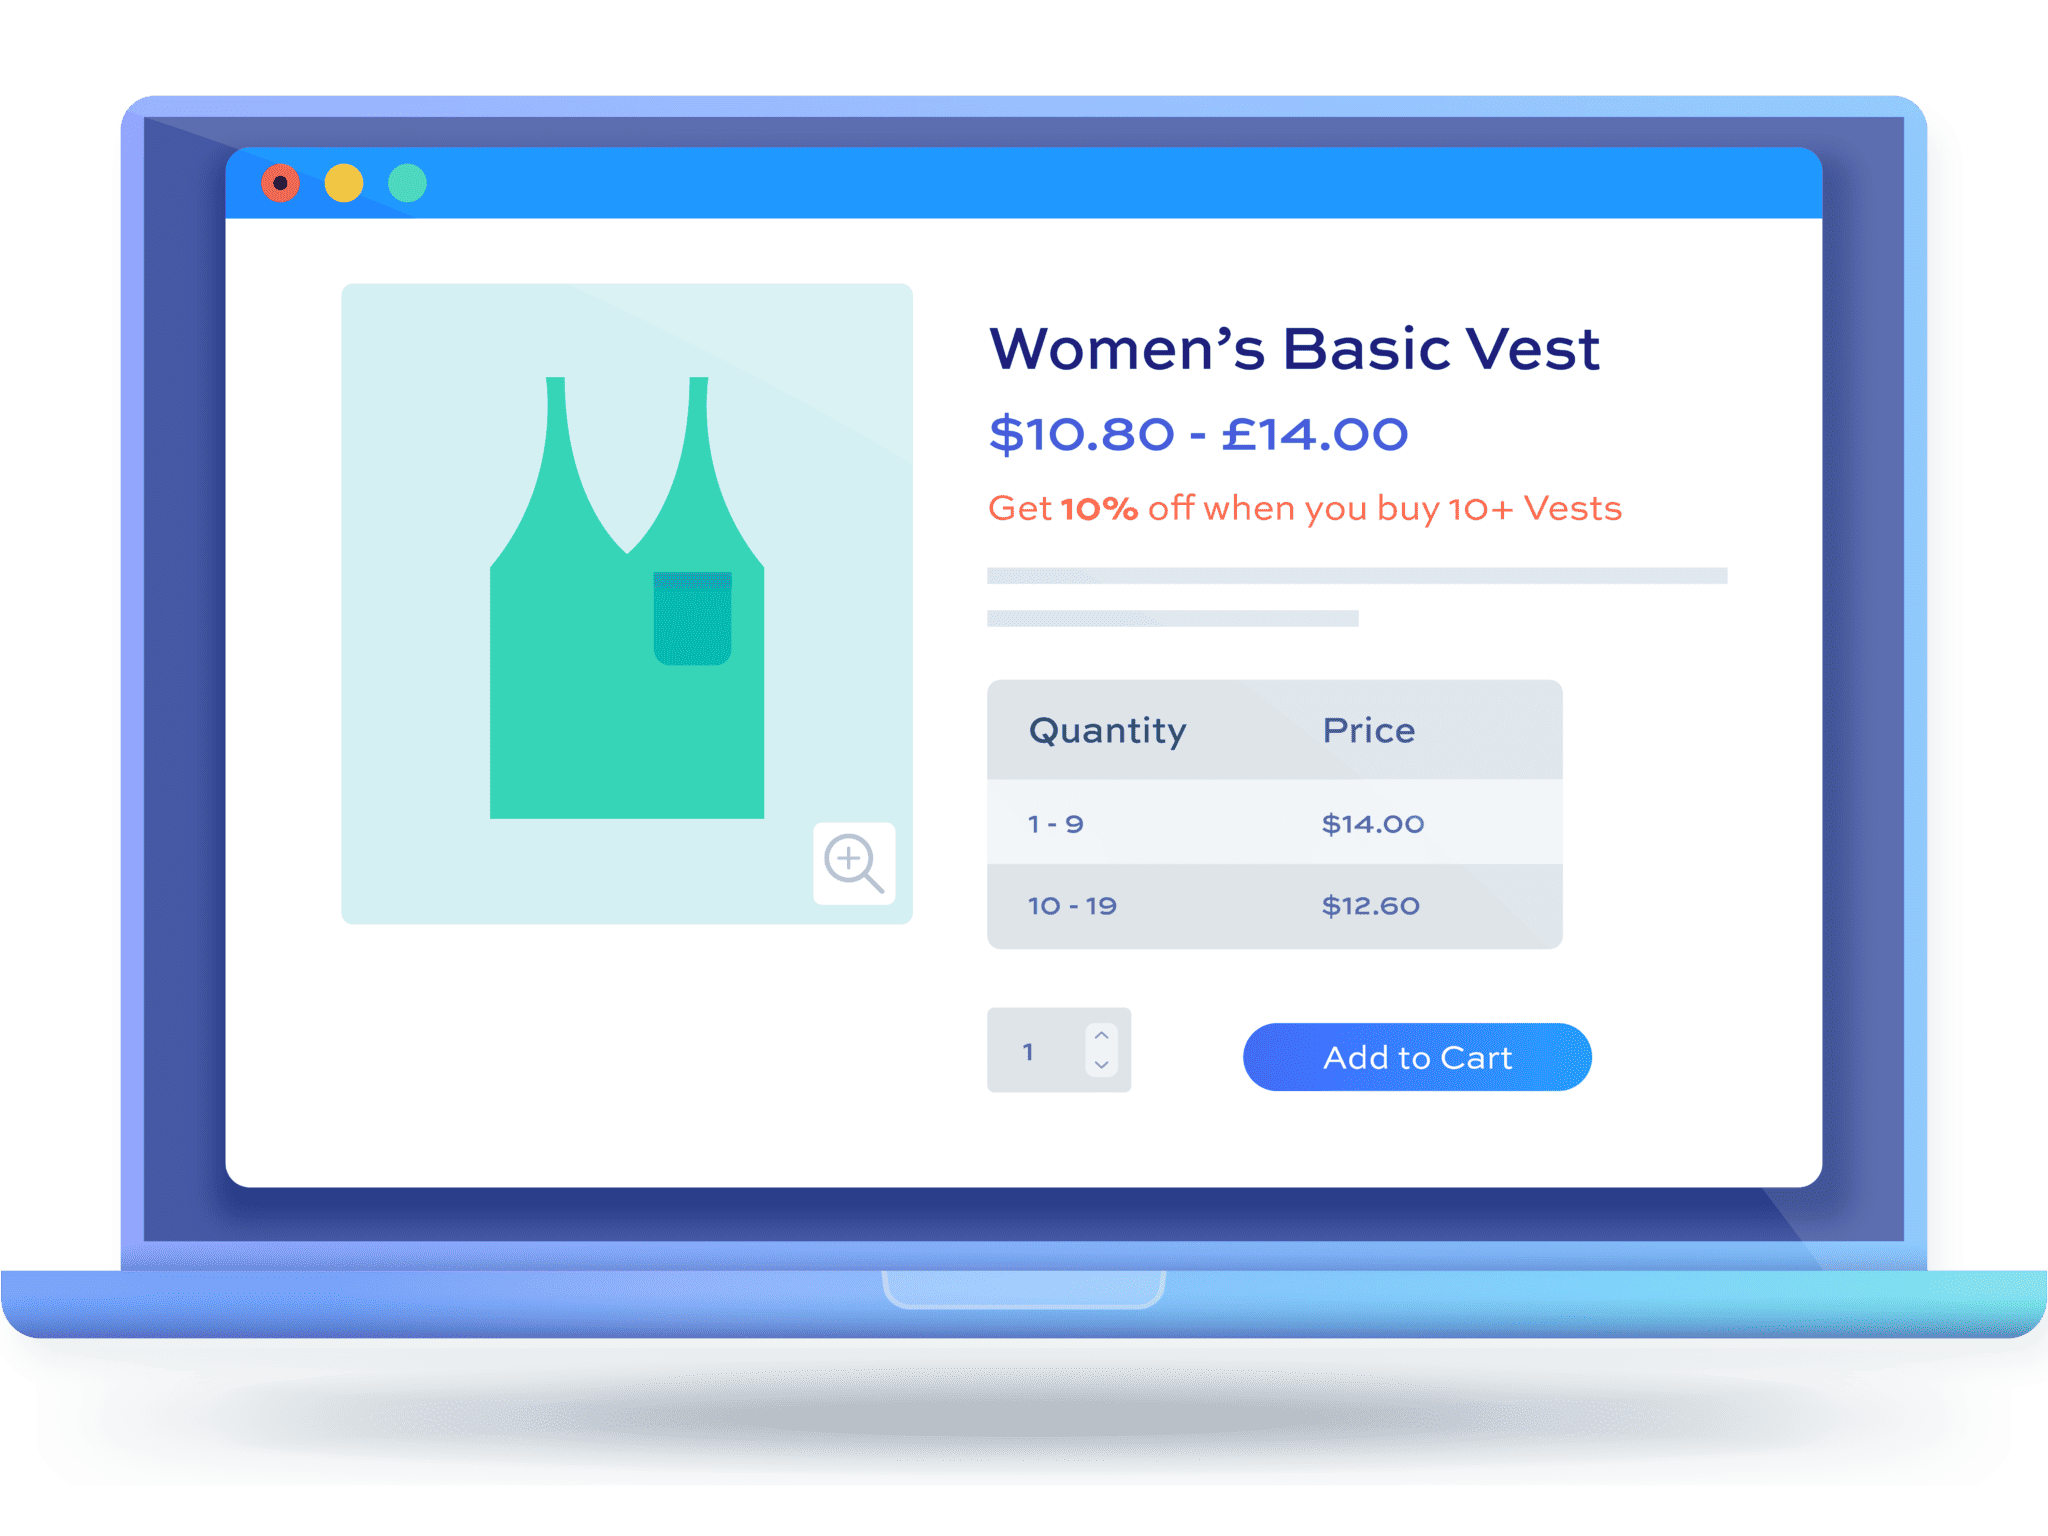
You can see how that looks on a standard product page here.
Notice how the price is displayed as a range: £15.20 – £19.00. And there’s a pricing table showing the different discount levels.
Setting up a bulk discount
To set up your bulk discount, install and activate the Dynamic Pricing and Discount Rules plugin. You’ll get full guidance when you purchase the plugin and you can view how to get started here.
Once activated, here’s how you can create your beauty products discounts:
- Go to WooCommerce > Settings > Fees and Discounts
- Click the ‘Dynamic Pricing’ sub heading
- Click ‘Add Rule’
- Choose ‘Bulk Pricing’ in the ‘Offer type’ field
- Enter your discount tiers
You can see in the settings above, I’ve chosen ‘Percentage Discount’ as the adjustment type. But you can also choose a fixed discount – or even to add a fixed or percentage fee.
Setting different discounts for different products
Dynamic Pricing and Discount Rules allows us to be flexible in how we apply discounts in our store.
The discount rule I created above will apply the same discounts to all products. But maybe we want to have different discounts for different products and/or categories.
To create different discounts by product:
- Update the rule we made above so that the ‘Applies to’ field is set to ‘Specific categories’. (You could set this to ‘Specific Products’ instead if you wished).
- In the ‘Buy Categories’ field, enter the categories that should receive the discount. The rule will apply to all the products in this category.
- Click ‘Save changes’
You can create multiple rules with different discounts that will apply to different products and categories.
Related Tutorial
You can take a look at this article for more details about bulk discounts in WooCommerce

Other types of offers
You might also plan to run other types of promotions when you’re selling your beauty products online. A typical example is ‘Buy One Get One Free’.
To create a ‘Buy One Get One Free’ offer in Dynamic Pricing and Discount Rules, add a new rule with the following settings:
- Change ‘Offer type’ to ‘Buy X Get X’
- Then enter the number of items that the customer needs to purchase in the ‘Buy’ field – in this case 1
- Enter the number of items that the customer will receive in the ‘Get’ field – again 1
- You can use ‘Percentage Discount’ as the adjustment type and 100 as the amount to discount 100% of the price of eligible items

Now when the user adds two qualifying items to their cart, they’ll get the second one free.

You can be flexible with this type of rule by choosing how many items the user must buy in order to qualify for the deal, how many items the user receives once they qualify, and what sort of discount they get. So you can create ‘Buy Two Get One Half Price’ and so on.
Applying discounts for certain customers
We’ve looked at several options for how you might like to offer certain discounts when you’re selling beauty products online. Let’s now look at how you might offer some or all discounts only to certain customers.
To decide which customers are eligible for discounts or alternative pricing, we’ll use WordPress roles. You can find out more about roles from the link below but essentially they’re a way of giving different users different permissions on your site.
Related Tutorial
There’s a more detailed tutorial on user role pricing here

Creating differential pricing for customers when selling beauty products online
We’ll need another plugin, WooCommerce Members Only, to allow us to apply discounts in this way. Luckily, the Dynamic Pricing and Discount Rules plugin and the Members Only plugin are bundled together at a discount. They’re available as the WooCommerce Wholesale Plugin Bundle:
WooCommerce Wholesale & B2B Plugin Bundle
Create a wholesale or B2B store in WooCommerce
With both these plugins installed and active, we’ll look at some different methods to apply pricing adjustments for different users.
Applying bulk discounts by user role
Let’s look at a couple of quick scenarios.
Firstly, let say that we only want to apply a bulk discount to certain users. The way to do that is to assign those users a certain role. Then you can update the bulk discount rule so that it only applies to that role.
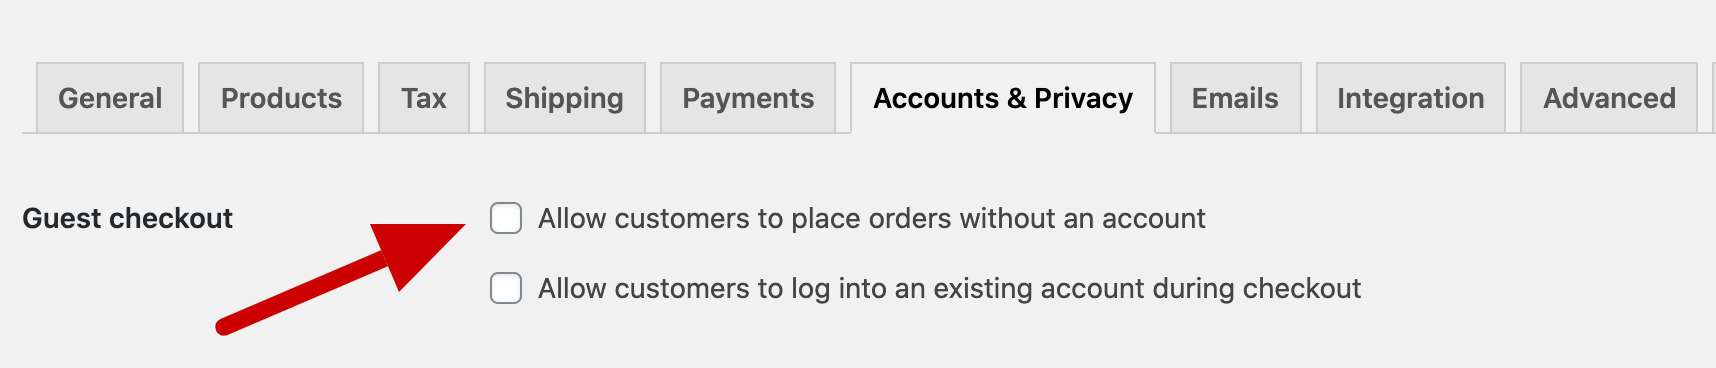
Note that for all role-based pricing to work, you need to require the user to log in to make a purchase. To do so:
- Go to WooCommerce > Settings > Accounts & Privacy
- Ensure the ‘Allow customers to place order without an account’ field is unchecked
How to create a new user role
The first thing we need to do is to create a new role for our users who will have preferential pricing. We do this via the Members Only plugin:
- Go to WooCommerce > Settings > Members Only > User Roles
- In the ‘User roles’ field select ‘Customer’
- Then in the ‘New role name’ field enter the name of your new customer role. In this case, I’ve called the new role VIP Customer
- Click ‘Duplicate role’

This will create a new user role called VIP Customer.
How to assign a new role to a user
Now we need to assign this role to any customers that we want to offer our preferential bulk discount to. To change a customer’s user role:
- Go to Users
- Find the user whose role you want to change
- Select the new role from the ‘Role’ field

Defining role-based bulk discounts
Finally, we just need to update the bulk pricing rule that we created earlier:
- Go to WooCommerce > Settings > Fees and Discounts > Dynamic Pricing
- In the ‘Roles’ field, enter the roles that are eligible for the discount

Now, only users with the role of VIP Customer will get the special bulk discounts.
Setting different product prices by role
Let’s briefly look at an alternative way to offer your customers different pricing based on their role.
Instead of applying discounts, we can actually define different product prices for each user role. So a normal customer would get one price but a VIP customer would get a different price.
To enable role-based pricing for your beauty products:
- Go to WooCommerce > Settings > Fees and Discounts > User Role Pricing
- Enter the roles that should have alternative product prices in the ‘Roles’ field
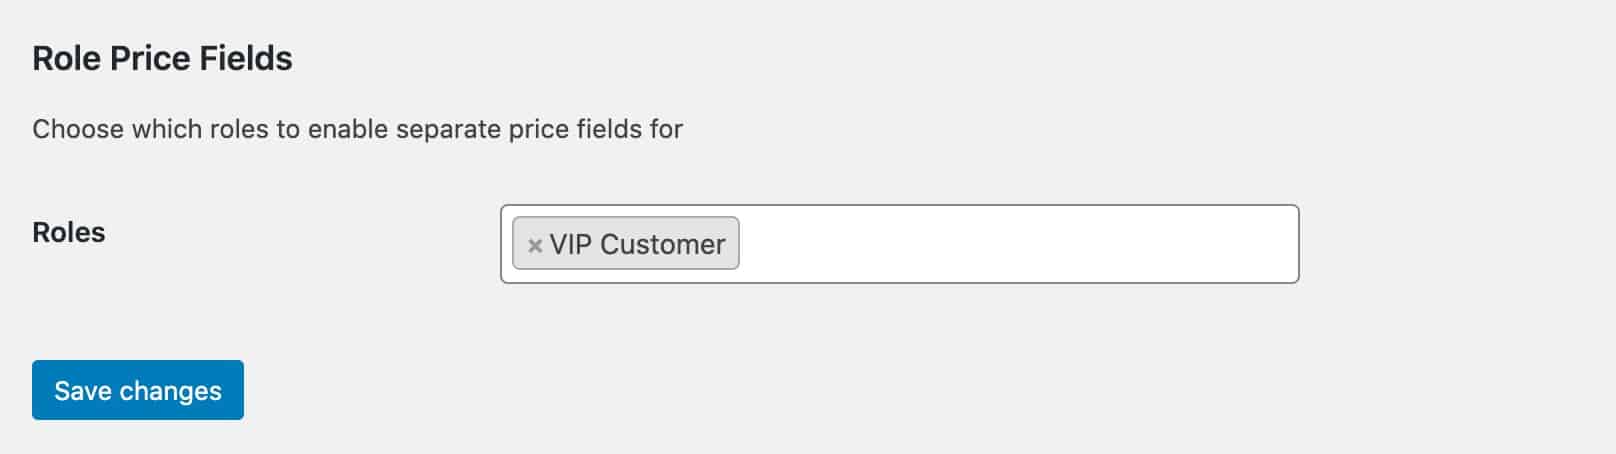
Click ‘Save changes’.
Now go to a product where you’d like to apply a different price for VIP customers. You’ll see that there’s a new product price field specifically for that user role. Enter the preferential price here.

Now, for this product, standard users will see one price (£15 in this example) and VIP Customers will see a different price (£12.50). You can apply this to as many products as you like.
Our beauty products store is taking shape. We’ve added all our products and created a number of discount scenarios. This all works well if your primary sales channel is retail – but what if you’re selling beauty products wholesale?
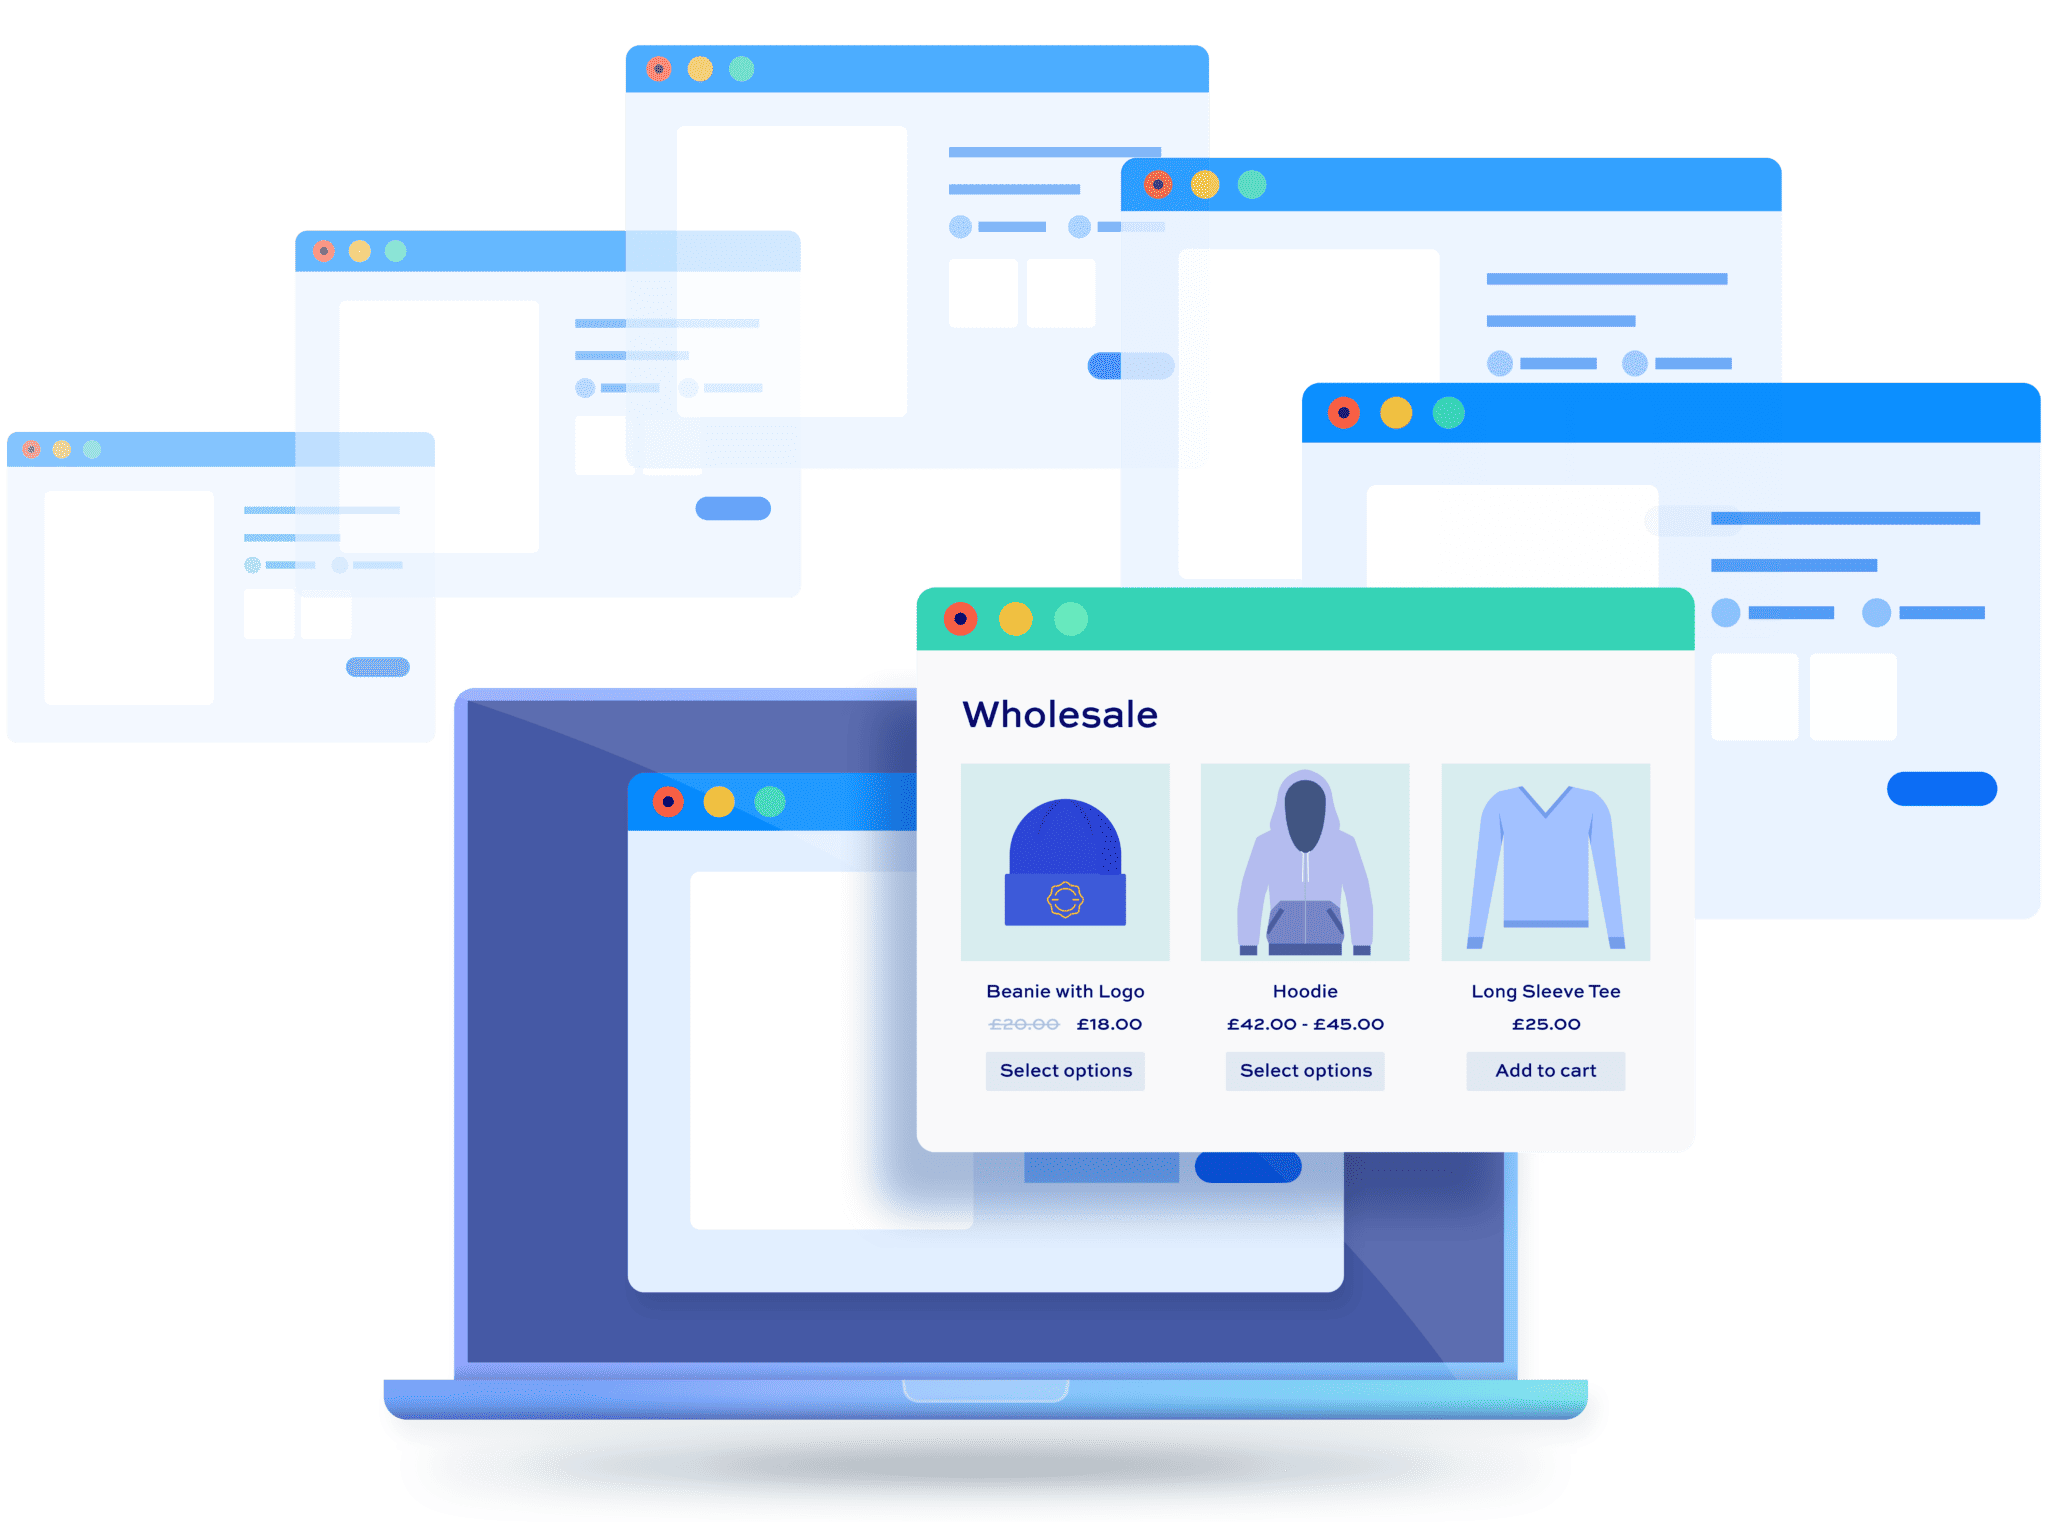
Creating a wholesale beauty products store online
You can decide whether you want your store to be retail only (B2C), retail and wholesale (B2C and B2B), or just wholesale (B2B).
Furthermore, you can decide whether some products are retail only, or wholesale only, or retail and wholesale.
You can offer different prices for different wholesale customers, or offer them all the same prices.
You can choose to hide wholesale products from retail customers, or you can let retail customers see wholesale products but hide the price, or you can let retail customers see wholesale products and prices but just not be able to purchase them.
There are a lot of options for selling beauty products wholesale. Luckily, we’ve already covered a lot of the basics in creating discounts and roles above. We just need the Wholesale Plugin Bundle:
WooCommerce Wholesale & B2B Plugin Bundle
Create a wholesale or B2B store in WooCommerce
Let’s look at a few ways we can extend what we’ve already covered for a wholesale shop.
Creating multiple wholesale customer roles
In your wholesale beauty products store, you might have several levels of wholesale user. Each level is entitled to receive different prices and discounts.
This is easy to accomplish. Just repeat the steps above to create new user roles for each level.
Then either create bulk pricing rules for each user role or assign different prices for each role.
Here’s an example product which has different prices for Wholesale Level 1 Customer and Wholesale Level 2 Customer roles. Of course, you can name your roles however you like.

Restricting wholesale products from retail customers
There are several options for choosing how to show or hide wholesale products from non-wholesale customers. Let’s have a look at couple of those options.
Hiding all wholesale products
In the first scenario, we have different products available to wholesale customers, which we want to restrict from non-wholesale customers.
In order to hide wholesale products from retail customers:
- Go to Products > Categories and create a new category called ‘Wholesale’
- Assign all your wholesale products to this category
- Go to WooCommerce > Settings > Members Only
- Set ‘Restriction Method’ to ‘User Role’
- Change ‘Restricted Content’ to ‘Specified Categories’
- In the ‘Restricted Categories’ field, enter the categories that you wish to keep hidden
- Then in the ‘Permitted User Roles’ field, enter the roles that are allowed to see the restricted categories
- Finally, check the ‘Hide In Archives’ setting

Now, only customers with one of the wholesale user roles will be able to see the wholesale products.
Preventing retail customers from purchasing wholesale products
The second scenario is a slight variation of the first. In this version, we don’t mind if our retail customers see wholesale products, we just don’t want them to be able to buy them.
So in the place of an ‘Add to Cart’ button we’ll display a button that links to the registration form. To do this, change the settings from the first scenario above:
- Deselect ‘Hide In Archives’
- Enable ‘Access Product Pages’
- Enter some text to replace the ‘Add to Cart’ text, e.g. ‘Log in to purchase’
- Check the option to ‘Redirect from Add to Cart Button’. This will redirect the user to the log in page when they click the button
- Finally, select ‘Hide Price’

Now the user can see the product but they’re prompted to register or log in.

Related Tutorial
You can find out more about hiding products from users in this article

Approving new registrations
As the owner of a store selling wholesale beauty products, you’ll want to control which users can purchase at wholesale prices. You might also want to ensure that you approve any new registrations.
Enabling user approval
If you would like to manually approve or reject every new user registration on your site:
- Go to WooCommerce > Members Only > Registration
- Check the ‘Enable User Approval’ option
Now you’ll get notified of every registration by email. You’ll be able to click a link on the email that will approve or reject the registration.
Registration fields
You can also set some different options on the registration form if you like. For one thing, you might want the user to select what type of customer they are – e.g. retail or wholesale.
You might also want them to enter further details about themselves, including their billing addresses.
Finally, you might want to ask them for additional information like their VAT number.
For all this:
- Go to WooCommerce > Settings > Registration
- In ‘Additional Registration Fields’, check which fields should appear on the registration form and which are required fields
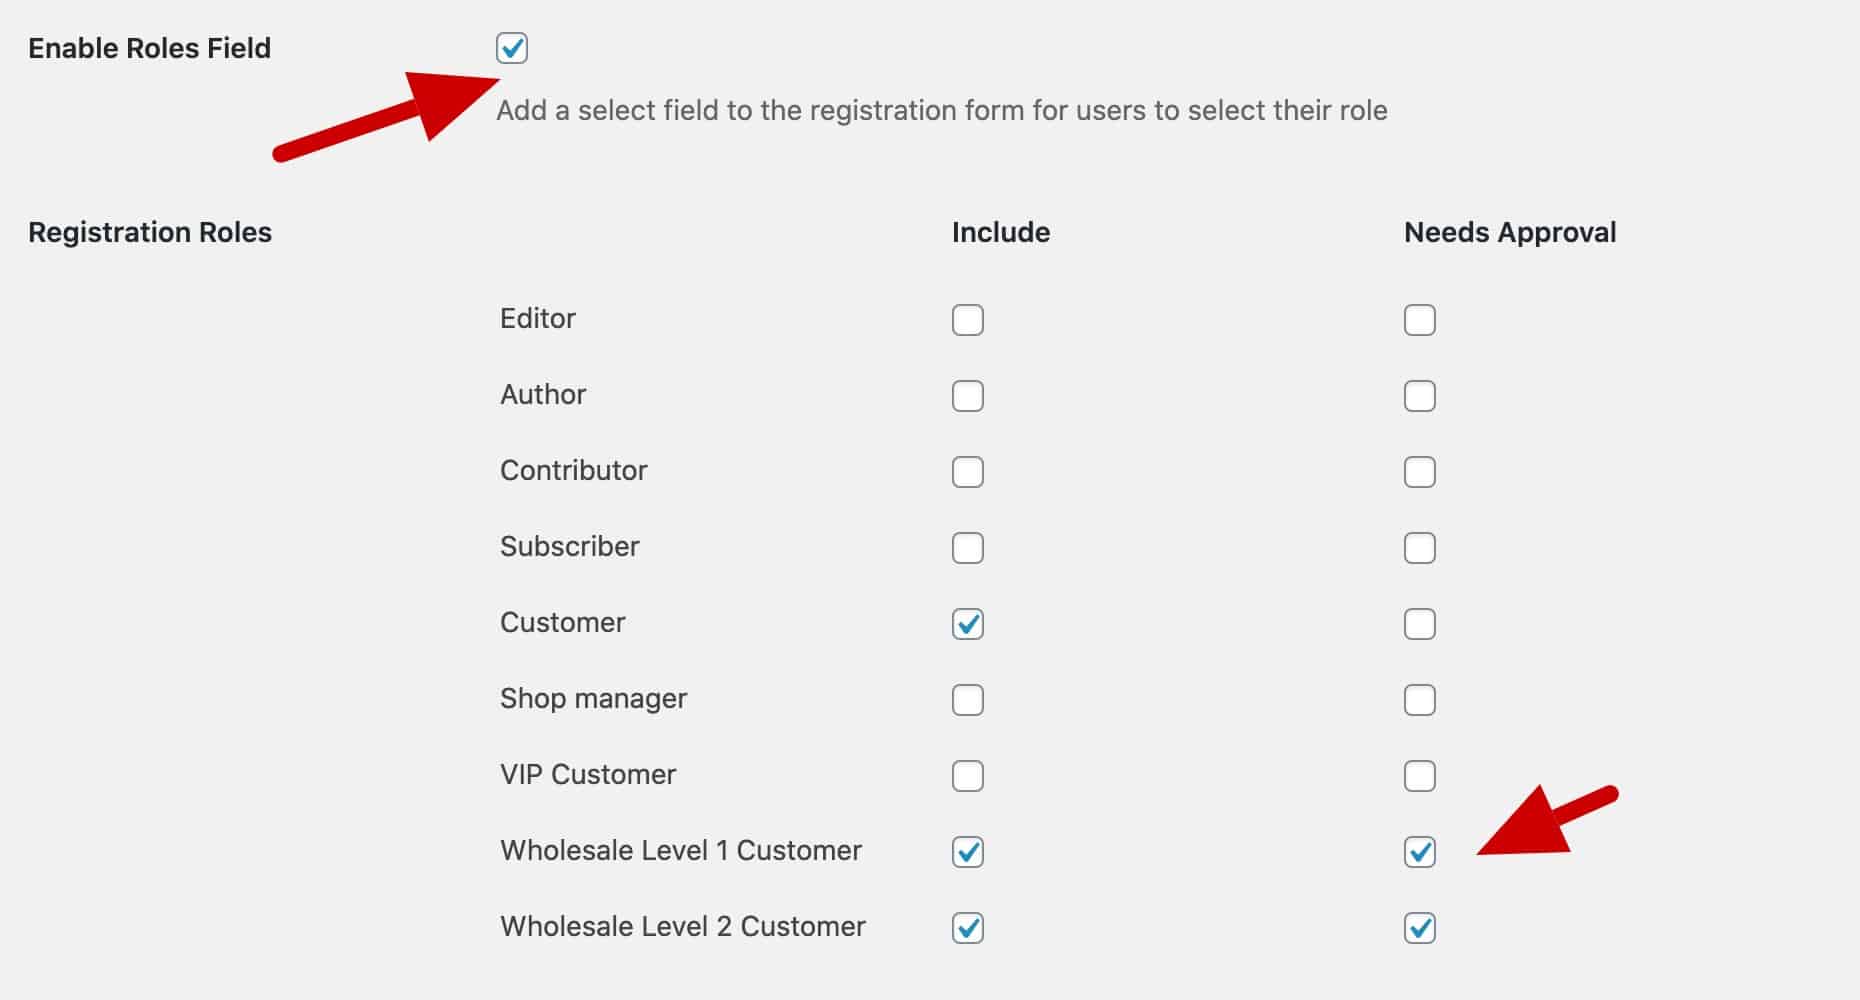
To enable a field where users can select their role:
- Check ‘Enable Roles Field’
- Then select which roles the user should be able to choose from
- You can also define which roles require your approval
Related Tutorial
See this article for further options on approving user registrations
Selling wholesale beauty products online – recap
That’s about it for looking at wholesale options. We looked at various methods of setting discounts, how to create different membership levels, and how to control registration.
Listing large numbers of products
Now let’s think about a different aspect of the site.

You can see that our shop page is an orthodox layout with products organised on the page in rows of three each. This is how most online stores present their products.
However, depending on your store, you might find this isn’t the ideal layout for you. For one thing, if your users are likely to be adding multiple items to their basket, they just want to scan down a list of items and add as they go.
Selling beauty products using WooCommerce Product Table Ultimate
Using a table layout for your products makes a lot of sense whether it’s retail or wholesale. It’s especially true if your users tend to order a lot of products at a time.
That’s where the WooCommerce Product Table Ultimate plugin comes in.
The Product Table Ultimate plugin reorganises your shop page so that products are listed in a table format.

Users are able to scan products more quickly and simply need to check a box to add them to their cart. They can also set quantities for each product without needing to actually click into each product page. So the flow is much quicker.
Using a table layout essentially turns your shop page into a highly interactive order form, improving the user’s experience and maximising your sales.
How to create product tables
After you’ve installed and activated the Product Table Ultimate plugin, you can create your first product table:
- Create a page for the table by going to Pages > Add New
- Give your page a title
- Insert the ‘Product Table Ultimate’ block on the page

You can configure the table using the options on the right. Let’s look at the most important ones:
- Columns: this field defines what information you display about each product. Choose from the following list: sku, thumbnail, name, short-description, attributes, categories, tags, price, add-to-cart
- Products Source: choose whether to display all products or only products from certain categories
- Variations Display: if you’re using variable products you can choose whether to display each variation on its own row or as part of the main product
- Products per Page: choose how many products to list per page
There’s a more detailed article on using product tables to create wholesale order forms here.
How to sell beauty products online – recap
This tutorial should have given you everything you need to start selling beauty products and cosmetics online. We looked at how to set up WooCommerce and start adding your products.
Then we looked at various ways to extend the store, including creating discounts, user roles and registration, and allowing wholesale customers.
WooCommerce Wholesale & B2B Plugin Bundle
Create a wholesale or B2B store in WooCommerce
Finally, we looked at an option to display your products in a table format, making it easier for users to scan and order your goods.
If you’ve got any questions, just leave a comment below.