How do you take bookings for wine tasting events in WooCommerce?
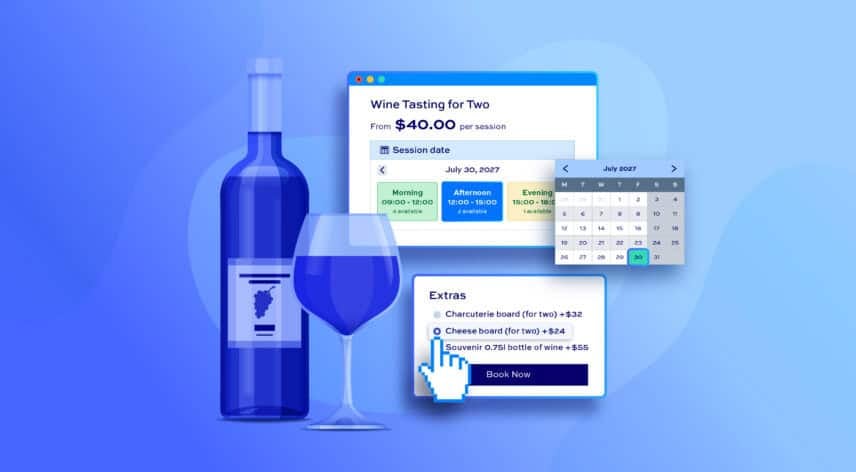
This tutorial shows you how to sell wine tasting bookings directly through WooCommerce, with date and time selection, party size, optional extras, and seasonal pricing all handled automatically. The same setup works just as well for beer, cider, or whisky tastings, and cheese and wine pairing evenings – anywhere you’re selling a timed, capacity-limited experience.
Event bookings made up 15.2% of the global online booking systems market in 2025, according to Dataintelo. Wine tastings and tours alone account for over 57% of wine tourism revenue, and the global wine tourism market is projected to grow from $46.47 billion in 2023 to $106.74 billion by 2030, according to Grand View Research.
Running your booking system through WooCommerce keeps everything – bookings, payments, and customer data – on your own site, instead of paying commission to a third-party booking platform. You avoid the monthly SaaS fees and per-booking cuts that eat into tasting margins, and you own the customer data outright for remarketing and repeat visits.
It also means one system instead of several. Your tasting sessions sit alongside your wine shop, gift vouchers, and any other products you sell, all sharing the same cart, checkout, and payment gateways.
After completing this tutorial:
- Customers will be able to:
- Pick a date and an available time slot for the tasting they want to attend
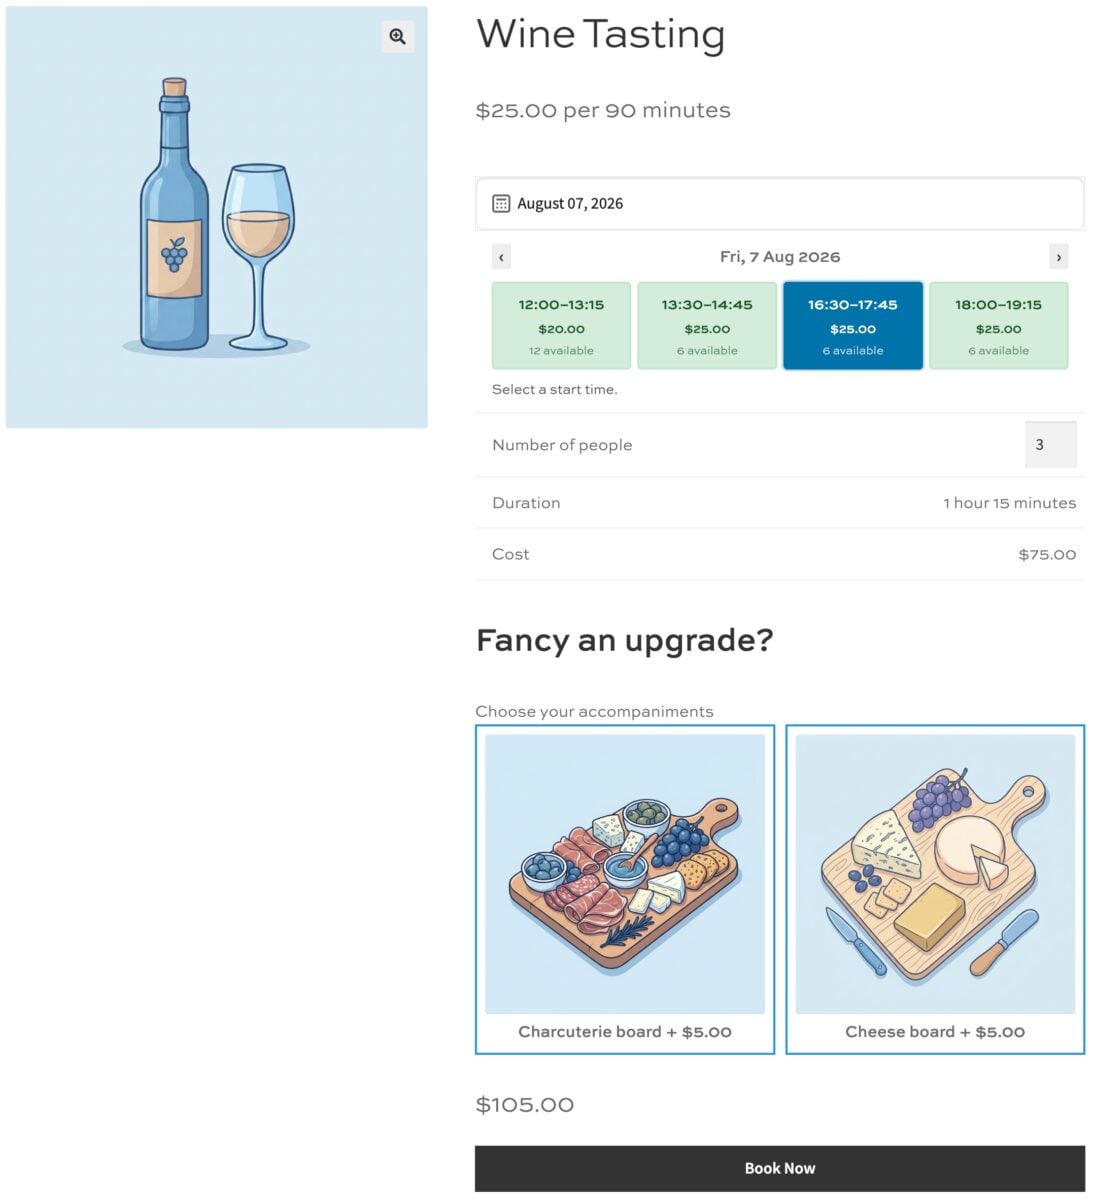
- Enter the number of people in their party and add optional extras like a charcuterie board
- As the store owner or admin, you’ll be able to:
- Charge per attendee or block-book each session for a fixed price
- Set different availability on different days, e.g. more sessions on weekends
- Cap the number of places per session so you never overbook
As a bonus, we’ll also look at how to:
- Set seasonal pricing for peak periods
- Offer discounts for larger groups
In this tutorial, we’ll assume that you already have WordPress and WooCommerce installed and ready to go. We’ll use the Bookings for WooCommerce plugin to handle the booking logic, along with Product Add-Ons Ultimate for optional extras.
Bookings for WooCommerce lets you accept date and time-based bookings through standard WooCommerce products. It’s compatible with all themes and page builders, and with all WooCommerce payment gateways.
Once you’ve purchased Bookings for WooCommerce:
- Download the plugin’s zip file by clicking on the link on your order confirmation screen or in your welcome email. You’ll receive the email automatically a few seconds after you’ve completed the purchase
- Go to Plugins > Add New in your WordPress dashboard
- Click on the ‘Upload Plugin’ button
- Drag and drop the plugin’s downloaded zip file into the ‘Choose File’ area and click ‘Install Now’
- When the plugin has uploaded, click the ‘Activate Now’ button
Quick how-to guide to create a wine tasting booking in WooCommerce
Here’s a quick overview of how to create wine tasting bookings in WooCommerce.
- Create a product for your wine tasting session
Set up a bookable product for each tasting experience you offer.
- Decide how you charge
Choose between a per-attendee rate with shared capacity, or a fixed price for the whole session.
- Enable time slots
Set your session length, buffer time, and opening hours so customers can pick a slot.
- Add day-specific times
Give weekends more sessions than weekdays, if that suits your venue.
- Cap numbers and set seasonal pricing
Fine-tune availability and pricing for individual sessions.
Now let’s walk through each of these steps in detail.
Step #1: Create a product for your wine tasting session
Go to Products > Add New and give your product a name, e.g. ‘Sunset Vineyard Tasting’. In the ‘Product data’ section, select ‘Booking’ from the ‘Product type’ dropdown.

If you offer tiers within the same session – a standard tasting and a reserve tasting, for example – you don’t need a separate product for each. Set ‘Max bookings per unit’ to cover your total capacity, then use Product Add-Ons Ultimate to let customers specify which tier they want when they book.
If you need to, you can create separate booking products only when an experience needs its own personnel or timings – a full vineyard tour alongside your regular tasting sessions, for example. This gives each one its own calendar and capacity.
Step #2: Set the booking unit
The ‘Booking Settings’ tab in the ‘Product data’ section is where the ‘Booking unit’ lives, and it defaults to ‘Day’ – exactly what you need for a wine tasting, so there’s nothing to change here. This is what makes time slots available later in the setup, since slots divide a single day into fixed windows.

You now have a day-based bookable product for your tasting, ready for capacity and timing.
Step #3: Decide how you charge – per attendee or block-booked
How you handle group size depends on whether you charge each guest individually or sell the whole session as a private booking.
Option #1: Charge a single price for the session
If you run a private tasting for one group at a time, you don’t need a quantity or participant field at all. Set ‘Max bookings per unit’ to ‘1’ so only one group can book each time slot – you’ll set your flat price for the session in the ‘Time Slots’ section a little later.

Mention your session’s recommended group size (e.g. ‘best for 2–8 guests’) in the product description, since this option doesn’t enforce a headcount – it simply reserves the whole slot for whoever books it.
Option #2: Set a capacity and charge per attendee
If you’re happy to seat smaller parties together in the same session, set ‘Max bookings per unit’ to your tasting room’s total capacity, e.g. ‘6’. You’ll set the ‘Price per slot’ to a per-person rate in the ‘Time Slots’ section a little later, so the cost is multiplied by the number of people the customer enters when booking.
A couple and a group of four can now book the same session, and it closes automatically once the combined total reaches your capacity. This is also how customers will enter the number of people attending – the quantity field on the product page becomes their party size.

Either way, you now have a session with its group size controlled. Next, let’s add the time slots.
Step #4: Enable time slots and set your session length and hours
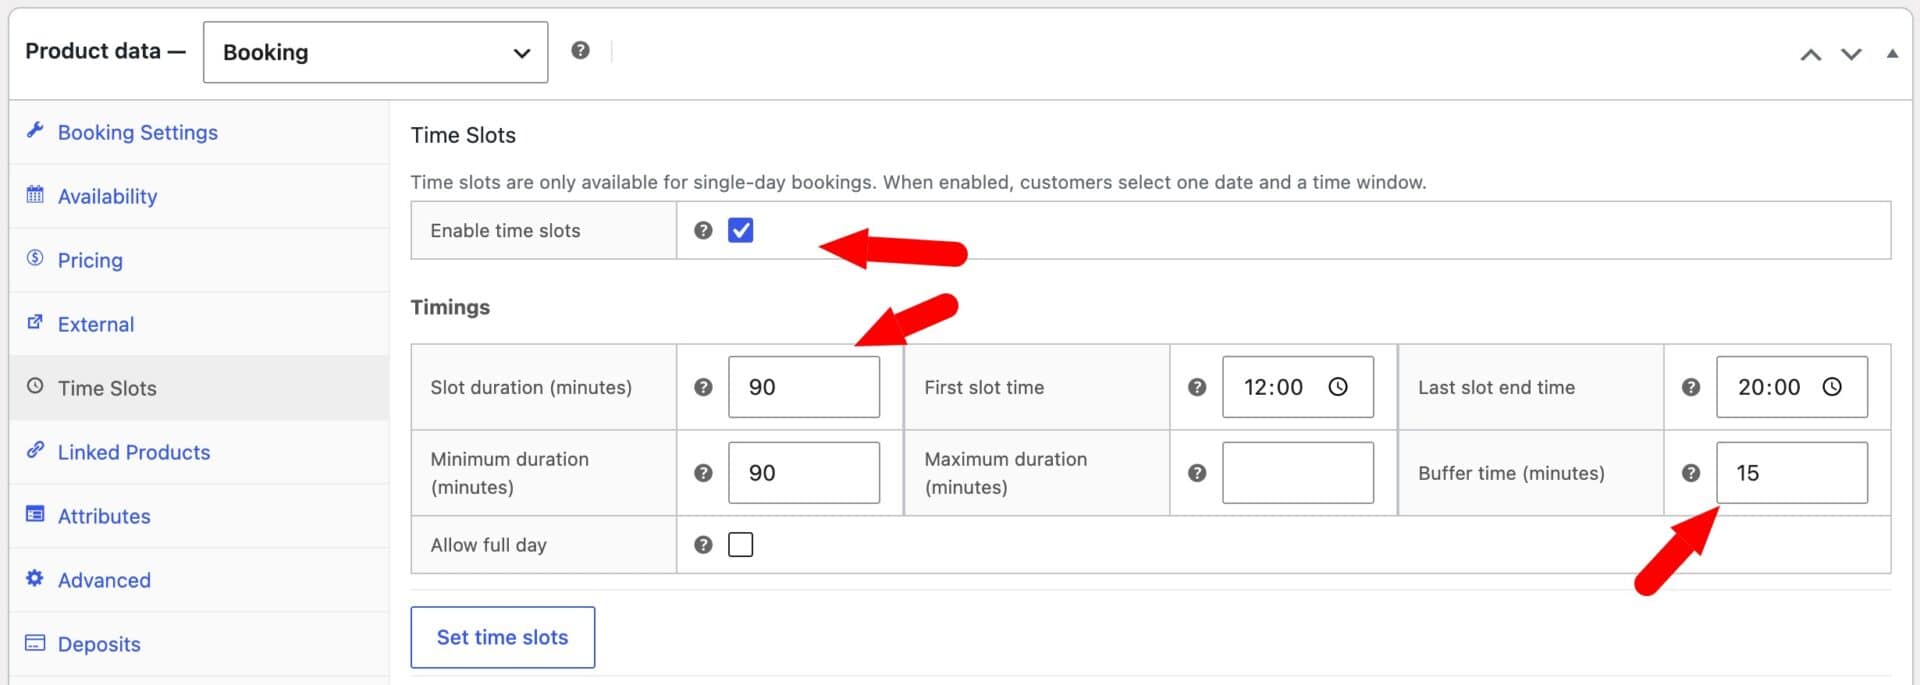
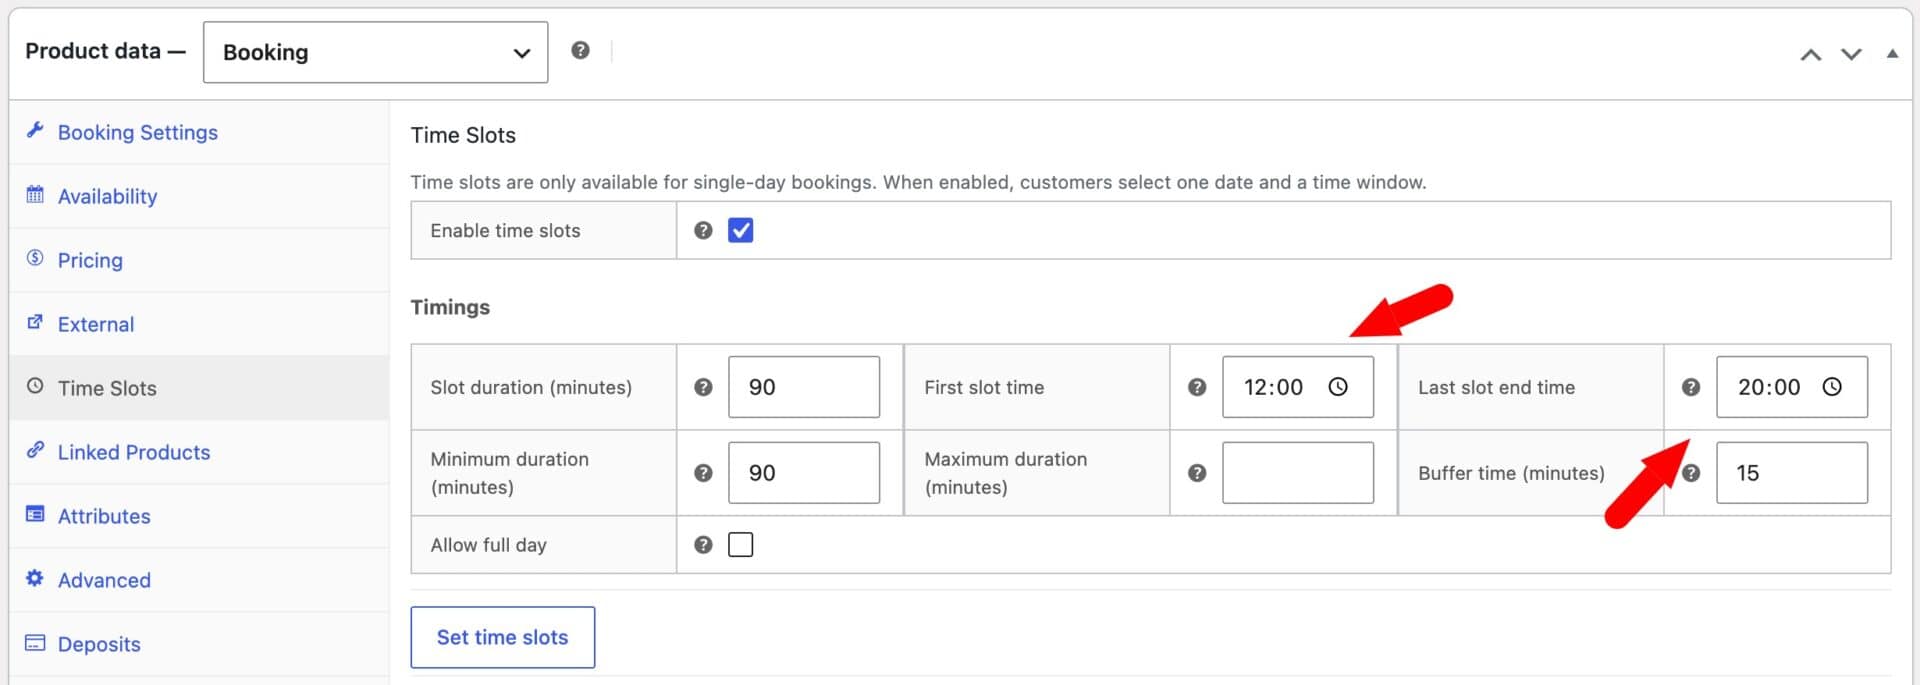
Open the ‘Time Slots’ tab and check ‘Enable time slots’. A new set of options appears once this is switched on.
Set your session length
Set the ‘Slot duration’ field to match your tasting’s length in minutes – for example, ’90’ for a 90-minute guided tasting. If you need time to reset the room between groups, add a ‘Buffer time’ too, e.g. ’15’ minutes, so the next session doesn’t start until the space is ready.
Set ‘Maximum duration’ to the same value as ‘Slot duration’ – ’90’ in this example. This stops customers from booking back-to-back sessions in one go, so each group only ever books a single tasting.
Set your opening hours
Set your ‘First slot time’ to ‘Last slot end time’ fields to define your opening hours, e.g. ’12:00′ and ’20:00′.
Block out specific time slots
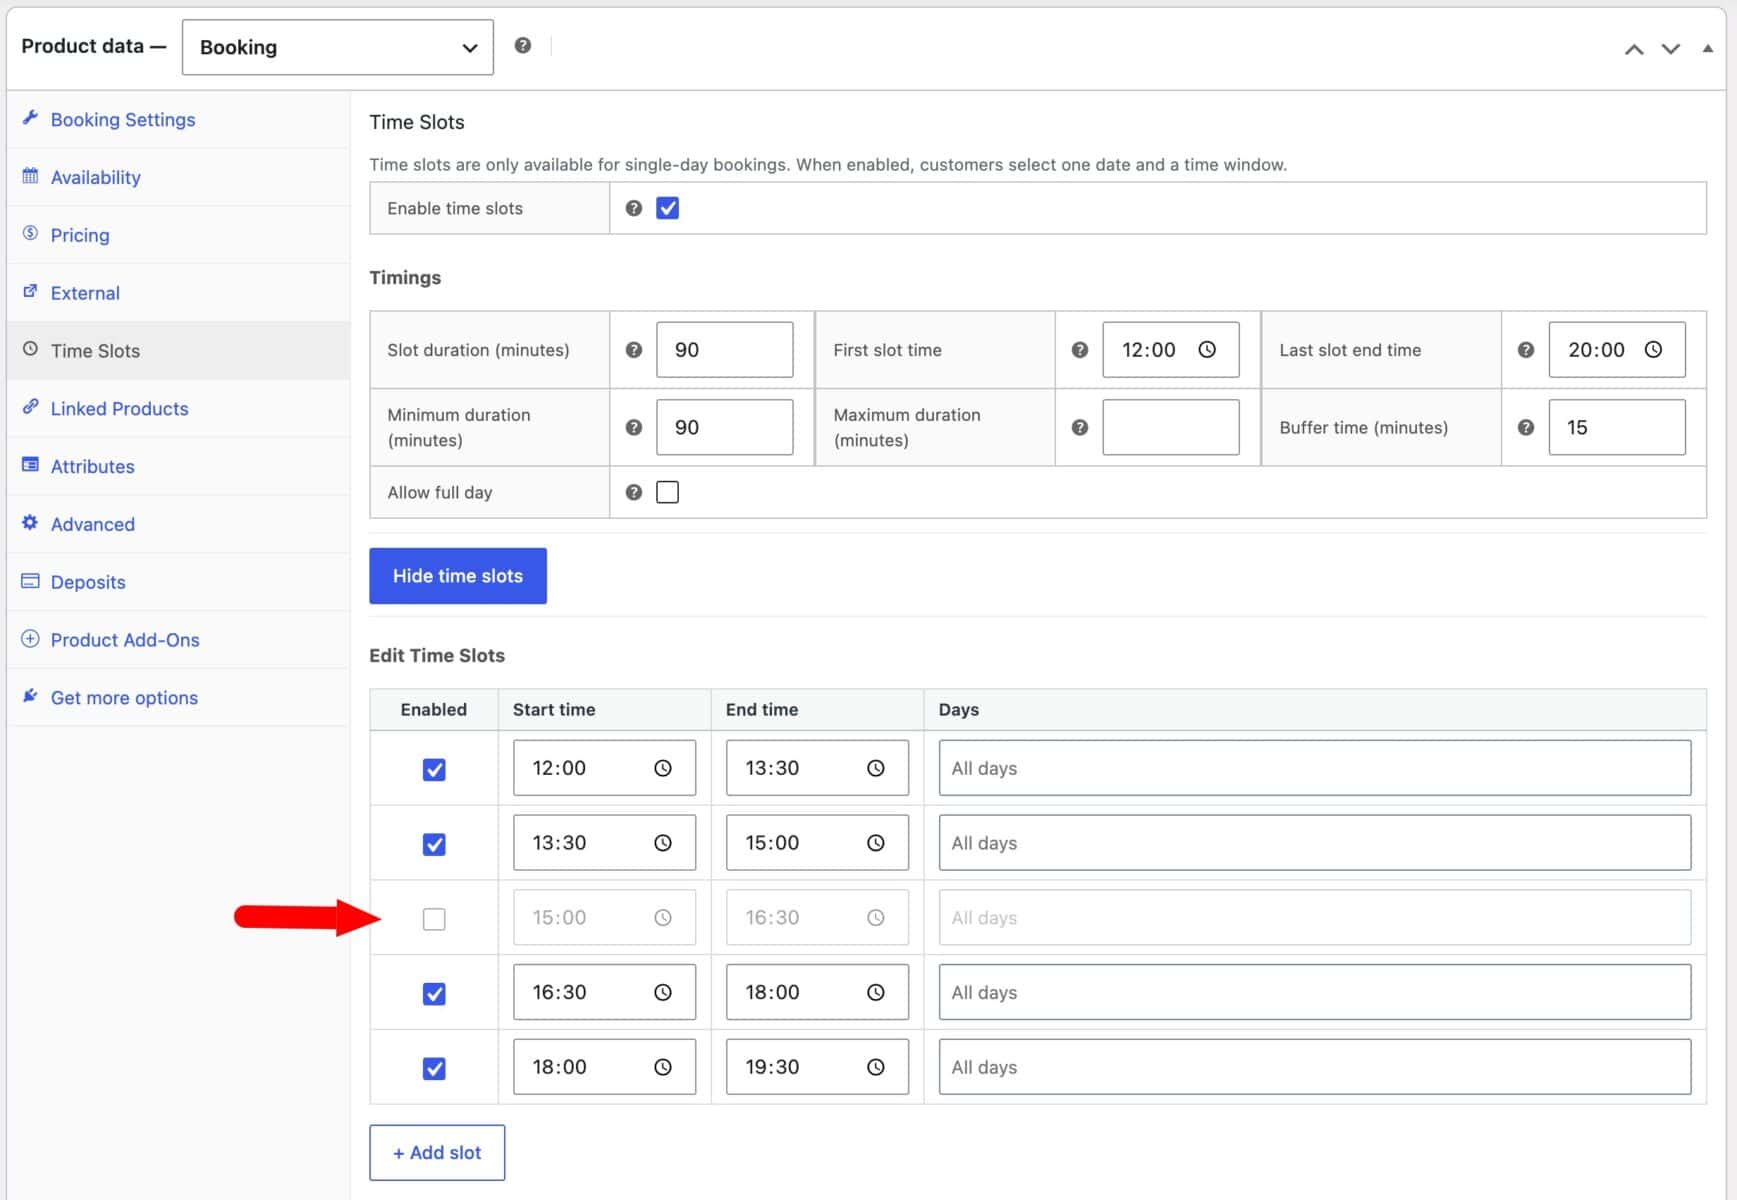
If there’s a slot you don’t want to offer – if you don’t run sessions throughout your opening hours, for example – click ‘Edit Time Slots’ and disable the relevant slots. They stop appearing as bookable to customers without affecting the rest of your schedule.
Set your price
Set the ‘Price per slot’ field to your rate for the session – a price for the whole session if you went with Option #1 in the previous step, or a per-person rate if you went with Option #2, since that’s multiplied by the number of guests each customer enters.

Choose how customers select a slot
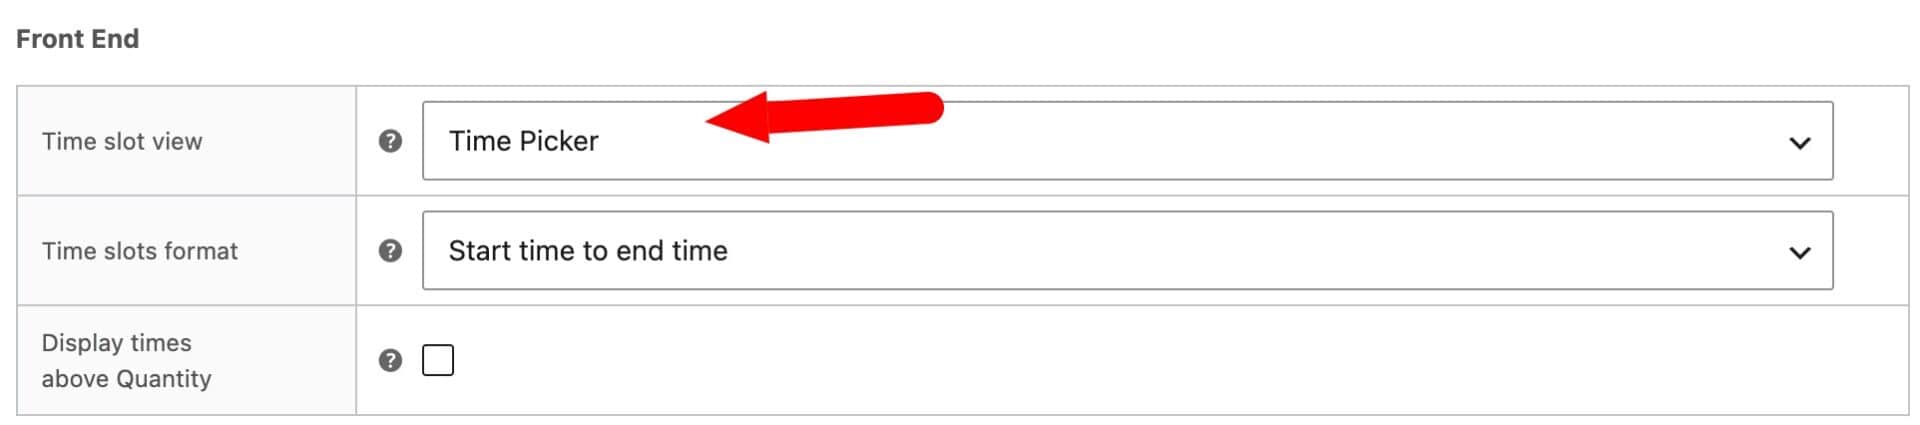
Under ‘Time slot view’, choose ‘Time Picker’. Since your session length is fixed, customers don’t need to pick a duration – a visual grid of the day’s available slots is the quickest way for them to see what’s free and select a start time.
Save your settings. You now have a tasting open for bookings across the day, split into fixed sessions with a reset window built in.
IMAGE
There’s a demo product here.
Step #5: Set different times for different days (optional)
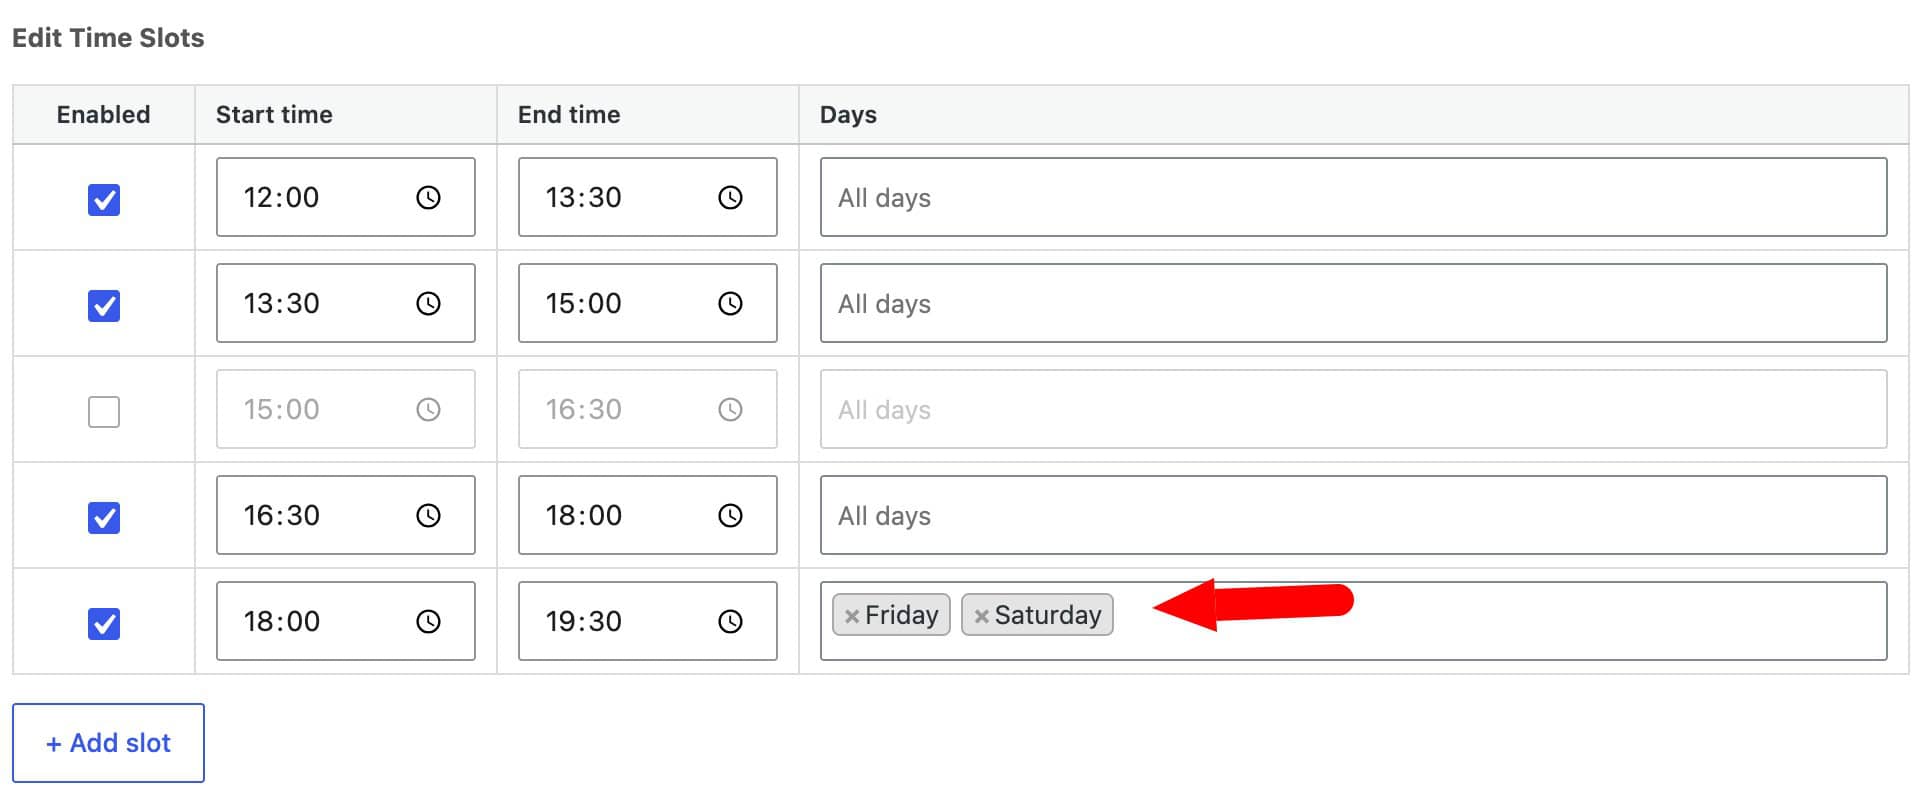
Your tasting room might run more sessions on weekends, or add an evening slot on Fridays. Click ‘Edit Time Slots’ in the ‘Timings’ section to open a table with one row per session.
From here, you can disable sessions you don’t need, override individual start and end times, and use the ‘Days’ column to restrict a session to specific days of the week. So you could add extra evening slots on Fridays, Saturdays, and Sundays only, and keep weekdays to a lighter schedule – or close the tasting room entirely on Mondays.
Now let’s look at an optional way to fine-tune availability for individual sessions.
Step #6: Change the number of places available for specific sessions (optional)
This step applies if you chose Option #2 in Step #3, where sessions have shared capacity. With Option #1, each session is already capped at a single booking, so there’s nothing further to restrict.
The ‘Per-slot overrides’ table, further down the ‘Time Slots’ tab, lets you adjust capacity for a specific date or session without touching your default settings. Click ‘Add override’ to add a row, set the ‘Start time’ and ‘End time’ the override applies to, and set an ‘Availability’ figure lower than your usual capacity – e.g. ‘6’ instead of ’12’, if you’re short-staffed for a particular date or want to hold some seats back.
The same override row lets you set a custom ‘Price per slot’ too, so you can charge more for sessions with greater capacity – a 12-person session priced higher per head than your usual 6-person sitting, for example.
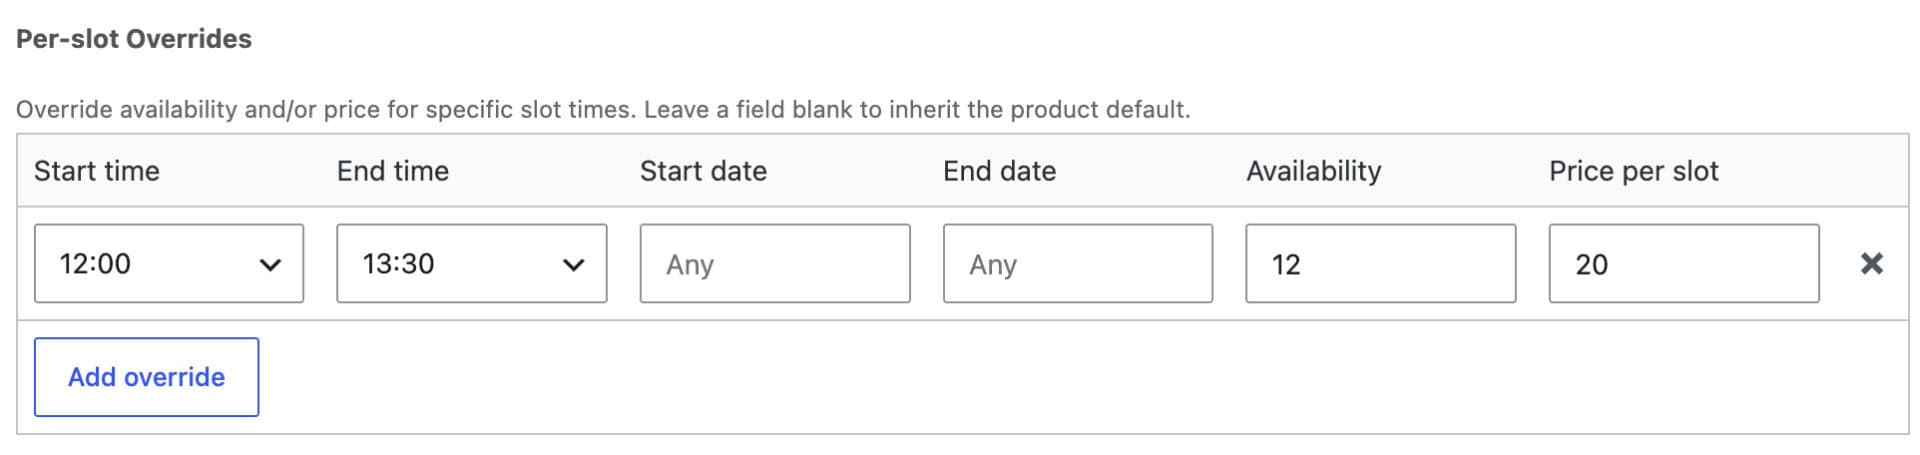
The session reopens at its full capacity automatically once the override’s date range ends.
Publish your product. You now have a working wine tasting booking product where customers can pick a date, choose an available time slot, enter their party size, and pay online, while you stay in full control of the schedule.
Now let’s look at some additional settings.
Bonus #1: Set seasonal pricing
To charge more for peak periods – peak season, public holidays, or weekend evenings – add a ‘Per-slot override’ with a higher ‘Price per slot’ and a date range covering the period. For example, an override for your evening slot with a higher price and a ‘Start date’ and ‘End date’ spanning the harvest season.
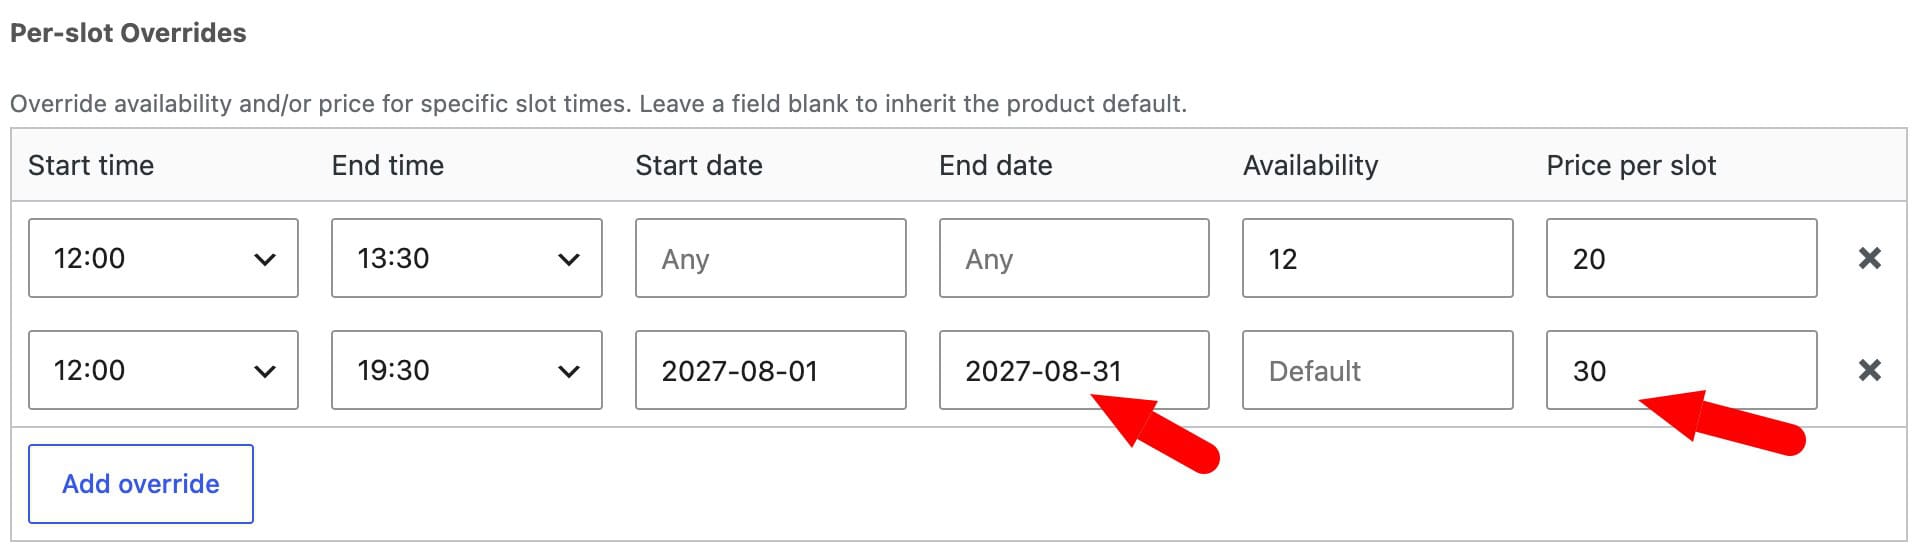
Add a separate row for each period or slot you want to price differently, since each override only covers the range you set.
Bonus #2: Add optional extras like a charcuterie board
Increase your average order value by letting customers add extras when they book, using Product Add-Ons Ultimate.
Open your wine tasting product and click the ‘Product Add-Ons’ tab in the ‘Product data’ section. Click ‘Add Group’, then click ‘Add Field’ to create a new field. Set the ‘Field Label’ to ‘Add your accompaniments’ and choose a field type like ‘Swatch’ so that you can display an image for each option.
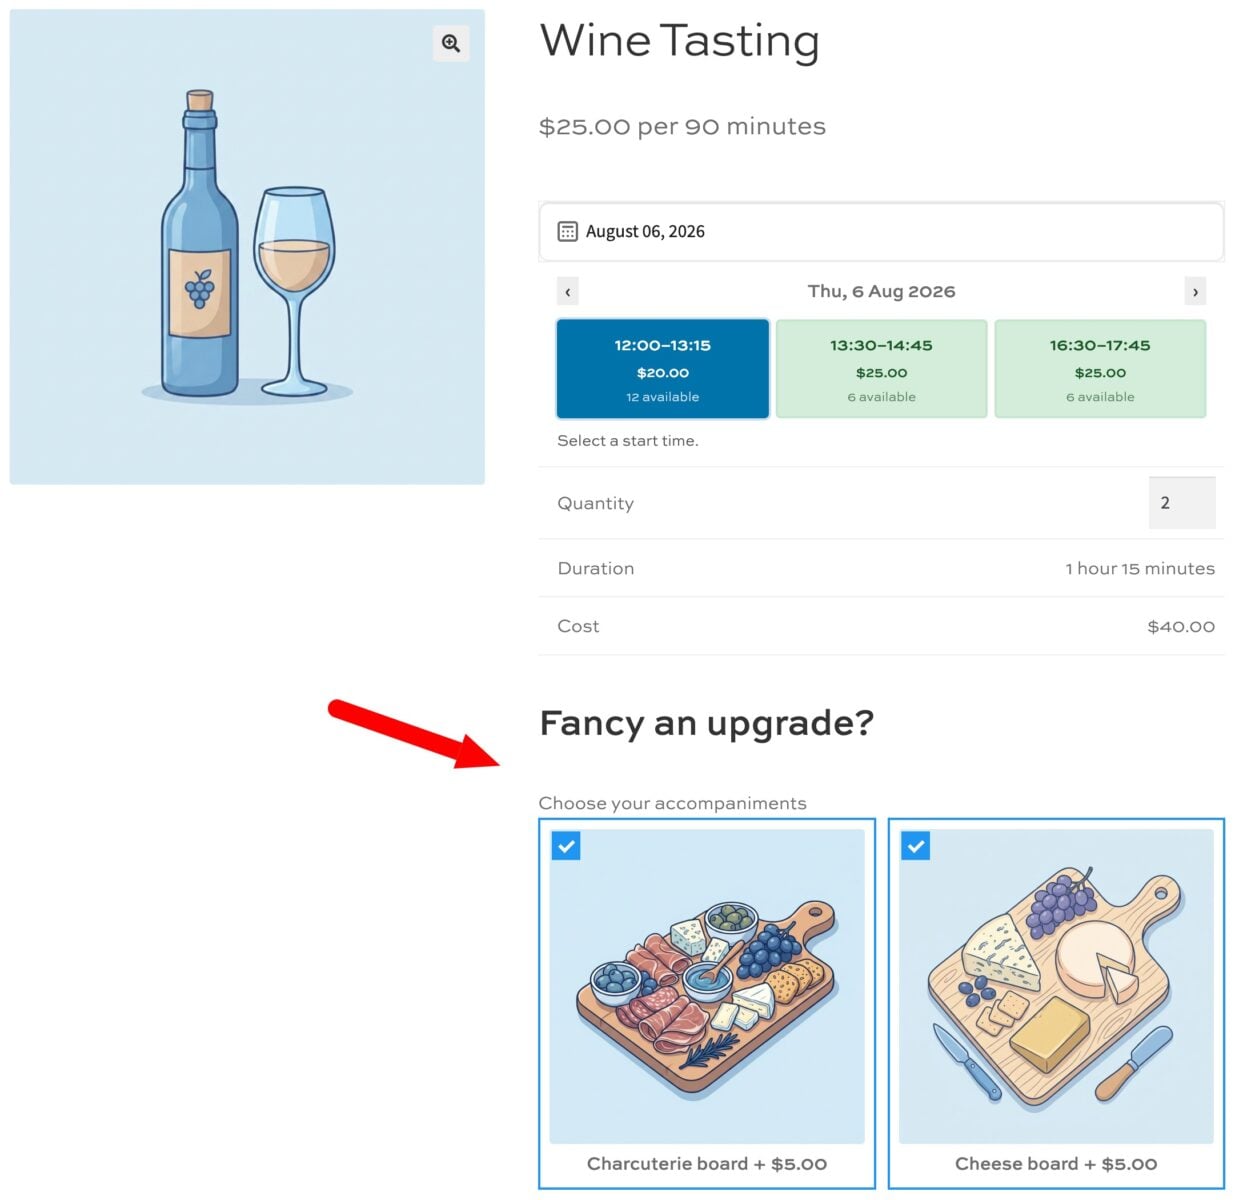
Set a price per option and on the ‘Pricing’ tab, enable ‘Price per booking unit’ to ensure that the cost of the optional extra is multiplied by the number of places being booked.
You can add as many extras as you like this way – a wine flight upgrade, a non-alcoholic pairing option, or a take-home bottle.
Bonus #3: Offer discounts for larger groups
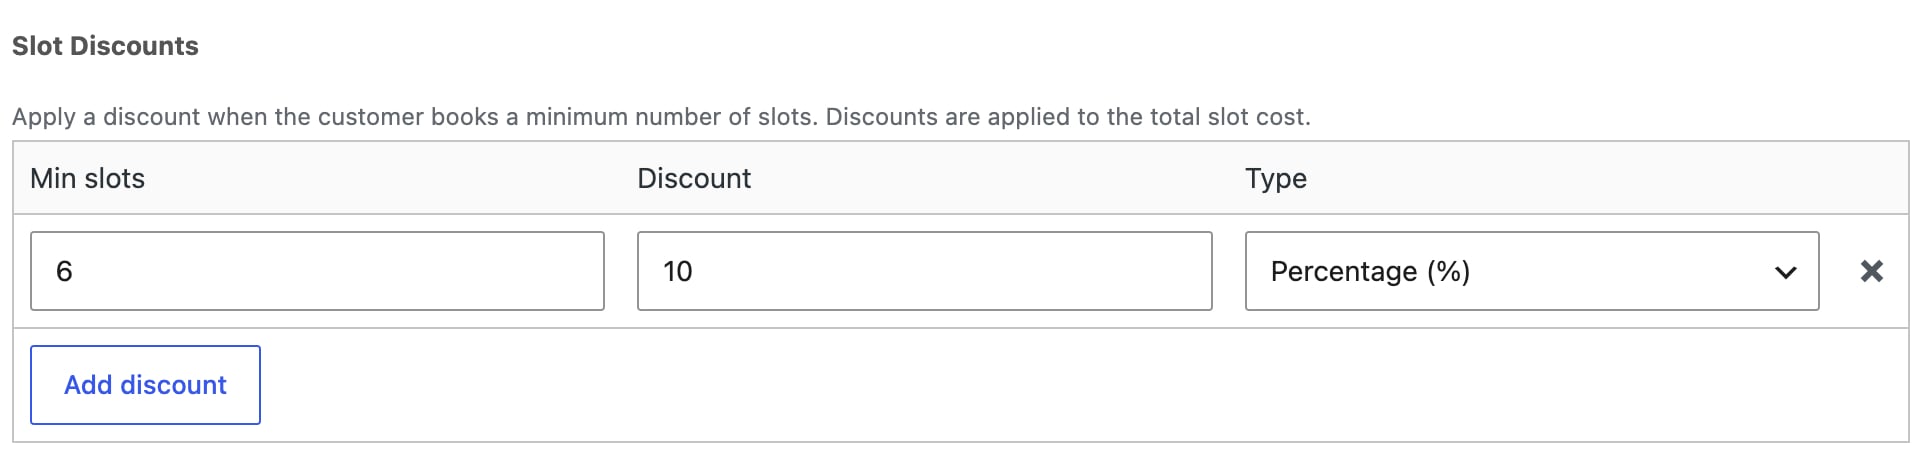
Bookings for WooCommerce includes built-in discount tiers, so you don’t need a separate plugin for this. Open the ‘Pricing’ section of your product’s booking settings and set a percentage or fixed discount based on the number of places booked.
This lets you reward larger parties automatically – so for example if a single group books all available places, give them a 10% discount.

Very easy to setup, and is the only plugin I found that allows you to set a stock level. Bookings for WooCommerce solved a problem I had for this client who needed to allow people to not only select the days, but also a number of people for those days.
Managing your wine tasting bookings
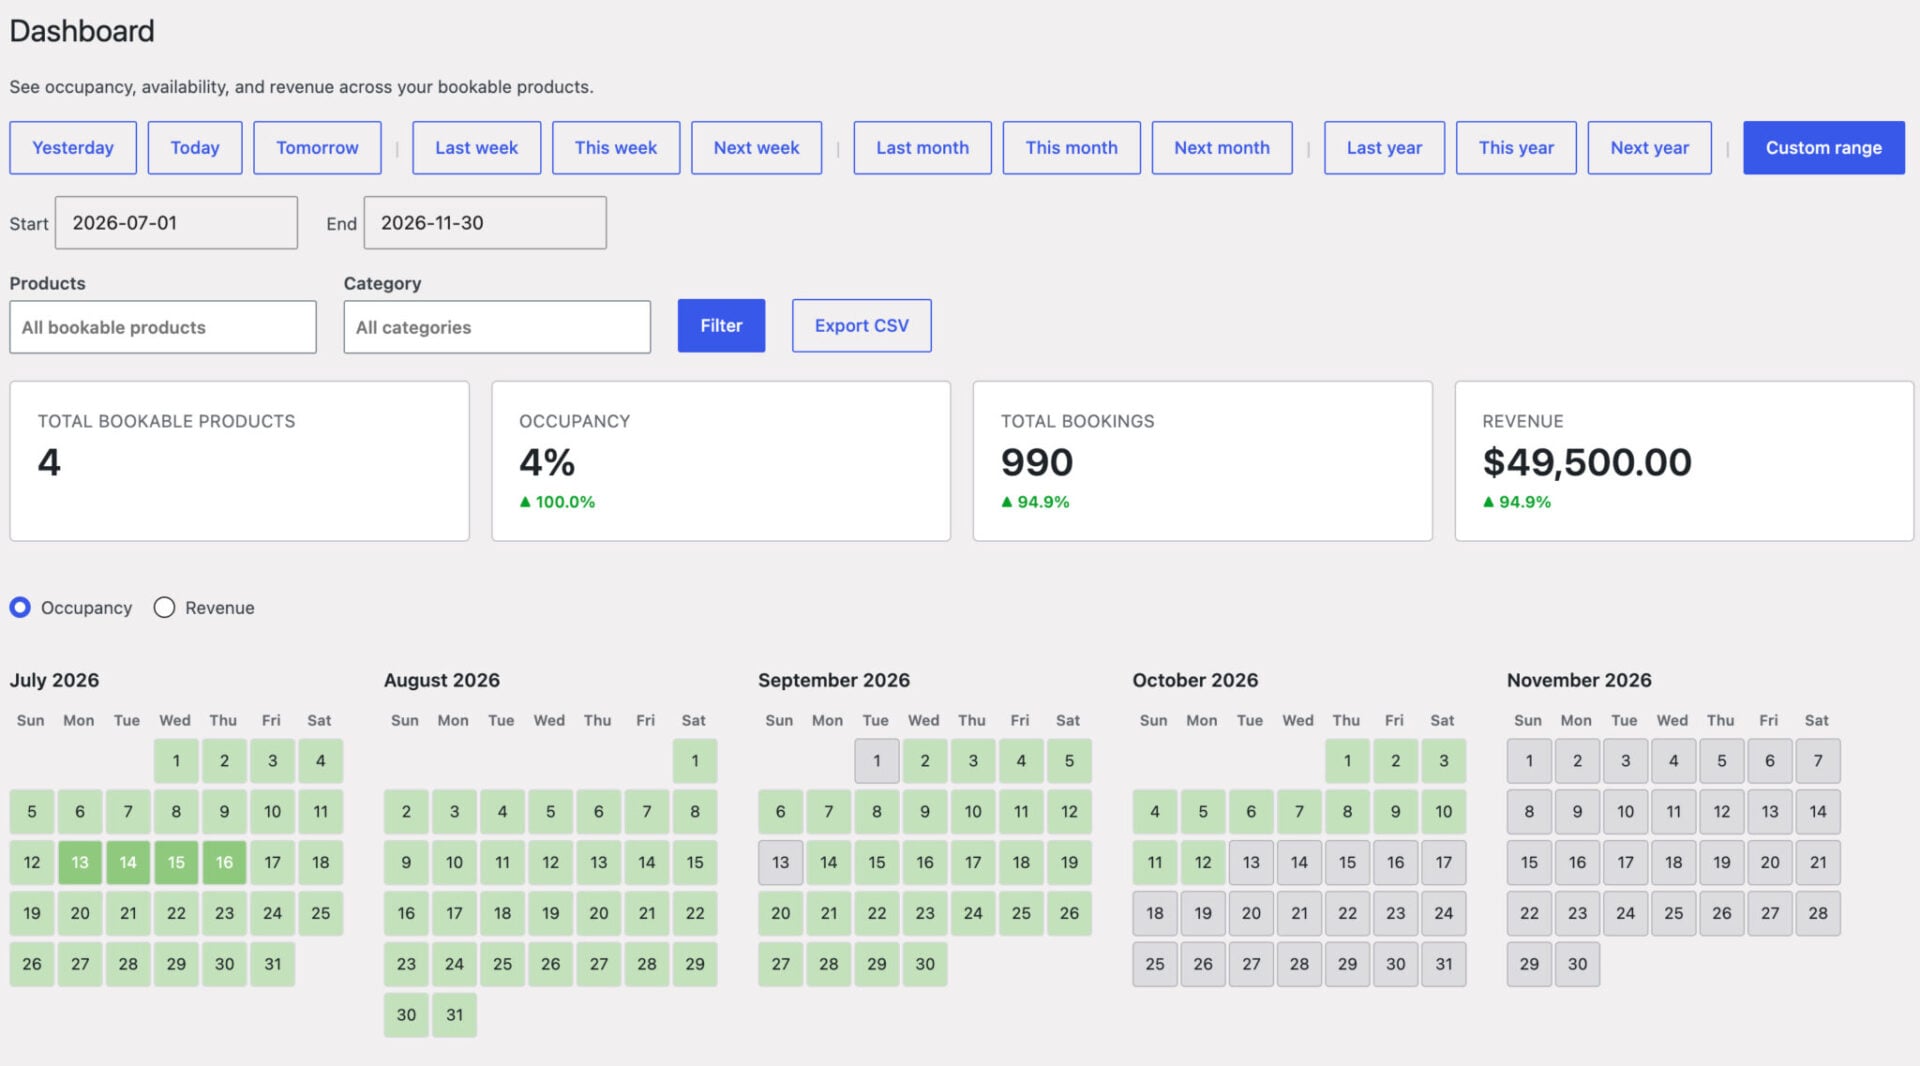
Once your sessions are live, you’ll manage every booking from Bookings > Dashboard in your WordPress admin. This gives you an at-a-glance view of occupancy, revenue, and upcoming sessions.
Choose a date range using the buttons along the top – Today, This week, This month, or a custom range. The Dashboard automatically shows the most useful view for that range: a Diary view with a time-grid for a single day, a Week diary for a few days, or a full Calendar for longer ranges.
Adding a booking manually
For phone or walk-in bookings, click any time slot in the Diary or Week diary view to open the day detail panel, then click ‘Add booking’. Set the start and end time, quantity, and price – overriding the price if needed – then search for the customer’s email or enter a new one.
Tick ‘Create a WooCommerce order for this booking’ if you want to record payment against it too. Availability is re-checked when you save, so you can’t accidentally double-book a session even if you’ve had the page open for a while.
Keeping your schedule in sync
Sync your bookings with Google Calendar so your tasting room schedule stays up to date automatically as bookings come in. If you edit or cancel a booking, the Google Calendar event updates to match.
You can also export all your bookings to a CSV file from the ‘Export CSV’ button, and check a single session’s schedule without leaving its edit screen using the ‘Availability’ tab on the product itself.
Wine tasting bookings – recap
So that’s how to take bookings for wine tasting events in WooCommerce using the Bookings for WooCommerce plugin. We looked at how to create a bookable session where customers can select a date and time, choose whether to charge per attendee or block-book the whole session, and set different availability on different days. We also covered seasonal pricing, group discounts, optional extras with Product Add-Ons Ultimate, and how to manage bookings from the Bookings Dashboard.
This same approach extends well beyond wine. If you’re running vineyard or brewery tours instead of a fixed tasting session, take a look at our tour booking tutorial. And if you offer cooking classes or tasting workshops on a fixed schedule, our course booking tutorial walks through that setup instead.
Bookings for WooCommerce is compatible with all themes and page builders, including Astra, Flatsome, and Woodmart, and page builders like Elementor and Divi. If you have any questions, our world-class support team is on hand to help. All our plugins are backed by a 14-day money-back guarantee, so you can try it risk-free.