How to build a B2B stationery and office supplies store in WooCommerce
Selling stationery and office supplies to other businesses means dealing with B2B accounts, bulk orders, and pricing that regular retail customers never see. This guide covers the plugins and features you need to build exactly that kind of store in WooCommerce, using the WooCommerce Wholesale & B2B Plugin Bundle as its foundation.
After reading this guide:
- Trade customers will be able to:
- Register for a trade account and see wholesale prices once approved
- Buy in bulk quantities at role-based prices
- Optionally, reorder quickly from a product table instead of hunting through single product pages
- As the store owner, you’ll be able to:
- Approve or reject B2B accounts before they can buy at trade prices
- Set different prices for different customer groups
- Hide retail pricing from the public
- Optionally, list your catalog as an easy reorder table
- You will also see how to:
- Set minimum order quantities and order values, e.g. packs of pens sold in multiples of 6
- Add personalization options for branded stationery, like custom logos and stamp text
- Let wholesale customers request quotes for large or custom orders
- Require manager approval for office or team orders that go over a spending limit
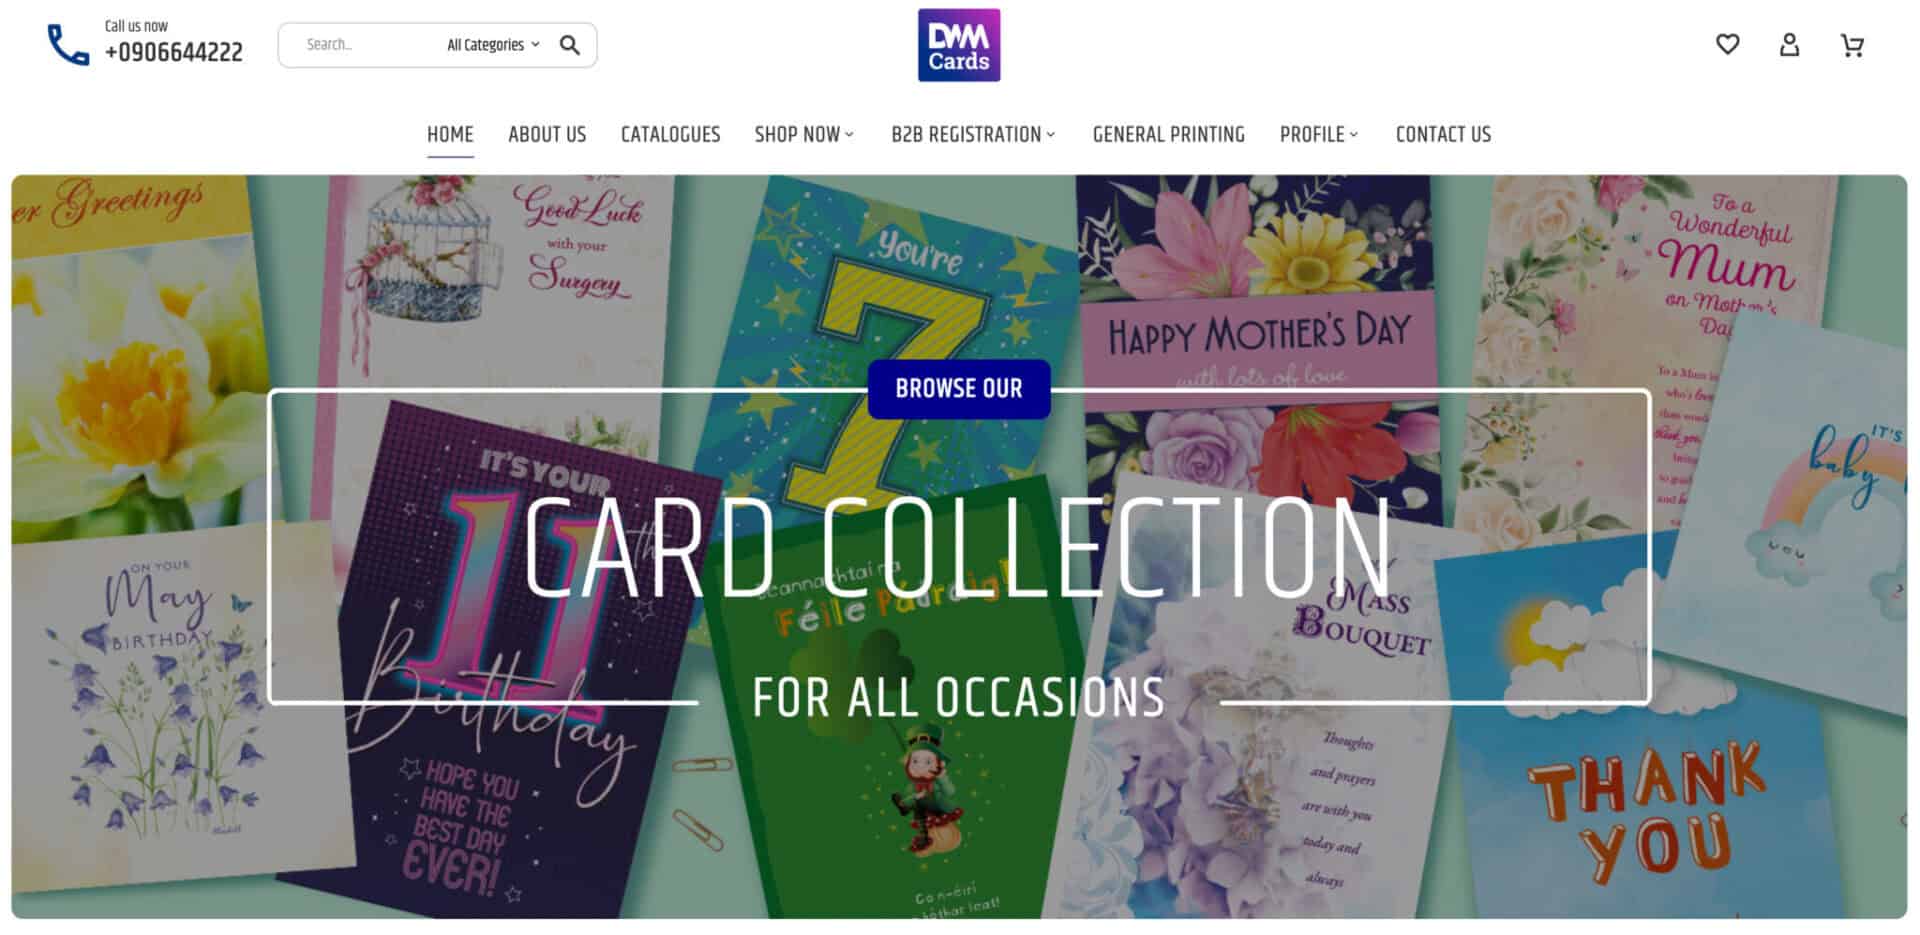
DWM Cards is a good example of this in action: it’s a WooCommerce store selling wholesale cards and stationery, with a dedicated B2B registration form, VAT-exempt wholesale pricing, and packet-based ordering – all built on the Wholesale & B2B Plugin Bundle covered in this guide.
WooCommerce Wholesale & B2B Plugin Bundle
Create a wholesale or B2B store in WooCommerce
Why use WooCommerce to build a B2B stationery and office supplies store?
Stationery and office supplies are one of the fastest-growing corners of B2B e-commerce. In its books and stationery market segmentation, Grand View Research projects this category will grow faster than any other product segment in the B2B e-commerce market through 2033, driven by schools, corporate offices, and training centers moving their procurement online. The wider B2B e-commerce market itself is forecast to reach $28 trillion in 2026.
Standard WooCommerce handles retail selling well, but it treats every visitor the same: one price, one catalog, no distinction between a one-off shopper and a business account that orders 500 notebooks a month. To sell stationery and office supplies to other businesses, you need trade accounts, bulk pricing, and a faster way for repeat buyers to reorder – none of which WooCommerce gives you out of the box.
What’s in the Wholesale & B2B Plugin Bundle?
The bundle brings together three plugins, each handling a different part of running a B2B store. Here’s what each one does and how it’s useful for a stationery or office supplies business.
Members Only
Members Only controls who can register, log in, and see your wholesale pricing.
- Purpose: create a B2B account system, separate from your regular retail customers, with its own registration flow and approval process
- Features: custom registration fields, a self-select role field so buyers can request a trade account, manual or automatic approval by role, hidden prices and products until login, and restriction by user role, individual user, or password on a per-product basis
- Benefit: you vet every wholesale buyer before they see your pricing, and retail visitors never stumble across wholesale rates that aren’t meant for them
Dynamic Pricing and Discount Rules
Dynamic Pricing and Discount Rules sets the actual prices your B2B customers see.
- Purpose: apply different pricing automatically based on who’s buying and how much they’re buying
- Features: role-based pricing and discounts, bulk and tiered pricing by quantity, tax exemption by role, on-page pricing tables that show every price break, and rule scheduling and priority so offers don’t conflict
- Benefit: wholesale customers get the right price the moment they log in, and larger orders earn a better unit price automatically, with no manual price lists or spreadsheets to maintain
Product Table Ultimate
Product Table Ultimate changes how B2B customers browse and order.
- Purpose: replace individual product pages with a scannable, orderable catalog view
- Features: customizable columns (SKU, thumbnail, price, add-to-cart, and more), shortcode or block placement, search and filtering, and the option to replace your default shop or archive pages
- Benefit: a buyer reordering a dozen SKUs can do it from one page in a few seconds, instead of clicking through a dozen separate product pages
Let’s take a look at different aspects of a B2B stationery store and how you can accomplish them using the bundle.
How to create a B2B customer role and registration form for stationery stores
A stationery trade account needs more than a name and email address – you’ll usually want a company name, a tax or VAT number, and some way to tell a genuine wholesale buyer from a regular shopper.
How do you create new user roles?
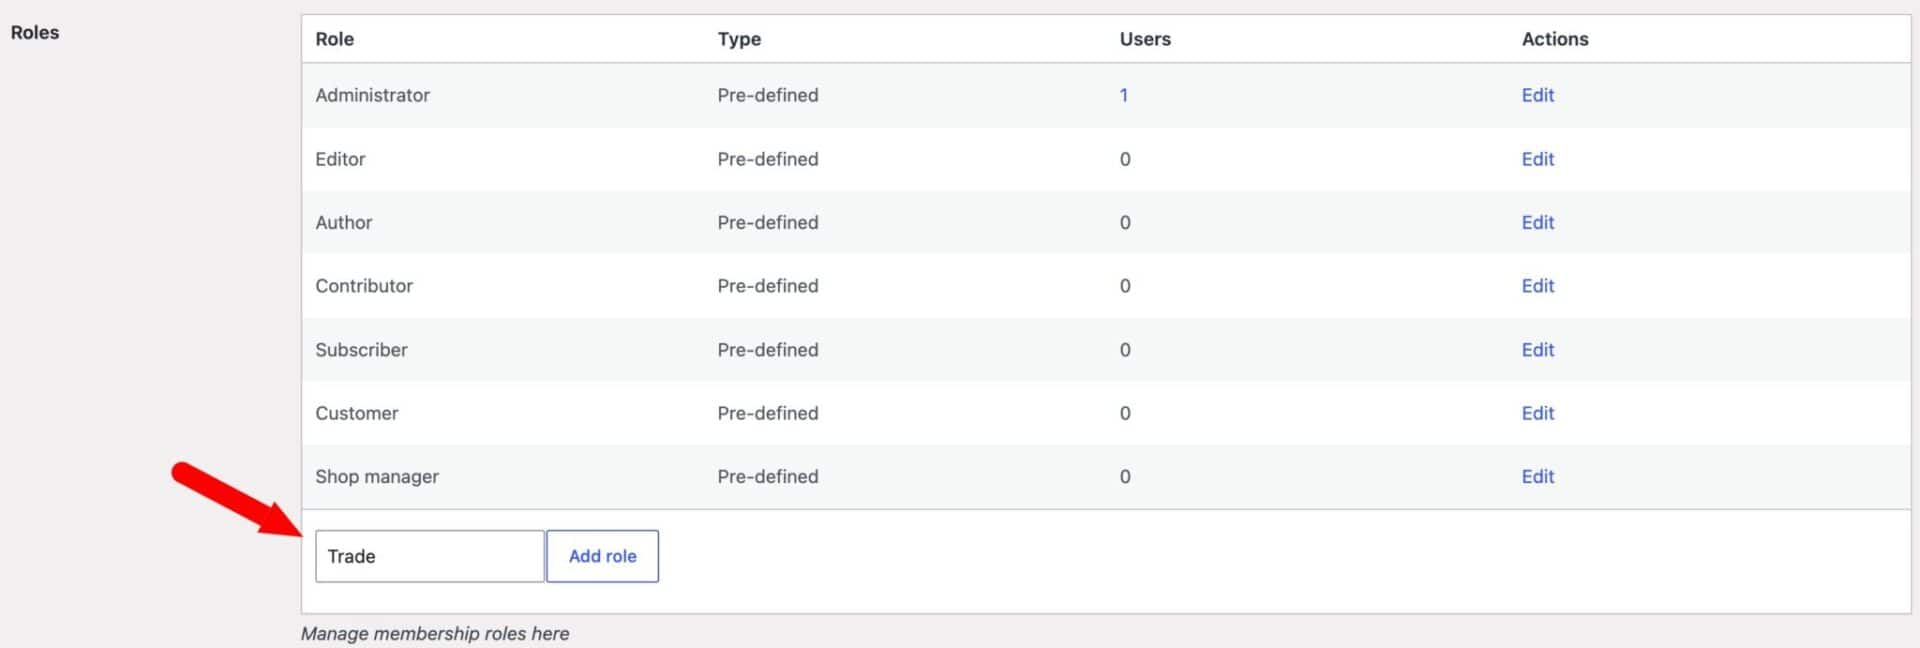
Before you can restrict pricing or products to trade buyers, you need a ‘Trade’ (or ‘B2B’ or ‘Wholesale’, etc) role for Members Only to check against – WordPress and WooCommerce don’t create one for you.
Go to Members Only > User Roles and scroll down to the Roles field. Enter ‘Trade’ as the name of your new role and click ‘Add role’. You can edit or delete this role from the same screen later if you need to.
You can create as many roles here as you like.
How do you build the registration form?
WooCommerce’s default registration form only collects a username, email address, and password, with no way to add extra fields, require approval, or let a customer select an account type.
Every registration is treated the same, and every new account is active immediately. For a B2B store, that means no way to distinguish a wholesale buyer from a retail customer at sign-up, and no chance to review who’s registering before granting access to trade pricing.
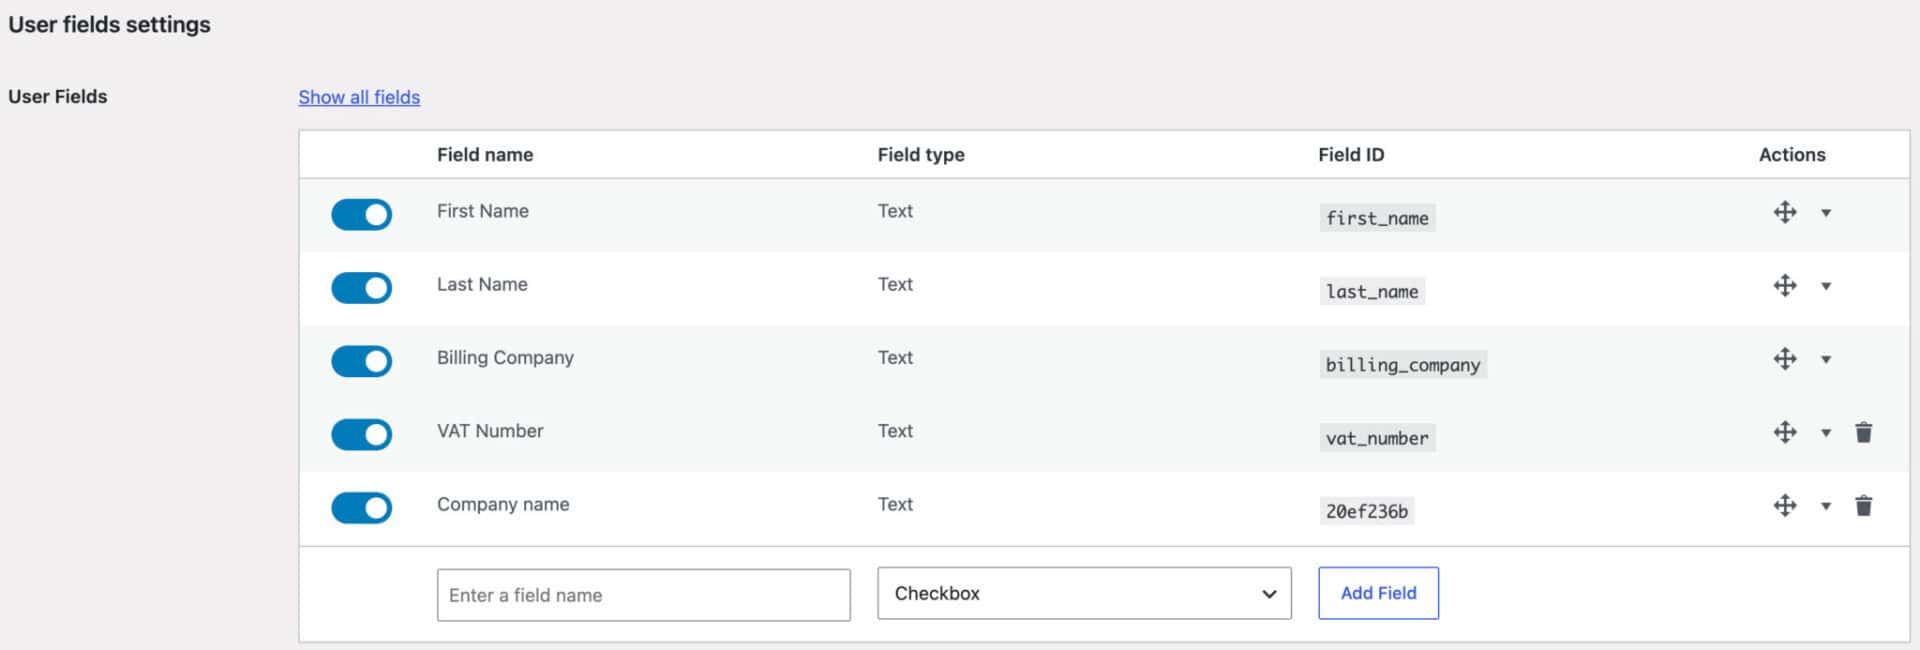
You can add extra fields to your registration form by going to Members Only > User Fields. You’ll see a list of standard WooCommerce user fields like First Name and Last Name, each with a toggle to enable it on the registration form.
Scroll to the bottom of the field list to add your own – for a stationery wholesale account, useful fields include ‘Company name’, ‘VAT or tax number’, and ‘Trade reference’. Enter a name for each field, choose a field type, and click ‘Add Field’. You can also drag and drop fields into your preferred position.
Conditional registration fields
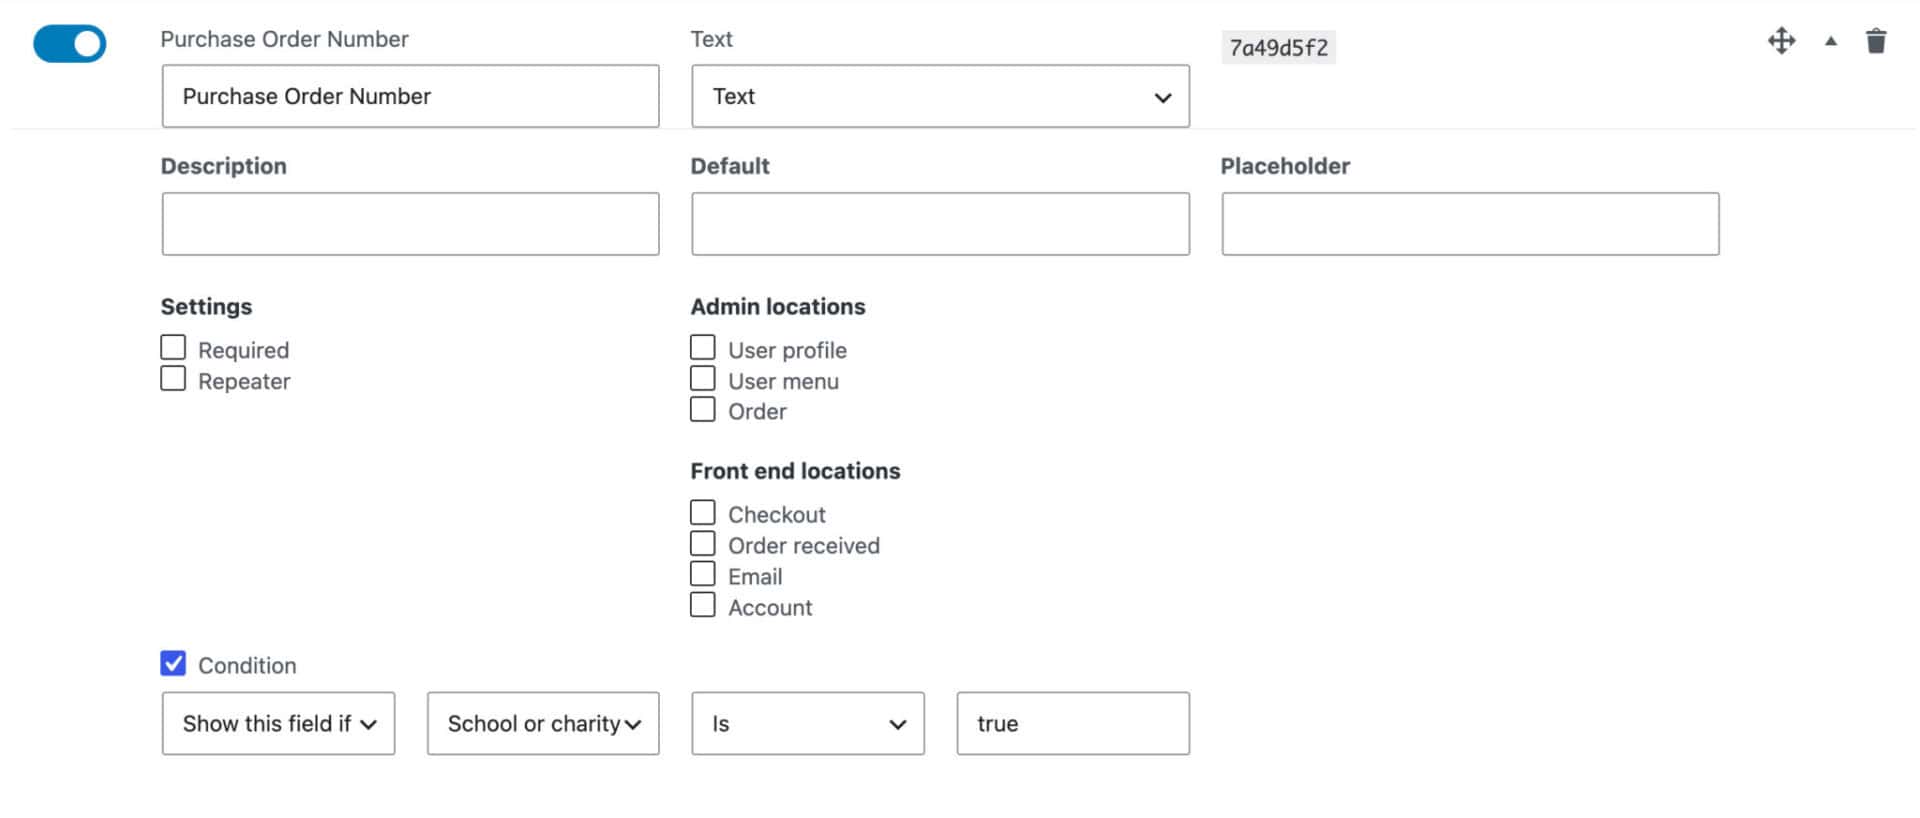
Not every buyer needs the same information. A school or charity ordering supplies for the year might need to give a purchase order number rather than a VAT number, while a stationery reseller needs a resale certificate to qualify for trade rates.
User Fields lets you set conditions on individual fields, so you can show a ‘Purchase order number’ field only when a buyer selects ‘School or charity’ from an account type field, and a ‘Resale certificate number’ field only when they select ‘Reseller’ – keeping the form relevant to whoever’s filling it in, rather than asking every buyer for the same details.
How do you let buyers select a trade account when they register?
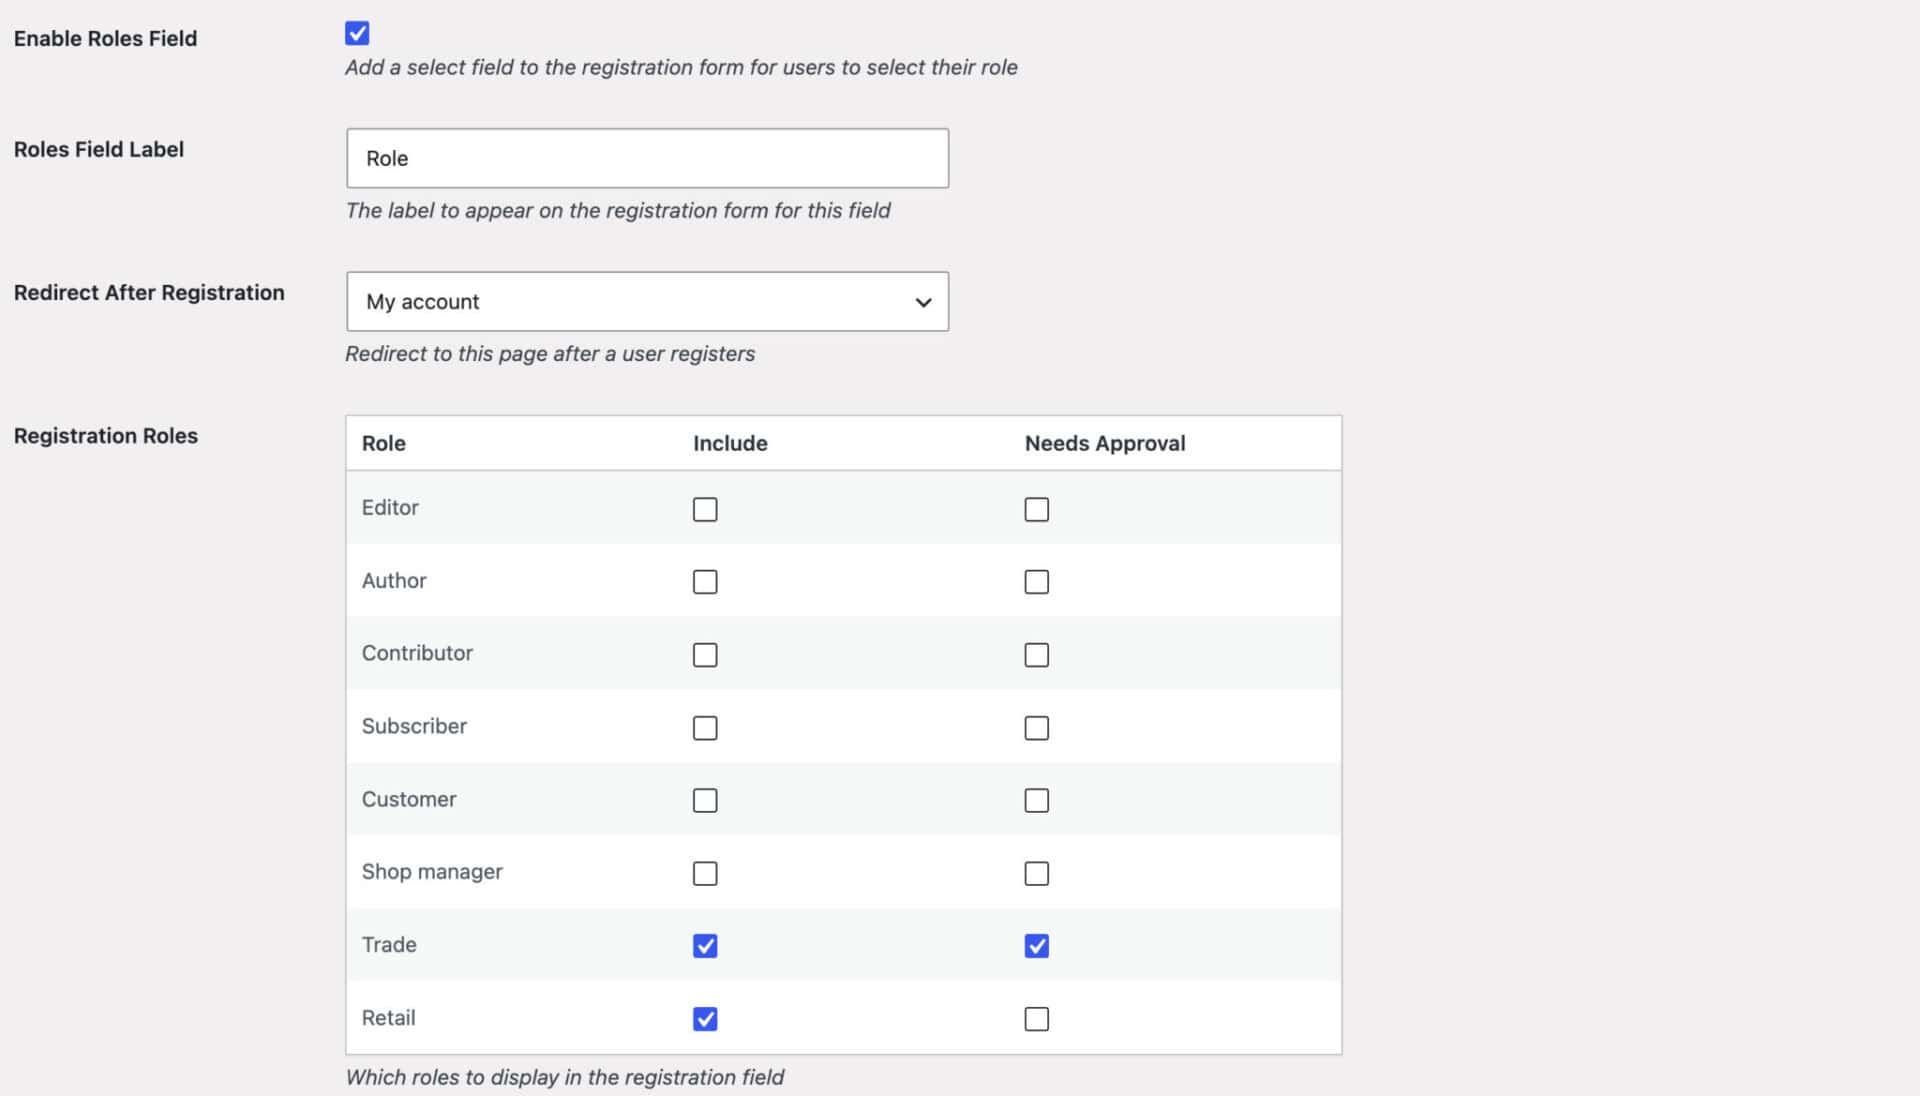
Next, set up a Roles field for the registration form so buyers can select ‘Trade’ when they register:
- Check the ‘Enable Roles Field’ option
- In the ‘Include’ column, select which roles should appear in the dropdown – e.g. ‘Trade’ and ‘Retail’
- In the ‘Needs Approval’ column, select ‘Trade’ so new trade registrations wait for your review, while retail sign-ups can go through automatically
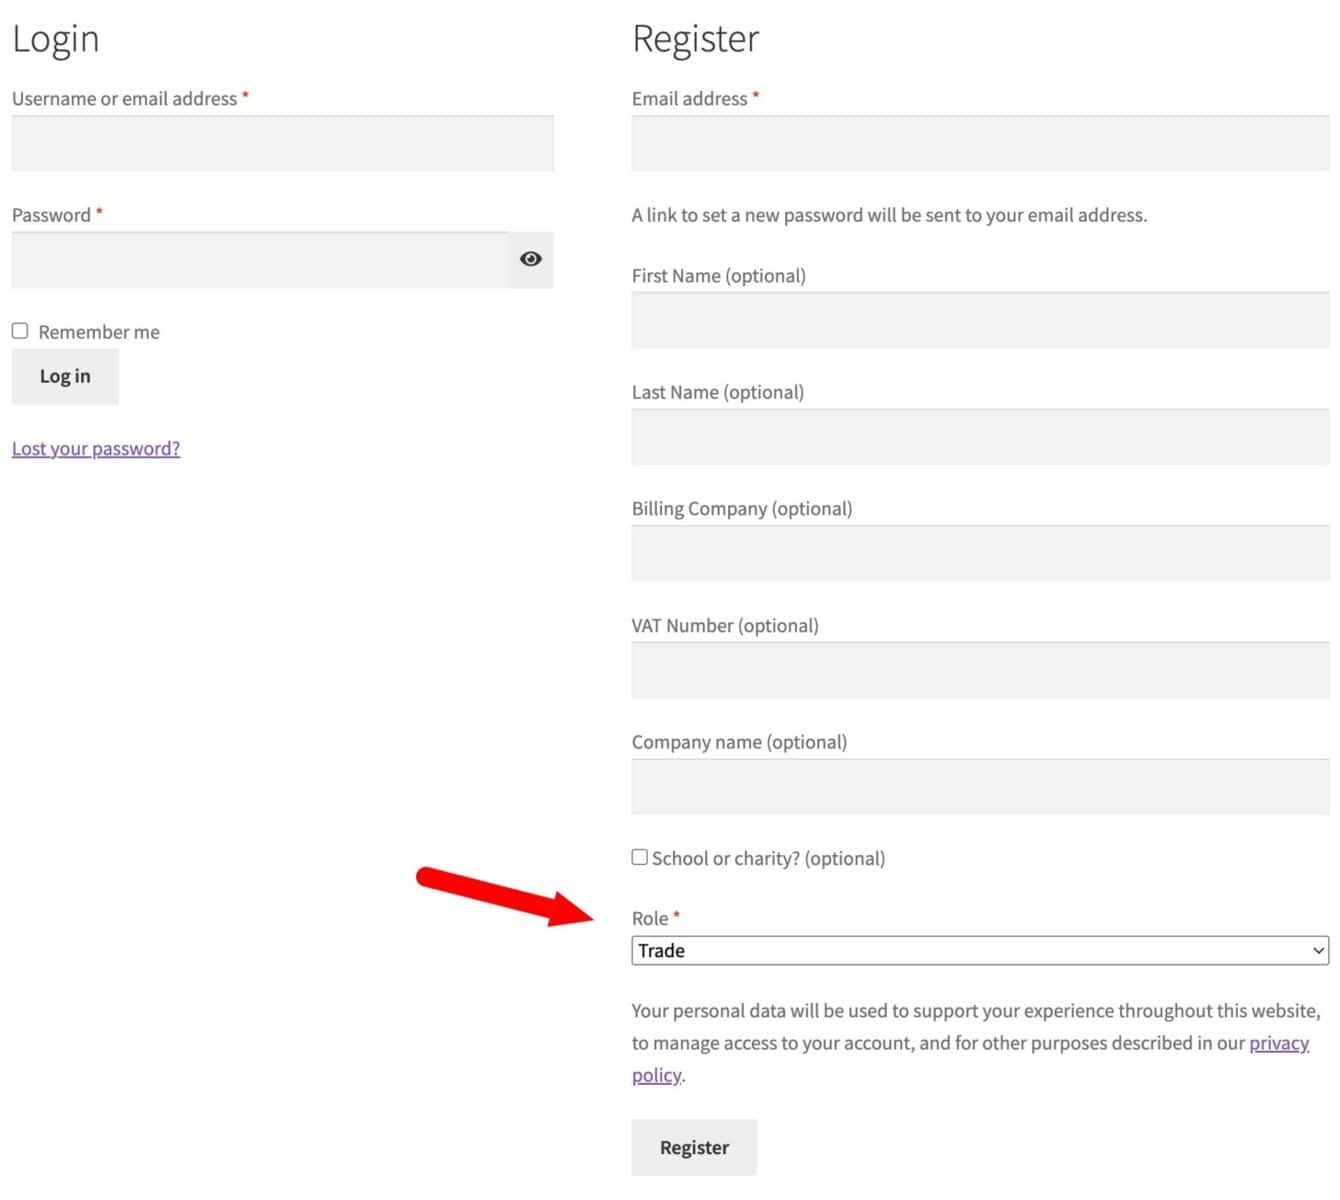
Trade buyers now see a registration form asking for their company details and requesting a B2B account, with their registration queued for your review rather than approved automatically.
How to approve B2B accounts and hide pricing from retail visitors
Stationery and office supplies businesses may want trade pricing kept private, and new wholesale accounts reviewed before they can buy at those rates – particularly if pricing depends on order history or an existing account relationship.
This section explains how to set up user approval if you require it. Skip forward to the next section if you don’t need to approve new customer registrations.
How do you approve new B2B registrations?
Before user approval can work, account creation needs to be switched on. Go to WooCommerce > Settings > Accounts & Privacy and enable the ‘On “My Account” page’ option under ‘Account Creation’.
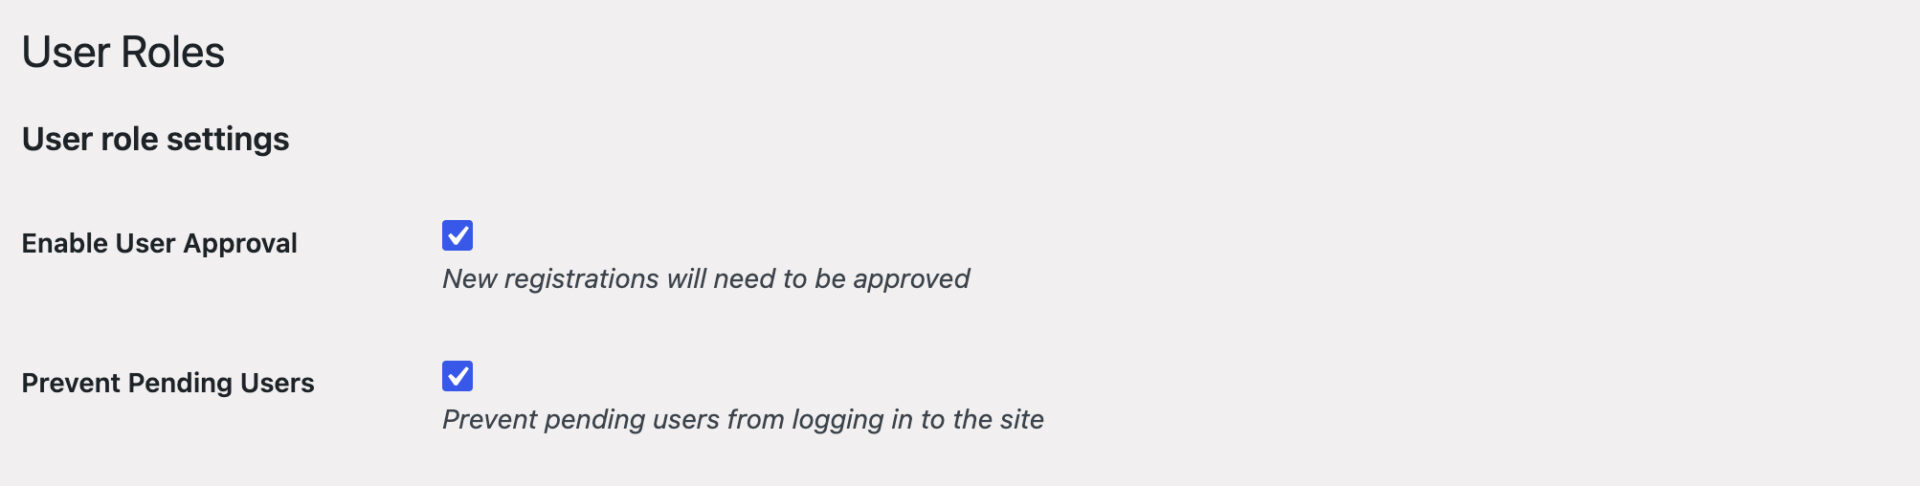
Then go to Members Only > User Roles and check the ‘Enable User Approval’ option. From this point on, every new trade registration sends you an email with the buyer’s details, and the account sits in a ‘Pending’ role until you approve or reject it.
You can also check ‘Prevent Pending Users’ if you don’t want unapproved buyers to log in at all while their account is under review.
How do you hide products or prices from non-B2B customers?
You can choose to hide your trade pricing or even entire product categories from non-trade customers. If your product catalog is the same for all users and you just want to display different prices for wholesale and retail customers, you can skip ahead to the next section.
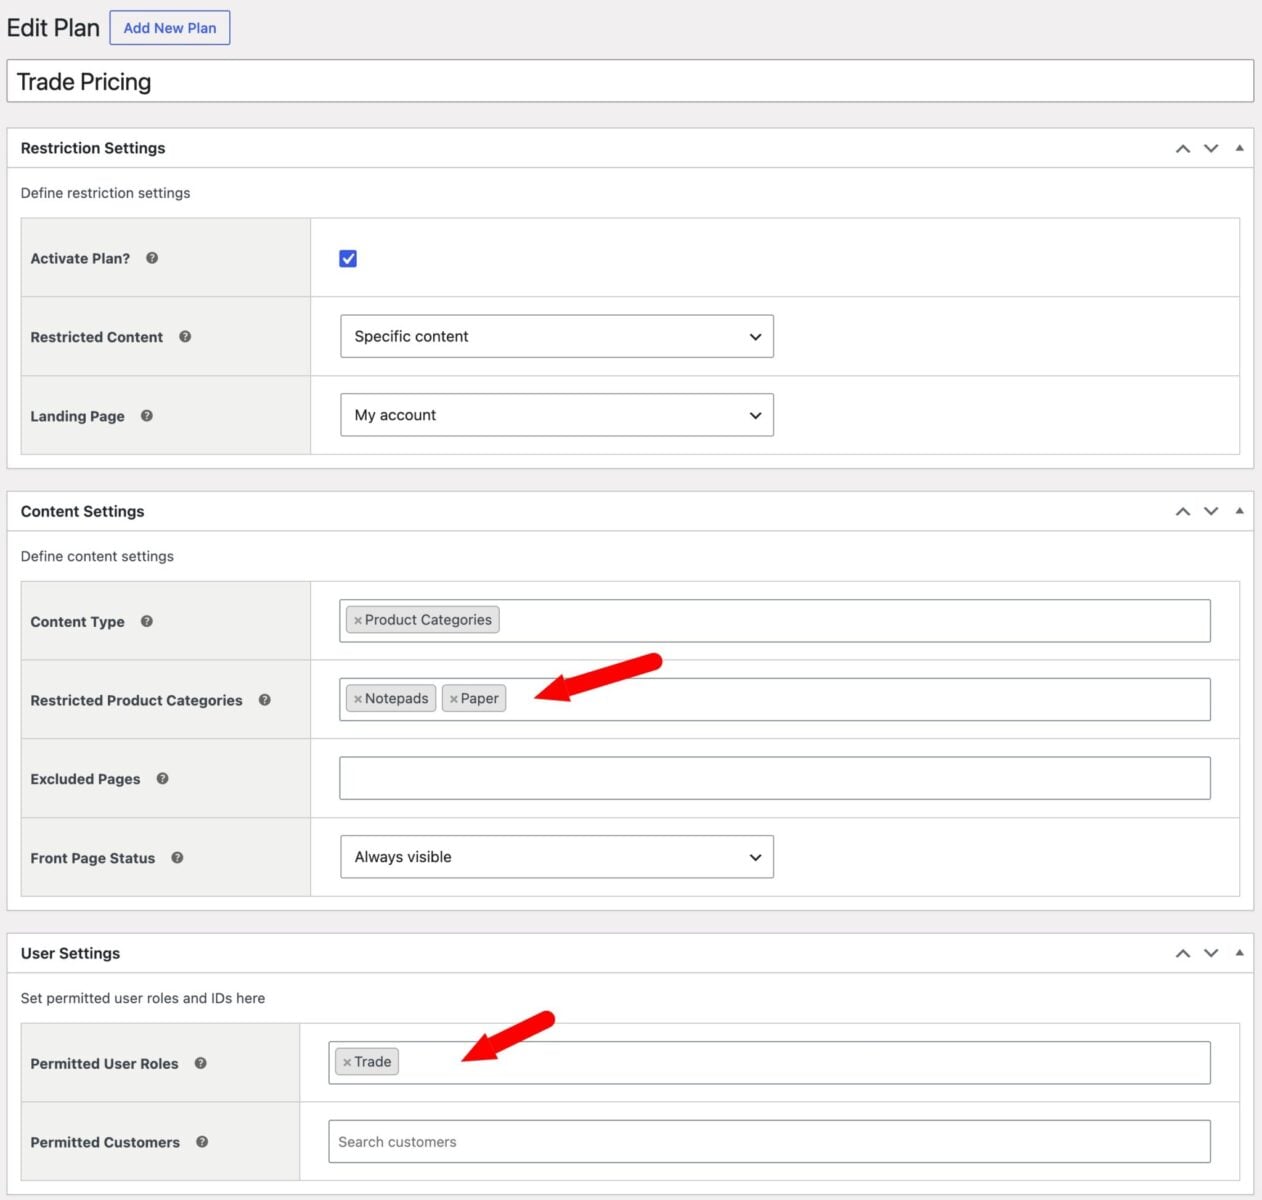
To hide content or pricing from retail customers, you need to specify ‘user role’ as the restriction method in Members Only and create a membership plan to specify which user roles can access which content.
- Go to Members Only > Settings and set ‘Restriction method’ to ‘User role’
- Go to Members Only > Plans and click ‘Add New Plan’
- Name the plan something like ‘Trade Pricing’ and enable ‘Activate Plan’
- Under ‘Restricted Content’ choose ‘Specific content’, then select the product category or categories that hold your trade-priced products
- Under ‘Permitted User Roles’, enter ‘Trade’ so only that role can access the restricted category
- Save the plan
How do you hide prices from non-trade visitors?
From the Members Only > Settings screen:
- Enable ‘Hide price’ to remove prices from restricted products until a user logs in
- Set ‘Add to cart text’ to something like ‘Log in for wholesale pricing’ so retail visitors understand why they can’t buy
- Check the ‘Redirect from Add to Cart Button’ option to direct the users to a log-in page if they click the button
- Enable ‘Access product pages’ if you’d like non-trade visitors to browse your catalog without being able to purchase
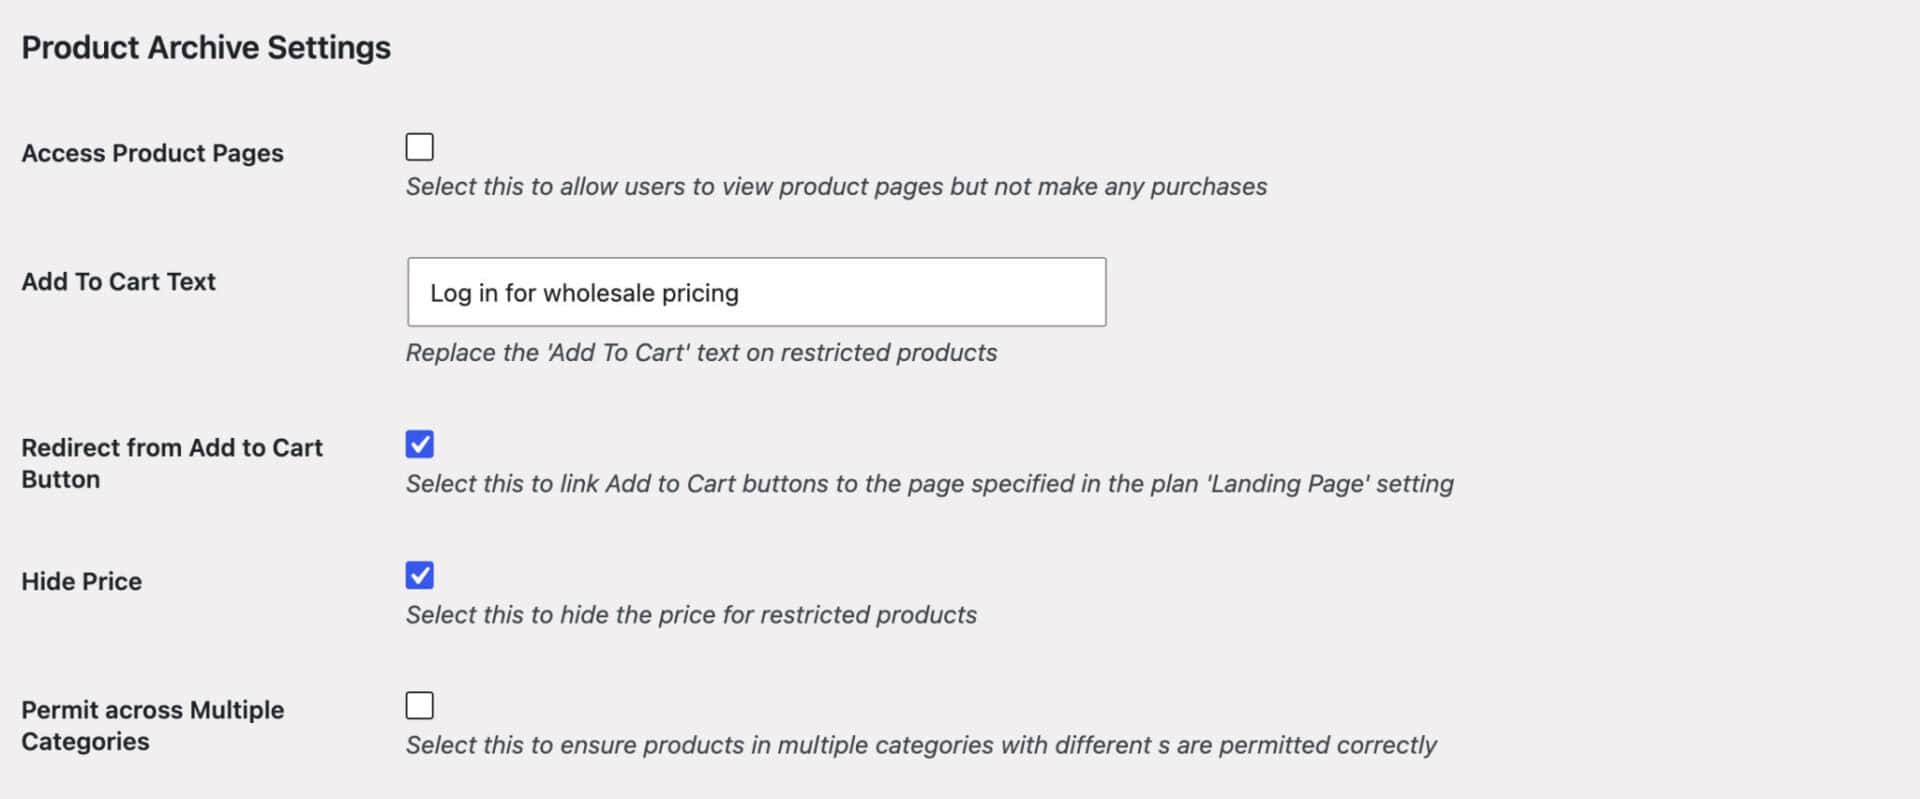
If you leave the ‘Hide price’ option unchecked, retail customers will see your standard pricing. Trade customers will see the discounted pricing when they log in.
How do you hide products from non-trade visitors?
Hiding the price is often enough if you’re happy for anyone to browse your catalog. If you’d rather restricted stationery lines didn’t appear at all – a bulk range you only want trade buyers to know about, for example – go a step further from the same Members Only > Settings screen:
- Enable ‘Hide in Archives’ to remove restricted products from your shop page, category pages, and search results for anyone outside the permitted role
- Disable ‘Access product pages’ so a non-trade visitor who finds the direct link is redirected instead of shown the page
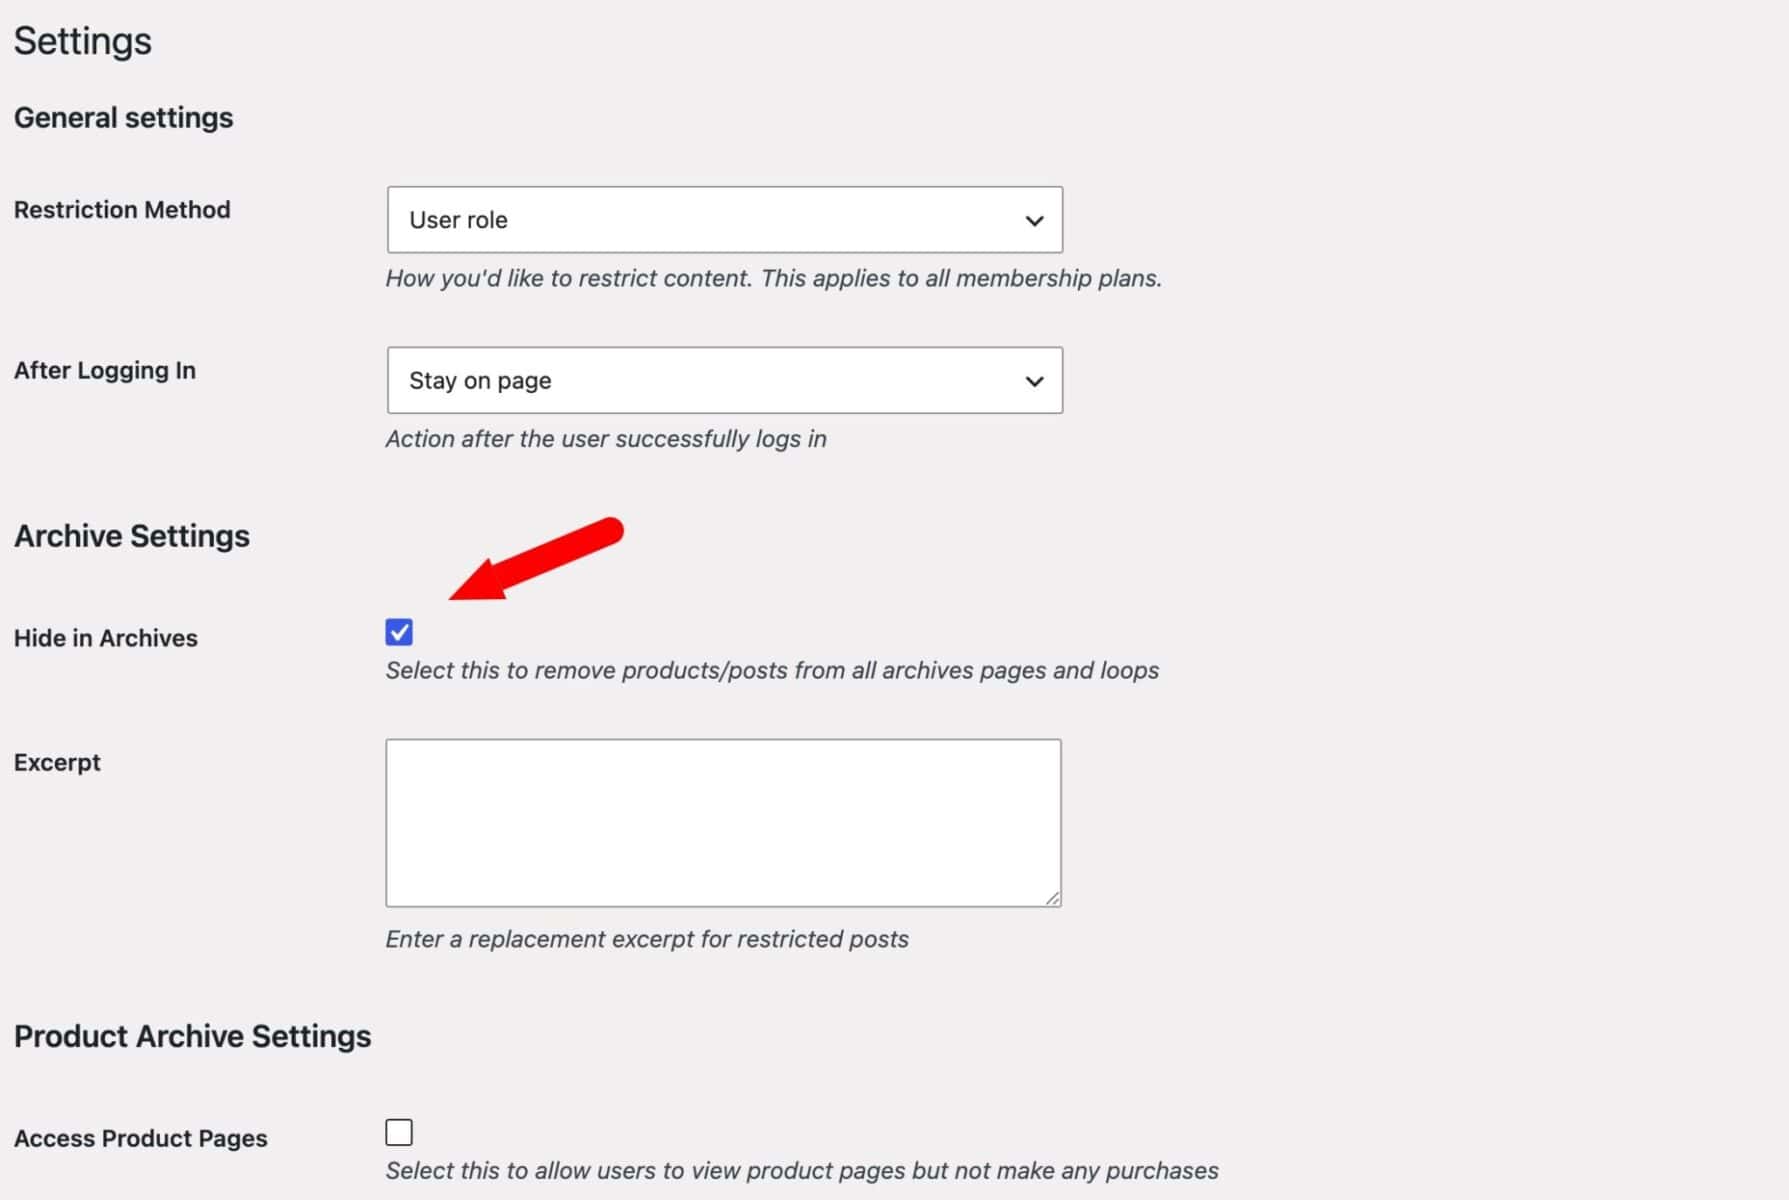
Together, these keep the restricted product categories out of sight entirely rather than just hiding their prices.
In the next section, we’ll look at how to set different prices for different customers.
How to set up wholesale and bulk pricing tiers for stationery orders
Stationery and office supplies are almost always priced by quantity – the more pens, reams, or folders a business buys, the lower the unit price should get.
Dynamic Pricing and Discount Rules handles role-based pricing, B2B discounts and bulk pricing.
How do you create a wholesale discount rule?
Go to WooCommerce > Fees and Discounts and click ‘Add New’ to create a pricing rule.
Every rule shares the same core settings:
- ‘Rule’ – the type of offer, e.g. Simple or Bulk Pricing
- ‘Applies to’ – whether the rule covers all items, specific categories, or specific products
- ‘Roles’ – which user roles the rule applies to
- ‘Adjustment type’ – fixed discount, percentage discount, or a tiered price
For a straightforward trade discount, choose ‘Simple’ as the Rule type, set an adjustment (e.g. a 15% percentage discount), and enter ‘Trade’ in the ‘Roles’ field. Anyone logged in with the Trade role sees the discounted price automatically, while retail visitors pay the regular price.
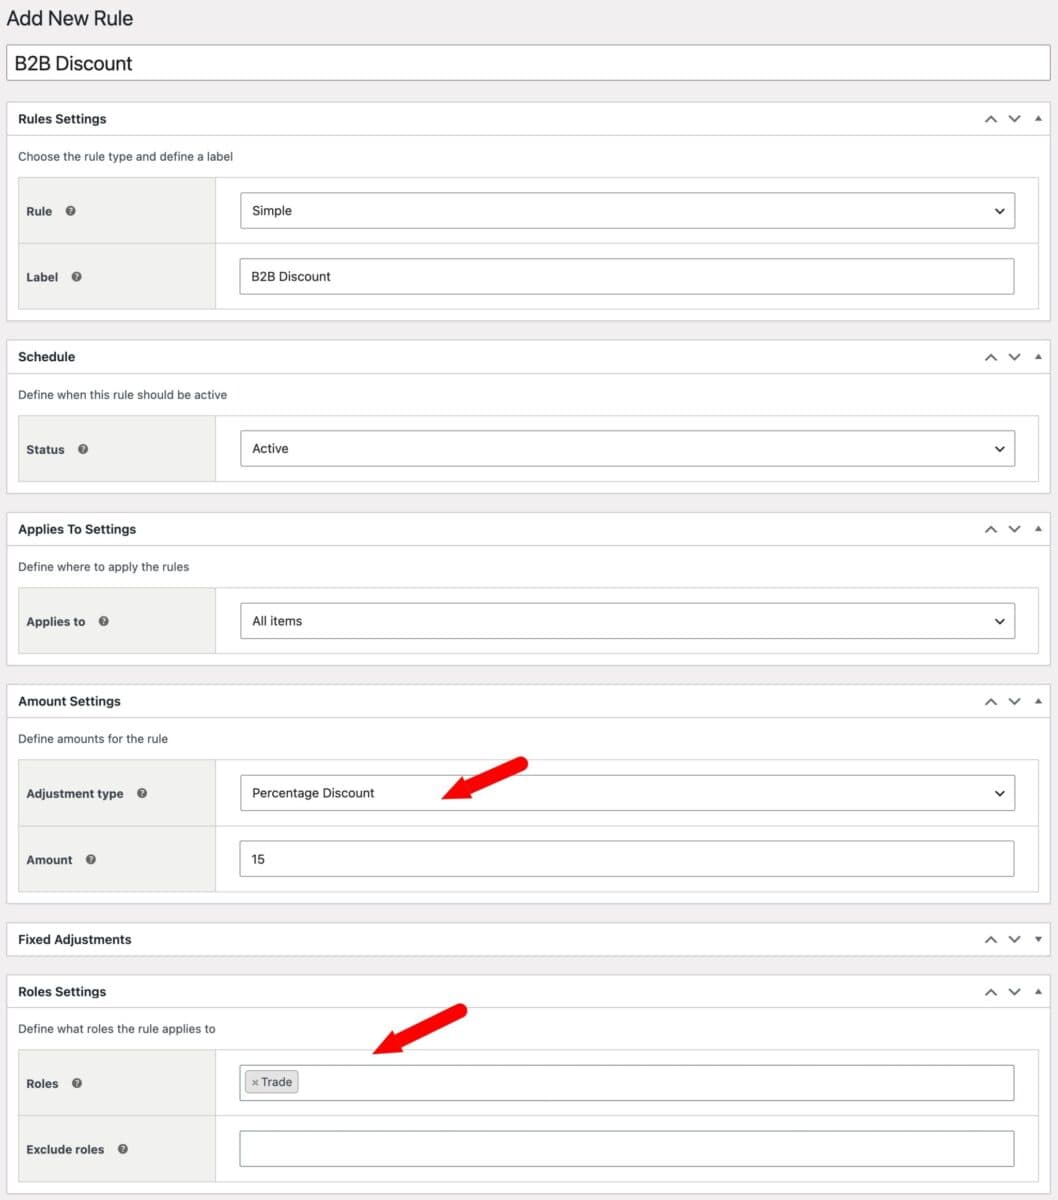
You can set up different discounts for different users if you like. For example, if you’ve set up separate roles for different buyer types – a Reseller role alongside Trade, or a School/Charity role – you can create a separate rule for each, with its own adjustment and its own ‘Roles’ field entry.
A reseller buying to sell on again might get a deeper discount than a school ordering for its own classrooms, even though both are B2B accounts, and each sees only the rate that applies to them.
How do you add bulk pricing tiers?
You can create bulk pricing rules for multiple products or individually per product.
To create a bulk pricing rule for multiple products where discounts are applied as a percentage:
- Go to WooCommerce > Fees and Discounts and click ‘Add New’
- Choose ‘Bulk Pricing’ as the Rule type
- Enter the user roles that the rule applies to
- Select which products the rule will apply to in ‘Applies to’
- Create the pricing bands per quantity in the ‘Tiers’ section
- Set the ‘Adjustment’ to ‘Percentage Discount’
As an example, for a pen sold at $2 each to B2B accounts, you could set 1–99 units at the standard trade price, 100–499 at a 10% discount, and 500 or more at a 20% discount.
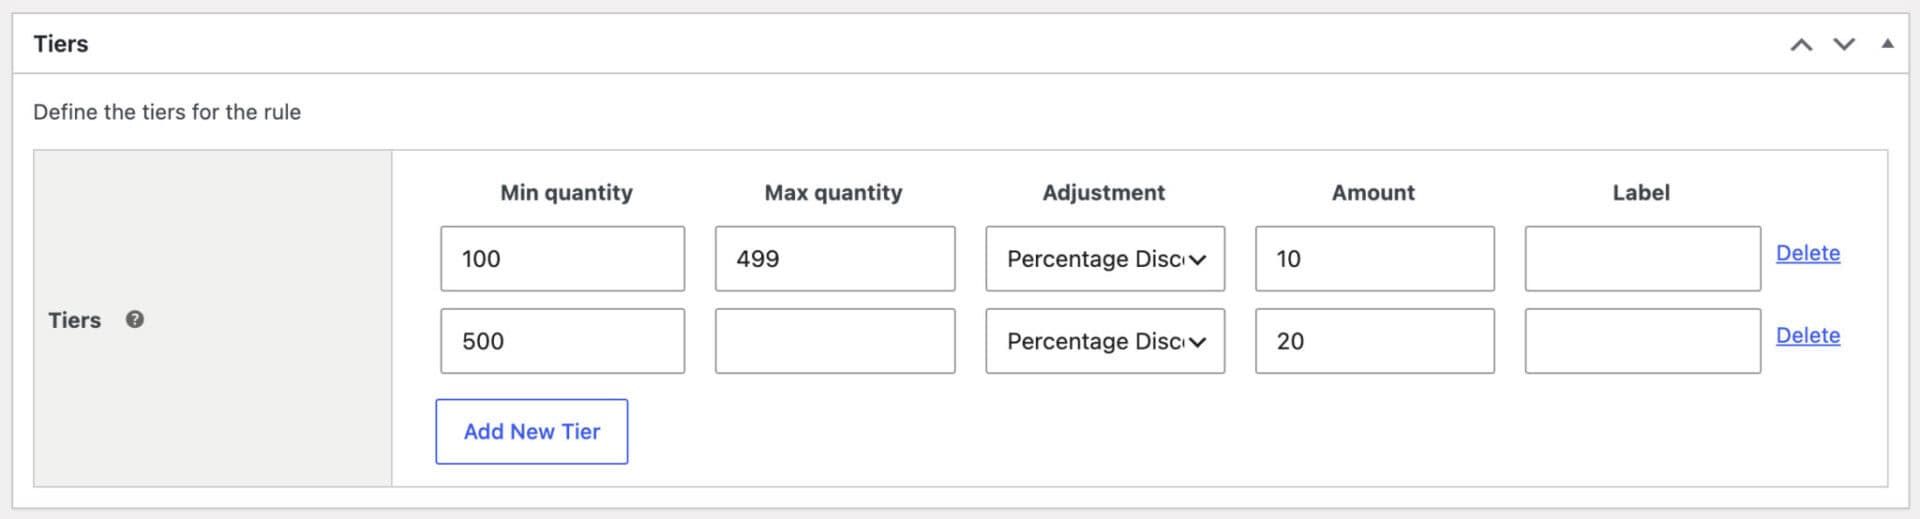
If you want to apply a fixed amount as a discount, e.g. $0.20 per item, set ‘Adjustment’ to ‘Fixed Discount’.
If you’d rather enter the exact unit price for each band instead of a discount off the base price, then set the adjustment type to ‘Tiered’. Then, in the ‘Amount’ field you enter the actual unit price per item for that quantity band.
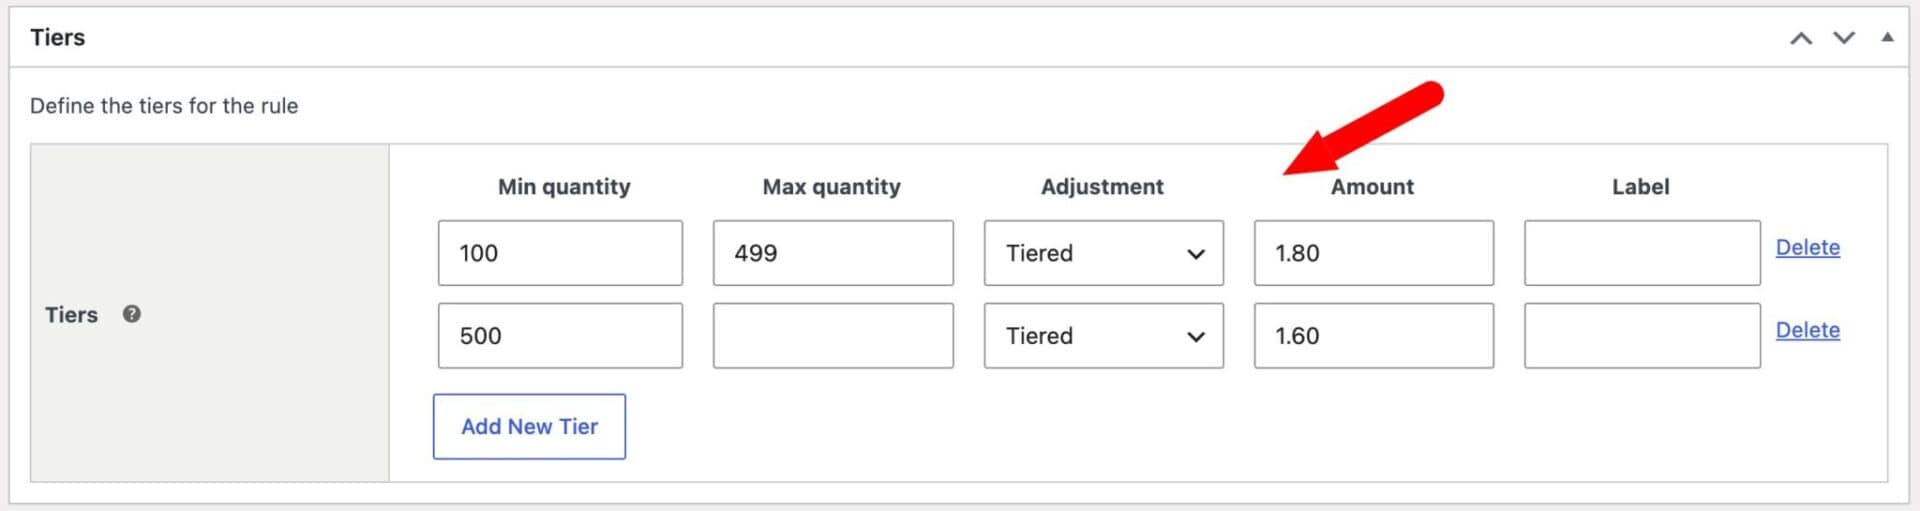
Tiered pricing works well for products where you’d rather quote a round, exact price per band than a percentage off. For copier paper sold by the ream, you might set 1–9 reams at $6 each, 10–49 reams at $5.50, and 50 or more reams at $5 – three tiers, each with its own fixed unit price rather than a discount calculated off the base rate.
Now, your trade customers will see their own pricing, with the unit price dropping automatically as they order in bulk – exactly the kind of pricing structure office supplies buyers expect.
How do you set pricing on individual products?
The rules above apply globally, or to whole categories or multiple products – but you can also set pricing for a single product without affecting the rest of your catalog. This is useful for one-off items like a limited stationery set that doesn’t fit your usual pricing structure or if your products have slightly different pricing that doesn’t fit a global rule.
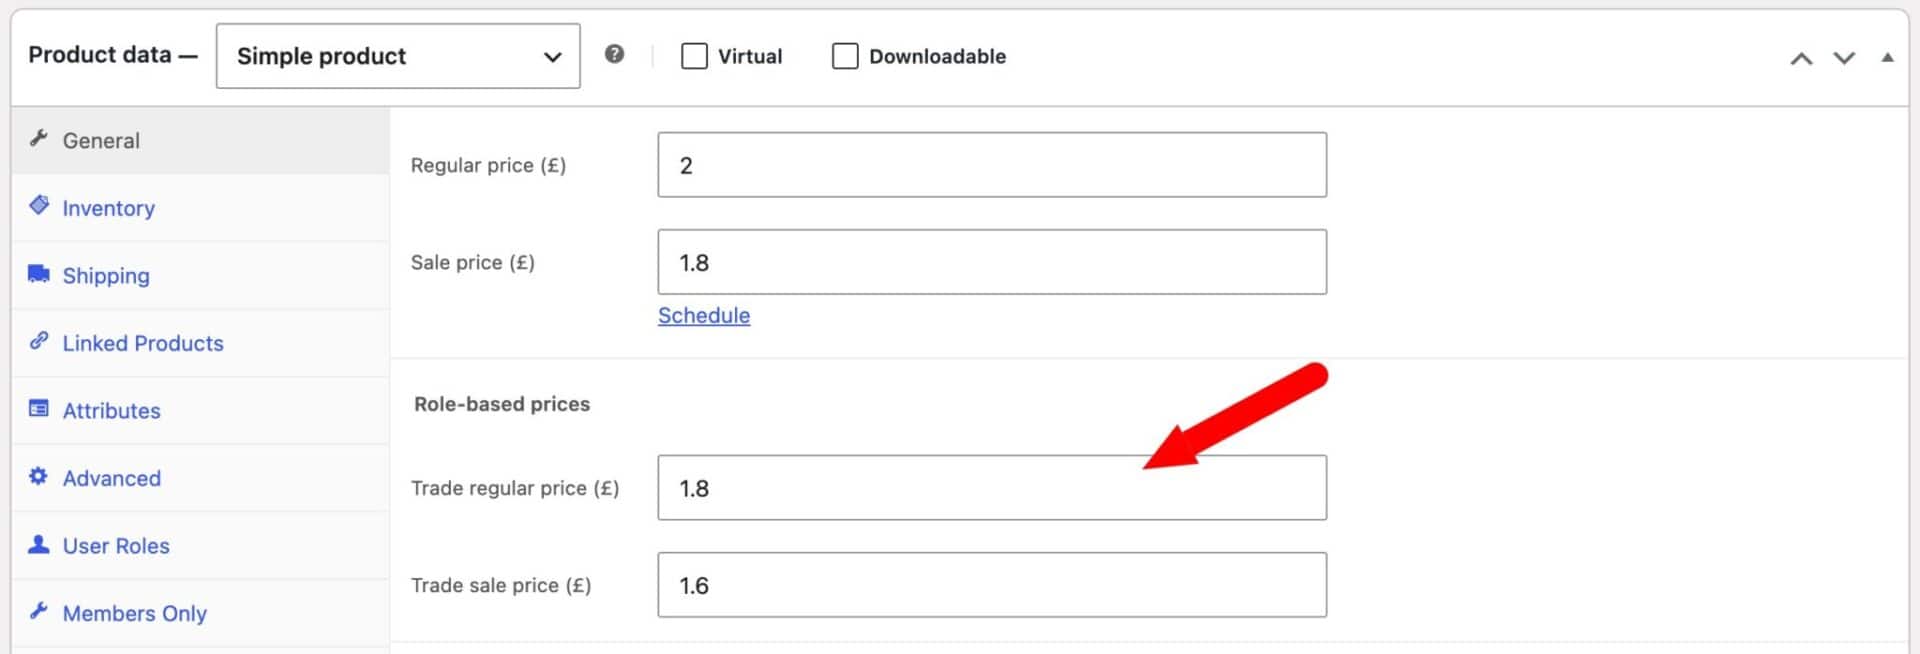
Set exact role-based prices per product
To set an exact price per role on one product, you need to define which roles should have unique pricing:
- Go to WooCommerce > Settings > Fees and Discounts > User Role Pricing
- Enter which roles should have their own product prices in the Roles and Roles (Sale Price) fields
- Enable ‘Role-based prices for variations’ if you want unique role-based prices per variations.
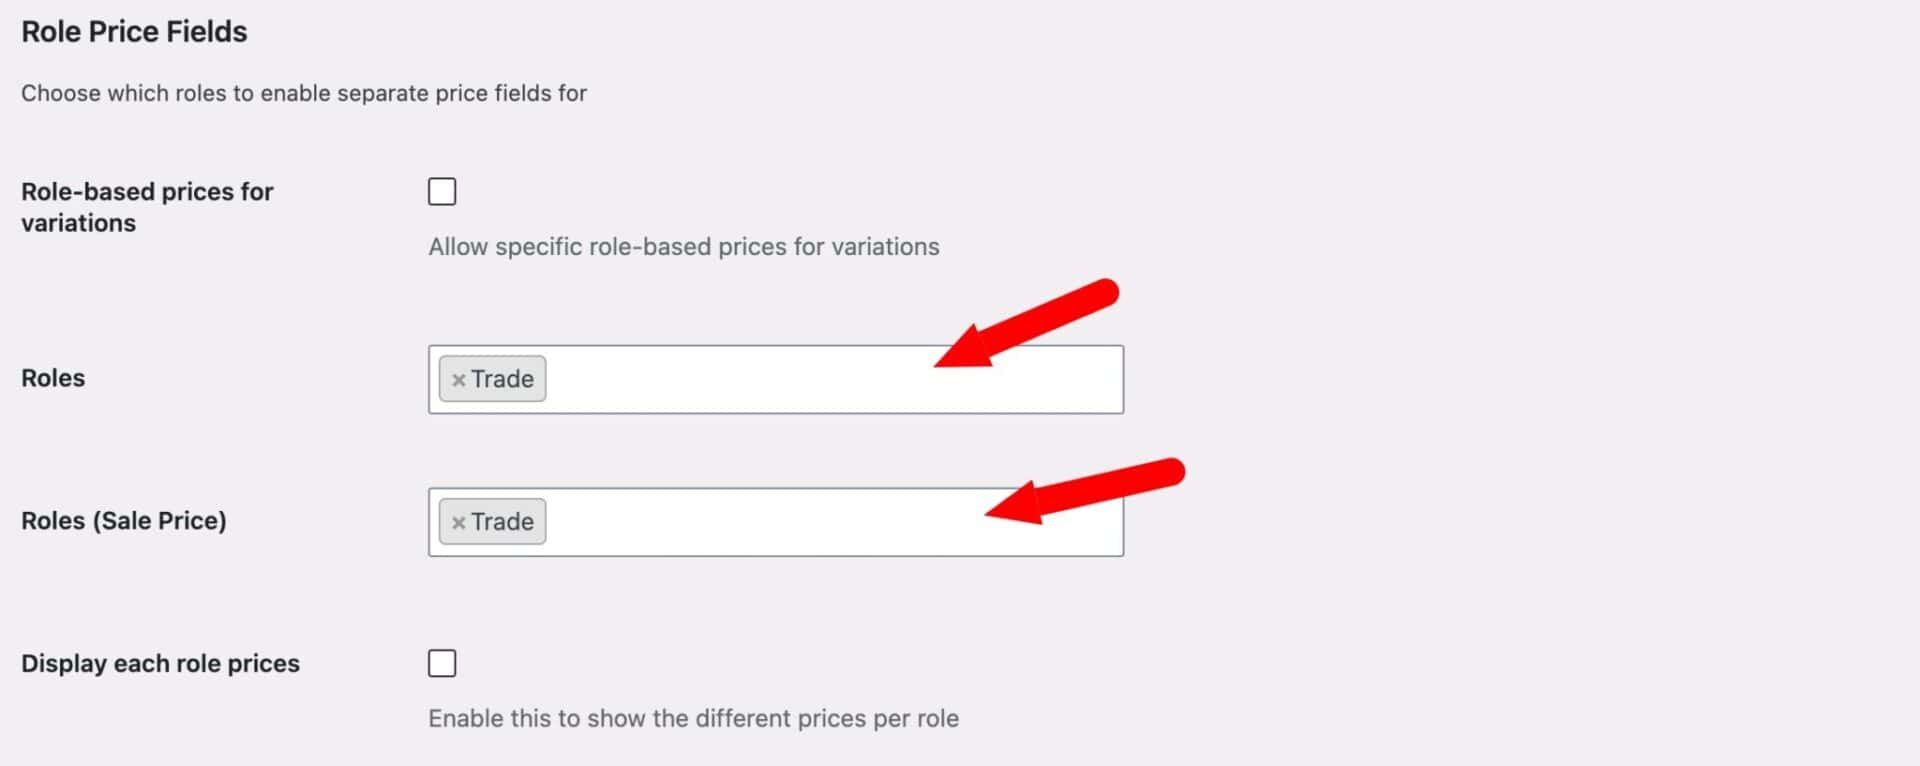
Now, in the product edit screen, you’ll get new fields under the standard price fields where you can enter your role-based prices.
Bulk pricing per product
Bulk pricing works the same way on a single product:
- Open the product, scroll to the Product Data section
- Choose ‘Bulk Pricing’ in the ‘Rule’ field
- Set the ‘Status’ to ‘Active’ and add tiers exactly as you would for a global rule
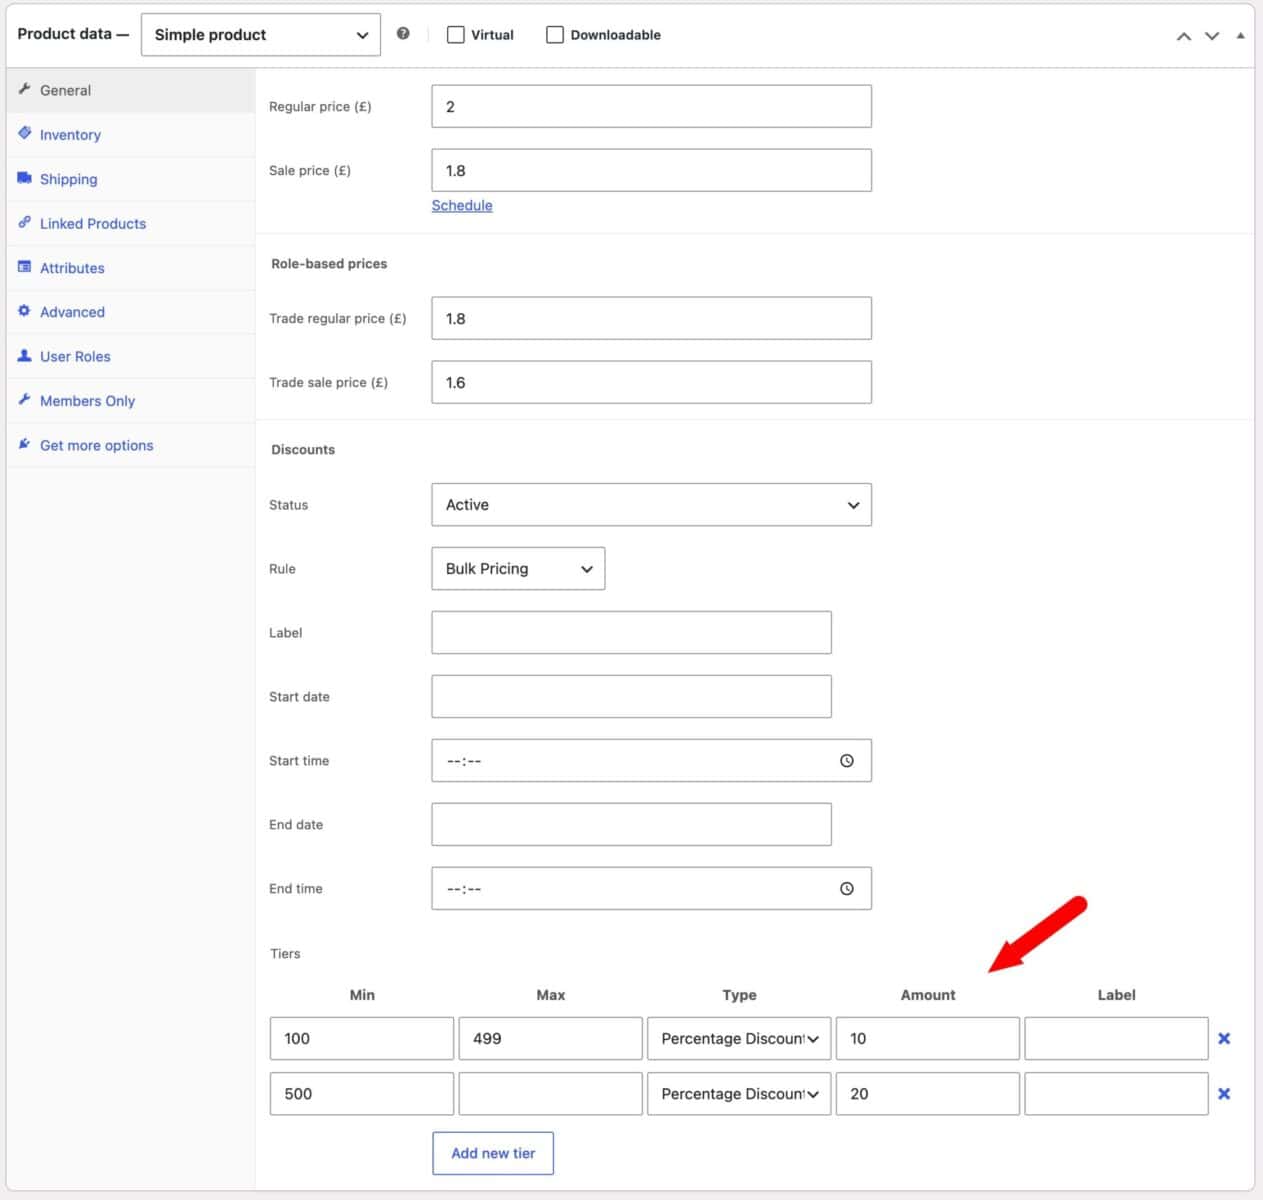
This is a good option when only one or two products need their own quantity bands – a limited-edition notebook, say – rather than adding a separate global rule just for them. You can also schedule the discounted pricing here if you wish.
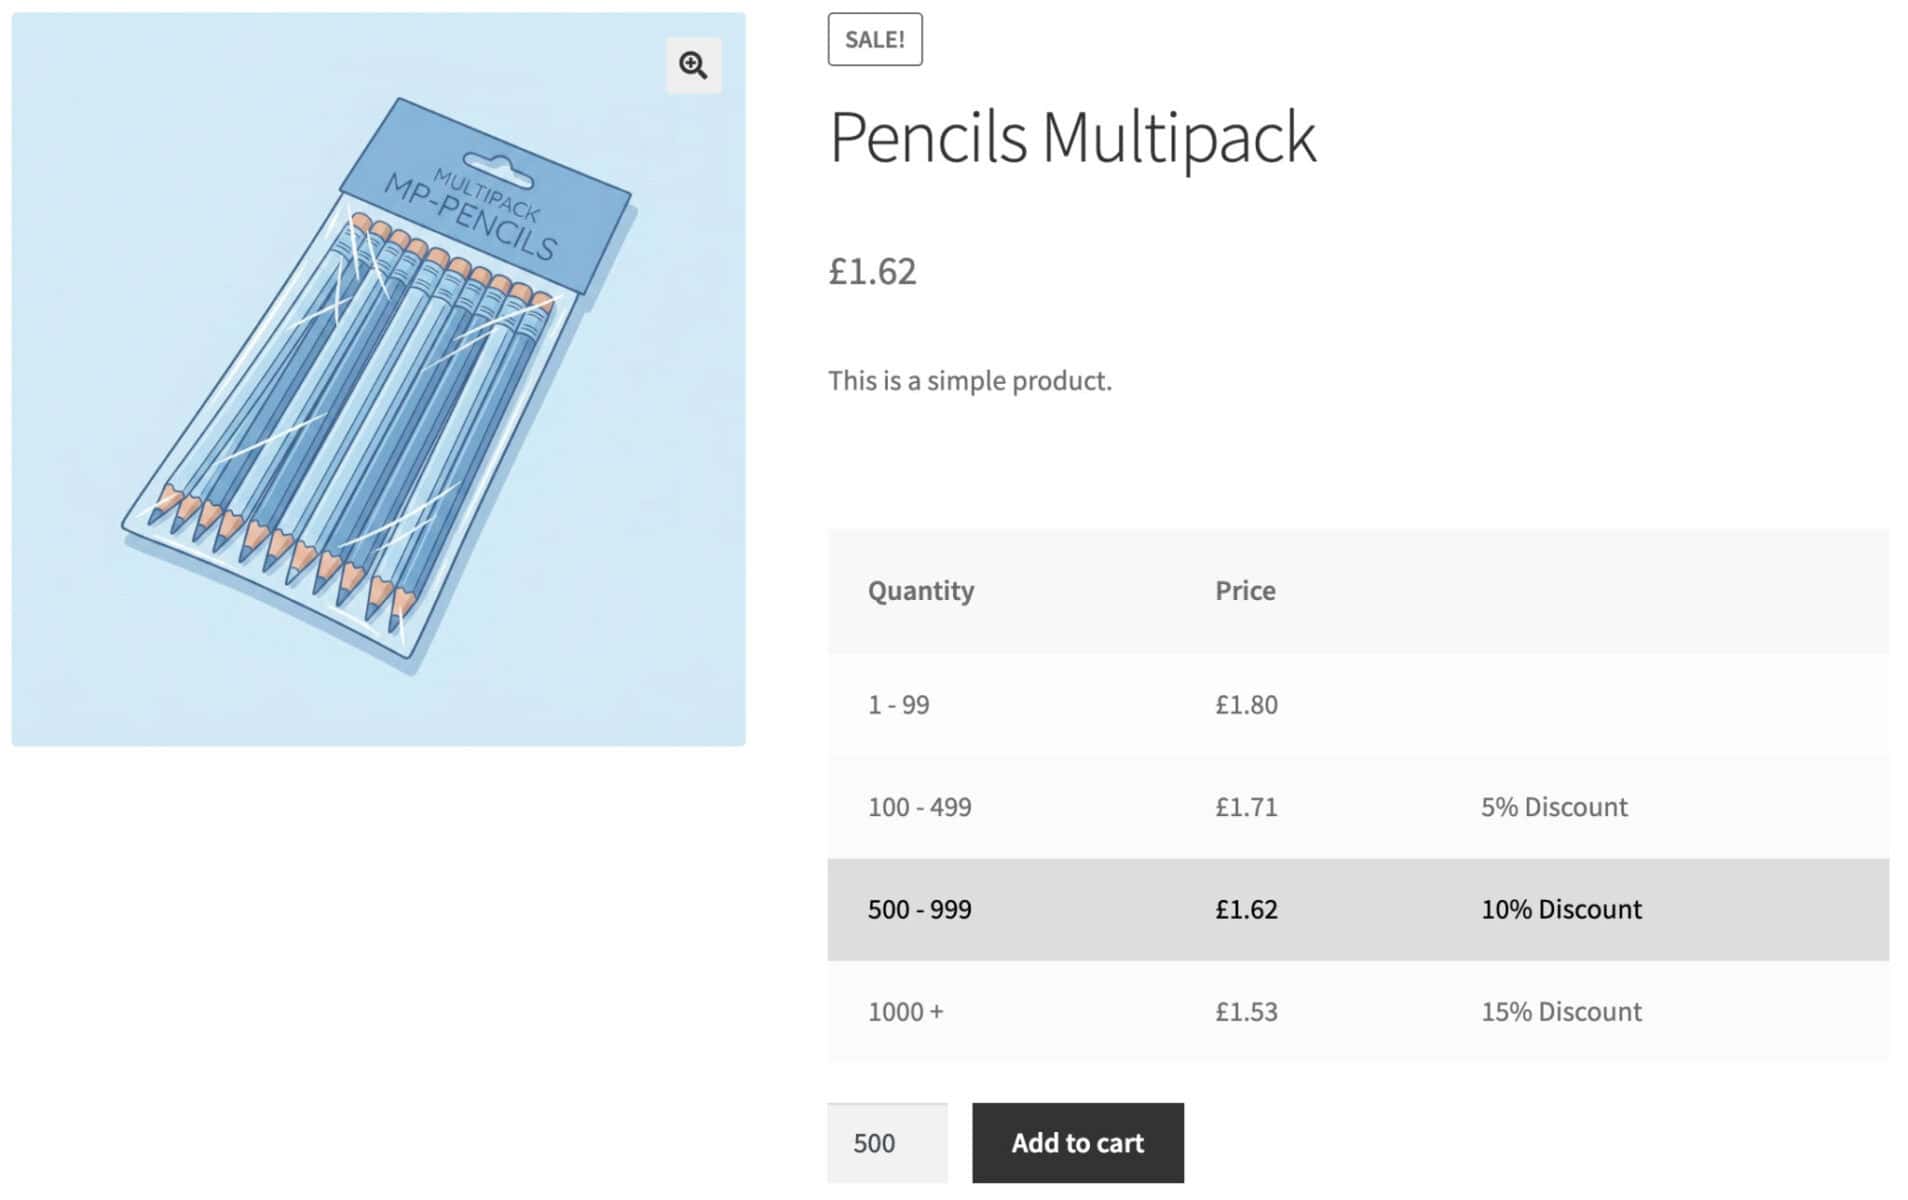
How do you show a pricing table to wholesale buyers?
Dynamic Pricing and Discount Rules can also display your quantity bands as a pricing table directly on the product page, so trade buyers can see every price break before they add anything to their cart.
How do you exempt B2B buyers from tax?
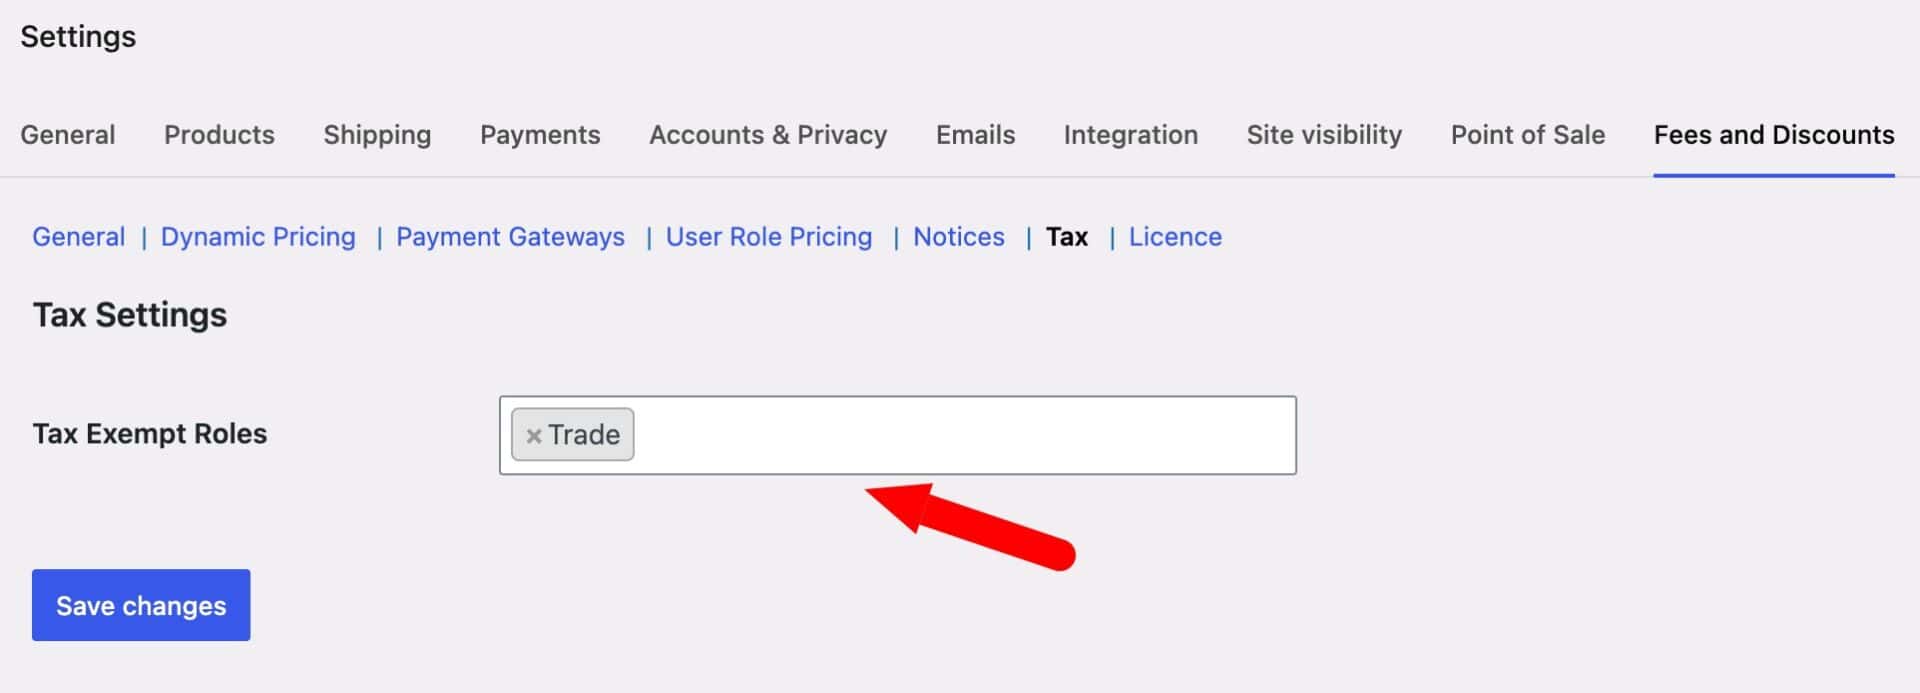
Many trade buyers – wholesalers, resellers, VAT-registered businesses, and tax-exempt organizations like schools and charities – also expect to be exempted from tax at checkout.
Go to WooCommerce > Settings > Fees and Discounts > Tax, select ‘Trade’ from the tax-exempt user roles dropdown, and click ‘Save changes’. Trade customers then see prices with tax removed automatically, while retail customers continue to see tax applied as normal.
How to display your stationery catalog as a fast-reorder product table
Trade buyers reordering pens, paper, and printer supplies don’t want to click through individual product pages.
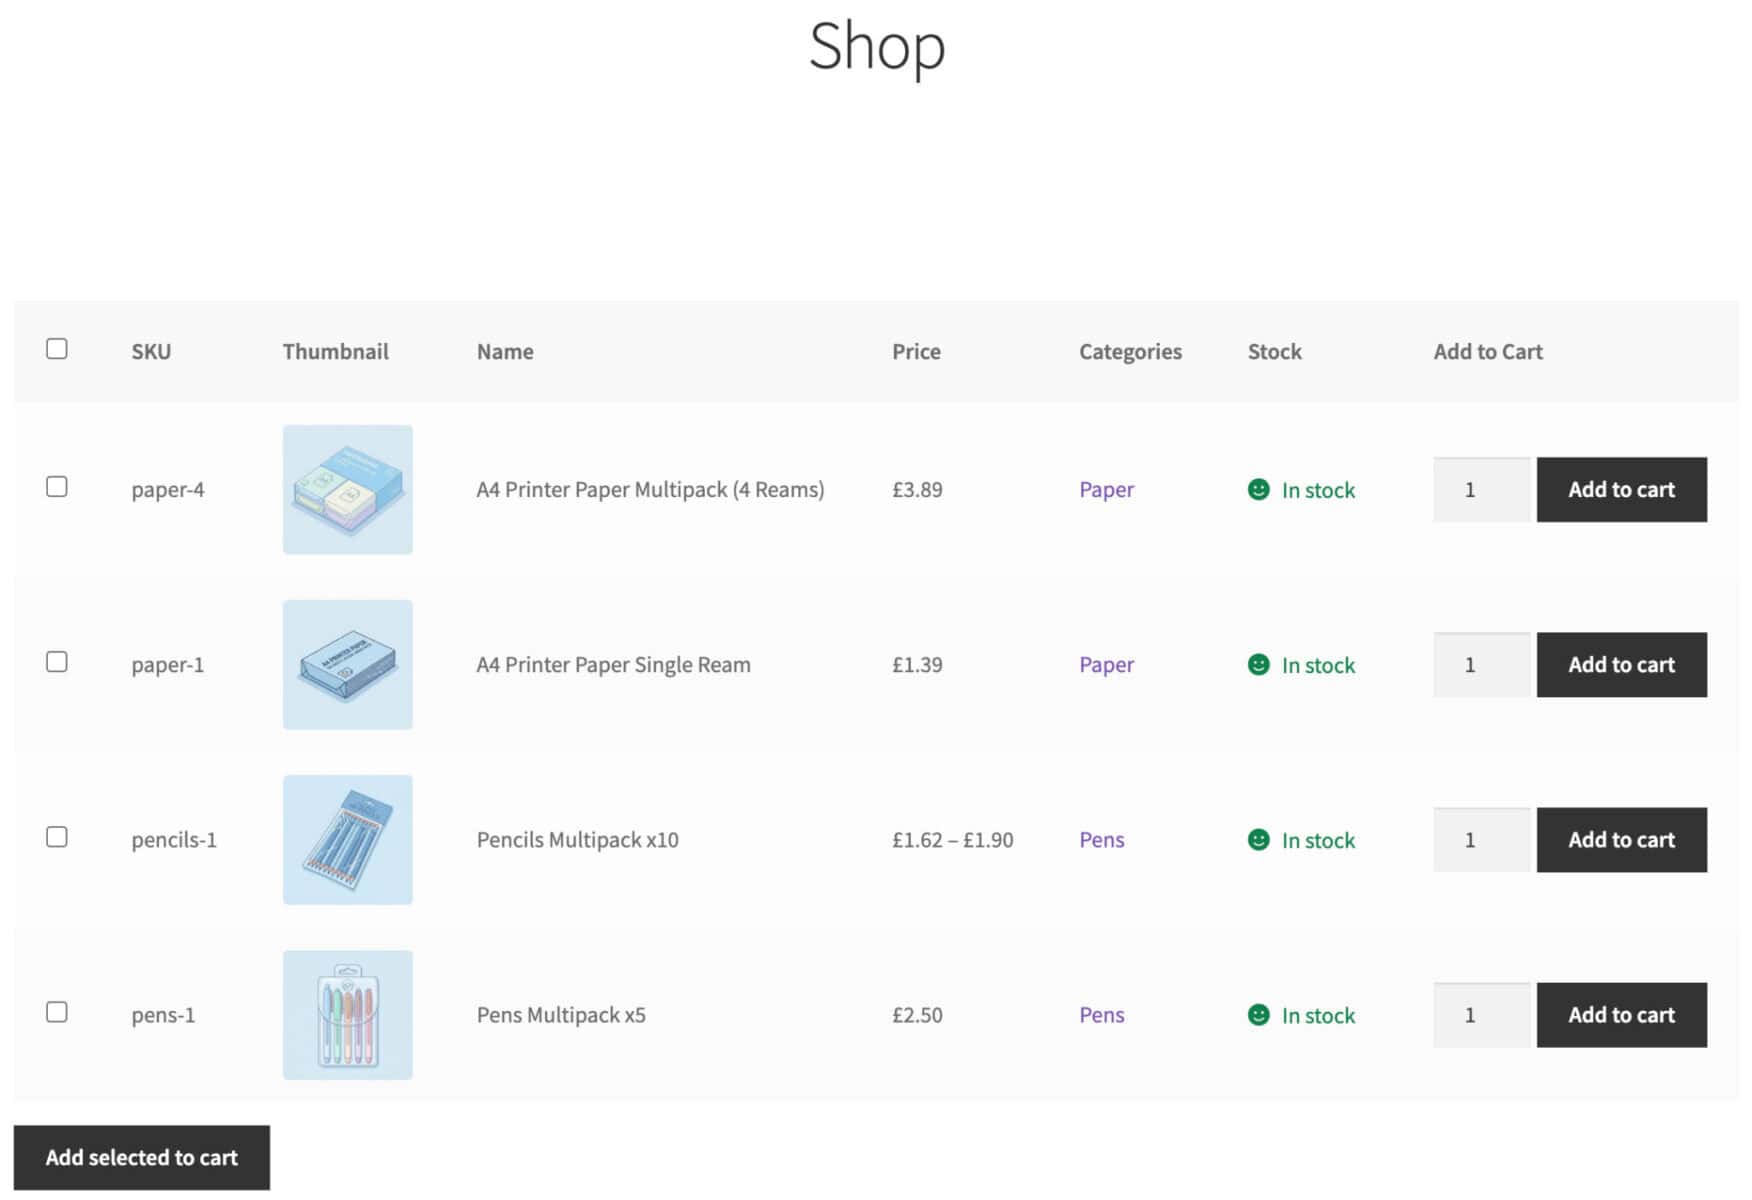
Product Table Ultimate replaces that with a single scrollable table, and is worth setting up if your wholesale customers place large, repeat orders across many SKUs – it’s an optional addition rather than a requirement for a working B2B store.
How do you add a product table to a page?
Go to the page where you’d like to display your wholesale catalog and add the Product Table Ultimate block, or enter the shortcode [product_table_ultimate] directly. By default, the table follows the settings at WooCommerce > Settings > Product Table, which is where you define which columns appear.
For a stationery catalog, useful columns include sku, thumbnail, name, price, and add-to-cart – enter these into the ‘Columns’ field, separated by commas. Trade buyers can then scan your whole catalog, adjust quantities, and add several products to their cart from one page, rather than navigating product by product.
How do you replace your shop or archive pages with a table?
Rather than adding a table to a single page, you can make it the default view across your store. Go to WooCommerce > Settings > Product Table > General and use the ‘Override pages’ setting to choose where a table layout replaces the standard WooCommerce product grid – Shop, Category, Tags, or other taxonomy pages.
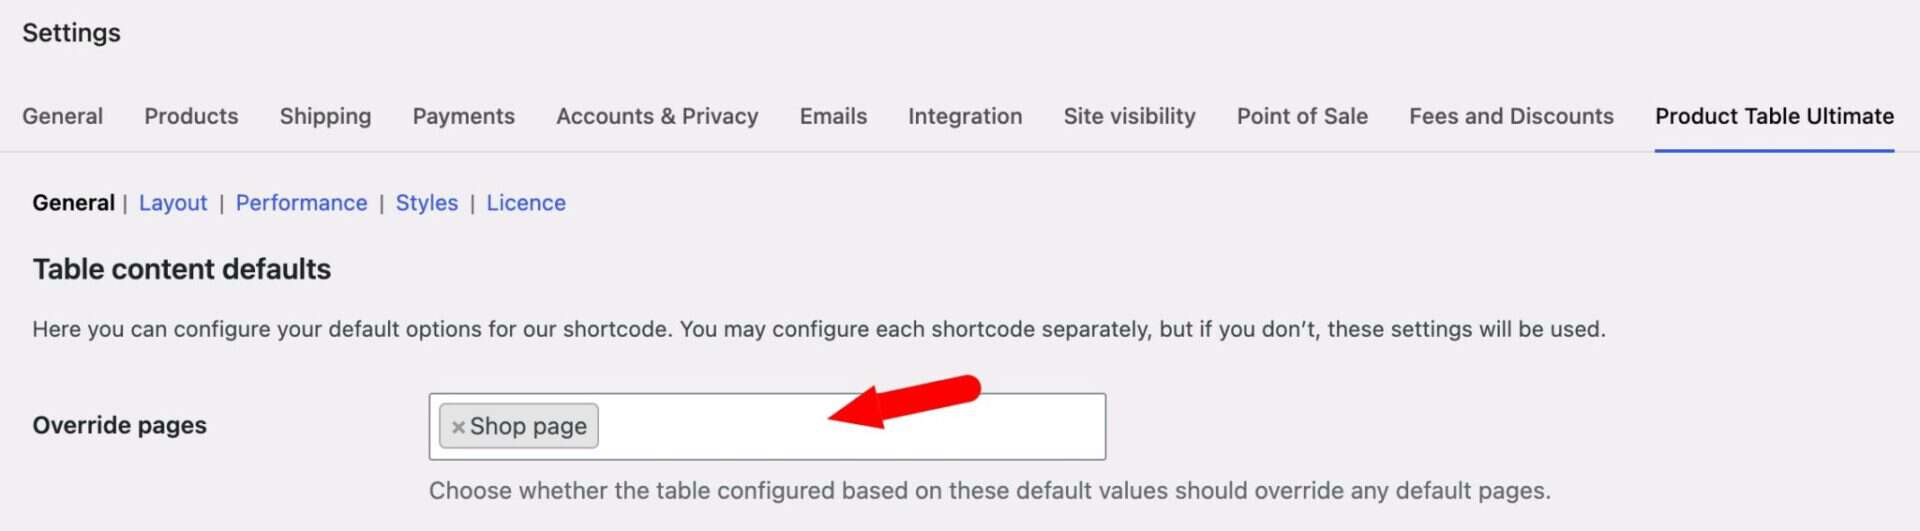
This is a good fit for a stationery store where trade buyers are shopping by category (pens, paper, filing) and expect a dense, scannable list rather than a grid of product images.
How do you create separate tables for different stationery categories?
You don’t need one table for your entire catalog. Set the ‘Products Source’ field to ‘Categories’ and select which category or categories that table should pull from – e.g. a dedicated ‘Pens and pencils’ table on one page, and a ‘Paper and printing’ table on another.
Each table on your site can have its own source, columns, and settings, so a category with more specification (paper weight, color, size) can show extra columns that a simpler category doesn’t need.
How do you restrict a product table to B2B customers only?
Product Table Ultimate works alongside Members Only rather than duplicating its access controls. If the products in your table belong to a category already restricted to the Trade role, they’ll be hidden or shown without a price in the table in exactly the same way as anywhere else on the site – there’s no separate setting to configure.
If you’d rather restrict the whole catalog page, add that page to your trade membership plan’s restricted content in Members Only, so only approved wholesale accounts can view the table at all.
How do you let customers filter and search the table?
Go to WooCommerce > Settings > Product Table > Layout to make columns sortable or filterable. Under ‘Sortable columns’, add any column you’d like customers to click and sort by, such as price or name. Under ‘Filterable columns’, add categories, tags, or attributes, then choose a ‘Filter method’ – clickable terms, or dropdown fields shown above or below the table.
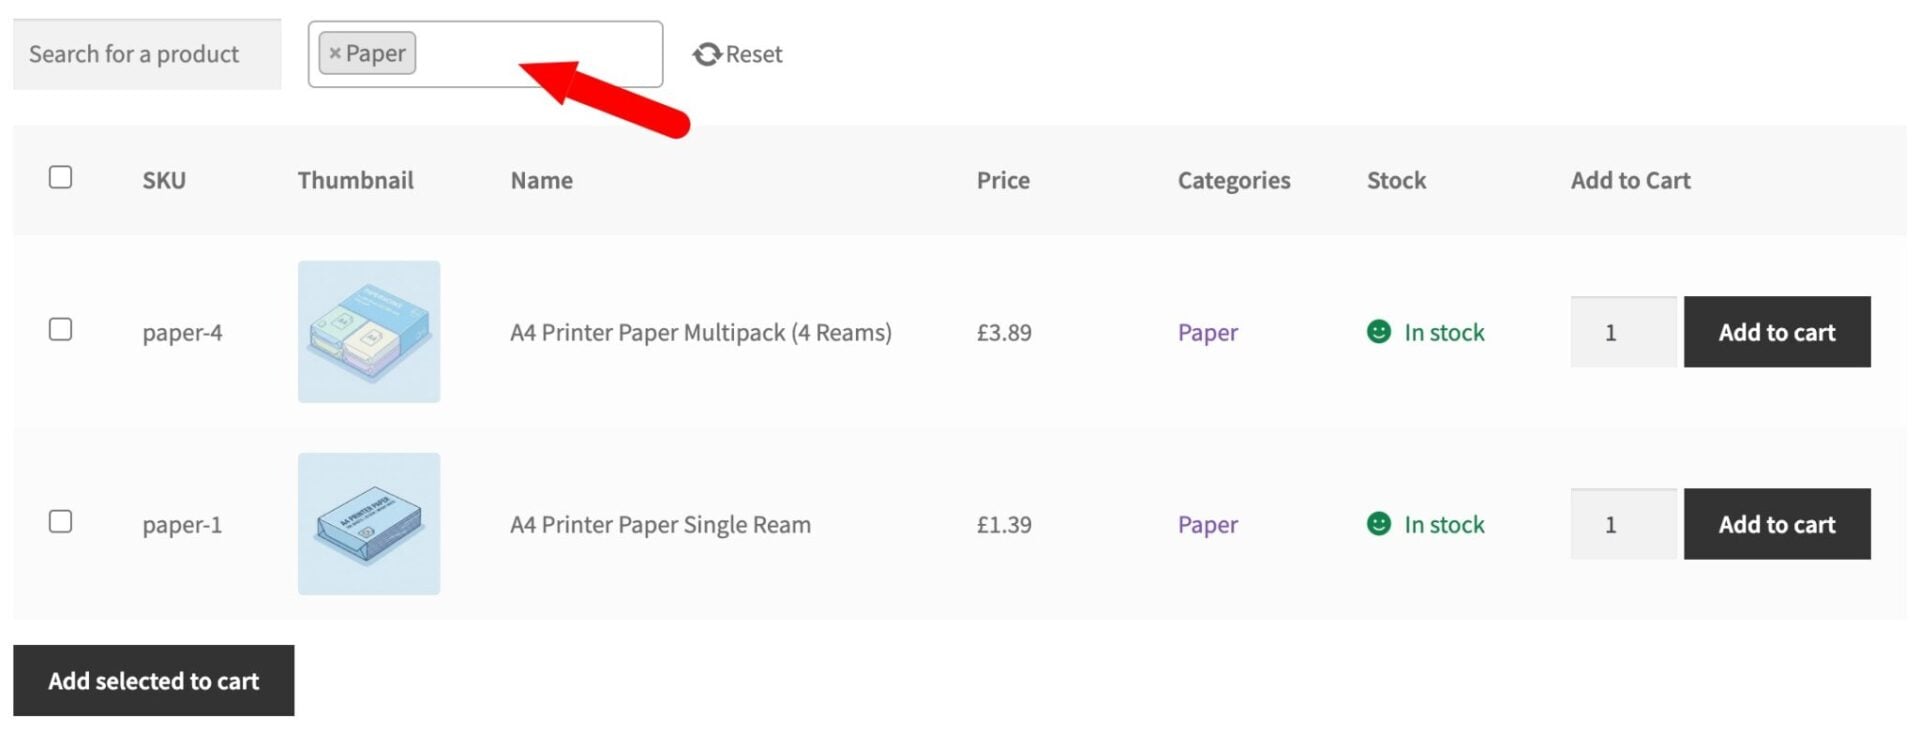
For a large stationery catalog, filtering by category or by attribute (color, pack size) is often more useful to a trade buyer than sorting alone, since they’re often looking for one specific item rather than browsing.
How to set minimum order quantities and order values for stationery packs
Trade stationery orders are usually sold in packs, not single units – pens in multiples of 6, paper in reams, folders by the box. The Minimum Maximum Quantity and Order plugin handles this, though it isn’t part of the bundle and needs to be purchased separately.
Once installed, go to WooCommerce > Settings > Min Max Quantity and Order to create a rule. Rules can apply globally, to selected categories or attributes, to specific products, or to individual variations, and rules set at a more specific level override broader ones.
For a pens category sold in multiples of 6, set the ‘Applies to’ field to ‘Selected Categories’ and choose your pens category. Set the ‘Step’ value to 6 so customers can only add quantities of 6, 12, 18, and so on. Under ‘Defined Quantities’, you can also list specific quantities like 6|Pack of 6, 12|Pack of 12, 24|Pack of 24 to show customers a dropdown of pack sizes with readable labels, instead of a plain number field.
To set a minimum spend for B2B accounts, create a global rule with a minimum order value – e.g. $150 – and set the ‘Roles’ field to ‘Trade’ so retail customers, if you have any, aren’t affected.
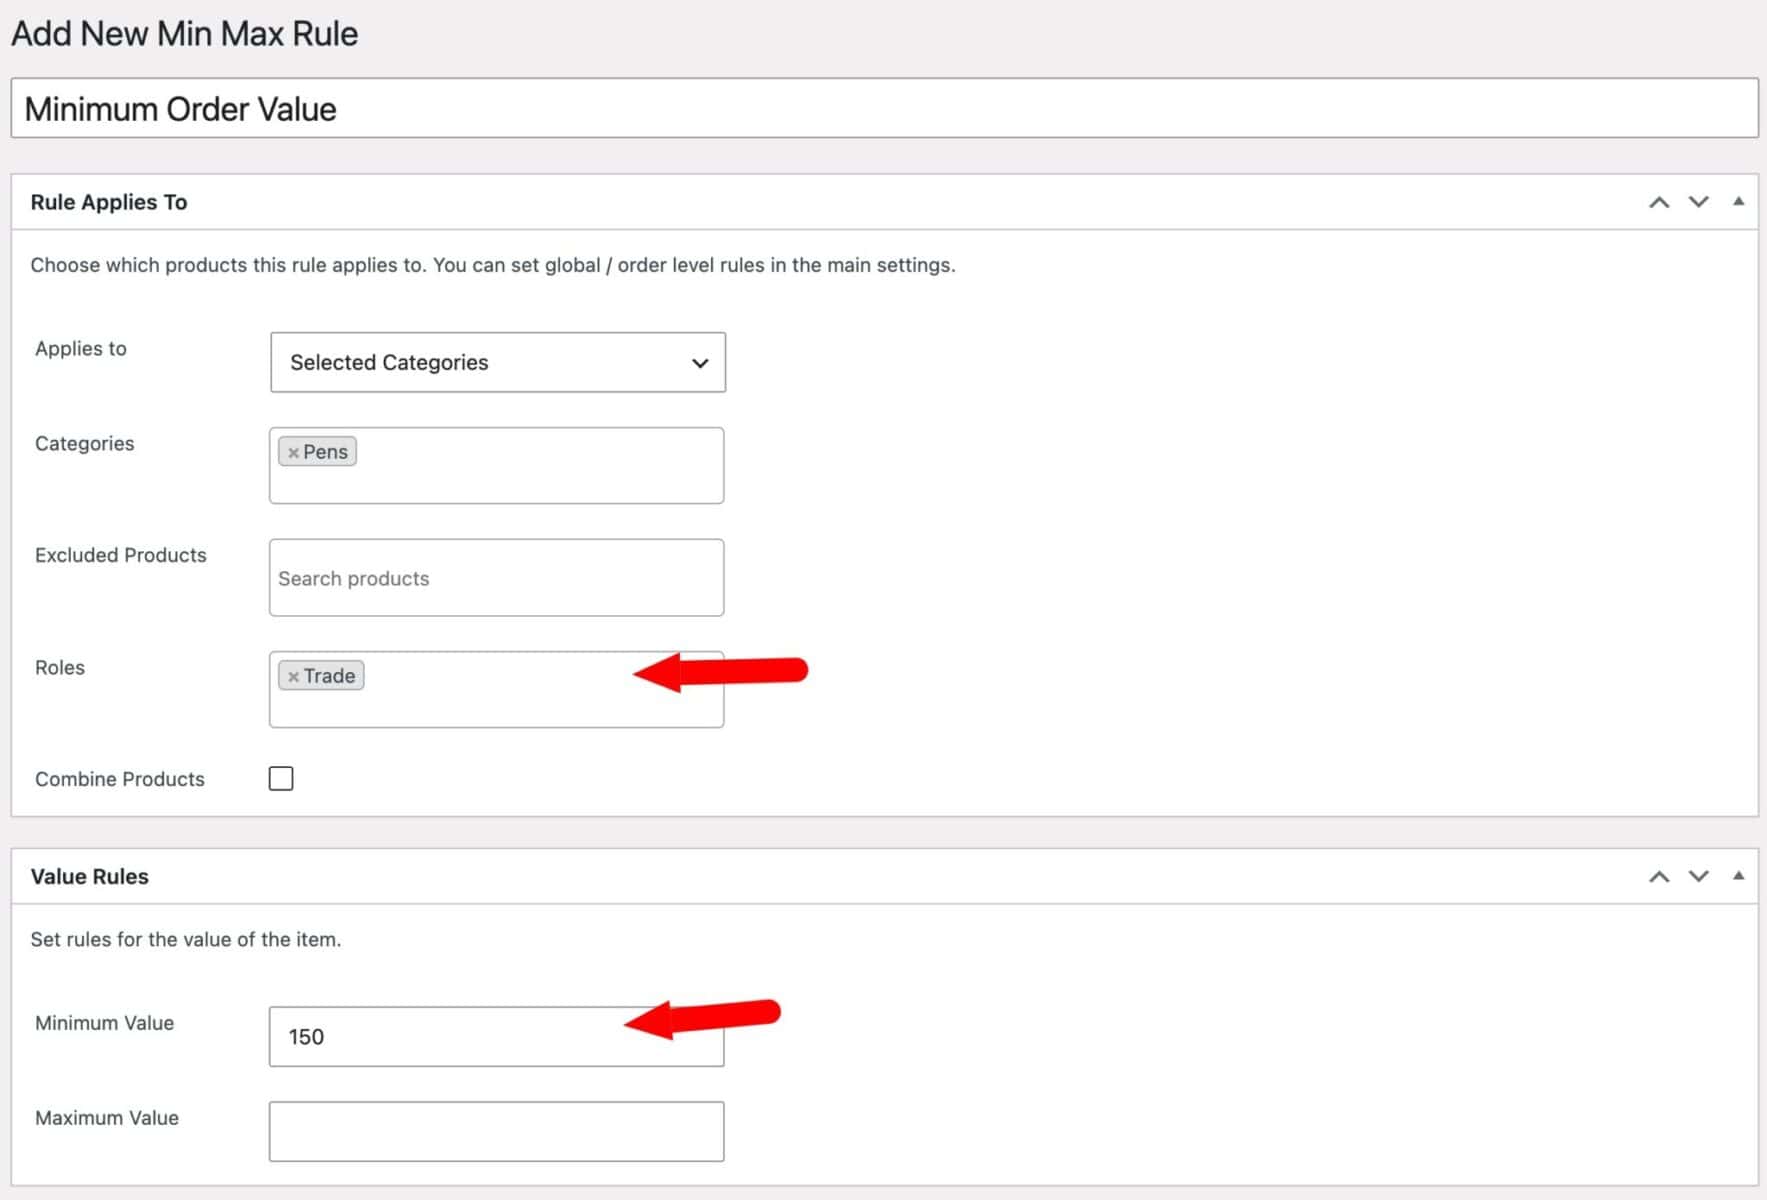
With these rules in place, trade buyers can only order in the multiples you set, and can’t check out below your minimum order value, keeping every wholesale order commercially viable.

I have a trade-only store where customers must buy 6, 12, 18 etc of any of the products they choose - in multiples of 6 - and the grand total must be not less than 120. WooCommerce Minimum Maximum Quantity and Order does exactly that - and is easy to set up.
How to personalize stationery products for business customers
Business customers ordering stationery often want it personalized – a name engraved on a pencil, a custom stamp, a company logo on a notebook cover. Product Add-Ons Ultimate adds these options to any product – though like the minimum order plugin, it’s sold separately from the bundle.
Teachit Co’s personalized pencils is a good example of what’s possible. Users can customize pencils and other stationery items in a variety of ways.
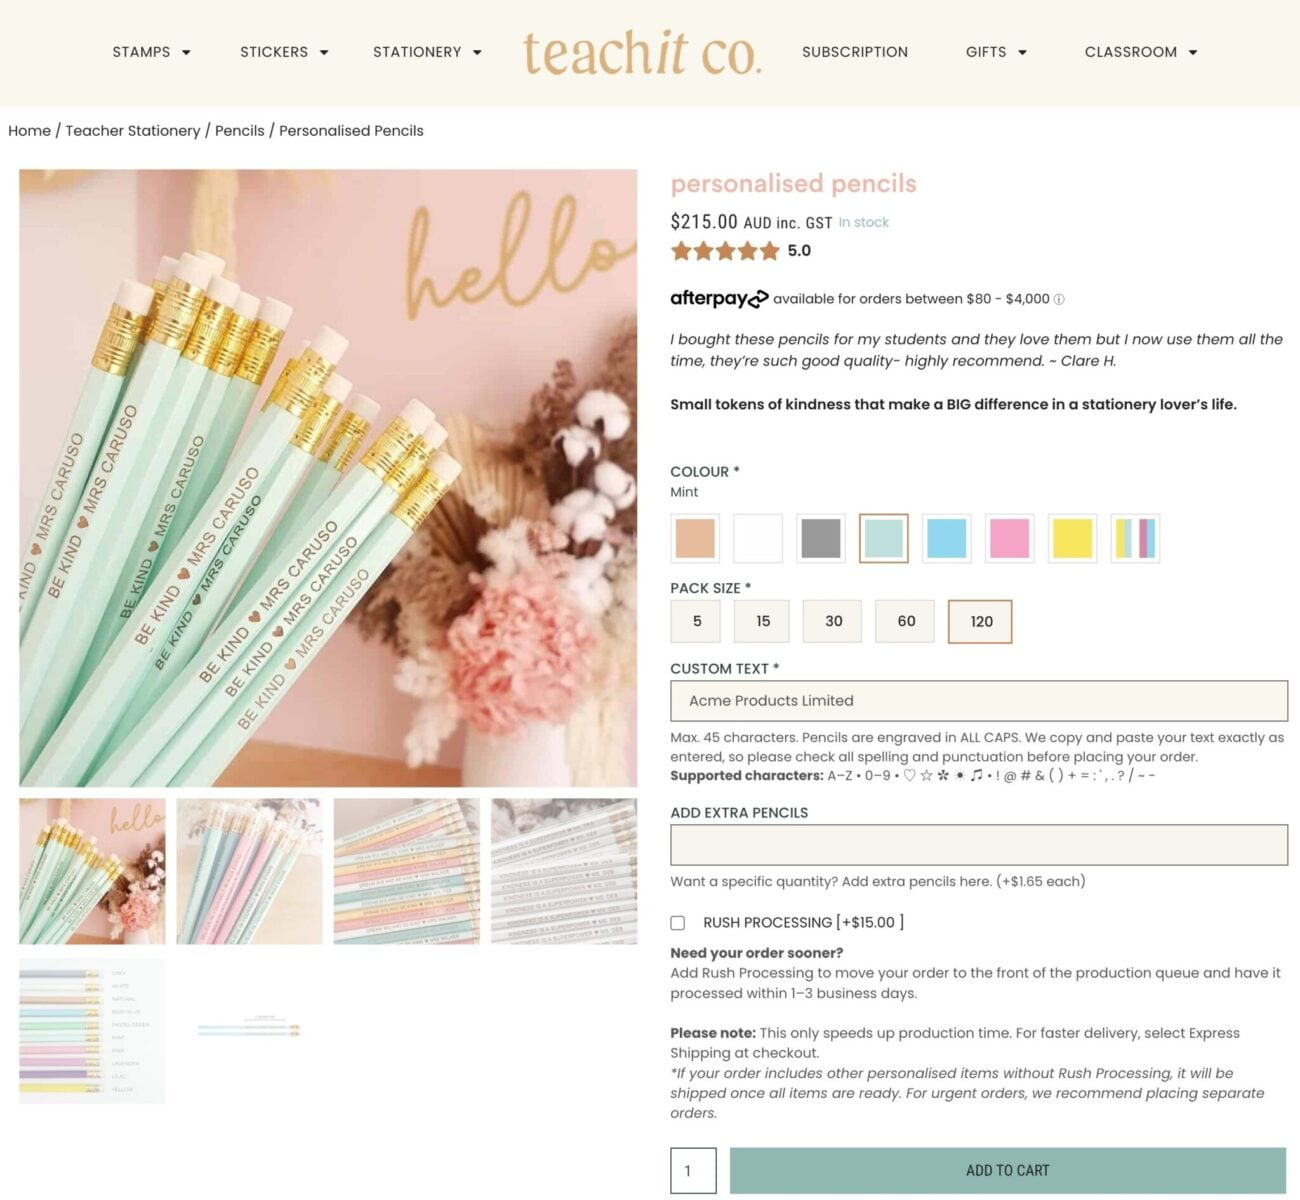
Once installed, edit a product and click the ‘Product Add-Ons’ tab in the Product Data panel. Add a Product Add-Ons group, then add a field within that group. For a personalized pencil, you might add:
- A ‘Select’ field labeled ‘Colour’, with an option for each pencil color you stock
- A ‘Select’ field labeled ‘Pack size’, with options like 5, 15, 30, 60, and 120
- A ‘Text’ field labeled ‘Custom text’, with a character limit so the engraving fits
- A ‘Number’ field labeled ‘Add extra pencils’, priced per unit (e.g. $1.65 each) so buyers can order an exact quantity on top of a pack
Trade customers can then personalize their order directly on the product page, with the price updating to reflect the pack size and any extras they choose. This works well alongside bulk pricing: a customer ordering a large personalized batch still gets the bulk discount, plus the cost of personalization on top.
How to let stationery customers request quotes for large or custom orders
Some orders are too large or too specific for a fixed price – a corporate client wanting 2,000 personalized diaries, for instance. Request a Quote lets B2B customers ask for a price instead of buying outright, and is also sold separately from the bundle.
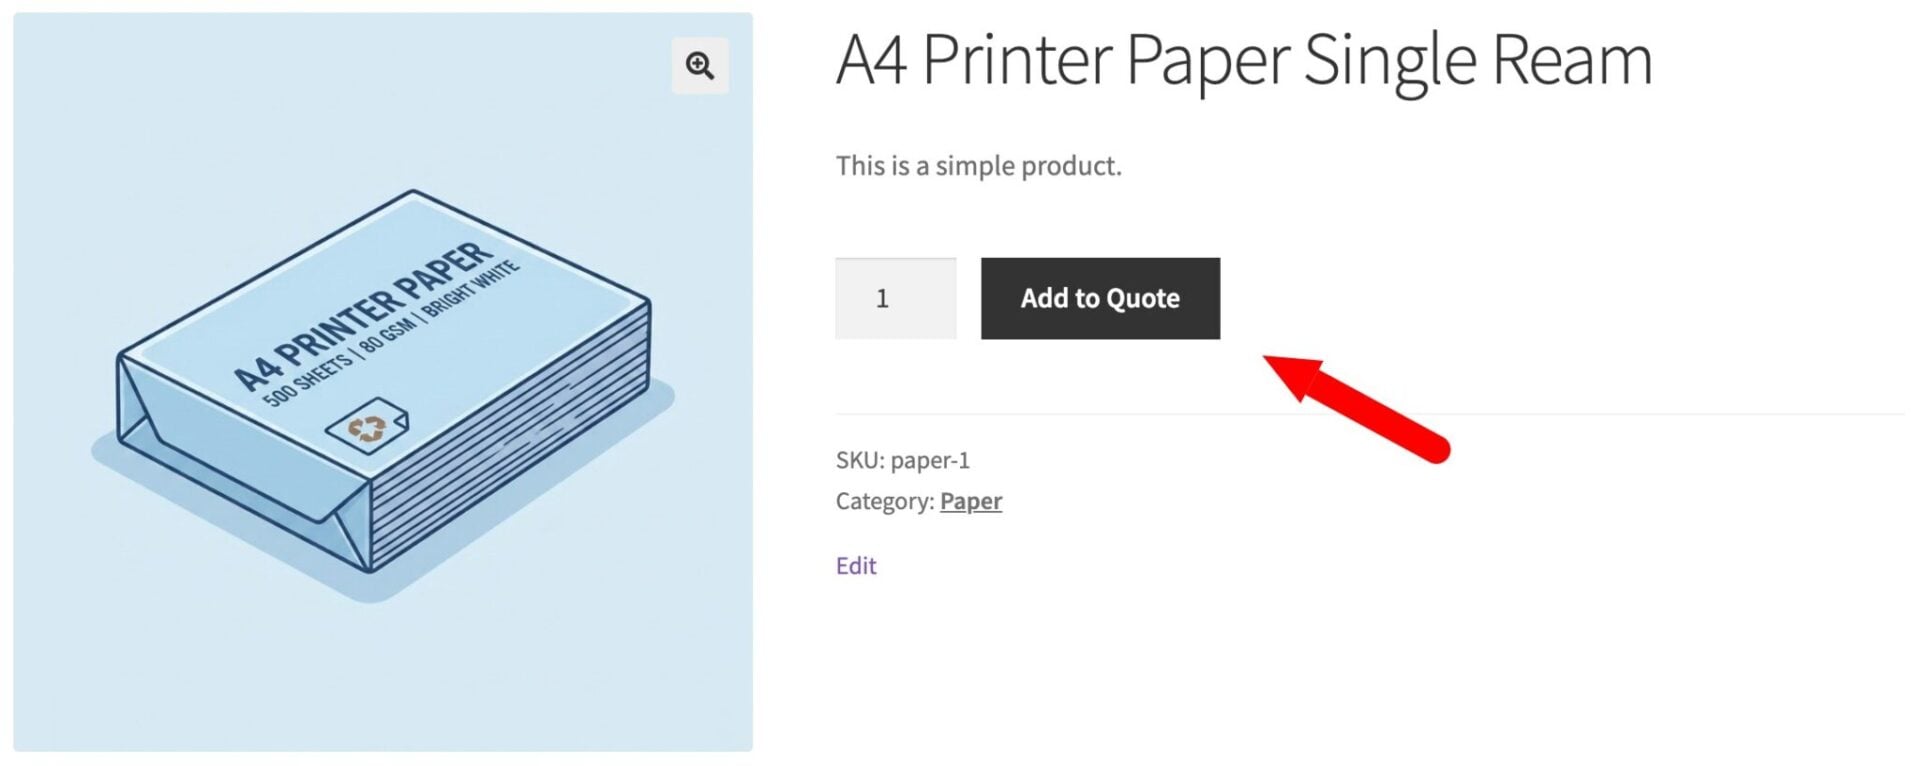
Once installed, go to the plugin’s settings to configure who can request quotes and for which products:
- Under ‘Enable request a quote for’, choose ‘Specific Categories’ and select your trade or bulk categories, or ‘All Products’ if you’d like every product to be quotable
- Under the user setting, choose ‘Specific User Roles’ and select ‘Trade’, so only approved trade accounts see the ‘Add to Quote’ button
- Optionally, check the option to hide prices on quotable products, so customers request a quote instead of seeing a price at all
Turn on PDF quotes in the plugin’s settings if you’d like a branded PDF attached to every quote email automatically, complete with your logo and a full breakdown of the order.
Managing quotes
When a quote request comes in, you’ll find it in WooCommerce > Orders alongside your regular orders. Hover over a line item and click the pencil icon to adjust the price if needed, then choose ‘Send updated quote to customer’ from the order actions dropdown. The customer receives an email with a ‘Checkout now’ link that takes them straight to payment for the exact order you’ve quoted.
Request a Quote also integrates with the other plugins covered in this guide: any personalization fields from Product Add-Ons Ultimate carry through to the quote, and existing bulk or role-based pricing rules from Dynamic Pricing and Discount Rules are applied automatically.
How do you manage your B2B stationery store from the back end?
Once your store is live, most day-to-day management happens in two places. Go to Users in your WordPress dashboard to review pending wholesale registrations, approve or reject them, and edit any user’s role manually if needed.
For orders – whether placed directly, personalized, or converted from a quote – go to WooCommerce > Orders as normal. Trade orders, bulk orders, and quote requests all appear in the same list, so there’s no separate system to check.
How to require manager approval for large office orders
Office and school purchasing often works differently from a simple wholesale account: individual staff place orders, but someone with budget authority needs to sign off on larger ones. Members Only’s Teams feature covers this – it’s part of the plugin already in the bundle, so there’s nothing extra to buy.
Go to Members Only > Settings and check the ‘Enable Teams’ option. Then go to Teams > Add New and create a team: select the user role the team applies to, choose an existing user as the manager, and optionally set a ‘Max Order Value’. You can also override this per individual user if some staff need a higher or lower limit than the rest of their team.
Once a team is set up, any member who tries to check out above the maximum order value can’t proceed straight to payment. Instead, they see a ‘Request Authorization’ button in the cart, which creates an order with the status ‘Awaiting Authorization’ and emails the manager. The manager can approve or reject it from the ‘Awaiting Authorizations’ tab on their account page – approving moves the order to ‘Processing’ as normal, and rejecting notifies the staff member who placed it.
Building a B2B stationery store – recap
That’s how to build a B2B stationery and office supplies store in WooCommerce using the Wholesale & B2B Plugin Bundle. We looked at how to create a B2B account registration and approval flow, hide pricing from the public, set up wholesale and bulk pricing tiers, and display your catalog as a fast-reorder product table. We also covered minimum order quantities, personalization for branded stationery, letting trade customers request quotes for larger orders, and manager approval for office team orders.
WooCommerce Wholesale & B2B Plugin Bundle
Create a wholesale or B2B store in WooCommerce
The Wholesale & B2B Plugin Bundle is compatible with all themes and page builders, including Astra, Storefront, and Flatsome, and page builders like Elementor and Divi. If you have any questions, our world-class support team is on hand to help. And all our plugins are backed by a 14-day money-back guarantee, so you can try them risk-free.