WooCommerce memberships: a complete guide to restricting content and products

You can restrict any content or product on your store to paying members – and this WooCommerce memberships guide will show you exactly how to do it.
Using the WooCommerce Members Only plugin, you can gate posts, pages, products, and entire site sections behind a membership. You can create multiple plans – each restricting different content from different users, sell memberships through standard WooCommerce products, and show different prices, or no prices at all, depending on who’s logged in.
After completing this tutorial:
- Members will be able to:
- Access content and products restricted to their membership tier
- Purchase a membership and immediately unlock gated content
- See exclusive pricing that’s hidden from non-members
- As the store owner or admin, you’ll be able to:
- Restrict any content type – posts, pages, products, product categories, custom post types, and more
- Create multiple membership plans, each with different access rules for different users
- Sell memberships through WooCommerce products or assign them manually to specific users
- Hide products, prices, and entire site sections from non-members
- Restrict content and products by user role or by individual user
- As a bonus, we’ll also look at how to:
- Offer members-only discounts and role-specific prices
- Hide product prices from non-members
- Customize registration forms and membership emails
In this tutorial, we’ll assume that you already have WordPress and WooCommerce installed and ready to go.
Why use a WooCommerce membership plugin?
Selling access to content or products is one of the most powerful ways to build recurring revenue from a WordPress site. Whether you’re running an online course, a wholesale store, a purchasing club, or a premium content library, a membership model lets you monetize what you create while keeping it exclusive.
WordPress and WooCommerce don’t give you this out of the box. WordPress has basic user roles – Administrator, Editor, Subscriber, and so on – but no way to tie those roles to content restrictions or purchasing. WooCommerce adds a full store, but it treats every visitor the same: anyone can browse your products, see your prices, and add items to their cart.
To build a real membership site, you need a dedicated plugin.
What does a WooCommerce membership plugin add?
A WooCommerce membership plugin bridges the gap between your store and your user base. It lets you define who can see what – and tie that access directly to a purchase, a role, or a registration.
With WooCommerce Members Only, you can restrict any content type on your site: posts, pages, products, product categories, custom post types, taxonomies, even entire sites. Access can be controlled by user role, by individual user, by login status, or by password. And each membership plan has its own access rules, so different users can see different content.

That flexibility is what separates a proper membership plugin from a simple password-protection tool.
What can you build with it?
WooCommerce Members Only is built for a wide range of membership use cases:
- Online learning platforms – restrict courses, lessons, or resource libraries to paying members
- Wholesale and B2B stores – show trade prices and products only to approved buyers
- Purchasing clubs – give members access to exclusive deals or limited stock
- Premium content sites – gate blog posts, tutorials, or downloads behind a membership
- Private community forums – restrict access to message boards or member directories
- Members-only stores – hide your entire product catalog from the public
Each of these use cases benefits from WooCommerce’s payment infrastructure – so you can sell membership access through a standard product, accept any WooCommerce payment gateway, and manage everything from one dashboard.

I've been using WooCommerce Members Only plugin to setup presale access for people who previously bought our limited edition books. The difficulty we faced was that we couldn't create private access to a specific user role. This plugin enabled us to assign multiple roles to users and thus enable presale access to them when we are about to launch a new product.
Why not just use a free plugin or WordPress roles alone?
Free membership plugins and manual role management can get you part of the way. But they typically lack the granularity to restrict individual products, set role-specific prices, create tiered access levels, or send customized membership emails.
WooCommerce Members Only handles all of that in a single plugin – with no need to stitch together multiple tools or write custom code. It also integrates directly with Dynamic Pricing and Discount Rules for member discounts, and with WooCommerce Subscriptions for recurring payments.
That makes it the practical choice whether you’re building a simple members-only store or a fully tiered membership platform.
Step #1: Install and activate the plugin
Once you’ve purchased WooCommerce Members Only:
- Download the plugin’s zip file by clicking on the link on your order confirmation screen or in your welcome email. You’ll receive the email automatically a few seconds after completing the purchase.
- Go to Plugins > Add New in your WordPress dashboard.
- Click the ‘Upload Plugin’ button.
- Drag and drop the plugin’s downloaded zip file into the ‘Choose File’ area and click ‘Install Now’.
- When the plugin has uploaded, click the ‘Activate Now’ button.
Once activated, you’ll find a new ‘Members Only’ menu item in your WordPress dashboard. The first thing to do is configure the global plugin settings – these apply across your whole site and determine how restriction works before you create any plans.
Step #2: Configure the plugin settings
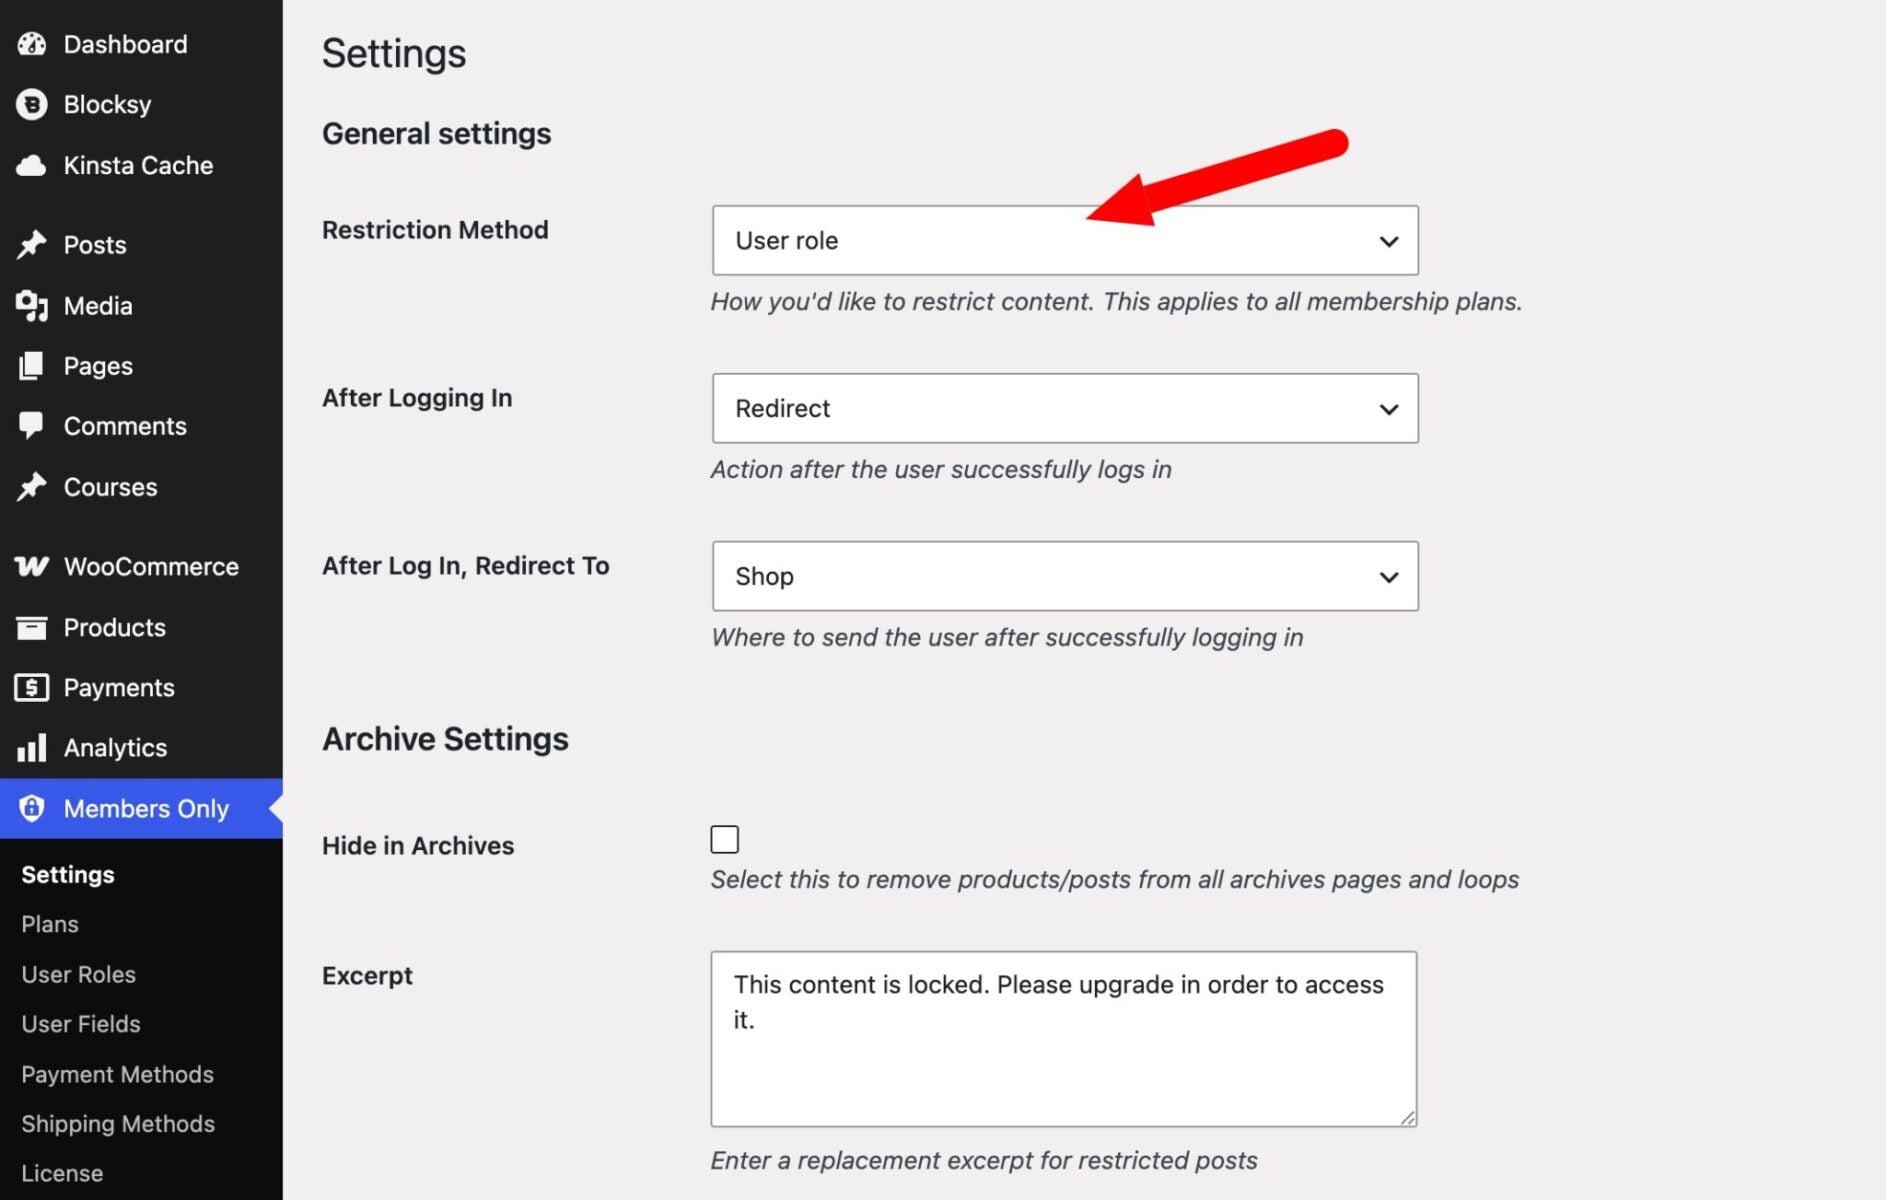
Go to Members Only > Settings. The most important setting here is ‘Restriction method’, which defines how the plugin identifies and restricts users. Everything else follows from this choice.
How do you choose a restriction method?
There are four options:
- No restriction – the default. All content is accessible to everyone. Change this as soon as you’re ready to go live.
- User role – the most common choice for membership sites. Restricts content according to the user’s WordPress role, which is assigned automatically when they purchase a membership product. This is the method you’ll need if you want to sell memberships or create tiered access levels.
- Log-in status – restricts content to any user who isn’t logged in. Use this if you simply want to require registration before anyone can access your site or store, without needing distinct membership tiers.
- Password – requires users to enter a password to access content. You can set different passwords for different plans, which makes this useful for simple setups where you want to share access with a group without requiring individual accounts.
Select ‘User role’ for a full membership site with tiers and purchased access, ‘Log-in status’ for a simple login wall, or ‘Password’ for password-protected content areas.
Setting up password protection
If you choose ‘Password’, the plugin will prompt you to create a password form page automatically. Click ‘Yes, please create a page for the password form’ and the plugin creates a front-end page with the login form already embedded. You can then set passwords at the individual plan level – different plans can have different passwords, so different user groups can unlock different content.
Setting up login status restriction
If you choose ‘Log-in status’, any user who isn’t logged in will be redirected when they try to access restricted content. Use the ‘After logging in’ setting to control where users land once they do log in – either keeping them on the same page or redirecting them to a specific page like a members’ dashboard.
Other global settings
Once you’ve set your restriction method, review the remaining settings:
- After logging in – choose ‘Stay on page’ to keep users where they are after logging in, or ‘Redirect’ to send them to a specific page.
- Hide in archives – enable this to remove restricted posts and products from category pages and the shop. Without this, restricted content still appears in listings but is blocked when clicked.
- Excerpt – enter text to display in place of a restricted post’s excerpt on archive pages.
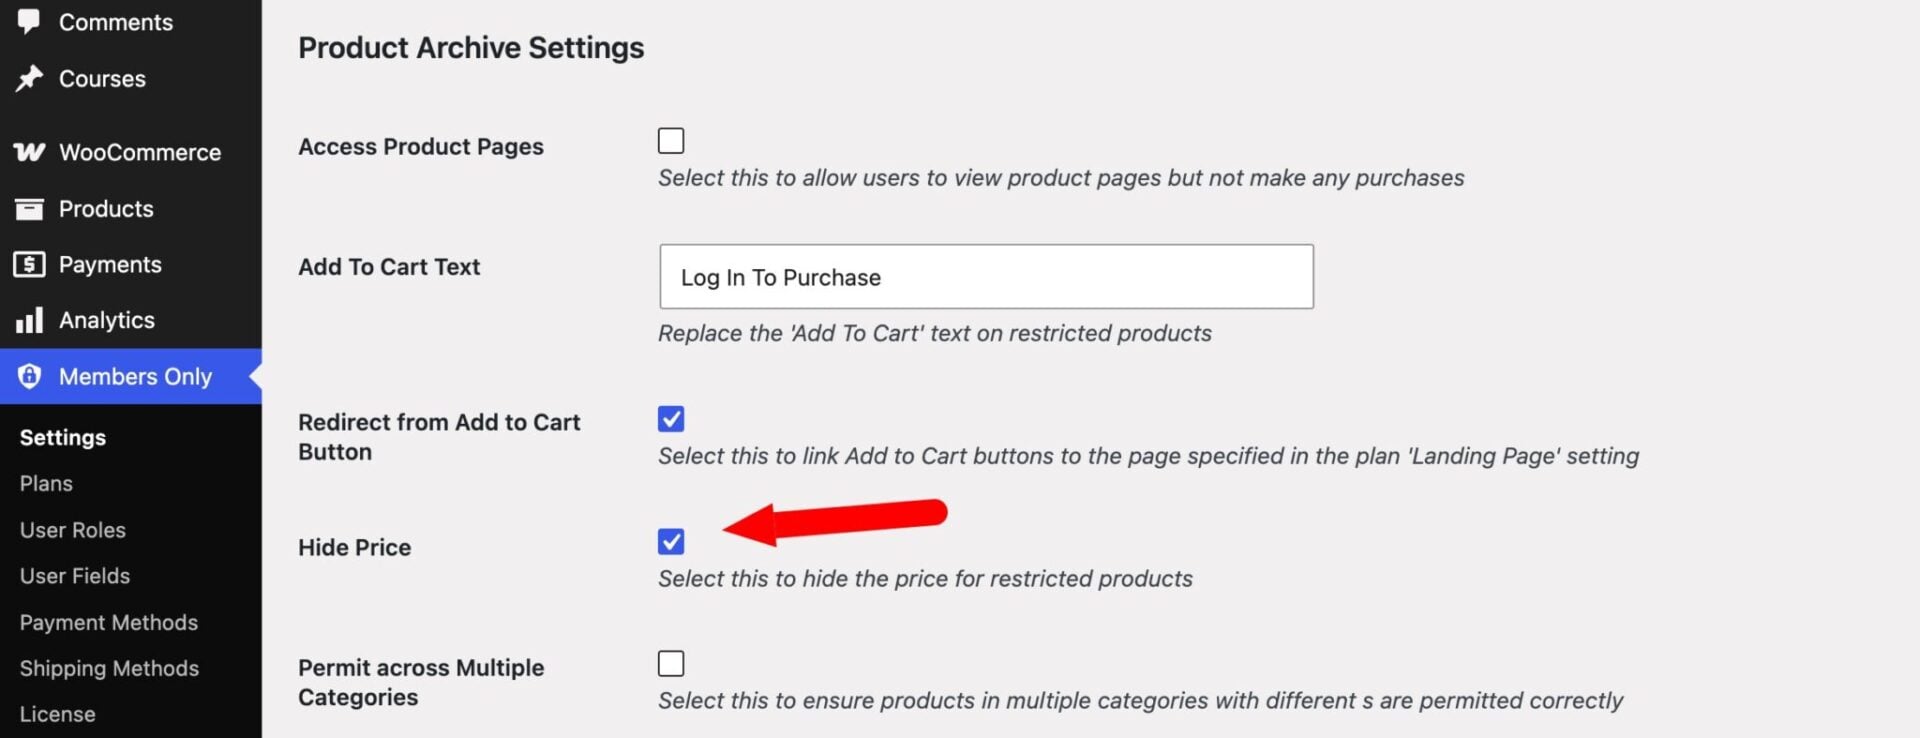
- Access product pages – enable this if you want non-members to view a product’s description but not be able to purchase it. Useful for showcasing what members get access to.
- Add to cart text – replace the standard ‘Add to cart’ button text on restricted products with your own message, such as ‘Log in to purchase’ or ‘Members only’.
- Redirect from add to cart button – send users to a landing page when they click the add to cart button on a restricted product. You set the destination at the plan level.
- Hide price – enable this to hide prices on restricted products across the store.
- Exclude from menu – enter menu item names to hide from users who don’t have access. Add each name on a new line.
Save your settings. Now you’re ready to create your first membership plan.
Step #3: Create a membership plan
A membership plan defines a specific set of access rules – what content is restricted, who can see it, and how they get access. You can create as many plans as you need, each restricting different content from different users.
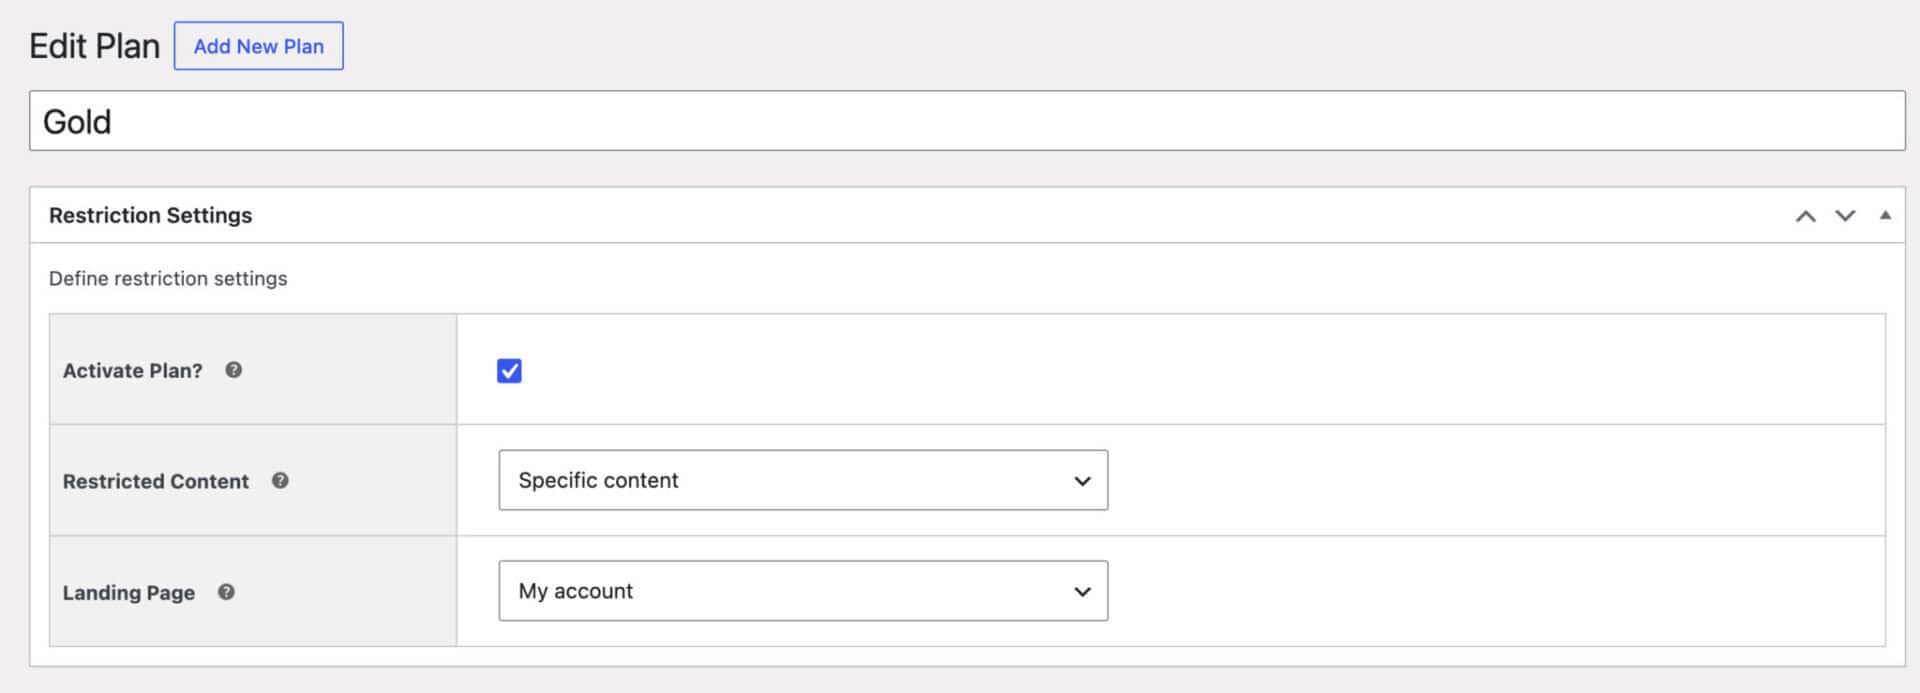
Go to Members Only > Plans and click ‘Add New Plan’. Give the plan a name that clearly describes the tier: ‘Pro Member’, ‘Wholesale Buyer’, ‘Gold’, and so on.
Enable the ‘Activate plan’ toggle. Plans are inactive by default, which lets you set everything up before going live. A plan that isn’t activated won’t restrict anything.
Step #3a: Choose what content to restrict
Under ‘Restricted content’, choose between:
- Entire site – every page on the site is restricted except the homepage and the login screen. This is the quickest way to build a fully private membership site.
- Specific content – restrict only selected content types. When you choose this, a ‘Content type’ field appears where you can select from product categories, post categories, pages, custom post types, and taxonomy terms. See the section on restricting content types below for detail on each option.
You can select multiple content types in a single plan. For example, one plan might restrict a product category and a set of pages at the same time.
Step #3b: Set the landing page
The ‘Landing page’ setting defines where non-members are redirected when they try to access restricted content. Setting this at plan level means different plans can send users to different pages – a useful pattern when you have multiple tiers and want to show each group a relevant upgrade or sign-up message.
Step #3c: Restrict content types
When you choose ‘Specific content’ in Step #3a, you can define exactly which content is restricted in that plan. Click the ‘Content type’ field and select one or more of the following:
- Product categories – restrict all products in one or more WooCommerce product categories. This is the most efficient way to build a members-only store: create a restricted product category and add your gated products to it.
- Post categories – restrict all posts in one or more post categories. Any post in that category is blocked from non-members.
- Pages – restrict specific pages on your site, selected individually.
- Custom post types – restrict an entire custom post type: courses, tutorials, resources, forum topics, and so on. Every item of that post type is gated by the plan.
- Taxonomy terms – restrict by a specific term within any taxonomy. This lets you gate a tag or a custom category term independently of the rest of the post type.
You can combine as many of these as you need within a single plan. A ‘Pro’ plan might restrict a product category, a set of pages, and a custom post type all at once.

Step #3d: Configure user role settings
This section is available when ‘User role’ is selected as the restriction method in global settings. Under ‘Permitted user roles’, enter the role or roles that are allowed to access the restricted content in this plan.
You can also add specific permitted customers by user ID. This lets you grant access to individual users without assigning them a role – useful for one-off access grants, VIPs, or testers who don’t fit into any of your standard membership tiers.

You now have a configured membership plan. Next, connect it to a WooCommerce product so customers can purchase their way in.
Step #4: Sell a membership
To sell a membership, you link a WooCommerce product to the plan. Purchasing that product grants the customer the corresponding membership role automatically. Note: you don’t have to sell memberships, you can also grant them manually. We’ll cover that below.
Create a new product in the normal way: go to Products > Add New and set a name, price, and any other details. You can use a simple product or a variable product – for example, monthly and annual access as two variations of the same product.
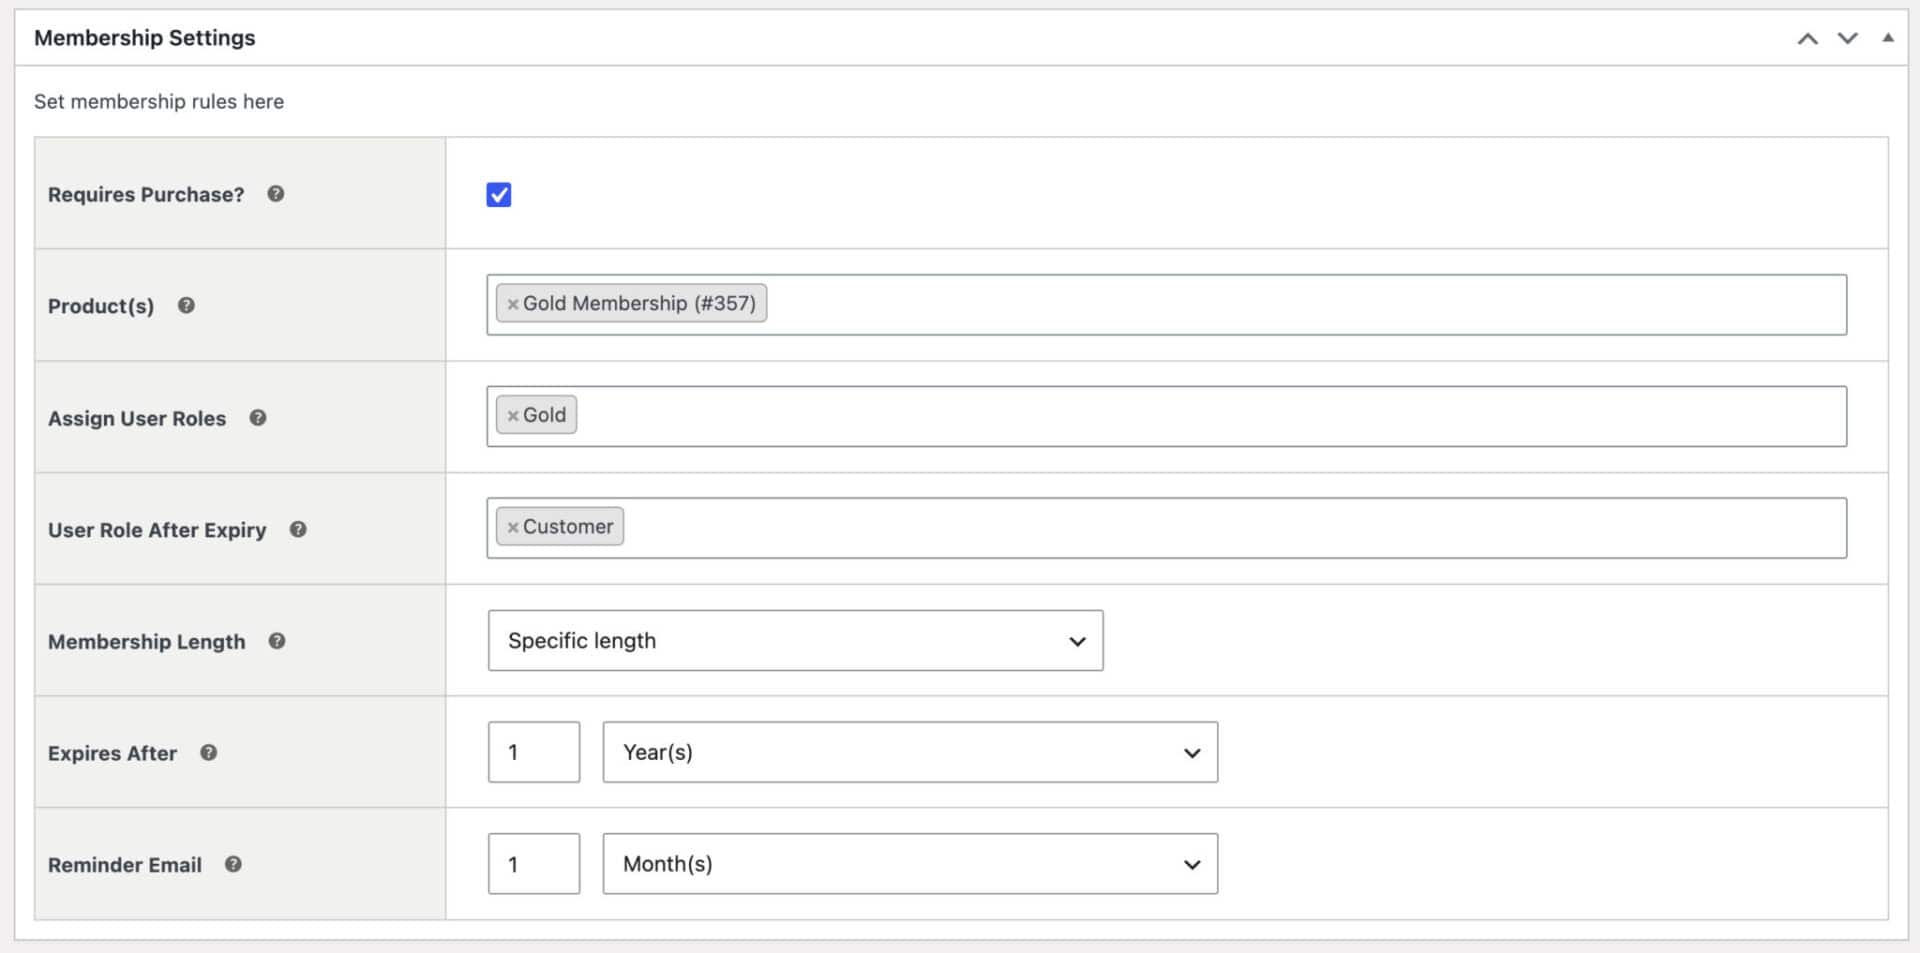
Once the product is created, go back to Members Only > Plans and open the plan from Step #3. Under ‘Membership settings’, enable the ‘Requires purchase’ option. In the ‘Product(s)’ field, search for and select the product you just created. Then, in ‘Assign user roles’, enter the role that should be granted to the user when they complete the purchase – this should match the role you set in ‘Permitted user roles’ in Step #3d.
Setting the membership length
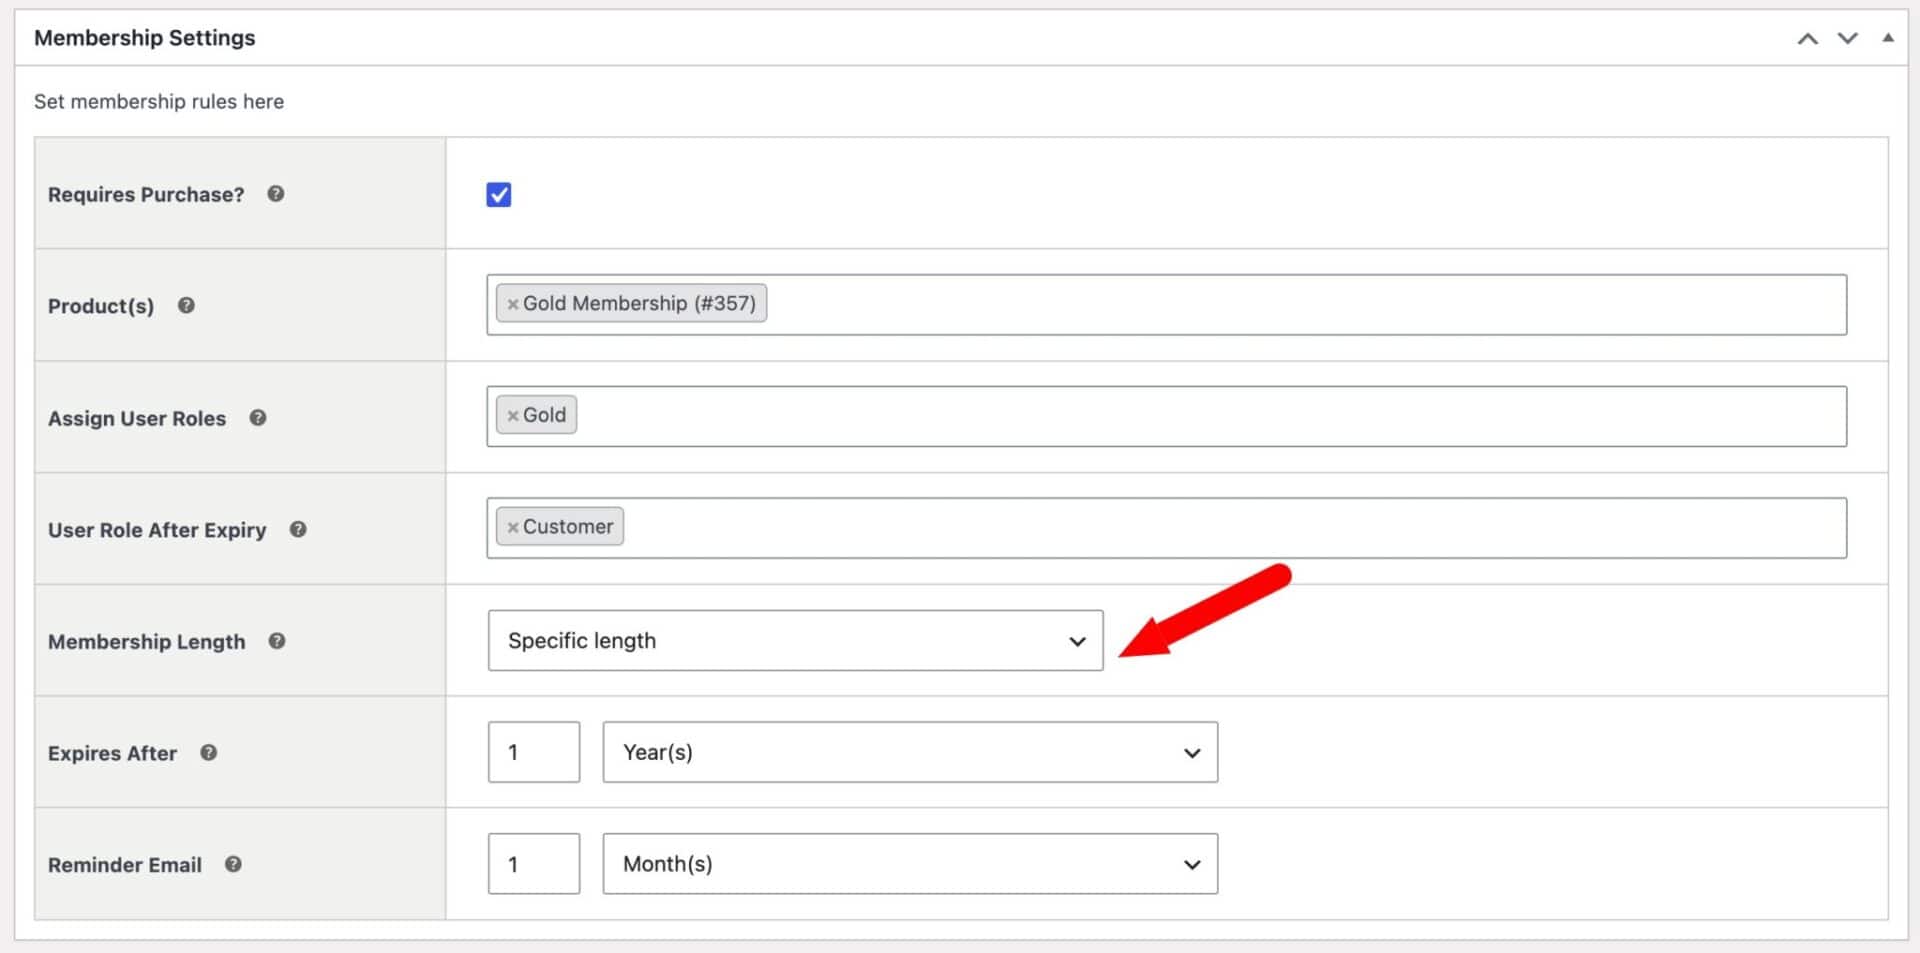
Use the ‘Membership length’ field to define how long access lasts:
- No expiry – lifetime membership, access never lapses
- Fixed date – access expires on a specific calendar date, useful for cohort-based courses or time-limited promotions
- Specific length – access lasts for a defined period (days, weeks, months, or years) from the date of purchase
If the plan is time-limited, you can also set a ‘User role after expiry’ – a role assigned automatically when the membership period ends, such as ‘Gold – expired’. This lets you redirect lapsed members to a renewal page rather than simply removing their access with no explanation.
You can also set a reminder email to notify members before their membership expires. Enter how many days before expiry the email should be sent, and the plugin handles the rest.
Save the plan and publish the product. Now when a customer purchases that product, their account is automatically assigned to the right role and they immediately gain access to the plan’s restricted content. There’s a demo here showing how this looks on the front end.
Using WooCommerce Subscriptions for recurring memberships
If you want to charge members on a recurring basis, WooCommerce Members Only integrates directly with WooCommerce Subscriptions. Create a subscription product instead of a simple product, link it to your plan in the same way, and the membership role is granted on each successful renewal – and revoked automatically if the subscription lapses or is cancelled.
Step #5: Optionally set up tiered membership levels
A single plan works for simple use cases, but most membership sites benefit from tiers – different levels of access at different price points.
Create a separate plan for each tier: go to Members Only > Plans and add plans for Gold, Silver, and Bronze (or Pro, Standard, and Free – whatever fits your model). In each plan, set a different ‘Permitted user roles’ value and restrict different content. Create a variable WooCommerce product and link each variation to a membership plan so customers can purchase the tier they want.
Then, when users attempt to access content above their tier, send them to a dedicated upgrade landing page rather than a generic login screen. Set the ‘Landing page’ in each plan to point to the appropriate upgrade page for that tier.
Allowing users to belong to multiple plans
Members Only supports multiple simultaneous plans. A user can be a Silver member and also hold a free ‘Newsletter’ membership that unlocks a separate set of content. Assign both roles to the user and the plugin handles the access rules for each independently.
You now have a fully tiered membership site with different access rules for each level. Now let’s look at some additional ways to restrict content and products.
How do you restrict individual products and posts?
The content type settings in your membership plan restrict content in bulk – by category, post type, or taxonomy. For one-off items that fall outside those rules, you can apply restriction directly at the individual item level.
Restricting individual products
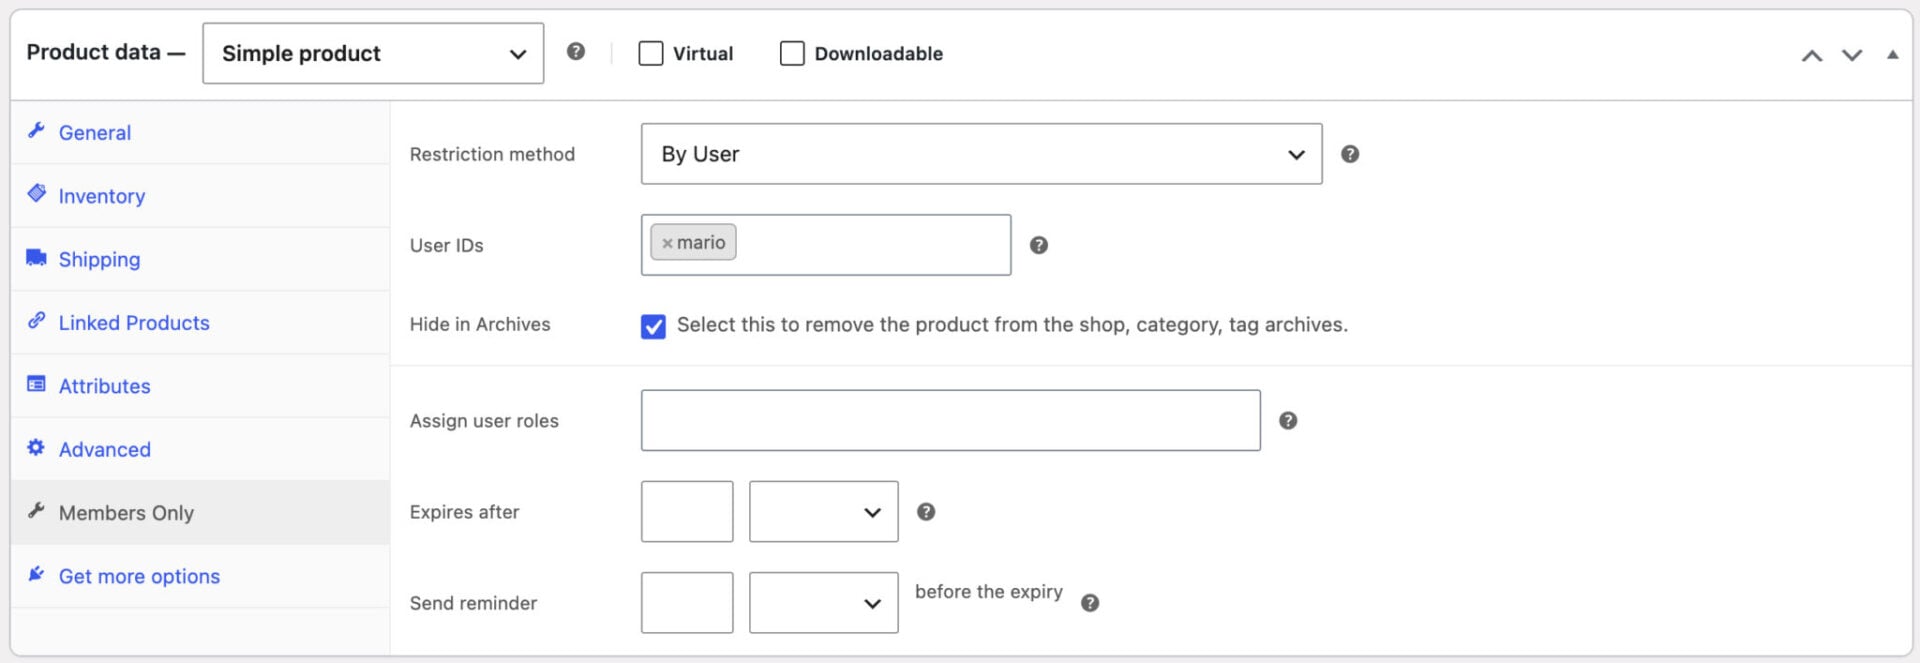
Open any WooCommerce product and scroll to the ‘Members Only’ panel. Here you can restrict the product independently of any plan-level rules, using one of three methods:
- By user role – restrict the product to one or more user roles, in the same way as a membership plan
- By user – enter a comma-separated list of user IDs. Only those specific users can access the product, regardless of their role. This is ideal for client-specific products or bespoke orders.
- By password – enter one or more passwords. Any user who enters a valid password can access the product, without needing an account or a membership role.
This product-level control is ideal when most of your store is public but certain items – limited editions, trade products, early-access releases – should only be available to specific users or roles.
How do you assign memberships manually?
Not every membership needs to be sold. You may want to grant access manually – to beta testers, migrated customers, specific individuals, or users you’ve approved through an offline process.
Go to Users in your WordPress dashboard and open the user’s profile. Assign the appropriate membership role from the ‘Role’ field – the same role you set as ‘Permitted user roles’ in the plan. That user immediately has access to all content restricted to that plan.
Alternatively, use the ‘Permitted customers’ field in the plan’s user settings (Step #3d) to grant access to a specific user by ID, without changing their role at all. This is the most targeted option – it gives one individual access without affecting anything else on their account.
Bulk assignment
To update multiple users at once, go to Users and use the bulk actions dropdown. Select the users, choose ‘Change role to…’, and apply the membership role. This is much faster when migrating a large existing user base.
Admin approval for new registrations
If you want to vet users before granting them access, you can enable a manual approval workflow. Go to Members Only > User Roles and check the ‘Enable user approval’ option. From that point on, every new registration triggers an email notification with a link to approve or reject the user. The new user’s role is set to ‘Pending’ until you act.
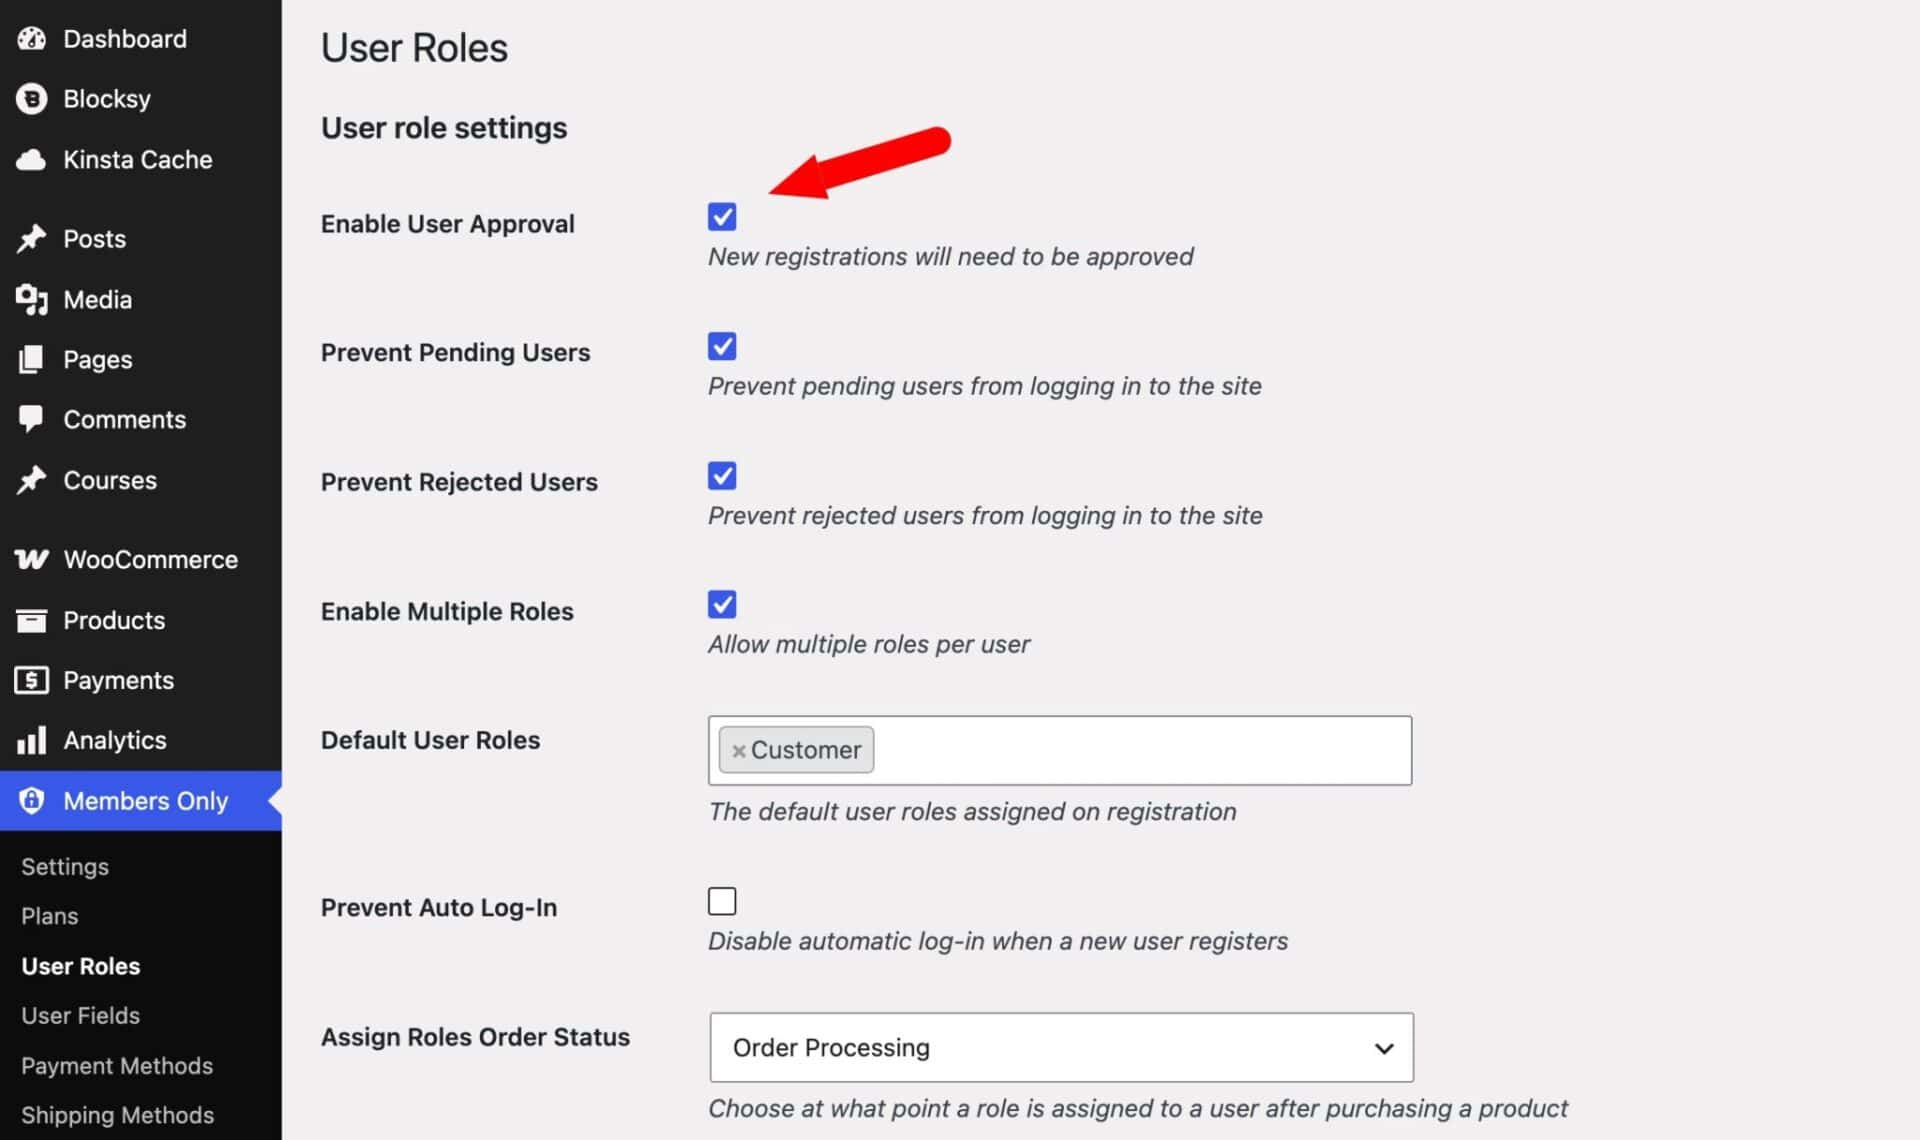
Clicking ‘Approve this user’ on the user’s profile page assigns them the default user role and grants access. Clicking ‘Reject this user’ sets their role to ‘Rejected’. You can also enable ‘Prevent pending users’ and ‘Prevent rejected users’ in the same settings screen to block those users from logging in at all while their status is unresolved.
This is especially useful for wholesale stores where you want to vet buyers before granting trade access. For a full walkthrough, see our guide on WooCommerce user approval.
Bonus #1: How do you offer members-only discounts?
WooCommerce Members Only integrates with our Dynamic Pricing and Discount Rules plugin to give members exclusive pricing. You can create any combination of the following:
- Percentage or fixed discounts on any product or category
- Bulk pricing tiers – the more they buy, the more they save
- Buy One Get One deals exclusive to members
- Discounts triggered by cart value
Go to WooCommerce > Fees and Discounts > Add New Rule. Set the rule type, the discount amount, and under ‘User conditions’, select the membership role it applies to. Save the rule.
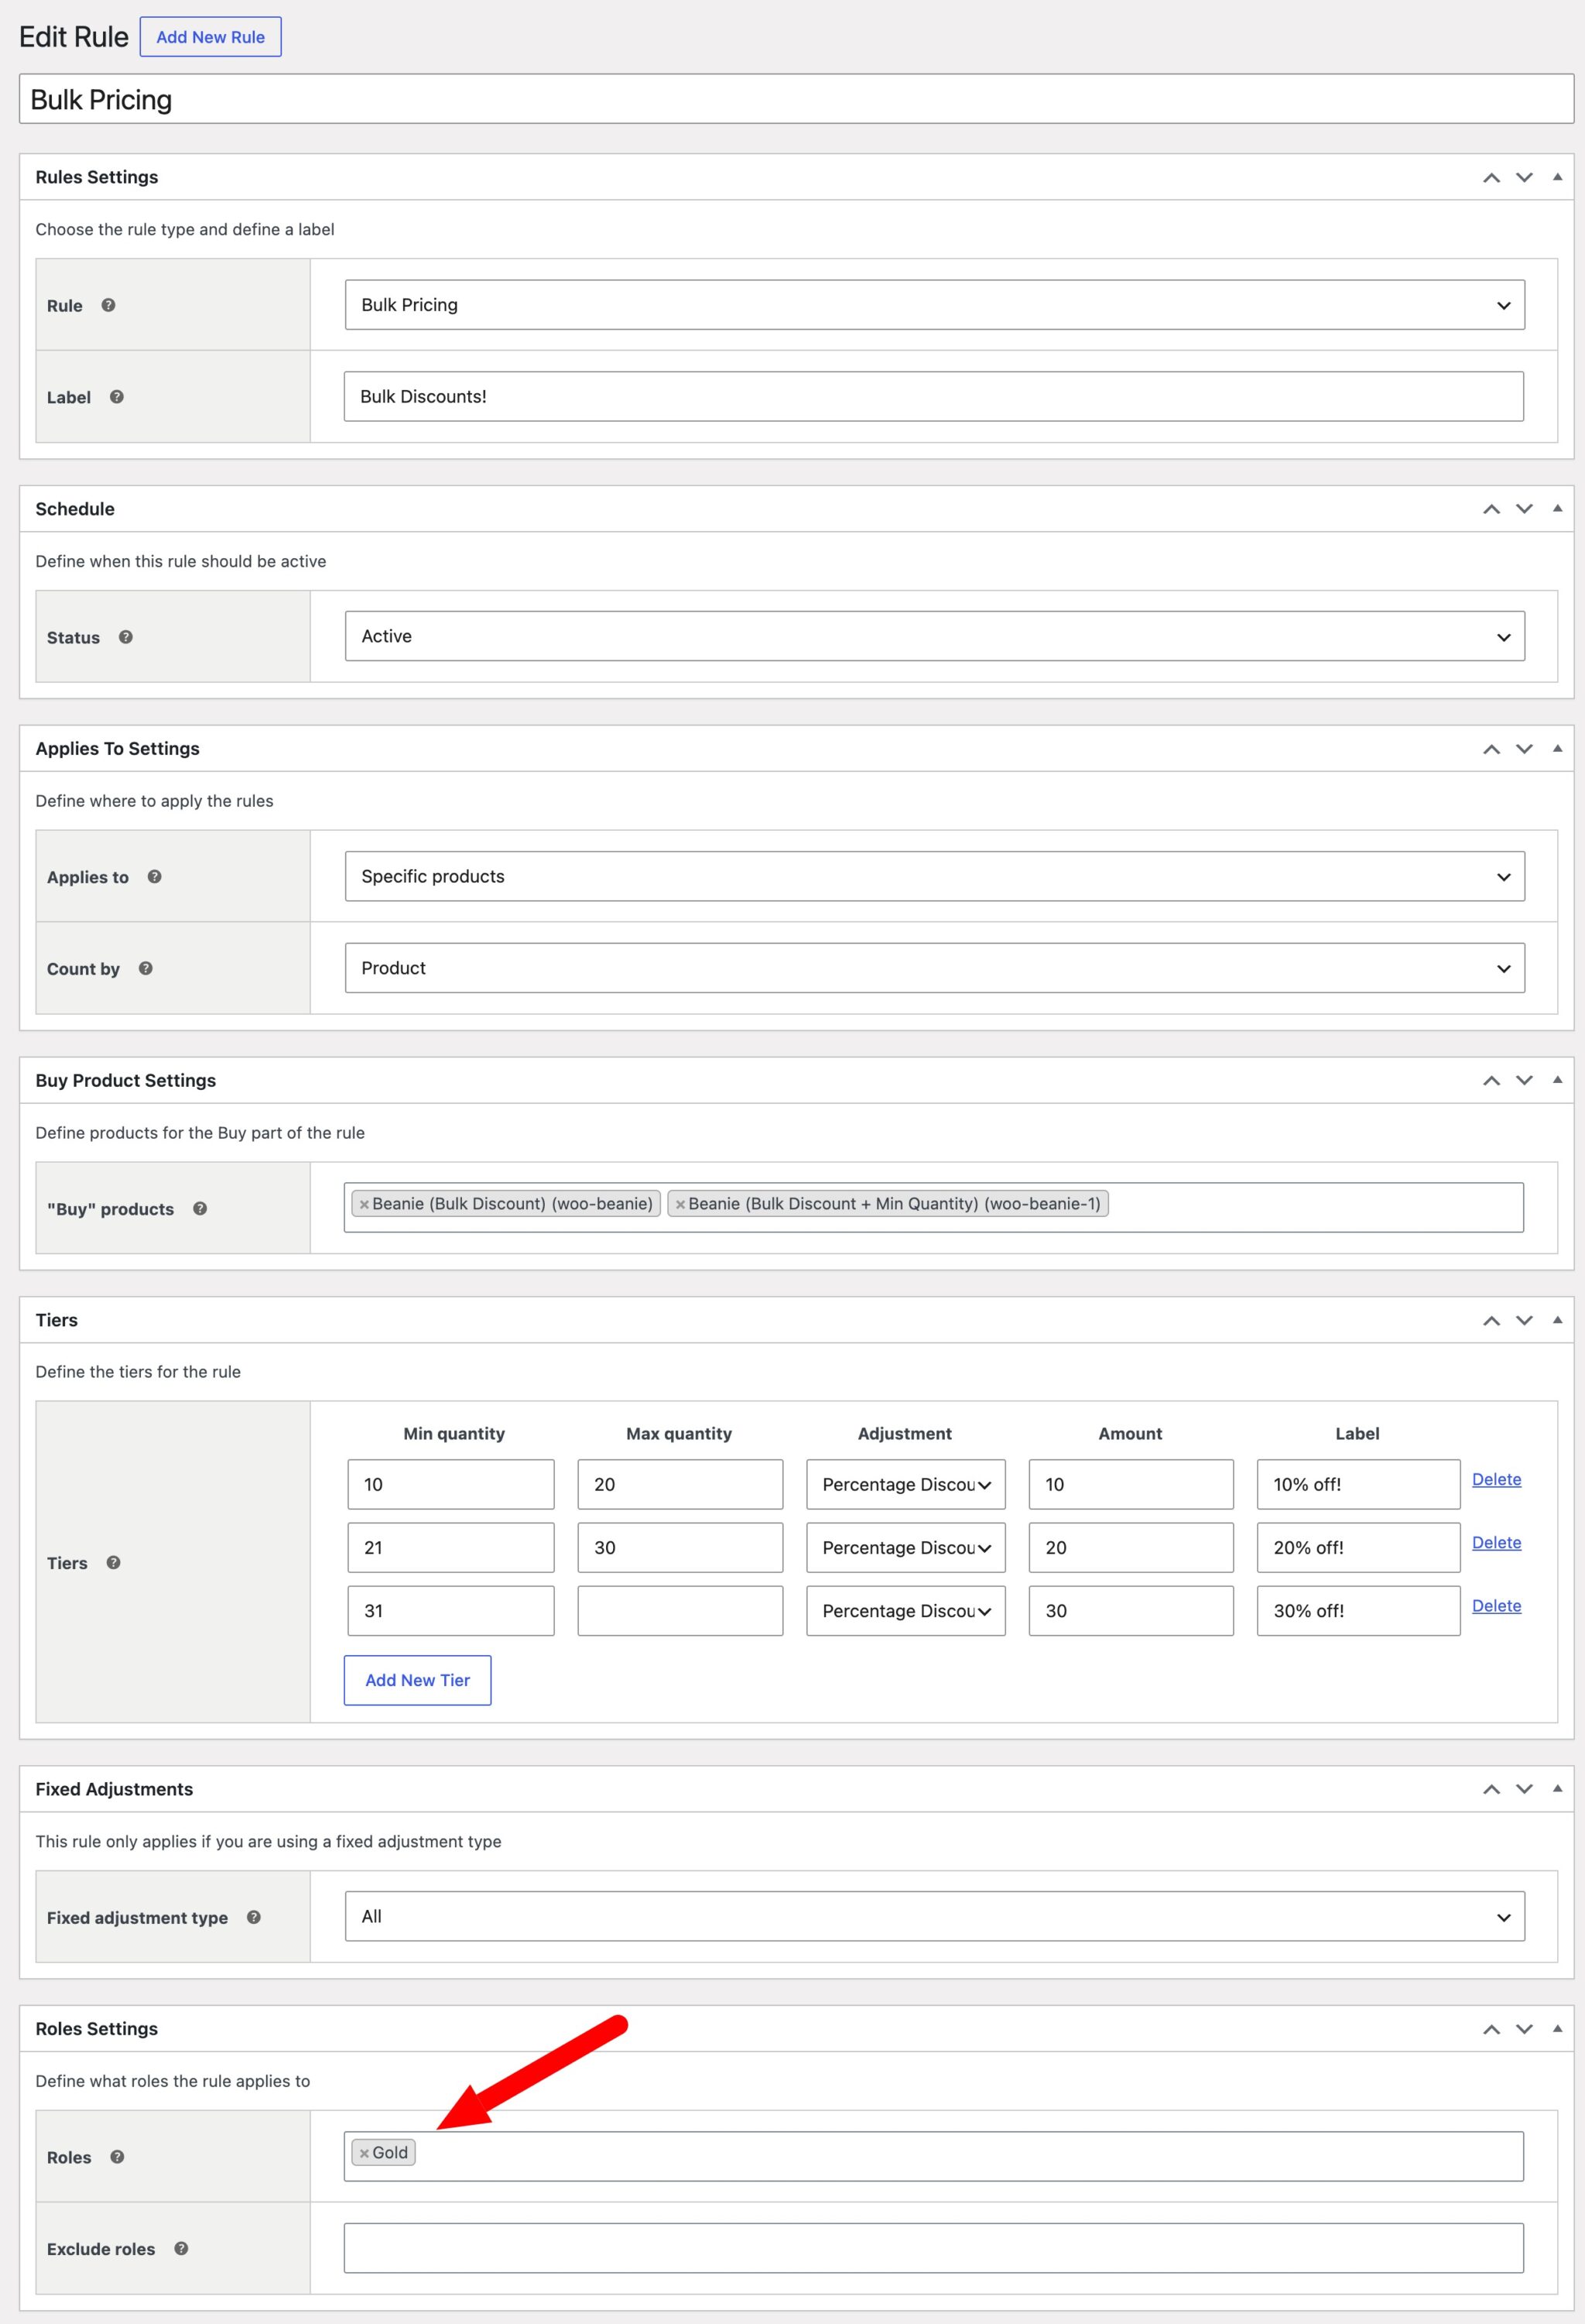
Members with that role will now see discounted prices throughout your store. Non-members see the standard price, with no indication that a lower price exists.
Set role-specific prices per product
For more precision, open an individual product and go to the ‘Role-based pricing’ tab in the product data panel. Enter exact prices for each membership role – useful when you need specific trade prices for wholesale buyers rather than percentage discounts.
Bonus #2: How do you hide product prices from non-members?
Hiding prices until a user logs in is a common requirement for wholesale stores and purchasing clubs. It signals that special pricing is available – without giving it away publicly.
Enable ‘Hide price’ in Members Only > Settings > Product archive settings. This hides prices on all restricted products across the store. Pair this with a custom ‘Add to cart text’ message – for example, “Log in to see member pricing” – and set the add to cart button to redirect non-members to your registration or membership product page.
That turns every restricted product into a soft conversion point rather than a dead end. See our complete guide to hiding prices in WooCommerce.
Bonus #3: Customizing registration and membership emails
WooCommerce Members Only gives you control over the registration experience from the sign-up form to the welcome email.
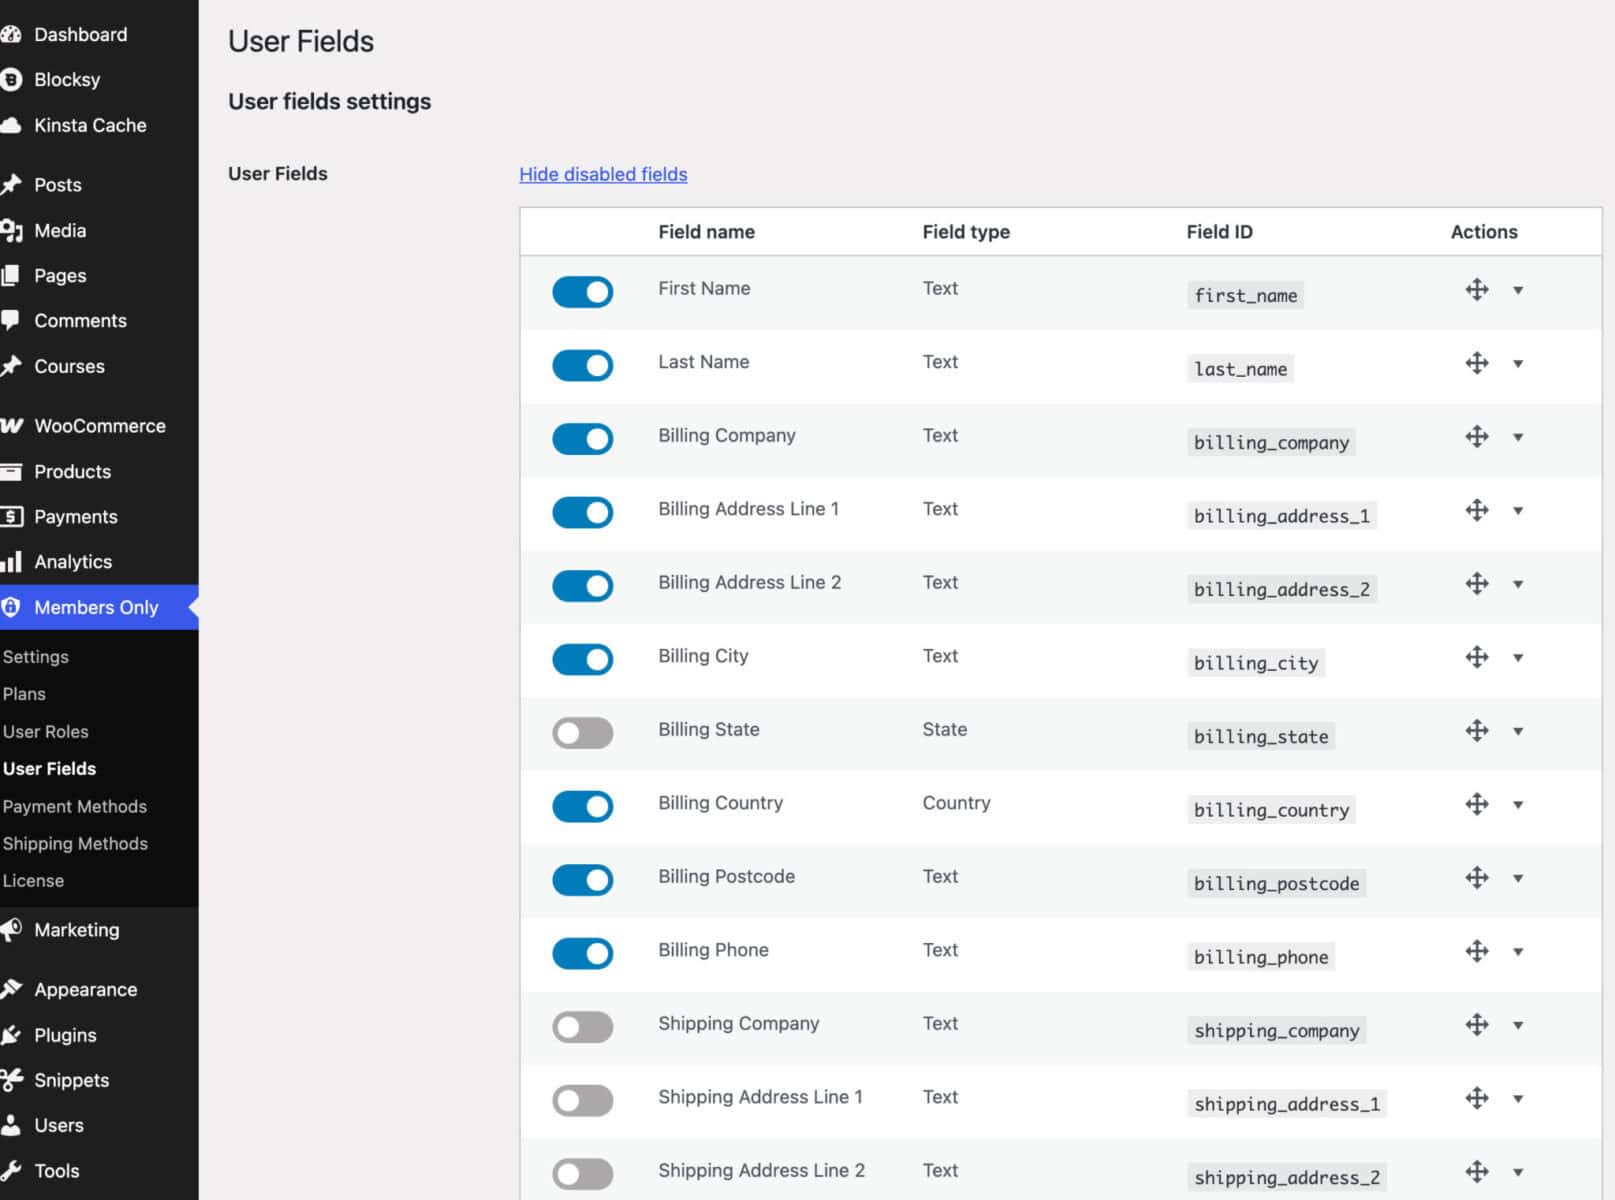
Custom registration fields
Go to Members Only > Registration > Fields. Add text fields, checkboxes, select dropdowns, or file upload fields to the registration form. These are saved to the user’s profile and can collect information like company name, VAT number, or job title – useful for B2B and wholesale stores that need to qualify buyers at registration.
See our complete guide to WooCommerce user registration.
User role self-selection at sign-up
Enable role self-selection and users can choose their membership tier when they register. Combine this with admin approval to allow some roles to activate instantly while others require review – for example, anyone can sign up for a Basic membership, but Pro membership requires approval.
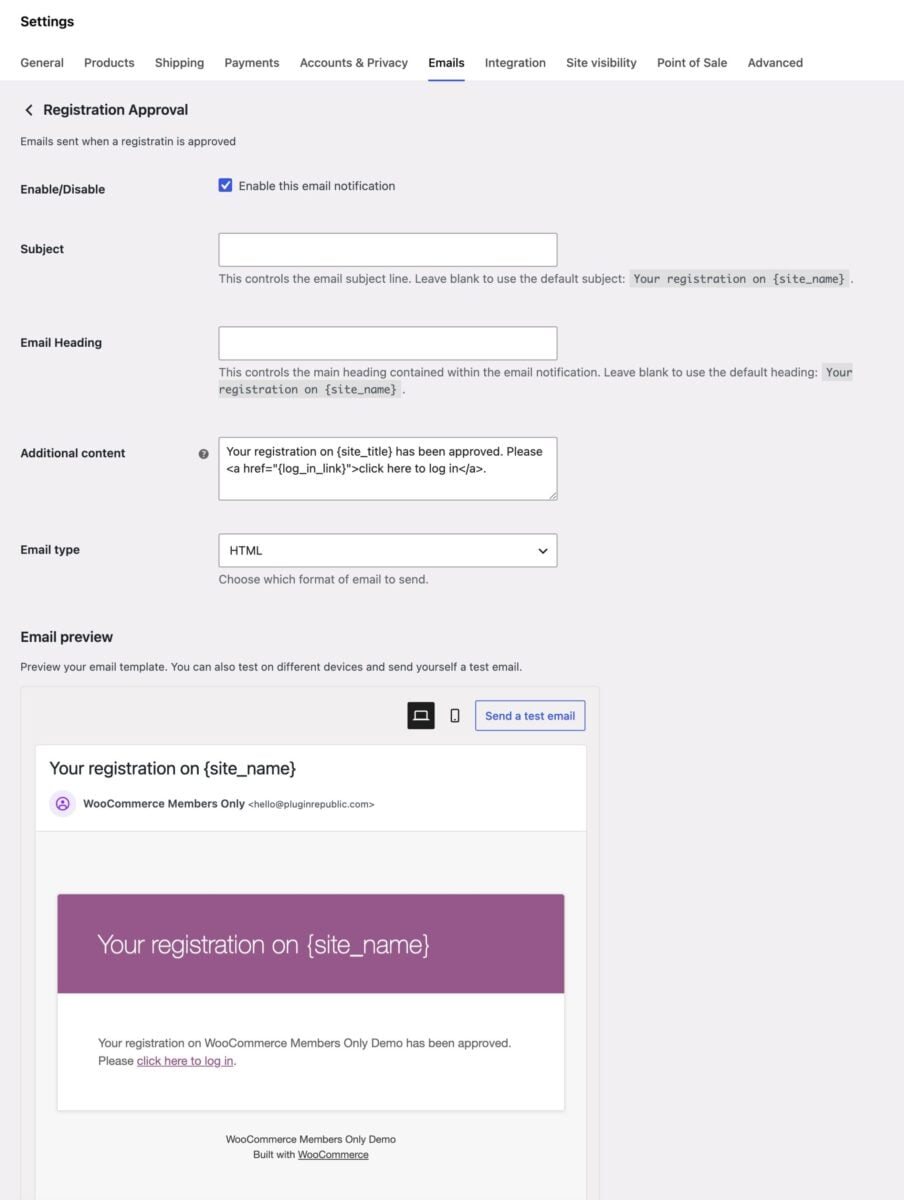
Membership emails
Go to WooCommerce > Settings > Emails to customize every automated email the plugin sends: welcome emails, approval notifications, expiry reminders, and rejection notices. Edit the subject line and body copy, and use custom placeholders to personalize messages with the member’s name, plan name, or expiry date.
How do you manage memberships from the back end?
Once your site is live, manage ongoing memberships from Users in your WordPress dashboard. Here you can view every user and their current role, edit a user’s role, and extend or expire memberships manually by changing the role assignment.
For order-related membership activity – purchases, refunds, and subscription renewals – go to WooCommerce > Orders as normal. Memberships are granted and revoked automatically based on order status, so a refunded order will revoke the membership role without any manual action required.

We use WooCommerce Members Only to customer groups different prices and delivery choices. Members of some groups have free delivery, others need to pay for delivery etc. Members Only solved all our problems with customer grouping.
WooCommerce memberships – recap
That’s how to set up a complete membership site using WooCommerce and the WooCommerce Members Only plugin. We looked at how to configure the global plugin settings, create membership plans with specific content restrictions, sell memberships through WooCommerce products, restrict individual products and posts, and manage members from the WordPress dashboard. We also covered tiered access levels, member discounts, hidden pricing, and custom registration flows.
WooCommerce Members Only is compatible with all themes and page builders – and it’s backed by a 14-day money-back guarantee and world-class support, so you can try it risk-free.