How to create a bike rental store in WooCommerce
In this tutorial, we’re going to look at everything you need to offer bike rentals through your WooCommerce / WordPress site. We’ll cover two ways to rent bikes out: by the hour, using time slots, and by the day – so customers can select their times, book, and pay online.
Create a bike rental store in WordPress
This tutorial will walk you through how to create product pages where users can rent bikes from you and pay online.
After completing this tutorial:
- Users will be able to:
- Pick dates from a calendar to hire bikes
- Choose how many bikes they’d like
- See availability and pricing per day
- Optionally choose different models to rent
- As the store owner or admin, you’ll be able to:
- Accept payments for bike rentals online
- Manage stock so that you don’t oversell bikes on certain days
- Set seasonal costs – so you can charge more in peak season
- Offer discounts on longer rentals
- As a bonus, we’ll also look at how to:
- Add options like insurance
- Upsell extra items like helmets or gloves
Why use WooCommerce?
If your site does not already have WooCommerce installed, here are three top reasons to use it for your bike rental site:
- WooCommerce is the most widely-used ecommerce platform in the world
- It offers hundreds of payment gateways – so you can accept payments online, through bank transfer, even with cash on delivery
- It’s easy to use, well-documented and well-supported
For the purposes of this article, we’ll assume you already have WooCommerce installed. There’s also a complete guide on how to get started with WooCommerce here.
WooCommerce bike rental plugin
Although it’s hugely flexible, WooCommerce doesn’t have any built-in options to allow customers to rent products. So for this tutorial, we’ll also need a WooCommerce bookings plugin:
The Bookings for WooCommerce plugin will allow you to accept date-based bookings through standard WooCommerce products. It’s compatible with all themes and page builders and it’s also compatible with all WooCommerce payment gateways.
Let’s take a look at how to create a WooCommerce where users can hire one or more bikes for a period of time.
WooCommerce bike rental tutorial
In this tutorial, we’ll assume that you already have WordPress and WooCommerce installed and ready to go.
There are two ways to rent bikes with Bookings for WooCommerce: by the hour or by the day. Hourly hire uses the time slots feature, while daily hire uses date-based bookings.
We’ll cover both below. Whichever you choose, start by installing the plugin.
Step #1: Install and activate Bookings for WooCommerce
Once you’ve purchased Bookings for WooCommerce:
- Download the plugin’s zip file by clicking on the link on your order confirmation screen or in your welcome email. You’ll receive the email automatically a few seconds after you’ve completed the purchase
- Go to Plugins > Add New in your WordPress dashboard
- Click on the ‘Upload Plugin’ button
- Drag and drop the plugin’s downloaded zip file into the ‘Choose File’ area and click ‘Install Now’
- When the plugin has uploaded, click the ‘Activate Now’ button
Part 1: Rent bikes by the hour
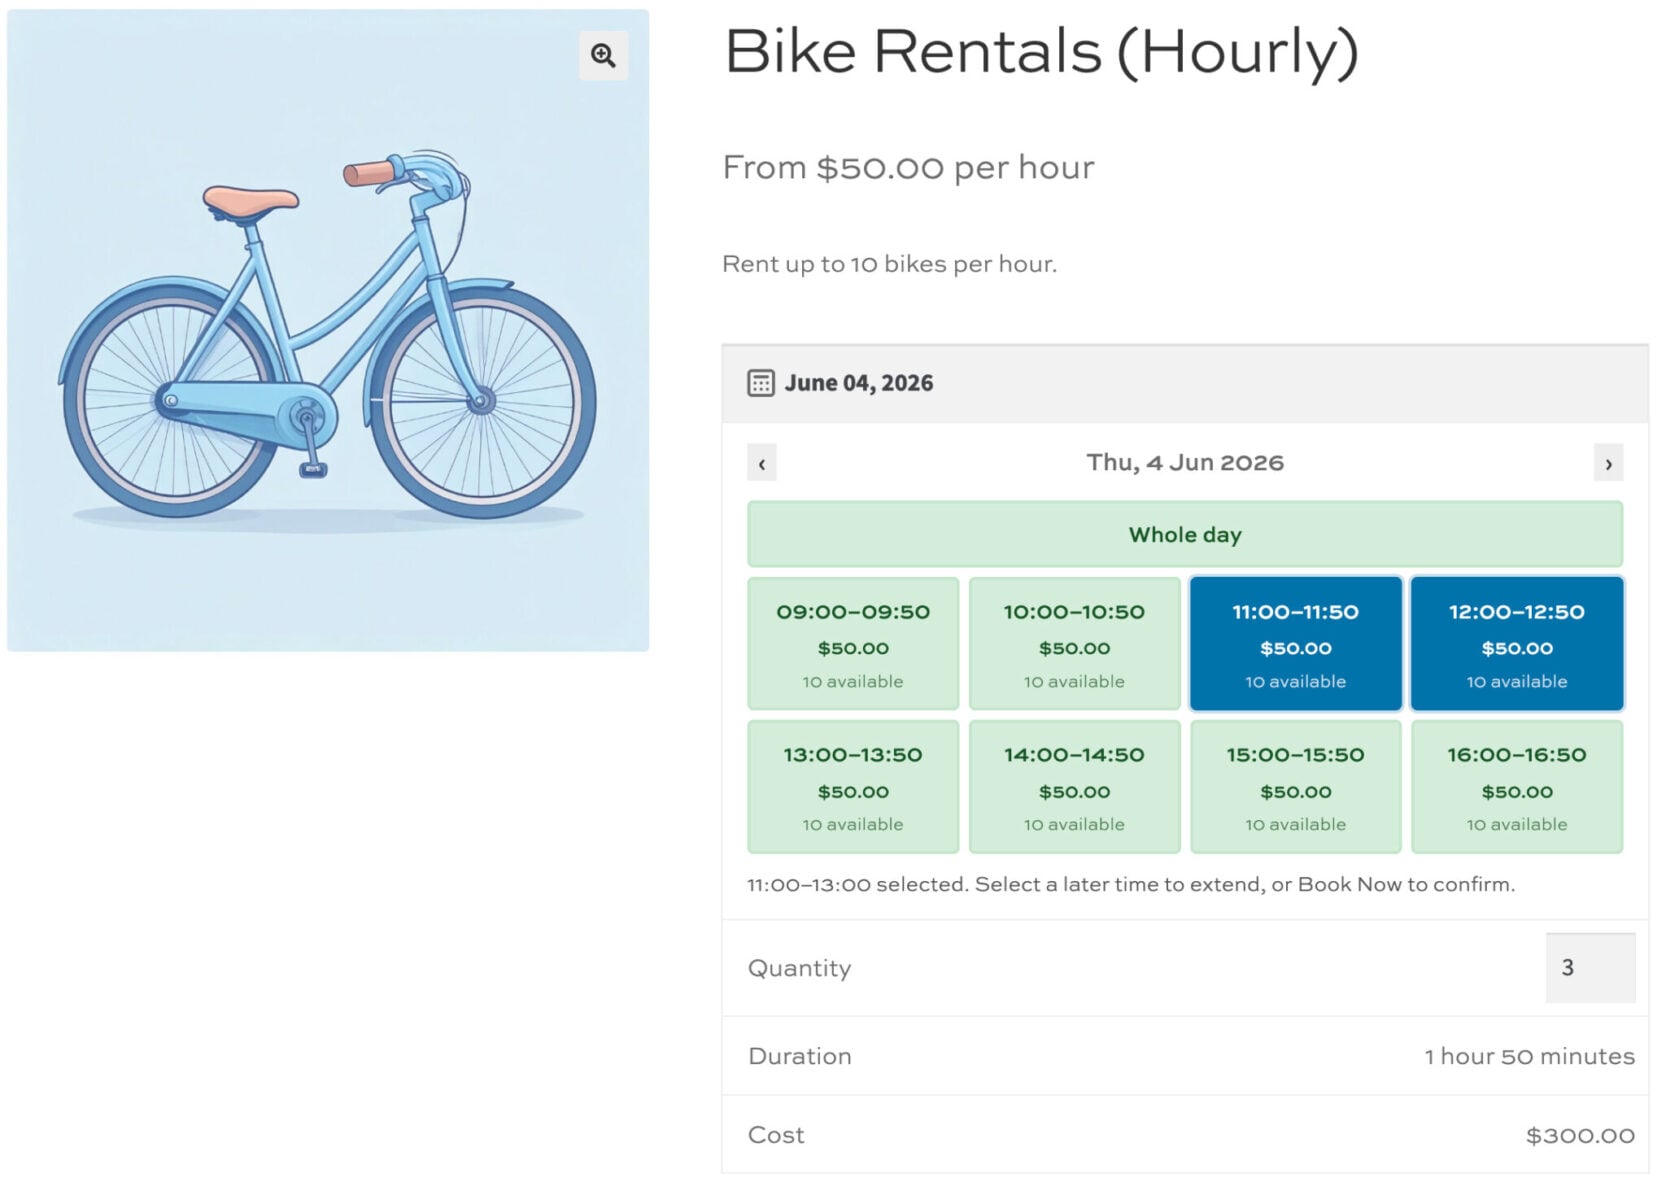
Renting by the hour suits town-center hire, where customers want a bike for a few hours rather than a full day. Using the time slots feature, customers pick a date, choose a start time, and select how many hours they want.
You set your opening hours, the length of each slot, and the price per hour. Here’s how to set it up.
Step #1: Create the bookable product
Set up a standard WooCommerce product, then make it bookable:
- Go to Products > Add New and add a name, description, and images
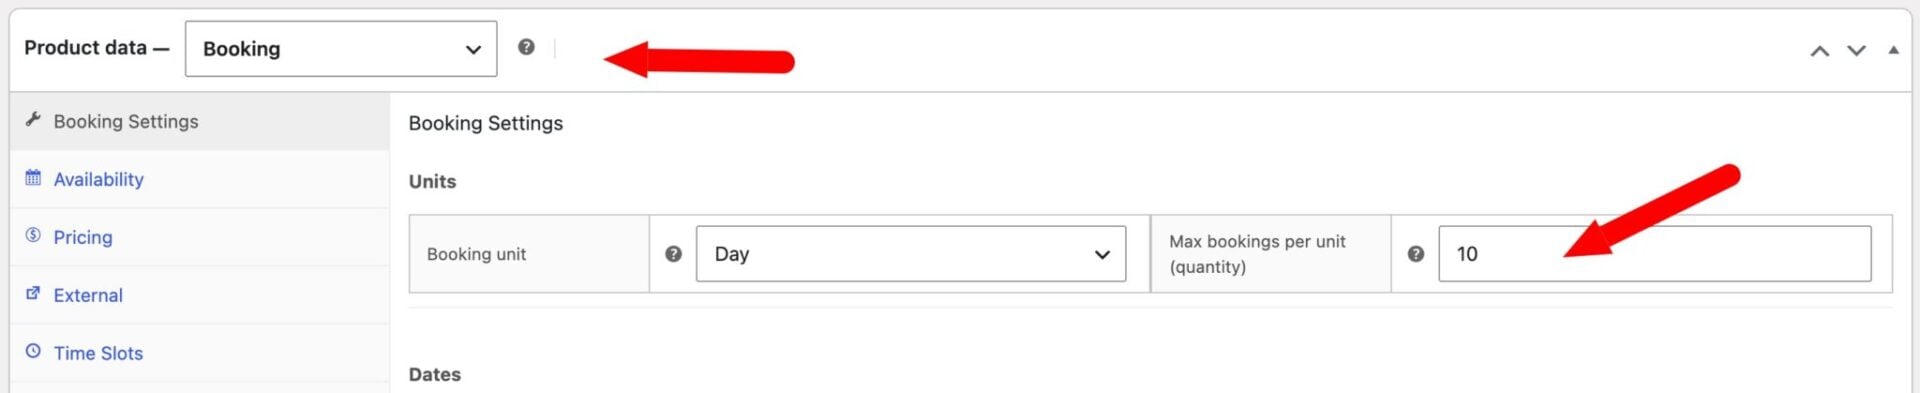
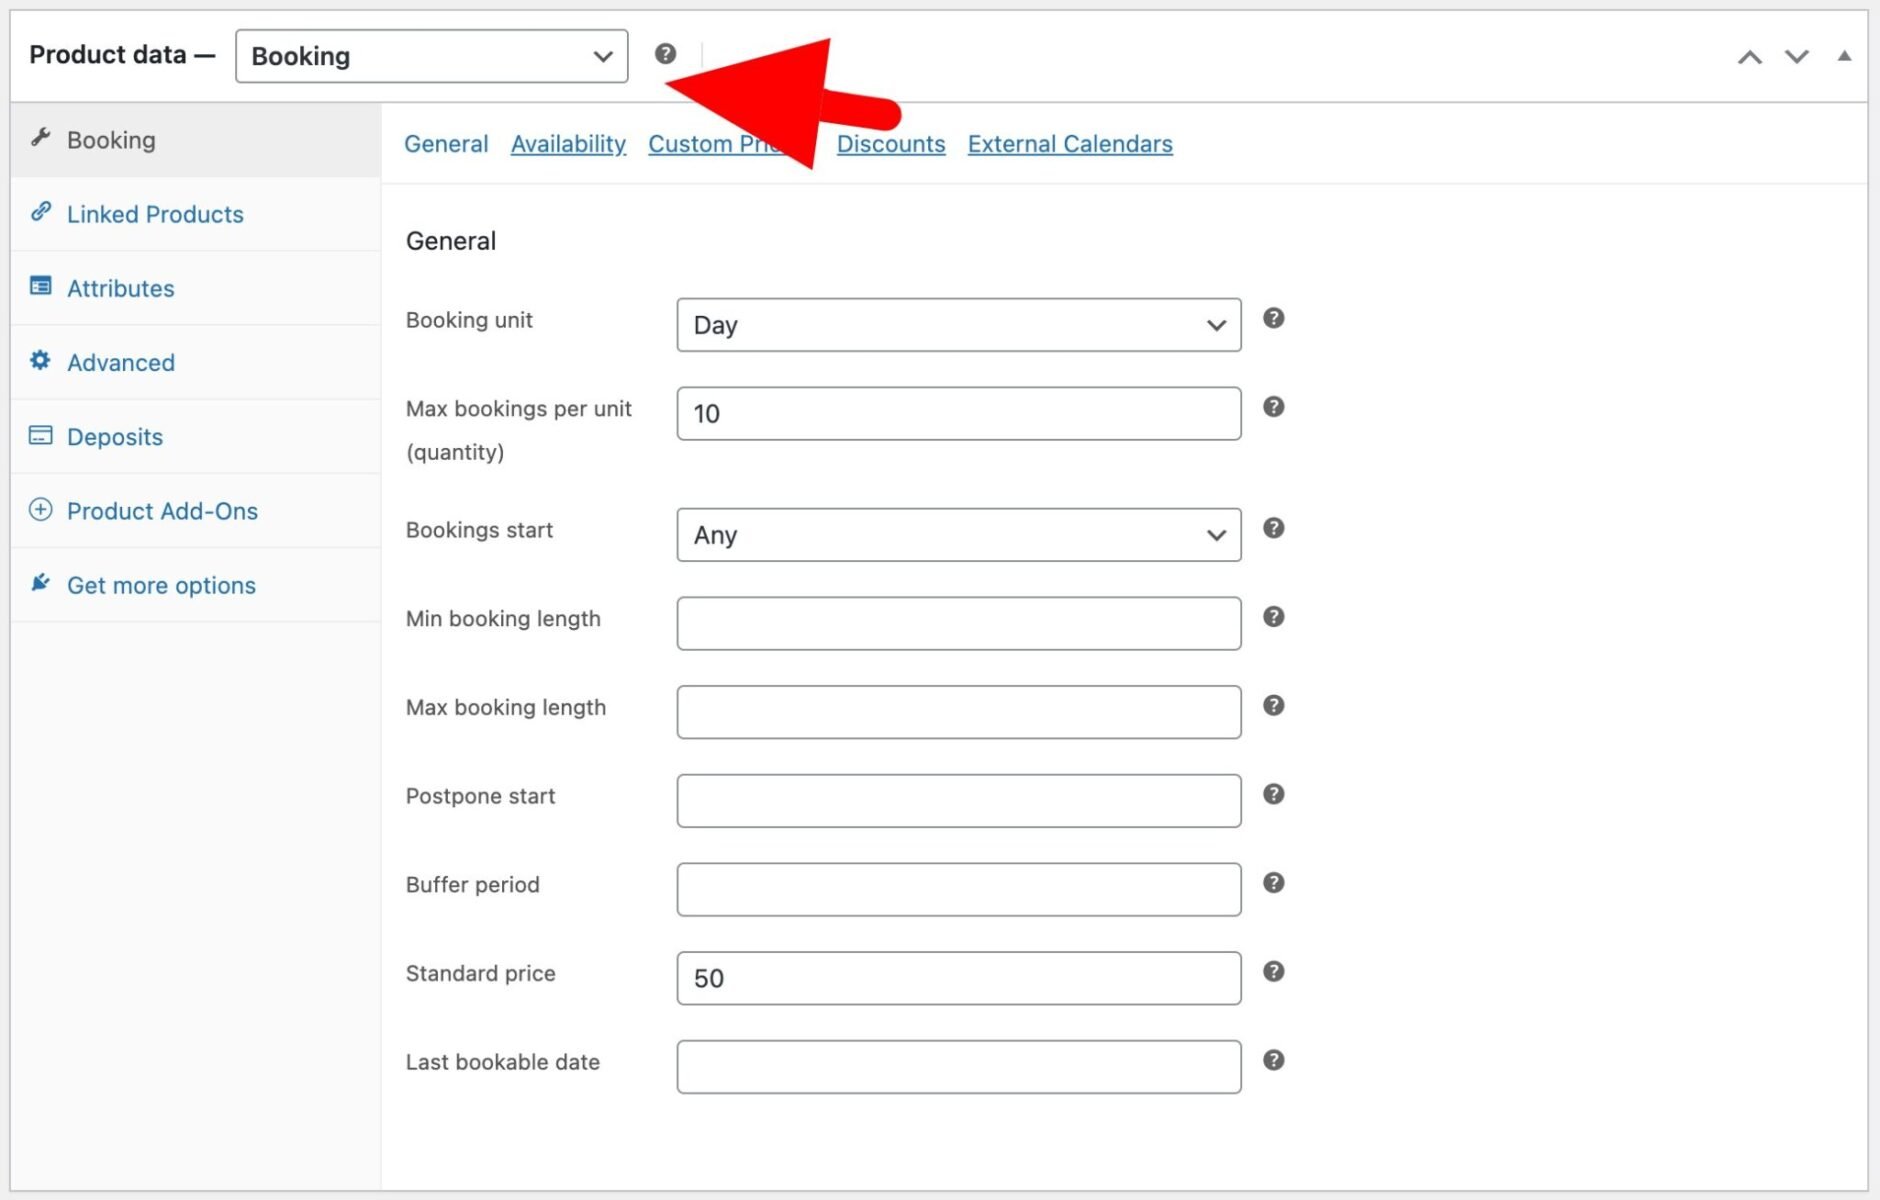
- Select ‘Booking’ from the ‘Product type’ field in the ‘Product data’ section
- Set the ‘Booking unit’ to ‘Day’ on the ‘Booking Settings’ tab – time slots are only available when the unit is set to ‘Day’
- Enter the number of bikes you have in the ‘Max bookings per unit’ field
You now have a bookable product set to the day unit. Next, we’ll turn each day into hourly slots.
Step #2: Enable and configure hourly time slots
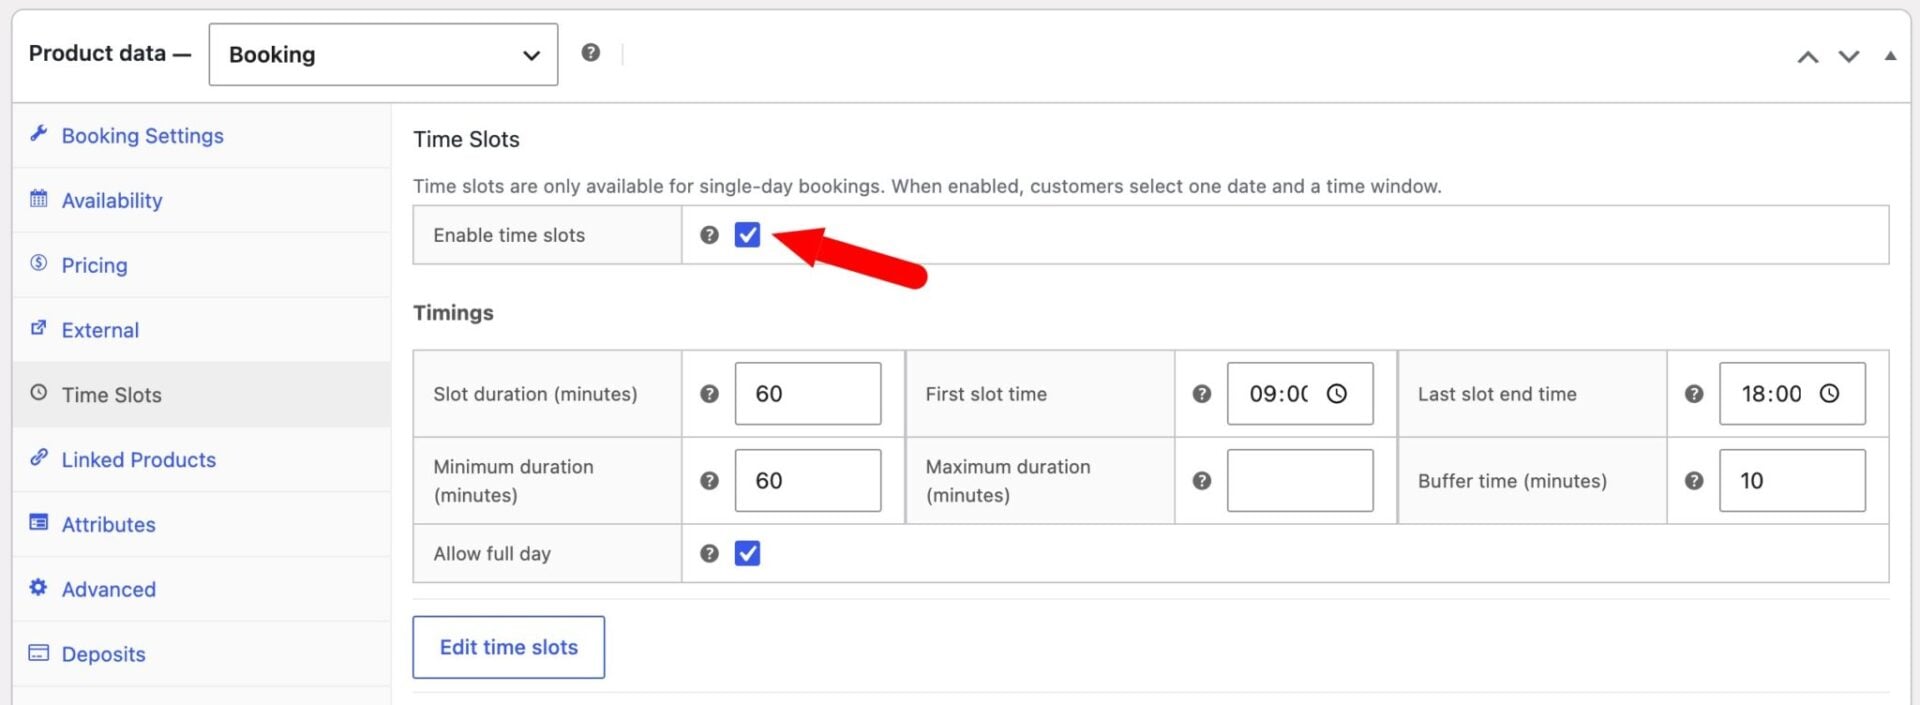
Open the ‘Time Slots’ tab and check ‘Enable time slots’. The remaining settings appear once this is enabled.
Set your timings to match your opening hours:
- Slot duration (minutes) – the length of one slot. For hourly rentals, enter ’60’
- First slot time – when you open, e.g. ’09:00′
- Last slot end time – when you close, e.g. ’18:00′
This creates a row of one-hour slots across the day, from 09:00–10:00 through to 17:00–18:00.
To let customers rent for several hours, set the booking length range:
- Minimum duration – the shortest rental, e.g. ’60’ for one hour
- Maximum duration – the longest rental, e.g. ‘480’ for eight hours
- If you want to allow users to book the whole day, enable the ‘Allow whole day’ option
Both values must be a multiple of the slot duration.
Next, let’s look at how to tweak the slots and times.
Step #3: Optionally fine-tune capacity, pricing, and turnaround
A few optional settings give you more control:
- Buffer time – subtract a few minutes from the displayed end of each slot to allow for checks between rentals, without changing the price or when the next slot starts
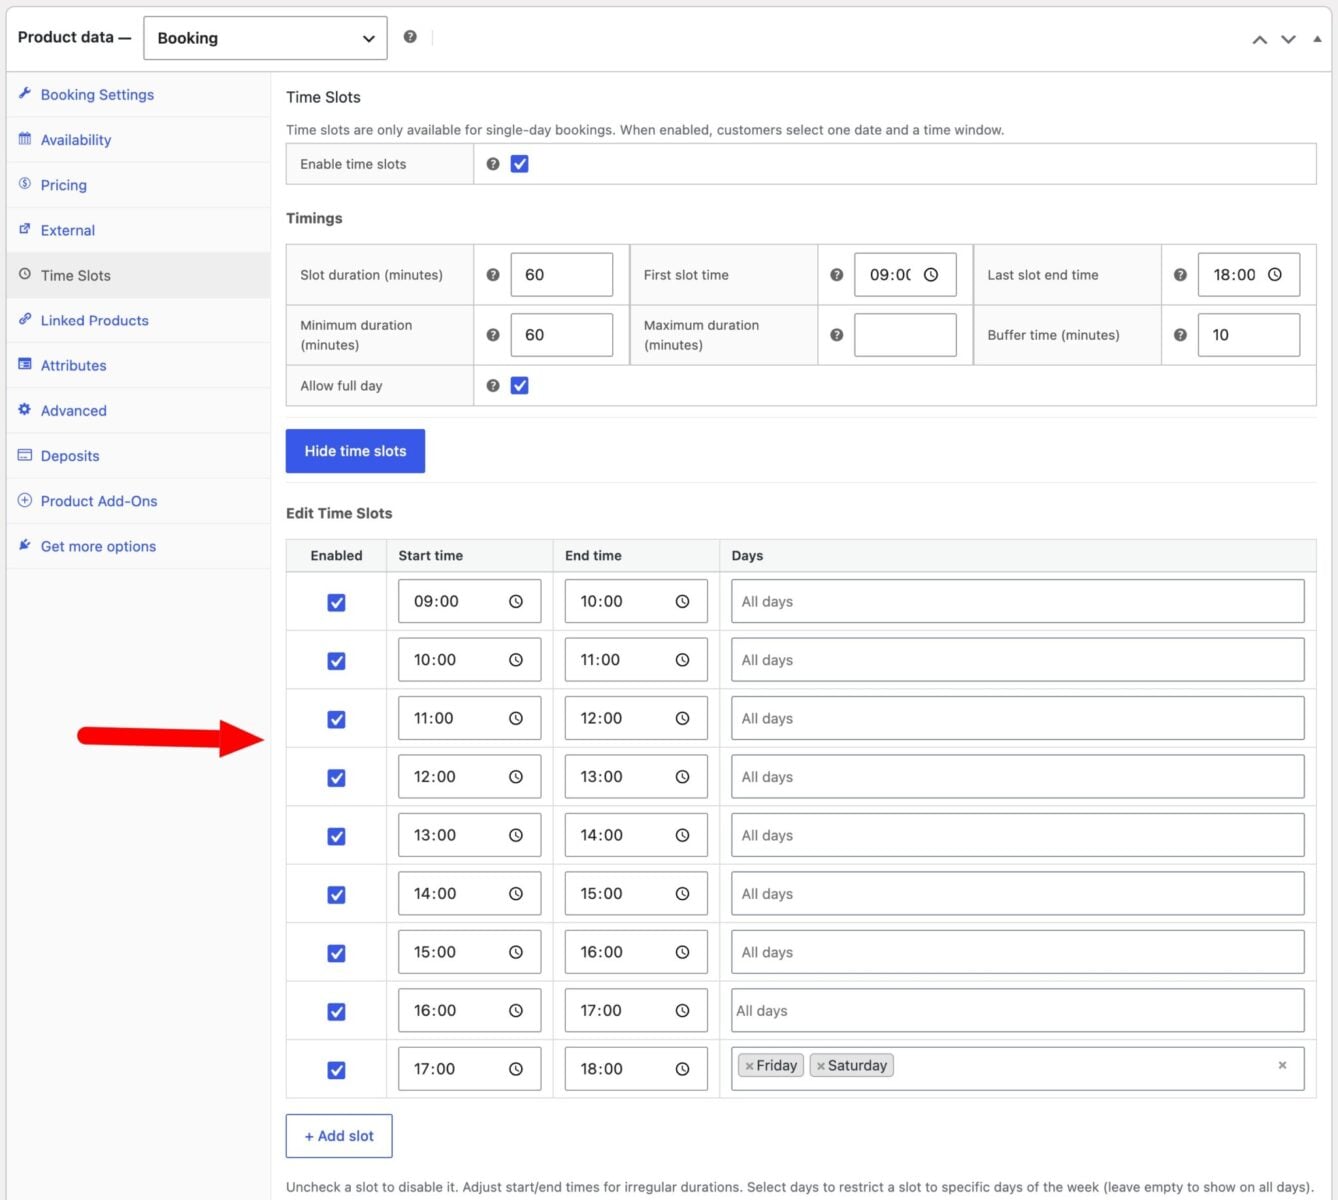
- Edit Time Slots – open this table to disable hours you don’t rent, change individual start and end times, or restrict a slot to certain days of the week using the ‘Days’ column. In the example below, the last time slot from 17:00 to 18:00 is only available on Friday and Saturdays
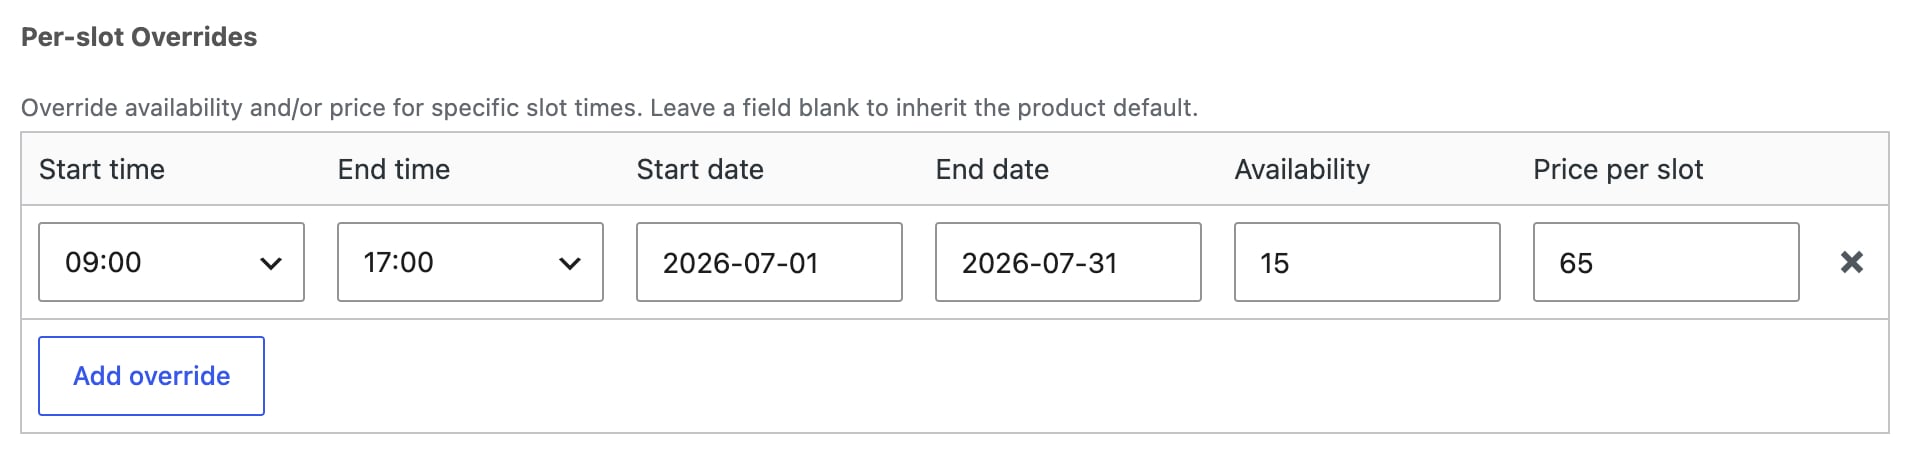
- Per-slot overrides – set a different capacity or price for particular hours, e.g. a higher rate at peak times or fewer bikes during a busy slot. Use the ‘Per-slot overrides’ table and fill in the ‘Availability’ or ‘Price per slot’ field. In the example below, there is a greater of bikes available over the summer and the price per hour has been increased slightly
These settings are optional, so you can publish first and refine your hours later.
Step #4: Set hourly pricing and the booking layout
Enter your hourly rate in the ‘Price per slot’ field, e.g. ’50’. A customer booking three hours is charged for three slots.

You can override the prices per slot in the Overrides section – see above. So if you want to charge more for evening rentals than morning rentals, you can do that easily.
Save and publish the product. Now customers can pick a date, choose a start time, and rent a bike by the hour. Take a look at the demo product here.
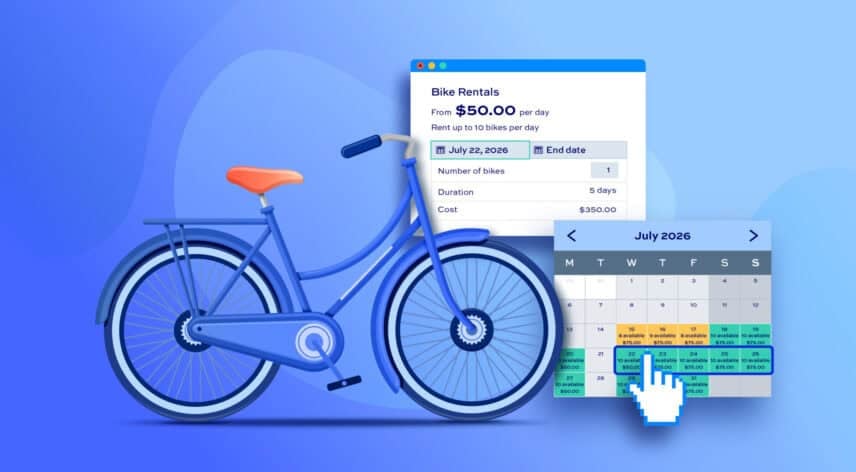
Part 2: Rent bikes by the day
Daily hire lets customers book a bike across one or more days, charged per day. This is the better fit for longer rentals, tours, and holidays.
Step #1: Create a bookable product
To create your first bike rental product, just follow the standard steps for creating a product in WooCommerce:
- Go to Products > Add New
- Give your product a name, add some description, and upload any images
Now, to make the product bookable:
- Select ‘Booking’ from the ‘Product type’ field in the ‘Product data’ section
- Choose your ‘Booking unit’. For bike rentals, this is most likely to be per ‘Day’
- Enter the price per day of a rental in the ‘Standard price’ field
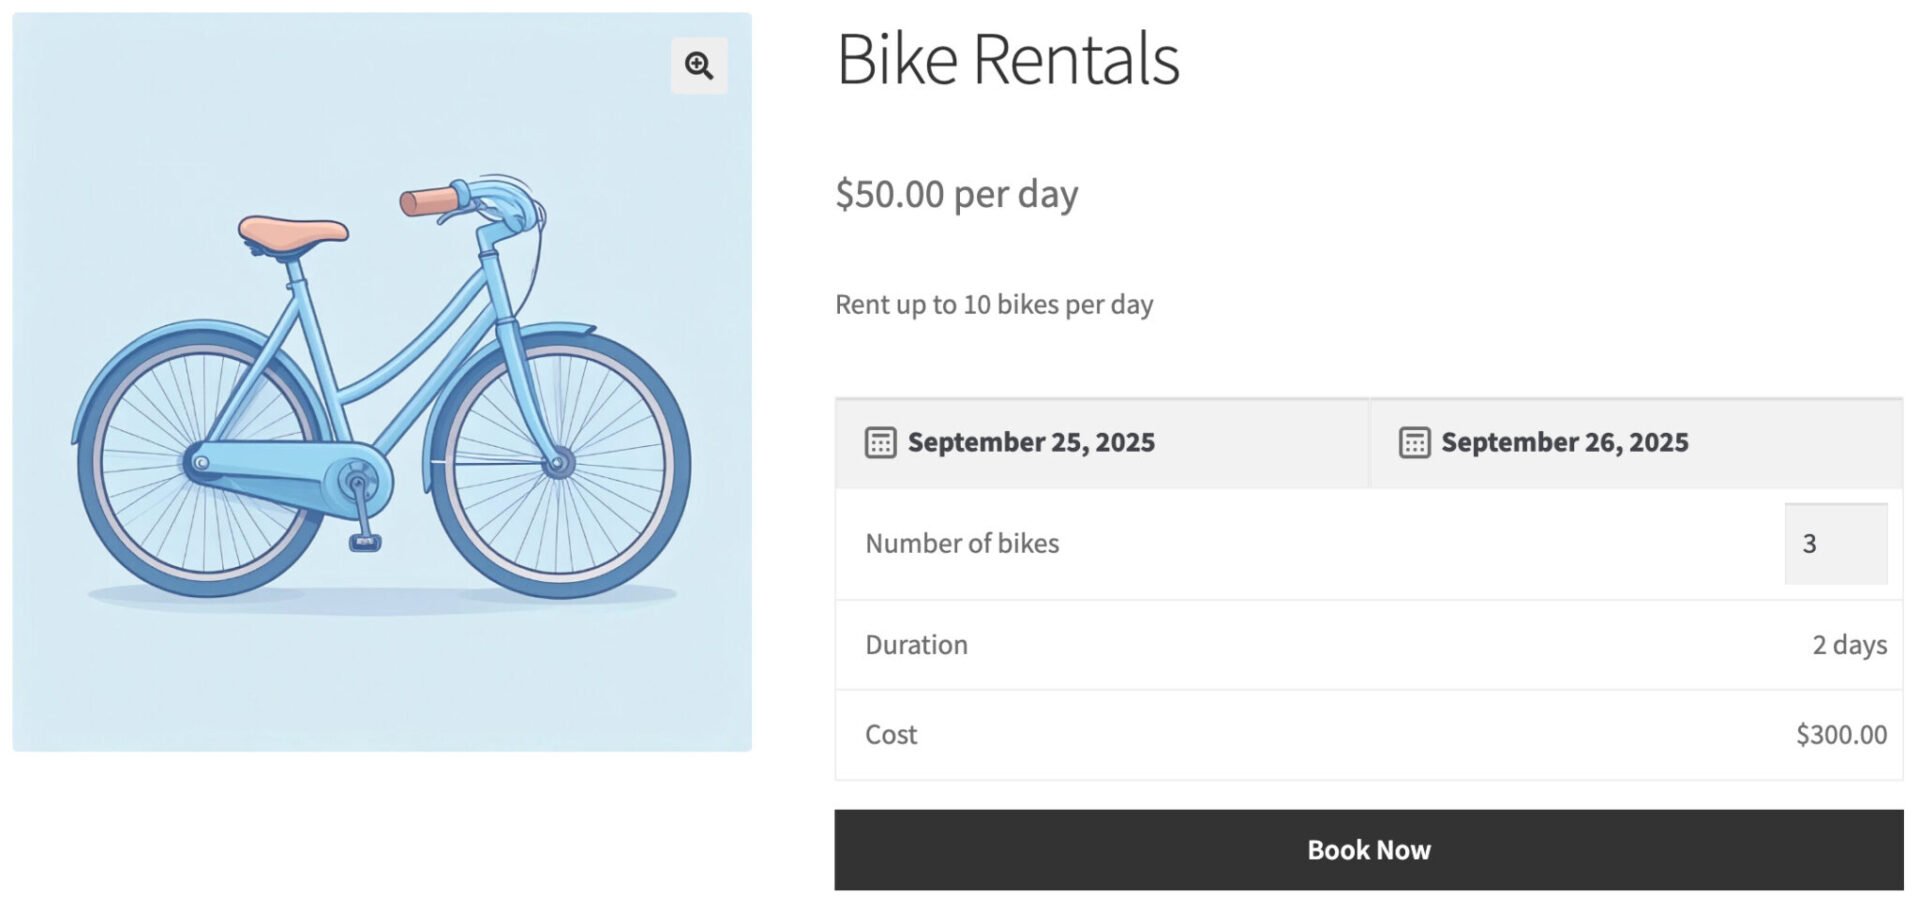
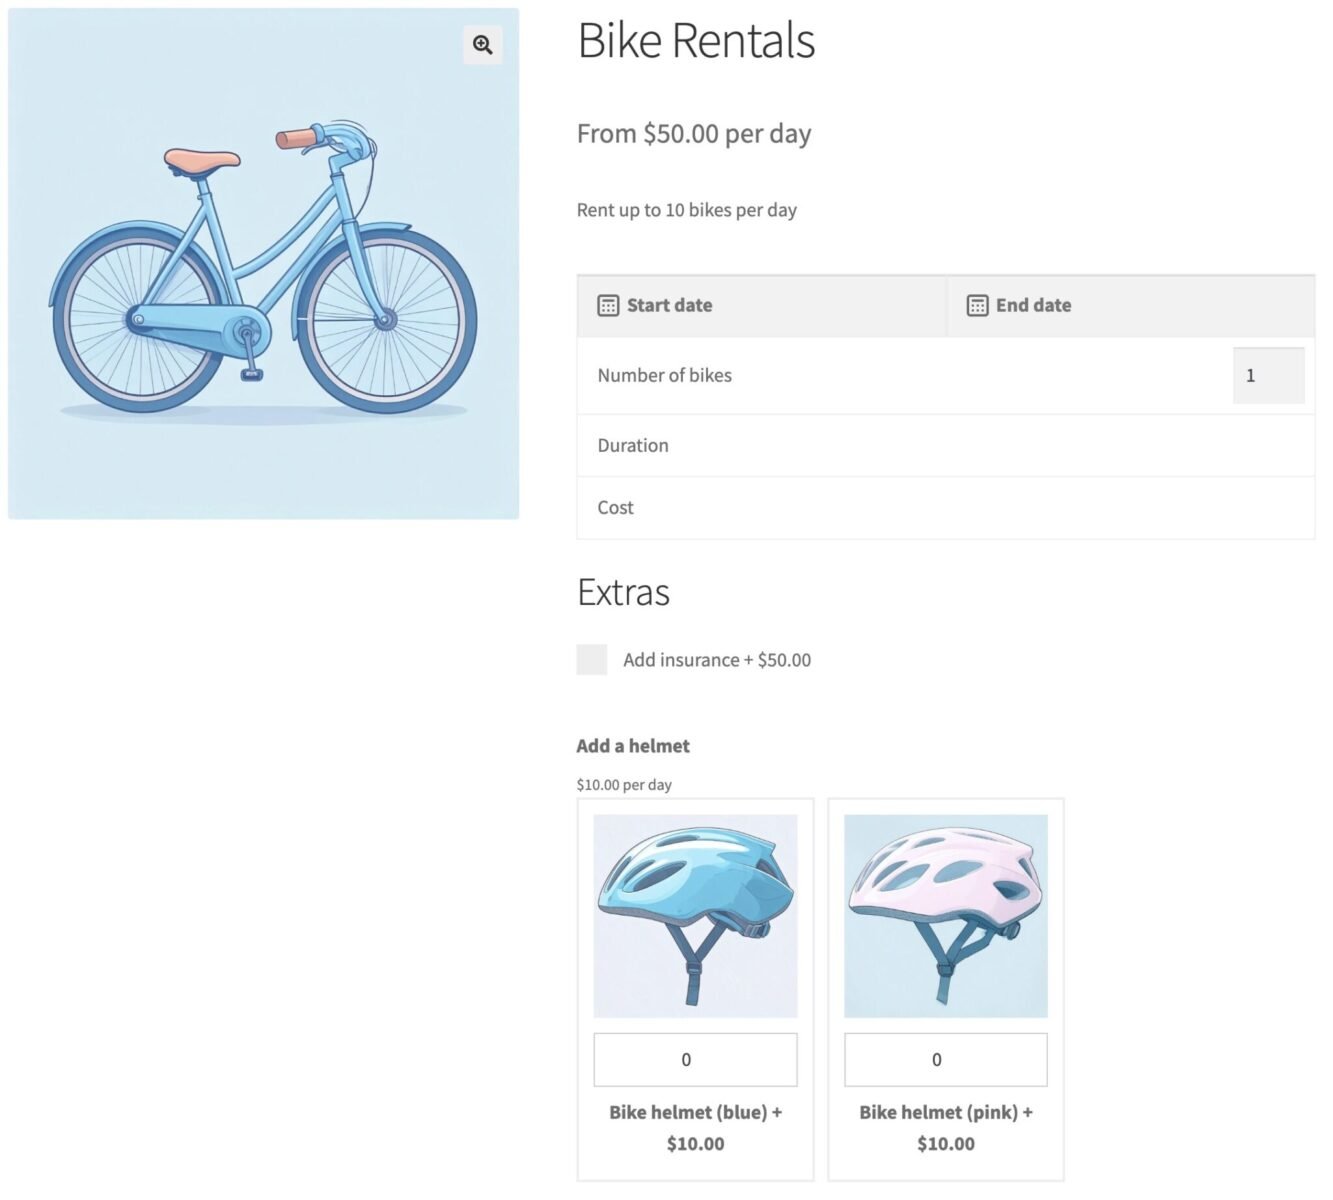
Publish your product. You now have a simple bike rental product with a booking form where users can hire a bike between two dates and be charged per day. There’s a demo product here so you can see how a rental page works.
Now let’s look at some additional settings.
Step #2: Configure inventory and other parameters
Most likely, you’ll have a limited number of bikes that you can hire out per day. To ensure that your customers can’t rent more bikes than you have available, enter the number of available bikes in the ‘Max bookings per unit’ field. So if you enter 10 in this field, for example, no more than 10 bikes can ever be rented per day.
Minimum and maximum booking lengths
If you’d like to set a minimum or maximum number of days that customers can hire bikes for, just enter values in the ‘Minimum booking length’ and/or ‘Maximum booking length’ fields. So, for example, if you only want your bike rental period to last a maximum of 7 days, just enter 7 in the ‘Maximum booking length’ field.
If you want to offer different models of bike, each with their own spec and pricing, you just need to create a new product for each model.
Step #3: Optionally disable days of the week or block dates
Booking online is great because customers can do it any time. But your rental facility might not be open every day of the week. To ensure that users can collect or return bikes on certain days of the week:
- In the ‘Booking’ tab of the ‘Product data’ section, click the ‘Availability’ menu
- Select any days of the week that you would like to block out on the calendar
- Now users will not be able to select those days of the week from the front end booking form

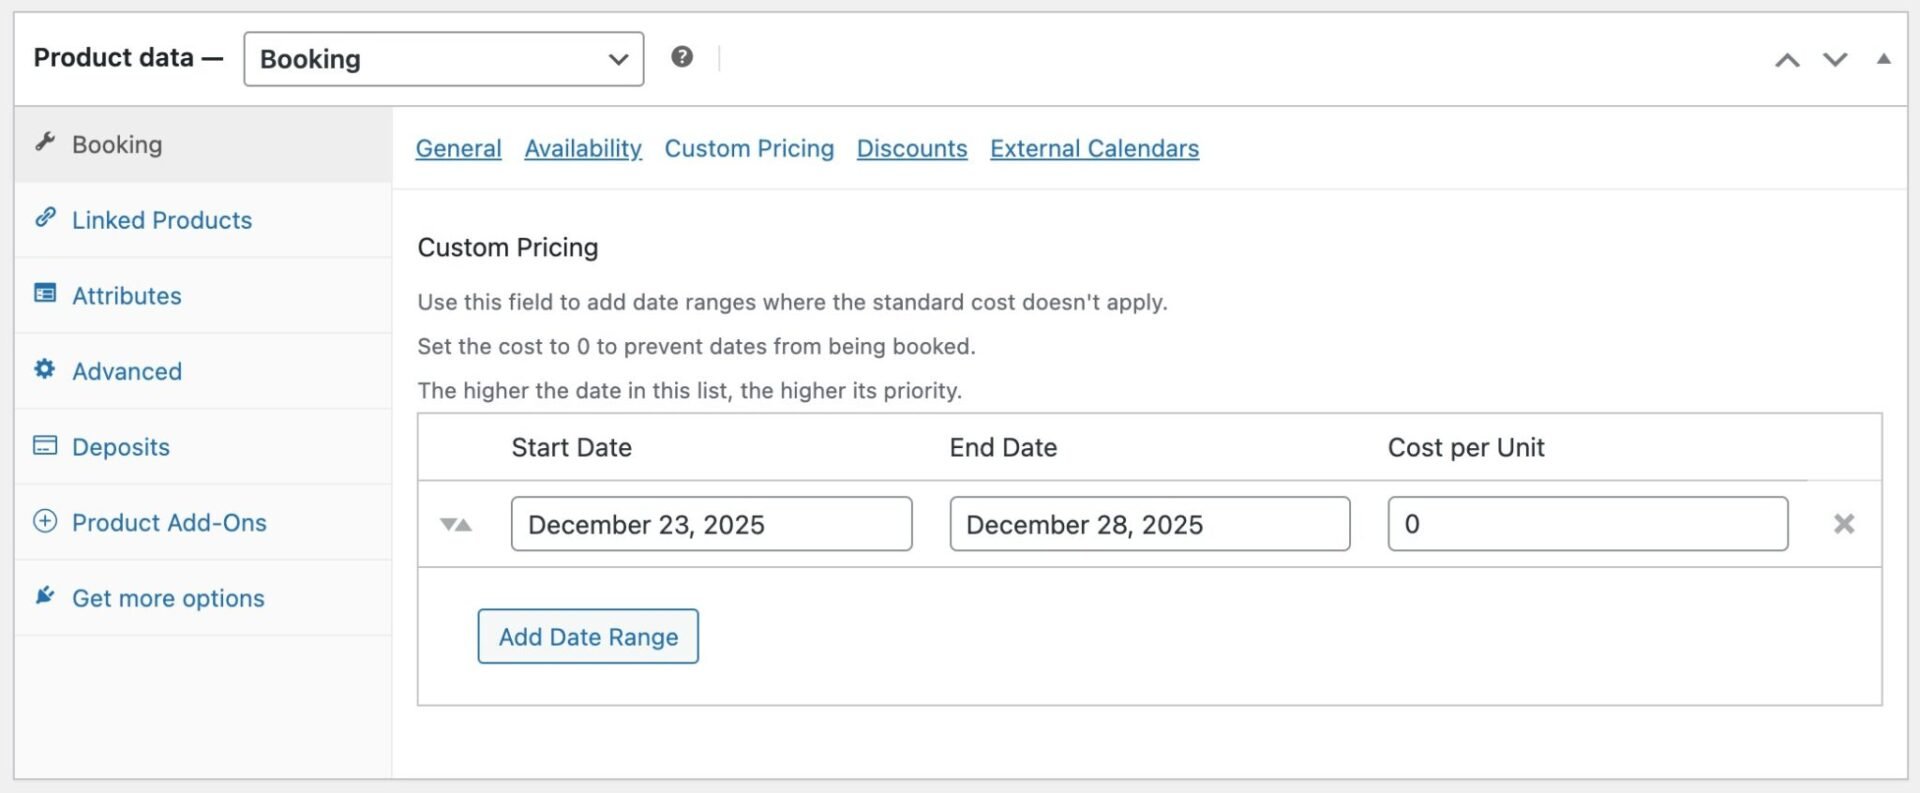
If you’d like to block out specific dates so that users can’t make any rentals at all during certain periods:
- Click the ‘Custom Pricing’ menu item
- Click the ‘Add Date Range’ button to add a new date range
- Enter the start and end dates where user can’t make any bookings
- Enter 0 in the ‘Cost per Unit’ field to ensure that these dates are unavailable in the front end calendar
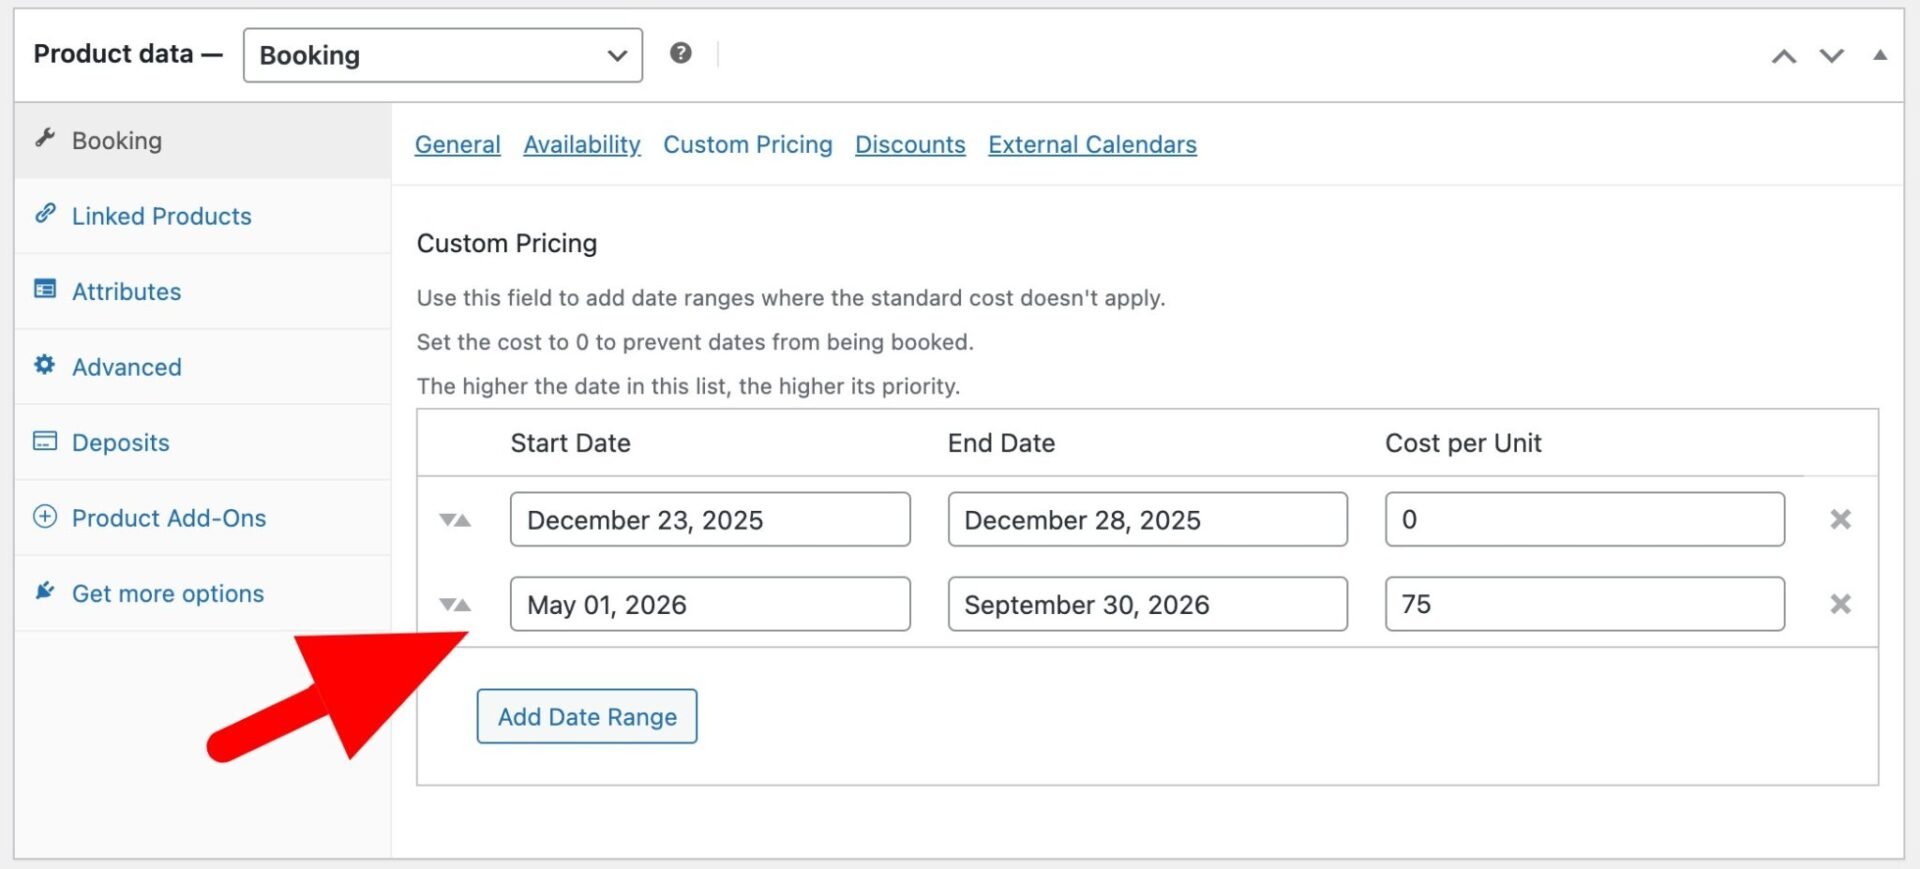
Step #4: Optionally configure seasonal pricing
Certain times of the year might be busier or quieter for the bike rental business. You can set different prices per rental product for different date ranges, allowing you to increase your prices in times of greater demand and reduce them during quieter periods.
To set seasonal pricing for bike rentals:
- Click the ‘Custom Pricing’ menu item
- Click the ‘Add Date Range’ button to add a new date range
- Enter the start and end dates for the specific period
- Enter the adjusted price in the ‘Cost per Unit’ field. This is the price that will be used for the product during the dates you selected
Step #5: Optionally create discounts for longer rentals
You might want to offer your customers a discount for hiring a bike for longer periods. To create a discount for bike rentals:
- Click the ‘Discounts’ menu item
- Set a ‘Discount Rate’ as a percentage
- In the ‘After’ field, enter the minimum number of days the rental must last to qualify for the discount
- In ‘Apply From’, select ‘All’ if the discounted rate should apply to the entire booking, or ‘Partial’ if the discounted rate only applies to the days after the minimum period

Step #6: Optionally offer different bike models for rental
If you have different models and types of bike for rent, you can create follow the steps above to create a product for each model.
Let users search all available bikes by date
If you have more than one product on your site that users can book, then you can add a search form to your shop page so that customers can search by date range for available bikes.
To enable a bookings search form for all your rental bikes, go to WooCommerce > Settings > Bookings > Search and check the ‘Enable search on archive pages’ field.
This will automatically insert a search form at the top of your shop and archive pages. Users will be able to enter the start and end dates they’d like to hire a book, and they’ll see all bikes with availability within those dates.
How to manage your rentals
Once you’ve got your bike rental products up and running, you’ll want to be able to manage them from the back end.
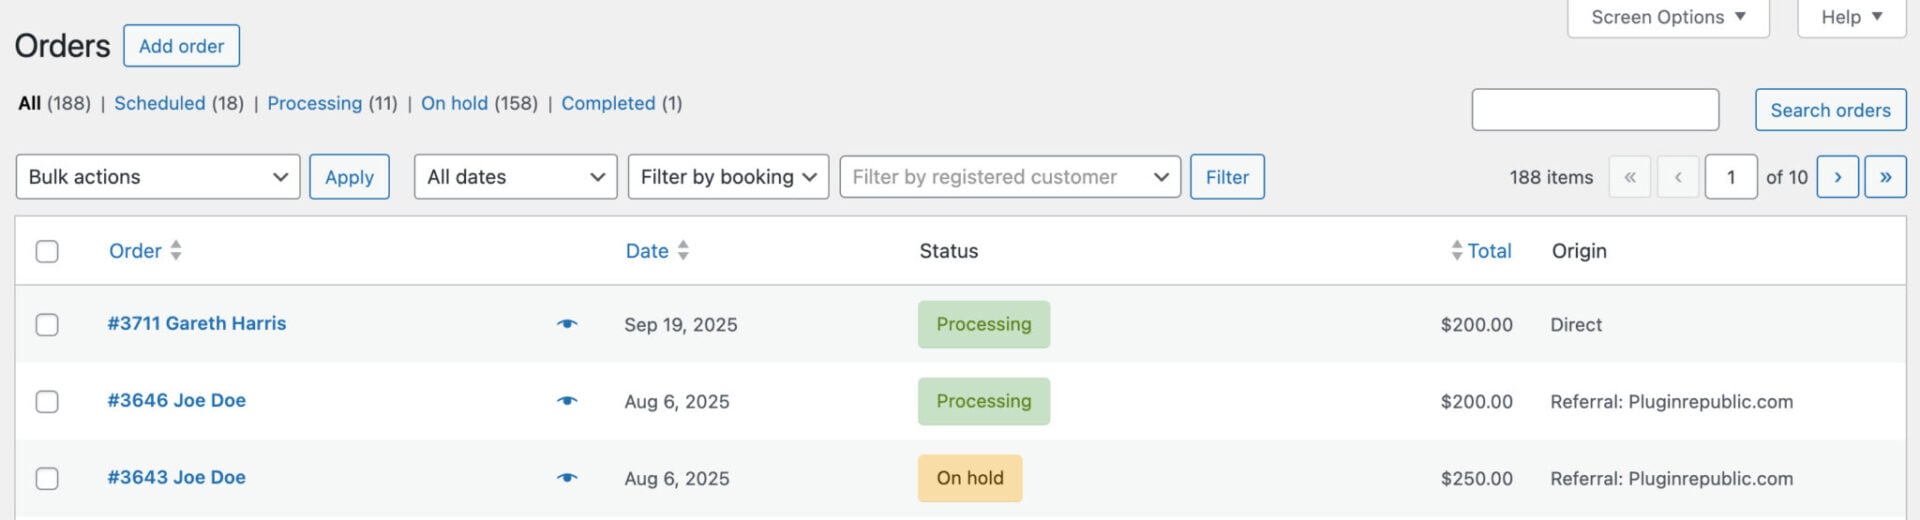
Manage orders
When a customer hires a bike online, they create a standard WooCommerce order then you can view in the WordPress dashboard. Just go to WooCommerce > Orders to see all the orders that have been placed on your site.
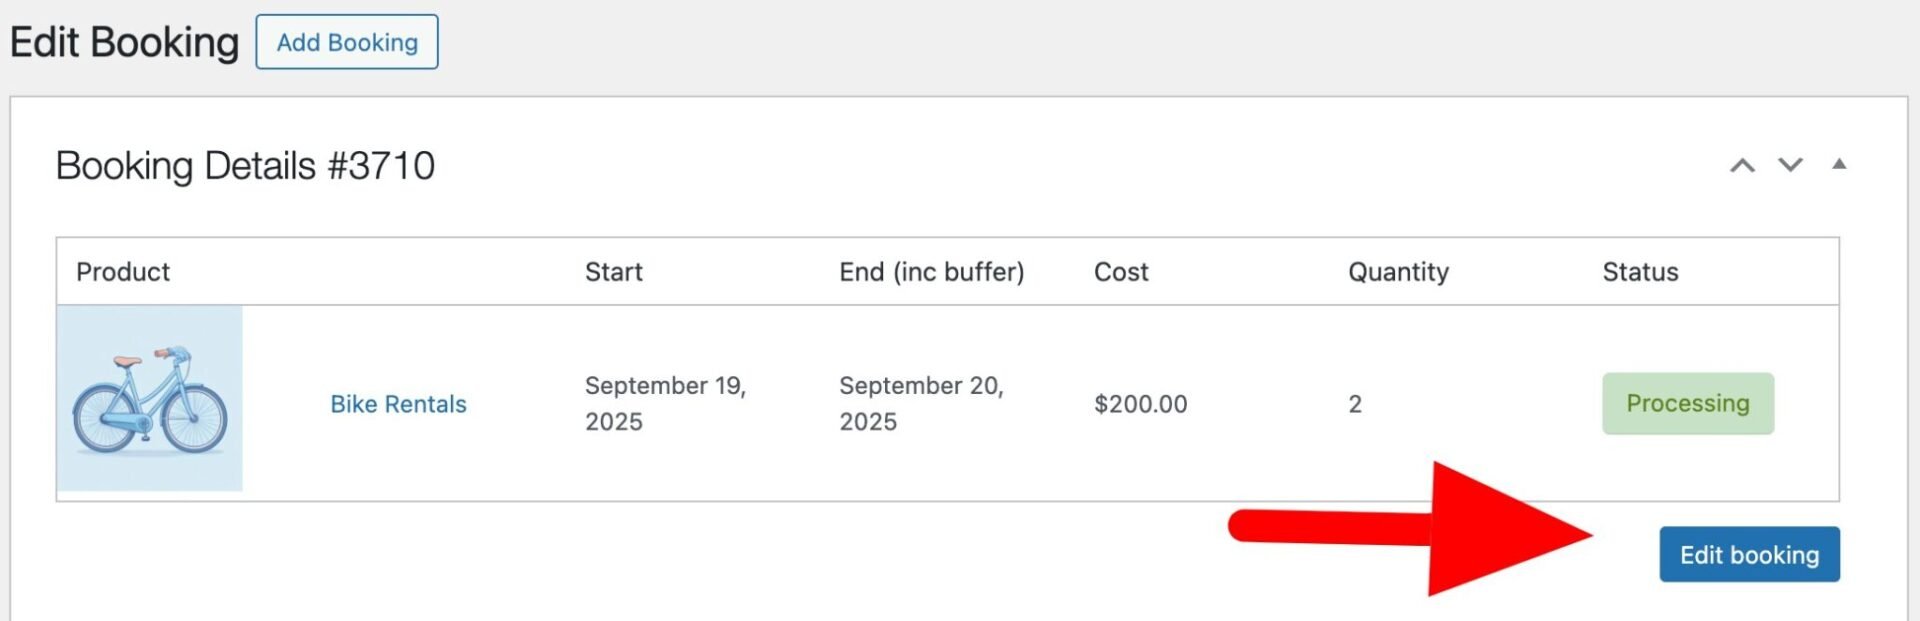
If you need to change the details of the rental, click on the booking ID number in the ‘Booking Details’ section of the order.

You’ll be directed to a screen with all the details of the rental. Click on the ‘Edit booking’ button to make any adjustments. You’ll be able to edit the start and end dates as well as the number of bikes being hired. Once you’ve finished, save the booking and the order will be automatically updated.
Create rentals manually
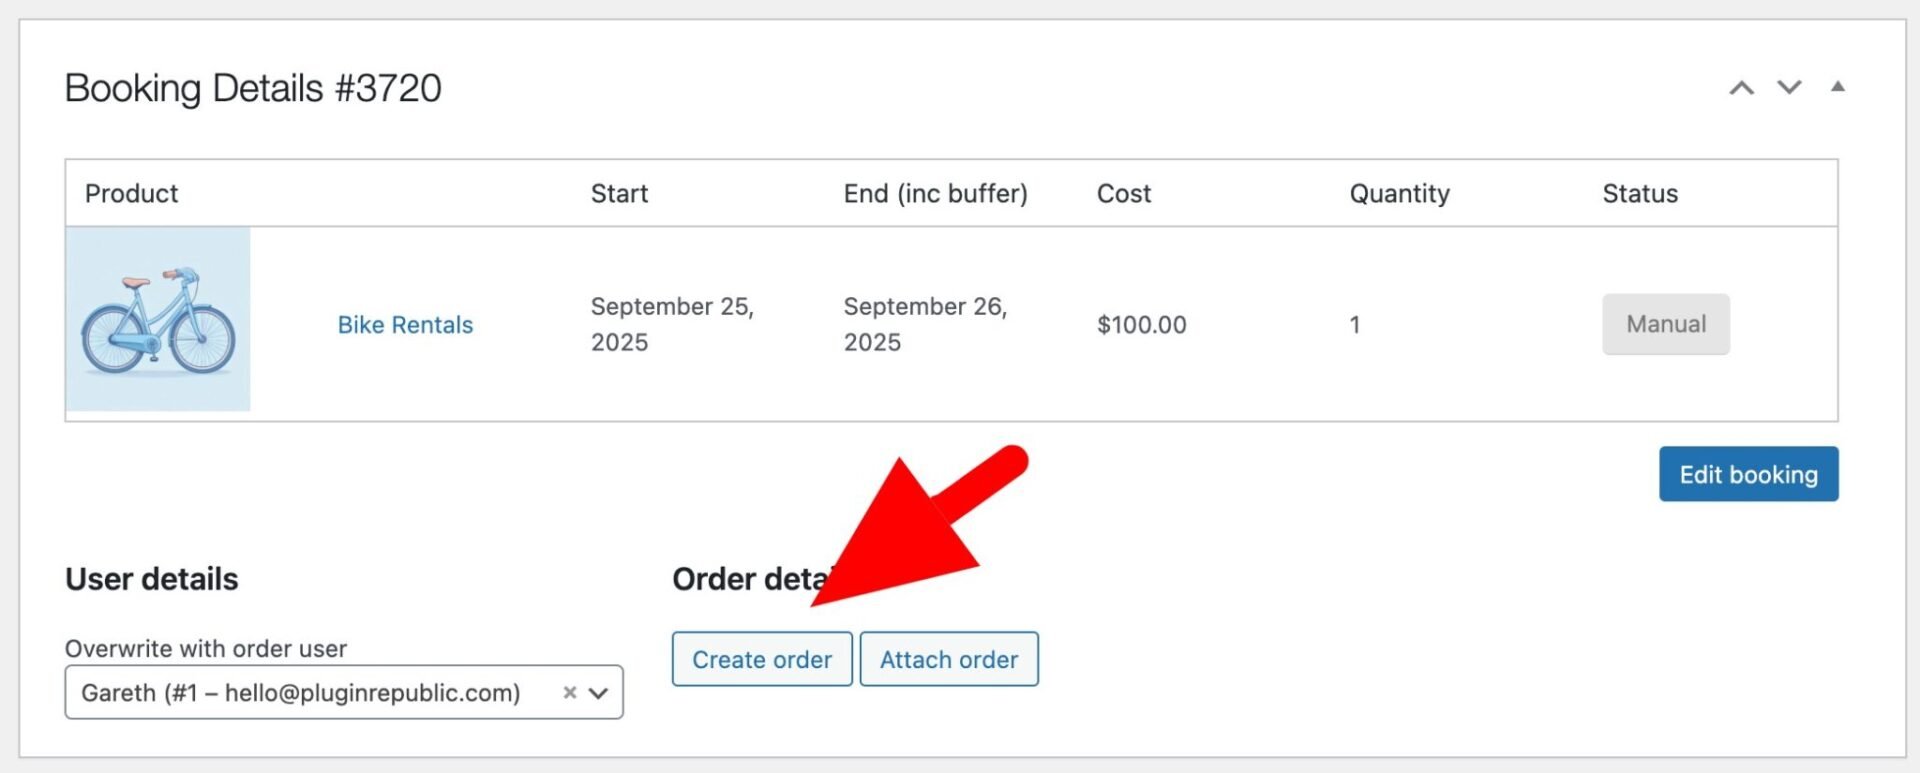
If a customer wants to hire their bike directly with you, you can make a manual booking. To create a booking manually:
- Go to Bookings > Add Booking
- Enter the booking details, including the product, start date, end date and quantity
- Enter the user details
- Publish the booking has been published, you can then link it to a new order by clicking the ‘Create order’ button
View product availability
If you need to look at current and future availability for your bikes, you can do so globally or from the individual product pages.
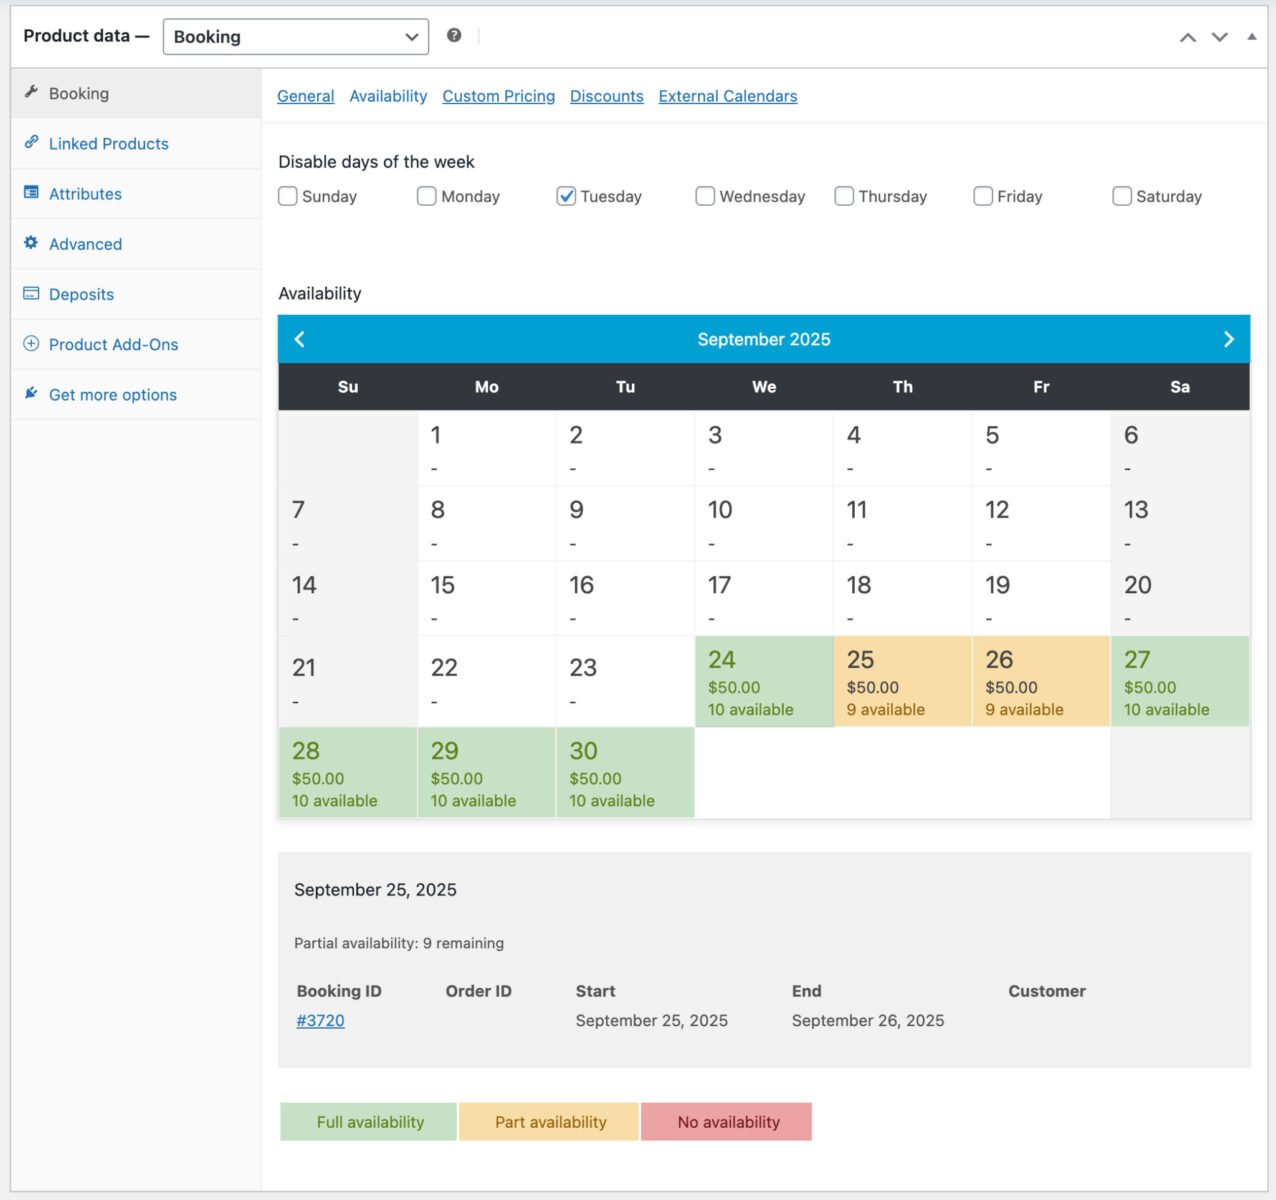
To check availability per bike:
- Go to the product page for the bike in question
- In the ‘Product data’ section, click the ‘Availability’ tab
- You’ll see a calendar with availability and pricing information
- Click on individual dates for further booking information (e.g. who has booked the bike for that day)
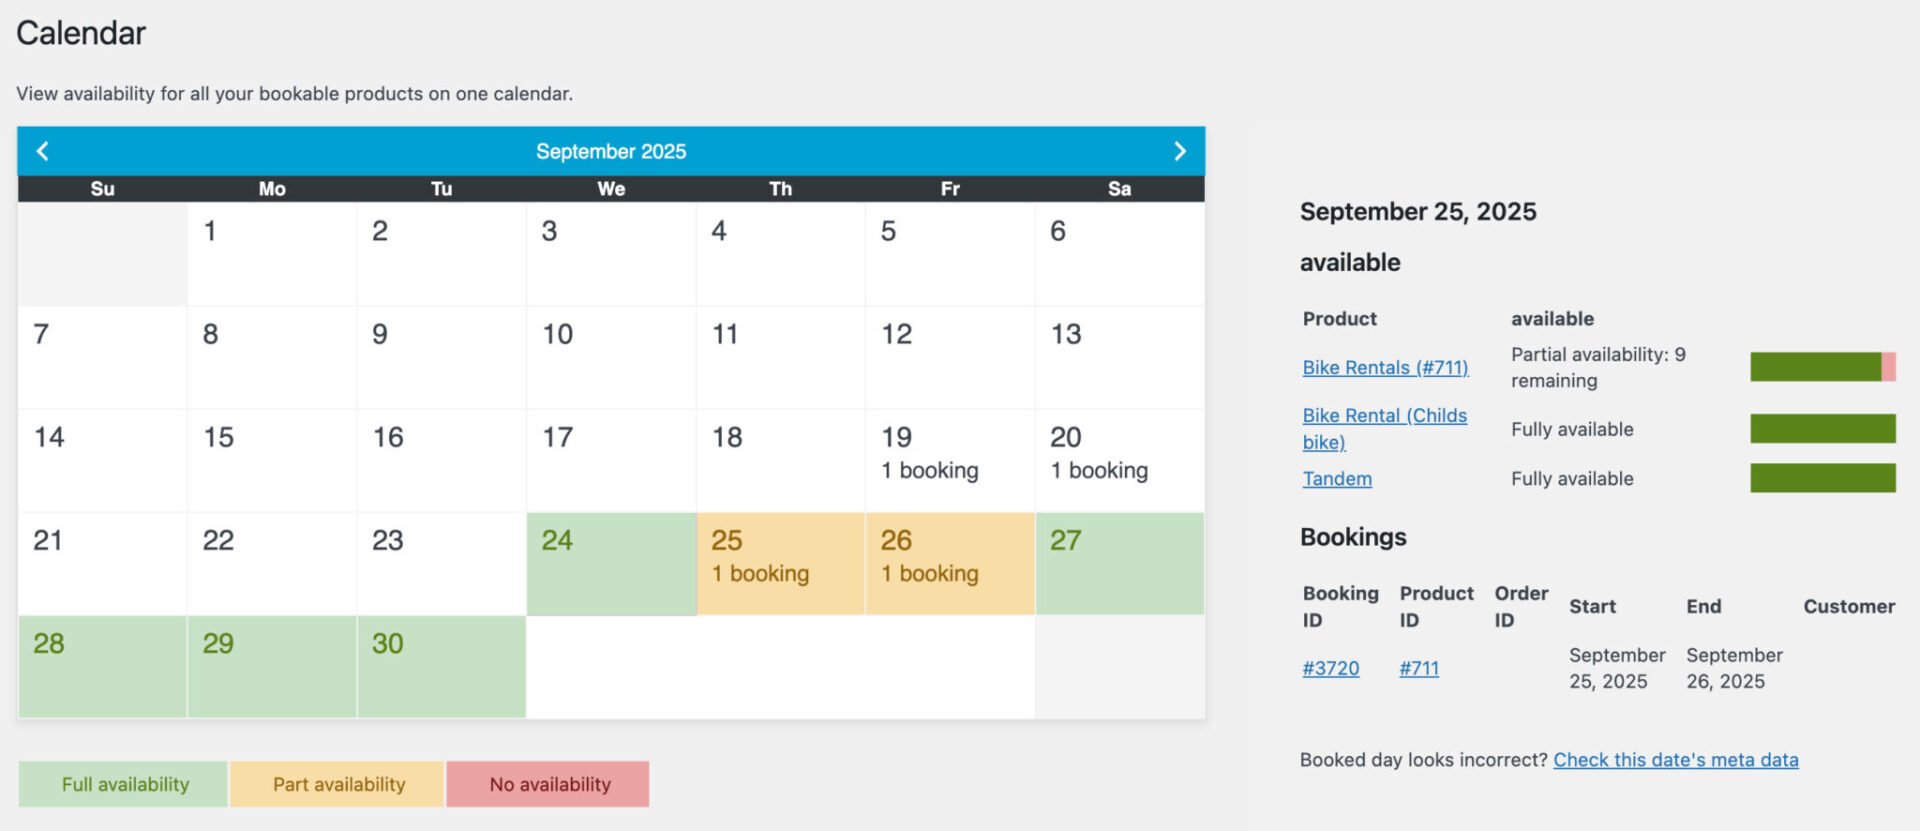
To view a single calendar showing availability for all your bike rental products, go to Bookings > Calendar. You’ll see a month-by-month view of bookings. Click on individual dates to see further information, including availability per product and existing bookings for that date.
So that’s how to create and manage bike rental products in WooCommerce. Let’s quickly at a bonus step.
Add upsells and extra options to your bike rentals
Let’s look at how you can increase profitability in your bike rental business by adding upsells and extra options.
For this step, you’ll need the WooCommerce Product Add-Ons Ultimate plugin.

Let’s look at how to add a couple of example options. You can add as many or as few as you like.
Option #1: Add insurance to the bike rental
A common upsell is the option for the customer to take out insurance with you. To add a simple checkbox option for insurance:
- Go to the ‘Product data’ section and click the ‘Product Add-ons’ tab
- Click ‘Add Group’ then ‘Add Field’
- Give your field a label, e.g. ‘Add insurance’
- Select ‘Checkbox’ as the field type
- Enter a price for the option in the ‘Field price’ setting
Now, when the user selects this option, an additional charge will be made to their rental booking.
Option #2: Add option for bike helmets
Another common upsell is for additional equipment. In our example, we’re offering the user the option to hire helmets as well as the bike.
- Go to the ‘Product data’ section and click the ‘Product Add-ons’ tab
- Click ‘Add Group’ then ‘Add Field’
- Give your field a label, e.g. ‘Add insurance’
- Select ‘Products’ as the field type
- In the ‘Child products’ field, enter the products that you’re offering
WooCommerce bike rentals – recap
So that’s how to easily create a bike rental store using WooCommerce and WordPress. We looked at how to create a bookable product for your bikes where users can select the dates they want to hire using a calendar and date picker and select the number of bikes they need. We also looked at how to manage your orders and rentals in the back end.
All you need is the Bookings for WooCommerce plugin. It’s compatible with all themes and page builders – and it’s backed by a 14 day money back guarantee so you can try it risk-free. If you have any questions, just get in touch and our support team will be happy to help.