How to accept direct hotel and accommodation bookings in WooCommerce
In this article, we show you how to accept direct hotel and accommodation bookings in WooCommerce.
The global vacation rental market was valued at around $88 billion in 2024 and is projected to reach nearly $137 billion by 2033. But a growing share of that revenue never reaches property owners – it goes straight to the platforms. Airbnb now charges hosts up to 15.5% on every booking. On a $200-per-night stay, that’s $31 gone before you’ve covered a single cost.
Bookings for WooCommerce lets you take those bookings directly on your own site instead. Guests pick their dates from a real-time availability calendar, costs are calculated automatically, and it’s fully integrated with WooCommerce so you can take direct payment yourself through any gateway you like – with no platform sitting in the middle. It’s also compatible with all themes and page builders so it can just sit inside your existing site.
Bookings for WooCommerce is built for holiday lets, B&Bs, serviced apartments, guesthouses, boutique hotels, home stays – any kind of accommodation or property that you plan to let.
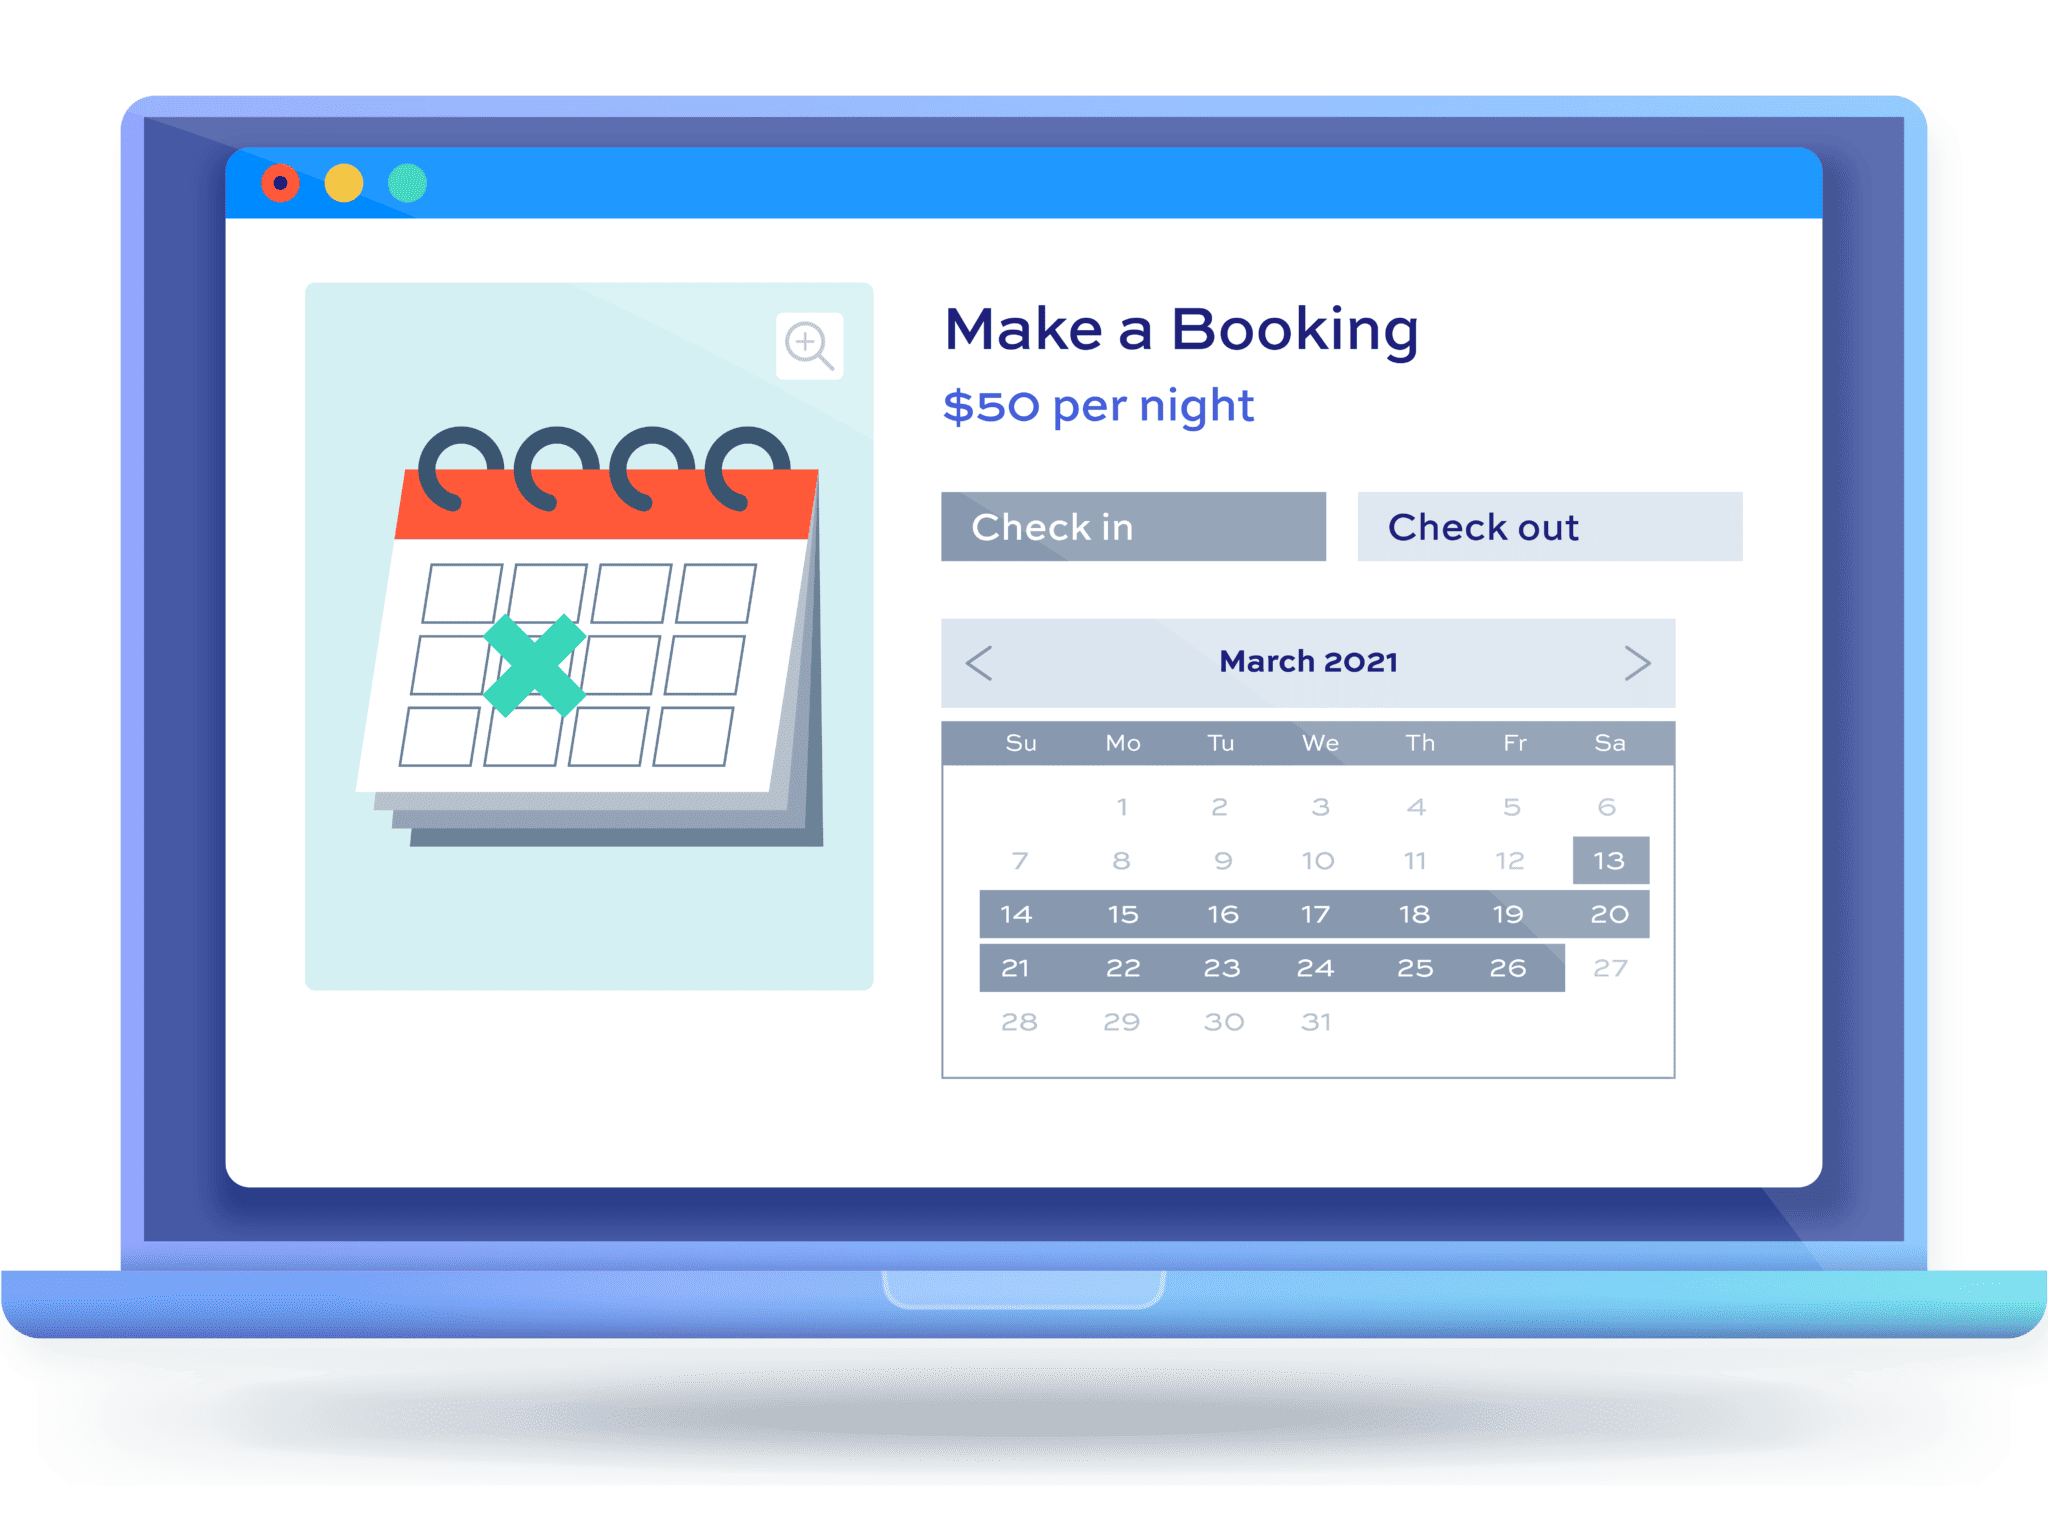
Direct accommodation bookings in WooCommerce
After completing this tutorial:
- Guests will be able to:
- Pick their check-in and check-out dates from a live availability calendar
- See booked and unavailable dates blocked out in real time
- Get an automatic price calculation based on the length of their stay
- Check out and pay online – direct with you, with no platform fee
- As the property owner, you’ll be able to:
- Accept bookings 24/7 without paying commission to a third-party platform
- Manage availability and block out dates from your WordPress admin
- Prevent double bookings automatically
- Sync your availability calendar with Airbnb, Booking.com, and VRBO
- As a bonus, we’ll also look at how to:
- Add a front-end availability search so guests can find free dates before they commit
- Add optional extras like breakfast, parking, and late checkout
- Take a security deposit
In this tutorial, we’ll assume that you already have WordPress and WooCommerce installed and ready to go.
How should you structure your listings?
The main tutorial below covers a single property – e.g. one cottage, one apartment, one holiday let.
If you have multiple rooms of the same type (say, six double rooms in a B&B) or multiple distinct properties (a portfolio of cottages), the setup is slightly different. We’ll cover both of those cases in dedicated sections after the main tutorial.
WooCommerce direct accommodation bookings tutorial
Let’s get started by creating our first bookable accommodation product.
Step #1: Install and activate Bookings for WooCommerce
Once you’ve purchased Bookings for WooCommerce:
- Download the plugin’s zip file by clicking the link on your order confirmation screen or in your welcome email. You’ll receive the email automatically a few seconds after completing your purchase
- Go to Plugins > Add New in your WordPress dashboard
- Click the ‘Upload Plugin’ button
- Drag and drop the zip file into the ‘Choose File’ area and click ‘Install Now’
- When the plugin has uploaded, click ‘Activate Now’
Enter your license key when prompted. Bookings for WooCommerce is compatible with all WordPress themes and page builders, and it works with all WooCommerce payment gateways – so it’ll slot straight into your existing setup.
Step #2: Create your bookable accommodation product
Go to Products > Add New. Give your property a name – for example, “Lavender Cottage” or “Seaside Apartment” – and add your description, photos, and any details guests need to know.
In the ‘Product data’ panel, open the product type dropdown and select ‘Booking’.

A set of booking-specific settings will appear below. Click the ‘Booking Settings’ tab.
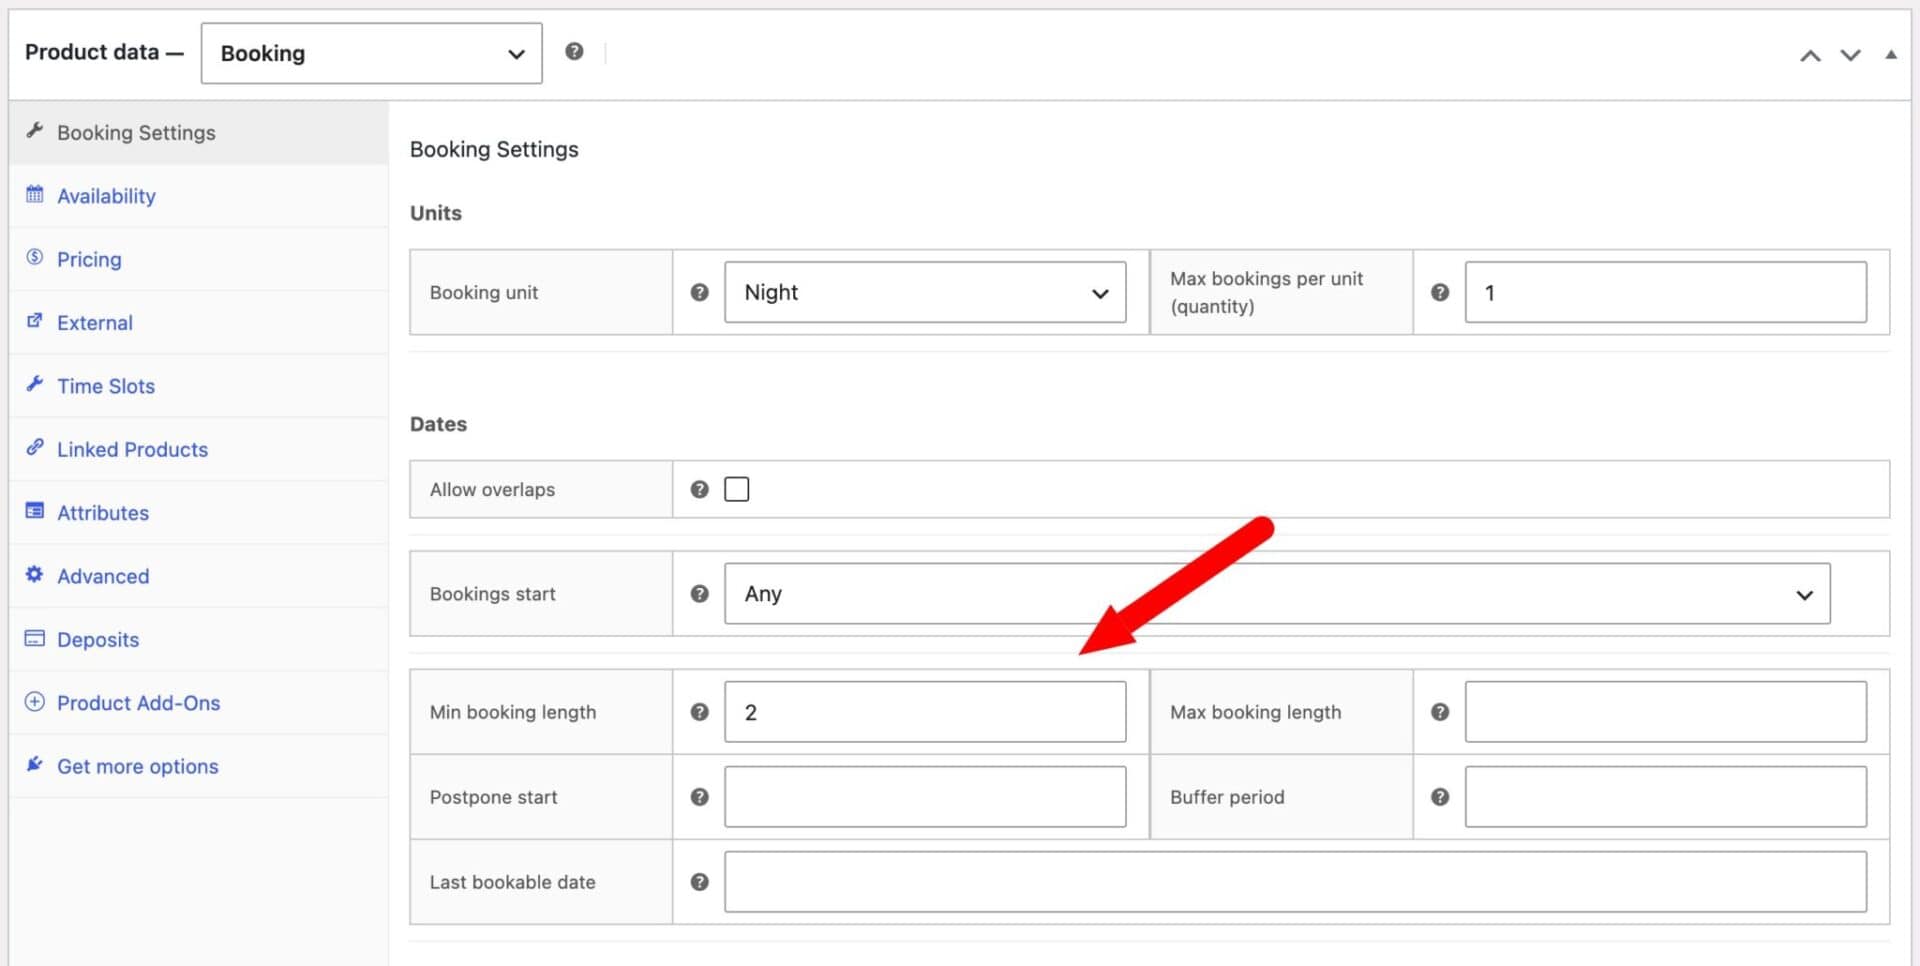
Under ‘Units’:
- Set ‘Booking unit’ to ‘Night’ for overnight stays. You could also set this to ‘Day’ or even to ‘Week’ (ideal if you have longer term rentals like villas that run weekly)
- Leave ‘Max bookings per unit’ set to 1 – this tells the plugin you have one property of this type available, so only one booking can be accepted per night

Under ‘Dates’:
- Enable ‘Allow overlaps’ if you’re happy for one set of guests to start their stay on the same day that the previous guests check out
- Set ‘Bookings start’ if you only accept arrivals on certain days – for example, Friday or Saturday for a weekly-let cottage
- Set a minimum stay length in ‘Min booking length’ – two nights is common for holiday lets; one night works well for B&Bs and apartments
- Set a maximum stay length in ‘Max booking length’ if you want to cap bookings (optional)
- Add a value in ‘Postpone start’ if you don’t want any surprise bookings today – for example, enter 2 here to prevent anyone booking until 2 days from the current date
- Add a value in ‘Buffer time’ to give yourself turnaround time between guests for cleaning and inspection
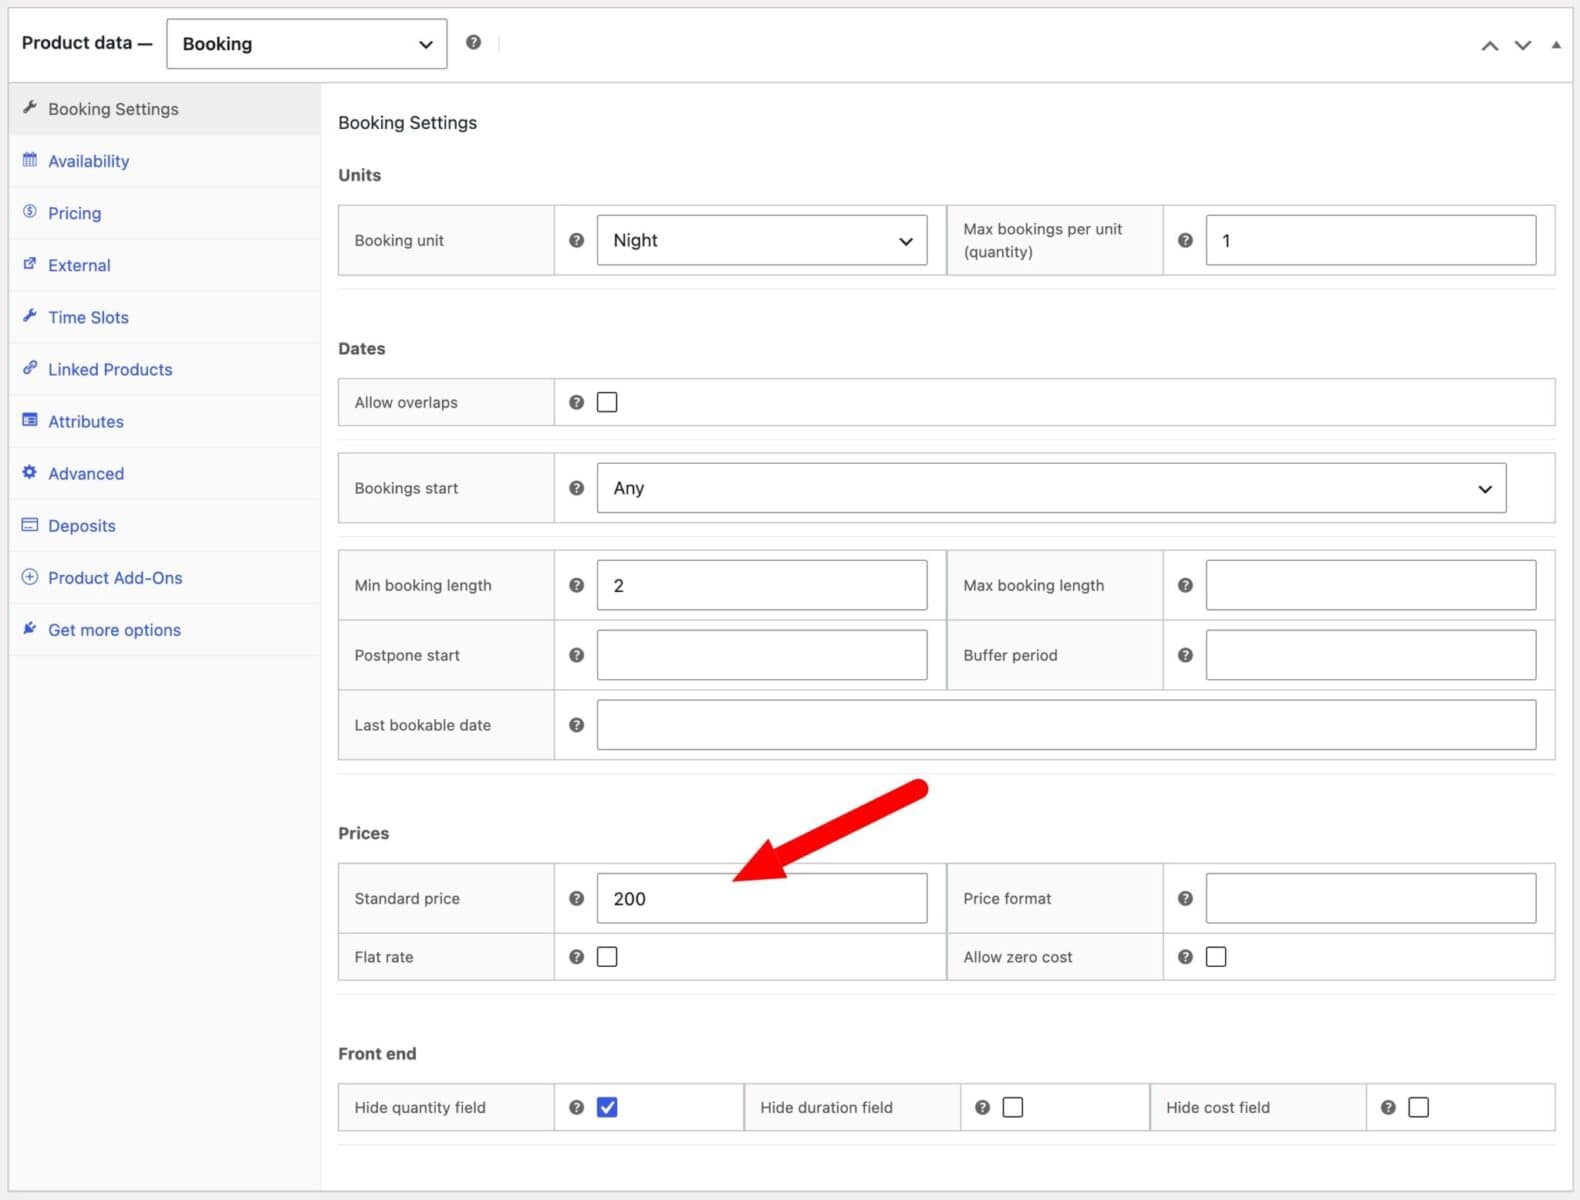
Finally, under ‘Pricing’:
- Enter your nightly rate in the ‘Standard price’ field
- If you are charging a flat rate, i.e. it’s the same price however many nights the clients stays, then check the ‘Flat rate’ field. This will apply the price as a single fixed price, not per night
Publish your product. Guests will now see a calendar date picker on the product page with available dates highlighted and unavailable dates blocked out.
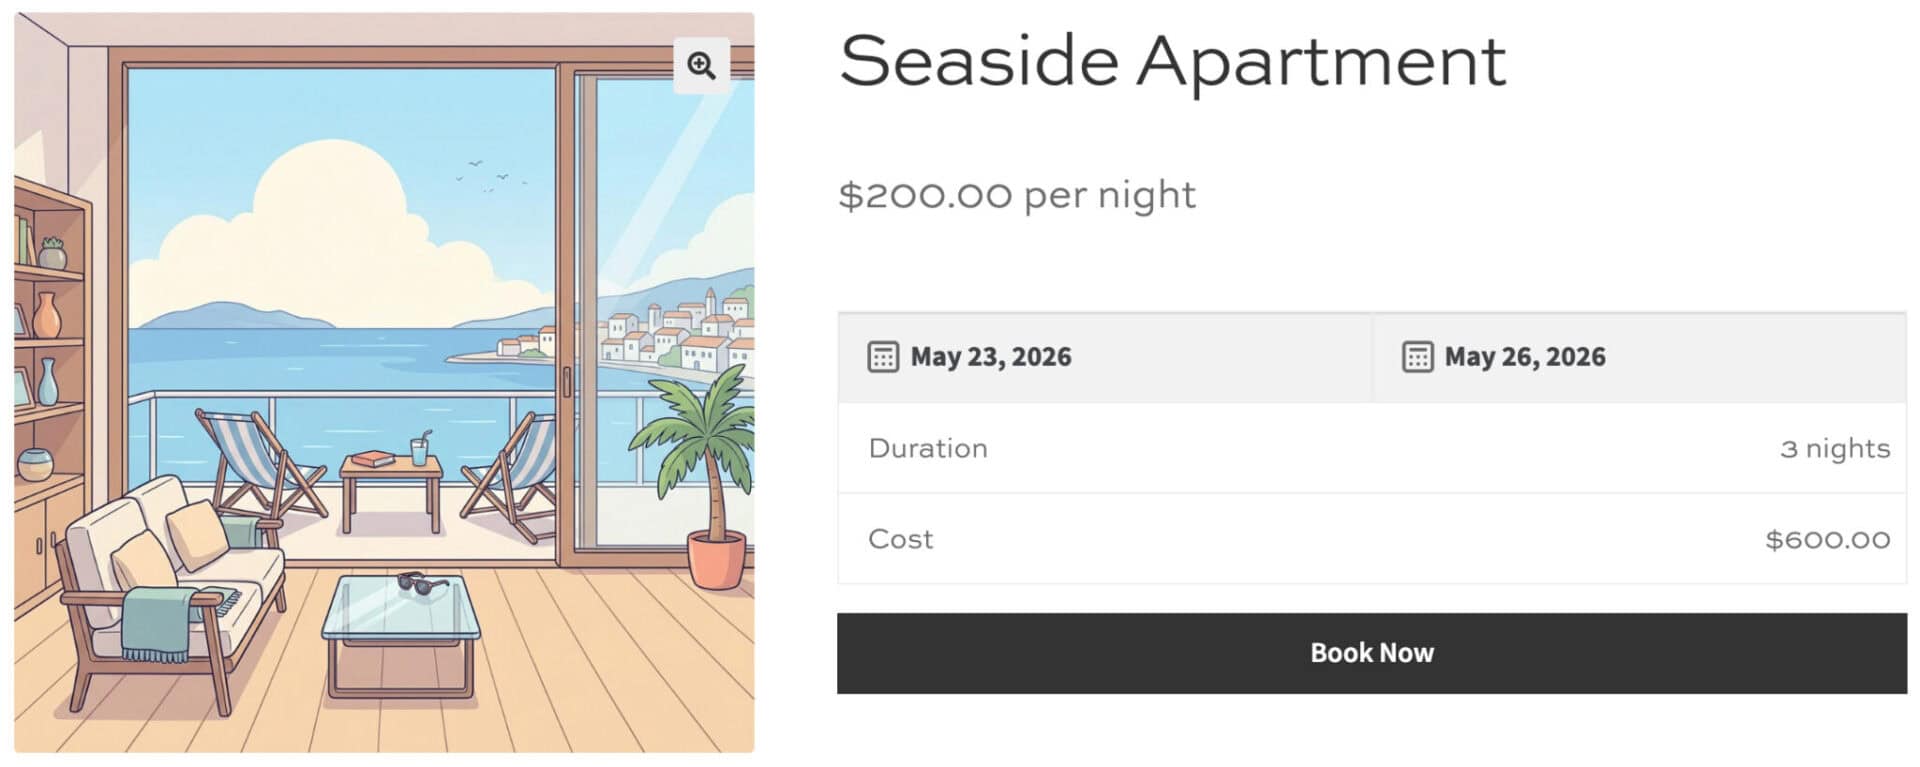
There’s a demo product here so you can see how it looks for guests. Remember: Bookings for WooCommerce is compatible with all themes and will inherit your theme styles to ensure it’s consistent with the look and feel of your site.
Now let’s look at how to set some advanced pricing rules.
Step #3: Set pricing and availability rules
You might not want to charge the same rate the whole year round. And you might not want to have the property available all the time – you might like to use it yourself for a holiday at some point. Bookings for WooCommerce makes it possible to set seasonal rates, apply discounts for longer stays, and block dates out when your property is unavailable.
Set seasonal pricing
Your base nightly rate is already set from Step #2. Bookings for WooCommerce also lets you add pricing rules on top of that to maximize revenue across the year.
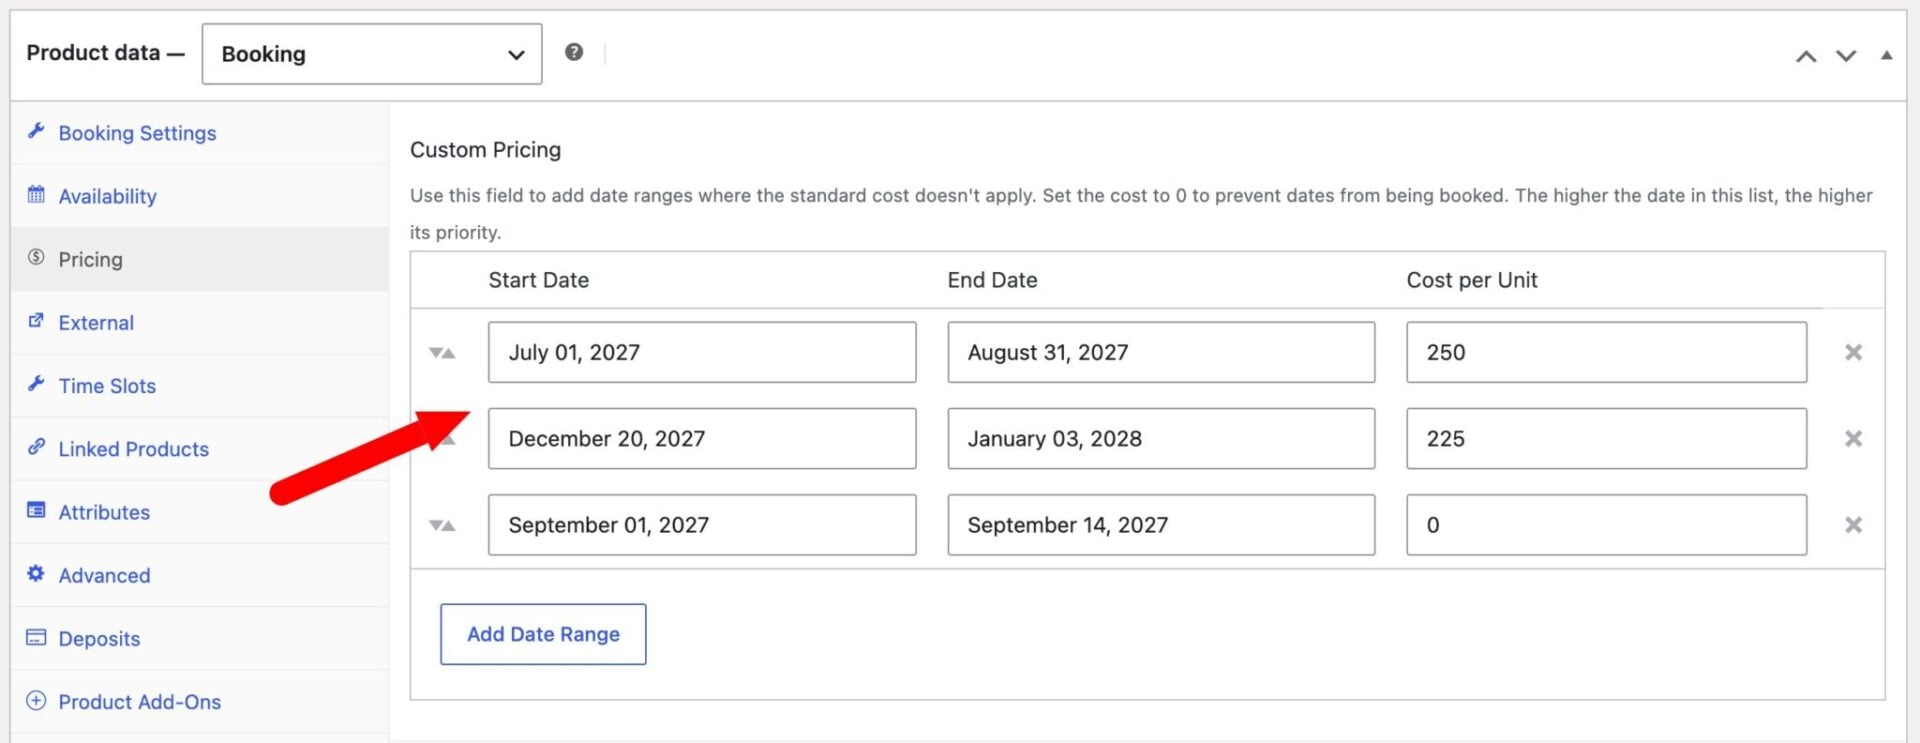
Go to the ‘Pricing’ tab in the ‘Product data’ panel. To add a peak season rate, add a date range with an adjusted price – for example, a higher nightly rate across school holidays or summer months. You can add as many pricing rules as you need.
Block out specific dates
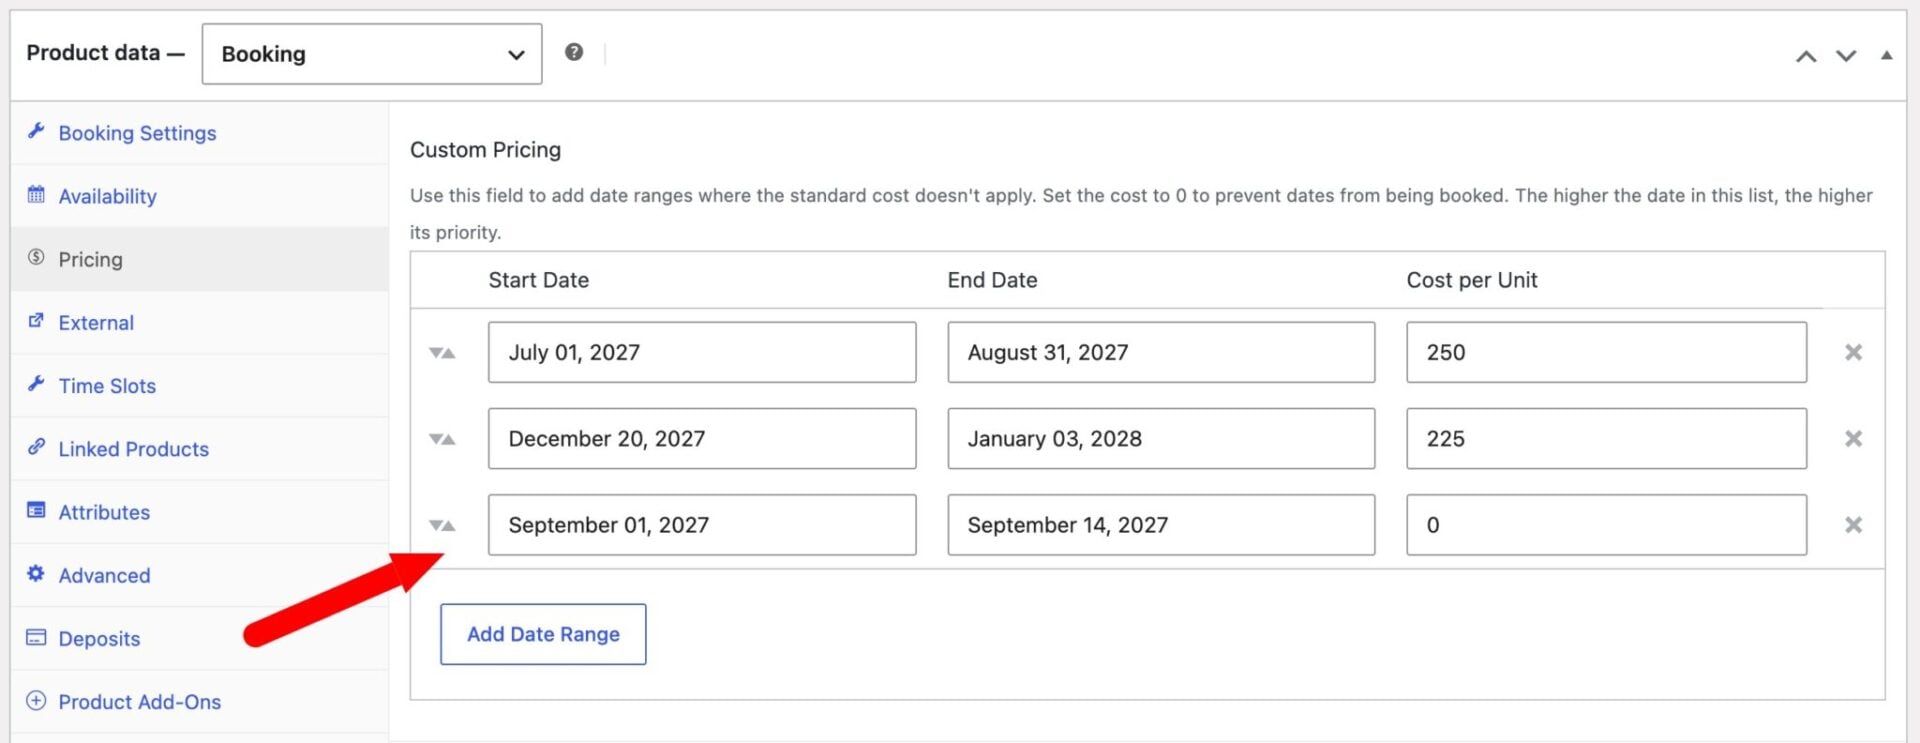
To block out specific dates for maintenance windows, personal use, or dates already booked elsewhere, etc, just add another row to the Custom Pricing table, enter the date range and set the Cost per Unit to 0. This will block these dates in the calendar so that guests can’t book them.
Offer discounts for longer stays
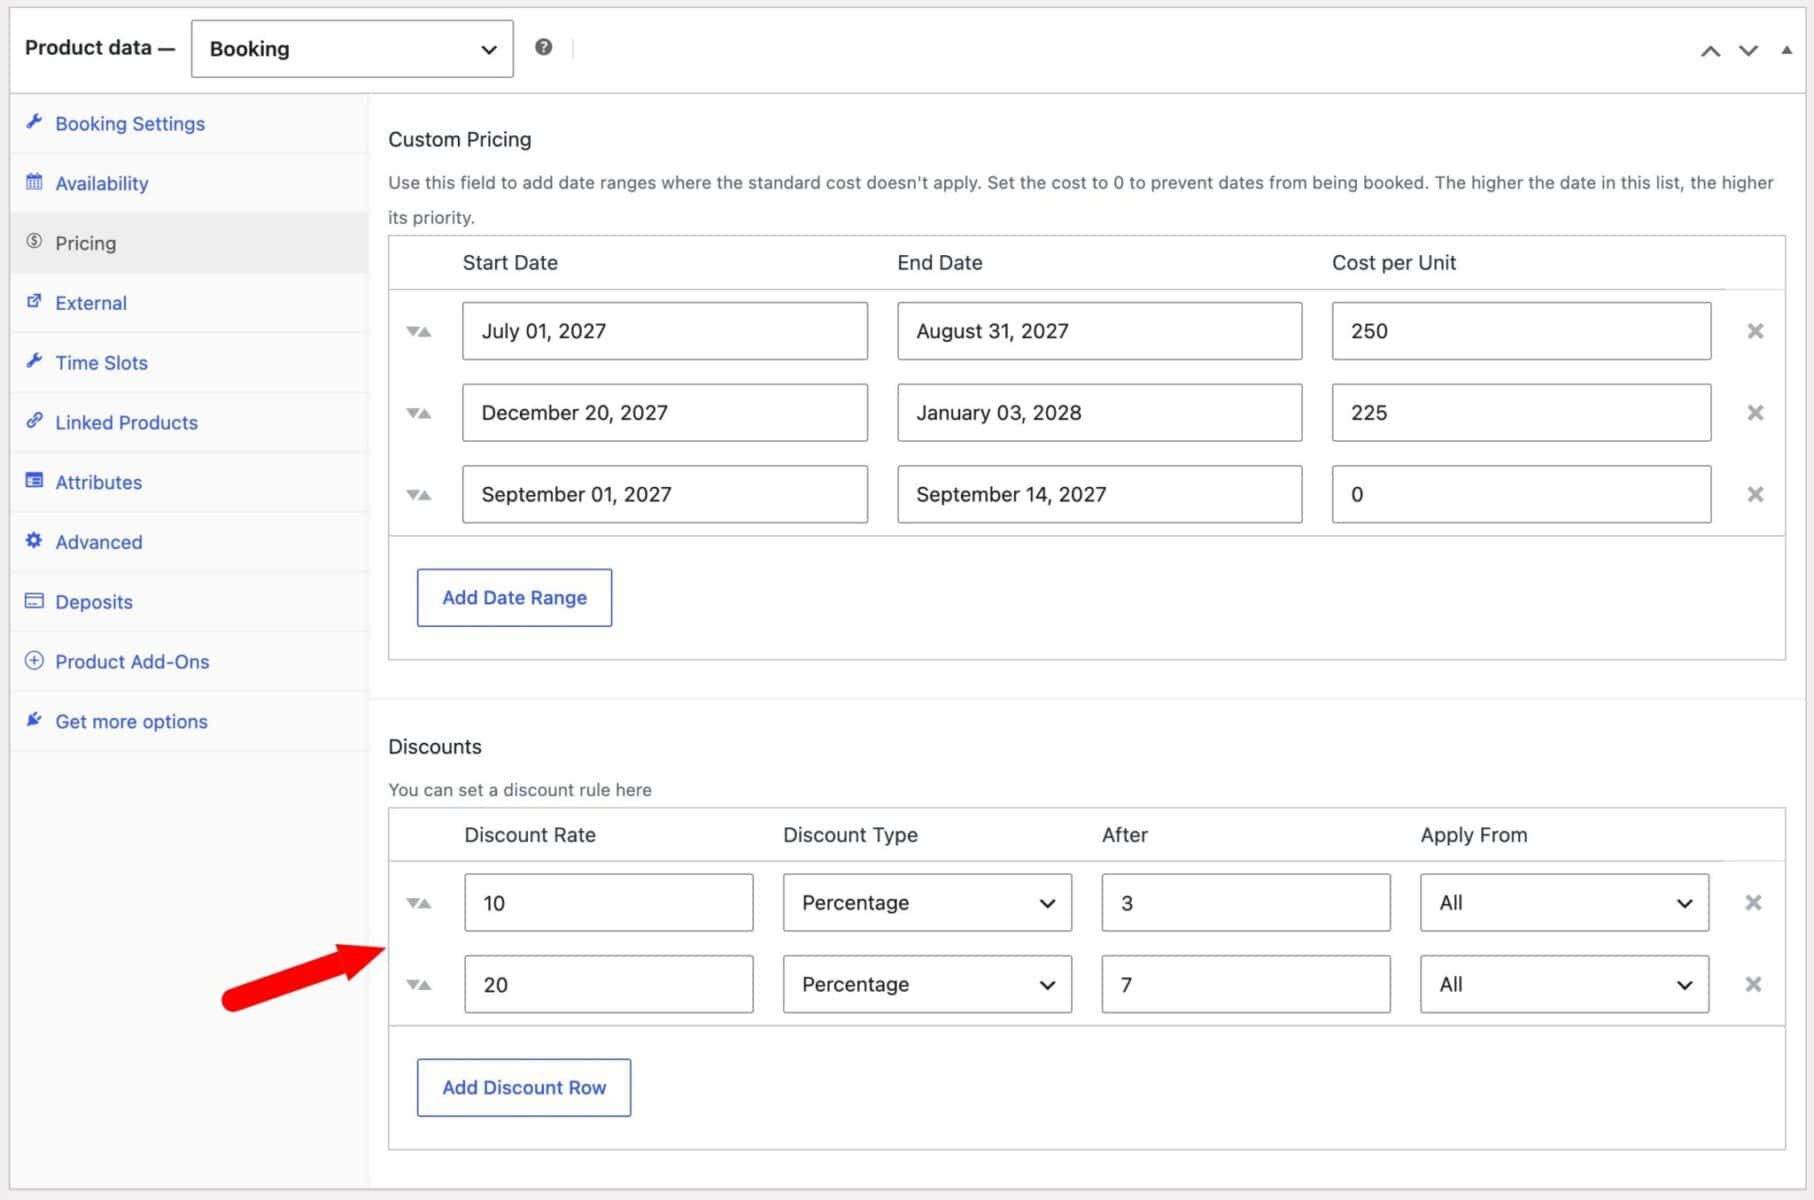
To offer a discount for longer stays, e.g. offer 10% off stays over 3 nights, you can add a discount rule on the ‘Pricing’ tab:
- Click ‘Add Discount Row’
- Enter the value and type of the discount – e.g. 10 and ‘Percentage’
- Enter how many nights the user must book in order to qualify for the discount
- Set either ‘All’ or ‘Partial’ – all means that the discount applies to the whole of the stay; partial means that the discount only applies to the number of nights after the threshold
You can add multiple rules offering bigger discounts the longer that guests stay. The discounts are automatically calculated on the front end when the guest makes the booking.
That’s our holiday let property done. Now let’s look at how to sync with third-party platforms in case you are planning to take direct bookings for your accommodation as well as letting it through a platform.
Step #4: Sync your calendar with Airbnb, Booking.com, VRBO or Google Calendar
For a single property, two-way syncing keeps your availability accurate across every channel. When a guest books through Airbnb, the dates are blocked on your WooCommerce site automatically. When a guest books direct through your site, Airbnb updates too.
There are two important things to note about syncing with third-party platforms like Airbnb:
- Because of the way Airbnb and others manage their bookings, you will need to use the ‘Day’ as the ‘Booking unit’ (step 2 above)
- Calendar syncing is available for single-property listings only. If you set ‘Max bookings per unit’ to more than 1, sync is not available. We’ll cover how to manage availability for multi-unit setups in the section below
To set up syncing:
- Go to WooCommerce > Settings > Bookings > External
- Enable ‘Auto-sync calendars’ and enter a value in ‘Sync interval’ – this is the number of minutes between each sync, with a minimum of 30
- Go to your property product and click the ‘External’ tab in ‘Product data’
- Check ‘Enable sync calendars’
- Enter the name of your external service (e.g. Airbnb) and paste in the iCal URL from that platform – links to guidance for each platform are below
- Copy the ‘Export URL’ shown and paste it into the calendar sync settings on the external platform
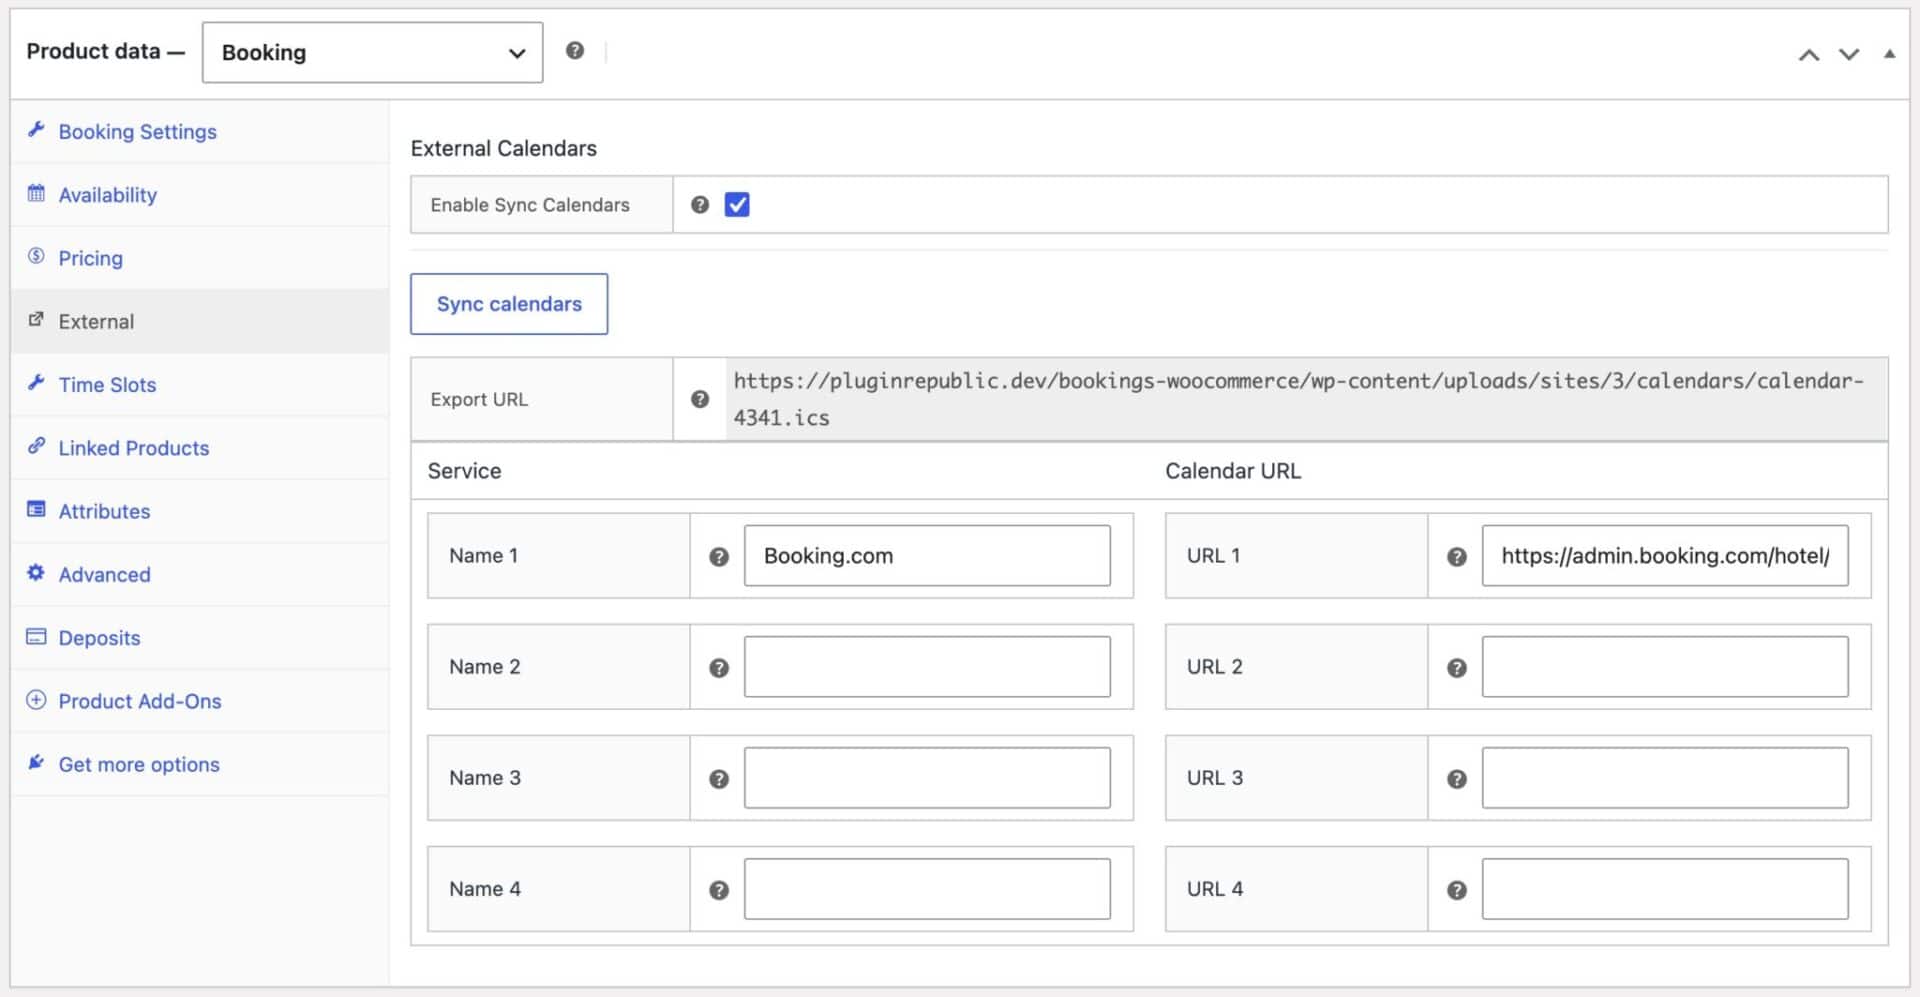
You can sync with up to four external services per product. Most platforms – including Airbnb – sync at intervals of around two hours, so if a booking comes through on your WooCommerce site, you may want to trigger a manual sync to update the external platform immediately.
- Airbnb: airbnb.co.uk/help/article/99
- Booking.com: partner.booking.com calendar sync guidance
- VRBO: help.vrbo.com iCal import guidance
Your calendar is now live and in sync across every channel guests might find you on.
Google Calendar
You can also sync your bookings with Google Calendar. New bookings are added as calendar events automatically, and any edits or cancellations update the calendar to match. Two-way sync is supported – so events you create in Google Calendar feed back to your store and block availability there too. See the Google Calendar sync documentation for the full setup steps.
How do you manage your accommodation bookings from the back end?
Once guests start booking, every reservation appears as a standard order under WooCommerce > Orders, where you can view guest details, take payment, issue refunds, and add order notes.
For an overview of your whole property or portfolio, go to Bookings > Dashboard. Choose a date range and it shows a calendar, week diary, or single-day diary depending on the length, with summary tiles for occupancy, bookings, and revenue – so you can see which rooms or units are fully booked, which have availability, and which are wide open, without checking each listing separately.
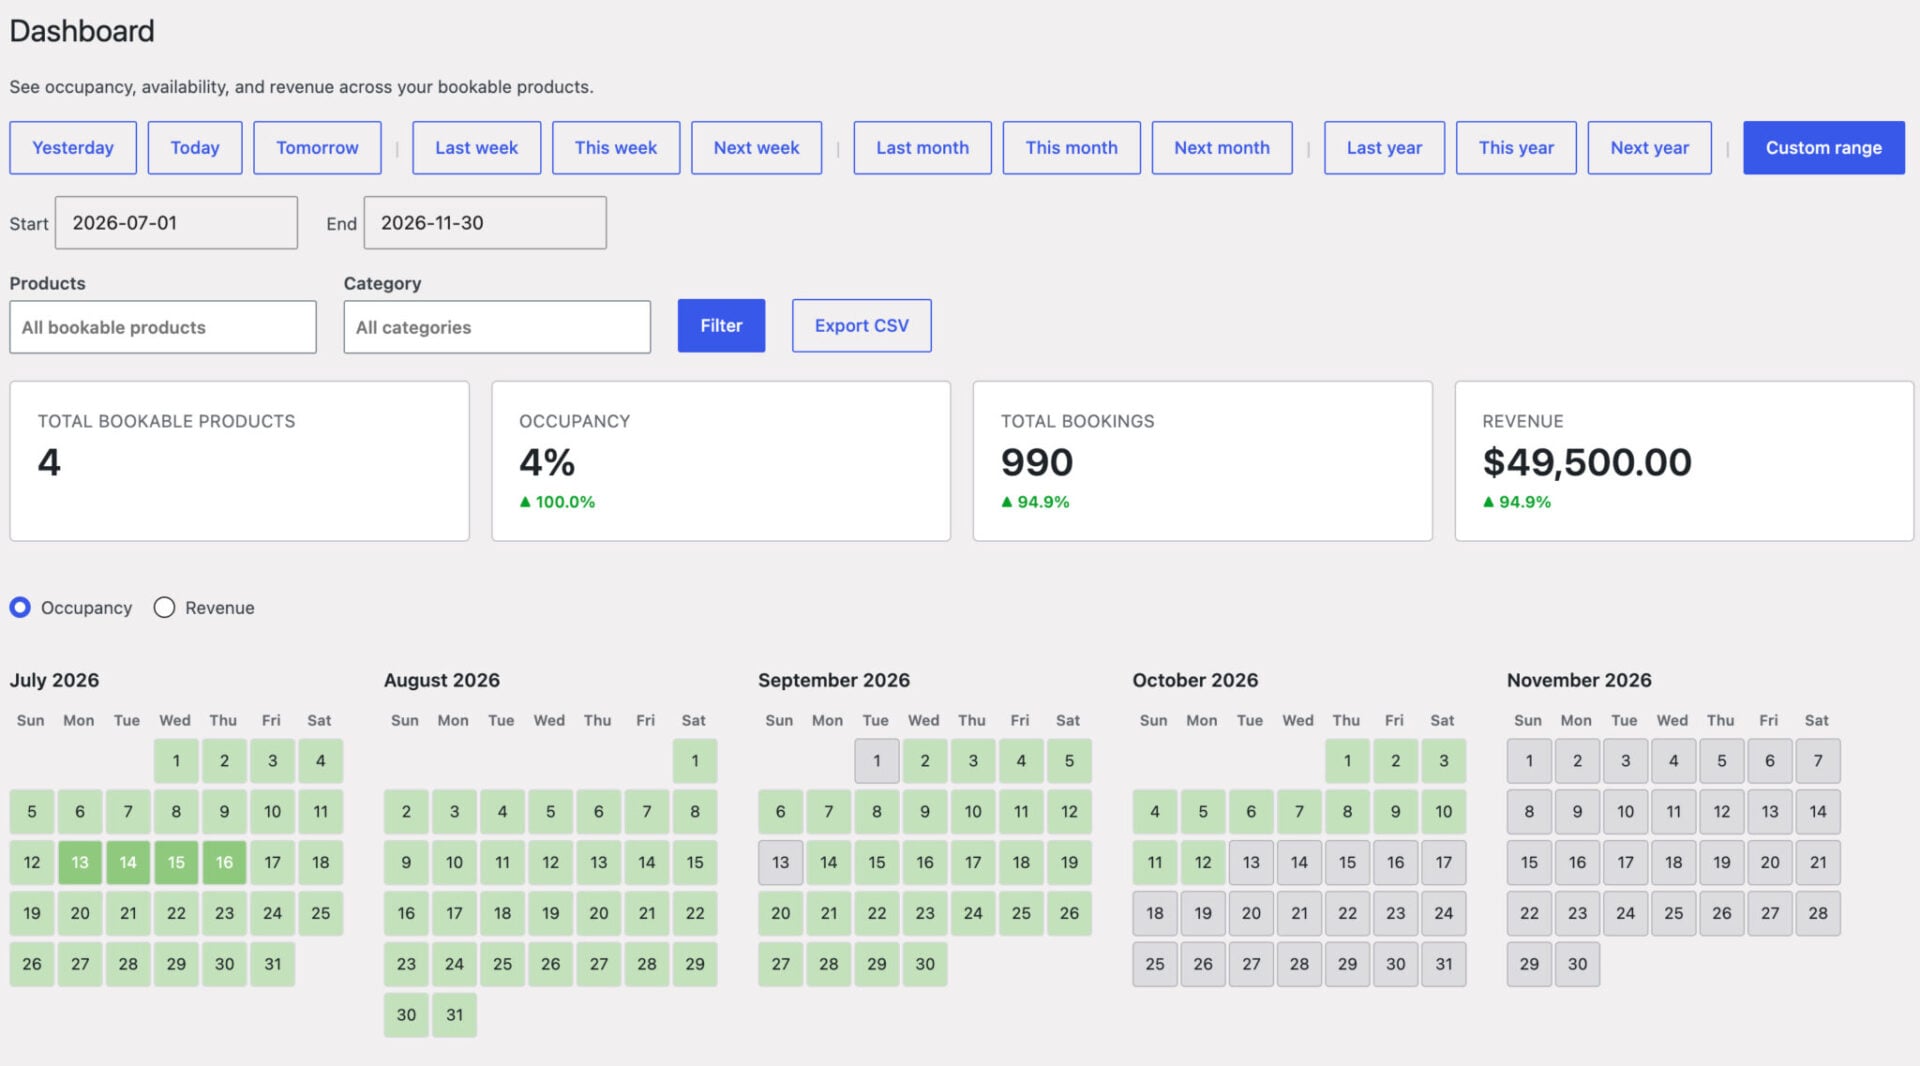
Click any date to open a panel showing check-ins, check-outs, and stays for that day, with an ‘Add booking’ button so you can add a reservation manually – useful for guests who book by phone or email. Each room or unit product also has its own ‘Availability’ tab with the same views scoped to just that listing.
For a manual booking from scratch, go to Bookings > Add Booking, select the property, choose the check-in and check-out dates, and save.
What if you have multiple accommodations of the same type?
This setup suits B&Bs, guesthouses, and small hotels where you have more than one room or property in a given category – for example, six double rooms, three family suites, or four superior doubles.
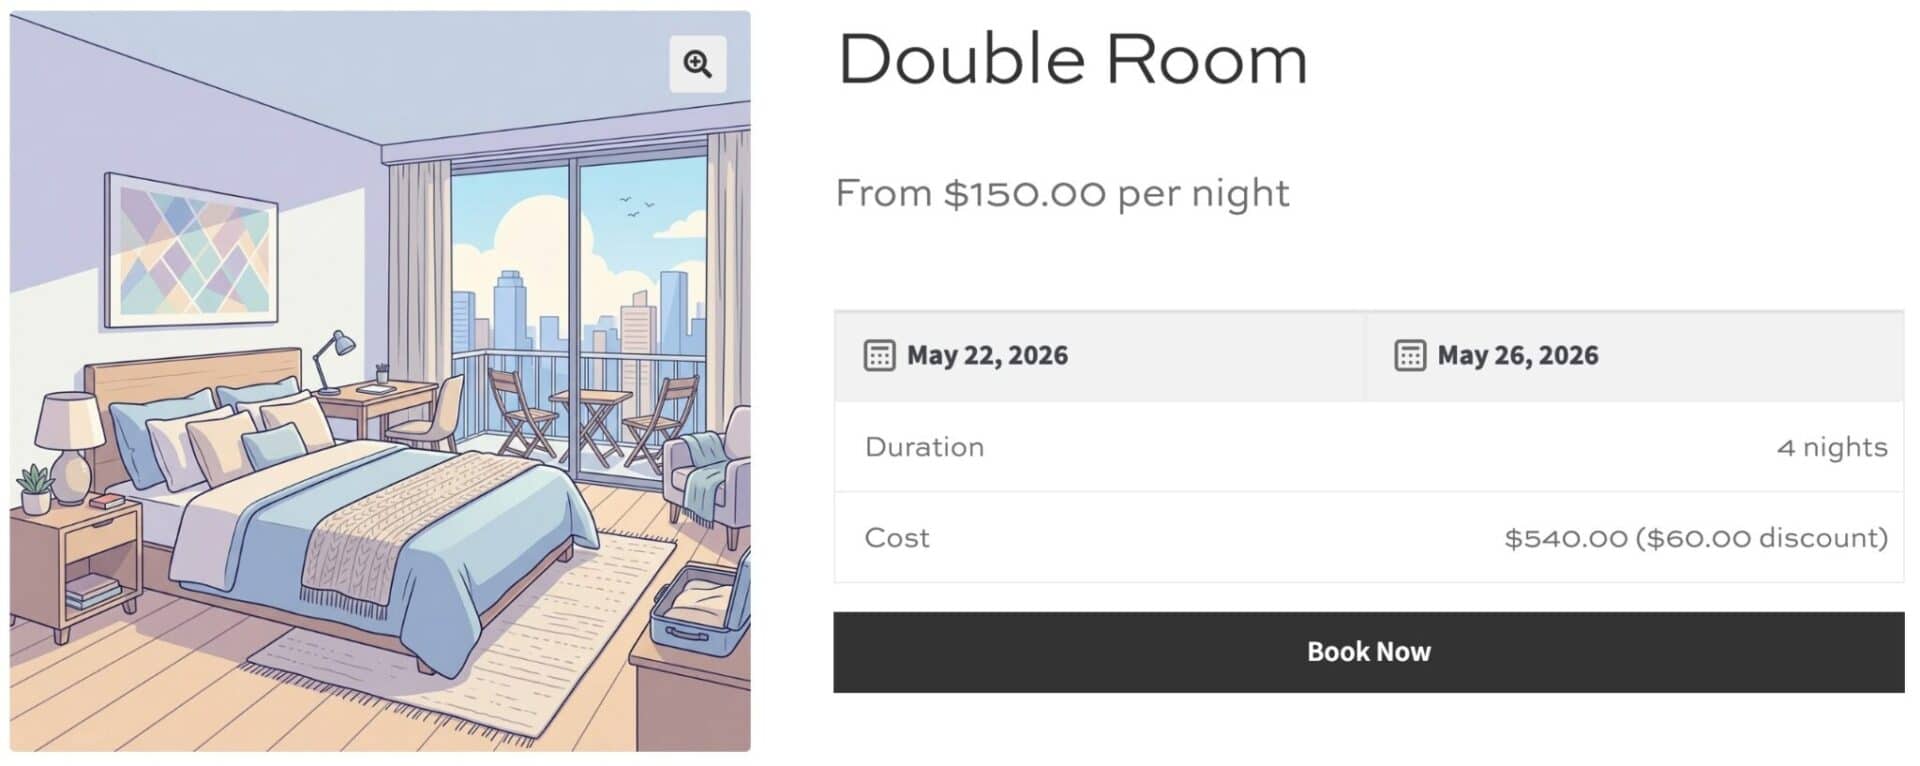
Instead of creating one product per room, you can create a single product and allow multiple bookings. So if you have six double rooms, you can create one product called “Double Room” and set its capacity to 6.
To do this:
- Create a product following the steps above
- In ‘Max bookings per unit’ define how many rooms you have available – e.g. 6

Now, multiple guests will be able to book the same type of room from the same product page – without the risk of you being overbooked. Bookings for WooCommerce tracks availability across all units automatically, so if you have six double rooms and five are already booked on a given night, the plugin will only allow one more booking – with no manual management required.
A typical setup might look like this:
- Double room – 6 units, $120/night
- Family suite – 3 units, $180/night
- Superior double – 4 units, $150/night
Each room type gets its own product page with its own photos, description, and pricing rules. Check-in day restrictions and buffer time settings work the same way as in the single-property tutorial above.
A note on calendar syncing: iCal syncing with Airbnb, Booking.com, and VRBO is not available when ‘Max bookings per unit’ is greater than 1. Instead, you would need to create each room or property as a standalone product.
Use product categories to group room types together so guests can browse by room type easily.
What if you have multiple distinct properties or accommodation types?
This setup suits portfolio owners – holiday cottage collections, serviced apartment operators, or anyone managing several individual properties under one brand.
Create one product per property. Each property is a separate, self-contained listing with its own product page, availability calendar, nightly rate, pricing rules, minimum stay, and check-in day settings. Set ‘Max bookings per unit’ to 1 for each property.
Because each property is a single-unit listing, each one can be synced independently with Airbnb, Booking.com, and VRBO via its own iCal feed. Follow the same syncing steps from Step #4 for each property product.
Use product categories or tags to organize your portfolio – by location, size, number of bedrooms, or property type. This makes it straightforward for guests to browse and filter on the front end.
Bonus #1: Add a front-end availability search
Enable a front-end date search so guests can enter their check-in and check-out dates and see only the properties or room types available for their stay. This removes the friction of guests clicking through individual product pages only to find their dates are taken – and it’s especially useful for multi-property portfolios and hotels with several room types.
The availability search is built into Bookings for WooCommerce and can be automatically enabled.
Bonus #2: Add optional extras to accommodation bookings
Use WooCommerce Product Add-Ons Ultimate alongside Bookings for WooCommerce to offer paid extras at the point of booking. Add-ons appear on the product page before checkout, so guests can select what they want and the cost is added to their order automatically. Both plugins are available at a discount in the Bookings and Product Add-Ons Bundle.
Here’s how to add a breakfast option as an example:
- Go to your property product and click the ‘Add-Ons’ tab in the ‘Product data’ panel
- Click ‘Add Group’, then ‘Add Field’ within that group
- Set the field type to ‘Checkbox’ and give it a label, for example, “Add breakfast ($15 per person per day)”
- Enter the price in the ‘Price’ field
- It the price should be multiplied by the number of nights, enable the ‘Price per unit’ option
Save the product. Guests will now see the breakfast option on the product page, with the cost added to the order total automatically when they check the box.
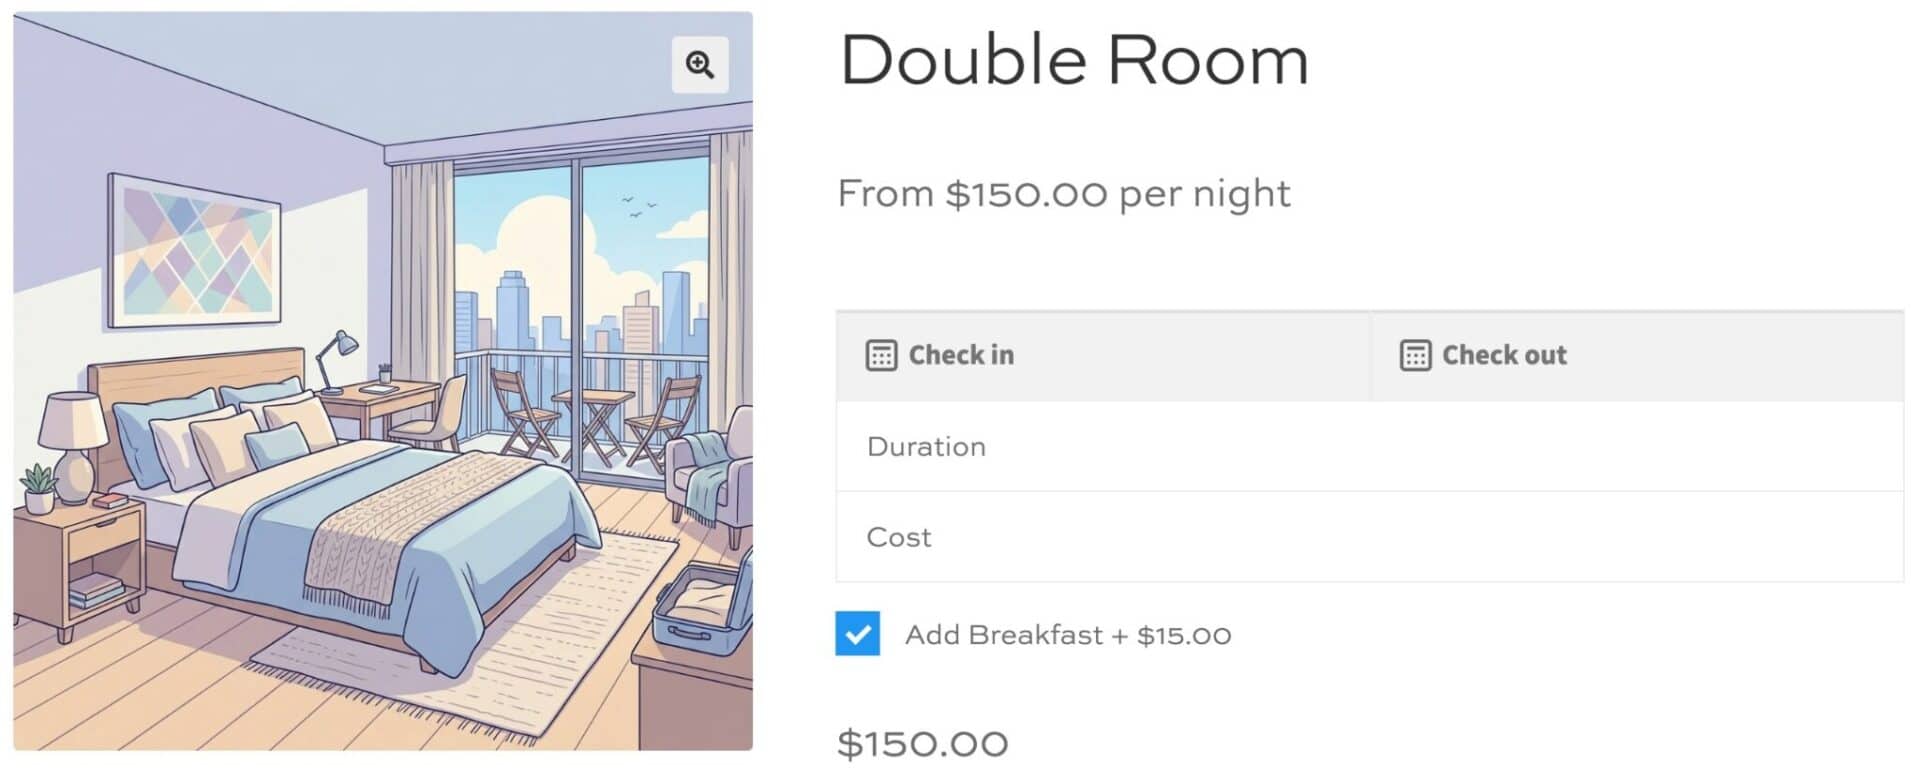
You can add as many or as few options as you like using the same approach. Other useful extras for accommodation bookings include:
- Parking space
- Late checkout
- Pet surcharge
- Welcome hamper
Bonus #3: Take a security deposit
Take a refundable security deposit at the time of booking using Product Add-Ons Ultimate. The deposit is added as a separate line item in the WooCommerce order, which makes it straightforward to refund after the stay – or to make a partial repayment, or withhold it if needed. You can find a full walkthrough in our guide to accepting security deposits for rentals in WooCommerce.
Direct accommodation bookings in WooCommerce – recap
That’s how to set up direct accommodation bookings in WooCommerce using the Bookings for WooCommerce plugin. We covered how to create a bookable property product with a live availability calendar, how to configure check-in rules, pricing, and buffer time, and how to sync with Airbnb, Booking.com, and VRBO. We also looked at how to scale the setup for multi-room properties and multi-property portfolios, and how to add an availability search, optional extras, and a security deposit.
Bookings for WooCommerce is compatible with all WordPress themes and page builders – and it’s backed by a 14-day money-back guarantee and world-class support, so you can try it risk-free.