WooCommerce wishlist tutorial: Enhancing your store’s functionality

As a WooCommerce store owner, one of the many features that can enhance your customers’ shopping experience is a wishlist functionality. Now, if you’ve scoured through WooCommerce’s documentation, you might have wondered: Is there a WooCommerce wishlist shortcode to quickly implement this feature?
Shortcodes are essentially small pieces of code enclosed in square brackets, enabling you to embed a variety of functionalities into your WordPress or WooCommerce posts, pages, or widgets without requiring any coding skills.
For instance, with the [featured_products] shortcode, you can display a list of highlighted items in your store. Similarly, [woocommerce_edit_account] and [woocommerce_pay] allow users to edit their account details and view the payment page for an order, respectively.
Considering their convenience, you might be surprised to know that WooCommerce does not offer a shortcode for adding a wishlist feature directly.
So, in this comprehensive tutorial, we are focusing on the best way to help you achieve this – using the WooCommerce Wishlists Ultimate plugin.
If you’re keen on offering a wishlist feature to keep your customers engaged and, more importantly, coming back to make a purchase, you’re in the right place. Let’s delve into our step-by-step guide to setting up WooCommerce Wishlists Ultimate and boosting your store’s functionality.
Introducing WooCommerce Wishlists Ultimate
WooCommerce Wishlists Ultimate seamlessly integrates with WooCommerce, enabling you to offer an intuitive wishlist experience to your customers. Let’s unpack the features that make this plugin indispensable for enhancing your online store.
WooCommerce Wishlists Ultimate
Boost sales and increase customer loyalty with WooCommerce wishlists
Features for users
- Multiple wishlists: The plugin allows your customers to create multiple wishlists. Each wishlist can have a unique name, offering users a customized way to keep track of different categories of products they wish to buy – be it gifts for upcoming holidays, personal indulgences, or future investments.
- Privacy settings: As privacy is of paramount importance in today’s day and age, the plugin provides users with the ability to set a privacy level for each wishlist. They can opt to make it public, keep it private, or even share it with a select audience by providing a unique link.
- Account page access: For easy navigation, users can view all their wishlists directly from their account page. This centralized location ensures that users don’t have to keep searching the site to find their saved products.
- Product management: From each wishlist, users can not only view the products but also select the quantities they desire. If they decide to make a purchase, adding products to the cart is a simple click away, streamlining the journey from interest to transaction.
Features for store owners
- Unified settings dashboard: WooCommerce Wishlists Ultimate simplifies accessibility to plugin settings by housing all settings in one consolidated place: WooCommerce > Settings > Wishlists. No more sifting through multiple menus or worrying about shortcodes.
- Supports all product types: Whether you’re selling simple products, bundled items, or even product variations, the plugin has you covered. It supports all product types by default, making it a flexible solution for diverse inventory types.
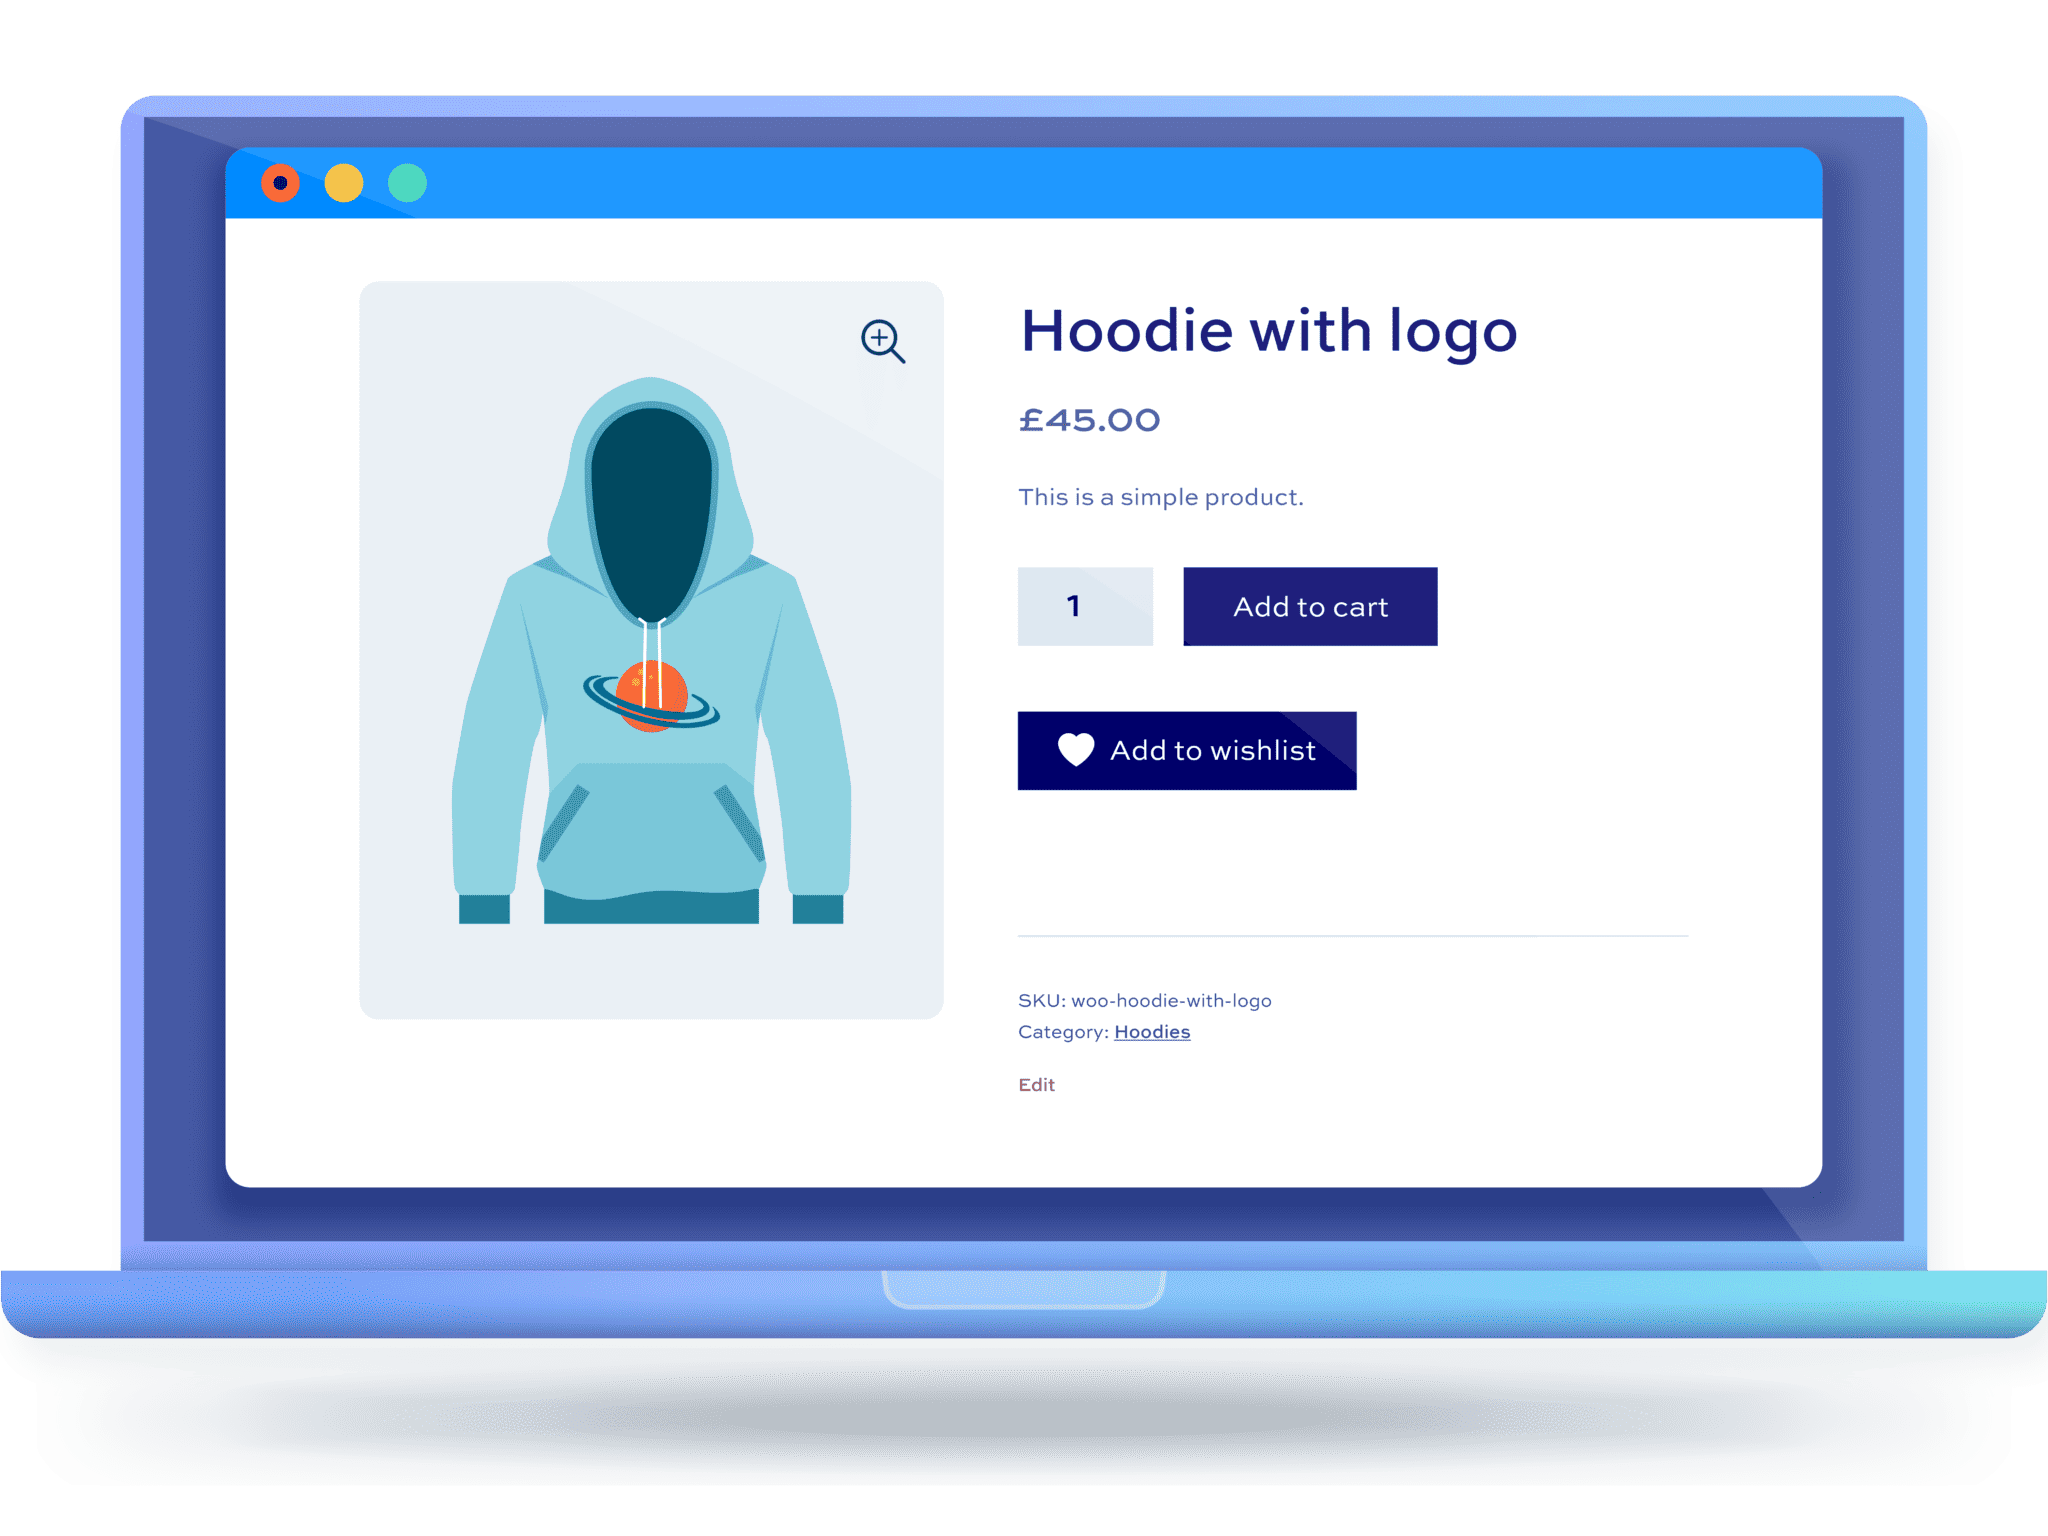
- Optimized user experience: It displays ‘Add to Wishlist‘ buttons automatically on product pages. All you need to do is make some fine-tuning, such as how the ‘Add to Wishlist‘ call-to-action (CTA) appears, be it as a button, a link, or an icon, and where it should be placed in relation to the ‘Add to Cart’ CTA.
- Customization: You get control over the entire messaging and default settings surrounding the wishlist functionality. From deciding the default privacy settings to customizing textual cues, everything can be adjusted to align with your brand voice.
How to set up WooCommerce Wishlists Ultimate
Adding a wishlist functionality to your online store is easier than you might think, especially with a plugin as intuitive as WooCommerce Wishlists Ultimate. Let’s see how!
Step 1: Download, install, and activate the plugin
Download the WooCommerce Wishlists Ultimate plugin directly from the Plugin Republic website or the WordPress plugin repository. Once downloaded:
- Navigate to your WordPress admin dashboard.
- Go to Plugins > Add New.
- Click on the ‘Upload Plugin‘ button and upload the .zip file you just downloaded.
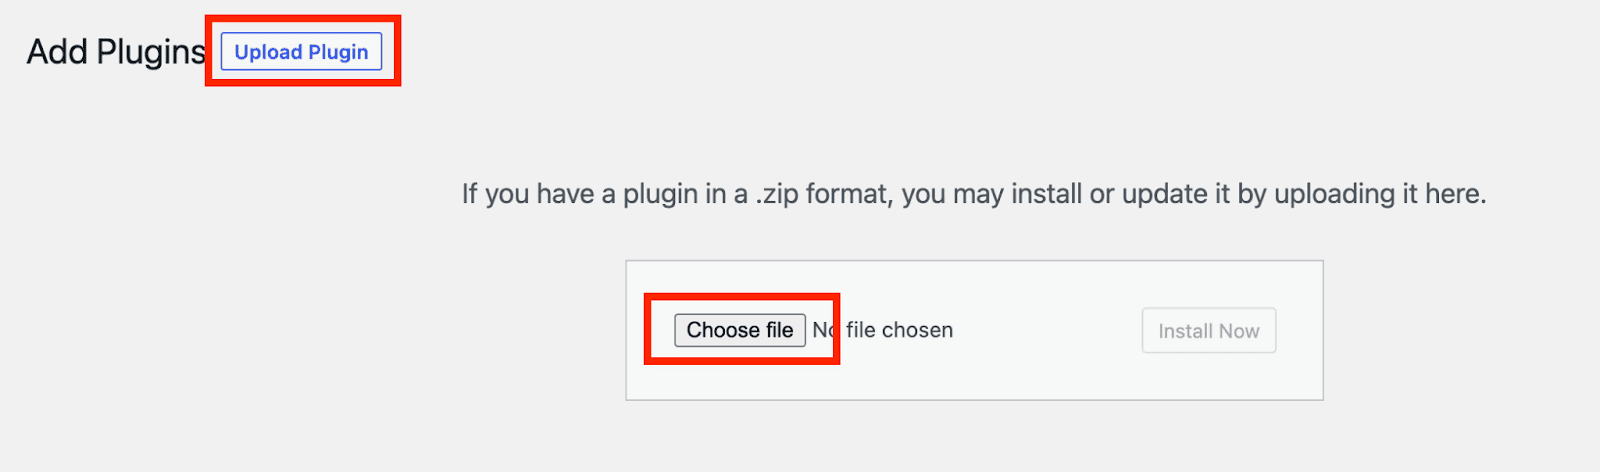
- After uploading, click on ‘Install Now’.
- Once installed, activate the plugin by clicking on the ‘Activate Plugin’ button.
Step 2: Enable wishlist functionality
After the plugin is activated, it’s time to enable the wishlist feature across all products in your store.
- Go to WooCommerce > Settings.
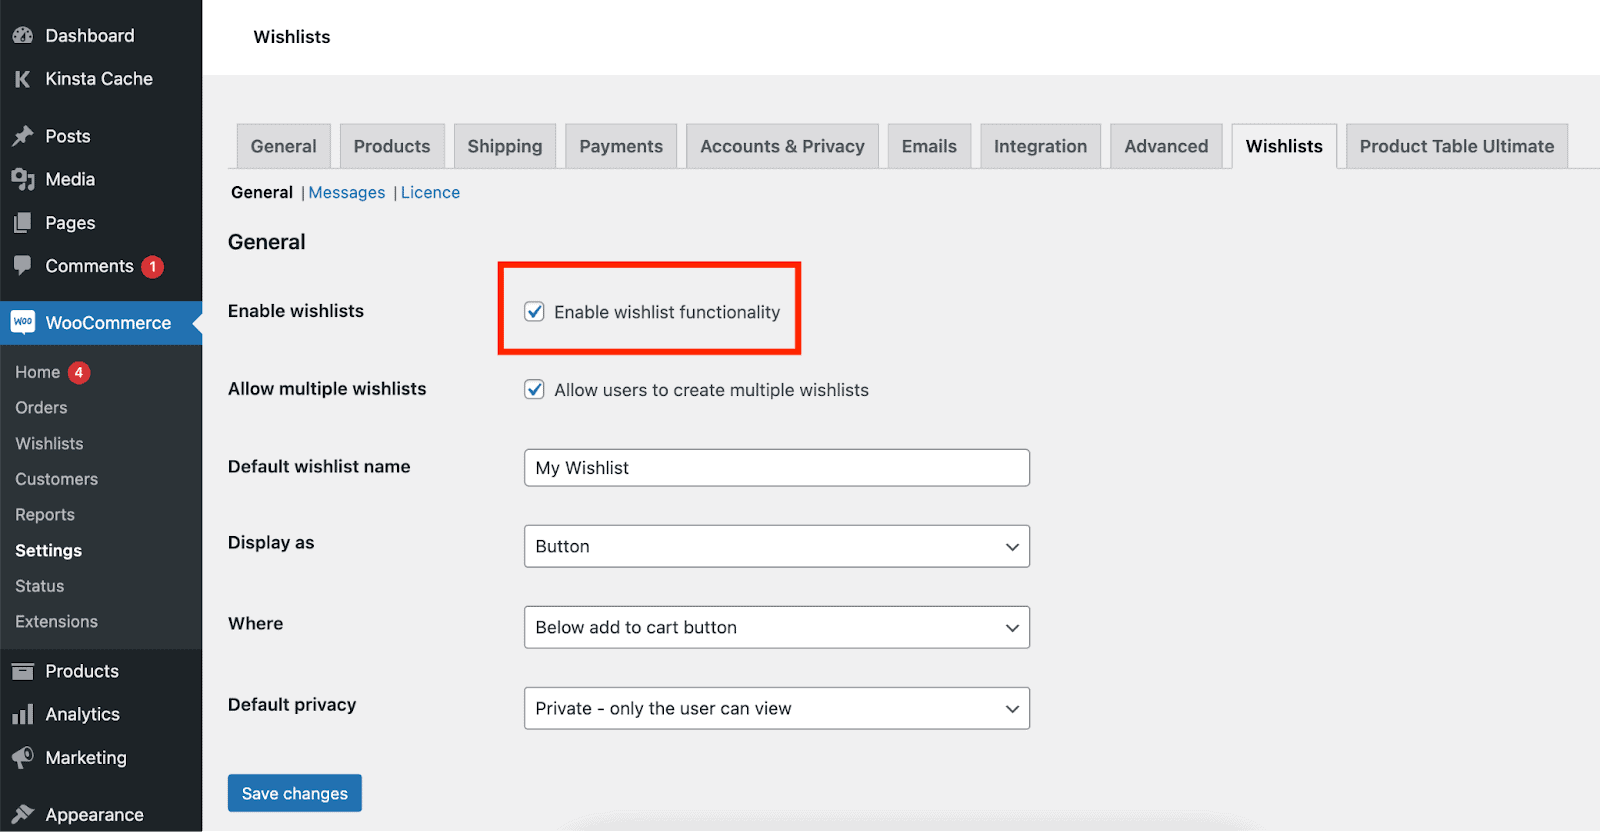
- Navigate to the Wishlists tab.
- You’ll find a checkbox labeled ‘Enable wishlist functionality’. Tick this box.
- Click ‘Save Changes’.
Step 3: Configure display settings for wishlists
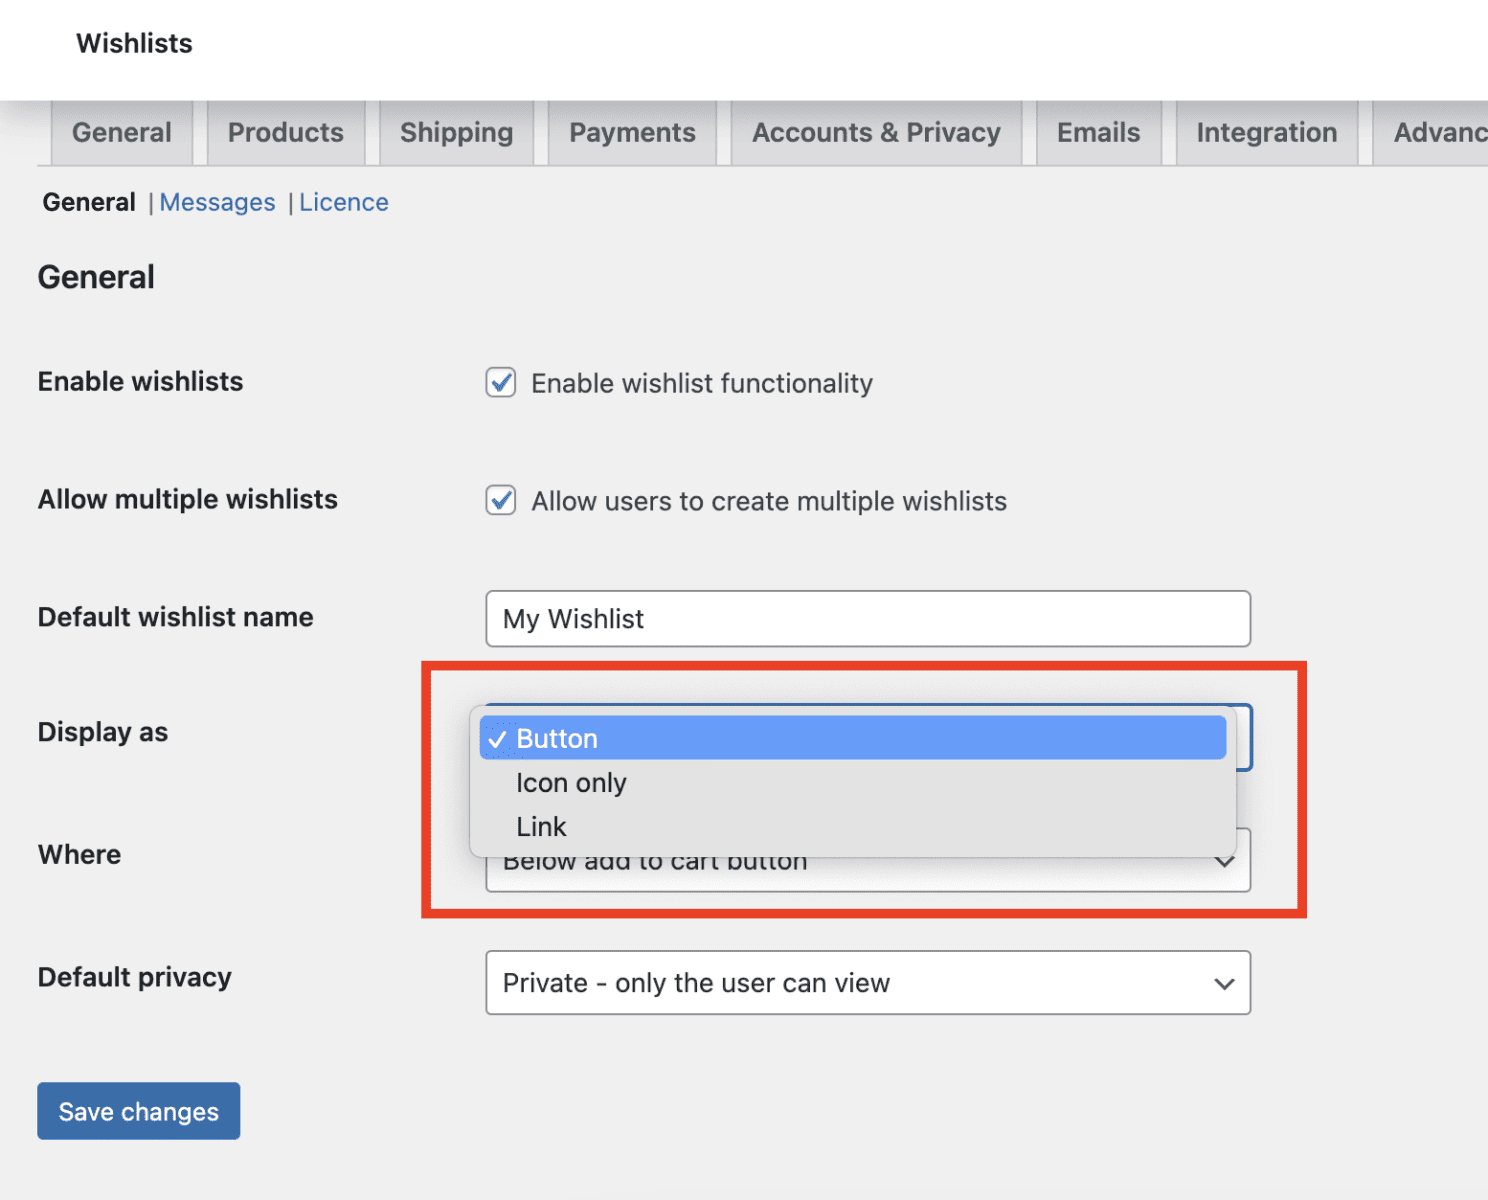
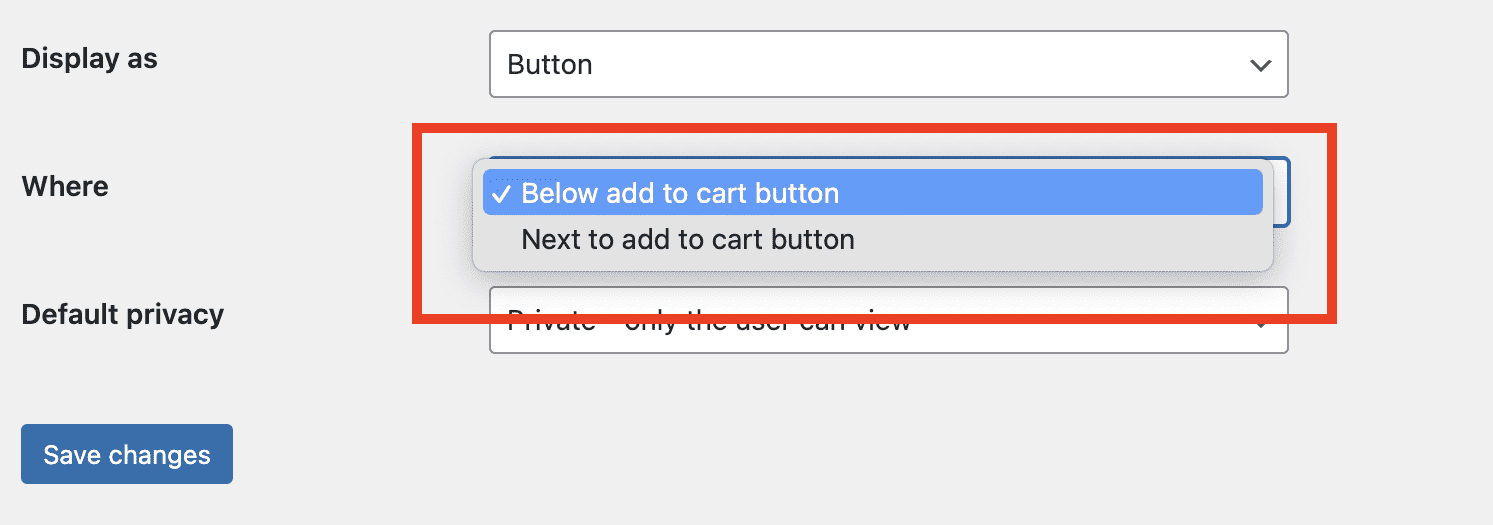
- Display type: Under the ‘General’ tab, you’ll find an option that allows you to display the wishlist functionality as a button, link, or icon. Choose the one that best fits your website’s design language.
- Button placement: Right beneath, there’s an option to decide the placement of the ‘Add to Wishlist‘ button. You can opt to have it displayed either below or next to the ‘Add to Cart‘ button.
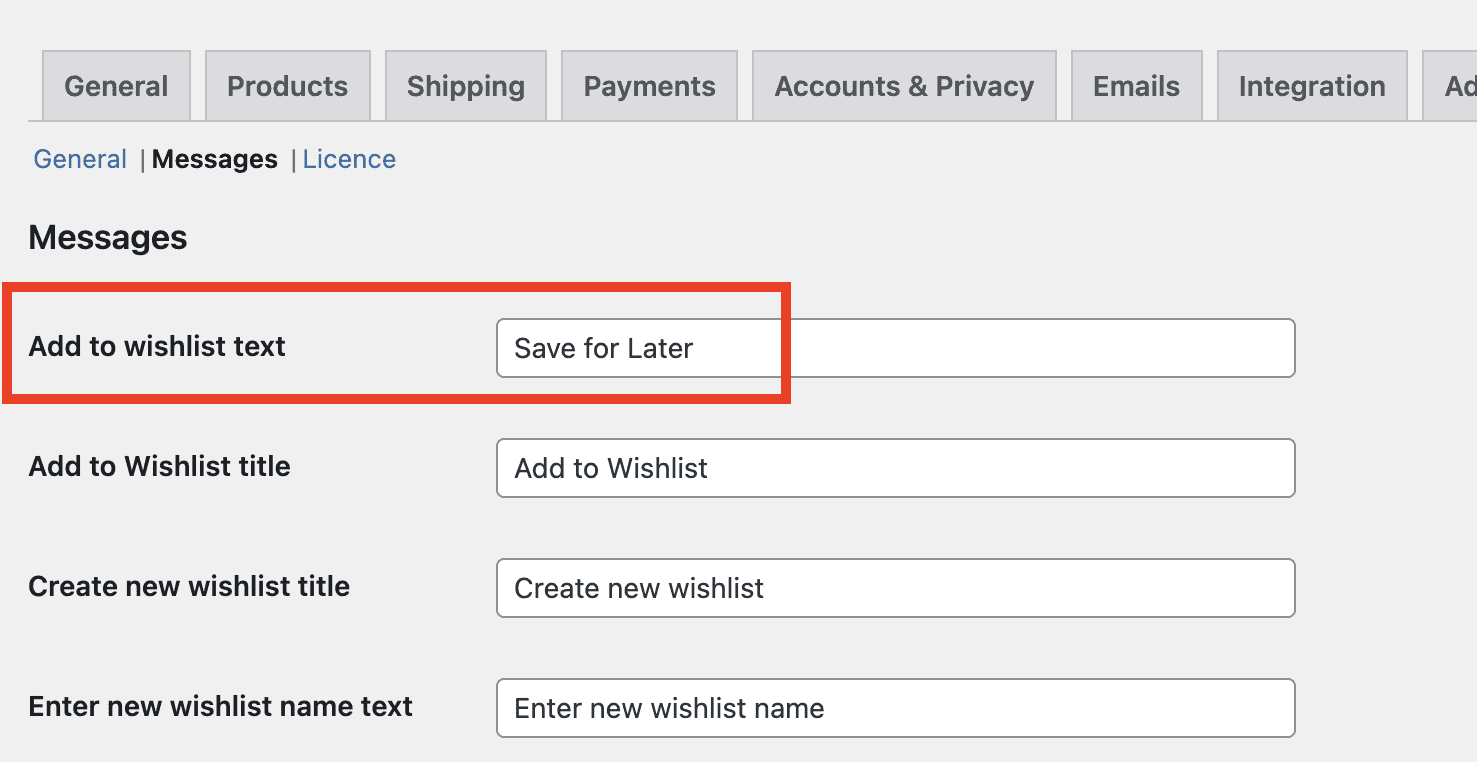
Under the Messages tab, you can customize the text associated with the wishlist functionality.
- Add to wishlist: The default text for adding a product to a wishlist can be changed. If you prefer, you can have it say ‘Bookmark’ or ‘Save for Later’.
- Create new wishlist: This is the text that appears when a user is about to create a new wishlist. You could customize it to say something like ‘Start a New Collection’.

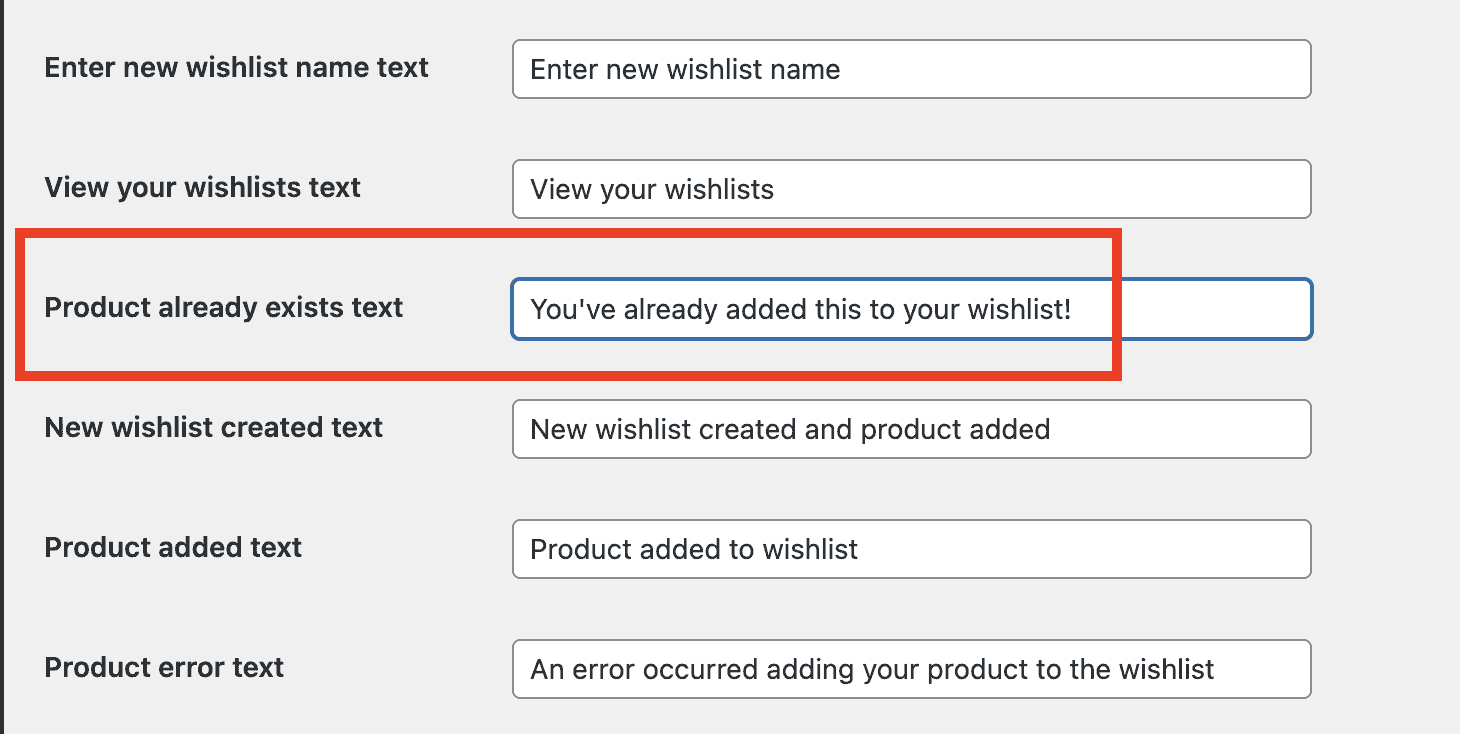
- Product already exists: This is the message displayed when a user tries to add a product already in their wishlist. Instead of the default message, you could have it say ‘You’ve Already Saved This Item’.
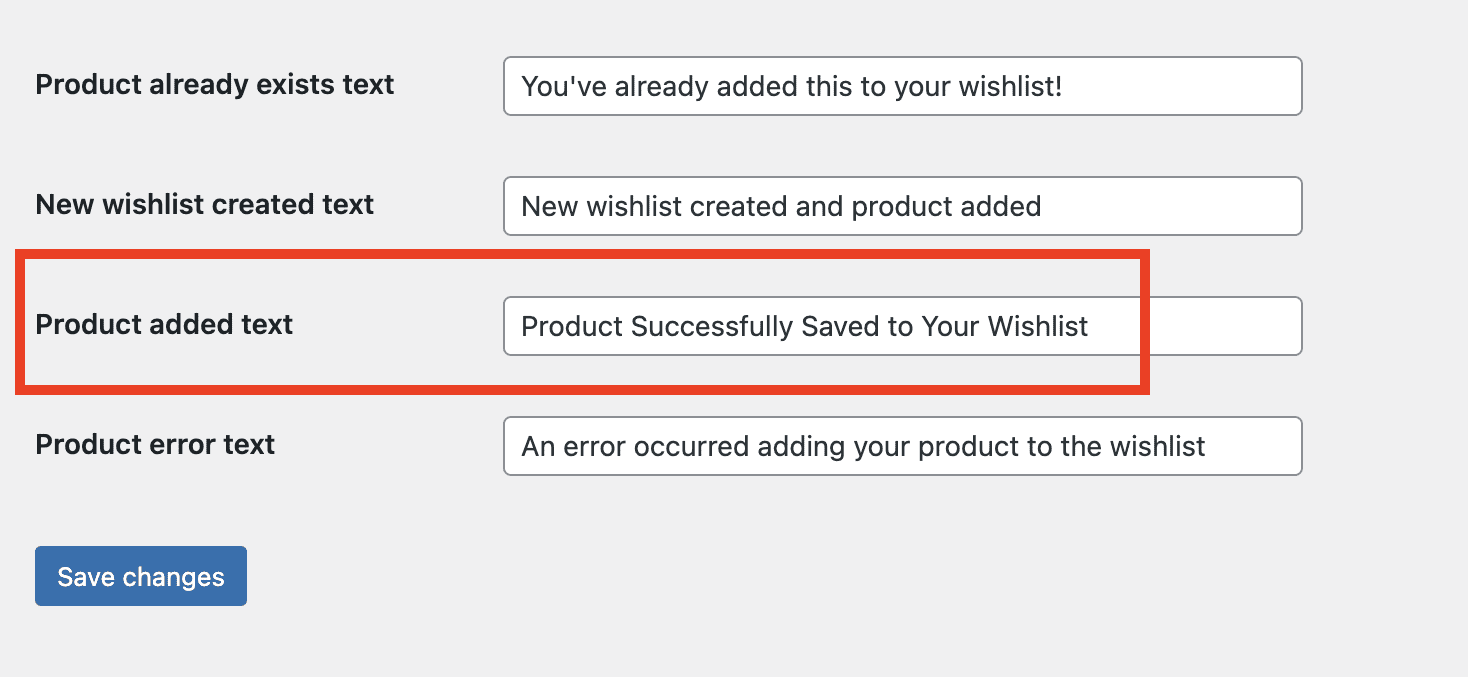
- Product added: The message displayed when a product is successfully added can also be changed. Perhaps something like ‘Product Successfully Saved to Your Wishlist‘ might work for you.
Step 4: Configuring default user settings
This is a crucial step to ensure that users get off to a smooth start when interacting with the wishlist functionality for the first time.
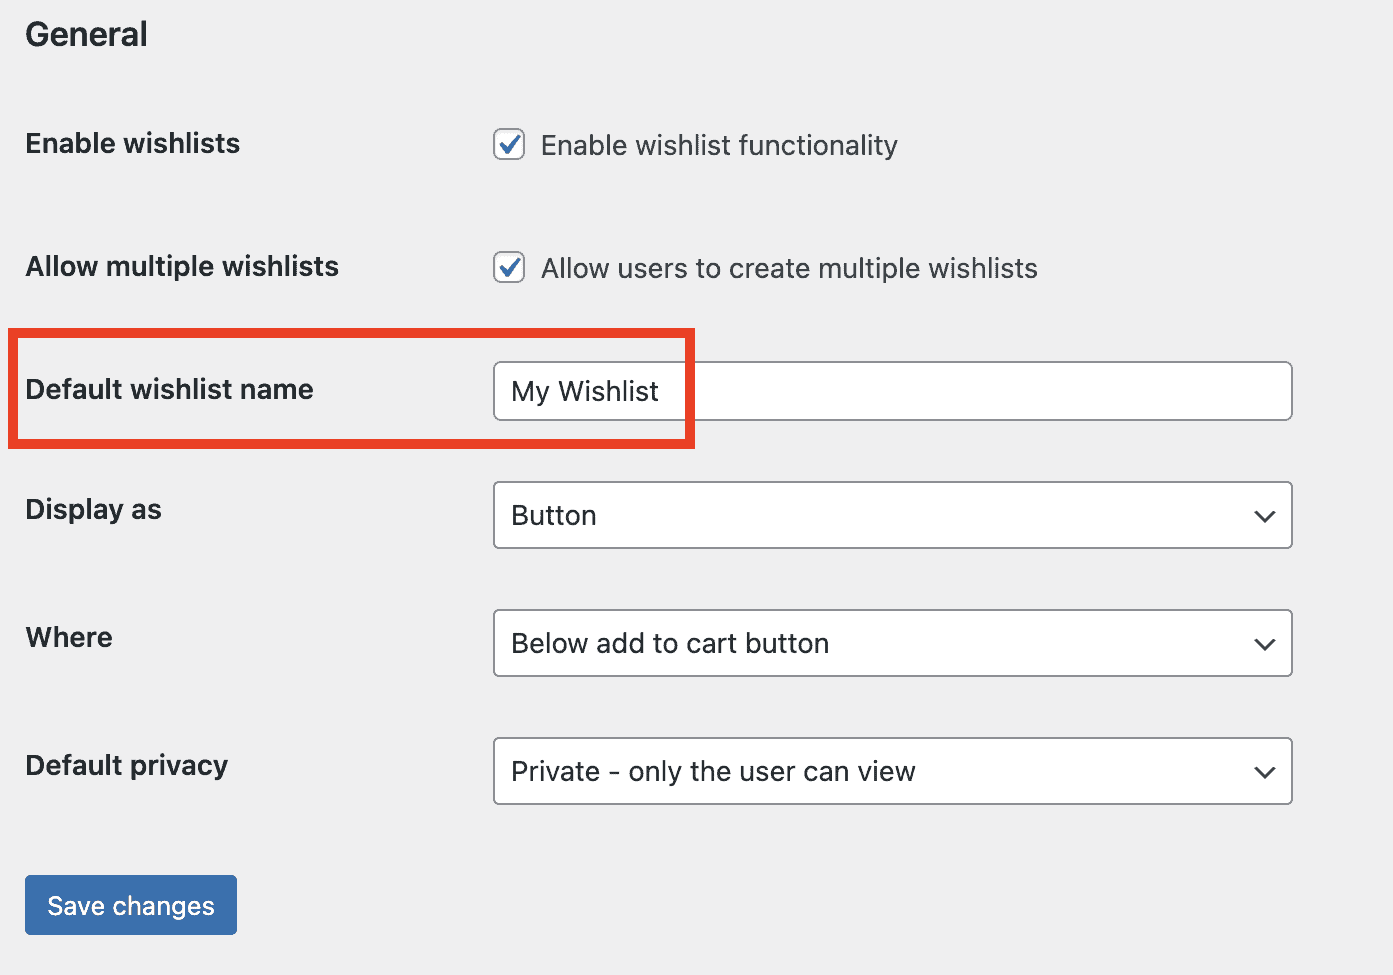
- Create a default wishlist name
- Navigate to WooCommerce > Settings.
- Click on the Wishlists tab.
- Scroll down until you see an option labeled ‘Default Wishlist Name’.
- Enter a name that you think best suits a generic wishlist; this could be something like ‘My Wishlist‘ or ‘Saved Items’.
- Save your changes.
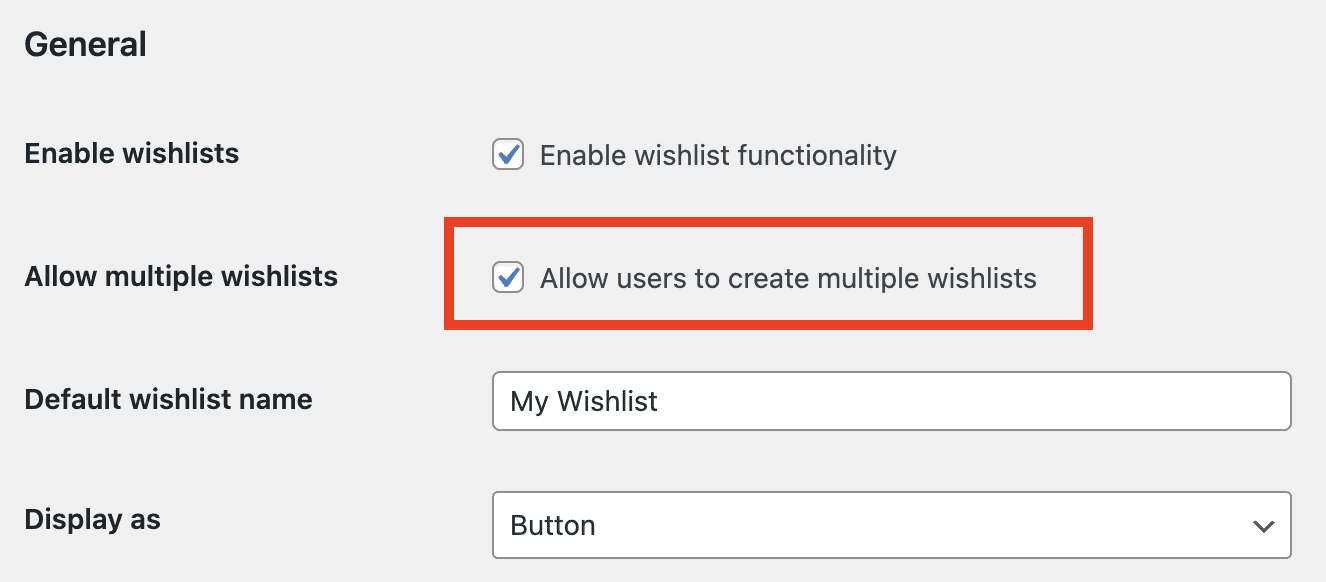
- Enable multiple wishlists per user
- Under the Wishlists tab, look for the option that says ‘Allow Multiple Wishlists’.
- Check this box to enable the feature.
- Save your changes.
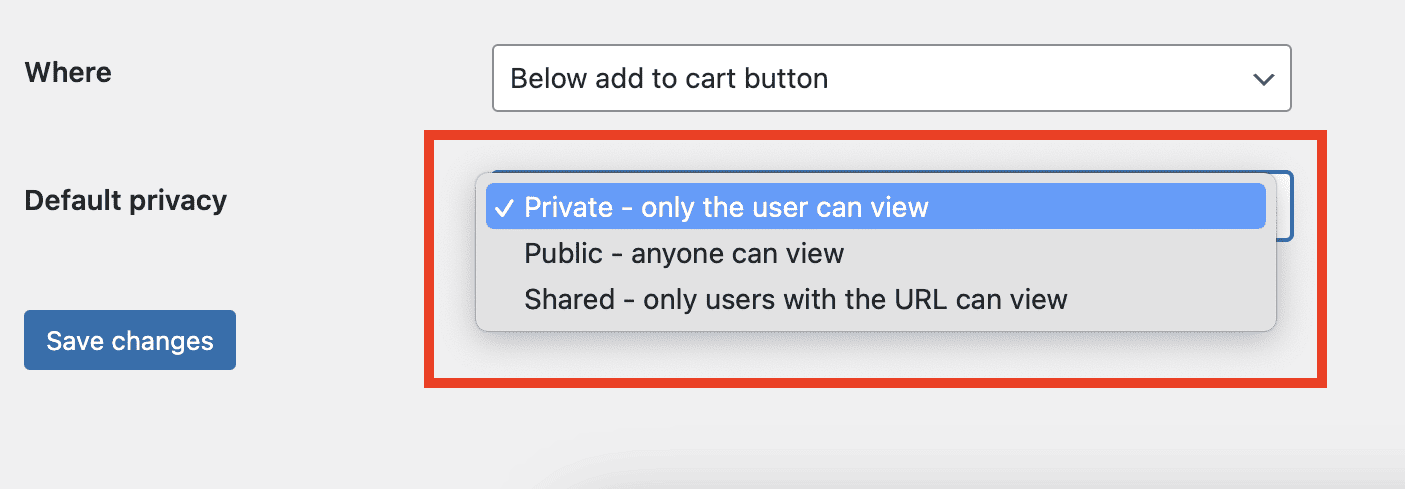
- Set default privacy settings
- Locate the ‘Default Privacy Settings‘ option within the Wishlists tab.
- Choose from three options: Public, Private, or Shared. The default setting will be applied to all newly created wishlists.
- Save your changes.
Note that these are just default settings designed to create a uniform and straightforward experience for all first-time users.
However, the plugin allows users to override these defaults according to their preferences, depending on their user roles. For instance, even if you set the default wishlist privacy setting to ‘Public’, users can change this to ‘Private’ or ‘Shared’ for their individual wishlists as they see fit.
Add wishlist functionality to your store today
We’ve covered a lot of ground in this comprehensive tutorial, demystifying the process of adding a wishlist feature to your WooCommerce store.
While it’s true that WooCommerce doesn’t offer a built-in shortcode for wishlists, we’ve seen how effortlessly this gap can be filled by using a specialized plugin like WooCommerce Wishlists Ultimate.
This wishlist feature provides a richer, more personalized shopping experience. Users can plan their purchases better, share wishlists with friends and family, and even categorize their preferred items into multiple wishlists for different occasions or needs.
In addition, the plugin also has the potential to increase sales. When customers save items to a wishlist, it’s a step closer to a purchase. Plus, the ease of managing this functionality allows you to focus more on other aspects of your business.
If you’re still on the fence, consider this: In today’s competitive ecommerce landscape, anything that makes your store more engaging and user-friendly can set you apart.
WooCommerce Wishlists Ultimate offers a streamlined solution that’s easy to install, simple to manage, and invaluable in enhancing customer satisfaction.
WooCommerce Wishlists Ultimate
Boost sales and increase customer loyalty with WooCommerce wishlists
So why wait? Add WooCommerce Wishlists Ultimate to your store today and take your customer experience to the next level.