How to accept security deposits for rentals in WooCommerce
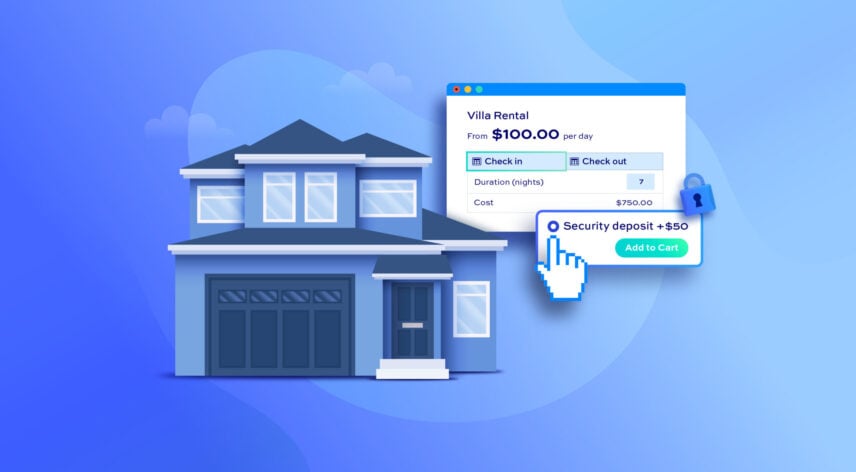
In this tutorial, we’ll show you how to create a WooCommerce product that lets customers book by the day and automatically adds a security deposit at checkout. We’ll use two plugins: Bookings for WooCommerce to handle the date-based booking logic, and Product Add-Ons Ultimate to attach the deposit as a child product. These two plugins are available together as part of the WooCommerce Bookings and Product Add-Ons Bundle.
WooCommerce Bookings and Product Add-Ons Bundle
Create the ultimate bookings site in WooCommerce
Here’s what the finished product page will look like: customers select their start and end dates, the cost is calculated automatically, and a security deposit option is displayed below – pre-selected and ready to go.
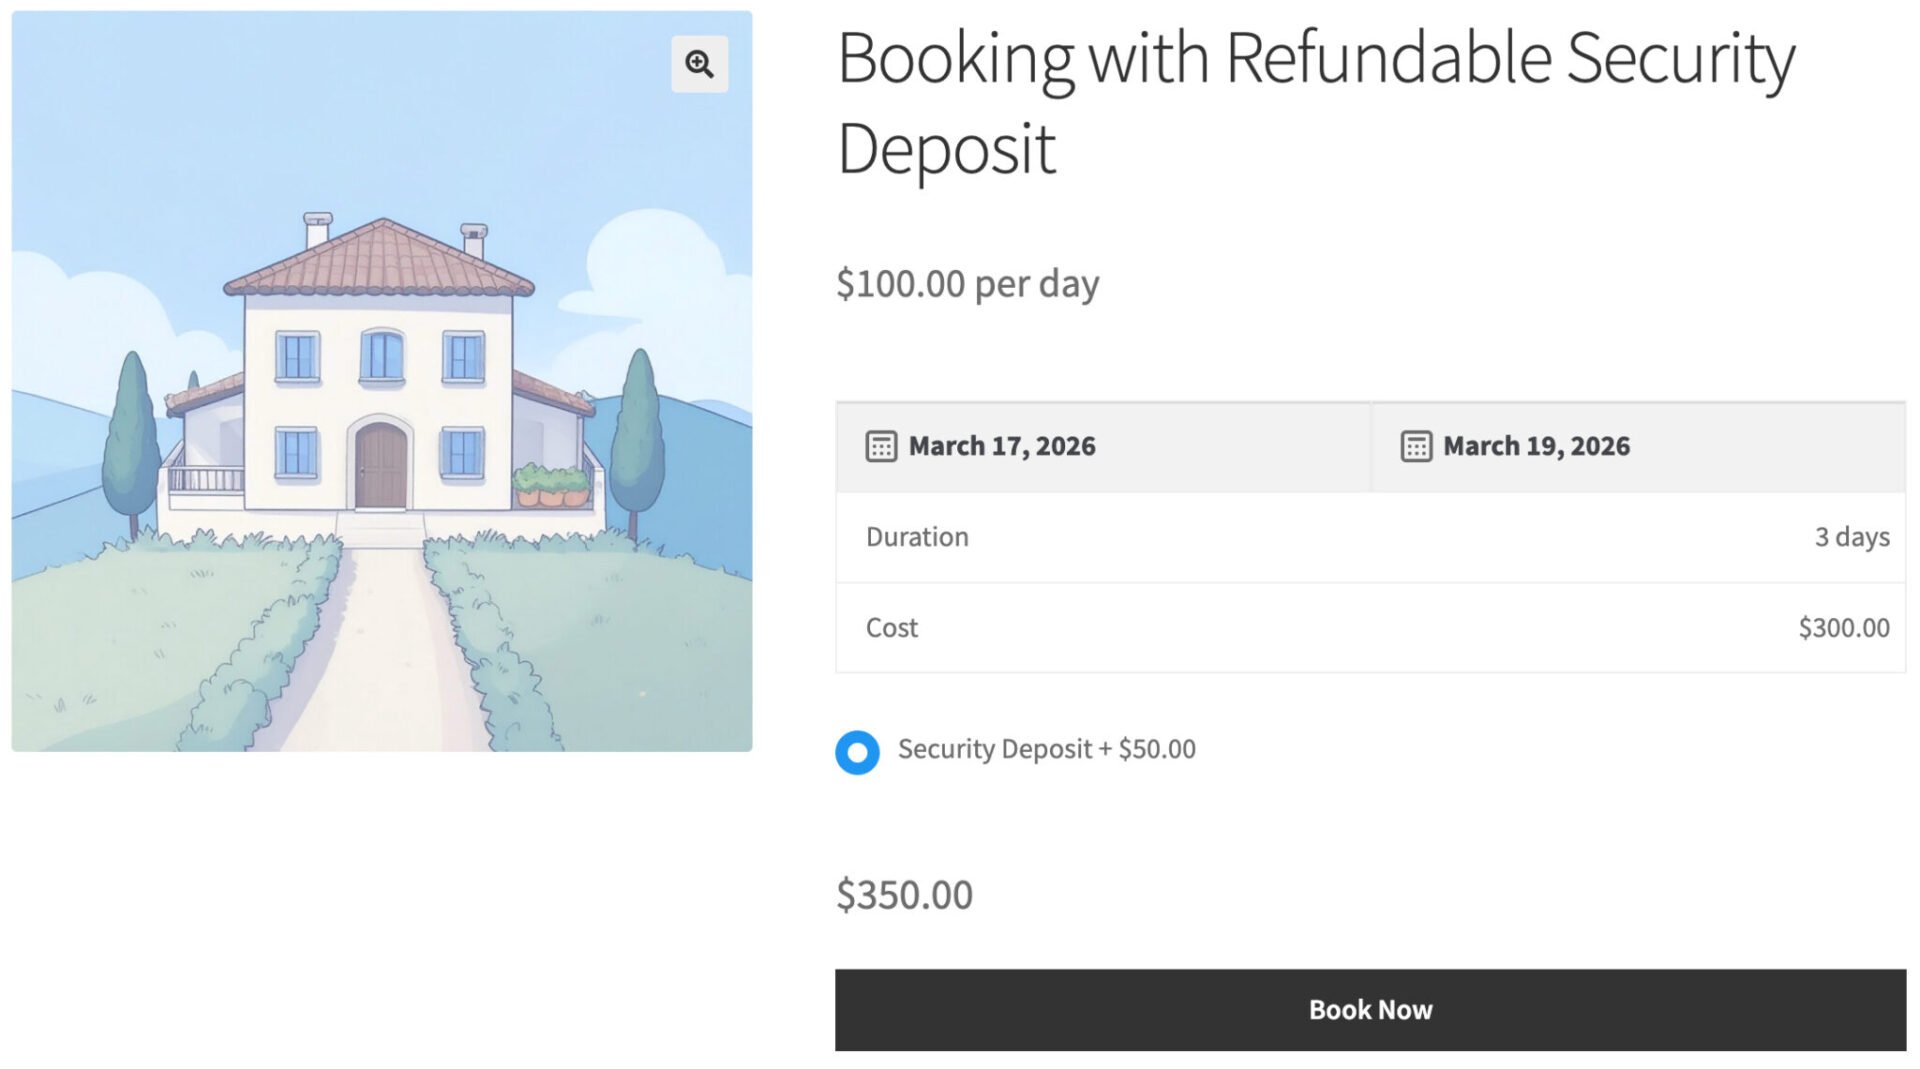
The security deposit will be added to the cart as a separate line item – making it simple for you to refund it direct from the WooCommerce order screen once the booking has been completed and you’re satisfied that the deposit can be returned. You can also choose to make a partial repayment or even withhold the deposit if necessary.
There’s a fully working demo product here.
WooCommerce security deposit product tutorial
Before you start, make sure you have the following installed and activated:
Once purchased, download them from your account, upload them via Plugins > Add New > Upload Plugin, and enter your license keys when prompted.
Step #1: Create the security deposit product
The security deposit is a standard WooCommerce simple product. We create it first so it’s available to select when we configure the bookable product later.
Using a simple product allows you to add the security deposit as a separate line item. It also makes it easy to issue the refund after the booking and to track and report on deposits separately from bookings themselves.
- Go to Products > Add New and give the product a name, e.g “Security Deposit”
- Under Product data, make sure the product type is set to Simple product, then enter the deposit amount in the Regular price field. In this example we’re using $50.00.
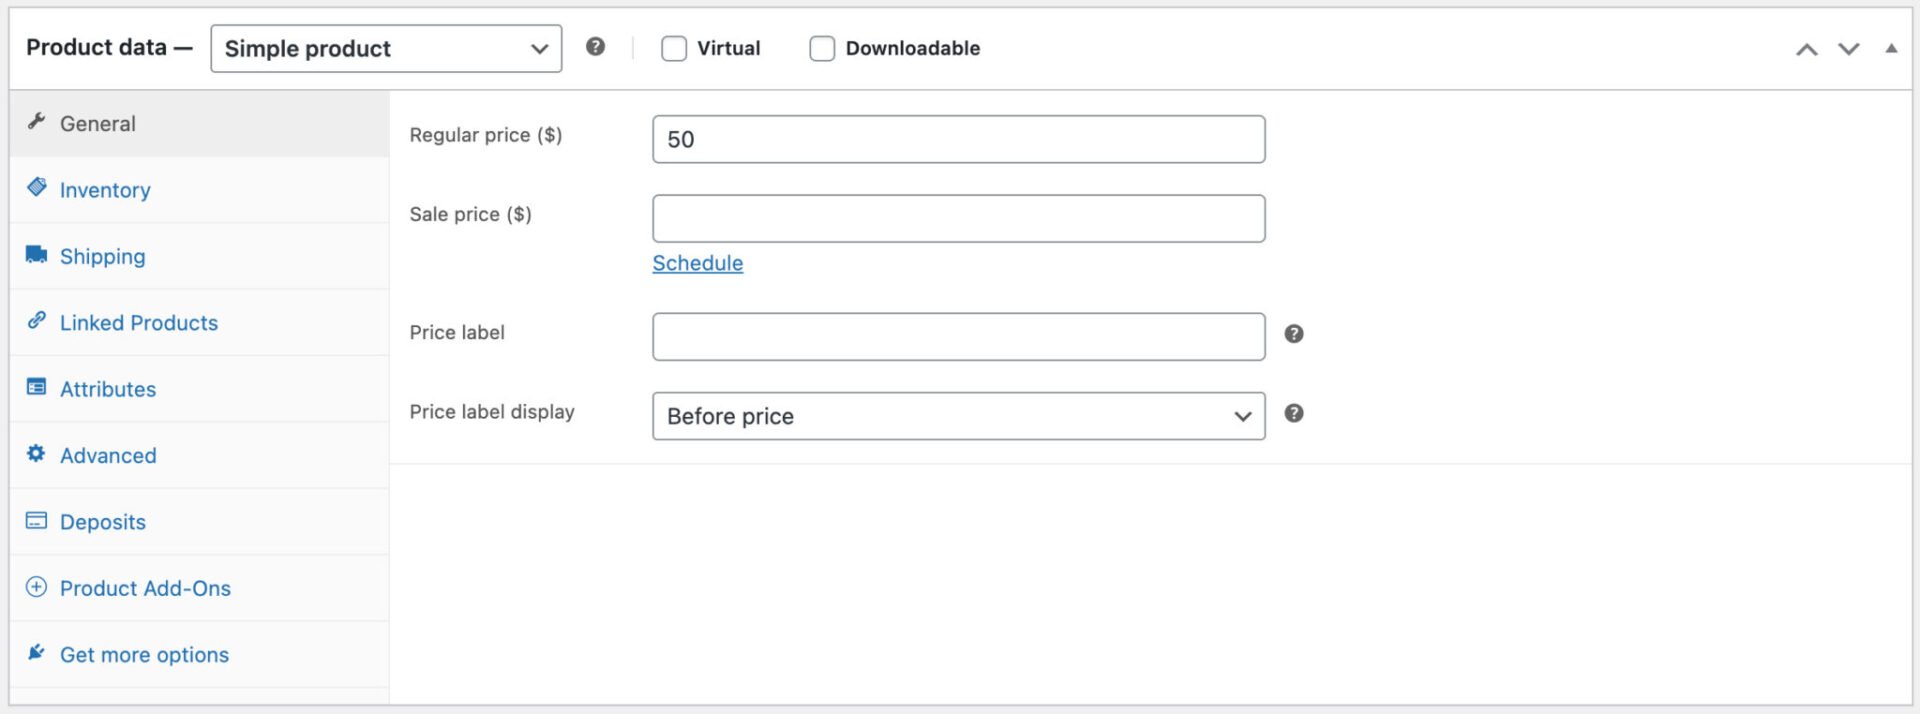
There’s no need to change any other settings. Click Publish to save the product. Make a note of the product ID – you’ll see it in the URL when editing the product (e.g. post=4063). You’ll need this in Step #5.
Note: By default WooCommerce sets catalog visibility to “Shop and search results”. You may want to change this to Hidden so the deposit doesn’t appear as a standalone product in your shop – customers should only encounter it as part of the booking.
Step #2: Create the bookable product
To create your bookable product:
- Go to Products > Add New and give your product a name, e.g. “Lakeside Cabin” or whatever suits your business
- In the Product data panel, open the product type dropdown and select Booking. This changes the panel to show the booking-specific settings.
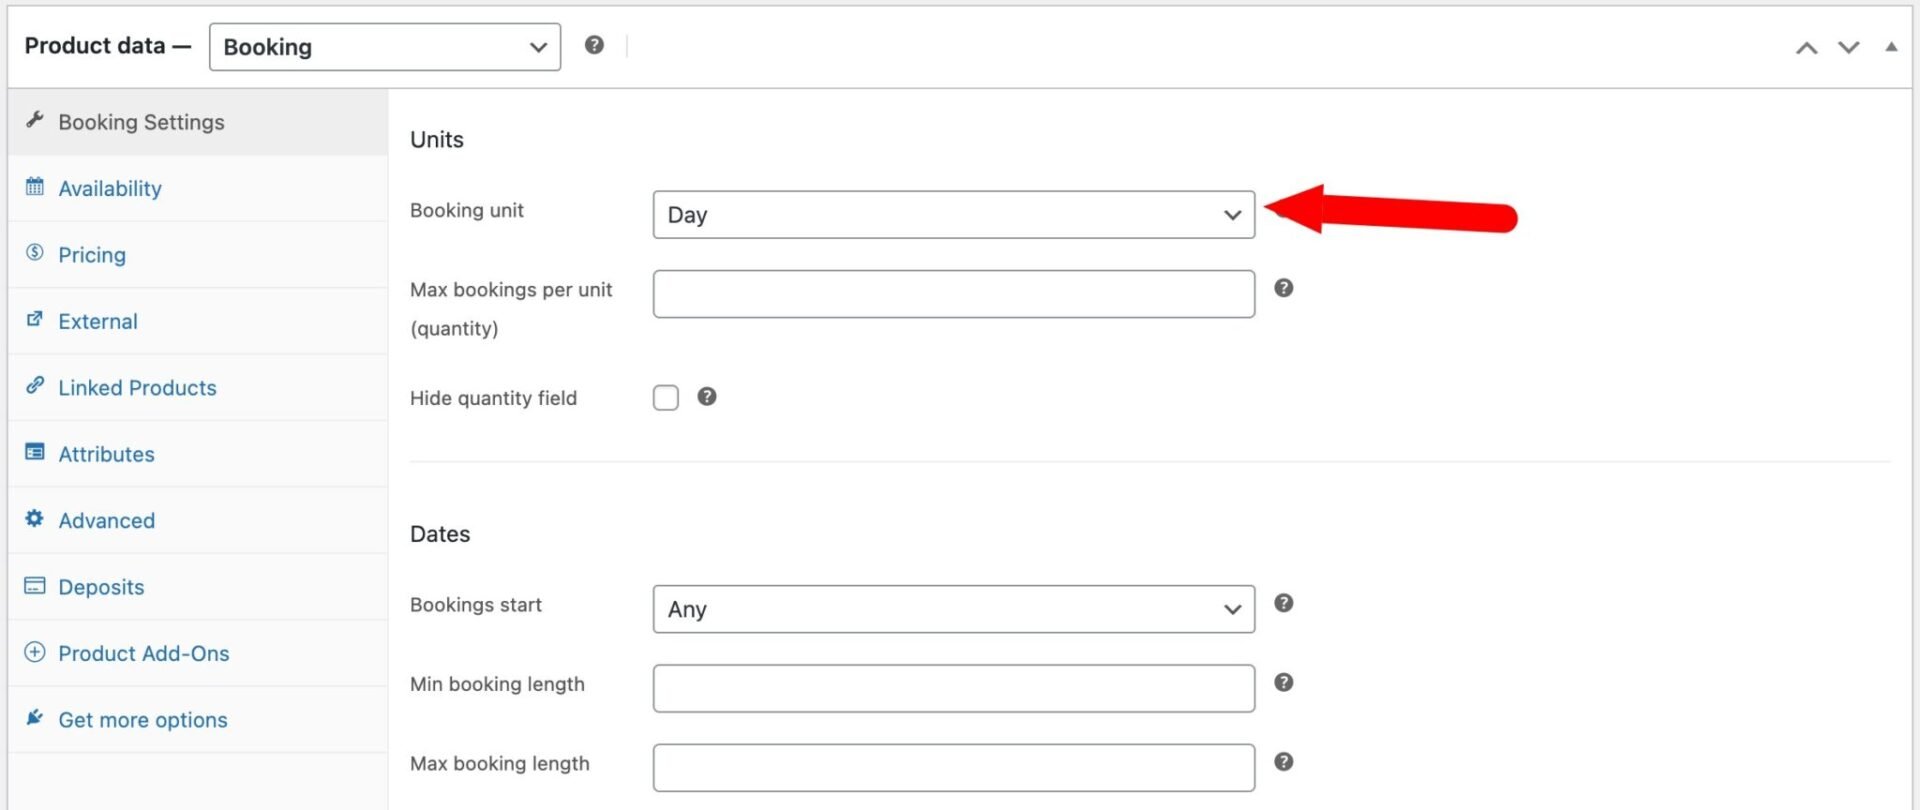
Step #3: Configure the booking settings
With the Booking product type selected, click the Booking Settings tab in the Product data panel.
Under Units, set the Booking unit to Day. This means the cost will be calculated per day based on the start and end dates the customer selects. You can optionally set a Max bookings per unit value if you want to limit how many bookings can be made for the same dates – for example, set this to 1 if you’re renting a single property.
Under Dates, the key settings are:
- Bookings start: leave this set to Any to allow bookings to start on any day of the week
- Min booking length: optionally set a minimum number of days (e.g.
2for a two-night minimum stay) - Max booking length: optionally cap the booking duration
Step #4: Set the price
In the Pricing section, enter your base price in the Standard price field – this is the per-day rate that will be multiplied by the number of days when a customer selects their dates. In our example this is $100.00 per day.
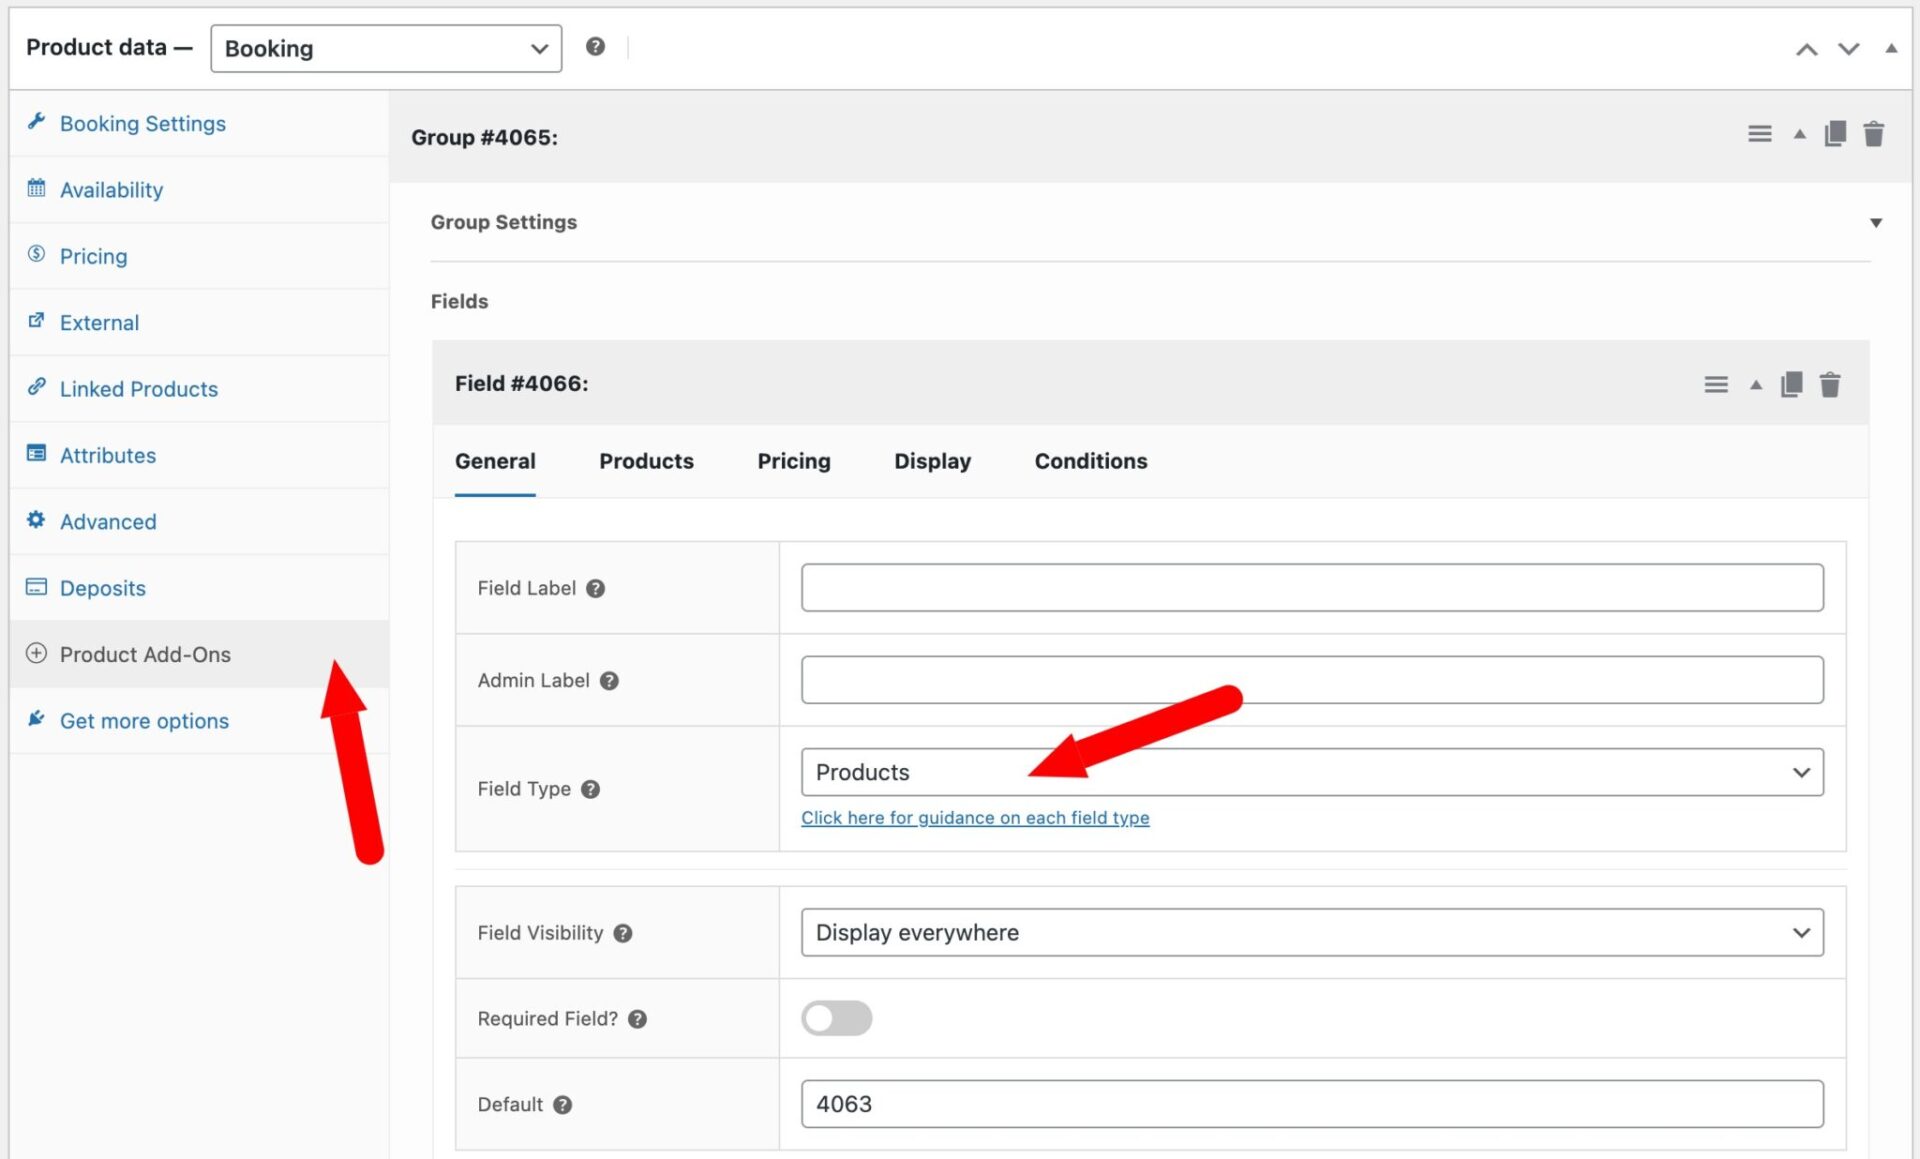
Step #5: Add the security deposit using Product Add-Ons Ultimate
Now we’ll attach the security deposit to the booking product. Click the Product Add-Ons tab in the Product data panel. Then:
- Click Add Group. This creates a container for your add-on fields. You can leave the Group Title blank – it won’t be displayed on the product page unless you want a visible heading above the deposit option.
- Click Add Field. A new field will appear
- On the General tab, set the following:
- Field Label: enter “Deposit”. This is the label displayed to customers above the deposit option.
- Field Type: select Products from the dropdown.
- Required Field: toggle this on if the deposit is mandatory.
- Default: enter the ID of the “Security Deposit” product you created in Step #1, e.g. 4063
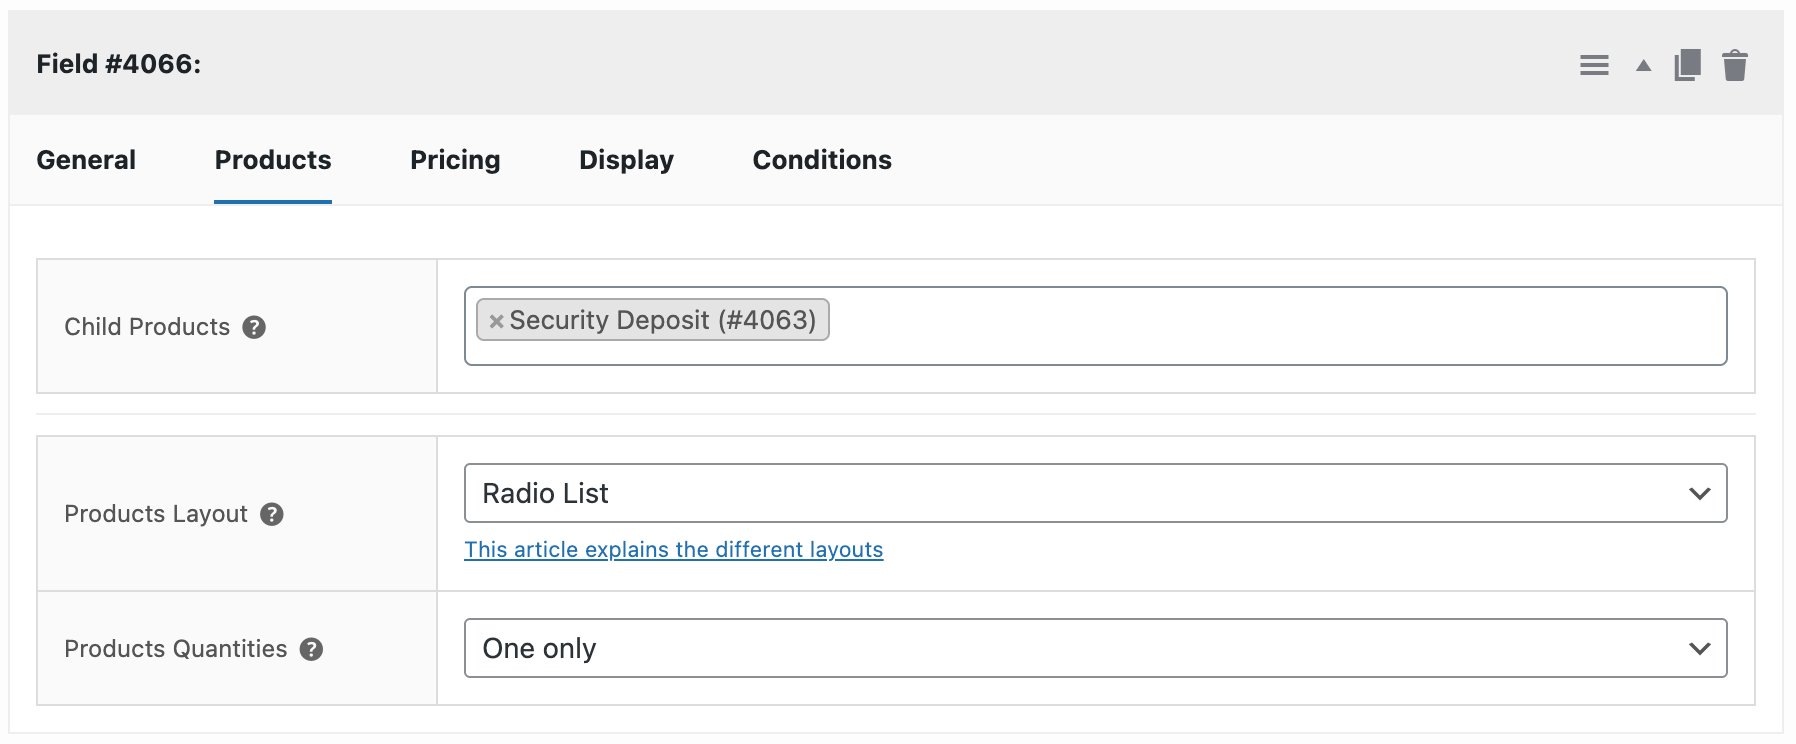
Step #6: Configure the Products tab
Click the Products tab within the field settings. Here you’ll configure which product appears as the deposit option:
- Child Products: search for and select the Security Deposit product you created in Step 1. You can also type its product ID (
4063in our example) directly into the default value field to pre-select it automatically. - Products Layout: select Radio List. This displays the deposit as a radio button option, which matches the style shown on the product page.
- Products Quantities: select One only. This prevents customers from changing the quantity of the deposit – there should always be exactly one.
Click Update to save the product.
Step #7: Test the product page
Visit the product page on the front end. You should see:
- A date picker for selecting the start and end dates
- A Duration row that updates when dates are selected
- A Cost row showing the total booking cost (e.g. 3 days × $100.00 = $300.00)
- A Deposit section with the Security Deposit option displayed as a radio button, pre-selected, showing the $50.00 fee
Add the product to the cart and go to the cart page to confirm that both the booking cost and the security deposit are listed as separate line items.

How do I refund the security deposit?
When a booking is complete and you’ve confirmed the customer hasn’t caused any damage, you can refund the security deposit directly from the order screen without refunding the entire order.
Go to WooCommerce > Orders and open the relevant order. Scroll down to the order items, then click the Refund button at the bottom of the items table. This expands the refund interface inline — the order total doesn’t change until you confirm.
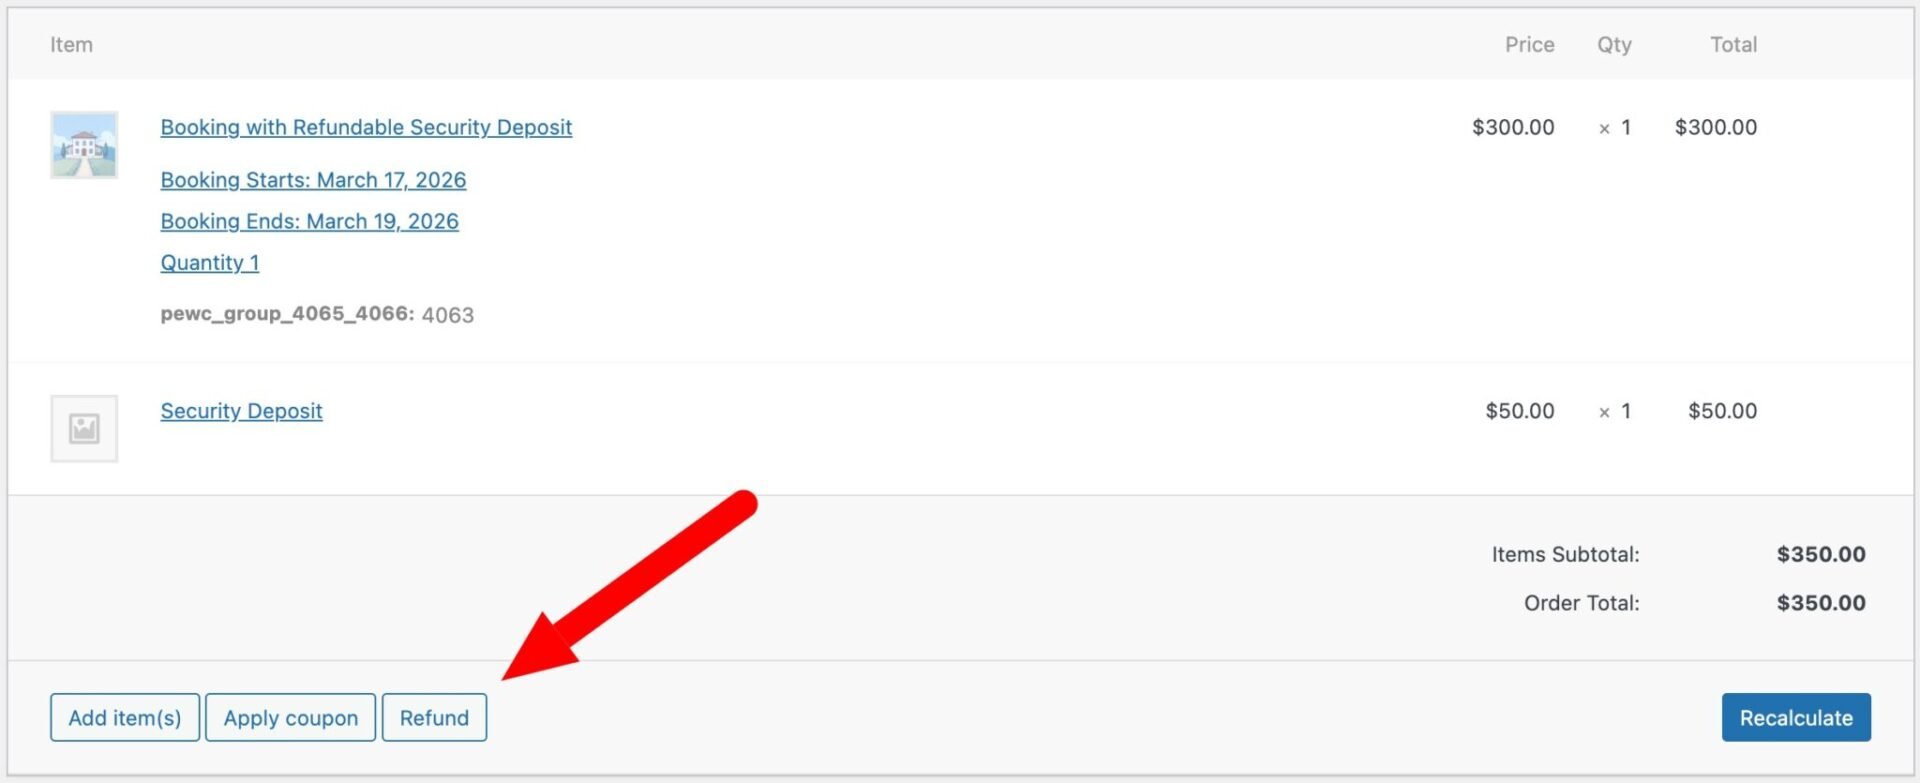
You’ll see a refund quantity field and a refund amount field next to each line item. Because the security deposit is added as a child product, it appears as its own line item in the order. Leave the quantity and amount fields for the main booking product at zero, and enter the deposit amount – 50.00 in our example – in the refund amount field next to the Security Deposit line item.
If you need to make a partial refund, just enter the amount to be refunded.
You can also add a reason in the Reason for refund field, such as “Security deposit returned”.
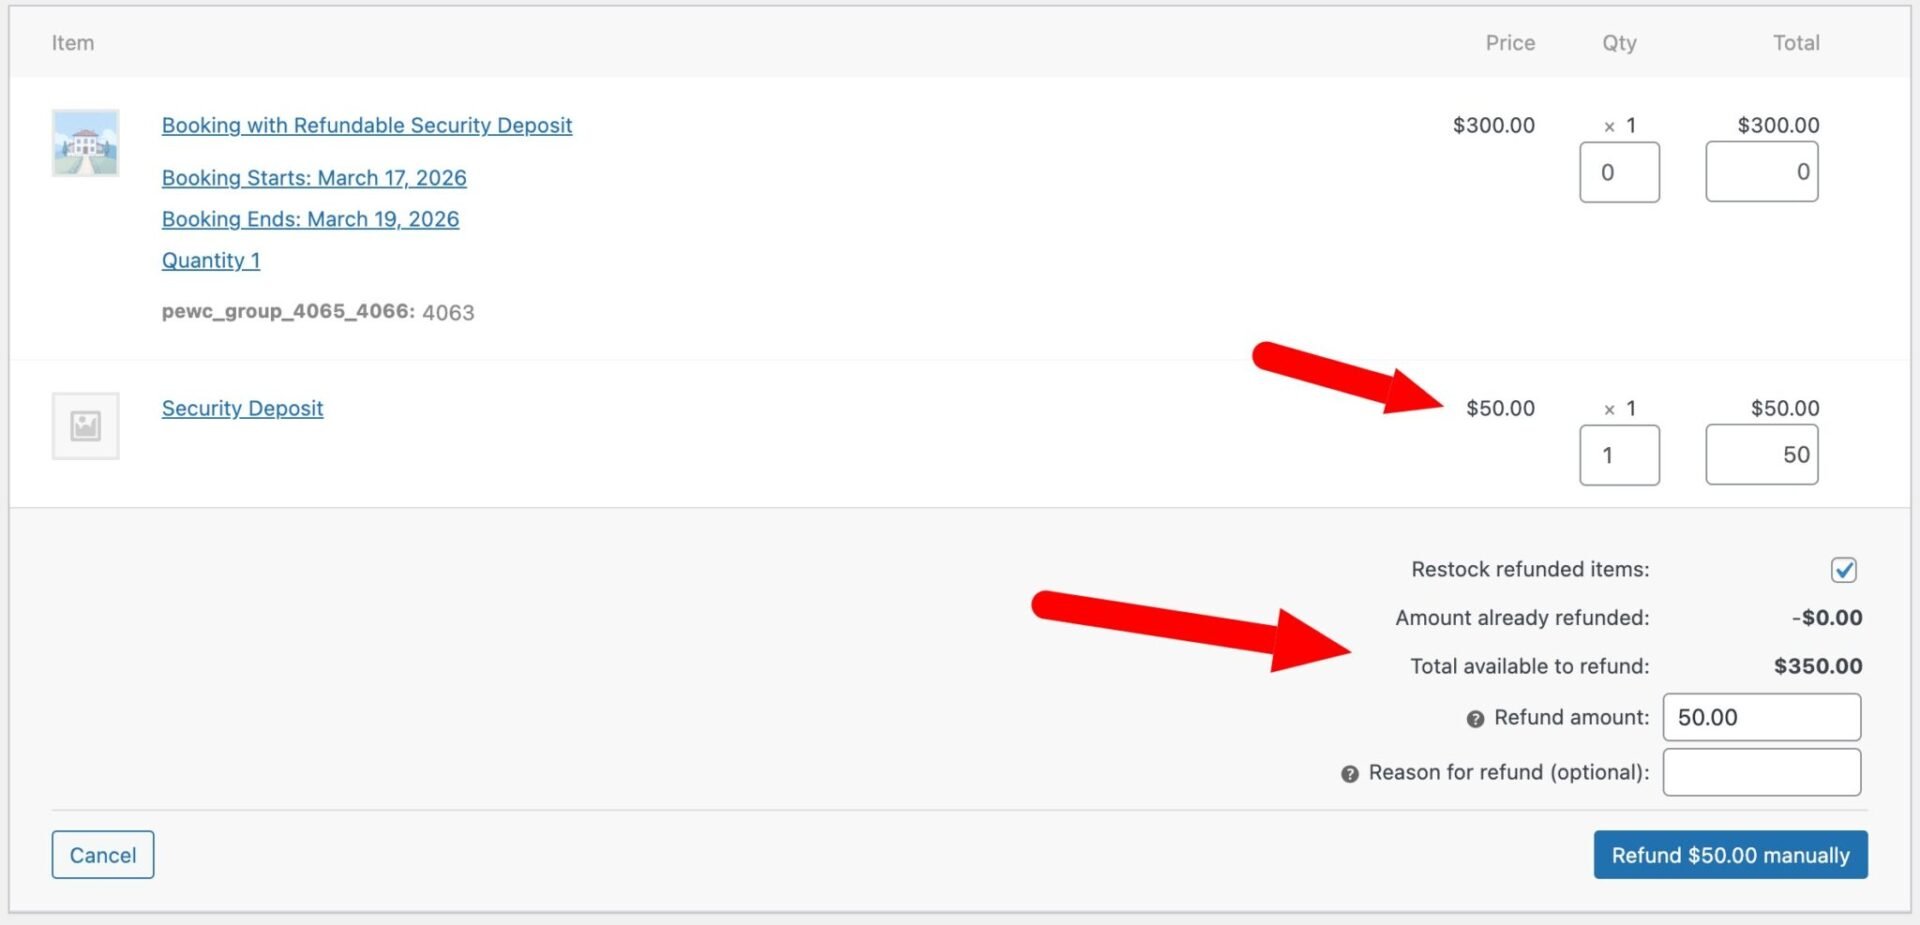
Once you’re happy, click Refund $50.00 manually. This records the refund against the order without triggering an automatic payment reversal – use this if you’re paying the customer back by bank transfer or cash. If you took payment via a gateway that supports automatic refunds (such as Stripe or PayPal), click Refund $50.00 via [gateway name] instead and the funds will be returned to the customer’s original payment method automatically.
The order will be updated to show the refund, and a note will be added to the order timeline recording the amount refunded and the reason.
Remember that your payment gateway, e.g. Stripe, may well charge you a fee on a refund so you should factor that into calculating the value of your security deposits.
WooCommerce security deposit video
Find out how to add a security deposit to your rentals using WooCommerce with this quick video tutorial.
FAQs
Yes, because you’re using a standalone product for your security deposit, you can apply a different tax class (or remove tax altogether) for the deposit. Just update the tax class setting in the security deposit product.
Going further
Once you have the basics working, there are several ways to extend this setup:
- Use conditional logic in Product Add-Ons Ultimate to show or hide the deposit based on the booking duration or other criteria
- Add additional add-on fields for optional extras such as cleaning fees, linen packs, or transfer costs
- Use the Pricing settings in Bookings for WooCommerce to apply seasonal rates or length-of-stay discounts
- Combine with the WooCommerce Deposits and Part Payments plugin if you also want to take an upfront deposit as an initial payment and collect the balance separately
WooCommerce Bookings and Product Add-Ons Bundle
Create the ultimate bookings site in WooCommerce
Bookings for WooCommerce and Product Add-Ons Ultimate work with all themes and page builders. We offer a 14 day money back guarantee on our plugins – so you can try them risk free. Plus we have a world-class support team on hand to assist you with any questions.