How to change the number of products per page in WooCommerce [2023]

Imagine you’re shopping online and constantly clicking on “next page” to find the product you want. It can get annoying very quickly!
While there are many reasons to customize the number of products displayed per page on your WooCommerce site, the biggest one is that it improves the website user experience and journey.
In this article, we’ll explore the various methods you can use to edit the number of products per page in WooCommerce, including using plugins like WooCommerce Product Table Ultimate.
Why customizing product display matters
WooCommerce, by default, is pretty limited in terms of displaying a custom number of products per page on your online store. Most WooCommerce themes are designed to only showcase 3 columns and 4 rows per page, or 4 columns and 4 rows per page. This means you can either display a maximum of 12 or 16 products per page.
While you can change the number of columns and rows you display per page (and we’ll show you how to do this), you’ll still be limited to a grid format for displaying products on your main shop page.
Customizing the default number of products per page on your online store is useful if you have a large product catalog. This enables shoppers to easily and quickly breeze through multiple products without having to navigate to multiple pages.
You also want to have control over the total number of products that appear on the shop page as it may interfere with pop-ups or other displays. The last thing you want is to cause clutter on your online store which may cause shoppers to leave without making purchases.
In addition to this, when you want to display additional product information on your online store, you will need more space, more than what the default grid format offers. A better alternative to this would be to use product tables since you will be able to dedicate a row to each product and include essential information easily. Product tables also make it extremely easy to showcase multiple products in a neat way.
Ultimately, customizing the number of products per page on your WooCommerce site can help improve user experience and increase product discoverability, which means potentially higher sales for eCommerce businesses.
How to customize the number of products per page in WooCommerce
There are multiple ways to customize the number of products per page in WooCommerce, each with its own advantages and disadvantages.
We’ll get into the top three methods, and show you why the easiest and most effective is by using a plugin – like the WooCommerce Product Table Ultimate plugin – to create a customized table display of your products.
Method #1: Using WooCommerce default theme
If you’re using any default WooCommerce theme like Storefront or Twenty Twenty-Three, you can change the number of products directly from the WordPress admin dashboard. Simply navigate to Appearance → Customize using the admin panel and then click on the WooCommerce tab.

Now click on the Product Catalog tab to find the Products per row and the Rows per page fields. This lets you customize the default WooCommerce product display by letting you set a custom number of products per row or change the number of rows per page on your online store.

Note that some themes like OceanWP let you edit the products per page using the theme settings.
Method #2: Using code
While you can use your WooCommerce theme settings to change the number of products displayed per page on your online store, it’s also possible to do this with code. You can change the number of products that will be shown on your main shop pages by editing the functions.php file.
All you need to do is add a simple code snippet at the end of the functions.php file. However, since this file also directly influences the functioning of your WordPress site, we do not recommend this method, especially if you’re not a developer.
Making the slightest error when editing the functions.php file can cause your site to break, and can cause other problems such as compatibility issues with other plugins. A common workaround to this is to edit in a child theme as it will be easier to revert changes if something goes wrong. However, be aware that if you update or change your theme, this can override any changes you may have made.
That’s why it’s best to use a plugin to change the number of products that appear on a single page of your WooCommerce site. It’s a much safer and user-friendly option that gives you access to additional benefits and features.
Method #3: Using a plugin
Plugins make it easier to edit the way products are displayed in the WooCommerce store because they include functionality and options for displaying products that you wouldn’t get by default in a theme. For example, one of the best ways to display multiple products in a user-friendly way is to use customized tables, and you will need a dedicated plugin if you want to do this. Here’s why we think product tables are a gamechanger for displaying products on the WooCommerce shop page:
- Showcasing your products in a table-style format makes it easier for shoppers to navigate through multiple products at once and quickly find what they’re looking for. You can display additional information in product tables such as a short description so that customers don’t need to visit the individual product pages to learn more.
- You can also let customers shop directly from product tables to speed up the process for them. This way, they’ll be able to multiple products to their cart in one go without having to navigate to multiple pages. For instance, wholesale buyers might want to compare two different products before they purchase one in bulk.
- In addition to this, if you have a lot of product variations, you can easily create comparison tables that let you showcase related products in a custom product table. This will make it easier for your customers to quickly sort through all product options and order multiple product variations at once.
The best plugin to do this is WooCommerce Product Table Ultimate, which lets you override the shop page and category pages in your WooCommerce store with customized product tables. Alternatively, you can add customized product tables to any page on your website. You have full control over how many products are displayed in a table and what information is included.
Using the plugin, you can create custom tables that enable customers to add multiple products to their shopping carts at once. This way, they can select the products they like and quickly checkout from your online store without having to add each product from its single product page.
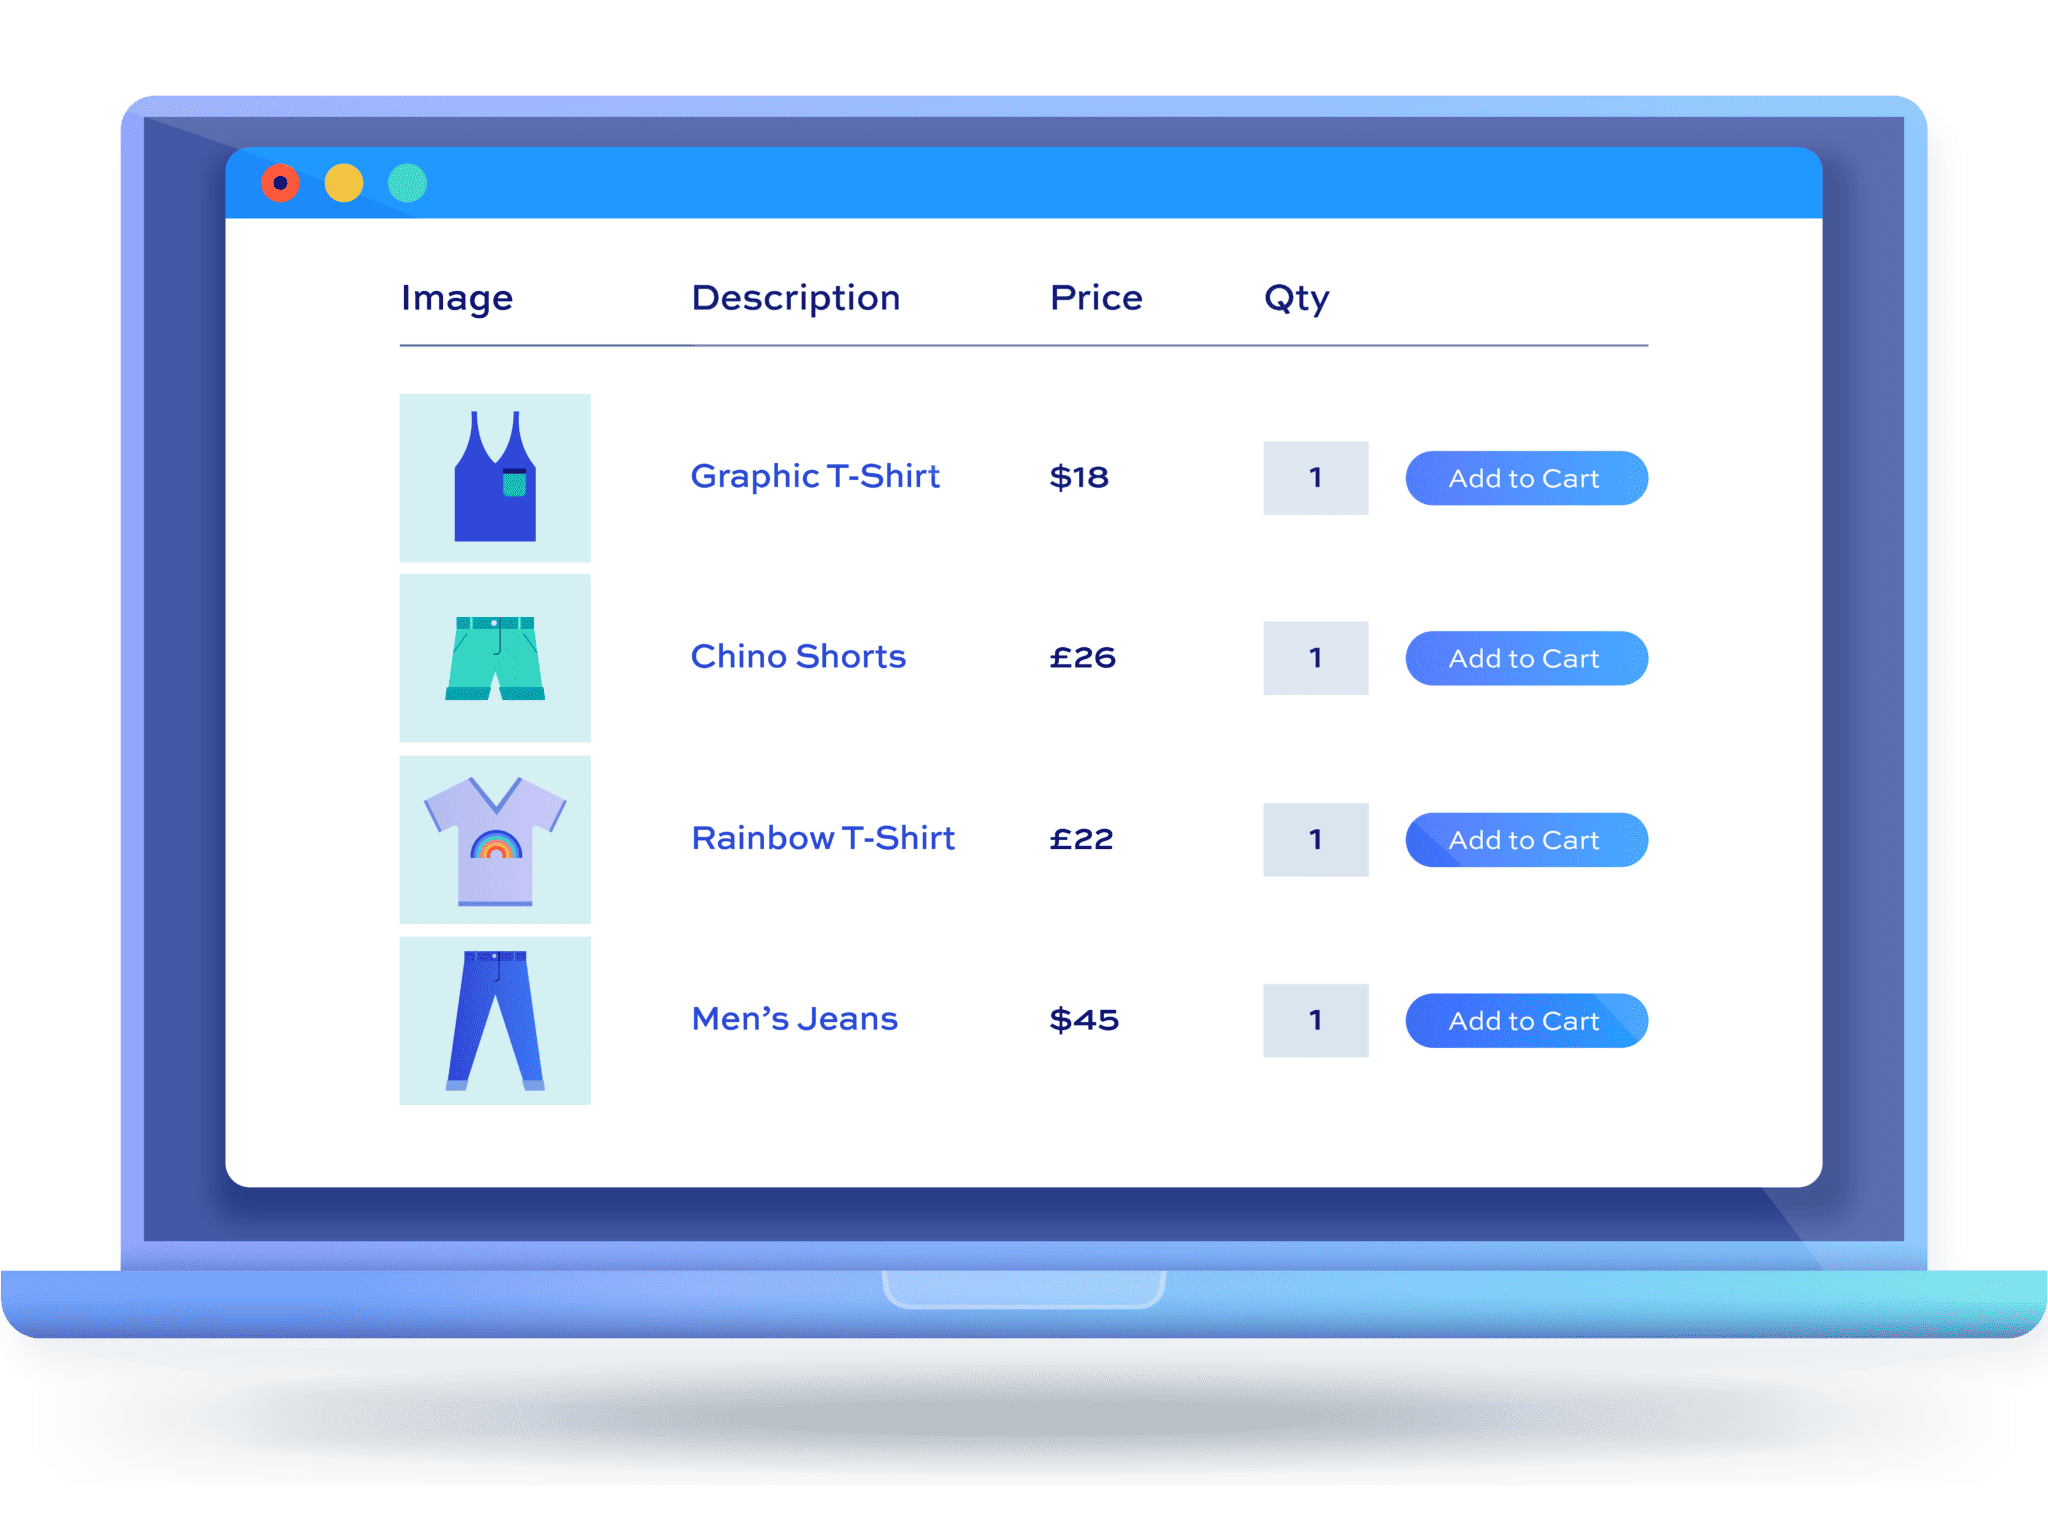
You can display each product in a row, including variable products as well as products with add-on fields or extra options. You also have full control over how your columns look and feel in product tables. You can showcase product thumbnails, titles, SKUs, descriptions, stock level attributes, categories, tags, quantity, and add-to-cart buttons as columns in your product tables.
The WooCommerce Product Table Ultimate plugin also integrates with the WooCommerce Product Add-Ons Ultimate plugin. This way, you can show extra product options directly on your product tables such as date picker fields or color selector fields. This makes it easier to create a visually appealing, user-friendly, and efficient user experience on your WooCommerce site.
Create custom product tables to display a custom number of products per page
Here, we’ll show you how to create custom product tables to display a custom number of products per page on your WooCommerce site.
For this, you will need a WordPress site with the WooCommerce plugin installed as well as a few products that you want to showcase in a product table. In addition to this, you will also need the WooCommerce Product Table Ultimate plugin to create custom product tables in WooCommerce.
Step #1: Install and activate the WooCommerce Product Table Ultimate plugin
To begin, get the WooCommerce Product Table Ultimate plugin and install it on your WordPress site. To install a new plugin to your WooCommerce site, navigate to Plugins → Add New and upload the plugin’s .ZIP file to your site and click on the Install Now button to continue.
Once you install the plugin on your WooCommerce site, it’s time to activate its license key. For this, navigate to WooCommerce → Settings → Product Table Ultimate and click on the Licence link from the top.
Enter the license key given to you at the time of purchase and click on the Activate this license button to continue.
Step #2: Create a custom product tables
Now that the WooCommerce Product Table Ultimate plugin is ready to go, we can start setting up a custom product table with a user-defined number of products per page.
To get started, navigate to WooCommerce → Settings → Product Table Ultimate and click on the General link from the top.

While you can configure each product table differently, this page lets you customize the default options for displaying product tables on your WooCommerce site. The Columns field lets you add or remove columns from the product table. This way, you can configure multiple columns in your product tables. It also gives you full control over how much information you want to display on your product table.
The Show Quantities on add-to-cart column lets you showcase the quantity selector next to each product row. This makes it easier for shoppers to quickly set the product quantity without having to navigate to single product pages.
Once you’re done setting up basic options for your product table, you can choose which products will be displayed in product tables using the Product Source dropdown menu. For instance, if you only want to display the top-selling products in product tables, you can select the relevant product category using the Products Source dropdown menu. Make sure to click on the Save Changes button so new fields appear after selecting any option other than All.

You can also select how variations are displayed on your product tables using the Variations Display dropdown menu. The plugin also lets you set the default order in which products will be listed in your product tables using the Order table by and Order fields.
Setting the number of products per page
The Products per page field lets you specify a custom number of products to be listed in product tables. This way, you can showcase as many or as few products per page on your WooCommerce site as you’d like. Based on the settings configured in the screenshot above, the product table will show 10 products per page.
In addition to this, you can also set both the Enable add selected button and Enable add all fields to Yes to let your customers add multiple products to their shopping cart at once using select checkboxes.
Once you’re done, make sure to click on the Save changes button to continue.
Step #3: Showcase a custom number of products per page on default WooCommerce pages
Now that you’ve set up a product table with a custom number of products per page, you can showcase the custom product table on the default WooCommerce pages.
To do this, you will need to access the plugin settings again by navigating to WooCommerce → Settings → Product Table Ultimate.
Using the Override pages field, you can specify which default WordPress pages will show product tables. For instance, you can showcase a custom number of products per page on the default category pages of your WooCommerce site using product tables.

Bonus: Display product tables anywhere on your site
While you can use the previous step for replacing the default WooCommerce page layout with custom-looking product tables, you can also showcase them anywhere on your site using Gutenberg Blocks. Navigate to any page on your site or create a new page by navigating to Pages → Add New.

Simply click on the “+” button or add a new Product Table Ultimate block. This will automatically showcase the custom product table we created earlier using the plugin’s settings on your custom WooCommerce page.

Control how many products are displayed in your store!
Customizing the number of products displayed per page in WooCommerce is important for improving user experience, product visibility, and boosting sales. You can technically change the number of products per page in WooCommerce using your theme’s settings, but this will still usually limit you to using a grid format. You could also add a custom code snippet in the functions.php file, but this isn’t recommended if you aren’t very tech-savvy.
Instead, it’s much better to use a dedicated plugin like WooCommerce Product Table Ultimate to change the number of products per page on your online store. This allows you to fully customize the layout of your main shop pages using product tables or a table-style layout and let shoppers view multiple products on a single page. You can set how many products you want to display on your table and set advanced filtering to make it easier for customers to narrow down their options. You can also add add-to-cart buttons so that customers can quickly make purchases when shopping from your online store.
Ready to start changing the number of products per page in WooCommerce? Get WooCommerce Product Table Ultimate today!