A complete guide to WooCommerce product list view in WordPress

Running an online store requires strategic product presentation. The default WooCommerce layout might work well for a small inventory, but as your catalog expands, you might consider leveraging the WooCommerce product list view. This tutorial will guide you on how to optimize your WooCommerce store by displaying products in a list layout using the WooCommerce Product Table Ultimate plugin.
Understanding the importance of WooCommerce product list view
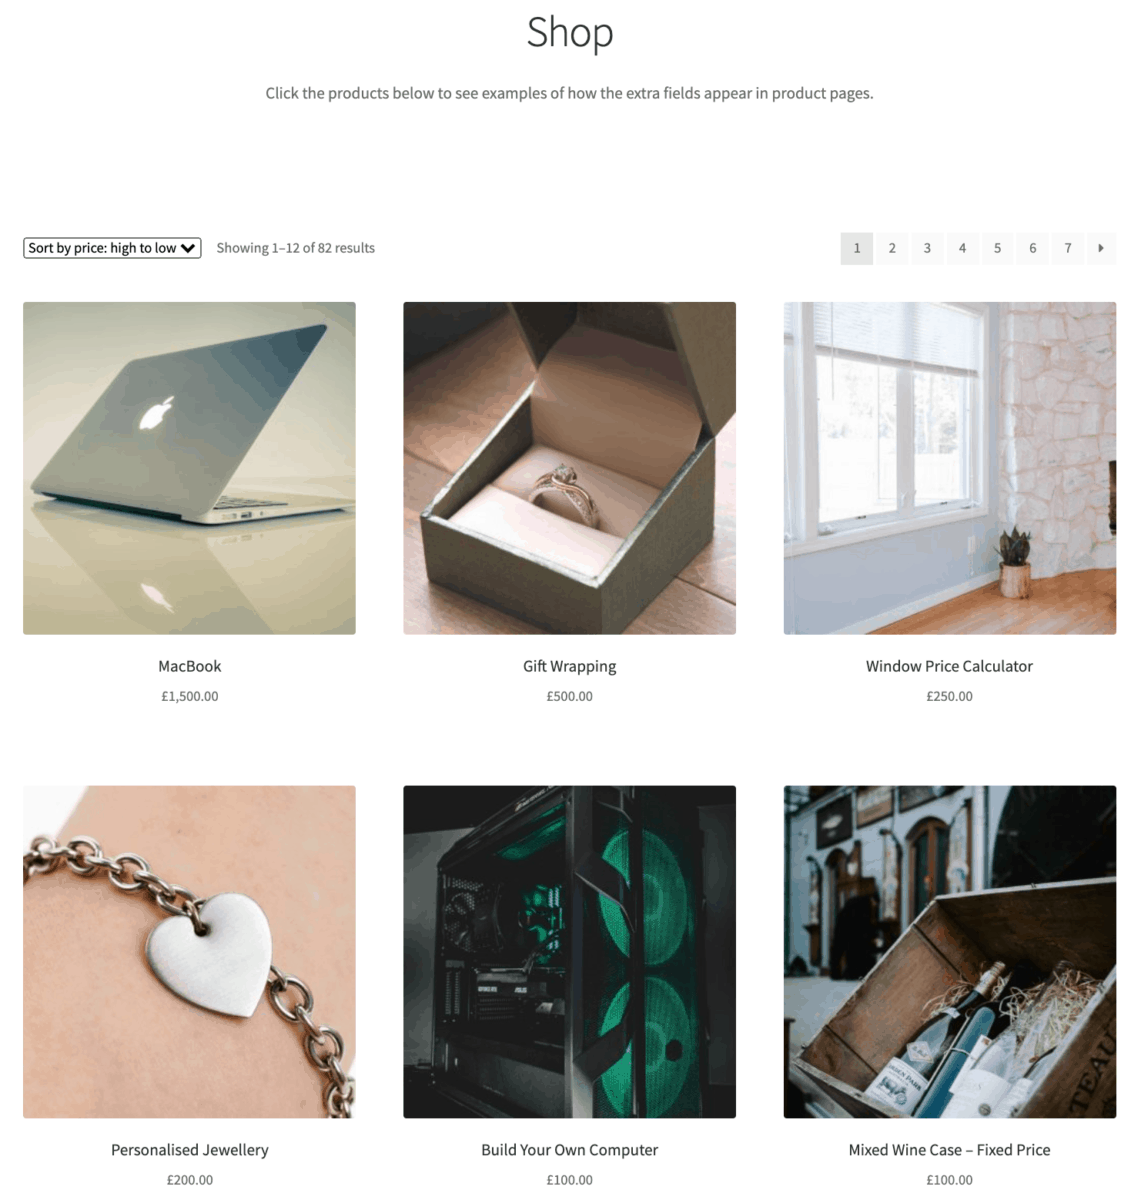
While the default WooCommerce shop page layout is visually appealing, showcasing three to four products per row with images, ratings, price, and an “add to cart” button, it’s not always the best option for every business.
Stores that sell items like wholesale products, electronics, or hardware goods, often need a different, less visual way to showcase their products.
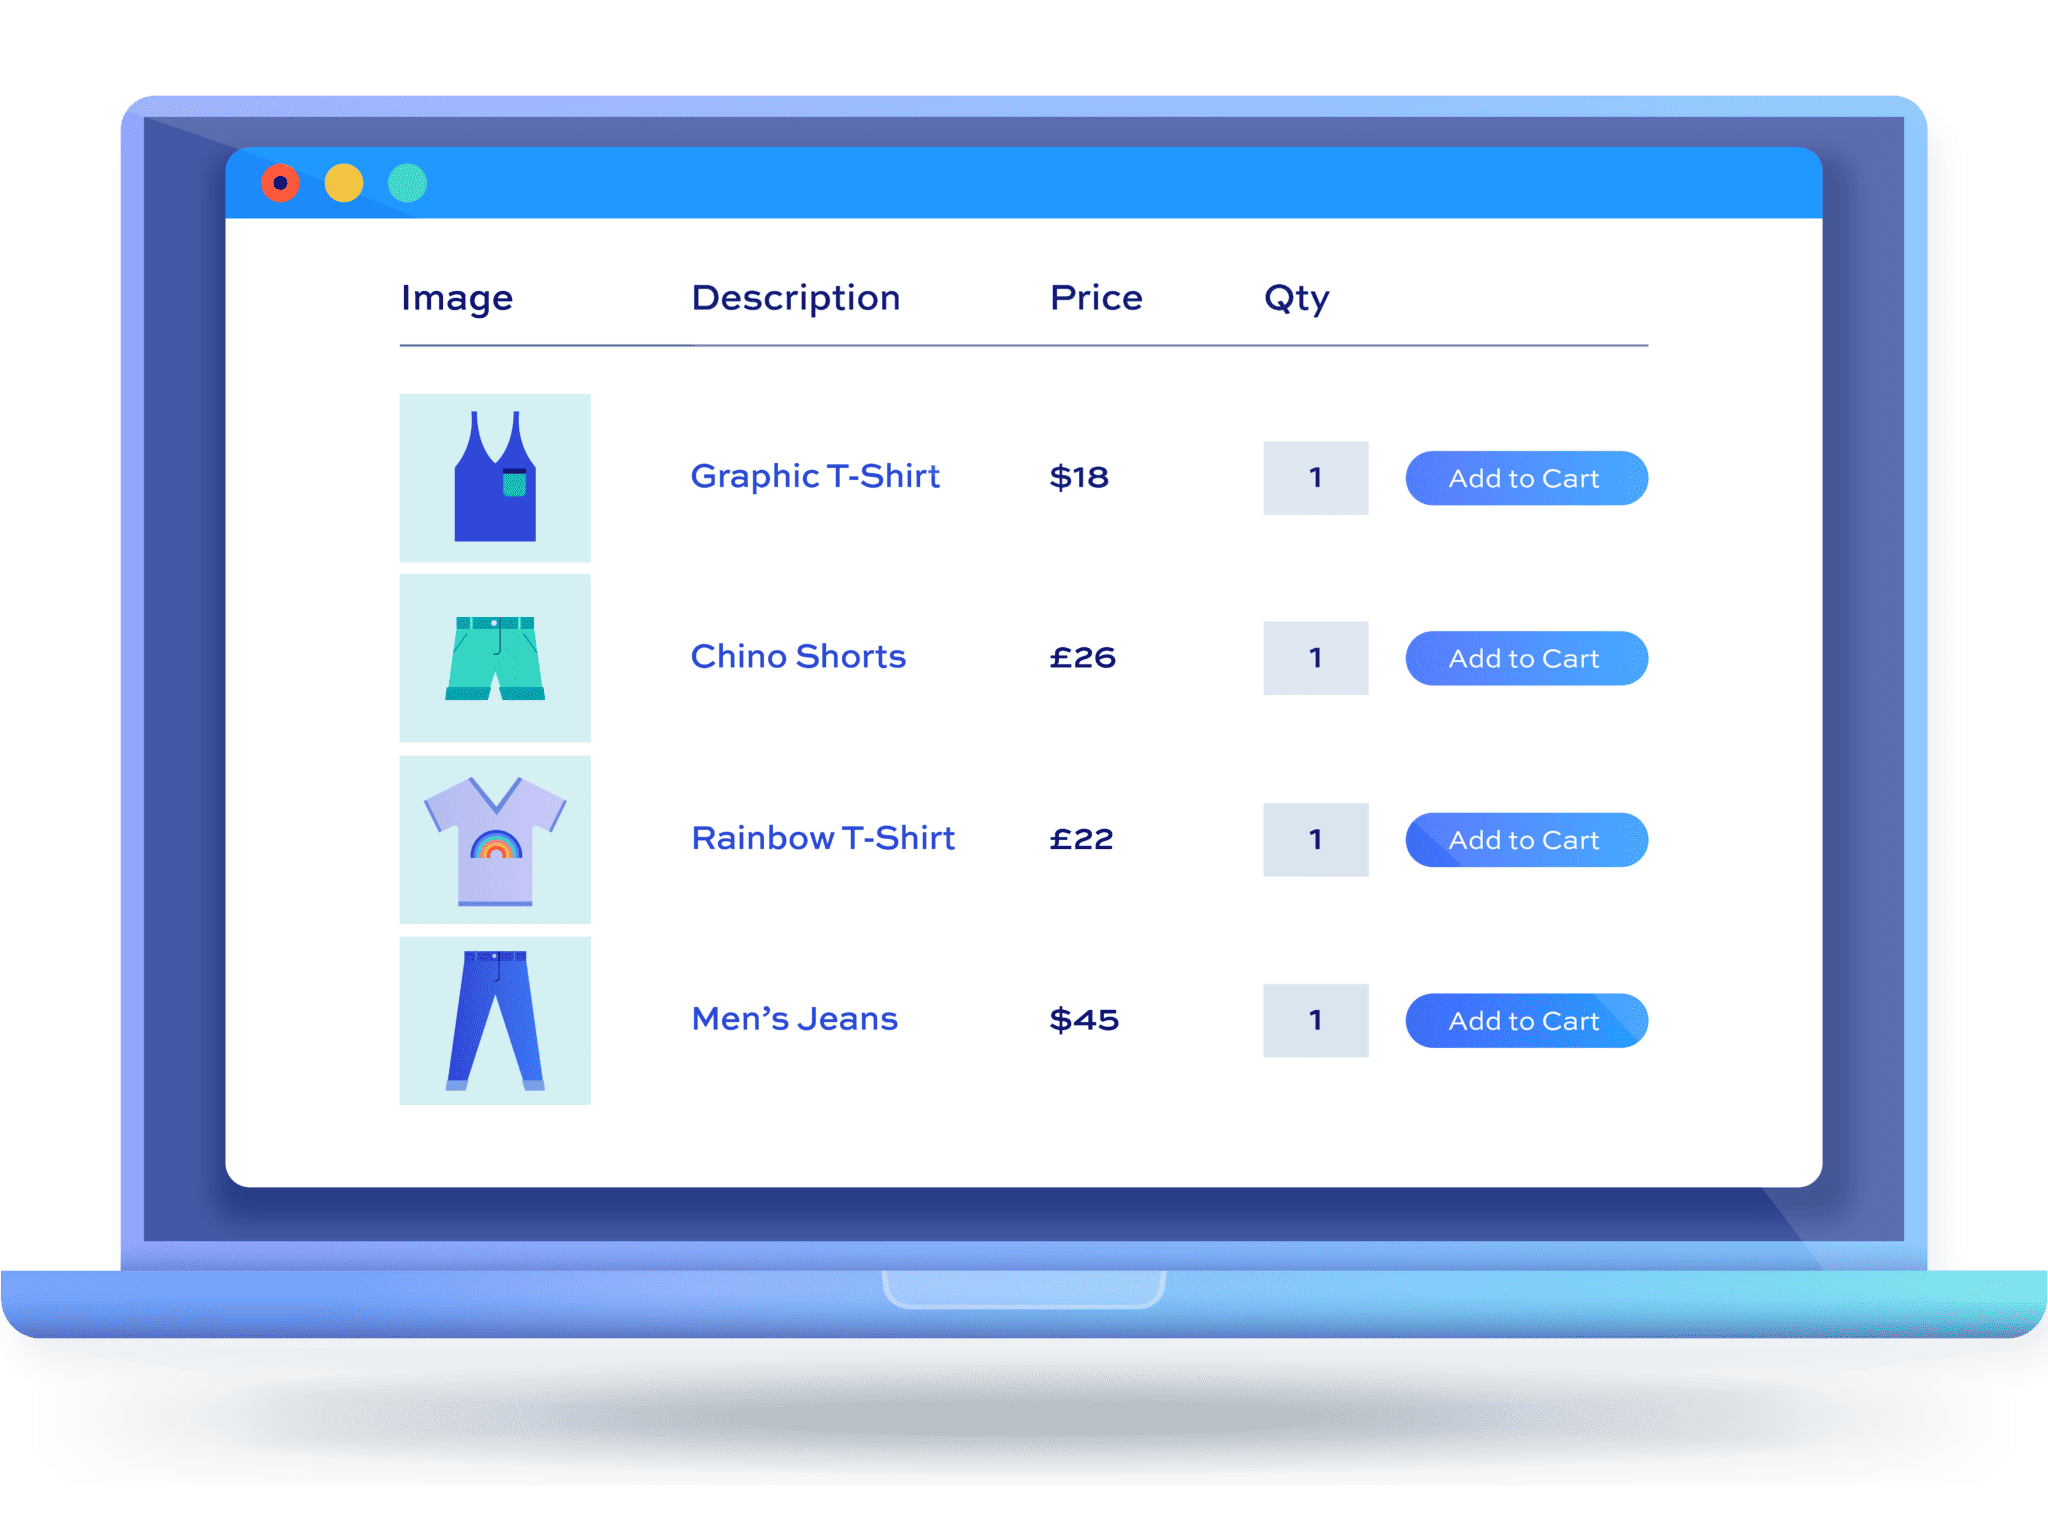
The WooCommerce product list or grid view offers an effective solution, enabling you to display more products per page.
This view can be tailored to show as many product details as you want for each item in individual columns, thereby providing a comprehensive overview for your customers. You can see a working example of a product list here.
Benefits of displaying items in a WooCommerce product list
Displaying items in a WooCommerce product list versus the default shop page layout means that you can deliver a better user experience to customers. Here are some of the main ways how a product list is better than the default layout:
- Quick ordering and single-page order form. The main benefit of displaying items in a product list layout is that it doubles as a quick order form. In other words, customers can simply select the products they’d like to buy using a single-page order form.
- Multiple products in one click. Displaying WooCommerce products in a list enables customers to add multiple products to their cart at once. The benefit of this is that they don’t have to click through to the single product page for each item, view product details, and add products to the cart. This is especially useful when customers already know what they’re going to buy, such as wholesale purchases or food orders.
- Easy to read. Showcasing WooCommerce products in a list make it easier to browse items and read product details. If you sell products that have lots of specifications (such as electronics), then this can help you deliver a better shopping experience.
- Display product details. A WooCommerce product list lets you display product details in a neat layout. You can create separate columns for each product detail you want to display, such as the product’s description, reviews, SKUs, and much more.
So, if you sell products that aren’t image-centric or if you sell dozens of products, then you might consider displaying them in a WooCommerce product list rather than the default shop page layout. It can help you enhance the customer’s shopping experience and potentially boost your store’s average order value.
Pain points addressed by list view
The list view layout tackles several issues that may arise with the default grid layout:
- Streamlined browsing: Showcasing products in a list makes it easier for customers to browse items and read product details, especially for products with a lot of specifications, like electronics.
- Reduced clicks: Customers don’t have to click through to the single product page for each item, view product details, and add products to the cart. This means a smoother, more seamless shopping experience.
Better for large inventories: If your store carries dozens or hundreds of products, a list layout can help manage the display more efficiently, enhancing the customer’s shopping experience and potentially boosting your store’s average order value.
Introducing WooCommerce Product Table Ultimate
The WooCommerce Product Table Ultimate plugin lets you list products on the same page. You can choose which columns to display in the front-end list layout. Customers can simply tick the checkboxes next to the items they’d like to purchase and add them to the cart in a single click. You can display the product tables anywhere on your WooCommerce store.
Key features:
- Lets you choose which columns to display in the product table.
- Makes it easy to create a single-page order form.
- Supports variable products and products with add-on fields.
- Customers can add multiple products to their cart in one click.
- Display product tables on the front end using Gutenberg blocks or shortcodes.
It’s also worth mentioning that the WooCommerce Product Table Ultimate lets you add as many product tables to your site as you’d like. You can create separate product tables for different product categories.
How to display products in a grid using WooCommerce Product Table Ultimate
Here, we’ll explain how you can create a WooCommerce product list to display products in a grid layout on the front-end.
We’ll assume you already have a WordPress website set up with the WooCommerce plugin installed and some products added to it.
Step #1: Install and activate WooCommerce Product Table Ultimate
The first thing you need to do is get the WooCommerce Product Table Ultimate plugin and install and activate it on your WordPress website.
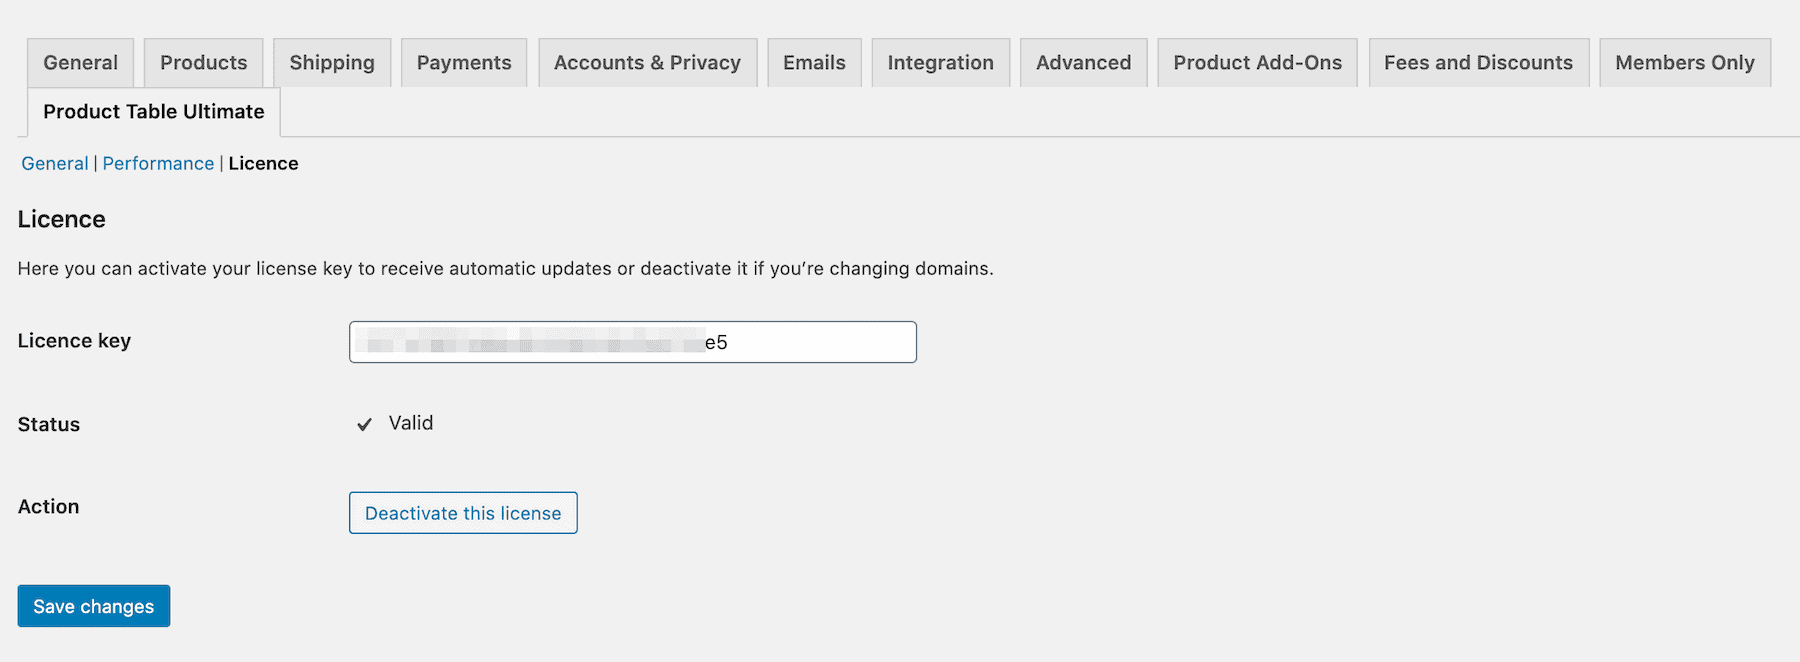
Once that’s done, head over to WooCommerce > Settings > Product Table Ultimate > Licence and enter the licence key.
Click the ‘Save changes’ button to continue.
Step #2: Configure plugin settings
Now that you have the WooCommerce Product Table Ultimate plugin installed on your WordPress site, you can start configuring its settings. The plugin’s configuration options determine how the WooCommerce product list appears on your site’s front-end.
Navigate to WooCommerce > Settings > Product Table Ultimate from the admin panel to get started. There are only a few settings which makes it quick and easy to get started with the plugin.
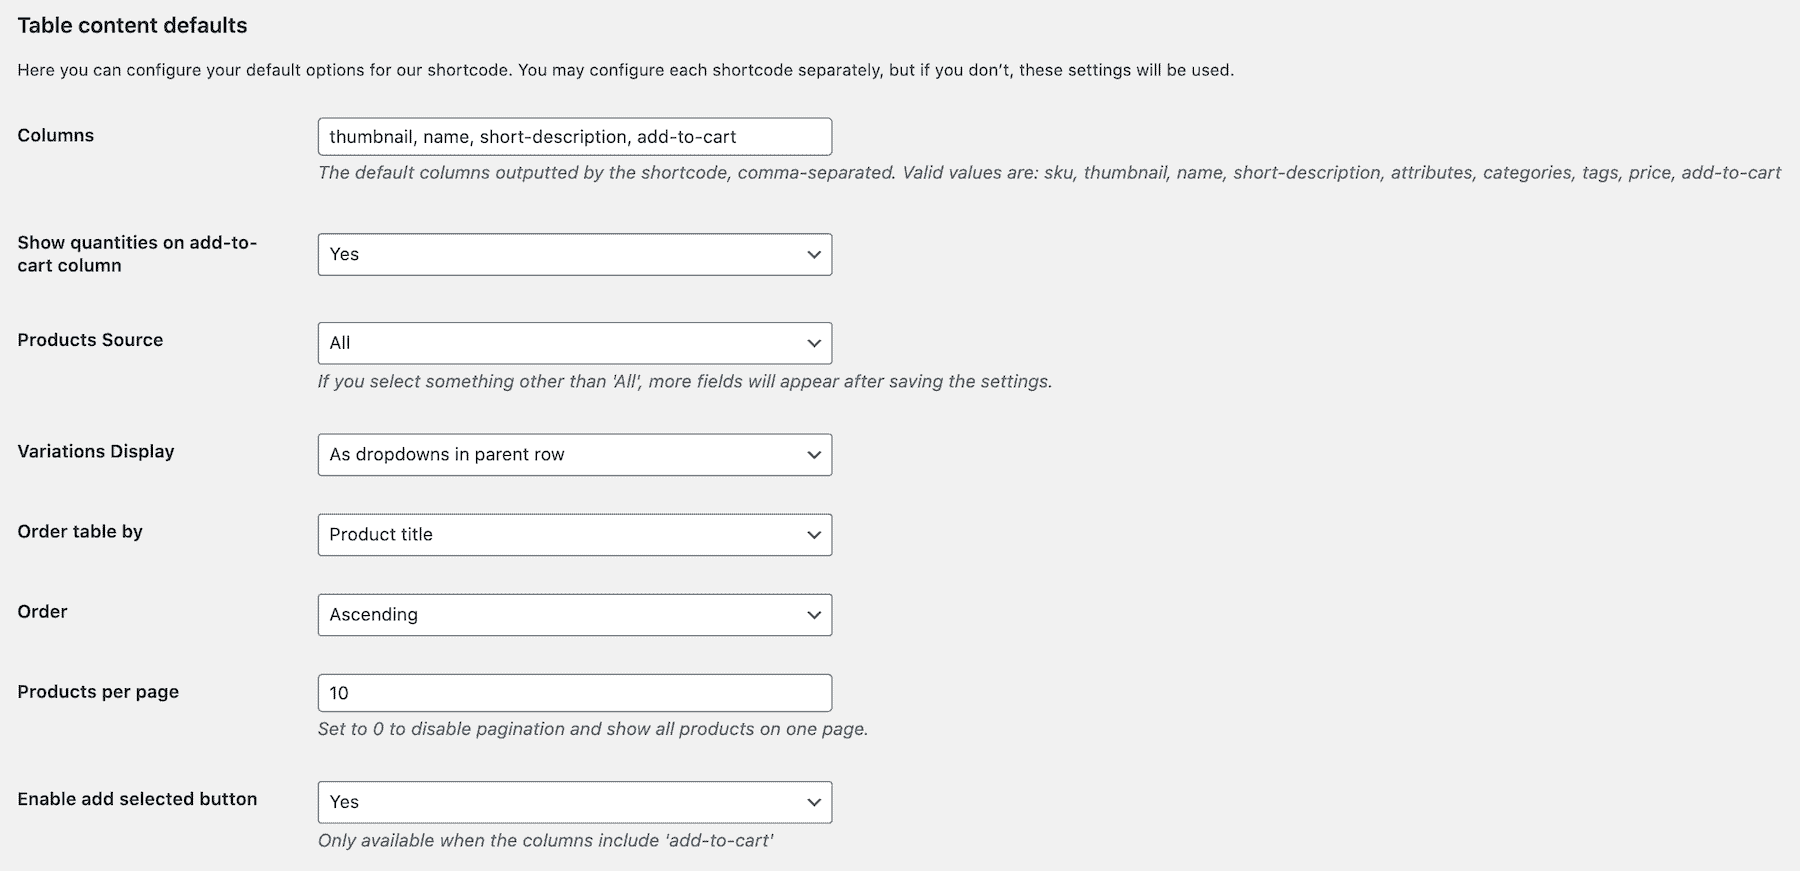
Here’s a quick breakdown of the different options you can configure to create a WooCommerce product list:
Columns
The columns field lets you decide which columns you’d like to display in the front-end product table. For example, you might consider displaying the product’s thumbnail image, name, description, category, and add to cart button.
For this, you’d simply enter thumbnail, name, categories, short-description, add-to-cart in the ‘Columns’ field.
Add to cart column
The ‘Show quantities on add-to-cart column’ option lets you decide whether you’d like to display quantity selectors in the product table. If you want to give customers the option to set the quantity of the product they’d like to purchase then you should set this field to ‘Yes’. This will add a quantity field next to the add to cart button.
Products source
The ‘Products source’ field lets you specify which WooCommerce products to display in the product list. You can set it to display all products or based on a callback function, categories, or tags using the dropdown menu.
Variations display
The ‘Variations Display’ field lets you choose how to display variable products i.e. WooCommerce products with variations. You can set this field to ‘Redirect to parent page’, ‘As separate rows’, and ‘As dropdowns in parent row’ depending on your preferences.
If you only sell a handful of products, you might consider setting this to ‘As separate rows’ to increase WooCommerce product variation visibility. However, if you sell lots of products then we recommend setting this field to ‘As dropdowns in parent row’ to save space.
Order table by
The ‘Order table by’ field lets you decide the sort order of the WooCommerce product list. You can choose to order by the product ID, title, price, date, popularity, rating, and menu order.
Order
You can choose to display products in ascending order or descending order using the dropdown menu. If you want to display the latest products first, you’d set the ‘Order table by’ field to ‘Date’ and the ‘Order’ option to ‘Descending’.
Products per page
The ‘Products per page’ field lets you enable pagination and decide how many WooCommerce products to list on a single page. If you’d like to disable pagination and display all products on a single page, you can set this field to ‘0’.
Enable add selected button
Set the ‘Enable add selected button’ field to ‘Yes’ to display a checkbox at the start of each row in the product table. This way, customers will be able to browse through the WooCommerce product list, select multiple products, and add them all to their order with a single click.
Check out the plugin’s complete documentation for more information.
Step #3: Display the WooCommerce product list on the front-end
By now, we’ve set up the Product Table Ultimate plugin and configured its settings. All that’s left to do now is display the product lisings on the front end.
There are two ways to display the product table on your site’s front end: by using a shortcode or by using a Gutenberg block.
Regardless of which method you choose to go with, you’ll need to first create a page to add the product table. To do this, navigate to Pages > Add New from the WordPress admin panel and give your page a title.
Using a shortcode
If you’re using the classic text editor, you can use a shortcode to add the WooCommerce product list to your site’s front-end. One of the benefits of using a shortcode is that it keeps your content neater while you’re editing.
All you have to do is enter the following shortcode in the page content where you’d like the WooCommerce product list to appear: [product_table_ultimate].
Click the ‘Publish’ button to continue.
Using a Gutenberg block
If you’re using the Gutenberg text editor, then you can simply use a Gutenberg block to add your product table to your site’s front end. The key benefit of this approach is that it gives you a visual representation of the table in the back end while you’re designing your page. This way, you can tweak the WooCommerce product table before publishing the page.
To add your table to a Gutenberg block, click the ‘New Block’ icon and search for the ‘Product Table Ultimate’ block. This will automatically add the product table to the text editor. You will also be able to edit its parameters from the ‘Block’ menu on the right.
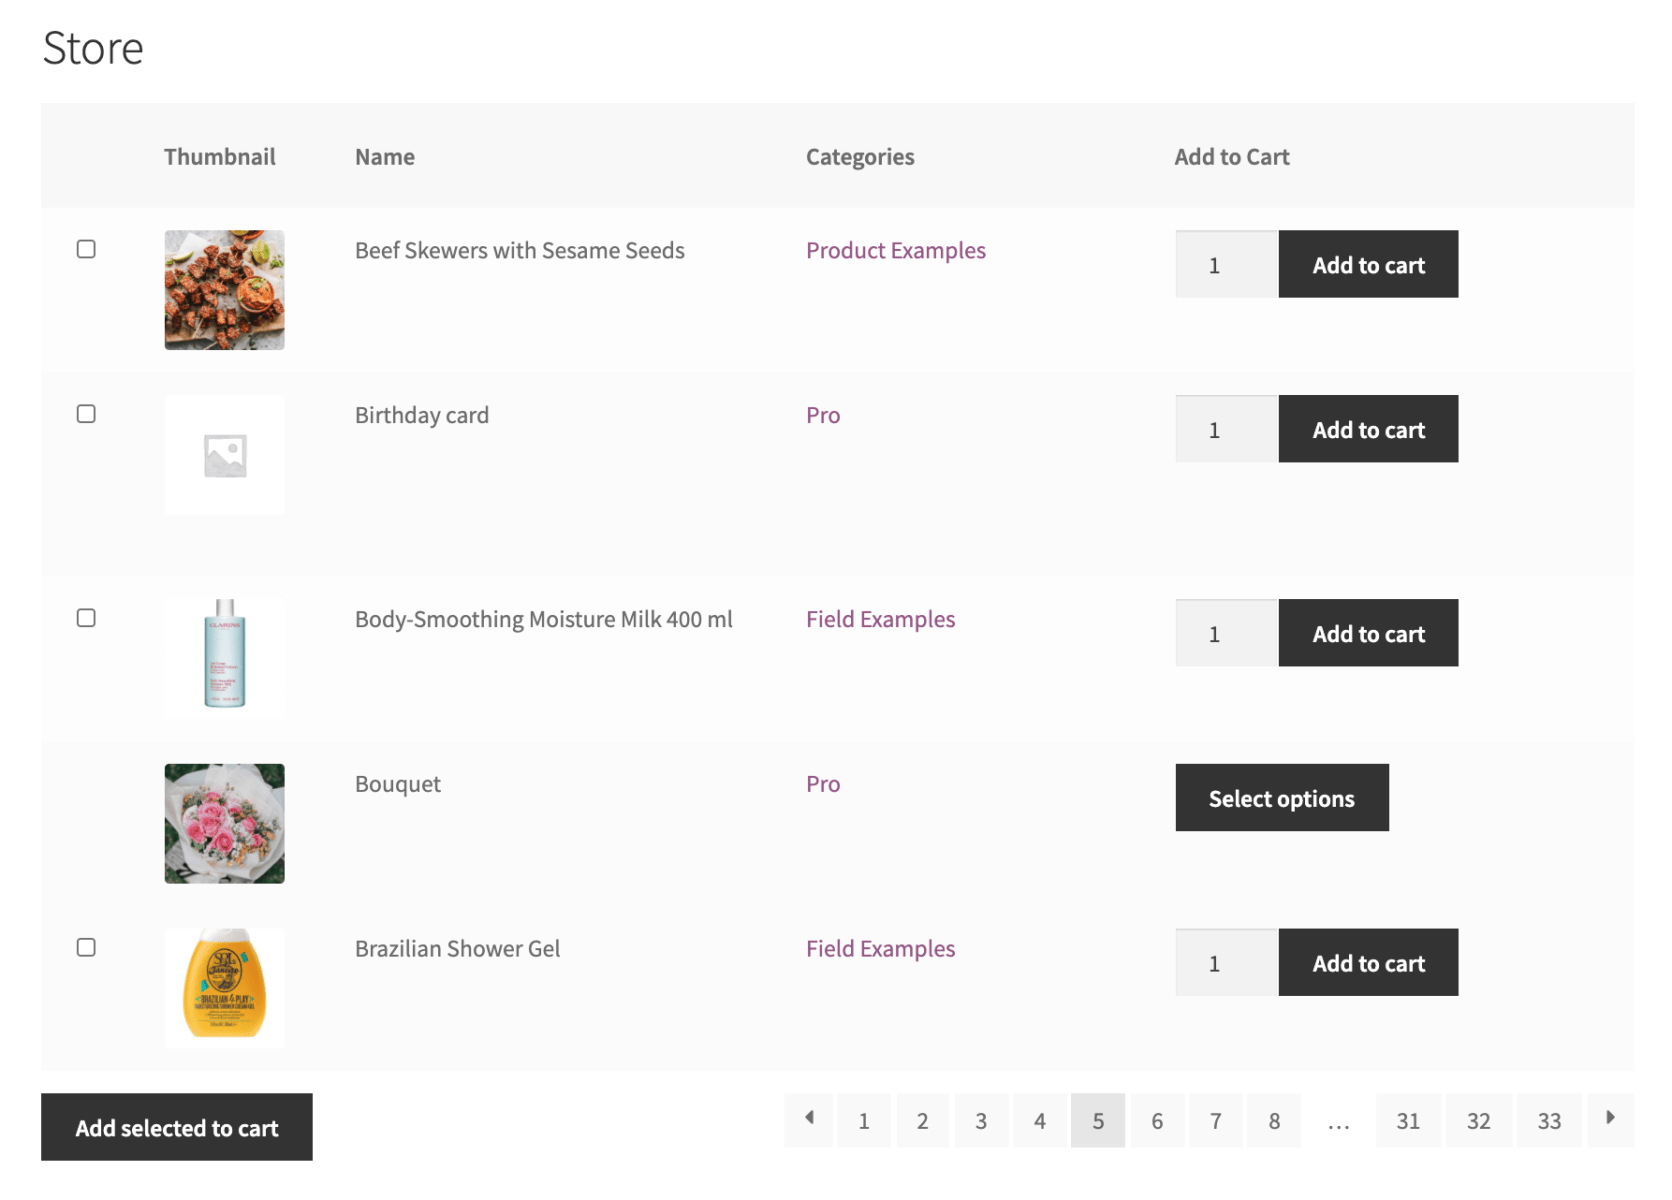
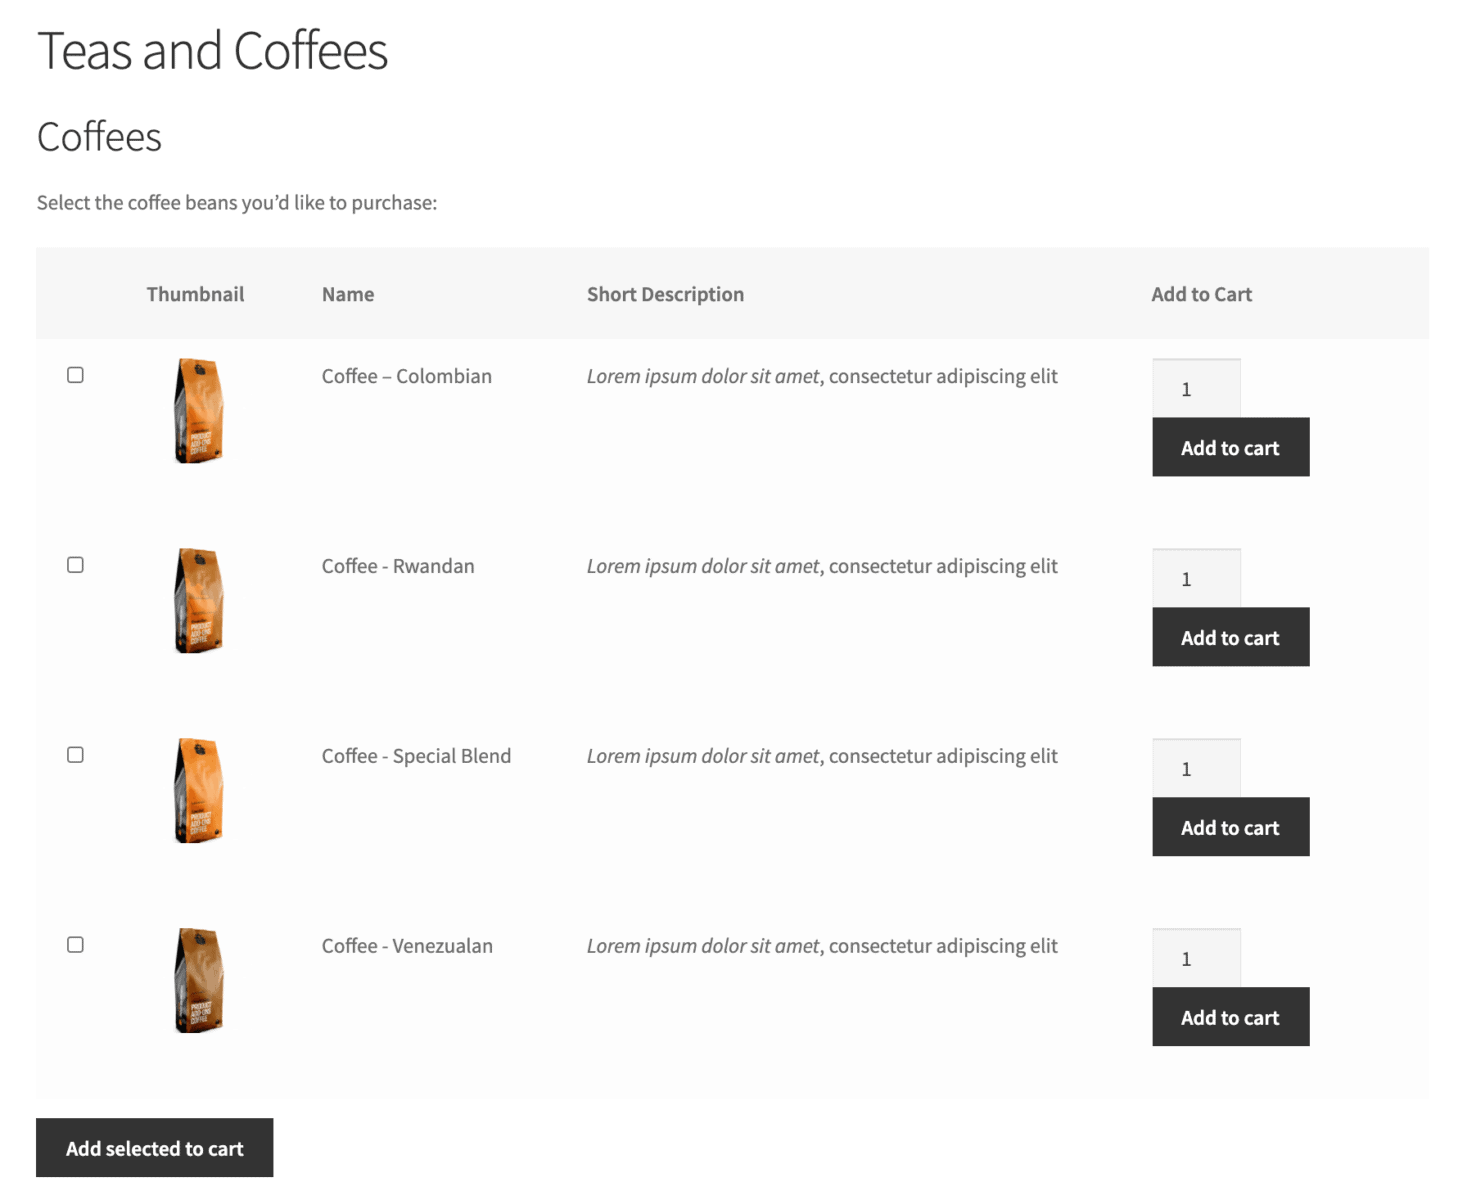
When you preview the page on the front end, you’ll see neat WooCommerce product listings that customers can use to place their orders. Here’s a preview of what the WooCommerce product table will look like on the front end:
Bonus: Display categories as separate sections
We showed you how to list all of your WooCommerce products in a front-end list-style layout. If you sell different types of products, then this might not be the best way to showcase them on the front end.
You might want to display products from a specific WooCommerce category in one product table and products from a different category in a separate product table. This is possible with the WooCommerce Product Table Ultimate plugin.
You can simply split the product table into separate sections based on product categories. For example, if you’re selling grocery items, you might consider listing teas on one product table and coffees on another. This will make it easier for customers to find the exact product they’re looking for and place their orders.
Instead of displaying one product table with all of the products, we’re going to display a separate product table for each WooCommerce category. We’ll do this by entering a special parameter in the shortcode, which will let WordPress know which category to display in that table.
The first thing you need to do is find out the ID number of each of your WooCommerce categories. Open Products > Categories in a new tab to see a list of all of your WooCommerce categories.
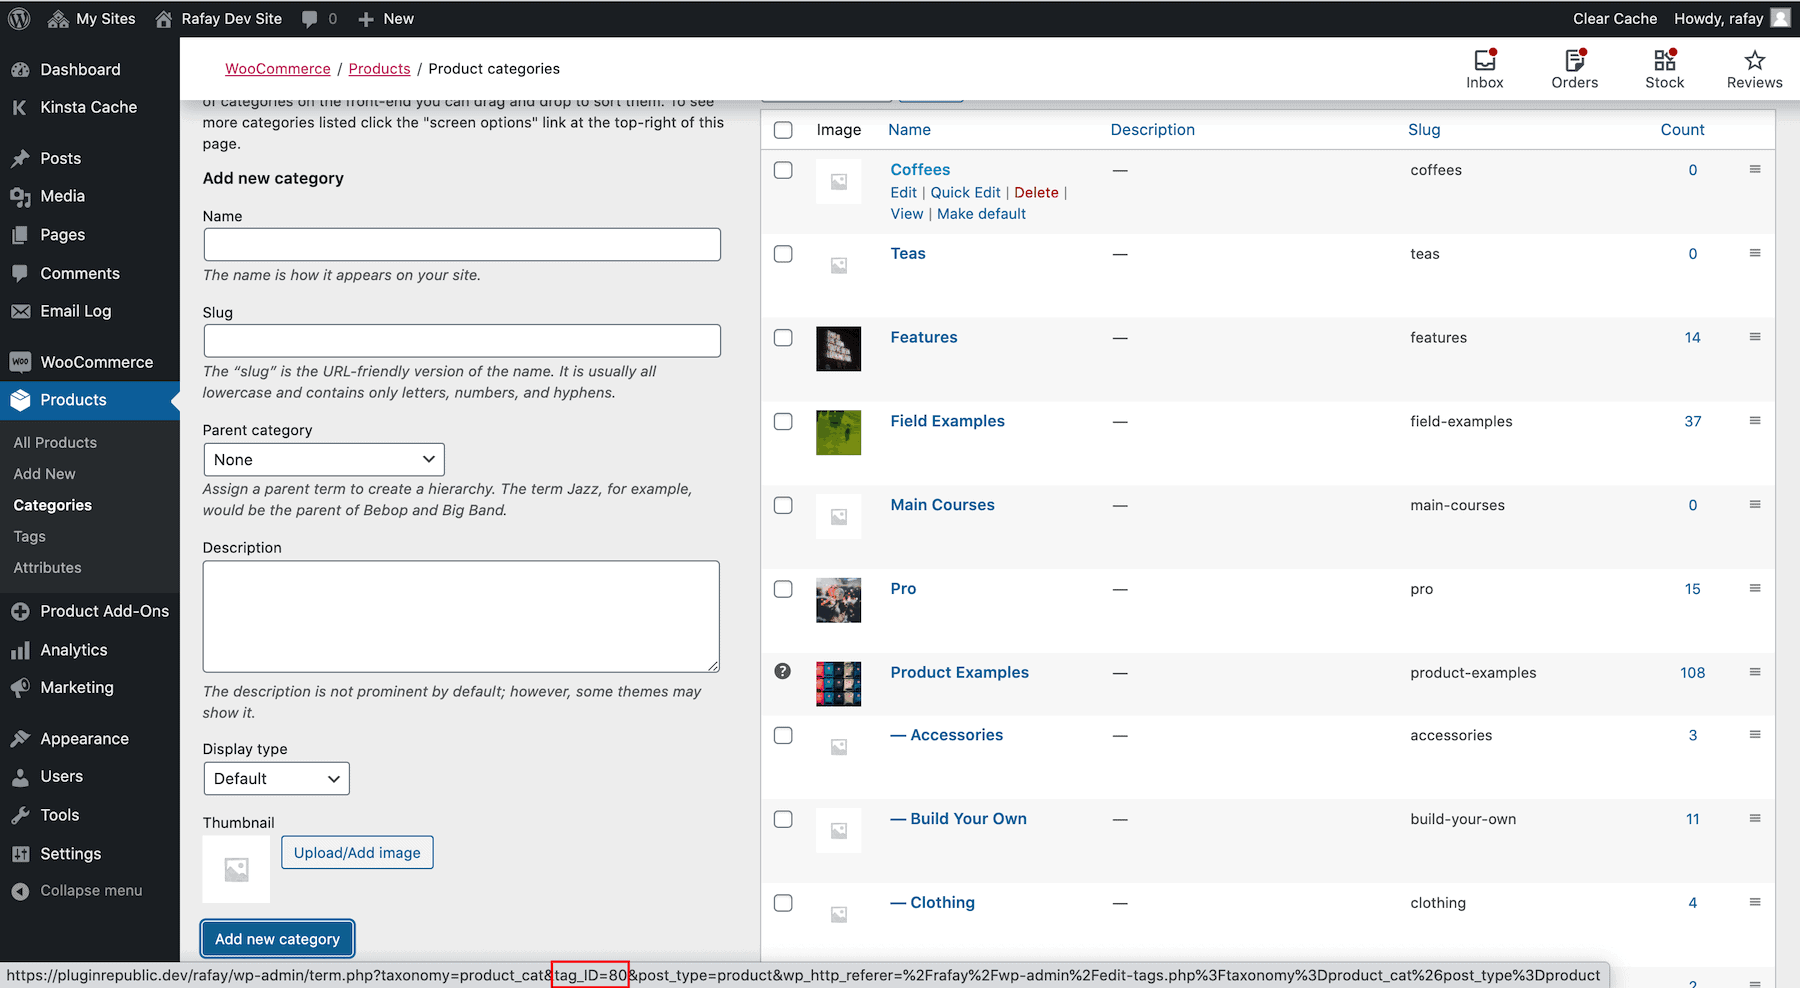
Hover over the category you’d like to display in the product table. At the bottom of the screen, you’ll see a URL for that category page which includes the ‘tag_ID=’ parameter followed by a number. That number is your category ID. In the screenshot below, the ID number of the ‘Coffees’ category is 80.
Modifying the shortcode
If you’re using a shortcode, modify it to [product_table_ultimate source="categories" categories="80"].
The source="categories" tells the product table that it should display products from specific categories. And the categories="80" parameter tells the table that it should only display products from the category with the ID number 80.
Modifying the Gutenberg block
On the other hand, if you’re using the Gutenberg block then you can modify the settings using the ‘Block’ menu on the right.
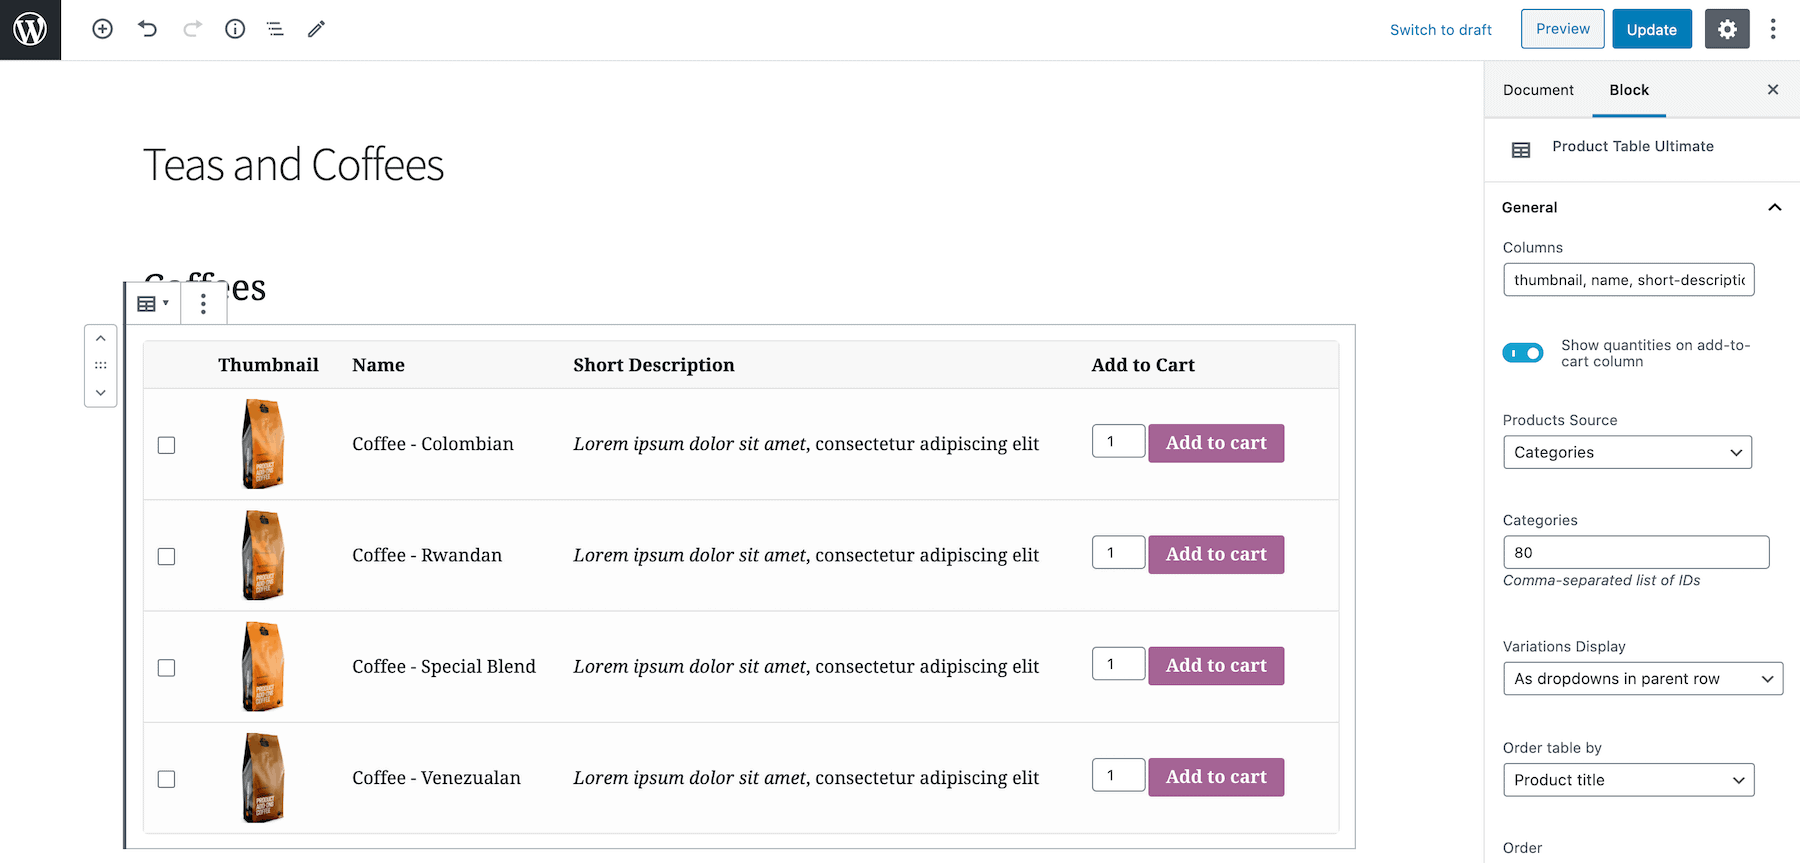
- Set the ‘Product Source’ field to ‘Categories’ using the dropdown menu.
- Set the ‘Categories’ field to ‘80’. You can also display multiple product categories in a product table. Simply enter a comma-separated list of category IDs in this field.
When you update the page and preview it, you’ll see that it now displays products from the specified categories only.
WooCommerce product grid use cases
As an online store owner, you want to display your products on the front end in the best way possible. The default WooCommerce shop page layout works perfectly fine for some. However, it’s not ideal for stores that sell dozens of products or products that aren’t particularly image-centric.
Here are some examples of stores that would benefit from displaying WooCommerce products in a grid:
- Restaurants. Restaurants and eateries can add food items to a product list to create an online menu. Customers can select the different foods, beverages, and desserts they’d like to order and add them all to the cart in one click.
- Stores that need bulk ordering features. Stores that sell products in bulk can benefit from displaying products in a grid layout. It makes it quick and easy for customers to find the products they’d like to buy and add products to their shopping cart in one go.
- Wholesale stores. Most of the time, wholesale and B2B stores sell to customers who already know what they’re going to place an order for. In other words, wholesale buyers generally don’t need to browse your product catalog. Displaying products in a list-style layout enables them to quickly place their orders.
For more inspiration, check out our tutorial on how to set up WooCommerce restaurant ordering.
Next steps for implementing an optimized WooCommerce product list view
Operating an e-commerce store is not a set-it-and-forget-it endeavor, especially when it comes to product presentation. Adapting to your growing catalog and changing customer needs is crucial for success. This is where the power of WooCommerce Product List View shines.
By utilizing the WooCommerce Product Table Ultimate plugin, you have the power to significantly enhance your WooCommerce store. Not only does this enable a more streamlined and efficient shopping experience for customers, but it can also drive up your average order value by making it easier to shop in bulk and quickly purchase known items.
We have demystified the process of setting up a customized WooCommerce product listings and equipped you with the knowledge to move forward confidently. This includes understanding why a product list view is beneficial, the pain points it addresses, and an in-depth step-by-step guide to implementing the WooCommerce Product Table Ultimate plugin, along with advanced usage tips.Now that you have the tools and know-how, the next step is in your hands. Dive in and supercharge your sales with the WooCommerce Product Table Ultimate plugin today!