How to set up a paywall for your WooCommerce store (step-by-step)

Do you want to make your WooCommerce store more profitable? Setting up a paywall can help you increase revenue and make it harder for competing businesses to access and steal your content. It also allows you to offer exclusive access to premium content to customers who are interested in it and willing to pay extra.
In this step-by-step guide, we’ll show you how you can start charging for your content by setting up a paywall for your WooCommerce site. You can charge for access to:
- WooCommerce products or categories
- Blog content
- Custom post types – e.g. ‘Courses’
- Specific taxonomies, like ‘Brands’
By the end of this article, you’ll know how to set up a paywall for your content in WooCommerce by:
- Defining rules for which content can be accessed
- Defining rules for who can access the content
- Setting up a product that users must purchase to access restricted content
- Creating new user roles, if required
What is a WooCommerce paywall, and what can you use it for?
Before we jump into setting up the paywall, it’s essential to understand what a WooCommerce paywall is.
A paywall is a system that restricts access to content until users have paid for it. For example, you can sell access to exclusive tutorials, custom content, and video, audio or documents on your WooCommerce site. Similarly, you can also sell access to premium features in an app or plugin by setting up a paywall.
A WooCommerce paywall also works great if you’re an ecommerce store looking to sell digital products, offer free trials, or charge extra for premium content on your WooCommerce site.
Let’s dive deeper into how using a WooCommerce paywall can benefit your business:
- Increase sales and revenue. Setting up a paywall on your WooCommerce site allows you to restrict access to certain parts of your site. As a result, you can generate more sales and revenue by charging users extra to access exclusive “members-only” areas on your site, which would otherwise not generate any sales or revenue.
- Encourage recurring membership payments. Regular users will become registered members if they know that they get more valuable content or exclusive products from your site. If they know that they can keep benefitting as a member, then they will likely renew their membership often. Regularly adding new member-only products is a great way to retain your current members, for example
- Improve customer loyalty. Setting up a WooCommerce paywall also helps improve customer loyalty by allowing users to sign up for unique membership benefits, such as being able to give feedback on upcoming products, or getting member-only discounts they can redeem on checkout.
Using a WooCommerce membership plugin
WooCommerce, by default, doesn’t have any built-in features for creating a paywall, but many WordPress plugins can help you create one easily.
One of the best ways to restrict content on your WooCommerce site is by using a membership plugin. A membership plugin is the easiest way to create membership sites, as it integrates with your site automatically and takes care of all the technical requirements for you. Thanks to this, you can easily decide what content you want to be exclusive and set up different customer journeys for registered and non-registered members.
This is why we recommend using the ultimate membership plugin: WooCommerce Members Only.

WooCommerce Members Only offers an all-in-one solution for creating a full-fledged membership site that restricts users’ access to content – either through their log-in status, through passwords, or based on their user role. It also lets you sell members-only products on your WooCommerce site.
The paywall plugin lets you choose which content is publicly accessible and which is only for members. This way, you can let members access premium content while regular site visitors only get to see the publicly accessible content.
WooCommerce Members Only gives you complete control over what parts of your membership site can be restricted behind a paywall. This means you can restrict content to specific parts of your WooCommerce site, including blog posts, categories, custom post types, taxonomies, and specific products or entire sections of your online store. This way, you can create the membership experience you want for your customer base.
It’s also compatible with WooCommerce Subscriptions, allowing you to take subscription payments from users to continue accessing content behind the paywall.
Access tiered content through a paywall
Another great feature of the WooCommerce Members Only plugin is that it lets you create membership tiers and custom user roles on your site. This way, different members can access different parts of your WooCommerce site. For instance, you could create two membership levels, “Gold” and “Silver”. You can then create an exclusive “Gold Members” area on your site that’s not accessible to people with the “Silver Members” user role on your site. This is a great way to upsell your membership plan and encourage registered members to upgrade their plans.
In addition, you can restrict specific payment gateways like PayPal and shipping methods on your WooCommerce site by user role. This can be a great opportunity to offer exclusive payment methods to members only while encouraging regular site visitors to become paying members.
The WooCommerce Members Only plugin lets you choose restriction method on your WooCommerce site, such as restricting content by passwords. This way, you can either set a global password and hand it out to users who subscribe or create specific passwords for different content, products, and categories on your WooCommerce site.
Additionally, this WordPress plugin gives you the functionality to sell memberships as a product on your WooCommerce site. This allows you to create a paywall for member-restricted content and only let paying users access the premium content on your site.
How to set up a paywall on your WooCommerce site
Here, we’ll show you how to set up a paywall on your WooCommerce site using the WooCommerce Members Only plugin.
For this, you’ll need a WordPress site with the WooCommerce plugin installed. You’ll also need the WooCommerce Members Only plugin to set up a paywall and restrict access to specific products on your online store.
Step #1: Install and activate the WooCommerce Members Only plugin
To get started, download and install the WooCommerce Members Only plugin on your site. You can download the plugin’s .ZIP file using the link given to you at the time of purchase and navigate to Plugins > Add New from the WordPress admin panel to install it.
Upload the Members Only plugin to your WooCommerce site and make sure to activate the plugin before continuing.
Finally, navigate to Members Only > License and paste your license key in the ‘License’ key field.
Step #2: Define the restriction method
Now, with WooCommerce Members Only plugin installed and activated, it’s time to define the paywall settings for users to access the exclusive products.
Members Only gives you a choice of which restriction method to use:
- Log-in status – so only users who are registered and logged in can access the content
- Password – users will need the correct password to access paywalled content. You can use multiple passwords and set different restrictions – so some content can be hidden behind one set of passwords, other content can be hidden behind a different set of passwords
- User roles – users will need to have the correct role to access paywalled content. You can set different roles for different content – so ‘Gold’ users can access ‘Gold’ content, ‘Silver’ can access ‘Silver’, etc
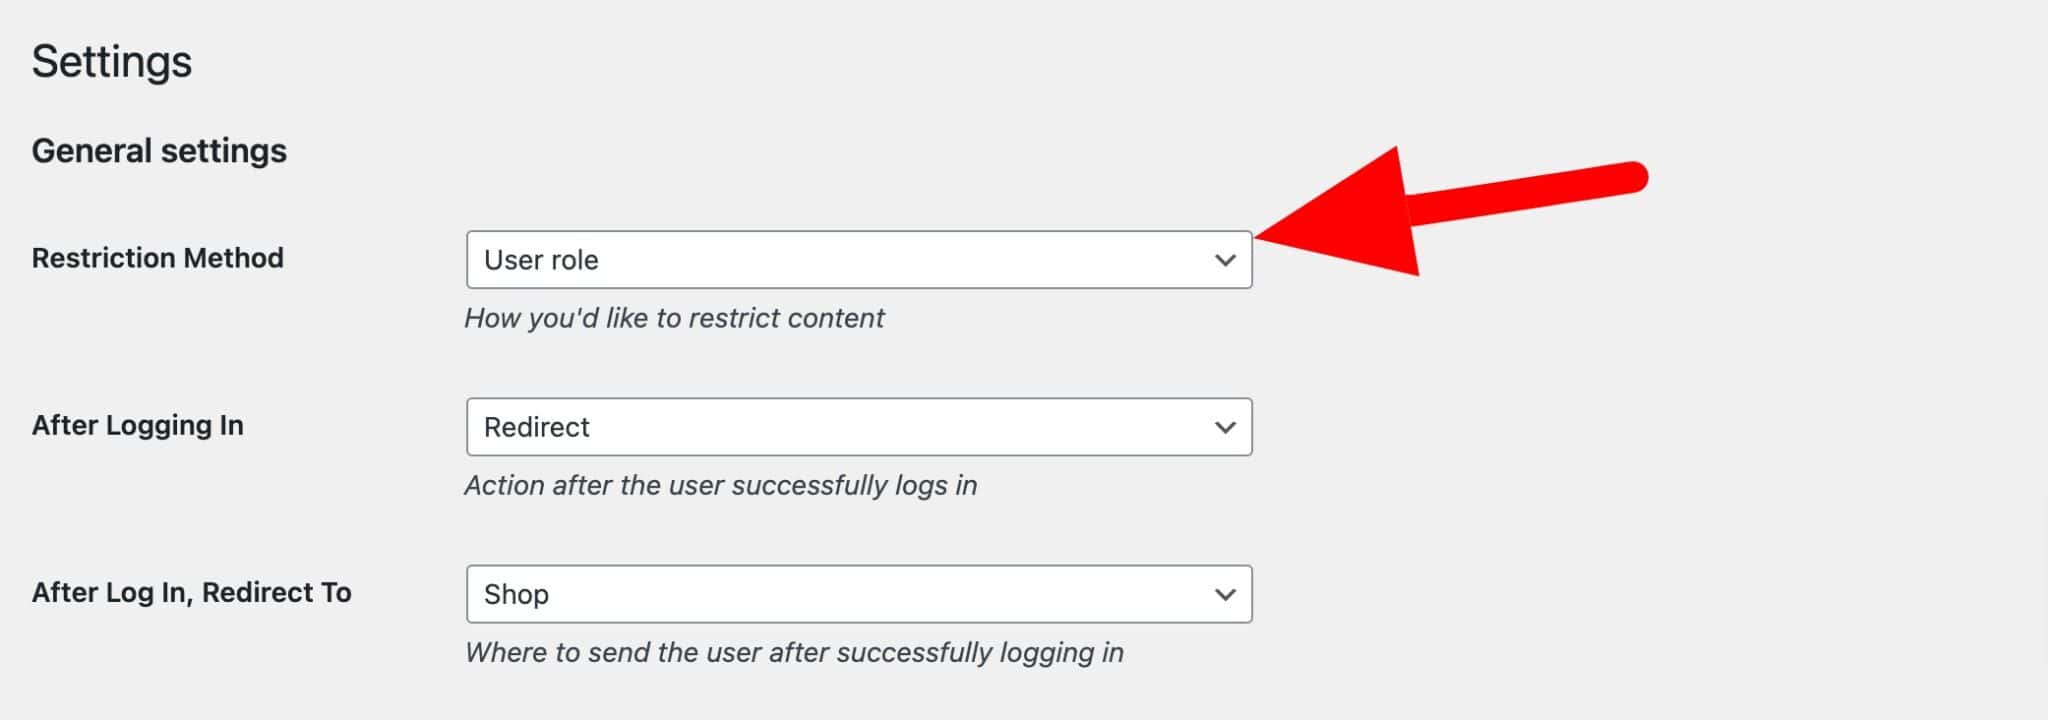
To set your restriction method:
- Go to Members Only > Settings
- Update the ‘Restriction Method’ setting. In this example, we’ll use ‘User role’ as the restriction method
Step #3: Create a membership plan
Membership plans are how you define what content is restricted and which users can access that content. You can create or more plans – so you can create different rules for different content and users. You can also define which products need to be purchased to access the content.
Membership plans can last indefinitely or you can set fixed time limits on them. In this step we’ll look at how to create a membership plan and different options for which content to restrict.
To create your first membership plan:
- Go to Members Only > Plans and create a new plan
- In ‘Landing Page’, select a dedicated landing page to direct the user to if they try to access content that is behind the paywall
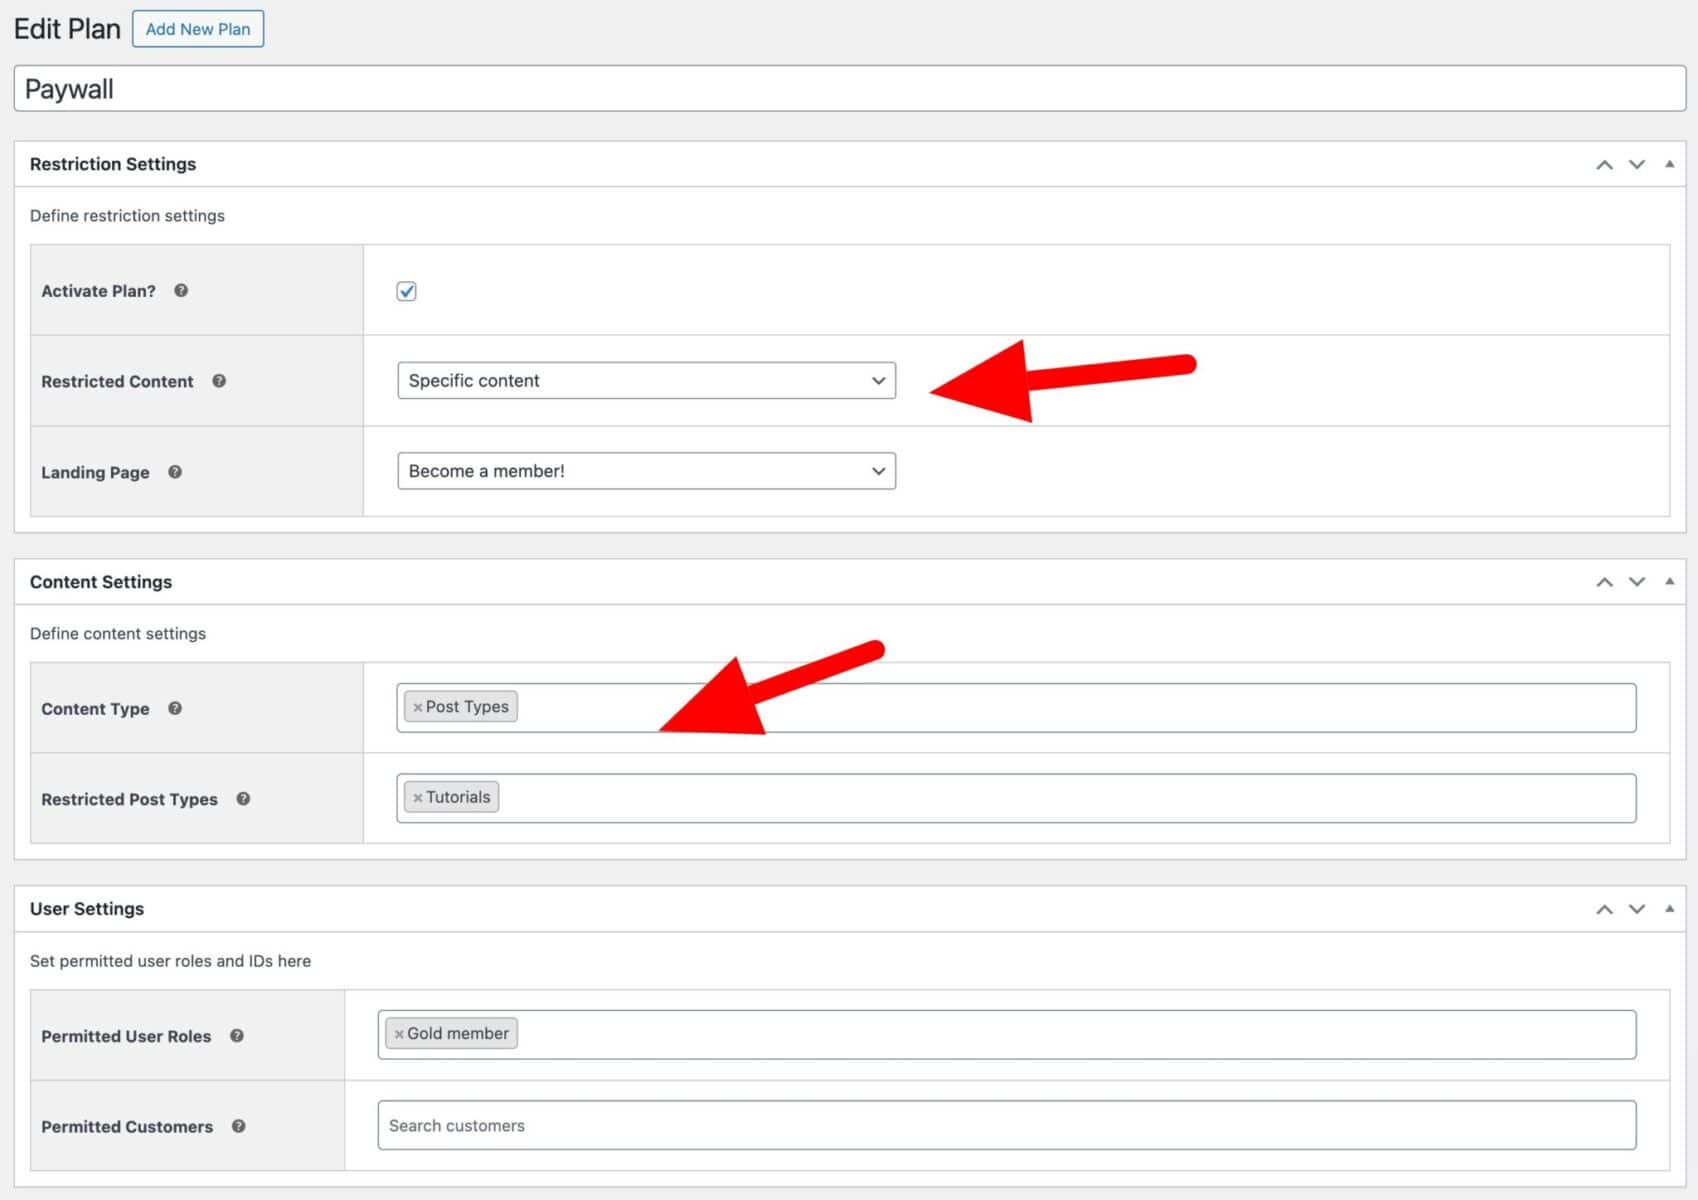
- Define which content will be hidden by selecting ‘Specific content’ in the ‘Restricted Content’ field
- Choose the content types in ‘Content Type’. You can choose one or more from ‘Product categories’, ‘Post categories’, ‘Pages’, ‘Post types’ and ‘Taxonomy’
- Depending on what type of content you select, you’ll have further fields appear where you can specify the exact content to be restricted
- Enter which user roles are permitted to access the content in the ‘Permitted User Roles’ field. If you are using passwords as the restriction method, you can enter one or more passwords for this plan instead
- You can also define specific users who can access the content in the ‘Permitted Customers’ field
Creating a paywall for custom post types
If you’d like to create a paywall for content in one or more custom post types, follow the steps above, then choose your custom post type(s) in the ‘Restricted Post Types’ field. In the example below, access to any content in the ‘Tutorials’ custom post type will be restricted to users with the ‘Gold member’ role.
Creating a paywall for terms in taxonomies
Alternatively, if you wanted to restrict access to specific terms in a taxonomy:
- Select ‘Taxonomy’ in the ‘Content Type’ field
- Choose your custom taxonomy in the ‘Restricted Taxonomies’ field
- Enter the term(s) to restrict
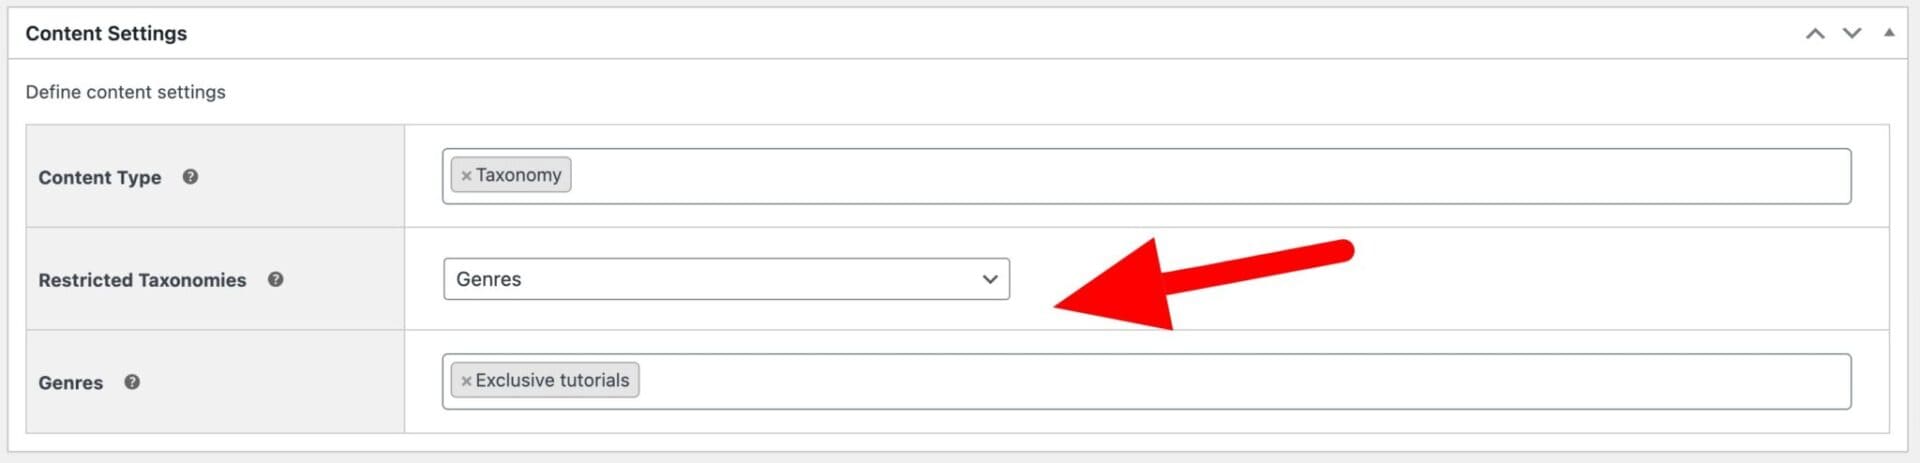
So in the example above, we would restrict access to any content in the ‘Exclusive tutorials’ genre. The exact settings you use here will depend on what content you want to restrict.
Create a paywall for WooCommerce products
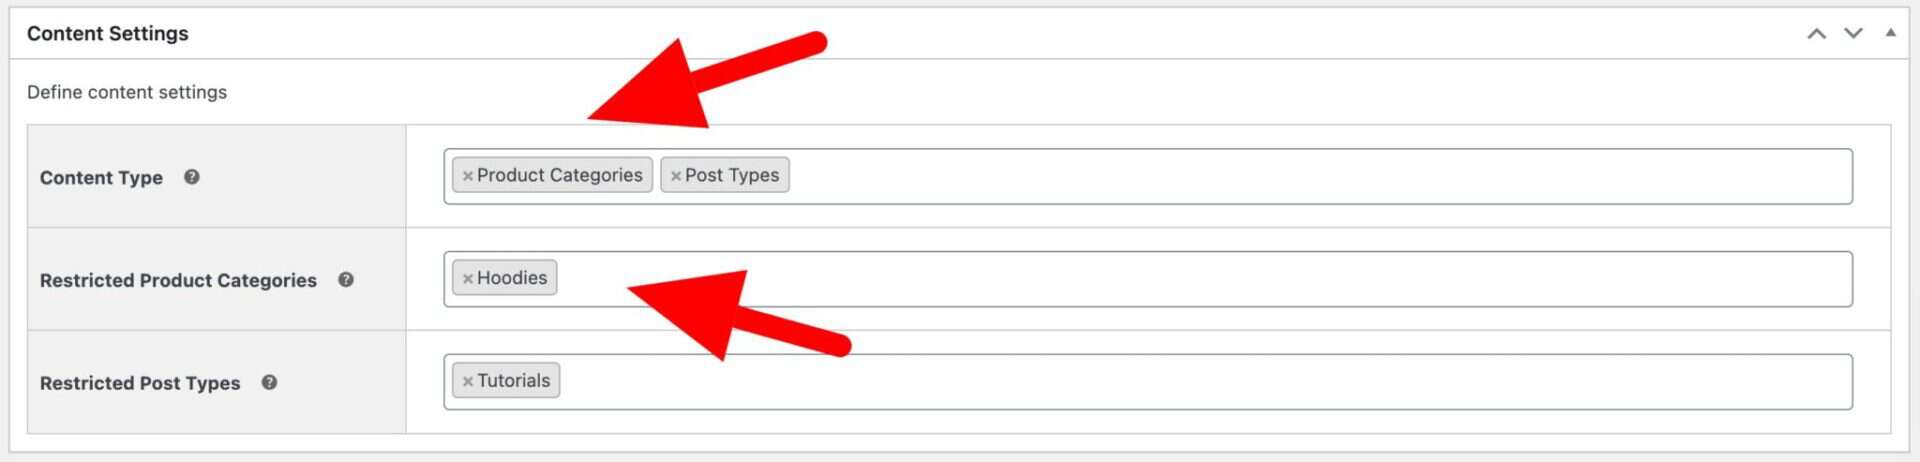
If you have premium products that you’d like to put behind a paywall:
- Select ‘Product categories’ in the ‘Content Type’ field
- Select which product categories should be restricted
Note that you can restrict multiple content types – so in the example below, certain products and custom posts are hidden behind the paywall.
If you are hiding products behind the paywall, you can also set some further options:
- Go to Members Only > Settings
- Enable ‘Hide in Archives’ to hide restricted content from category and the shop pages. If you leave this option disabled, then users will be able to see the restricted products, just unable to purchase them
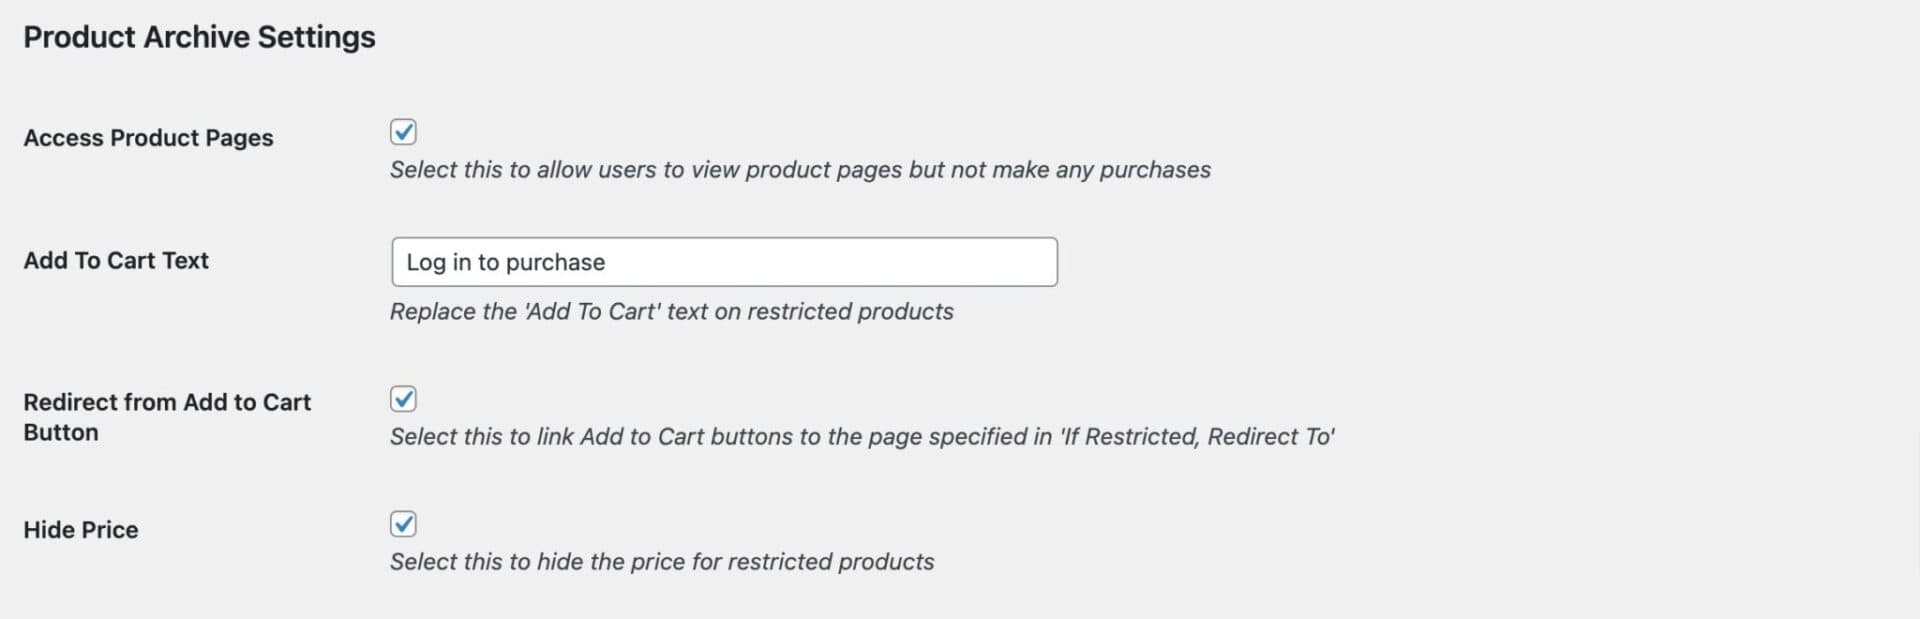
- Enable ‘Access Product Pages’ if you want the users to be able to view and land on the restricted product pages, without being able to make a purchase
- Update the ‘Add to Cart Text’ if you’d like to replace the standard add to cart button with some custom text
- Enable the ‘Redirect from Add to Cart Button’ if you’d like to send the user to a dedicated landing page when they clicked the button
- Enable ‘Hide Price’ if products are visible to the user but you just want to hide the price
Step #4: Create a paywall product
Very importantly, we’ll need to create a product that the user will need to purchase in order to access the content behind the paywall.
To create a paywall product:
- Go to Products > Add New
- Assign your product a title and description
- Set a price for the product
- Publish the product
Note that if you want more than one membership plan, you could create a variable product and use each variation as a different access level: e.g. ‘Gold’, ‘Silver’, ‘Bronze’, etc.
If you are using WooCommerce Subscriptions, you can create a subscription product as your paywall product. This will allow you to collect recurring payments for your membership plan.
There’s more information on how to add a product in WooCommerce here.
Step #5: Link the paywall product with the membership plan
We’ve created a membership plan to restrict content behind our paywall and we’ve created a product that the user will need to purchase in order to access that content. Now we just need to link the two together.
To assign a product to your membership plan:
- Go to Members Only > Plans and edit the plan that you created
- Enable the ‘Required Purchase?’ setting
- In the ‘Product(s)’ field, select the product that created
- In the ‘Assign User Roles’ field, select which user role will be allocated to the customer when they purchase the product. This will ensure they can access content behind the paywall
- You can optionally select a role to assign if the user’s membership expires
- In the ‘Membership Length’ field, define whether access is for a limited period
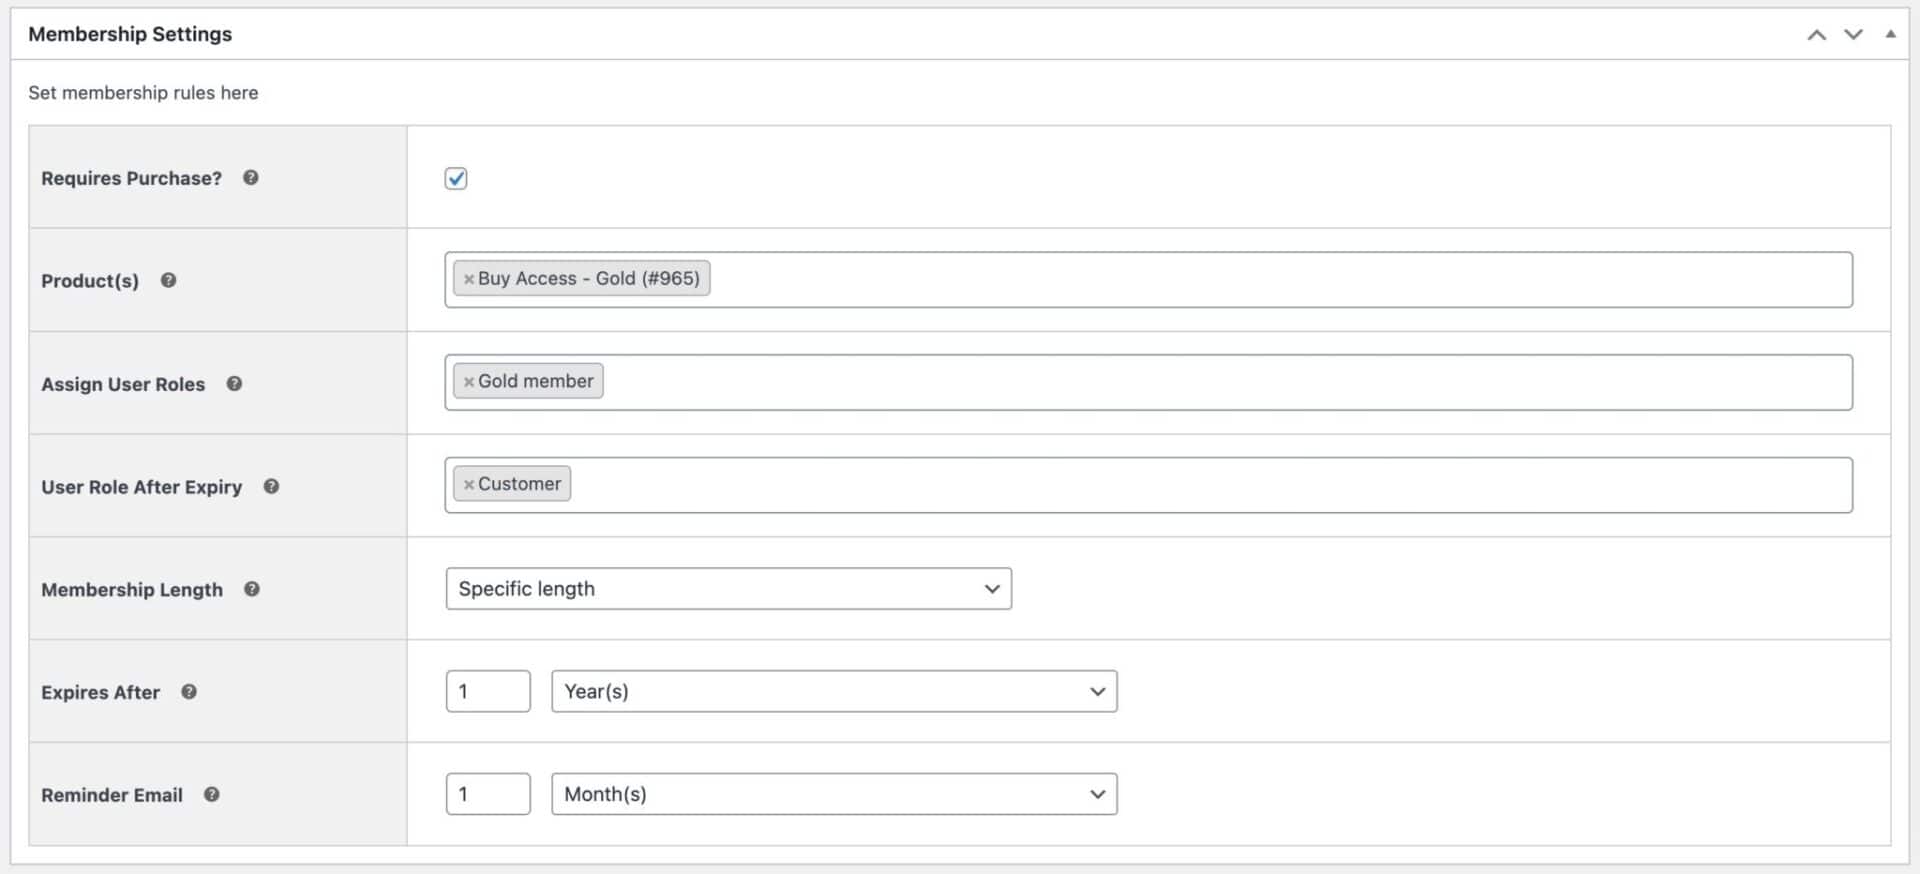
Now, users will need to purchase a product in order to access your paywalled content. Access can be granted for a set length of time and you can also choose to send the user a reminder email a set period before the end of their membership.
Save the plan and you have now successfully created a paywall for your content using WooCommerce. Users will need to purchase access and you can specify different tiers of access if you wish.
Now let’s look at some further options.
How to create new user roles in WooCommerce
If you’re using roles as the restriction method, it’s likely that you will want to create new roles. For instance, if you have a paywall for ‘Gold’ members, you’ll need to create a ‘Gold members’ role.
To create a new user role in WooCommerce:
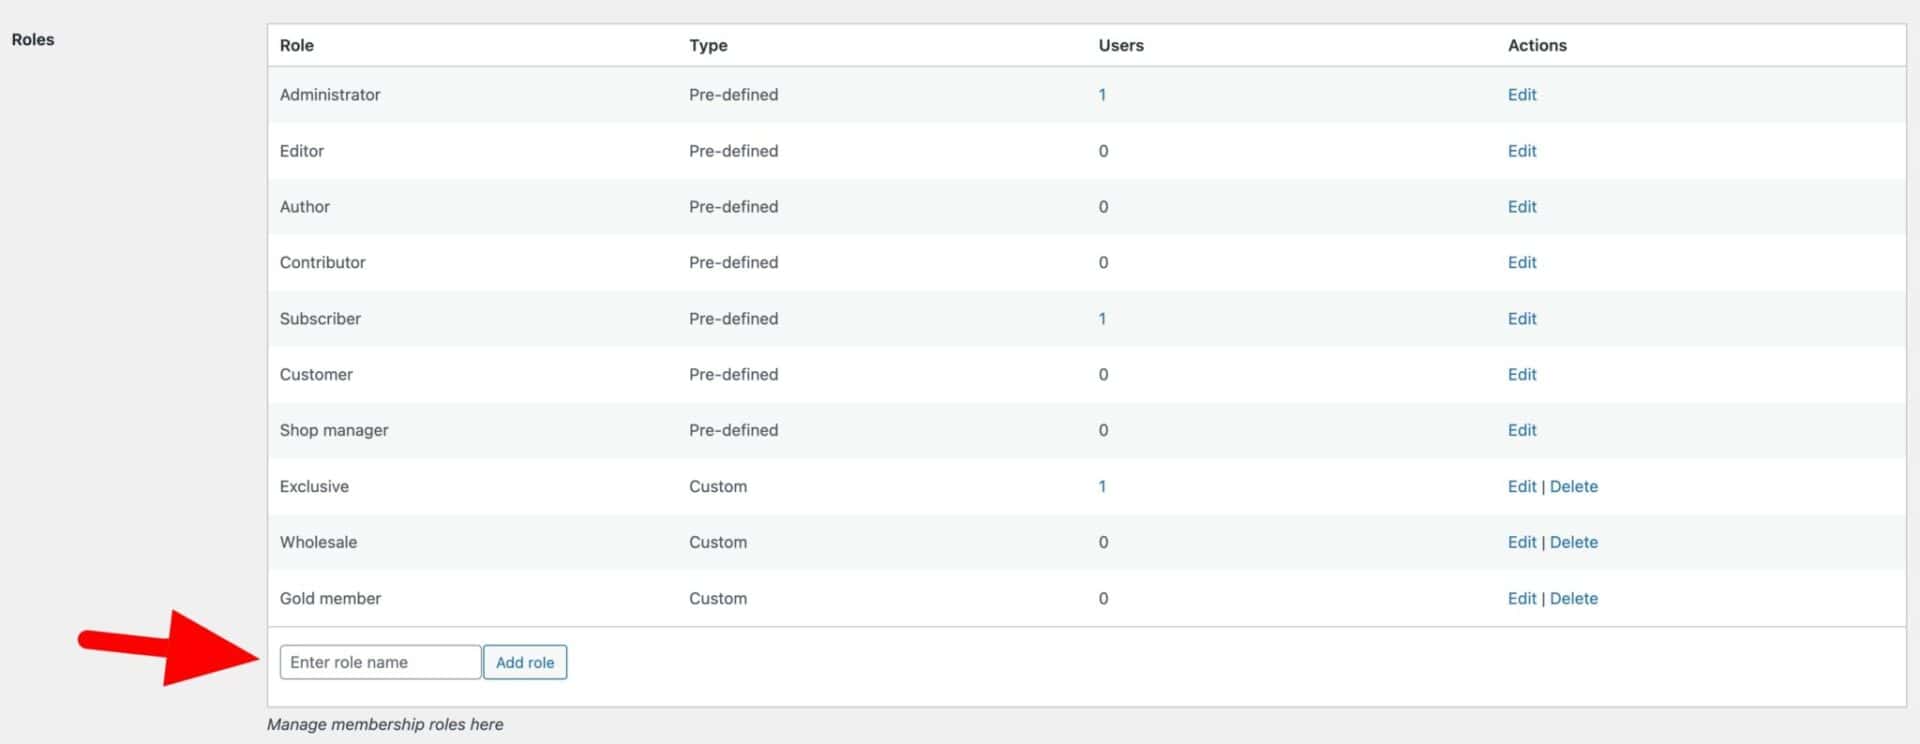
- Go to Members Only > User Roles
- In the ‘Roles’ table, enter the name of your new role
- Click ‘Add role’
See this article for more information on user roles in WooCommerce.
Conclusion
Setting up a paywall on your WooCommerce site is a great way to increase revenue by incentivizing customers to pay extra for a premium membership plan. This way, you let members access premium content and exclusive deals once they subscribe to your membership plan. It’s also a great way to increase customer loyalty by letting them access restricted products, which imparts a sense of exclusivity.
In addition to this, a WooCommerce paywall can generate revenue for parts of your store that might otherwise not be profitable. For instance, by hiding them behind a paywall, you can charge for digital downloads, PDFs, audiobooks, and custom products on your WooCommerce site.
However, setting up a paywall on your WooCommerce site can be tricky, especially if you don’t have the right tools. This is why we recommend using the WooCommerce Members Only plugin as your paywall solution, as it gives you complete control over access to different content on your site. This is perfect for setting up paywall-restricted content on your WooCommerce site and lets you set up custom user roles with different levels of access. The plugin also lets you restrict specific payment and shipping methods based on the user role and use passwords to freely hide specific parts of your WooCommerce site.
Ready to set up a paywall for your WooCommerce site? Get WooCommerce Members Only today!